

Cyllo Purchase Documentation
Introduction
The Purchase module lets you manage every part of purchasing your products. Cyllo's advanced purchase management system automates vendor administration, product setup, purchase order tracking, and product or service pricing, and lets you manage purchase orders and quotation requests from one place.
Because the Purchase module is tightly integrated with Accounting, Inventory, and Sales, every action — confirming an order, receiving a delivery, posting a bill — automatically reflects across every connected department. This guide walks through the module in the order you'll typically use it: setting up products and vendors, requesting quotations, raising and receiving purchase orders, billing, purchase agreements, advanced features such as dropshipping and digitisation, and finally reporting.
1.1 Product Catalog
The Products page displays every previously created product. By default it opens in Kanban view, but you can switch to List view at any time. Kanban cards show the product image, price, name, and internal reference, and the Filters / Group By buttons help you narrow down a large catalog.
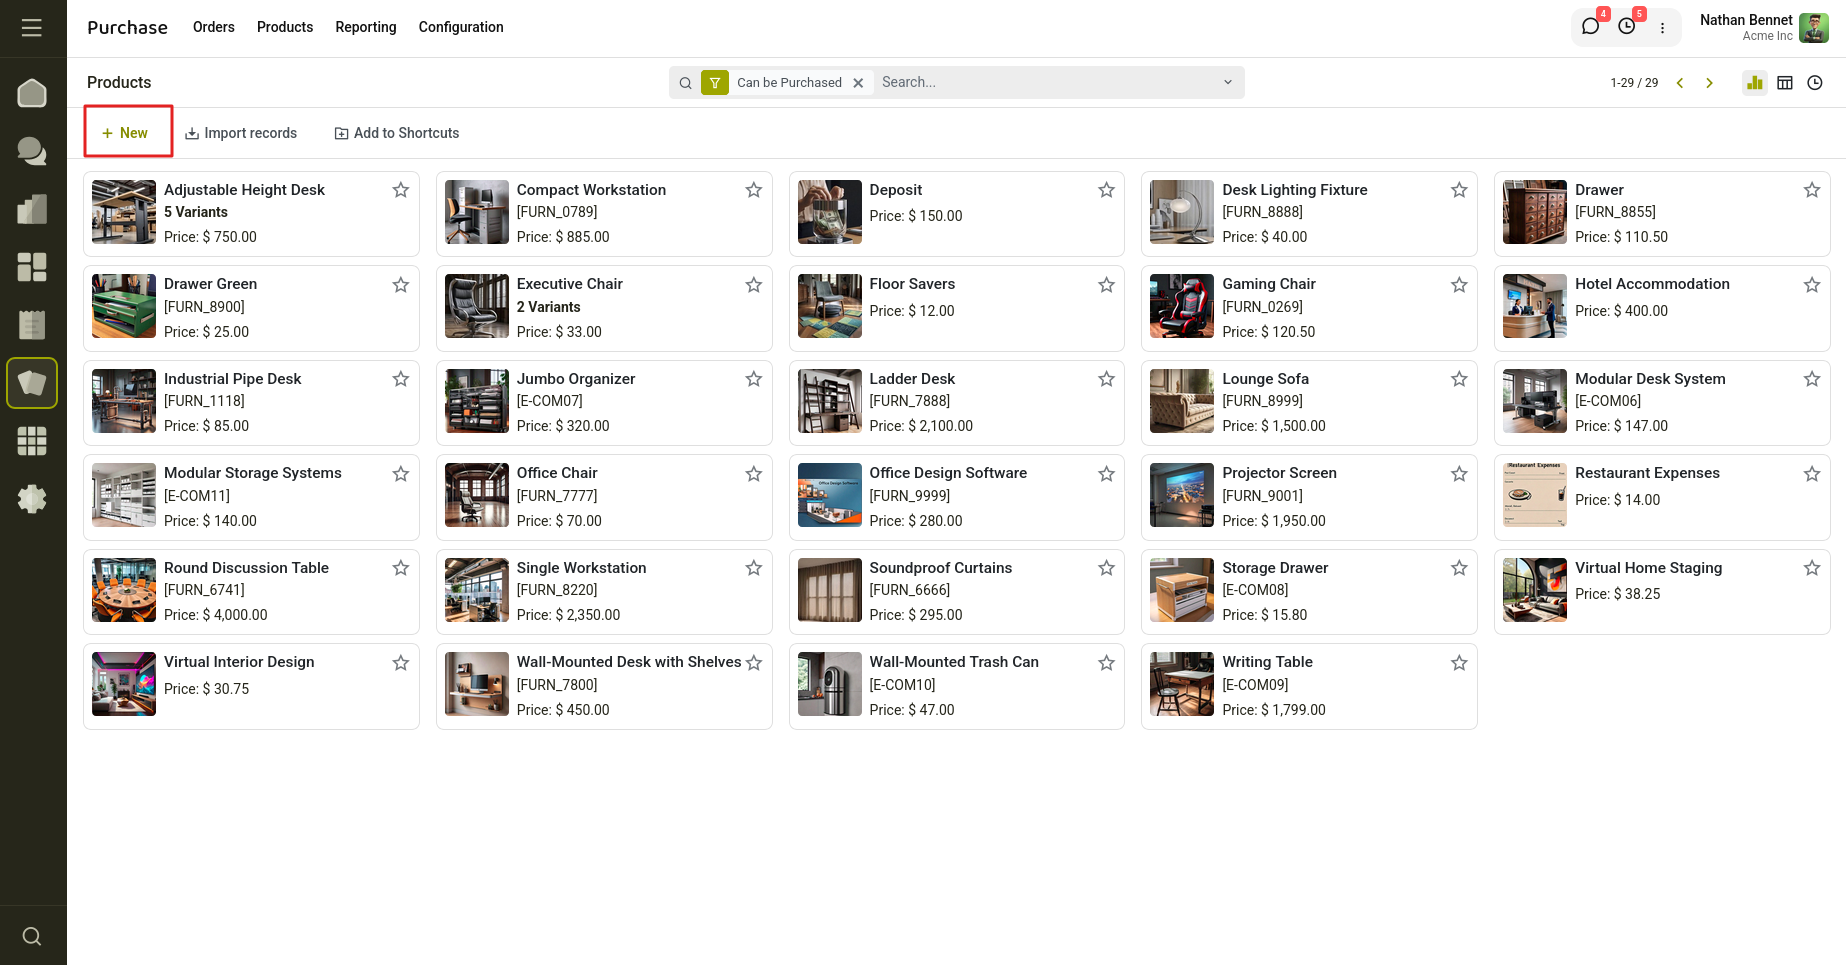
Fig 1.1 — Products Kanban view with price and stock at a glance
1.2 Creating a Product
To add a new product, click Create from the Products list and fill in the General Information tab.
How to Create a Product
- Go to Purchase → Products → Products → New
- Enter the Product Name and click the camera icon to add an image
- Select Can Be Purchased, Can Be Sold, Can Be Expensed, and/or Subscription Product as applicable
- Choose a Product Type: Consumable, Service, Storable Product,
- Set the Invoicing Policy — Ordered Quantities (invoice on order) or Delivered Quantities (invoice on delivery)
- Fill in Unit of Measure, Purchase UoM, Sales Price, Cost, Product Category, Internal Reference, Barcode, and Tags
- Assign a Company if the product should be restricted to one entity, then Save
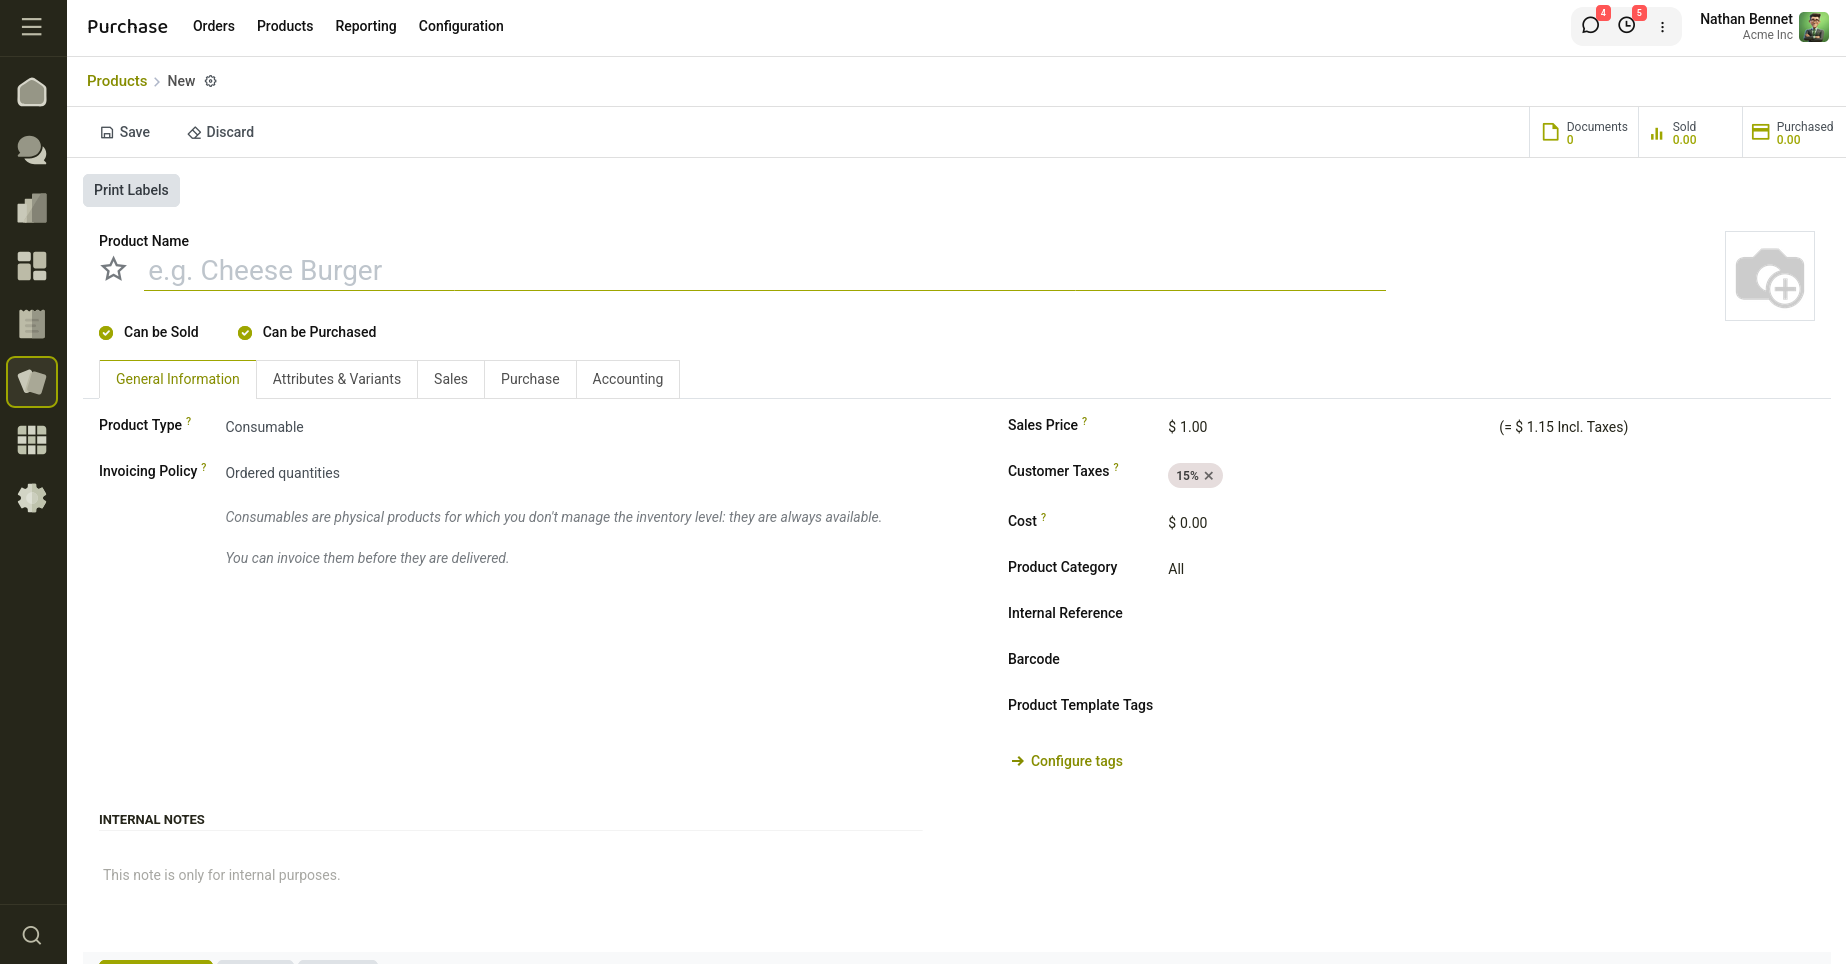
Fig 1.2 — Product form: General Information tab
1.3 Attributes & Variants
If a product comes in multiple configurations — size, colour, material — define them under Attributes & Variants. Cyllo generates every combination automatically, exactly as in the Sales module.
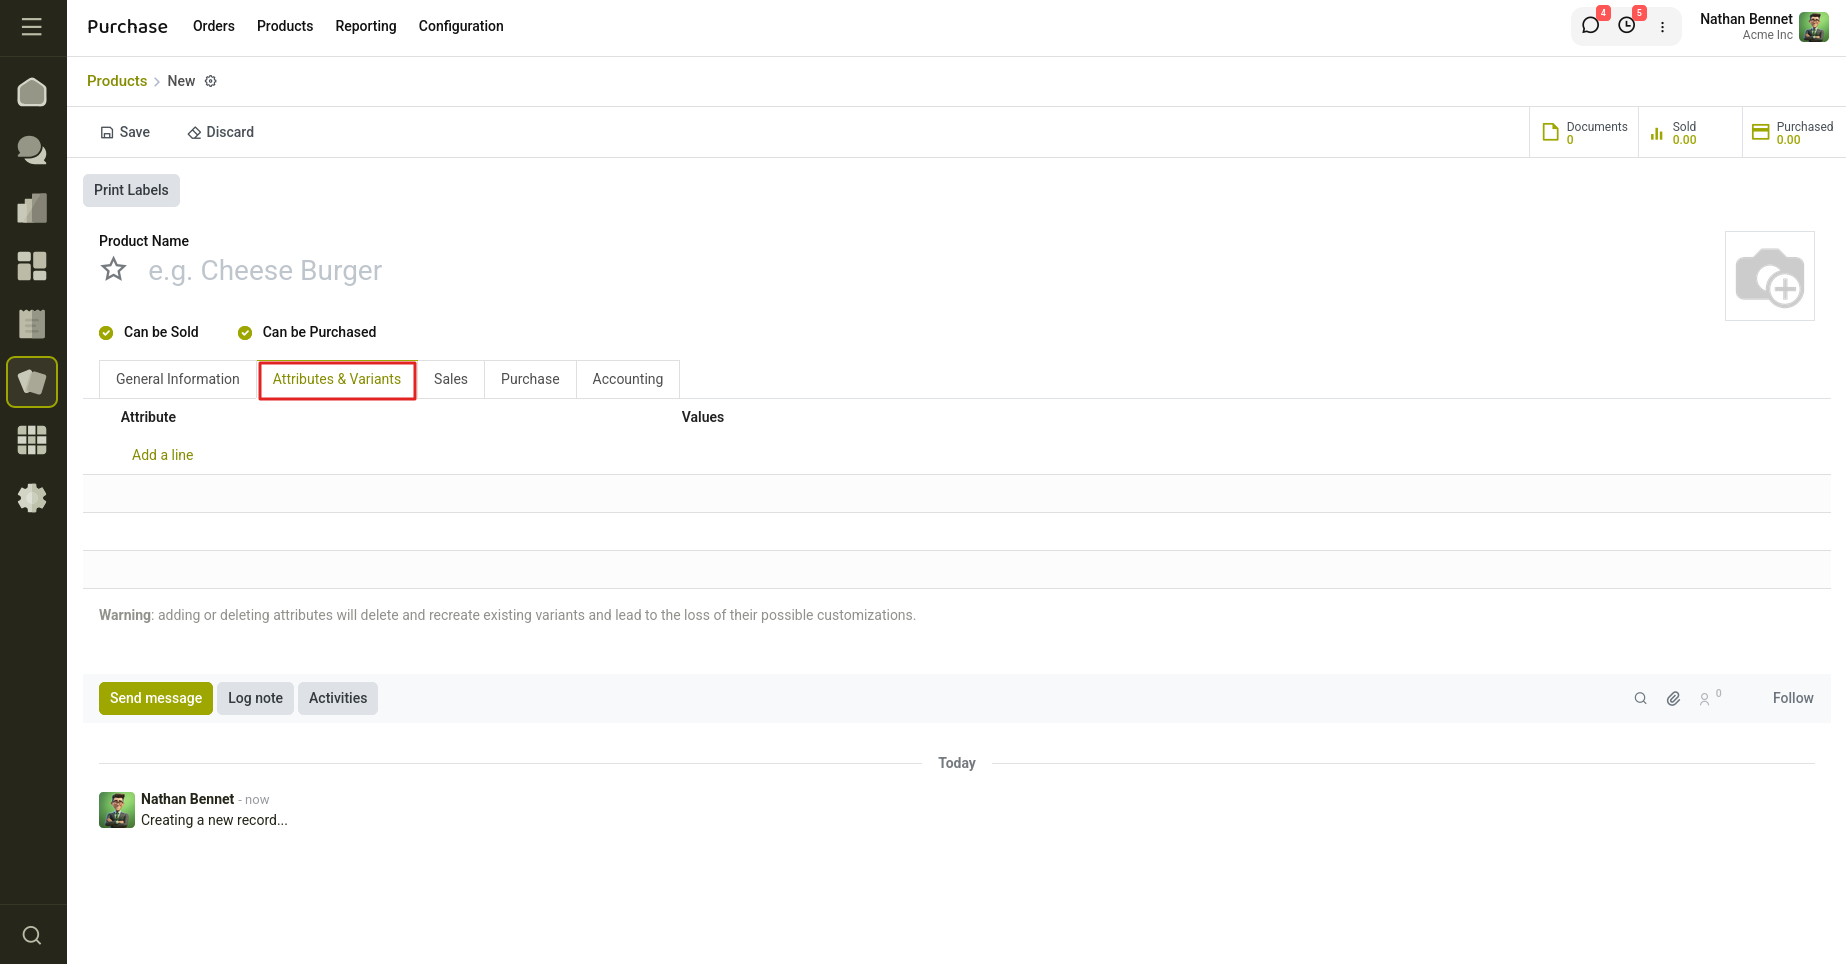
Fig 1.3 — Attributes & Variants tab on the product form
1.4 Vendors & Purchase Settings
The Purchase tab is where you link a product to one or more suppliers. Use Add a Line to list each vendor with its delivery time, currency, and price, so buyers can choose between suppliers at order time.
Vendor Taxes sets the default tax applied when the product is purchased, and the Control Policy — Ordered Quantities or Received Quantities — decides when a vendor bill can be created for this specific product. A Purchase Description note is added automatically to purchase orders, and a Warning can alert buyers when the product is added to an order.
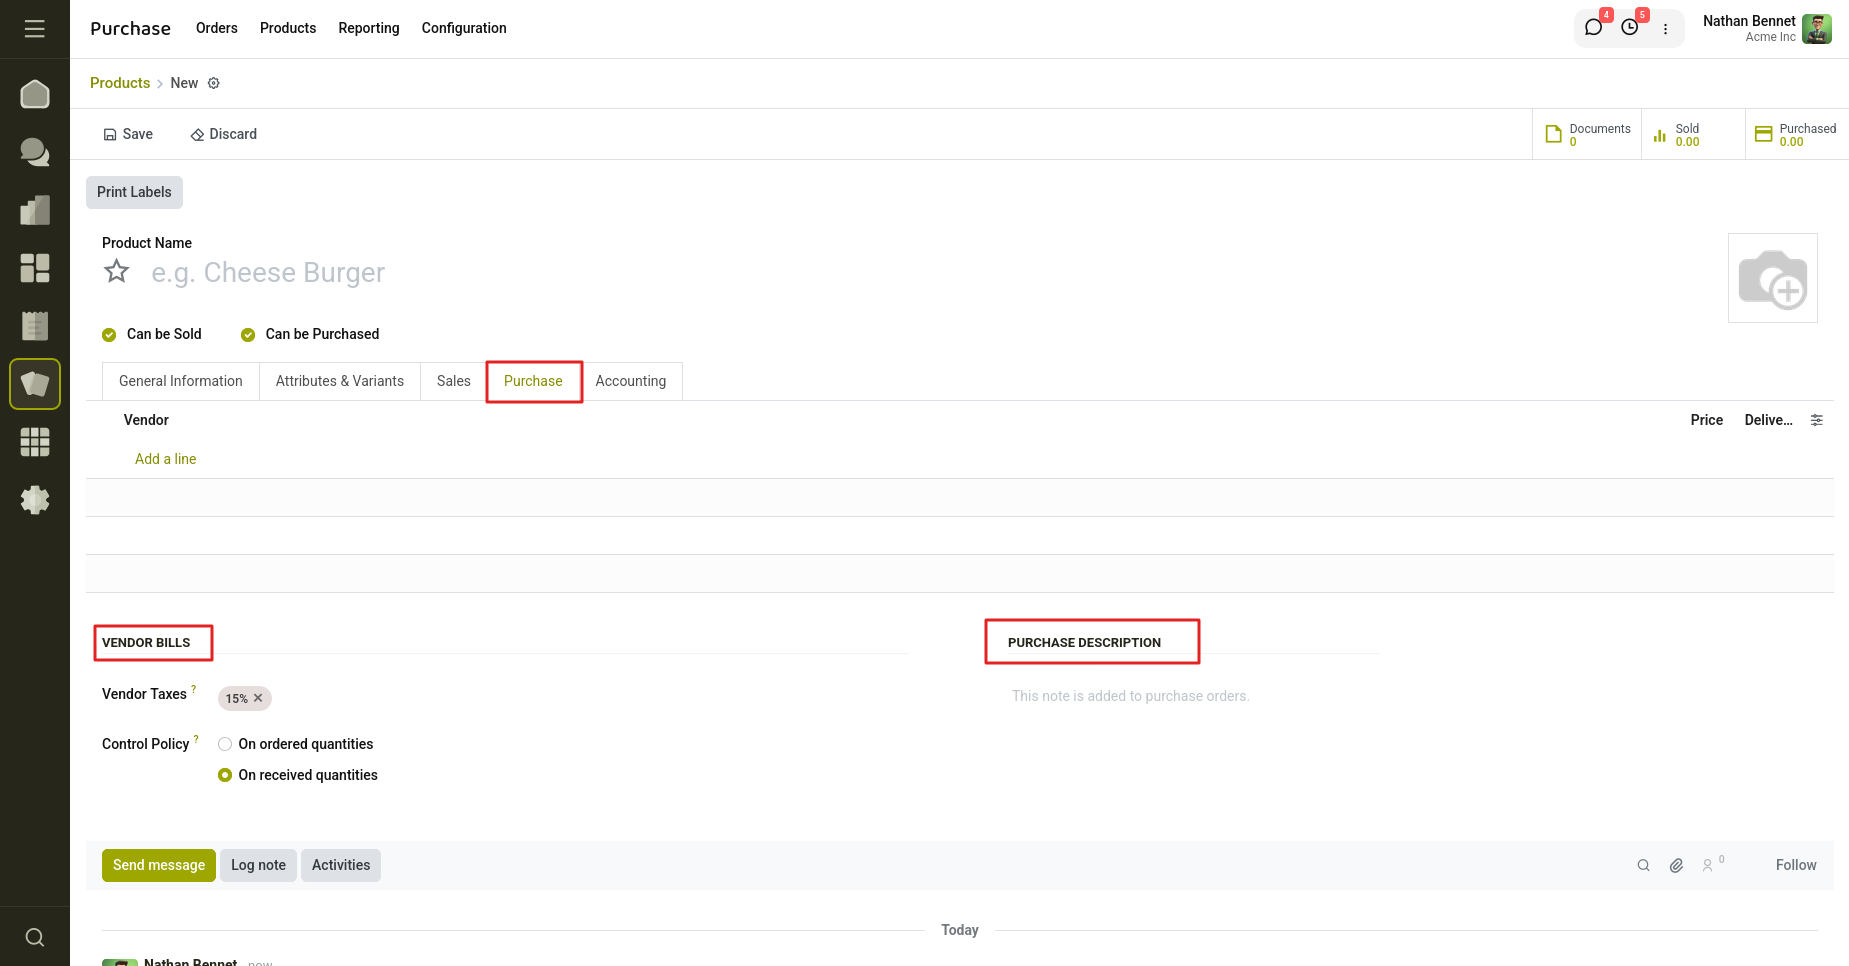
Fig 1.4 — Purchase tab: vendor list, vendor taxes, and control policy
1.5 Default Bill Control Policy
Rather than set the control policy product by product, you can define a company-wide default from Settings. Every new product then inherits this policy, though it can still be overridden from an individual product's form.
Setting the Default Bill Control
- Go to Purchase → Configuration → Settings
- Under Invoicing, locate Bill Control
- Choose Ordered Quantities (bill for the amount ordered) or Received Quantities (bill only what was received)
- Save settings
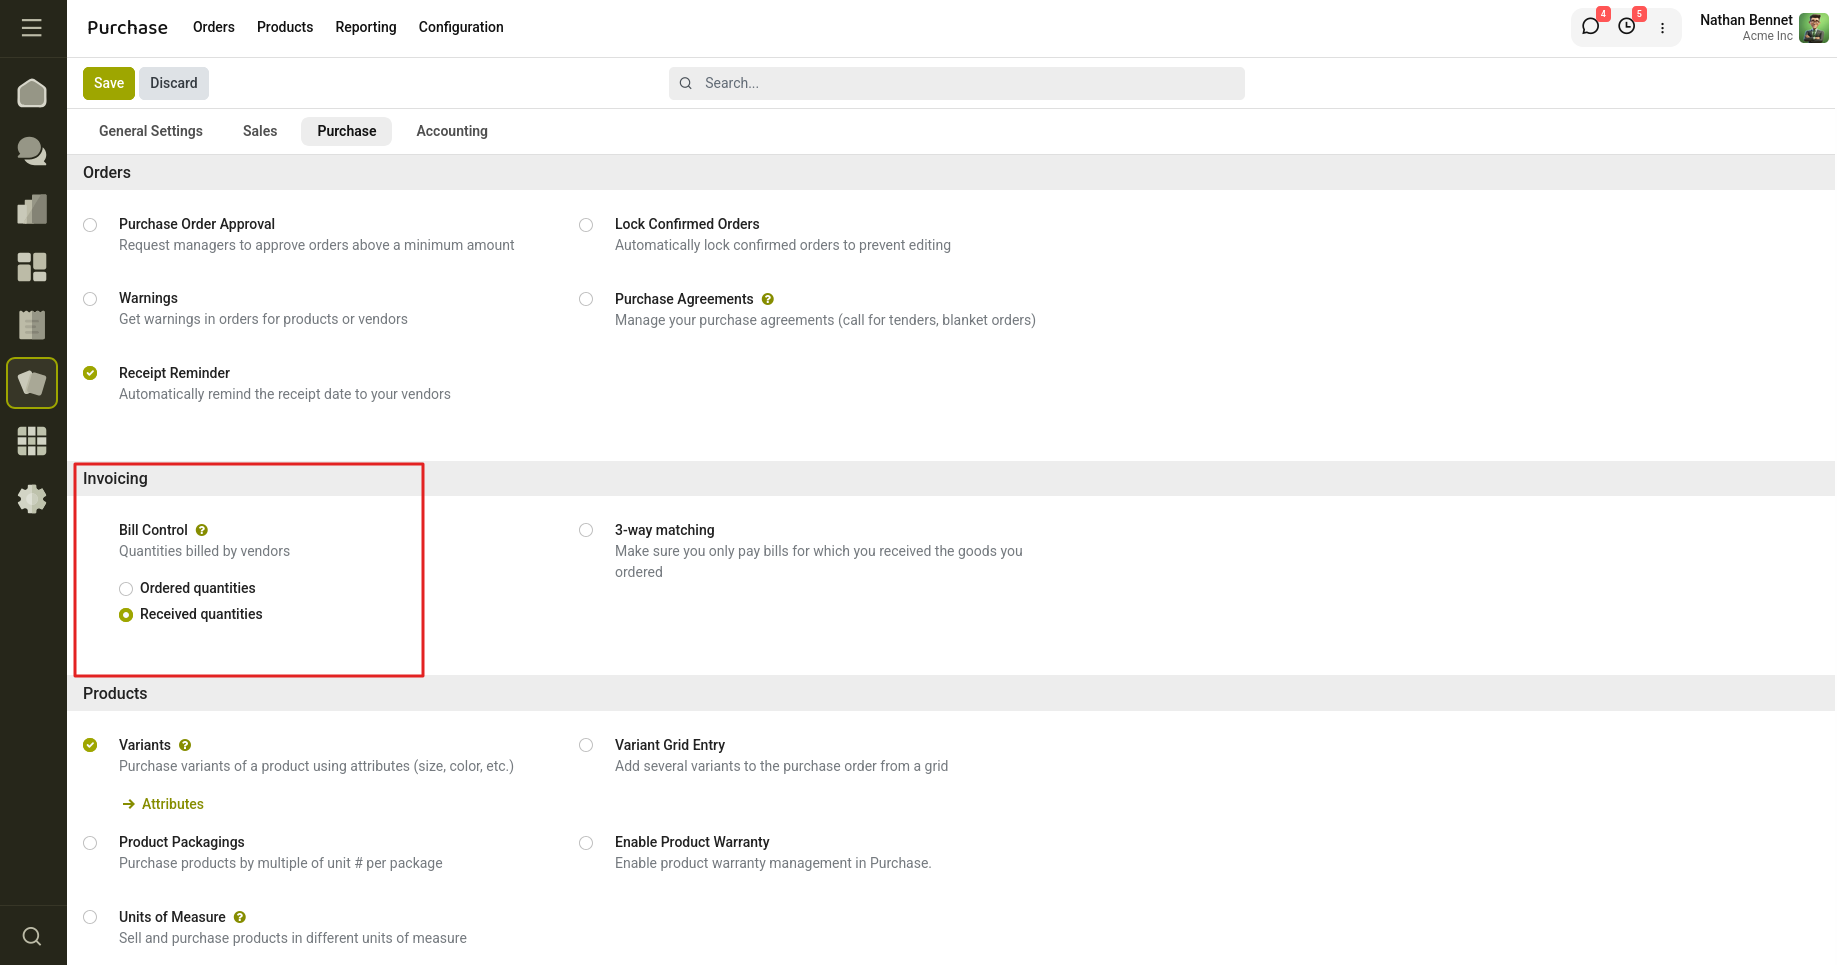
Fig 1.5 — Bill Control default under Purchase Settings
1.6 Purchase Warnings
Enabling Warnings in Settings lets you flag individual products (or vendors) with a message that appears whenever someone tries to purchase them — useful for discontinued items, quality holds, or approval reminders.
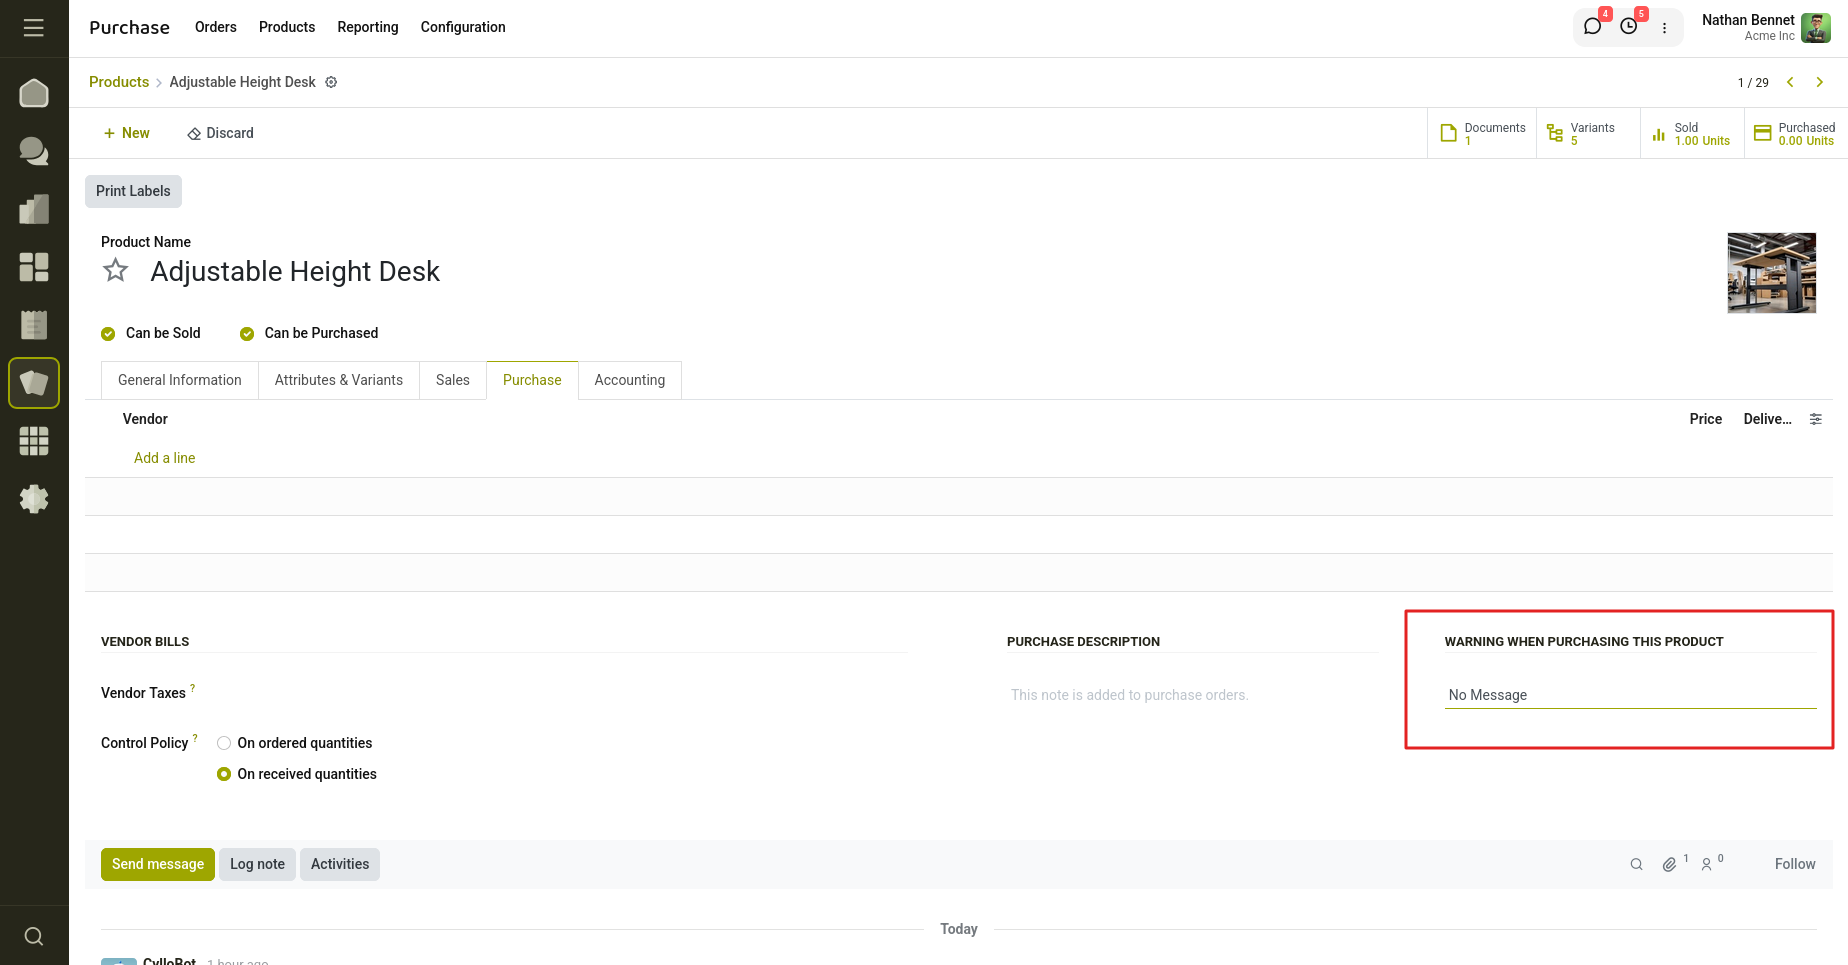
Fig 1.6 — Warning message options on a product
2. Vendor Management
Cyllo lets you maintain a full directory of suppliers, complete with contact details, purchase history, and vendor-specific pricing — all linked automatically to the products and orders they're associated with.
2.1 Vendor Directory
Open Purchase → Orders → Vendors to see every vendor on record in Kanban view, with quick-access icons for meetings, opportunities, and purchases.
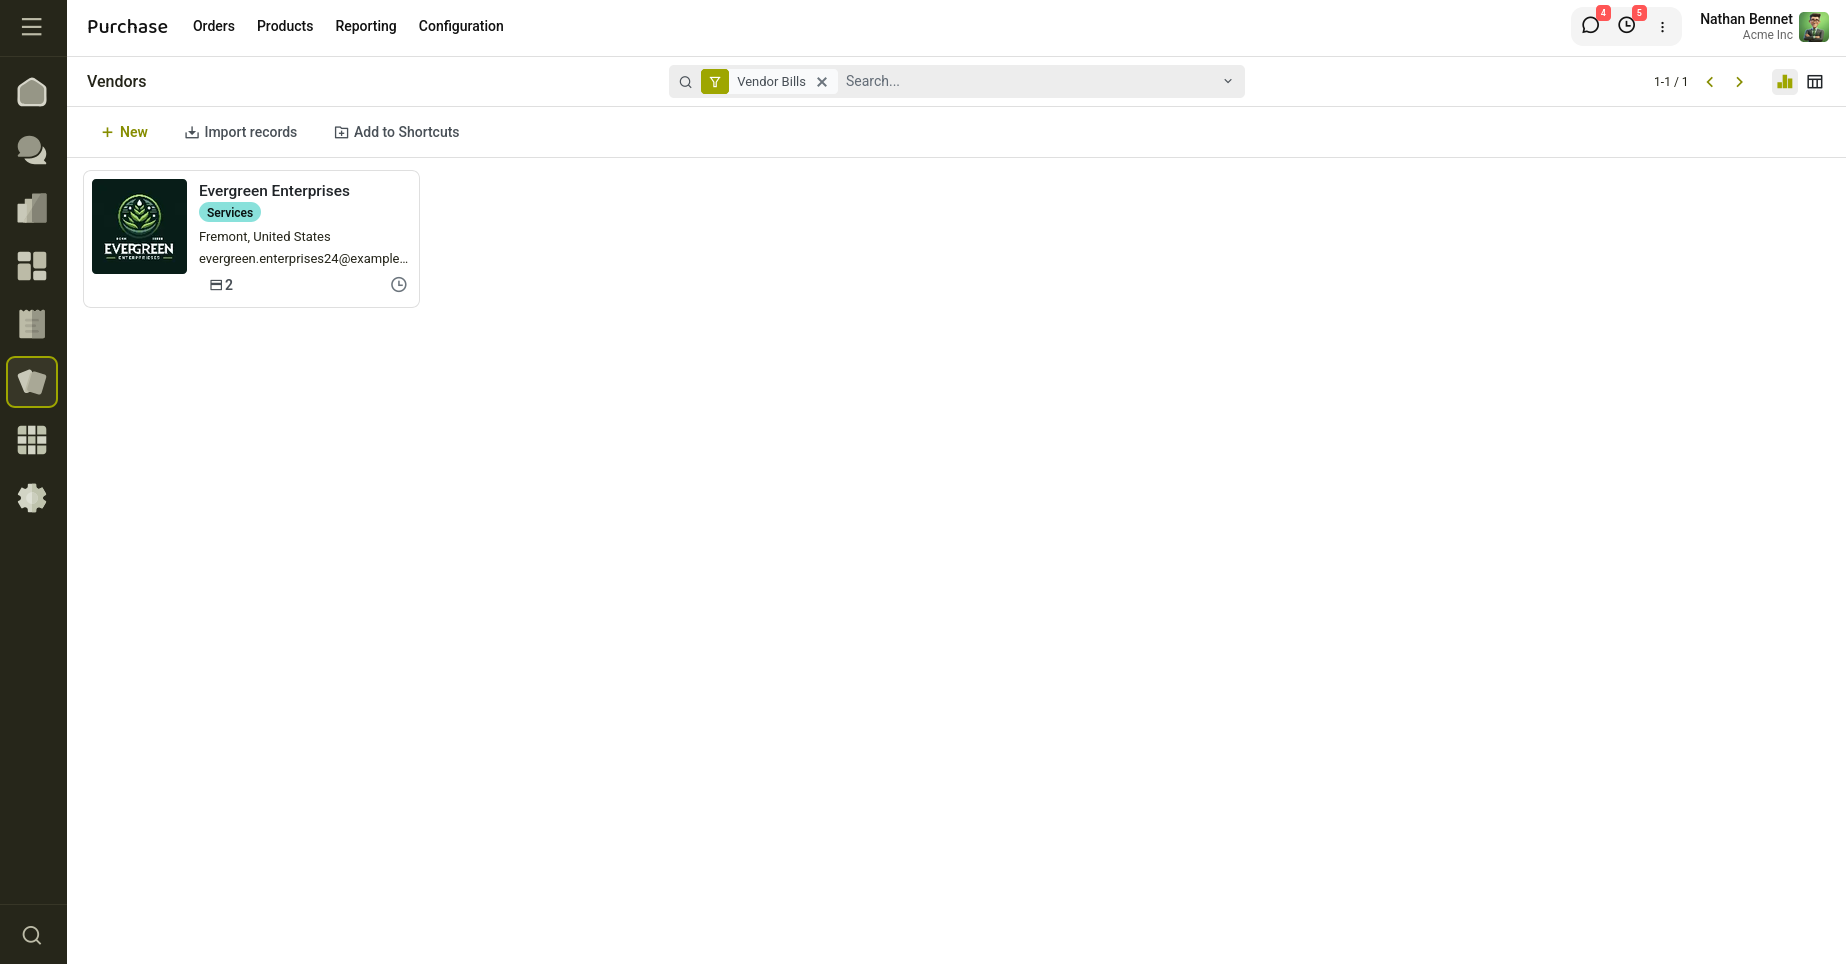
Fig 2.1 — Vendors Kanban view
2.2 Activities & List View
Click the clock icon on a vendor card to schedule a follow-up activity directly from the Kanban view. Switching to List view — and enabling extra columns from the toolbar — lets you see Phone, Email, Salesperson, Activities, City, State, Country, Tax ID, EDI Format, and Tags side by side for every vendor.
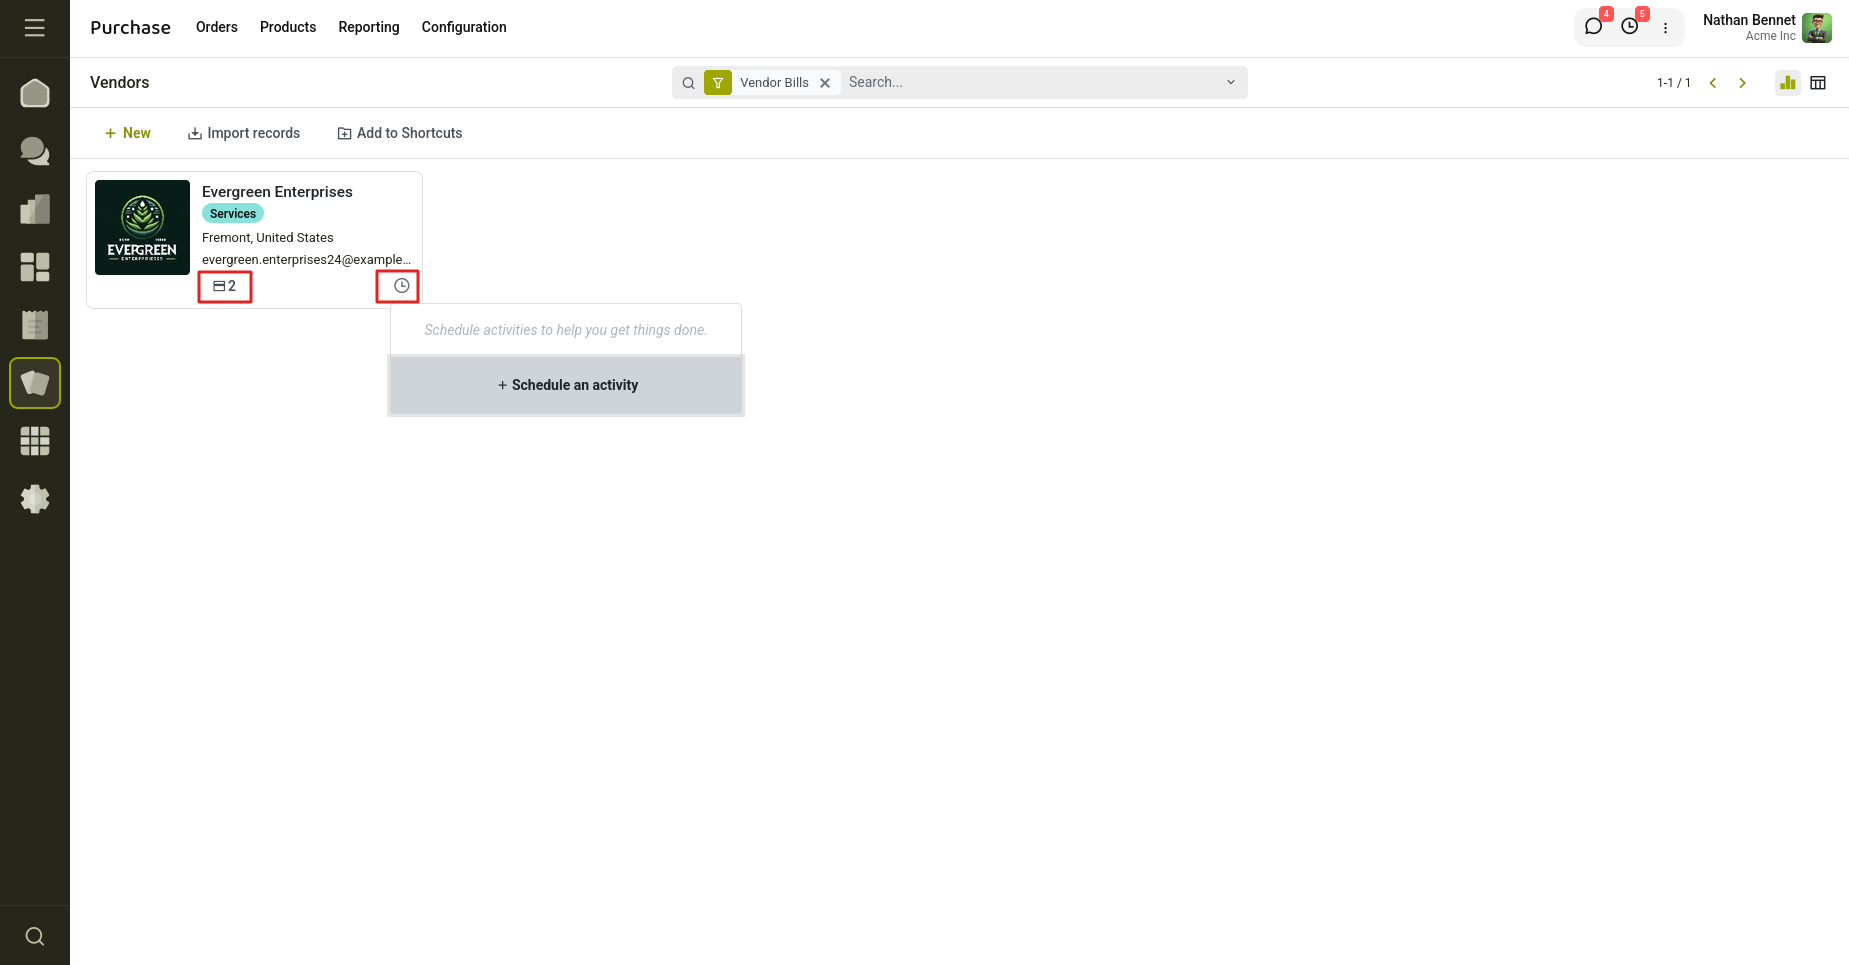
Fig 2.2 — Scheduling an activity from a vendor card
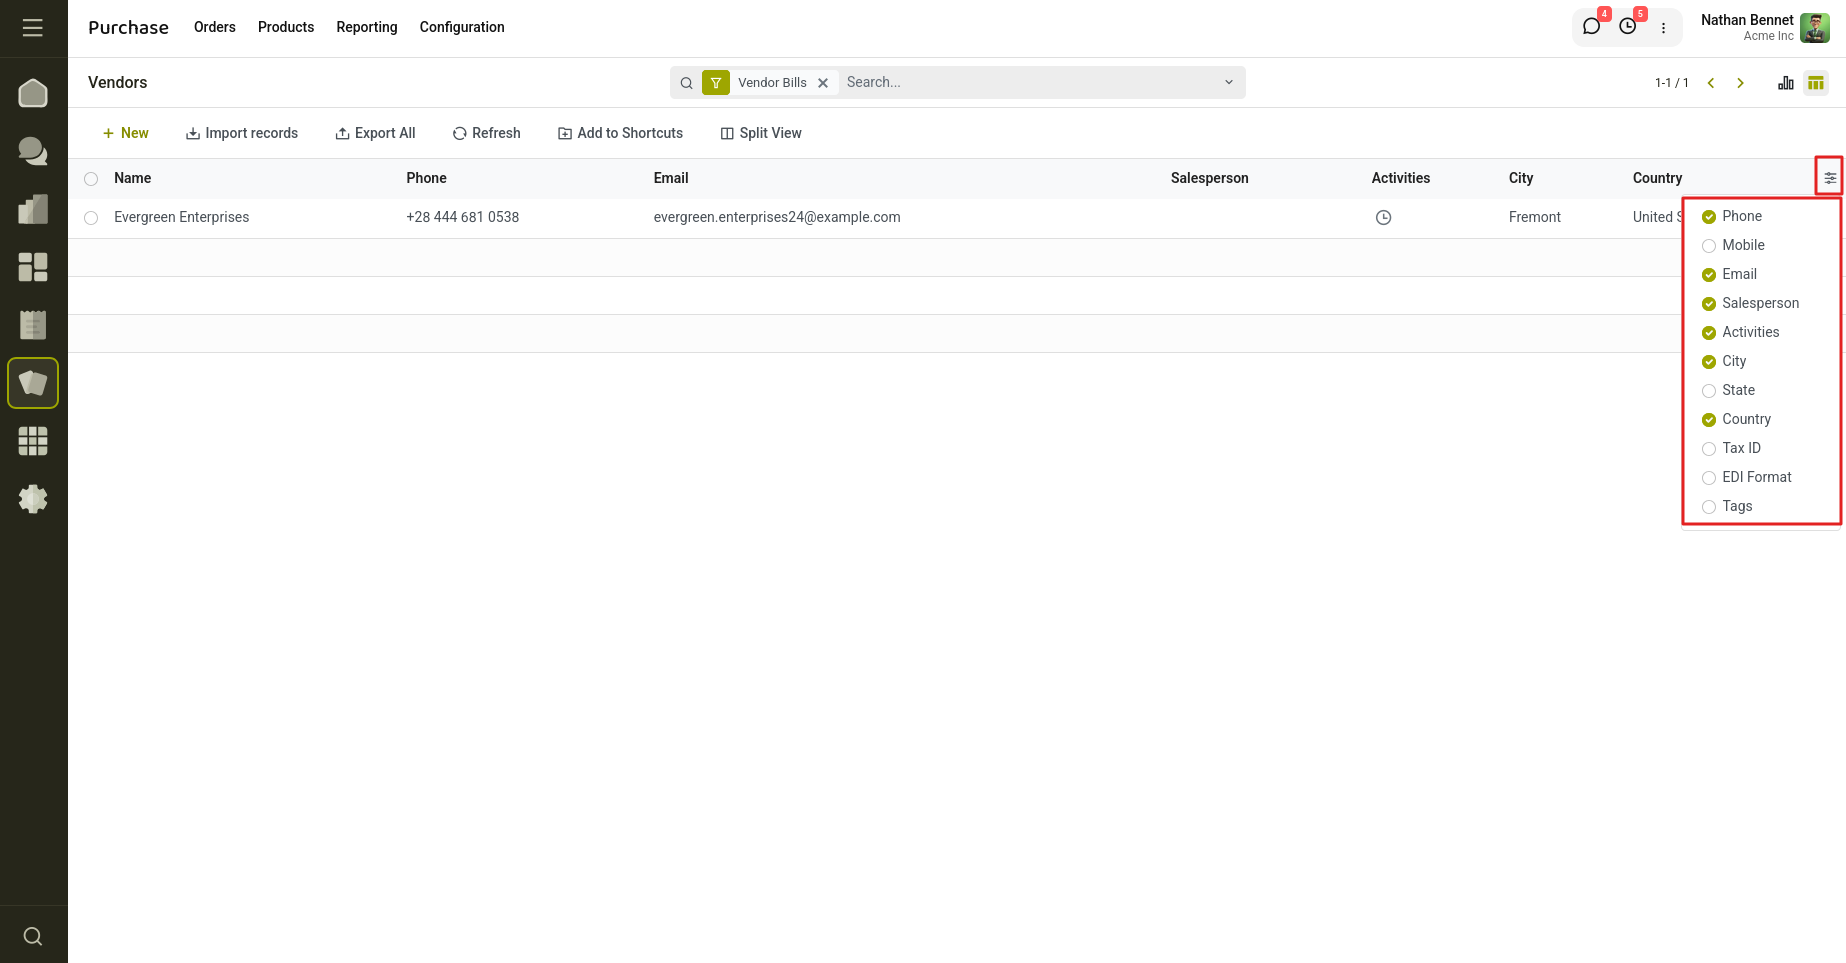
Fig 2.3 — Vendor list view with configurable columns
2.3 Vendor Price Lists
A Vendor Price List lets you record what a specific vendor charges for a specific product over a given period. These prices are then used automatically whenever you purchase that product from that vendor.
Creating a Vendor Price List
- Go to Purchase → Configuration → Vendor Pricelists → New
- Select the Vendor, and optionally the Vendor Product Name, Vendor Product Code, and Delivery Lead Time
- Under the Pricelist section, choose the Product, Product Variant, Quantity, Unit Price, Validity dates, Discount (%), and Company
- Save the record
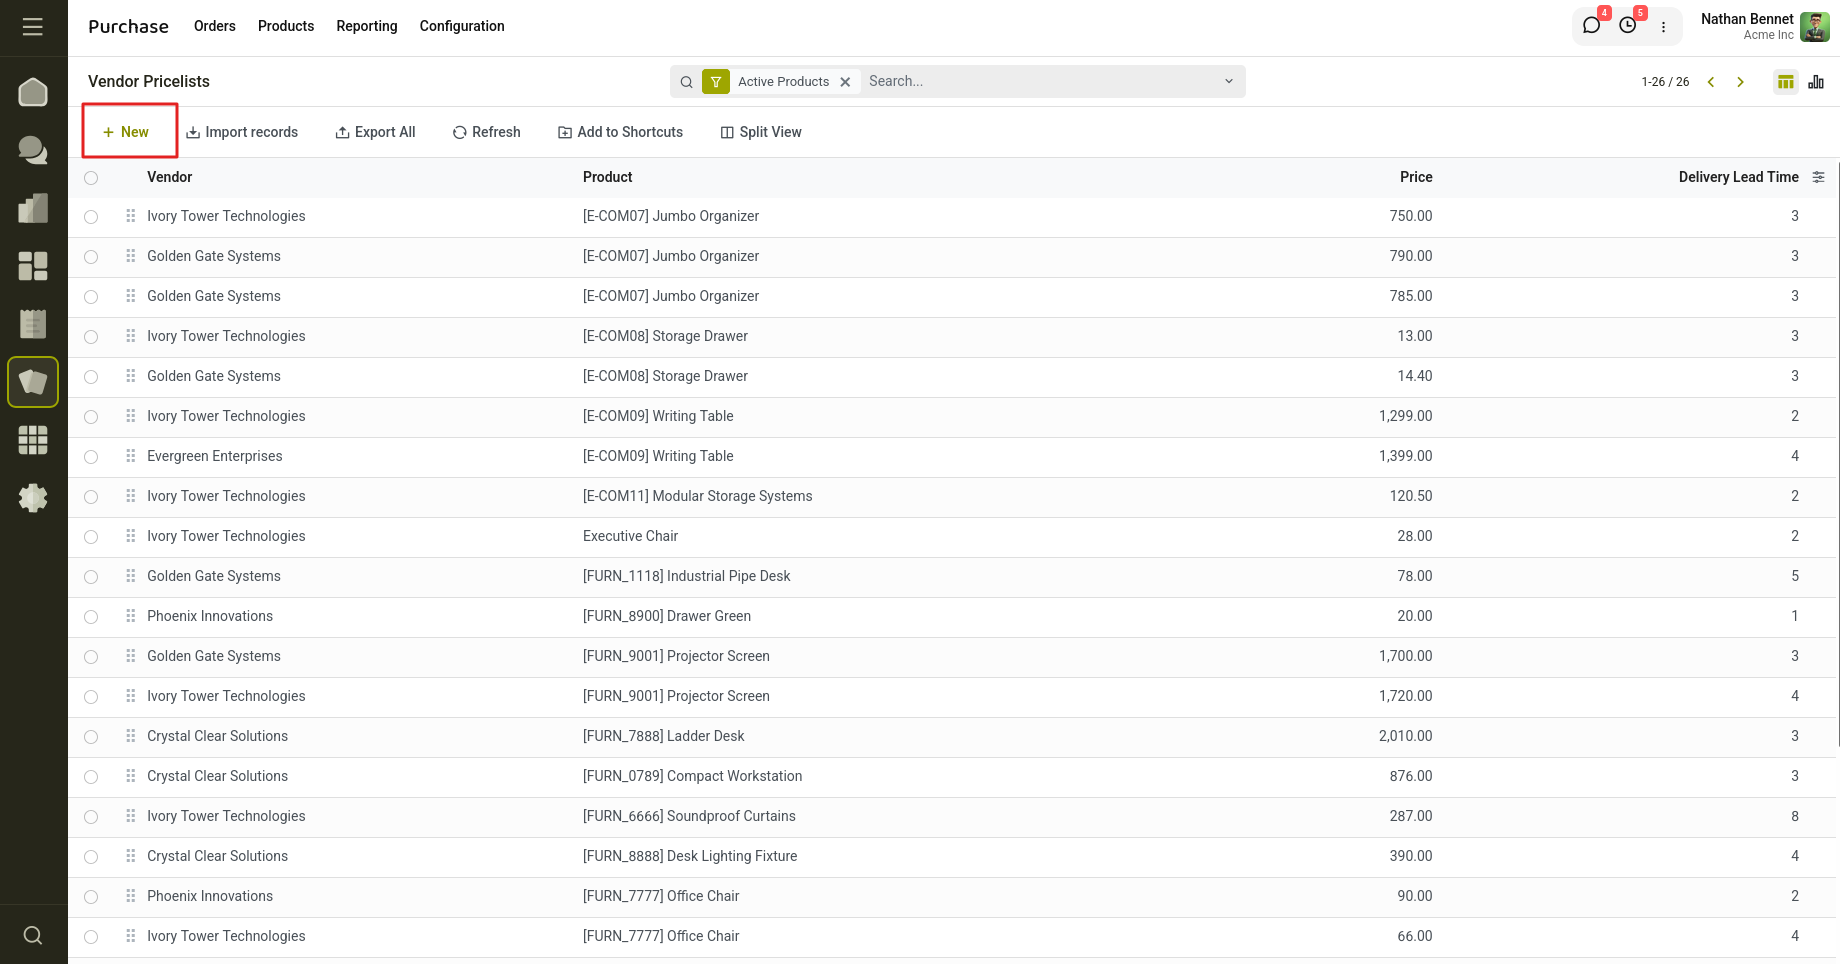
Fig 2.4 — Vendor Pricelists list view
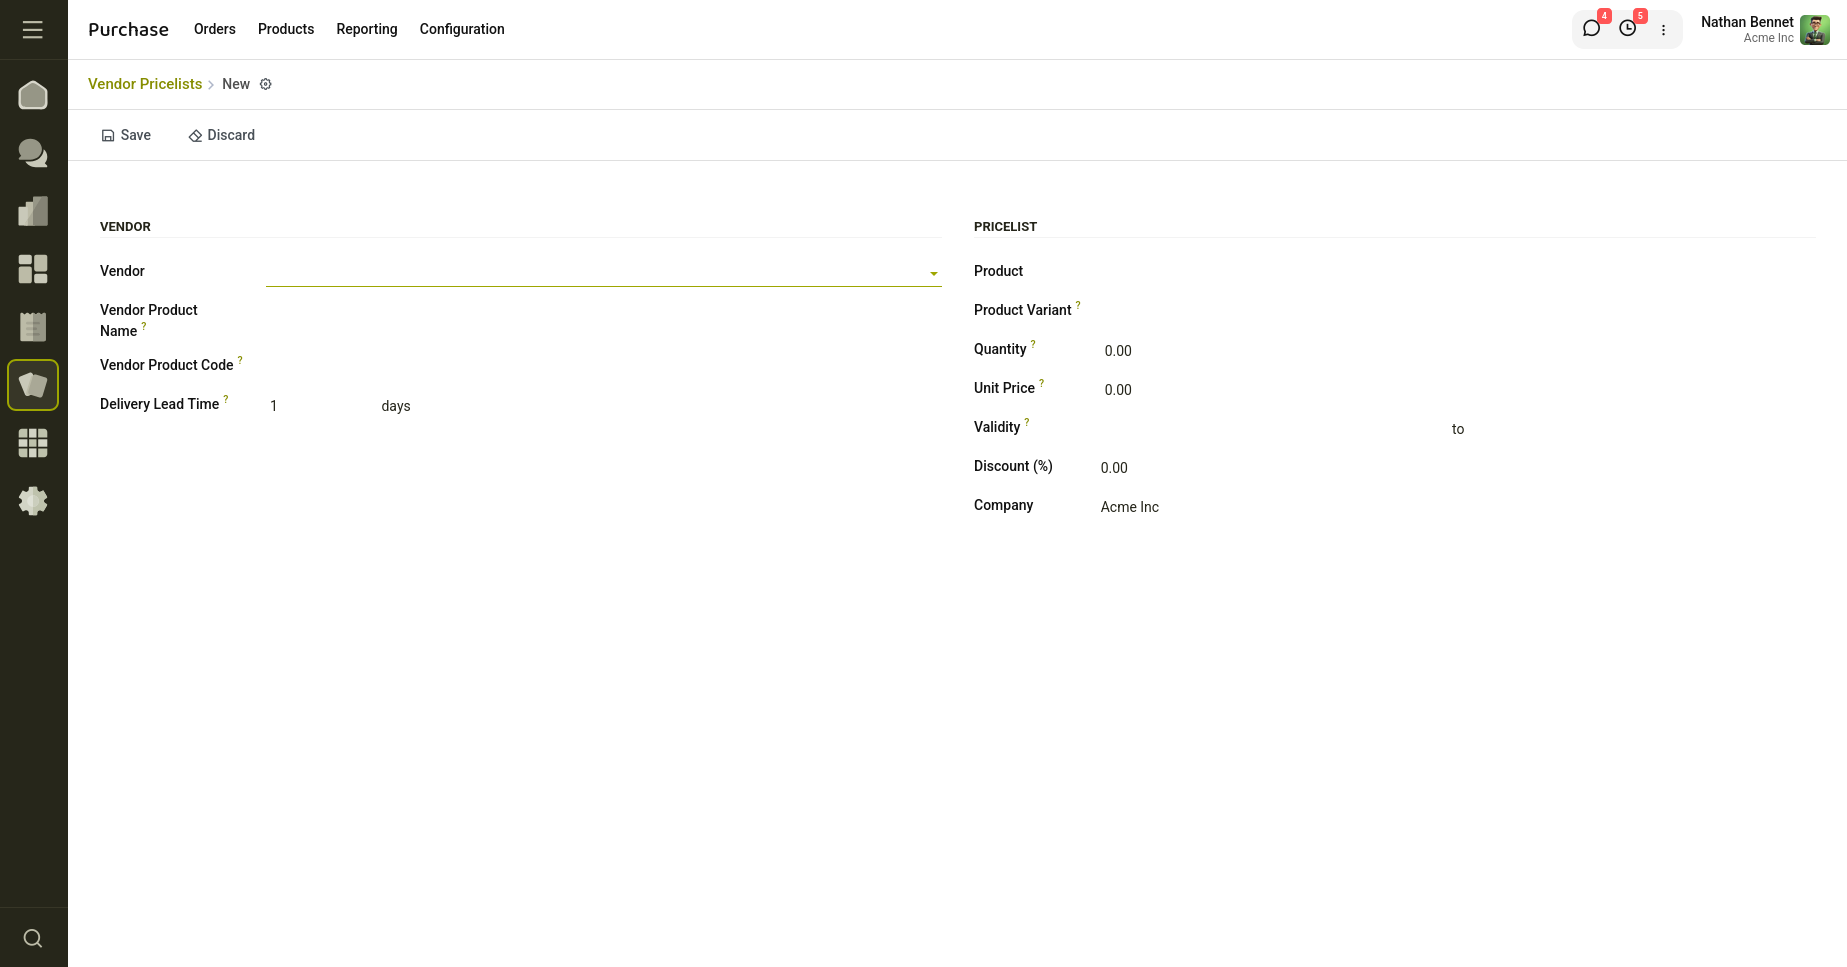
Fig 2.5 — New vendor price list form
3. Request for Quotation (RFQ)
Before committing to a purchase, you can ask one or more vendors to quote on the items you need. Cyllo tracks every RFQ from draft through to a confirmed purchase order, and lets you compare vendors side by side before deciding.
3.1 RFQ Dashboard
Purchase → Orders → Requests for Quotation opens a dashboard split into All RFQs and My RFQs, each showing counts for To Send, Waiting, and Late requests, plus Average Order Value, Purchased Last 7 Days, Lead Time to Purchase, and RFQs Sent Last 7 Days.
Switch between List, Kanban, Pivot, Graph, and Calendar views from the icons in the top-right corner, and use Filters / Group By to slice the list by vendor, status, order date, and more.
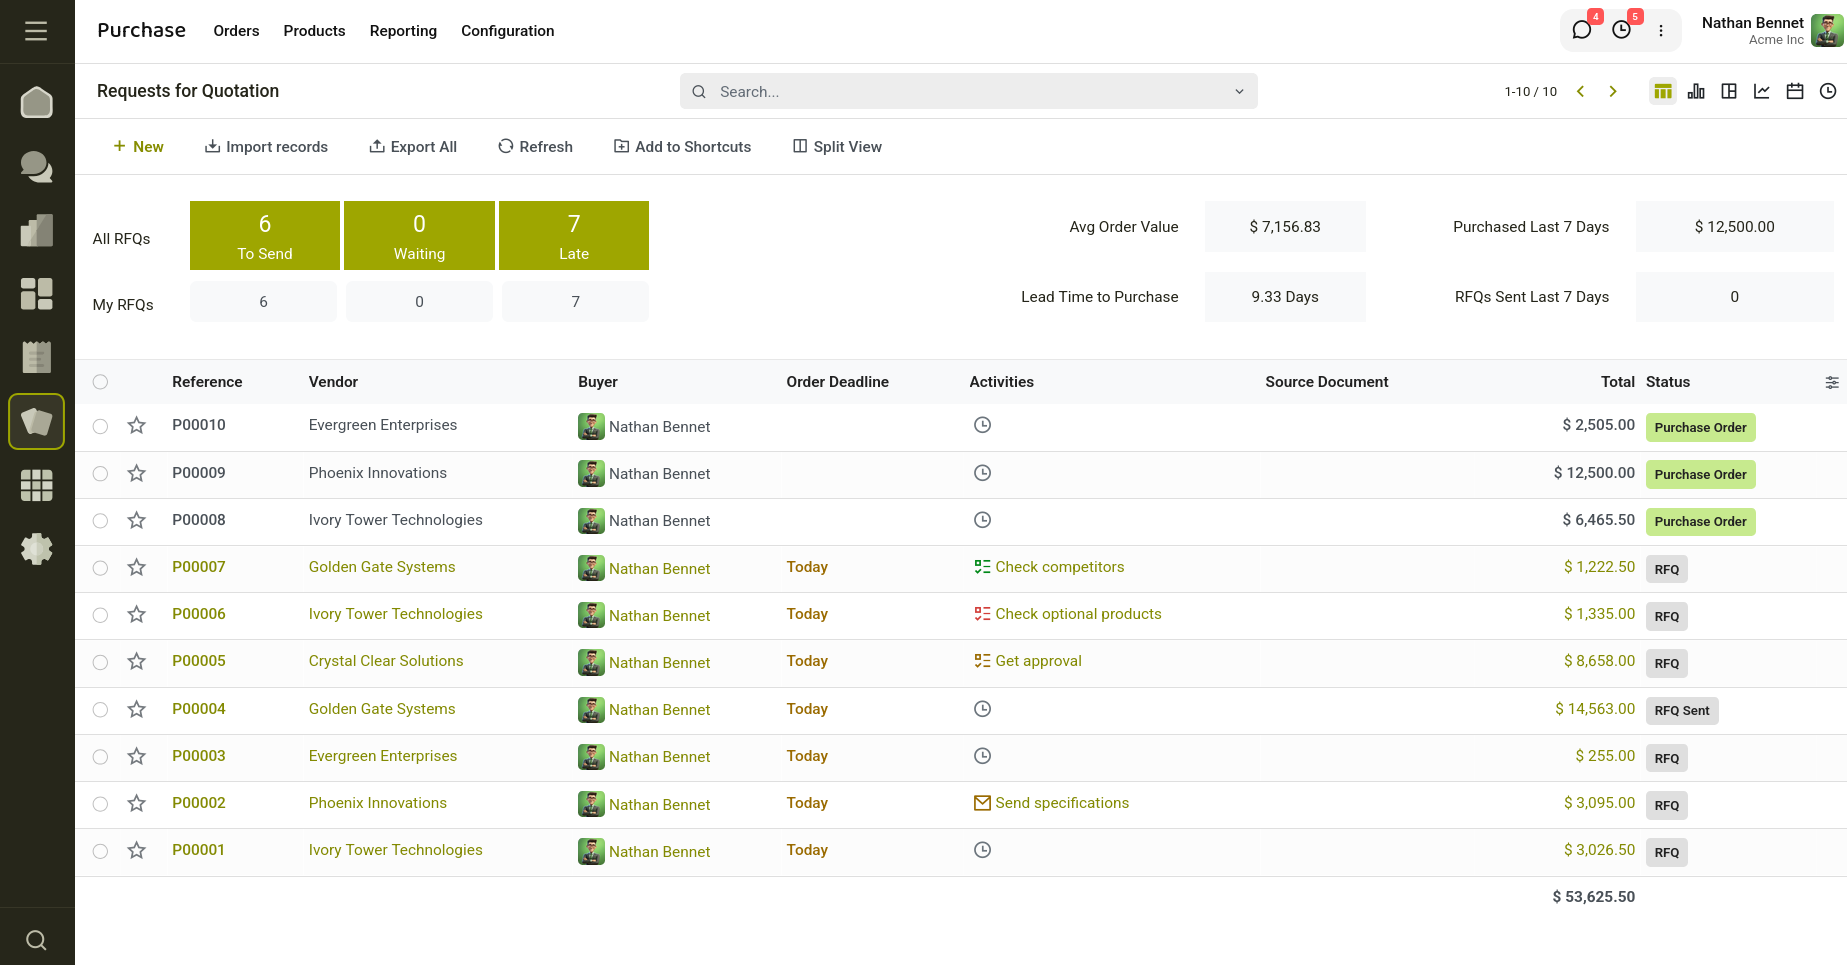
Fig 3.1 — RFQ dashboard with status counters and KPIs
3.2 Creating a New RFQ
Click New from the Requests for Quotation list to start a fresh request.
How to Create an RFQ
- Go to Purchase → Orders → Requests for Quotation → New
- Select the Vendor and, optionally, the Vendor Reference and Blanket Order
- Set the Order Deadline (the date the RFQ converts to an order) and Expected Arrival
- Tick Ask Confirmation if you want the vendor to confirm the receipt date by email
- Add products under the Products tab, or use Add a Section / Add a Note to organise the list
- Save the RFQ
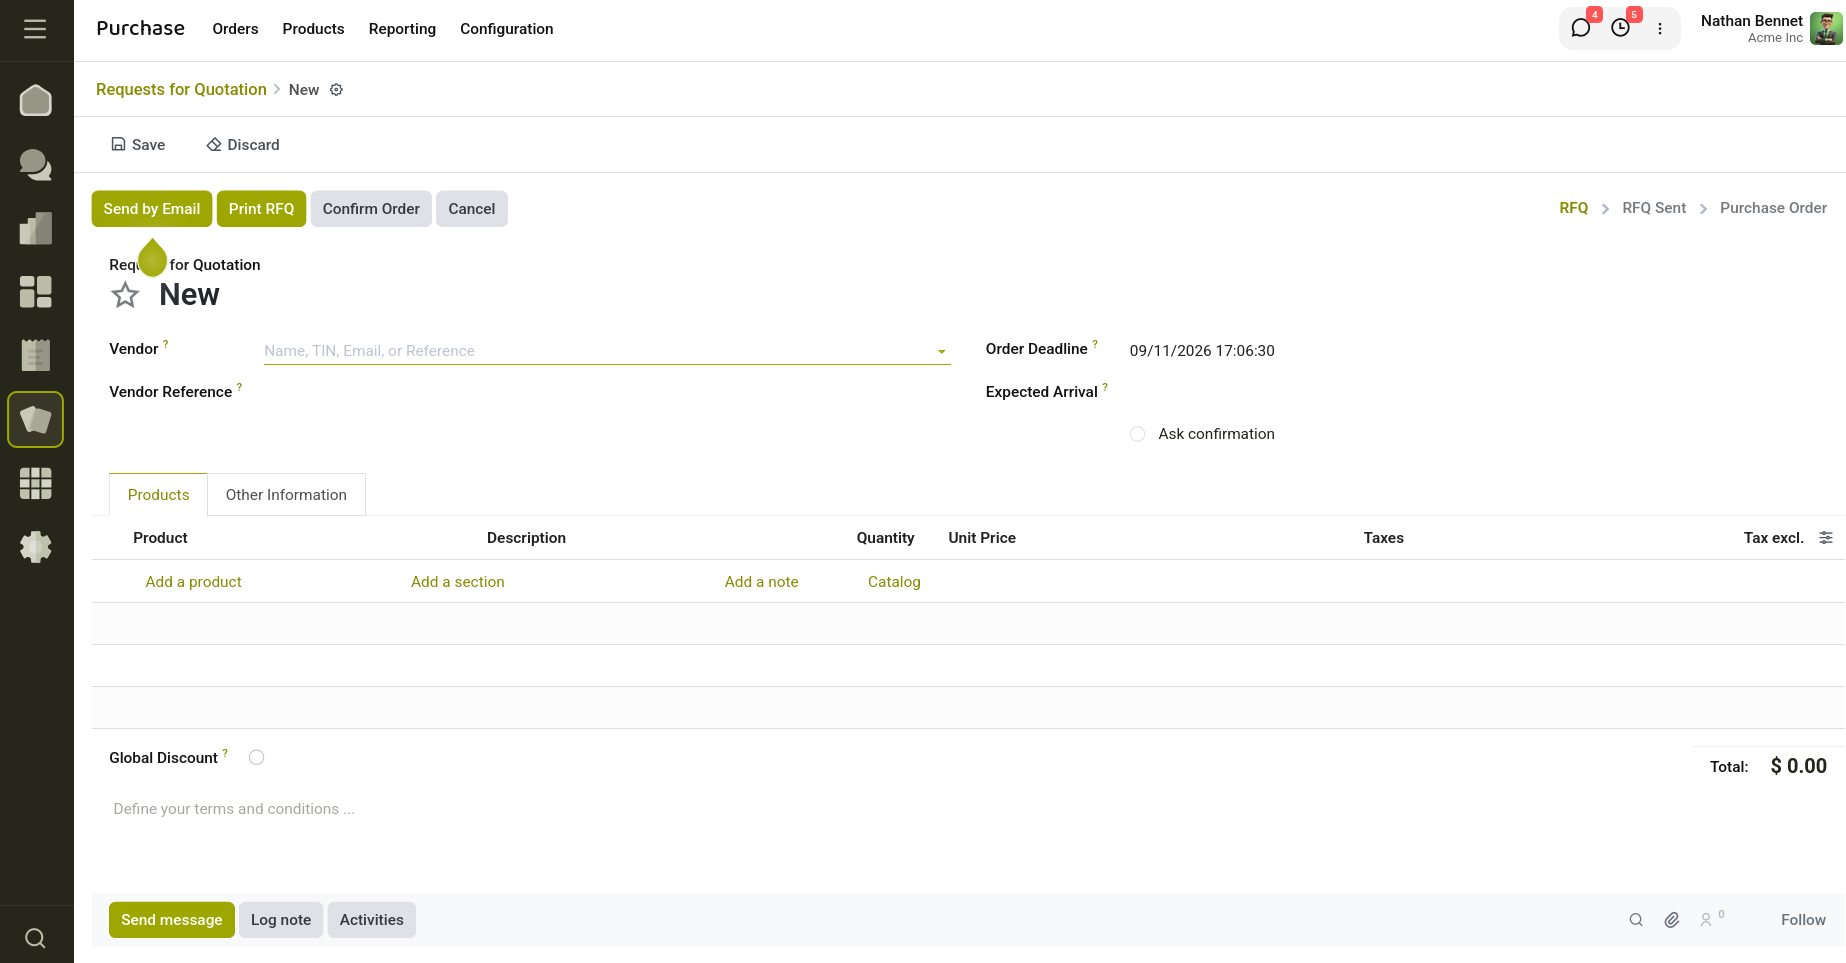
Fig 3.2 — New RFQ form
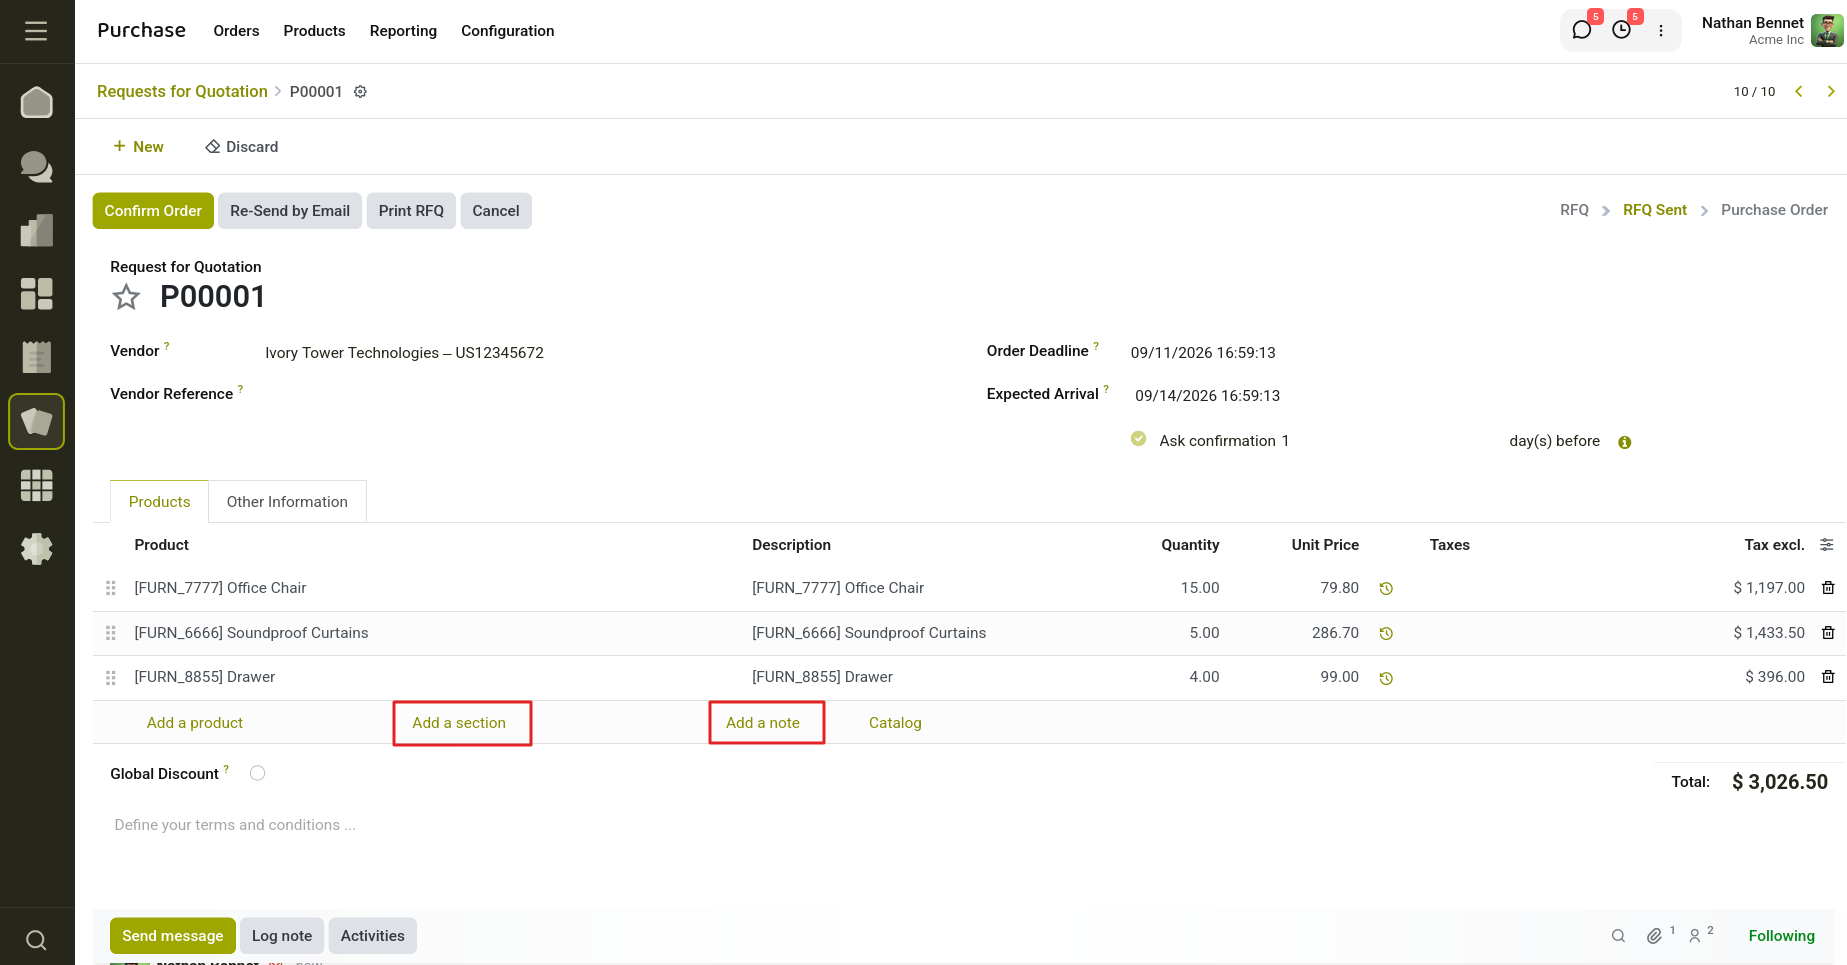
Fig 3.3 — RFQ with product lines, a section, and a note
3.3 Adding Products via Catalog
The Catalog button opens every product the selected vendor offers, so you can browse and add items with the + and Add buttons instead of typing product codes one by one. Quantity, unit price, taxes, and subtotal fill in automatically once a product is added, and the totals recalculate as you adjust quantities.
Purchase representative, Company, Payment Terms, Fiscal Position, and Incoterm details are set separately, under the Other Information tab.
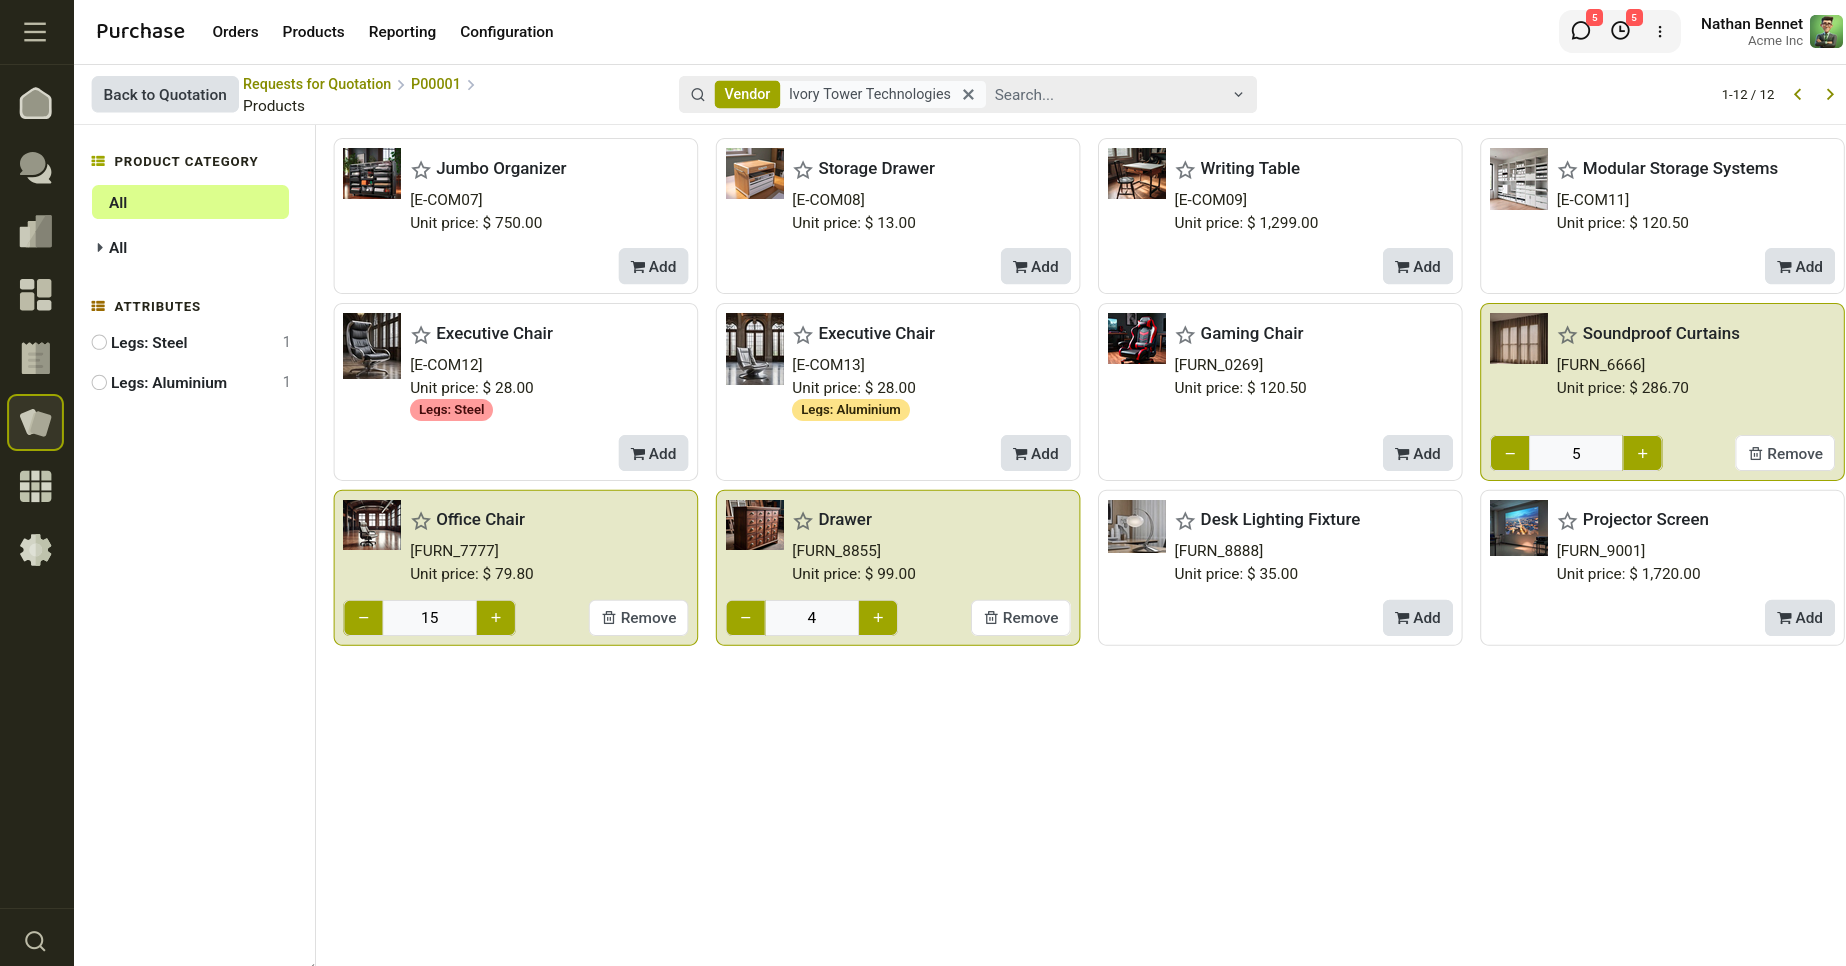
Fig 3.4 — Catalog view for adding products from the selected vendor
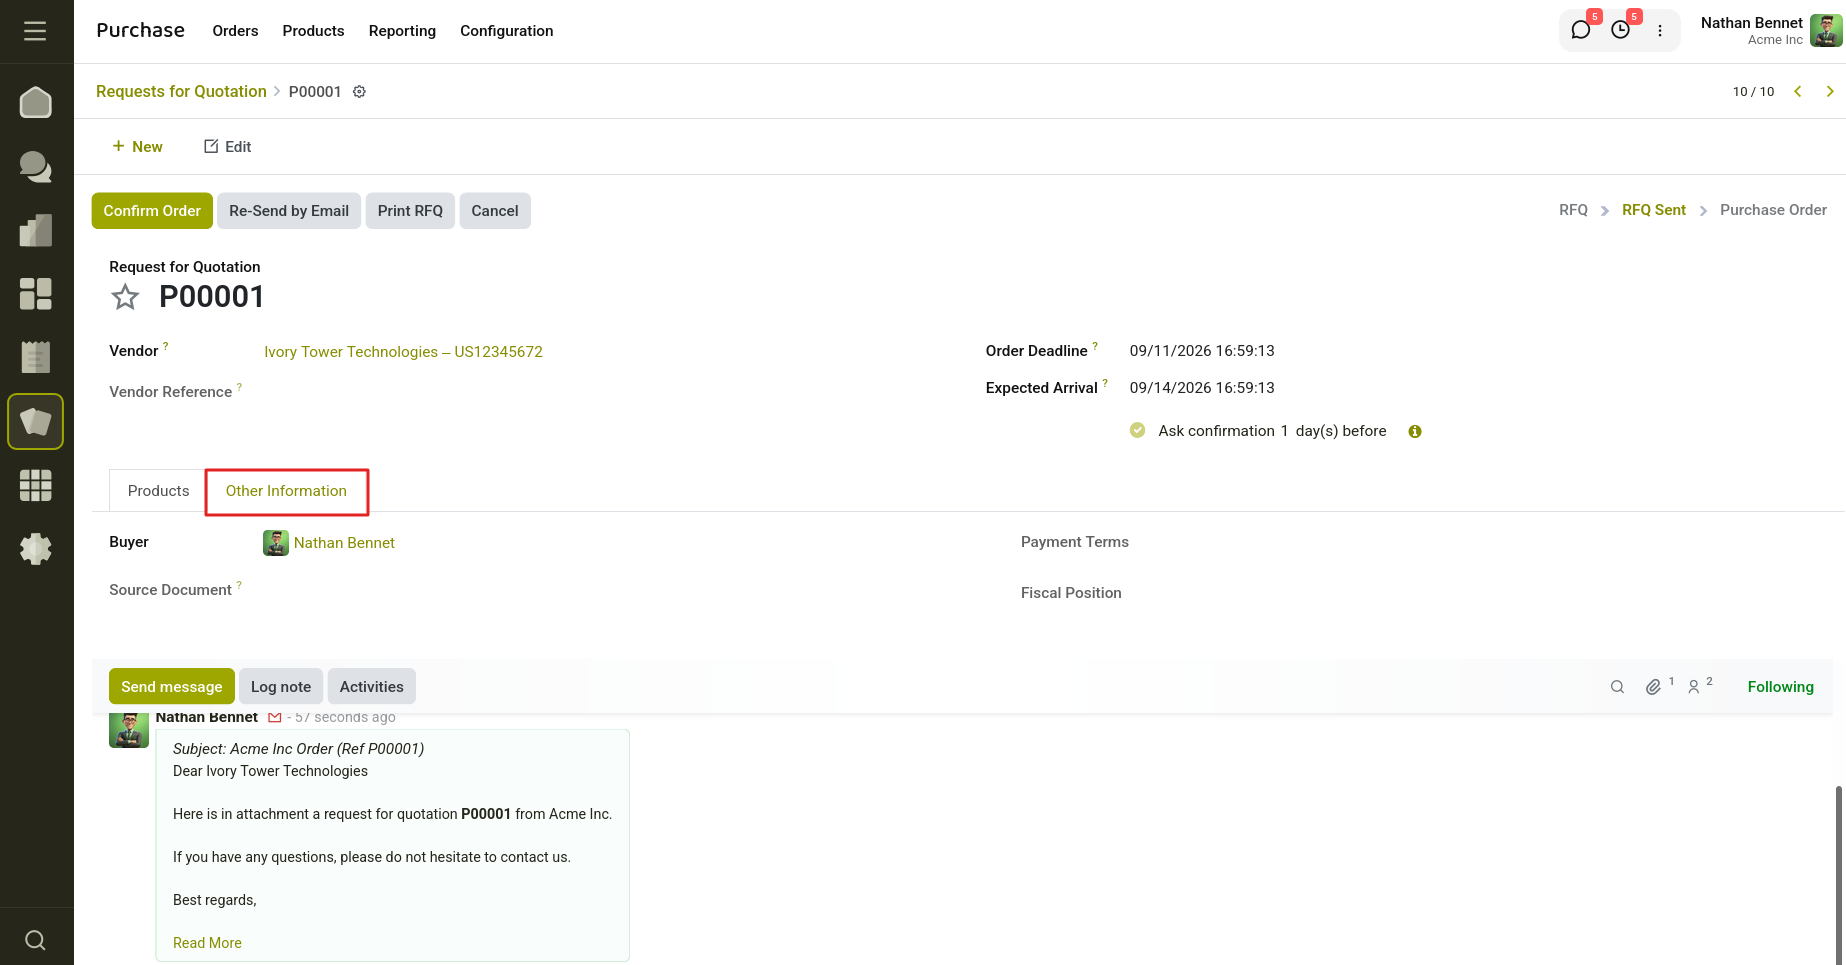
Fig 3.5 — Other Information tab: buyer, company, payment terms
3.4 Alternatives & Call for Tender
When you want to compare quotes from several vendors for the same products, open the Alternatives tab and click Create Alternative. Choose another vendor and decide whether to Copy Products from the current RFQ.
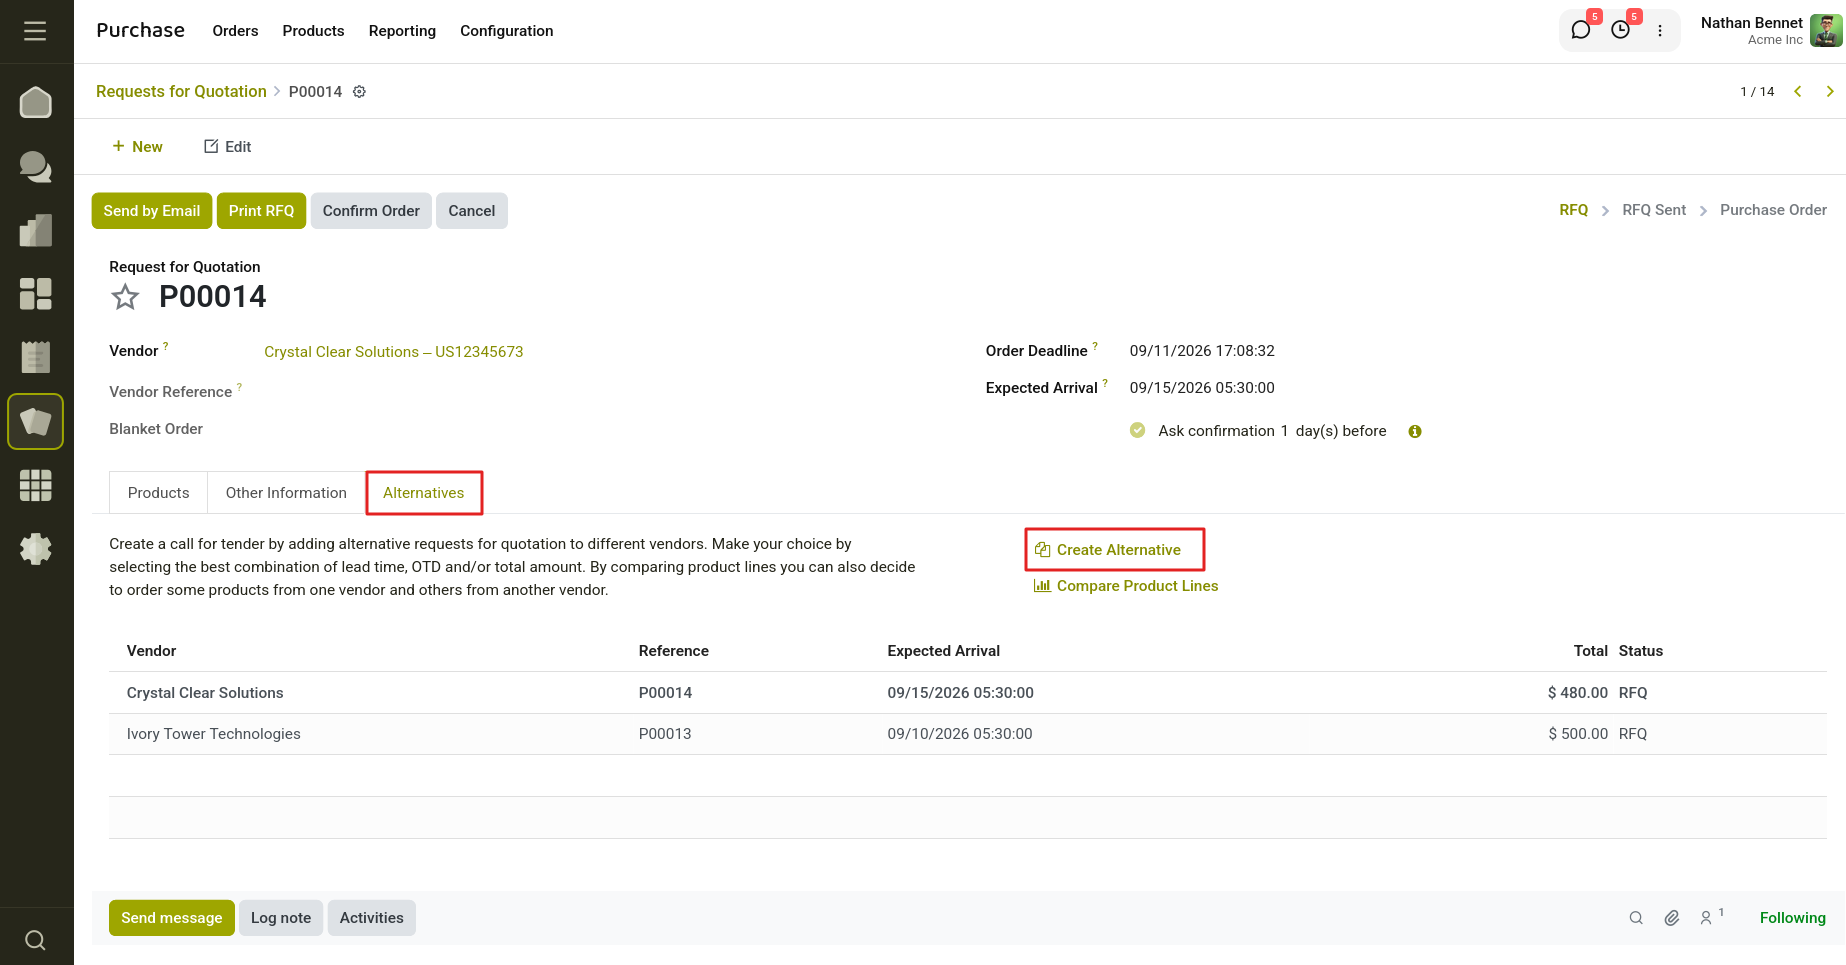
Fig 3.6 — Alternatives tab with Create Alternative
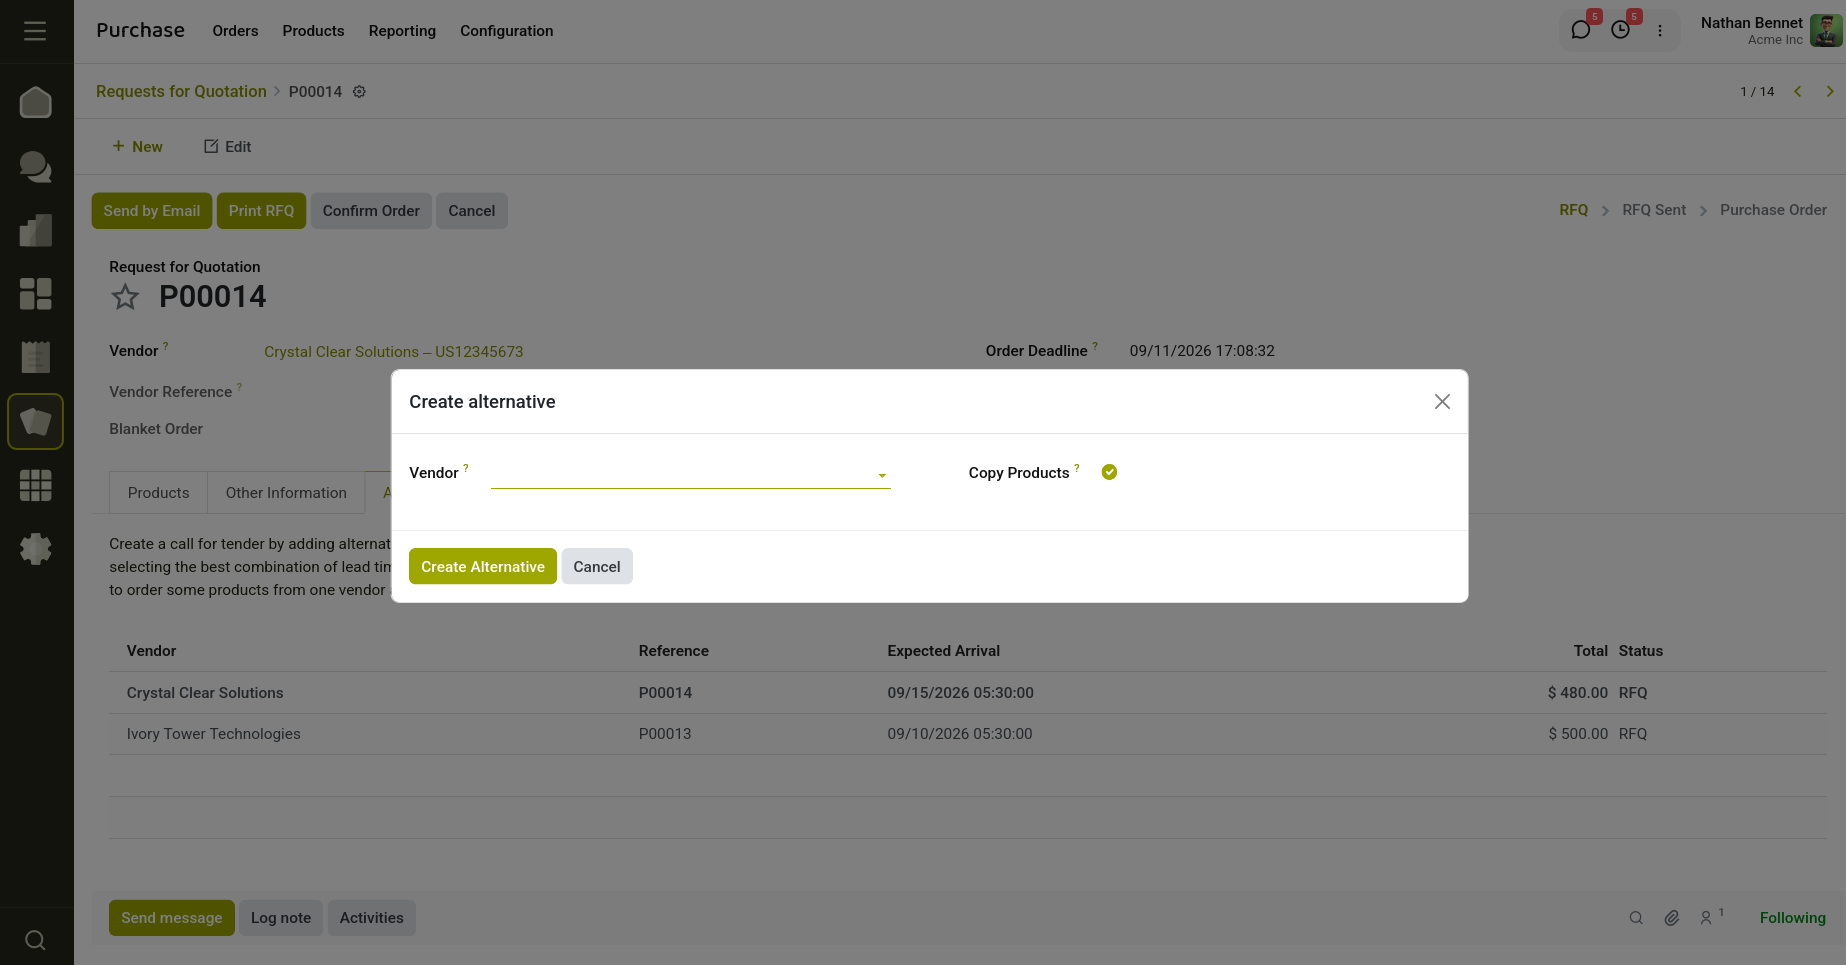
Fig 3.7 — Create Alternative dialog
3.5 Comparing Product Lines
Once alternatives exist, use Compare Product Lines to see every vendor's product, reference, status, quantity, unit price, and currency in one table. Click Choose on the best line item, or Clear to discard an option — you can even mix and match, buying some lines from one vendor and others from another.
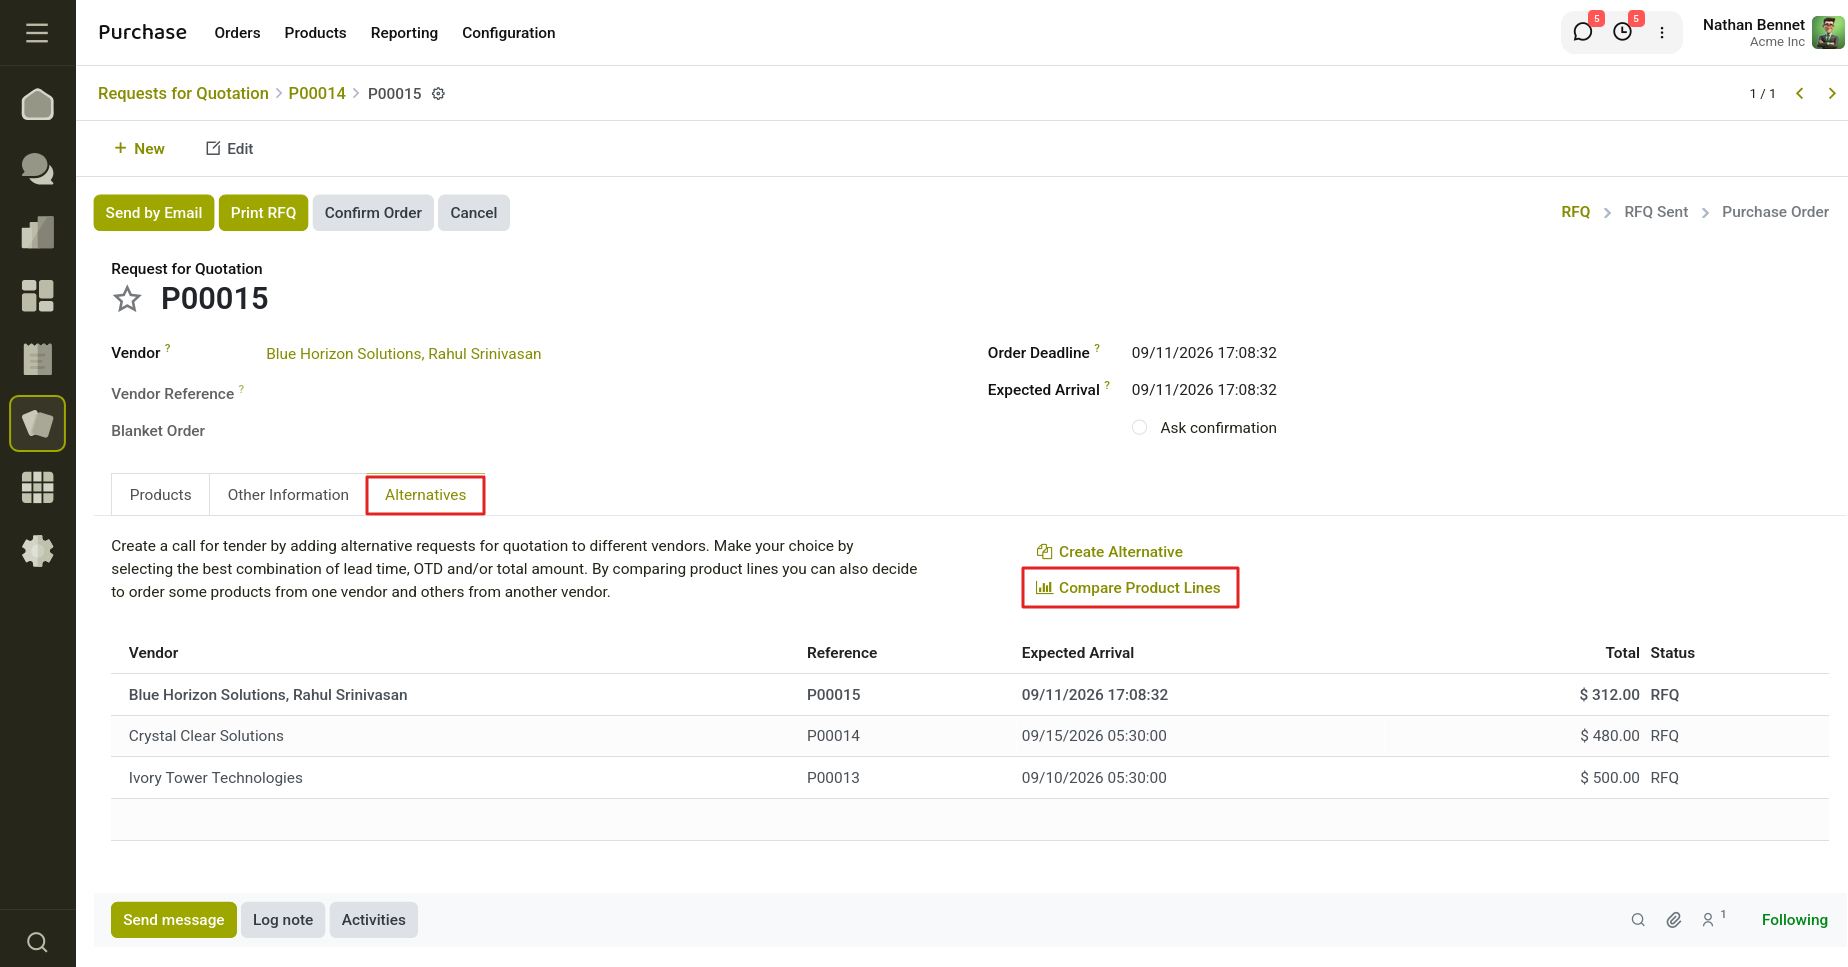
Fig 3.8 — Alternatives tab with Compare Product Lines
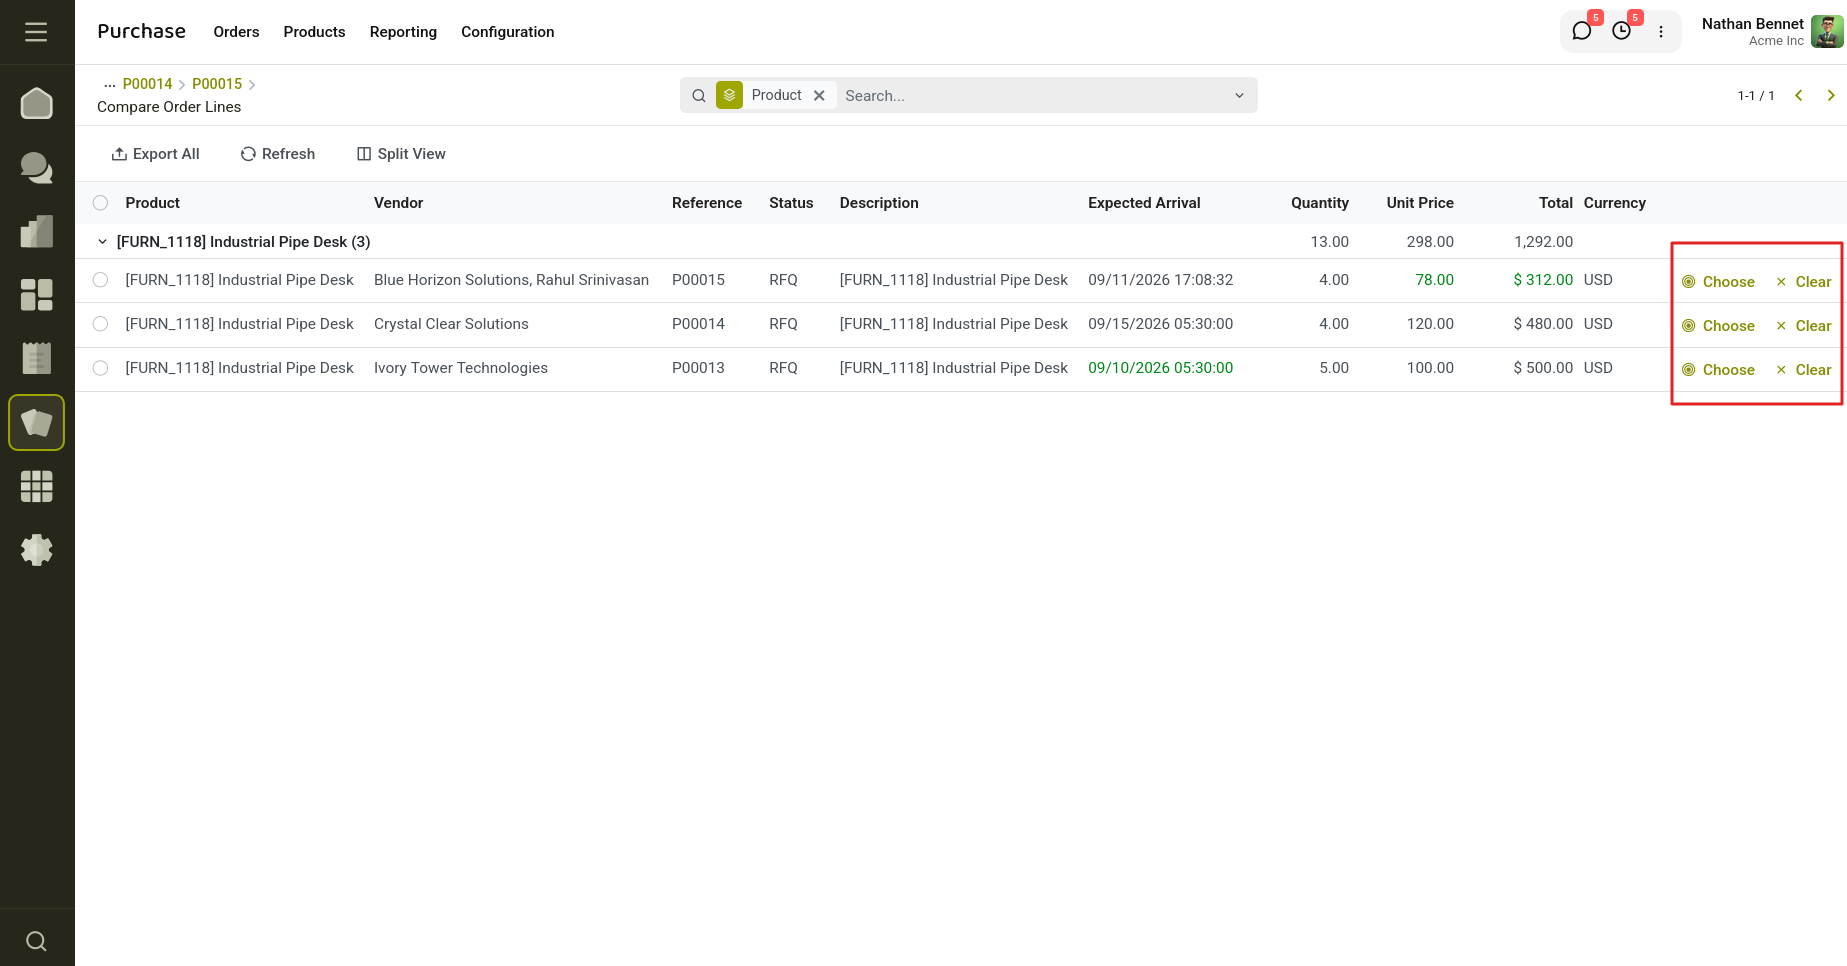
Fig 3.9 — Compare Product Lines window
3.6 Sending the RFQ
Once the RFQ is saved, click Send by Email to trigger an automatically generated email to the vendor. The status updates to RFQ Sent, and you can track it from the dashboard until the vendor responds. If the vendor accepts the terms, click Confirm Order to turn the RFQ straight into a Purchase Order.
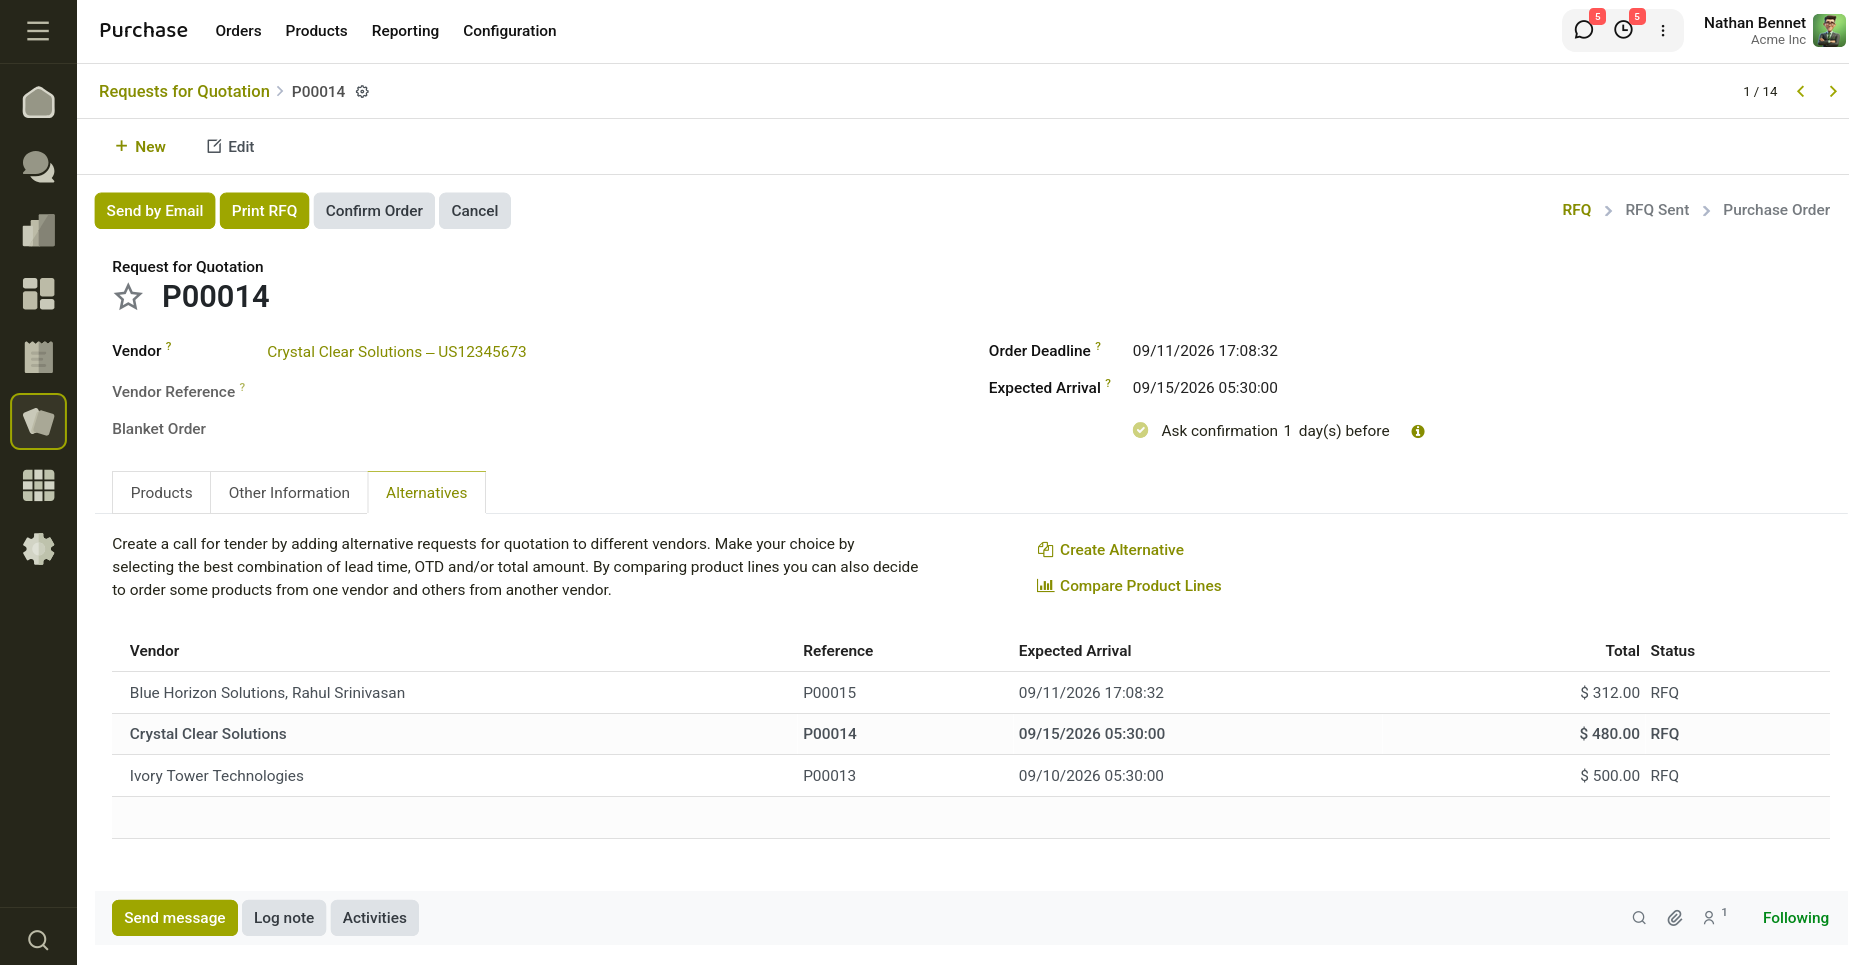
Fig 3.10 — Sending an RFQ by email
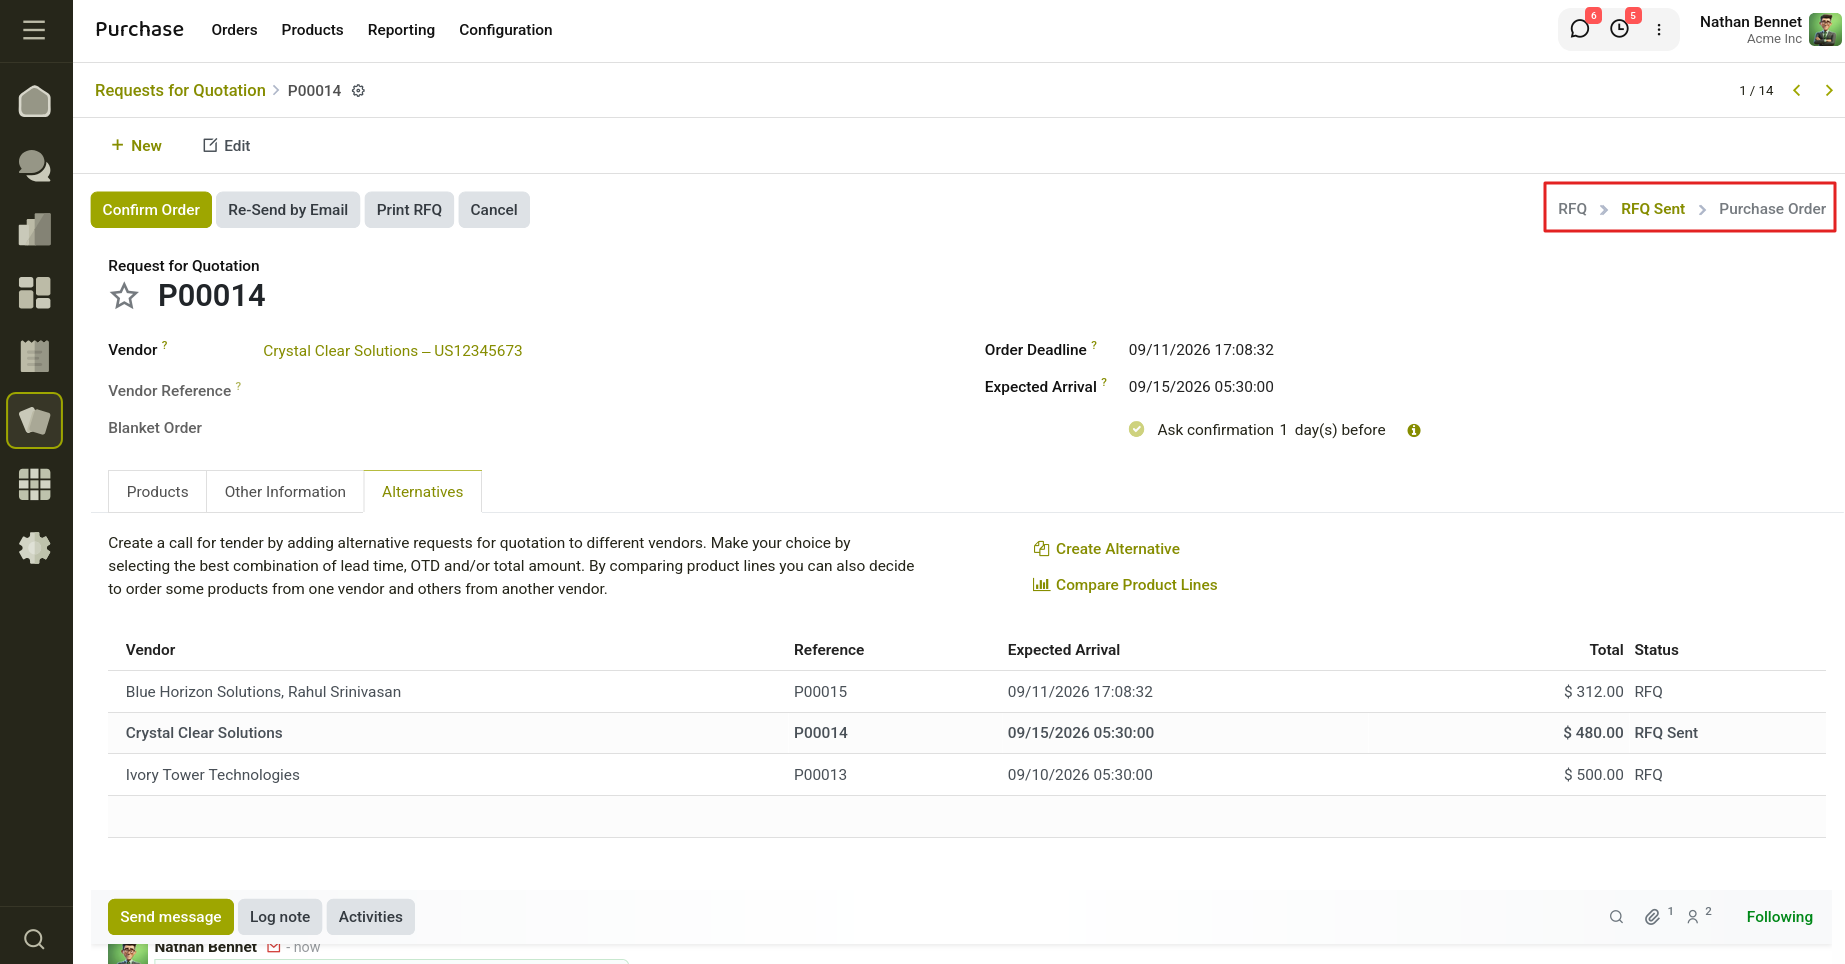
Fig 3.11 — RFQ status updated to “RFQ Sent”
4. Purchase Orders
A confirmed Purchase Order is the binding agreement between your company and a vendor. You can create one directly, or convert an RFQ once the vendor has responded favourably.
4.1 Purchase Orders List
Purchase → Orders → Purchase Orders lists every confirmed order with its reference, confirmation date, vendor, company, receipt date, purchase representative, total, and billing status. As with every other Cyllo list, you can switch views and apply filters or grouping.
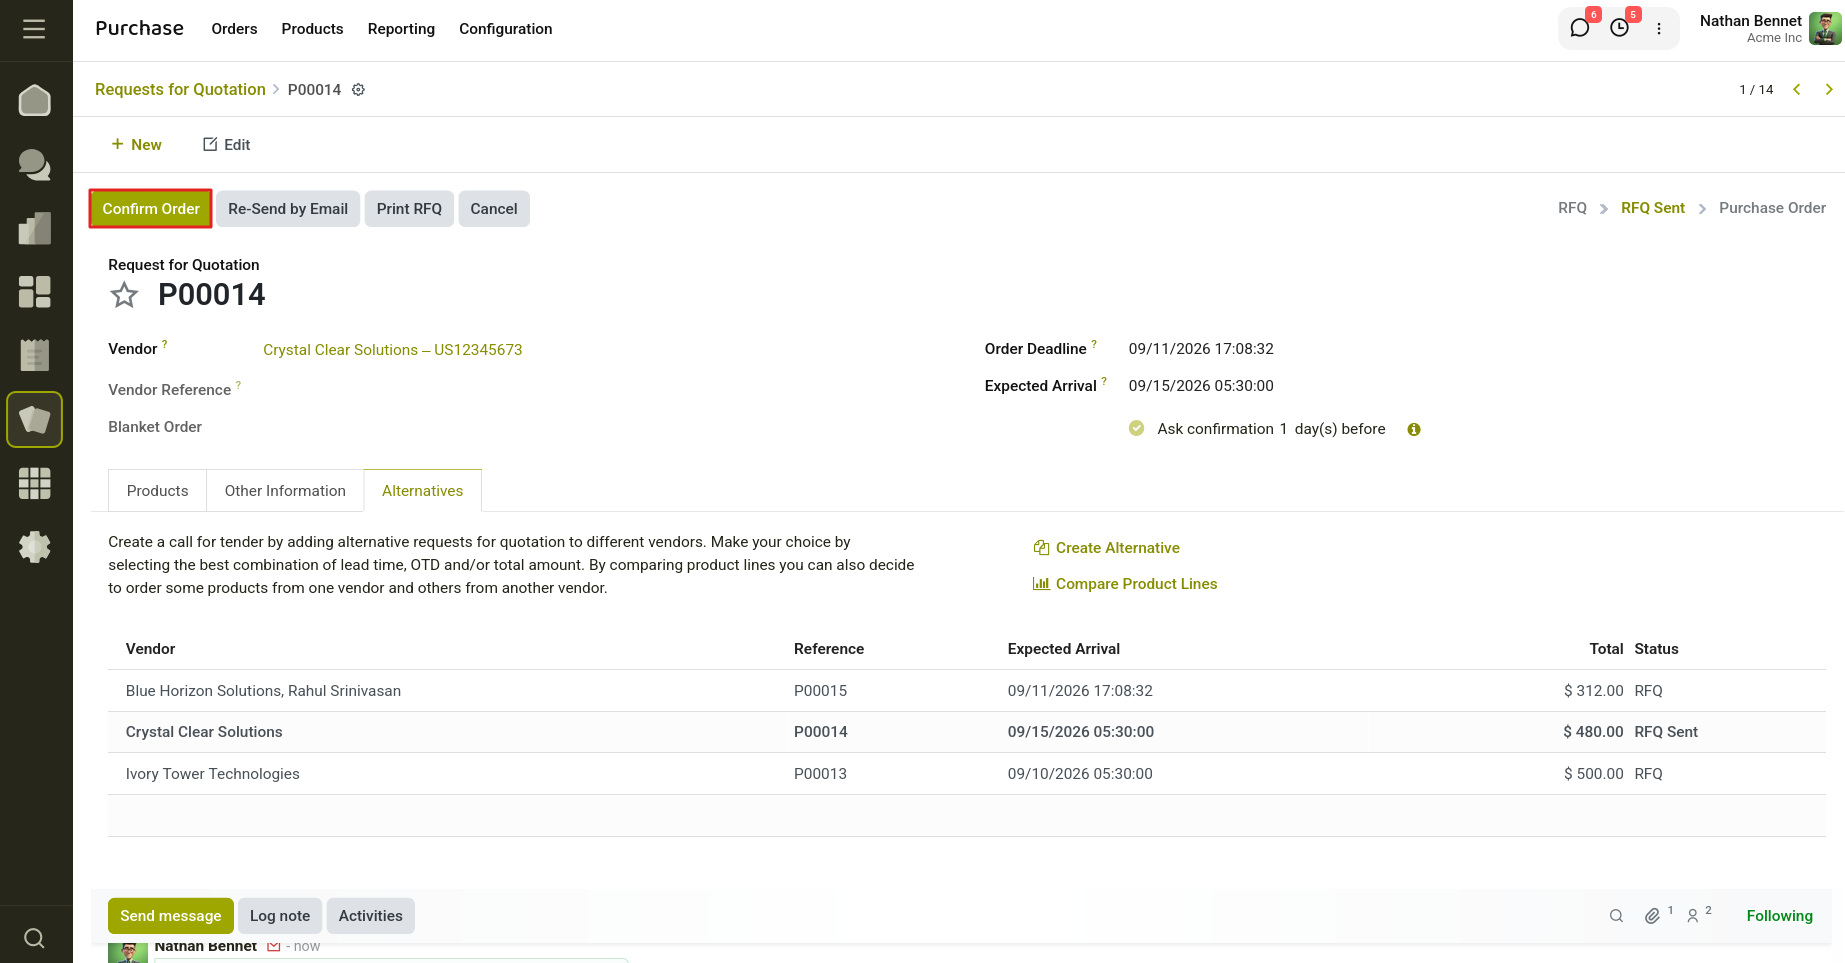
Fig 4.1 — Purchase Orders list view
4.2 Locking Confirmed Orders
To prevent accidental edits once an order is confirmed, enable Lock Confirmed Orders in Settings. Confirmed orders then move to a Locked status automatically; an Unlock button lets an authorised user make revisions if needed.
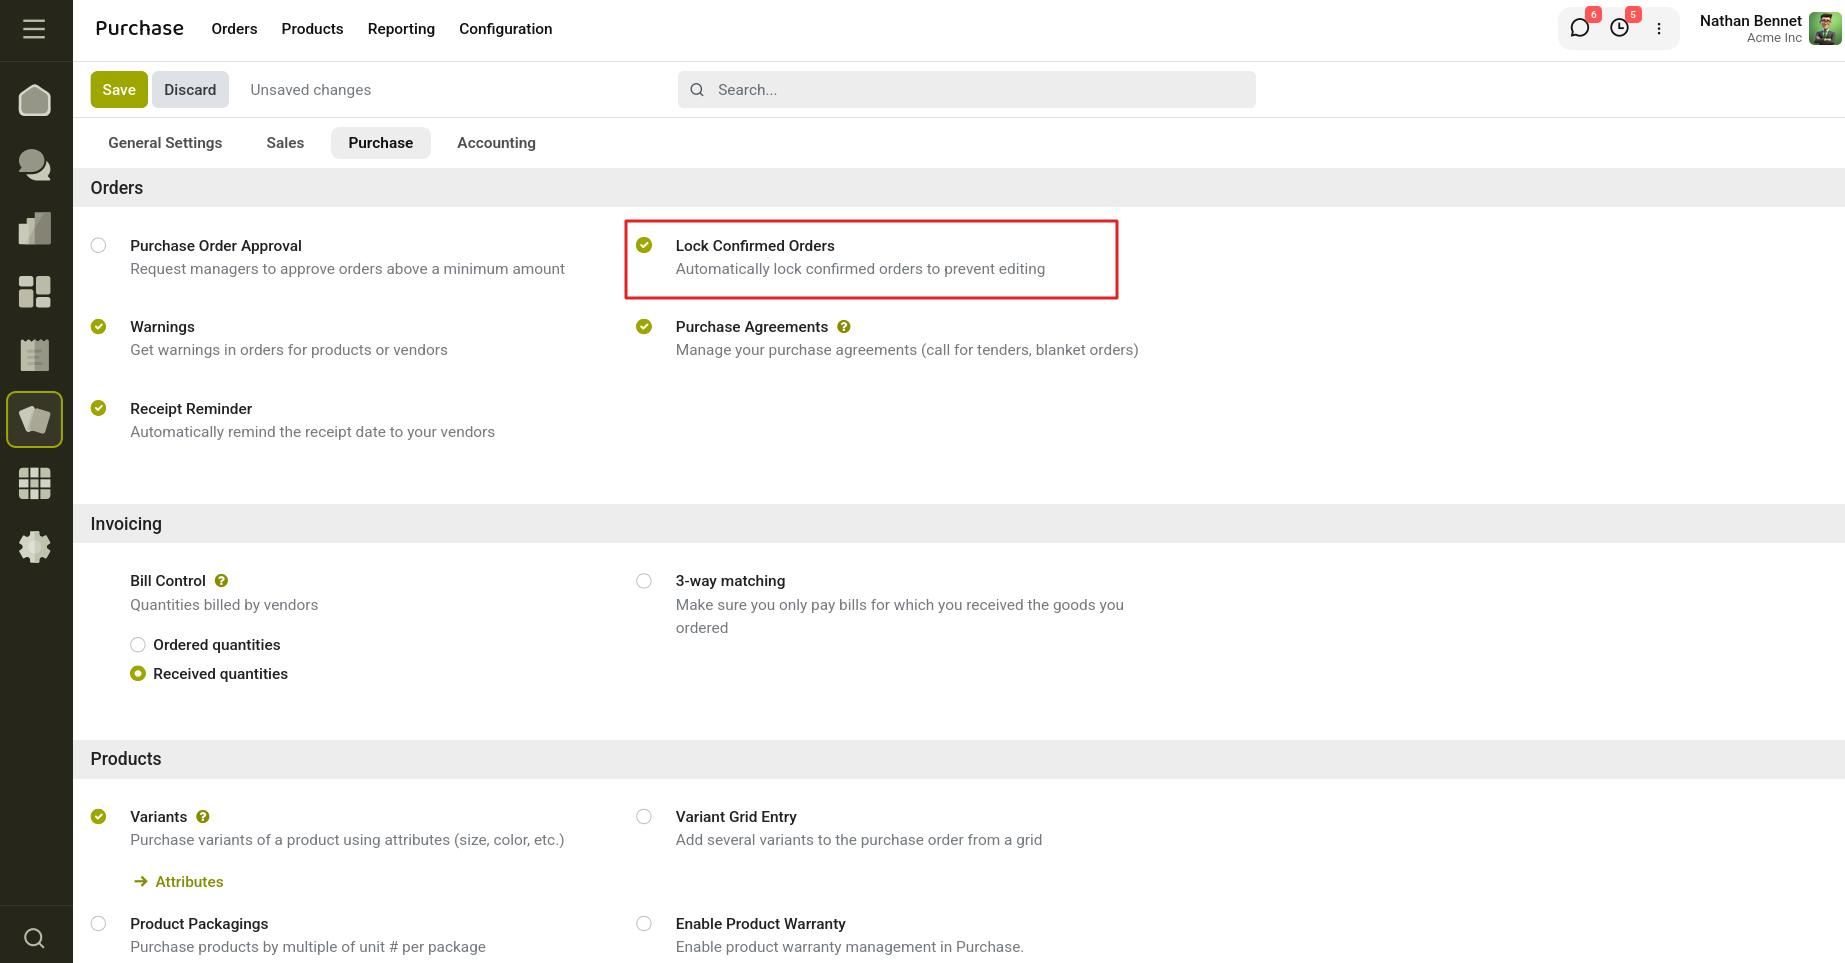
Fig 4.2 — Enabling Lock Confirmed Orders in Settings
4.3 Receiving Products
Once an order is confirmed, the goods are shipped to the address on the order. Click Receive Products to record what arrives, or open the Receipt smart button for details on the incoming transfer.
Validating a Receipt
- Open the confirmed purchase order and click Receive Products (or the Receipt smart button)
- Review the transfer — product, demand, and quantity received
- Click Validate to confirm the delivery
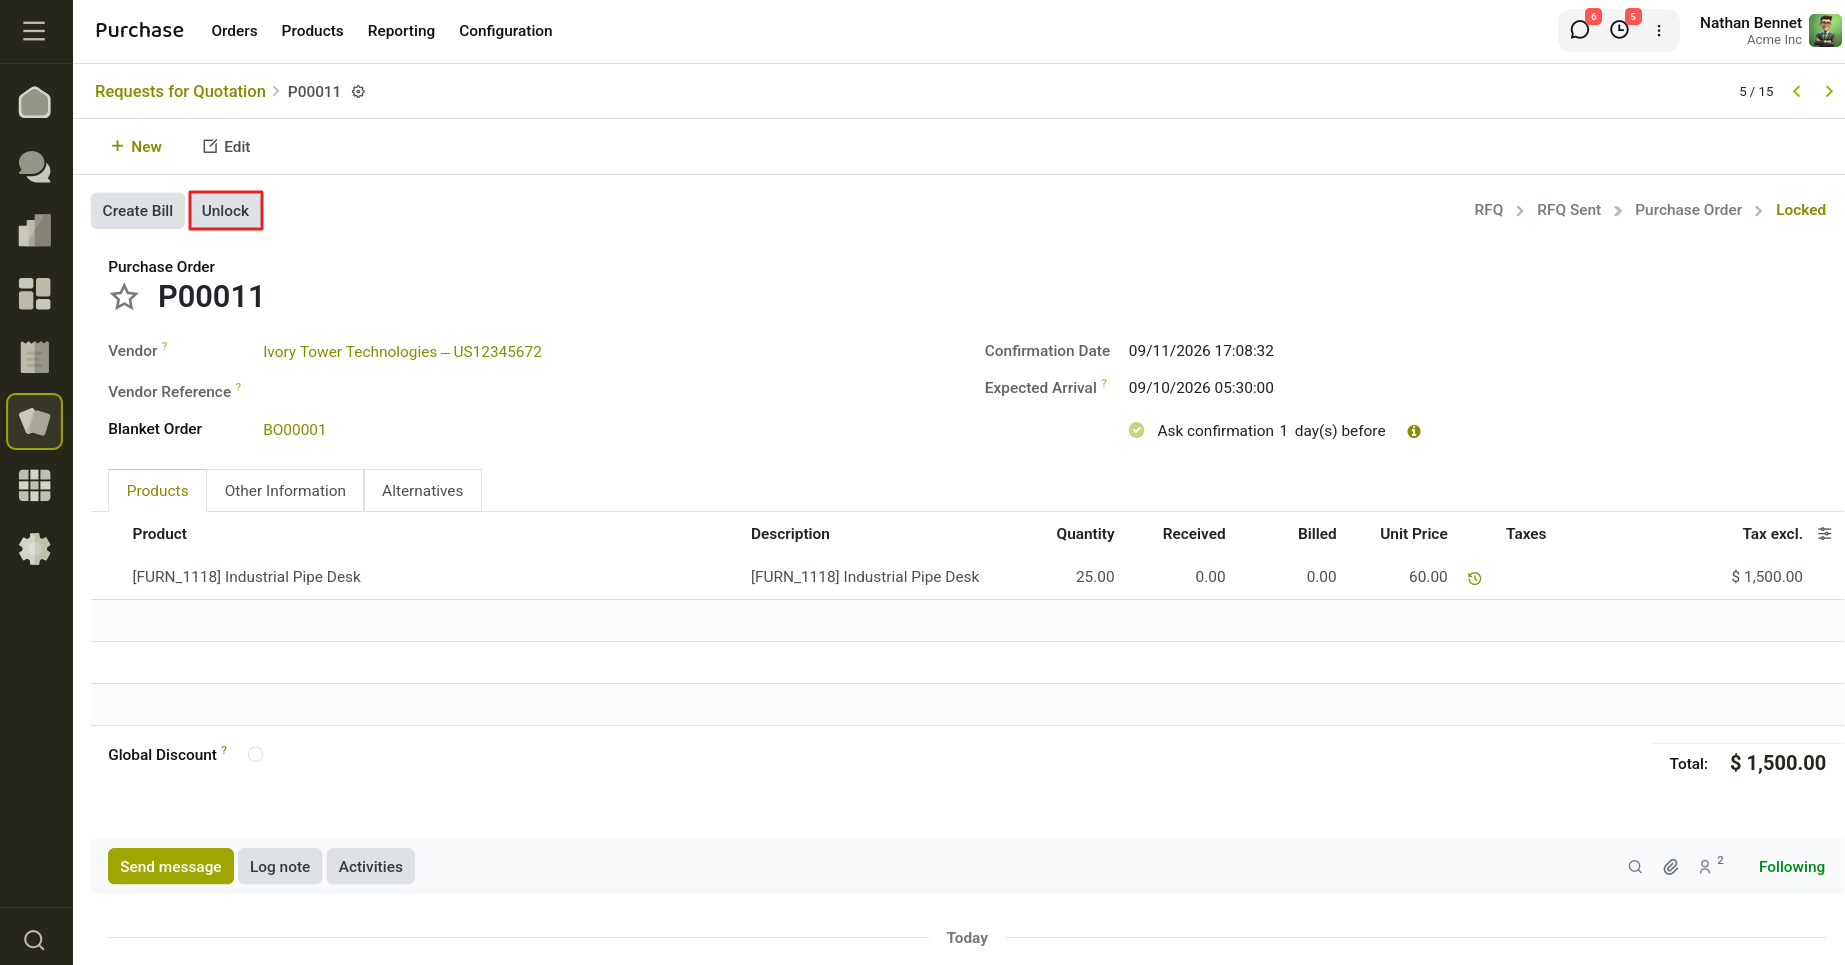
Fig 4.3 — Receive Products button on a locked order
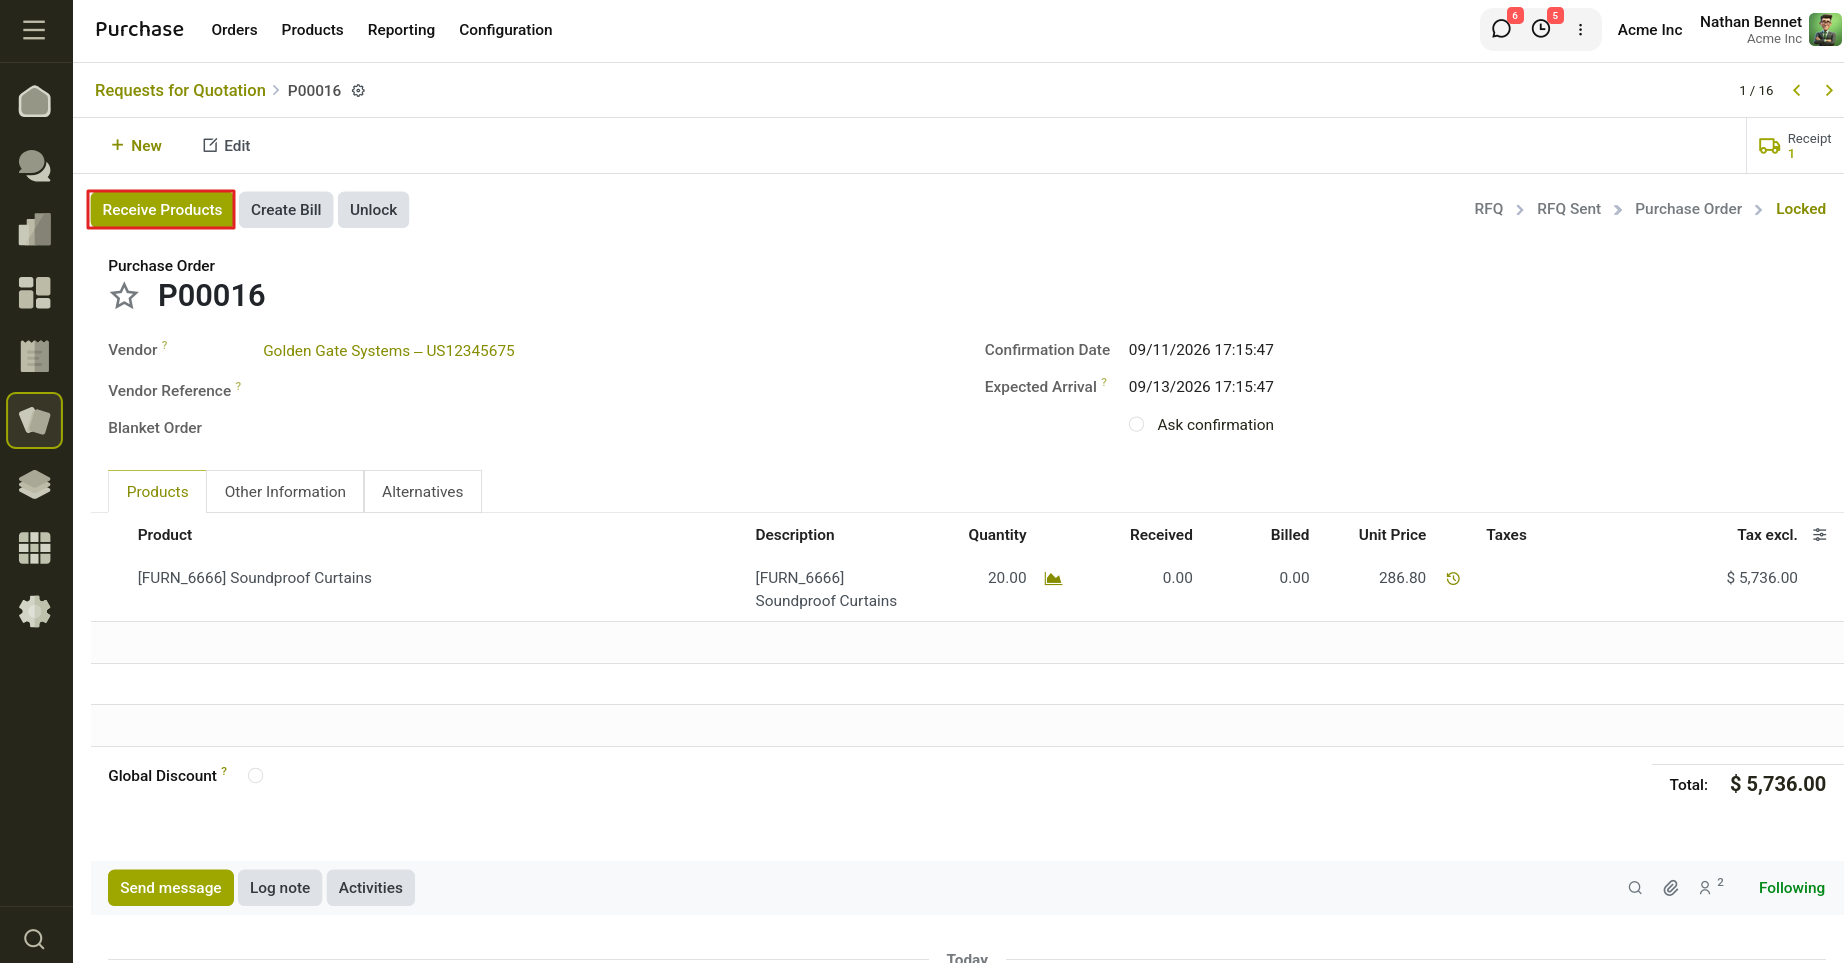
Fig 4.4 — Validating the incoming delivery
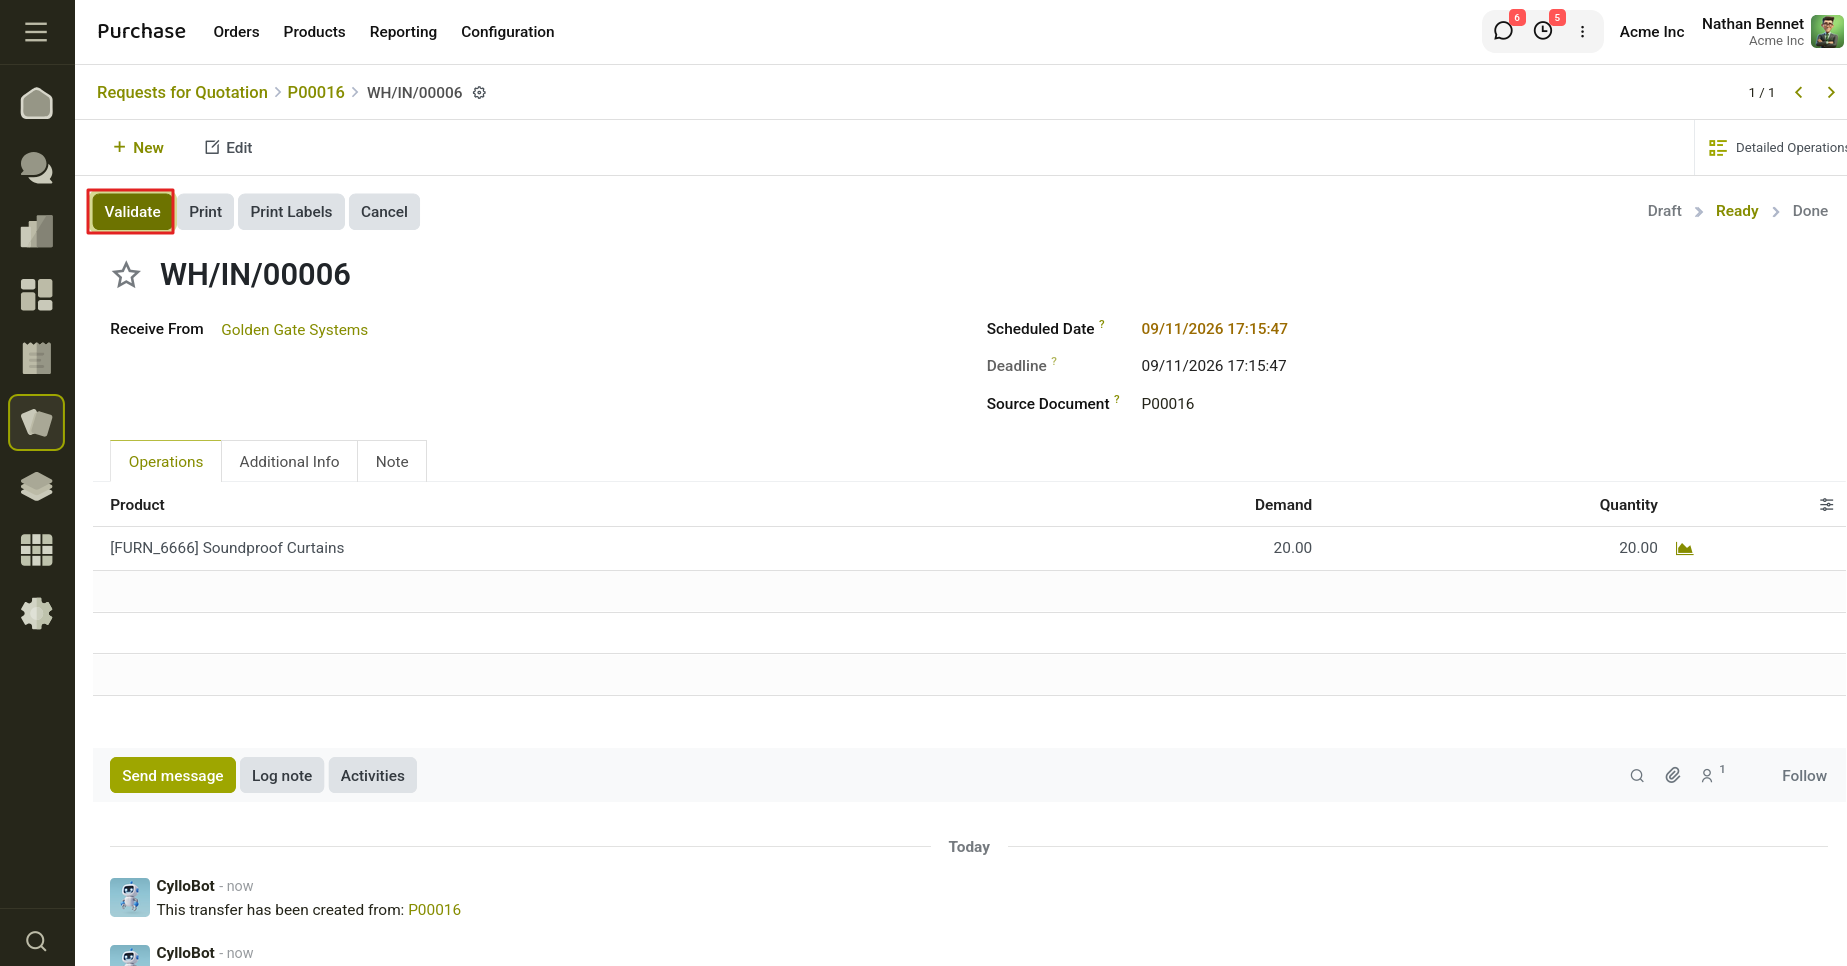
Fig 4.5 — Transfer marked Done and stock updated
4.3 Warranty on Purchase Orders
The Warranty Purchase feature enables users to track and manage product warranties directly from purchase orders. Once enabled, the system automatically calculates warranty expiration dates for eligible products, displays the warranty information on purchase order lines, and allows users to extend warranties whenever required.
- Navigate to Purchases → Configuration → Settings.
- Enable the Enable Product Warranty option.
- Click Save.
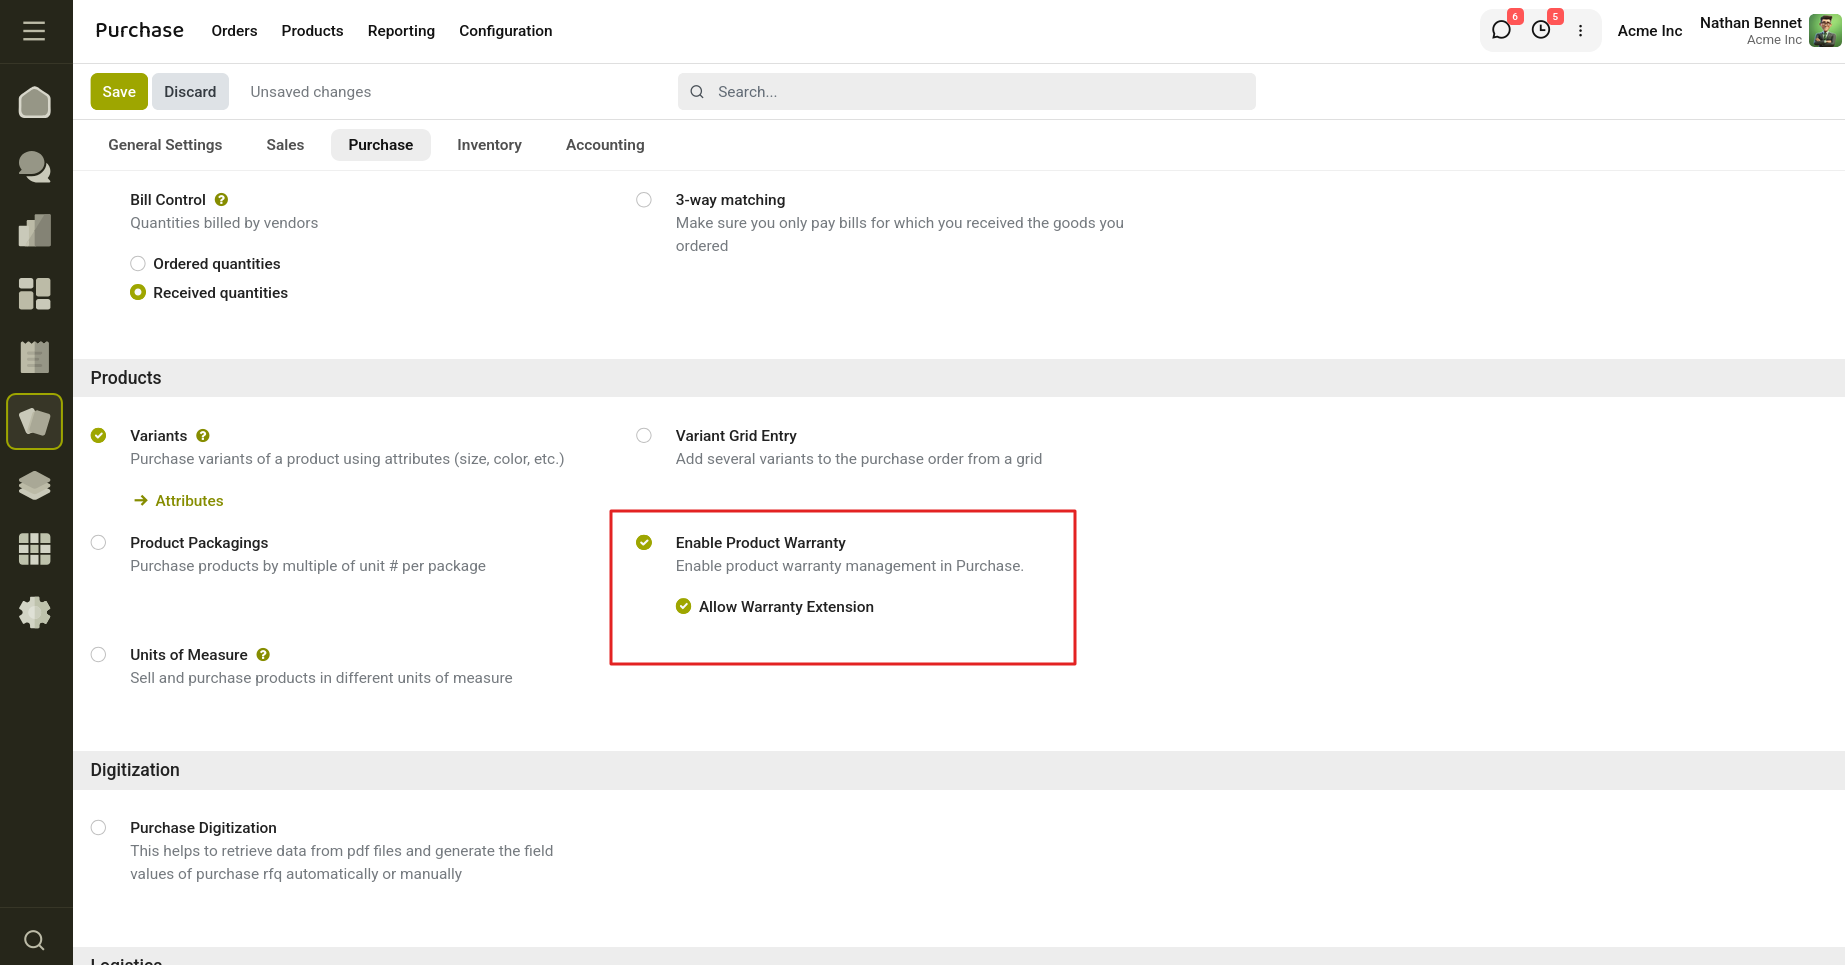
Fig 4.6 — Enable Product Warranty on Purchase Settings
Once enabled, warranty information is automatically managed for eligible products on purchase orders.
To view warranty information:
- Navigate to Purchases → Orders → Purchase Orders.
- Open a purchase order in the Purchase or Done state.
- In the Order Lines section, view the Warranty Expiration Date for each eligible product.
- Select an order line to view additional warranty details, if required.
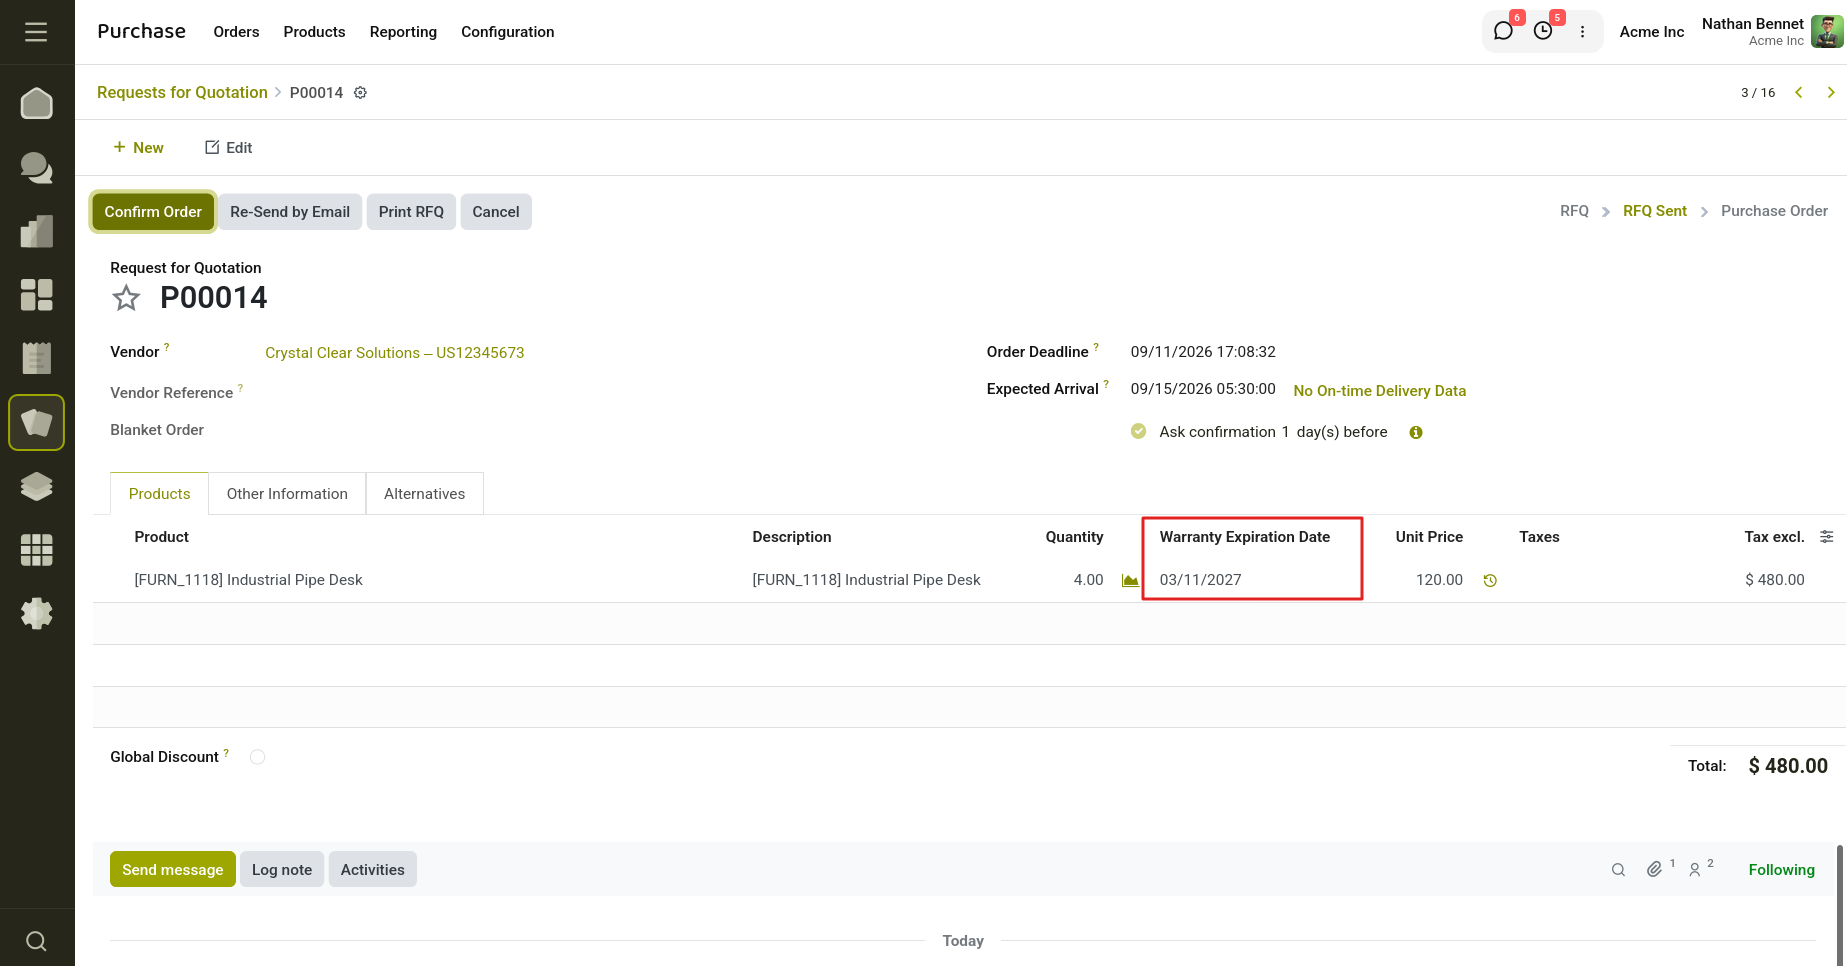
Fig 4.7 — Product Warranty Information on Purchase order
To extend the warranty:
- Open a purchase order in the Purchase or Done state.
- Click the Extend Warranty button in the header.
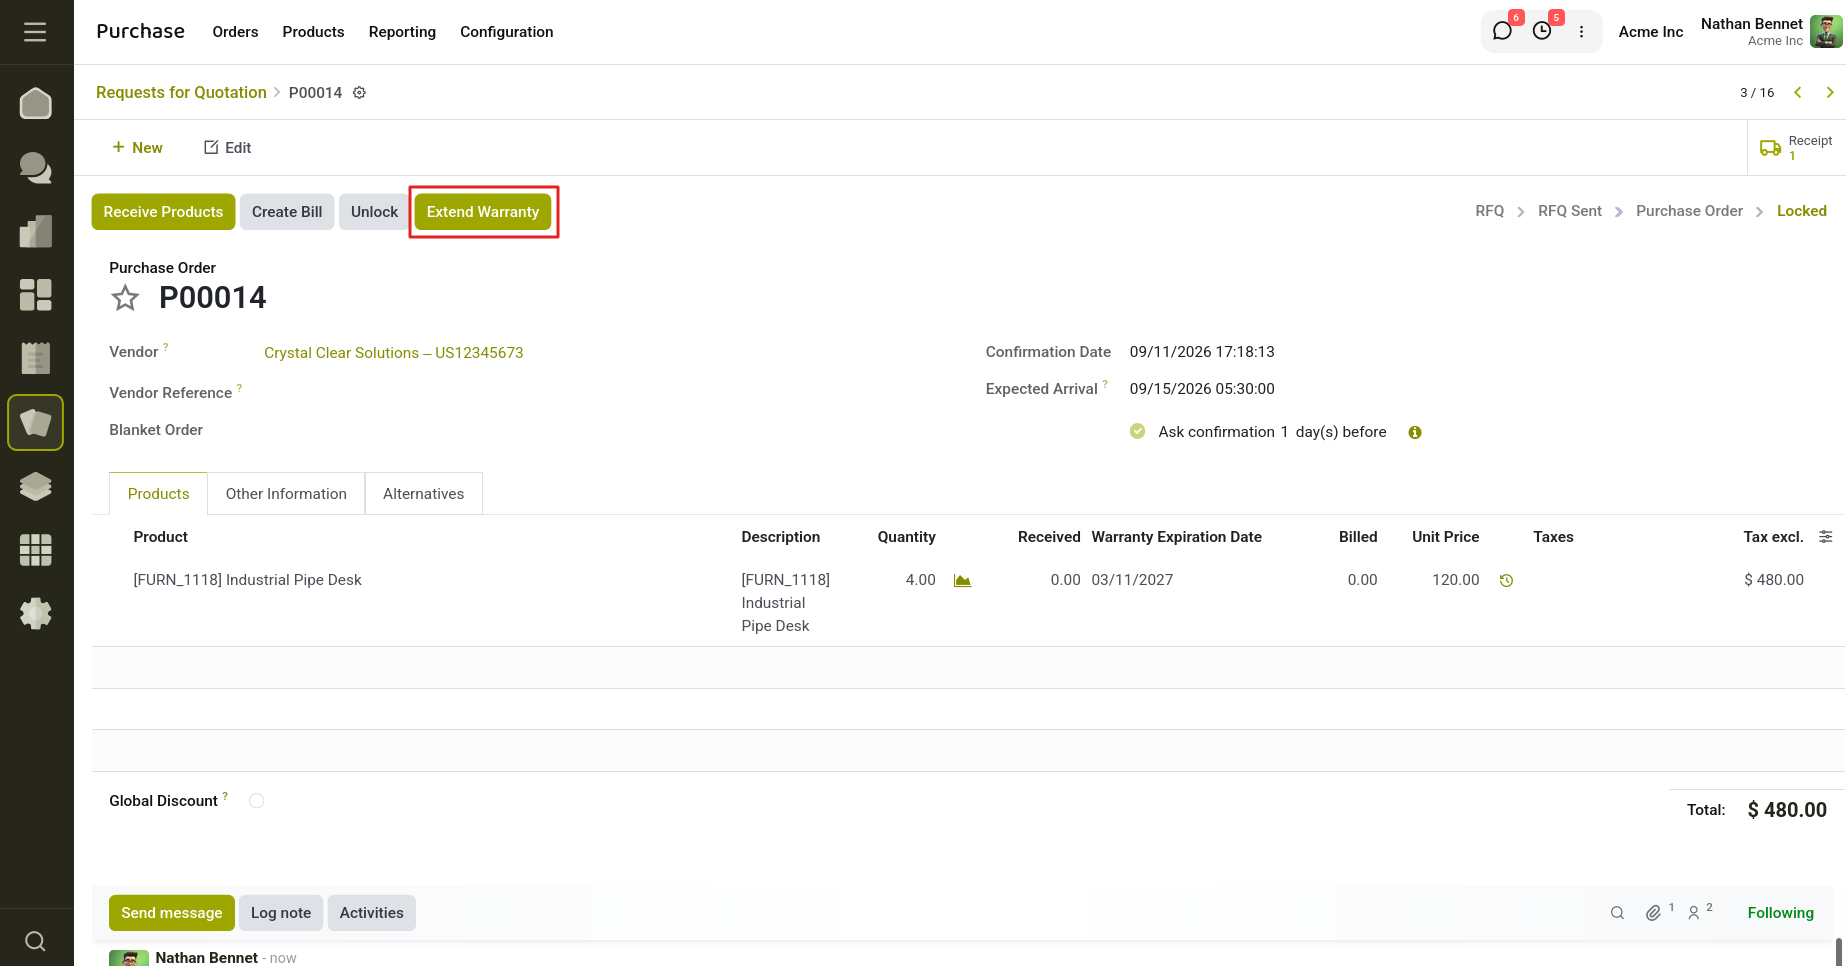
Fig 4.8 — Extend Warranty button on Purchase Order.
- In the Warranty Extension wizard, select the purchase order lines to extend.
- Enter the extension period.
- Choose the extension unit (Days, Months, or Years).
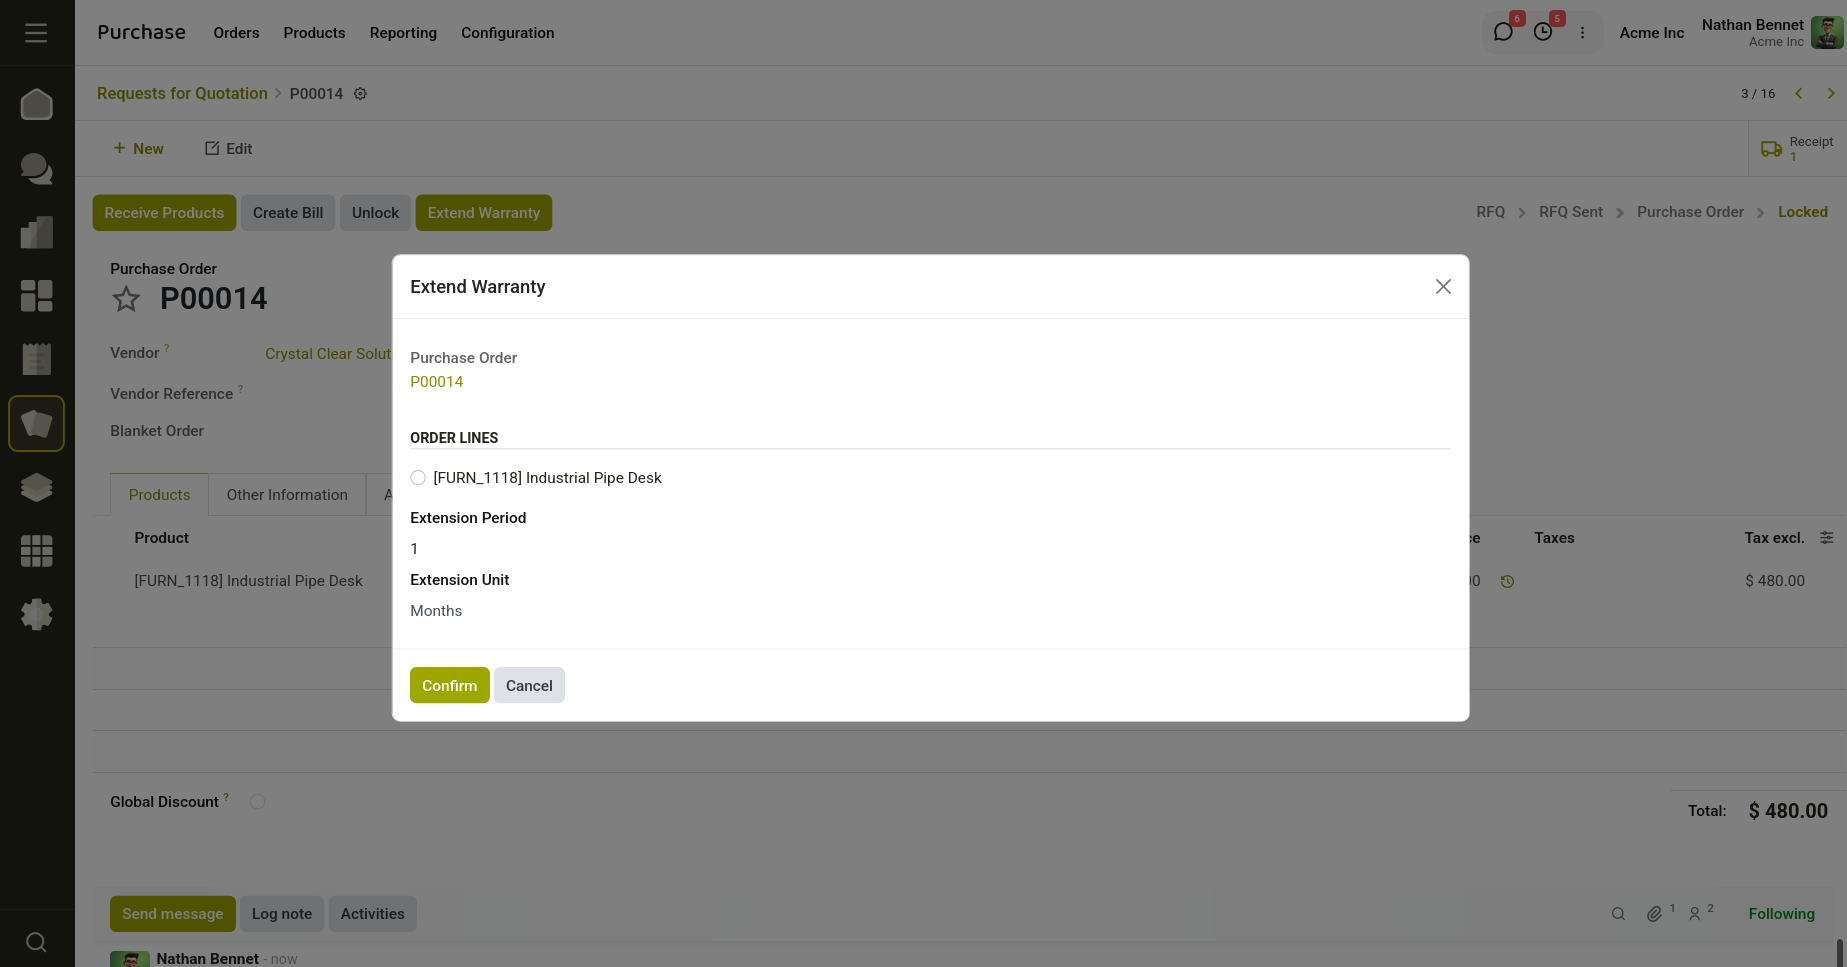
Fig 4.9 — Choose the Extension Period.
- Click Confirm.
The system recalculates the warranty expiration dates and updates the purchase order with the revised warranty information.
5. Vendor Bills & Invoicing
Cyllo builds vendor bills straight from a purchase order, using whichever Bill Control policy — Ordered or Received Quantities — applies to that order's products.
5.1 Bill Control Policy
The Bill Control option on the Invoicing tab of Settings determines the default billing process for every product. Choose Ordered Quantities to bill for the amount on the order as soon as it's confirmed, or Received Quantities to bill only what has actually been delivered. This default can still be overridden per product from its Purchase tab.
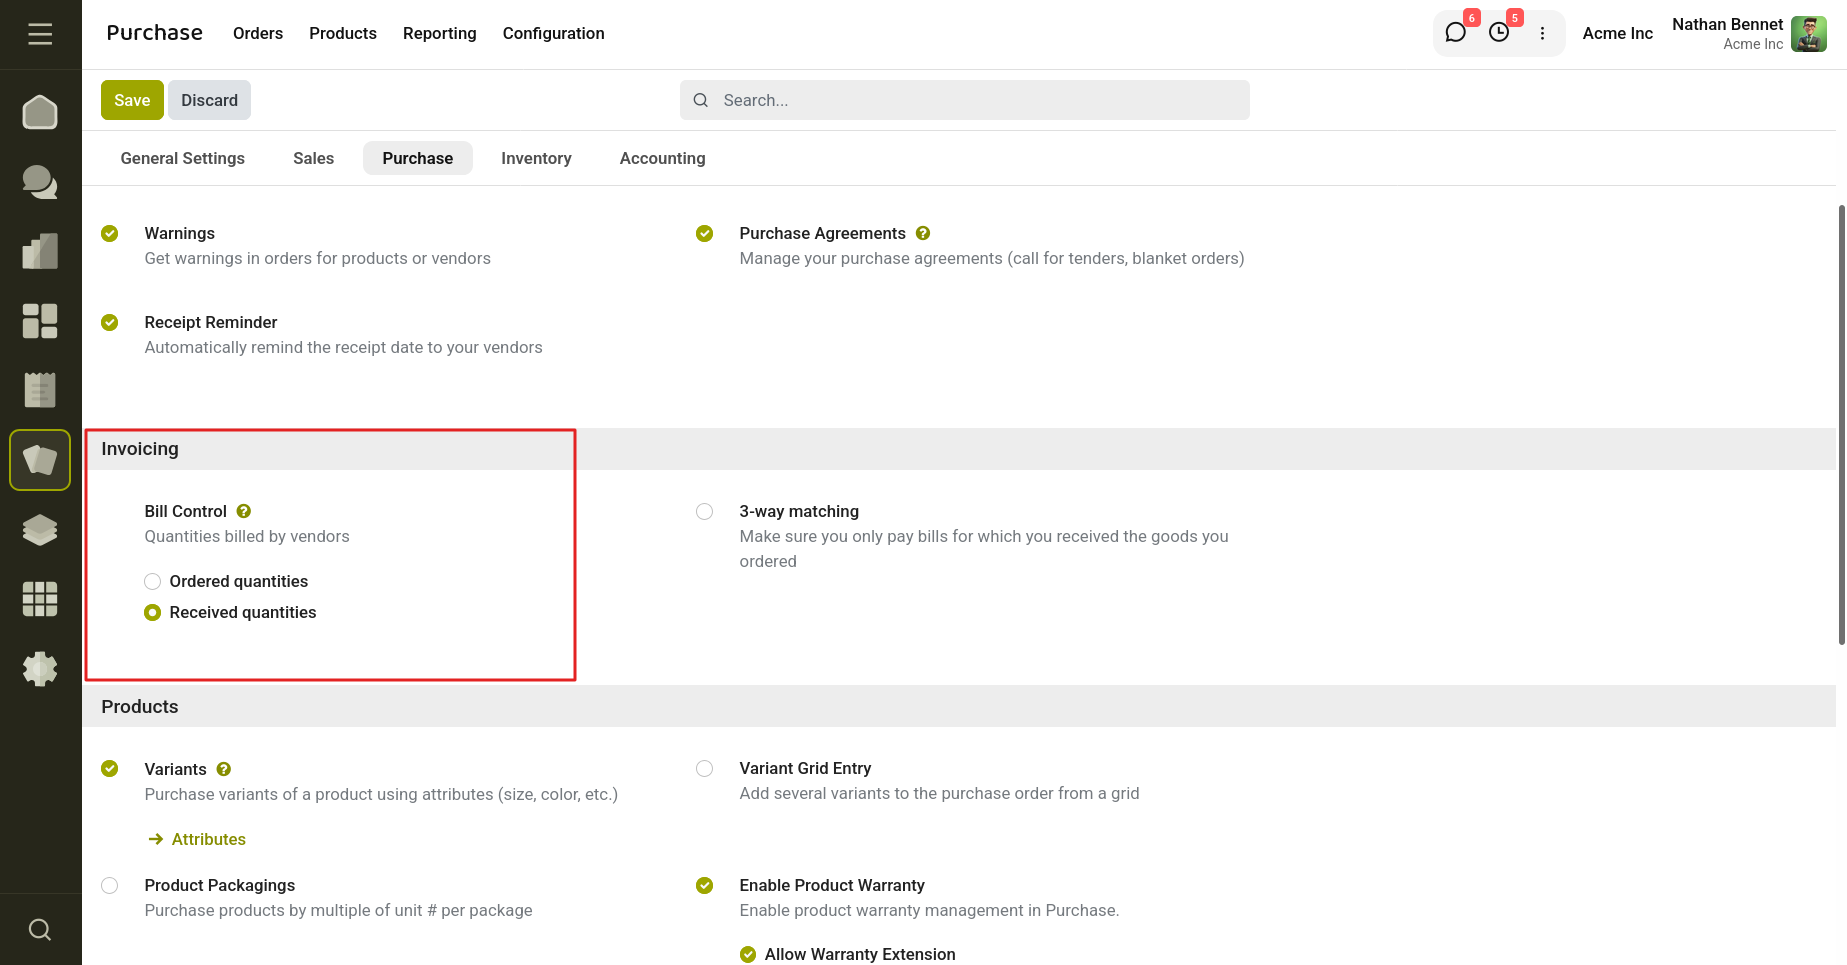
Fig 5.1 — Bill Control policy under Purchase Settings
5.2 Creating a Vendor Bill
Once a purchase order is confirmed, a Create Bill button becomes available.
How to Create a Vendor Bill
- Open the confirmed purchase order and click Create Bill
- Review the draft bill: vendor, bill reference, accounting date, payment reference, and journal
- Set the Bill Date, and check Invoice Lines, Journal Items, and Other Info as needed
- Click Confirm to post the bill and accept payment
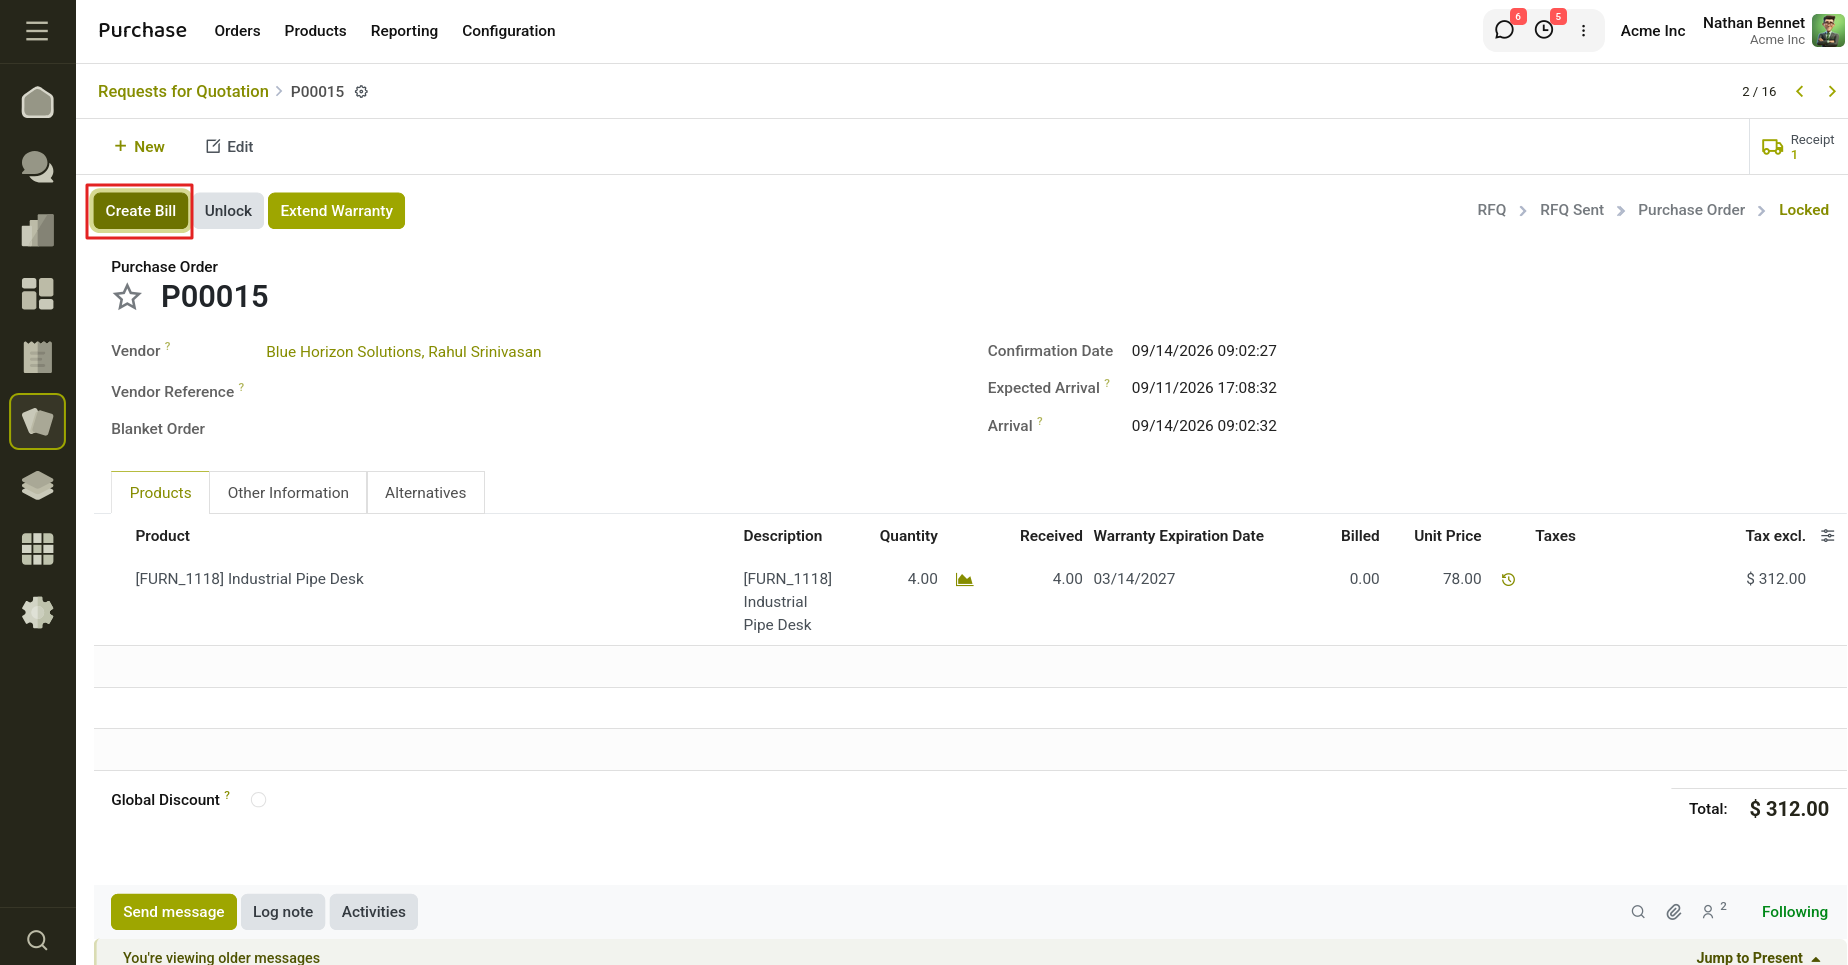
Fig 5.2 — Create Bill button on a confirmed purchase order
6. Purchase Agreements
A purchase agreement records the terms both sides commit to before a purchase order is ever raised. Cyllo supports two kinds of agreement: Call for Tenders, for comparing vendors on a one-off basis, and Blanket Orders, for a standing arrangement with a regular supplier.
6.1 Enabling Purchase Agreements
Purchase Agreements is an optional feature that must be switched on before Blanket Orders and Call for Tenders appear in the Orders menu.
Enabling the Feature
- Go to Purchase → Configuration → Settings
- Under Orders, enable Purchase Agreements
- Save settings — Blanket Orders now appears under the Orders menu
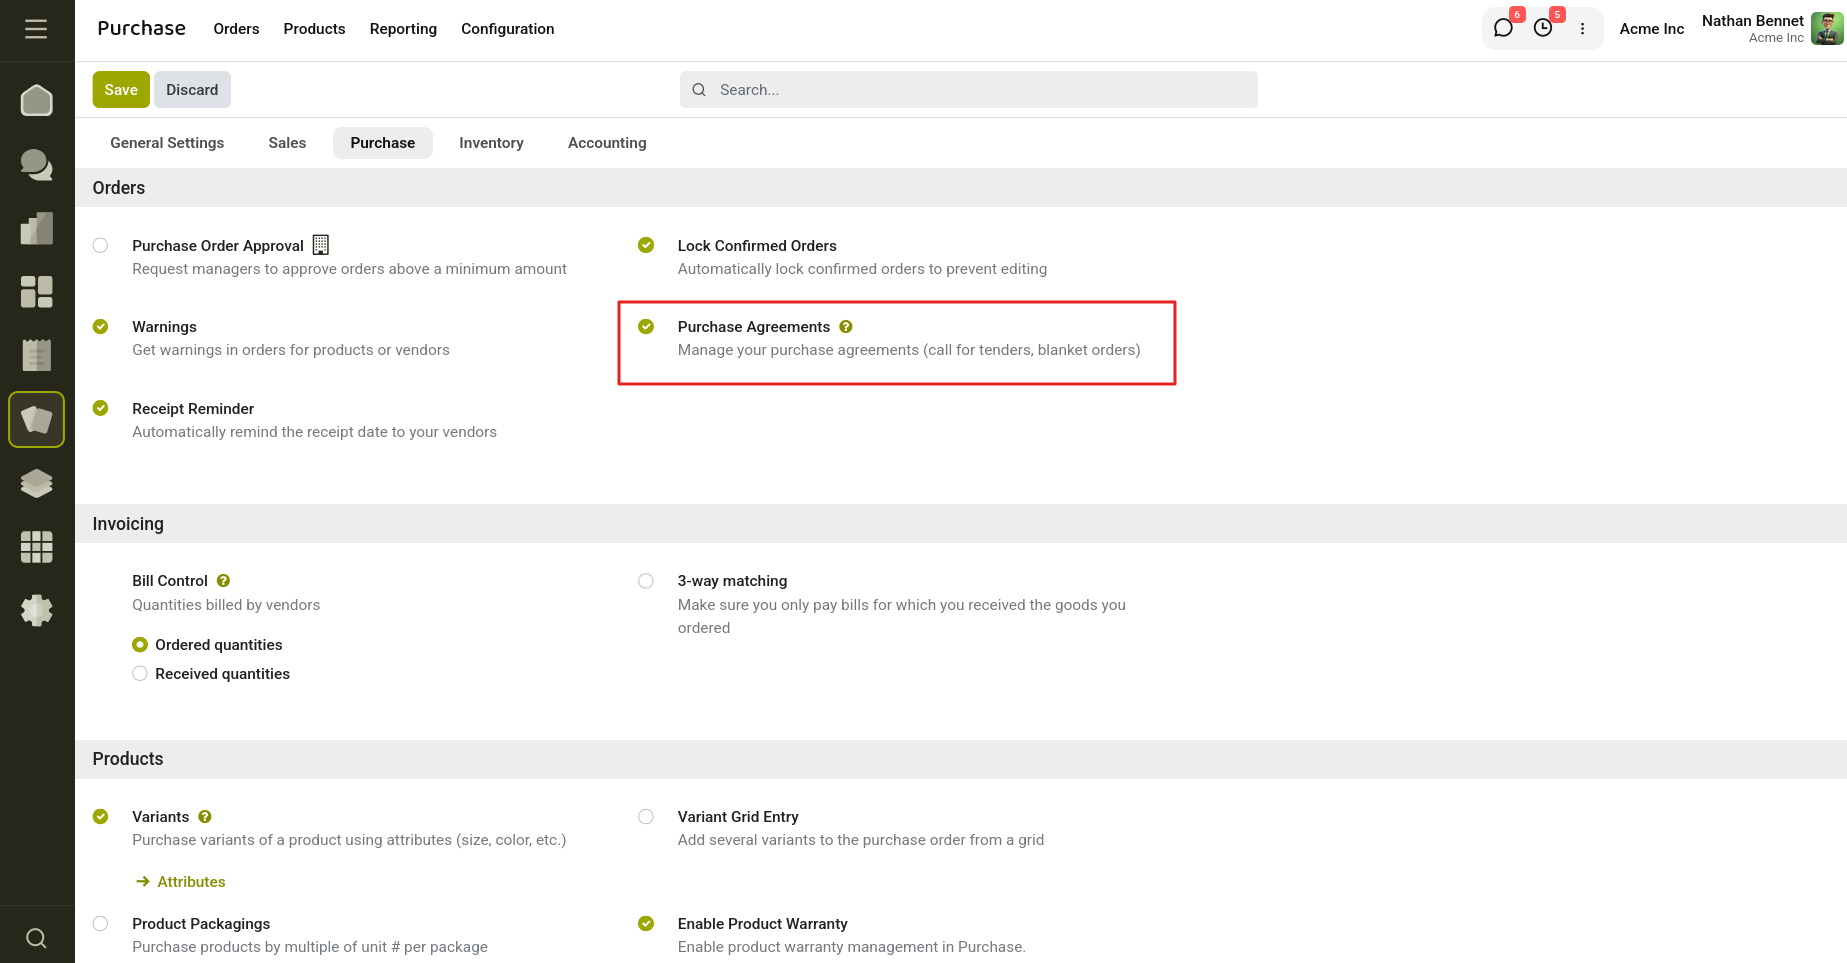
Fig 6.1 — Enabling Purchase Agreements in Settings
6.2 Call for Tender
A call for tender is simply the Alternatives workflow described in the RFQ section — creating competing quotation lines from different vendors and comparing them before you commit.
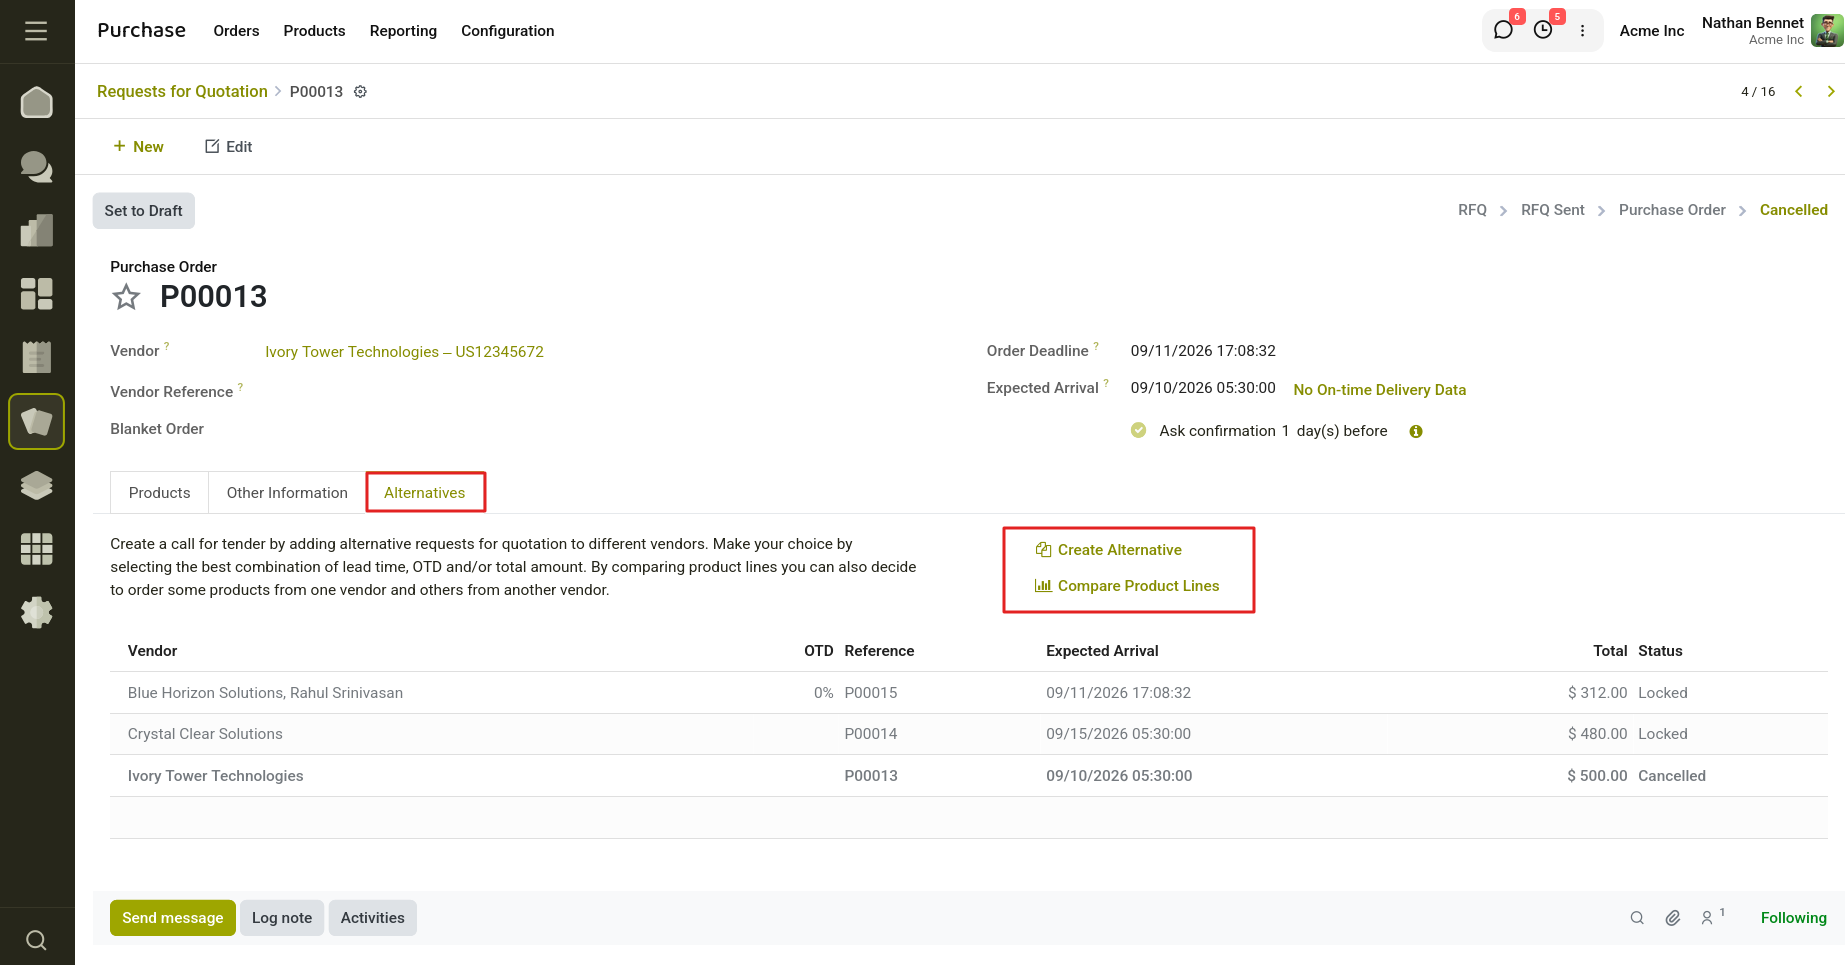
Fig 6.2 — Call for Tender via the Alternatives tab
6.3 Blanket Orders
Blanket orders are ideal for a supplier you buy from regularly — they let you lock in a personalised price list that every new RFQ against that agreement will honour automatically.
Creating a Blanket Order
- Go to Purchase → Orders → Blanket Orders → New
- Select the Purchase Representative, Agreement Type, and Vendor
- Set the Agreement Deadline, Ordering Date, Delivery Date, Source Document, and Company
- Add product lines with Custom Description, Quantity, Ordered quantity, UoM, and Unit Price
- Add any Terms and Conditions, then click Confirm — the status changes to Ongoing
- When the Agreement Deadline passes, the status automatically changes to Closed
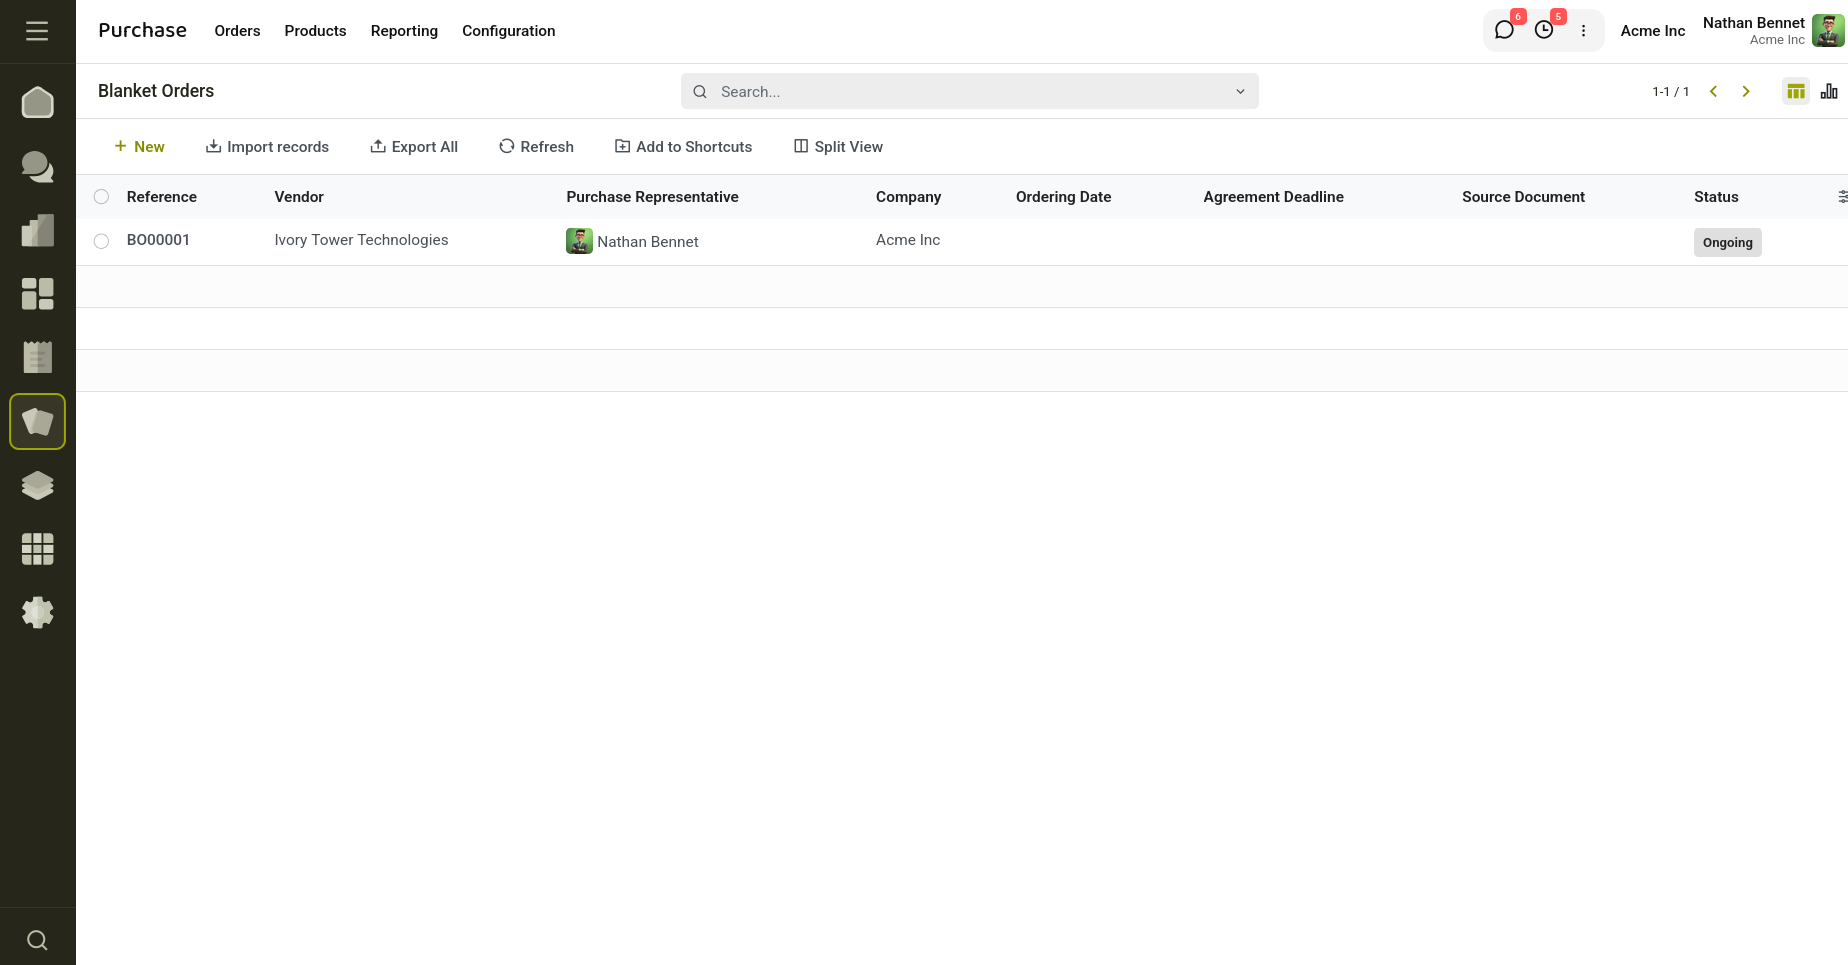
Fig 6.3 — Blanket Orders list view
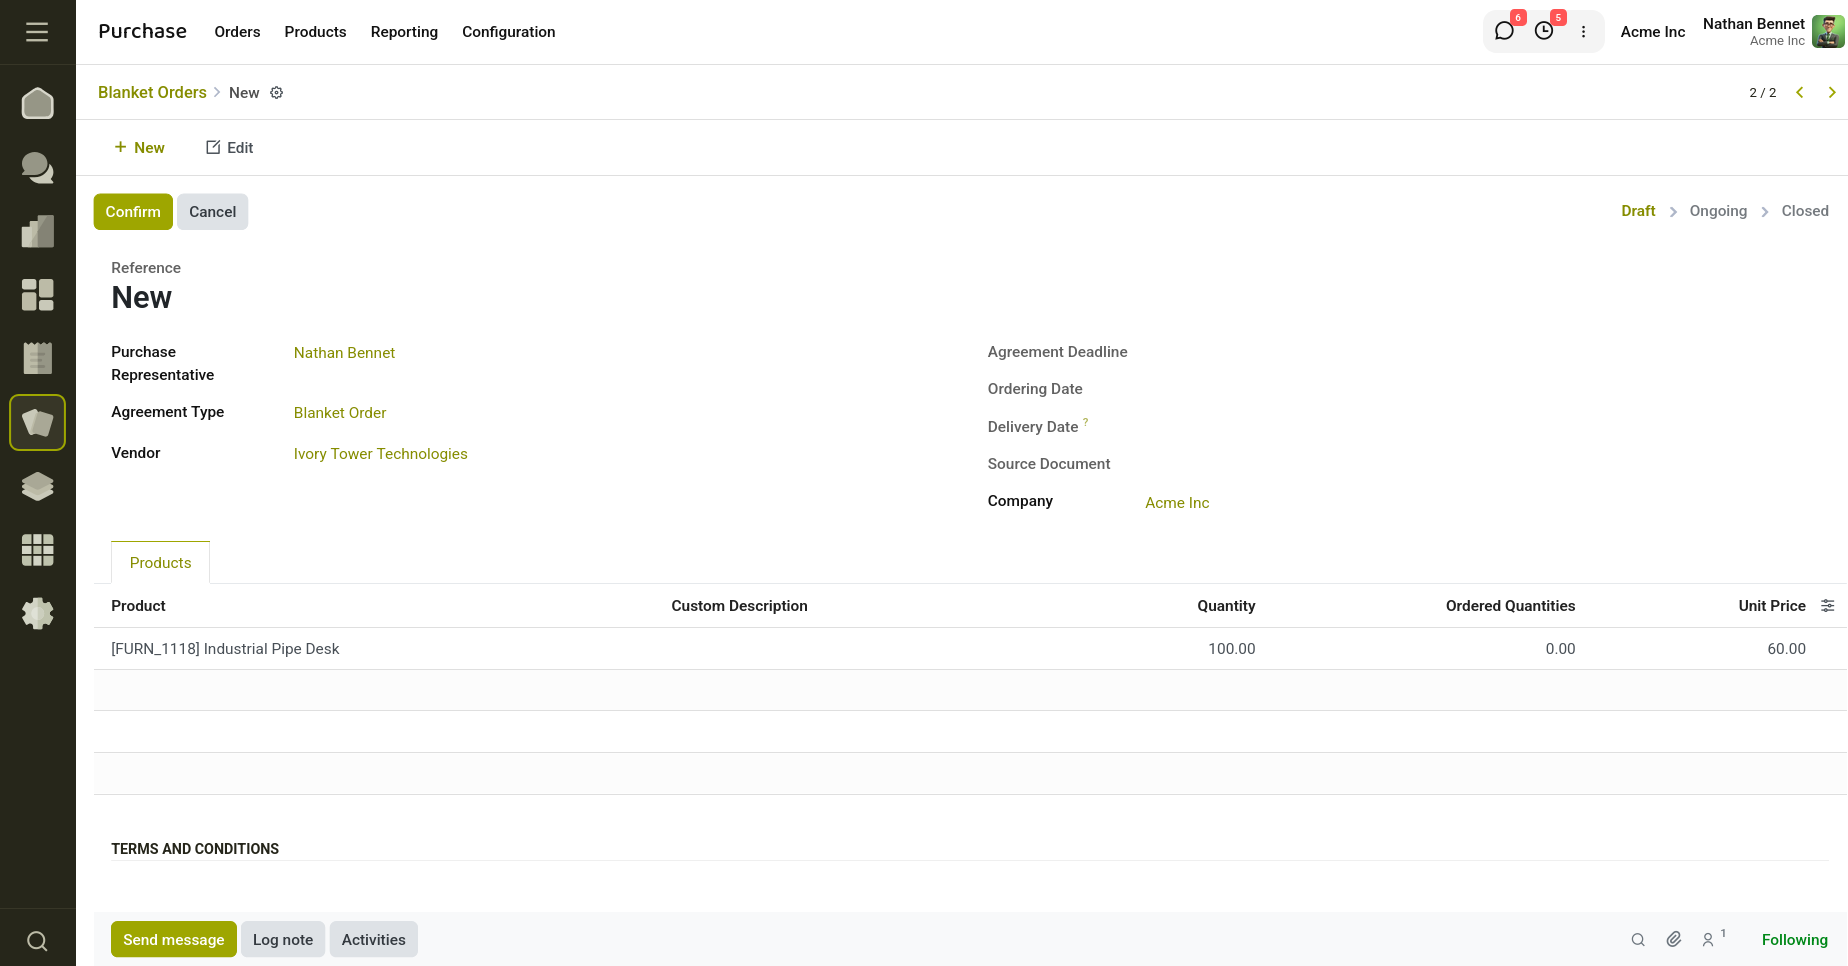
Fig 6.4 — Draft blanket order before confirmation
6.4 Purchasing Against an Agreement
When you create a new RFQ and link it to a Blanket Order, the vendor and agreed pricing populate automatically, so buyers don't need to re-enter negotiated terms every time.
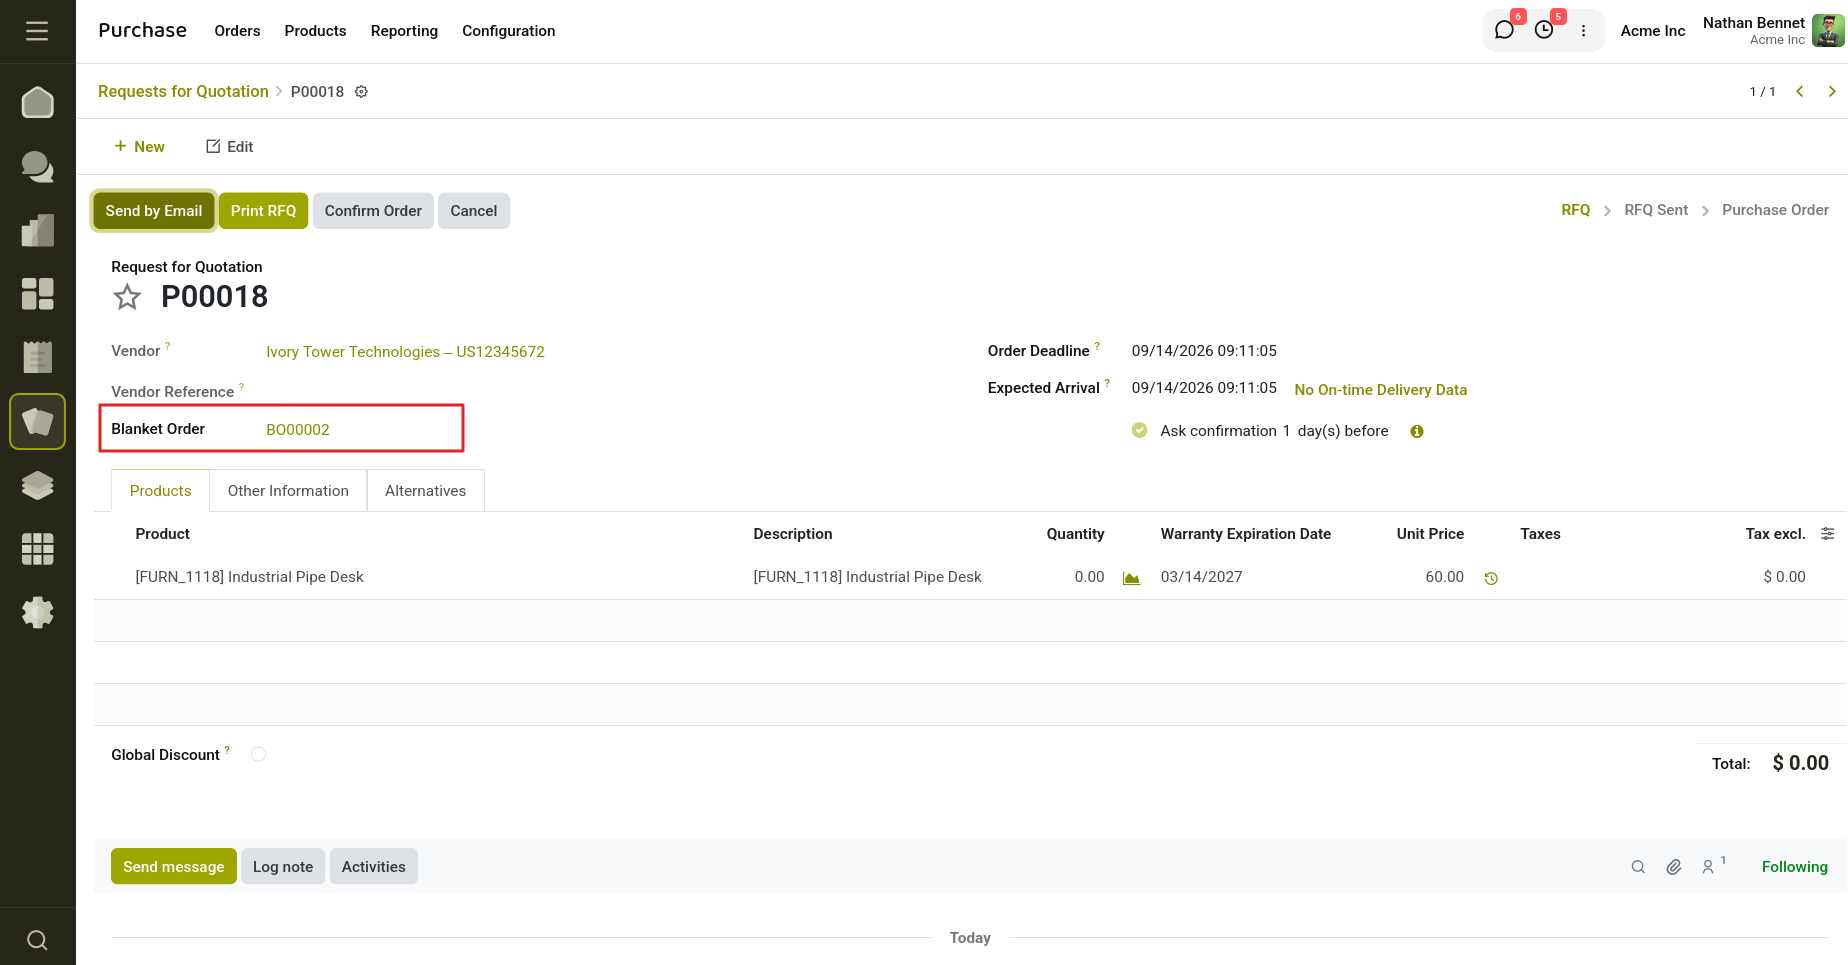
Fig 6.5 — Purchase order auto-populated from a blanket order
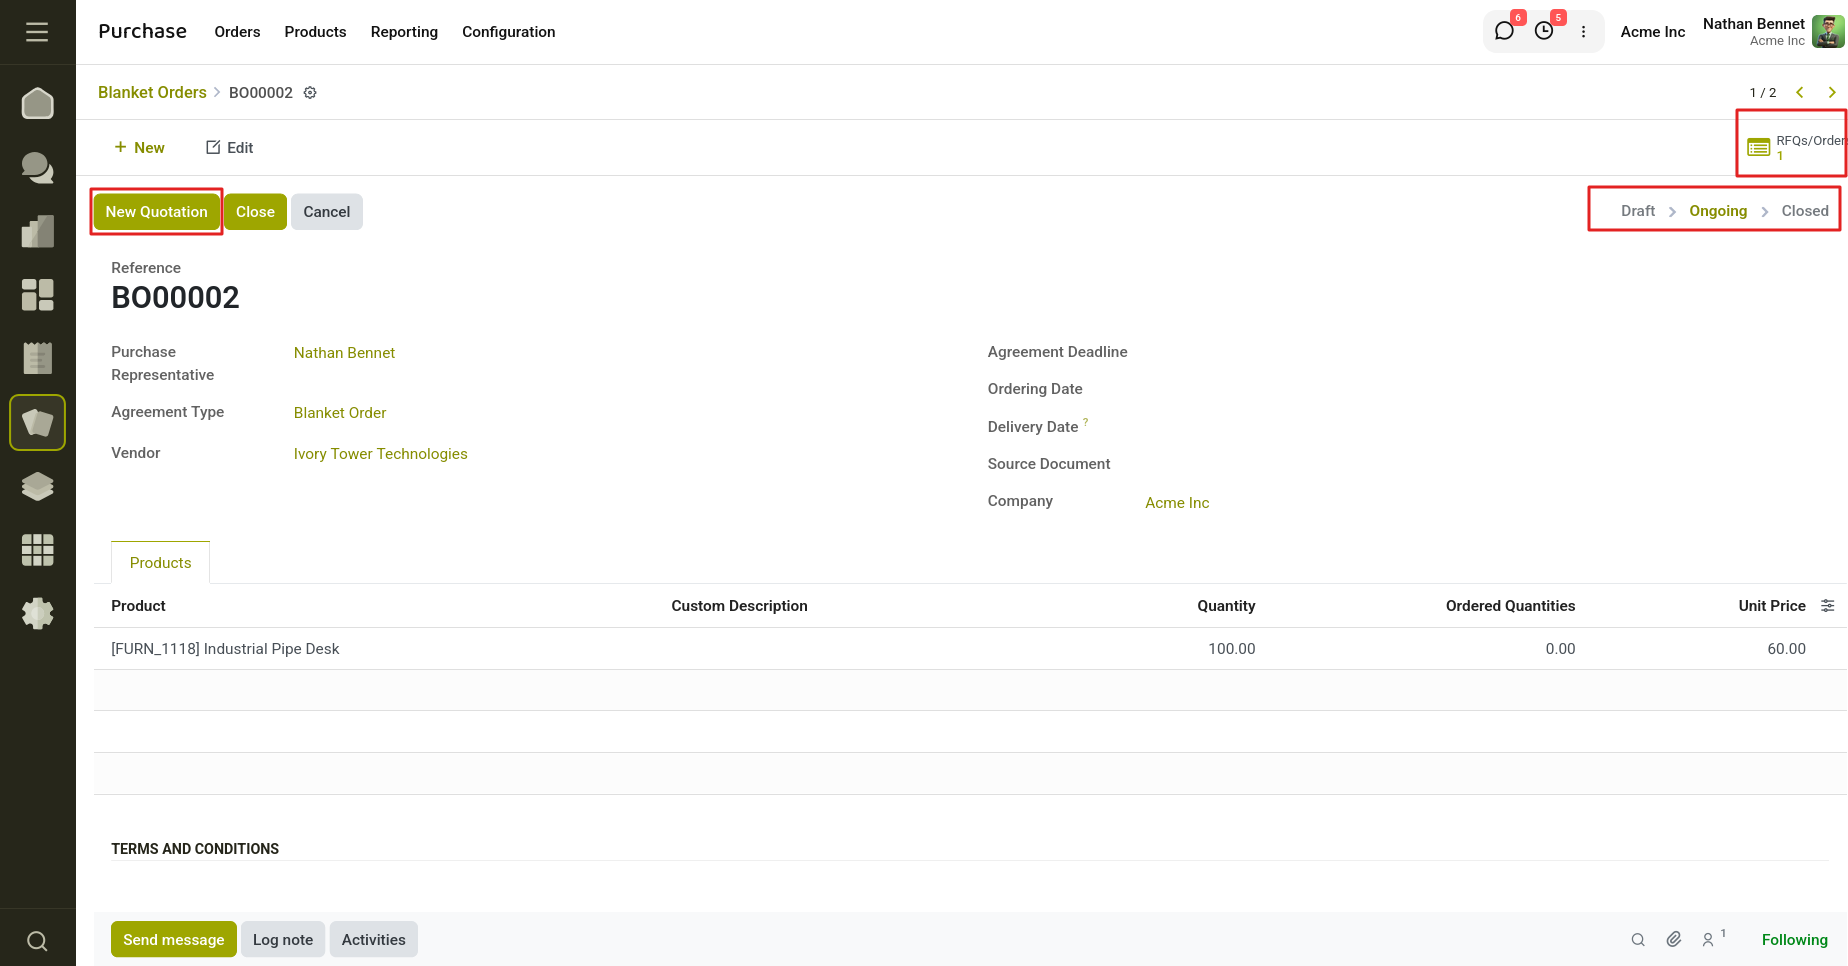
Fig 6.6 — Confirmed blanket order, status Ongoing
7. Advanced Purchasing Features
Beyond the core order-to-bill flow, Cyllo's Purchase module includes a set of features that automate follow-ups, speed up data entry, and support fulfilment models that skip your own warehouse entirely.
7.1 Drop Shipping
With dropshipping, goods travel directly from your vendor to your customer, so you never have to stock the item yourself.
Setting Up Dropshipping
- Go to Purchase → Configuration → Settings and enable Dropshipping under Logistics
- On the product form, open the Inventory tab and tick Dropship under Routes
- Create a sale order for the product and click Confirm — Cyllo automatically raises a purchase order to the vendor
- Open the Dropship smart button on that purchase order to review the Dropship Validation, then click Validate
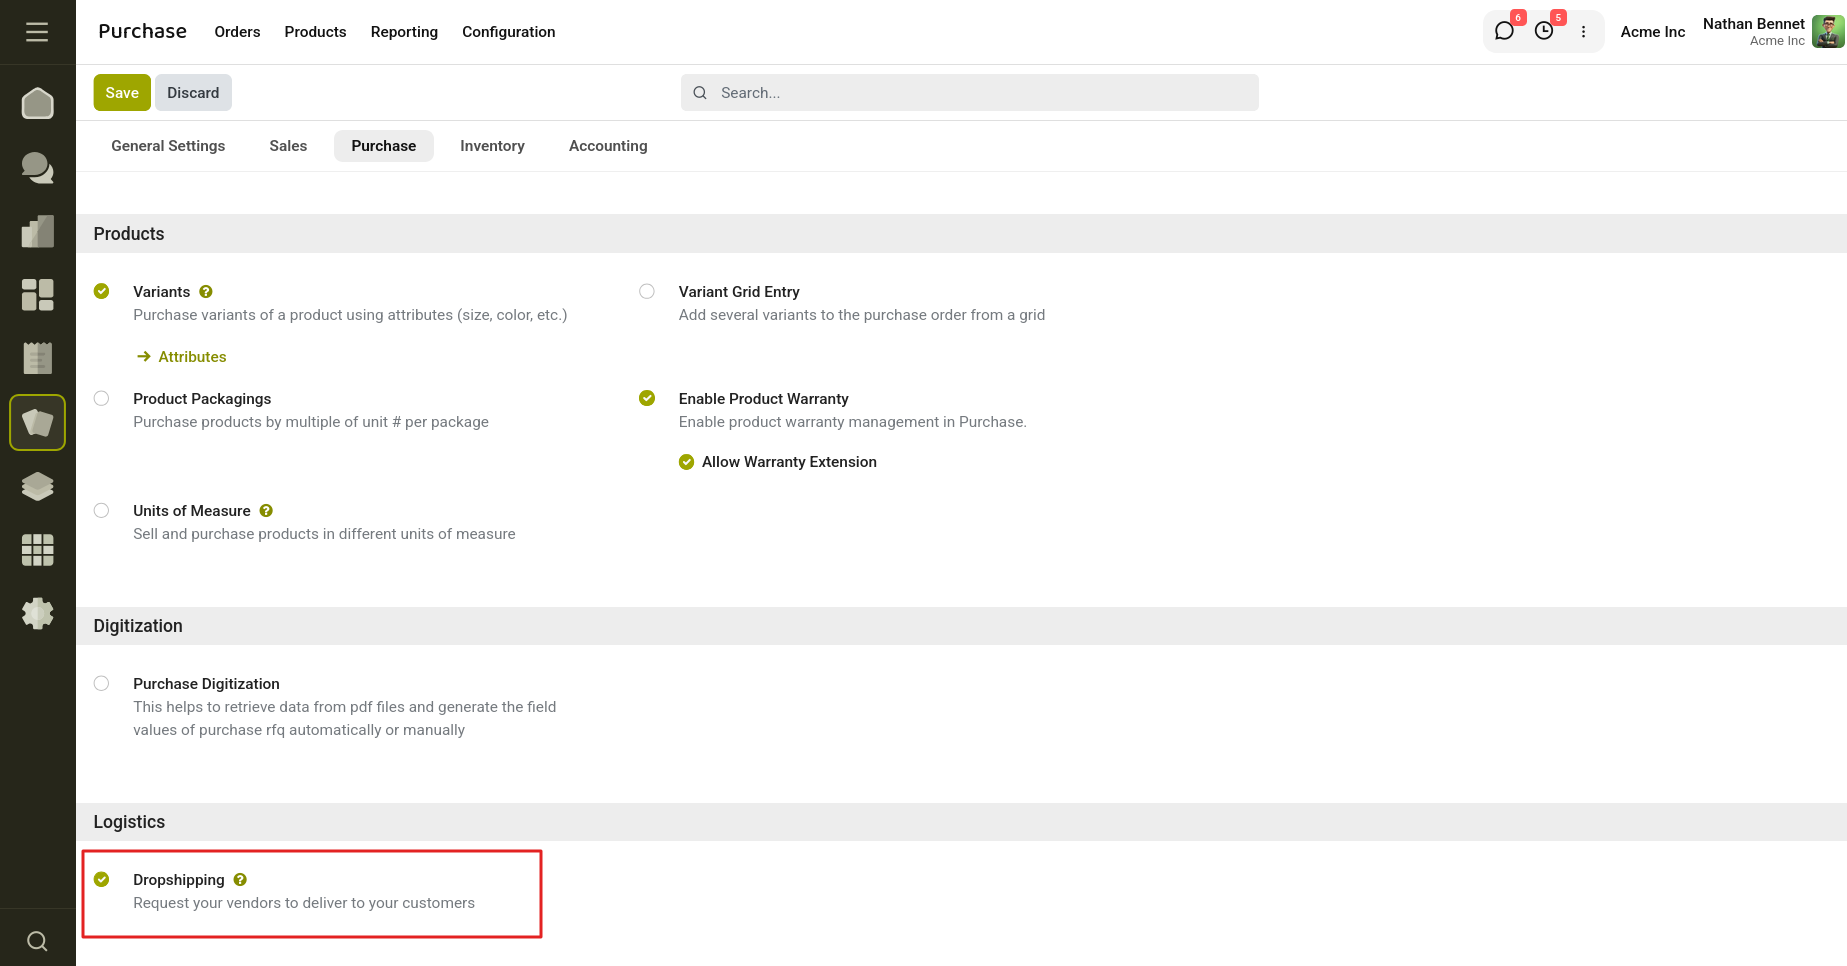
Fig 7.1 — Enabling Dropshipping in Settings
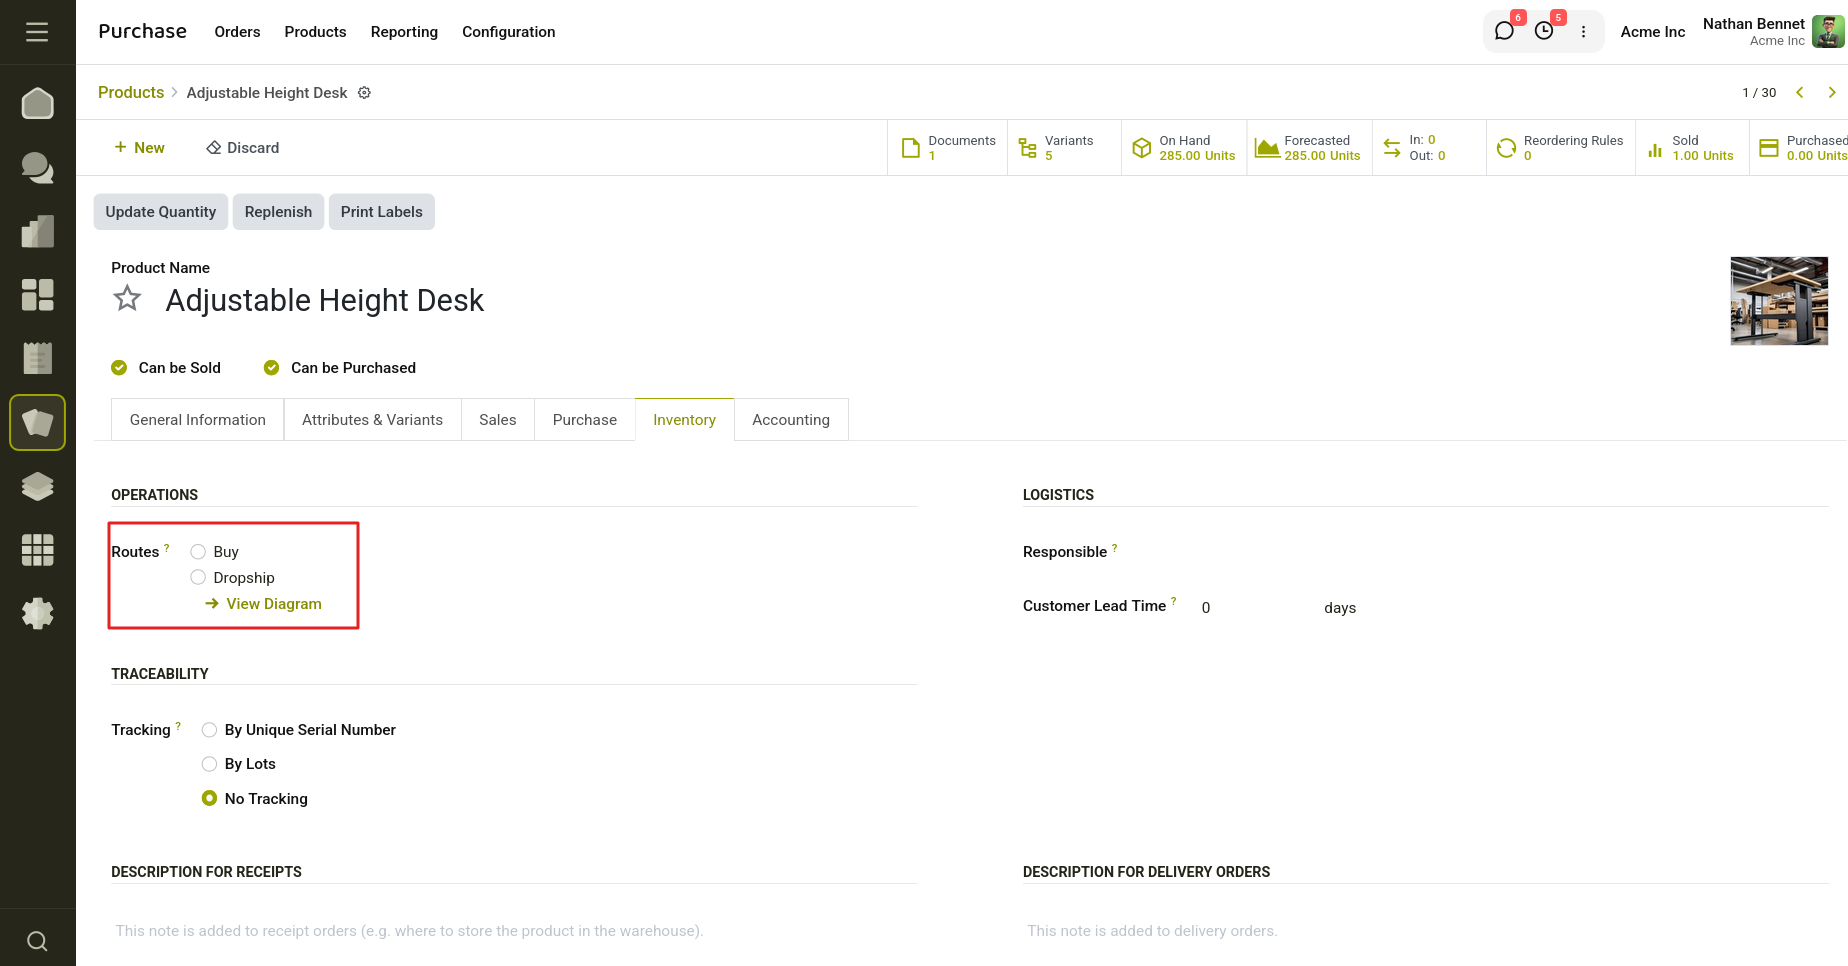
Fig 7.2 — Dropship route enabled on a product
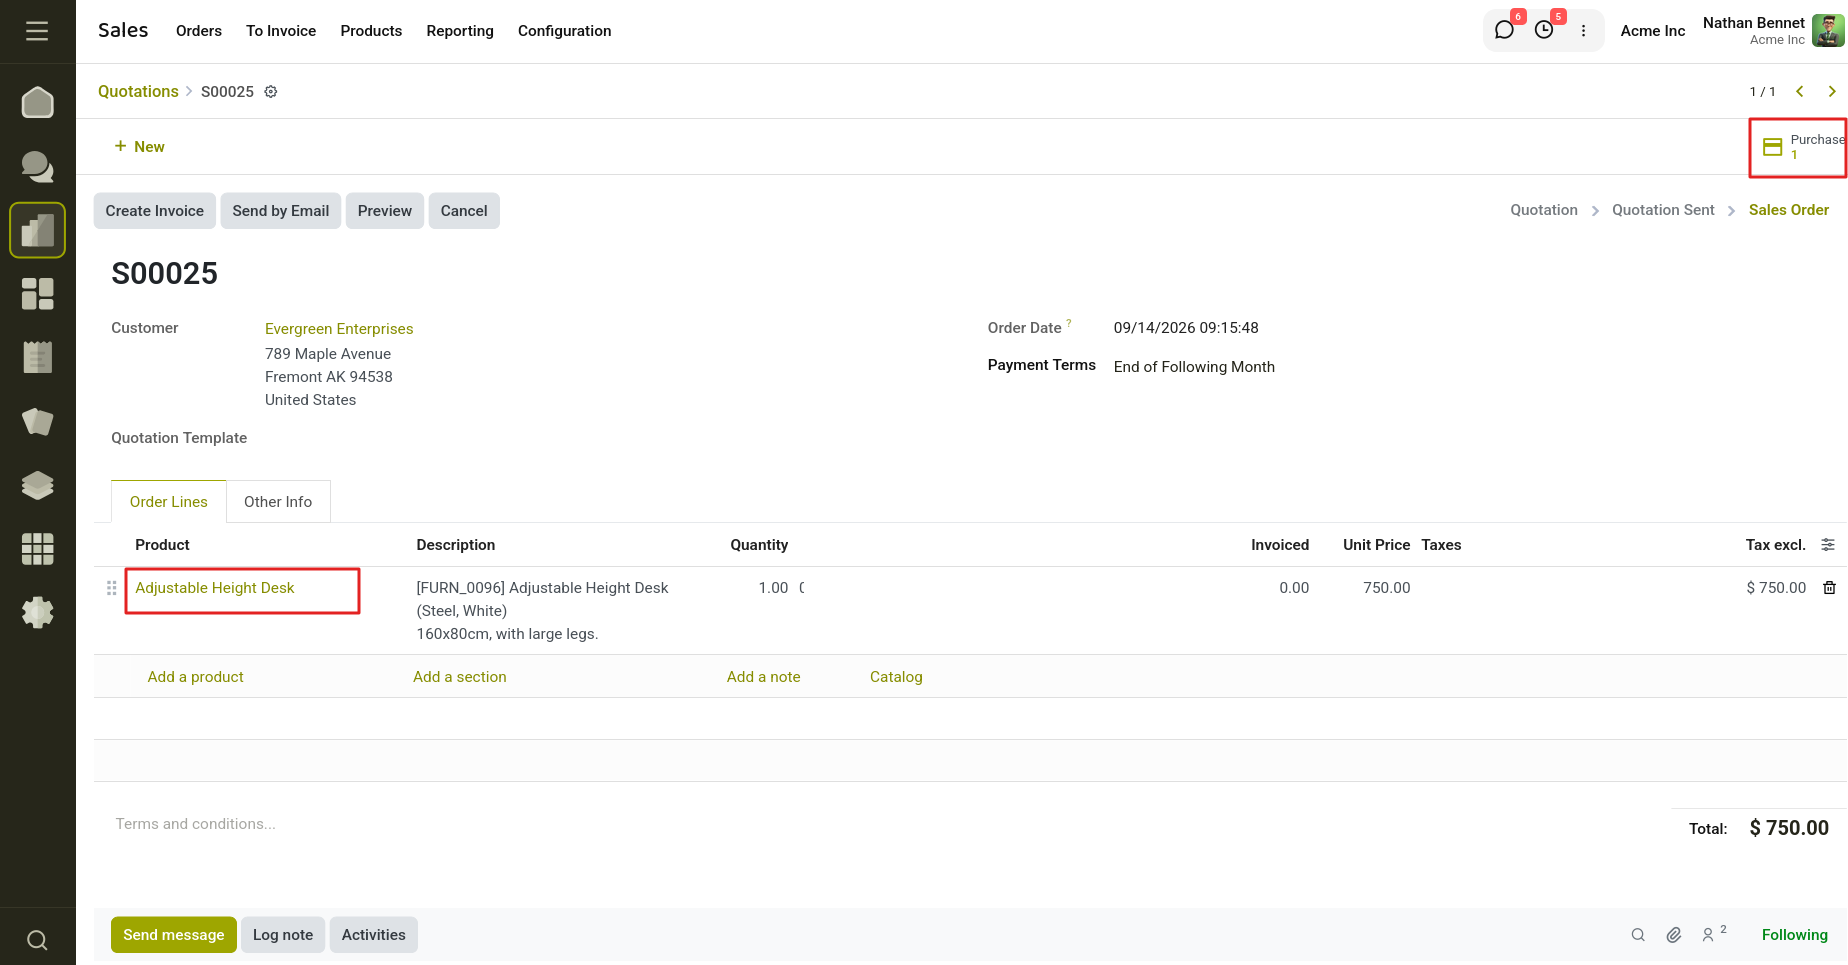
Fig 7.3 — Sale order for a dropshipped product
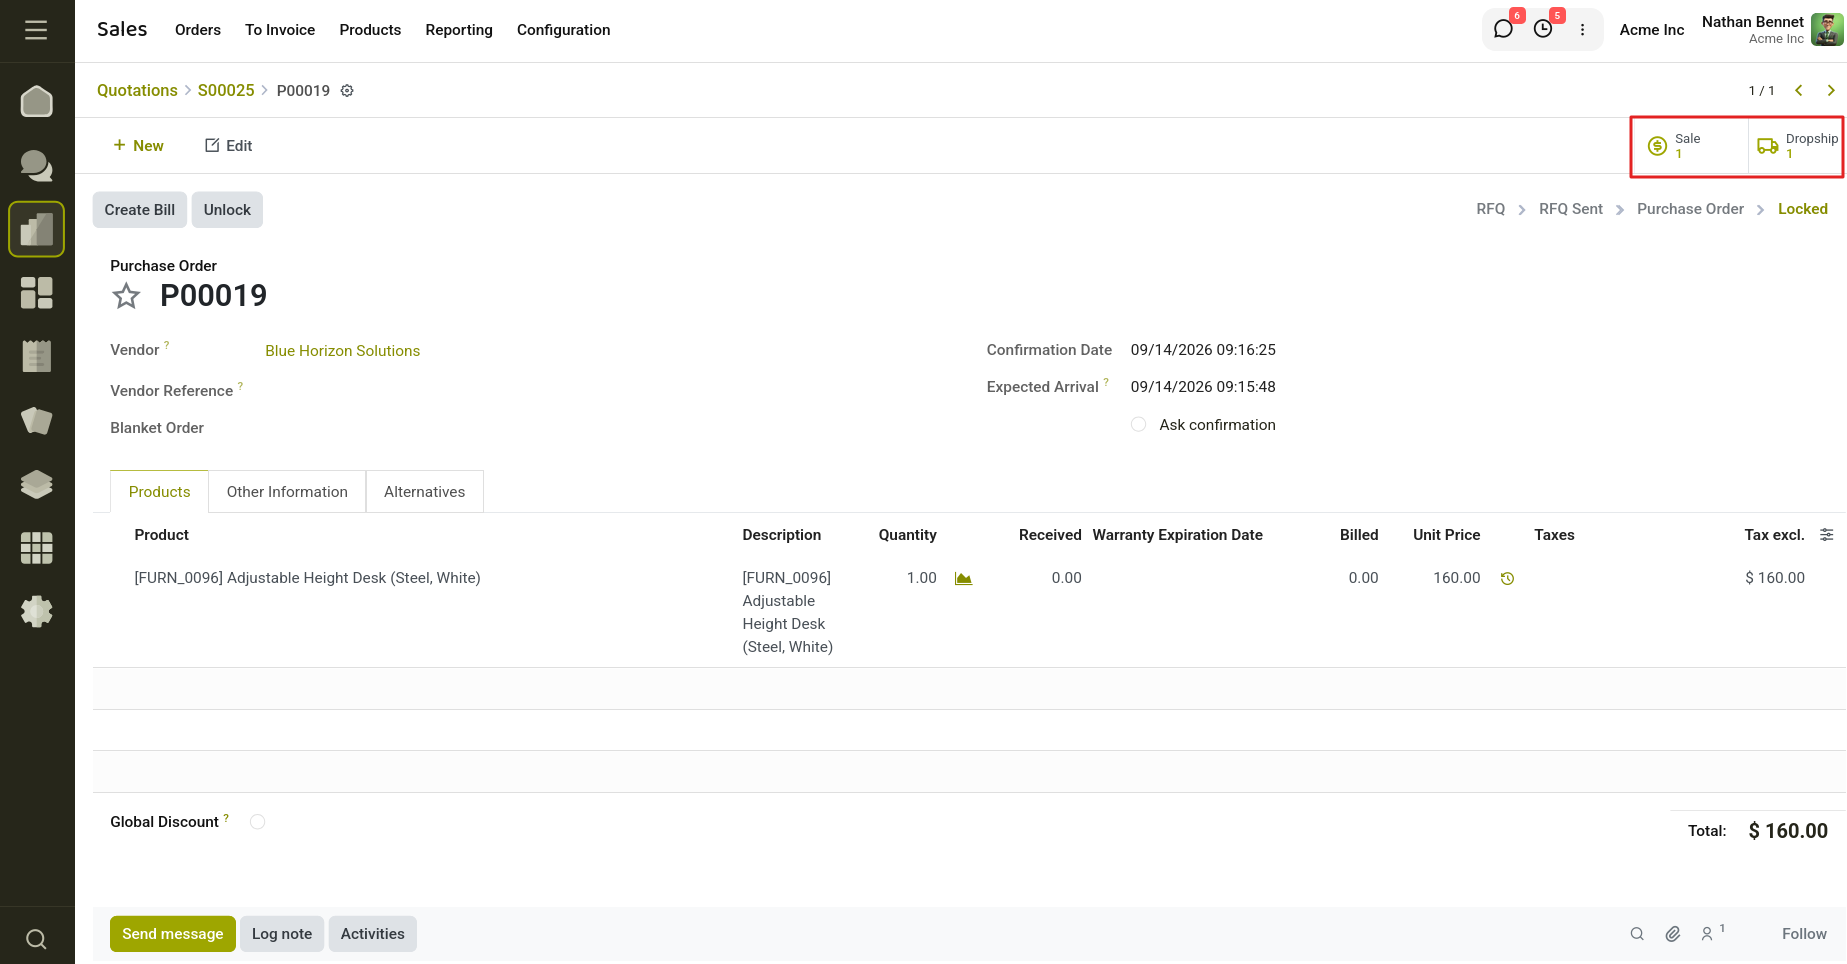
Fig 7.4 — Purchase order auto-generated for the dropship
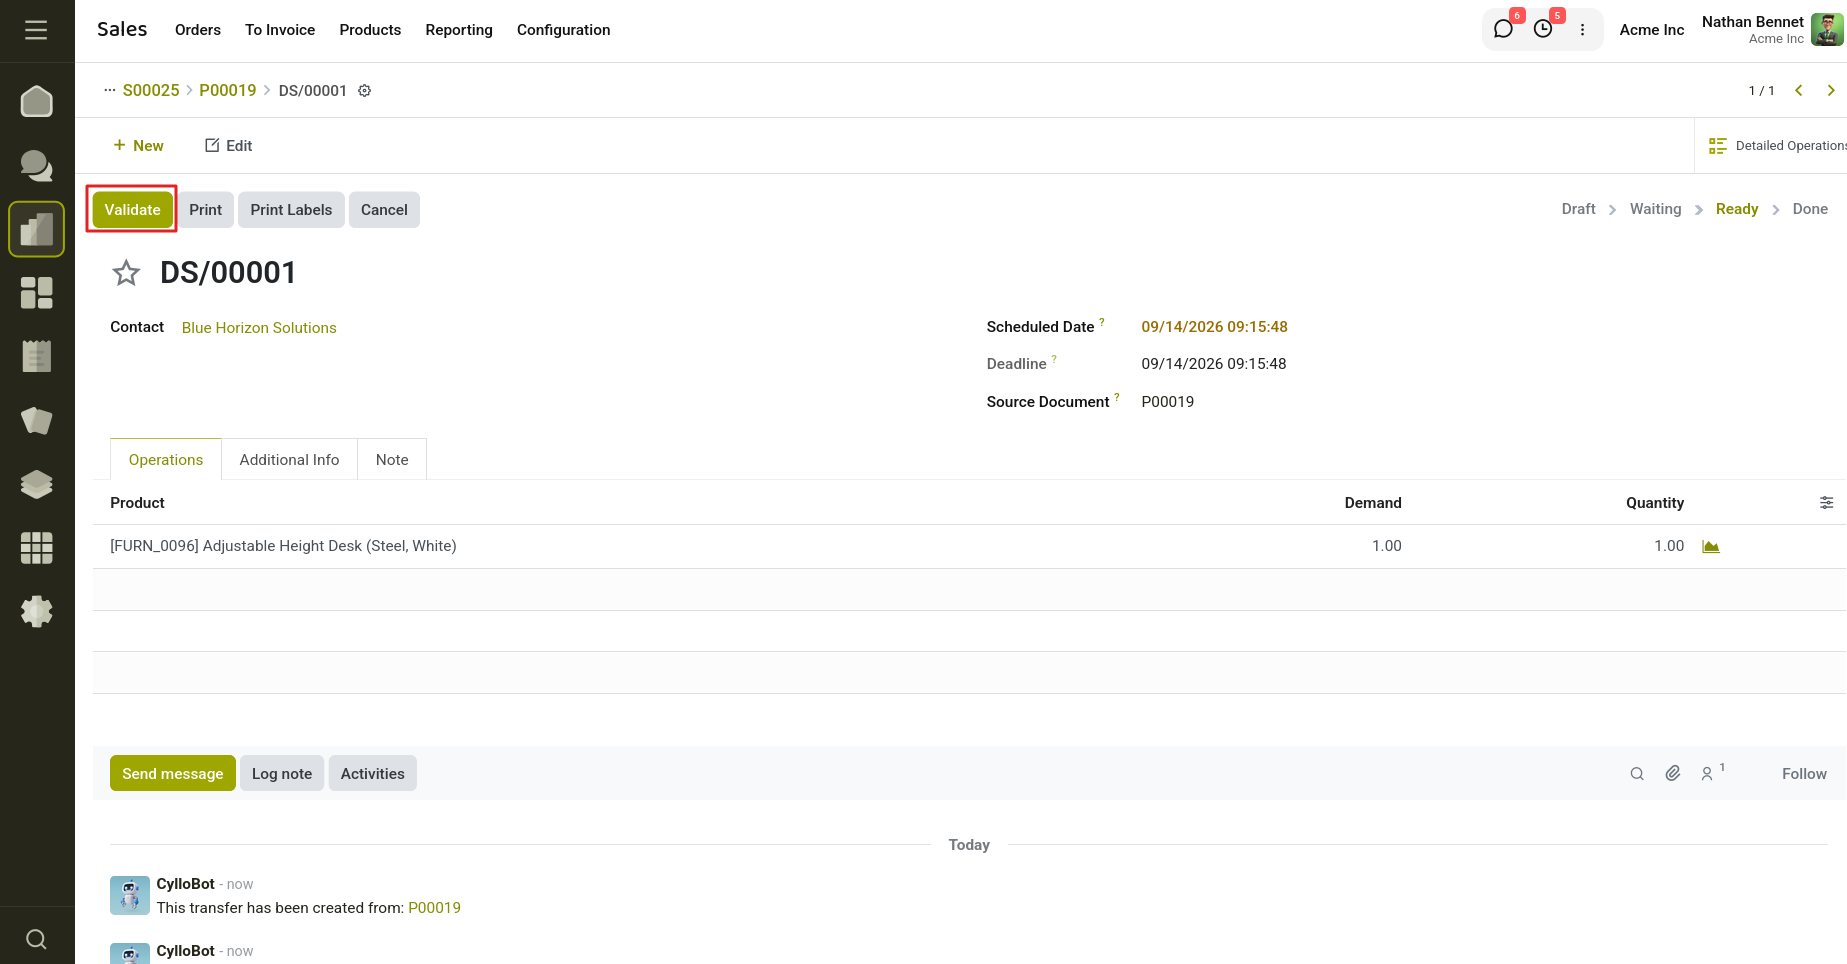
Fig 7.5 — Validating the dropship delivery
7.2 Receipt Reminder
A receipt reminder automatically emails the vendor ahead of the expected delivery date, asking them to confirm it will arrive on time — a simple way to catch delays before they become a problem.
Setting Up Receipt Reminders
- Configure an Outgoing Email Server in Settings
- Enable Receipt Reminder under Purchase → Configuration → Settings → Orders
- On the vendor's form, set Receipt Reminder and the number of days before delivery to send it
- Create an RFQ as usual — the Ask Confirmation field is now pre-filled from the vendor's setting
- Cyllo emails the vendor automatically ahead of the expected arrival date
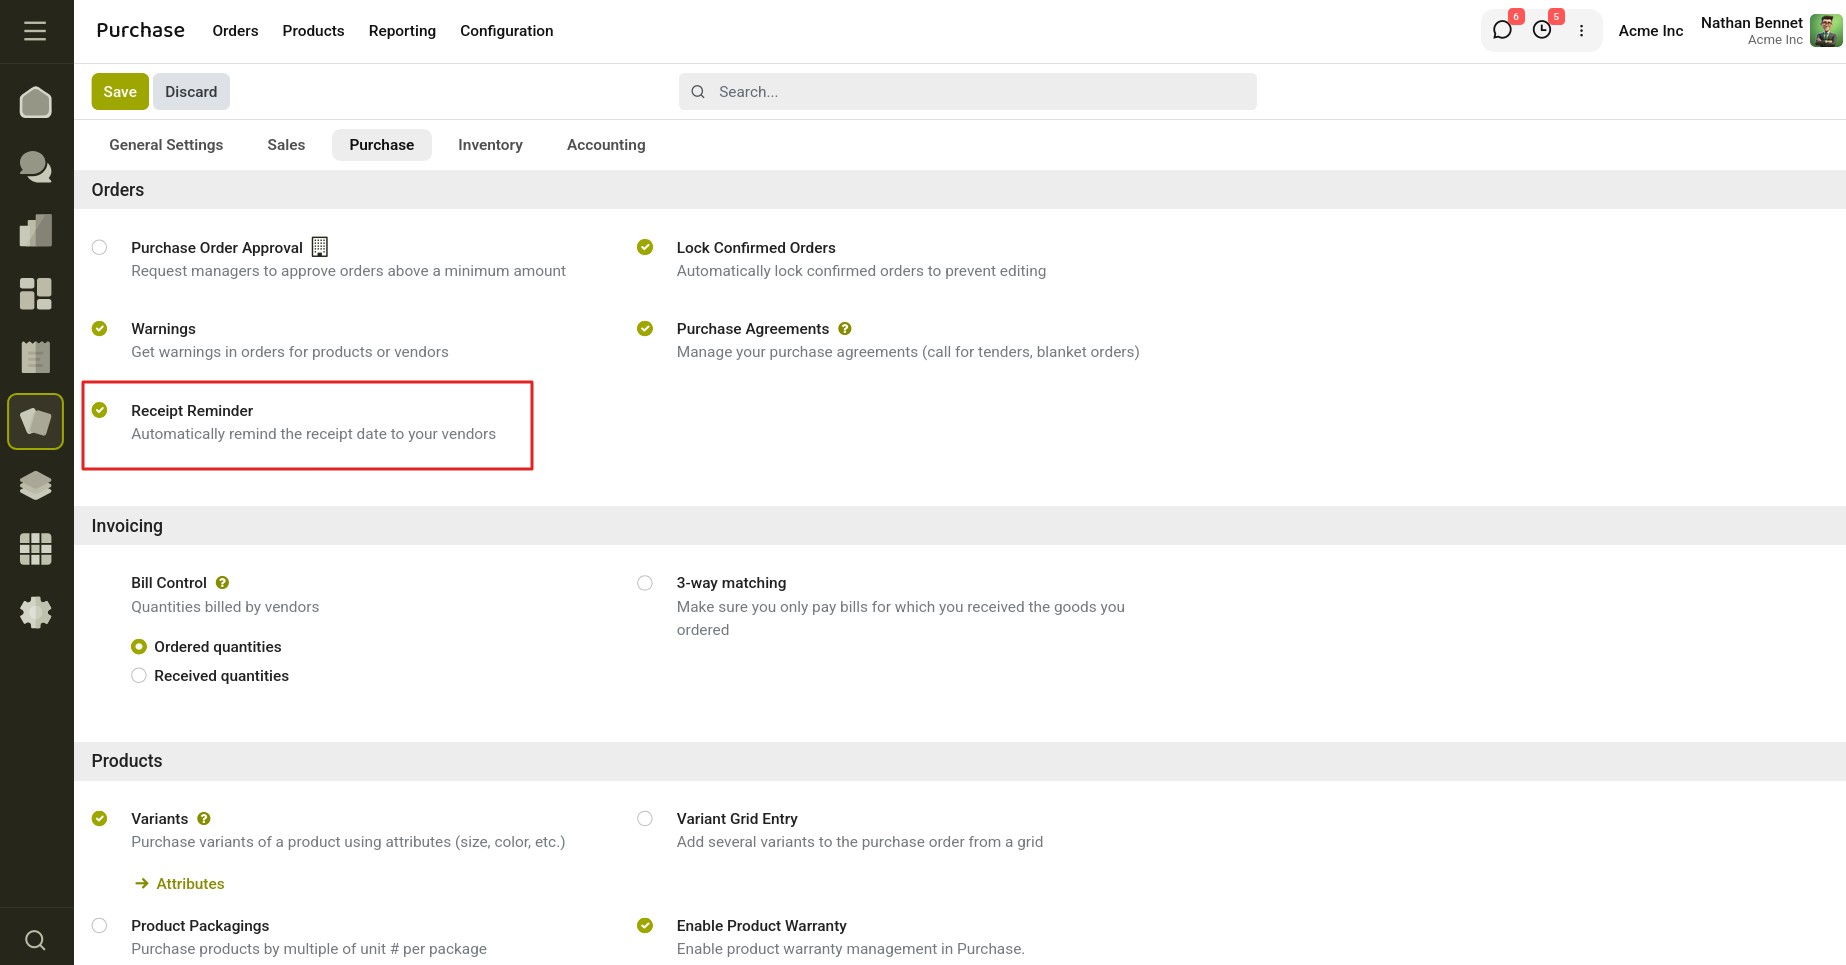
Fig 7.6 — Enabling Receipt Reminder in Settings
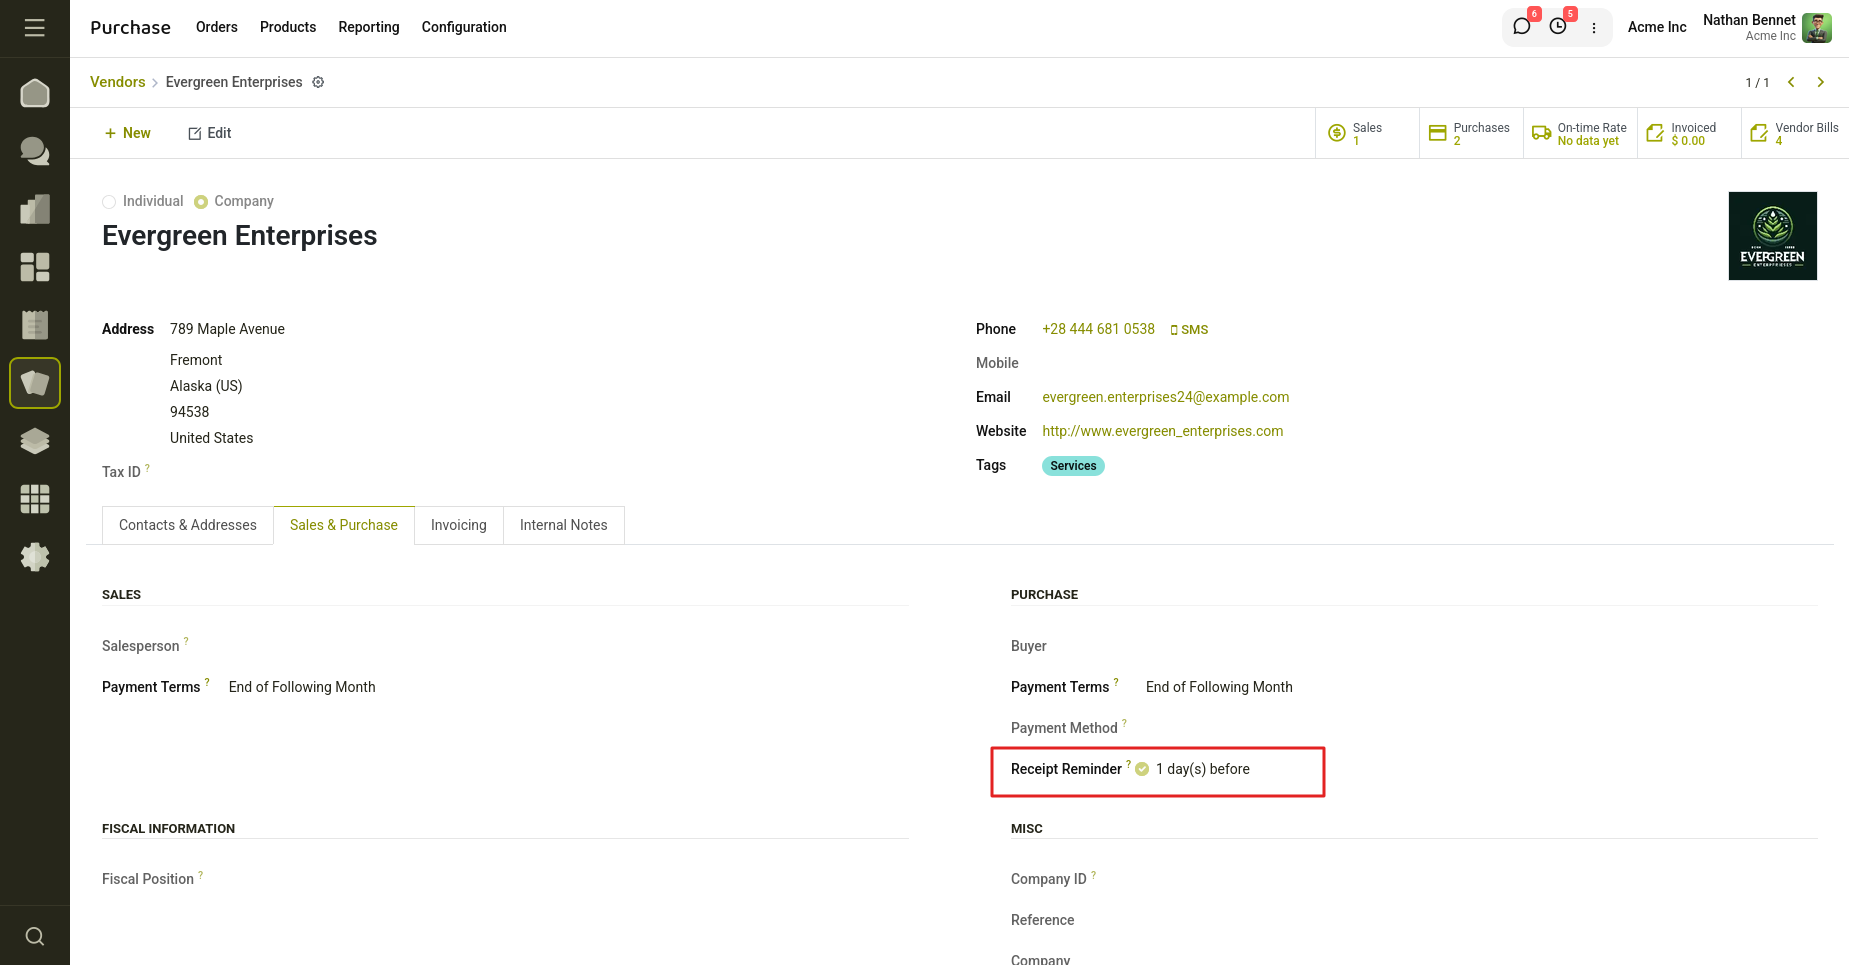
Fig 7.7 — Receipt Reminder configured on a vendor record
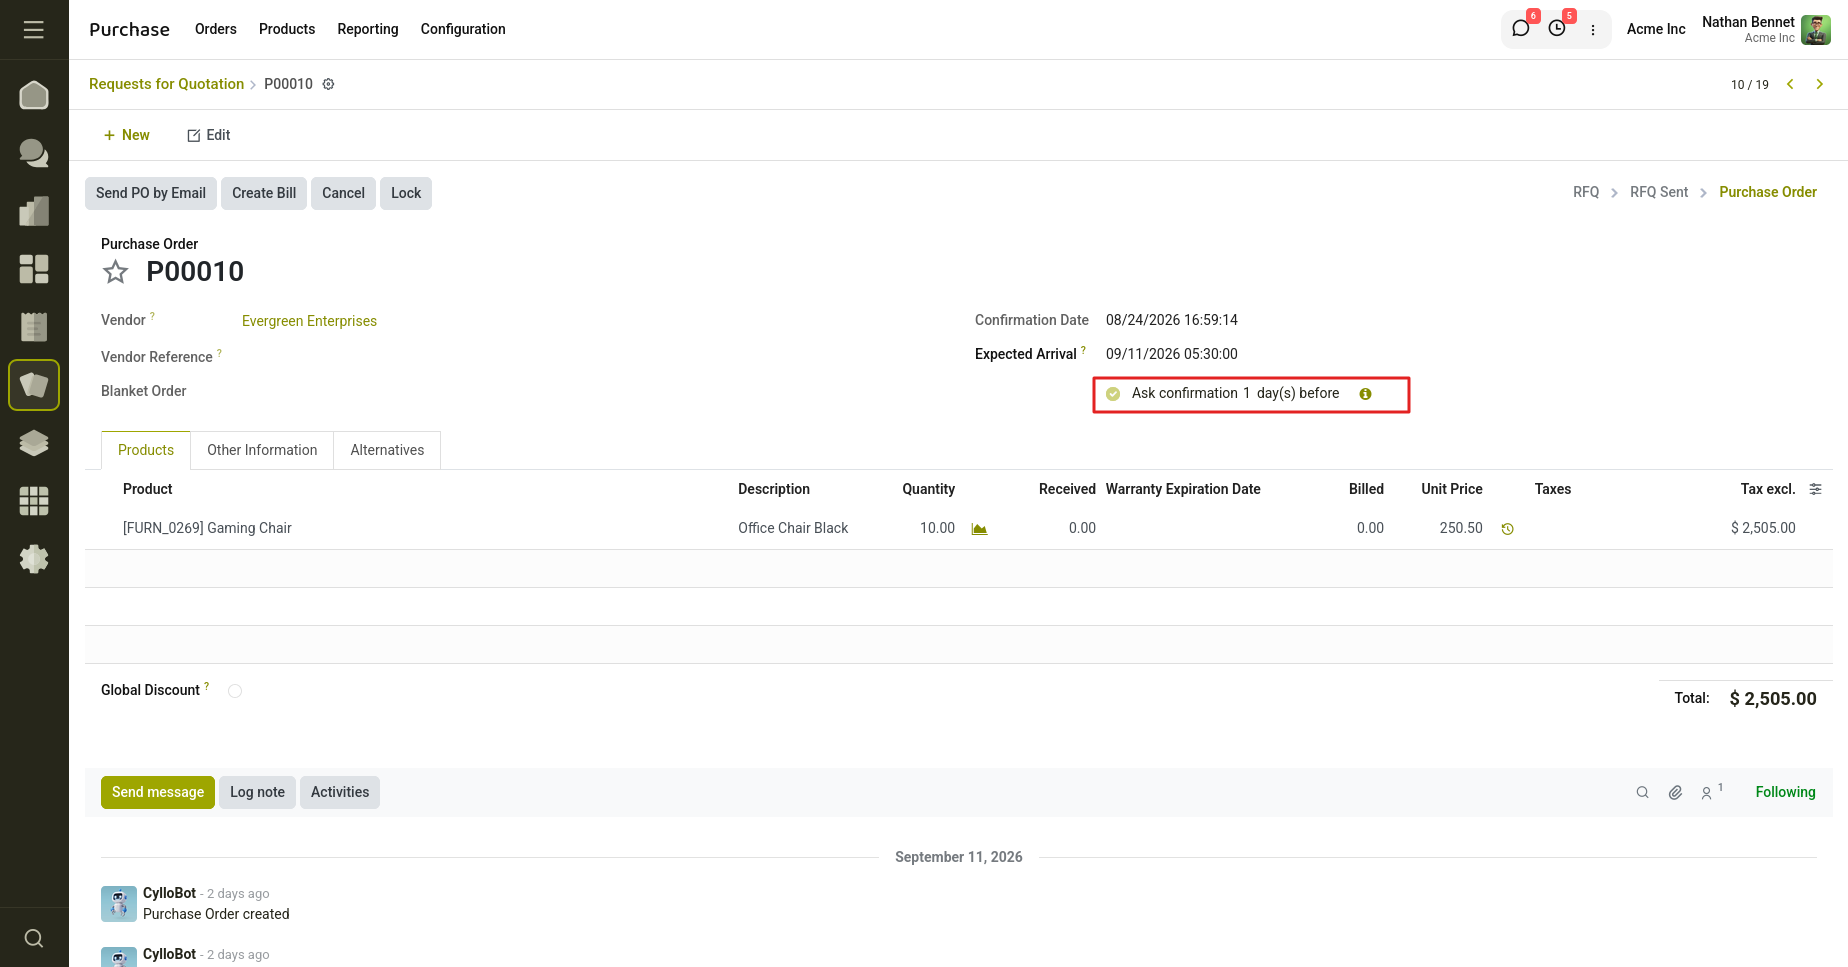
Fig 7.8 — RFQ with Ask Confirmation pre-filled
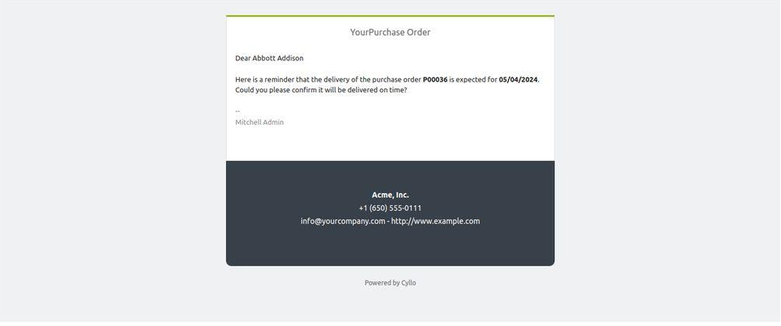
Fig 7.9 — Automated receipt confirmation email
7.3 Merge RFQ
If the same vendor has several open RFQs, Merge RFQ consolidates them into a single request — reducing duplicate outreach and keeping vendor communication tidy.
Merging RFQs
- From the Requests for Quotation list, select two or more RFQs from the same vendor
- Click More → Merge RFQ
- Cyllo combines every line into a single RFQ
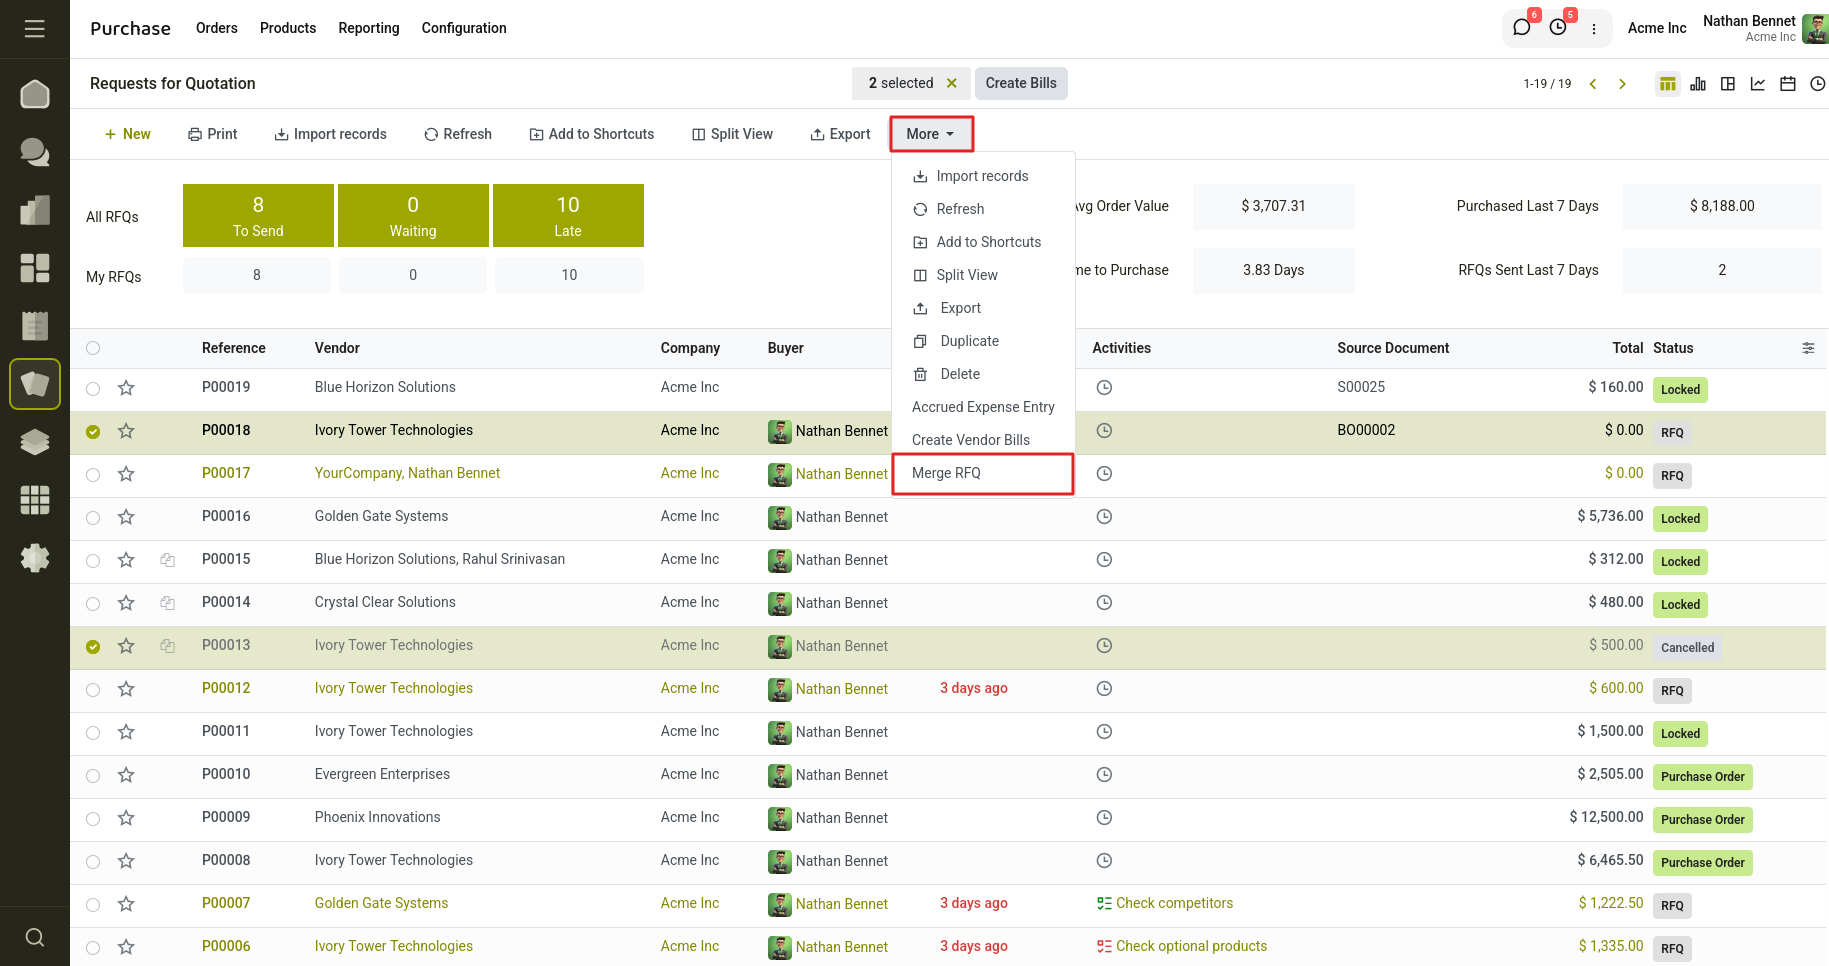
Fig 7.10 — Selecting RFQs and choosing Merge RFQ
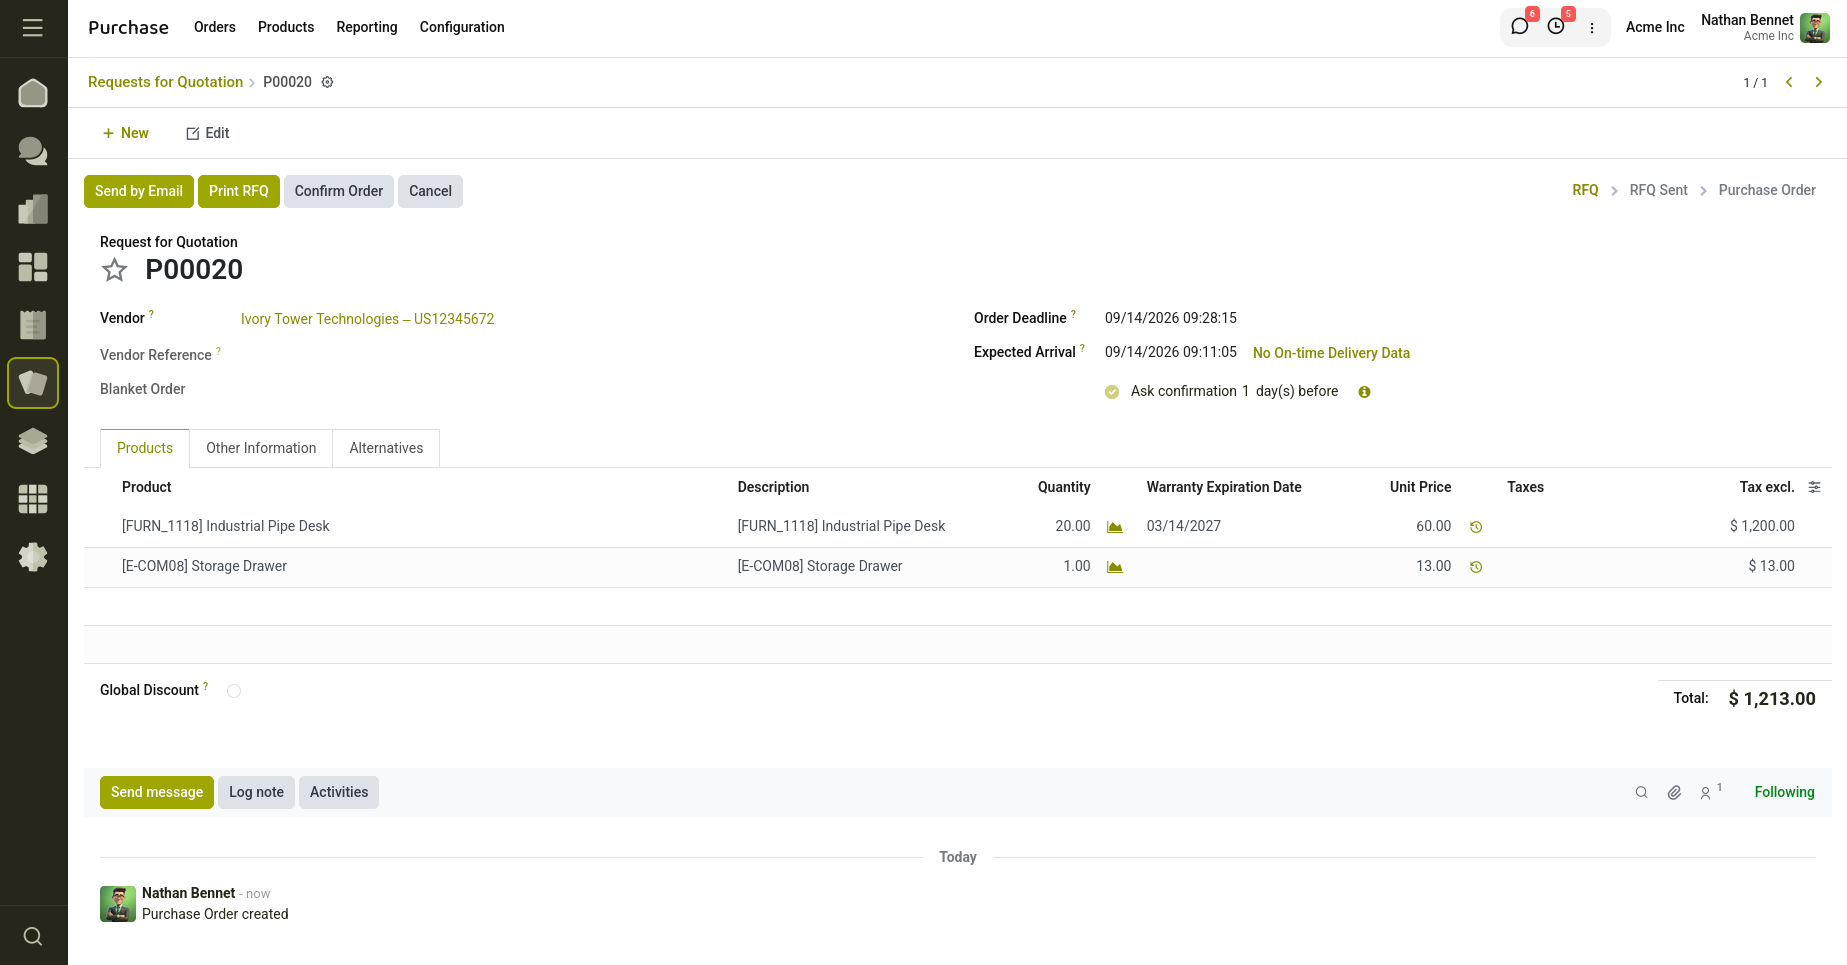
Fig 7.11 — The merged RFQ with all product lines combined
7.4 Advance Payment
The Advance Payment feature lets you register a partial payment against a purchase order before the goods or services are received — useful for large or custom orders that require a deposit.
Recording an Advance Payment
- Install the Advance Payment module, then enable Advance Payment (Purchase) under a user's settings
- Confirm the purchase order as normal
- Click Advance Payment and enter the payment amount, method, journal, and date
- Click Advance Payment to register it — the amount is deducted from the order total automatically
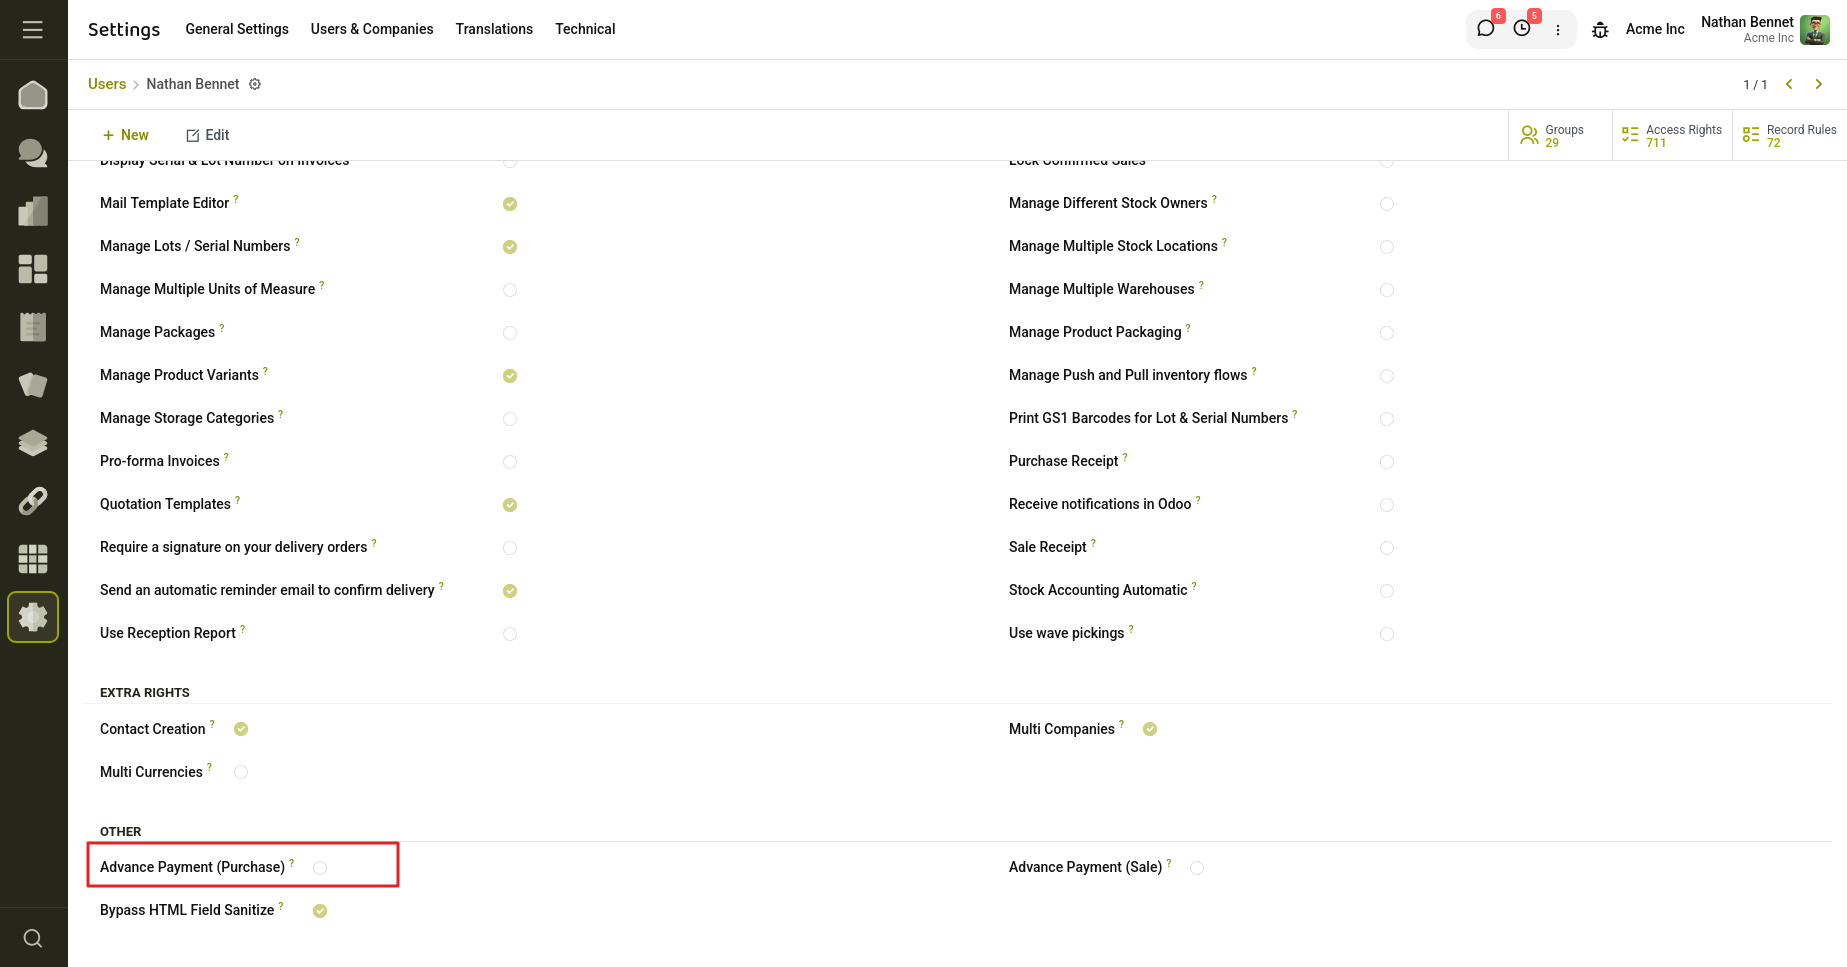
Fig 7.12 — Enabling Advance Payment (Purchase) for a user
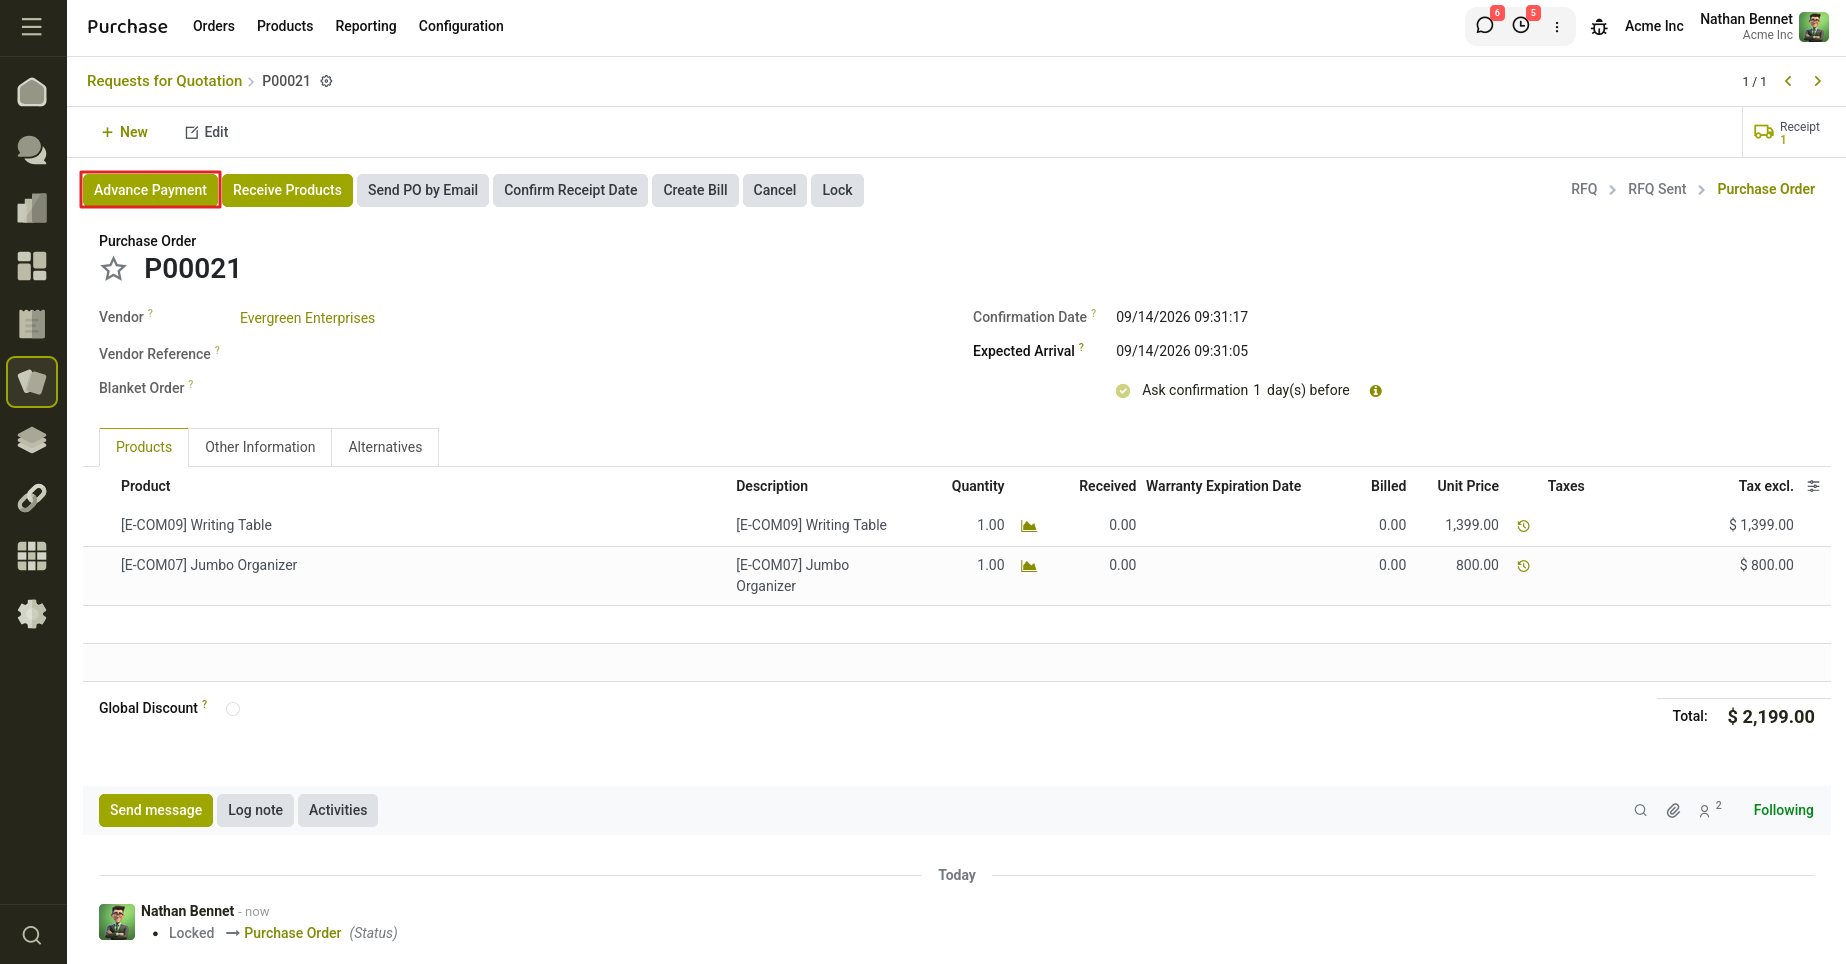
Fig 7.13 — Advance Payment button on a confirmed order
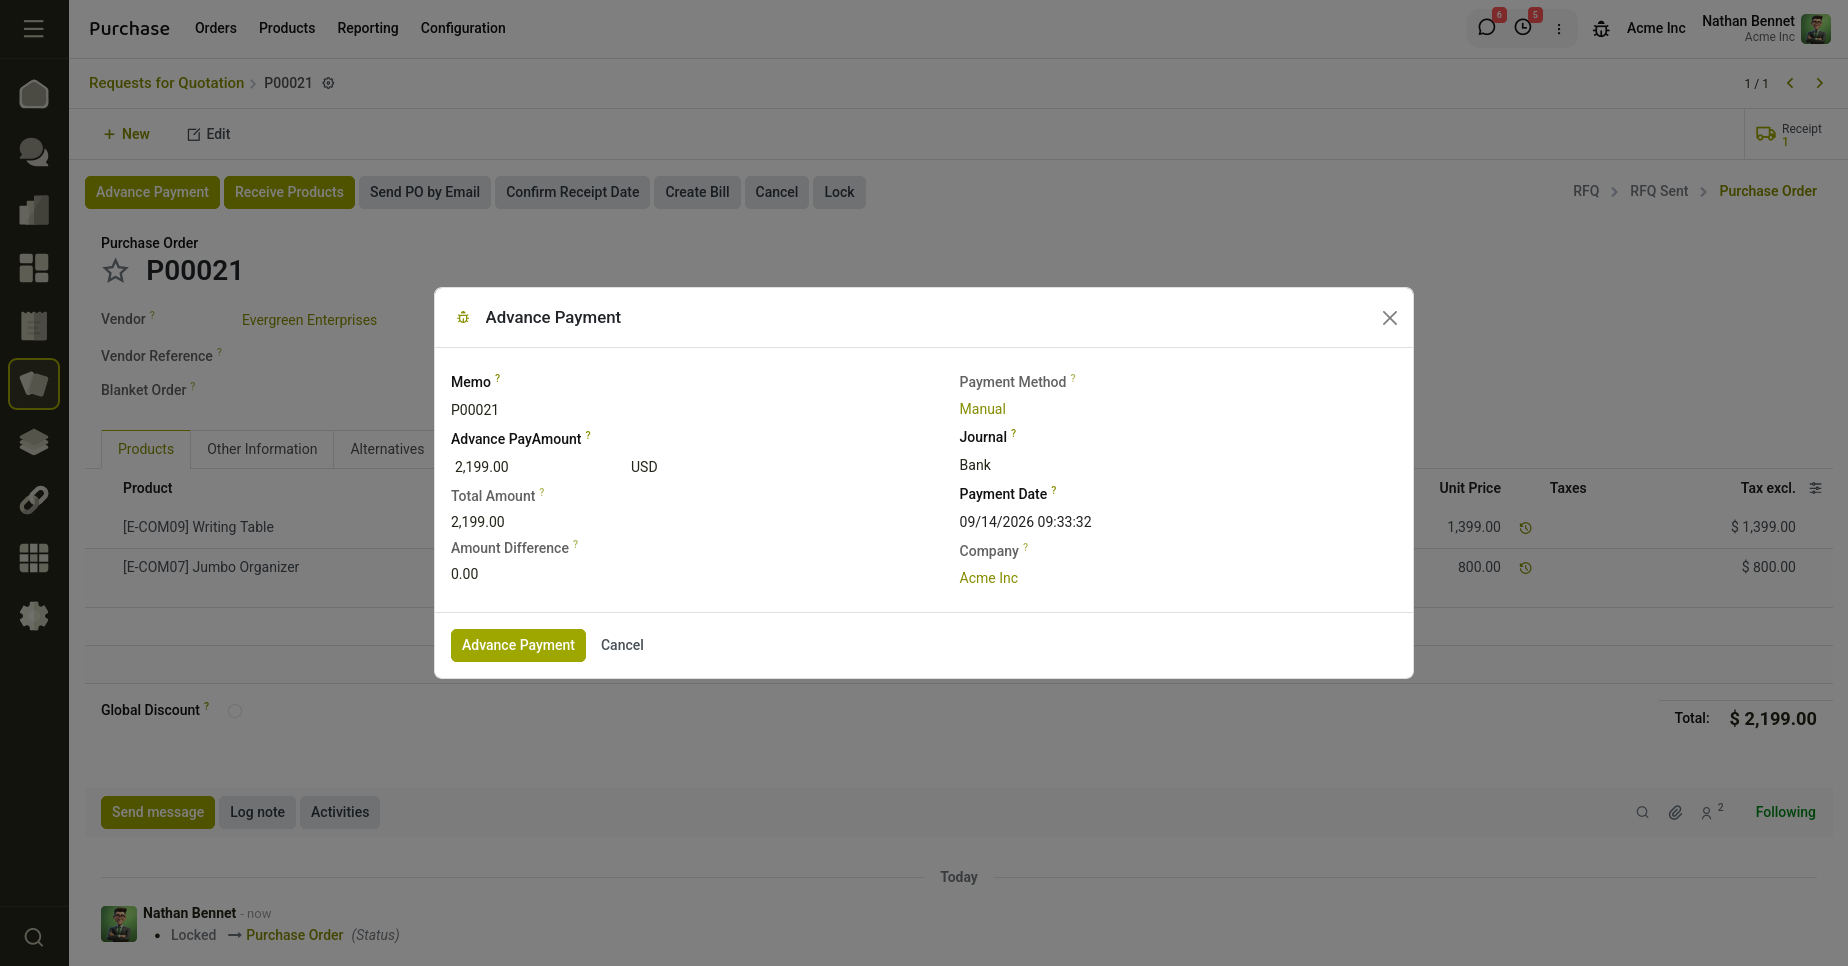
Fig 7.14 — Advance Payment wizard
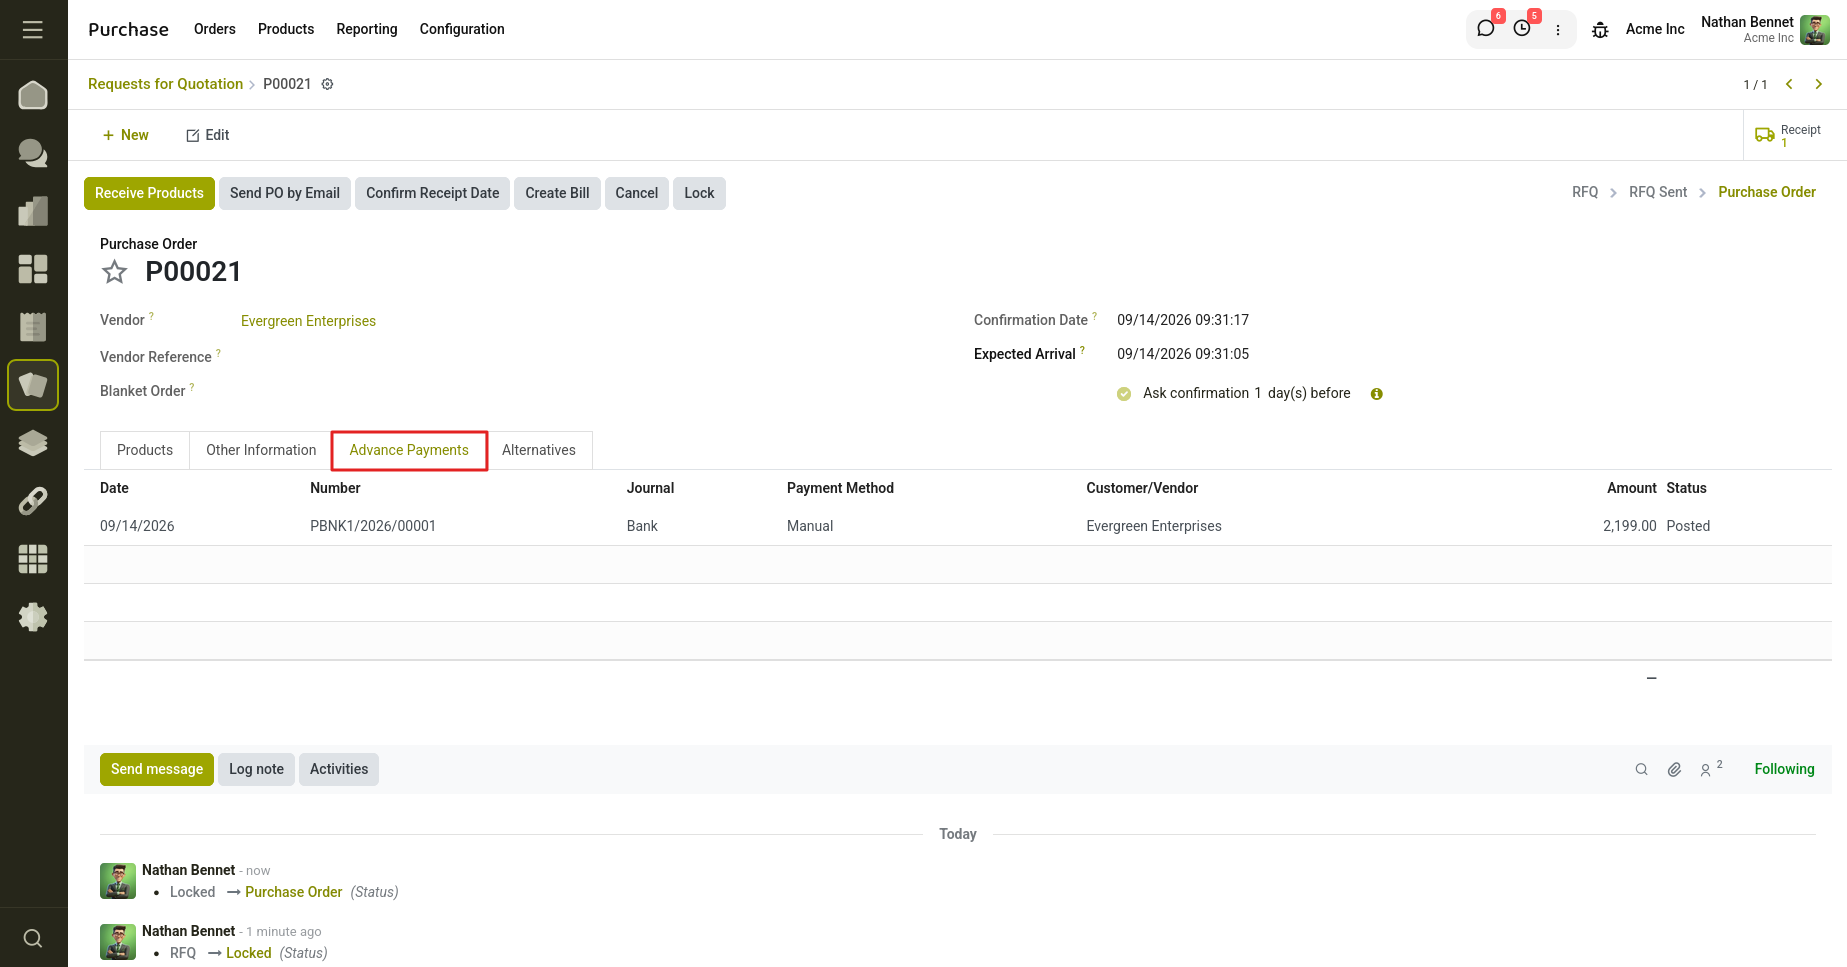
Fig 7.15 — Advance Payments tab showing the recorded payment
7.5 Purchase Digitization
Purchase Digitization reads a vendor's sales-quotation PDF and generates an RFQ automatically, eliminating manual data entry. Cyllo supports two digitisation methods — Manual, where you map each field to a keyword found in the PDF, and AI, which detects the values without any mapping — and three digitisation types: Do Not Digitize, Digitize on Request Only, and Automatically Digitize.
Configuring Manual Digitization
- Enable Purchase Digitization under Purchase → Configuration → Settings
- Open Configure Digitization and choose Manual Digitization and a Digitize Type
- Under Purchase Details, map fields such as Vendor Reference, Incoterm, and Payment Terms to keywords that appear in the PDF
- Repeat the mapping under Purchase Line Details for product, quantity, unit price, and taxes
- On the Tax Details tab, choose Tax Per Purchase Line or Tax Per Purchase Order
- On the Product Creation tab, choose Create Product Automatically or Do Not Create Product Automatically
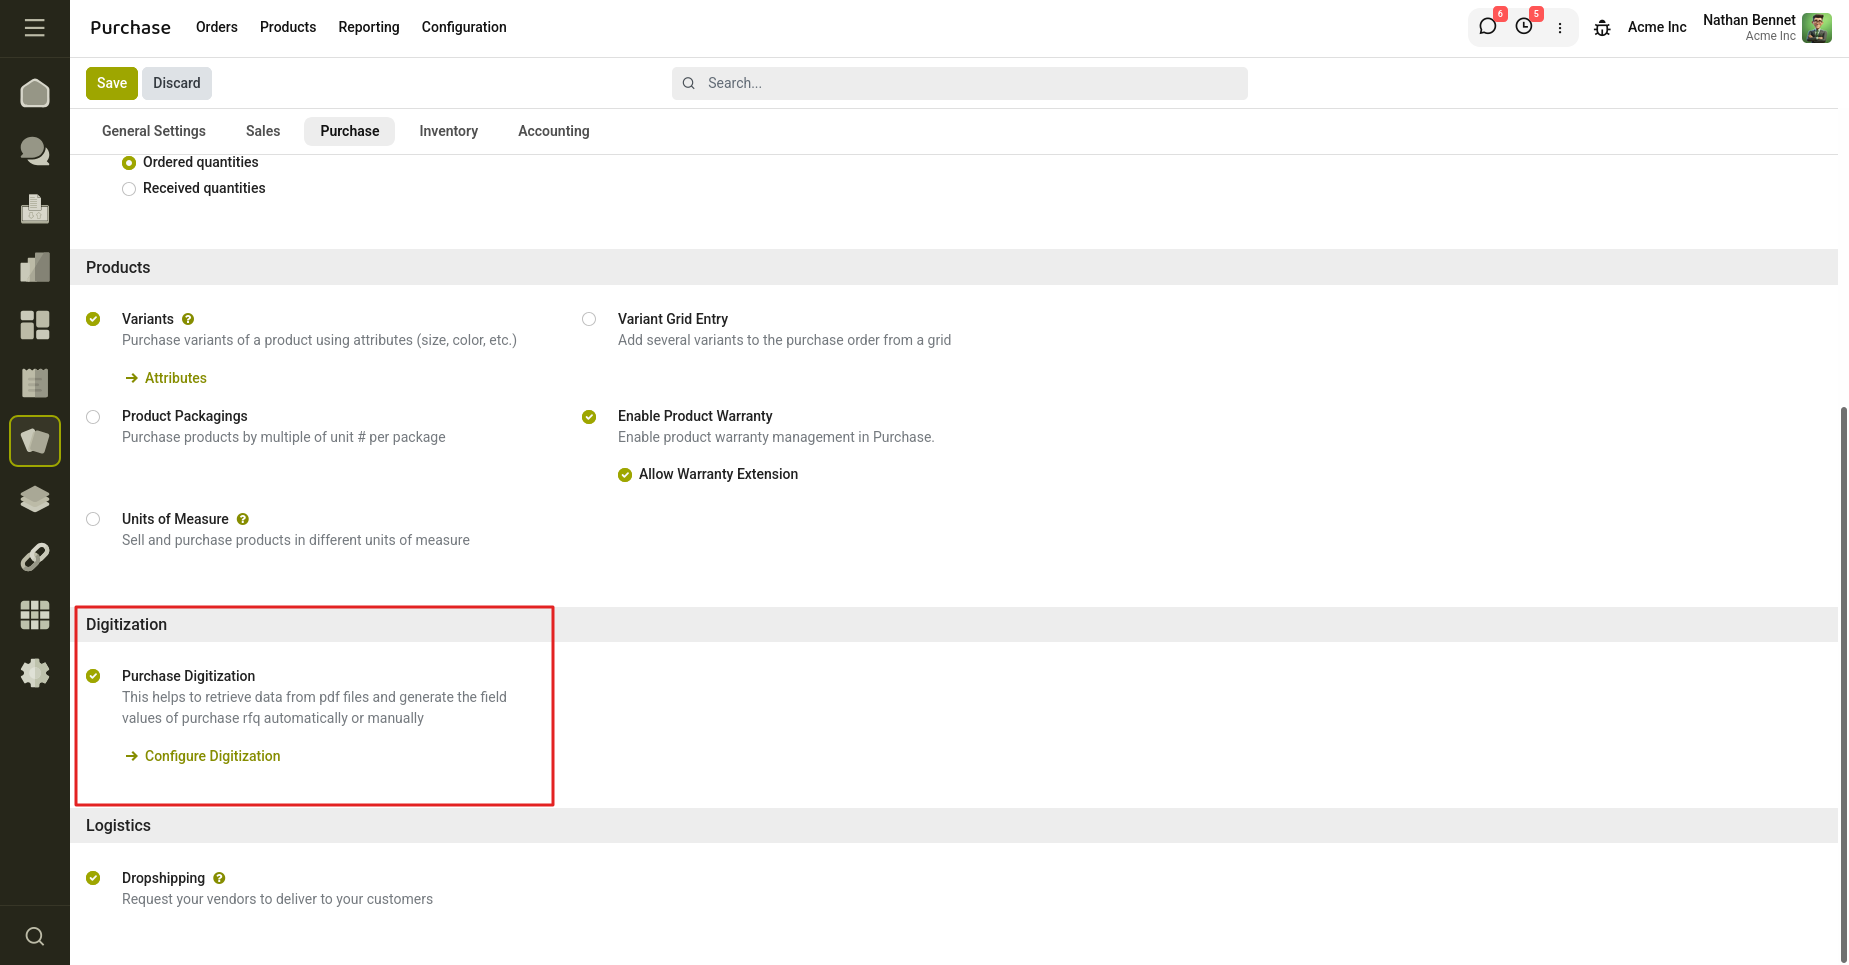
Fig 7.16 — Enabling Purchase Digitization in Settings
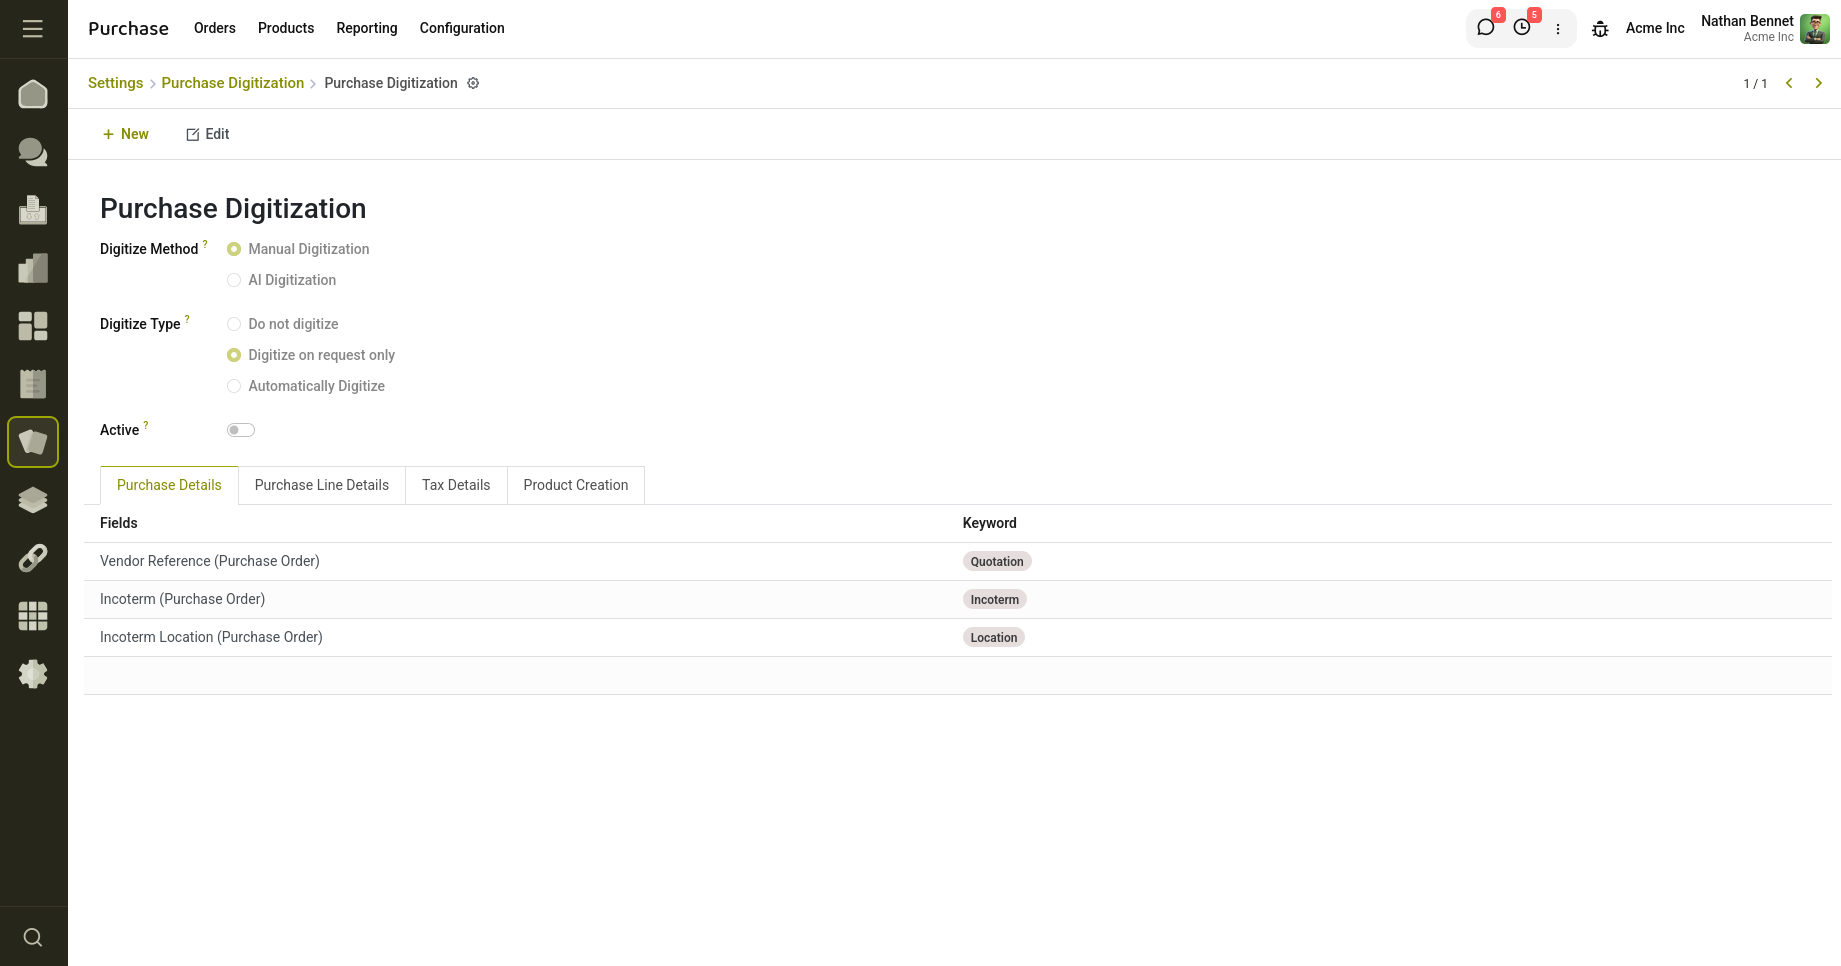
Fig 7.17 — Purchase Details keyword mapping
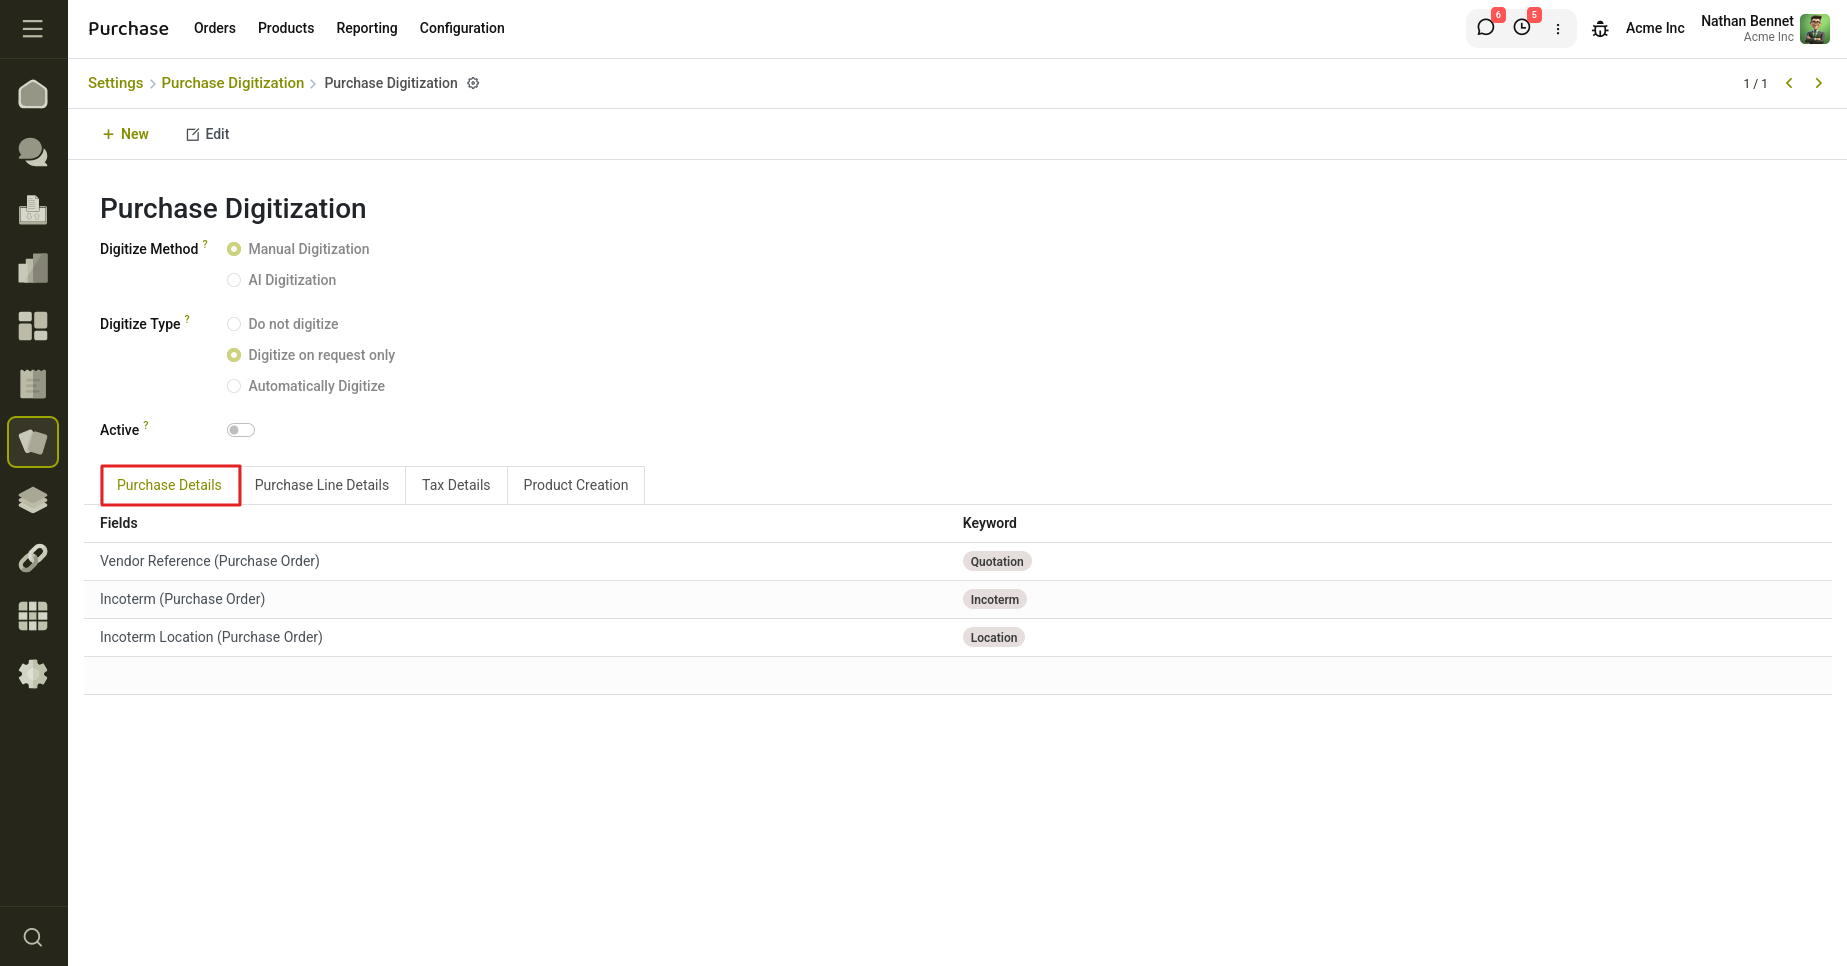
Fig 7.18 — Keywords mapped to each purchase field
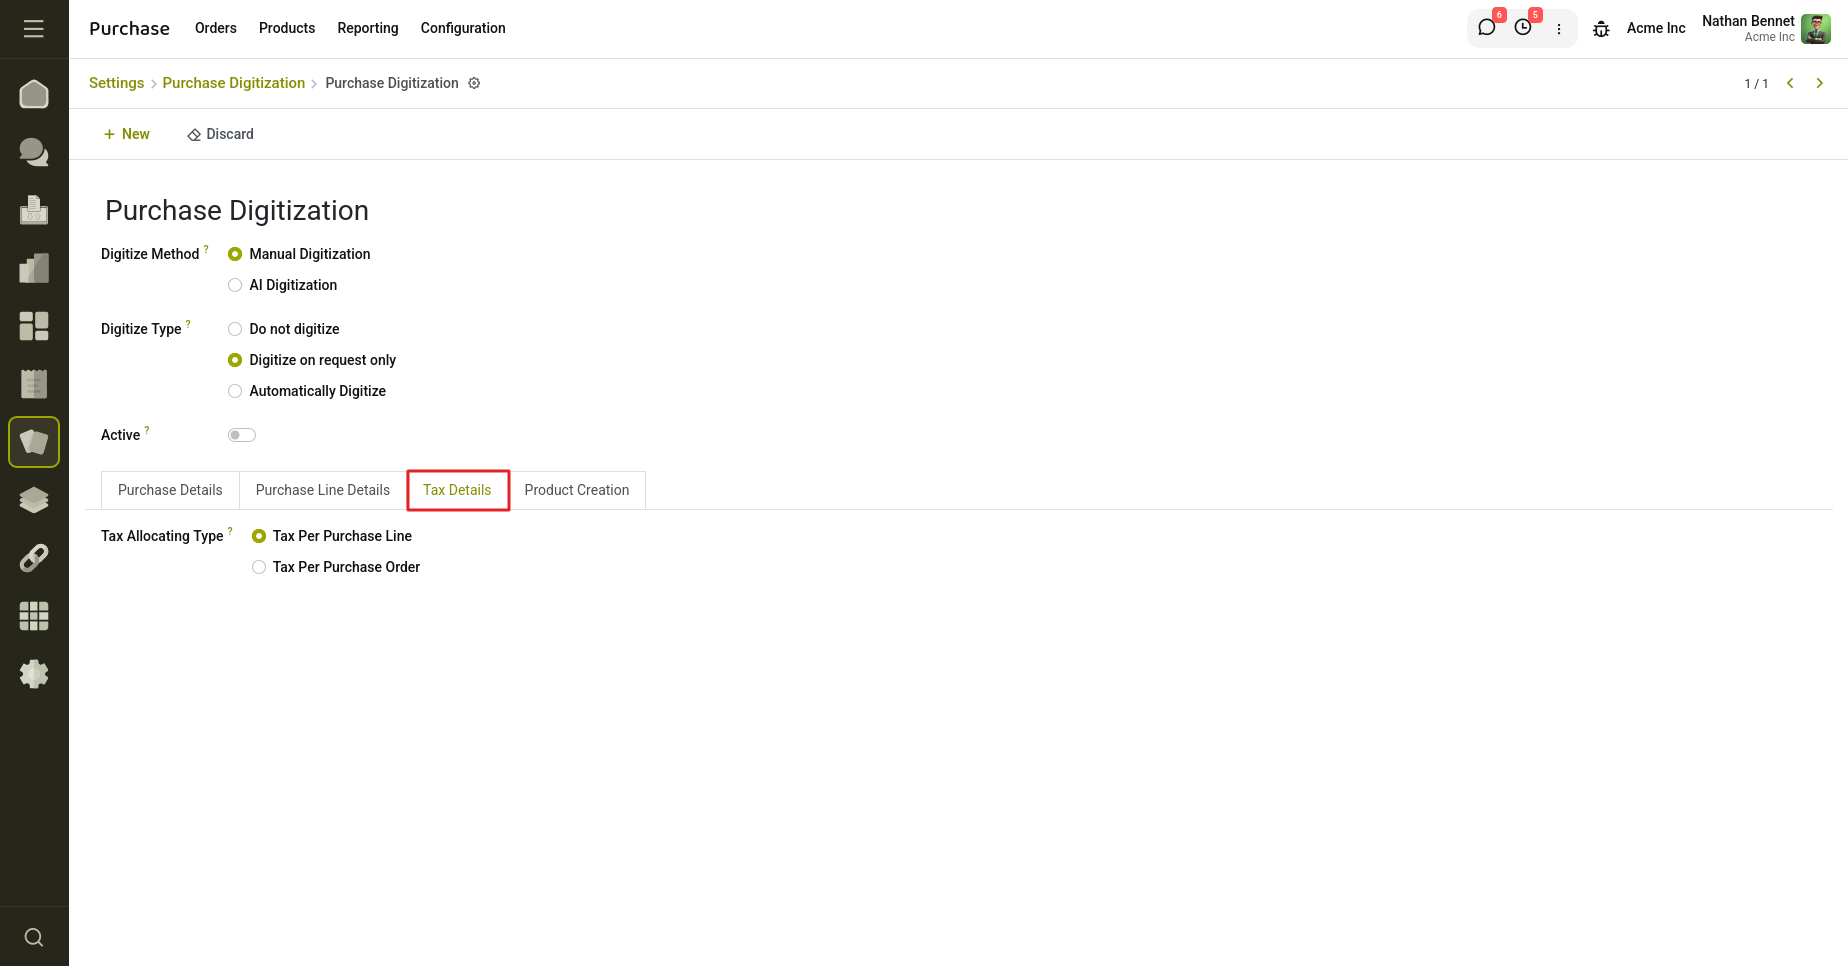
Fig 7.19 — Tax Details: allocating tax per line or per order
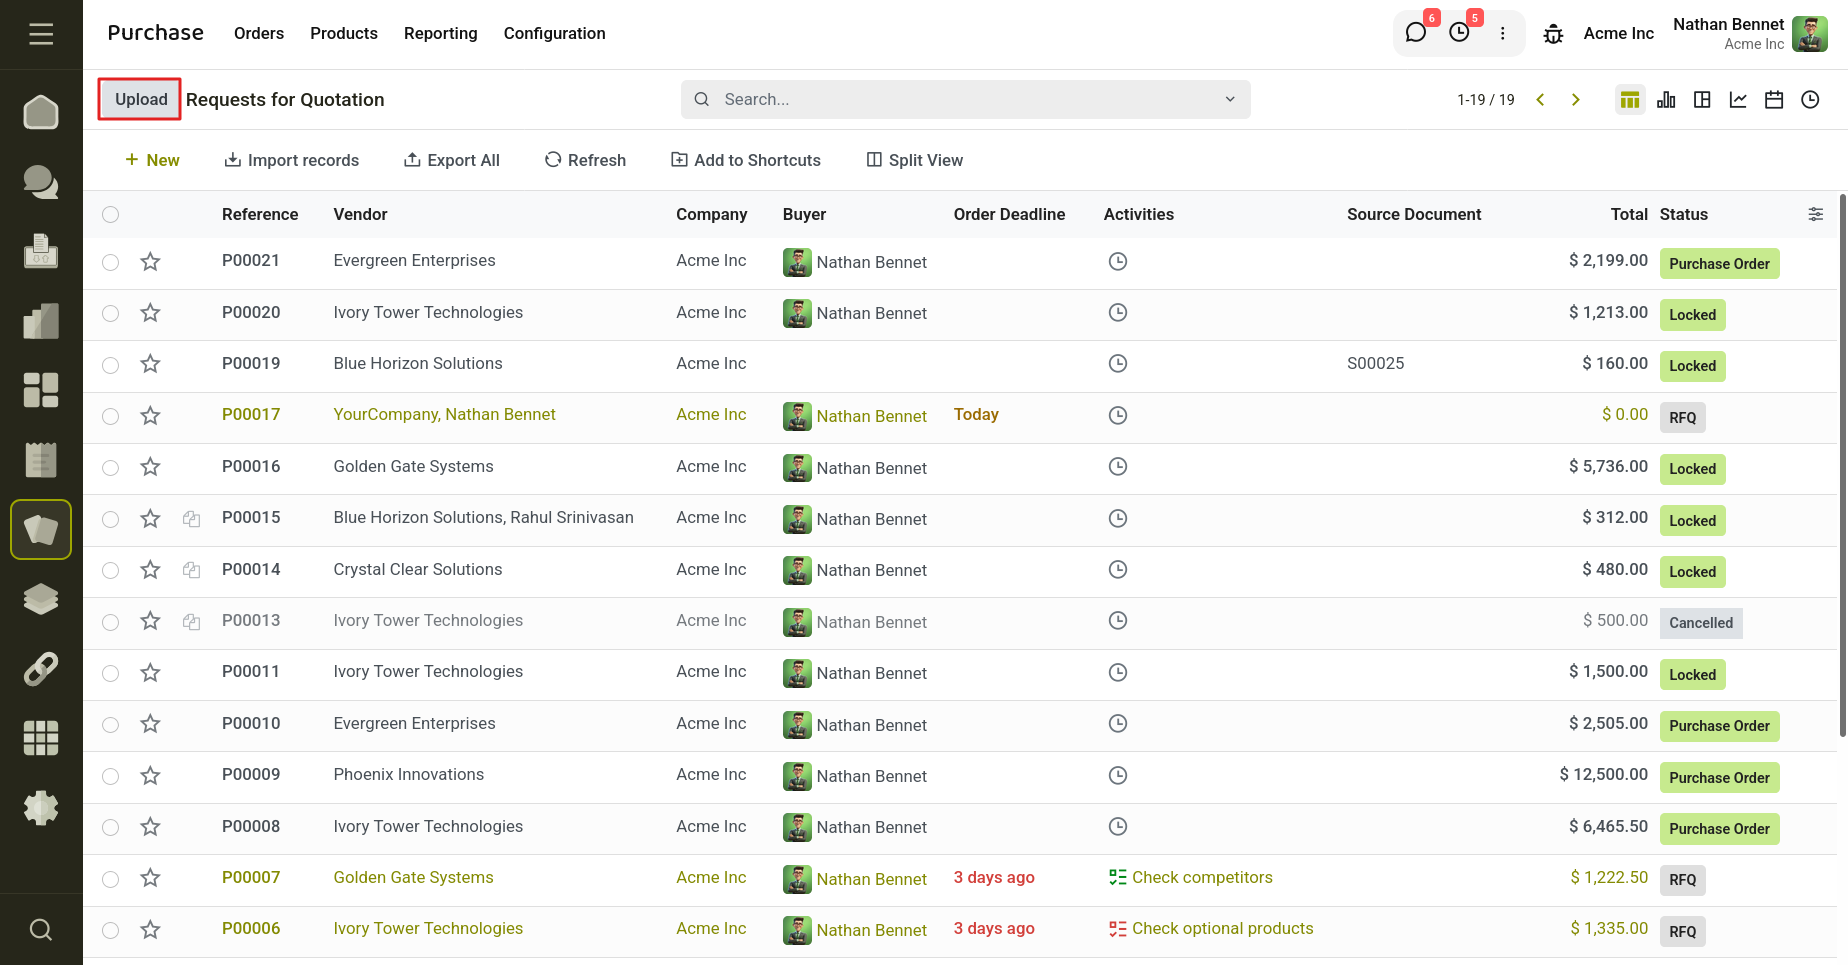
Fig 7.20 — Product Creation: automatic vs. manual product creation
7.6 Running a Digitization
Once configured, upload the vendor's PDF quotation to an RFQ and let Cyllo populate the fields automatically.
Digitizing a Document
- From Requests for Quotation, click Upload and attach the vendor's PDF — a new RFQ is created with the file attached
- Open the RFQ and click Send To Digitization
- Review the populated vendor, order deadline, and product lines against the source PDF
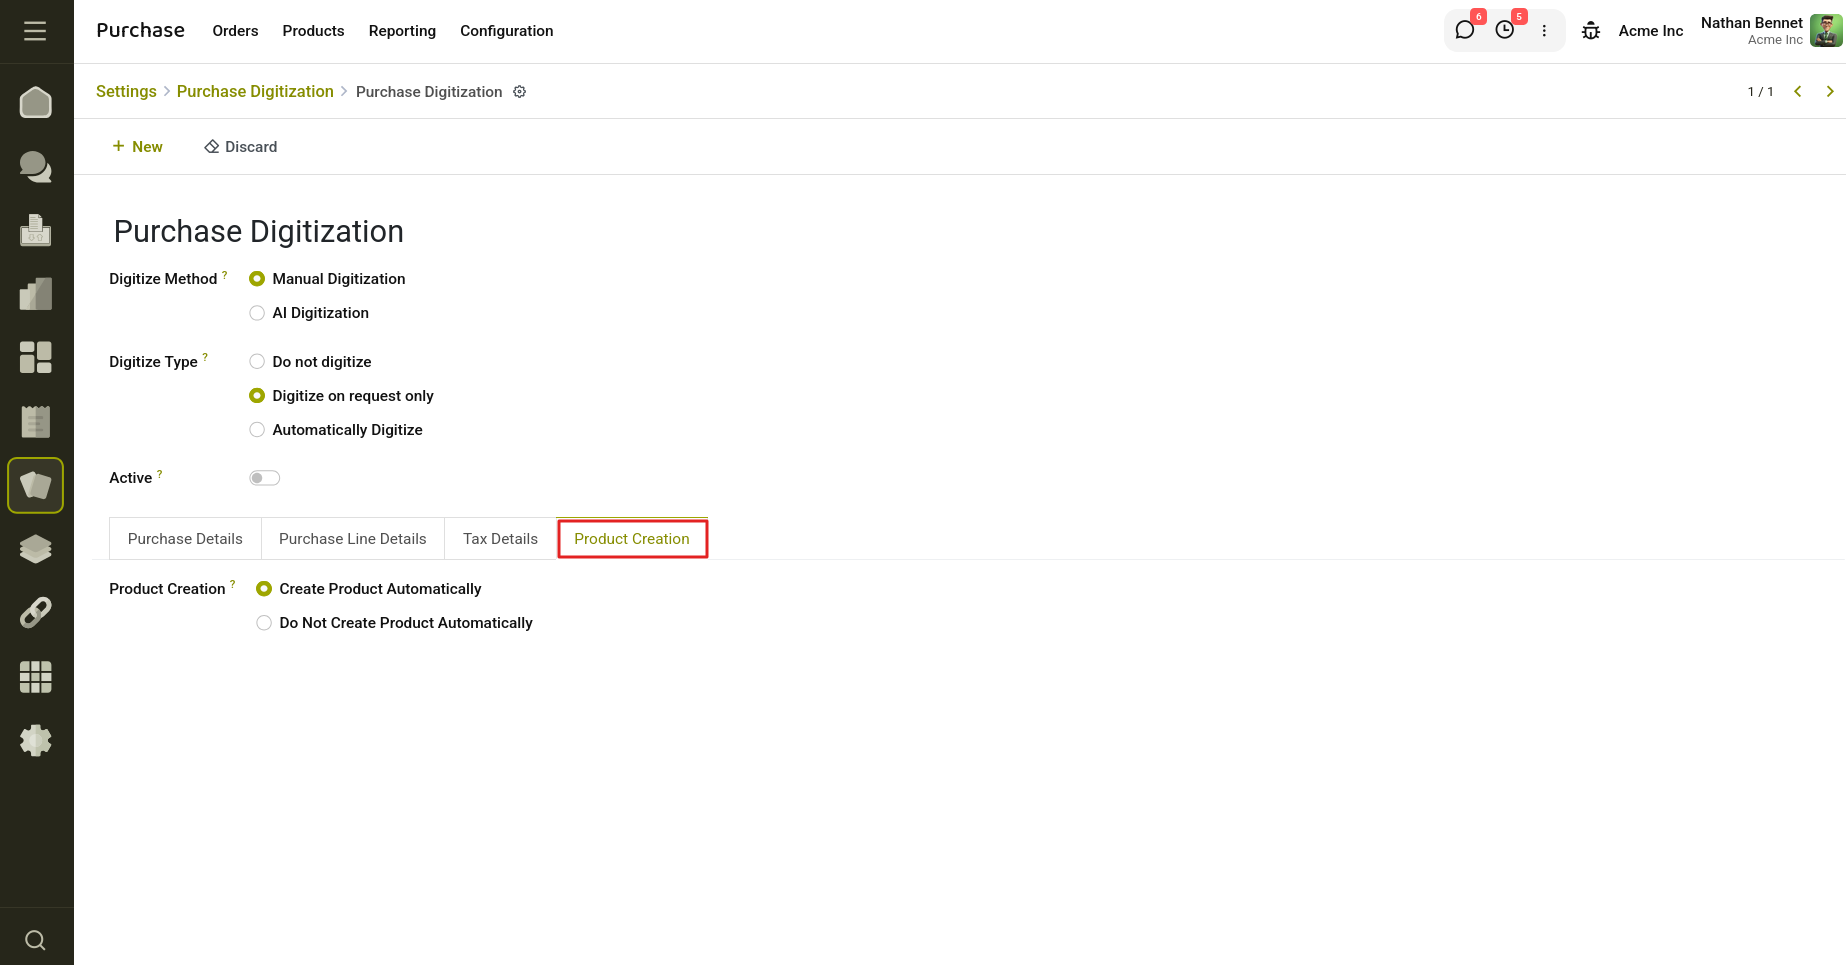
Fig 7.21 — Uploading a sales-quotation PDF to an RFQ
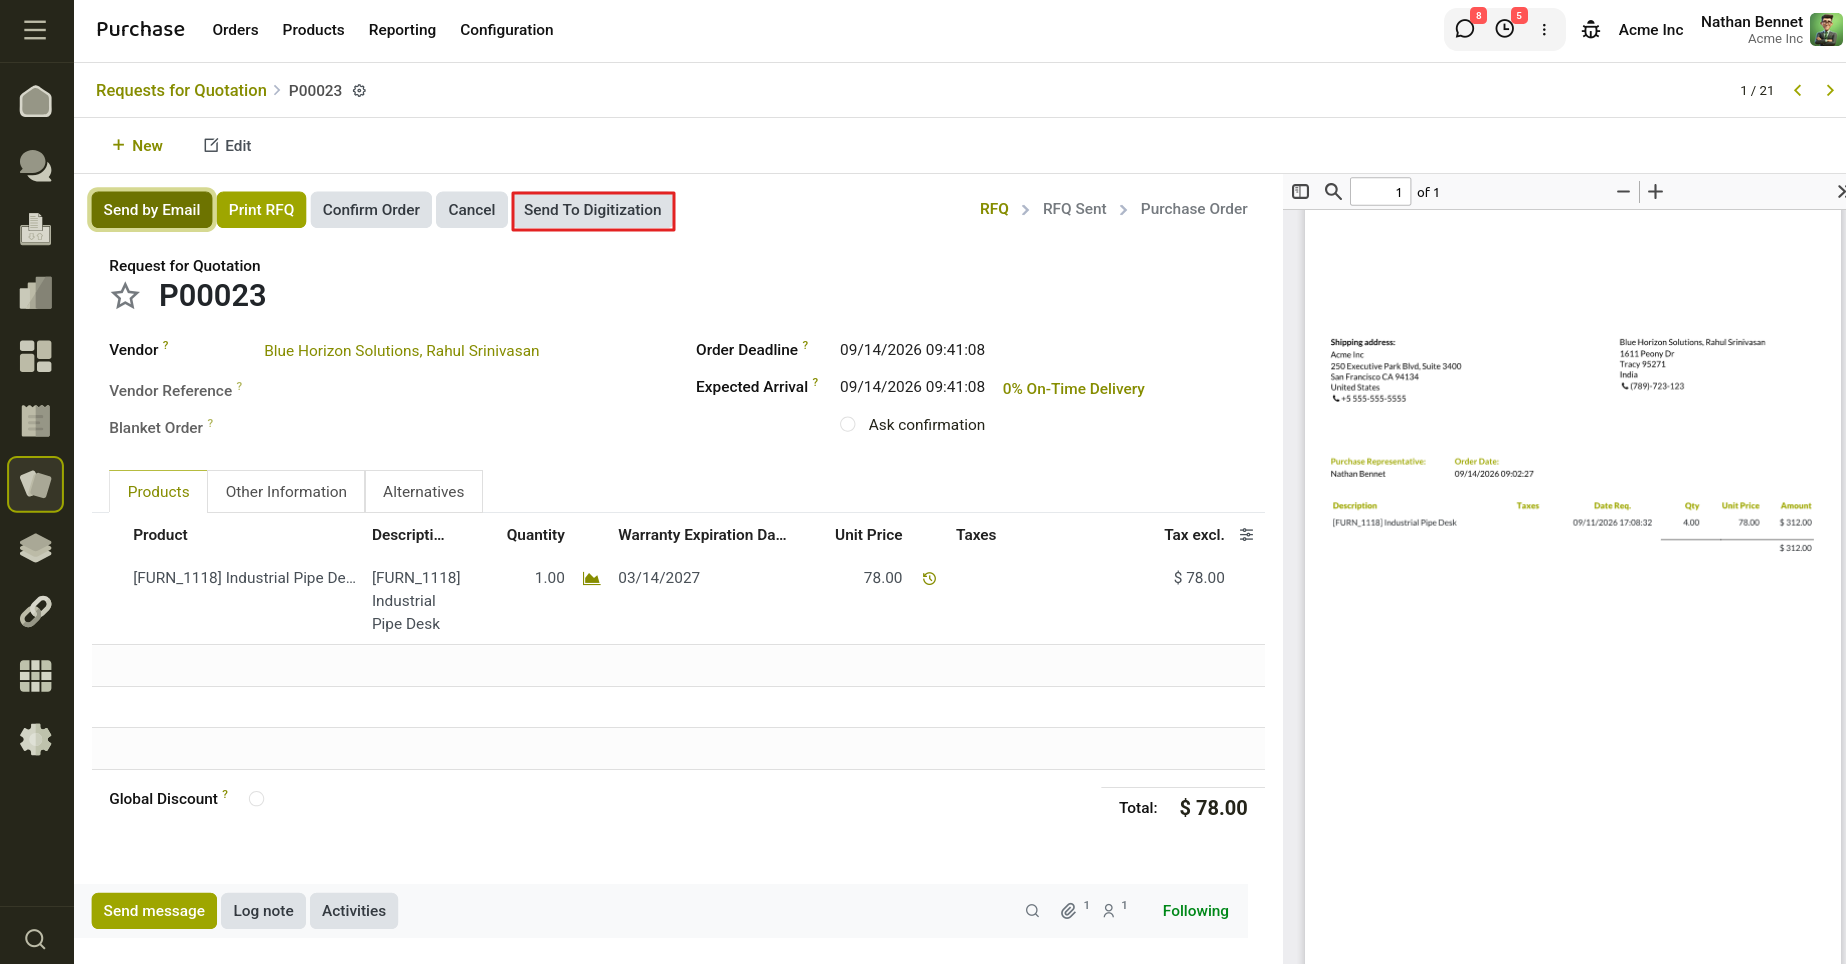
Fig 7.22 — Manual digitization populating an RFQ from a PDF
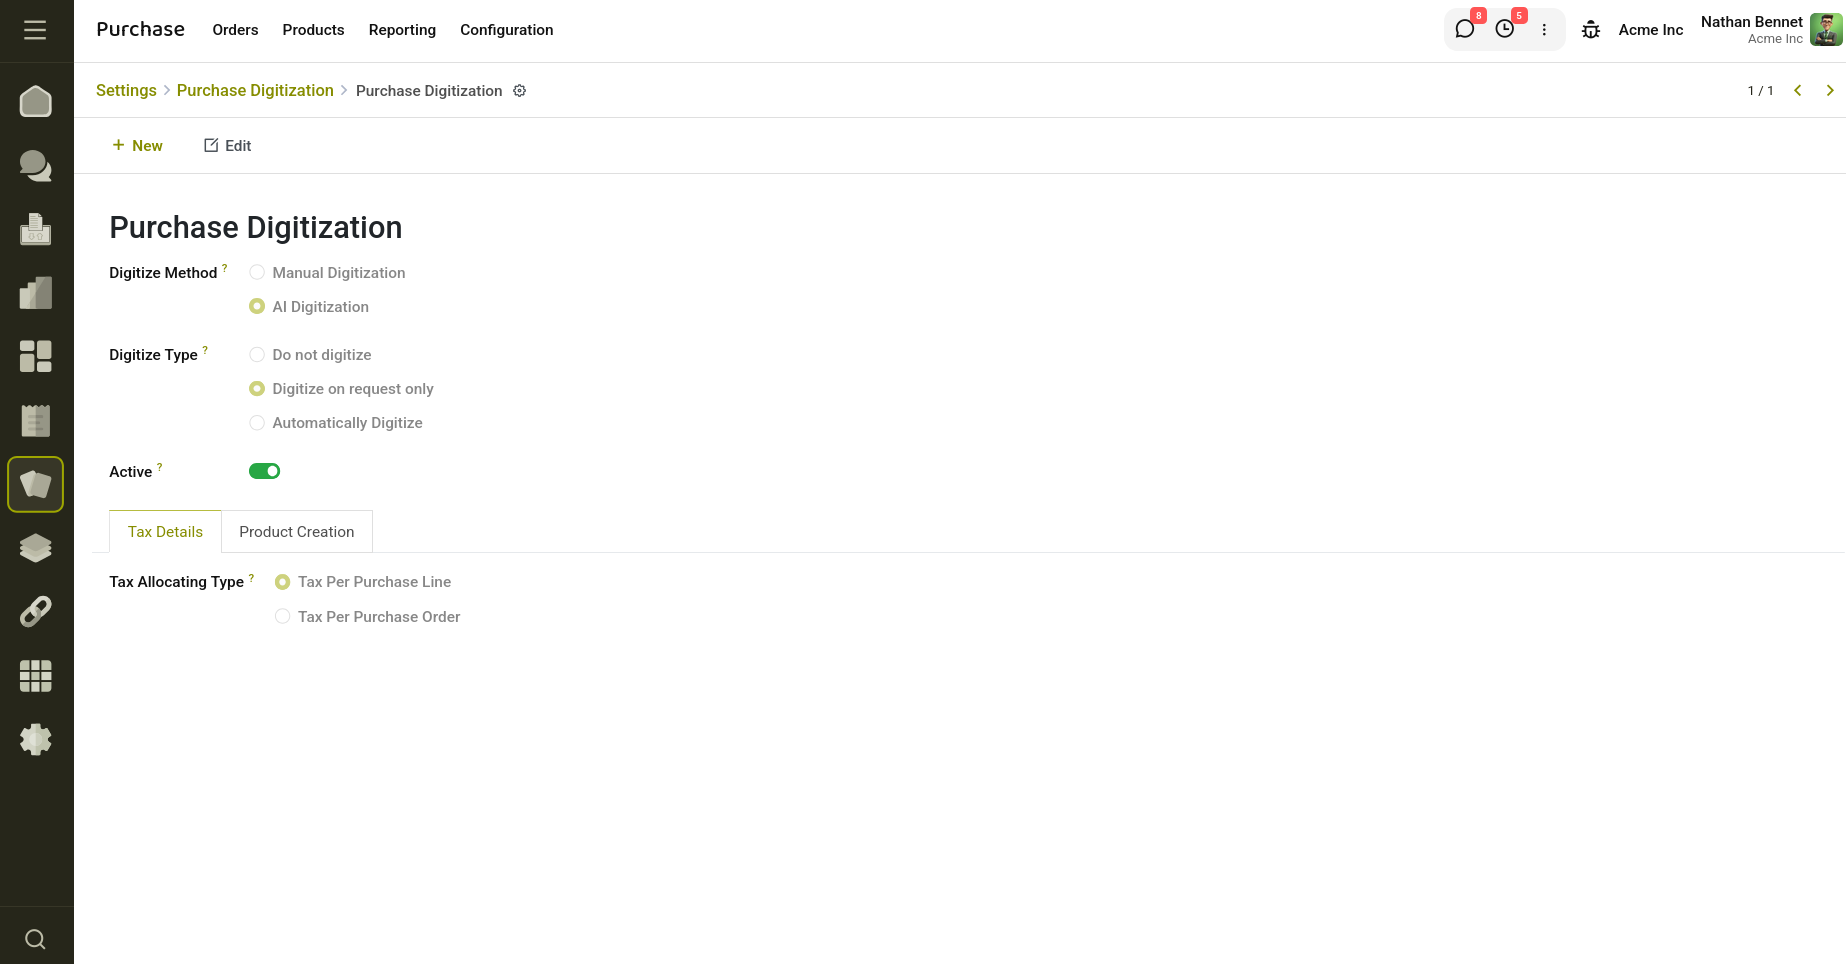
Fig 7.23 — AI Digitization configuration (no keyword mapping needed)
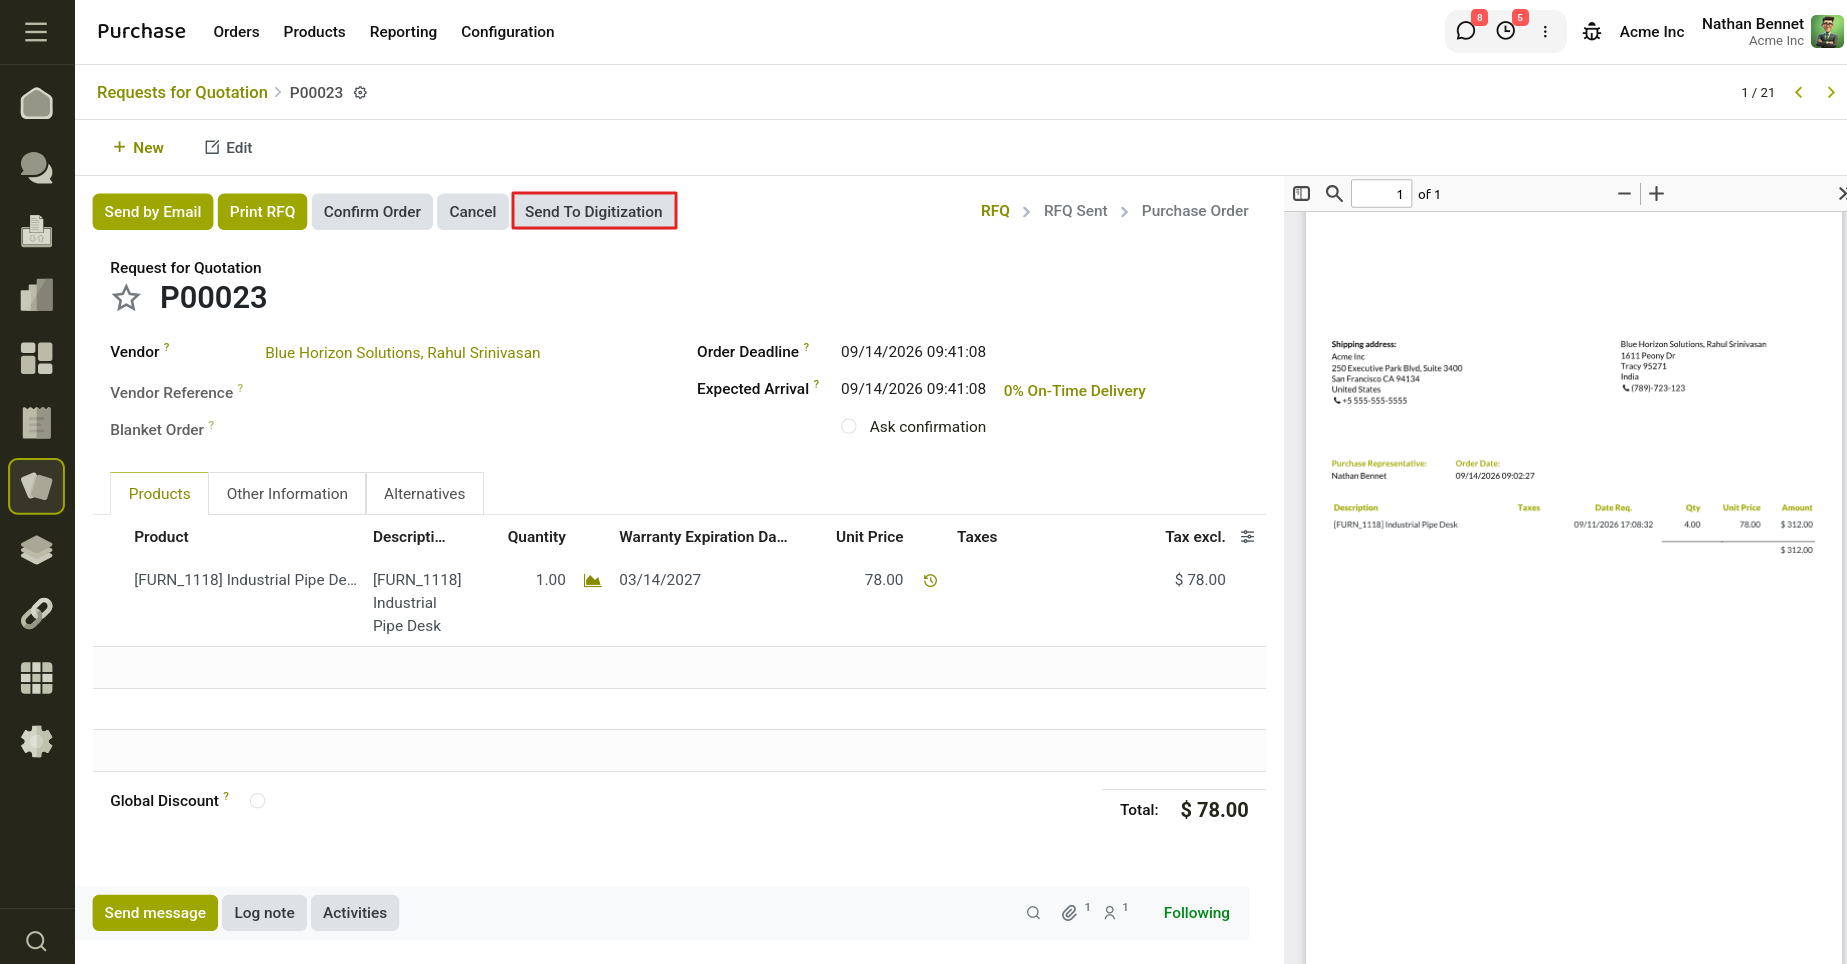
Fig 7.24 — Sending a document for AI digitization
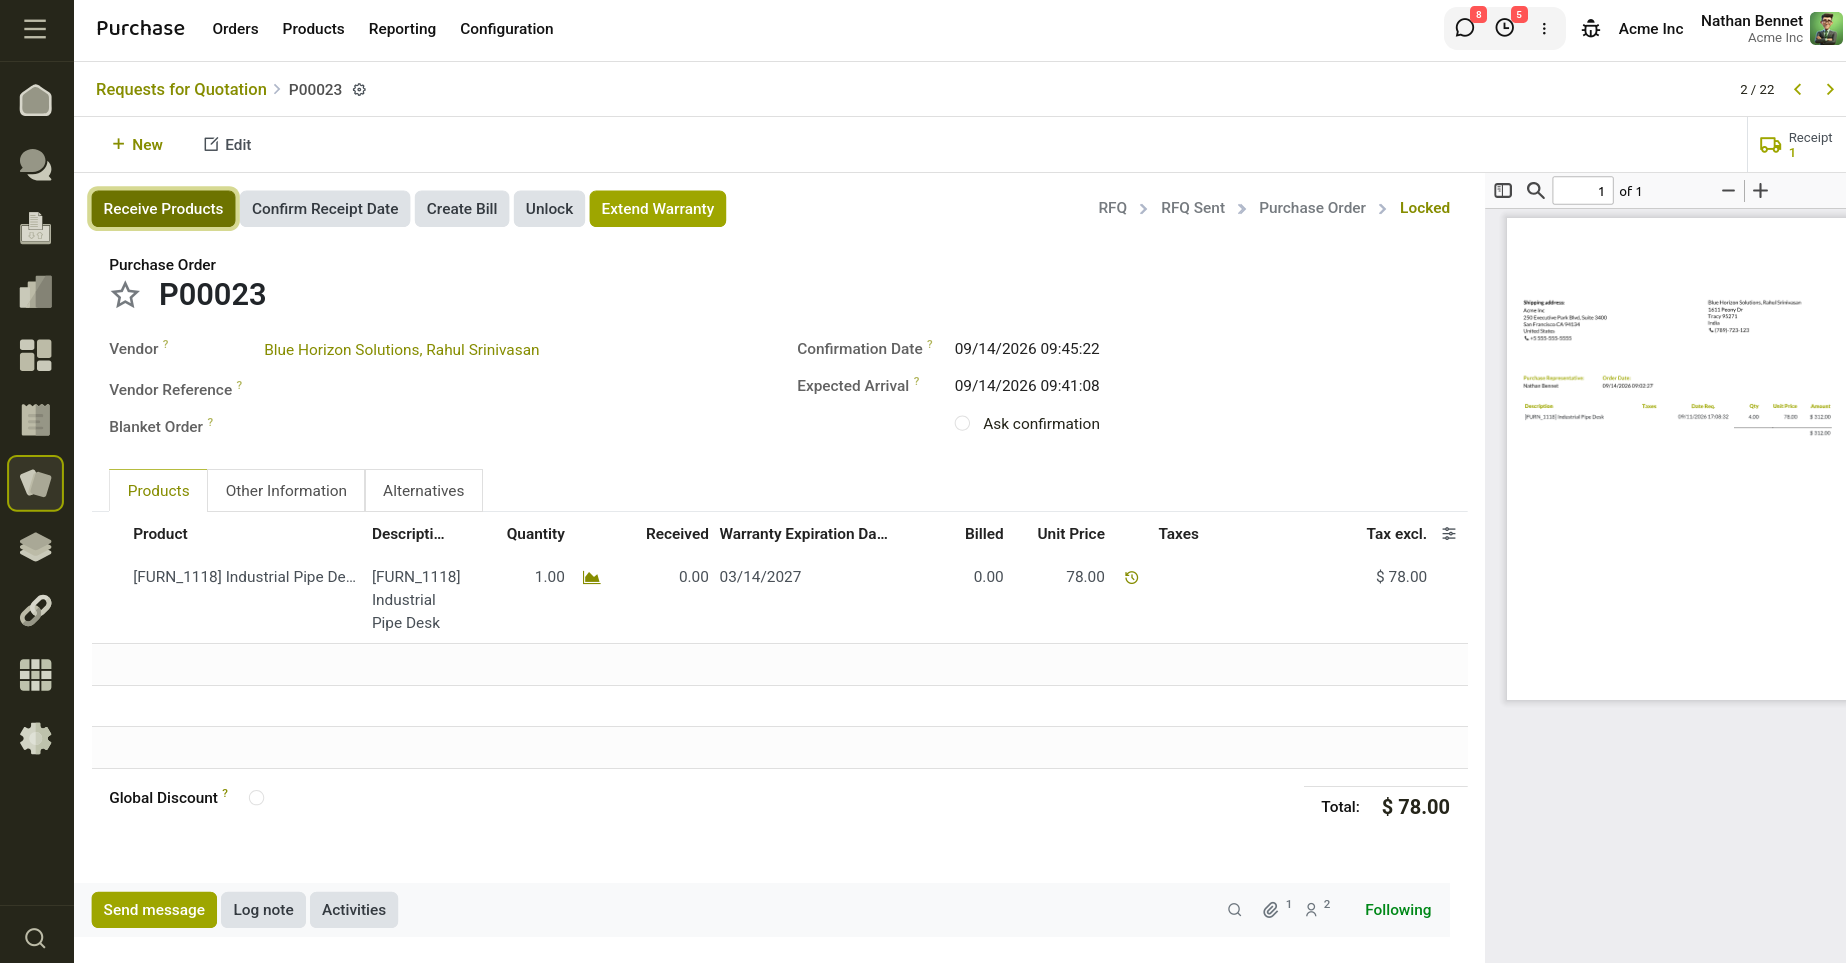
Fig 7.25 — Digitization completed successfully
8. Reporting & Analytics
The Purchase Analysis report gives full visibility into purchasing activity, letting you track spend, delivery performance, and vendor behaviour from a single dashboard.
8.1 Purchase Analysis Report
Open Purchase → Reporting → Purchase to see the Purchase Analysis window. Choose between bar, line, and pie chart views, and toggle stacked, cumulative, ascending, or descending display from the icons in the top-left corner.
Using the Report
- Go to Purchase → Reporting → Purchase
- Switch between Graph and Pivot view using the icons in the top-right corner
- Use Filters to select Requests for Quotation, Purchase Orders, Confirmation Date, Order Date, or a custom filter
- Use Group By to segment by Vendor, Vendor Country, Purchase Representative, Product, Product Category, Status, Company, or a custom group
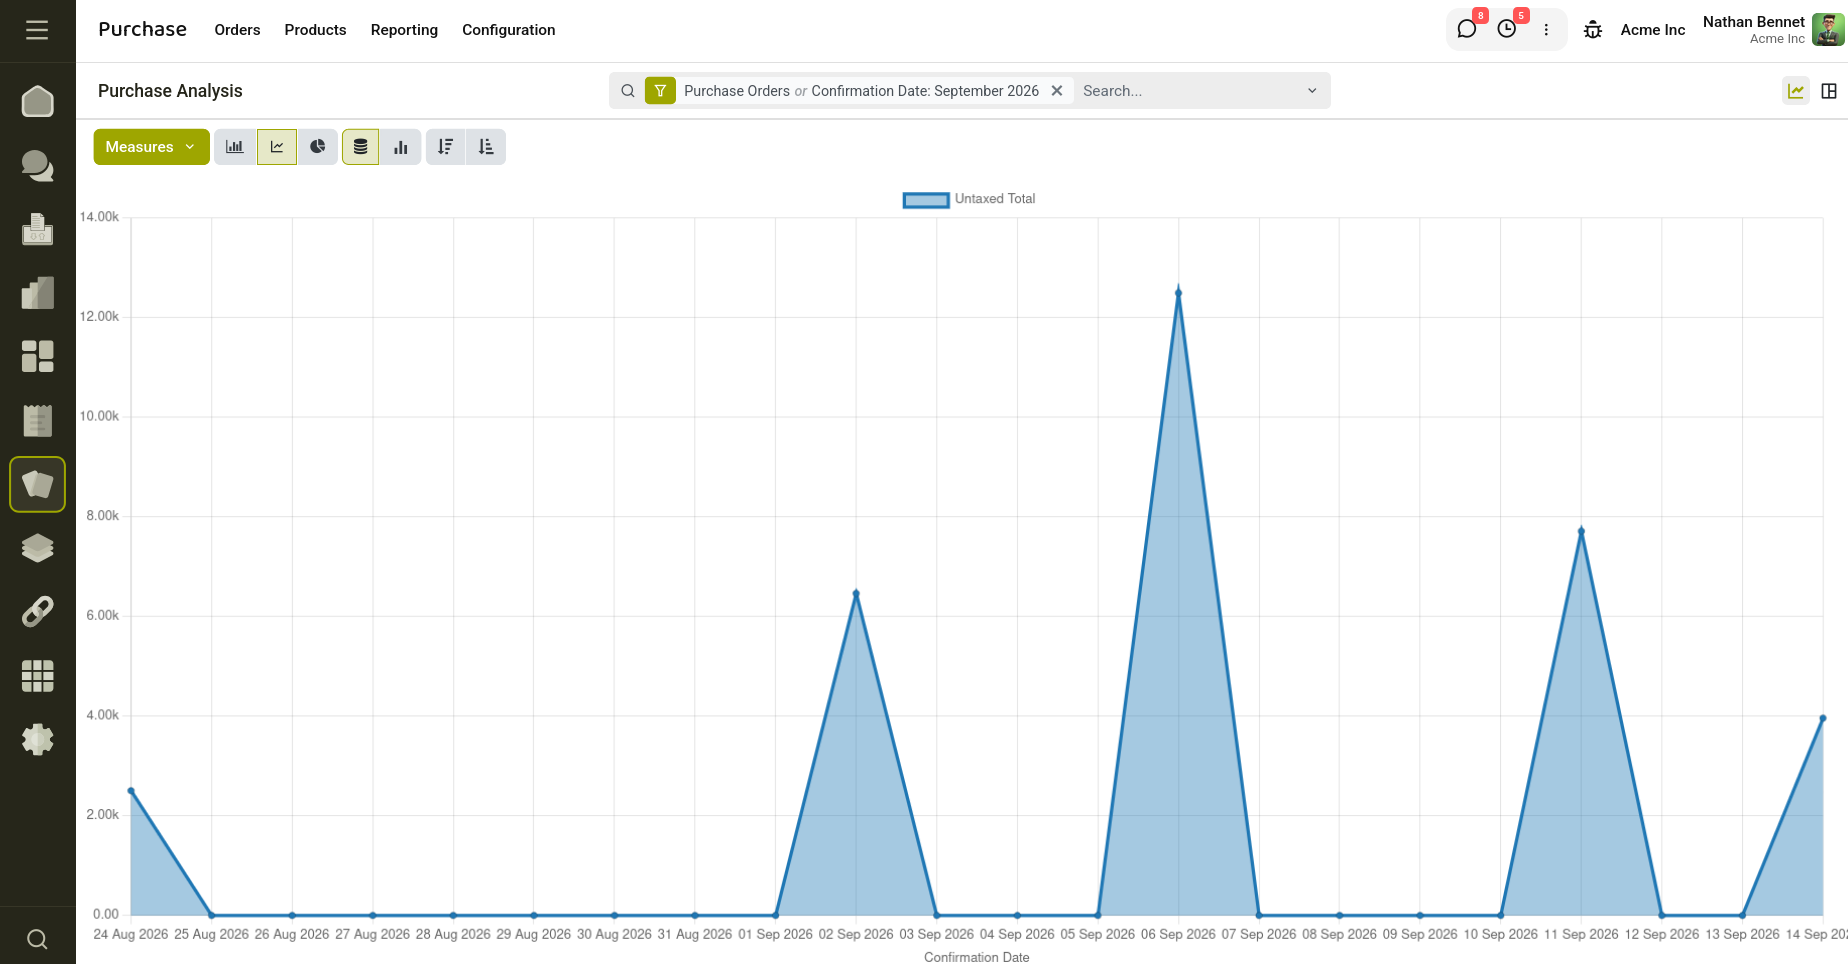
Fig 8.1 — Purchase Analysis graph view
8.2 Filters, Grouping & Metrics
The available metrics include Average Cost, Days to Confirm, Days to Receive, Gross Weight, Order Quantity Billed, Ordered, Received, Quantity to be Billed, Total, Untaxed Total, Volume, and Count — enough to analyse spend from almost any angle.
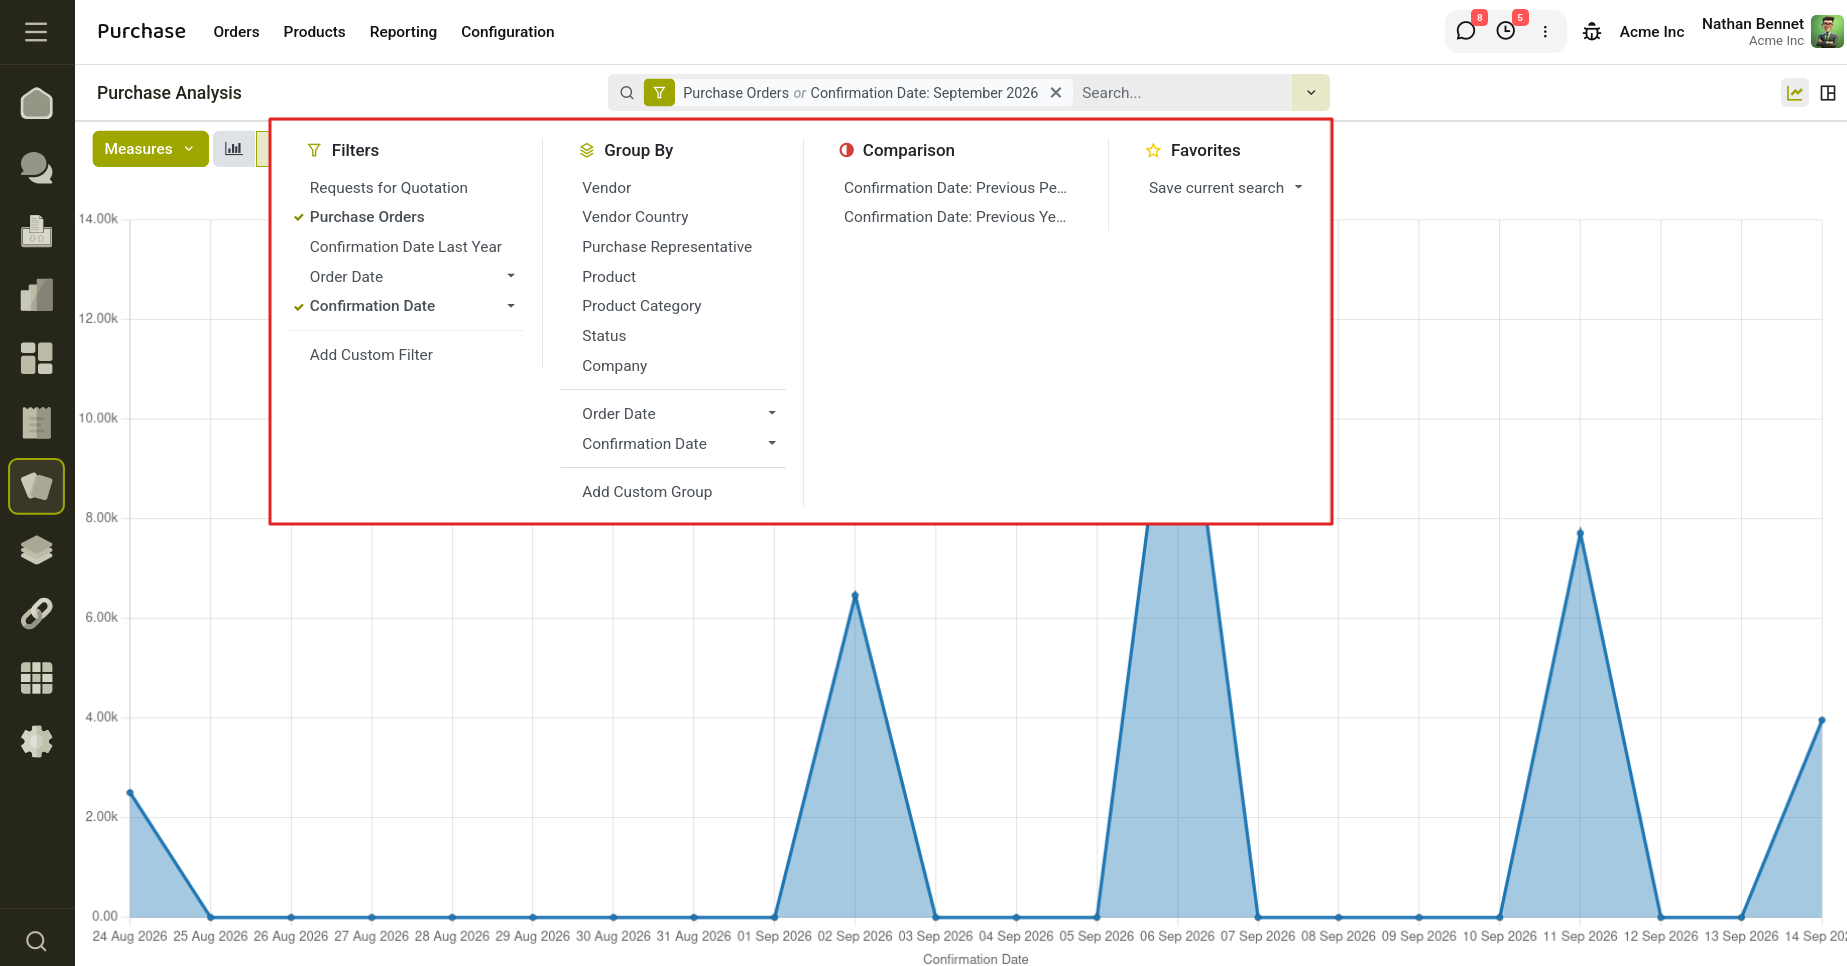
Fig 8.2 — Filters, Group By, and Comparison options
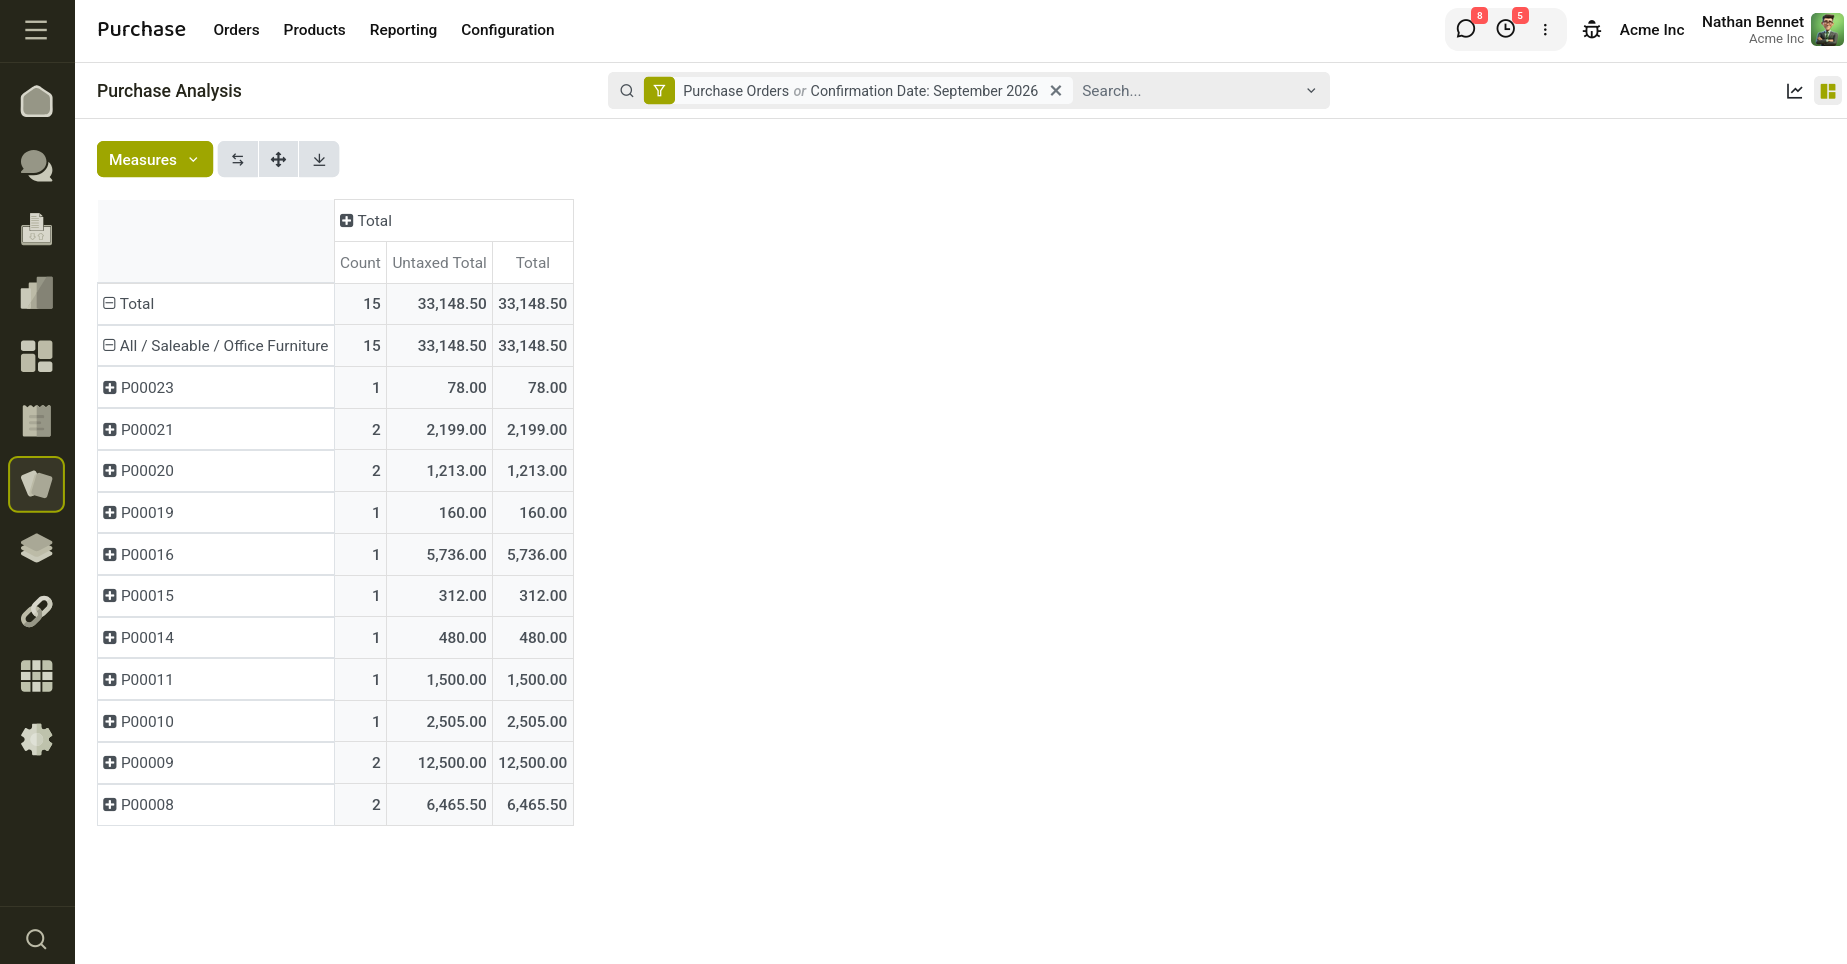
Fig 8.3 — Purchase Analysis pivot view