

Cyllo Exporting/Importing Data Documentation
Introduction
Cyllo provides built-in tools to export data out of the system and import data into it — without requiring any developer involvement or database access. Whether you are migrating data from a legacy system, performing a bulk update, sharing records with an external team, or backing up your database for disaster recovery, Cyllo handles it all from within the same interface your team uses every day. This document covers every method available for moving data in and out of Cyllo — from simple list exports to full database backups — so your team knows exactly which tool to use and when.
1. Exporting Data
1.1 Exporting from List Views
Any list view in Cyllo — Sales Orders, Customers, Products, Employees, Invoices, and more — can be exported directly to XLSX or CSV. No special permissions or technical knowledge are required.
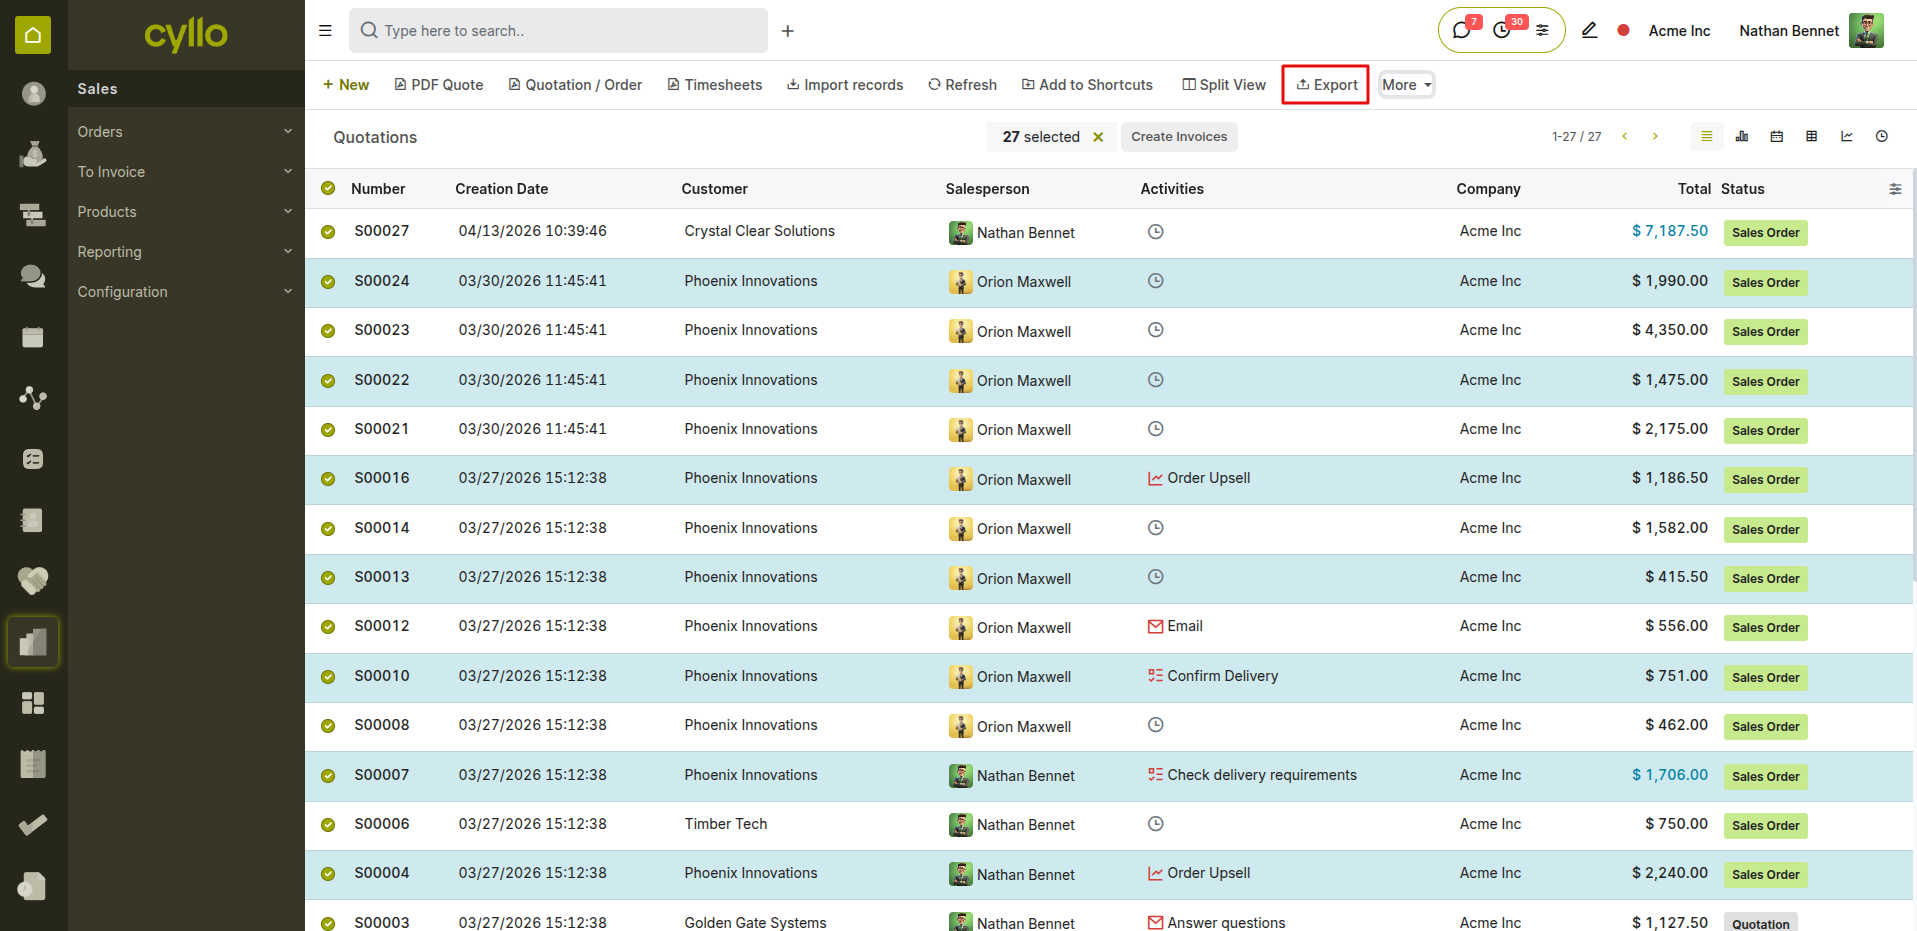
Fig 1.1 — List view with records selected and the Export option in the Action menu
How to Export Records from a List View:
- Navigate to the module and open the list view (e.g., Sales → Orders → Orders)
- Select the records you want to export by ticking the checkboxes on the left
- To export all records, tick the checkbox in the header row — then click Select All if prompted
- Click Action → Export
- The Export Records dialog opens
- Select the fields to include in the export
- Choose the file format: XLSX or CSV
- Click Export — the file downloads immediately to your device
Note
Filters and search terms applied to the list view affect which records are exported. Always confirm the active filters before selecting all records to avoid accidentally exporting incomplete data.
1.2 Selecting Fields to Export
Cyllo lets you choose exactly which fields to include in your export — you are not limited to what is visible on screen. Any field on the model, including related fields from linked records, can be added to the export.

Fig 1.2 — Export Records dialog showing available fields and selected export columns
How to Select Export Fields:
- In the Export Records dialog, the left panel shows Available Fields
- The right panel shows Selected Fields — these are the columns in your export file
- Type in the search box to find a specific field quickly
- Click the + button next to a field to add it to the export
- Drag fields in the Selected Fields list to reorder the columns
- To add a related field (e.g., Customer → Country), expand the field by clicking the arrow next to it and select the sub-field
- Click Remove (×) to remove a field from the export
Key Fields in the Export Dialog
- Available Fields: All fields on the current model — searchable by name.
- Selected Fields: The columns that will appear in the exported file.
- Field Path: Shown below the field name — indicates related model fields (e.g., partner_id/country_id/name).
- Export Format: XLSX (Excel) or CSV (comma-separated text).
Note
Related fields are indicated by an arrow (▶) next to the field name. Expand them to access fields from linked records — for example, on a Sales Order export you can include the Customer's Country, Payment Terms, or Pricelist.
1.3 Export Formats
Cyllo supports two export formats — XLSX and CSV. The right choice depends on what you plan to do with the exported data.
XLSX (Excel):
- Opens directly in Microsoft Excel or Google Sheets
- Preserves formatting, column widths, and special characters
- Best for: reports, analysis, sharing with management, printing
- Use when: the file will be read by a person or used for presentation
CSV (Comma-Separated Values):
- Plain text format — universally compatible with all data tools
- No formatting — raw data only
- Best for: re-importing into Cyllo, loading into external databases, data migration
- Use when: the file will be processed by another system or re-imported
Note
Always use CSV format when exporting data that you intend to clean up and re-import. XLSX files can introduce formatting issues during re-import. Use XLSX only for human-readable reports and analysis.
1.4 Saving Export Templates
If you regularly export the same set of fields from a model — such as a weekly customer list or monthly product report — you can save the field selection as a named template so you do not have to reconfigure it every time.
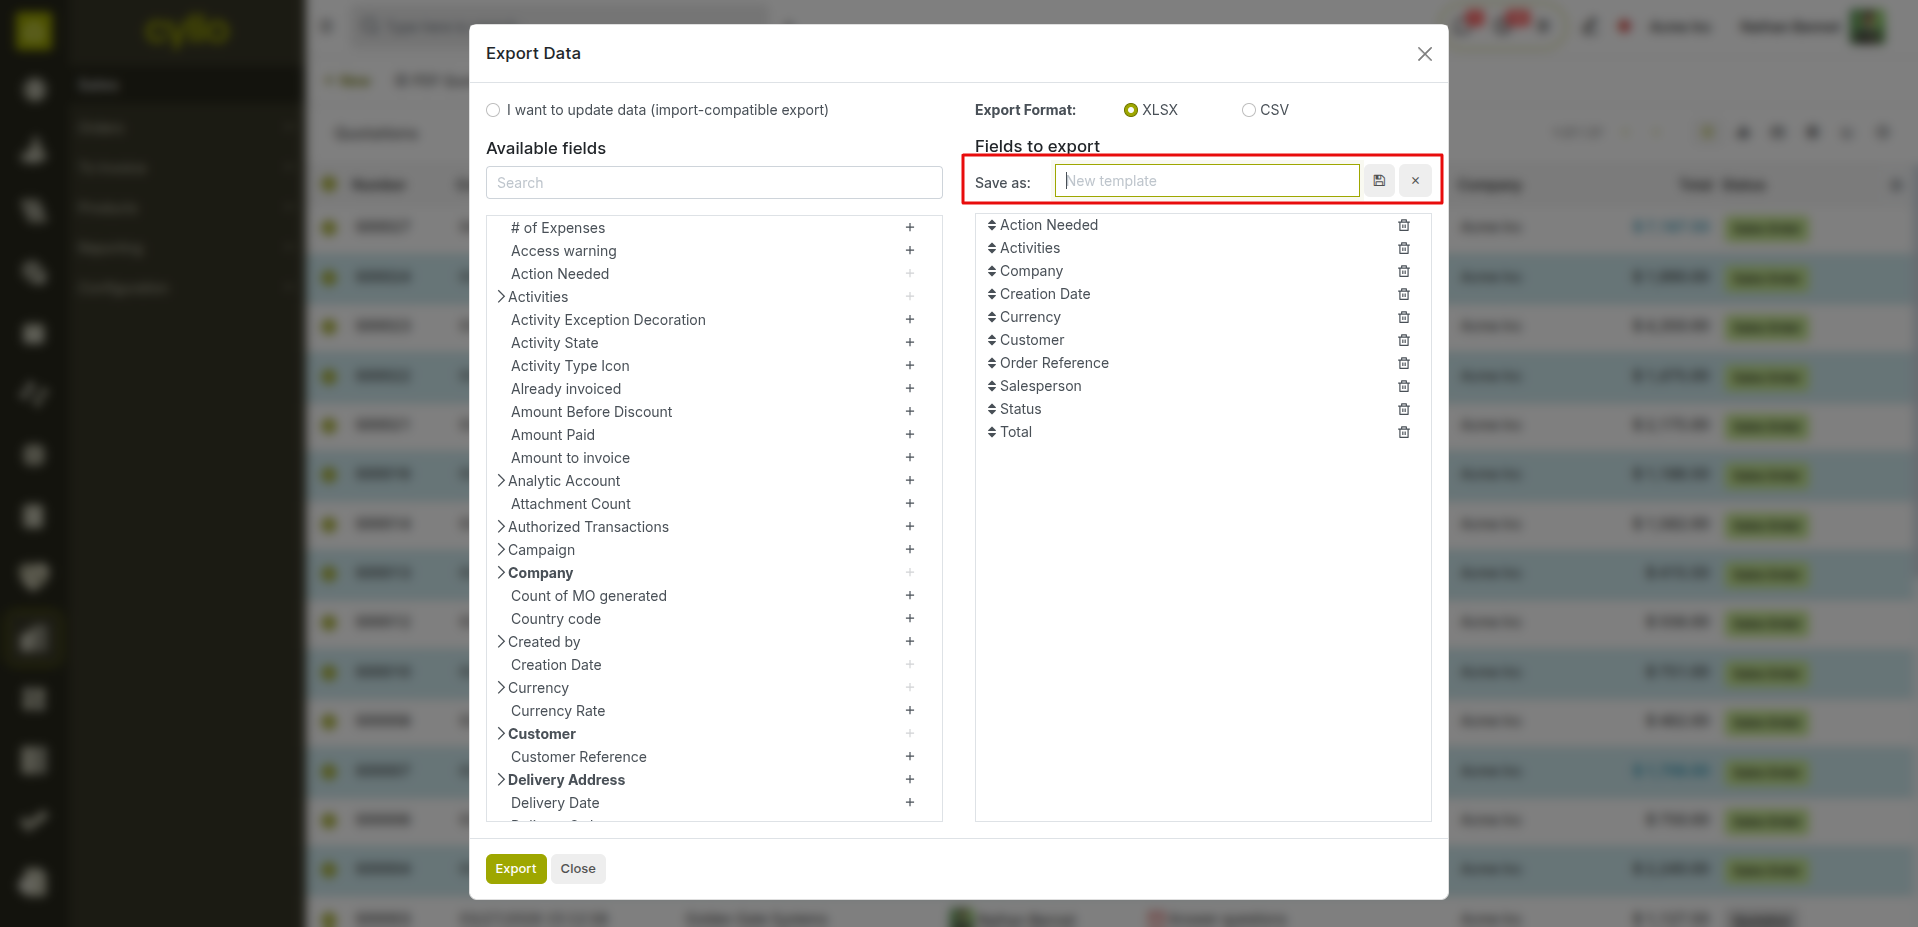
Fig 1.3 — Export template saved with a custom name for reuse
How to Save an Export Template:
- Open the Export Records dialog
- Configure the Selected Fields as required
- Click the Template dropdown at the top of the dialog
- Select New Template
- Enter a name for the template (e.g., Monthly Customer Export, Product Price List)
- Click Save Template
- The template is saved and available in the Template dropdown for all future exports of this model
Note
Export templates are saved per user — they are personal to your account and not shared with other users. If your team uses the same export regularly, each person should save their own copy.
1.5 Exporting from Reports
Cyllo's built-in reports — Sales Analysis, HR Analysis, Payroll Reports, Inventory Reports, and more — can also be exported directly from the reporting interface.
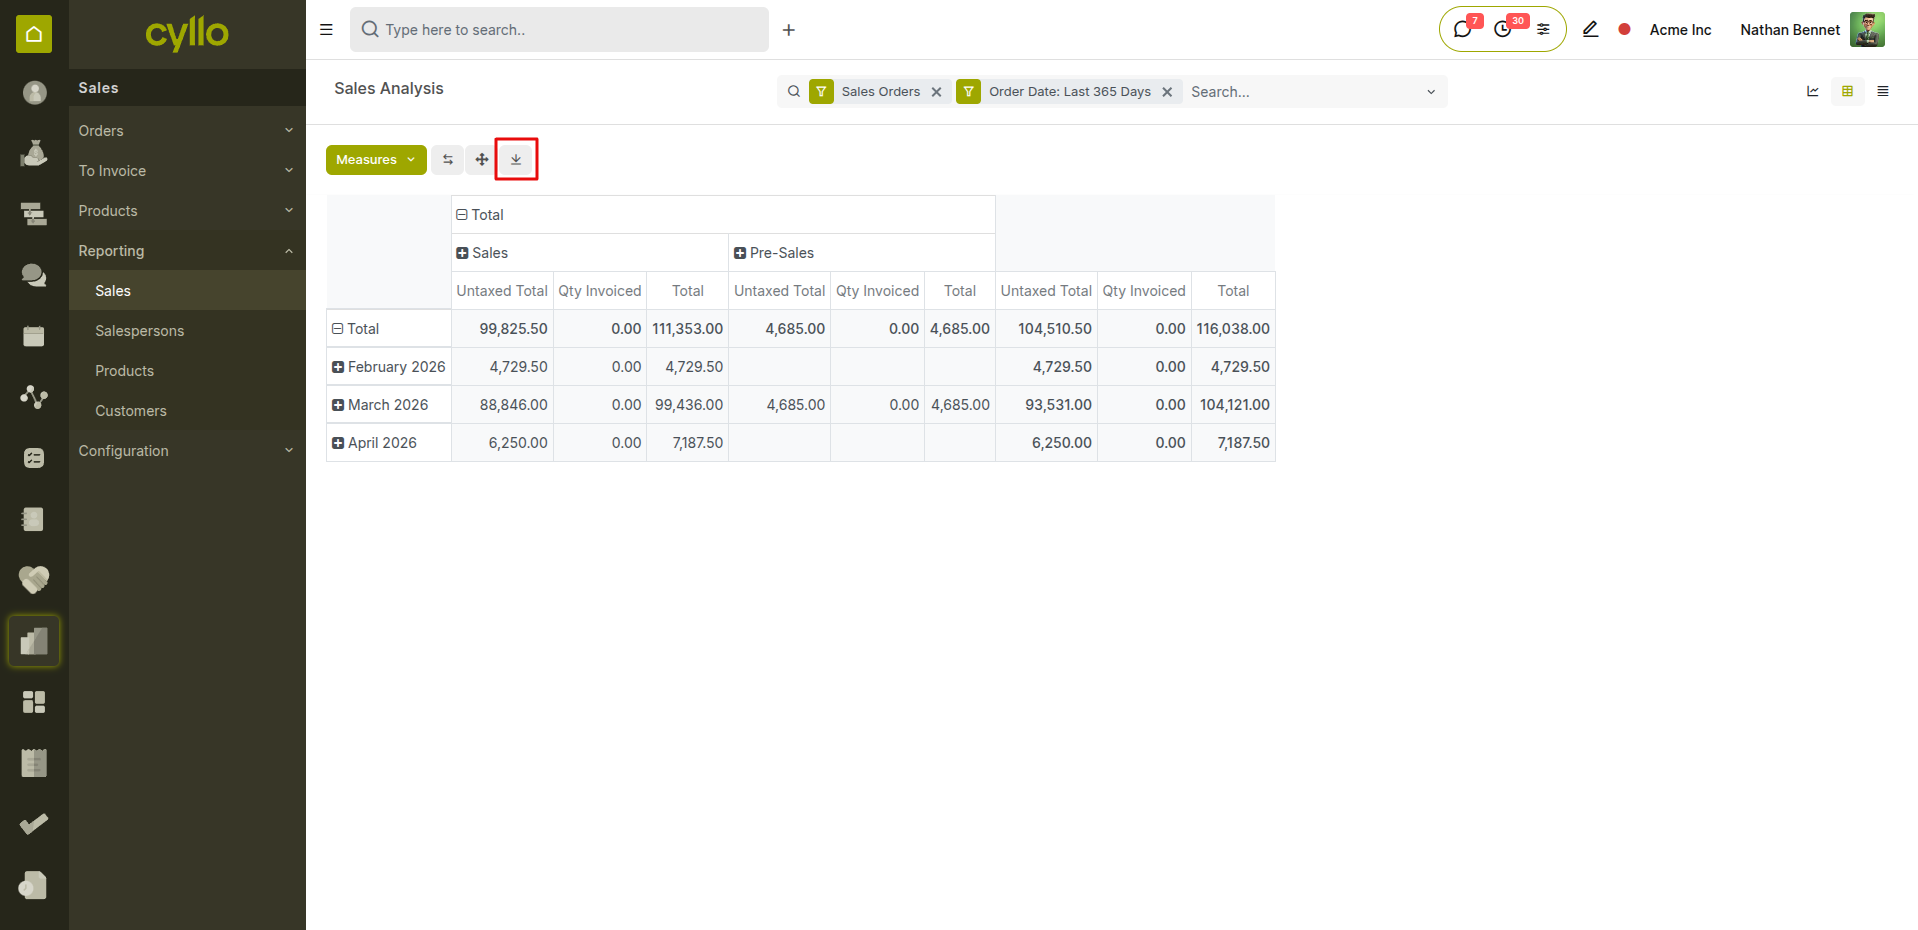
Fig 1.4 — Sales Analysis report with the Export to XLSX button highlighted
How to Export a Report:
- Navigate to the report (e.g., Sales → Reporting → Sales Analysis)
- Apply the desired filters and groupings
- Switch to the view you want to export: Pivot for tabular data, List for row-by-row
- Click the Export button (download icon, top right of the report)
- Select XLSX or CSV
- The file downloads immediately with all visible data
Note
The Pivot view export includes all row and column groupings exactly as displayed on screen — making it ideal for management reports that need structured breakdowns. The List view export gives a flat row-by-row data set — better for further analysis or re-import.
2. Importing Data
2.1 Preparing Your Import File
A well-prepared import file is the single most important factor in a successful data import. Before importing anything into Cyllo, your file must be structured correctly — with the right columns, the right formats, and no blank or incorrectly formatted rows. Import File Requirements:
- File format: XLSX or CSV (CSV strongly recommended for large imports)
- First row must be column headers — these map to Cyllo field names
- One record per row — no merged cells, no summary rows, no blank rows between data
- Date fields must be in YYYY-MM-DD format (e.g., 2026-03-15)
- Boolean fields use TRUE / FALSE or 1 / 0
- Numeric fields use plain numbers — no currency symbols, commas as thousands separators, or text
- Relational fields (Many2one) should reference the linked record's Name or External ID
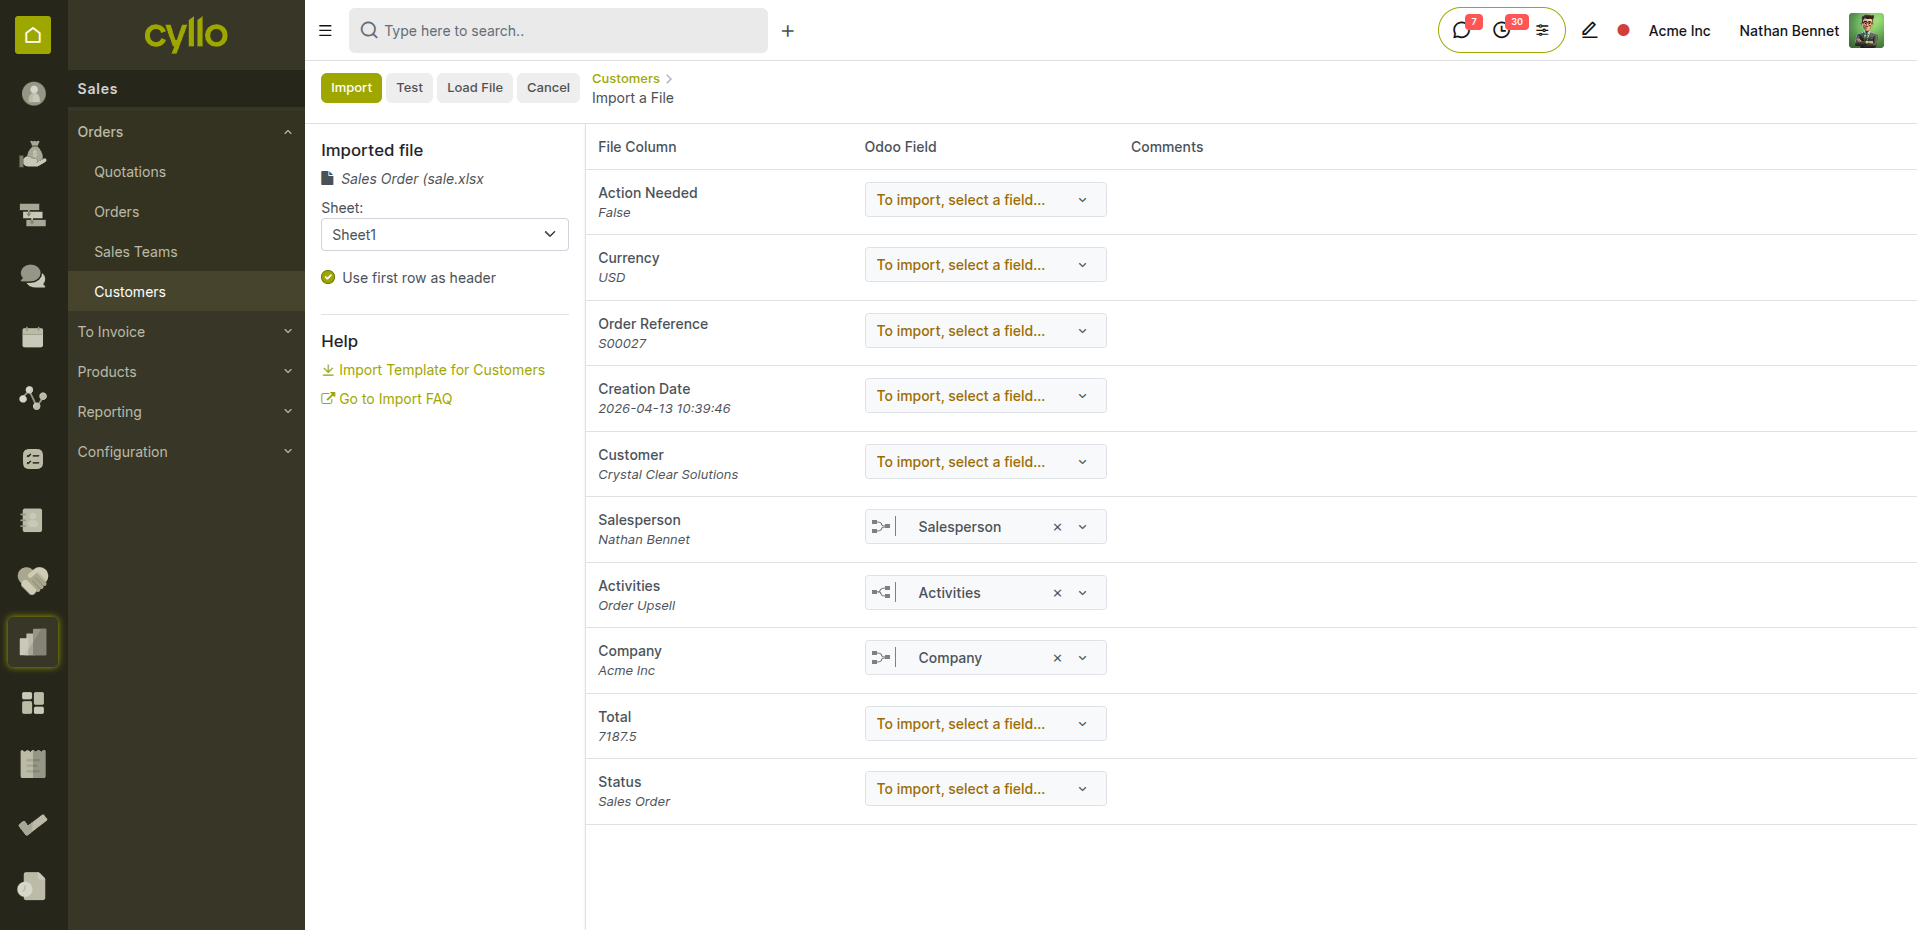
Fig 2.1 — Example import file for customers showing correctly formatted columns
Note
Download Cyllo's import template for the model you are importing into — it gives you the exact column headers Cyllo expects and eliminates guesswork.
2.2 Importing into Any Module
Any Cyllo model that has a list view supports data import. The import button appears in the top action bar of most list views — visible to users with the appropriate access rights.
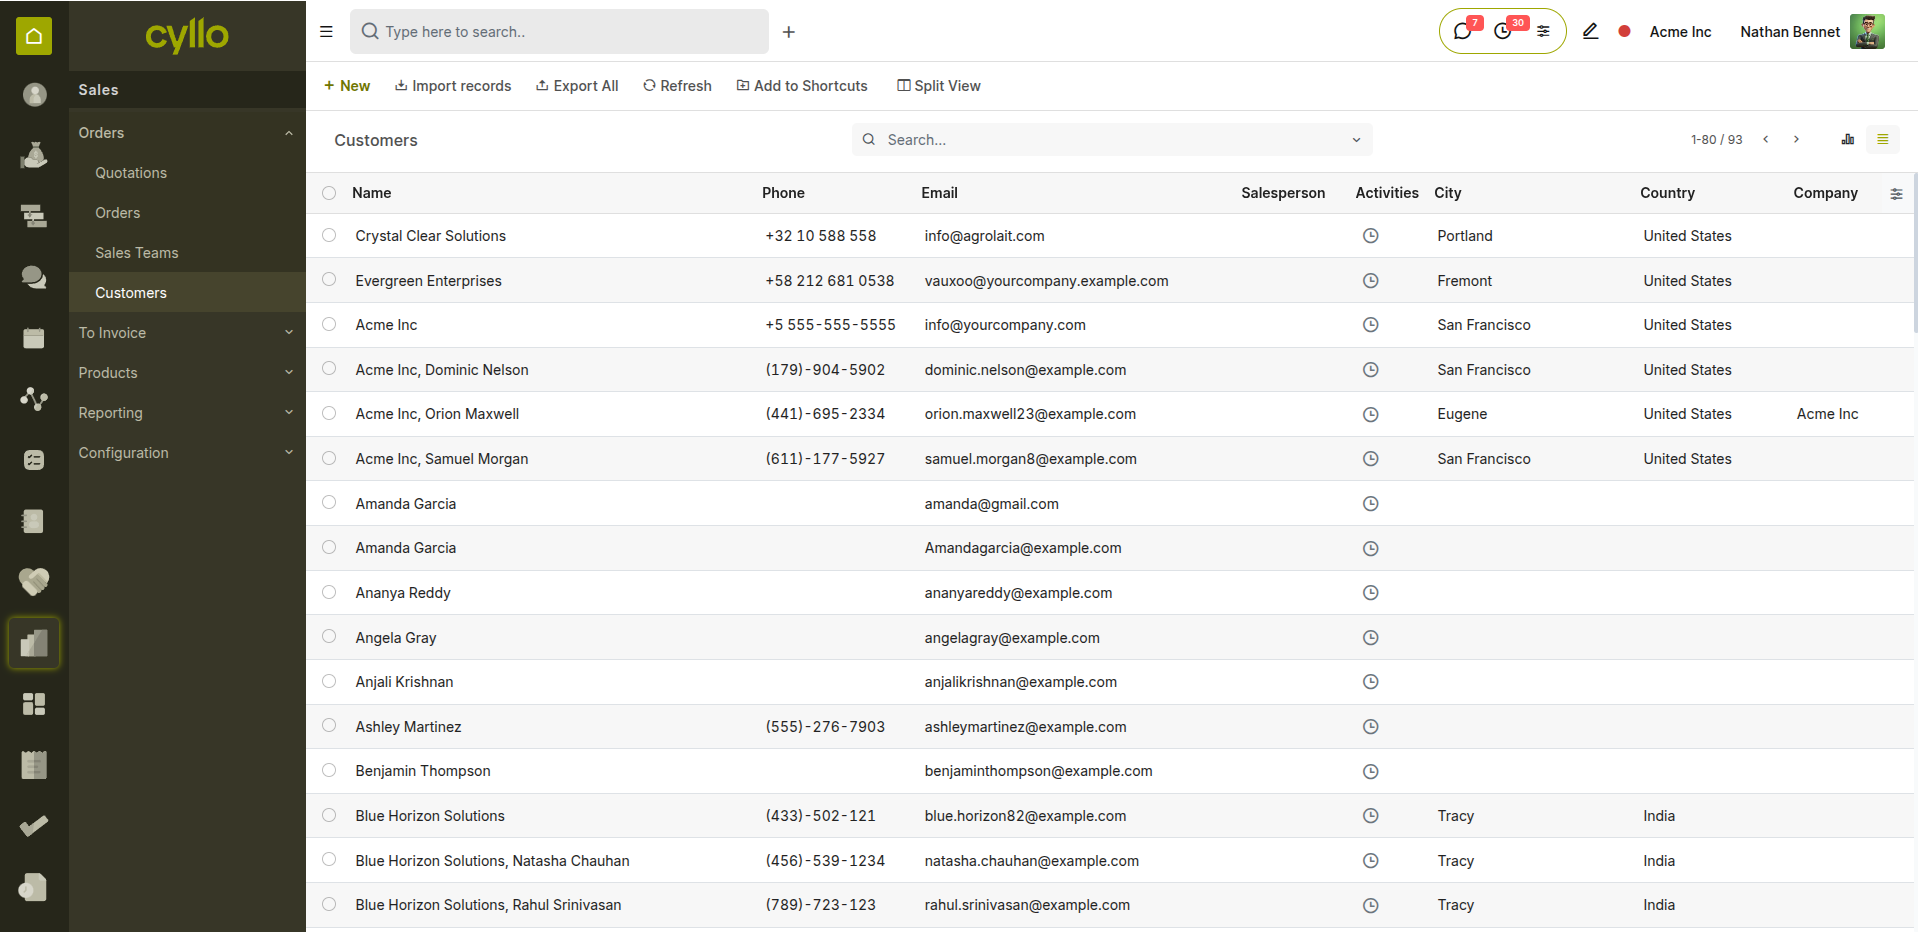
Fig 2.2 — Import button in the list view action bar for the Customers model
How to Import Data:
- Navigate to the model you want to import into (e.g., Sales → Orders → Customers)
- Click the Import Records button (upload icon or Import in the action bar)
- Click Upload File and select your prepared XLSX or CSV file
- Cyllo reads the file and displays a field mapping preview
- Map your file's column headers to the correct Cyllo fields (see Section 2.3)
- Click Test Import to validate the file before committing
- Review any errors reported in the test — fix them in your file
- Re-upload the corrected file and run the test again
- When the test passes with no errors, click Import to commit the data
Note
Always run Test Import before clicking Import. The test validates every row without writing any data — it costs nothing to test and saves significant time correcting partial imports or rollback issues.
2.3 Field Mapping
Field mapping connects the column headers in your import file to the corresponding fields in Cyllo. If your column names exactly match Cyllo's field labels or technical names, mapping is automatic. For custom column names, you map them manually.
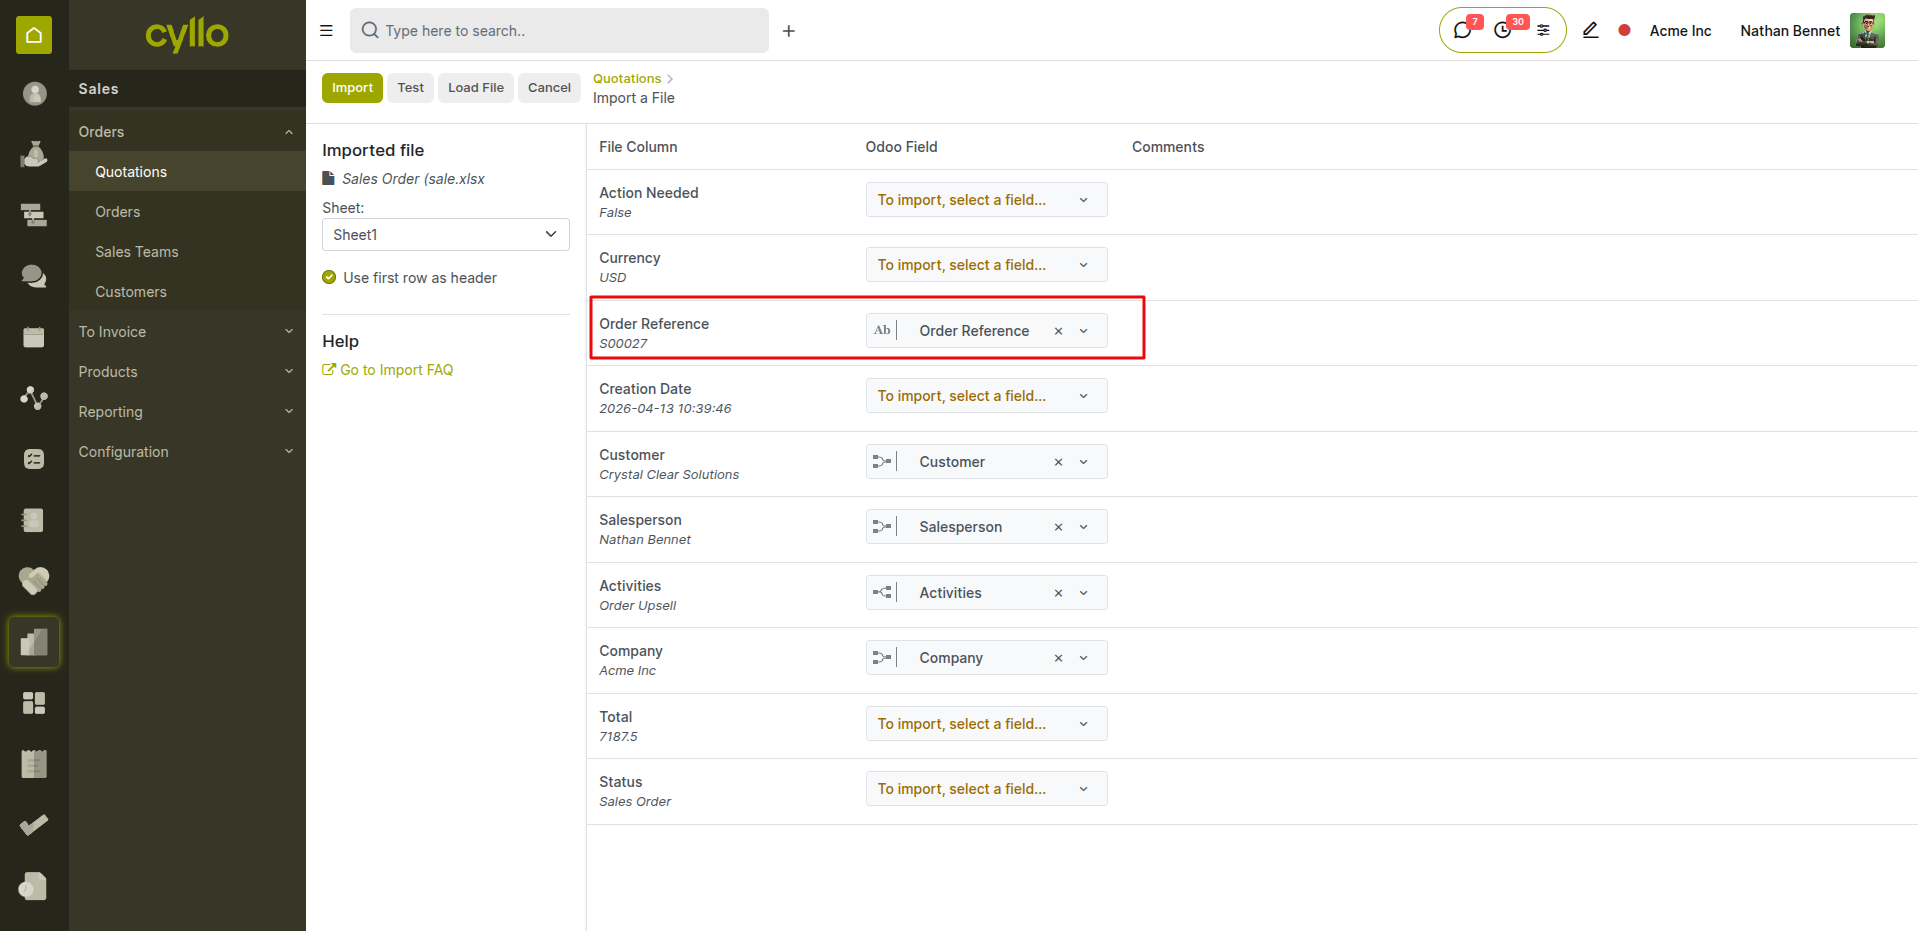
Fig 2.3 — Field mapping interface showing automatic and manual column-to-field assignments
How to Map Fields:
- After uploading your file, the Import screen shows a two-column mapping table
- Left column: your file's column headers
- Right column: the Cyllo field each column maps to
- Columns with exact name matches are mapped automatically (shown with a green tick)
- For unmapped columns, click the dropdown in the right column and search for the correct field
- To ignore a column, select Do Not Import for that row
- Relational fields (e.g., Customer, Product, Salesperson) can be matched by Name, External ID, or ID
Field Types & How to Populate Them:
- Text Fields: Plain text — e.g., "Acme Corporation", "Senior Accountant"
- Number Fields: Plain numeric value — e.g., 1500.00, 12, 0.25
- Date Fields: YYYY-MM-DD format — e.g., 2026-04-01
- Boolean Fields: TRUE or FALSE
- Many2one (Relational): The exact name of the linked record — e.g., "USD" for currency, "John Smith" for salesperson
- Many2many: Multiple values separated by a comma — e.g., "Tag1,Tag2,Tag3"
- Selection Fields: The exact option value — e.g., "confirmed", "draft", "done"
Note
For relational fields, the value in your import file must exactly match an existing record in Cyllo. If the linked record does not exist yet, the import will fail for that row. Import master data (customers, products, employees) before importing transactional data (orders, invoices, payslips).
2.4 Handling Import Errors
After running Test Import, Cyllo reports any rows that contain errors — showing the row number, the field, and the reason for the error. No data is written during a test — you fix the file and re-test until all errors are resolved.
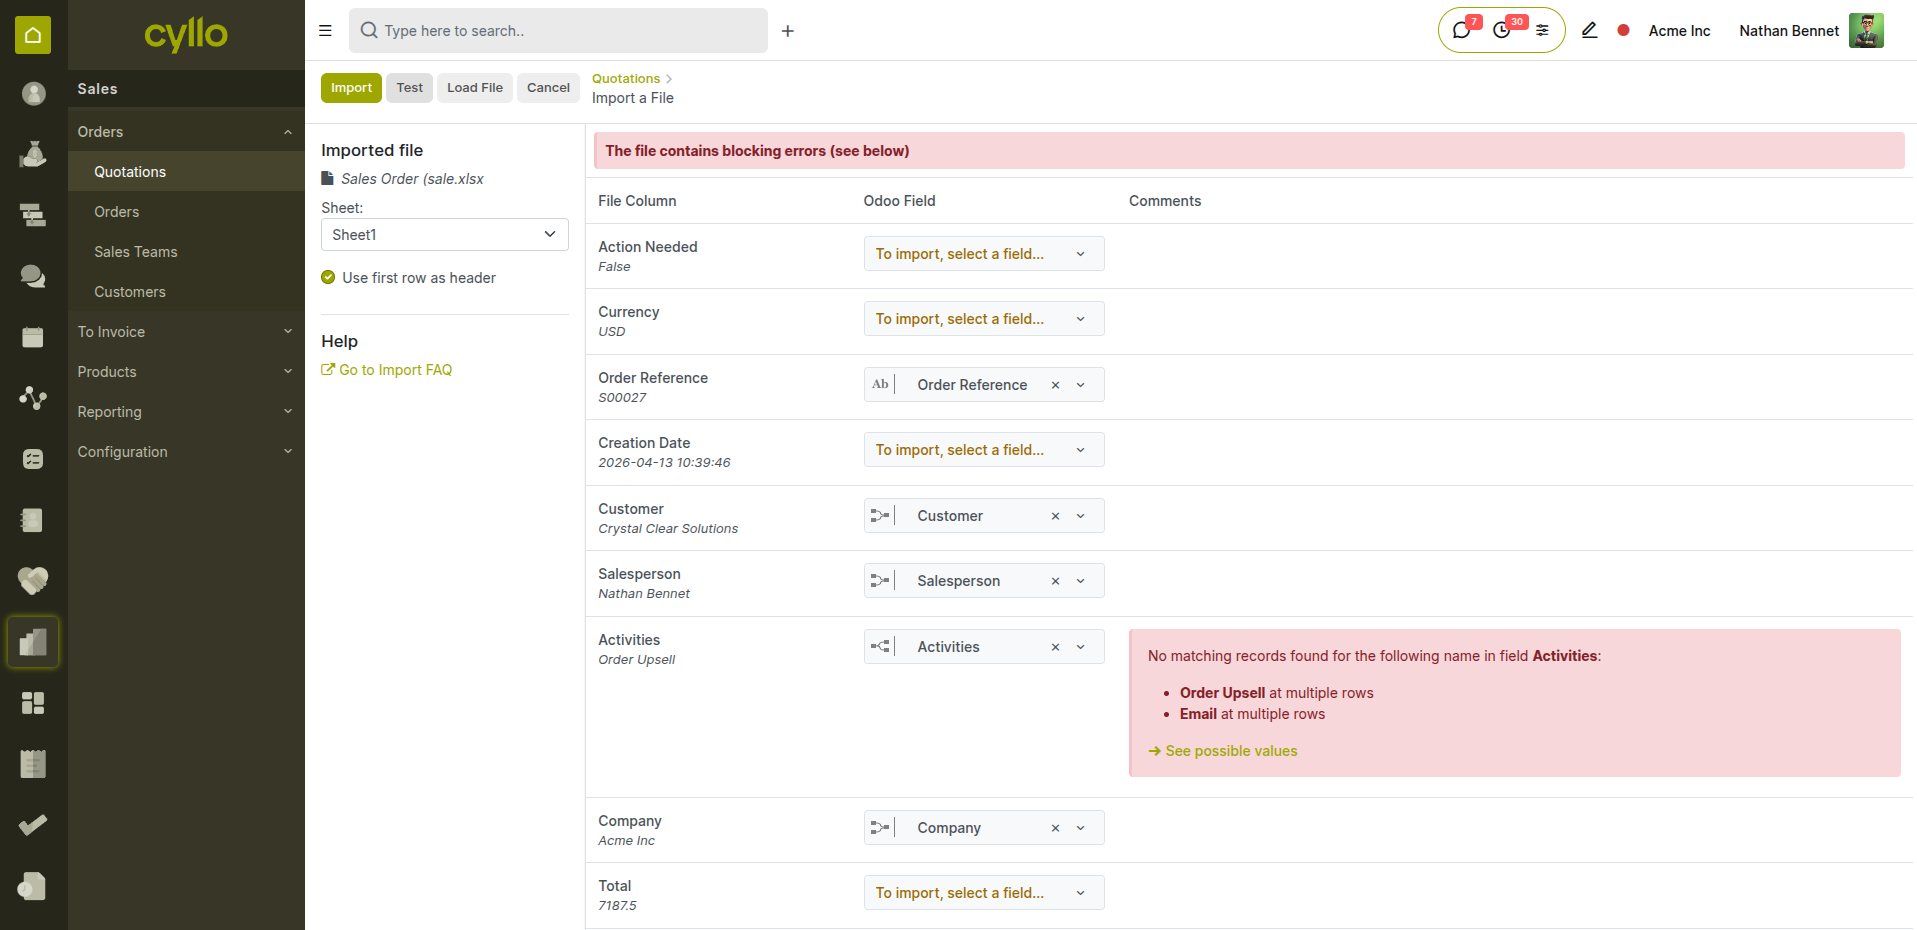
Fig 2.4 — Import error report showing row number, field, and error description
Common Import Errors & How to Fix Them:
- Record Not Found (relational field): The value in a Many2one field does not match any existing record. Fix: Check spelling and exact capitalisation. Ensure the linked record exists in Cyllo before importing.
- Invalid Date Format: The date value is not in YYYY-MM-DD format. Fix: Reformat dates in your spreadsheet. In Excel use: =TEXT(A1,"YYYY-MM-DD")
- Duplicate External ID: An External ID in your file already exists in Cyllo. Fix: Remove the duplicate rows or update the existing records instead of re-importing them.
- Required Field Missing: A mandatory field has a blank value in one or more rows. Fix: Fill in all required fields. Download the template to see which fields are required (marked with *).
- Value Not in Selection List: A Selection field contains a value that does not match any valid option. Fix: Use only the exact option values Cyllo accepts — check the field in the UI to confirm the exact values.
Note
Fix all errors in your source file — do not try to import a partially errored file. Even if 990 out of 1000 rows are correct, it is better to fix all 10 errors and import the complete clean file in one run.
2.5 Updating Existing Records
Import is not only for new records — you can also use it to update existing records in bulk. This is useful for mass price updates, bulk field changes, or correcting data across many records at once. How to Update Existing Records via Import:
- Export the records you want to update — include the ID or External ID column in the export
- Open the exported file and make the changes you need in the relevant columns
- Do not change the ID or External ID values — these identify which records to update
- Save the file
- Import it back using the standard import process
- Cyllo matches each row to the existing record by ID and updates only the fields you have included
Note
When updating existing records, only include the columns you want to change — plus the ID column for matching. You do not need to include all fields. Leaving a column out of the import file means that field is not touched — it is not cleared.
3. Import Templates
3.1 Required vs Optional Fields
Every Cyllo model has a set of fields that are mandatory — the import will fail for any row where these are blank. Optional fields can be left empty without causing errors. How to Identify Required Fields:
- Required fields are marked with an asterisk (*) in the import field mapping screen
- In the downloaded template, required column headers are marked with a star or noted in the first row
- In the Cyllo UI, required fields show a red border when left blank on the form
Commonly Required Fields by Model:
- Customers / Vendors: Name
- Products: Name, Product Type
- Employees: Name, Job Position
- Sale Orders: Customer, Order Date, at least one Order Line with Product and Quantity
- Invoices: Customer, Invoice Date, Journal, at least one line with Account and Amount
- Chart of Accounts: Account Code, Account Name, Account Type
Note
Optional fields that are left blank will be set to their default values on import — the same defaults that apply when creating a record manually. Check default values in the Cyllo settings for your company before importing to ensure they are correct.
3.2 Relational Fields & External IDs
Relational fields link one record to another — for example, a Sales Order links to a Customer, a Product links to a Category, an Employee links to a Department. Getting these right is the most important part of preparing an import file.
How Relational Fields Work in Import:
- By Name: Enter the exact name of the linked record as it exists in Cyllo (e.g., "Acme Corp", "USD", "Sales Team A")
- By External ID: Enter the External ID of the linked record (e.g., "base.res_partner_1") — more reliable for programmatic imports
- By Database ID: Enter the numeric database ID — only recommended for technical imports What is an External ID? An External ID is a unique stable identifier assigned to every record in Cyllo — used to reliably reference records across imports, exports, and integrations without depending on display names that might change. How to Find an External ID:
- Enable developer mode: Settings → Activate Developer Mode
- Open the record you need the External ID for
- Go to Action → View Metadata
- The External ID is shown in the popup (e.g., "your_module.res_partner_123")
Note
For large imports with many relational fields, always use External IDs instead of names. Names can have typos, duplicates, or change over time — External IDs are permanent and unique, making import matching reliable.
4. Common Data Imports
4.1 Importing Customers & Vendors
Customer and vendor records are usually the first data imported into a new Cyllo instance — they are referenced by almost every other model (orders, invoices, contracts) so they must exist before transactional data is imported.
- Required Fields: Name
- Recommended Fields: Email, Phone, Street, City, Country, Payment Terms, Pricelist, Sales Team, VAT Number
- Import Path: Sales → Orders → Customers → Import Records
Tips:
- Import companies first, then individuals linked to those companies (set Company Name column to the parent company name)
- Set the Company Type column: Company or Individual
- Include the Country field — it drives tax and fiscal position rules
- Include External IDs in your file so you can update these records reliably in future imports
4.2 Importing Products
Products are the second most critical master data import — they are referenced by sales orders, purchase orders, invoices, and inventory records.
- Required Fields: Name, Product Type
- Recommended Fields: Internal Reference, Sales Price, Cost, Category, Unit of Measure, Purchase UoM, Taxes, Supplier, Barcode
- Import Path: Sales → Products → Products → Import Records Tips:
- Set Product Type correctly: Storable Product, Consumable, or Service — this cannot be changed later without consequences
- Include the Internal Reference (SKU) for easy identification after import
- Import Product Categories before importing Products — categories must exist first
- For products with variants, import the product template first, then import variants separately
4.3 Importing Employees
Employee records are imported at go-live and updated when bulk changes are needed — such as department restructures or mass salary adjustments.
- Required Fields: Name
- Recommended Fields: Job Position, Department, Manager, Work Email, Work Phone, Work Schedule, Private — Date of Birth, Private — Identification Number
- Import Path: Employees → Employees → Import Records Tips:
- Import Departments and Job Positions before importing Employees — they must exist as linked records
- Set the Manager field using the manager's name exactly as it appears in Cyllo
- After importing employees, create contracts separately — contracts cannot be bulk imported through the employee import; use the contract model import instead
- Import employees in hierarchical order — managers before their direct reports, so the Manager field can be resolved correctly
4.4 Importing Chart of Accounts
The Chart of Accounts defines the financial structure of the company. It is typically imported once at initial setup and rarely changed after that.
- Required Fields: Code, Name, Account Type Recommended Fields: Parent Account, Reconcile (True/False), Deprecated (True/False), Tax, Tags Tips:
- Import parent accounts before child accounts — child accounts reference their parent
- Account Type must exactly match Cyllo's accepted values: Receivable, Payable, Bank, Cash, Current Assets, Fixed Assets, Current Liabilities, Equity, Income, Expenses, etc.
- Set Reconcile to TRUE for receivable and payable accounts — required for bank reconciliation to work
- Do not import accounts that already exist in the default chart — this causes duplicates
4.5 Importing Opening Balances
Opening balances bring historical financial data into Cyllo at go-live — ensuring the starting balance of every account matches your previous system before new transactions begin. How to Import Opening Balances:
- Go to Accounting → Accounting → Journal Entries → New
- Set the Journal to a dedicated Opening Balance journal
- Set the Date to your go-live date minus one day (the last day of the previous period)
- Add one line per account with the correct Debit or Credit amount
- For large charts of accounts, prepare the lines as a CSV and import into the journal entry lines
- Post the journal entry — balances are now reflected in all financial reports
Note
Opening balances must be imported before any live transactions are entered. Get sign-off from your accountant on the opening balance figures before posting — reversing a posted opening entry causes complications in financial reporting.
4.6 Importing Sales Orders
Historical sales orders from a previous system are sometimes imported at go-live for reference — so the sales team can look up past orders without switching to another system.
- Required Fields: Customer, Order Date, Product (on order lines), Quantity, Unit Price
- Recommended Fields: Salesperson, Sales Team, Pricelist, Payment Terms, External ID
- Import Path: Sales → Orders → Orders → Import Records Tips:
- Import historical orders in Locked state — this prevents accidental re-processing or re-invoicing
- Customers and Products must exist in Cyllo before importing orders
- For orders with multiple lines, each line is a separate row in the CSV — repeat the order header fields on every line or use a blank in subsequent rows (Cyllo groups them by order)
- Do not import historical orders as Confirmed if they have already been fully invoiced and delivered — use a reference-only status to avoid triggering inventory or accounting movements
5. Data Migration Best Practices
5.1 Pre-Migration Checklist
A successful data migration into Cyllo requires preparation before a single row of data is imported. Rushing the migration is the most common cause of go-live problems. Before Starting Any Import:
- Define the scope: which data is being migrated and which is being left in the legacy system
- Cleanse your source data: remove duplicates, fix formatting, standardise values
- Confirm go-live date: all imports should be completed and validated before go-live
- Agree on opening balance date with your accountant
- Identify all relational dependencies: know which models must be imported before others
- Set up a staging environment for test imports before touching production data
- Assign a migration owner: one person who is responsible for the import process end-to-end
- Back up your Cyllo database before starting any bulk import
5.2 Test Import on Staging
Never run a bulk import directly on your production Cyllo database without testing it first. Always use a staging instance — a copy of your production environment — to test and validate the import before going live. How to Test Imports Safely:
- Request a staging environment from your Cyllo administrator or set one up locally
- Run the full import on staging first
- Validate the imported data: check counts, spot-check individual records, run reports
- Confirm relational links are correct: orders linked to the right customers, employees linked to the right departments
- Fix any issues in the source file
- Re-run the import on staging until it is clean
- Only then run the import on the production database
Note
A staging test import takes a few extra hours. A failed production import can take days to clean up — and in some cases requires a full database restore. The time investment in testing always pays off.
5.3 Import Order & Dependencies
Cyllo records reference each other — a Sales Order references a Customer, a Customer references a Country, a Payslip references an Employee. Import in the wrong order and relational lookups fail, causing cascading errors. Correct Import Order for a Full Go-Live Migration:
Phase 1 — Configuration (no dependencies): Countries and States (usually pre-loaded) Currencies Units of Measure Product Categories Account Tags and Tax Groups Payment Terms Sales Teams
Phase 2 — Master Data: Chart of Accounts Taxes Pricelists Customers and Vendors Products (after categories and UoMs exist) Warehouses and Locations
Phase 3 — HR Master Data: Departments Job Positions Employees (managers before direct reports) Contracts (after employees exist) Leave Types and Accrual Plans Leave Allocations (after employees and leave types exist)
Phase 4 — Transactional Data: Opening Balances (after chart of accounts) Historical Sales Orders (after customers and products) Historical Purchase Orders (after vendors and products) Historical Invoices (after customers and chart of accounts) Initial Stock Levels (after products and warehouses)
Note
Never skip Phase 1 and 2 to get to Phase 4 faster. Every transactional record depends on master data. Importing transactions before master data means every row fails — and you end up doing the work twice.
5.4 Post-Import Validation
After completing an import, validate the data before declaring the migration done. A passed import test does not mean the data is correct — it only means the file was formatted correctly. Post-Import Validation Checklist:
- Record counts: compare the number of imported records against the source system
- Spot-check records: open 10–20 randomly selected records and verify all fields
- Check relational links: open a Sales Order and confirm the Customer, Salesperson, and Products are correctly linked
- Run key reports: Sales Analysis, Customer Ageing, Stock Valuation — compare totals to the source system
- Check opening balances: run the Balance Sheet and Trial Balance and compare to the previous system
- Confirm leave balances: spot-check 5–10 employees and verify their leave allocations match the source HR system
- Test a full workflow end-to-end: create a new sale order, confirm it, create an invoice, and post it
Note
Post-import validation should be signed off by the relevant department heads — not just the IT or implementation team. Finance signs off on accounting data, HR signs off on employee data, and Sales signs off on customer and order data.
6. Database Backup & Restore
6.1 Manual Database Backup
A manual database backup creates a complete snapshot of your Cyllo instance — all data, attachments, and configuration — at a specific point in time. Always take a manual backup before any bulk import or major system change.
Fig 6.1 — Database backup manager interface with backup now button
How to Take a Manual Backup:
- Go to Settings → Technical → Database Backup Management
- Click New to create a backup configuration if one does not exist
- Enter the Database Name and Master Password
- Select the Backup Format: Zip (includes filestore attachments) or Dump (database only)
- Click Backup Now to trigger an immediate backup
- The backup file downloads to the configured destination
- Check the Backup Log to confirm the backup completed successfully
Note
Always take a Zip format backup (not Dump) when you need a complete snapshot — Zip includes all uploaded attachments and documents. Dump format is database-only and cannot restore file attachments.
6.2 Automated Backup Configuration
Cyllo's Database Backup module (cyllo_database_backup) supports fully automated scheduled backups to multiple destinations — running in the background without any manual intervention.
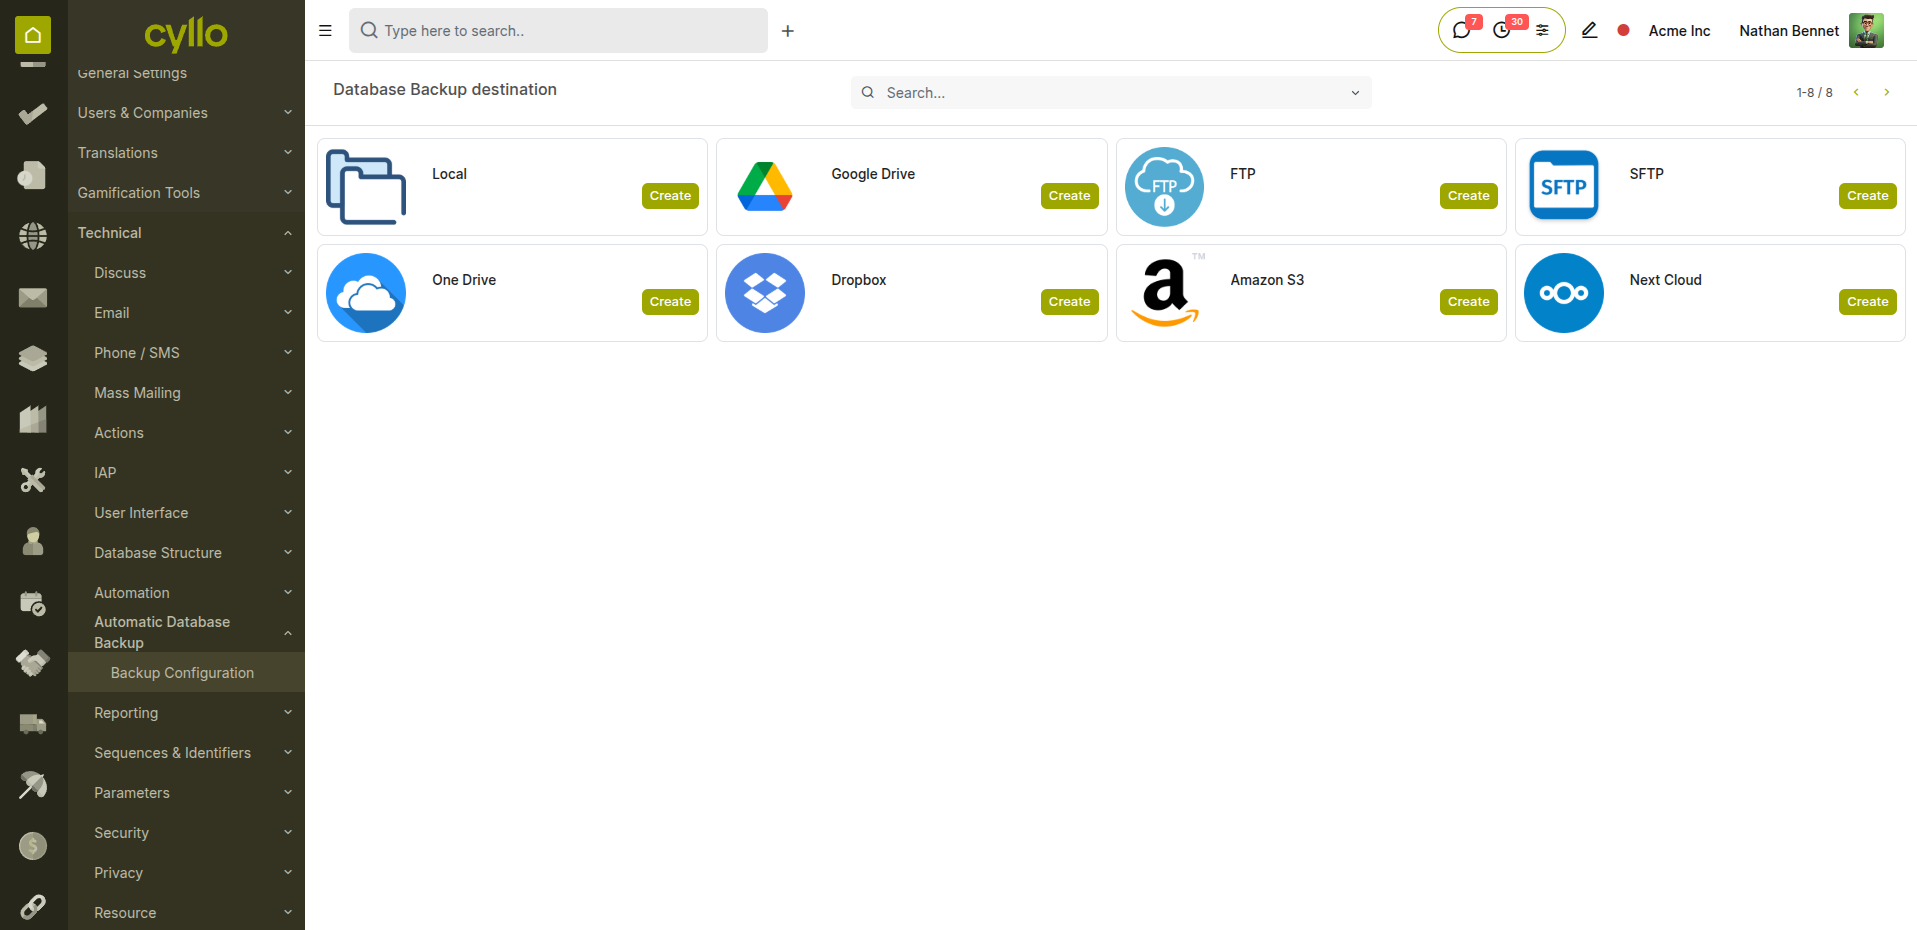
Fig 6.1 — Automated backup configuration form with schedule and destination settings
How to Configure Automated Backups:
- Go to Settings → Technical → Database Backup Management → New
- Enter a Configuration Name (e.g., Daily Backup to Google Drive)
- Enter the Database Name and Master Password
- Select the Backup Format: Zip or Dump
- Set the Schedule: Daily, Weekly, or Monthly
- Add one or more Backup Destinations (see Section 6.3)
- Save the configuration
- Cyllo will run the backup automatically according to the schedule
- Review the Backup Log regularly to confirm backups are completing without errors Key Fields Database Name: The technical name of your Cyllo database. Master Password: The administrator password set during Cyllo installation. Backup Format: Zip (full backup with attachments) or Dump (database only). Schedule: The frequency at which automatic backups run. Destinations: Where the backup files are sent after creation.
Note
Configure at least two backup destinations — one local and one cloud. If your server fails, you need the cloud copy. If your internet is down, you need the local copy. Never rely on a single backup destination.
6.3 Backup Destinations
Cyllo supports eight backup destination types — from local file storage to major cloud platforms. Multiple destinations can be configured per backup run — the backup is sent to all of them simultaneously.
Fig 6.3 — Backup destinations list showing cloud and local storage options
Available Backup Destinations: Local Storage: Saves the backup file to a folder on the Cyllo server. Fast but vulnerable to server failure. Use as a primary destination only if combined with a cloud destination.
Google Drive: Saves to a configured Google Drive folder via OAuth. Requires Google Drive API credentials. Ideal for teams already using Google Workspace.
Dropbox: Saves to a Dropbox folder using Dropbox API client key and secret. Simple to set up and widely accessible.
Amazon S3: Saves to an AWS S3 bucket using access key and secret. Most reliable for enterprise-level backup retention with versioning and lifecycle policies.
OneDrive: Saves to a Microsoft OneDrive folder. Ideal for organisations using Microsoft 365.
NextCloud: Saves to a self-hosted NextCloud instance. Preferred by organisations that want full control over their backup storage without relying on third-party cloud providers.
Remote SFTP: Saves to any SFTP-accessible server using host, port, username, and password. Flexible for organisations with existing backup infrastructure.
FTP: Saves to any FTP-accessible server. Use only when SFTP is not available — FTP is unencrypted and less secure.
Note
For best security and resilience, use Amazon S3 or Google Drive as your primary cloud destination combined with local storage. Enable S3 versioning so that previous backup versions are retained — allowing you to restore to any point in time, not just the most recent backup.
6.4 Restoring a Backup
If data is lost, corrupted, or a bulk import goes wrong, a backup can be restored to bring the database back to its previous state. Restoration replaces the entire database — all changes made after the backup point will be lost.
Fig 6.4 — Cyllo database manager restore interface with backup file upload
How to Restore a Database Backup:
- Go to the Cyllo Database Manager: https://your-cyllo-domain/web/database/manager
- Click Restore
- Upload the backup file (Zip or Dump format)
- Enter the Master Password
- Choose whether to restore as a new database (safe — keeps existing database intact) or overwrite the existing database
- Click Restore
- Wait for the restoration to complete — this may take several minutes for large databases
- Log in and verify the restored data When to Restore:
- A bulk import introduced incorrect data that cannot be easily reversed
- Critical records were accidentally deleted
- A system error corrupted data
- Disaster recovery after server failure
Note
Before restoring to production, always restore to a separate database first and verify the data is correct. Restoring directly to production without verification risks replacing good data with a backup that has its own issues. Test the restore, then decide whether to apply it to production.