

Cyllo CRM Documentation
Introduction
The most often used module in Cyllo for managing lead generation and customer acquisition is the Customer Relationship Management (CRM) module. Using this platform, you can collect and arrange leads from multiple sources to convert them into opportunities quickly and effectively. It is also possible to handle these leads via a single integrated channel. The ability of Cyllo CRM to integrate with other modules, like Sales and Inventory, ensures increased productivity in producing output, or the ability to turn leads into opportunities.
It is easier for the sales department to operate effectively because of the CRM module's speed and versatility. Because it's closely related to marketing, accounting, management, and other departments, you can monitor and control their activities with the help of the CRM module. A customer relationship management (CRM) system is one of the essential elements of a business that directly affects how it expands. This module provides a comprehensive framework for customer-related operations, optimizing business dealings, and raising output. Gathering contact details, engagement metrics, and sales potential of potential clients and customers within a business is the primary function of Cyllo's CRM module.
Maintaining and advancing the company's commercial prospects requires a solid professional relationship with its clientele. All necessary data is transferred to and from the system by the centralized Cyllo ERP database, making creating and managing these interactions more efficient. For future convenience, you can store a record of your clients and business dealings in this section. The CRM module's flexible and user-friendly interface improves its operational competency in managing your correspondence with prospects and customers. You might also schedule and prepare meetings with potential customers. Additionally, it makes it easier for the sales department to input and export pertinent system contact data. The integration with the Sales Module in Cyllo’s CRM module ensures seamless coordination between customer relationship management and sales activities. From the point of lead generation to the final sale, this connection enables a uniform view of client interactions. Sales representatives can access customer data, communication history, and opportunity status directly from the CRM interface, enabling them to make informed decisions and prioritize their sales efforts effectively. By streamlining the sales process and improving data visibility, this integration enhances overall sales efficiency and customer satisfaction.
1. Dashboard
When you open the CRM module, the first thing you see is the main dashboard, which gives you an overview of all CRM details.
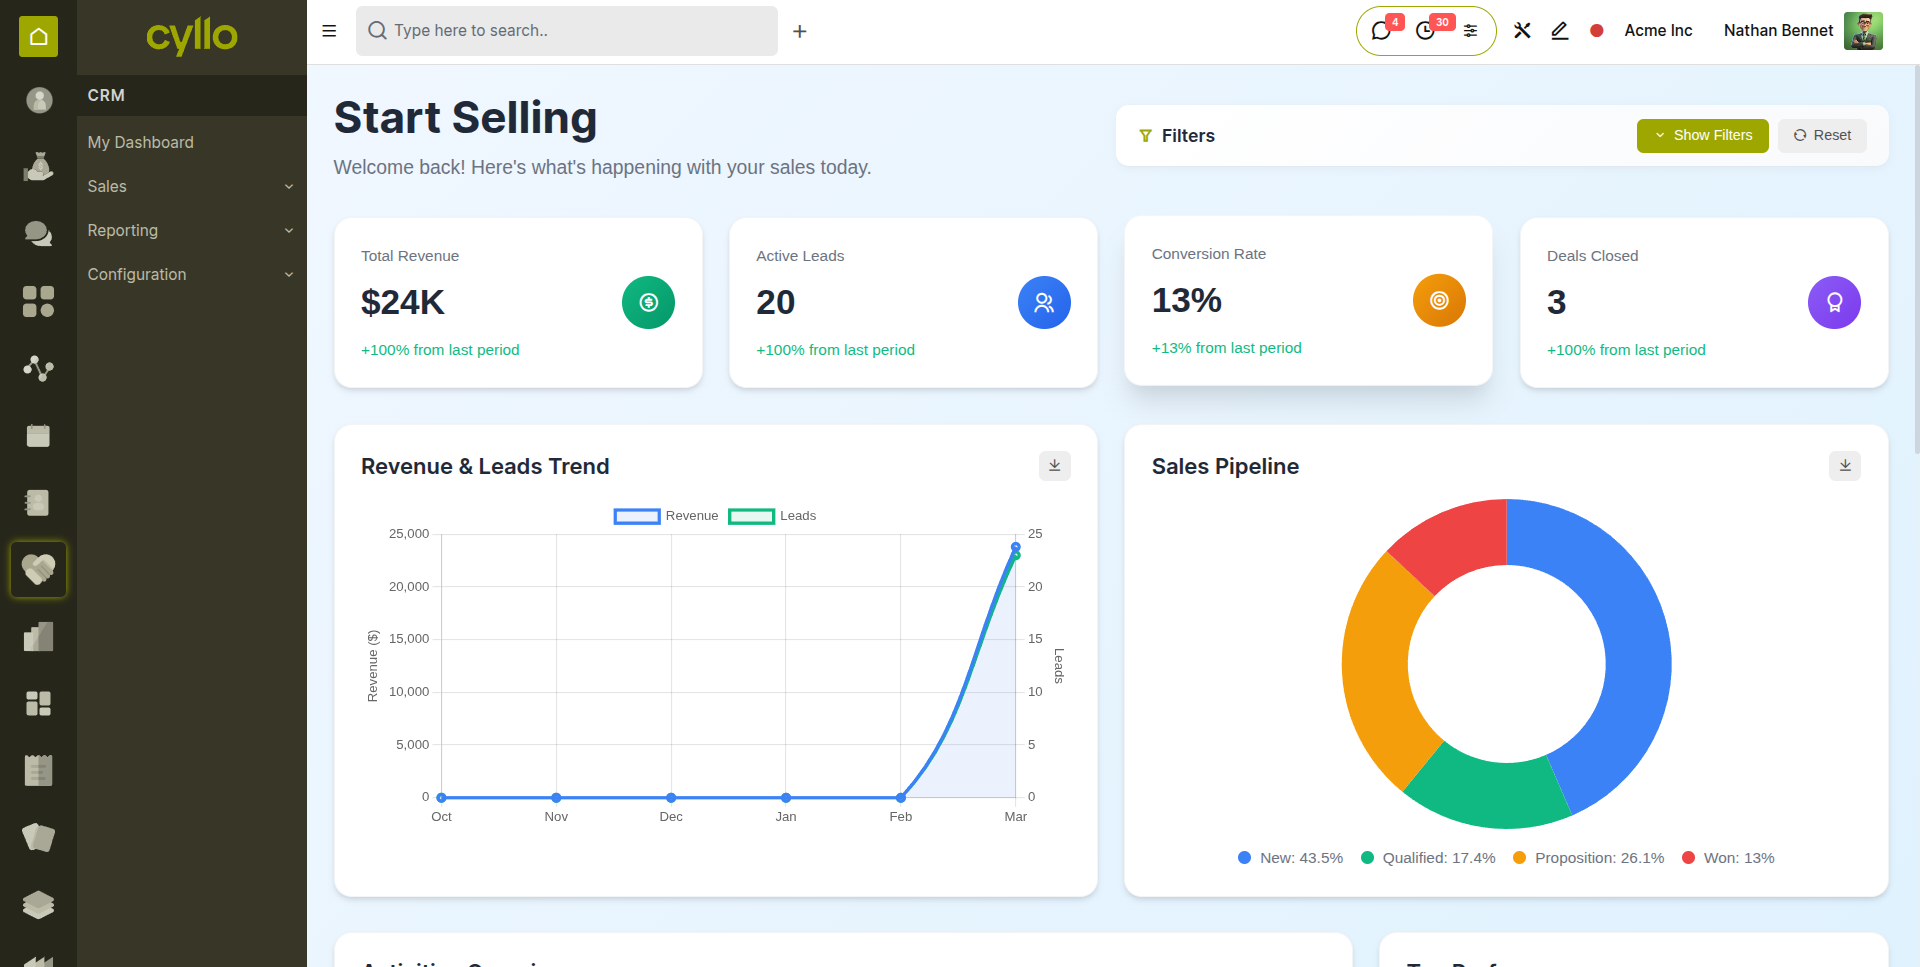
Fig 1.1 — CRM Dashboard
We can filter the data displayed on the dashboard except the updates with the filters.
Click on the “Show Filter” button to display the filters dropdown and if we have added filters and we need to clear it on single click ,click on the “Reset” Button.
In the summary cards we can see the Total Revenue, Active Leads, Conversion Rate and Closed Deals along with the growth rate from the previous period of the same.
In the Revenue and Lead Trend graph will show the expected revenue and leads for the applied filter.Click on the download icon to download the graphClick
In the sales pipeline we can see the graphical representation of leads in different stages along with the download icon to download the graph.
Activity Overview will display the activities for the filters applied with the Count of each activity in y-axis and Date in x-axis .Top performers will list the salespersons who worked on the closed leads with sum of expected revenue for the applied filter.
Updates will display the Activities(Due,today) ,Idle leads for the last 7 days with button View lead and Dismiss, view lead will take you to the lead and Dismiss button will dismiss the update from there.
- Due activities in orange color
- High expected revenue leads in green color
The View Report button in the Quick Actions will take you to the Pipeline Report.
2. Leads
2.1 What is a Lead?
A lead is any potential customer who has shown interest but has not yet been confirmed as a real sales opportunity. Think of leads as the raw material of your pipeline — they need to be reviewed, contacted, and qualified before you invest significant sales effort. In Cyllo CRM, leads can arrive from multiple sources: a web form submission, an email to your sales address, a manual entry by a salesperson, or an import from a spreadsheet.
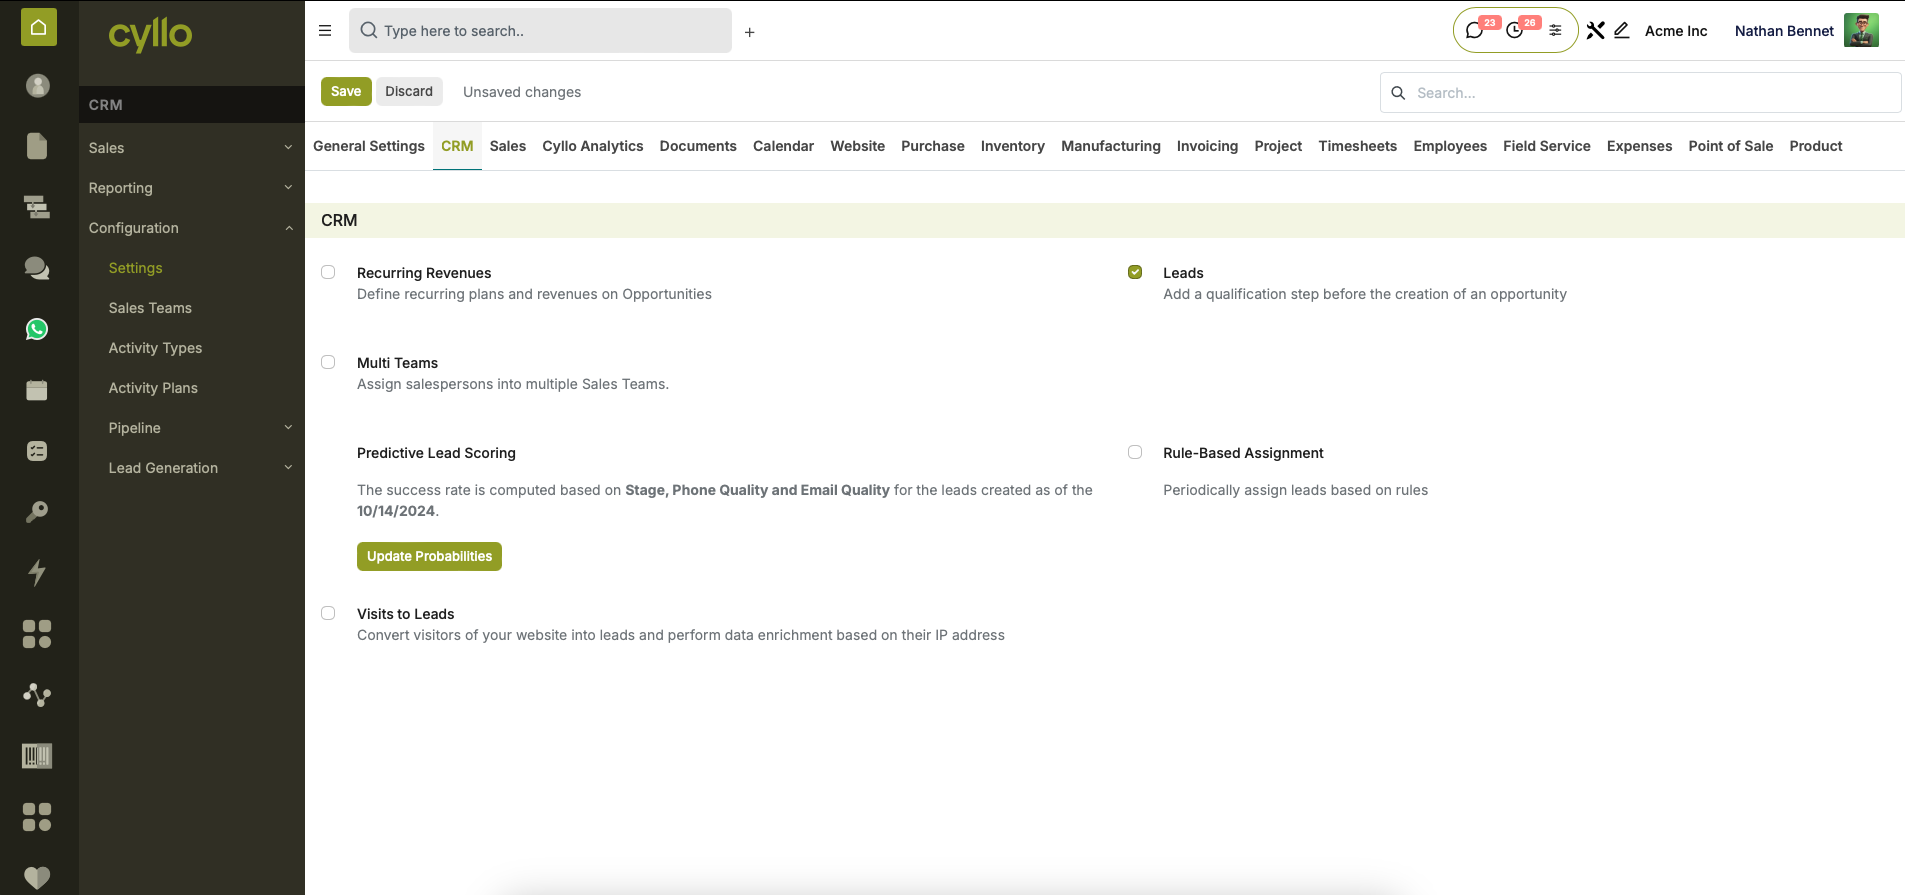
Fig 2.1 — CRM settings
2.2 Creating Leads Manually
To create a lead manually:
- Go to CRM → Leads.
- Click the New button in the top-left corner.
- Fill in the Lead Name (usually the company or the inquiry topic).
- Add the Customer details.
- Select a Salesperson and Sales Team.
- Click Add to save the lead.
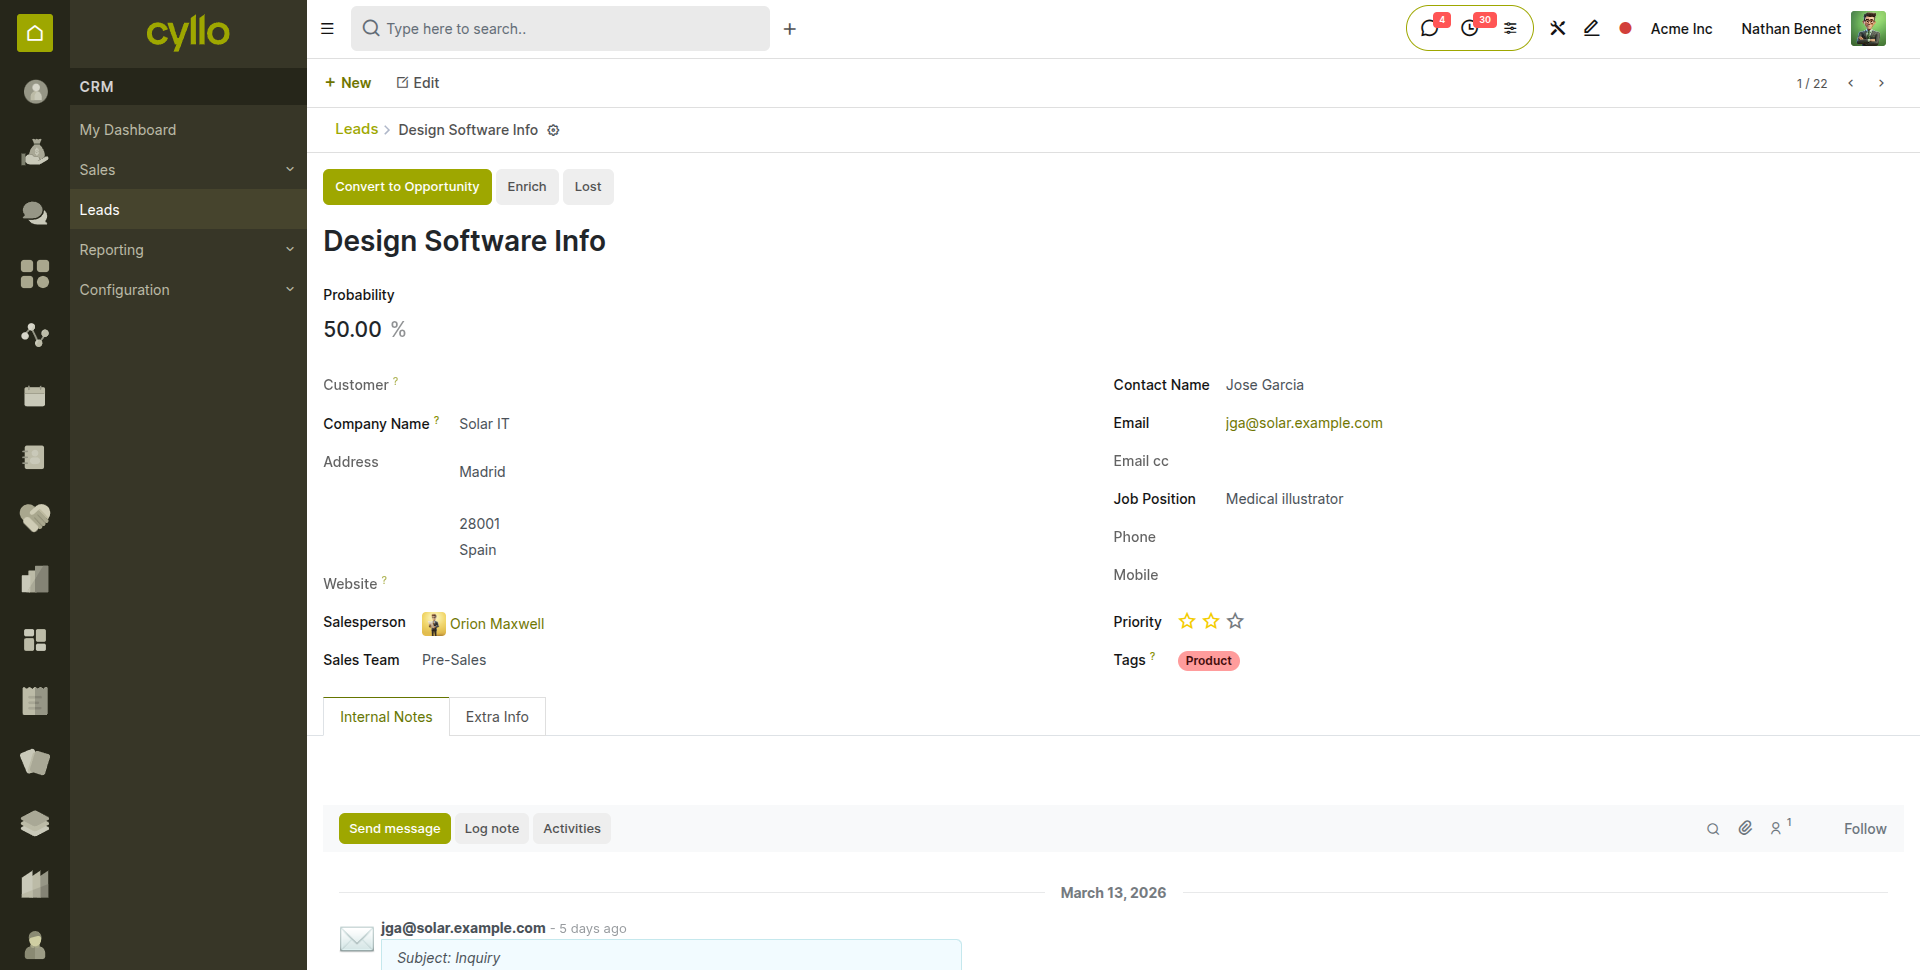
Fig 2.2 — Lead form view
Note
Use a descriptive lead name that helps your team identify the inquiry at a glance — for example 'ABC Corp — Office Supplies Inquiry' rather than just 'New Lead'.
2.3 Lead Sources & Tracking
Cyllo CRM tracks where each lead came from. This helps you understand which channels are generating the most business. Common lead sources include:
- Website Contact Form — automatically creates a lead when a visitor submits the form.
- Email Alias — emails sent to a configured address (e.g. sales@yourcompany.com) are turned into leads automatically.
- Manual Entry — created directly by a salesperson in the CRM interface.
- Import — bulk upload of leads from a CSV or Excel file.
- Phone Call — logged manually after an inbound call.

Fig 2.3 — Marketing details in lead form
2.4 Converting a Lead to an Opportunity
Once you have reviewed a lead and confirmed there is genuine sales potential, you convert it into an Opportunity. This moves it into the pipeline where it becomes trackable with revenue and close date.
To convert a lead:
- Open the lead record.
- Click the Convert to Opportunity button at the top of the form.
- In the dialog that appears, set Customer if not given in lead a. Create a new customer b. Link to an existing customer c. Do not link to a customer
- Check for duplicate leads. a. Convert to opportunity b. Merge with existing opportunities
- Set the Sales Team and Salesperson.
- Click Create Opportunity.
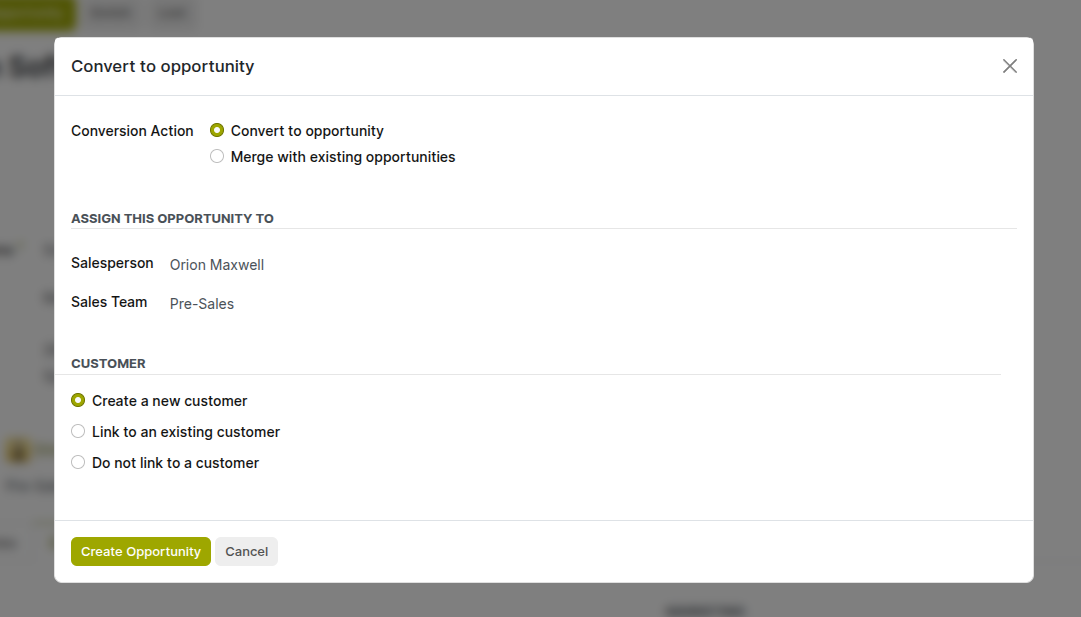
Fig 2.4 — Lead converting popup
3. Opportunities
3.1 What is an Opportunity?
An opportunity is a qualified sales prospect. Unlike a lead, an opportunity represents a real potential deal — it has a customer, an expected value, a close date, and a place in your pipeline. Your sales team works opportunities every day: scheduling calls, sending proposals, and moving them through stages toward a win.
3.2 Opportunity Form — Field by Field
Key Fields:
- Opportunity: Name of the deal or inquiry (required)
- Customer: Link to the customer
- Email: Customer's email address
- Phone: Customer's phone number
- Sales Team: Team responsible for this opportunity
- Salesperson: Individual owner of the opportunity
- Expected Revenue: Estimated deal value in your company currency
- Probability (%): Likelihood of closing — set manually or by AI scoring
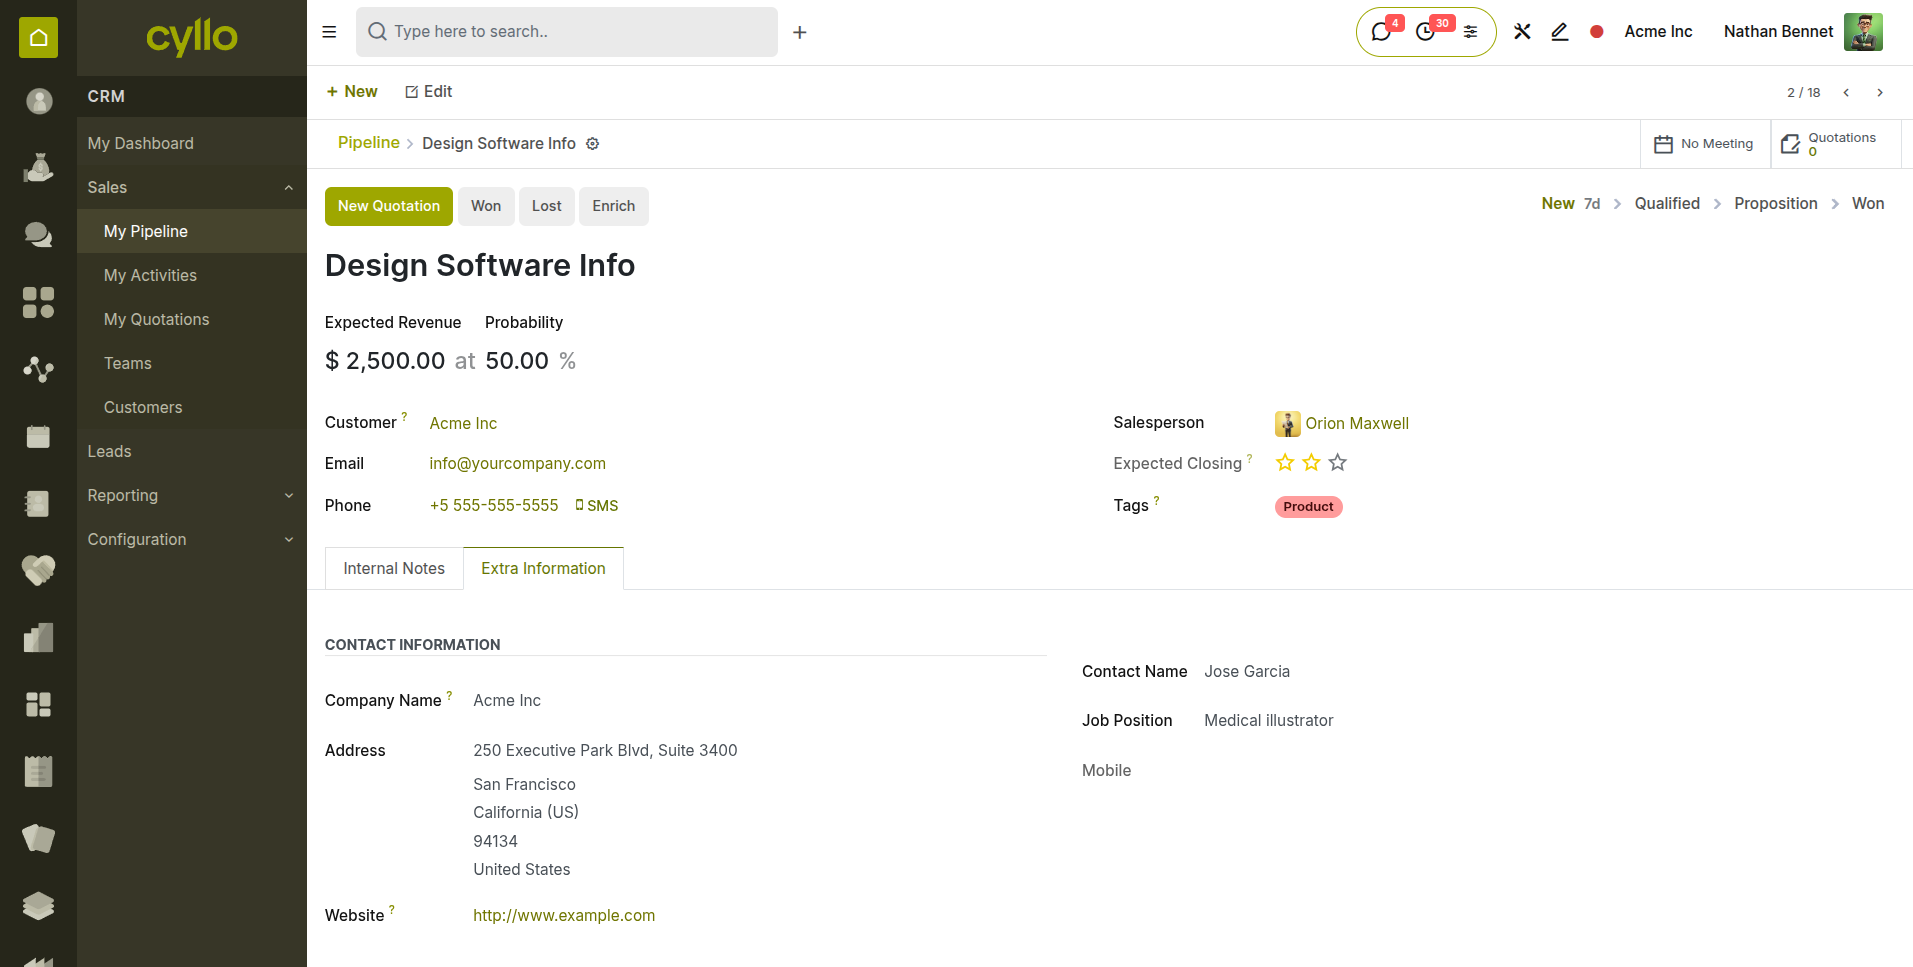
Fig 3.1 — Lead converting popup
3.3 Moving Opportunities Through Stages
You can move an opportunity to the next stage in two ways:
- Drag and drop — on the Kanban pipeline view, drag the opportunity card to the target stage column.
- Form view — on the opportunity form, click the stage name in the status bar at the top to jump to any stage.
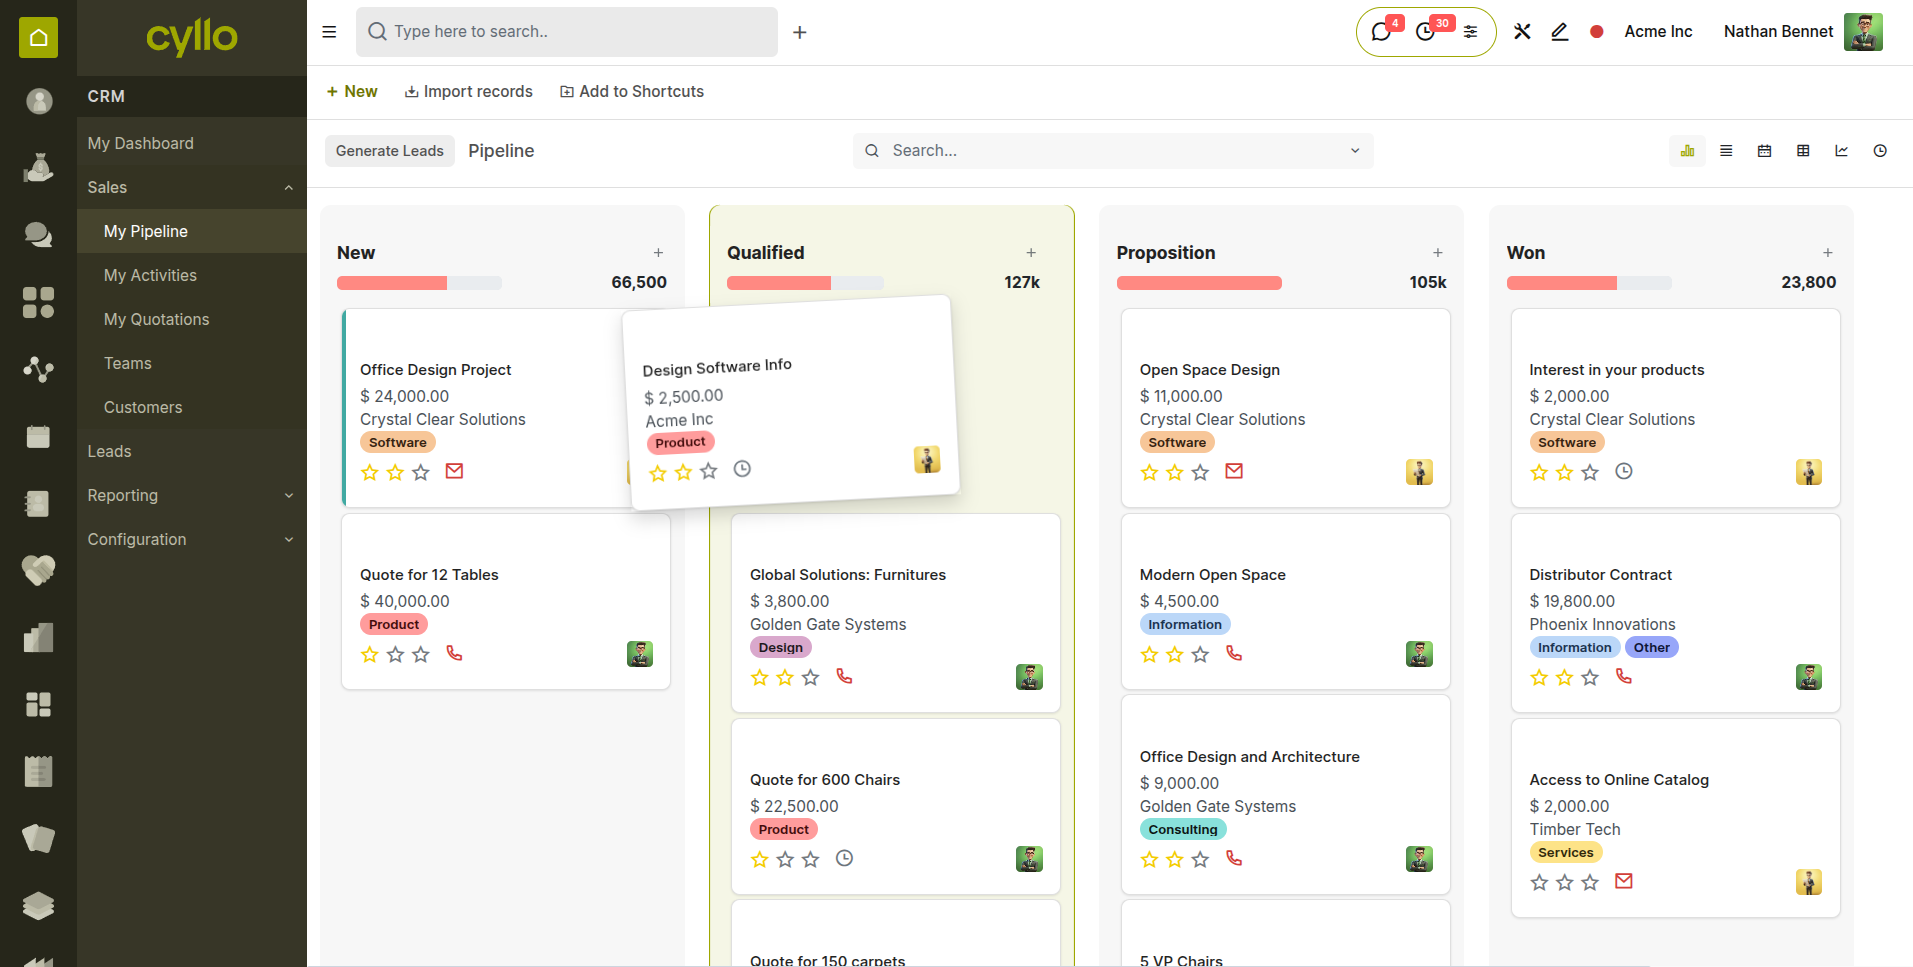
Fig 3.2 — Drag and drop from kanban
3.4 Setting Expected Revenue & Close Date
Expected Revenue is the estimated value of the deal if won. Close Date is when you expect the deal to close. Both fields are used in the revenue forecast report. Keep them updated as the deal progresses — stale data leads to inaccurate forecasts
Note
Set a Close Date on every opportunity, even an approximate one. Without a date, the opportunity will not appear in pipeline forecasts or activity planning views.
3.5 Auto Assigning to a Salesperson / Team
Cyllo CRM automatically assigns incoming leads to the right sales team or salesperson without manual intervention.
How to set assignment rules:
- Go to CRM → Configuration → Settings → Enable Rule-Based Assignment
- CRM → Configuration → Sales Teams → Open a team → Under Assignment Rules → Set domain.
- Rules evaluate lead properties such as country, language, industry, or lead source to find a match.
- When a lead matches a rule's conditions, it is assigned to the corresponding team or individual instantly.
- Simple rules can target a single condition — for example, all leads from a specific country go to a regional team.
- Multiple conditions can be combined for more precise targeting and routing.
- At the salesperson level, leads can be assigned based on more granular criteria within their team's scope.
- When multiple rules exist, Cyllo evaluates them in sequence and applies the first matching rule.
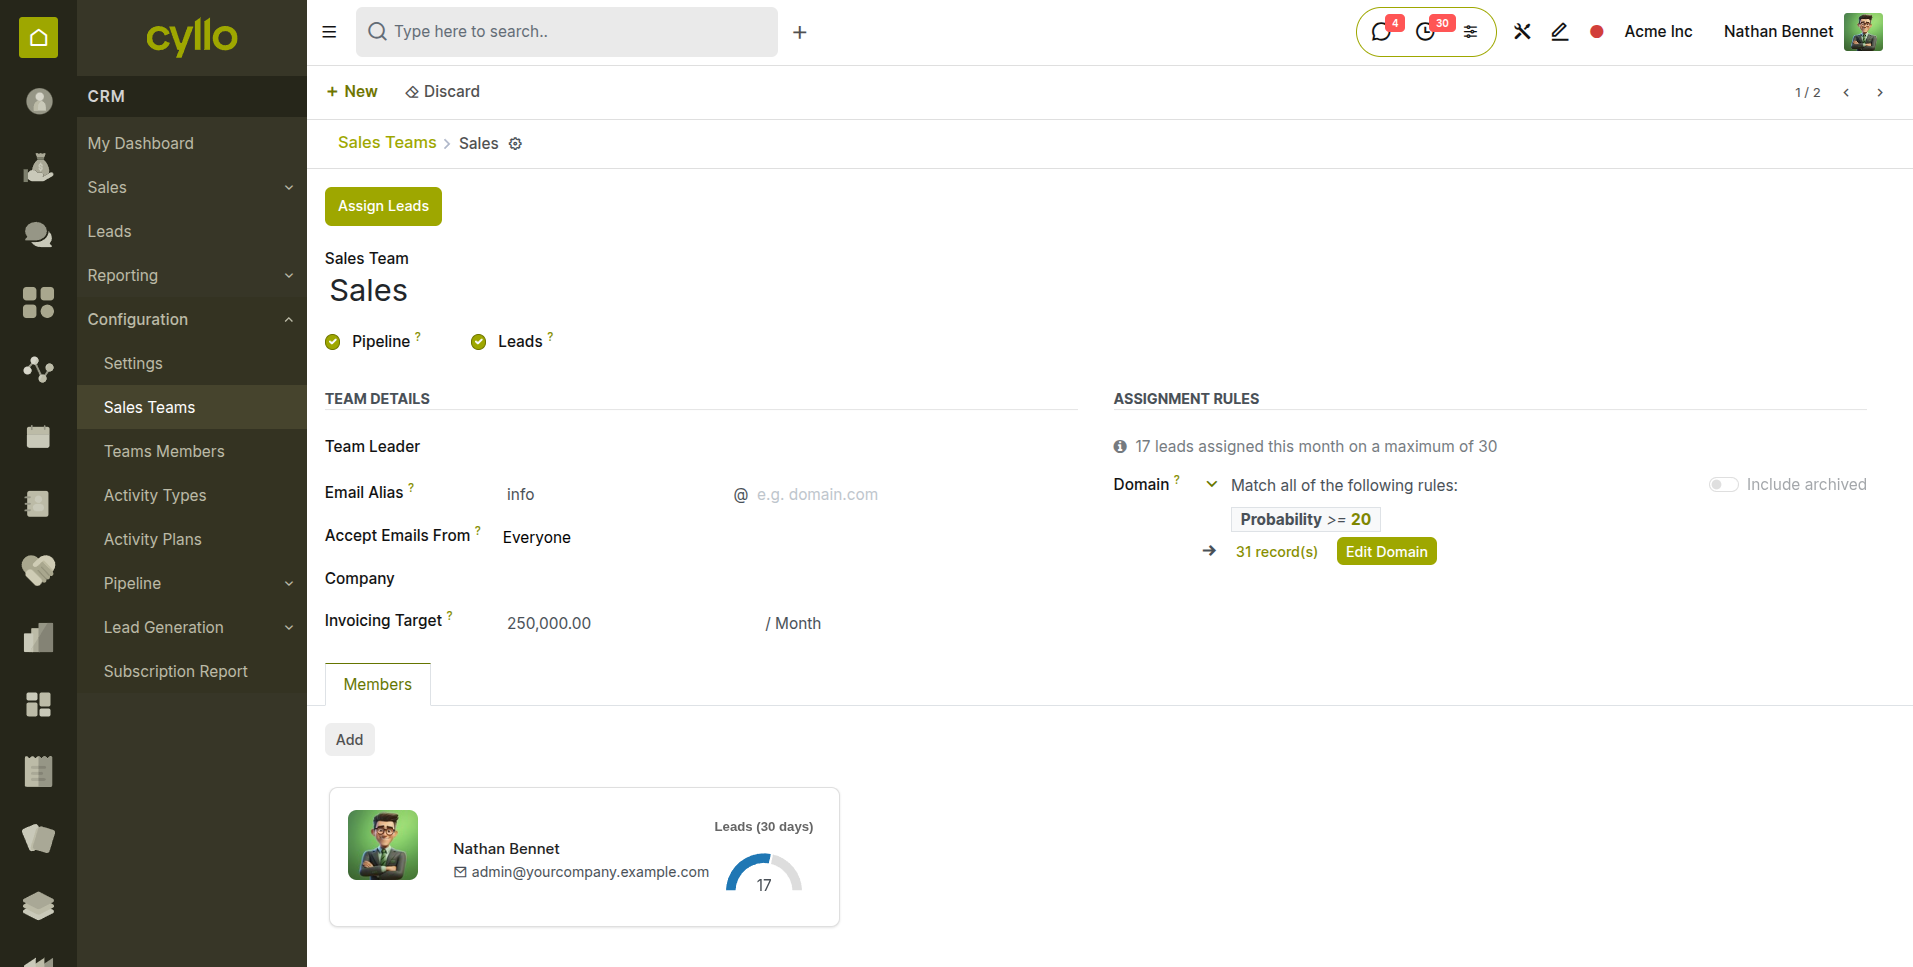
Fig 3.3 —Sales team form with assignment rules
3.6 Marking Won or Lost
When a deal reaches a final outcome, you must mark it as Won or Lost. This removes it from the active pipeline and records the result for reporting.
To mark an opportunity as Won:
- Open the opportunity.
- Click the Won button.
To mark an opportunity as Lost:
- Open the opportunity.
- Click the Lost button.
- Select a Lost Reason from the dropdown (e.g. Too Expensive, Chose Competitor).
- Add an optional note and click Submit.
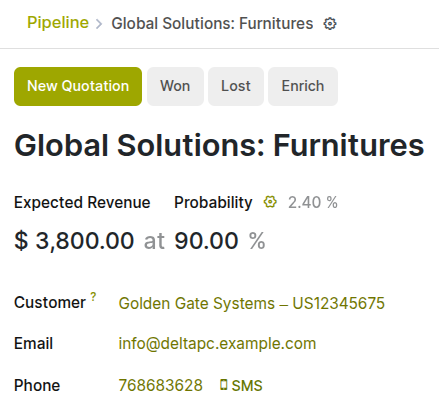
Fig 3.4 —Won, Lost buttons in opportunity
Note
Lost reasons are configured by your administrator in CRM > Configuration > Pipeline > Lost Reasons. Always select a reason — it is critical for win/loss analysis reports.
4. Pipeline
4.1 Understanding the Kanban Pipeline
The pipeline is the central workspace of Cyllo CRM. It shows all active opportunities as cards arranged in columns — each column is a stage in your sales process. At a glance, you can see how many deals are in each stage, their expected values, and which ones need attention.
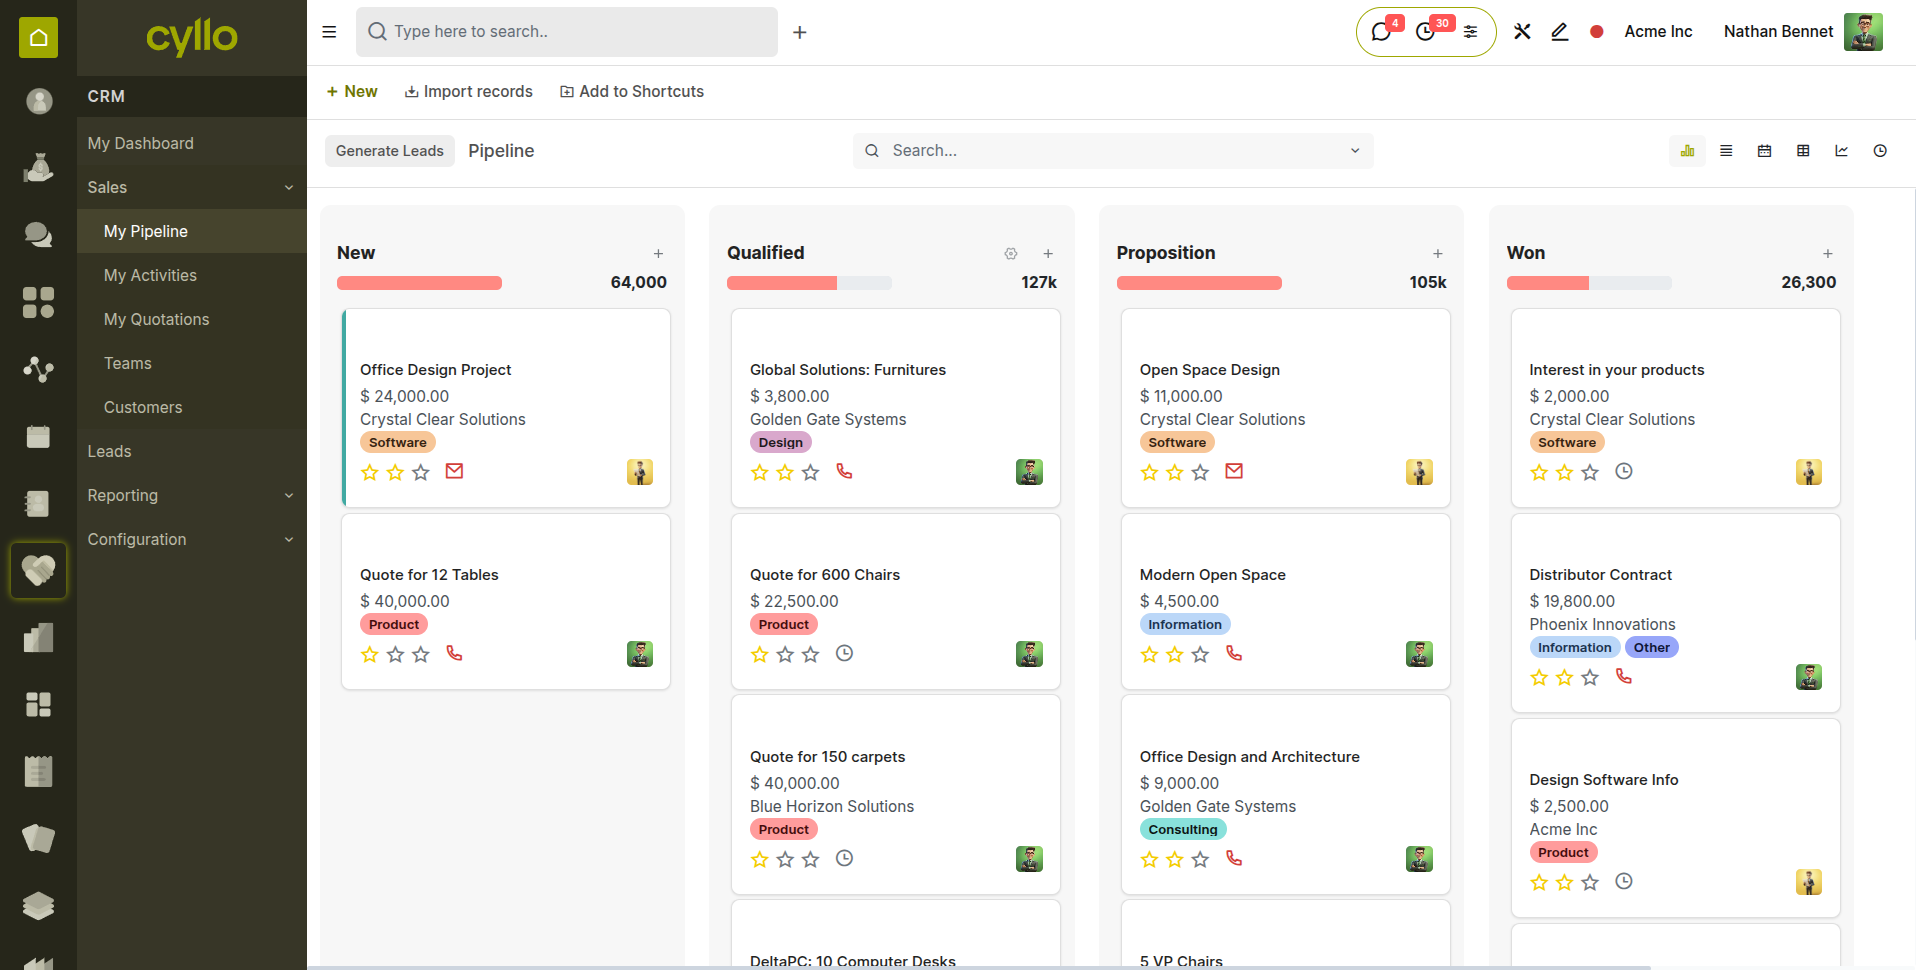
Fig 4.1 — Pipeline kanban
Each opportunity card on the pipeline shows:
- Opportunity name and customer
- Expected revenue
- Priority (stars)
- Assigned salesperson avatar
- Next scheduled activity (if any)
- Activity status indicator (green = on track, orange = due today, red = overdue)
4.2 Customizing Stages
Stages define your sales process. Cyllo comes with default stages, but your administrator can rename, reorder, add, or remove stages to match your real-world workflow.
- Stage customization is done by an administrator.
- CRM > Configuration > Pipeline > Stages.
- Add a new stage or open a stage to modify existing.
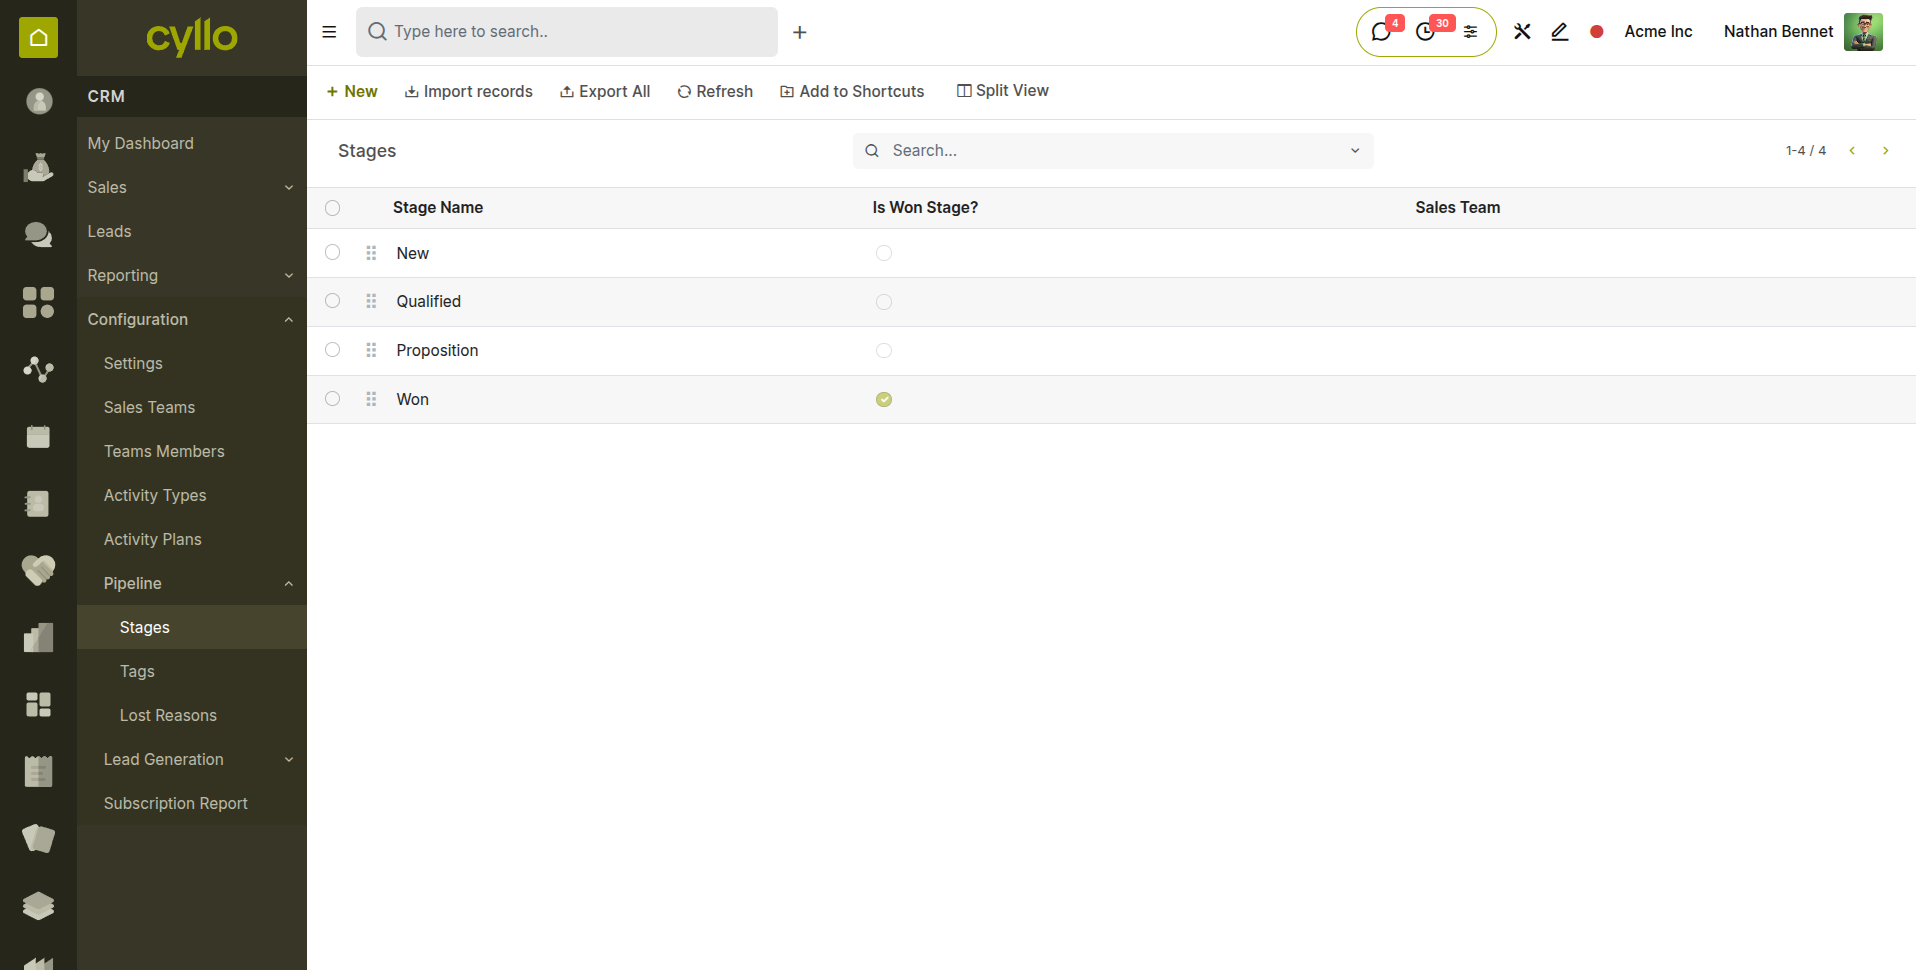
Fig 4.2 — Stages list
4.3 Filtering & Grouping the Pipeline
The pipeline search bar lets you filter and group opportunities to focus on what matters most.
Click the search bar and use the built-in filters:
- My Pipeline: Only opportunities assigned to you
- My Activities: Opportunities with activities assigned to you
- Overdue: Opportunities past their close date
- Won: Closed won opportunities
- Lost: Closed lost opportunities
- Group by Team: Columns organized by sales team instead of stage
- Group by Salesperson: Columns organized by individual salesperson
5. Activities & Follow-ups
5.1 Scheduling Activities
Activities are the day-to-day tasks your sales team performs to move deals forward — calls, emails, meetings, and demos. Scheduling an activity on an opportunity creates a reminder and assigns responsibility to a team member.
To schedule an activity:
- Open an opportunity.
- Click the Activities button (clock icon) in the chatter section.
- Select the Activity Type: Call, Email, Meeting, To-Do, or a custom type.
- Set the Due Date and assign it to a User.
- Add a Note describing what needs to happen.
- Click Schedule.
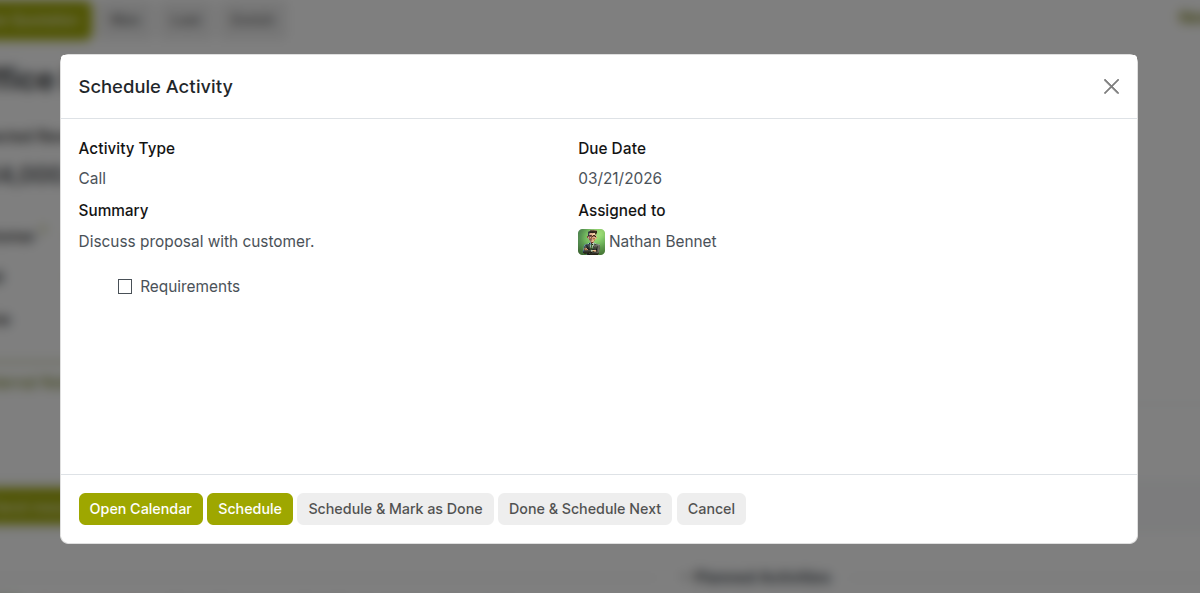
Fig 5.1 — Form for scheduling activity
5.2 Activity Reminders & Deadlines
Cyllo uses color-coded activity indicators to keep your team on track:
🟢 Green: Activity is scheduled and not yet due
🟠 Orange: Activity is due today — action required
🔴 Red: Activity is overdue — immediate attention needed
⚪ Grey: No activity scheduled on this opportunity
Note
Note: Review your activity list every morning by going to CRM > Sales > My Activities. This view shows all your scheduled activities across all opportunities in one place.
5.3 Logging Notes & Internal Messages
The chatter at the bottom of every opportunity form is used for:
- Log a Note: add an internal comment visible only to your team (not sent to the customer). Use this to record a call summary, a decision made, or context for the next person who opens the record.
- Send a Message: compose and send an email to the customer directly from the opportunity. The email is logged in the chatter automatically.
- Field changes: when a key field like Stage or Expected Revenue changes, Cyllo logs the old and new values automatically.
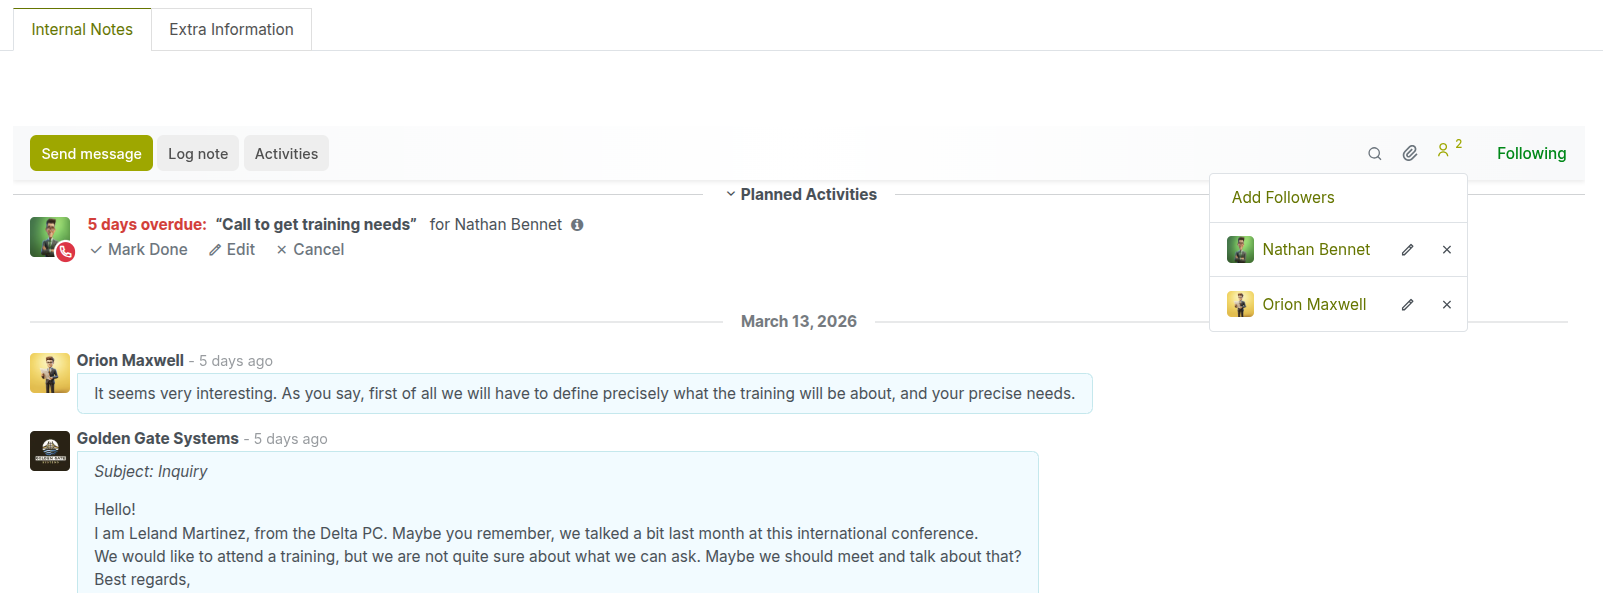
Fig 5.2 — Form for scheduling activity
Note
- Followers — add colleagues as followers so they receive email notifications when the record is updated.
- Attachments — drag and drop files (proposals, contracts, PDFs) directly into the chatter.
6. Customers & Contacts
Customers in Cyllo are managed as Contacts — a unified record shared across Sales, Accounting, CRM, and other modules. For details refer sales page
6.1 Customer History & Interactions
Cyllo gives you a complete view of everything connected to a customer. Open any customer record and you will find:
- All opportunities (open and closed) — how many deals and their total value.
- All meetings scheduled — past and future.
- All invoices and payments — financial history.
- All support tickets — if Helpdesk is enabled.
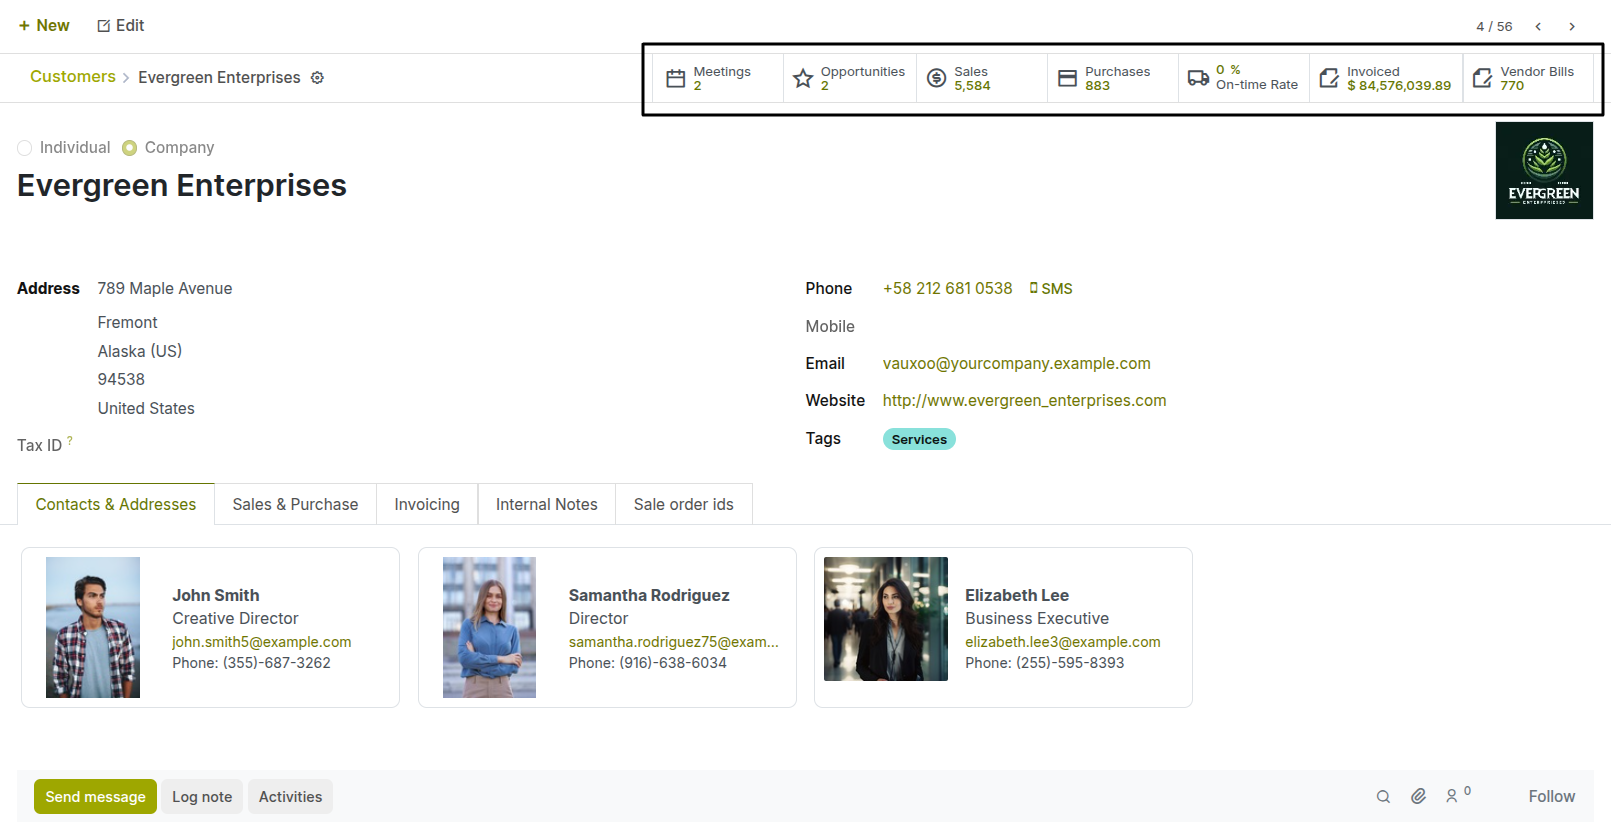
Fig 6.1 — Contact form with smart buttons to easy access
7. Communication
7.1 Sending Emails from CRM
You can send emails to customers directly from any opportunity or lead — no need to switch to an external email client. All sent emails are automatically logged in the chatter.
- Open the opportunity.
- In the chatter at the bottom, click Send message.
- Expand with the full composer button at the end of the text box.
- Type your message or choose a template.
- Add recipients (the customer is added by default).
- Attach files if needed.
- Click Send.
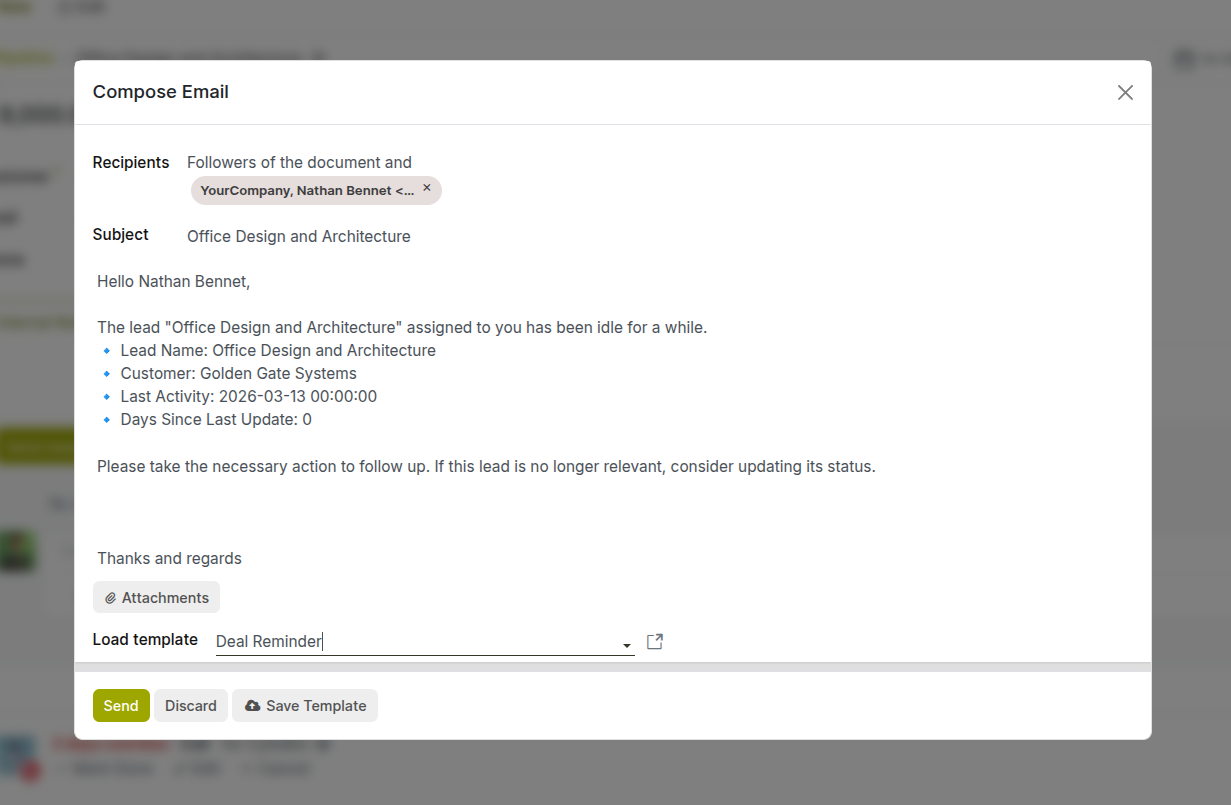
Fig 7.1 — Chatter 'Send message' form
7.2 Email Templates
Email templates let you send consistent, professional messages without retyping common content. Cyllo supports dynamic placeholders that automatically fill in the customer name, opportunity details, salesperson name, and more.
Creating a Template:
Go to Settings → Technical → Email → Templates
Click the New button (top left).
Fill in the Basic Details
- Name — Give your template a clear name, e.g. Sales Order Confirmation
- Applies To — Select the model this template is for, e.g. Sale Order or Invoice
- Subject — Write the email subject, e.g. Your Order (object.name )is Confirmed
Write the Email Body Key variables you can use:
- (object.name ) — the record's name
- (object.partner_id.name) — the customer name
- (user.name ) — the logged-in user
- (object.company_id.name) — the company name
Example: Dear (object.partner_id.name),
Your order ( object.name ) has been confirmed. Total: (object.amount_total) (object.currency_id.name)
Thanks,
(user.name )
- Click Save.
Note
Only administrators have access. Ask your administrator to set up templates for your most common emails: introduction, follow-up after meeting, proposal sent, and deal won. This saves significant time and ensures consistent messaging.
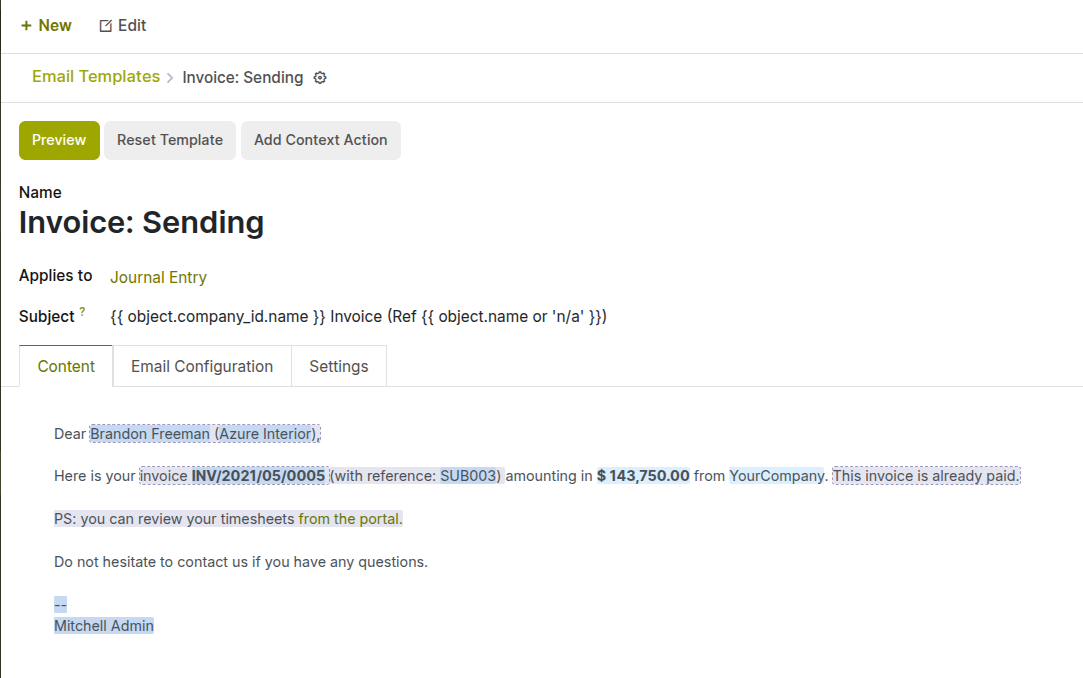
Fig 7.2 — Email template form for custom templates
7.3 WhatsApp / SMS (if enabled)
If your Cyllo instance has WhatsApp or SMS integration enabled, you can send messages directly from an opportunity using the same chatter interface. Contact your administrator to confirm if this feature is active for your account.
Note
WhatsApp and SMS availability depends on your Cyllo configuration and active integrations. These features may require additional setup and a third-party provider account.
7.4 Meeting Scheduling
You can schedule a meeting with a customer directly from an opportunity. The meeting is added to your Cyllo Calendar and can be synced with Google Calendar or Outlook.
- Open the opportunity.
- Click the Activities button and select Meeting as the activity type.
- Alternatively, click the Meetings smart button at the top of the form.
- Click on the date-time in the calendar to schedule the meeting.
- Set the meeting title, date, time, duration, and location.
- Add attendees — Cyllo will send them an invitation email.
- Save the meeting.
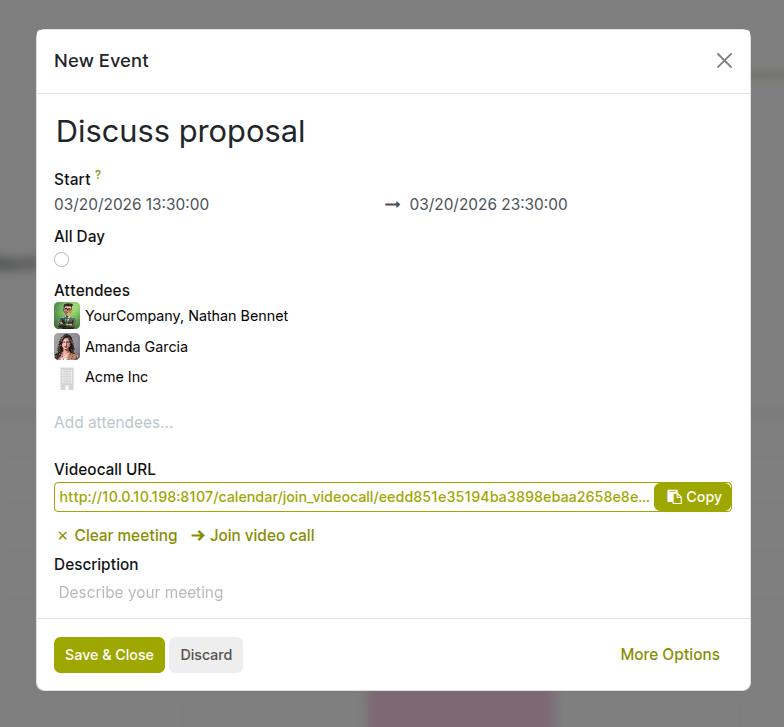
Fig 7.3 — Meeting configuration from calender
8. Quotations & Sales Orders
8.1 Creating a Quotation from an Opportunity
When a deal is ready to move into a formal proposal, you can create a quotation (sales order draft) directly from the opportunity. The customer details, salesperson, and pricing automatically carry over.
- Open the opportunity.
- Click the New Quotation button at the top of the form.
- A new quotation form opens pre-filled with the customer and salesperson.
- Add the products or services to the order lines.
- Set quantities, prices, and discounts as needed.
- Click Send by Email to send the quotation to the customer.
Note
Refer Sales documentation for details
8.2 Linking Sales Orders to CRM
All quotations and sales orders created from an opportunity are automatically linked back to it. You can see them from the opportunity's Quotations smart button. This keeps a full commercial history — every proposal version, every order — in one place.
If a sales order is created outside of CRM (directly from the Sales module), it will not automatically link to an opportunity. Always create quotations from within the opportunity to maintain the link.
8.3 Tracking Revenue from CRM
Cyllo CRM tracks two types of revenue for each opportunity:
- Expected Revenue — the estimated deal value you enter manually on the opportunity form. Used for forecasting.
- Prorated Revenue — the actual revenue from confirmed sales orders linked to the opportunity, weighted by the probability percentage.
When an opportunity is marked Won, the Expected Revenue is recorded in the win history and appears in all CRM revenue reports.
8.4 Recurring Revenues from CRM
How to set assignment rules:
- Go to CRM → Configuration → Settings → Enable ‘Recurring Revenues’
- Add Recurring Revenue to a Lead/Opportunity from form view.
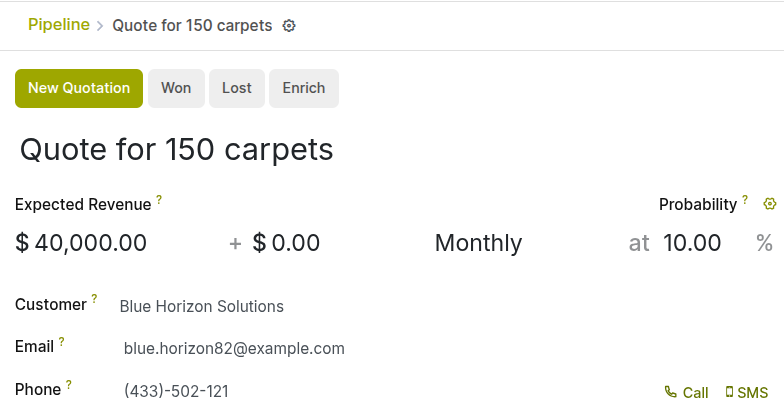
Fig 8.1 — Setting recurring period in opportunity form
9. Reports
9.1 Pipeline Analysis
The Pipeline Analysis report (CRM > Reporting > Pipeline) lets you analyze your pipeline by any dimension — stage, salesperson, team, expected revenue, or date range. Use it to:
- Identify where deals are getting stuck.
- Compare pipeline health across periods.
- Drill down into specific stages to see individual opportunities.
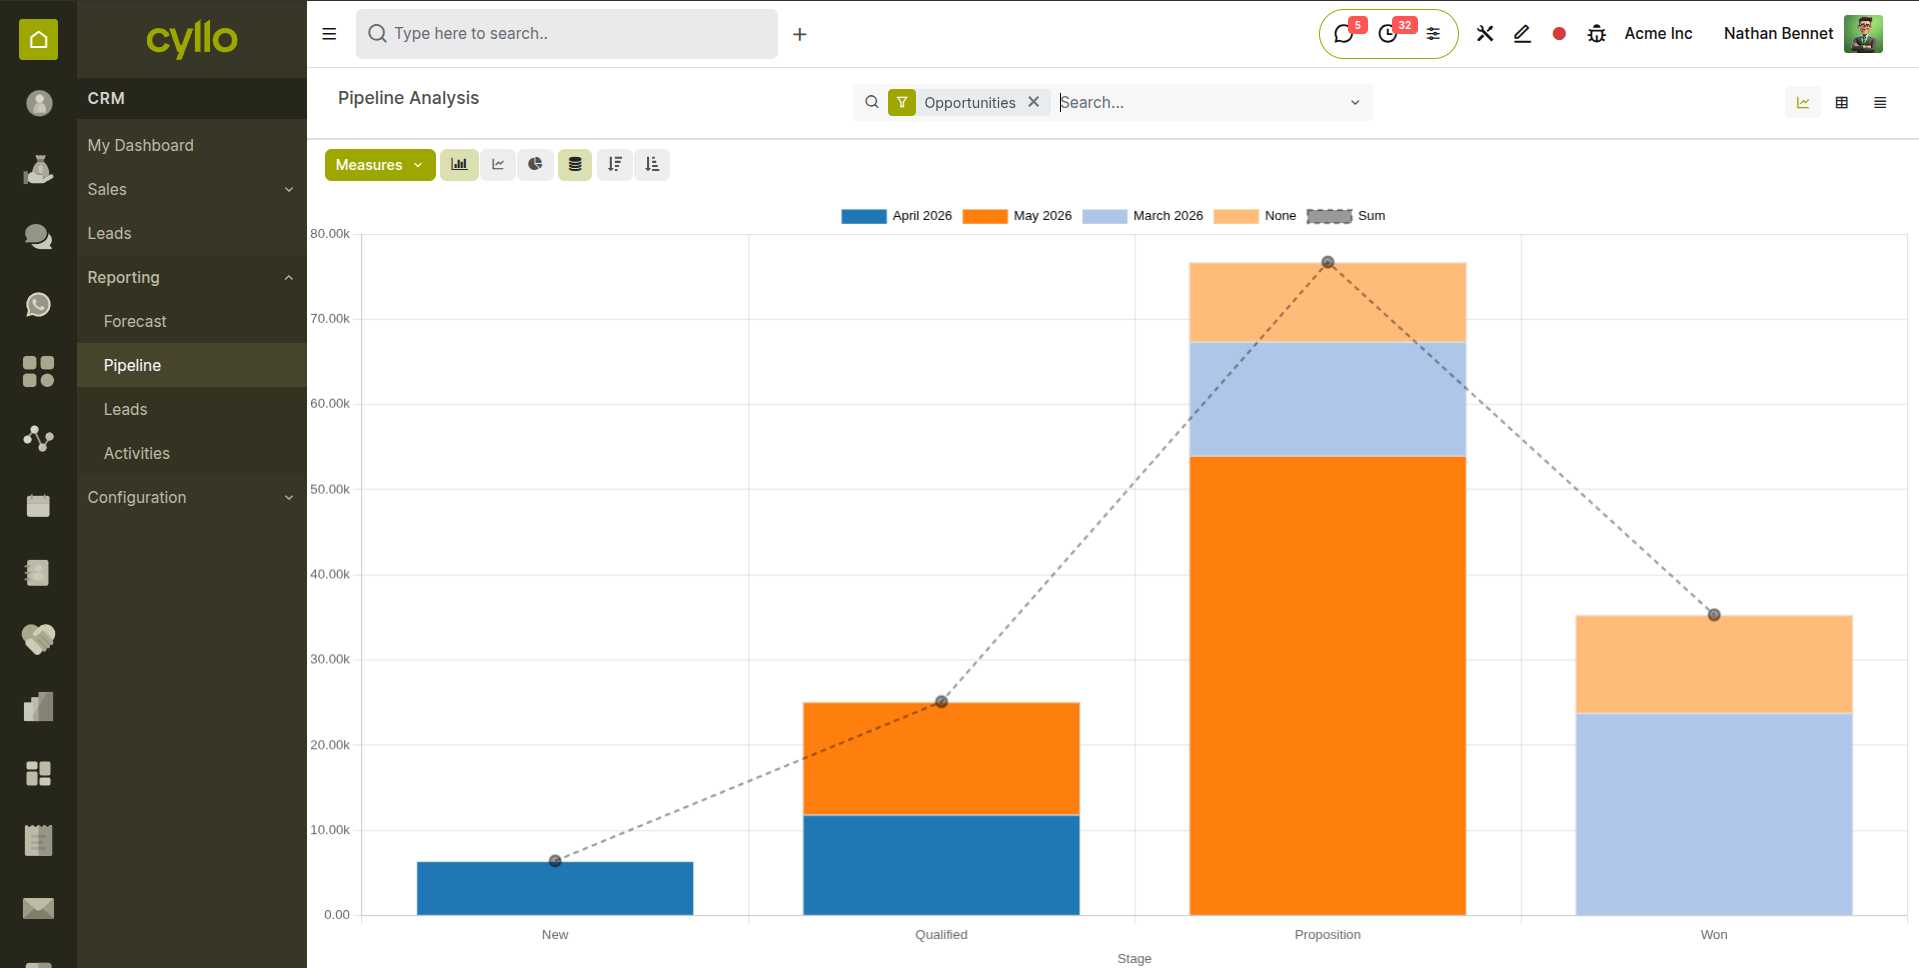
Fig 9.1 — Pipeline Analysis: bar chart grouped by stage, with filter options visible on the left side
9.2 Forecasted leads
The Forecast report projects future revenue based on all open opportunities, weighted by their probability. It answers the question: 'How much business can we realistically expect to close in the next 30, 60, or 90 days?'
Note
Forecast accuracy depends directly on how up-to-date your opportunity data is. Encourage your team to keep Expected Revenue, Close Date, and Probability updated on every open deal.
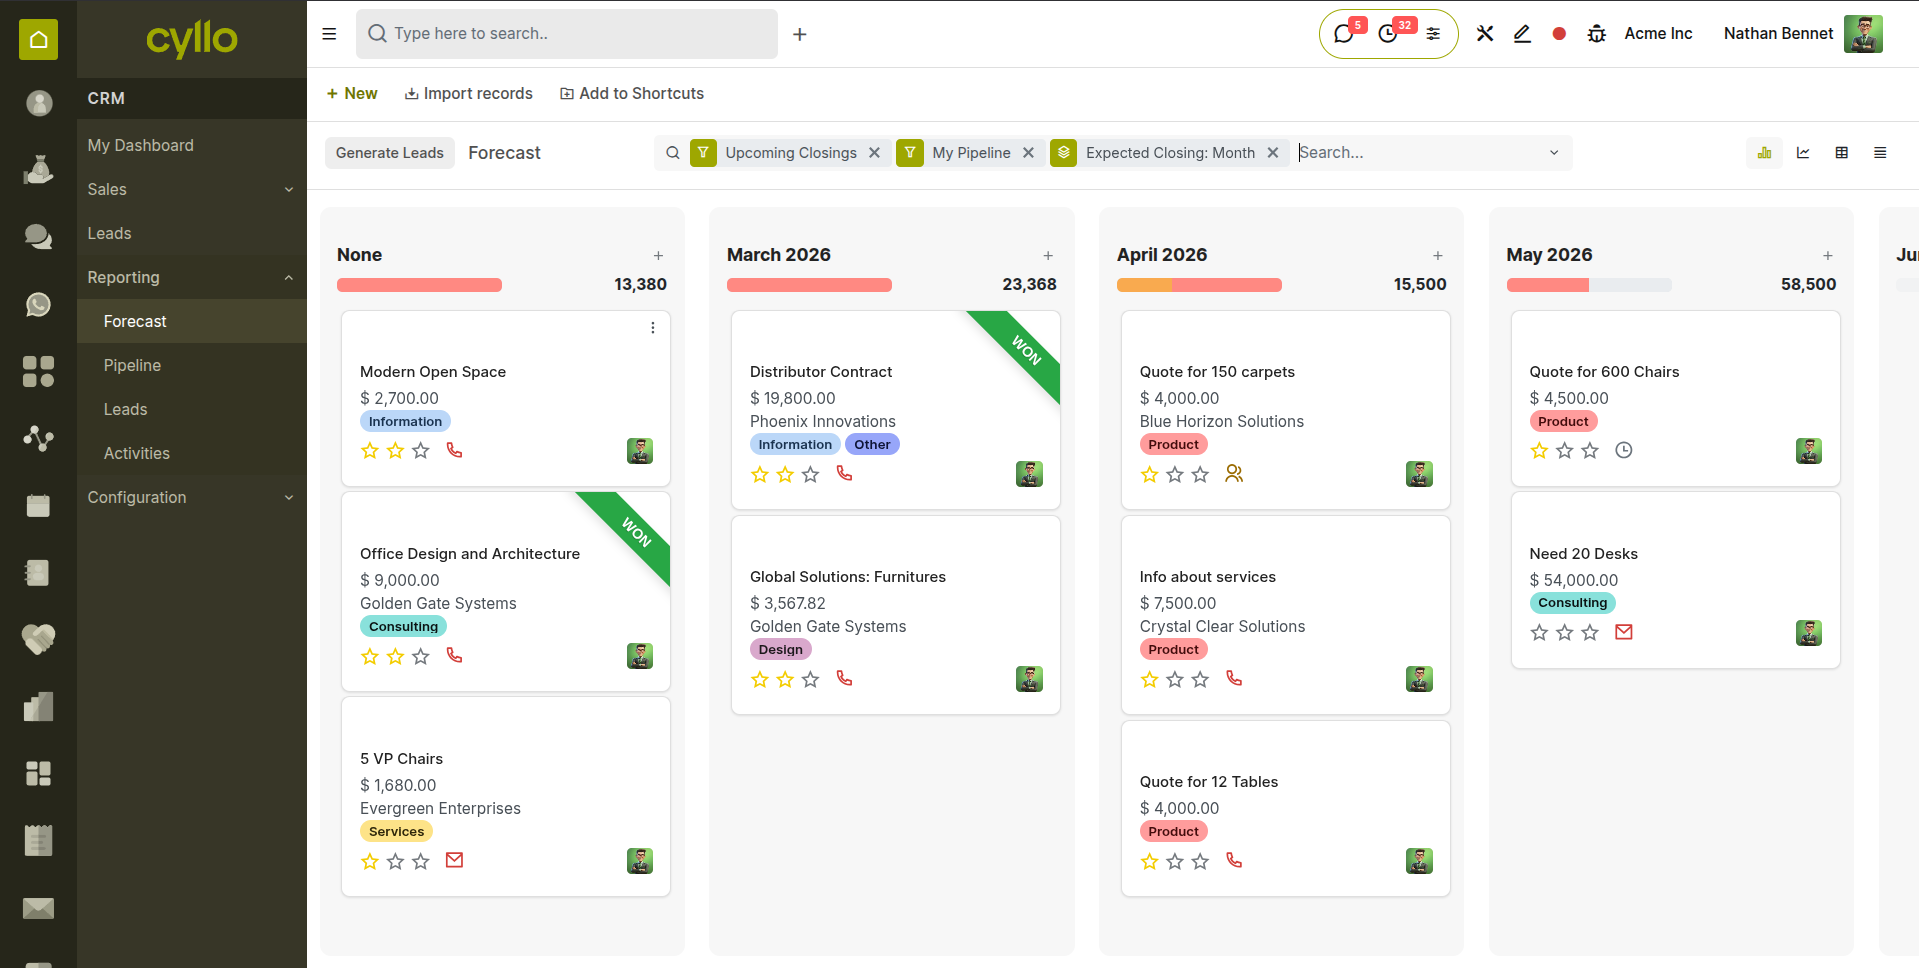
Fig 9.2 — Revenue Forecast report: timeline chart showing weighted revenue by month
9.3 Activity Report
The Activity Report shows a breakdown of all CRM activities — calls logged, emails sent, meetings held — by salesperson and time period. Use it to:
- Monitor sales activity levels across the team.
- Identify underperforming activity patterns before they affect revenue.
- Track follow-up completion rates.