

Cyllo Ecommerce Documentation
Introduction
The eCommerce module in Cyllo ERP transforms your website into a fully functional online store — product catalog, shopping cart, multi-gateway checkout, automated invoicing, and real-time inventory integration — all managed from within the Cyllo interface. Customers can browse products by category, filter by attributes, add items to a wishlist, apply coupon codes, and check out as a guest or as a registered account holder. Abandoned carts are tracked automatically and can trigger recovery workflows. Every element of the storefront — product pages, promotional banners, category navigation, and SEO metadata — is configurable without writing code.
Because the eCommerce module shares the same Cyllo ERP database as Inventory, Accounting, Sales, and CRM, every online sale flows automatically into the back-end without any manual reconciliation. A confirmed order on the website generates a Sales Order in the Sales module, triggers a delivery order in Inventory, and auto-creates an invoice that is posted to the Accounting module. Stock levels update in real time — a product sold online is immediately reflected in warehouse counts, preventing overselling. Customer loyalty points, pricelist assignments, and account details are the same records used by the sales and customer service teams.
1. Getting Started
This section covers installation, the relationship between the Website and eCommerce modules, and the initial configuration steps required before the store can accept orders.
1.1. What is the eCommerce Module?
The eCommerce module extends Cyllo's Website module with a complete online selling capability. While the Website module provides the page builder and publishing tools, the eCommerce module adds the commercial layer — product listing pages, cart, checkout, payment processing, order creation, and customer account management. Both modules must be installed for the store to function. Unlike standalone eCommerce platforms such as Shopify or WooCommerce, Cyllo's eCommerce module is natively embedded in the ERP. There is no API synchronisation, no plugin to maintain, and no separate admin panel — the same interface used to manage sales orders, run payroll, and track stock is the interface used to manage the online store.
Note
Installing eCommerce from apps also activates the Customer Portal, allowing registered customers to log in and view their order history, invoices, and account details from the website's My Account section.
1.2. eCommerce Setup Overview
After installation, a minimum set of steps is needed before the store can accept live orders. The checklist below summarises the setup sequence; each item is covered in detail in the corresponding section of this document.
| Setup Step | Covered In |
|---|---|
| Publish products with prices and images | Section 2.1 |
| Configure at least one payment provider | Section 5.2 |
| Set up at least one shipping method | Section 6.1 |
| Configure tax rules on products | Section 12.2 |
| Set guest vs. account checkout policy | Section 4.3 |
TIP
Run a full test order using a sandbox payment credential before going live. Place an order, confirm it is visible in Sales → Orders, and verify the invoice is auto-generated and stock has decreased. This confirms the entire integration is working.
2. Product Catalog
The product catalog is the collection of items available for purchase on the storefront. Each product is a Cyllo product record made visible on the website with its own page, images, description, price, and variant selectors. This section covers all aspects of building and maintaining the catalog.
2.1. Publishing Products to the Store
Products in Cyllo are not published to the online store automatically. Each product must be explicitly enabled for the website. This allows the back-office product catalog to contain items that are not for public sale — raw materials, internal services, or unlaunched products — while showing only the intended range to website visitors.
- Go to Website → eCommerce → Products → Products and open the product to publish.
- Click the Go to Website button to open the product's page in the website editor, then use the Published toggle in the top bar to make it live.
- Set the Sales Price — this is the price shown to customers on the product page.
- Enter a Website Description in the rich-text field on the Sales tab. This is separate from the internal description and supports formatted text, images, and links.
- Assign a Website Category so the product appears under the correct filter tab on the shop page.
- Click Save.
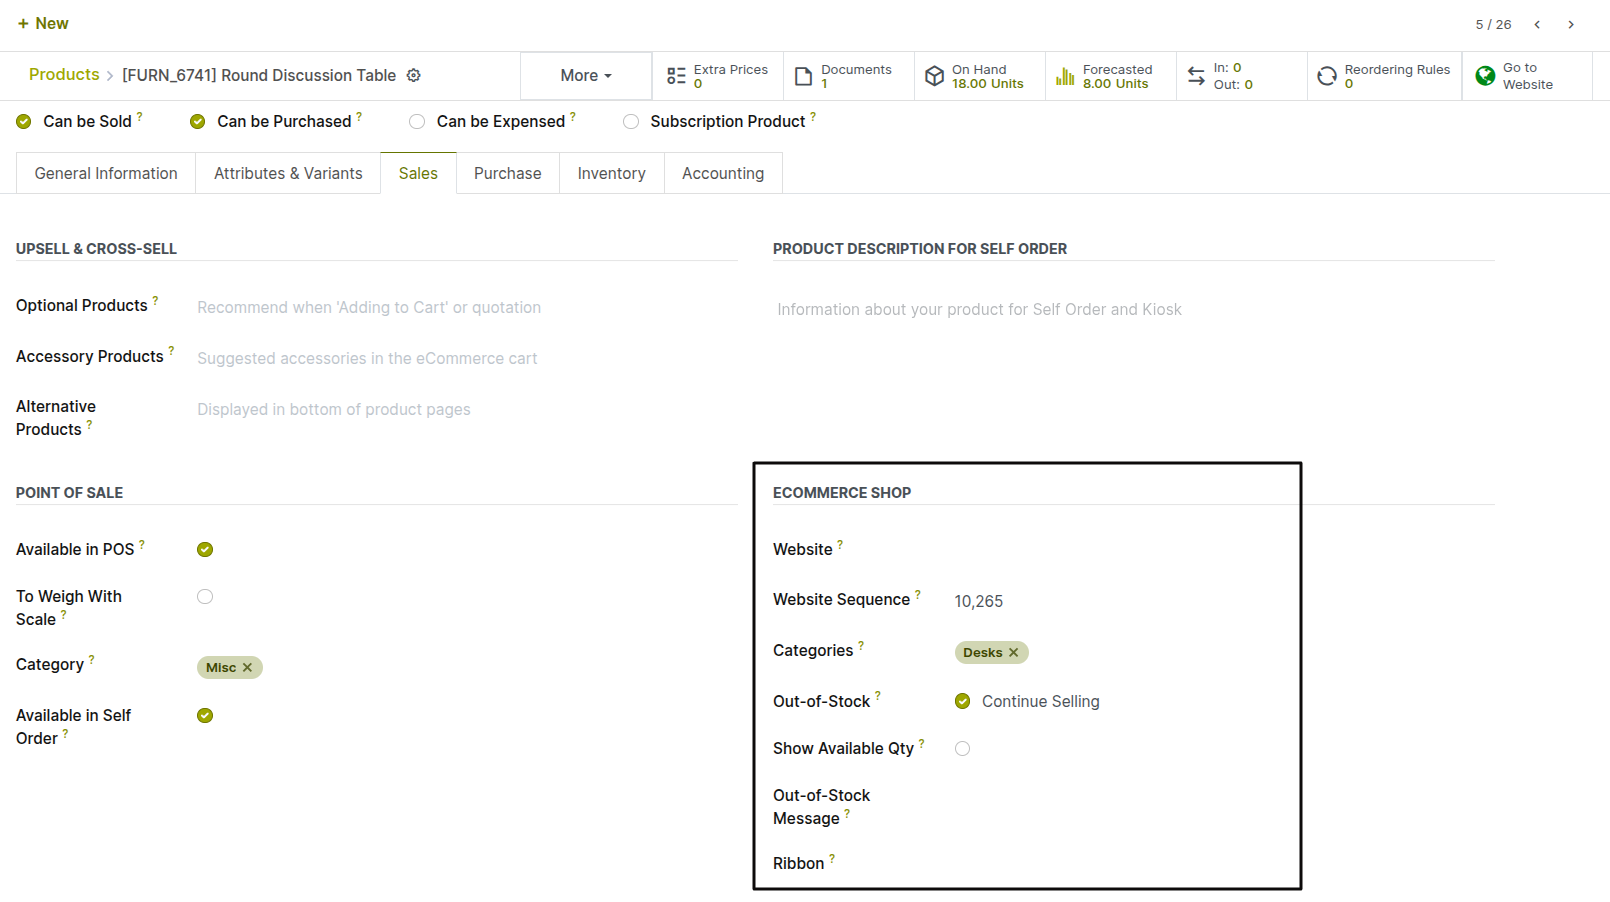
Fig 2.1 — Product form Sales tab — Website Description editor, and Website Category field
Key Fields
- Go To Website: Controls visibility on the storefront. Unpublished products are only visible to logged-in website editors.
- Sales Price: The price displayed on the product page. Can be overridden by pricelists for specific customer groups.
- Website Category: Determines which category filter the product appears under on the shop page.
- Website Description: The customer-facing product description. Supports rich formatting, images, and embedded video.
2.2. Product Variants
Product variants allow a single product listing to offer multiple options — for example, a T-shirt in sizes S, M, L, XL and colours Red, Blue, Green. On the product page, variants are shown as selector buttons or dropdown menus. The customer selects their combination and adds it to the cart. Each variant can have its own price, barcode, image, and stock level.
- Open the product form and go to the Attributes & Variants tab.
- Click Add a Line to add an attribute (e.g. Color).
- Enter the attribute values (e.g. White, Black). Each value combination becomes a separate variant record.
- To set a price difference for a variant, click the variant line and enter the Extra Price — this amount is added to the base sales price for that option.
- To assign a different image to a specific variant, go to the Variants tab, open the variant, and upload its image.
- Save. On the website product page, the configured attributes appear as selector buttons for the customer to choose.
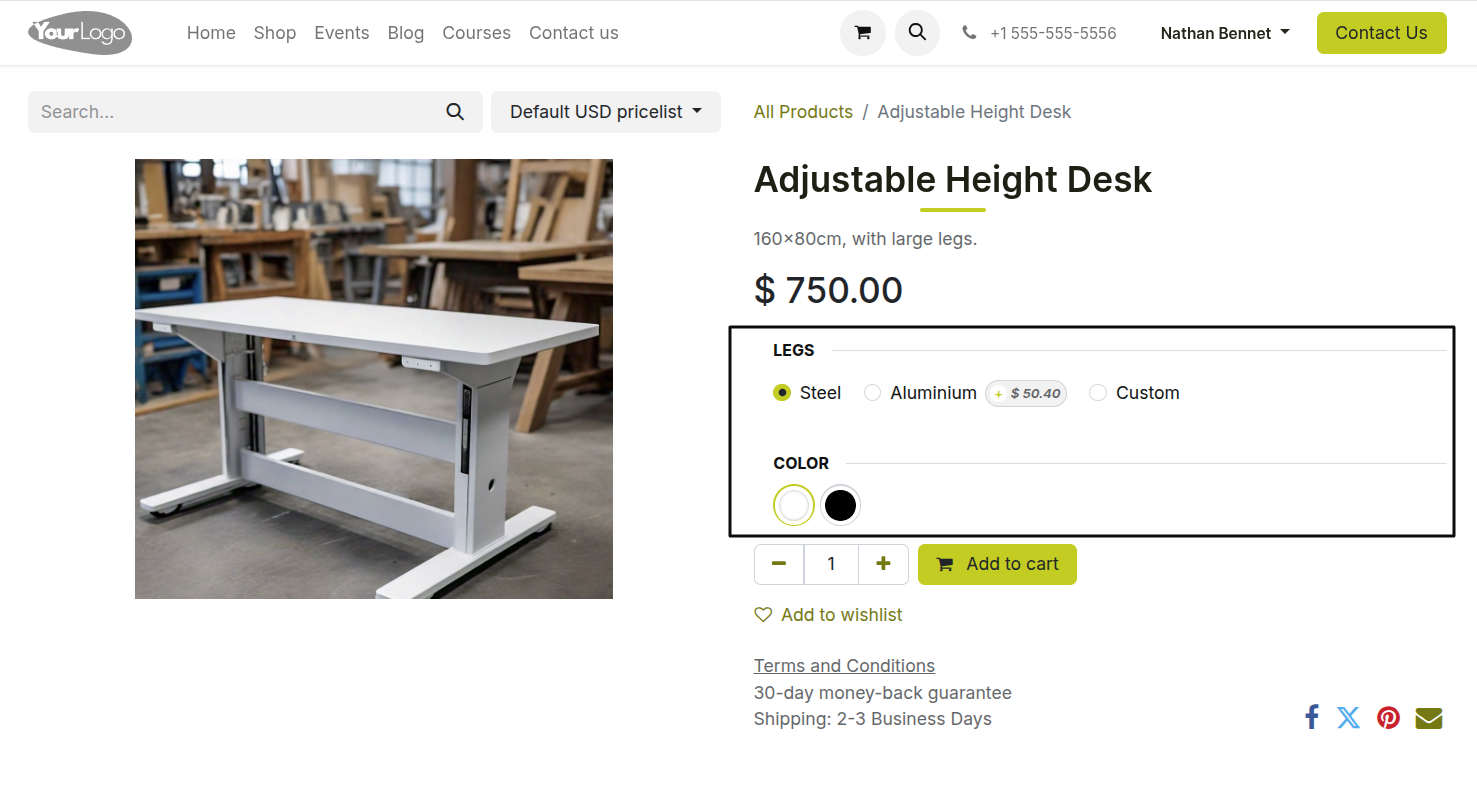
Fig 2.2 — Product page on storefront — Size and Colour attribute selectors showing available combinations; selected variant with updated price
Note
If a variant has zero stock and out-of-stock prevention is enabled (see Section 9.2), that specific variant combination is greyed out on the product page and cannot be added to the cart, while other available combinations remain selectable.
2.3. Product Images & Media
High-quality images are essential for eCommerce conversion. Cyllo supports multiple images per product, displayed as a gallery on the product page with thumbnail navigation. The first image is used as the catalog thumbnail on the shop listing page.
- Open the product form and click the main image area to upload the primary product photo.
- To add additional images, click the ‘Add a Media’ button under Sales tab and upload multiple photos — different angles, lifestyle shots, or detailed close-ups.
- Images are displayed in the order they are uploaded. Drag to reorder — the first image becomes the shop thumbnail.
- For variant-specific images, open the individual variant record from the Variants tab and upload an image. This image is shown automatically when that variant is selected by the customer.
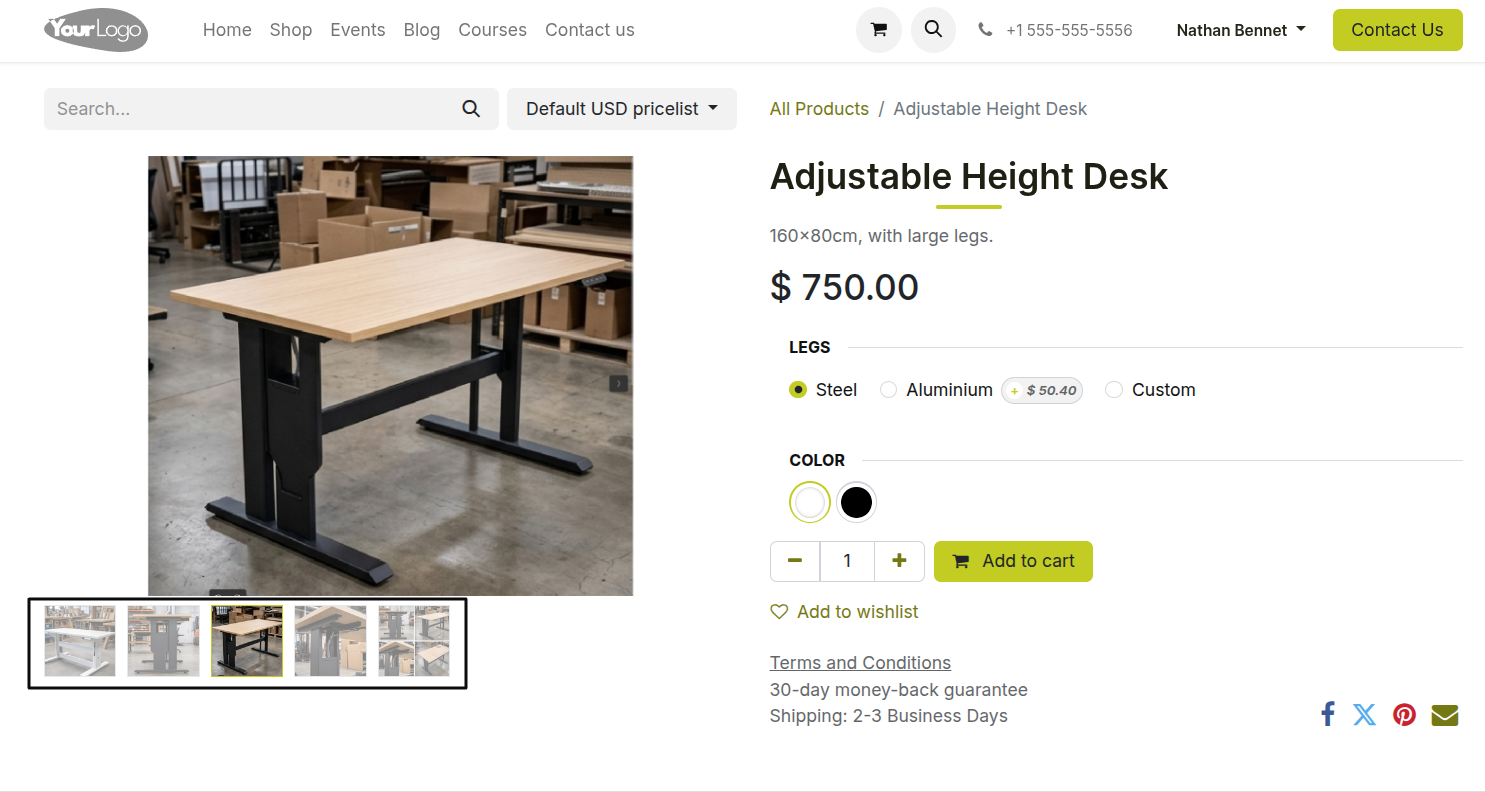
Fig 2.3 — Product page — main image displayed large on the left with thumbnail strip below; clicking a thumbnail swaps the main image
TIP
Use square images at a minimum resolution of 1024x1024 pixels for the best display across all screen sizes. Inconsistent image dimensions across products create a misaligned grid on the shop listing page.
2.4. Product Categories & Filtering
eCommerce product categories organise the shop page into sections that customers can filter by — Electronics, Apparel, Home & Garden. Categories appear as clickable filter links in the shop sidebar or navigation. Products can belong to multiple categories and categories can be nested for multi-level browsing.
- Go to Website → eCommerce → eCommerce → eCommerce Categories.
- Click New to create a category. Enter the Category Name.
- Optionally, select a Parent Category to create a sub-category (e.g. Men's Shirts under Apparel).
- Upload a Category Image — shown as the category tile on the shop page when a category grid layout is used.
- Set the Sequence to control the order categories appear in the sidebar.
- Assign products to this category via the product form's Website Category field, or from the category form using the Products tab.
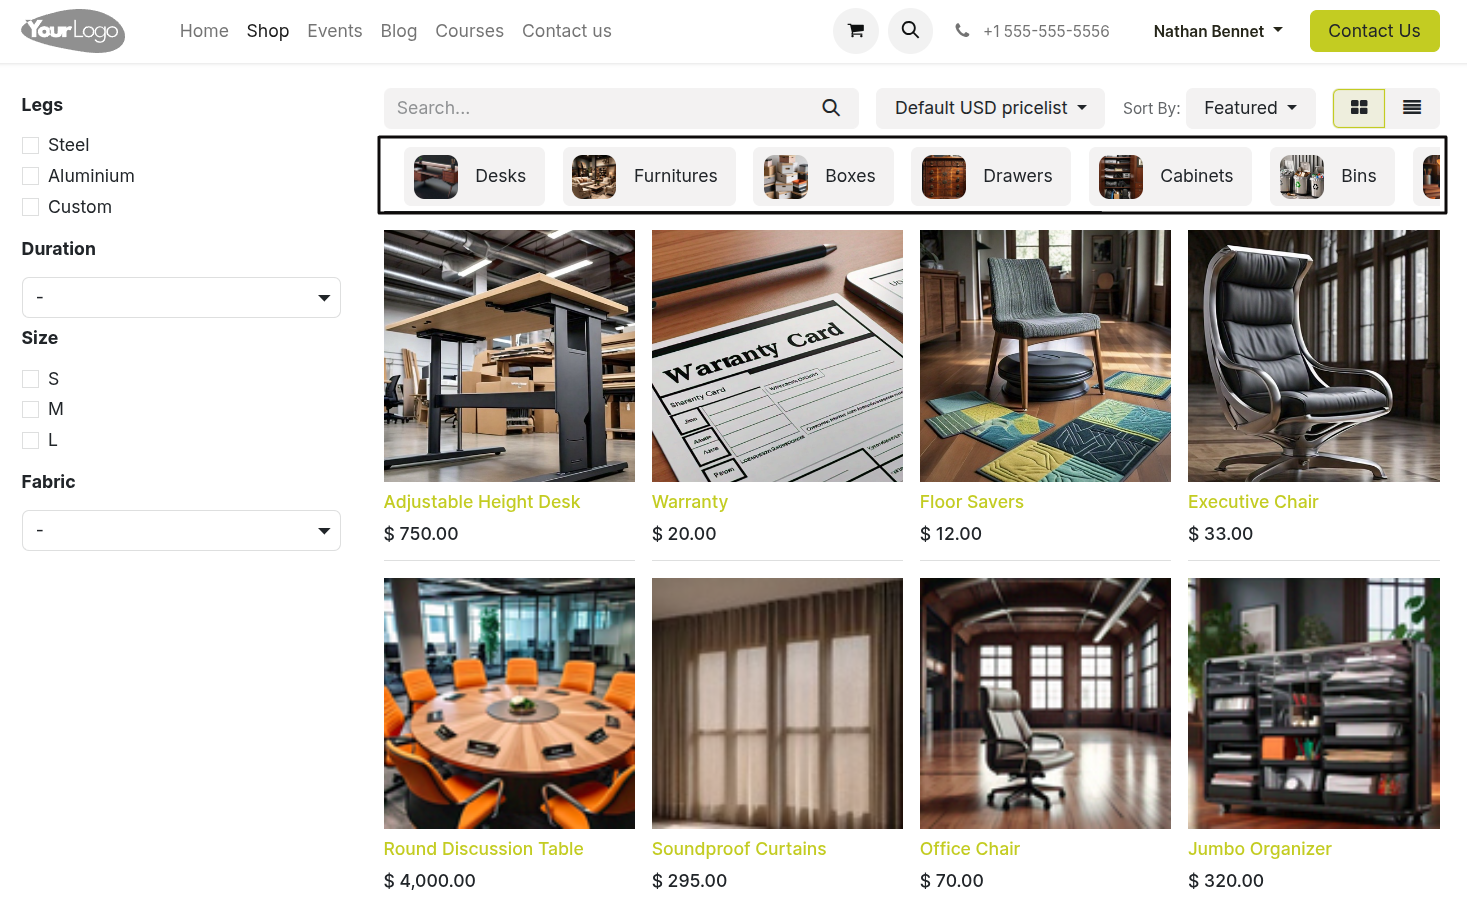
Fig 2.4 — eCommerce shop page — category filter sidebar on the top with nested categories; product grid filtered by the selected category
Note
eCommerce categories (Website Categories) are separate from internal Inventory product categories. A product can have a different eCommerce category from its internal category, allowing flexible storefront organisation without disrupting back-office product grouping.
2.5. Cross-Selling & Upselling
Cross-selling and upselling increase average order value by suggesting related or complementary products to customers. Cross-sells appear on the cart page — items that pair well with what the customer already has. Upsells appear on the product page — premium alternatives or upgrades to the item being viewed.
Setting Up Cross-Sells:
- Open the product form and go to the Sales tab.
- In the Optional Products field (cross-sells), add the products you want to suggest when this item is in the cart.
- Save. When a customer adds this product to the cart, the optional products appear as suggestions on the cart page with Add to Cart buttons.
Setting Up Upsells (Accessories):
- In the Sales tab of the product form, use the Accessory Products field to add higher-value alternatives or complementary items.
- These products appear in a 'You might also like' or 'Frequently bought together' section on the product page.
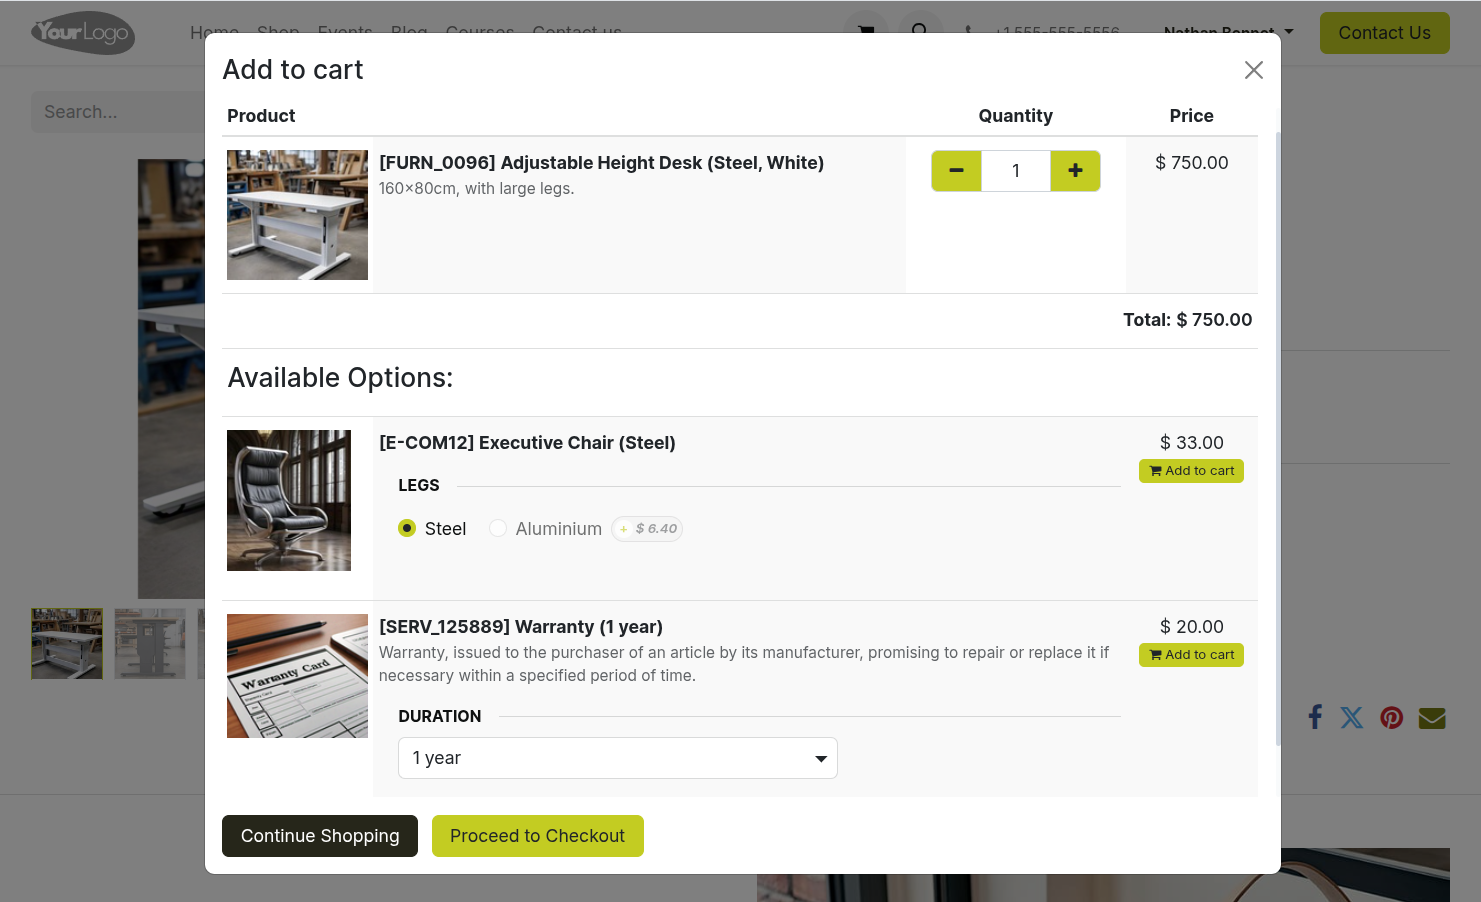
Fig 2.5 — Add to cart page — cross-sell suggestions shown below the cart items as a horizontal product row with images, prices, and Add buttons
TIP
Link your highest-margin accessories and bundles as cross-sells on popular products. A customer buying a laptop is a prime candidate to see a laptop bag or screen protector — items with high margin that require minimal deliberation.
3. Pricing & Promotions
This section covers all aspects of pricing on the Cyllo eCommerce store — base product pricing, customer-specific pricelists, coupons and promotional codes, product discounts, and multi-currency support.
3.1. Product Pricing
Each product has a Sales Price that serves as the default price shown on the storefront. This price is set directly on the product form and applies to all customers who are not assigned a specific price list. Variant-specific pricing can be configured by adding an Extra Price to individual attribute values.
- Open the product form.
- Set the Sales Price under the General Information tab of the form.
- To set a different price per variant, go to the Attributes & Variants tab, open the attribute value, and enter the Extra Price — this is added to the base price for that variant.
- To show a compare-at (struck-through original) price alongside a discounted price, enable ‘Comparison Price’ in configuration settings, then enter the Compare to Price in the Sales tab. The storefront displays both prices, with the sale price highlighted.

Fig 3.1 — Product page — sale price shown prominently with the original compare-at price struck through next to it
3.2. Pricelists & Customer-Specific Pricing
Pricelists allow the store to show different prices to different customer groups — for example, wholesale pricing for business buyers, VIP member pricing, or regional pricing for different markets. When a customer is logged in and assigned a pricelist, the storefront automatically shows prices from their pricelist rather than the default.
Enabling Pricelists:
- Go to Website → eCommerce → Configuration → Settings.
- Under the Shop - Products section, enable Pricelists.
- Select whether customers can switch pricelist manually using a currency/country selector, or whether it is applied silently based on their account.
Creating a Pricelist:
- Go to Website → eCommerce → Configuration → Pricelists (or Sales → Configuration → Pricelists).
- Click New and enter the pricelist name (e.g. Wholesale, VIP Members, UAE Region).
- Under the Rules tab, add pricing rules — set the product or category, the pricing method (fixed price, discount on sales price, formula), and any minimum quantity.
- Under the Configuration tab, set the currency for this price list if it differs from the default.
- Assign this pricelist to customers by opening the customer record and setting the Pricelist field, or allow customers to self-select from a dropdown on the storefront.

Fig 3.2 — Pricelist form — Configuration tab showing website settings
Note
When a logged-in customer with an assigned pricelist visits the store, all product prices shown are from their pricelist. If they log out, the default public pricelist pricing is shown again.
3.3. Coupons & Promo Codes
Coupon and promo codes allow customers to enter a discount code at checkout to receive a reduction on their order total, a specific product, or shipping costs. Codes are generated and managed from the eCommerce or Sales promotions configuration and can be time-limited, usage-capped, or tied to a minimum order value.
Enabling Coupons:
- Go to Website → eCommerce → Configuration → Settings.
- Under the Promotions section, enable Discounts, Loyalty & Gift Cards.
- Save. To create a coupon, refer to the sales coupon. Customer Experience:
- On the cart page, a Promo Code or Discount Code field is shown.
- The customer enters the code and clicks Apply. The discount is immediately deducted from the order total.
- If the code is invalid or the conditions are not met, an error message explains why.
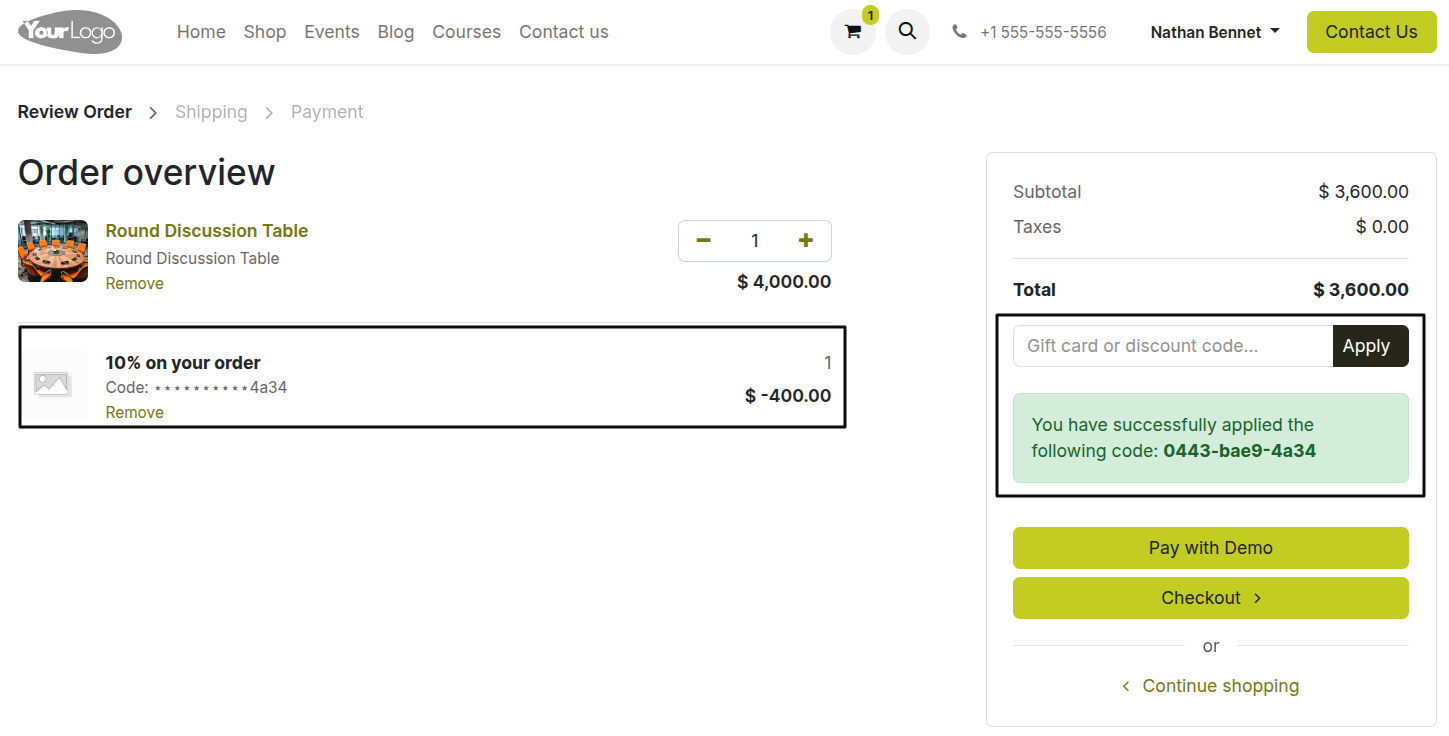
Fig 3.3 — Cart page — promo code input field with applied discount line showing the deduction from the order total
3.4. Discounts & Special Offers
Beyond coupon codes, Cyllo eCommerce supports automatic promotional discounts that apply to all qualifying orders without requiring a code — flash sales, quantity-based discounts, category discounts, and limited-time offers. These are configured as Promotion Programs.
- Go to Website → eCommerce → Products → Discount & Loyalty.
- Click New and select Promotion Program as the type.
- Enter the Program Name (e.g. Buy 3 Get 10% Off, Free Shipping Over £50).
- Set the Conditions — minimum order amount, minimum quantity, specific products or categories.
- Set the Reward — percentage discount, fixed amount off, free product, or free shipping.
- Set the Validity Period — start date and end date for the promotion.
- Save and set the program to Active. Cyllo applies the discount automatically to all qualifying orders during the valid period.
Note
Multiple promotions can be active simultaneously. Cyllo applies all qualifying promotions to an order and shows each discount as a separate line on the checkout summary, giving customers full transparency on their savings.
TIP
Use pricelist-based currency pricing for B2B or regional markets. This ensures each market sees commercially agreed prices rather than real-time converted figures that fluctuate daily.
4. Shopping Cart & Checkout
This section covers the full path from adding a product to the cart through to order confirmation — cart management, abandoned cart recovery, guest versus account checkout, the checkout step flow, and delivery address handling.
4.1. Shopping Cart Overview
The shopping cart accumulates products as the customer browses the store. It persists across the session and, for logged-in users, across multiple visits until the order is placed or the cart is cleared. The cart page provides a summary of all selected items before the customer proceeds to checkout.
- Customers add items using the Add to Cart button on any product tile or product page.
- The cart icon in the site header shows the current item count and total at all times.
- On the cart page, customers can update quantities, remove items, apply a promo code, and review the subtotal and estimated shipping cost before proceeding.
- Cross-sell suggestions appear below the cart items (if configured — see Section 2.5).
- A Checkout button takes the customer to the first step of the checkout flow.
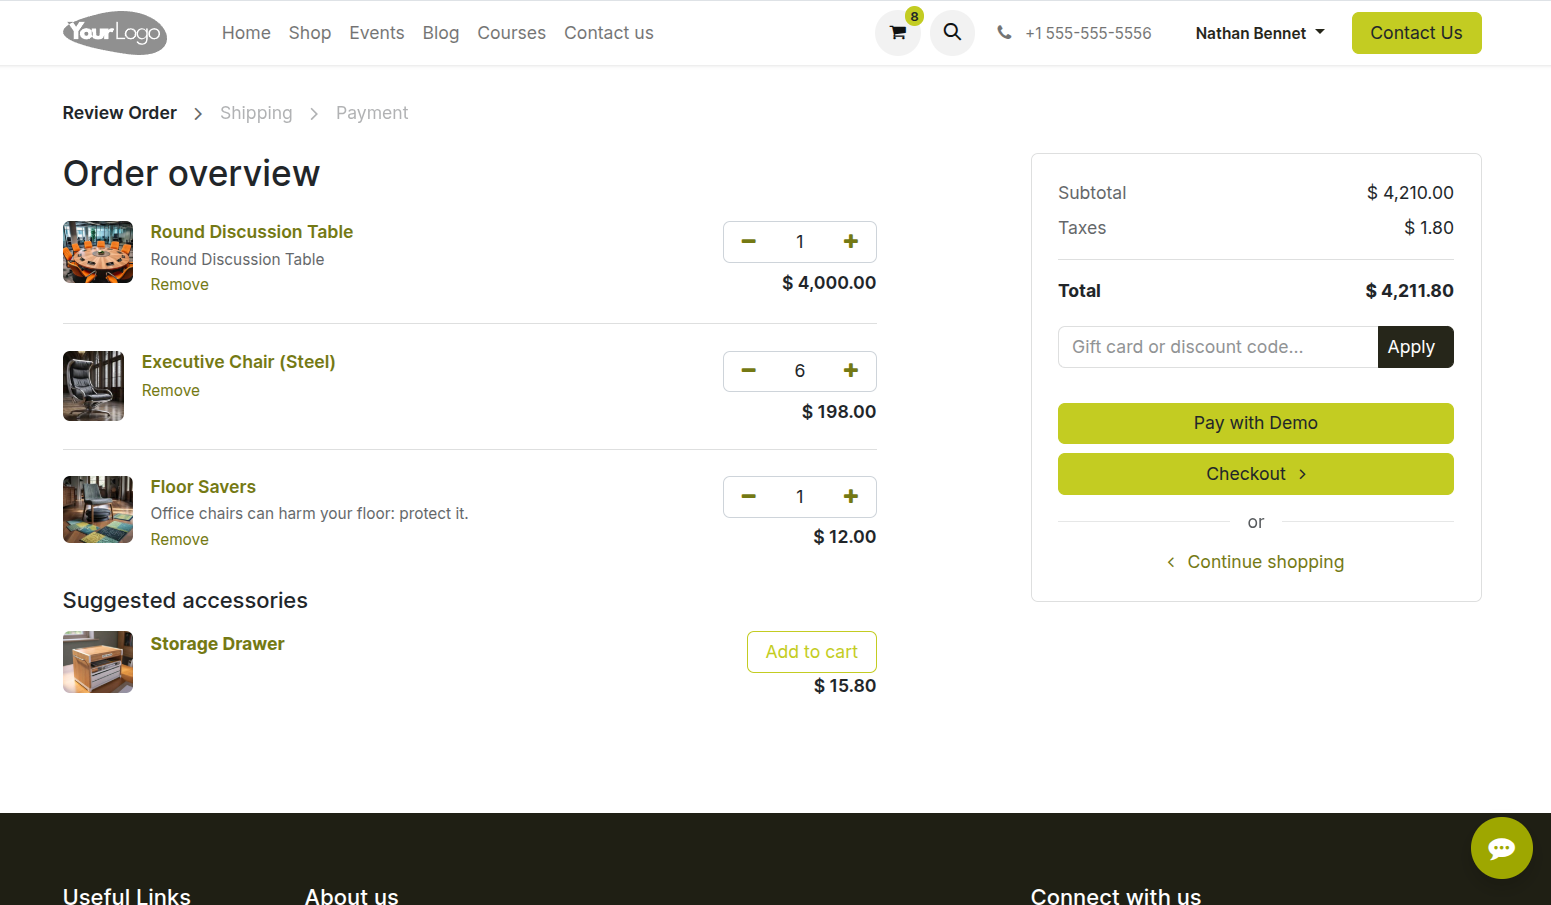
Fig 4.1 — Cart page — item list with quantity controls, remove button, promo code field, order summary on the right, and Checkout button
4.2. Abandoned Cart Recovery
Abandoned cart recovery tracks customers who added items to their cart but did not complete the checkout. Cyllo logs these sessions and can automatically send a recovery email reminding the customer of their cart contents — with a direct link back to their saved cart to complete the purchase.
How Abandoned Cart Tracking Works:
- A cart is recorded as abandoned when a customer adds at least one item to the cart but does not proceed past the cart page within the configured timeout period.
- For guest users, the email is captured at the cart/checkout stage when they enter their email address. For logged-in customers, the account email is used automatically.
- Abandoned carts are listed in eCommerce → Reporting → Abandoned Carts, showing customer email, cart value, and time since abandonment.
Setting Up Recovery Emails:
- Go to Website → eCommerce → Configuration → Settings and enable ‘Automatically send abandoned checkout emails’.
- Set the Recovery Delay — the number of hours after abandonment before the email is sent (e.g. 1 hour, 24 hours).
- Customise the email template from Website → eCommerce → Configuration → Abandoned Cart Email Template. The template automatically includes the customer's cart items and a link back to their saved cart.
- Save. Recovery emails are sent automatically by Cyllo's email scheduler.
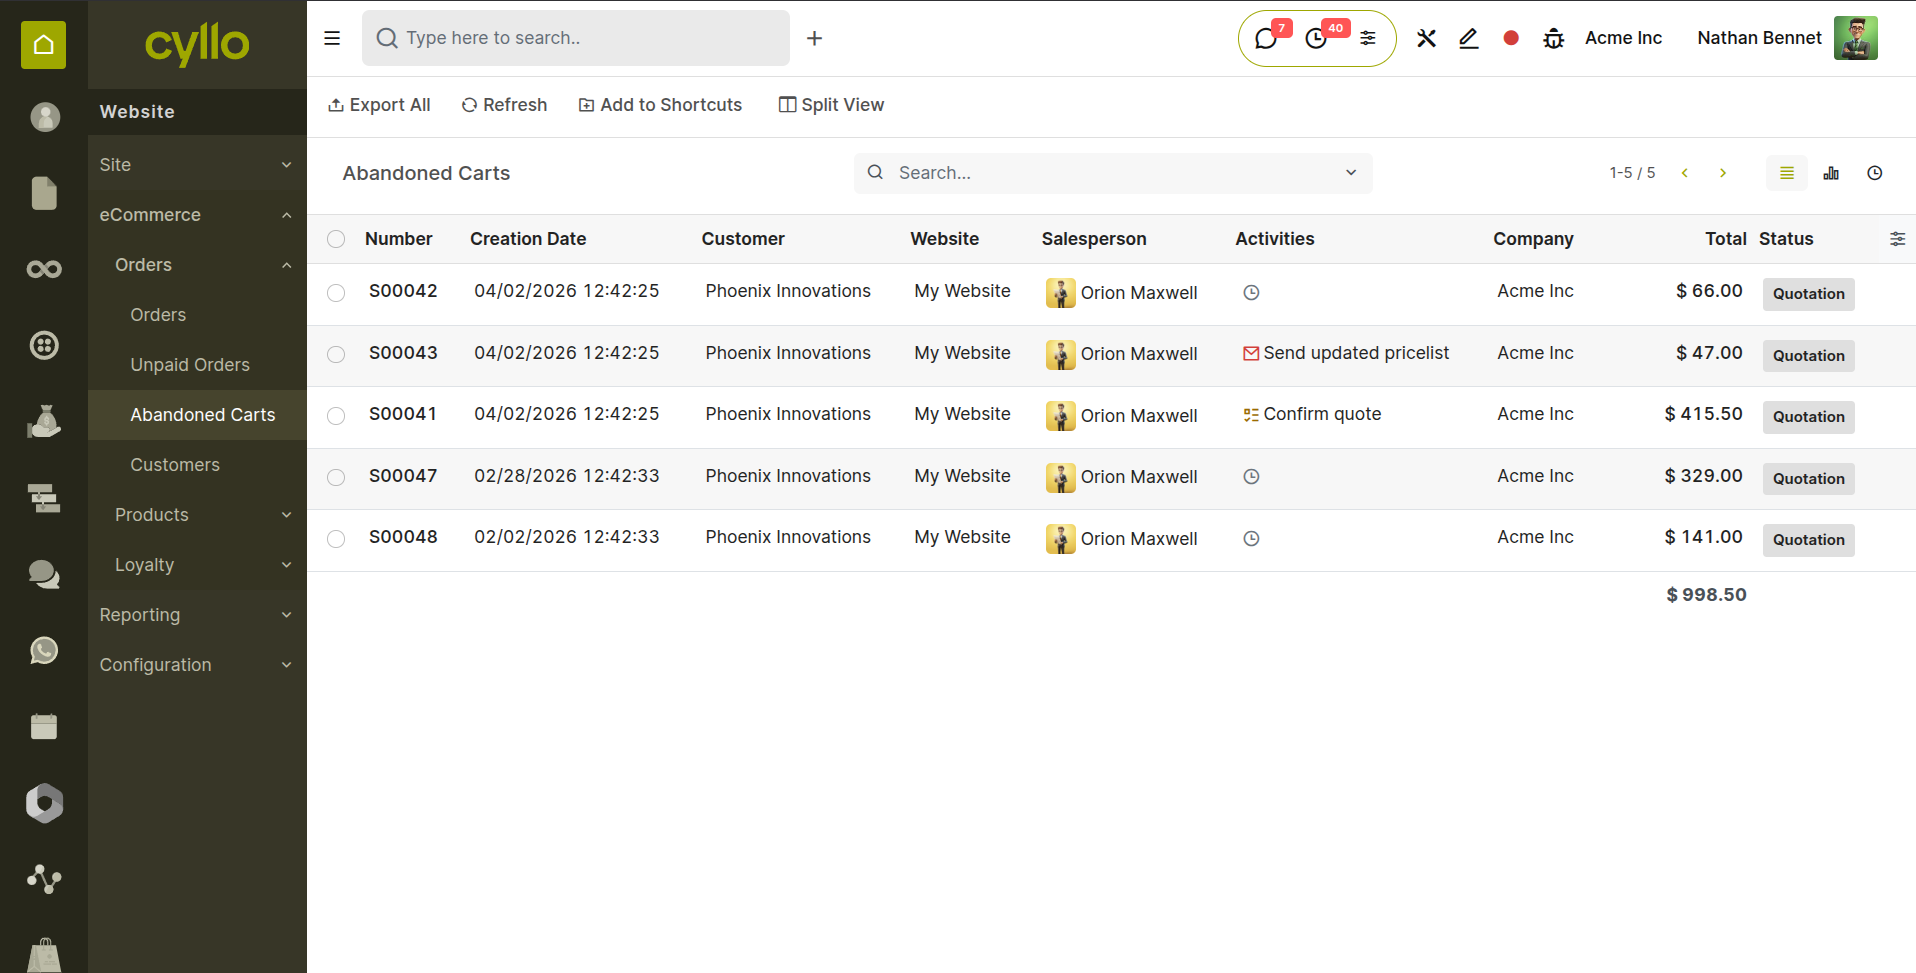
Fig 4.2 — Abandoned Carts list — customer email, cart value, date, order number columns with recovery email activities
TIP
Set the first recovery email at 1 hour after abandonment for maximum effectiveness. A second email at 24 hours can include a coupon code as an additional incentive. Configure this using the Marketing Automation module with a two-step email sequence.
4.3. Guest Checkout vs. Account Checkout
Cyllo eCommerce supports both guest checkout and registered account checkout. The checkout policy — whether to require account creation, allow guests, or present both options — is configurable per website. Offering guest checkout reduces friction and lowers cart abandonment rates; requiring accounts enables loyalty programs and order tracking.
- Go to Website → eCommerce → Configuration → Settings.
- Under the Checkout Process section, find the Sign In/Up option.
- Select the desired policy:
- Optional (default): Customers see a choice — Sign in, Create Account, or Continue as Guest. Recommended for most stores.
- Disabled (guest only): No login prompt. All customers check out as guests. Simplest checkout experience.
- Mandatory: Customers must create or log into an account before proceeding. Use only for B2B or members-only stores.
- Save. The checkout entry screen updates immediately.
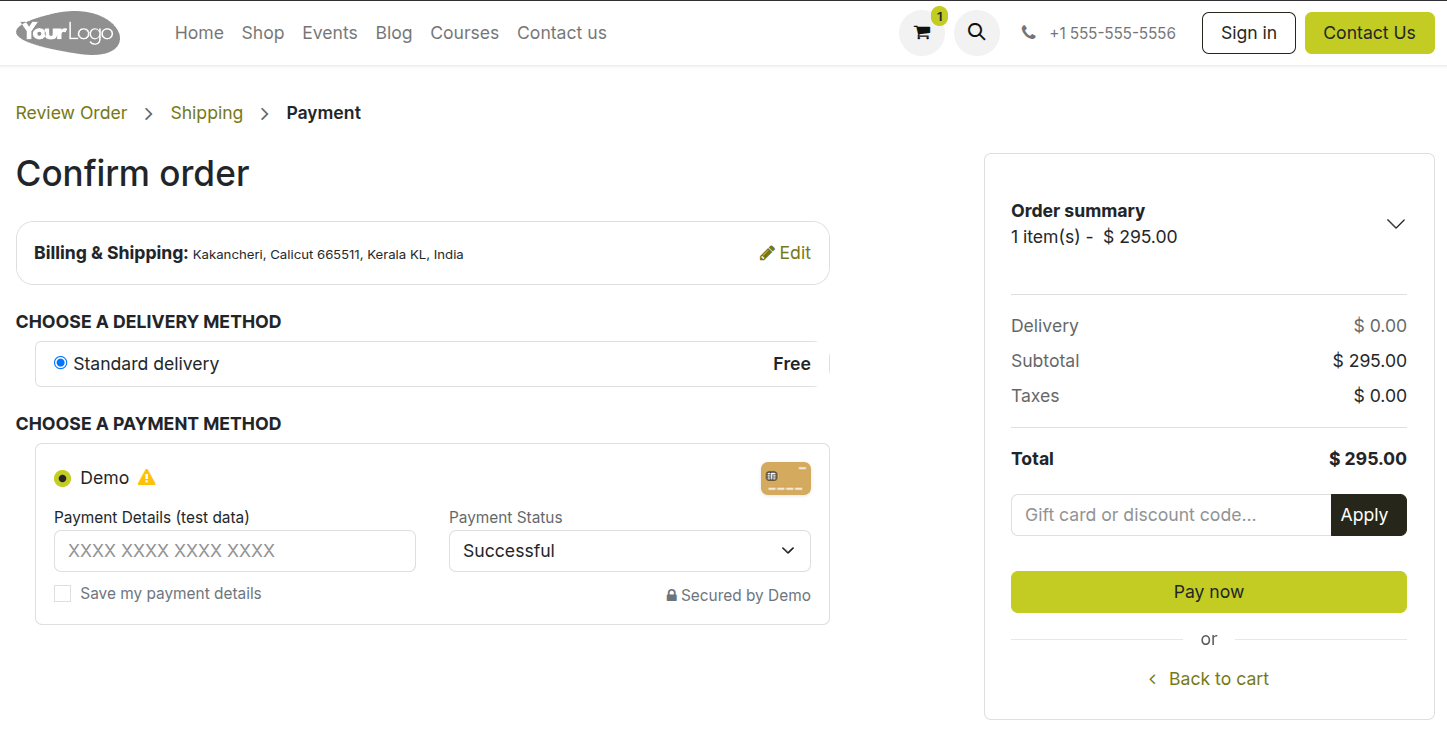
Fig 4.3 — Checkout entry screen — Sign In button or Pay as Guest
Note
Guest customers can create an account after completing their order. A post-purchase prompt invites them to set a password and convert their guest order into a tracked account. This recovers a portion of guest checkouts into registered customer records.
4.4. Checkout Flow
The checkout process is a guided multi-step flow that takes the customer from cart review to order confirmation. Each step is clearly labelled in a progress bar and the customer can navigate backwards to correct their details without losing cart data.
| Checkout Step | What Happens |
|---|---|
| 1. Cart Review | Customer reviews items, quantities, and applies promo codes. Subtotal and estimated shipping shown. |
| 2. Contact Details | Customer enters name, email, and phone number. Guest users enter these here; logged-in users see pre-filled details. |
| 3. Delivery Address | The customer enters or selects a shipping address. Saved addresses available for logged-in customers. |
| 4. Shipping Method | Available shipping methods are listed with their costs. Customer selects preferred method. |
| 5. Payment | The customer selects a payment method and completes payment. Gateway-specific fields appear (card number, UPI ID, etc.). |
| 6. Confirmation | Order confirmed. The confirmation page shows order number and summary. Confirmation email sent automatically. |
Note
The invoice is auto-generated at step 6 (order confirmation) immediately when payment is successful. Customers can download their invoice from the confirmation page or from their My Account portal.
4.5. Delivery Address Management
Customers can save multiple delivery addresses to their account — home, office, different shipping destinations — and select the appropriate address at checkout without re-typing details on every order. Address management is available from both the checkout flow and the customer's My Account portal.
During Checkout:
- On the Delivery Address step, logged-in customers see a list of their saved addresses. They select one or click Add a New Address.
- New addresses entered at checkout are saved to the customer's account automatically for future use.
From My Account:
- The customer logs in and navigates to My Account → Addresses.
- Click Add Address to enter a new shipping or billing address.
- Existing addresses can be edited or deleted from this page.
- A default shipping address can be set, which is pre-selected on the delivery step for faster checkout.
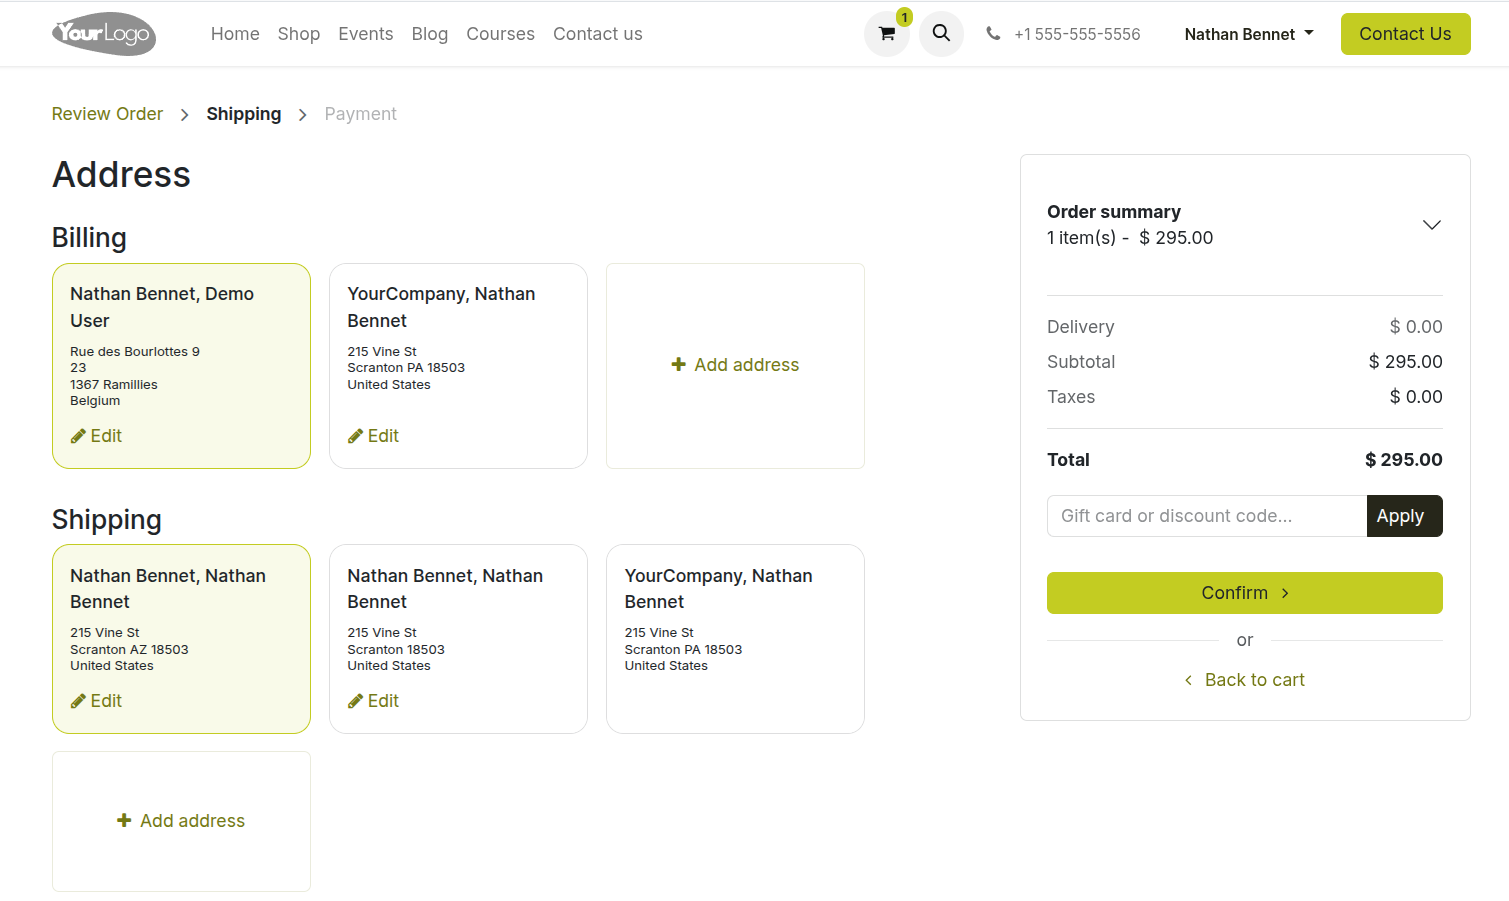
Fig 4.4 — Checkout delivery address step — saved address cards shown with a selected radio button; Add a New Address link at the bottom
5. Payment Gateways
Cyllo eCommerce supports a wide range of payment providers out of the box. This section covers the supported gateways, how to configure them, manual payment options, and the process for testing before going live.
5.1. Supported Payment Providers
Cyllo eCommerce supports many payment providers. The table below lists the key supported providers and their primary use regions.
| Payment Provider | Primary Region | Notes |
|---|---|---|
| PayPal | Global | PayPal wallet and card payments. Requires a PayPal Business account. |
| Stripe | Global | Card payments, Apple Pay, Google Pay. Most widely supported gateway. |
| Razorpay | India | Supports UPI, cards, netbanking, wallets, and EMI in India. |
| Adyen | Global | Enterprise-grade multi-method gateway with strong fraud tools. |
| Mollie | Europe | Popular in the Netherlands and Belgium; supports iDEAL, SEPA, and cards. |
| Amazon Payment Services | Middle East / Global | Previously Amazon Pay; strong adoption in MENA region. |
| AsiaPay | Asia-Pacific | Supports local Asian payment methods alongside cards. |
| Flutterwave | Africa | Covers Nigeria, Ghana, Kenya, and other African markets. |
| Pago | Latin America | Latin American payment methods including local bank transfers. |
| Wire Transfer | Global | Manual bank transfer; order confirmed after admin verifies payment. |
| Custom / Other Providers | Varies | Additional gateways can be integrated via the payment provider API. |
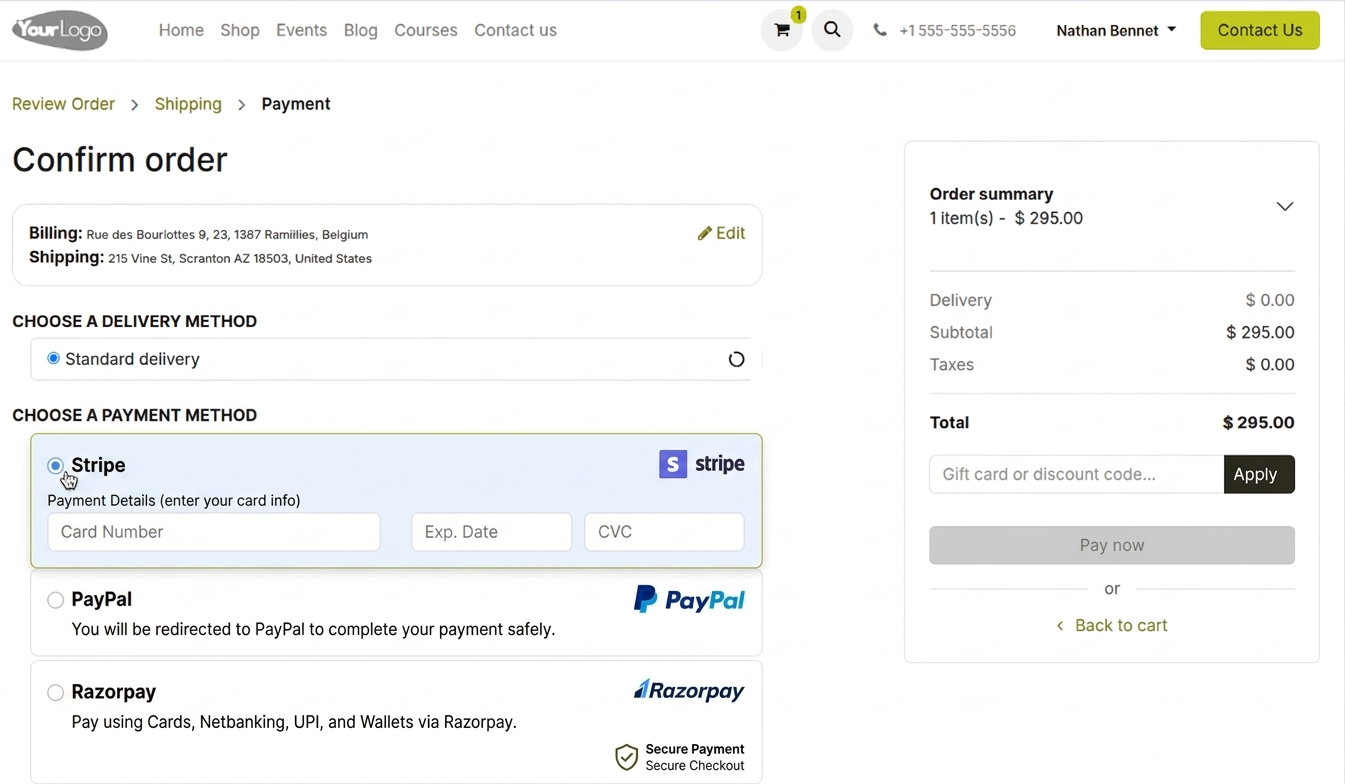
Fig 5.1 — eCommerce payment method selection at checkout — provider logos shown as selectable tiles: PayPal, Stripe, Razorpay
5.2. Configuring a Payment Provider
Each payment provider is configured individually from the eCommerce or Website settings. The configuration stores your API credentials, defines which currencies and countries the provider handles, and controls whether it appears in test mode or live mode.
- Go to Website → Configuration → eCommerce → Payment Providers.
- Click the provider you want to configure (e.g. Stripe).
- Set the State to Test Mode for initial setup and testing.
- Enter the required API credentials — these are found in your payment provider's developer dashboard. For most providers this means a Public Key and a Secret Key.
- Under the Configuration tab, set the Supported Currencies and Countries to restrict the provider to specific markets if needed.
- Set the Maximum Amount if you want to limit which orders this gateway processes (e.g. to route high-value orders to a specific provider).
- Click Save.
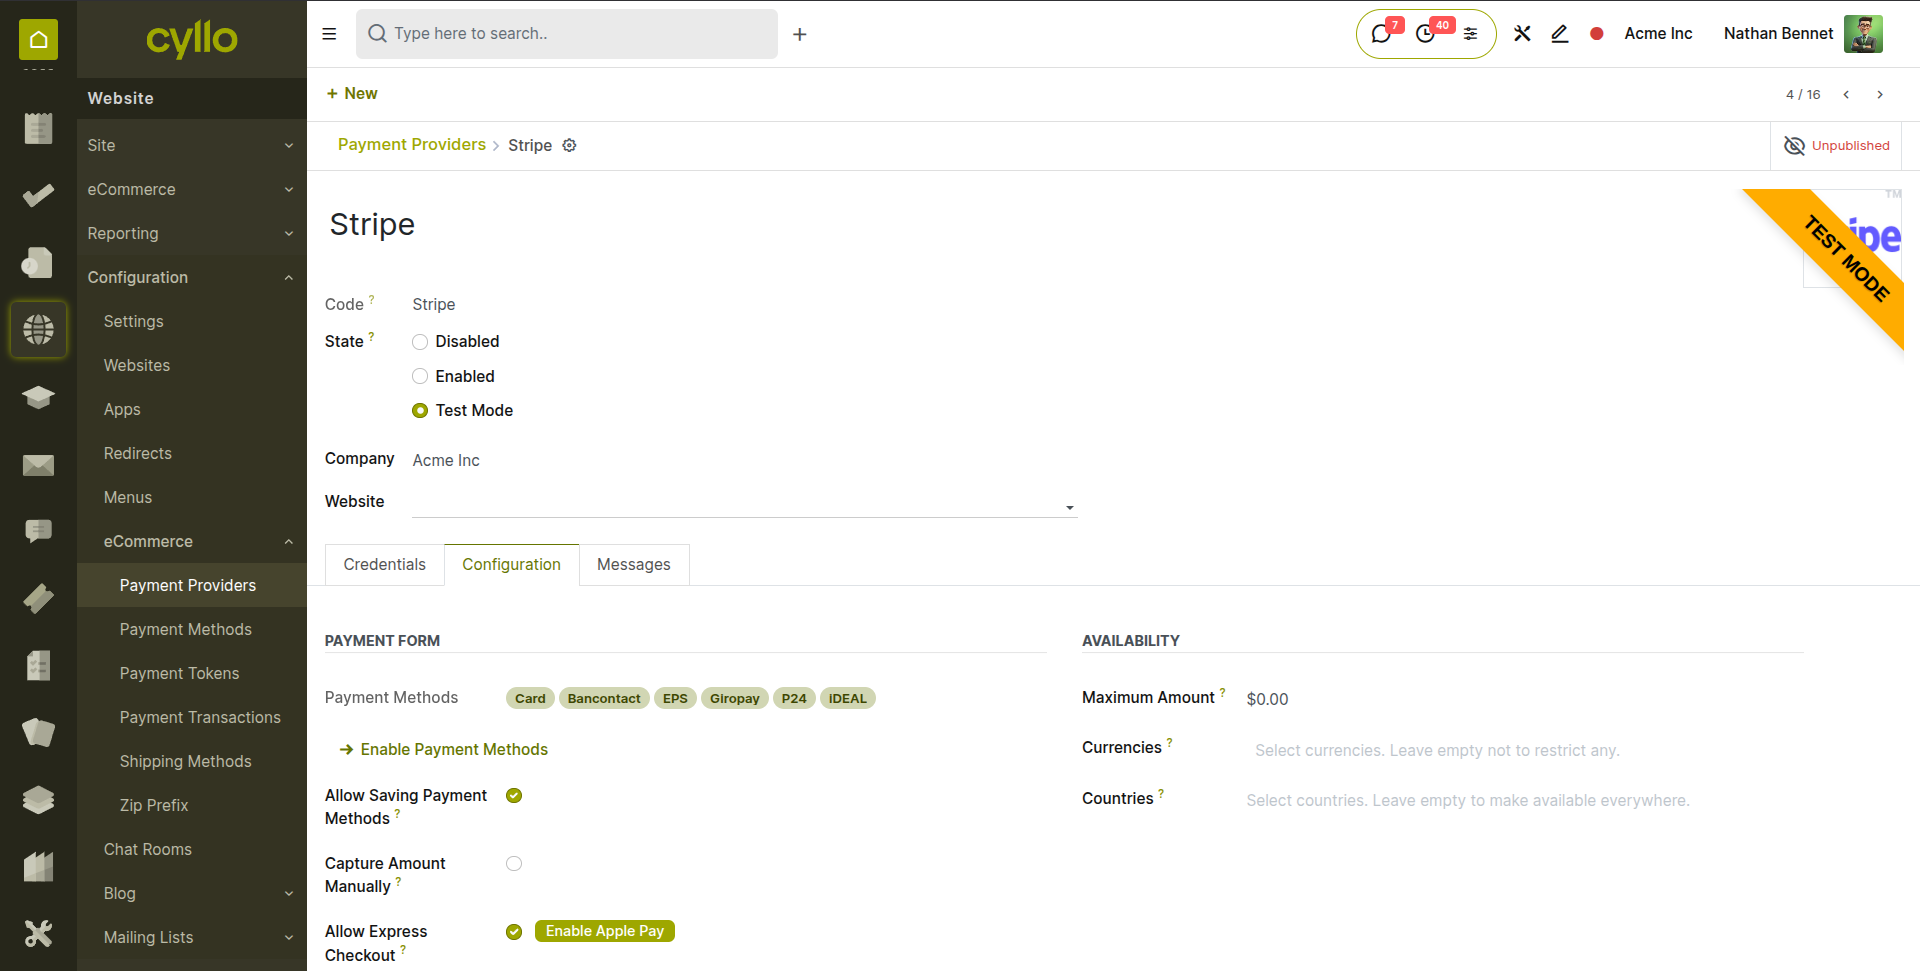
Fig 5.2 — Payment provider configuration form — State toggle between Test/Live, Credentials tab, Configuration tab
Key Fields
- State: Test Mode — uses sandbox credentials. Live Mode — processes real payments. Always test before switching to Live.
- Credentials Tab: Secret key, Publishable Key, Webhook Signing Secret etc..
- Payment Journal: The accounting journal where transactions from this gateway are posted. Set to the correct bank account.
- Payment Methods: Choose which payment methods are available in this provider.
5.3. Wire Transfer & Manual Payments
Wire Transfer is a built-in manual payment option where the customer places the order but payment is made offline — via a direct bank transfer. The order is created in a Pending Payment state and must be manually confirmed by an administrator once the bank transfer is received.
- Go to Website → Configuration → eCommerce → Payment Providers and open Wire Transfer.
- Set the State to Enabled.
- In the Communication Message field, enter the bank account details that will be shown to the customer after they place the order — account name, account number, sort code/IBAN, and payment reference instructions.
- Set the Journal to the bank account where transfers will be received.
- Save.
Processing a Wire Transfer Order:
- When a customer completes checkout with Wire Transfer, an order is created in Cyllo with state Pending Payment.
- Once the bank transfer is received and confirmed, go to Sales → Orders, open the order, and click Mark as Paid.
- The order progresses to Confirmed and the delivery process begins.
Note
Cyllo does not automatically detect incoming bank transfers. Wire transfer orders must be manually confirmed after payment is verified in your bank statement. For high wire transfer volumes, use the Accounting module's bank reconciliation to match transfers to pending orders efficiently.
WARNING
Never use live API credentials while in Test Mode, and never keep test credentials in Live Mode. A live credential in test mode may cause real charges in provider logs. Switch both the State and the credentials simultaneously when going live.
6. Shipping & Delivery
Shipping configuration determines the delivery methods available at checkout, how shipping costs are calculated, and whether free shipping applies to qualifying orders. This section also covers the DHL integration for label generation and tracking.
6.1. Shipping Methods Configuration
Shipping methods are the delivery options shown to customers during checkout — Standard Delivery, Express Delivery, Click & Collect, and so on. Each method has its own pricing rules, carrier association, and delivery time estimate.
- Go to Website → Configuration → eCommerce → Delivery Methods (or Inventory → Configuration → Delivery Methods).
- Click New to create a delivery method.
- Enter the Method Name (e.g. Standard Delivery, Next Day Express).
- Select the Delivery Product — a service product that represents the shipping charge line on the invoice.
- Set the Carrier — fixed or based on rules or a connected carrier like DHL.
- Based on rules, configure how the cost is calculated — see Section 6.2 for detailed cost rule options.
- Set the Destination Availability — restrict the method to specific countries or regions if needed.
- Enable Published to make the method visible at checkout.
- Save.
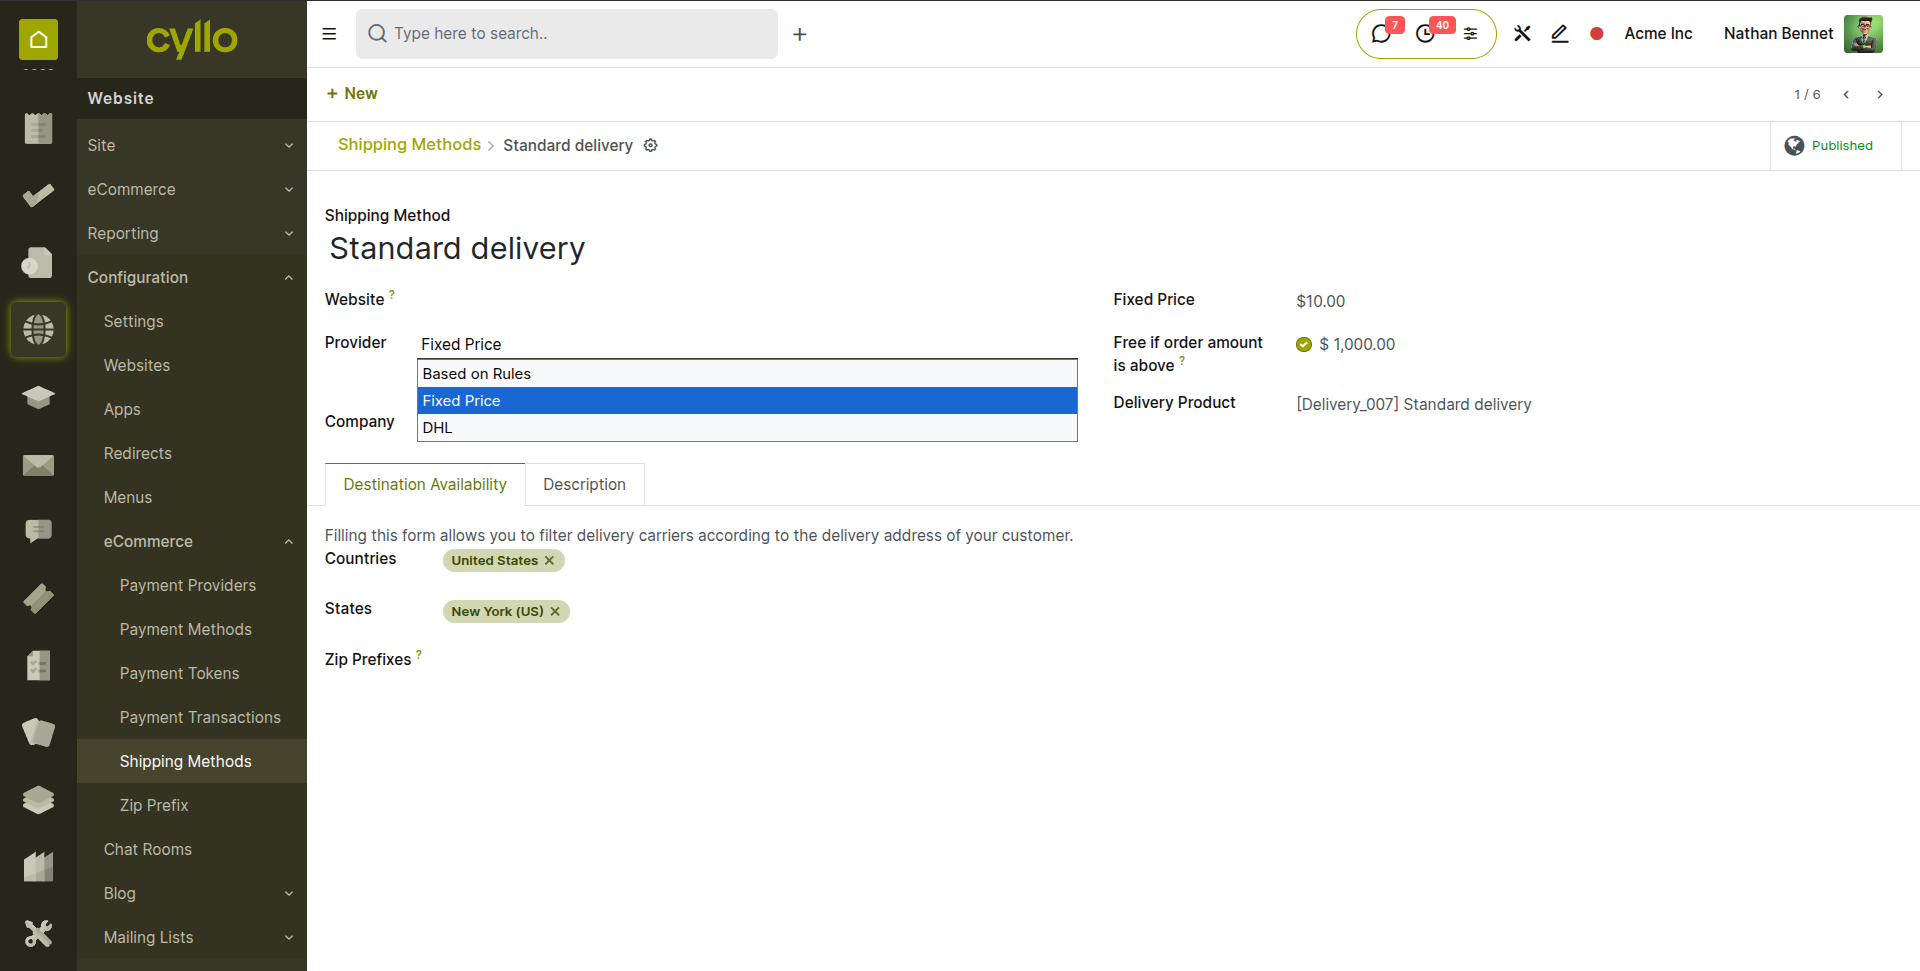
Fig 6.1 — Delivery method form — Method Name, Carrier, Pricing section, and Destination Availability fields; Published toggle enabled
Key Fields
- Delivery Product: The product whose price = the shipping charge on the customer's invoice. Must be a service-type product.
- Estimated Delivery Time: Shown to customers at checkout below the method name (e.g. 3–5 business days).
- Destination Availability: Restrict the method to specific countries. Methods outside a customer's country are hidden at checkout automatically.
6.2. Shipping Cost Rules
Shipping costs can be calculated using a variety of rules — a flat fee, a per-kilogram weight charge, a percentage of the order value, or tiered pricing based on order total ranges. Rules can be combined and stacked to build sophisticated shipping cost logic.
- Open the Delivery Method form.
- Under the Pricing tab, click Add a Line to add a pricing rule.
- Set the Condition — the rule applies when: Order Weight is between X and Y kg, Order Price is between £X and £Y, or for a specific Product.
- Set the Cost — a fixed amount, a per-unit price multiplied by quantity or weight, or a percentage of the order total.
- Add multiple rules to build tiered pricing (e.g. £3.99 for orders under 1kg, £5.99 for 1–5kg, £9.99 for over 5kg).
- Save.
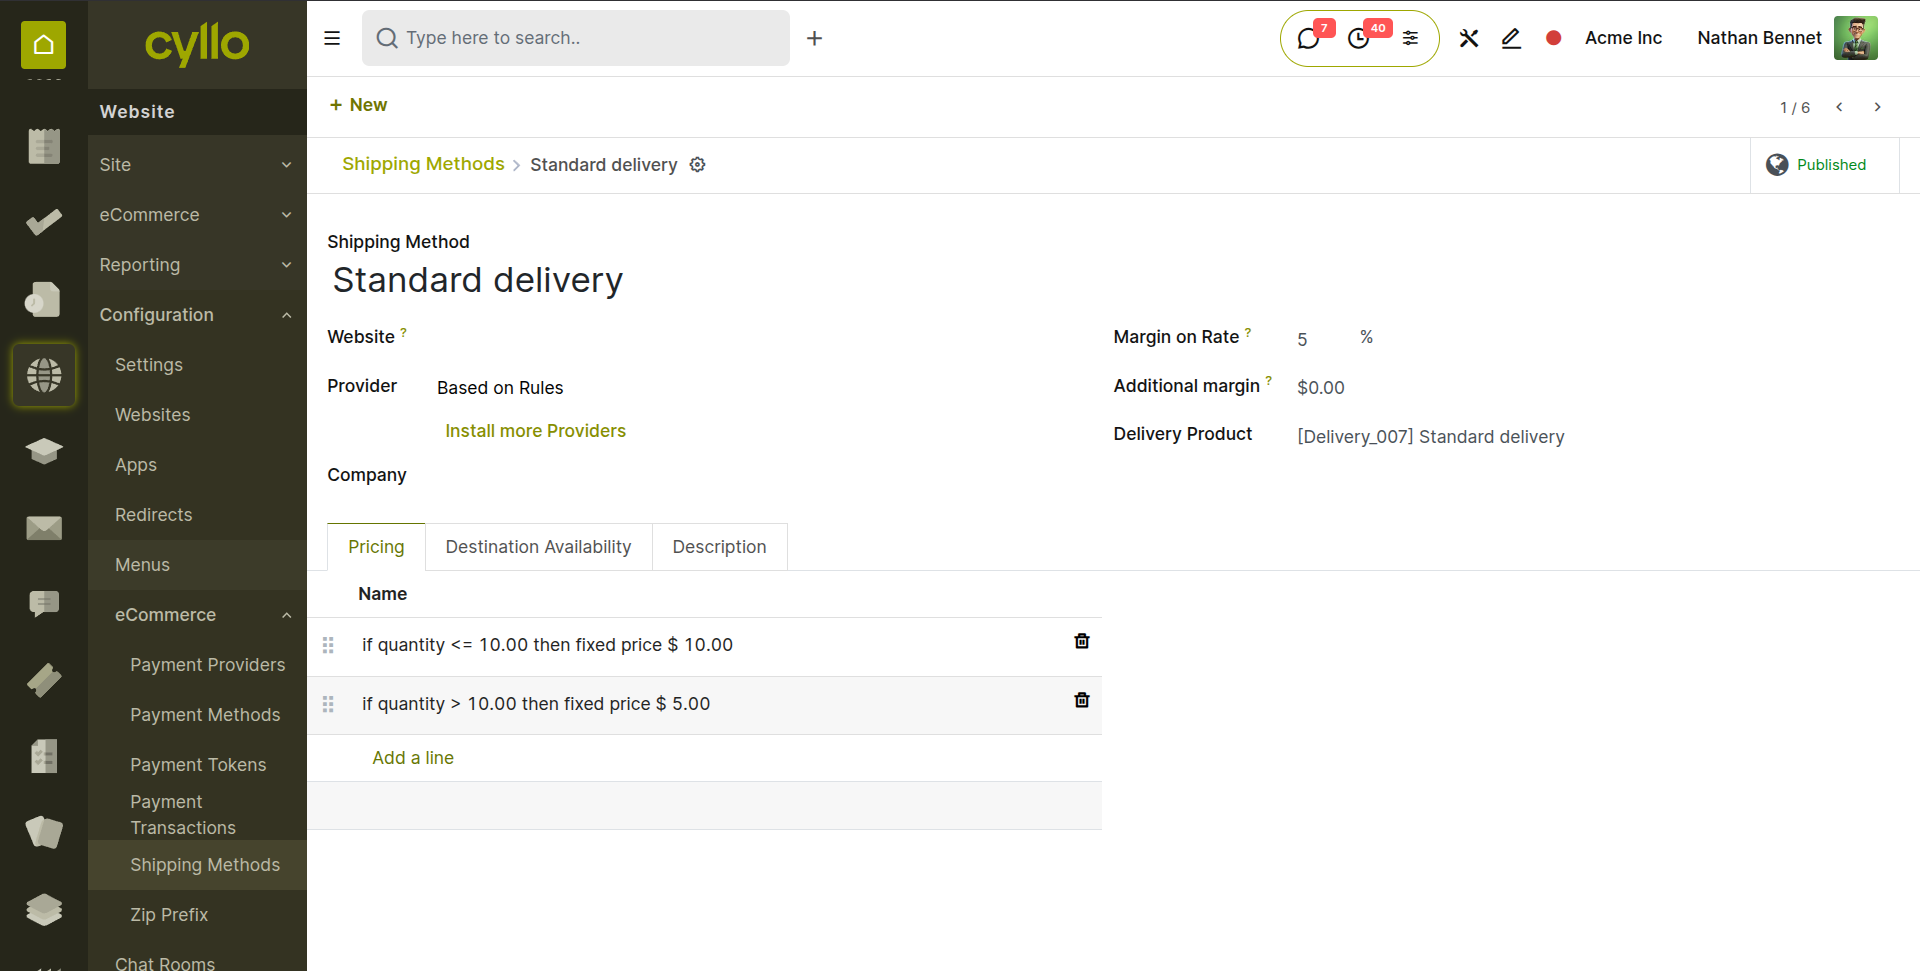
Fig 6.2 — Delivery method pricing tab — multiple rules listed with condition (weight range) and price; rules applying in order from top to bottom
| Pricing Rule Type | Typical Use |
|---|---|
| Fixed Price | Flat rate shipping regardless of order size or weight — simplest option. |
| Based on Order Weight | Charge by kg — fairer for heavy items. Requires product weights to be set. |
| Based on Order Price | Charge as a percentage of the order total — common for B2B or high-value orders. |
| Based on Quantity | Charge per item — useful for fragile or individually packaged products. |
Note
DHL live rate calculation requires the package weight to be set on the delivery order. Ensure product weights are configured on all product forms (Inventory → Products → Weight field) for accurate rate calculations.
7. Order Management
All orders placed on the Cyllo eCommerce store are automatically created as Sales Orders in the back-end. This section covers how to view and manage those orders, track their progress, handle invoicing, and process refunds.
7.1. Viewing eCommerce Orders
eCommerce orders appear in two places in Cyllo — the eCommerce Orders view for a store-centric perspective, and the Sales Orders list for a unified view alongside manually created orders. Both views contain the same underlying records.
- Go to Website → eCommerce → Orders → Orders to see all orders placed through the online store. Orders are tagged with the website source and show the customer name, order date, total, and status.
- Alternatively, go to Sales → Orders → Orders and filter by Source = Website to see eCommerce orders alongside back-office sales.
- Click any order to open the full order form — order lines, customer details, delivery address, payment information, and linked invoices and deliveries.
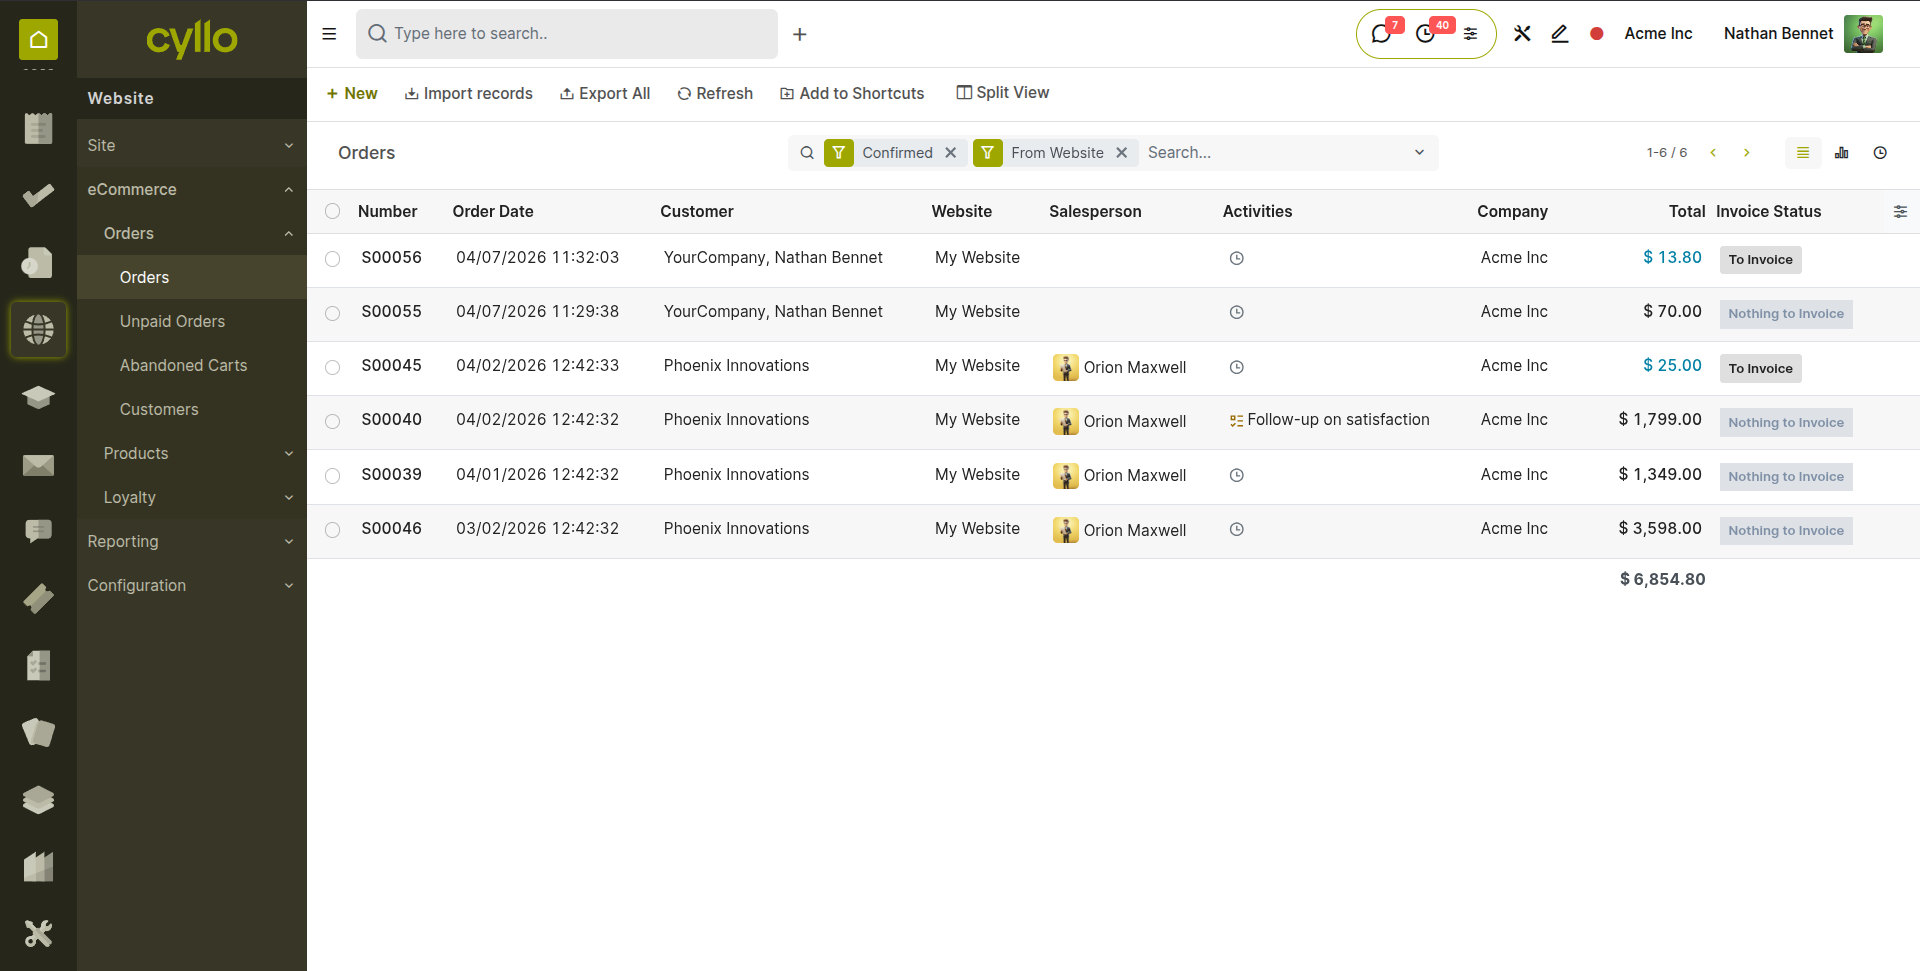
Fig 7.1 — eCommerce Orders list — order number, customer name, order date, total, and status columns on each row
7.2. Order Lifecycle & Statuses
An eCommerce order moves through a defined set of statuses from placement to fulfilment. Each status transition triggers automatic actions in connected modules — delivery creation, invoice generation, stock deduction. Understanding the lifecycle helps administrators manage exceptions and customer queries.
| Order Status | Meaning & Auto-Actions Triggered |
|---|---|
| Draft / Quotation | Order created but payment not yet confirmed. Created for wire transfer orders or payment failures. No delivery or invoice yet. |
| Confirmed (Sales Order) | Payment received. Delivery order created in Inventory. Invoice generated and marked Paid. |
| Cancelled | Order cancelled before delivery. Stock reservation released. Invoice (if any) credit noted. |
Note
For payment gateway transactions, the order moves directly from Draft to Confirmed as soon as the gateway confirms payment. For wire transfer orders, it stays in Draft / Pending Payment until manually confirmed by an administrator.
7.3. Invoicing & Payment
Invoices for eCommerce orders are generated automatically at the moment the order is confirmed — no manual invoicing step is required. The invoice is immediately marked as Paid when the online payment gateway confirms the transaction. Customers can download their invoice from the confirmation page and from their My Account portal.
- Invoice auto-created: At order confirmation. Linked to the sales order under the Invoices smart button.
- Invoice status: Paid — set automatically when the payment gateway confirms the transaction. No manual posting required.
- Accounting entries: Posted automatically to the configured accounting journals — revenue account for the sale, payment account for the gateway.
- Customer download: Available immediately from the order confirmation page and from My Account → Invoices.
- To view or download an invoice for any eCommerce order, open the order in eCommerce → Orders and click the Invoices smart button at the top of the order form.
- To send the invoice by email to the customer, click Send & Print on the invoice form.
7.4. Refunds & Returns
When a customer requests a refund — wrong item, damaged goods, or a change of mind — Cyllo processes the refund by creating a credit note against the original invoice. The refunded amount is returned to the customer via the original payment method, and returned stock is moved back into inventory.
- Open the Sales Order to be refunded from Website → eCommerce → Orders → Orders.
- Click the Invoices smart button and open the related invoice.
- Click Add Credit Note.
- Set the Reason for the credit note (e.g. Customer return, Damaged goods, Incorrect item shipped).
- Select the Reversal Date (usually today).
- Click Reverse. A draft credit note is created for the full invoice amount.
- To make a partial refund, edit the credit note lines to include only the returned items.
- Click Validate. The credit note is posted to Accounting.
- To refund via the original payment gateway, go to the customer's payment record and initiate the refund from there. Most gateways (Stripe, PayPal, Razorpay) support API-based refunds directly from the payment record in Cyllo.
Note
Returned stock is not automatically moved back to inventory when a credit note is created. To return physical goods, create a Return in Inventory → Operations → Deliveries, select the original delivery, and validate the return transfer to update stock levels.
8. Customer Management
Cyllo eCommerce creates and maintains customer records that are shared across the entire Cyllo ERP. This section covers customer registration, the self-service customer portal, and the wishlist feature.
8.1. Customer Accounts & Registration
When a customer creates an account on the Cyllo eCommerce website, a Contact record is created in the Cyllo database with the portal access flag enabled. This record is shared with the Sales, CRM, and Accounting modules — the customer's orders, invoices, and interactions are all visible under the same contact, providing a unified customer view.
Customer Self-Registration:
- Customers register by clicking Sign Up on the website and entering their name, email, and password.
- A confirmation email is sent. Once verified, they can log in to their account and access the My Account portal.
- Registered customers' orders, invoices, and addresses are visible in the backend under Contacts → open the contact.
Admin-Created Portal Access:
- Go to Contacts and open the contact record.
- Click Action → Grant Portal Access.
- The customer receives an email invitation to set their password and activate their account.

Fig 8.1 — Contact record — portal access popup with email, auth, access button
Note
Customer accounts are shared across all modules. A customer who places an online order and later contacts the sales team by phone is the same record in the CRM pipeline. The sales team can see the customer's order history directly from their CRM lead or contact record.
8.2. Customer Portal
The Customer Portal (My Account) is a self-service section of the website where registered customers log in to view their orders, download invoices, manage their addresses, and track deliveries. It reduces support workload by giving customers direct access to their transactional data.
| Portal Section | What the Customer Can Do |
|---|---|
| Orders | View all past and current orders. Click an order to see full details — items, quantities, prices, status, and tracking reference. |
| Invoices | List of all invoices. Download PDF copies. See payment status (Paid / Outstanding). |
| Addresses | Manage saved delivery and billing addresses. Set a default shipping address for faster checkout. |
| Account | Update name, email, and password. Manage communication preferences. |
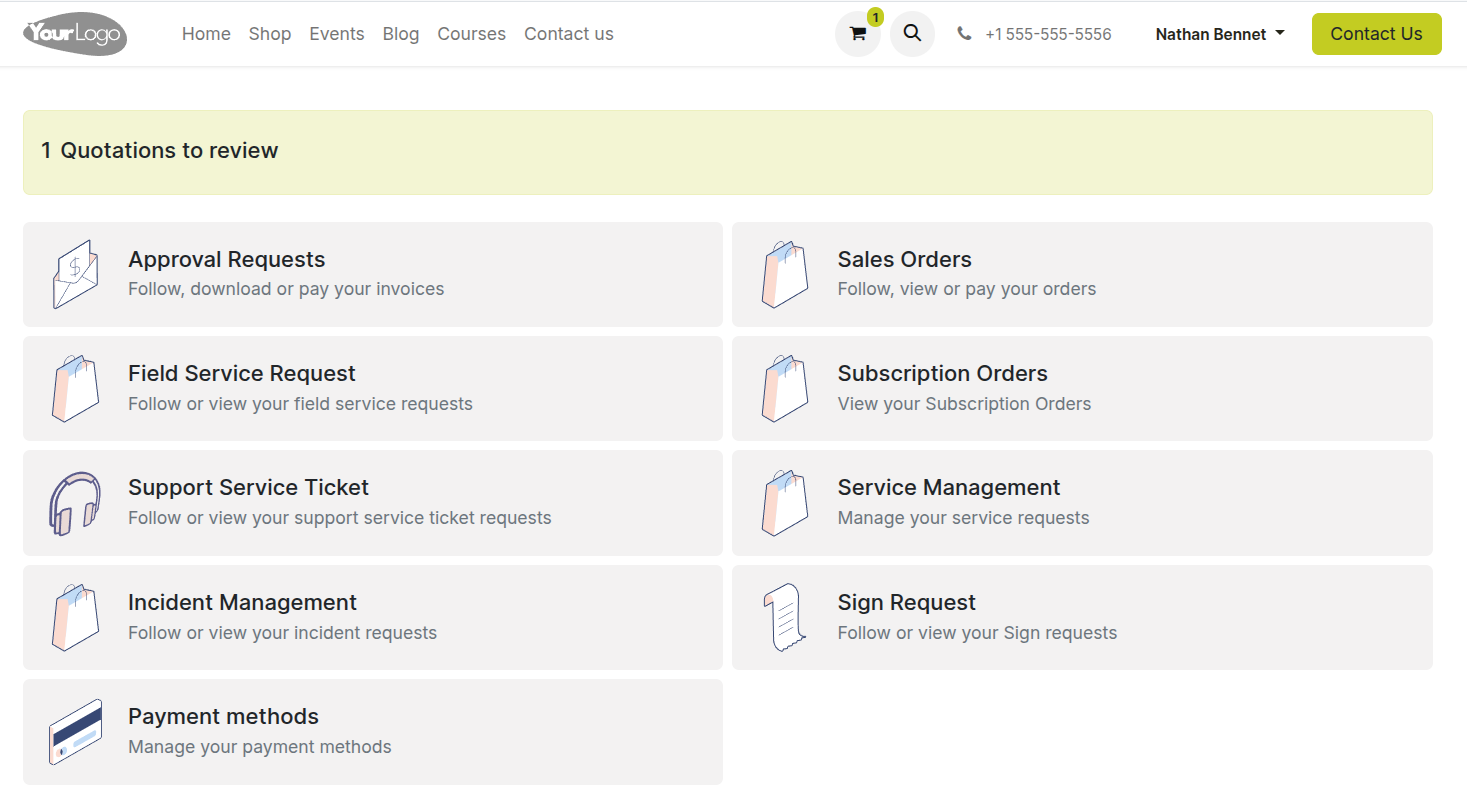
Fig 8.2 — My Account portal — dashboard showing recent orders, outstanding invoices count, and saved address summary tiles
Note
Link the My Account portal directly in the post-purchase confirmation email. A 'Track your order' button in the email that opens the portal order page eliminates the most common customer support query — 'Where is my order?'
8.3. Wishlist
The Wishlist feature allows customers to save products they are interested in for later purchase. Products added to a wishlist are stored in the customer's account and can be viewed and added to the cart on a future visit — reducing the need for customers to search for products they have already found.
Enabling Wishlist:
- Go to Website → eCommerce → Configuration → Settings.
- Under the Products section, enable Wishlists.
- Save.
Customer Experience:
- A heart icon appears on every product tile and product page. Clicking it adds the item to the customer's wishlist.
- The wishlist is accessible from the website header (heart icon with count) or from My Account → Wishlist.
- From the wishlist page, customers can add individual items to the cart or clear saved items.
- Wishlists are saved per account — customers retain their wishlist across sessions and devices.
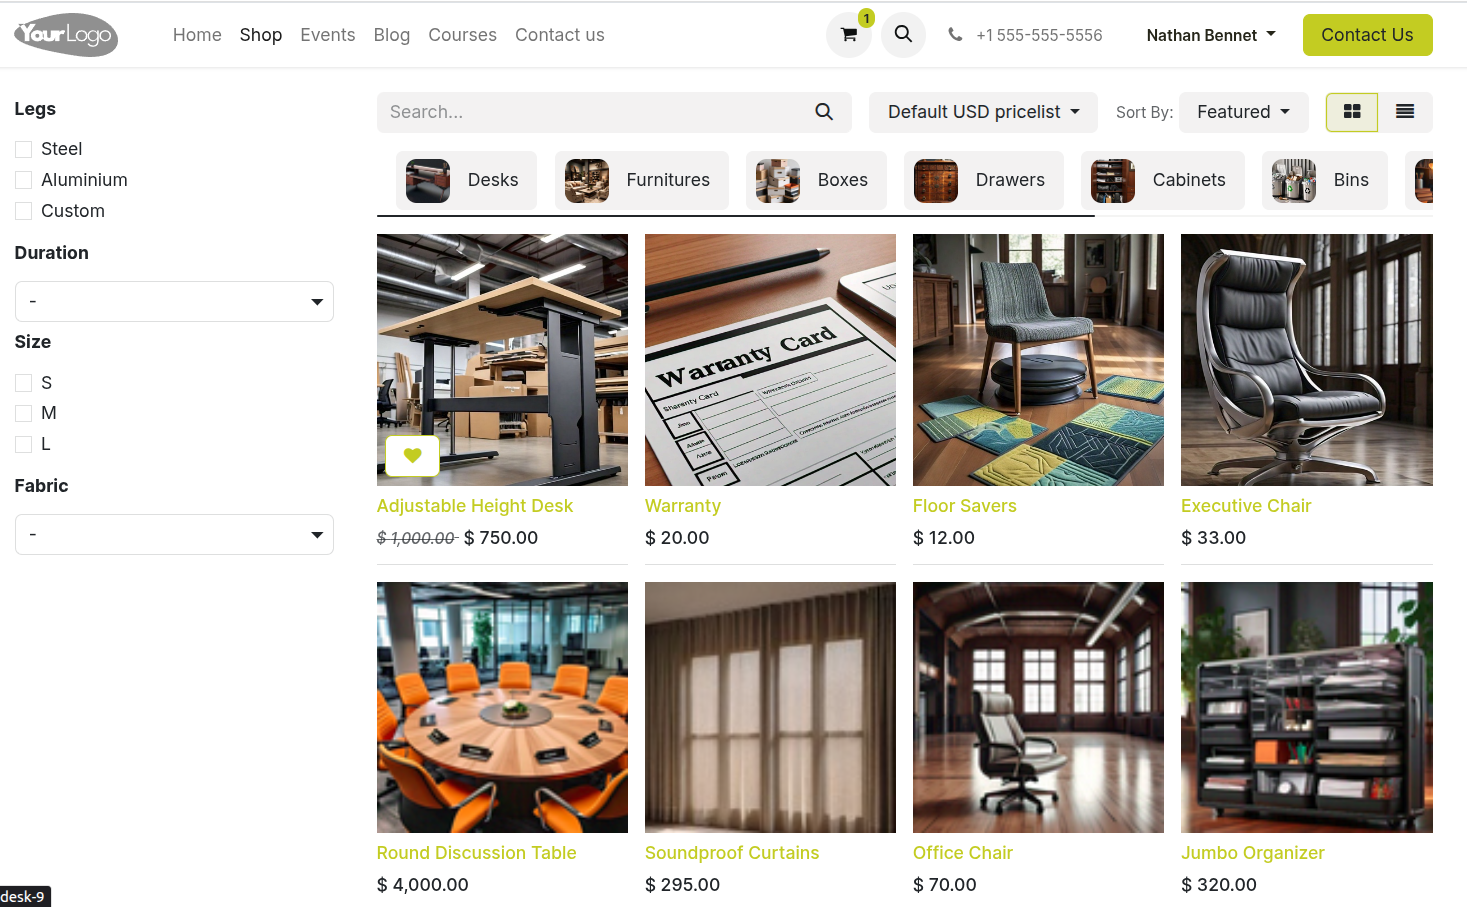
Fig 8.3 — Product grid — heart wishlist icon on product tile
9. Inventory & Stock Management
The eCommerce store is natively connected to Cyllo's Inventory module. Stock levels on the website reflect real warehouse quantities in real time, and every confirmed order automatically updates stock — preventing overselling and keeping the catalog accurate.
9.1. Stock-Aware Product Display
Cyllo can display real-time stock availability information on each product page — showing customers whether an item is in stock, available in limited quantity, or out of stock. This transparency reduces customer frustration and support queries about unavailable items.
- Go to Website → eCommerce → Configuration → Settings.
- Under the Products section, enable Show Availability.
- Select the display threshold — e.g. show a 'Only X left' warning when stock drops below a configurable quantity.
- Save. Product pages now display an availability indicator that updates in real time as orders are placed.

Fig 9.1 — Product page — 'In Stock' badge shown in green below the price; another product showing 'Only 3 left' warning badge in amber
Note
Stock quantity shown on the website reflects reserved stock by default — meaning items already in a confirmed customer's cart but not yet delivered reduce the displayed available quantity. This prevents overselling even during peak concurrent traffic.
9.2. Prevent Sale of Out-of-Stock Products
When a product reaches zero stock, Cyllo can automatically prevent customers from adding it to their cart. The product remains visible on the shop page (for SEO value) but the Add to Cart button is replaced with an Out of Stock indicator.
- Go to Website → eCommerce → Configuration → Settings.
- Under the Products section, disable Continue selling of Out-of-Stock.
- Save.
- For individual products where out-of-stock behaviour should differ — for example, a custom-made item that can always be ordered — open the product form and set the Out of Stock Behaviour override.
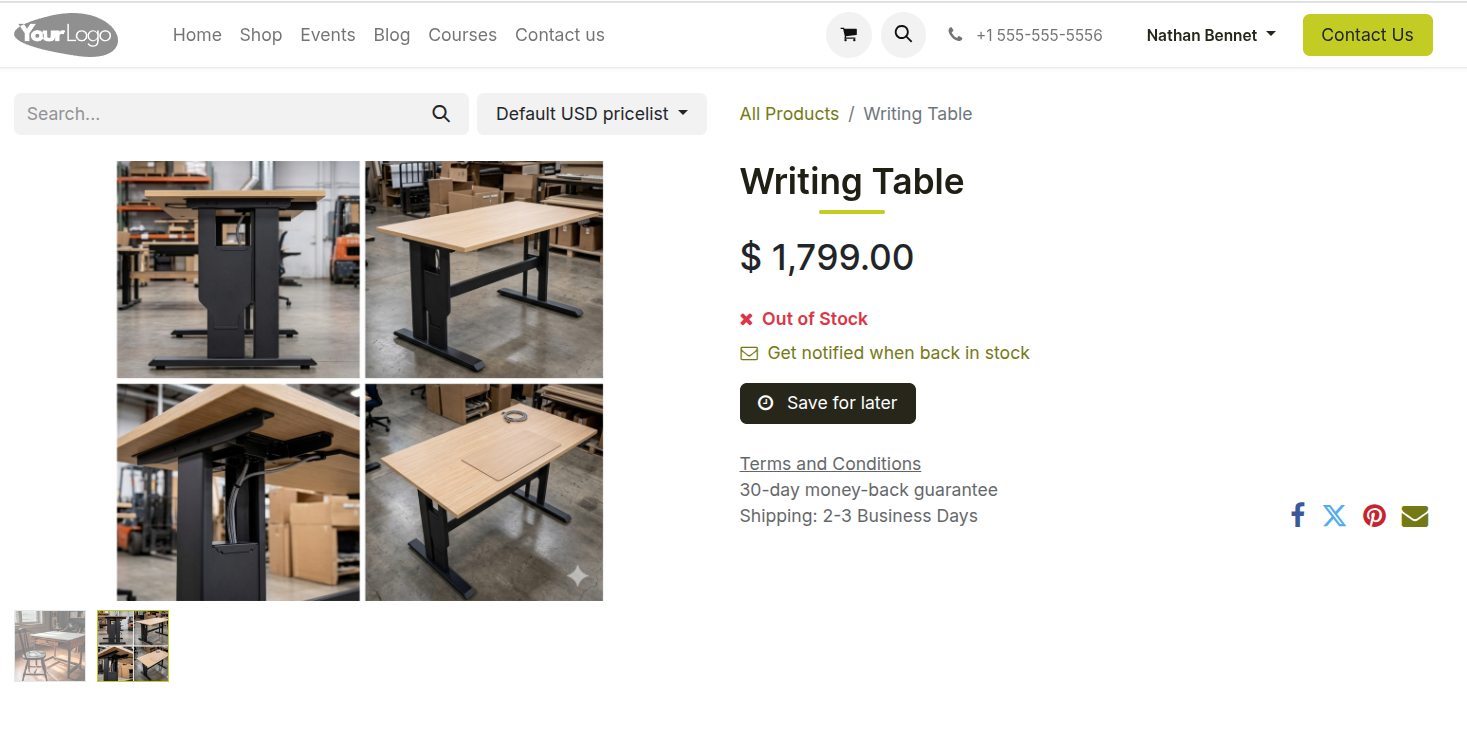
Fig 9.2 — Product page — 'Out of Stock' label replacing the Add to Cart button; product image and details still visible for SEO indexing
Note
Keep out-of-stock products published on the website rather than unpublishing them. The product page retains its SEO ranking and allows customers to check back or sign up for a restock notification if that feature is configured.
9.3. Inventory Integration
The eCommerce module and the Inventory module share the same product and stock database. Every confirmed eCommerce order triggers a delivery order in Inventory automatically, and every validated delivery reduces the stock count. No manual step is required to bridge the two modules.
- Delivery Order Auto-Creation: When an eCommerce order is confirmed (payment received), a delivery order is created in Inventory → Operations → Deliveries automatically with the ordered items and delivery address.
- Stock Reservation: Ordered quantities are reserved against the customer's order immediately on confirmation, preventing the same stock from being allocated to another order.
- Stock Deduction: Stock counts decrease when the delivery order is validated — not when the order is placed. This matches accounting standards where stock is removed on dispatch, not on sale.
- Return Integration: Returning stock from a customer return (see Section 7.4) is handled via a return transfer in Inventory, which increases the stock count when validated.
10. Store Design & Content
The shop and product pages are fully customisable using the same drag-and-drop editor used across the Cyllo website. This section covers the specific configuration options available for the eCommerce storefront — the shop listing page, product page layout, promotional banners, and SEO settings.
10.1. Shop Page Configuration
The shop page is the main product listing page of the store. Its layout — grid size, filter sidebar, sort options, and category navigation — is configured from the website editor and eCommerce settings.
- Navigate to your shop page on the website and click Edit.
- In the shop-specific settings panel, configure: Number of products per page, Default sort order (by name, price, newest), and Grid layout (2, 3, or 4 columns).
- Enable or disable the Category sidebar filter, Price range filter, and Attribute filters (e.g. size, colour, brand).
- To customize the page design further, add building blocks above or below the product grid — banners, featured categories, or promotional text.
- Click Save.
Fig 10.1 — Shop page editor — settings panel showing grid column count, sort order, and filter options; product grid preview
10.2. Product Page Customization
Each product page is automatically generated from the product's data — name, images, price, description, variants, and reviews. The layout and additional content sections of the product page can be customized using the website editor, allowing you to add comparison tables, usage guides, video embeds, or related content sections.
- Navigate to a product page on the website and click Edit.
- The product details section (image, title, price, variants, Add to Cart) is a fixed component — content within it comes from the product record. Edit product data from the product form.
- To add custom content sections below the product details, drag building blocks from the block panel — add a Features block for specifications, a Text block for a detailed description, or a Video block for a product demo.
- Add a Related Products block at the bottom to show cross-sells or same-category products.
- Click Save.
Fig 10.2 — Product page editor — Buy now button enabled from editor; building block panel open on the right
10.3. Banners & Promotional Sections
Promotional banners and featured sections on the shop and homepage drive customer attention to specific products, categories, or sales events. Cyllo's website editor provides banner blocks, countdown timers, and call-to-action sections that can be configured to display during a specific date range.
- Open the page where you want to add a promotional banner (homepage or shop page) in the website editor.
- Drag a Banner building block from the block panel onto the page.
- Click the banner image to replace it with your promotional artwork.
- Click the overlay text to edit the headline, sub-text, and CTA button label and link — for example, link the button to a filtered shop view showing only sale items.
- To time-limit the banner, add a Countdown Timer block below it. Set the end date of the promotion — the timer counts down and the block can be hidden after expiry.
- Click Save and Publish.
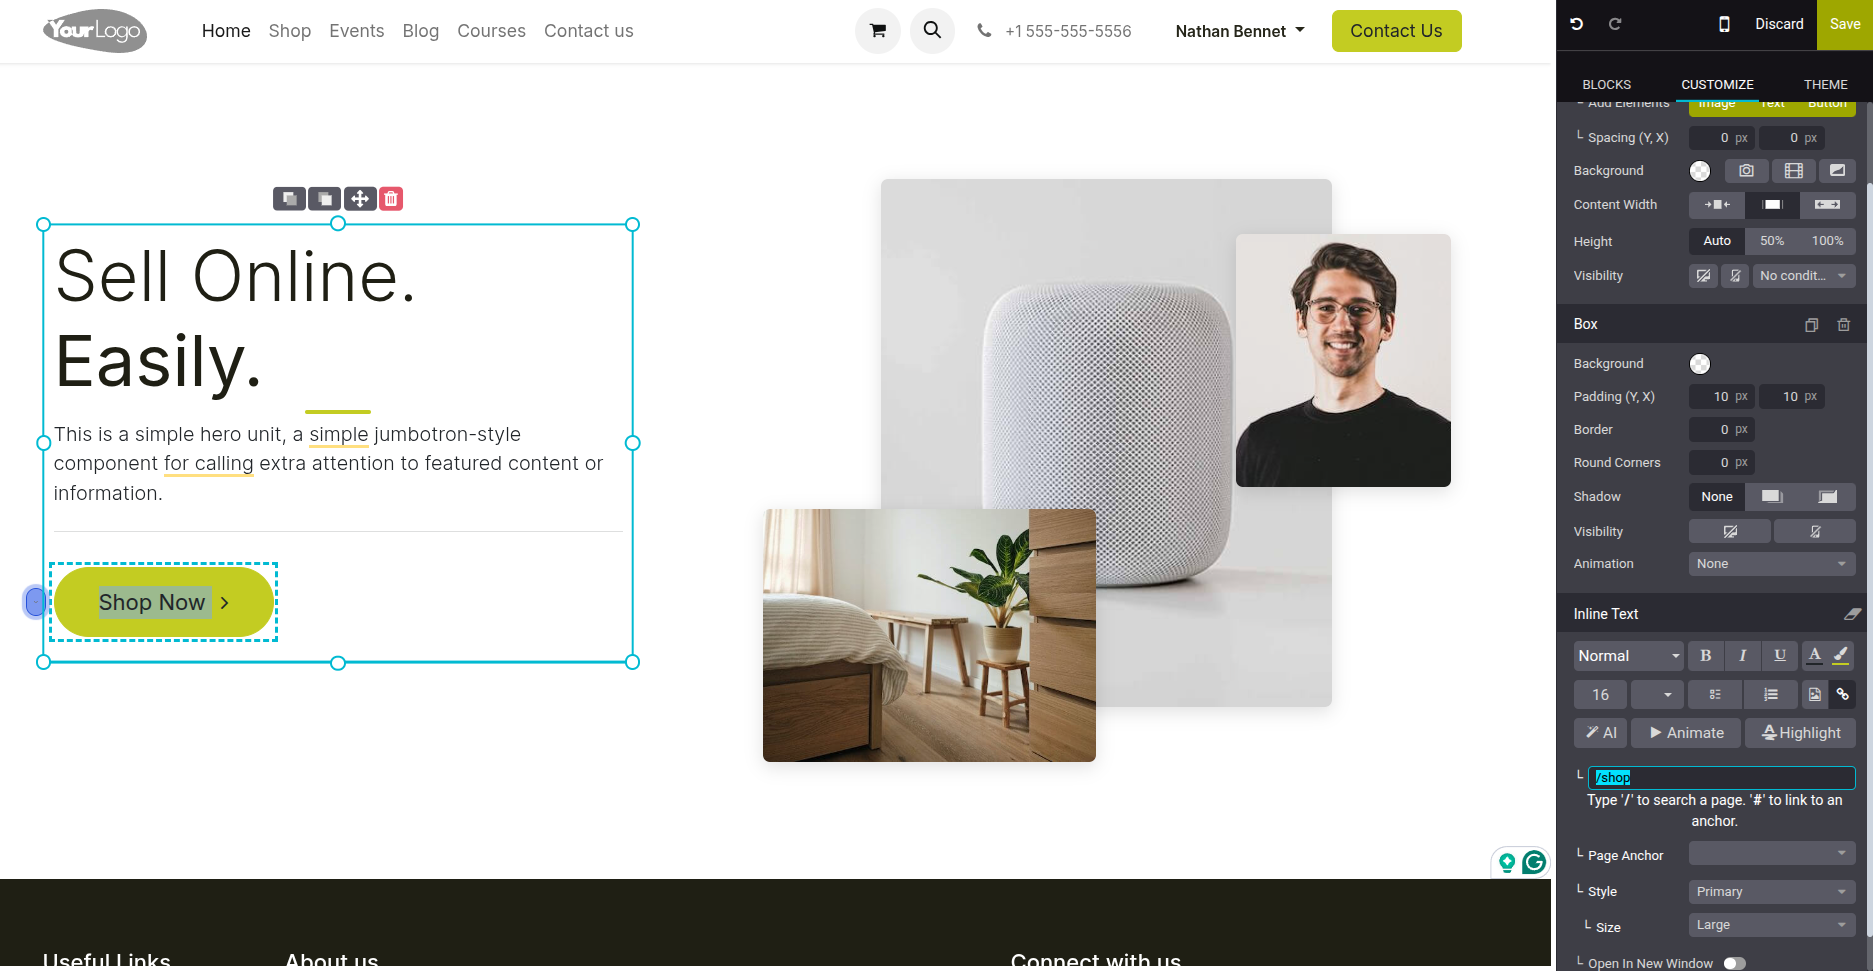
Fig 10.3 — Homepage editor — full-width promotional banner block with headline text, sub-headline, and Shop Now button over a product lifestyle image
Note
Product pages automatically include JSON-LD structured data (Product schema) with price, availability, and rating information. This enables rich snippets in Google search results — star ratings and price shown directly on the results page — which significantly improve click-through rates without any additional configuration.
11. Reporting & Analytics
Cyllo eCommerce provides built-in sales and performance reporting, plus integration with Cyllo Analytics for custom dashboards and cross-module analysis.
11.1. Sales Reports
The sales report provides an aggregate view of eCommerce revenue across any date range — total orders, revenue, average order value, and payment method breakdown. This is the primary report used for daily, weekly, and monthly performance review.
- Go to Website → eCommerce → Reporting → Online Sales.
- Use the date range filter to set the analysis period.
- The report shows: Total Orders, Total Revenue, Average Order Value, and a breakdown by date.
- Switch to Graph view for a visual revenue trend. Use Bar chart for period comparison, Line chart for trend tracking.
- Click the ‘Download’ button at top of the pivot view as an Excel file for further analysis or management reporting.
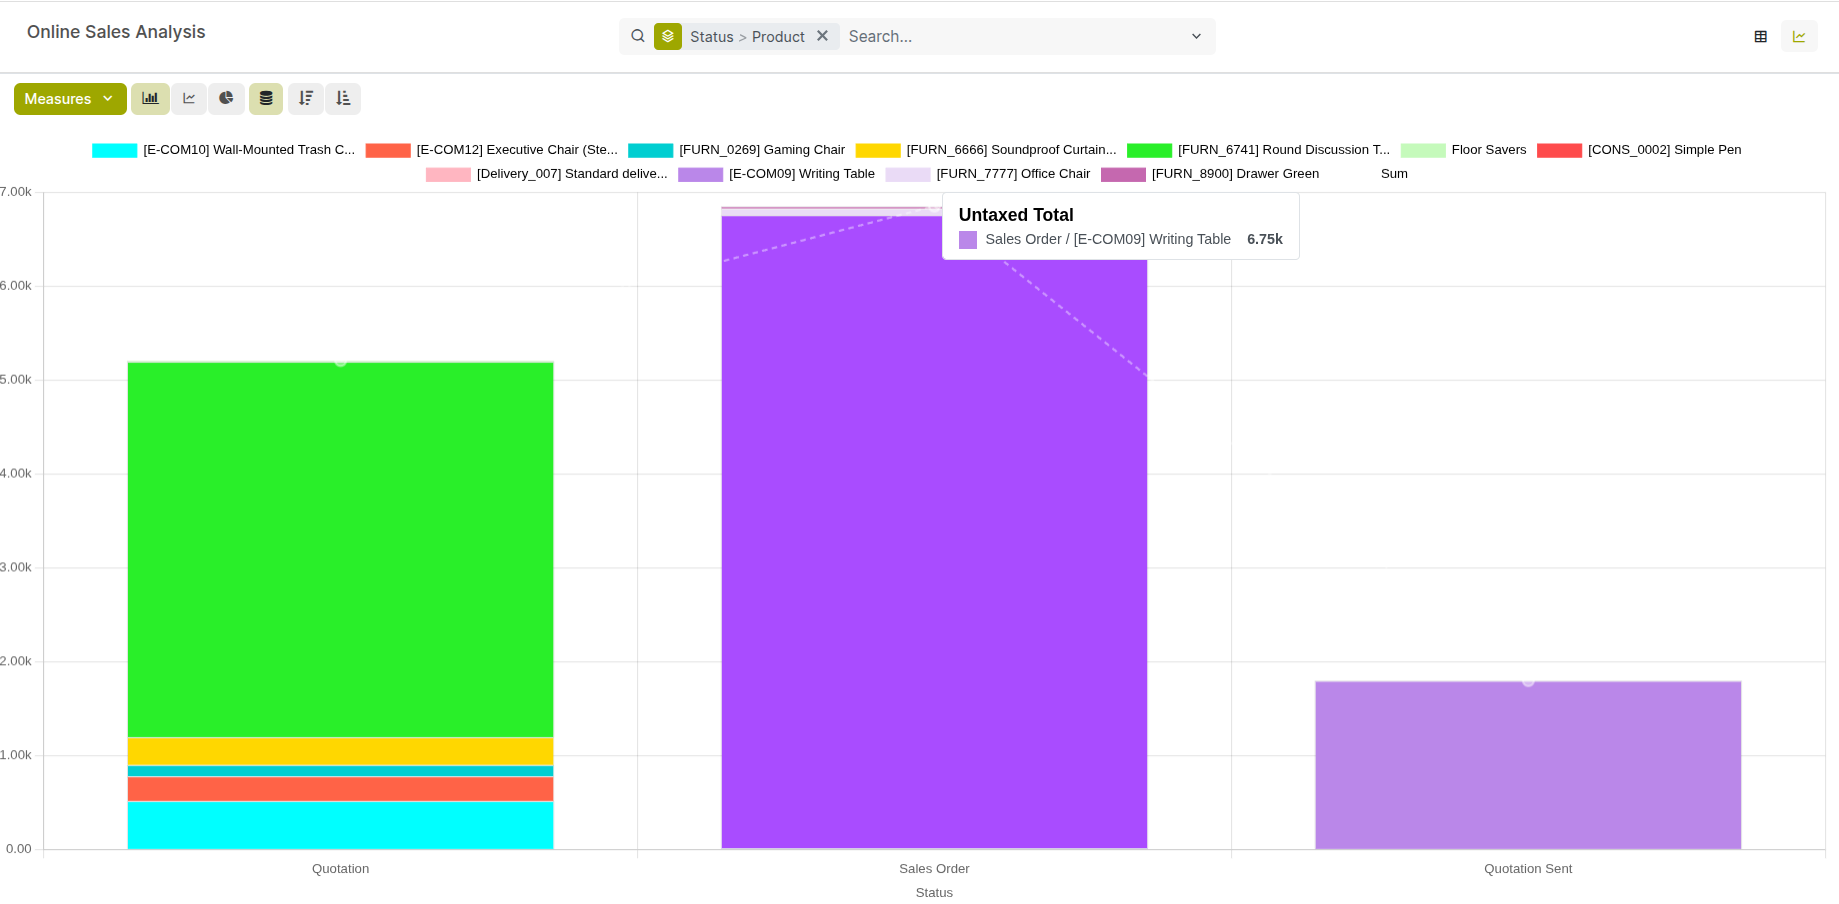
Fig 11.1 — eCommerce Sales report — bar chart showing daily revenue for the past 30 days with total revenue and order count summary cards above
12. Settings & Configuration
This section covers the global eCommerce settings that control store-wide behaviour — tax configuration, terms and conditions, and access controls. These settings require administrator access.
12.1. eCommerce Settings Overview
All store-level settings are managed from Website → eCommerce → Configuration → Settings. The table below summarises the key settings and their effect on store behaviour.
| Setting | What It Controls |
|---|---|
| Pricelists | Enables customer-specific and currency-based pricing (Section 3.2). |
| Wishlists | Enables the heart icon and wishlist feature for registered customers (Section 8.3). |
| Coupons & Promotions | Enables the promo code field at checkout and promotion program engine (Section 3.3). |
| Show Availability | Displays real-time stock availability on product pages (Section 9.1). |
| Prevent Zero-Stock Sales | Disables Add to Cart for out-of-stock products (Section 9.2). |
| Sign In/Up at Checkout | Controls guest vs. account checkout policy (Section 4.3). |
| Abandoned Cart Emails | Enables automated recovery emails for abandoned carts (Section 4.2). |
| Extra Step During Checkout | Adds a gift message or additional information step to the checkout flow. |
| Terms & Conditions | Requires customers to accept T&Cs before completing an order (Section 12.3). |
12.2. Tax & Fiscal Configuration
Taxes on eCommerce products are configured per product and applied automatically at checkout. The checkout summary shows a tax breakdown, and the auto-generated invoice includes the tax amounts posted to the correct tax accounts in Accounting.
- Product Taxes: Set on each product form under the Accounting tab → Customer Taxes field. Cyllo applies these to every order line for that product on the storefront.
- Tax Display Mode: Configure whether product prices on the storefront are shown tax-inclusive (B2C standard) or tax-exclusive (B2B standard) from Website → eCommerce → Configuration → Settings → Tax Display.
- B2B vs B2C Display: For stores serving both consumer and business customers, use pricelists combined with fiscal positions to show tax-inclusive prices to consumers and tax-exclusive prices to VAT-registered businesses.
- Fiscal Positions: Automatically remap taxes based on the customer's country — for example, zero-rating EU exports or applying different VAT rates for different regions. Configure in Accounting → Configuration → Fiscal Positions.
Note
If your store sells to customers in multiple countries, configure fiscal positions with automatic detection by customer billing address country. This ensures EU VAT rules, US state tax, or GST/VAT regulations in other jurisdictions are applied correctly without manual intervention per order.
12.3. Access & Security
Access to the eCommerce backend — products, orders, reports, and settings — is controlled by user groups in Cyllo. The storefront is publicly accessible, but the admin interface requires appropriate permissions.
| Role | eCommerce Access |
|---|---|
| eCommerce Manager | Full access — products, orders, promotions, settings, reports, and payment provider configuration. |
| Website Designer | Can publish and edit product pages and shop page layout. Cannot view orders or configure payments. |
| Sales User | Can view and manage eCommerce orders in Sales → Orders. Cannot modify store settings or products. |
| Accountant | Can view invoices generated from eCommerce orders. Cannot access store configuration. |
| Portal User | Customer-facing access only — My Account portal. No access to the Cyllo backend. |
| Public (no login) | Can browse the storefront, add to cart, and check out. No backend access. |
- Go to Settings → Users & Companies → Users and open the user you want to configure.
- Under the ‘Access Rights’ page, assign the appropriate role.
- Click Save.
13. Troubleshooting
This section addresses the most common issues encountered in Cyllo eCommerce — configuration errors, payment failures, stock display problems, and order synchronisation issues — with step-by-step resolution guidance.
13.1. Common Issues & Solutions
| Issue | Likely Cause | Solution |
|---|---|---|
| Product not visible on shop page | 'Website Published' not enabled on product | Open product form → Sales tab → enable Website Published. Save. |
| Add to Cart button not showing | Product not published, or zero stock with prevention enabled | Check Website Published toggle. If out of stock, check out-of-stock settings in eCommerce Settings. |
| Promo code says 'Invalid' | Code expired, wrong minimum order, or program inactive | Open the coupon program, verify dates, conditions, and that the program is Active. |
| Shipping method not appearing at checkout | Method not published or wrong destination country | Go to Delivery Methods, ensure the method is published and the destination includes the customer's country. |
| Order not appearing in Sales after payment | Gateway webhook not received or order stuck in Draft | Check the payment provider's dashboard for transaction status. Manually confirm the order if payment is confirmed. |
| Currency selector not showing | Multi-currency not enabled in settings | Go to eCommerce Settings → Enable Currency Selector. Activate currencies in Accounting → Currencies. |
| Reviews not appearing on product page | Reviews require approval and are still pending | Go to Website → eCommerce → Products → Reviews and approve pending reviews. |
| Wishlist icon not visible | Wishlist feature not enabled | Go to eCommerce Settings → enable Wishlists. Save. |
13.2. Payment Gateway Errors
Payment errors at checkout are the most disruptive issues on an eCommerce store — they cause immediate order abandonment and revenue loss. Most gateway errors are caused by credential mismatches, currency incompatibility, or test/live mode mismatches.
- Go to Website → eCommerce → Configuration → Payment Providers and open the affected provider.
- Verify the State — Test Mode or Enabled (Live). Ensure the credentials match the mode (test credentials in test mode, live credentials in live mode). A mismatch causes all transactions to fail silently.
- Copy-paste the API Key and Secret Key directly from the payment provider dashboard to avoid typo errors from manual entry.
- Confirm the store's configured currency is in the list of currencies supported by this gateway account. Most gateways must have each currency explicitly enabled in their dashboard.
- Check the payment provider's transaction log in their dashboard for the specific error code — this tells you whether the issue is on the gateway side (declined card, insufficient funds) or a configuration issue on Cyllo's side.
- If transactions succeed in the gateway dashboard but orders are not appearing in Cyllo, the issue is the payment confirmation webhook. Verify the webhook URL registered with the provider matches your Cyllo server URL exactly.
WARNING
If customers report successful charges but no order confirmation in Cyllo, do not ask them to pay again. Check the gateway dashboard for the transaction, manually confirm the order in Cyllo after verifying payment, and investigate the webhook configuration before the next order.
13.3. Stock & Availability Issues
Stock display issues — product showing as out of stock when stock exists, or available when it should not be — are caused by stock reservation settings, product configuration mismatches, or multi-warehouse routing issues.
- If a product shows as Out of Stock but stock exists in the warehouse, go to Inventory → Products, open the product, and check the On Hand quantity. Confirm stock is in the correct warehouse linked to the eCommerce delivery route.
- Check whether the stock is reserved against another order. Go to the product's stock move history — reserved stock is not counted as available for new orders.
- Verify the product's route configuration in the Inventory tab. The route must include the warehouse that serves eCommerce orders. If using a multi-warehouse, ensure the correct outgoing warehouse is set.
- If the product shows incorrect stock quantity on the website, force-refresh the website cache — go to Website → eCommerce → Configuration → Settings and click Clear Cache, or contact your server administrator to clear the web server cache.
13.4. Order Sync Issues
In rare cases, an eCommerce order may not sync correctly to the Sales module — for example, if the Cyllo server was under high load during a payment confirmation, or if a network error interrupted the webhook callback from the payment gateway.
- Go to Website → eCommerce → Orders → Orders and filter by Status = Draft (or Pending Payment). Draft orders are created but not yet confirmed.
- For each Draft order, check whether payment was actually collected by looking at the linked payment record or verifying in the gateway dashboard.
- If payment was collected, open the order in Cyllo and click Confirm. This manually moves the order to the Confirmed state and triggers the delivery order and invoice creation.
- If the order appears in the sales module but has no linked delivery order, open the order and click the Delivery smart button — if it shows zero, click Create Delivery to generate the delivery order manually.
- For recurring sync issues, check the Cyllo server logs for cron job errors — the payment confirmation and order processing pipeline runs as a scheduled task that may need to be restarted.
Note
Order sync issues are rare in production but more common during store launches when load is high and gateway configuration is still being validated. Run the test checklist in Section 1.3 before going live to establish a baseline of expected behaviour.