

Cyllo User & Access Management Documentation
Introduction
Cyllo's User & Access Management module gives system administrators full authority over user provisioning, role assignment, and security governance across the entire ERP platform. Administrators can create internal users, assign them to specific functional groups (such as Sales Manager, Accounting Officer, or HR Administrator), and control which menus, records, and operations each user can access — without writing a single line of code. User & Access Management integrates directly with every Cyllo module. When a user is assigned to the Sales group, the Sales menu immediately becomes available to them; accounting records remain hidden unless the Accounting role is also granted. This tight coupling ensures that sensitive financial data, HR records, and operational workflows are visible only to authorized personnel, enforcing data security as an inherent part of the platform architecture. Beyond basic user provisioning, Cyllo's access framework supports multi-company environments, portal user access for customers and vendors, two-factor authentication, API key management, and login session tracking — providing a comprehensive security foundation for businesses of any size.
1. Users
This section covers the full lifecycle of internal user accounts in Cyllo — from creation and role assignment to archiving and credential management.
1.1 Creating a New User
Creating a user account is the first step to granting someone access to Cyllo. Each internal user gets login credentials, a defined set of access rights, and optionally a personal profile photo and time zone.
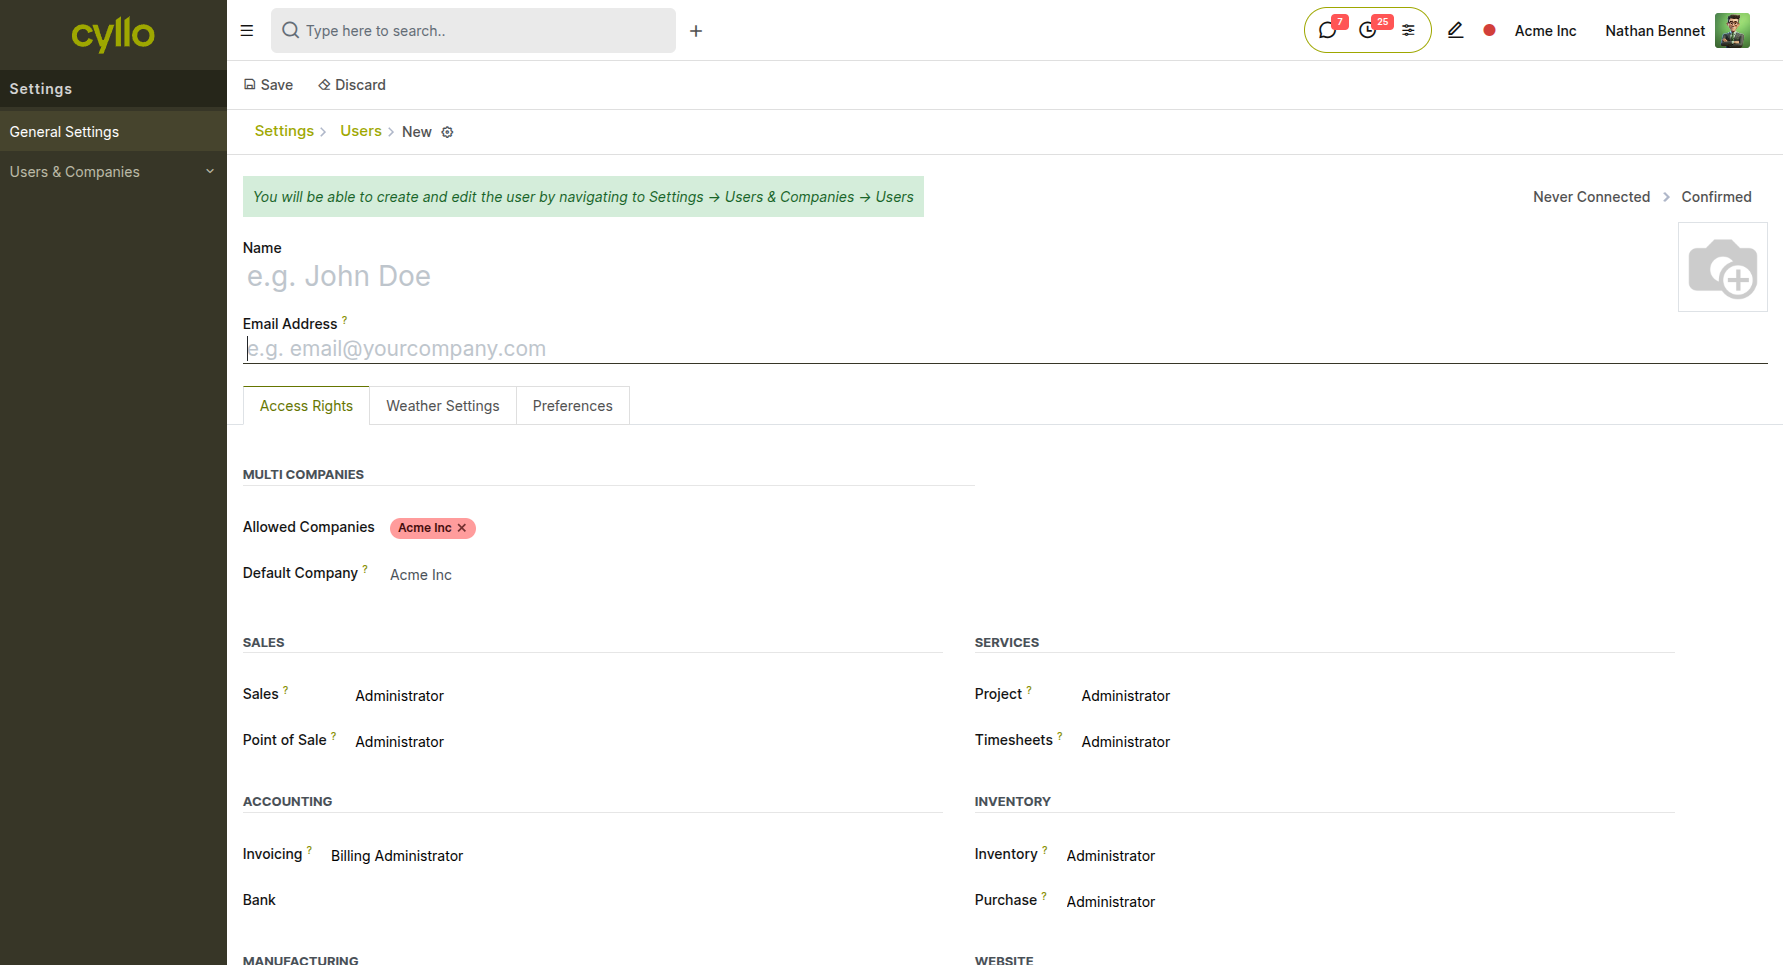
Fig 1.1 — New User form showing name, email, access rights, and company fields
How to Create a New User:
- Go to Settings → Users & Companies → Users
- Click New
- Enter the user's Name and Email Address (this becomes the login username)
- Under the Access Rights section, assign the relevant module roles (see Section 2.2)
- Set the user's Time Zone and Language under the Preferences tab
- Click Save, then click Send Invitation Email to send the user their login link Key Fields
- Name: Display name shown across Cyllo records and chatter messages
- Email: Used as the login identifier and for system notifications
- User Type: Internal User, Portal, or Public (see Section 4)
- Company: The company this user belongs to in a multi-company setup
- Time Zone: Ensures dates, deadlines, and scheduled actions display correctly for the user
Note
The invitation email contains a one-time link for the user to set their own password. This link expires after 24 hours. If the user misses it, use Reset Password (Section 1.4).
1.2 Editing an Existing User
User profiles and access rights can be updated at any time to reflect role changes, department transfers, or additional responsibilities.
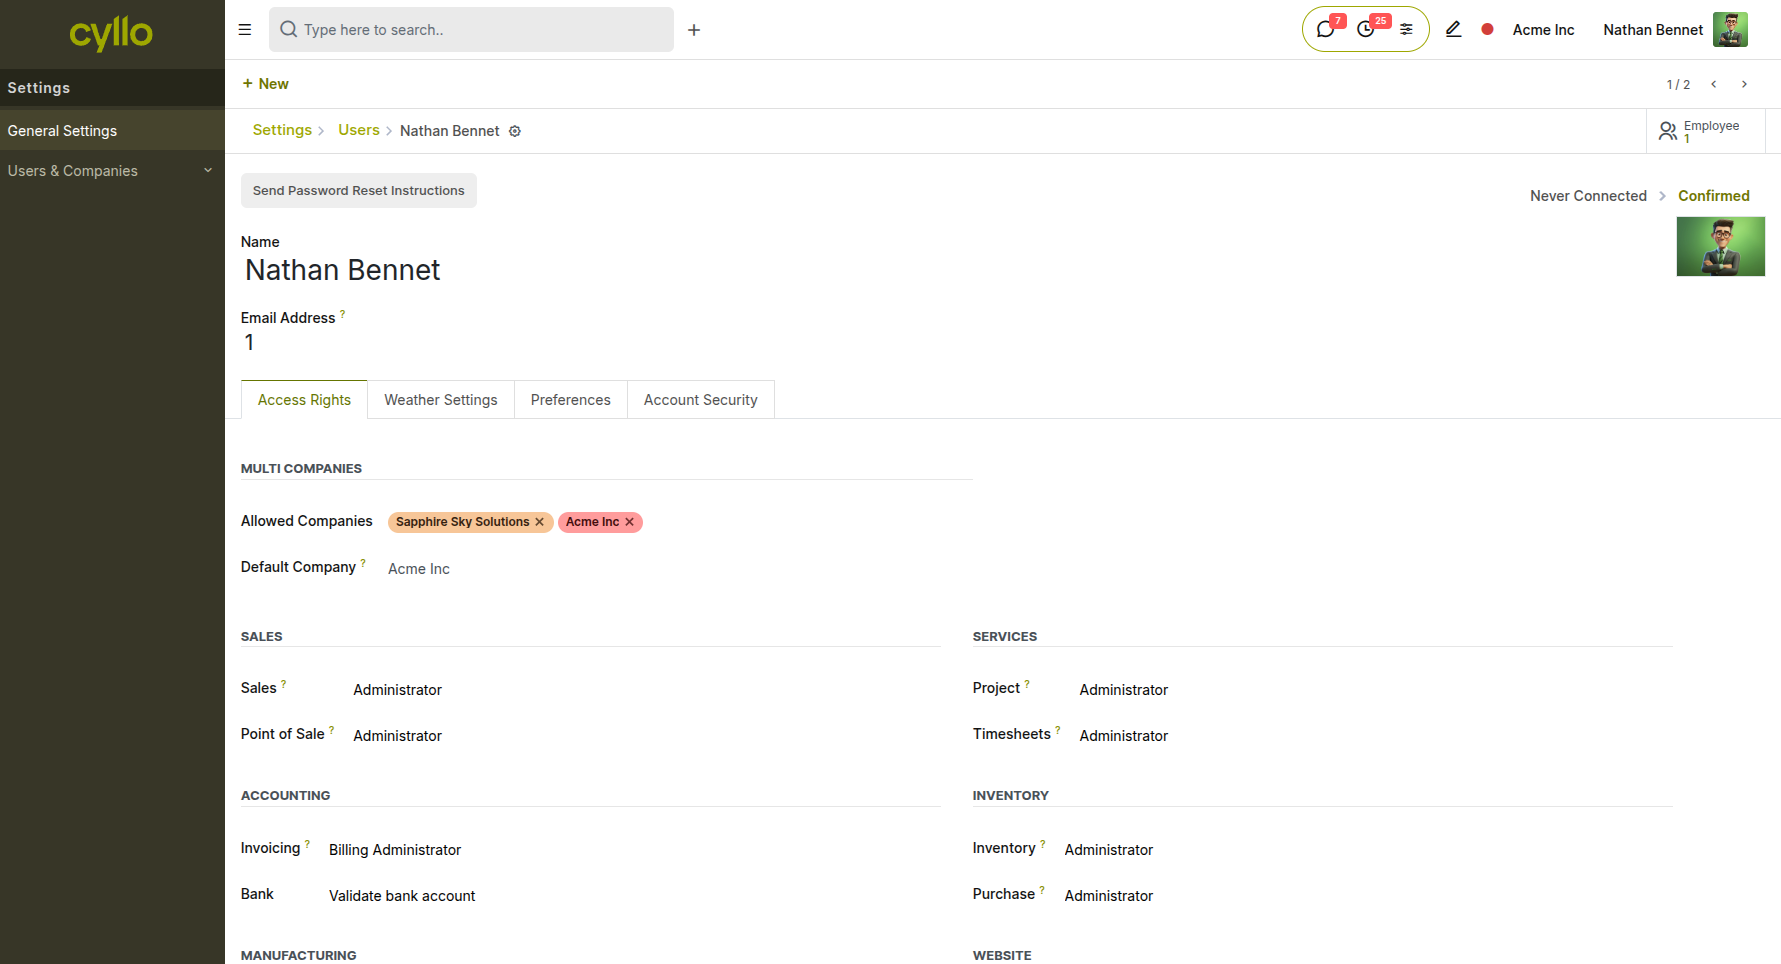
Fig 1.2 — Existing user form in edit mode with expanded access rights panel
How to Edit a User:
- Go to Settings → Users & Companies → Users
- Click on the user's name to open their profile
- Click Edit
- Modify the required fields — access rights, name, email, preferences, or company
- Click Save
Note
Changes to access rights take effect immediately on the user's next page load. Active sessions may need to refresh to reflect updated permissions.
1.3 Archiving and Deleting Users
When an employee leaves or no longer requires Cyllo access, their account should be archived rather than deleted. Archiving preserves historical records (sales orders, chatter messages, approvals) while revoking login access.
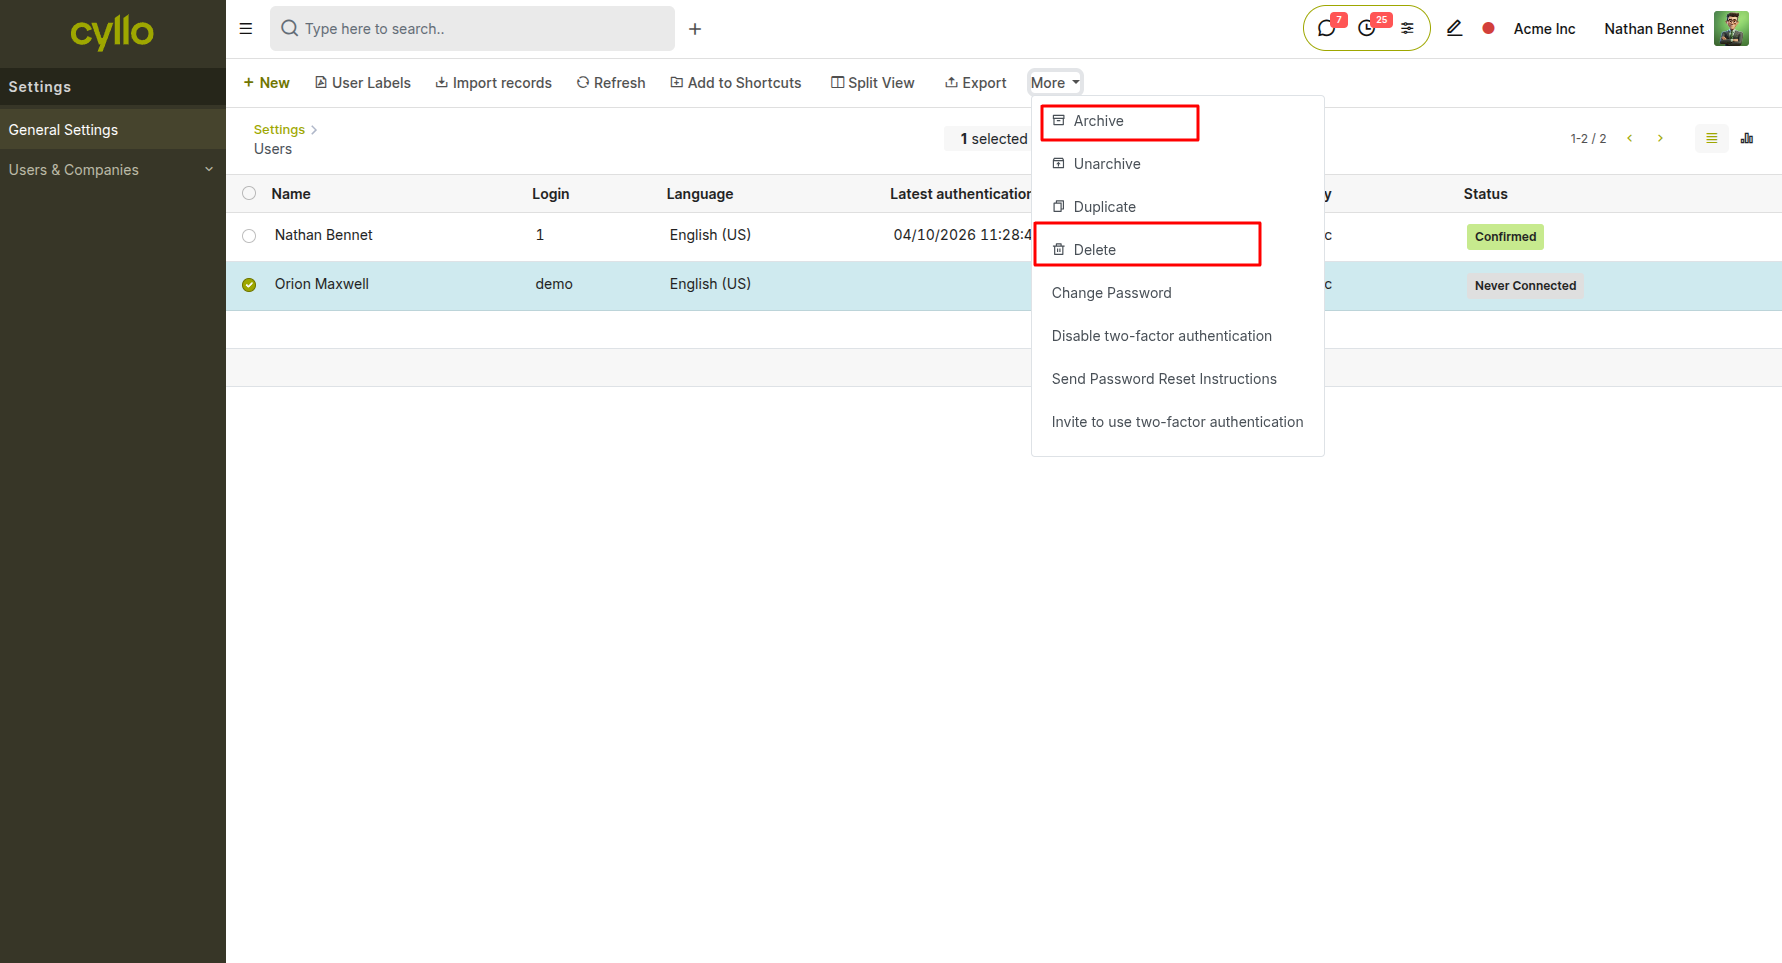
Fig 1.3 — User list view with Archive option highlighted in the Action dropdown
How to Archive a User:
- Go to Settings → Users & Companies → Users
- Select the checkbox next to the user's name
- Click Action → Archive
- Confirm the action How to Permanently Delete a User:
- Open the user record
- Click Action → Delete
- Confirm deletion
Note
Deleting a user is irreversible and will remove all associations to that user's login record. It is strongly recommended to archive rather than delete to preserve audit trails and historical data integrity.
1.4 Resetting a User Password
Administrators can trigger a password reset email for any user, or set a new password directly from the admin panel.
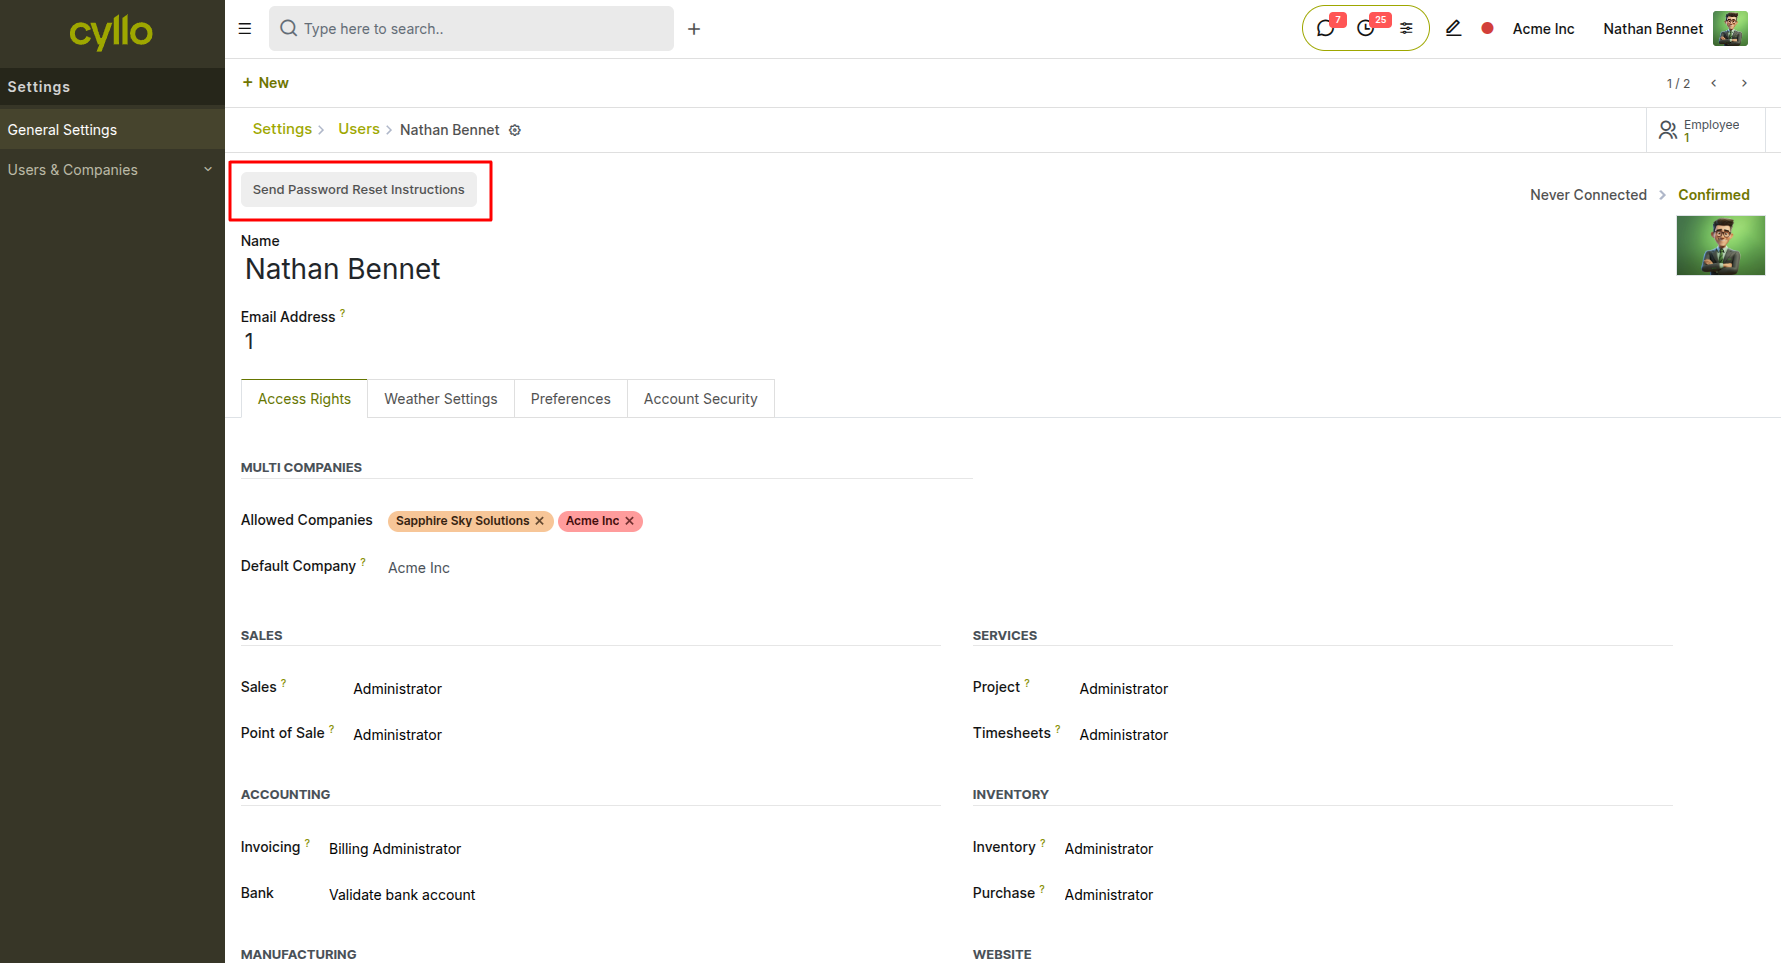
Fig 1.4 — User form showing the "Reset Password" button in the top action bar
How to Reset a Password:
- Go to Settings → Users & Companies → Users
- Open the user's record
- Click Reset Password
- Cyllo sends the user a password reset link to their registered email address How to Set a Password Directly (Admin Override):
- Open the user record
- Click Action → Change Password
- Enter the new password and confirm
- Click Change Password
Note
Forcing a password change is useful when onboarding users who have not received their invitation email, or in security-sensitive situations where an account may have been compromised.
2. Access Rights & Roles
Cyllo uses a group-based access control model. Every user is assigned to one or more groups (roles), and groups define what menus, records, and operations that user can access across all modules.
2.1 Understanding Access Groups
Access groups in Cyllo correspond to job roles and functional responsibilities. Each module exposes a set of predefined groups — for example, Sales has User, Manager; Accounting has Billing, Accountant, Adviser. Users assigned to a group inherit all the permissions defined for that group.
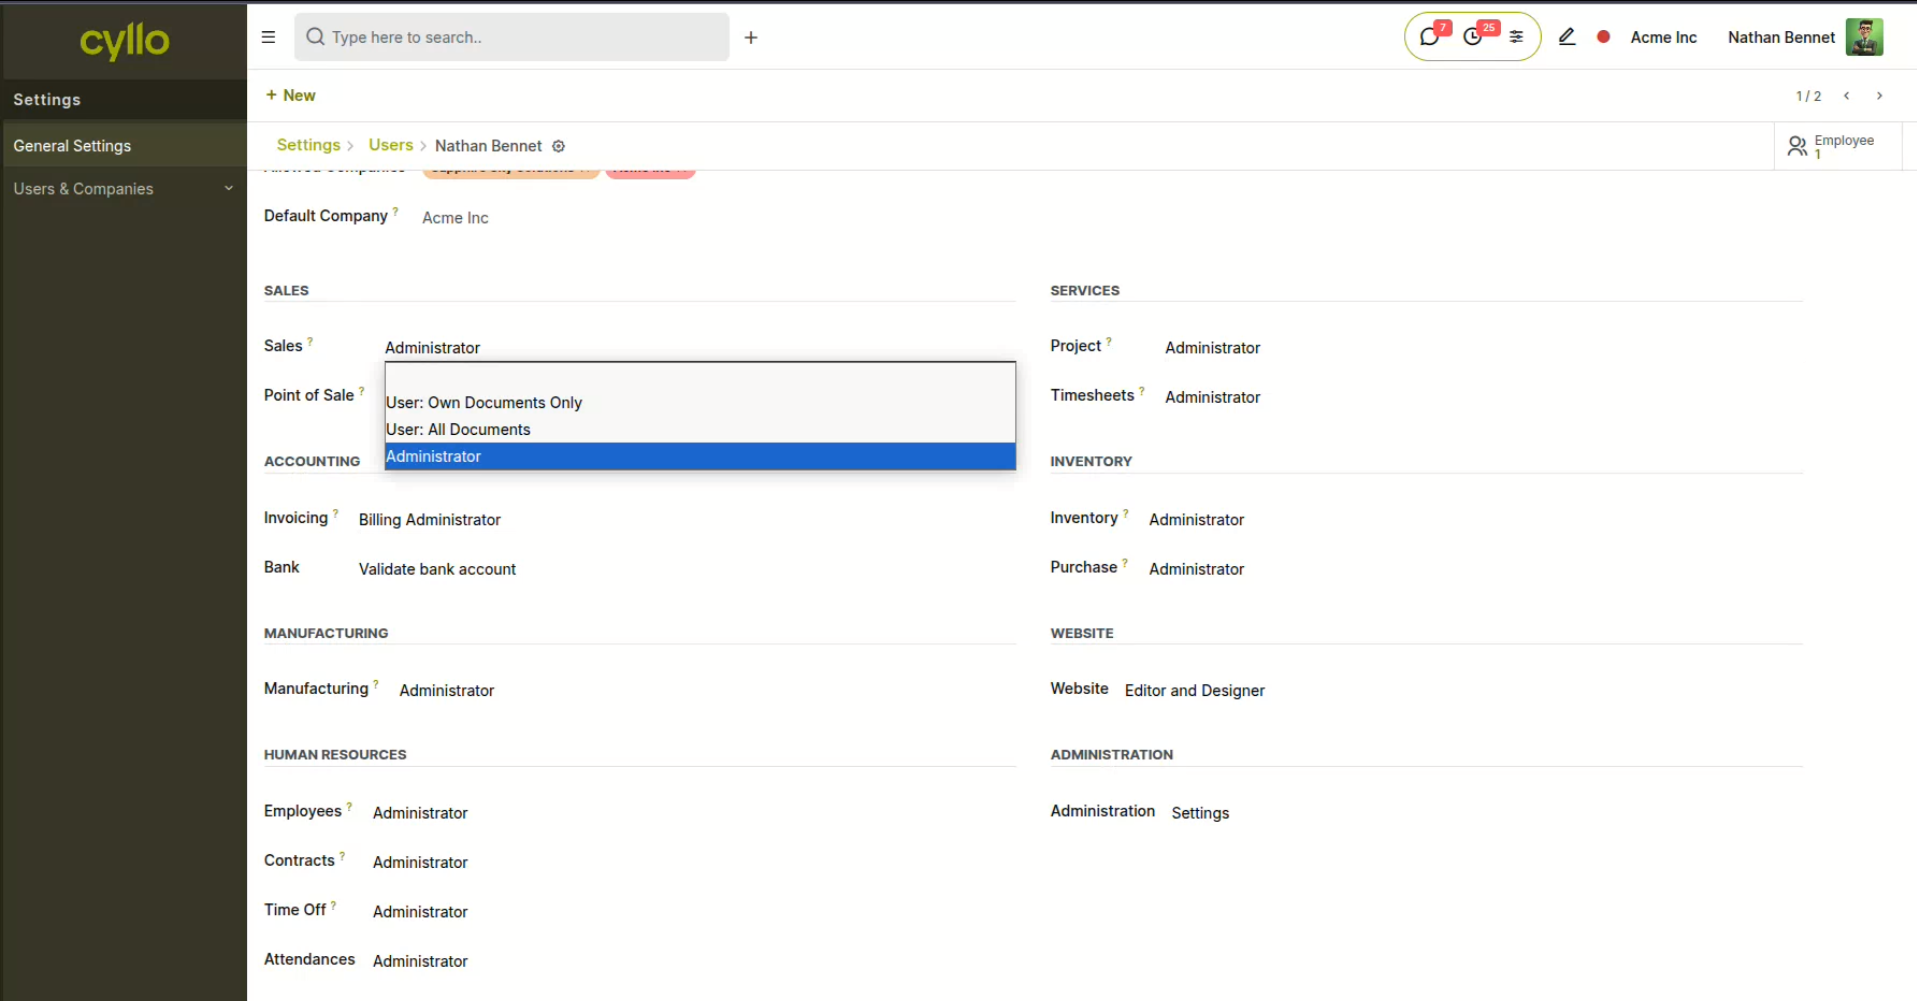
Fig 2.1 — Access Rights section on a user form showing module-by-module role dropdowns
Common group levels per module:
- User / Officer — standard operational access; can create and manage records within the module
- Manager / Administrator — full access including configuration, reporting, and approvals
- Technical / ERP Manager — system-level access for configuration, studio, and developer tools
Note
A user can hold different access levels across modules — for example, Sales Manager + Accounting User + HR Officer. Cyllo computes the union of all granted permissions at runtime.
2.2 Assigning Roles to Users
Access rights are assigned directly on the user profile, organized by module category.
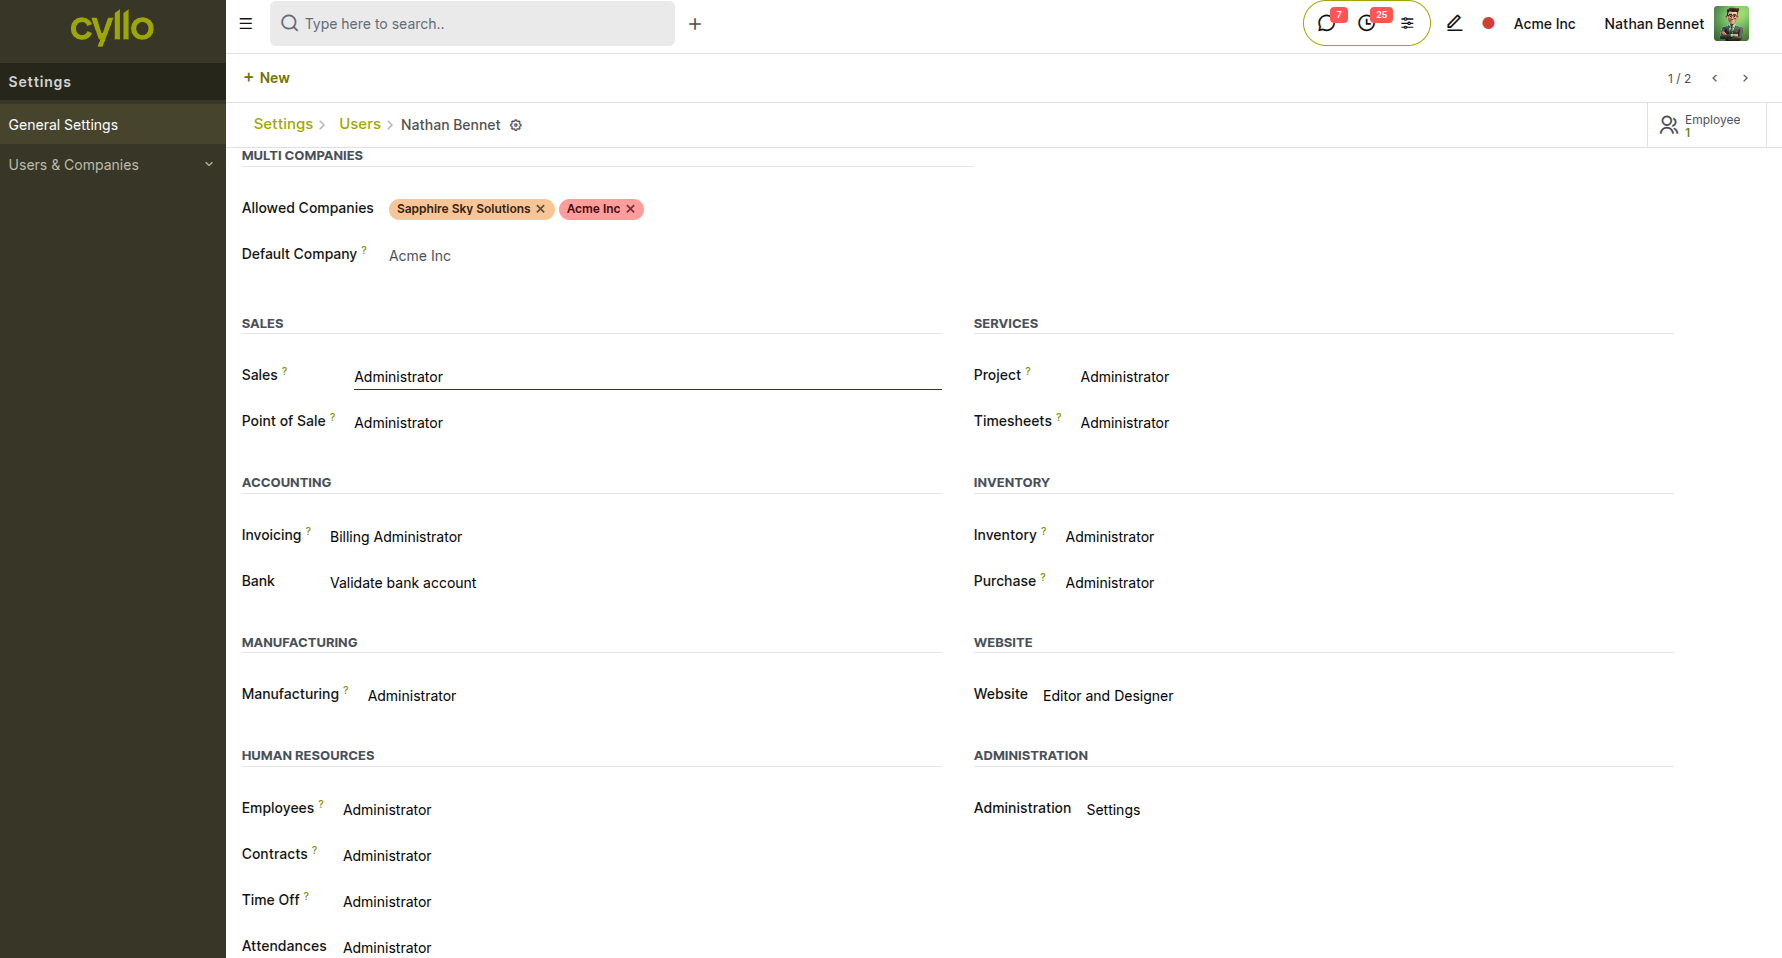
Fig 2.2 — User form with access rights panel expanded, showing Sales, Accounting, Inventory, and HR role assignments
How to Assign Roles:
- Go to Settings → Users & Companies → Users
- Open or create the user record
- Scroll to the Access Rights section
- For each module category (Sales, Accounting, Inventory, HR, etc.), select the appropriate role from the dropdown
- Click Save
Note
Leaving a module's role field blank means the user has no access to that module — its menu items will not appear in their navigation.
2.3 Technical Access Rights (Model-Level Permissions)
For advanced scenarios, Cyllo allows administrators to define granular permissions at the model level — controlling read, write, create, and delete rights per security group.
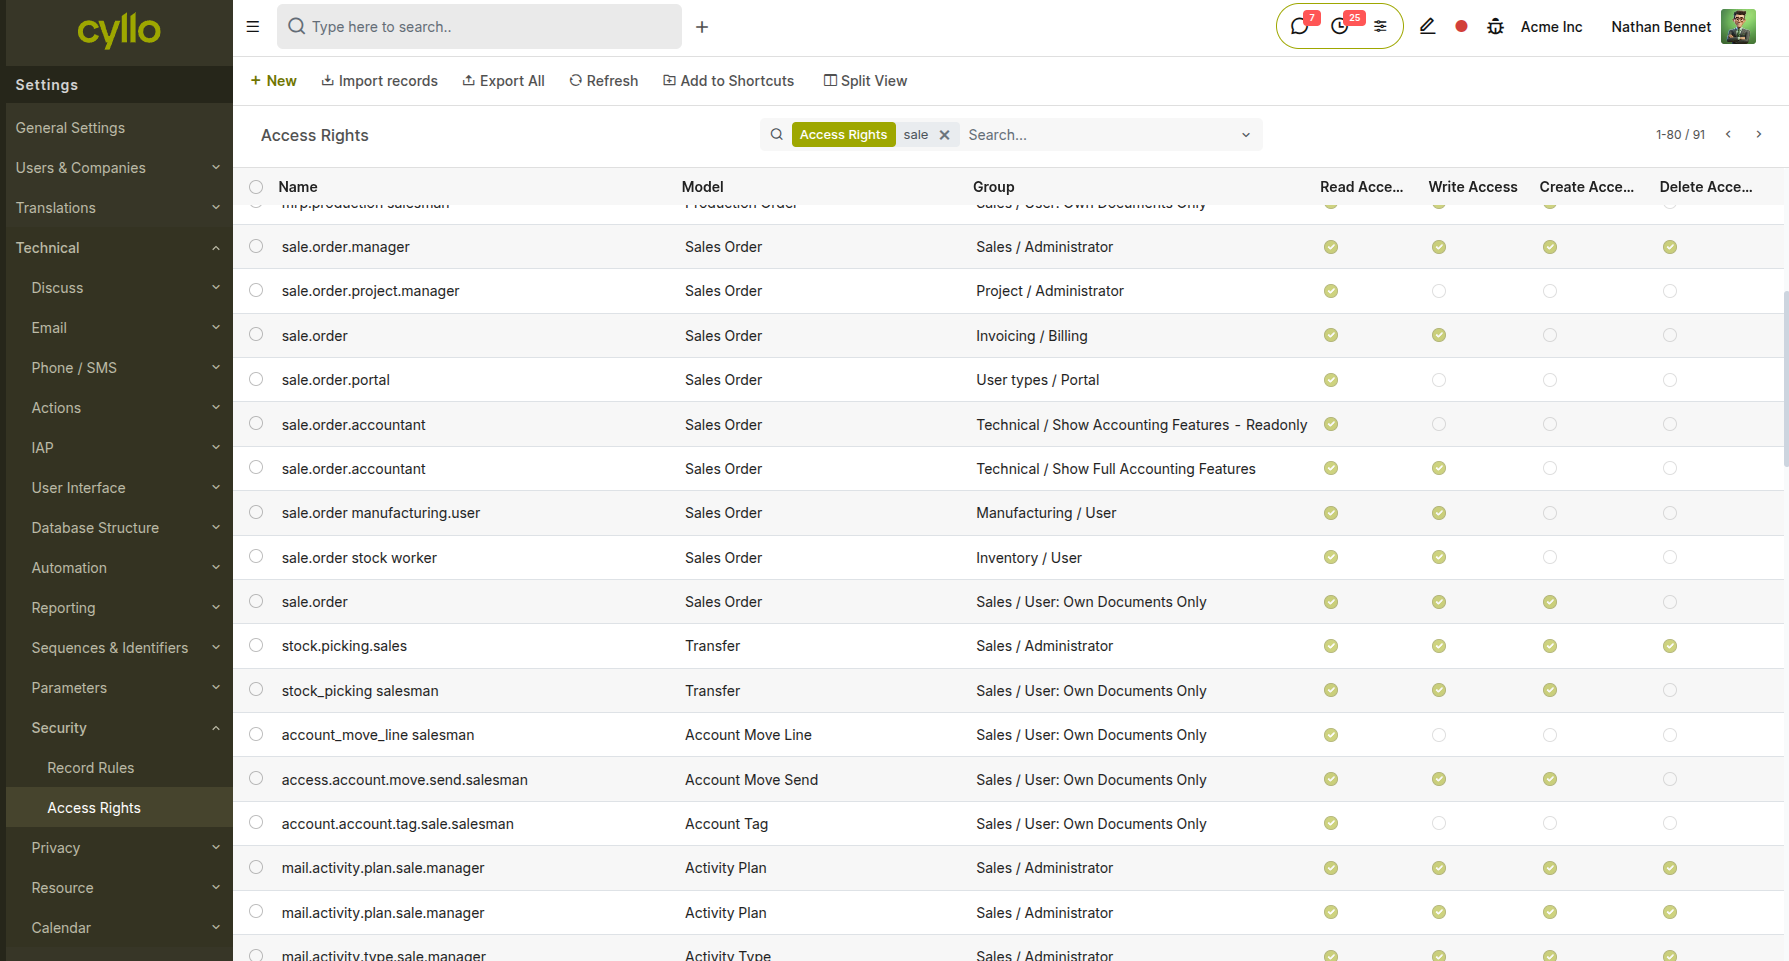
Fig 2.3 — Technical menu showing Access Rights list with model names, groups, and CRUD checkboxes
How to View and Edit Model-Level Access:
- Enable Developer Mode: Go to Settings → General Settings → Developer Tools → Activate the developer mode
- Go to Settings → Technical → Security → Access Rights
- Search for the model (e.g., sale.order) or the group
- Review or modify the Read, Write, Create, Delete checkboxes per group
- Click Save
Note
Model-level access rights are a technical override. Incorrect modifications can lock users out of essential workflows. Changes should be made with care and tested in a staging environment first.
3. Multi-Company & Branch Access
Cyllo supports multiple companies within a single database. Each user can be assigned to one or more companies, and their visible data is automatically filtered by the company they are currently operating in.
3.1 Assigning Users to Companies
Users working across subsidiaries or branches must be granted access to each relevant company. When multiple companies are assigned, the user can switch between them using the company switcher in the top navigation bar.
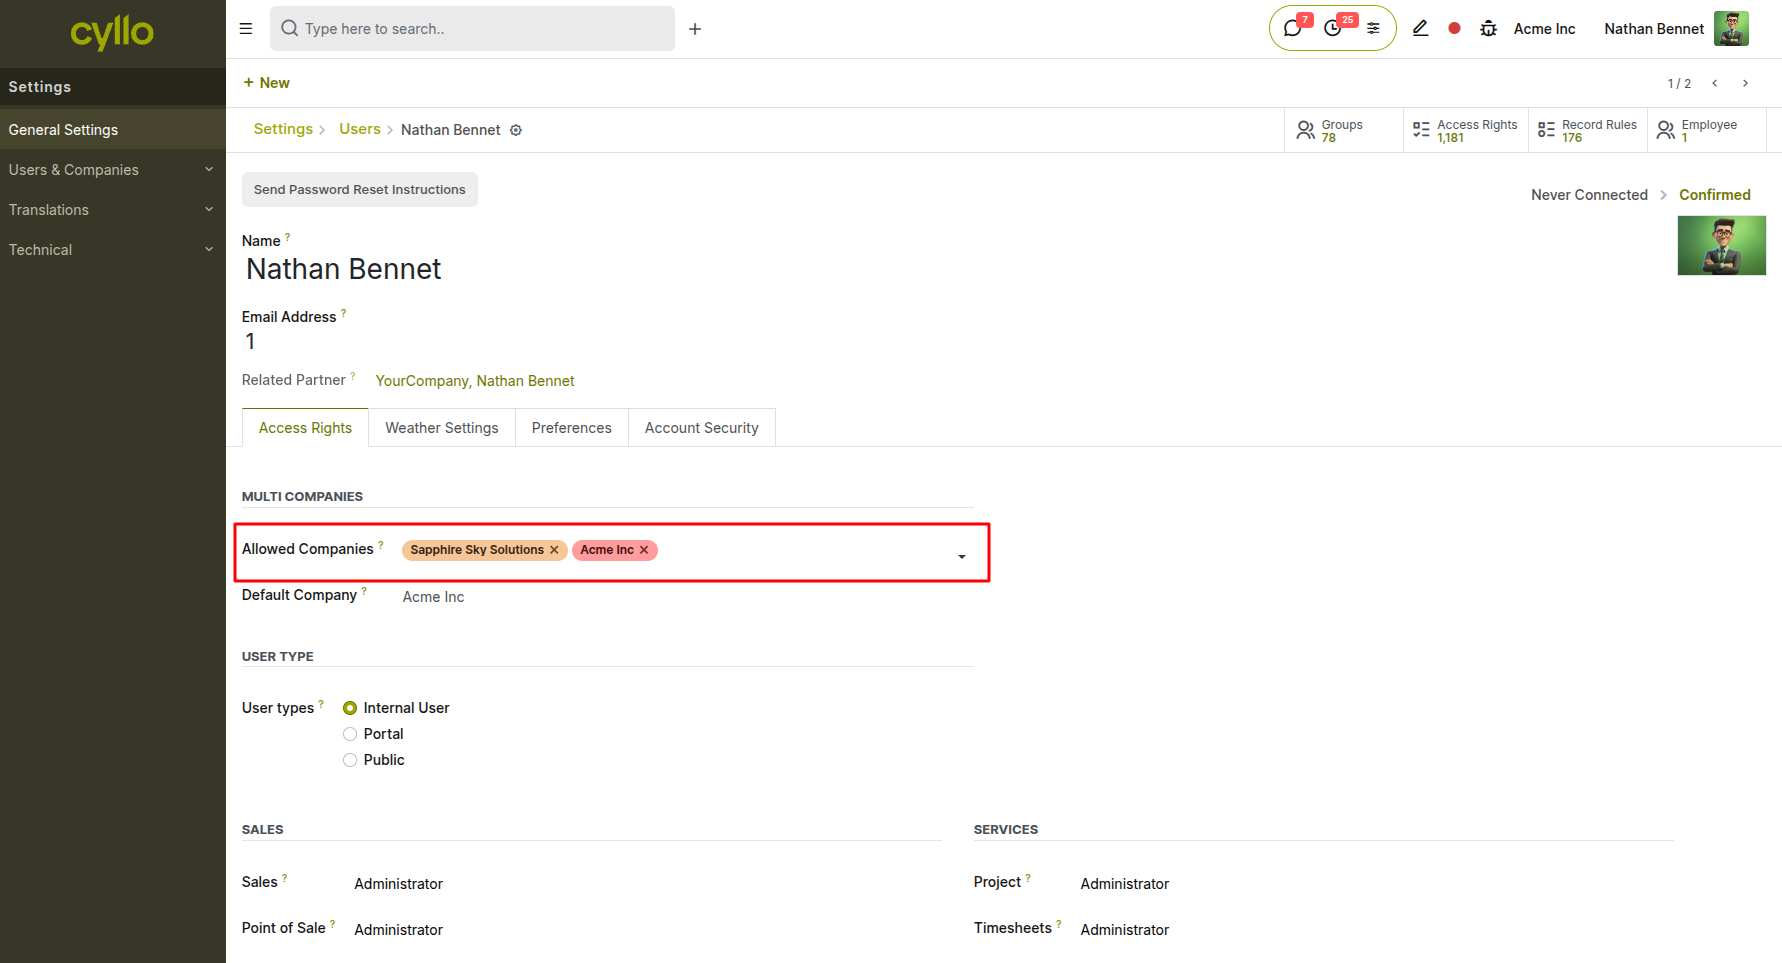
Fig 3.1 — User form showing the Companies field with multiple company tags assigned
How to Assign a User to Multiple Companies:
- Go to Settings → Users & Companies → Users
- Open the user's record
- In the Companies field, add all companies the user should have access to
- Click Save
Note
A user can only create records in their currently active company. Switching companies changes the context for all new records created during that session.
4. Portal & Public Users
Cyllo supports two non-internal user types — Portal and Public. Portal users are typically customers, vendors, or partners who need limited, read-only or self-service access to specific records (quotations, invoices, delivery orders, project tasks). 4.1 Granting Portal Access to Contacts Portal access can be granted directly from a contact record, giving the contact a login to the Cyllo customer portal without granting them internal system access.
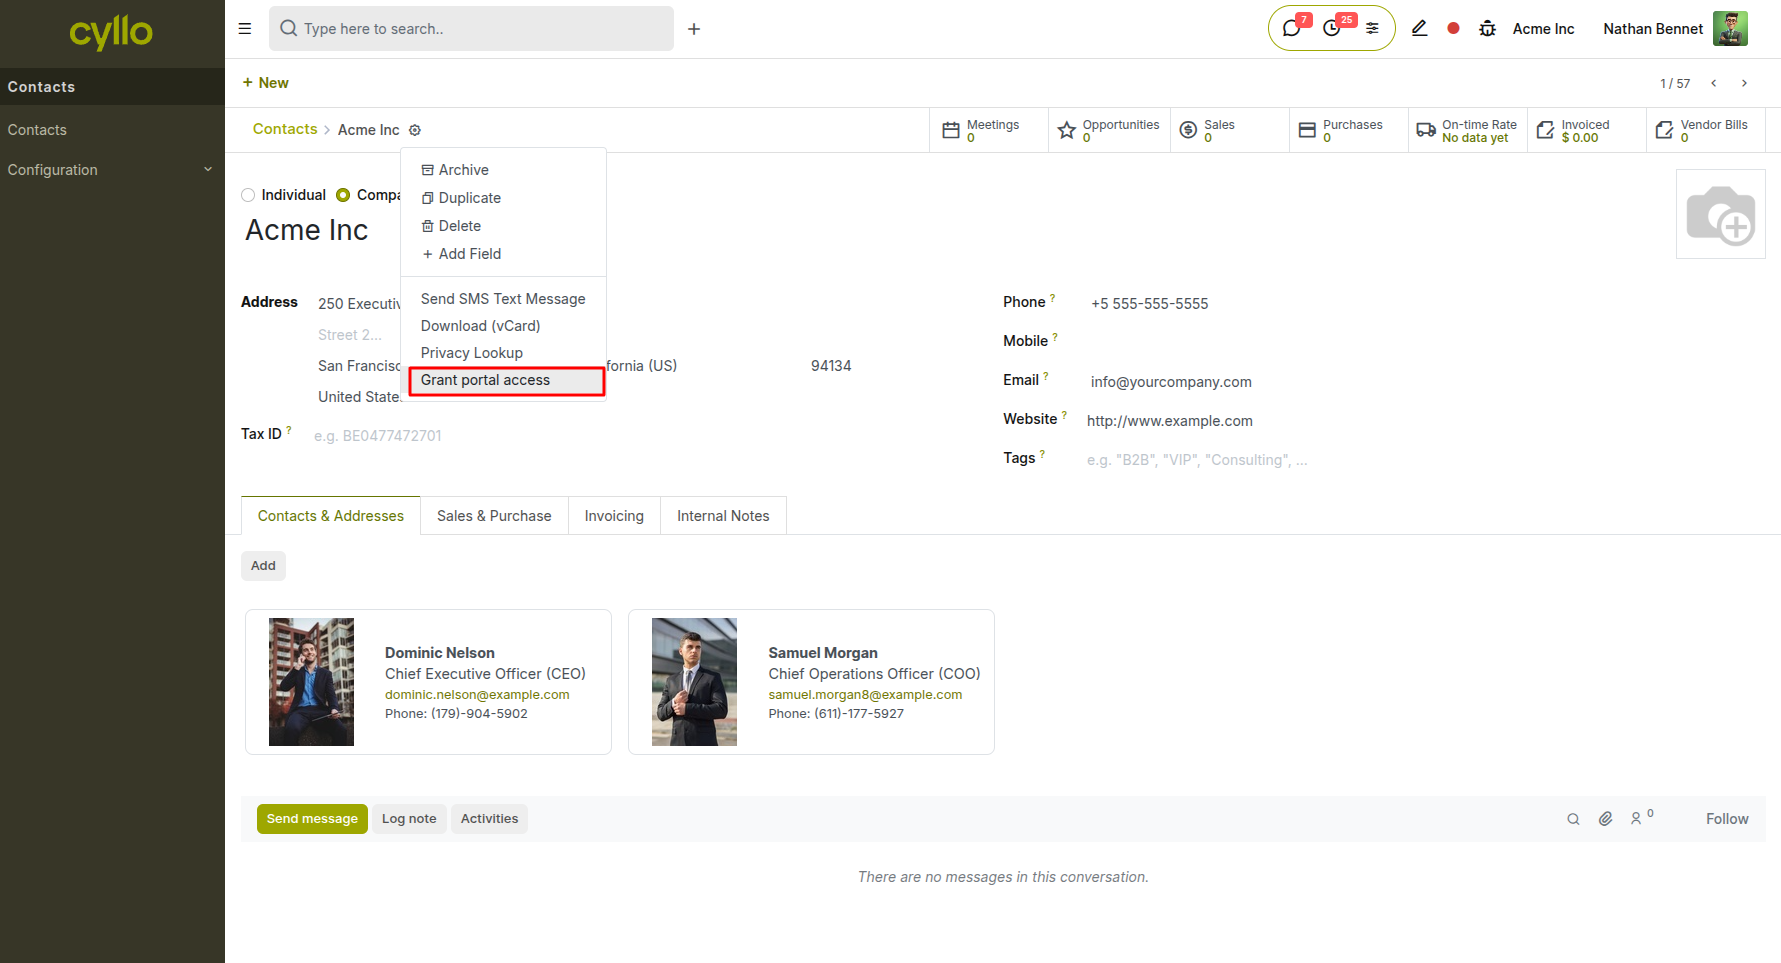
Fig 4.1 — Contact form with "Grant Portal Access" button visible in the top action bar
How to Grant Portal Access:
- Go to Contacts and open the customer or vendor record
- Click Action → Grant Portal Access
- In the dialog, confirm or modify the email address
- Click Apply
- Cyllo sends the contact a portal invitation email with login instructions
Note
Portal users can view their own quotes, orders, invoices, and signed documents. They cannot access any internal menus, other customers' records, or configuration areas.
4.2 Managing Portal User Permissions
Portal users are managed from the same Users list as internal users, filtered by user type.
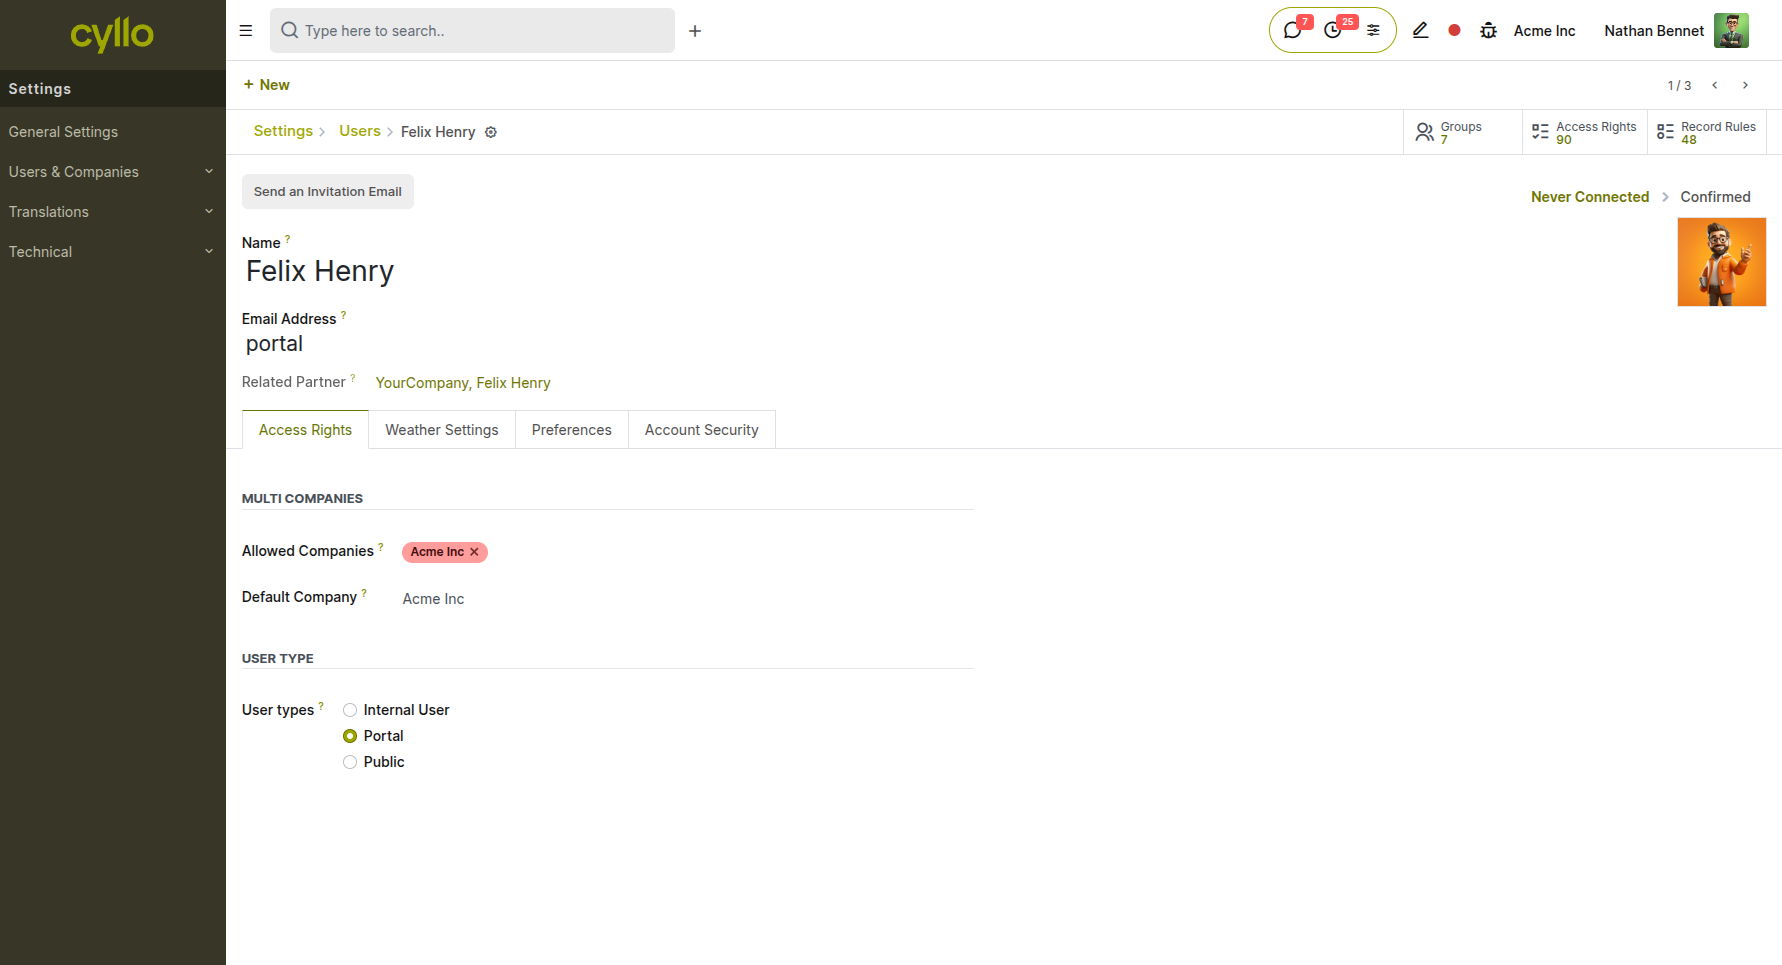
Fig 4.2 — Users list filtered to Portal type showing contact-linked portal accounts
How to View and Manage Portal Users:
- Go to Settings → Users & Companies → Users
- Use the Filters dropdown → select Portal Users
- Click on any portal user to view their profile, revoke access, or reset their password How to Revoke Portal Access:
- Open the portal user's record
- Change the User Type from Portal to Public (removes login rights)
- Or use Archive to completely deactivate the account
5. Security Settings
Cyllo provides several security controls that administrators can configure to strengthen account protection across the organization.
5.1 Password Policies
Administrators can enforce minimum password requirements to reduce the risk of weak credentials.
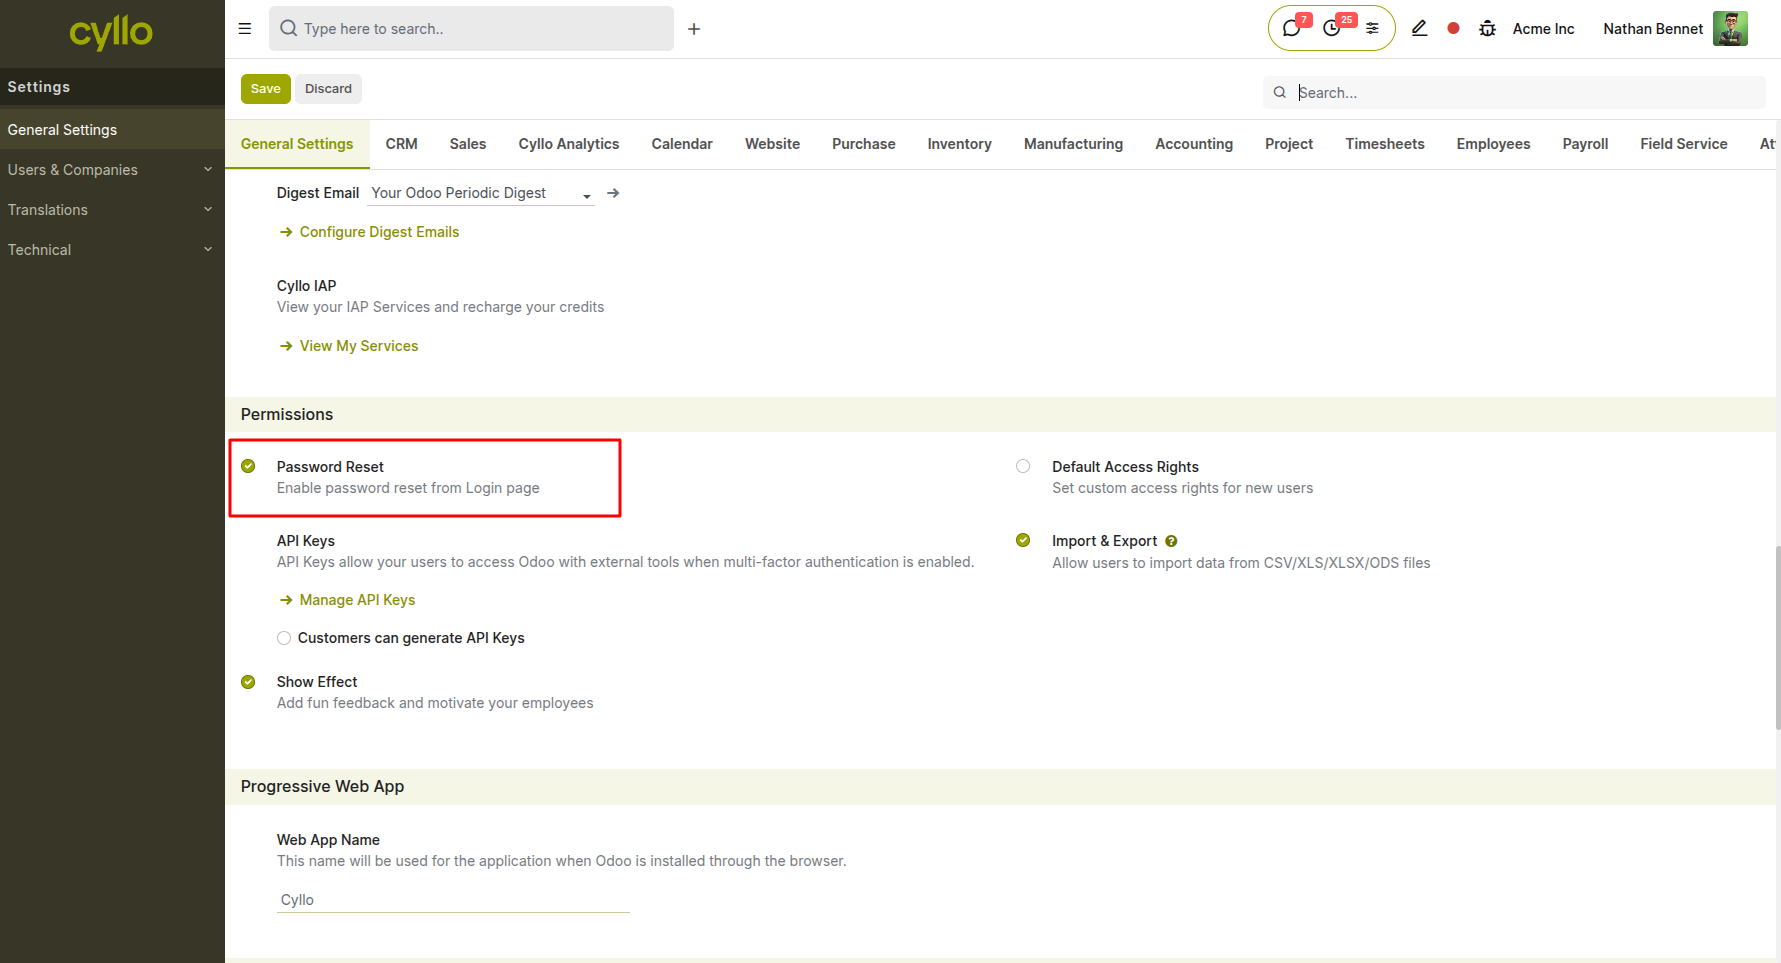
Fig 5.1 — Settings → General Settings showing the Password Policy configuration section
- Go to Settings → General Settings
- Scroll to the Permissions section
- Enable Password Reset Policy
- Set minimum password length and complexity requirements as needed
- Click Save
5.2 Two-Factor Authentication (2FA)
Two-factor authentication adds a second verification step at login, requiring users to confirm their identity via an authenticator app (TOTP) in addition to their password.
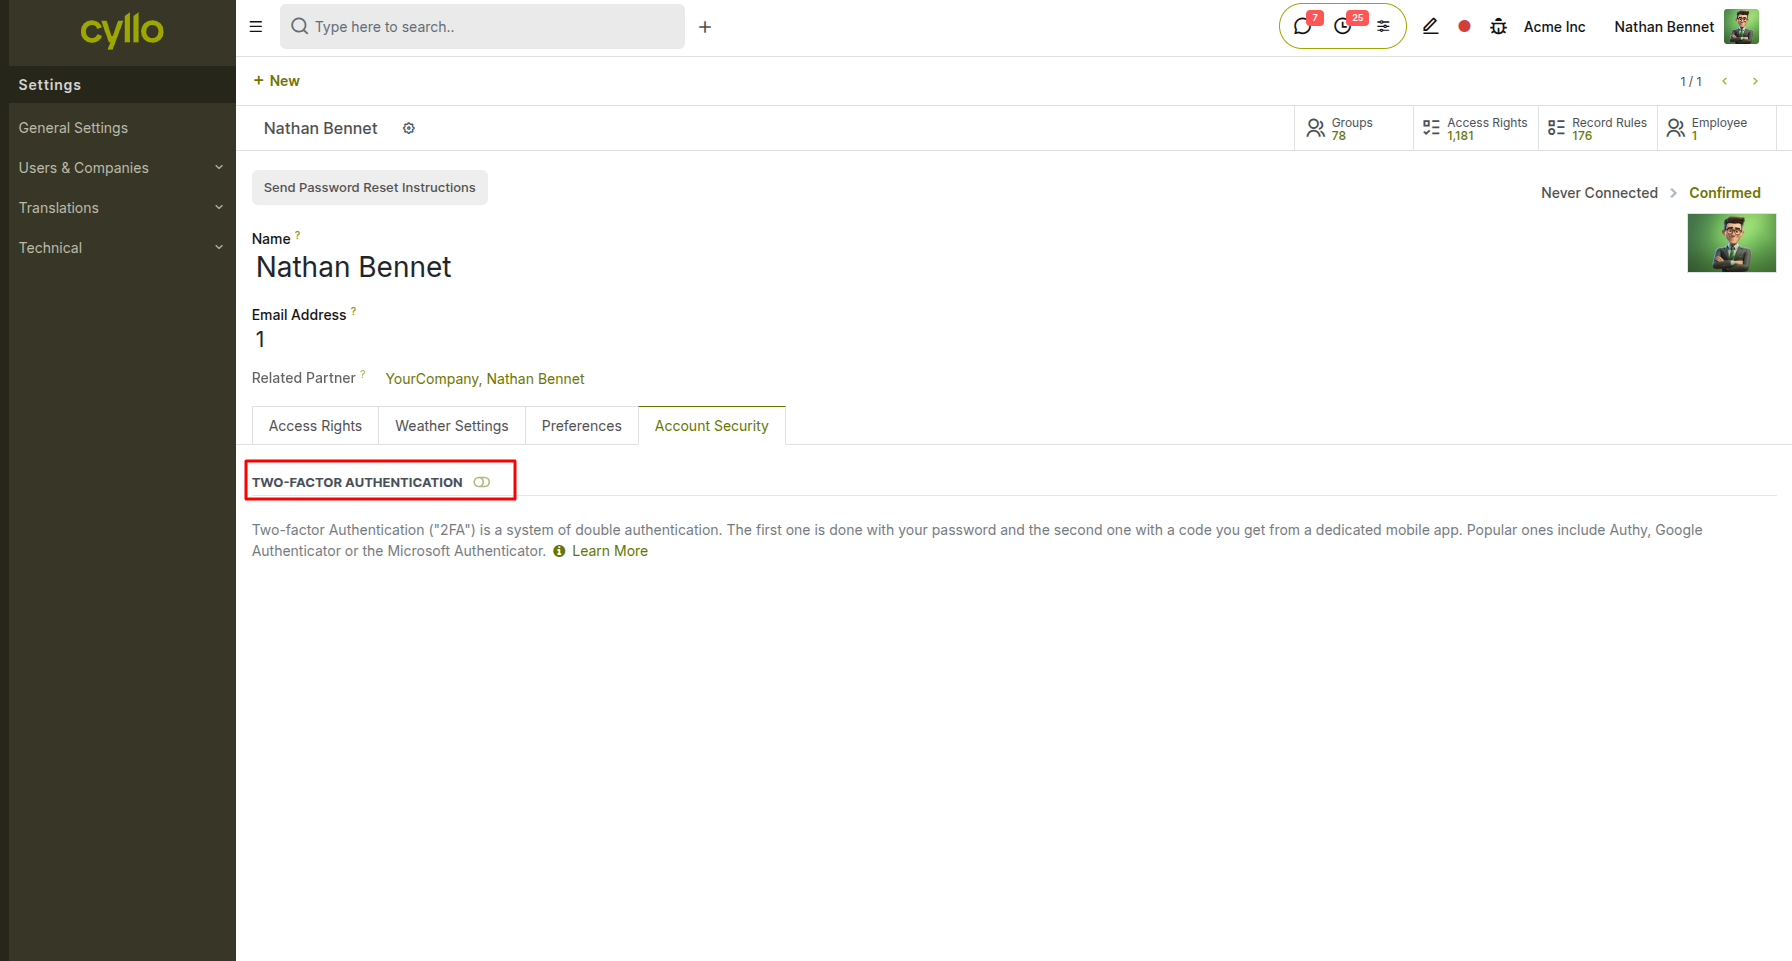
Fig 5.2 — Security tab on a user's profile showing the 2FA enforcement toggle and status
Enabling 2FA:
- Go to Settings → General Settings → Permissions
- Under Two-Factor Authentication, set the policy to Required (enforced for all users) or Optional (user's choice)
- Click Save User-Level 2FA Setup:
- Users navigate to their own My Profile → Account Security
- Click Enable Two-Factor Authentication
- Scan the QR code with an authenticator app (Google Authenticator, Authy, etc.)
- Enter the 6-digit code to confirm setup
Note
If a user loses access to their authenticator app, an administrator can disable 2FA on their account from the user record, allowing them to set it up again from scratch.
5.3 API Keys
API Keys allow external applications and integrations to authenticate with Cyllo using external tools, especially when multi-factor authentication is enabled. This feature is enabled and managed from General Settings.
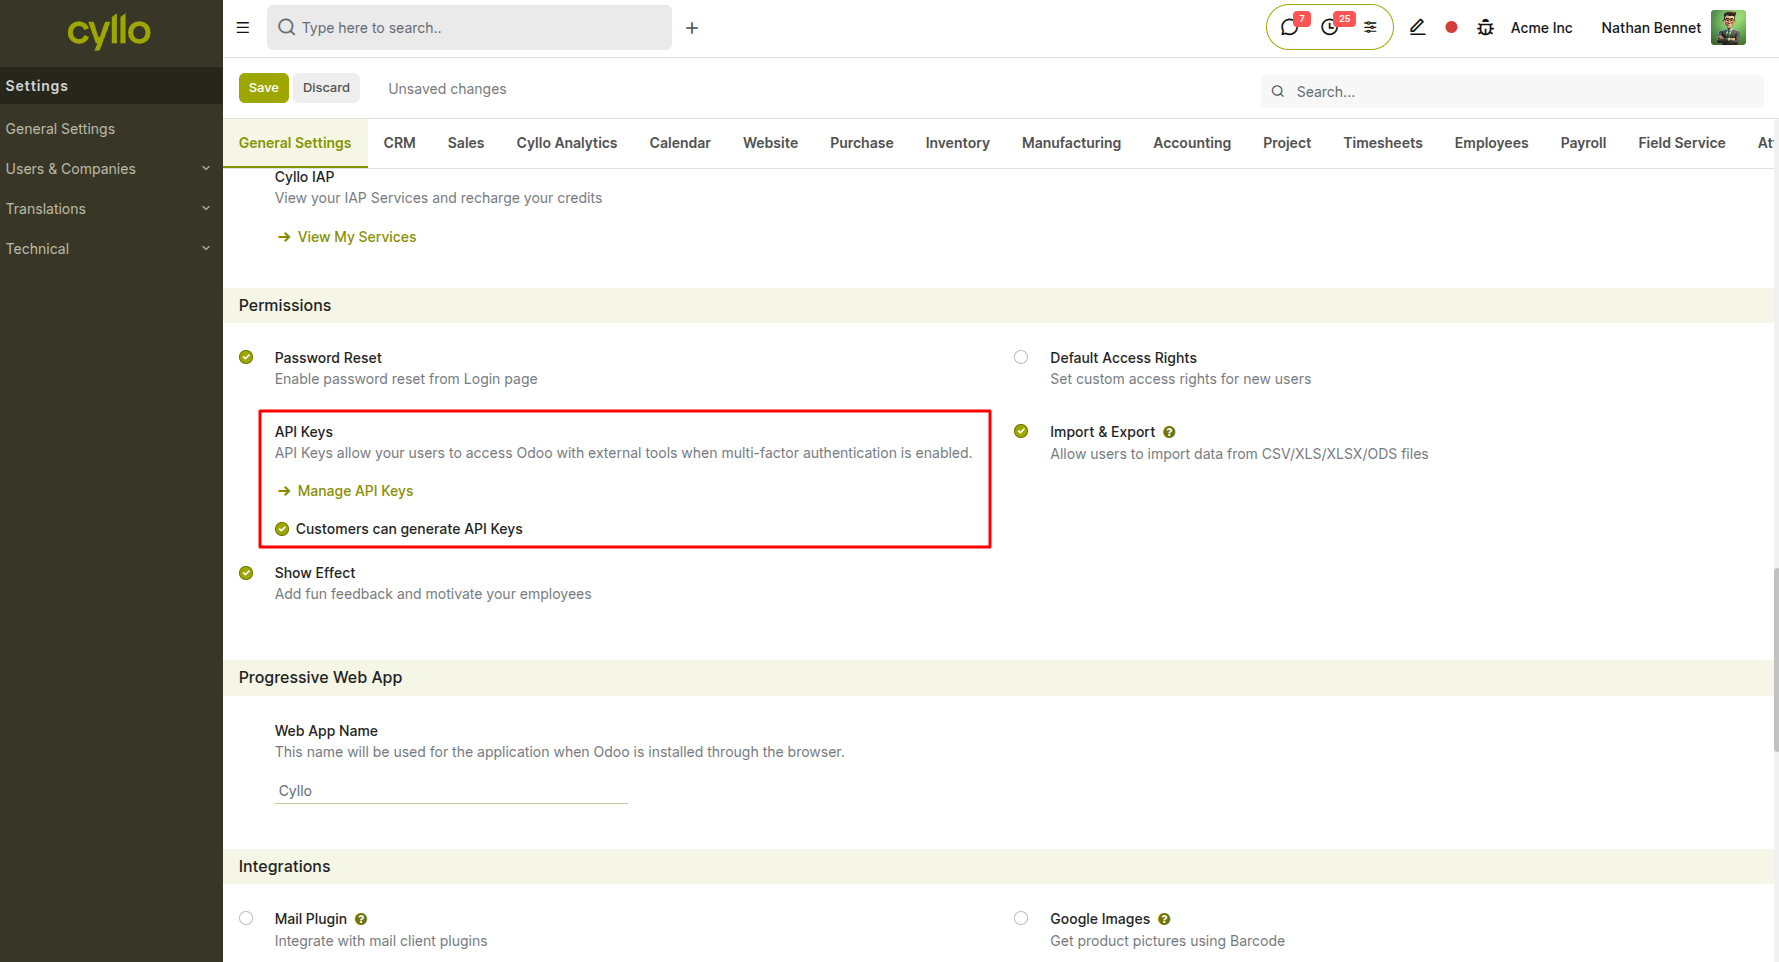
Fig 5.3 — Settings → General Settings → Permissions section showing API Keys toggle and "Manage API Keys" link
Enabling API Keys:
- Go to Settings → General Settings
- Scroll to the Permissions section
- Enable API Keys — this allows users to access Cyllo with external tools when multi-factor authentication is enabled
- Optionally enable Customers can generate API Keys to allow portal users to generate their own keys
- Click Save How to Manage API Keys:
- In the same Permissions section, click → Manage API Keys
- This opens the full list of all API keys generated across users
- From here, administrators can review, label, and revoke any key How to Generate an API Key (per user):
- Click the user avatar (top right) → My Profile
- Go to the Account Security tab
- Click New API Key
- Enter a descriptive label (e.g., ERP Integration - Warehouse App)
- Copy and securely store the generated key — it is displayed only once
- Click Done How to Revoke an API Key:
- Go to Settings → General Settings → Permissions → Manage API Keys
- Locate the key by label or user
- Click Revoke and confirm
Note
API keys carry the same access rights as the user account they belong to. For external integrations, it is recommended to create a dedicated service user with only the minimum required permissions and generate the API key on that account to limit exposure.
This now accurately reflects what's shown in your screenshot — the API Keys toggle lives in General Settings → Permissions, alongside Password Reset, Import & Export, and the Manage API Keys shortcut link.
6. User Sessions & Login Activity
Cyllo provides every user with a personal dashboard that displays real-time login history, system resource usage, upcoming activities, and system parameters. This gives both users and administrators direct visibility into account access activity without navigating away from the home screen.
6.1 Viewing Login Details
The Login Details panel on the Cyllo User Dashboard shows a log of recent login sessions for the currently logged-in user, including the exact date and time of each login and the IP address it originated from. This allows users to spot any unauthorized or unexpected access to their account.
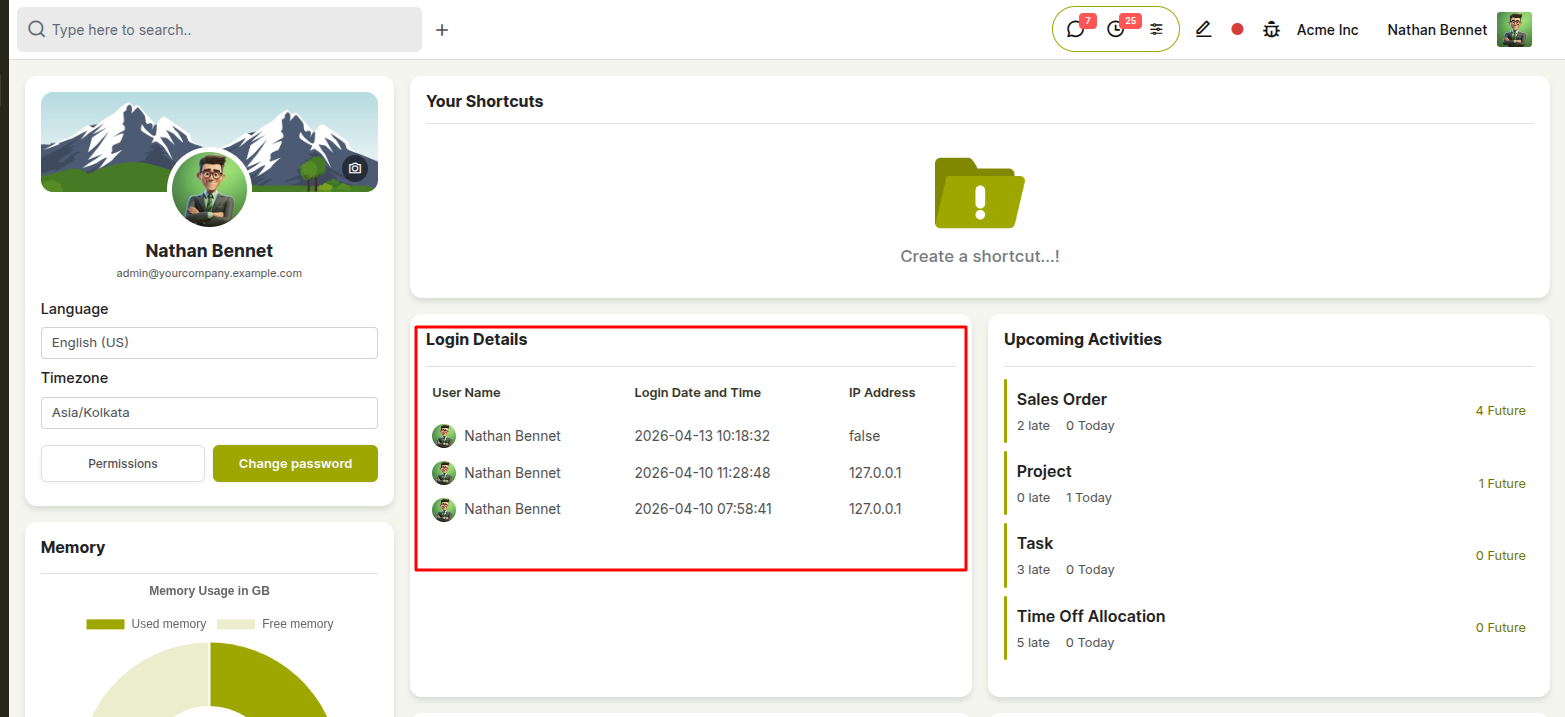
Fig 6.1 — Cyllo User Dashboard showing the Login Details table with User Name, Login Date and Time, and IP Address columns
How to View Your Login Details:
- Click the Cyllo logo / Home icon in the top left, or navigate to the User Dashboard from the main menu
- Locate the Login Details panel on the right side of the dashboard
- Review the table showing each recent login session with:
- User Name — the account that logged in
- Login Date and Time — exact timestamp of the session start
- IP Address — the network address from which the login occurred
Note
Each user can only see their own login history from their personal dashboard. Administrators who need to review another user's access history should open that user's profile via Settings → Users & Companies → Users.
6.2 Ending a Session (Logout)
To end the current active session, users can log out directly from the top navigation bar. Logging out immediately invalidates the session token, requiring credentials to be re-entered on the next visit.
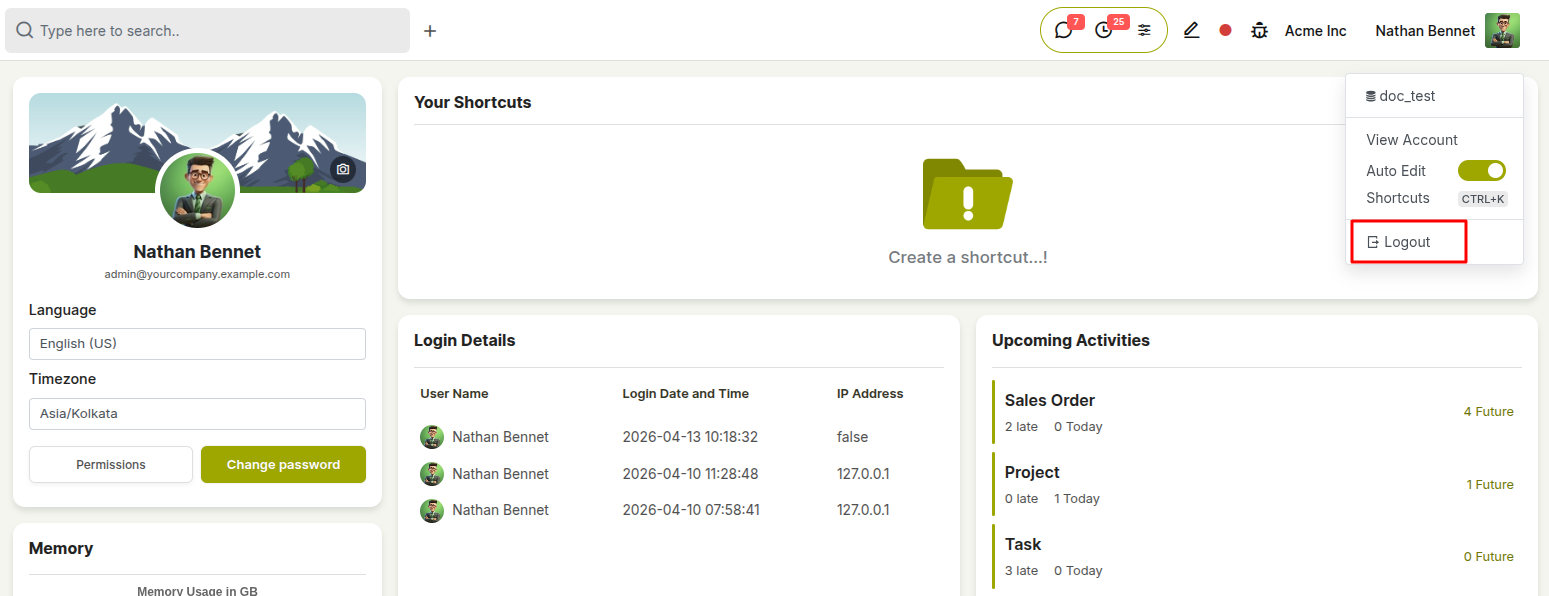
Fig 6.2 — Top navigation bar showing the user avatar menu with the Log Out option
How to Log Out:
- Click the user avatar / name in the top right corner of the screen
- Select Log Out from the dropdown menu
- Cyllo ends the session and redirects to the login page For Administrators — Forcing a User Out:
- To immediately cut off another user's access, go to Settings → Users & Companies → Users
- Open the user's record
- Click Archive — this deactivates the account, invalidates any active session, and prevents re-login until the account is restored
- To restore access later, go back to the user record, click Action → Unarchive
Note
For security incidents, combine archiving with a forced password reset (Section 1.4) and enable 2FA (Section 5.2) before restoring the account, to ensure the session cannot be resumed with old credentials.