

Cyllo Employees Documentation
Introduction
Cyllo's Employees module is the foundation of the entire HRMS — serving as the central hub where every staff member's professional and personal information is stored, managed, and referenced by all other HR modules. From the moment an employee is onboarded, their record becomes the single source of truth for payroll, attendance, leave, contracts, fleet assignments, and more. Whether you are managing a handful of staff or hundreds across multiple departments, Cyllo gives you a clean, organised employee directory with self-service access, availability tracking, and full integration across the platform — eliminating duplicate data entry and keeping HR information consistent at all times.
1. Employee Management
1.1 Employee Creation
An Employee record is the central profile for each staff member in Cyllo. It stores personal details, job information, contract linkage, and HR settings — and is referenced by every other HRMS module including Payroll, Attendance, Leave, and Fleet.
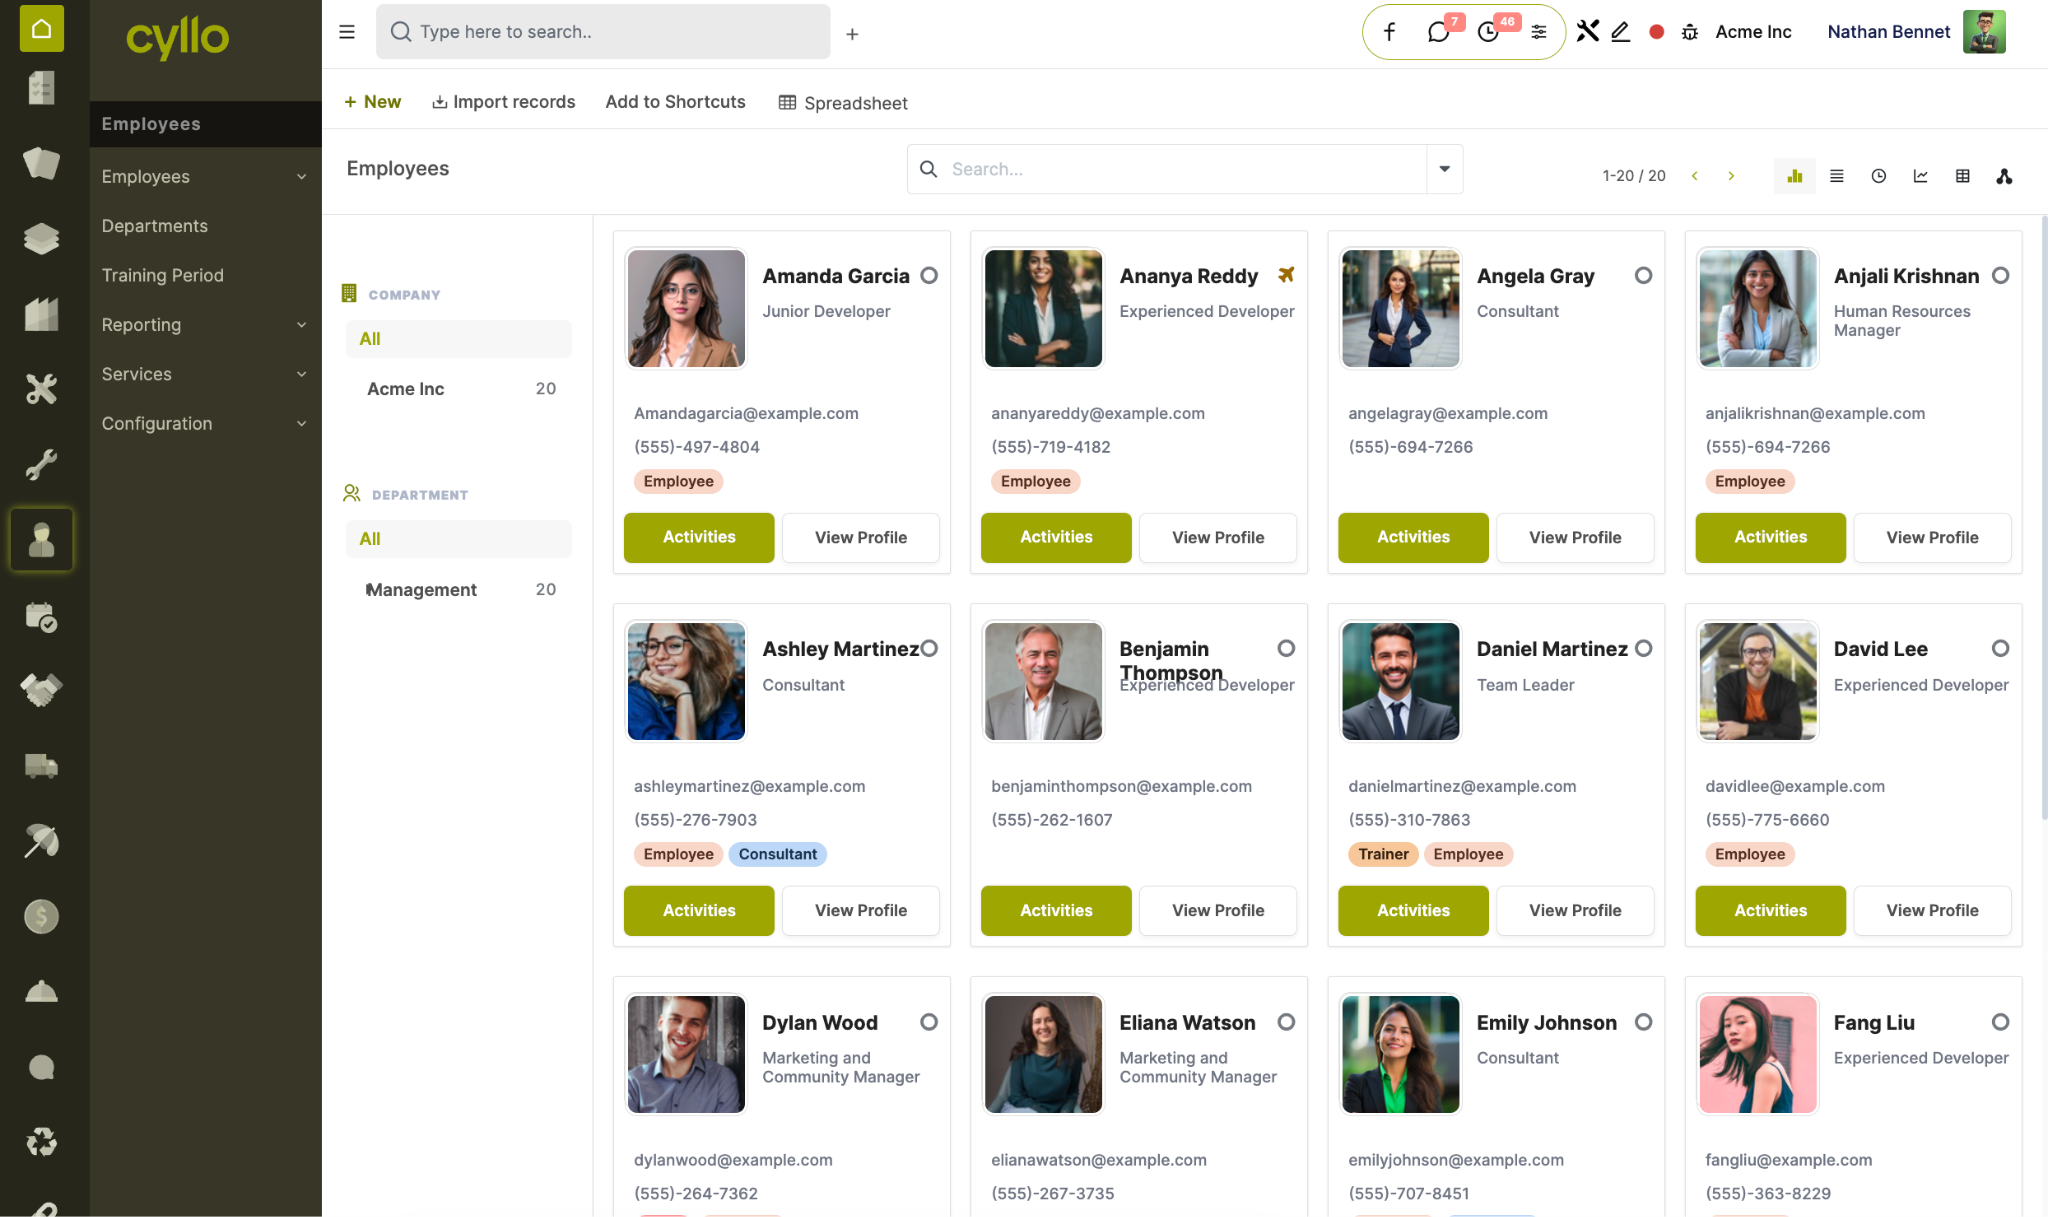
Fig 1.1 — Employee Card view with department, job position, and availability status
How to Create an Employee:
- Go to Employees → Employees → New
- Enter the Employee Name
- Upload a Profile Photo
- Select the Job Position and Job Title
- Select the Department and assign a Manager
- Set the Coach (the person responsible for the employee's development)
- Set the Work Phone and Work Email
- Configure the remaining tabs: Work Information, Private Information, HR Settings, Resume
- Save the record
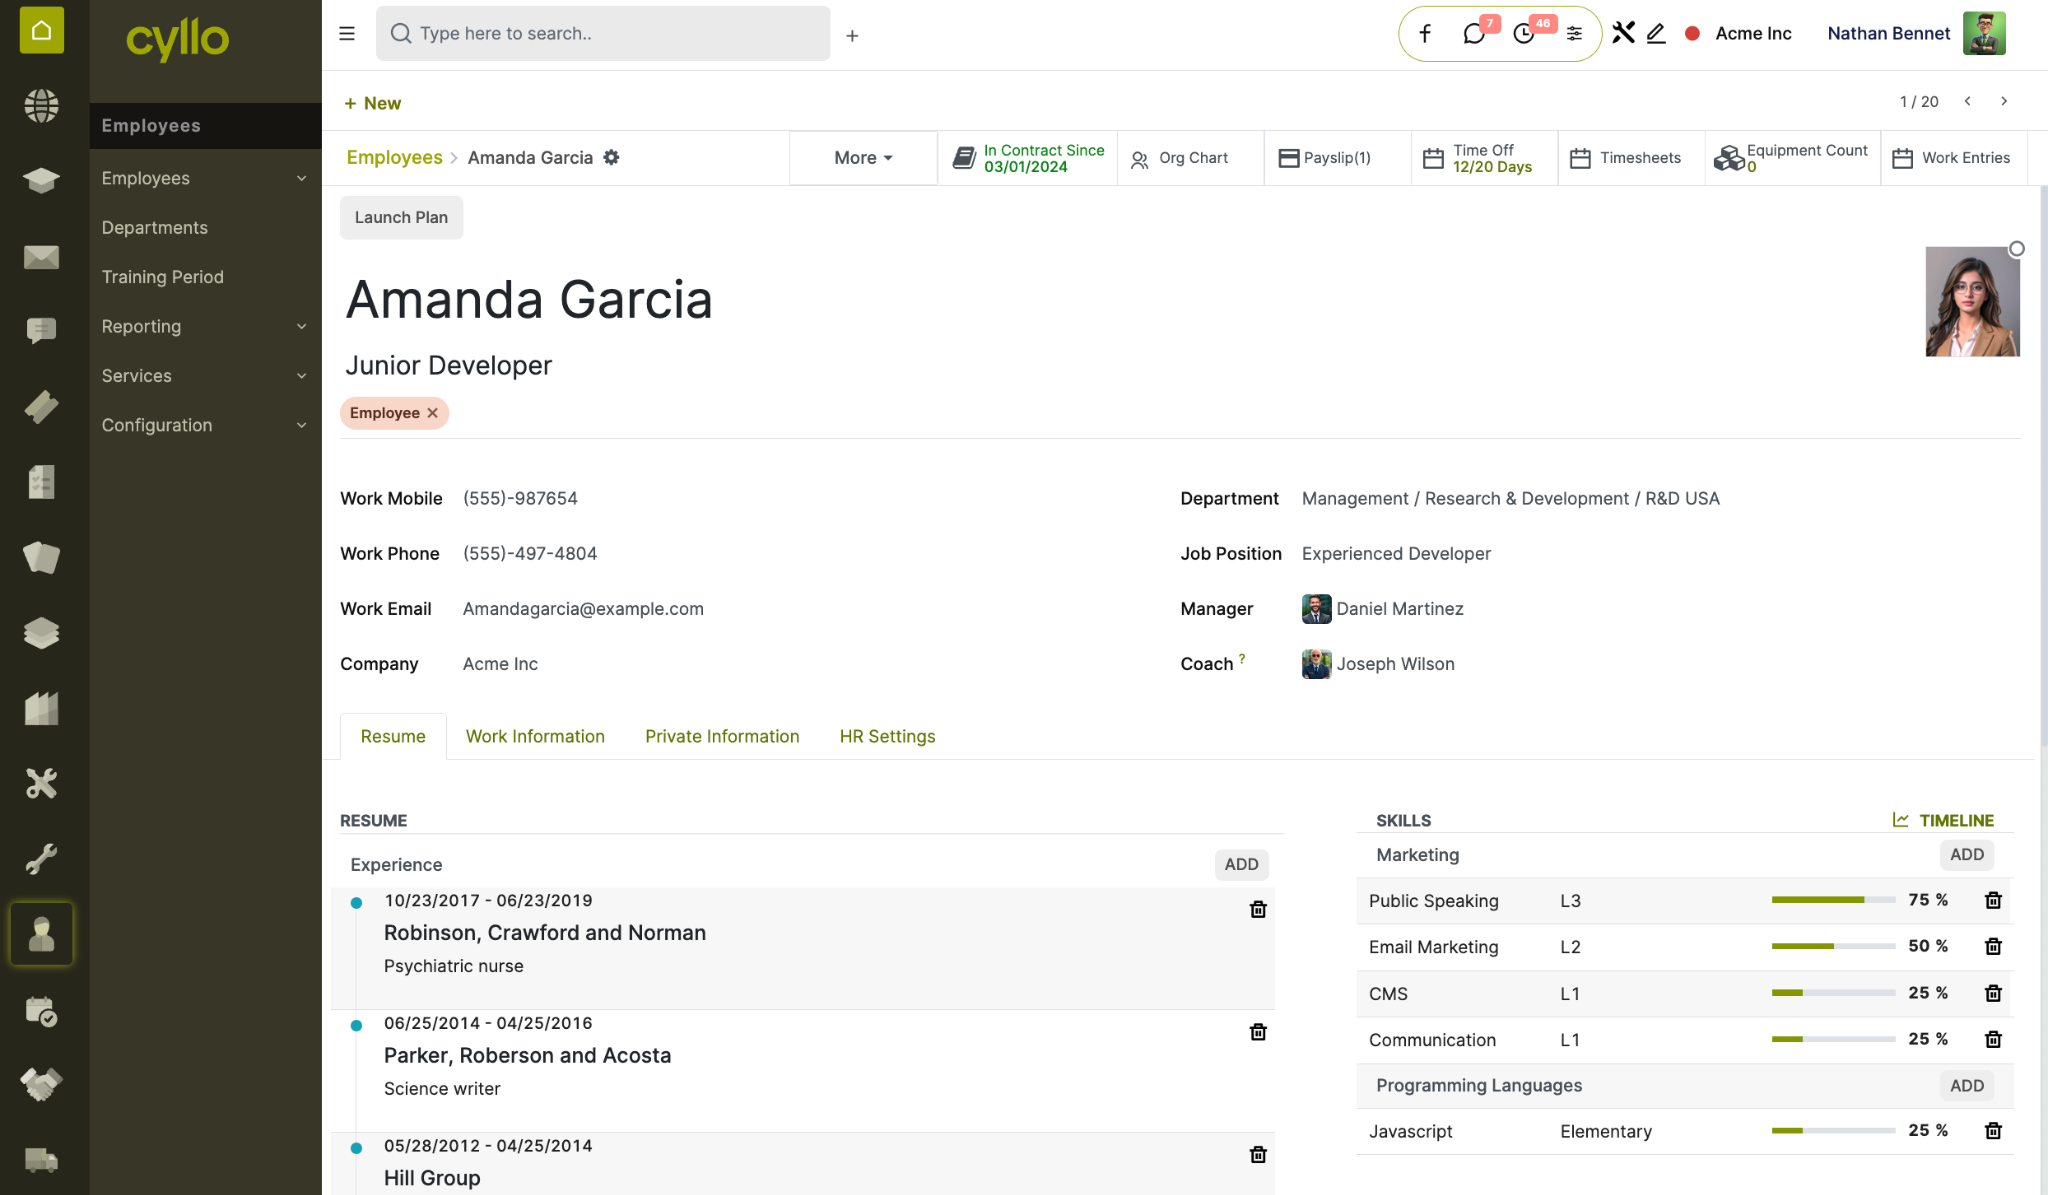
Fig 1.2 — Employee form view showing the main information panel
Key Fields
- Employee Name: Full name as it appears on contracts, payslips, and official documents.
- Job Position: The formal role linked to a department — drives reporting and recruitment.
- Job Title: The display title shown on the employee's profile and business card.
- Department: The business unit the employee belongs to.
- Manager: Direct reporting line — used in leave approvals and notifications.
- Coach: The person guiding the employee's development and performance.
- Status: Active → On Leave → Archived.
Note
The Manager field drives approval workflows across Leave, Expenses, and Timesheets. Always set this correctly when creating a new employee record.
1.2 Work Information
The Work Information tab defines where and how the employee works — their location, schedule, and working hours. This data feeds directly into Attendance and Payroll.

Fig 1.3 — Work Information tab showing location, schedule, and timezone settings
Key Fields
- Work Location: Office, Remote, or a specific site — used for attendance and planning.
- Work Schedule: The employee's working hours pattern (e.g., 40h/week, Morning Shift).
- Timezone: The employee's local timezone — important for distributed teams.
- Work Phone: Internal or direct phone number.
- Work Email: Official company email address.
Note
Work Schedule is critical — it defines the working days and hours used to calculate attendance, overtime, and leave durations. Assign the correct schedule from day one.
1.3 Private Information
The Private Information tab stores sensitive personal details required for HR compliance, payroll processing, and emergency contact management. Access to this tab is restricted to HR managers.
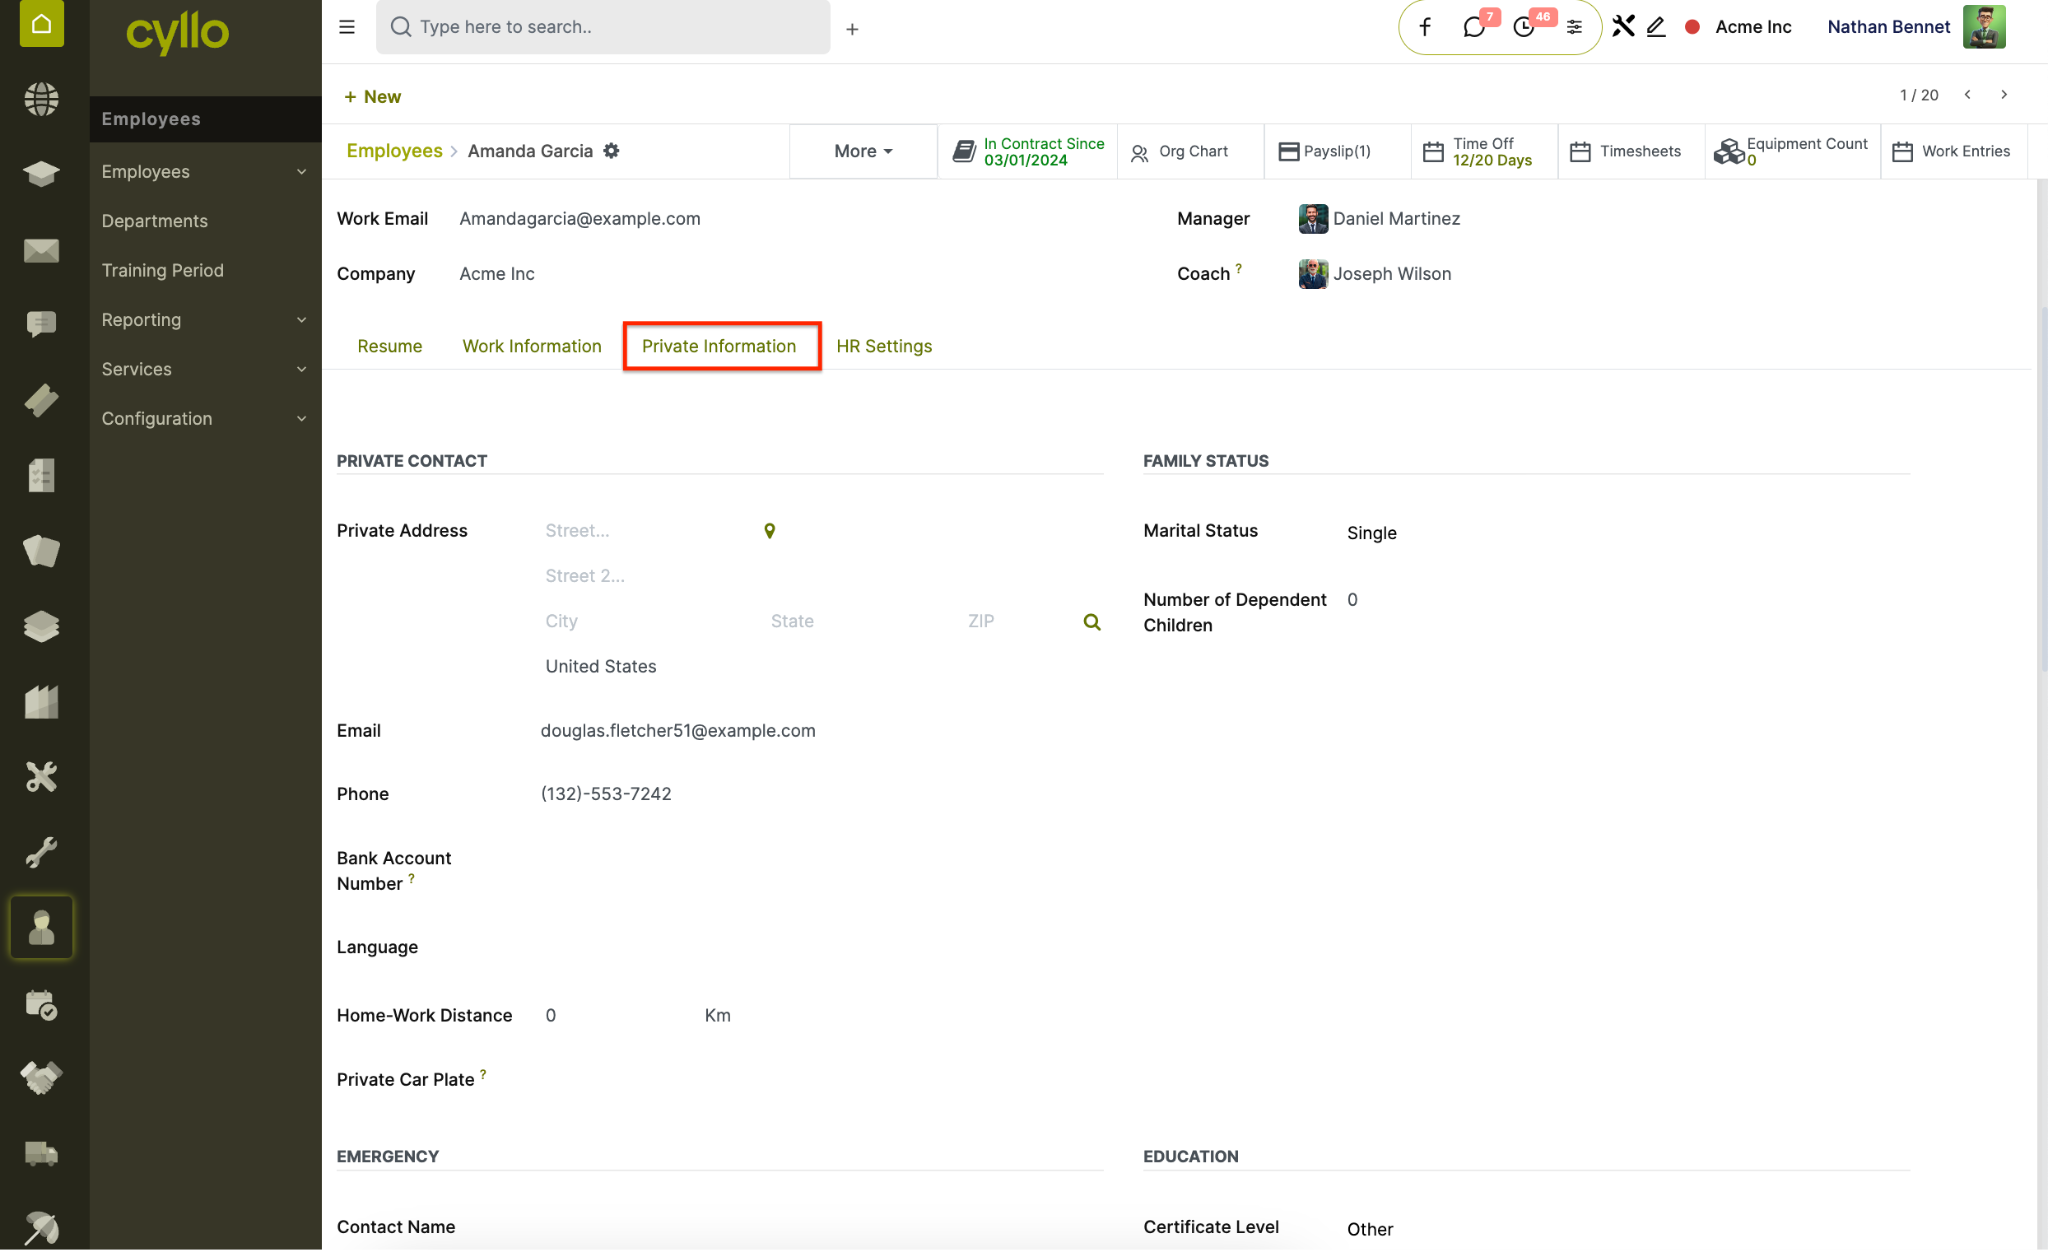
Fig 1.4 — Private Information tab with personal details and emergency contact fields
Key Fields
- Date of Birth: Used for age verification and statutory compliance. Gender: Required for certain payroll and statutory calculations.
- Nationality: Used for visa, work permit, and compliance tracking.
- Identification Number: National ID, passport, or employee ID.
- Emergency Contact: Name and phone number of the employee's emergency contact.
- Visa / Work Permit: Expiry dates tracked for compliance alerts.
- Certificate Level: Highest educational qualification attained.
Note
Private Information is only visible to users with HR Manager access. Standard employees and managers cannot see this tab on other employees' records.
1.4 HR Settings
The HR Settings tab controls system-level configurations for the employee — including their attendance PIN, expense settings, and linked user account.
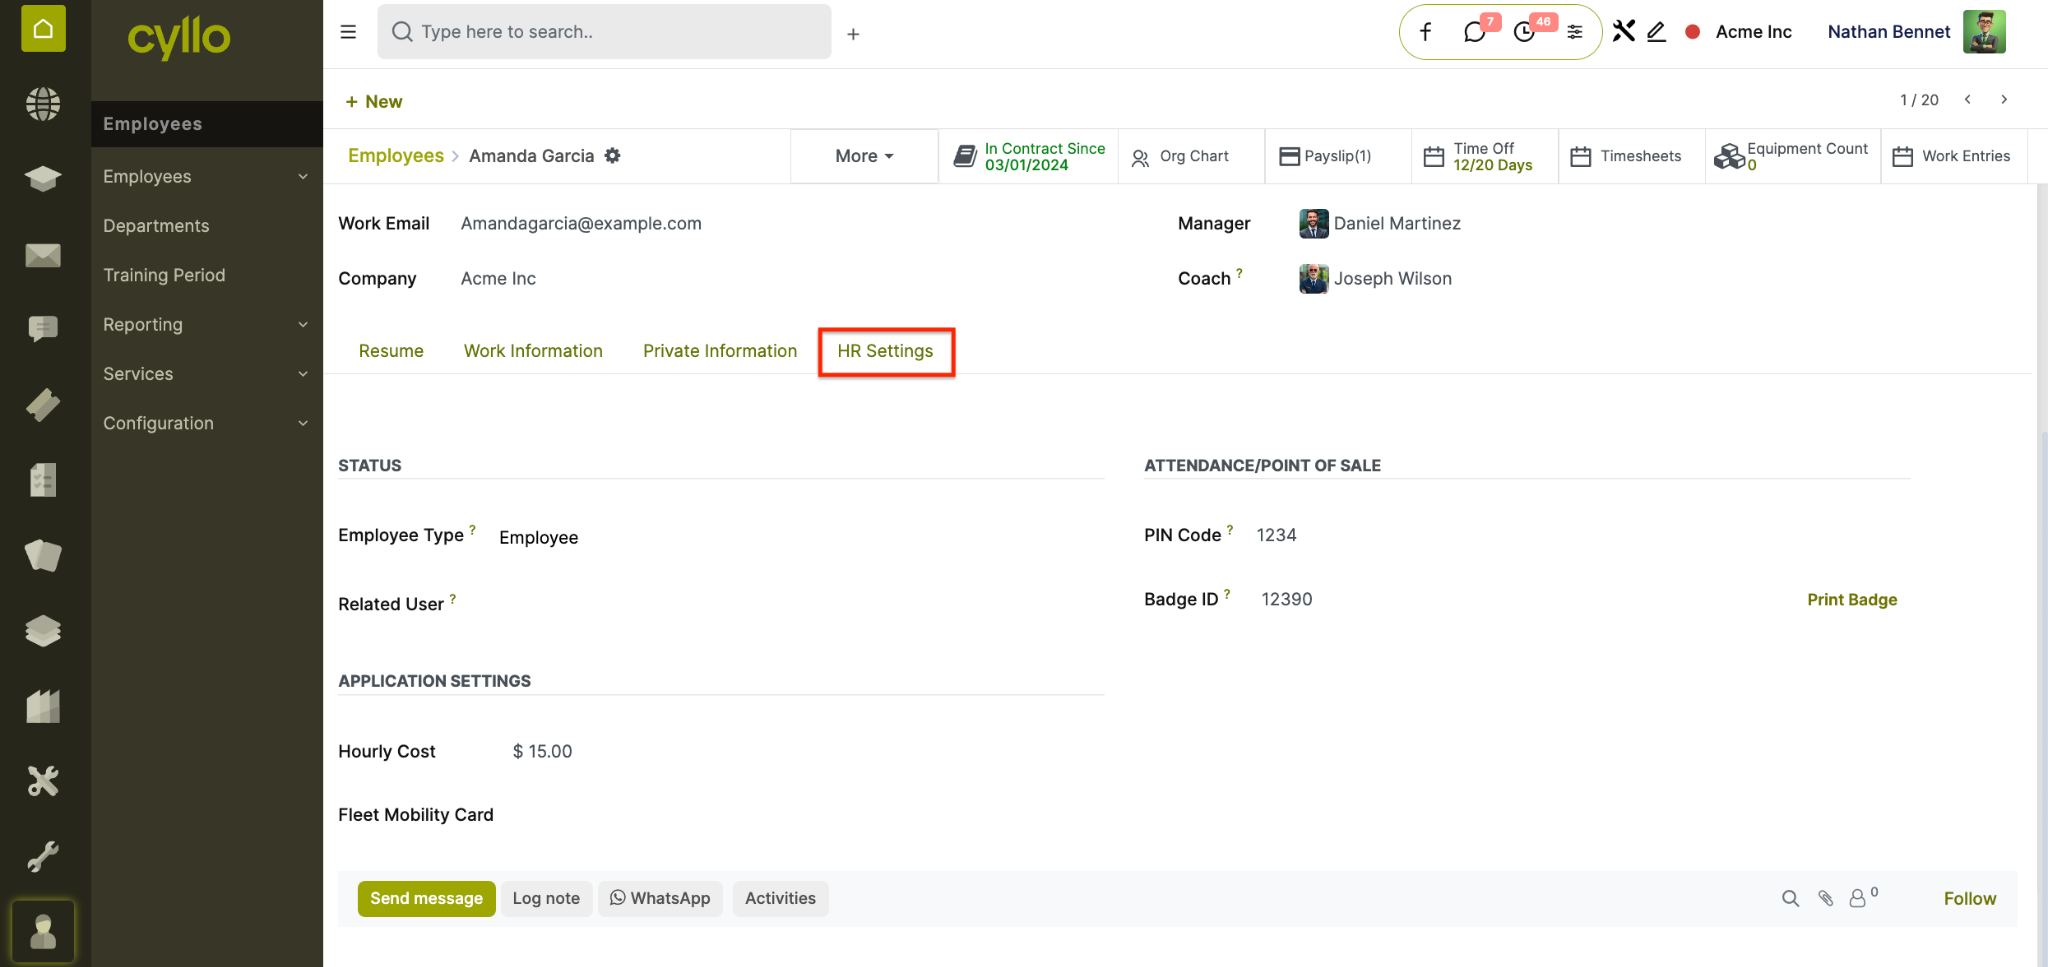
Fig 1.5 — HR Settings tab showing attendance PIN, user account, and expense policy
Key Fields
- Related User: Links the employee record to a portal or system user account — required for self-service access.
- Attendance PIN: 4-digit PIN used for Kiosk Mode clock-in/out. Badge ID: Physical badge identifier for RFID attendance systems.
- Expense Reminders: Enable automatic expense submission reminders. Billing Policy: For project timesheets — sets whether hours are billed at cost or sales rate.
Note
Always link a Related User to the employee record if the employee needs to access the portal, submit expenses, or log timesheets. Without this link, self-service features will not work.
1.5 Resume & Skills
The Resume tab stores the employee's professional background and competency profile — useful for internal mobility, project staffing, and field service worker matching.
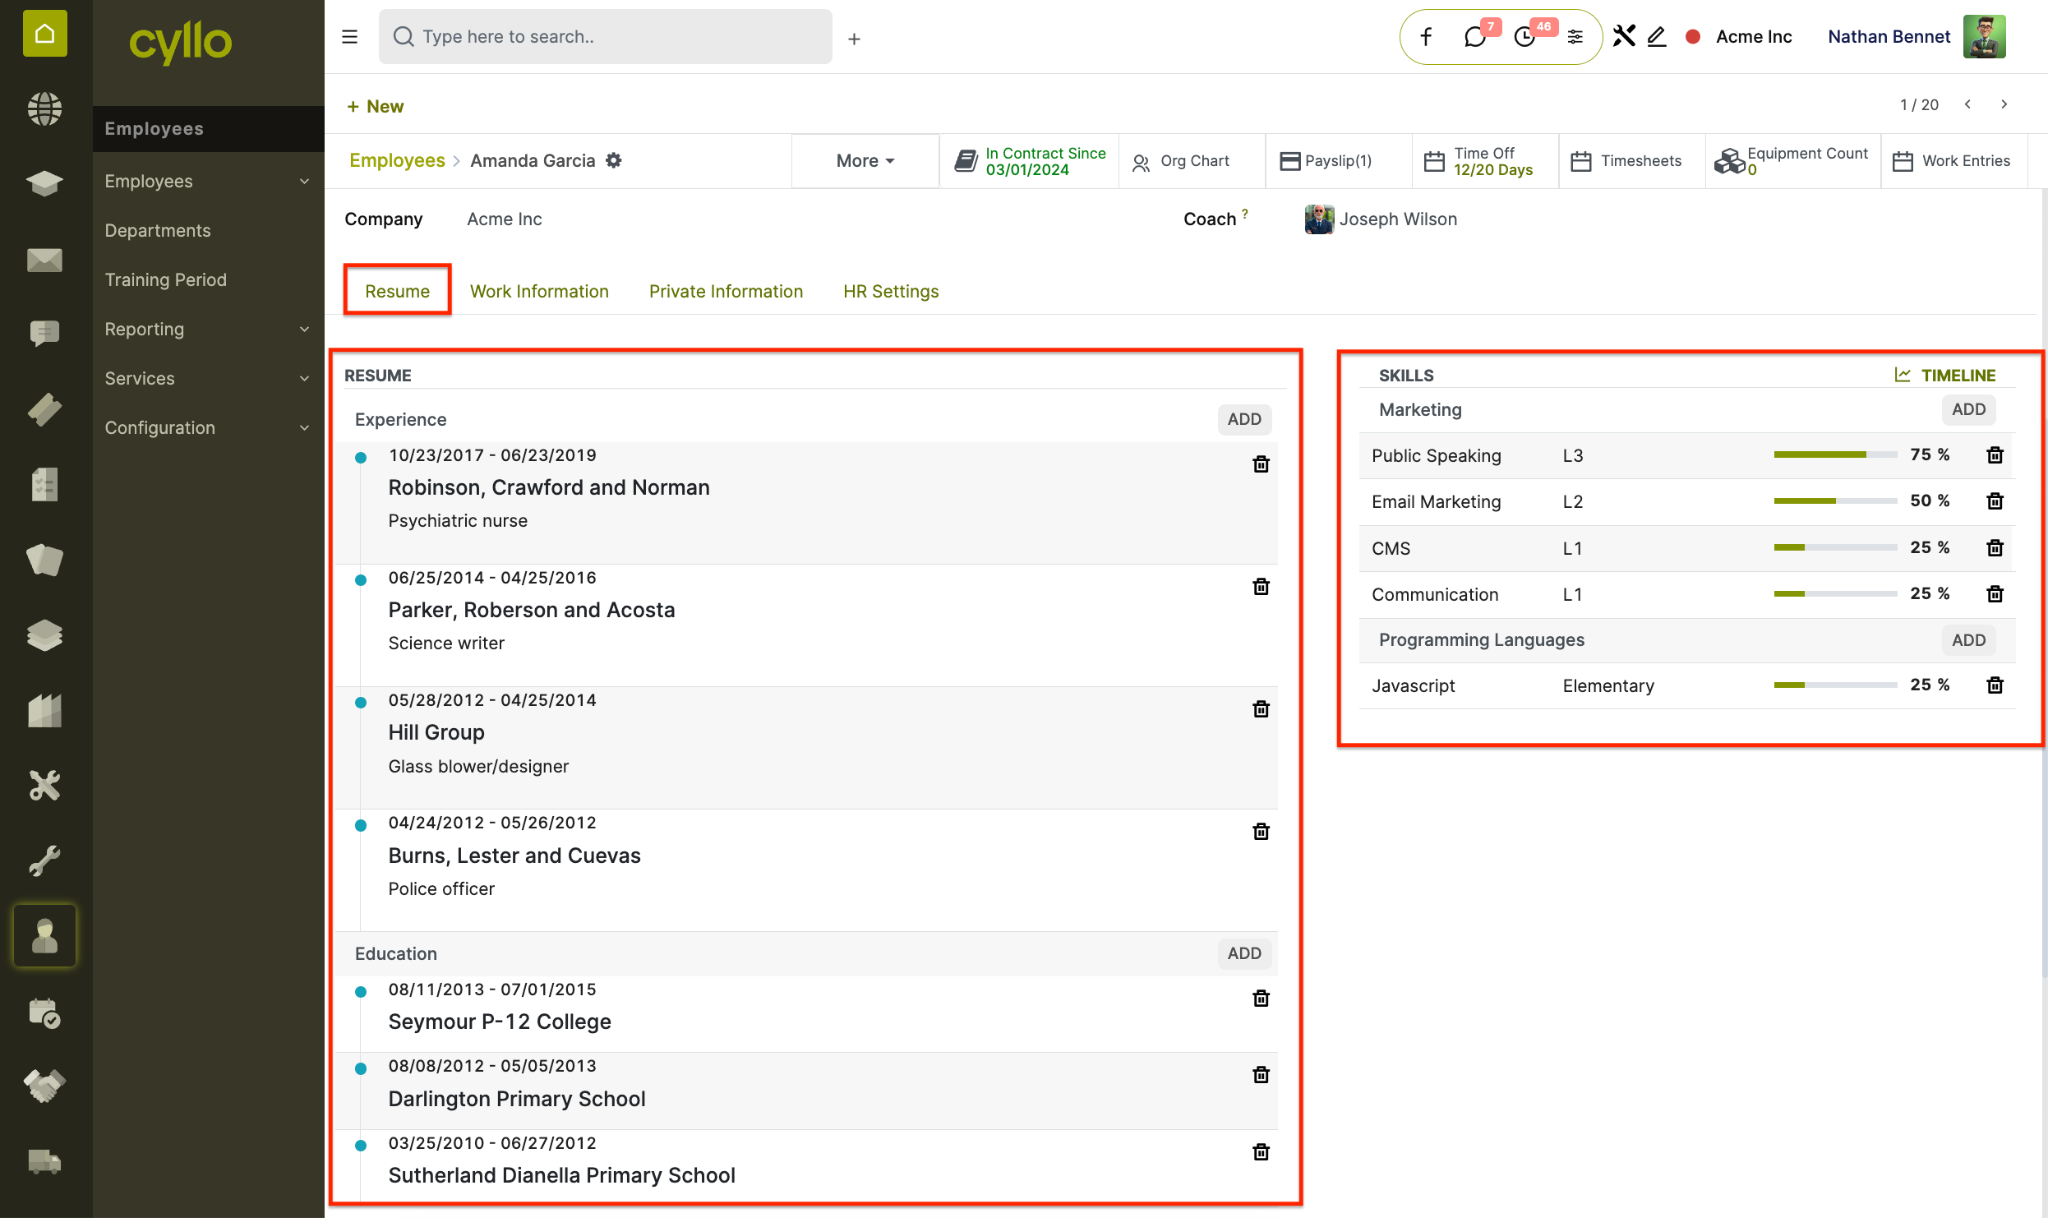
Fig 1.6 — Resume tab showing work history, education, and skill competencies
How to Add Resume Lines and Skills:
- Open the employee record and go to the Resume tab
- Under Resume, click Add a line
Select the Type:
- Experience, Education, or Internal Training
- Enter the Title, Date From, Date To, and Description
- Under Skills, click Add a line
- Select the Skill Type (e.g., Languages, Technology, Management)
- Select the Skill and the Level (e.g., Beginner, Intermediate, Expert)
- Save the record
Note
Skills defined here are used by the Field Service module to automatically match the right worker to a service request based on required competencies.
2. Departments
2.1 Creating Departments
Departments organise employees into business units — such as Sales, Finance, Operations, or HR. They are used across reporting, leave approvals, payroll grouping, and recruitment.
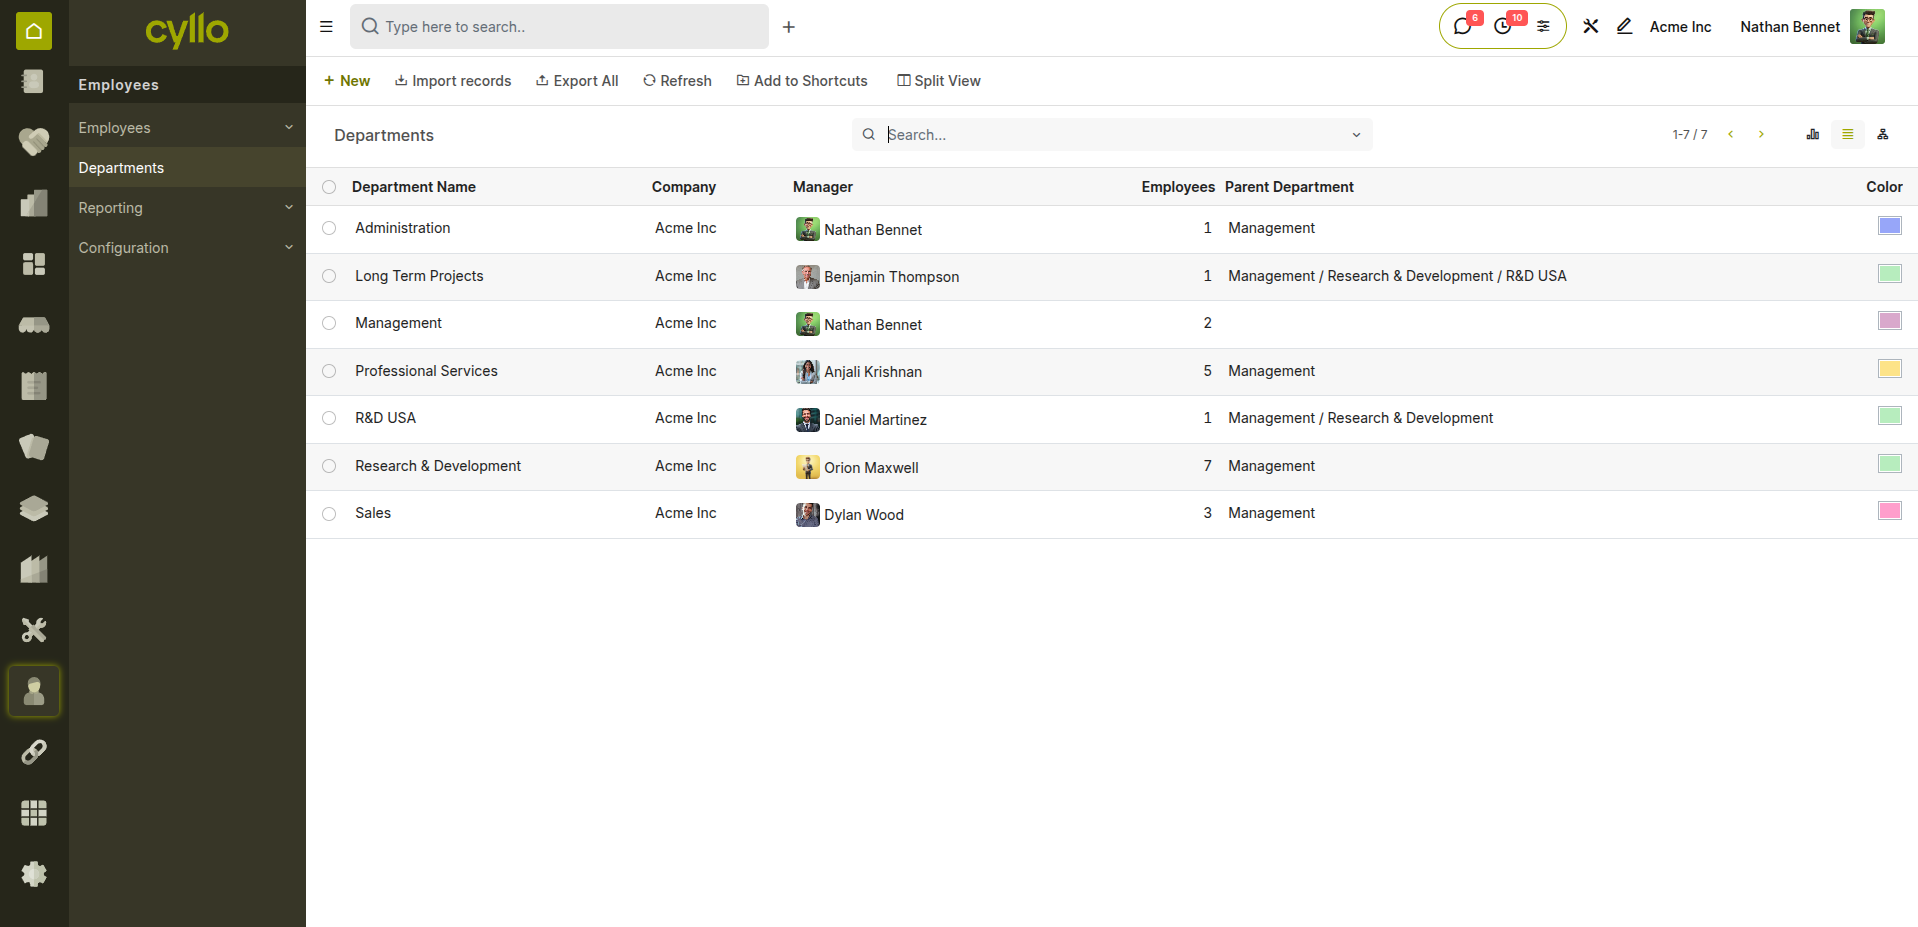
Fig 2.1 — Department list view with headcount and manager details
How to Create a Department: Go to Employees → Departments → New Enter the Department Name Select the Parent Department if this is a sub-department Assign a Manager for the department Save the department
Key Fields Department Name: The name of the business unit (e.g., Finance, Operations). Parent Department: Used to build a department hierarchy for reporting. Manager: The department head — receives leave and other approval requests. Headcount: Auto-calculated from the number of active employees in the department.
2.2 Department Hierarchy
Cyllo supports a multi-level department structure — allowing parent departments to contain sub-departments for accurate org chart representation and grouped reporting.
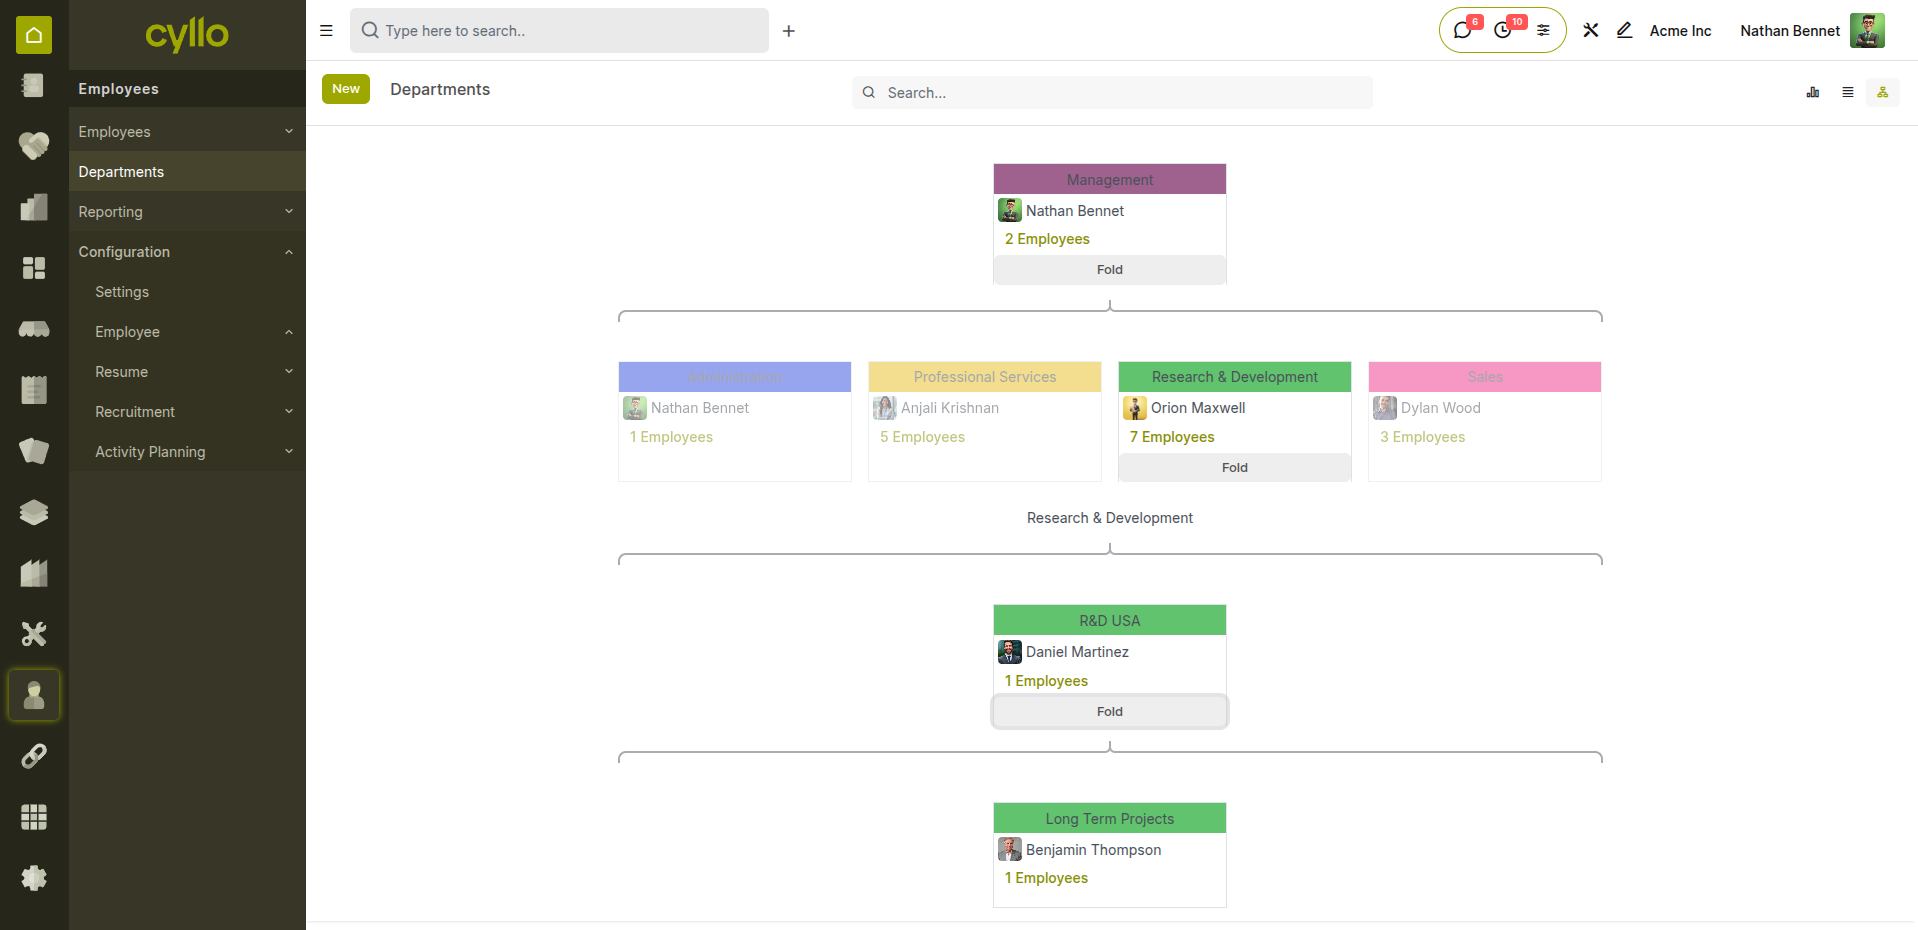
Fig 2.3 — Department hierarchy view showing parent and child departments
Note
Use the Parent Department field when creating sub-departments (e.g., Software Development under Technology). Reports and filters respect the hierarchy — filtering by a parent department includes all sub-departments automatically.
3. Job Positions & Job Titles
3.1 Job Positions
Job Positions are formal roles within the organisation — linked to a department and used in recruitment, headcount planning, and employee records. A Job Position represents a seat in the organisation chart.
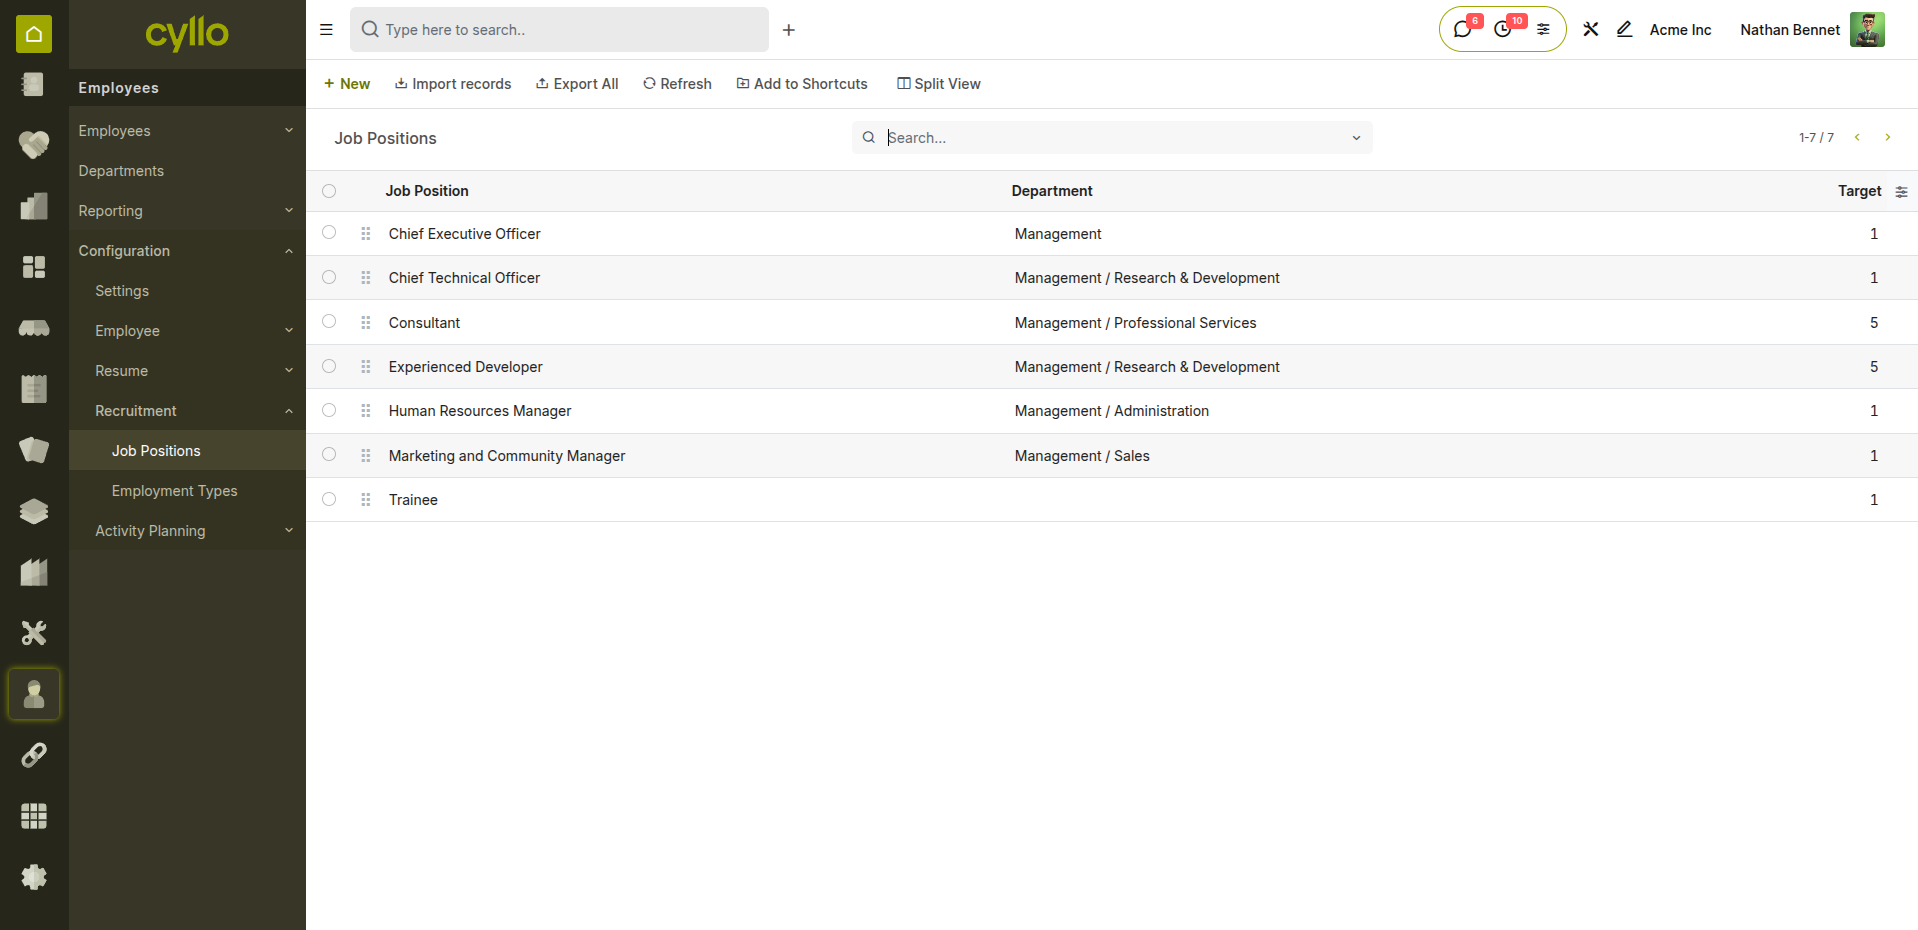
Fig 3.1 — Job positions list with department and expected headcount
How to Create a Job Position:
- Go to Employees → Configuration→Recruitment → Job Positions → New
- Enter the Job Position name (e.g., Senior Accountant, Warehouse Supervisor)
- Select the Department it belongs to
- Set the Expected New Employees count for headcount planning
- Click Start Recruitment to open a vacancy for this position
- Save
Note
Job Positions drive the Recruitment module — each open vacancy is linked to a Job Position. When the position is filled, the headcount updates automatically.
4. Contracts
4.1 Contract Creation
Every employee should have an active contract in Cyllo. The contract defines their salary, working schedule, and the salary structure used to compute their payslips.
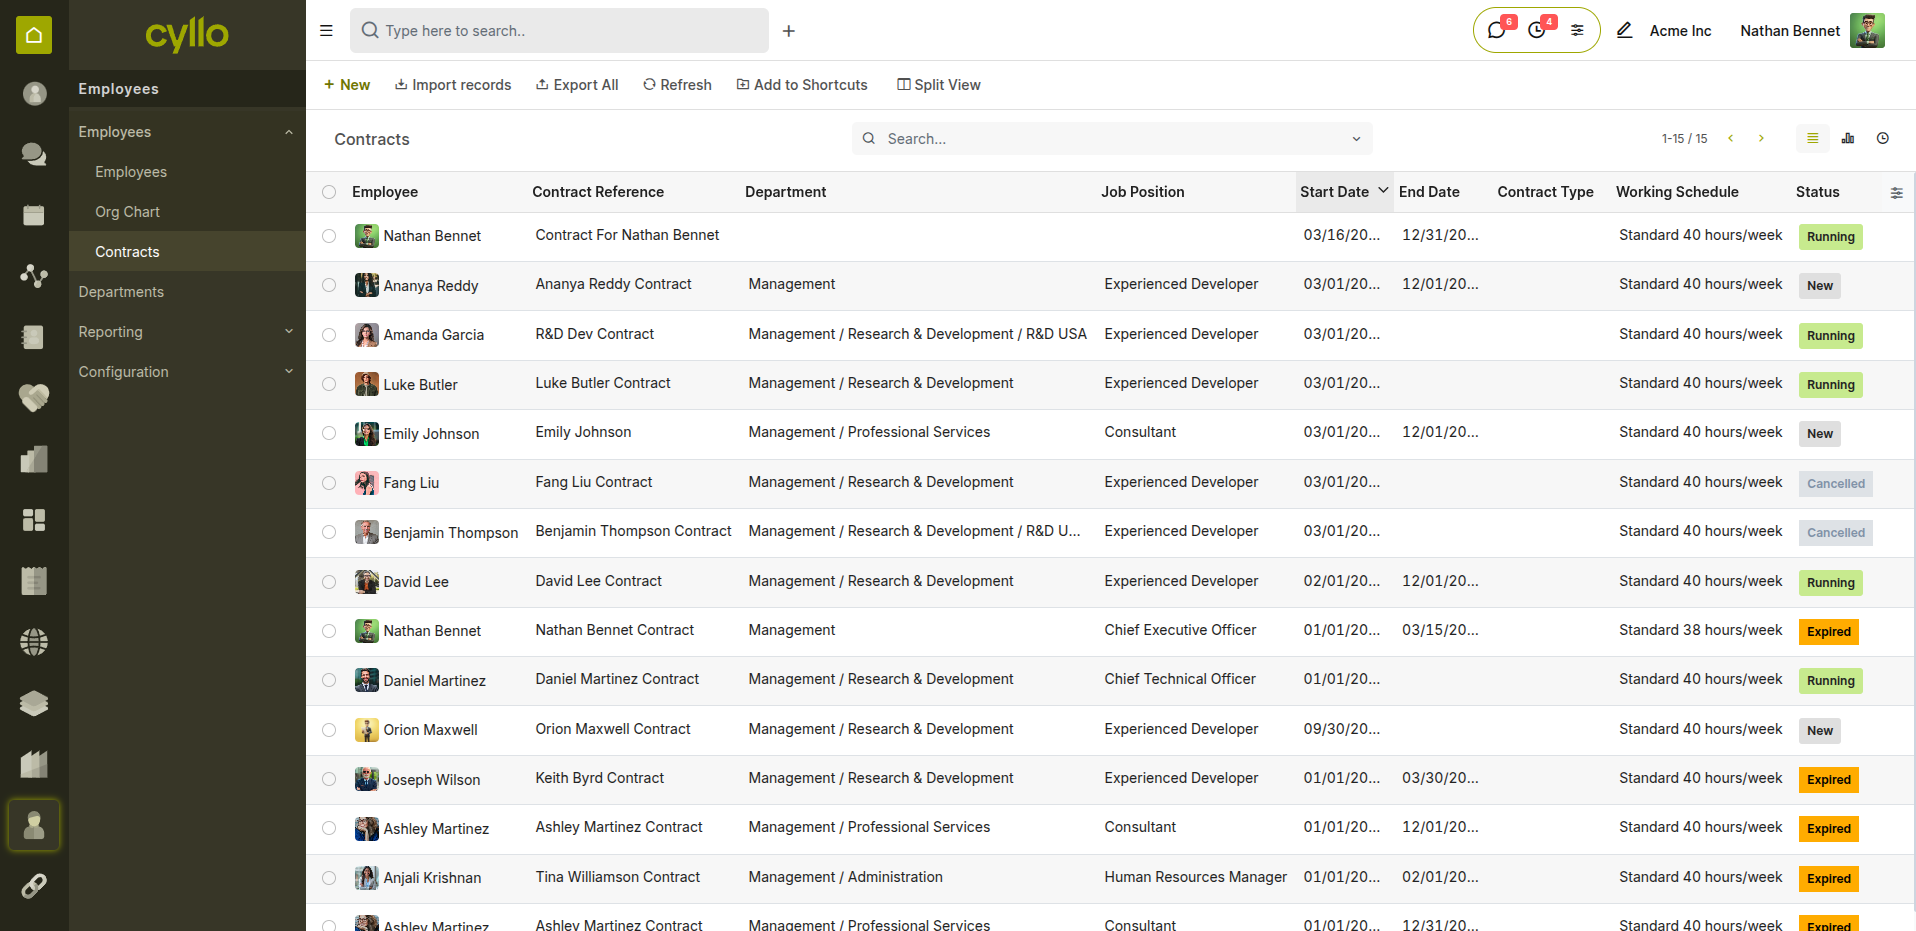
Fig 4.1 — Contract list view showing status, wage, and contract type per employee
How to Create a Contract:
- Open the employee record
- Click the Contracts smart button at the top
- Click New
- Enter the Contract Reference
- Set the Start Date and optionally an End Date
- Select the Contract Type: Limited or Open
- Set the Wage (monthly or hourly)
- Select the Salary Structure
- Set the status to Running
- Save
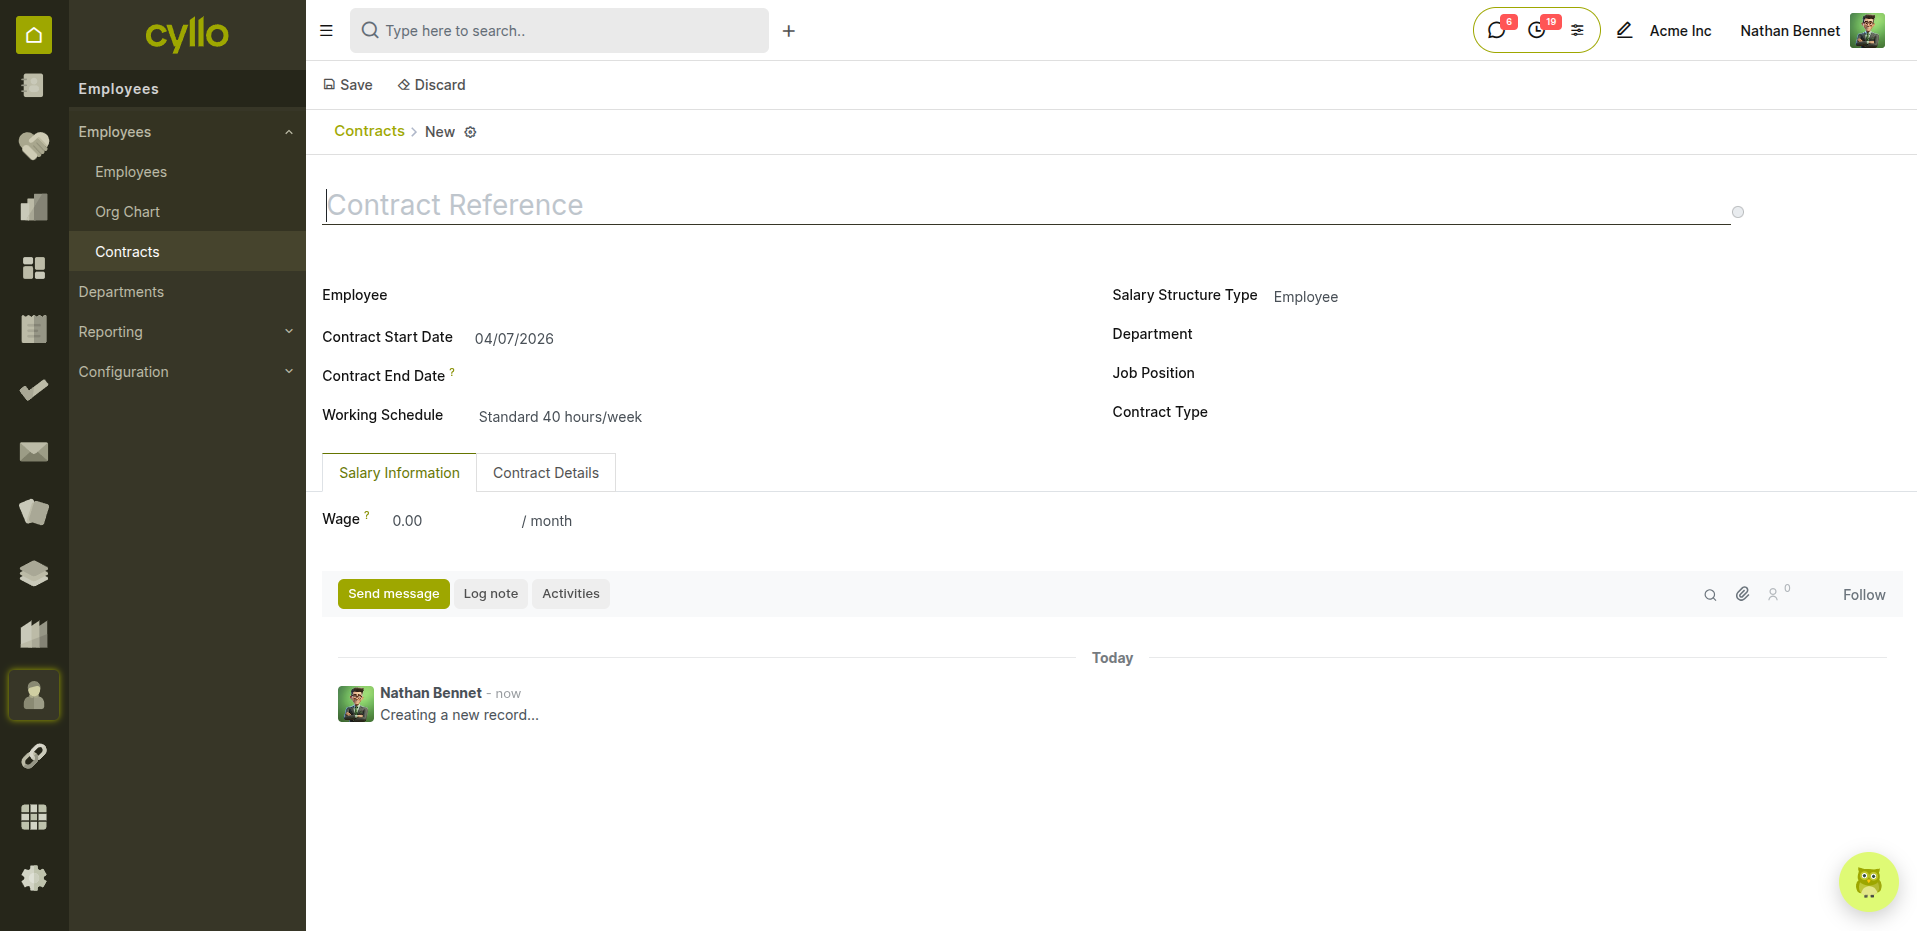
Fig 4.2 — Contract form with wage, salary structure, and schedule configuration
Key Fields
- Contract Reference: Unique identifier for the contract.
- Contract Type: Limited (fixed end date) or Open (indefinite employment).
- Start Date: First day covered by this contract. End Date: Leave blank for open contracts.
- Wage: Gross monthly or hourly salary.
- Salary Structure: The payroll computation template applied to this contract.
- Status: New → Running → Expired / Cancelled.
Note
An employee must have a Running contract before payslips can be generated for them. Always confirm the contract status before running the monthly payroll batch.
4.2 Contract Types
Contract Types categorise employment arrangements and directly affect how gratuity, end-of-service benefits, and payroll are calculated.
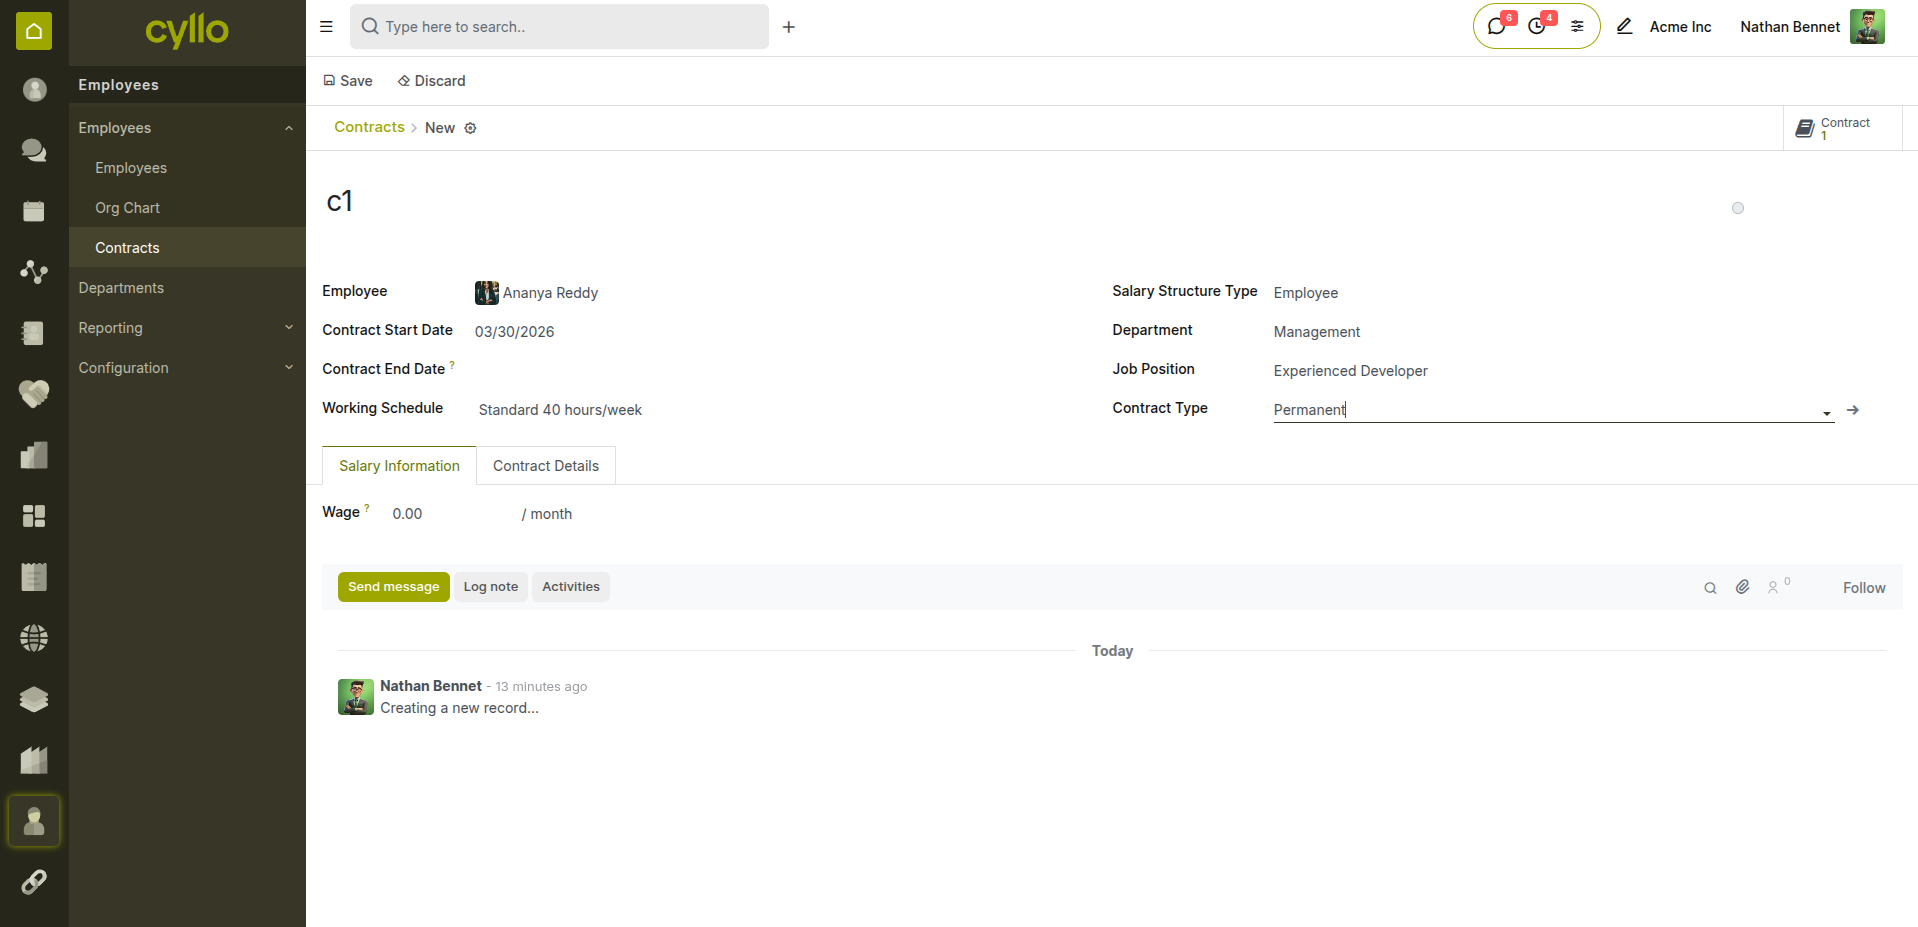
Fig 4.3 — Contract type selection on the contract form
5. Employee Self-Service
5.1 Employee Portal Access
The Employee Portal gives staff a self-service area to view and manage their own HR information — reducing the volume of routine requests sent to the HR team.
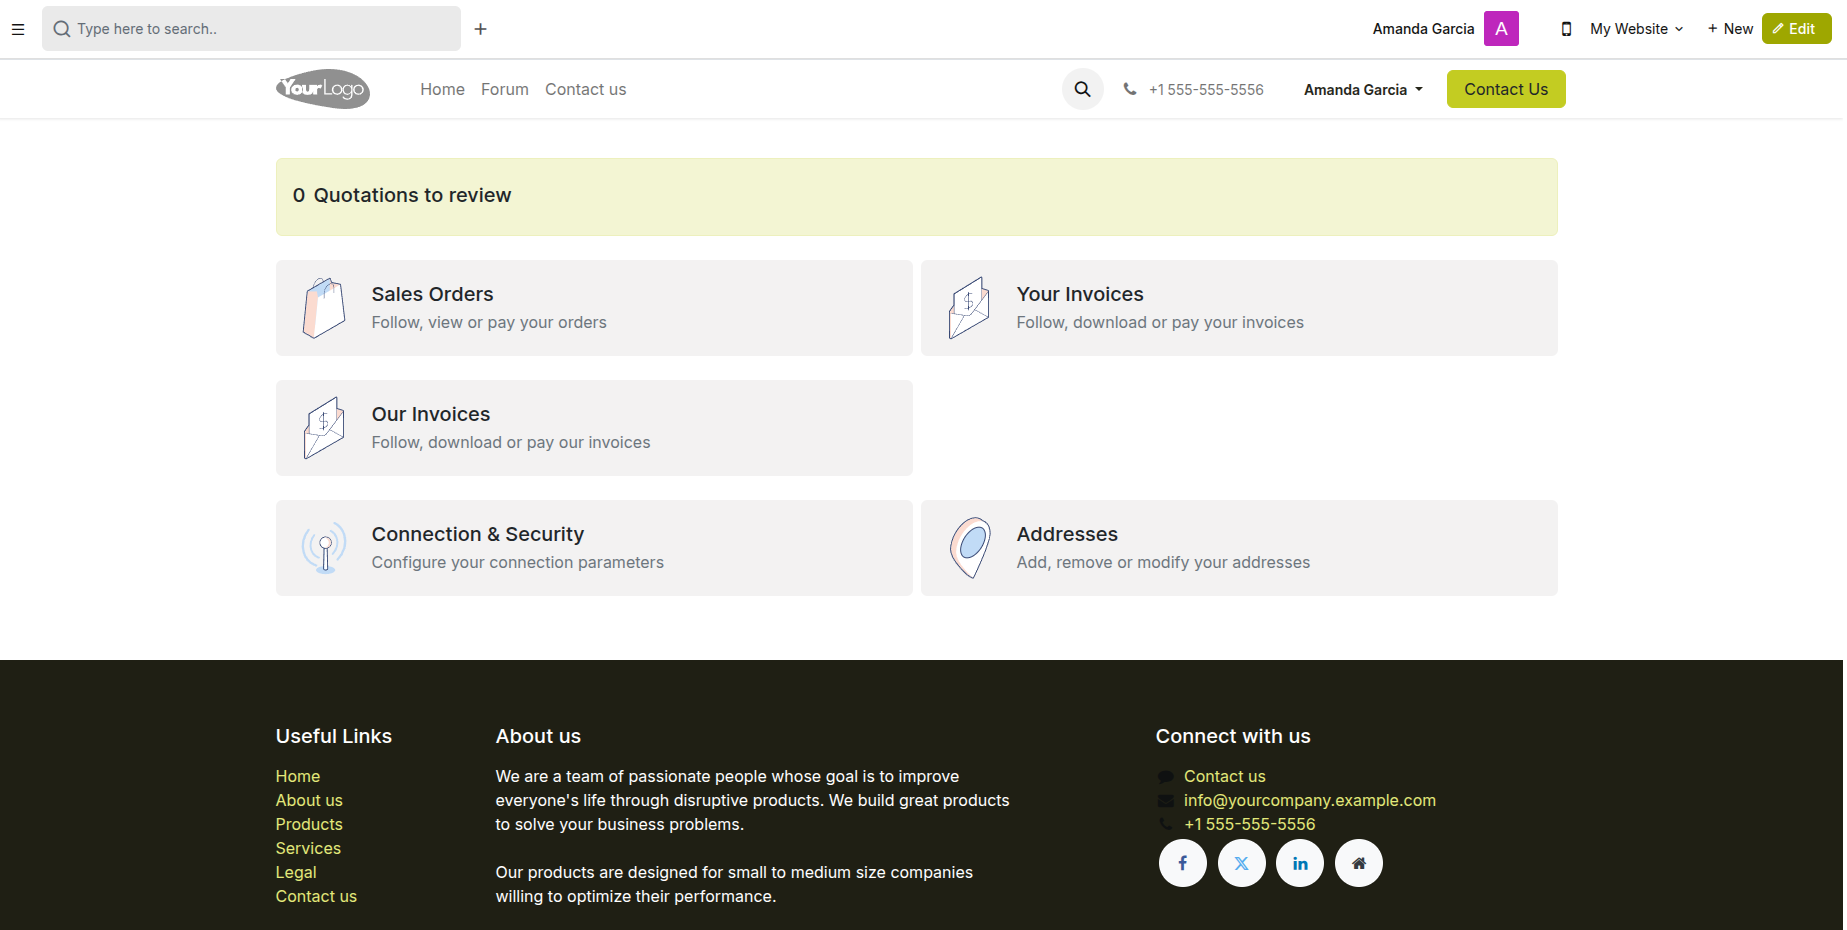
Fig 5.1 — Employee self-service portal showing personal data, payslips, and leave balance
How to Grant Portal Access:
- Open the employee record
- Go to the HR Settings tab
- Set the Related User field — link to an existing system user or create a new one
- The employee receives login credentials by email
- They can now access their portal from the Cyllo login page
What Employees Can Access:
- Personal information and documents
- Payslips and salary history
- Leave balances and requests
- Attendance records
- Expense submissions
- Contract details
Note
Employees can only view their own records on the portal. They cannot see other employees' data. HR managers retain full access to all records.
6. Archiving & Offboarding
6.1 Archiving an Employee
When an employee leaves the organisation, their record is archived rather than deleted — preserving payroll history, contract records, and audit trails.
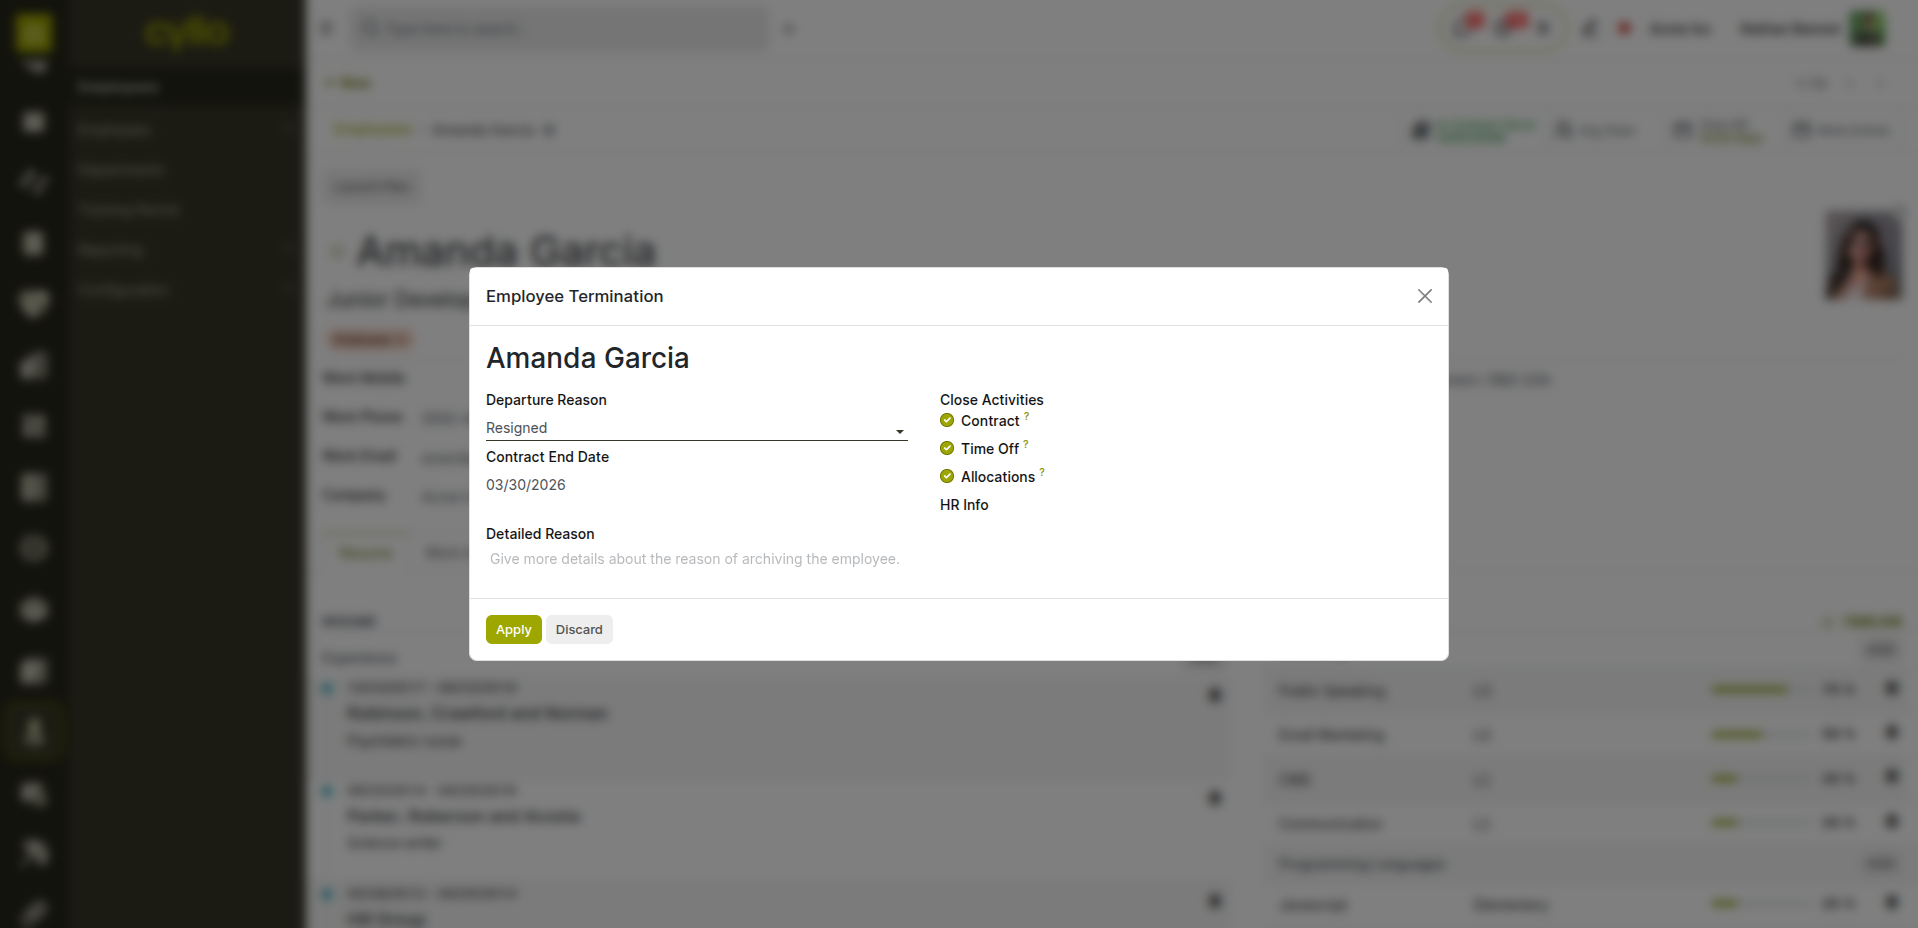
Fig 6.1 — Archive confirmation prompt on the employee record
How to Archive an Employee:
- Open the employee record
- Click the Action menu (⚙ gear icon) at the top
- Select Archive
- Confirm the action
- The employee is removed from active lists but all their historical data is preserved
- Run any final payslips and close their attendance records before archiving
Key Fields.
- Archive Date: The date the employee record was archived.
- Reason: Add a note in the chatter explaining the reason for archiving.
- Final Payslip: Ensure the last payslip is confirmed and paid before archiving.
- Resignation: Link the Resignation record before archiving for full audit trail.
Note
Archived employees do not appear in active lists, attendance, or payroll runs. To view archived records, use the Filters → Archived option in the employee list view.
7. Reporting & Analytics
7.1 Employee Analysis
The Employee Analysis report gives a consolidated view of your workforce — headcount, distribution by department, contract type, and employment status.
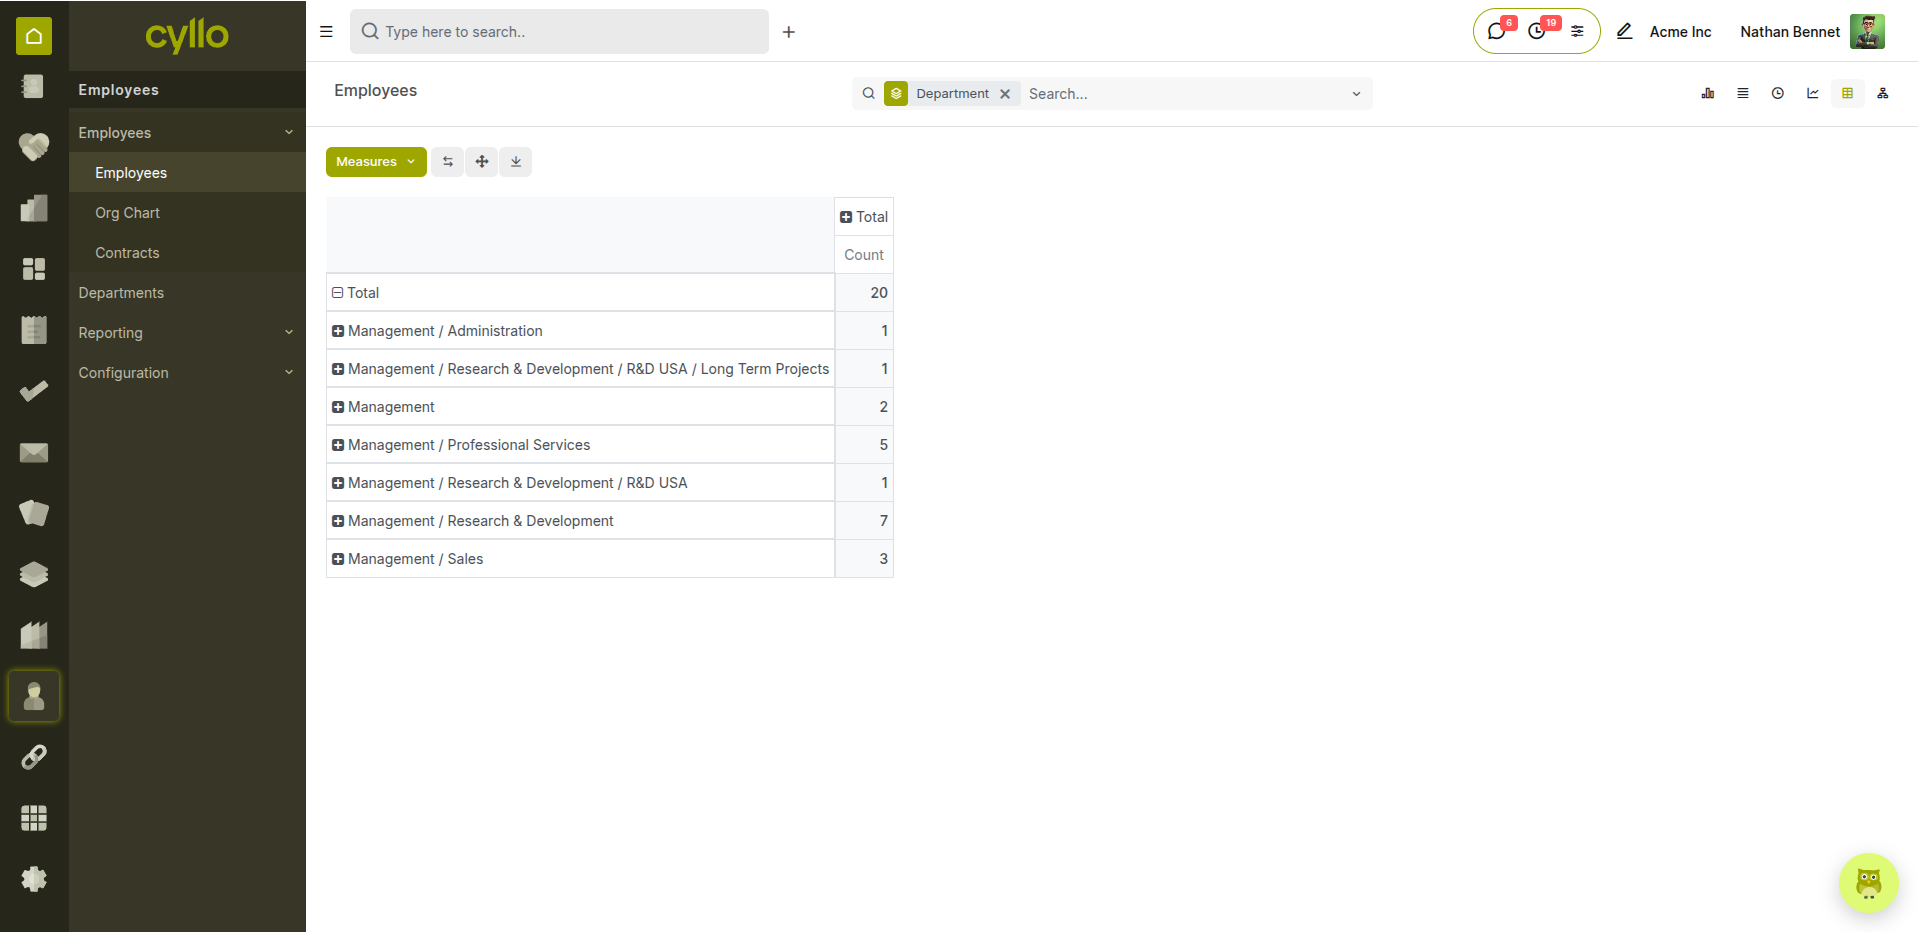
Fig 7.1 — Employee analysis pivot grouped by department and contract type
How to Access the Employee Analysis Report:
- Go to Employees → Pivot View
- Use Group By to segment by: Department, Job Position, Contract Type, Manager, Work Location
- Switch between Pivot, Graph (bar, line, pie), and List views
- Apply Filters: Active, Archived, Date of Joining, Department
- Export as XLSX or PDF
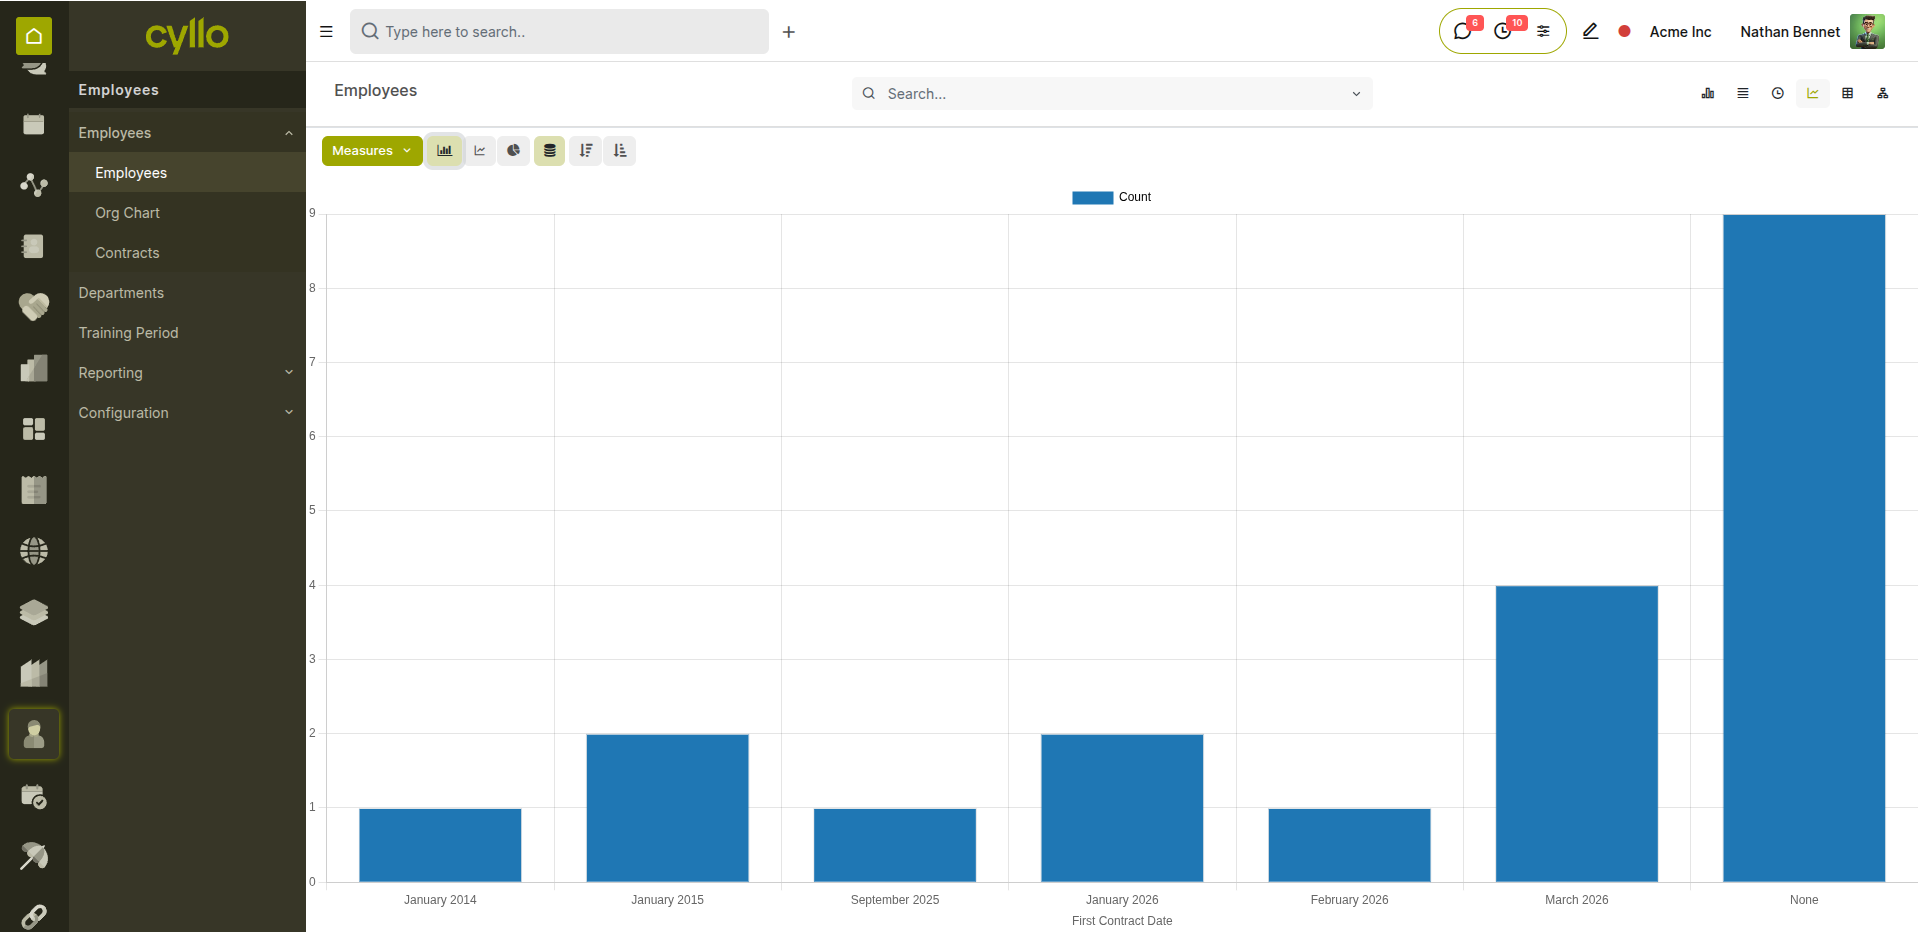
Fig 7.2 — Employee headcount bar chart by department
7.2 Headcount Reports
Headcount reports show the total number of active employees across the organisation — broken down by department, location, or contract type — for workforce planning and management review.
How to View Headcount:
- Go to Employees → Reporting → Employees Analysis
- Group By Department or Work Location
- Switch to the Graph view for a visual headcount breakdown
- Filter by a specific date to see headcount at a point in time
- Export for monthly management reporting
7.3 Contract Expiry Reports
Contract Expiry reports identify employees whose fixed-term contracts are approaching their end date — allowing HR to act before contracts lapse without renewal or offboarding.
How to Track Contract Expiries:
- Go to Employees → Employees → Contracts
- Apply the filter: End Date → is in the next 30 / 60 / 90 days
- Review the list of expiring contracts
- Contact the relevant manager to decide: renew, convert to open, or begin offboarding
- Update the contract status accordingly
Note
Set up an automated Workflow Automation in Cyllo to notify the HR manager by email when a contract end date is within 30 days — eliminating the need for manual checks.