

Cyllo Help Desk Documentation
Introduction
Cyllo Help Desk is a full-featured customer-support module. It lets your team receive, track, prioritise, and resolve support tickets from multiple channels — email, website forms, live chat, and manual entry — all in one place.
This manual is intended for all users of the system: front-line support agents, team managers, and system administrators.
1. Help Desk
Key Capabilities
- Multi-channel ticket creation (manual, email, website, live chat)
- Kanban and list views with colour-coded stage tracking
- Service Level Agreements (SLA) with deadline tracking and pause/resume
- Sub-tickets, parent-child linking, and dependency management
- Duplicate detection and ticket merging
- Customer satisfaction ratings
- PDF and Excel reports
- Customer self-service portal
- Auto-close with configurable reminder email
2. Overview Dashboard
Navigate to Help Desk > Overview to see a card for every active team. Each card displays:
- Team name and description
- Open ticket count
- Unassigned ticket count
- Urgent ticket count
- Failed SLA ticket count
- Overall team success rate (%) Click on any team card to open a filtered list of that team's tickets. Managers can also click the three-dot menu on a card to edit the team's configuration.
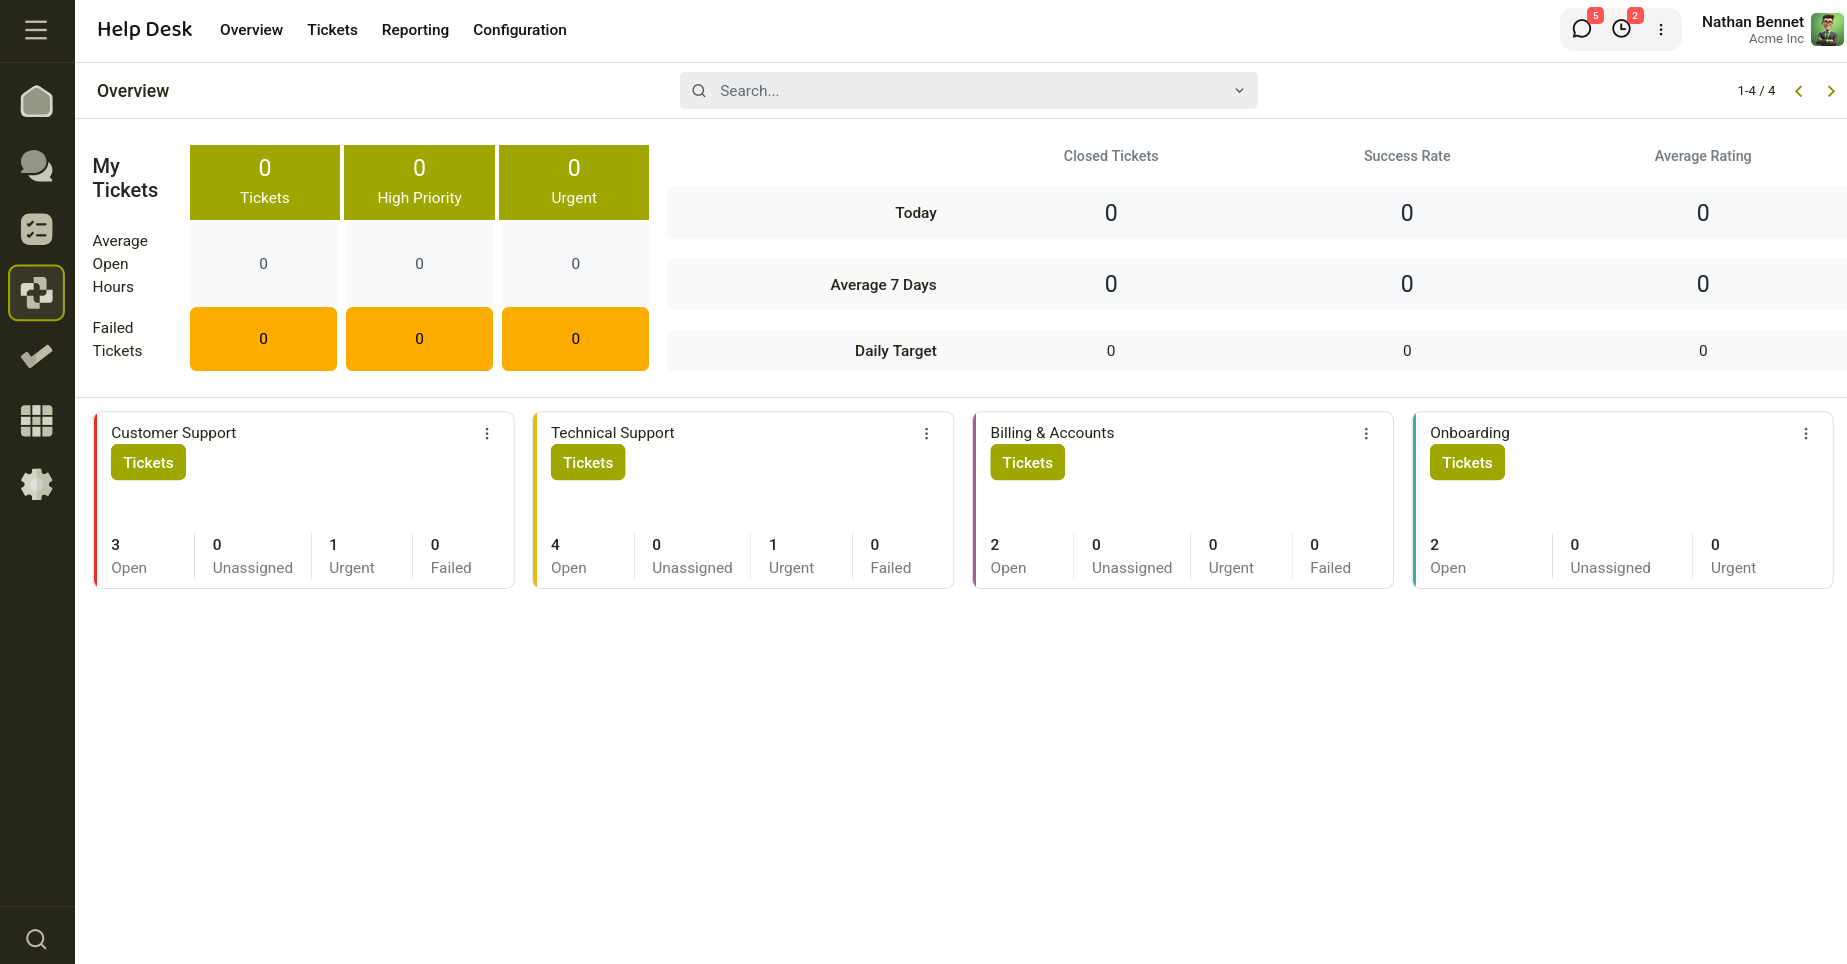
Fig 2.1 — Help Desk Dashboard.
3. Managing Tickets
3.1 Creating a Ticket
You can create a new support ticket in several ways:
- From the menu: Go to Tickets > All Tickets and click New.
- From Kanban view: Open any ticket list in Kanban mode and click the + icon under any stage column, or use the Quick Create card.
- From email: If your team has an email alias configured, inbound emails are automatically converted to tickets.
- From the website: If Website Ticket Creation is enabled on a team, customers can submit tickets via the public web form.
- From live chat: Agents can type ‘/ticket’ in a live-chat window to create a ticket from the conversation.
Ticket Stages
Every ticket moves through a pipeline of stages. The default stages are:
- New - Ticket just created, not yet actioned.
- In Progress - An agent is actively working on the issue.
- On Hold - Waiting for customer reply or third-party action.
- Solved - Issue resolved. This is a closed stage — SLA is evaluated here.
- Canceled - Ticket will not be resolved. Also a closed stage.
Stages are displayed as a status bar at the top of each ticket form. Click any stage name to advance the ticket. Note that tickets cannot be moved back to New once they have advanced past it.
The Solved and Canceled stages are marked as closed. Moving a ticket into a closed stage stops the SLA timer and records the closed date.
3.2 Prioritising Tickets
The Priority field uses four levels: Normal (0), Low (1), High (2), and Very High (3). The ticket list defaults to sorting by priority descending, so the most urgent tickets appear first. Priority stars are also visible on Kanban cards.
3.3 SLA Policy & Deadlines
If your team has SLA enabled, one or more SLA policies can be applied to a ticket. When an SLA policy is active:
- The SLA Deadline field is calculated based on the policy's 'Within (hours)' setting and your team's working hours calendar.
- A red SLA Failed badge appears on the ticket and in the list if the deadline is missed.
- Managers can pause and resume the SLA timer using the Pause SLA / Resume SLA buttons at the top of the ticket form. The total paused duration is recorded.
Note
SLA policies can be scoped by team, category, tag, or customer. See Section 6 for full configuration details.
3.4 Sub-tickets & Dependencies
Complex issues can be broken down into sub-tickets: To create a sub-ticket: Open the parent ticket, scroll to the Sub-tickets tab, and click Add a line. The new ticket inherits the parent link automatically. To set dependencies: In a ticket's Dependencies field, select other tickets that must be resolved first. The system prevents you from closing a ticket while any dependent ticket remains open.
3.5 Merging Duplicate Tickets
When a customer submits the same issue more than once, you can merge the duplicates:
- Go to Tickets > All Tickets.
- Select two or more ticket checkboxes.
- Click Action > Merge Tickets.
- In the wizard, choose the Destination Ticket — the surviving record.
- Click Merge. All messages, attachments, and child tickets are transferred. Source tickets are archived.
The system also highlights potential duplicates automatically. If a new ticket has the same customer as an existing open ticket, a yellow warning banner appears at the top of the form with a View Duplicates link.
3.6 Attachments & Internal Notes
Use the Attachments section on the ticket to upload supporting files such as screenshots, logs, or invoices. Attachments are visible to the assigned agent and, if the ticket is published to the portal, to the customer.
Internal Notes in the ticket form are separate from chatter messages and are visible to helpdesk staff only. Use them to record troubleshooting steps or escalation notes without emailing the customer.
3.7 Canned Responses
Canned responses are pre-written reply templates that speed up repetitive answers. To use one, open the chat composer on a ticket and type : followed by the shortcode keyword. A dropdown list of matching canned responses appears; select one to insert its text. To manage canned responses, go to Configuration > Canned Responses (manager access required).
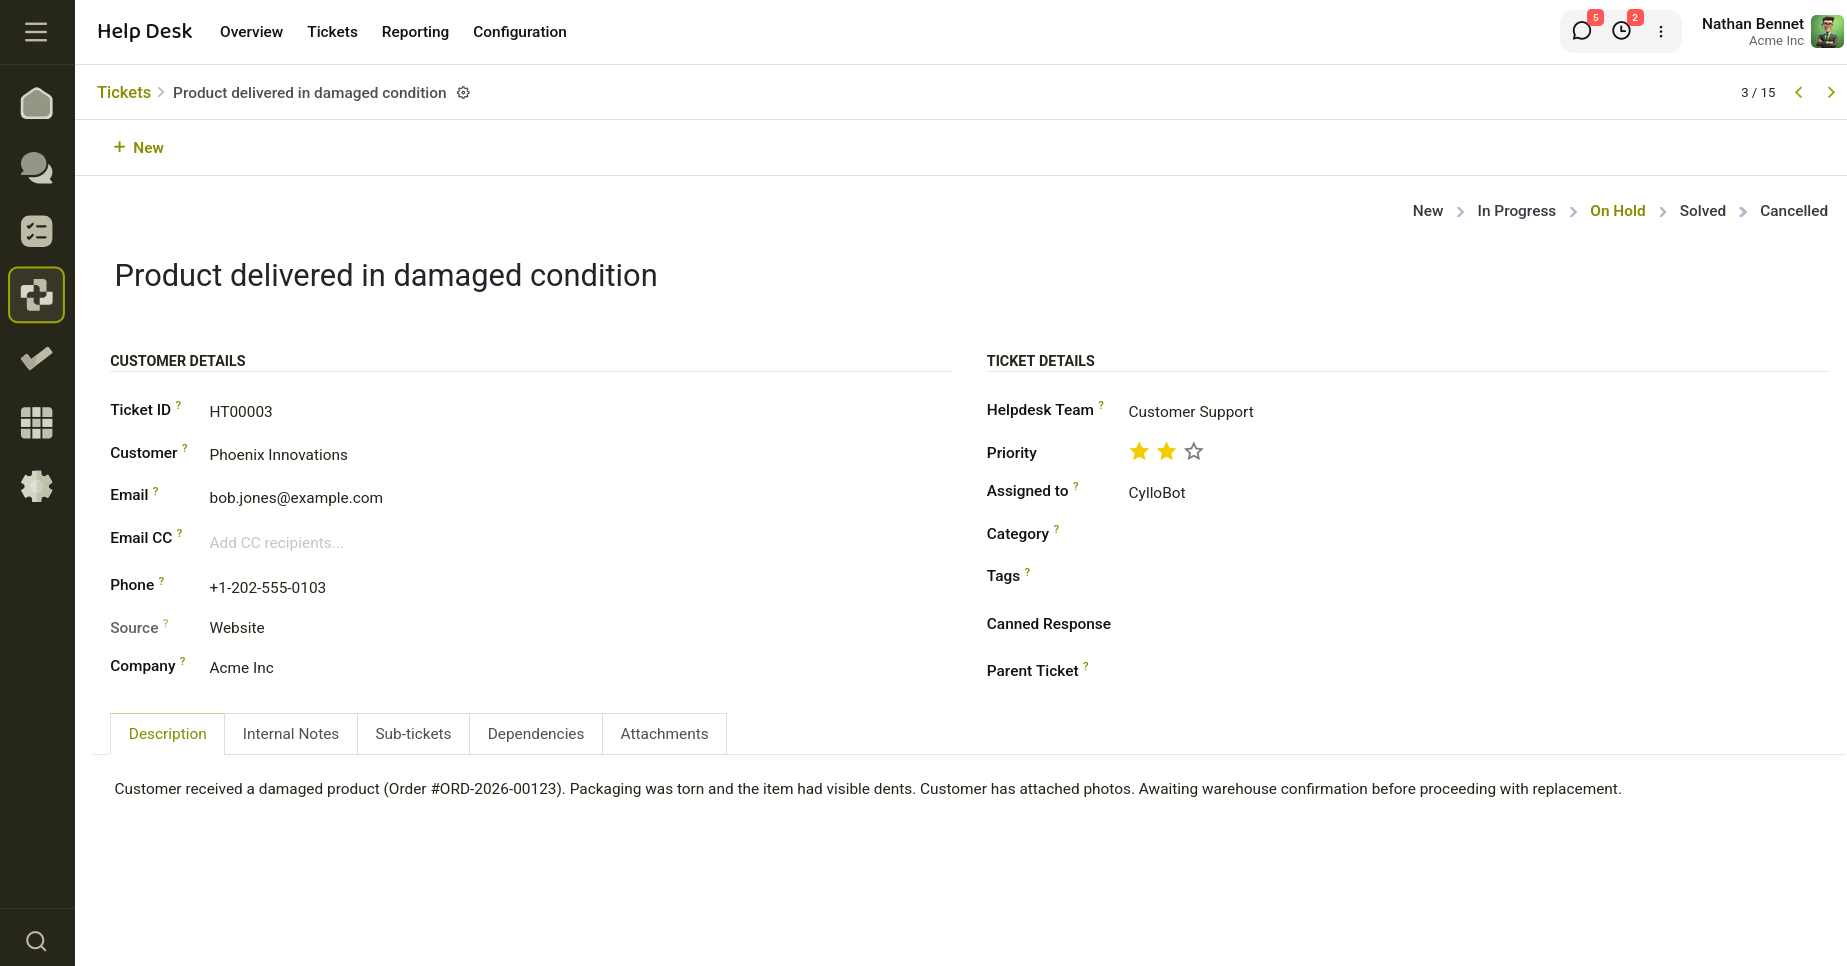
Fig 3.1 — Helpdesk Ticket.
4. Teams & Assignment
4.1 Creating & Configuring a Team
Go to Configuration > Teams and click New. Fill in:
- Name - Unique team name visible throughout the module.
- Members - Users who can be assigned tickets in this team.
- Working Hours - Resource calendar used for SLA time calculations.
- Customer Rating - Enable to send satisfaction surveys after ticket resolution.
- Use SLA - Enable SLA policy tracking for this team.
- Use Timesheets - Log time directly on tickets (requires Timesheet add-on).
- Email Alias - Inbound email address that auto-creates tickets.
- Confirmation Email - Send an automated email when a ticket is created via email.
- Website Ticket Creation - Expose a public web form for ticket submission.
- LiveChat Ticket Creation - Allow /ticket command in live-chat sessions.
- Use Credit Notes - Enable credit-note creation from tickets.
- Use Coupons / Gift Cards - Enable loyalty/voucher workflows.
- Use Returns - Enable return-order workflow from tickets.
- Use Repairs - Enable repair-order workflow from tickets.
- Use Sale Order - Link tickets to sale orders.
- Use CRM - Link tickets to CRM leads/opportunities.
- Use Field Service - Create field-service tasks from tickets.
Note
Enabling add-on features such as Use Repairs or Use Returns will automatically install the corresponding Cyllo module if it is not already installed.
4.2 Assignment Methods
Each team has an Assignment Method that controls how new tickets are assigned:
- Manual - No automatic assignment. The agent or manager selects the assignee.
- Random - A random team member is selected when a ticket is created or the team changes.
- Round Robin - Tickets are assigned to team members in turn, cycling through the list.
- Skill-based - The system assigns the ticket to the member whose skills best match the ticket's requirements.
4.3 Auto-close Settings
- Teams can be configured to close stale tickets automatically:
- Auto-close after (days): Number of days of inactivity before the ticket is closed automatically.
- Auto-close reminder after (days): A reminder email is sent this many days before the auto-close date.
- Auto-close Stage: The stage the ticket moves to when auto-closed (typically Solved or Canceled).
5. SLA Policies
SLA (Service Level Agreement) policies define the maximum time allowed to resolve a ticket. Go to Configuration > SLA Policy and click New.
- Name - Descriptive name, e.g. 'High Priority — 4 Hours'.
- Teams - One or more teams this SLA applies to. Teams must have Use SLA enabled.
- Category - Optional: restrict this SLA to specific ticket categories.
- Tags - Optional: restrict this SLA to tickets with specific tags.
- Customer - Optional: restrict this SLA to specific customers.
- Target Stage - The stage the ticket must reach within the time limit (default: Solved).
- Within (hours) - Maximum working hours allowed to reach the target stage.
- Excluding Stages - Stages that are paused and not counted toward the SLA timer.
Once a policy is saved, it appears as an option in the SLA Policy field on every ticket belonging to a configured team. The SLA Deadline on the ticket is recalculated whenever the policy, the team's working hours, or the creation time changes. When the deadline passes without the ticket reaching the target stage, the ticket is marked SLA Failed and a red ribbon appears on the ticket form.
6. Customer Ratings
If Customer Rating is enabled on a team, a satisfaction survey is sent to the customer when their ticket is closed. Customers can choose from three responses: Satisfied, Okay, or Dissatisfied. To view ratings, go to Reporting > Customer Ratings. The list shows:
- The ticket and team associated with the rating
- The agent who handled the ticket
- The rating value (1 = Dissatisfied, 5 = Okay, 10 = Satisfied)
- The date the rating was submitted The team overview cards and the Daily Targets feature also display an average rating so managers can monitor service quality at a glance.
7. Reporting
7.1 Help Desk Analysis
Navigate to Reporting > Help Desk Analysis to access a pivot-table view of all ticket data. You can group by team, category, stage, assignee, priority, or date to identify trends. Switch to a graph view for bar or pie charts.
7.2 Help Desk Report Wizard
Navigate to Reporting > Help Desk Report and click New to open the report wizard. Set:
- Start Date and End Date — the date range to include.
- Category — optionally filter to specific categories.
- Customer — optionally filter to specific customers. Then click:
- Print PDF to generate a printable PDF report.
- Export Excel to download an XLSX file of the filtered ticket data.
7.3 Daily Targets
Managers can set daily performance targets for individual agents, including a target ticket count, success rate (%), and average customer rating. The system automatically calculates the achieved values at the end of each day based on tickets closed by that agent. Daily targets appear under Reporting when the menu item is enabled.
8. Help Desk - CRM
The Cyllo Helpdesk CRM connects your Helpdesk and CRM applications. Support agents can convert a customer's ticket into a CRM lead in a single click, keeping the sales team informed without switching applications.
8.1 Features
- Create CRM Lead button to every eligible helpdesk ticket.
- Pre-fills the new CRM lead with the ticket's customer name and title, so agents save time.
- CRM Leads smart button (counter badge) on each ticket once leads exist.
- Lets you open, review, and create additional leads directly from the ticket screen.
- Records a chatter note on the ticket each time a lead is initiated,
Key Concepts
- Helpdesk Ticket - A support request raised by a customer, managed in the Helpdesk module.
- CRM Lead - A sales opportunity tracked in the CRM pipeline; can evolve into a customer order.
- Create CRM Lead - Button in the ticket header that opens the CRM lead form pre-filled with ticket data.
- CRM Leads (badge) - Smart button showing the number of leads already linked to this ticket.
- Use_crm - A flag on the helpdesk team that enables CRM integration. Must be ON for the buttons to appear. Configured by your administrator.
Prerequisites
- You must be on the ticket form view (not list view).
- Customer filled in.
- The helpdesk team for this ticket must have CRM integration enabled.
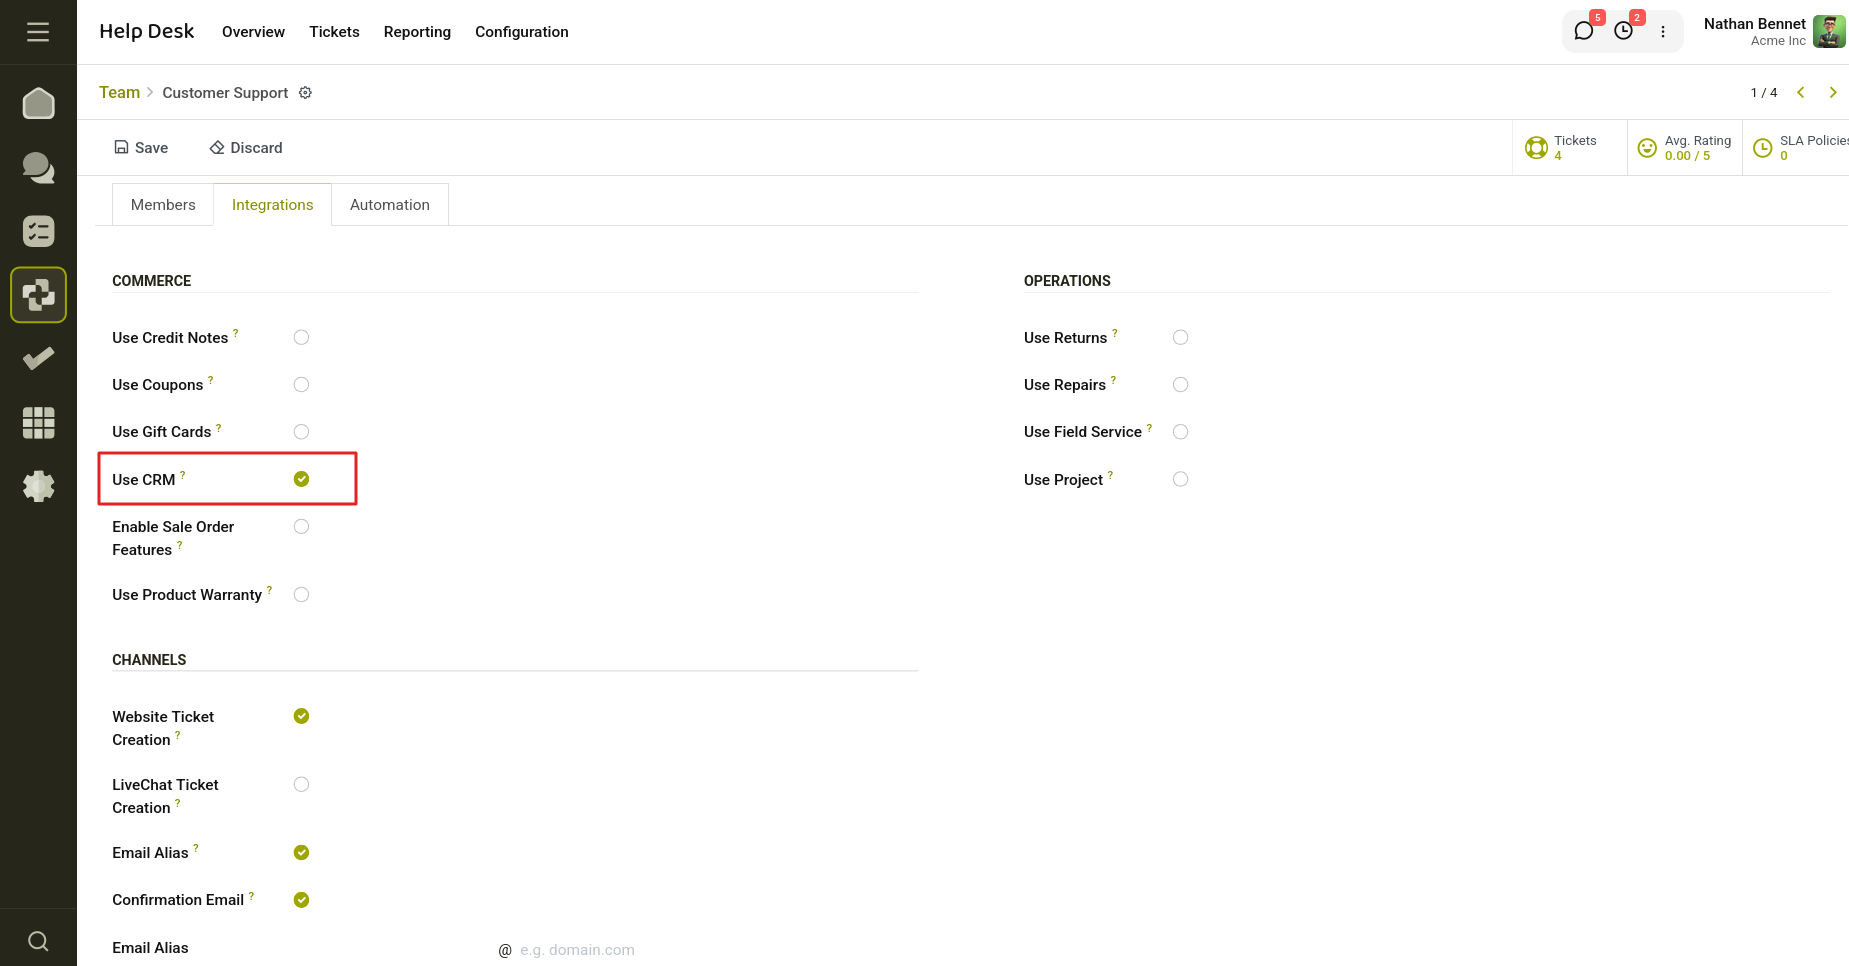
Fig 8.1 — CRM enabled ticket.
8.2 Creating a CRM Lead from a Ticket
- Open the ticket: Navigate to Helpdesk and open the ticket you want to convert into a lead.
- Check the customer field: Confirm that the Customer field (top of the form) is filled. If blank, set it now — the button will not appear without it.
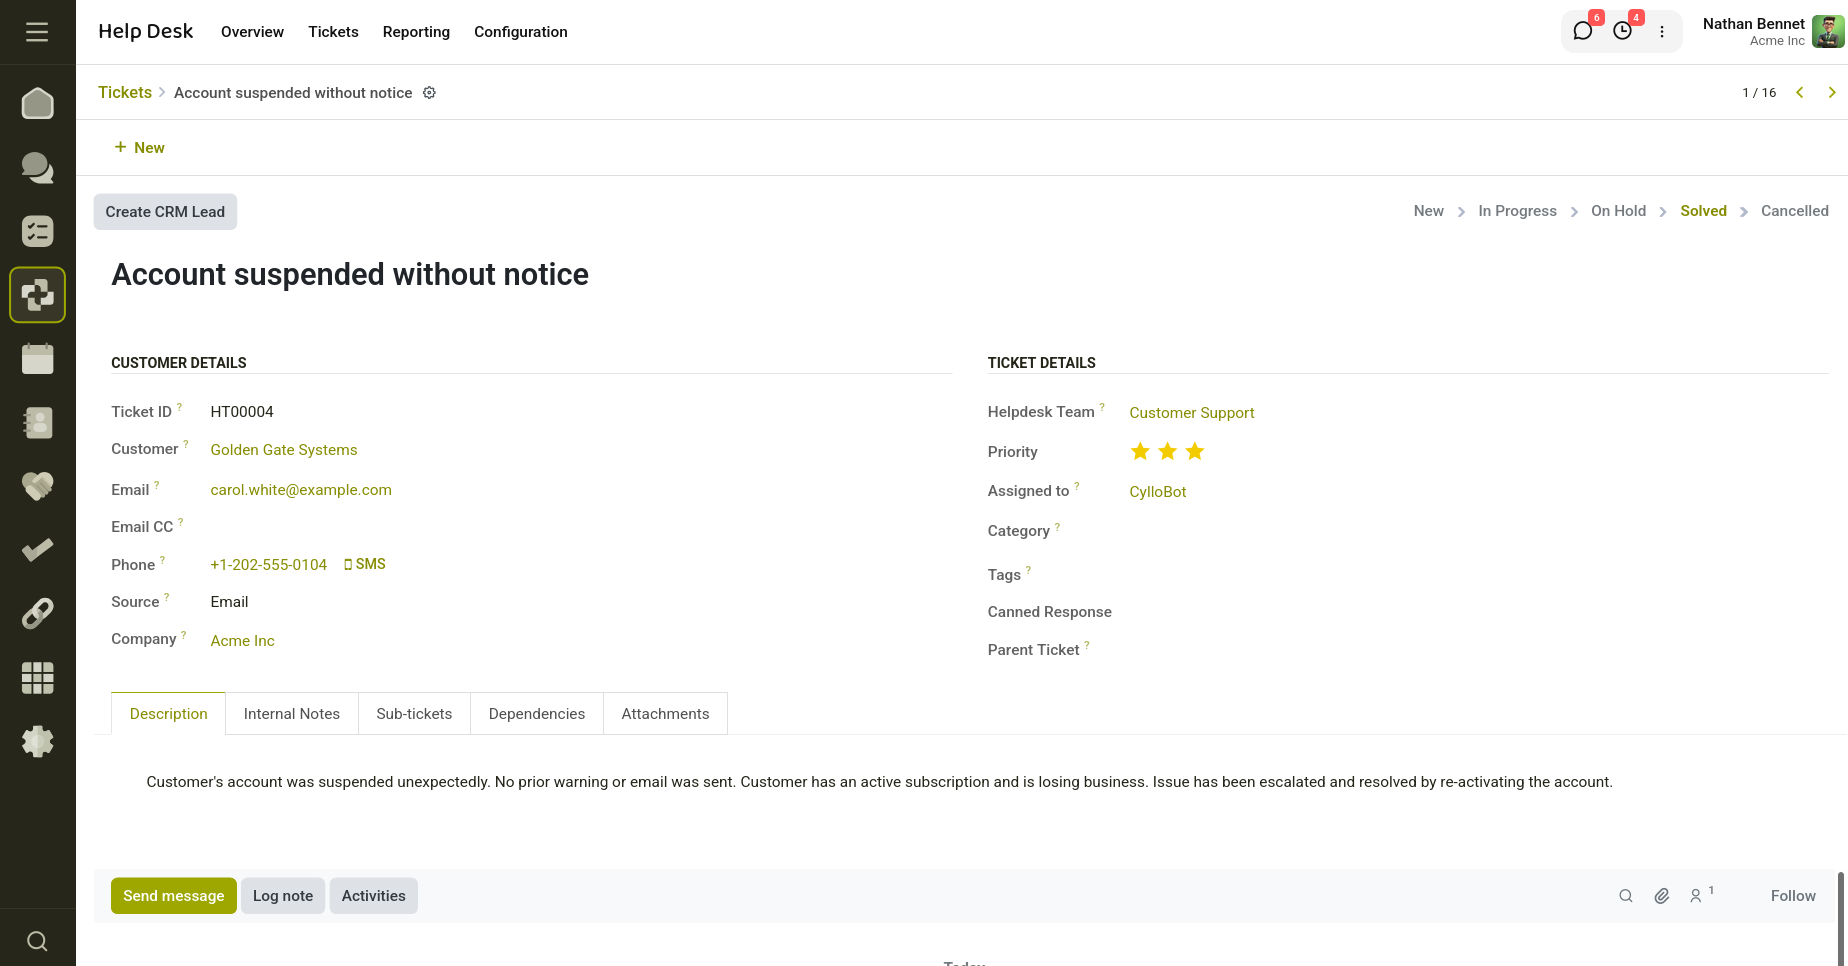
Fig 8.2 — Create Helpdesk Ticket.
- Click 'Create CRM Lead': The button appears in the ticket header, before the stage selector. Click it.
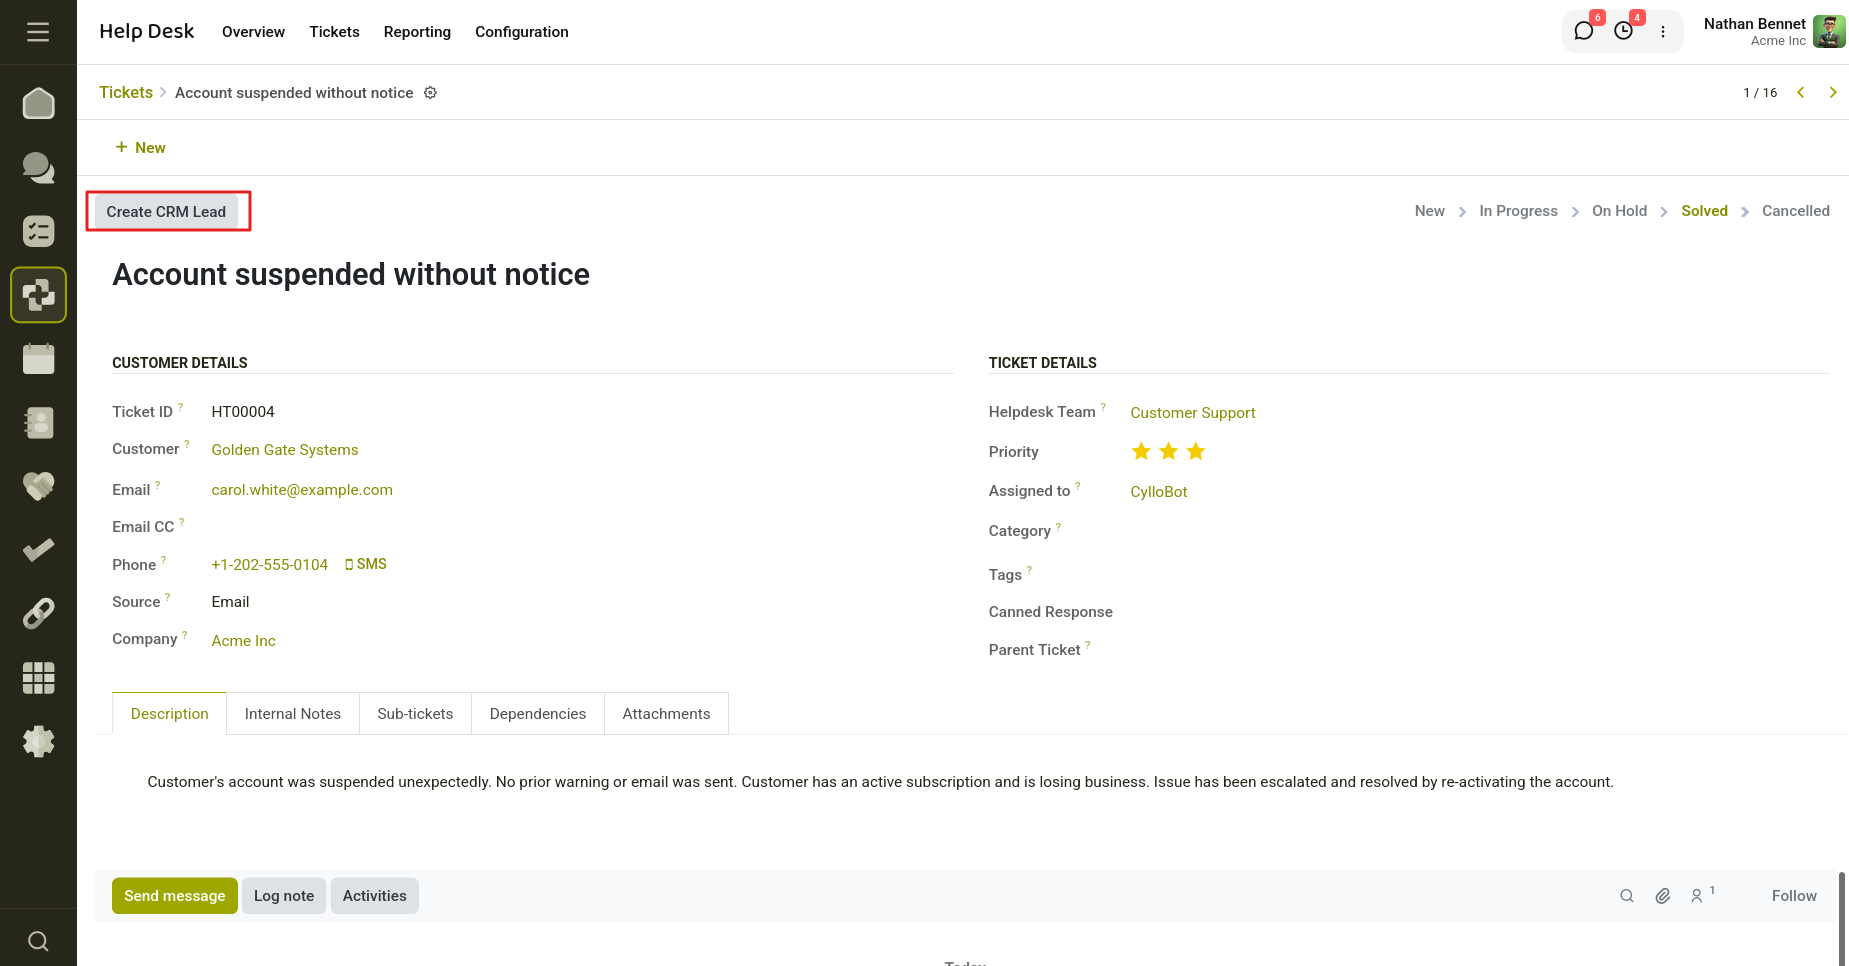
Fig 8.3 — Click Create CRM Lead button.
- Review the pre-filled form: The CRM lead form opens. Name, Customer, and Ticket reference are already set from the ticket data.
- Fill in sales details: Add Expected Revenue, Salesperson, Sales Team, and any notes relevant to the opportunity.
- Save the lead: Click Save. You are returned to the ticket.
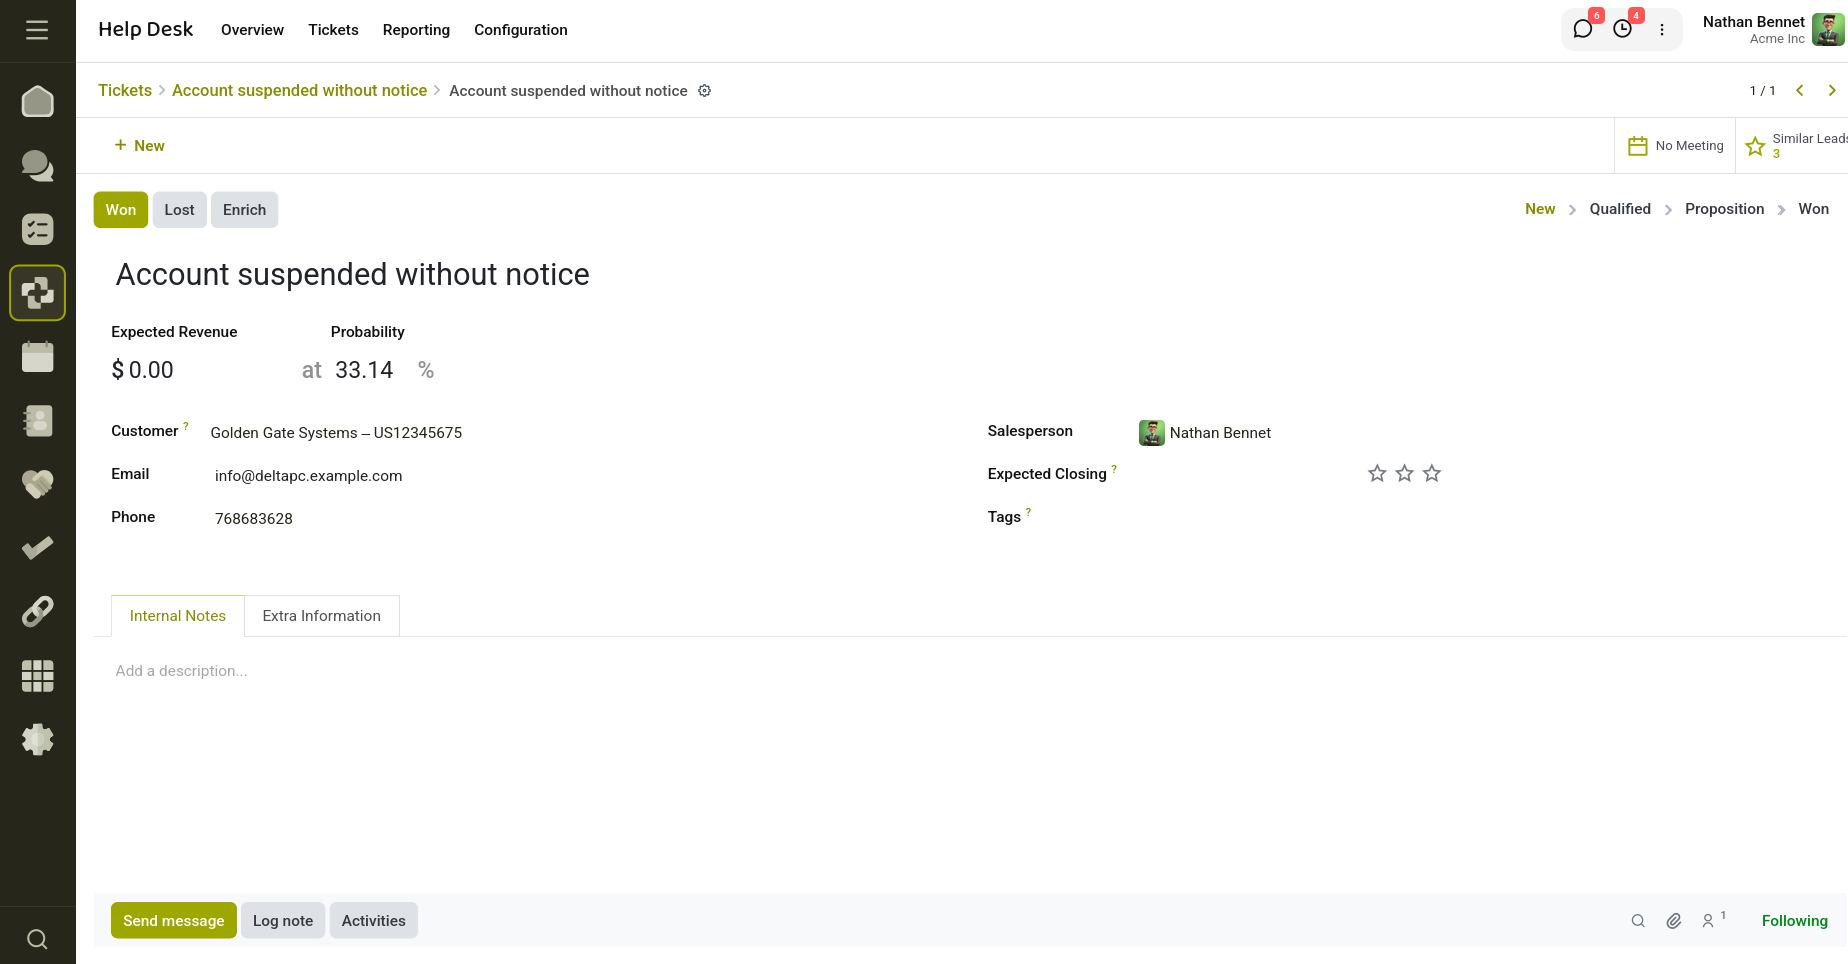
Fig 8.4 — CRM Lead created from Ticket.
- Verify the badge: The CRM Leads smart button now shows '1'. A chatter note 'CRM Lead creation initiated.' is also visible.
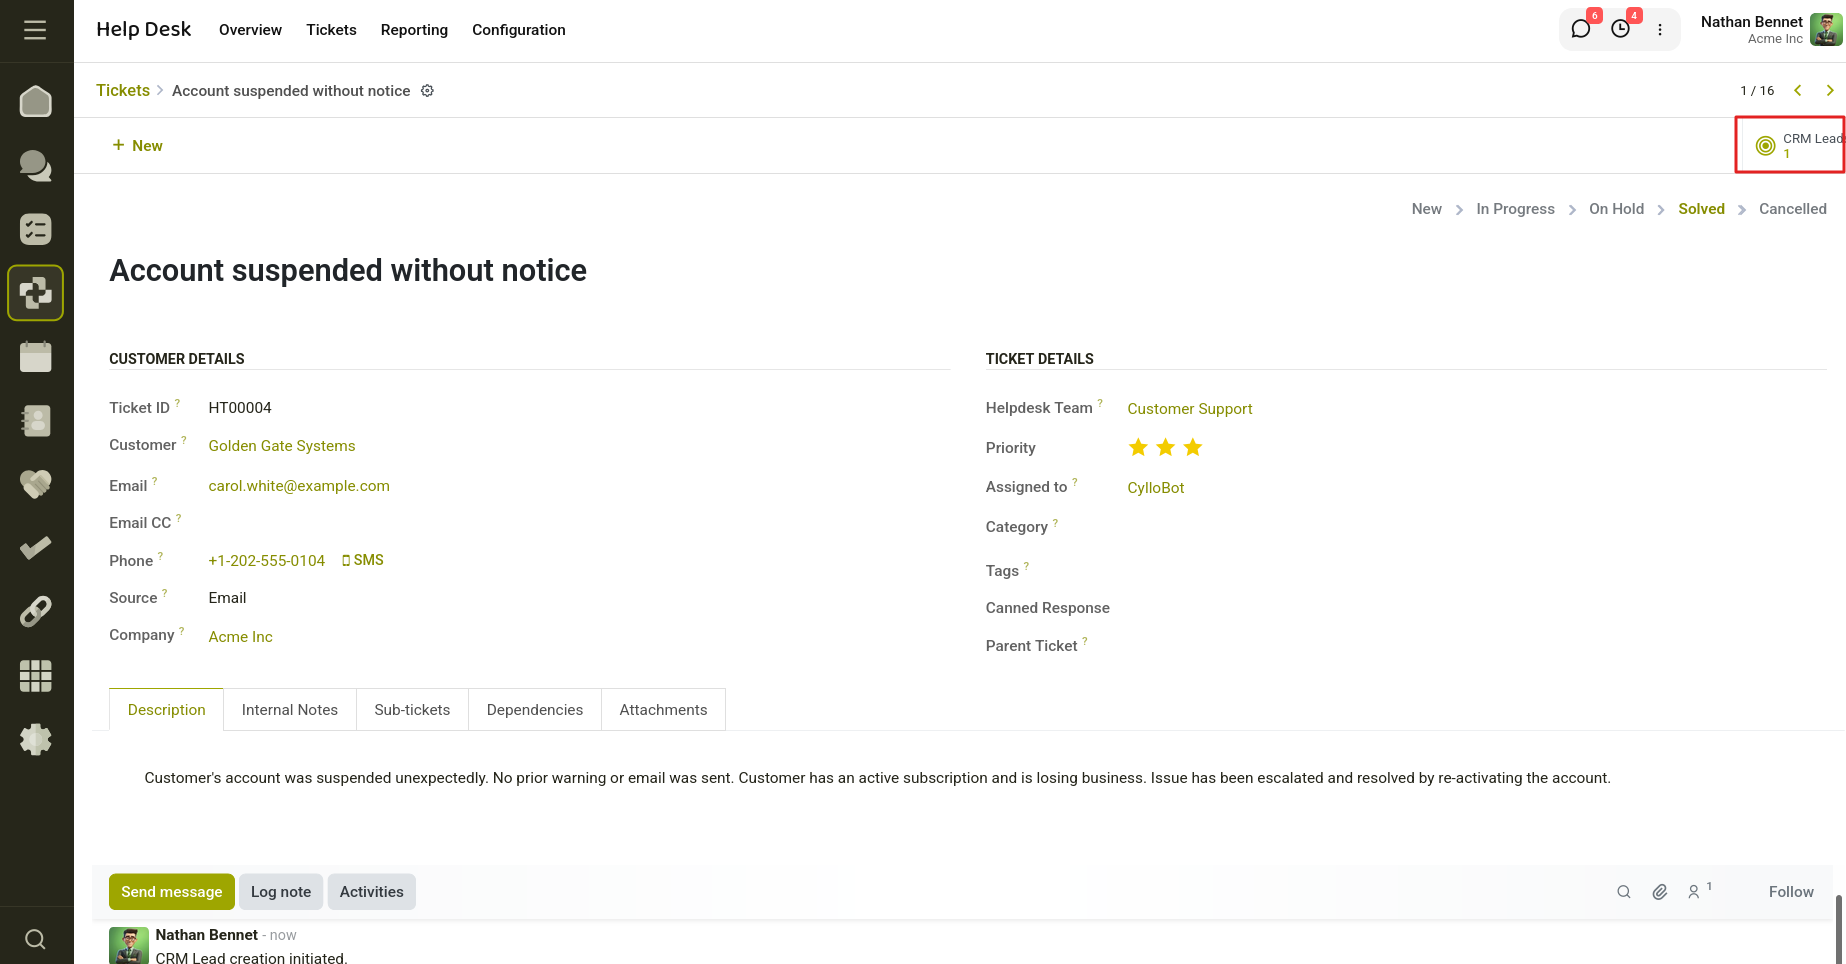
Fig 8.5 — See the leads from the ticket.
9. Help desk - Field Service
Cyllo Helpdesk Field Service is a bridge module that connects the Cyllo Help Desk and Cyllo Field Service applications. It allows support agents to escalate helpdesk tickets into on-site field service requests without leaving the ticket form, keeping both systems in sync and giving managers full visibility of field operations from a single interface.
9.1 Key Benefits
- Eliminate duplicate data entry — ticket details flow automatically into the service request.
- Real-time count of linked field service requests visible on every ticket.
- Priority mapping — helpdesk urgency levels are translated to the field service priority scale automatically.
- Sale-order context is preserved when creating field service requests from tickets.
- Chatter integration — a message is logged on the ticket when a field service request is initiated.
9.2 Enabling Field Service on a Helpdesk Team
Before the Create Field Service button appears on tickets, Field Service must be enabled for the relevant Helpdesk team. The use_field_service flag on the team controls this visibility.
- Navigate to Helpdesk > Configuration > Teams.
- Open the team you want to configure.
- Enable the Use Field Service option.
- Save the record.
From this point, all tickets belonging to that team will show the Create Field Service button and the Field Service stat button once a customer is set.
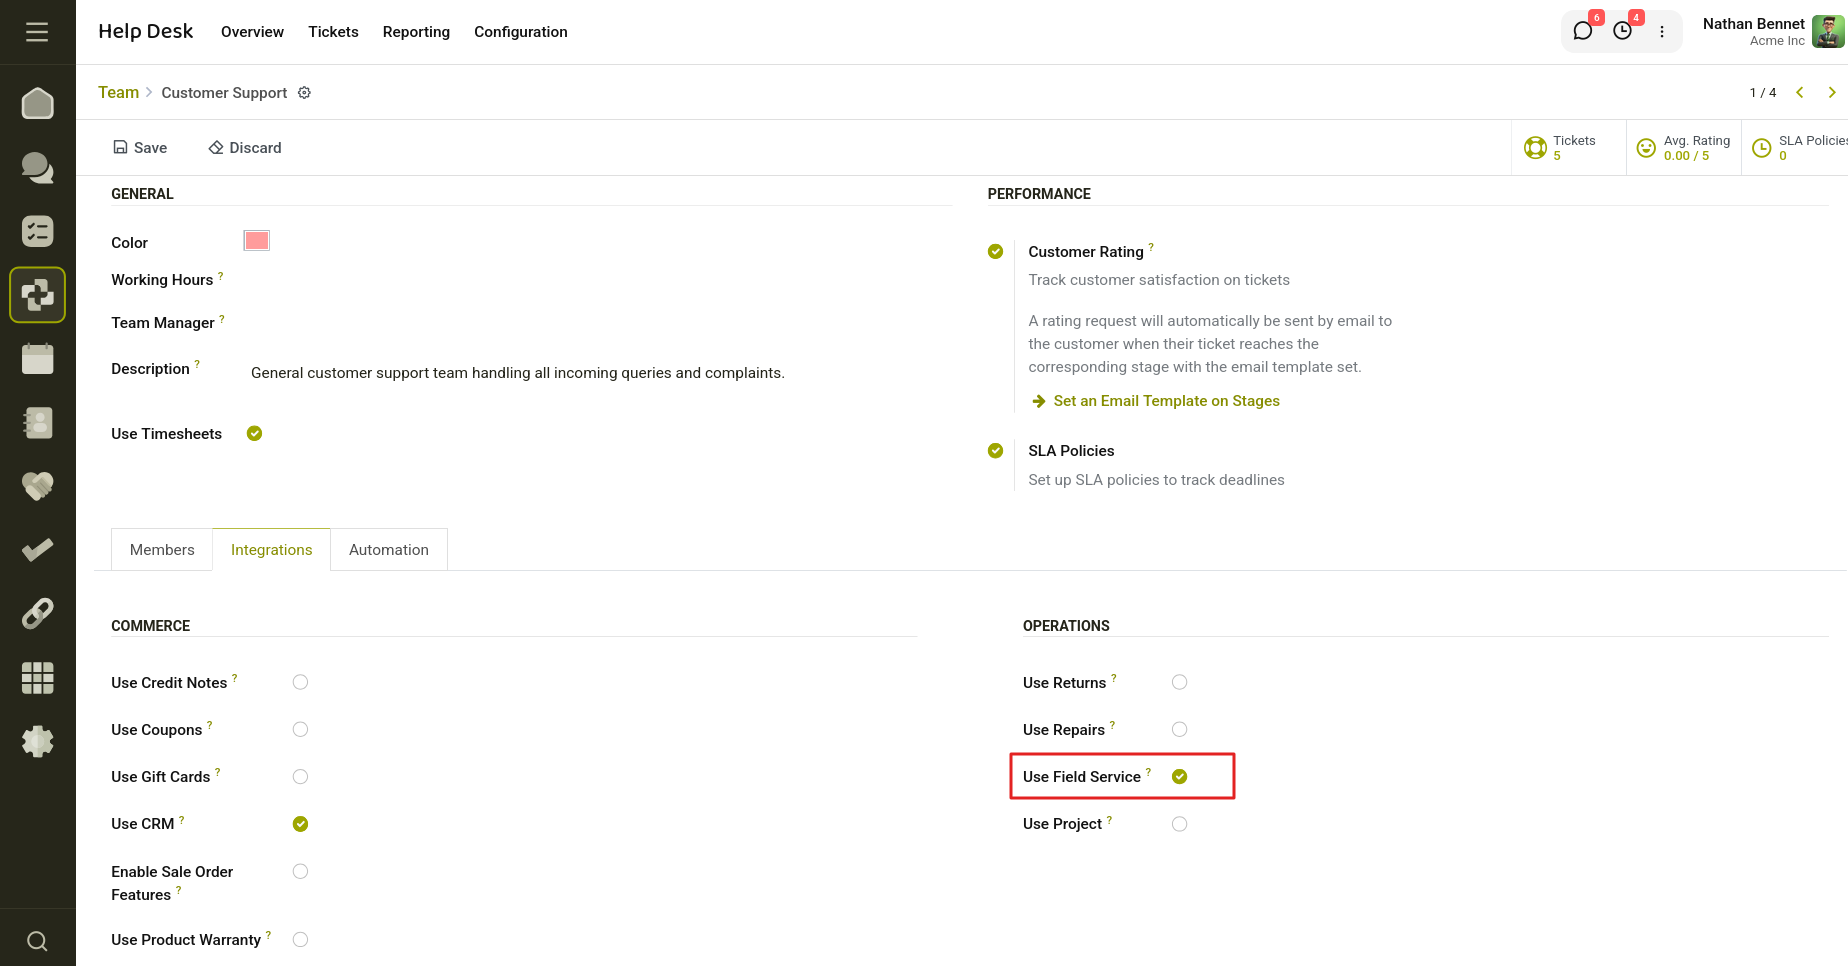
Fig 9.1 — Field service enabled ticket.
9.3 Create a Field Service Request from a Ticket
Step-by-Step Workflow
- Open the Helpdesk ticket you want to escalate.
- Confirm that a Customer is set on the ticket (the button will be invisible otherwise).
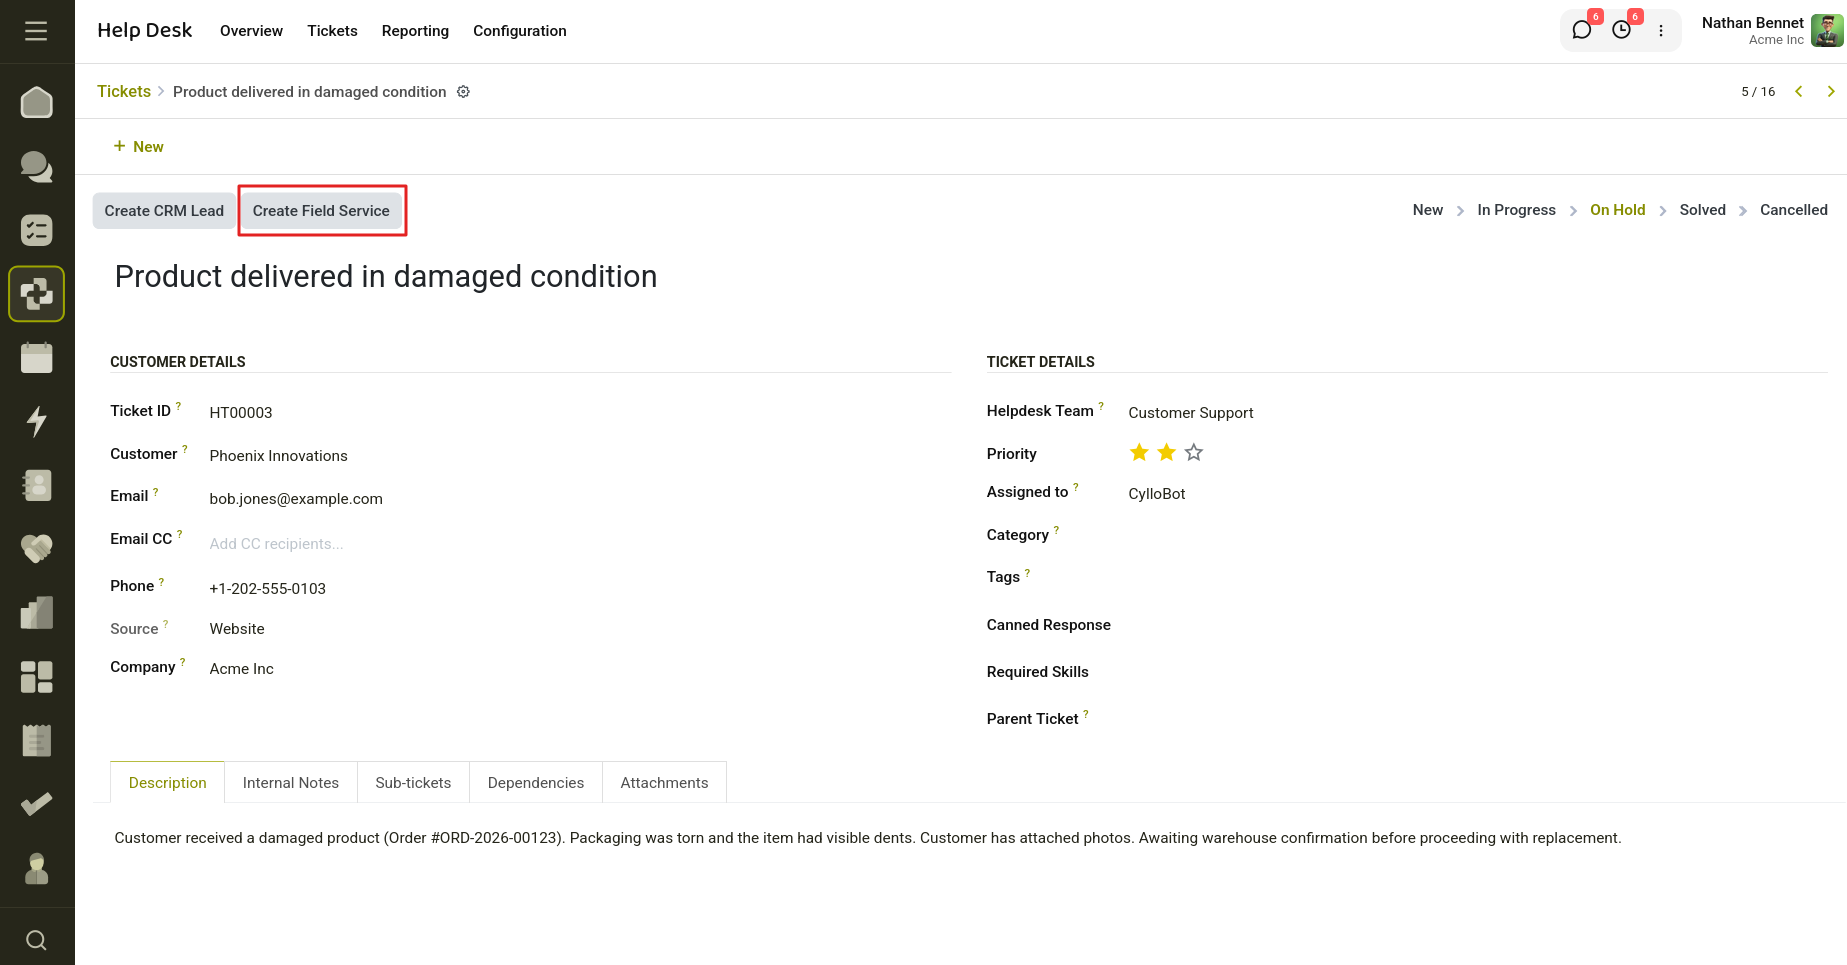
Fig 9.2 — Click on Create Field Service button.
- Click Create Field Service in the header.
- A Field Service Request form opens, pre-populated with the valuesReview and complete any additional fields — Skill Category, Deadline, Workers, and Checklist are not pre-filled and must be added manually.
- Click Save or proceed to Submit the request to start the service workflow.
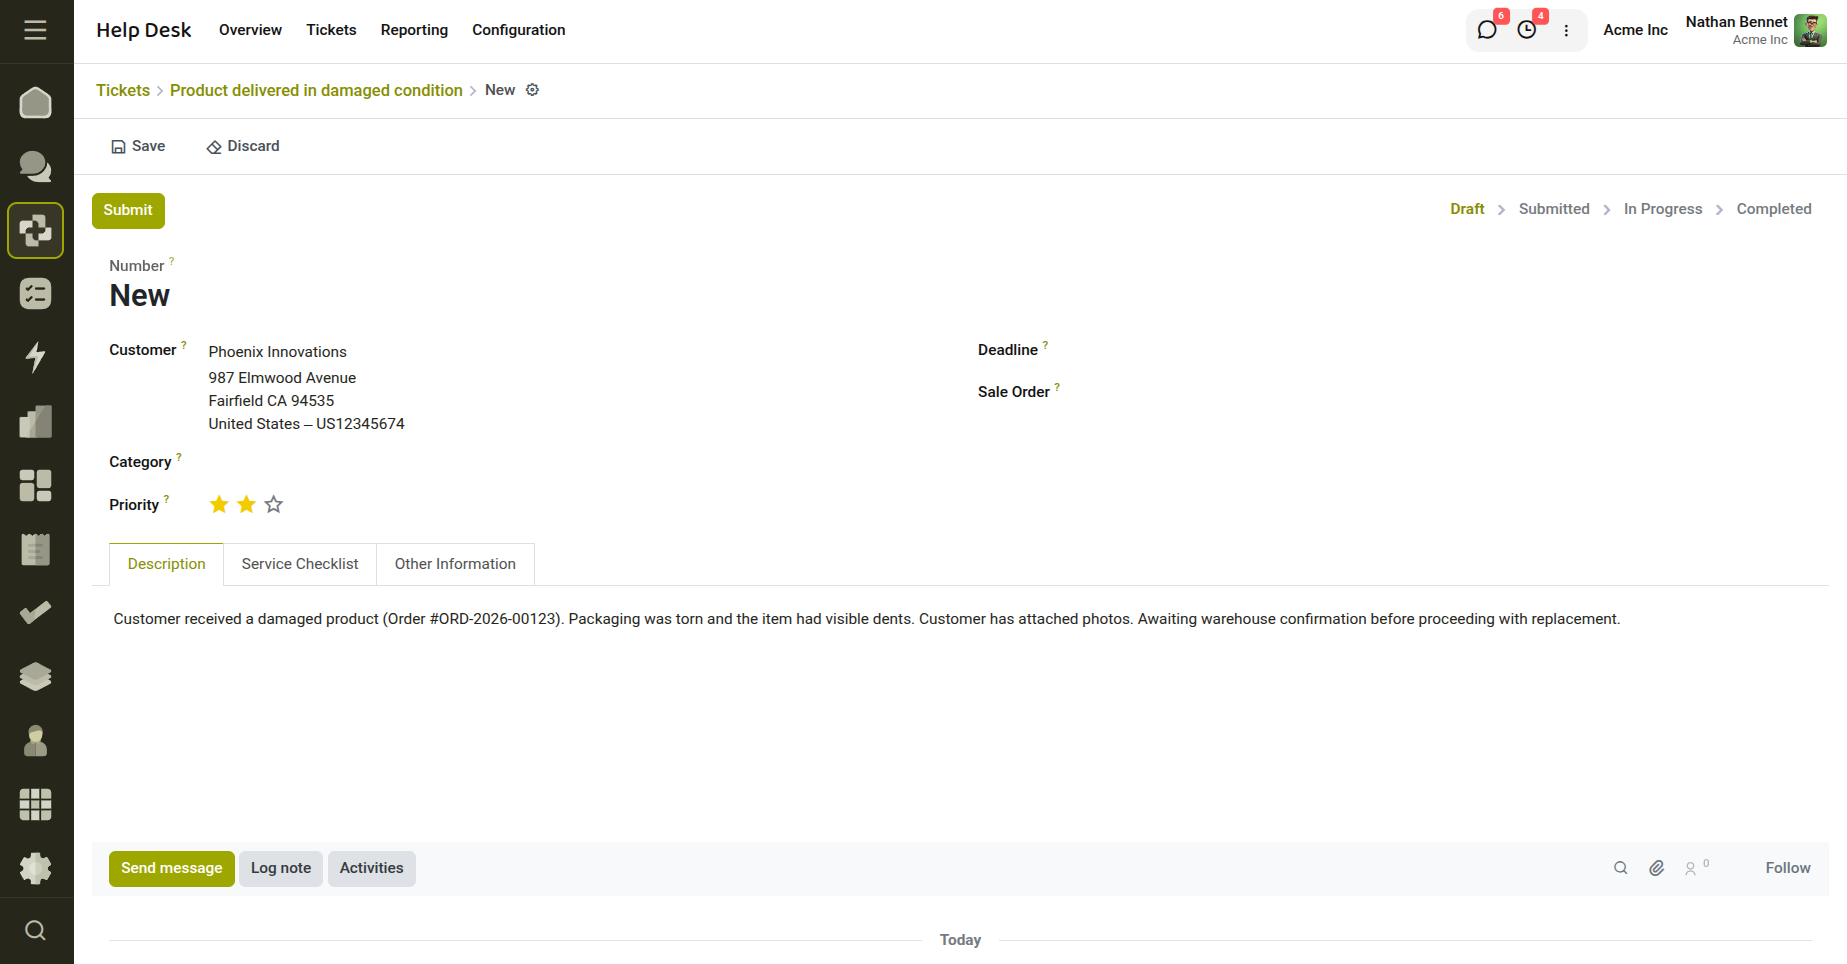
Fig 9.3 — Create the Field Service.
9.4 View Linked Field Service Requests
From the Ticket
Once at least one field service request has been created from (or linked to) a ticket, the Field Service stat button becomes visible in the button box at the top of the ticket form.
- Open the Helpdesk ticket.
- Click the Field Service stat button (showing a count, e.g. "2 Field Service").
- A list view opens showing all requests linked to this ticket.
- Click any row to open the individual Field Service Request form.
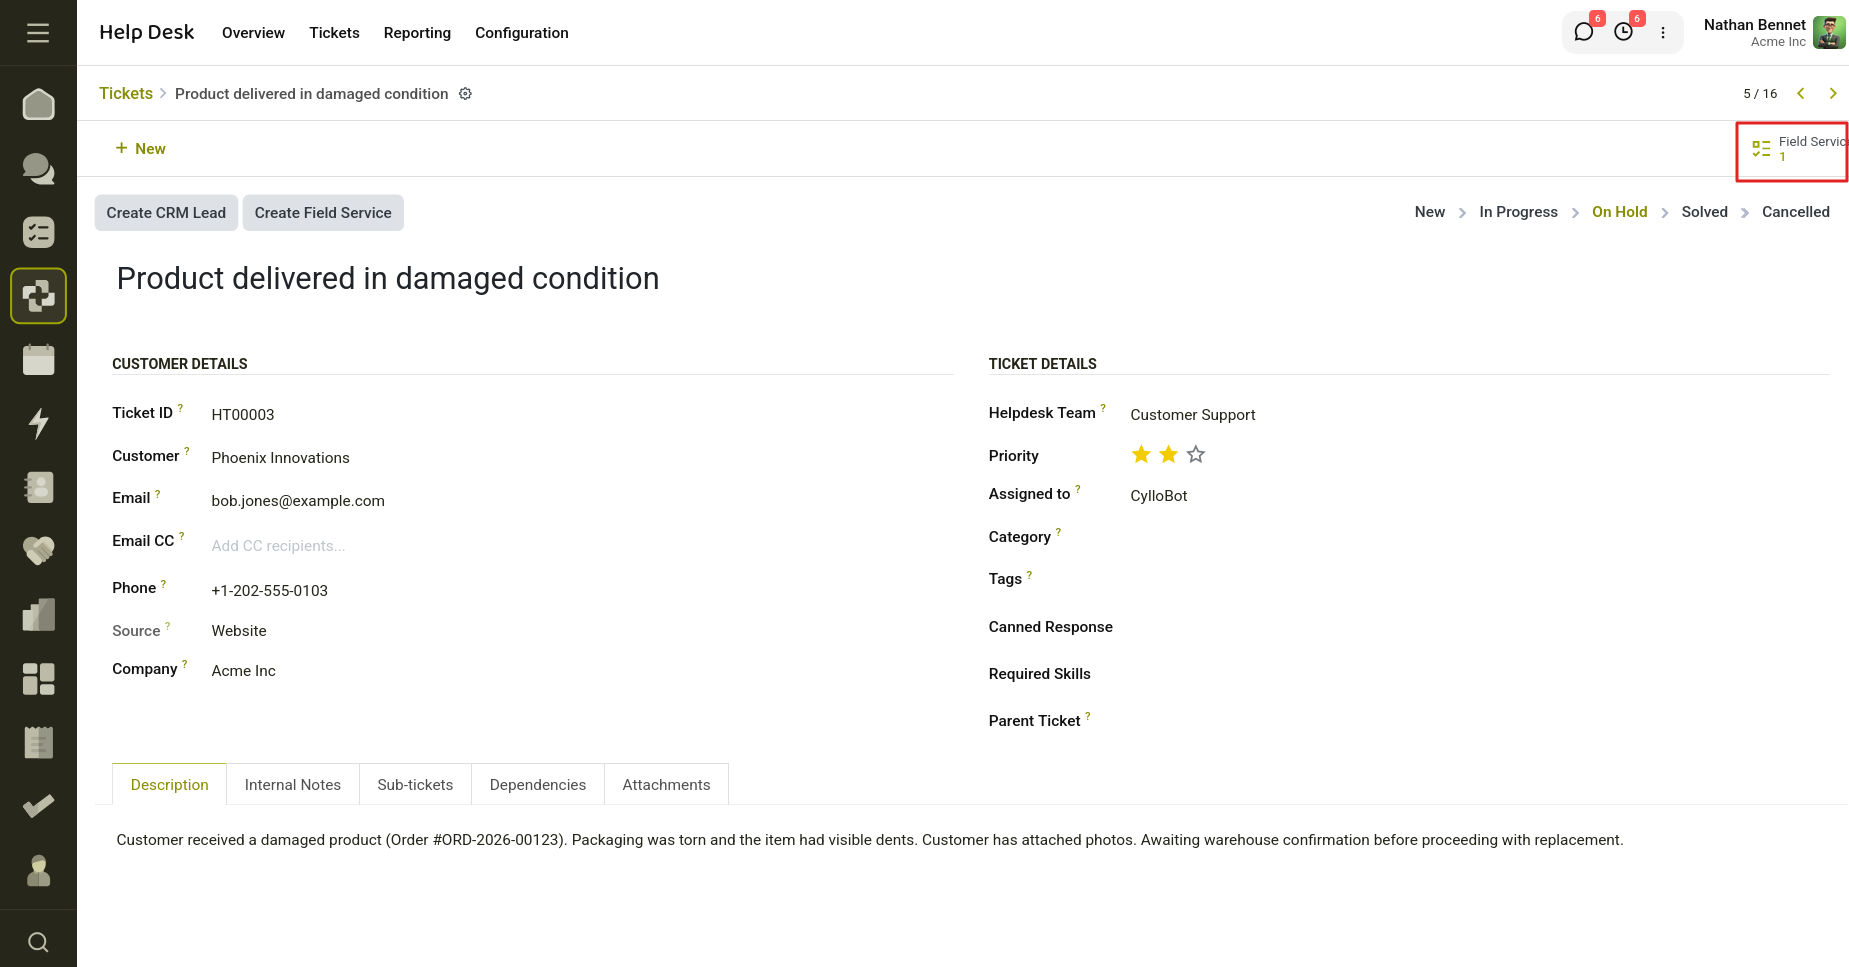
Fig 9.4 — View Linked Field Service Requests
From the Field Service Module
The Helpdesk Ticket field is also visible on the Field Service Request form. You can use the standard list and search views in the Field Service module to filter or group requests by their linked ticket.
- Navigate to Field Service > Service Requests.
- Use the Search bar and filter by Helpdesk Ticket to find requests originating from a specific ticket.
- Group By Helpdesk Ticket to see a summary of all tickets with linked field operations.
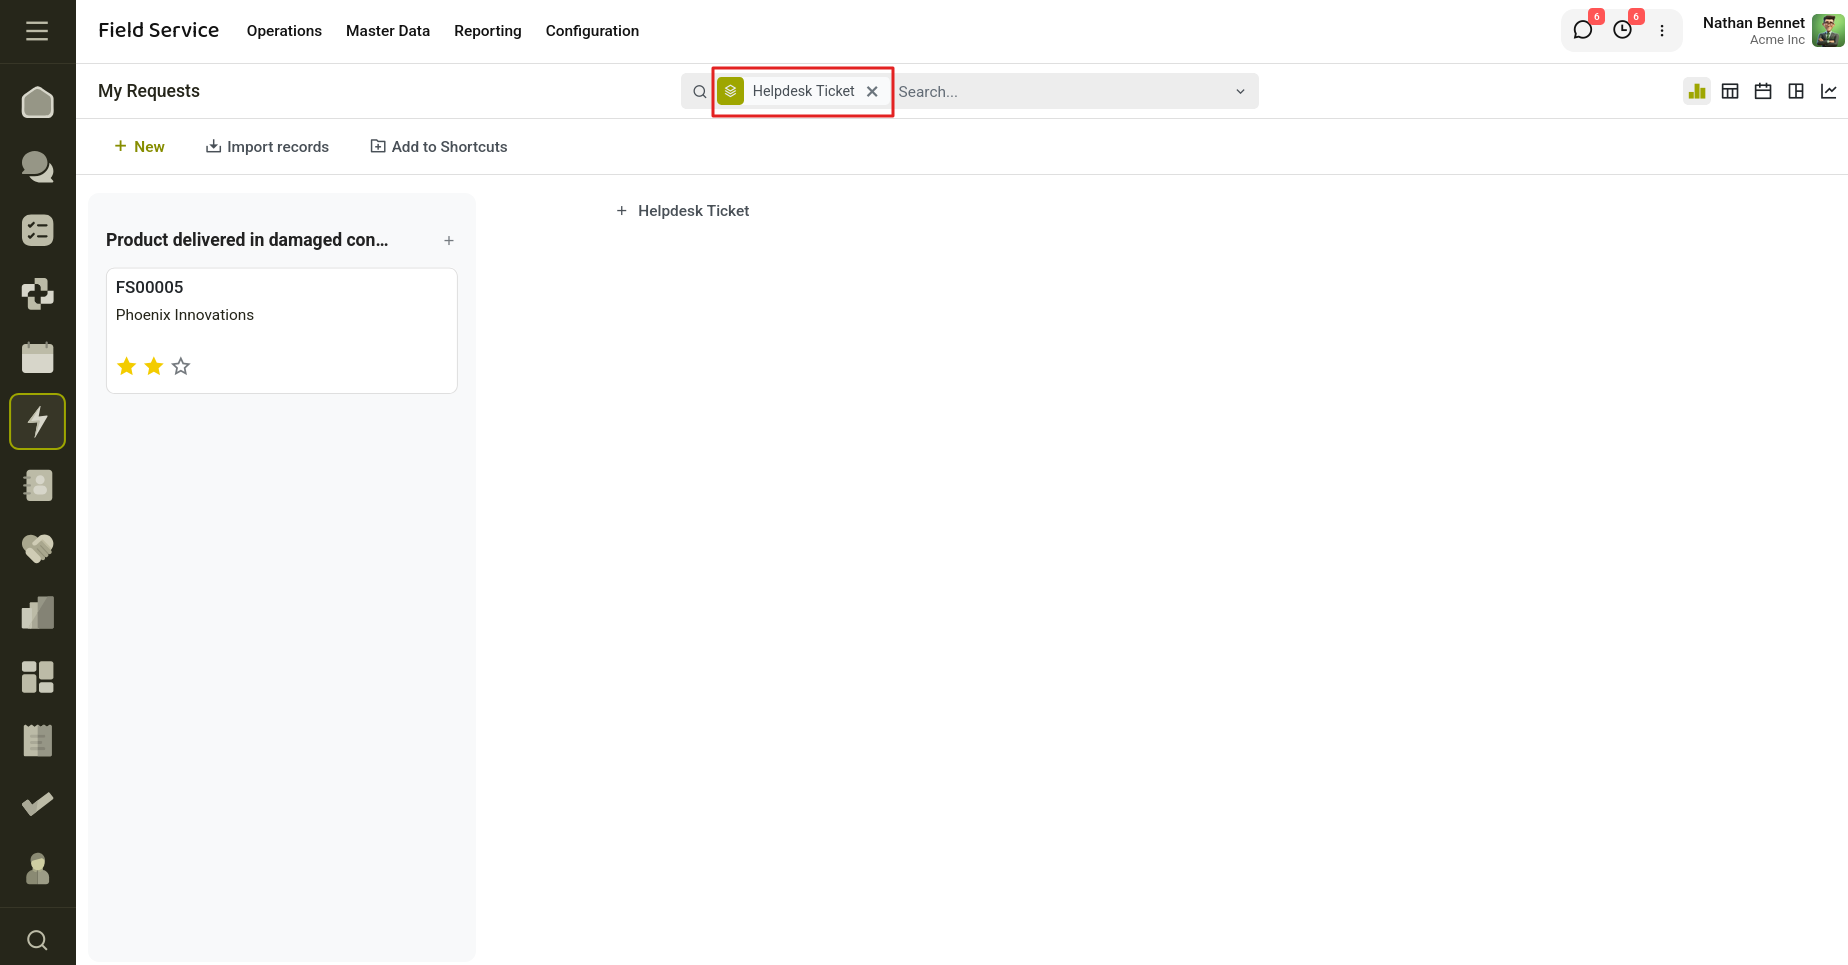
Fig 9.5 — Group By Helpdesk Ticket to see a all tickets with linked field operations.
10. Help Desk - Project
The Cyllo Helpdesk Project bridges two core applications — Helpdesk and Project — into a single, unified workflow. Support teams can create and track project tasks directly from helpdesk tickets without switching between modules, giving agents visibility into work progress and enabling seamless collaboration with development or field-service teams.
10.1 Key Benefits
- Link one or more project tasks to any helpdesk ticket.
- Monitor task progress without leaving the helpdesk interface.
- Automatically maintain a count of associated tasks on every ticket.
- Reduce duplicate data entry by reusing ticket context inside tasks.
10.2 Enabling the Integration on a Team
- Go to Helpdesk → Configuration → Teams.
- Open the team you want to configure (or create a new one).
- Locate the Use Project checkbox and tick it.
- A Project field appears immediately below. Select an existing project or create one inline.
- Save the team record.
10.3 Creating a Task from a Ticket
When a ticket requires work tracked in a project (e.g. a bug fix, a feature request, or a scheduled service), use the Create Task button to create a linked task in a single click.
- Open the relevant Helpdesk ticket.
- Confirm the ticket is assigned to a team that has Use Project enabled. The project name appears in the Project field beneath the Team field.
- Click the Create Task button in the header (highlighted in blue).
- The Project Task form opens pre-populated with:
- Task name — copied from the ticket subject.
- Project — set to the team's default project.
- Customer — copied from the ticket's customer.
- Description — copied from the ticket body.
- Assignee — set to the ticket's assigned user (if any).
- Add or edit any additional details (deadline, tags, subtasks, etc.) as needed.
- Save the task. redirects you to the task form.
- A chatter note "Project task creation initiated." is automatically posted on the originating ticket for traceability.
10.4 Viewing Tasks from a Ticket
The Tasks smart button appears in the top-right button box of the ticket form when at least one task has been linked to the ticket and Use Project is enabled.
- The button displays the total task count
- Click it to open the task list for this ticket.
- If exactly one task exists, open the task form directly instead of a list.
- If multiple tasks exist, you see a list view with task name, project, stage, assignee, and deadline. Click any row to open the task form.
11. Help Desk - Sale
The Cyllo Helpdesk Sale connects Helpdesk and Sales applications. Support agents can link existing Sale Orders to a ticket, drill into a specific order line, create brand-new Sale Orders directly from a ticket, and view all orders belonging to the same customer — without leaving the Helpdesk interface.
The integration also plugs into cyllo_warranty_sale, so warranty-related sale order operations can be managed within the same ticket context.
11.1 Key Features
- Link a confirmed Sale Order (and a specific order line) to a Helpdesk ticket for full context.
- Create a new Sale Order pre-filled with the ticket's customer, directly from the ticket header.
- Smart buttons show the count of Sale Orders linked to the ticket and the total count of all orders for the customer.
- Customer-order filtering: the Sale Order field automatically narrows its dropdown to confirmed/done orders for the selected customer.
- Bi-directional navigation: jump from a Sale Order back to the originating ticket via the Helpdesk Ticket field.
The Sale Order integration is gated by the Use Sale Order toggle on each Helpdesk Team.
11.2 Enabling Sale Order Integration on a Team
- Go to Helpdesk → Configuration → Teams.
- Open the team to configure.
- Locate the Use Sale Order checkbox (added by cyllo_warranty_sale) and tick it.
- Save the team record.
11.3 Linking a Sale Order to a Ticket
Use this workflow when a customer contacts support about an existing order.
- Open (or create) the Helpdesk ticket. Ensure a Customer is set.
- In the ticket form, locate the Sale Order field (below Company). The dropdown is automatically filtered to confirmed or done Sale Orders (state: sale or done) belonging to the selected customer's commercial entity.
- Select the relevant Sale Order from the dropdown.
- Optionally, select a specific Order Line from the Order Line field that appears once a Sale Order is chosen. Only lines from the chosen order are shown.
- Save the ticket.
Note
If you change the Customer, the Sale Order and Order Line fields are cleared automatically, and the Sale Order dropdown updates to reflect the new customer's orders.
11.4 Creating a New Sale Order from a Ticket
Use this workflow when a support interaction results in a new sale (e.g. a warranty replacement, upsell, or re-order).
- Open the ticket. Ensure a Customer is set and that the ticket's team has Use Sale Order enabled.
- Click the Create Sales Order button in the ticket header (visible only when a customer is set and Use Sale Order is on).
- The Sale Order form opens pre-filled with the ticket's customer. The new order is automatically linked back to this ticket via the Helpdesk Ticket field.
- Complete the order lines, pricing, and other details as usual.
- Confirm the order when ready.
- Return to the ticket — the Sales Orders smart button now shows 1 (or increments if previous orders exist).
12. Help Desk - Warranty
The Cyllo Helpdesk Warranty extends the Cyllo Helpdesk application with real-time product warranty tracking. Support agents can instantly see whether the product reported in a helpdesk ticket is still under warranty — directly inside the ticket form — without switching to the Sales or Warranty modules.
By combining data from the linked sale order line and the Cyllo Product Warranty module, the system computes a live warranty status and presents it through colour-coded badges in both the ticket list and the ticket form view.
12.1 Key Features
- Instantly check warranty status without leaving the helpdesk ticket.
- Visual shield icon (🛡) on the order line field when the product is under warranty.
- Colour-coded badge column in the ticket list for at-a-glance warranty visibility.
- Automatic status computation — no manual data entry required.
- Three clear warranty states: Under Warranty, Warranty Expired, No Warranty.
- Per-team toggle: enable warranty tracking only for teams that need it.
Note
If you change the Customer, the Sale Order and Order Line fields are cleared automatically, and the Sale Order dropdown updates to reflect the new customer's orders.
12.2 Enabling Warranty Tracking per Team
Warranty visibility is controlled at the helpdesk team level. This allows organisations to enable warranty tracking only for teams that handle product-related tickets (e.g., hardware support) while keeping it hidden for other teams (e.g., billing support).
- Navigate to Helpdesk → Configuration → Teams.
- Open the team for which you want to enable warranty tracking.
- Locate the Use Product Warranty toggle (added by this module).
- Switch it to enabled (checked).
- Save the team record.
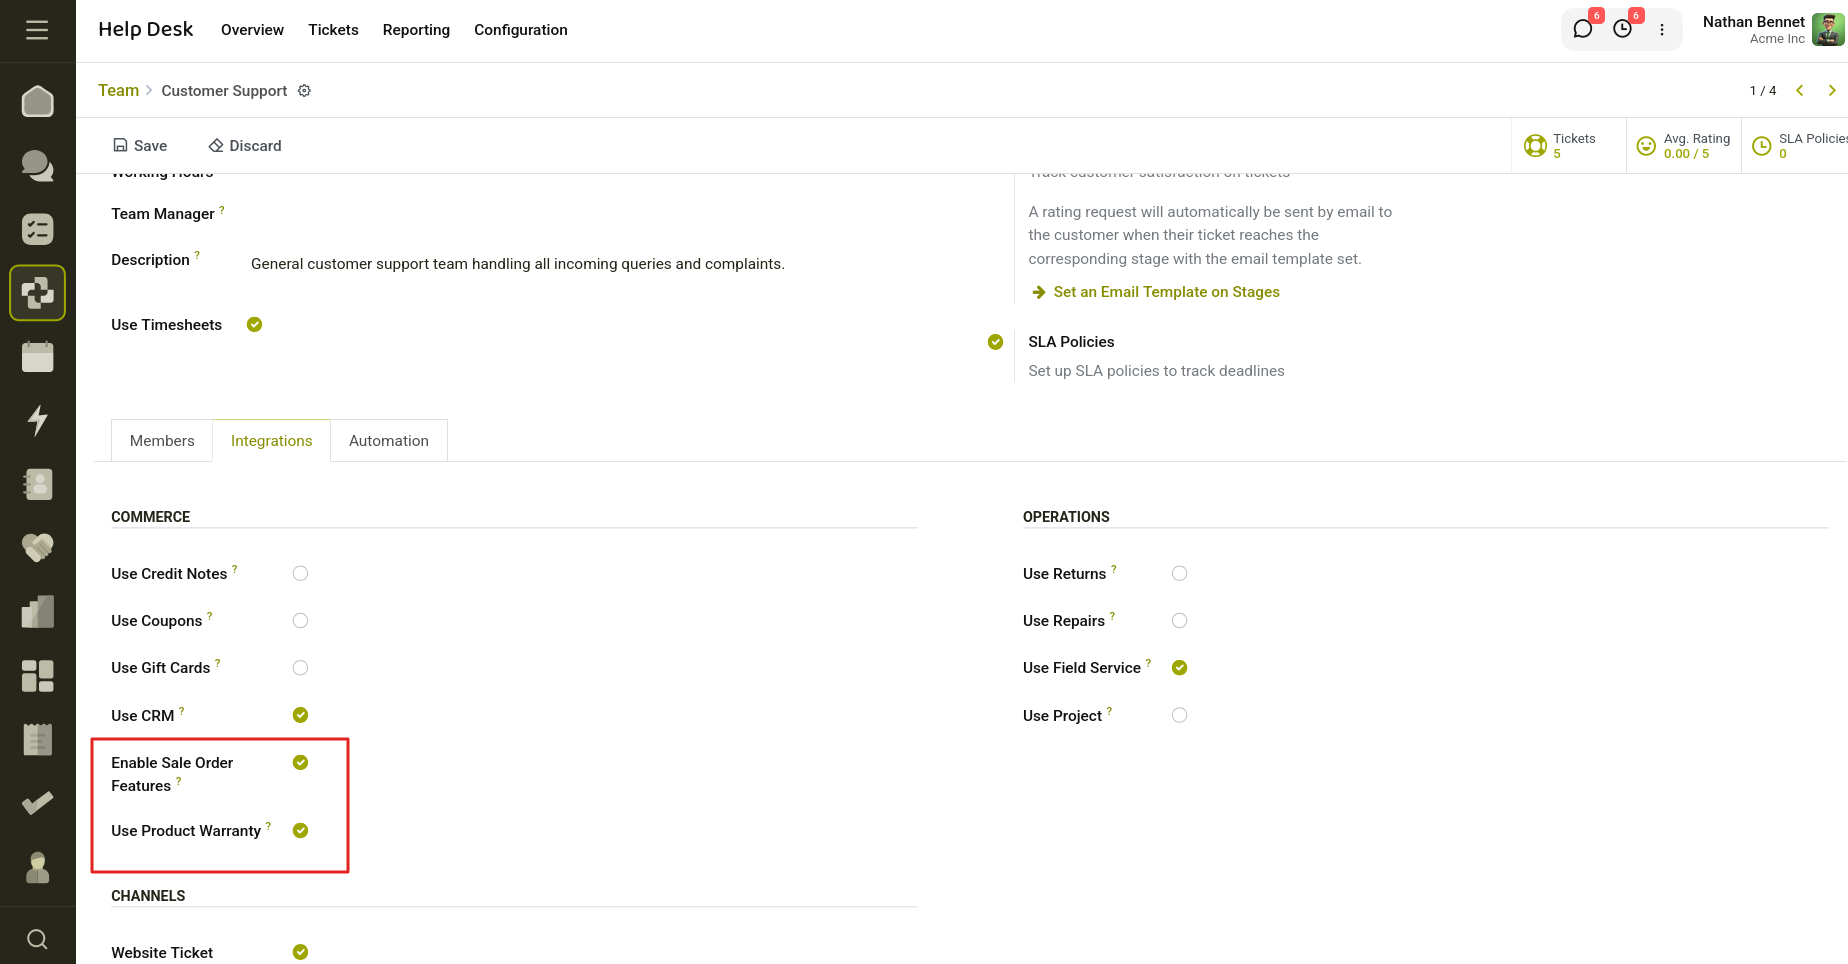
Fig 12.1 — Enable the Sale order features and Product warranty from the ticket.
Note
Tickets belonging to a team where Use Product Warranty is disabled will not display the shield icon or the warranty status badge, even if a sale order line is linked.
12.3 Linking a Sale Order Line to a Ticket
Warranty status is derived from the sale order line associated with a ticket. To see warranty information, you must first link a sale order and order line to the ticket. This is provided by the Helpdesk - Sale Integration.
- Open or create a helpdesk ticket for a team that has Use Product Warranty enabled.
- In the ticket form, locate the Sale Order field (from cyllo_helpdesk_sale).
- Select the customer's sale order.
- In the Sale Order Line field immediately below, select the specific order line (product) the customer is reporting an issue with.
- Save the ticket. The warranty status will be computed automatically.
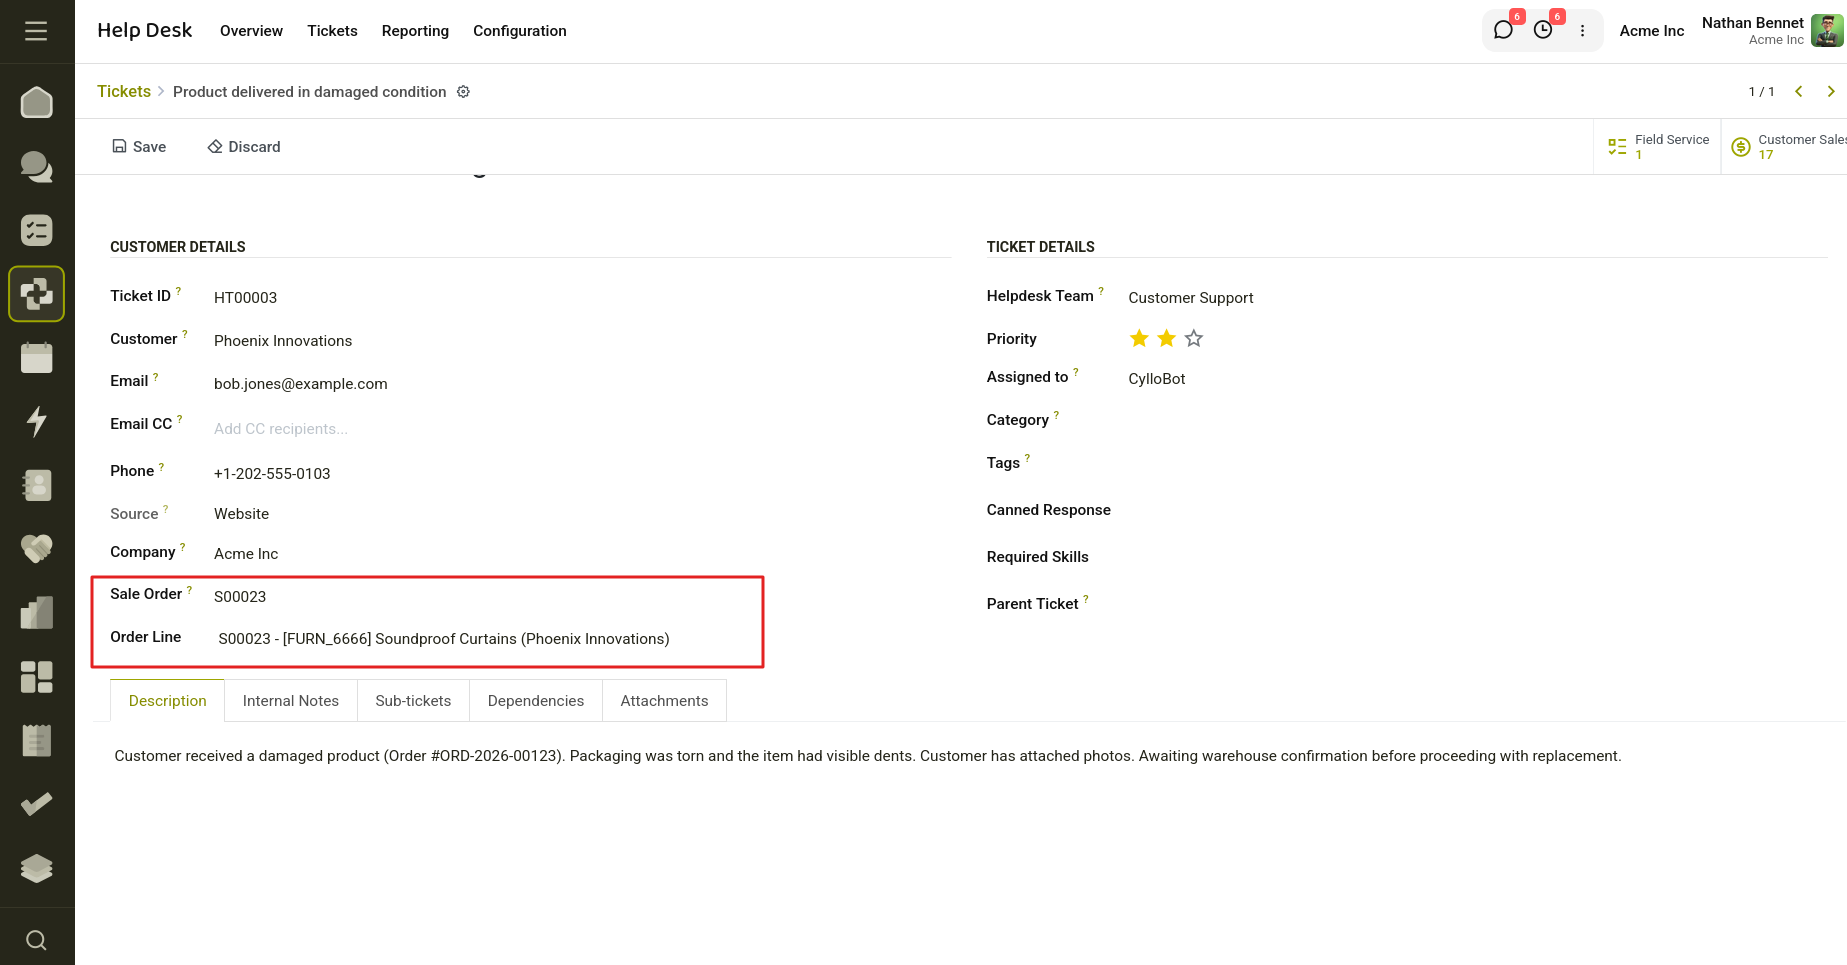
Fig 12.2 — Select the Orderline of the Sale Order selected.
Note
If the selected product is currently under warranty, a green shield icon appears immediately to the right of the Sale Order Line field. This gives a quick visual confirmation without needing to open any other view.
13. Help desk - Repair
The Cyllo Helpdesk Repair bridges Helpdesk and Repair applications. When a customer reports a defective or damaged product, support agents can launch a Repair Order directly from the Helpdesk ticket — without switching apps — keeping the full repair lifecycle visible and traceable from the originating support request.
The module integrates cleanly with the cyllo_helpdesk_sale module: if a ticket already has a Sale Order and Order Line set, the repair form is pre-populated with that product and order reference, streamlining warranty and post-sale repair workflows.
13.1 Key features
- Create a Repair Order from a Helpdesk ticket in one click, with customer, product, sale order, and warranty status pre-filled.
- Track how many Repair Orders are open for a ticket via a Repairs smart button showing the live count.
- Navigate from any Repair Order back to its originating Helpdesk ticket via a bi-directional link.
- Automatic chatter note on the ticket each time a Repair Order is initiated, providing a complete audit trail.
- Works alongside cyllo_helpdesk_sale: sale order and order line context is forwarded to the repair form when available.
- Warranty context forwarding: if the ticket carries a warranty_status of under_warranty, the repair form is pre-set with under_warranty = True.
The Repair integration is controlled by the use_repairs flag on the Helpdesk Team. This flag is provided by the base cyllo_help_desk module or a related add-on. No additional settings pages are introduced by this module.
13.2 Enabling Repairs on a Helpdesk Team
- Navigate to Helpdesk → Configuration → Teams.
- Open the team to configure (or create a new one).
- Locate the Use Repairs checkbox and tick it.
- Save the team record.
13.3 Creating a Repair Order from a Ticket
Use this workflow whenever a customer reports a product fault, damage, or service need that requires a formal repair.
Open (or create) the Helpdesk ticket and ensure a Customer is set.
Confirm the ticket's team has Use Repairs enabled.
Click the Create Repair Order button in the ticket header (highlighted, visible only when a customer is set and use_repairs is on).
The Repair Order form opens pre-filled with:
- Customer — copied from the ticket's customer.
- Helpdesk Ticket — linked back to this ticket.
- Sale Order — pre-filled from ticket's sale_order_id (if cyllo_helpdesk_sale is installed and a SO is set).
- Product — pre-filled from the sale order line's product (if an order line is set).
- Under Warranty — set to True if the ticket's warranty_status is under_warranty (if cyllo_warranty_sale is installed).
Complete any remaining repair details: product to repair (if not pre-filled), parts, labour, location, scheduled date.
Save and/or confirm the Repair Order as required.
Return to the ticket — the Repairs smart button now shows a count of 1 (or increments if previous repair orders exist).
A chatter message "Repair Order creation initiated." is automatically posted on the ticket for traceability.
14. Help Desk Loyalty
The Cyllo Helpdesk Loyalty module integrates your Helpdesk ticketing system with Loyalty & Coupon programs. Support agents can issue coupons and gift cards directly from within a helpdesk ticket — turning every customer service interaction into an opportunity to reward loyalty and resolve complaints swiftly.
Key Benefits
- Issue coupons to customers directly from a helpdesk ticket, without switching modules.
- Send gift cards as instant compensation or goodwill gestures from the ticket form.
- Track how many coupons and gift cards have been issued per ticket using smart stat buttons.
- Automatically links each coupon or gift card back to the originating ticket for full traceability.
- Works with named customers as well as anonymous contacts.
14.1 Working with Coupons
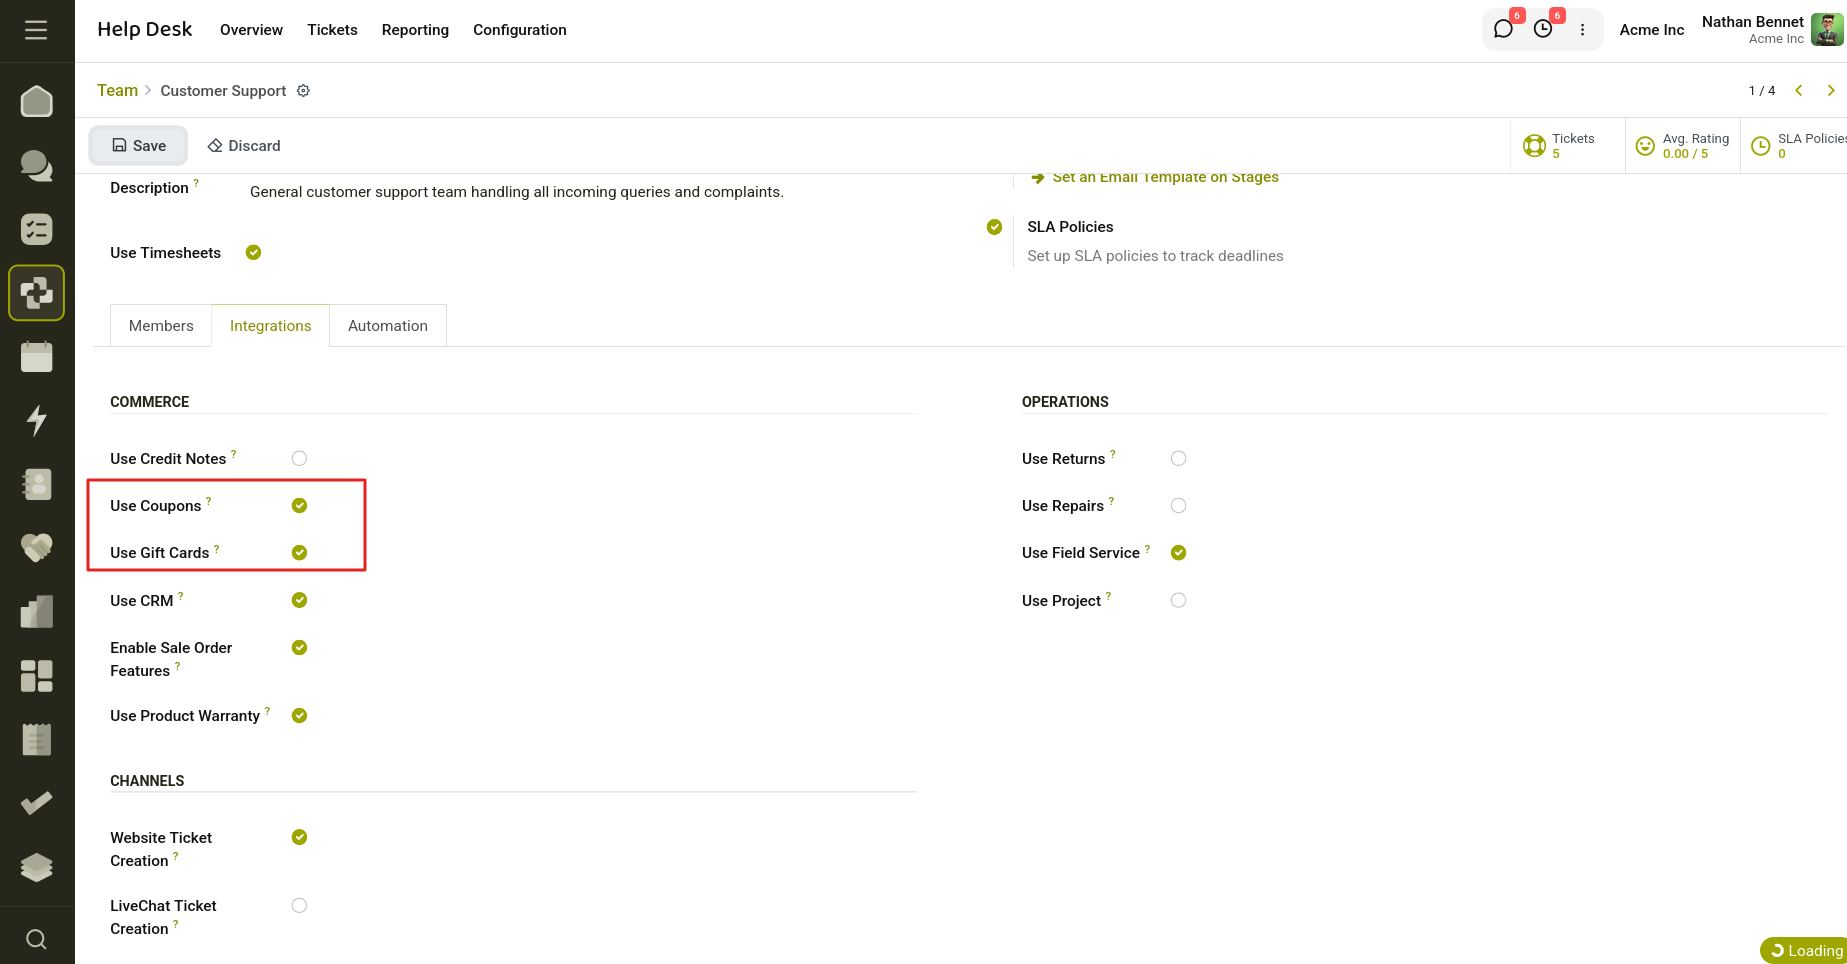
Fig 14.1 — Configure Coupons and Gift card from the ticket.
- Open the Helpdesk module and navigate to the ticket you want to work with.
- Ensure the Customer field is populated. If it is empty, set the customer before proceeding.
- In the ticket header bar, click the Create Coupon button.
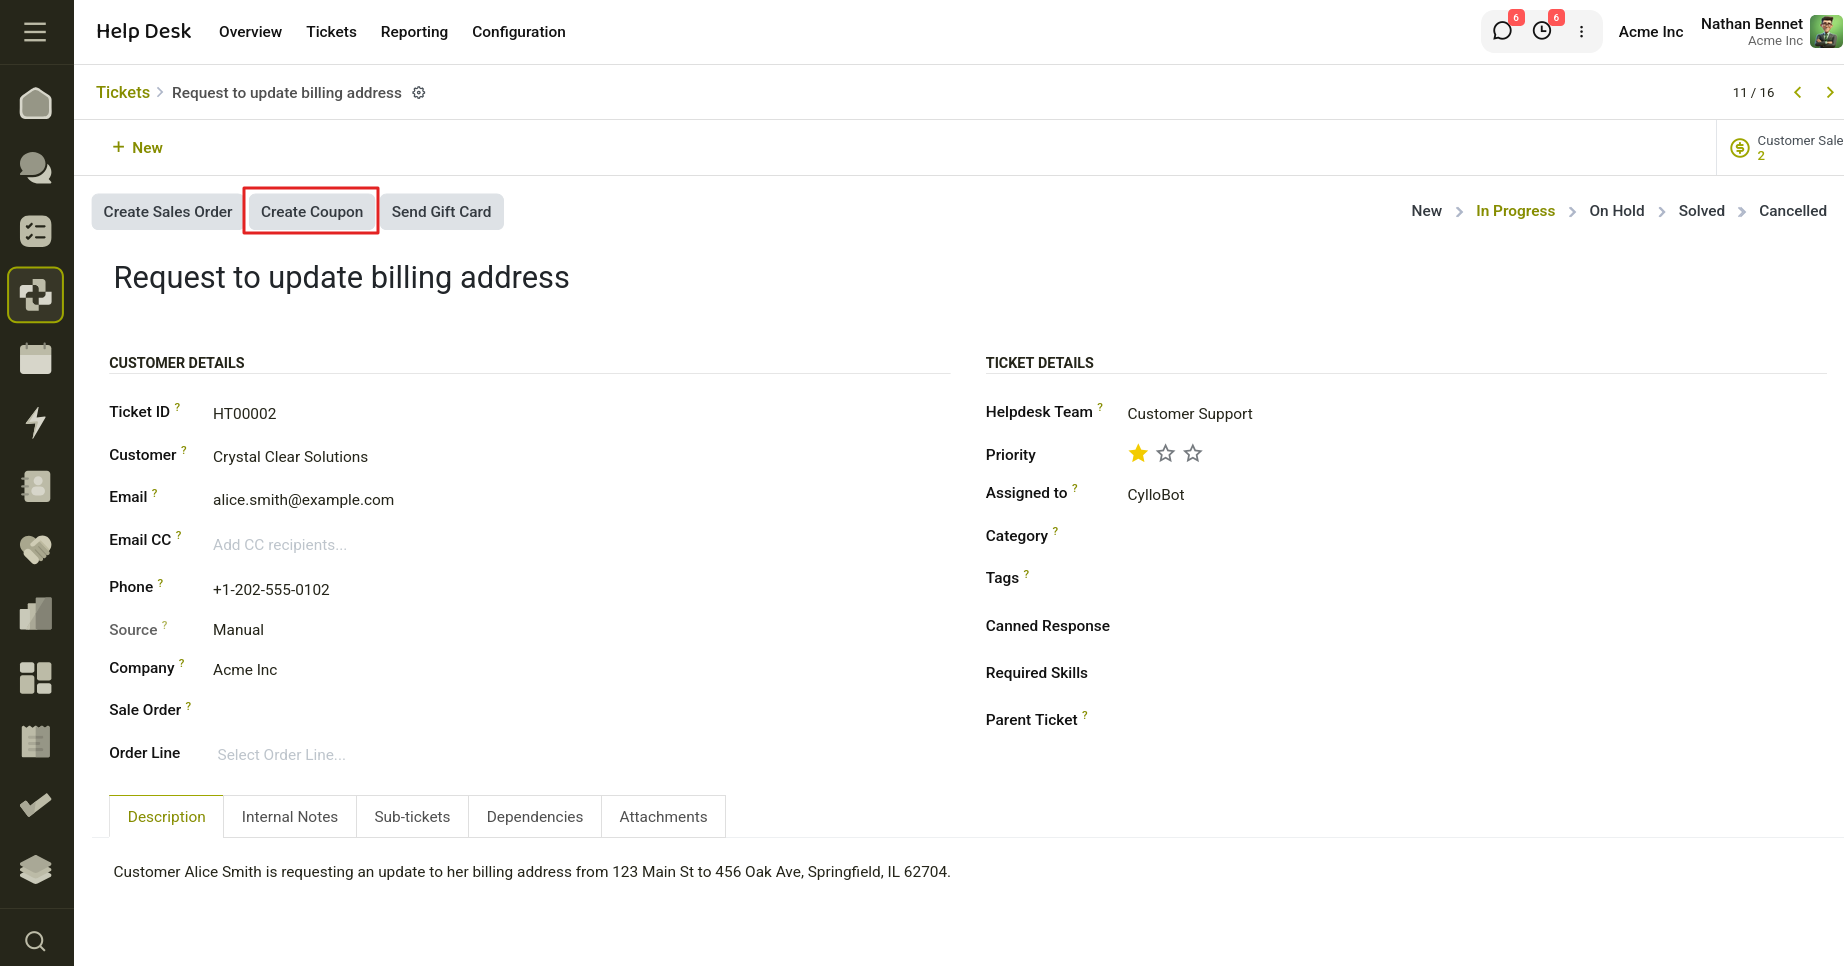
Fig 14.2 — Click create coupon button.
- The Coupon Generation Wizard opens. The system automatically pre-fills:
- The coupon program (first available program of type Coupons).
- The customer from the ticket.
- The quantity (default: 1 coupon).
- The generation mode (Selected Customer, because a customer is set on the ticket).
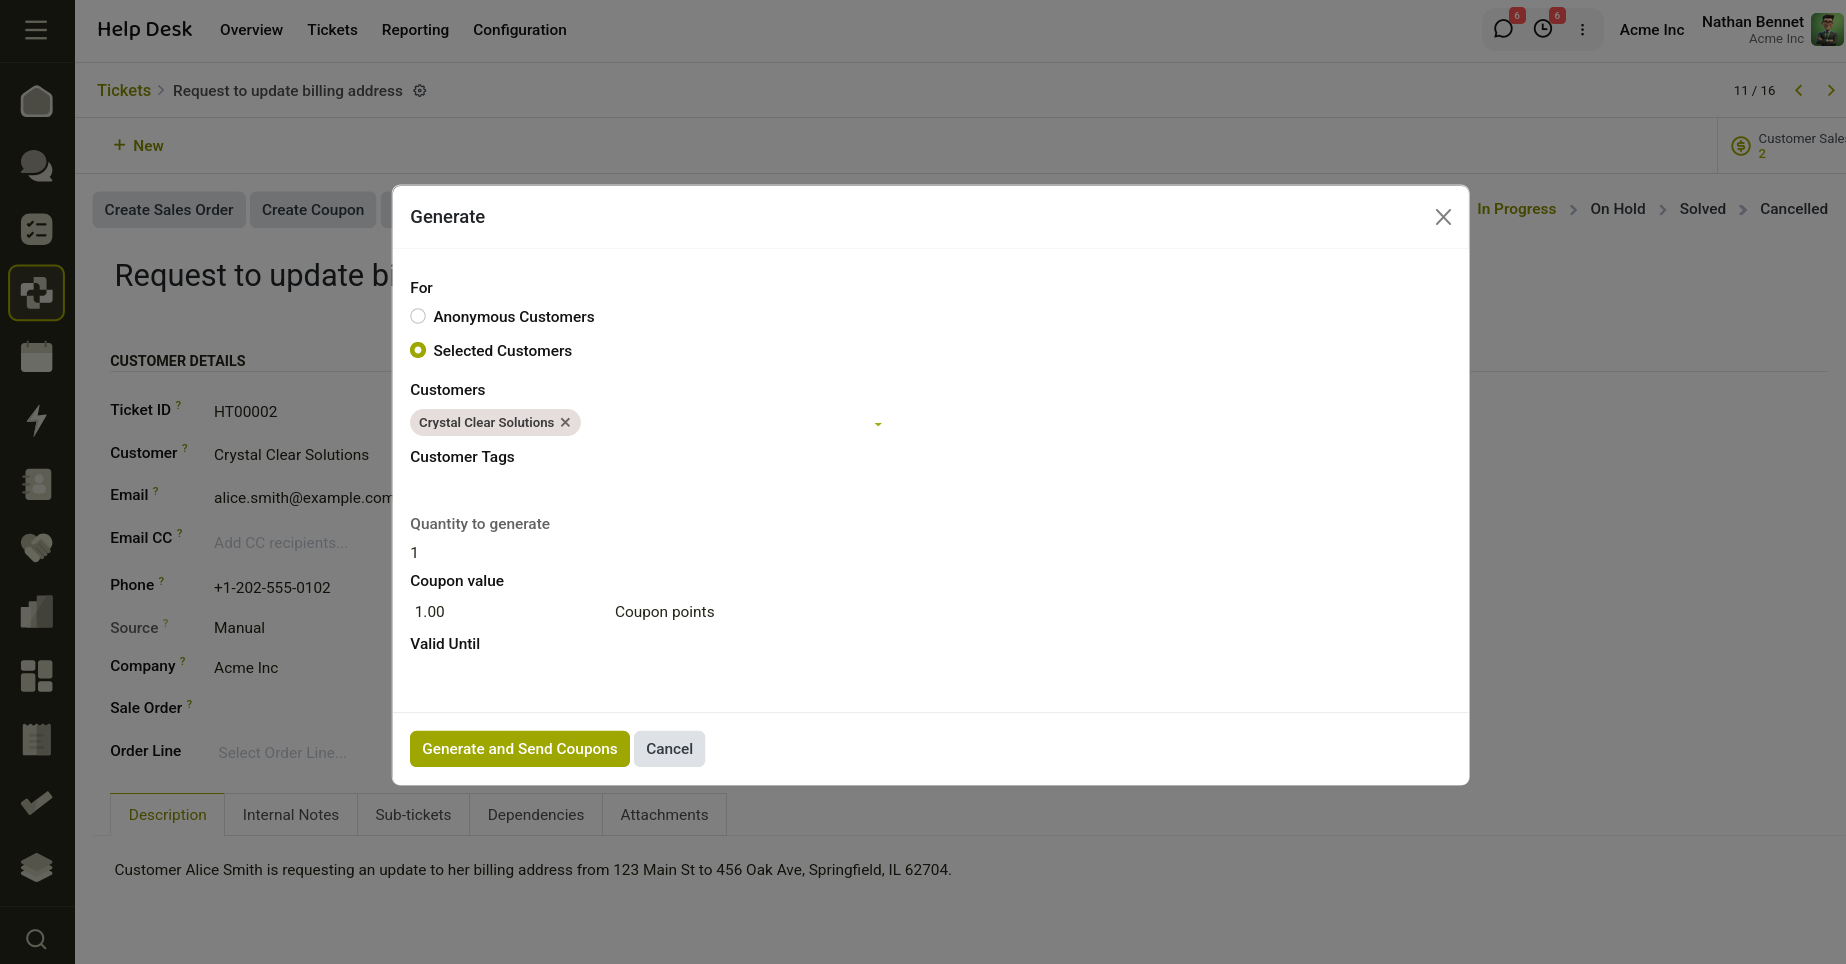
Fig 14.3 — Generate Coupons.
- Review and adjust the wizard fields as needed (e.g., coupon quantity, program selection).
- Click Generate to create the coupon(s).
- Return to the ticket. A chatter message reading "Coupon generation initiated." confirms the action, and the Coupons stat button now appears with the count.
14.2 Viewing Coupons Linked to a Ticket
Once one or more coupons have been generated for a ticket, they can be reviewed at any time:
- Open the helpdesk ticket.
- Locate the Coupons stat button in the top-right area of the ticket form (shown with a ticket icon and the count).
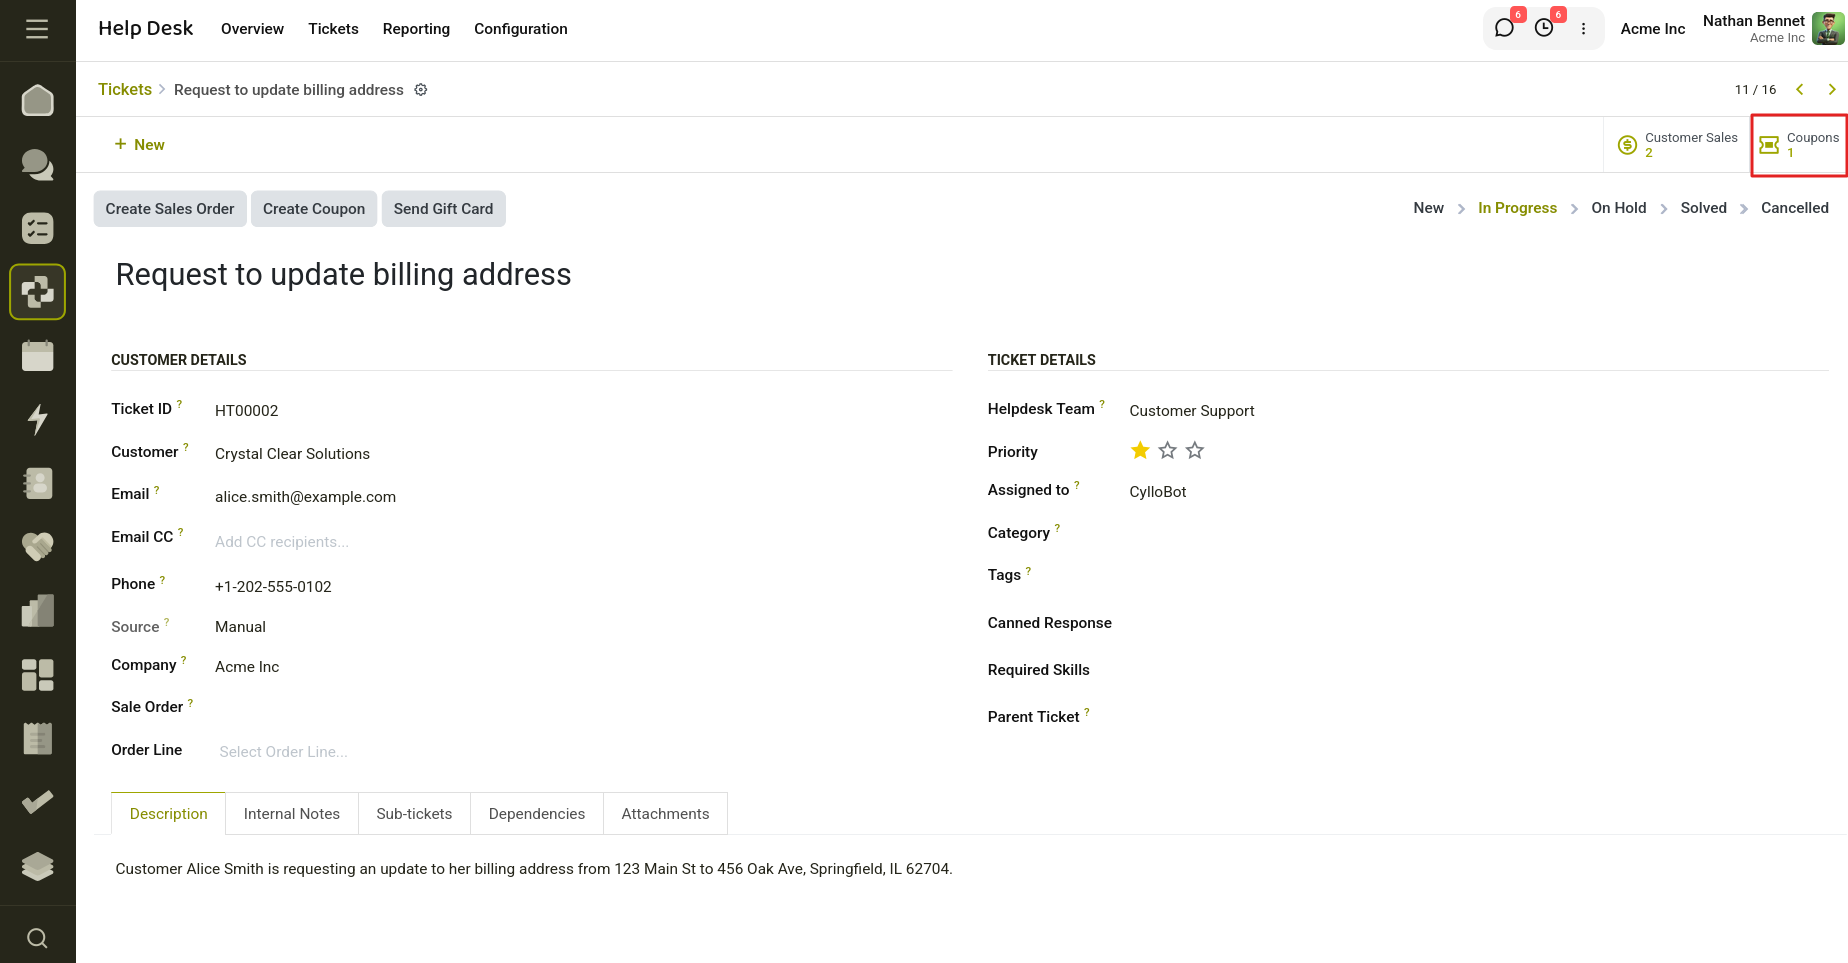
Fig 14.4 — View coupon linked to the ticket.
- Click the stat button. A filtered list view of all coupon records linked to this ticket opens.
- From this list you can view coupon codes, balances, expiry dates, and status.
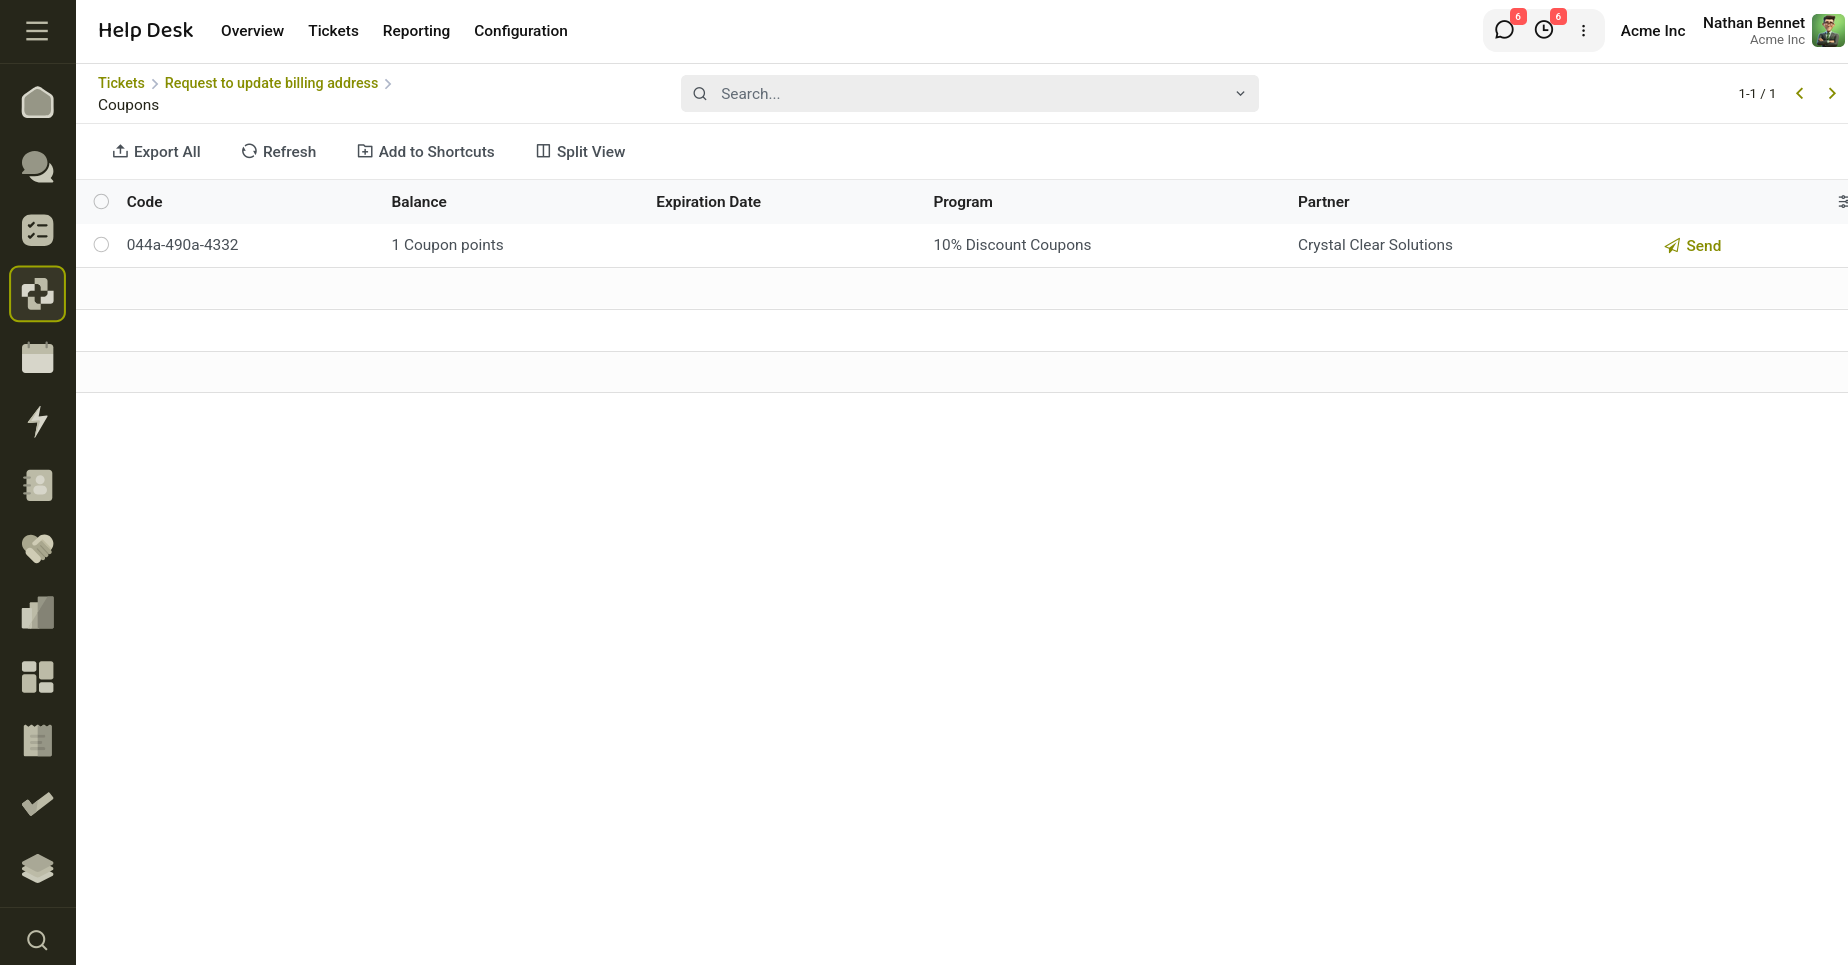
Fig 14.5 — Generated Coupons are visible in smart button.
14.3. Working with Gift Cards
14.4 Sending a Gift Card from a Ticket
Gift cards can be issued directly to customers as a compensation or goodwill gesture. The workflow mirrors that of coupons:
- Open the Helpdesk ticket for the relevant customer.
- Ensure the Customer field is populated.
- Click the Send Gift Card button in the ticket header.
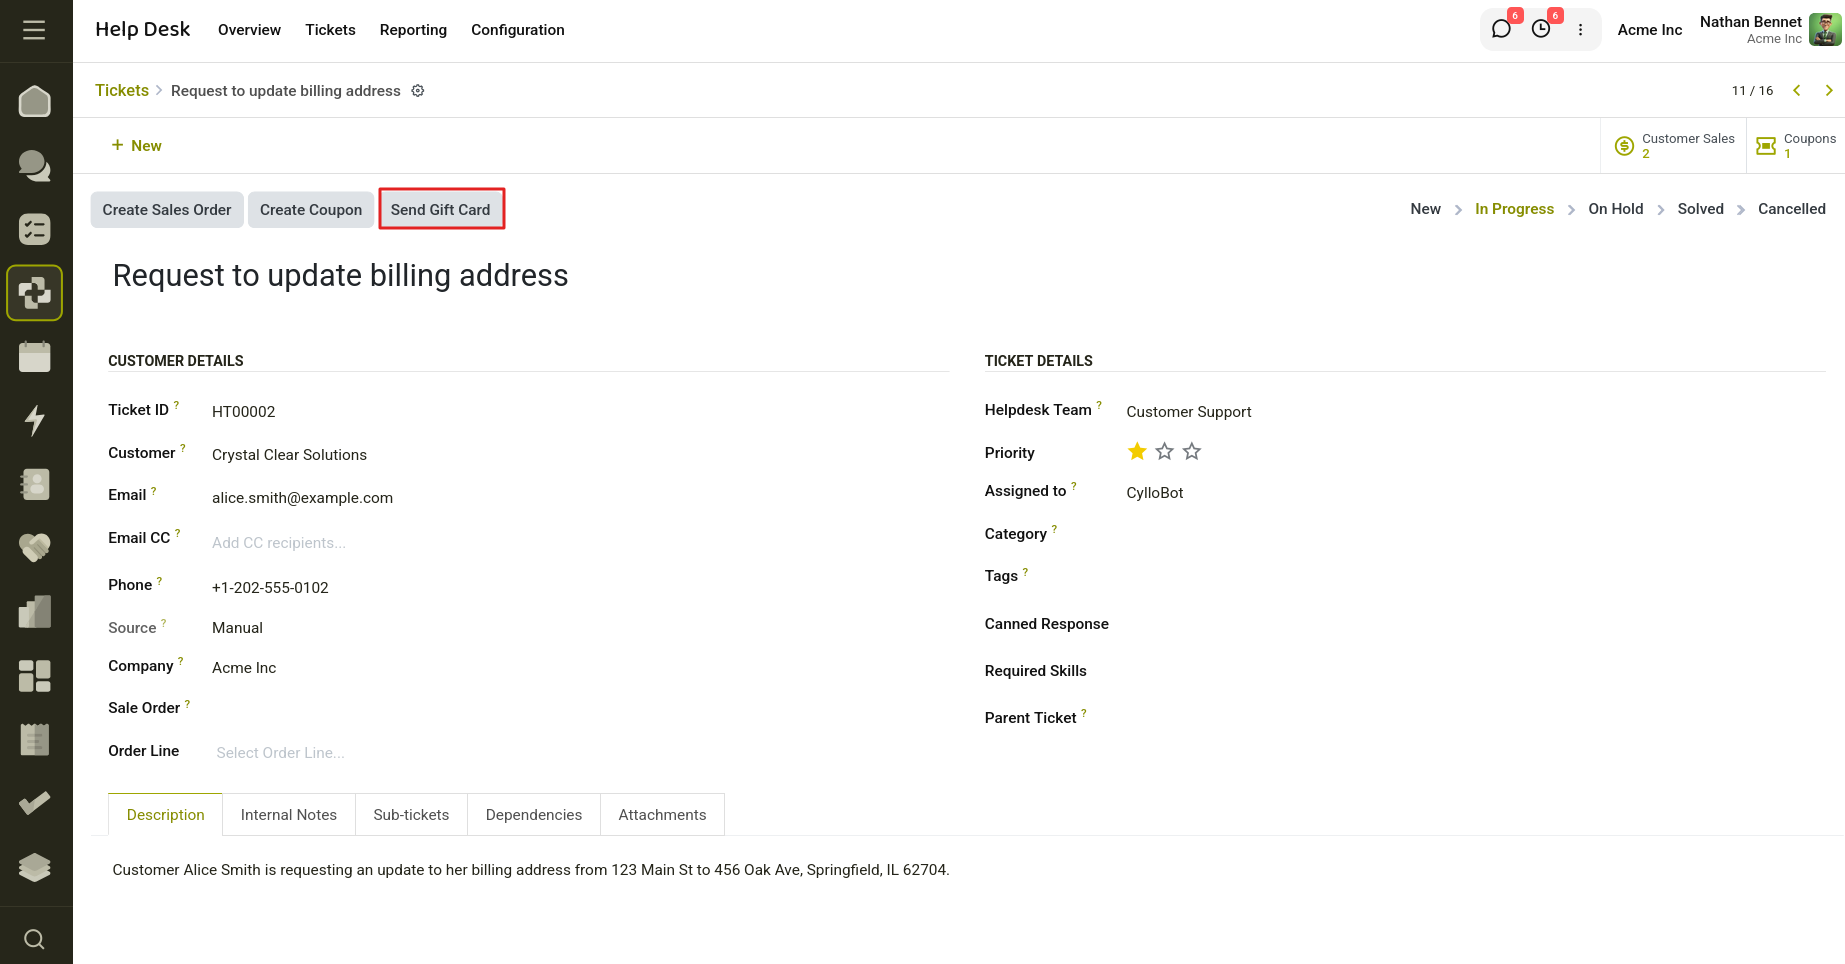
Fig 14.6 — Click Send Gift Card on the ticket.
- The Gift Card Generation Wizard opens, pre-filled with:
- The first available Gift Card program.
- The customer from the ticket.
- Quantity set to 1 (adjustable).
- Optionally adjust the gift card value, quantity, or target program.
- Click Generate. The gift card is created and linked to the ticket.
- The chatter logs "Gift card generation initiated." and the Gift Cards stat button appears.
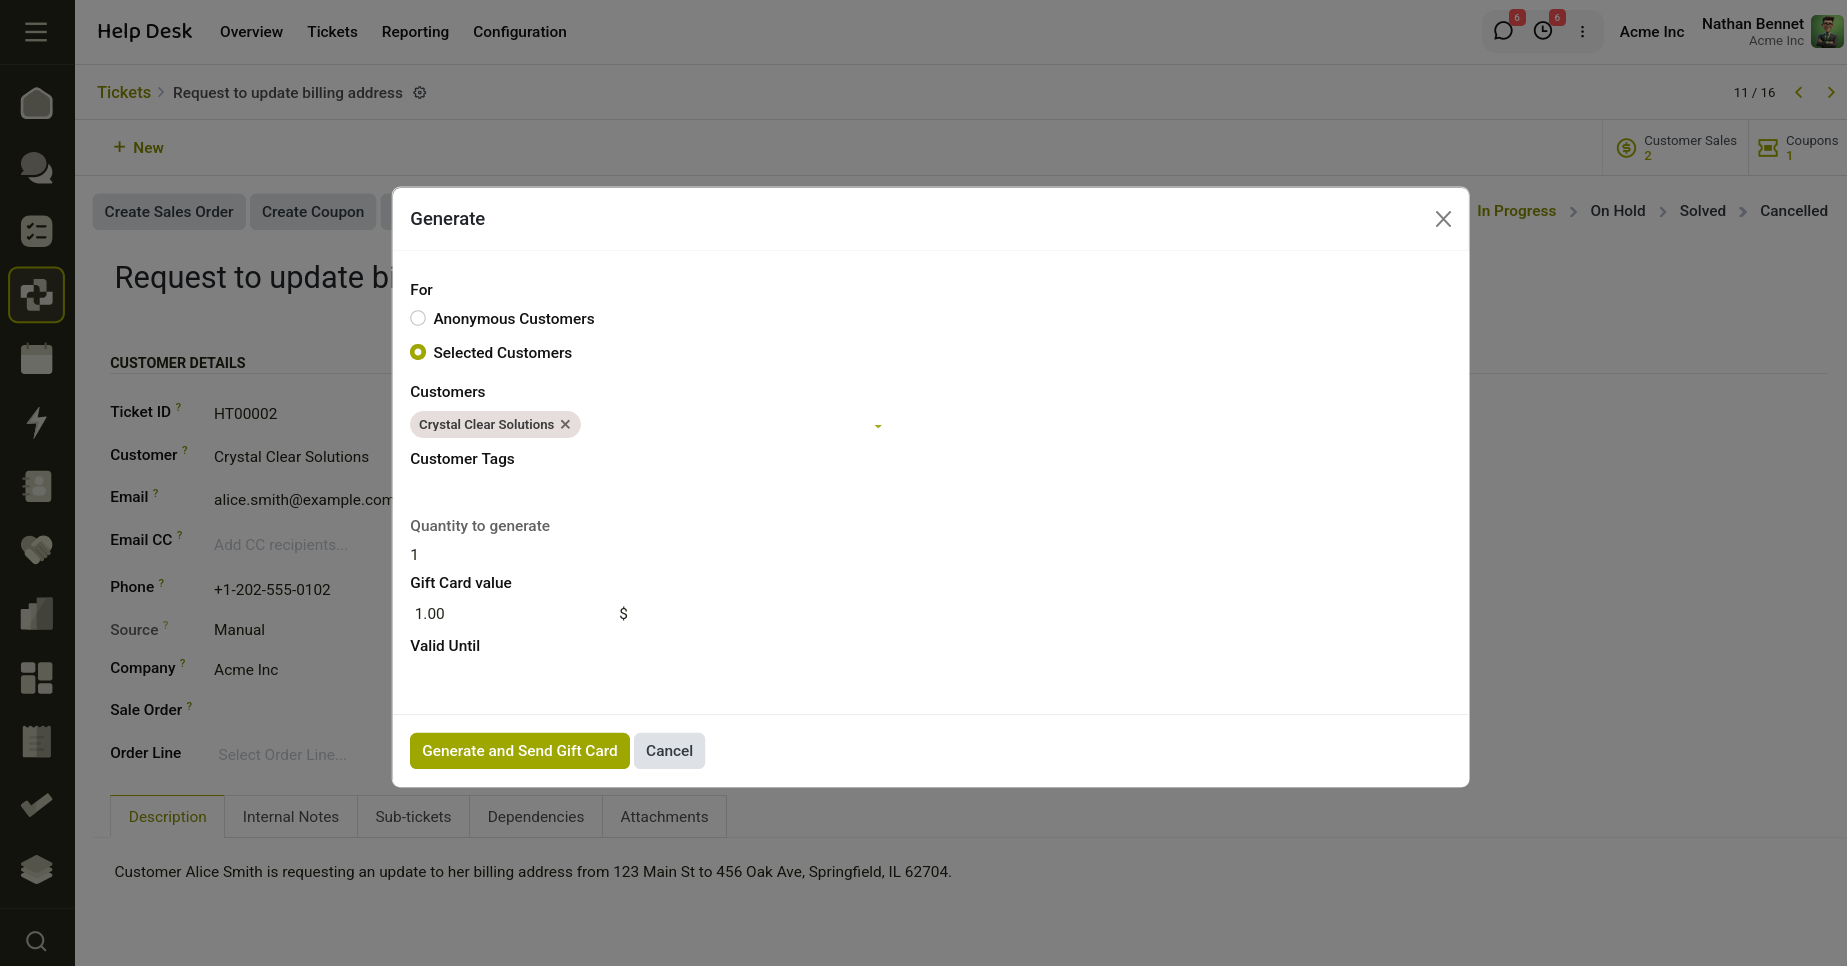
Fig 14.7 — Generate Gift Cards.
14.5 Viewing Gift Cards Linked to a Ticket
- Open the helpdesk ticket.
- Click the Gift Cards stat button (credit card icon) in the button box.
- A filtered list of all gift card records associated with the ticket opens.
- Review each gift card's code, remaining balance, and program details.
15. Help Desk - Stock
The Cyllo Helpdesk Stock module connects the Helpdesk application with Inventory (Stock) application. It allows helpdesk agents to create product returns and replacements directly from a support ticket, without leaving the Helpdesk app, and keeps every return linked back to the ticket and the team that handled it.
This manual explains how to use the Returns feature day-to-day. It is written for helpdesk agents, team leaders, and helpdesk managers who handle customer return or replacement requests.
15.1 What this feature does
- Lets an agent start a return directly from a customer's helpdesk ticket.
- Automatically finds the delivery (or deliveries) linked to the customer's sale order.
- Opens the standard return wizard, pre-filled and linked to the ticket.
- Keeps a running count of all returns linked to a ticket, and to a team, visible as stat buttons.
- Lets agents and managers jump straight from a ticket or a team into the related delivery/return records.
15.2 Requirements on the ticket
The "Create Return" button only appears on a ticket when both of the following are true:
- The ticket has a Customer set.
- The ticket's Helpdesk Team has the Returns feature enabled (see 2.2 below).
Note
SLA policies can be scoped by team, category, tag, or customer. See Section 6 for full configuration details.
15.3 Enabling Returns for a Helpdesk Team
Returns is a feature that is switched on per Helpdesk Team. A team leader or administrator enables it from the team's configuration:
- Go to Helpdesk → Configuration → Helpdesk Teams.
- Open the team you want to configure.
- Enable the Returns option in the team's feature settings.
- Save the team.
Once enabled, every ticket that belongs to this team can use the Create Return button (provided the ticket also has a customer set).
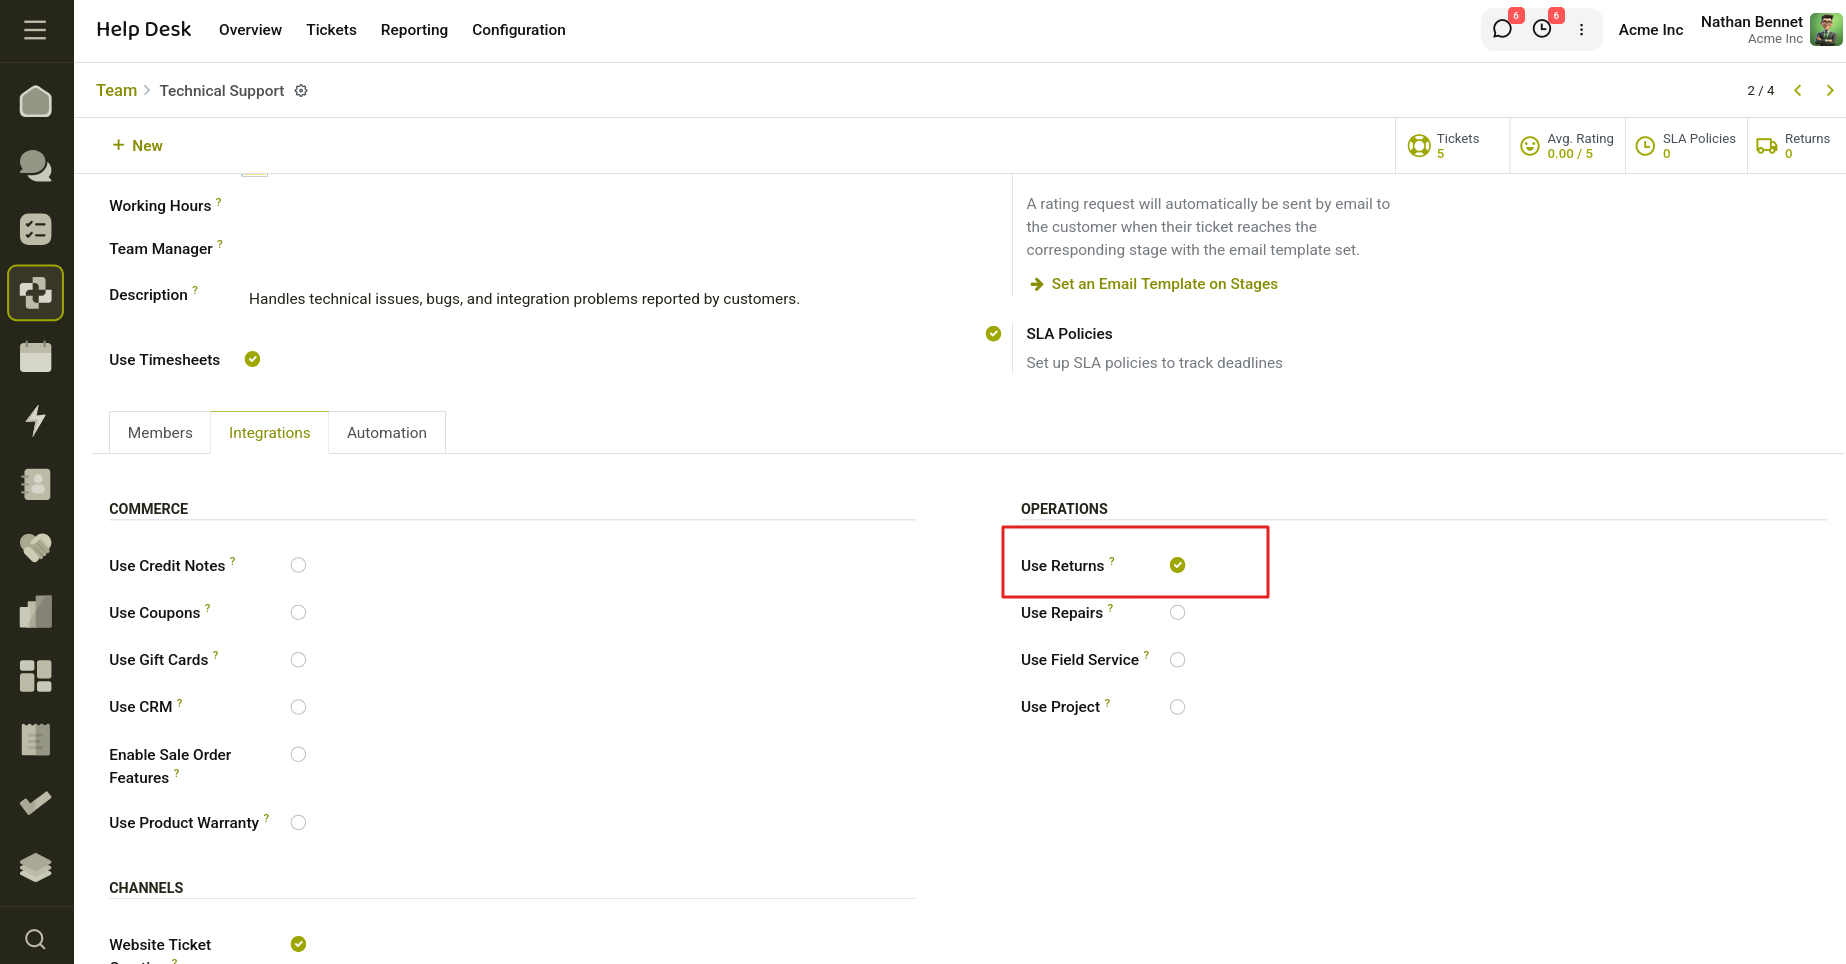
Fig 15.1 — Enable Use Returns on the ticket.
15.4 Creating a Return from a Ticket
Use this workflow whenever a customer wants to send a product back, or needs a replacement, for an order that has already been delivered.
- Open the customer's Helpdesk ticket.
- Make sure a Sale Order is linked to the ticket. If the customer's order is not already attached, set it before continuing.
- Click the Create Return button in the ticket's header bar.
- The system looks for completed (done) outgoing deliveries tied to that sale order.
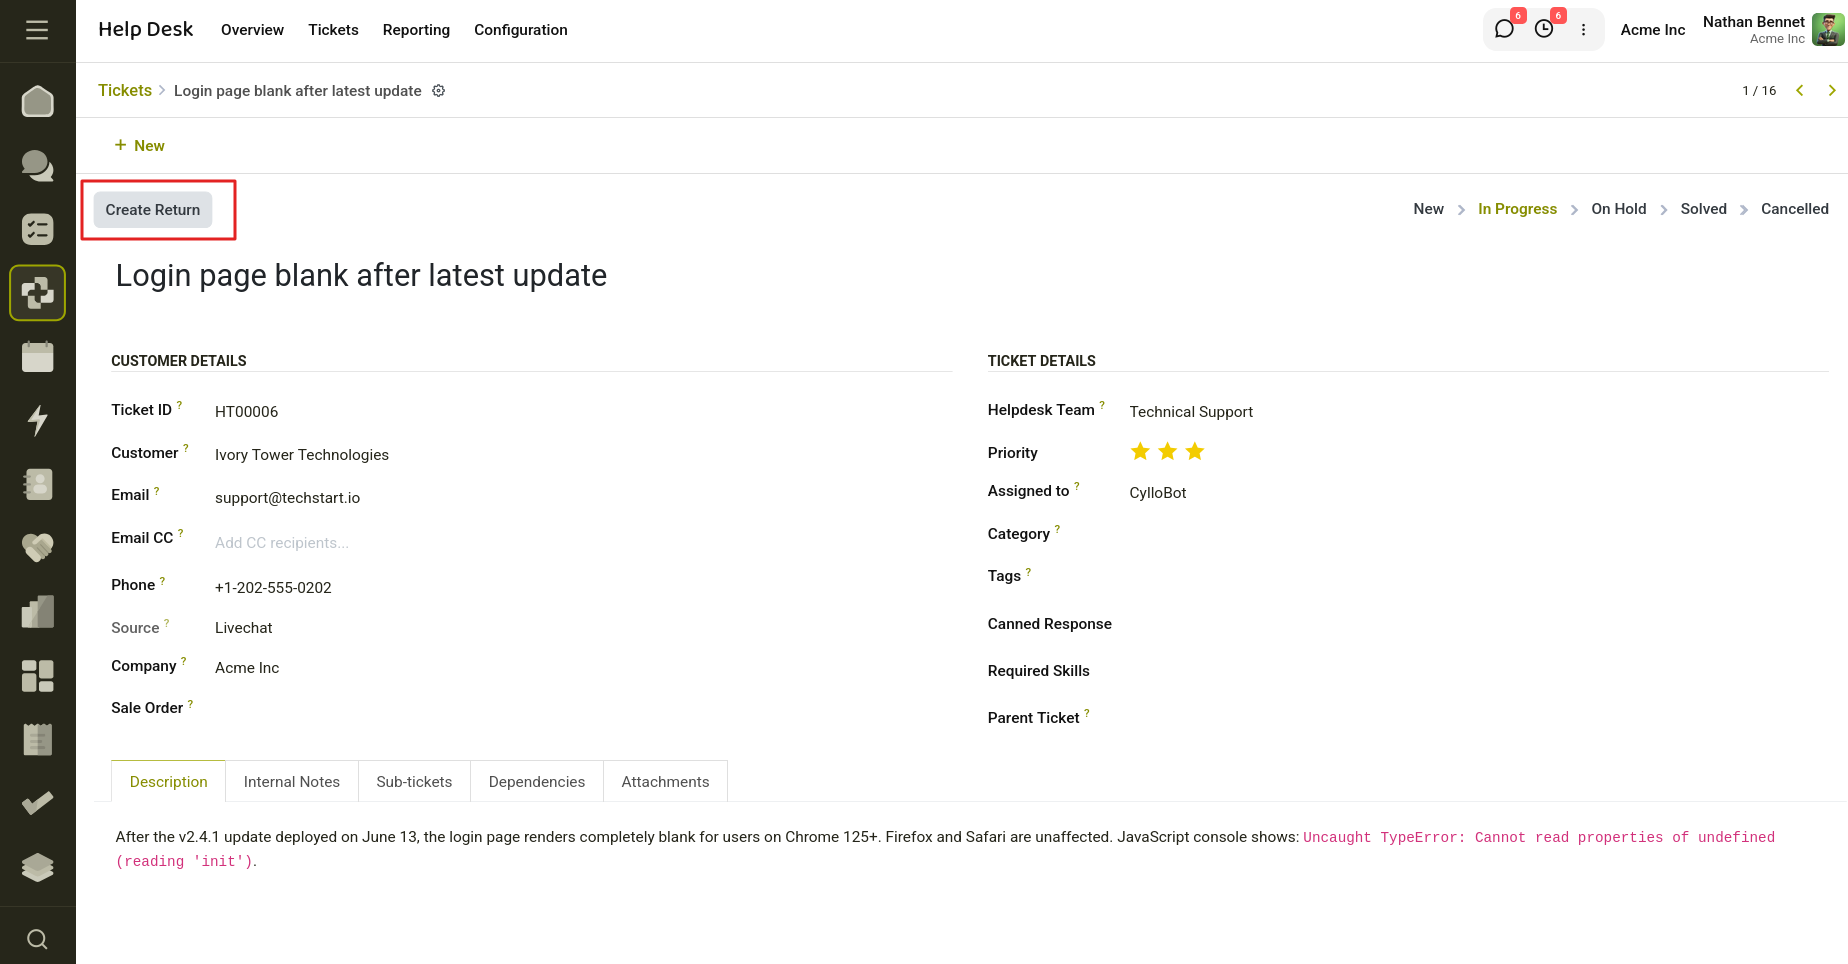
Fig 15.2 — Select the Sale order and Sale order line and click Return.
16. Help Desk - Website
Cyllo Helpdesk Website lets visitors on the public website submit Helpdesk tickets through a standard website form, instead of needing portal/back-end access. It plugs into built-in Website Form Builder framework and into the Helpdesk module's team and ticket models.
16.1 What this feature does
- Registers helpdesk.ticket as a website form target ("Create a Ticket" form key).
- A custom WebsiteForm controller override that resolves the right Helpdesk Team, finds or creates the res.partner for the submitter, and attaches uploaded files to the created ticket.
- A form-builder field definition (JS) so site editors can drag a working "Create Ticket" form block onto any page via the website editor.
- A ready-made template that replaces the page's Contact Us form with a full ticket-submission form.
16.2 Enable a team for website ticket creation
- Go to Helpdesk → Configuration → Helpdesk Teams.
- Open the team that should receive tickets submitted from the website.
- Enable the "Use Website Ticket Creation" option.
- Save.
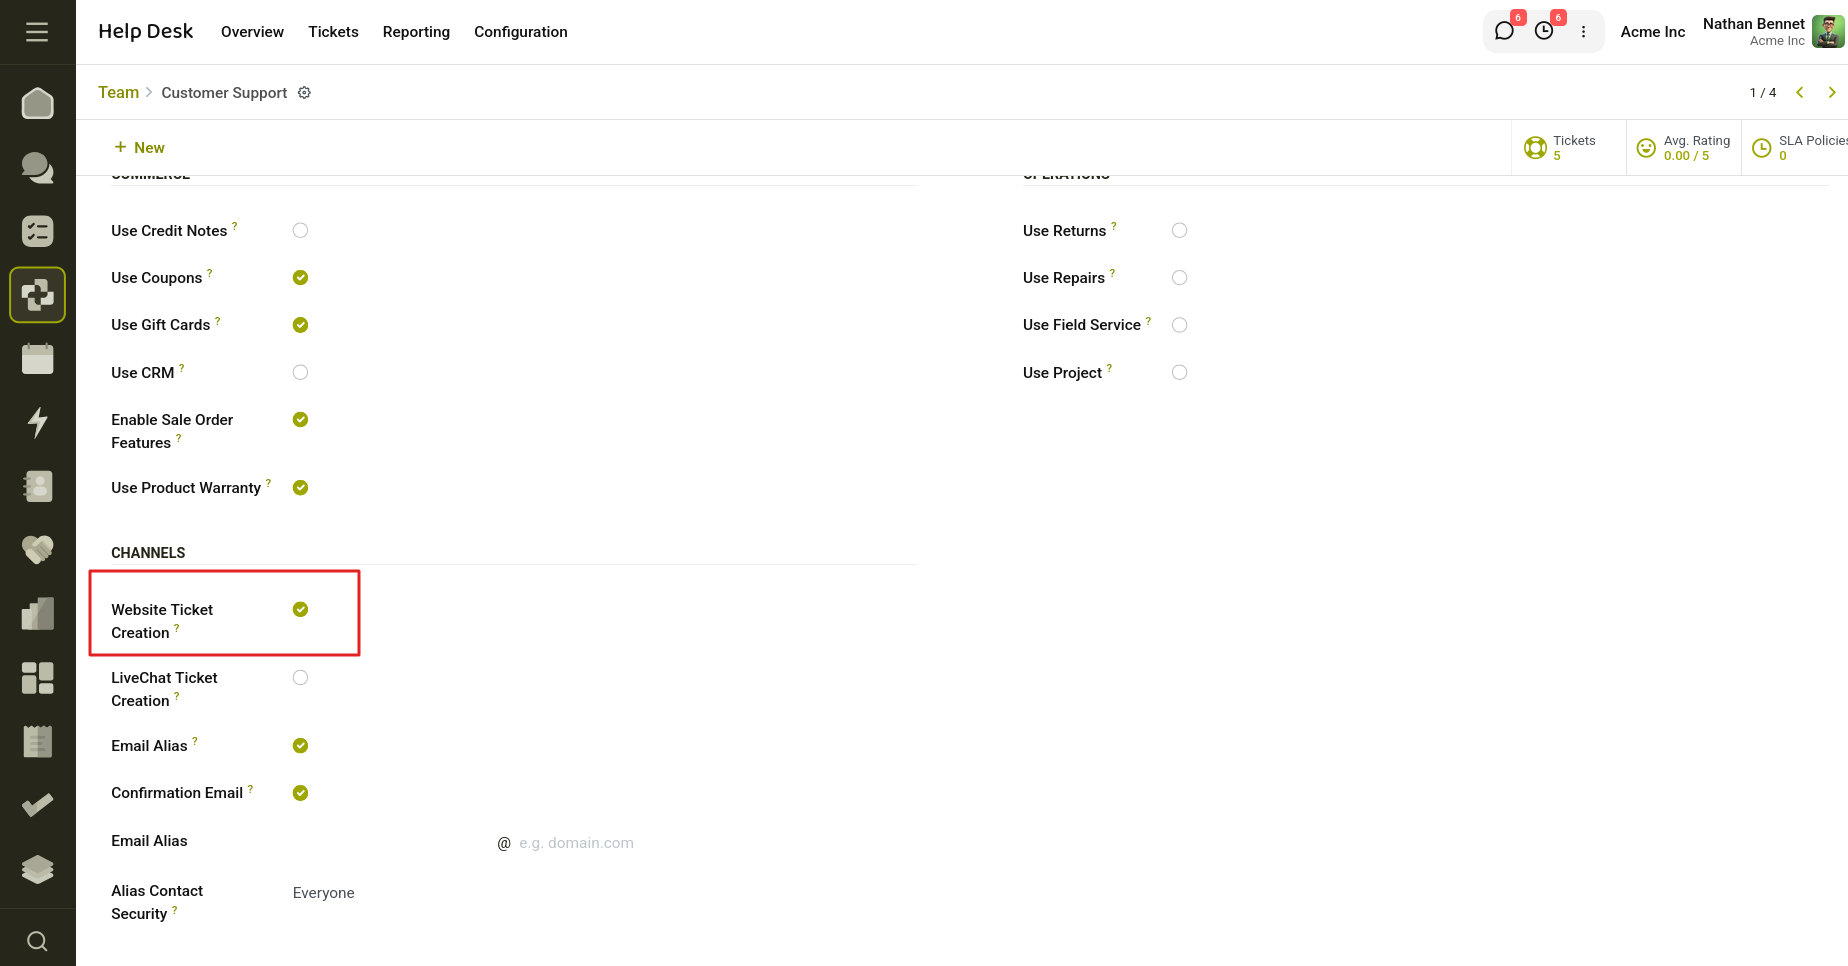
Fig 16.1 — Enable the ‘Website Ticket Creation’ on the ticket.
Note
If more than one team has this enabled, visitors can choose a team if the form exposes the Helpdesk Team field; otherwise the controller picks the first matching team it finds.
16.3 Add the ticket form to a page
- Open the website page in Edit mode (e.g., via the website editor).
- Drag a Form building block onto the page.
- In the Customize panel, change the form's Action / model to "Create a Ticket".
- Optionally show the Helpdesk Team field if you want visitors to pick a team explicitly.
- Save the page.
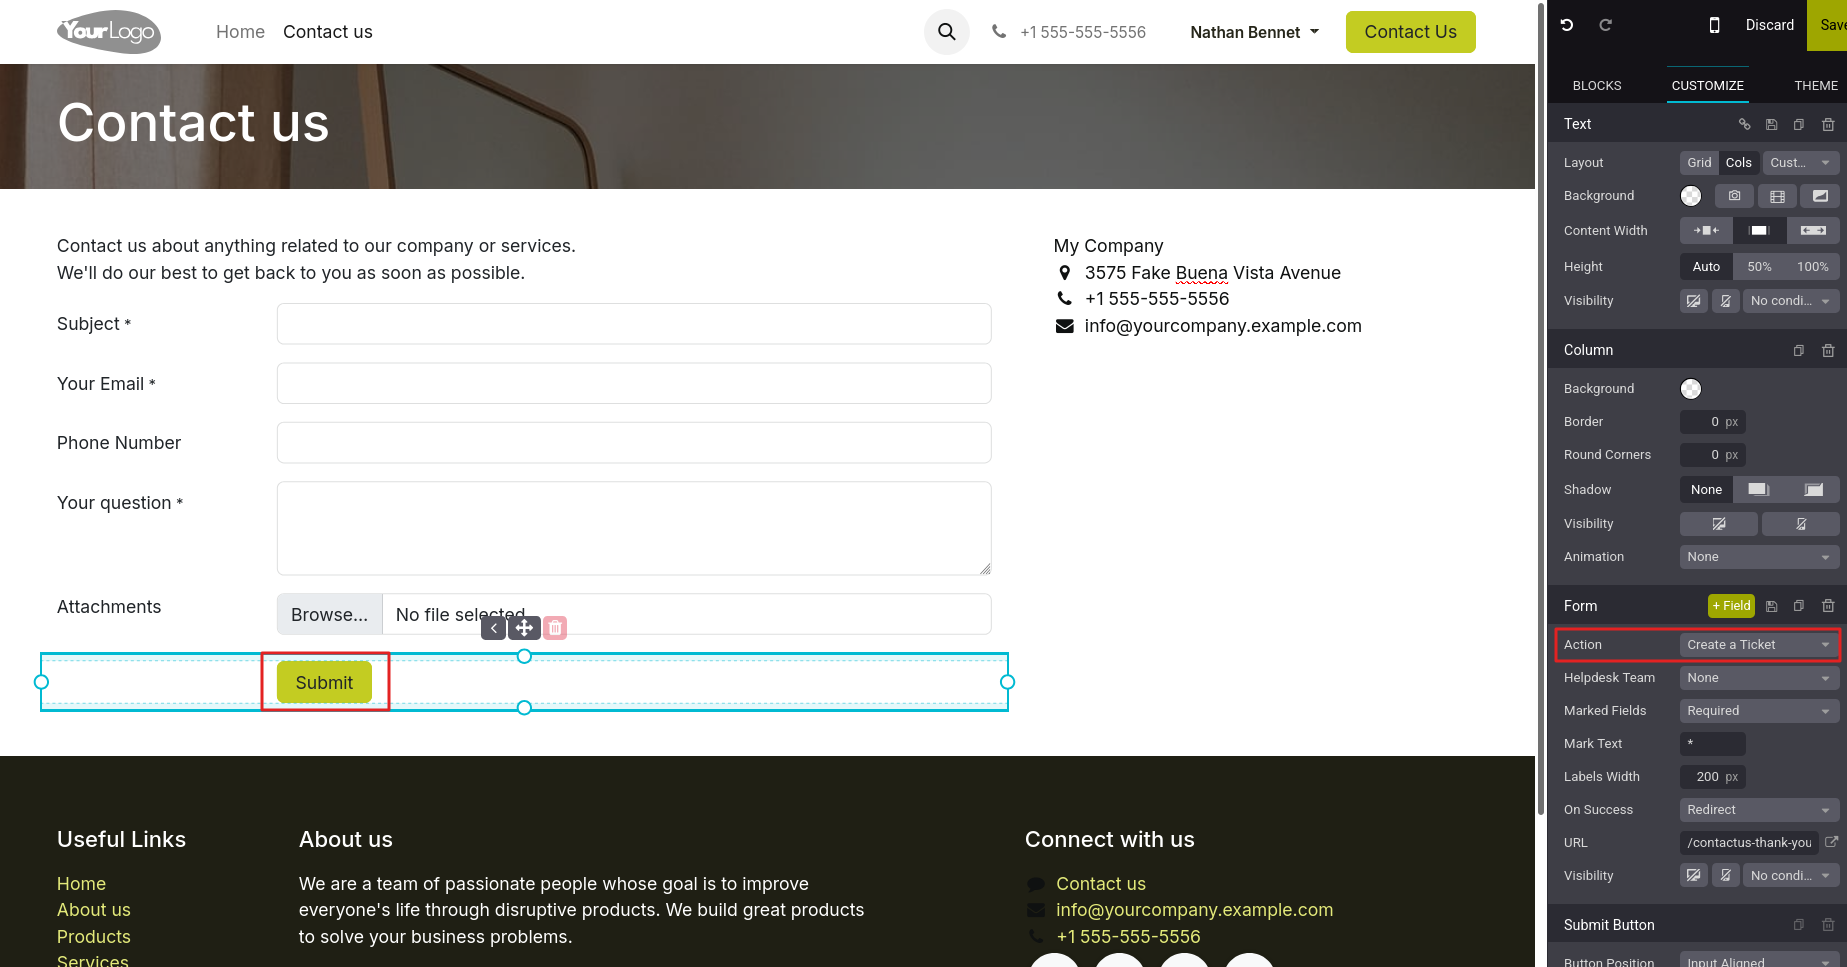
Fig 16.2 — Change the action to Create a ticket.
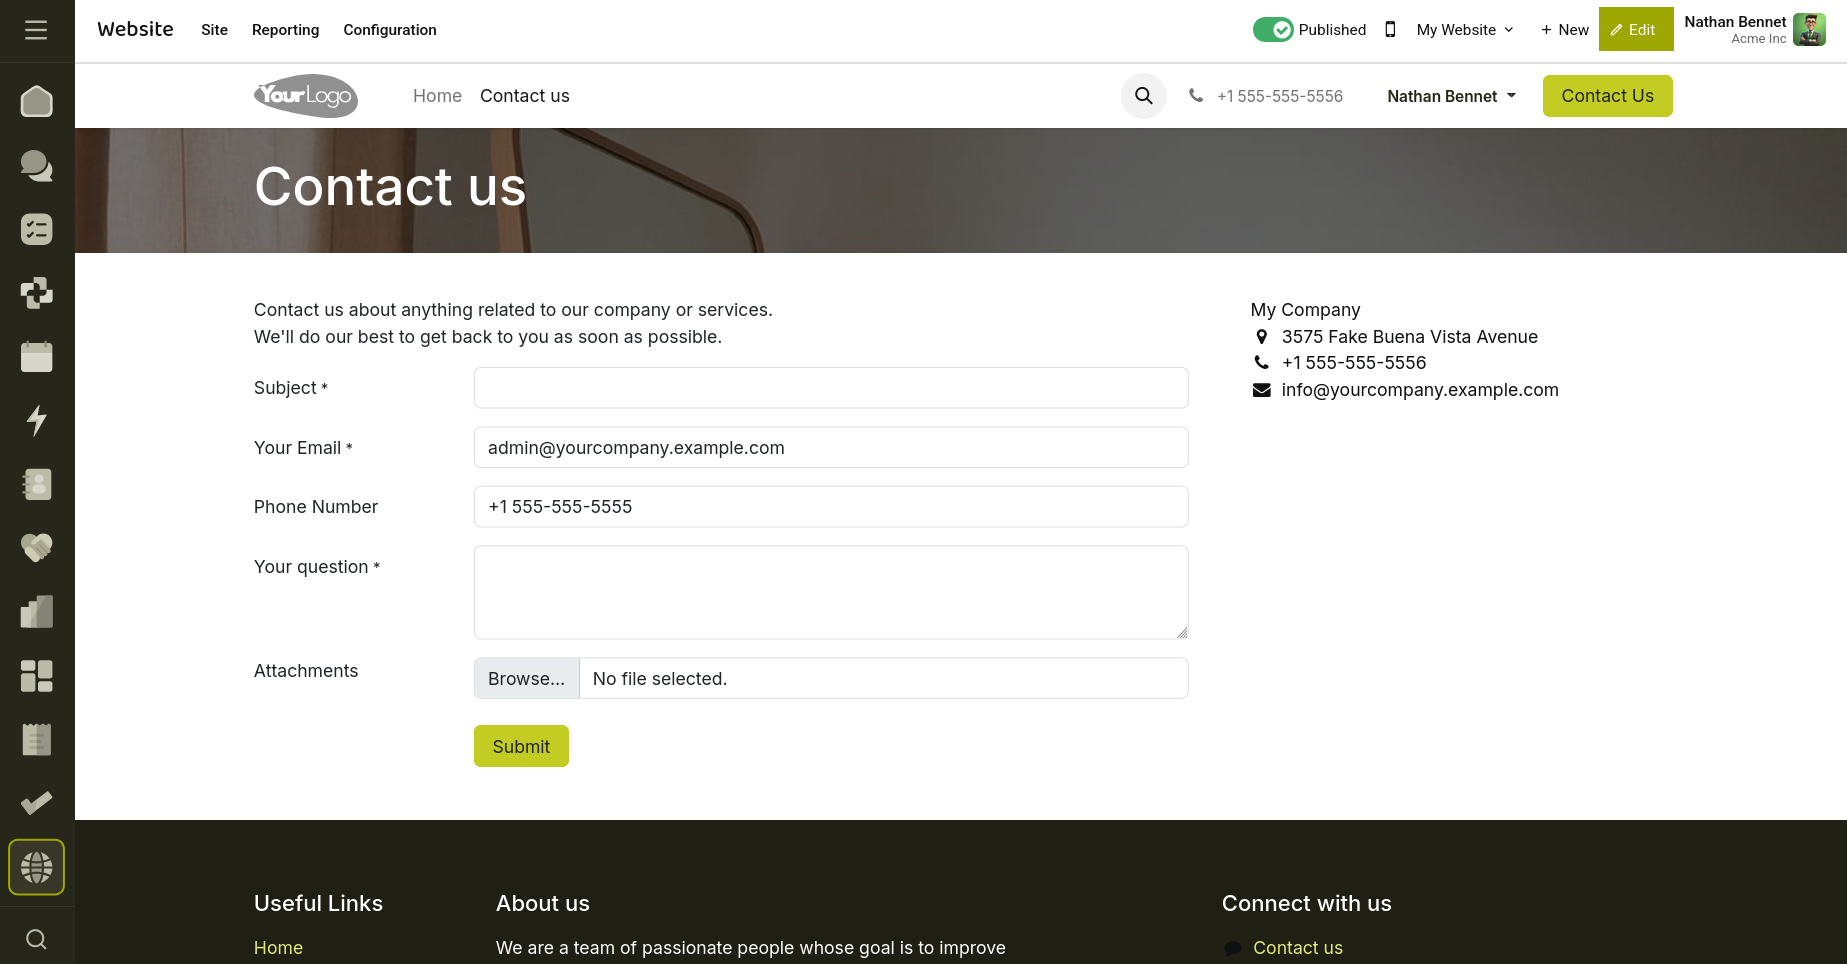
Fig 16.3 — On Submit, creates a ticket.
17. Help desk - Timesheet
Cyllo Helpdesk Timesheet connects two areas of your business that are normally separate: the Help Desk app, where your support team handles customer tickets, and Timesheets, where employees log the time they spend on work. Once installed, the module lets agents record and review time spent on a ticket without ever leaving that ticket, and lets managers see exactly how much effort went into resolving each case.
This is useful in everyday support scenarios such as:
- An agent spends an hour diagnosing a customer issue and wants to log that time immediately, against the ticket itself.
- A team lead reviews a ticket and wants to see, at a glance, how much time has already been invested in it.
- Billing or reporting teams need accurate time data tied back to the specific support case it was spent on, for invoicing or analysis.
17.1 Key Features
The module adds one focused feature to the helpdesk ticket form: a Timesheet tab. This tab:
- Lets agents add timesheet entries (date, employee, description, hours) directly from the ticket they are working on.
- Lists every entry that has been logged against that ticket, in one place.
- Links each timesheet entry back to its originating ticket, so the connection works in both directions — from the ticket to its time entries, and from a timesheet line back to the ticket it belongs to.
- Only appears when timesheets are enabled for the ticket's support team — keeping the interface clean for teams that don't track time.
17.2 Enabling Timesheets for a Support Team
The Timesheet tab is controlled at the Helpdesk Team level, not per ticket. To turn it on for a team:
- Go to Helpdesk > Configuration > Helpdesk Teams.
- Open the team you want to enable timesheets for.
- Find the Timesheet setting and switch it on. (This setting is enabled by default for new teams.)
- Save the team record.
- Once this is switched on for a team, every ticket assigned to that team will show the Timesheet tab.
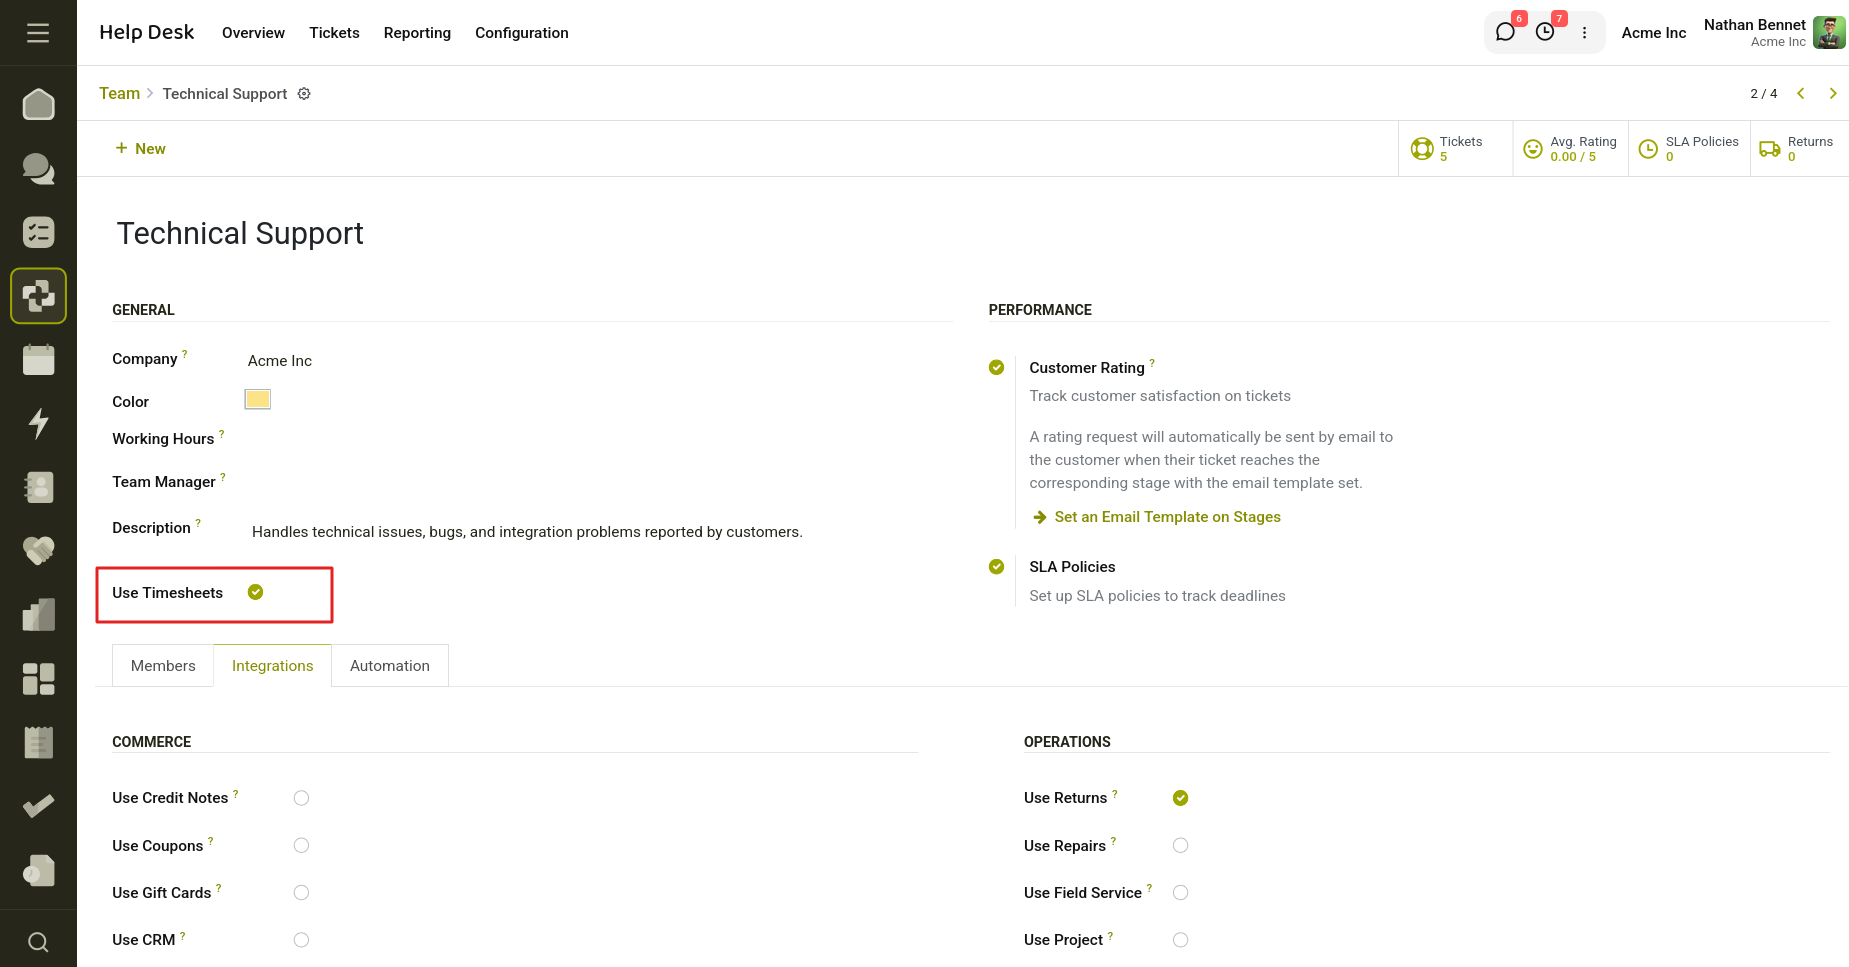
Fig 17.1 — Enable ‘Use Timesheets’ on Teams.
17.3 Opening a Ticket
- Go to the Help Desk app.
- Open any ticket from a pipeline view, list view, or by searching for it.
- Confirm the ticket's support team has timesheets enabled (see section 3.3). If it does, a Timesheet tab will be visible in the ticket's notebook area.
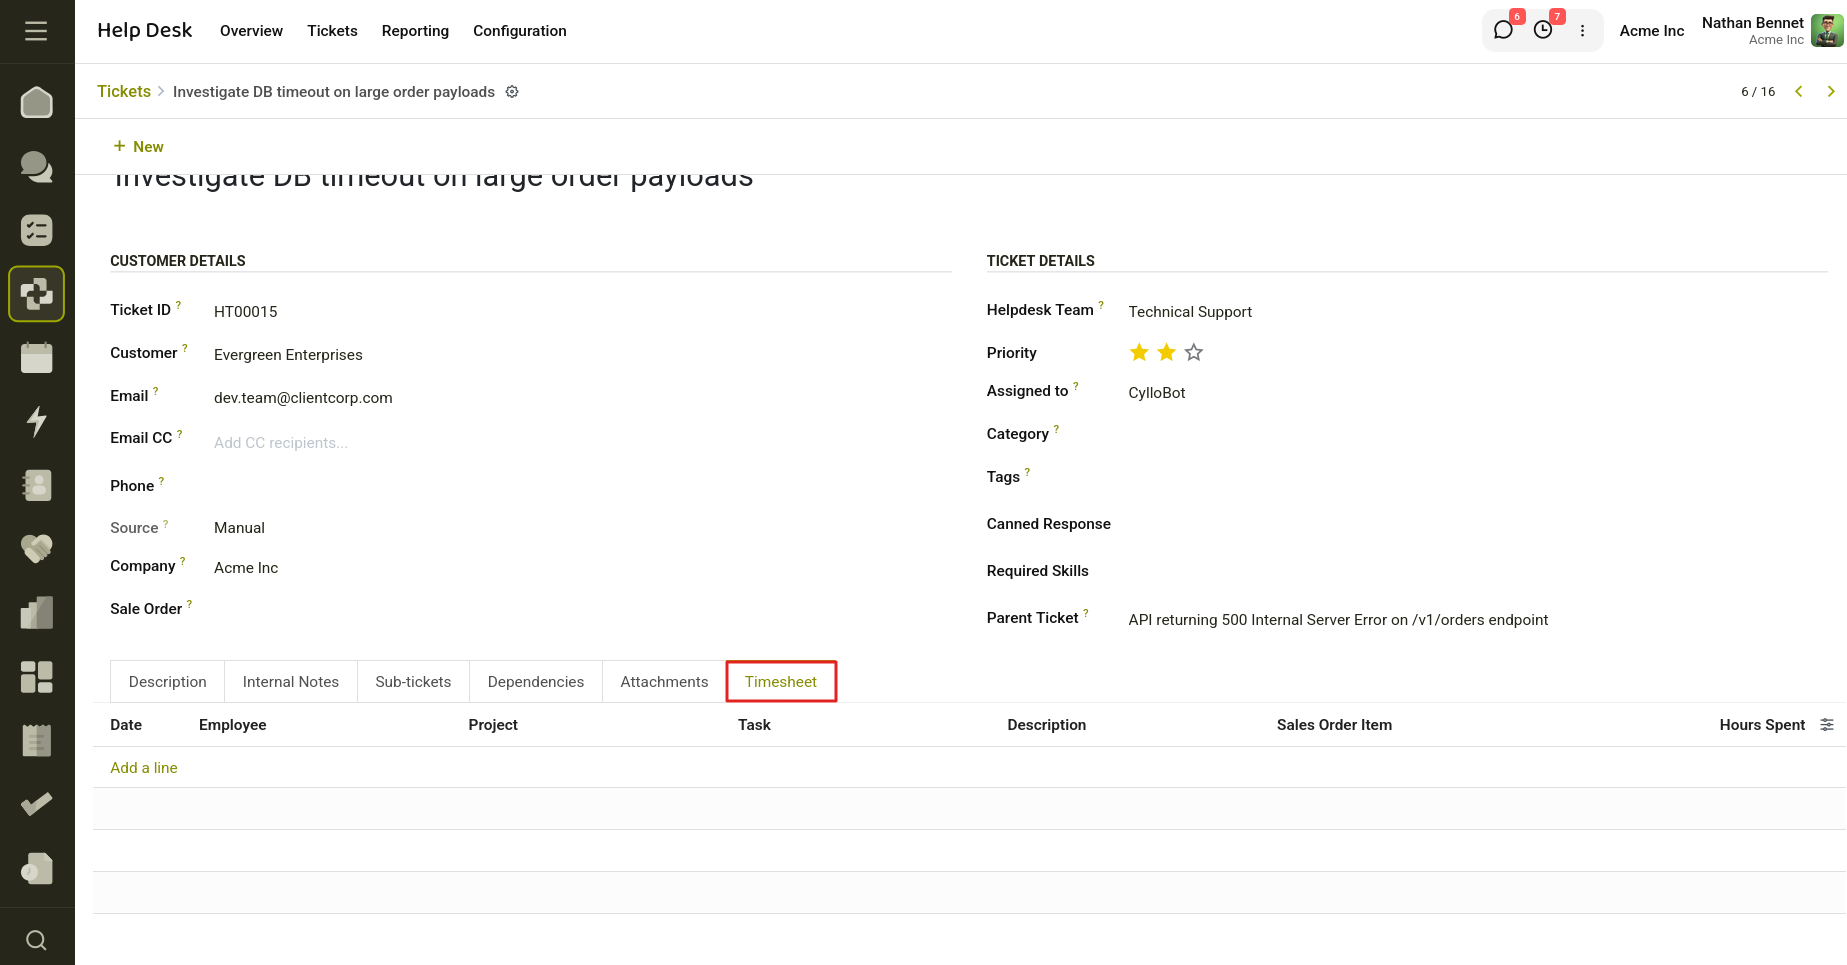
Fig 17.2 — Timesheet tab appears on the ticket.
17.4 Logging Time on a Ticket
- Open the ticket and click the Timesheet tab.
- Click Add a line (or the equivalent add-row control) to create a new timesheet entry.
- Fill in the entry details — typically the employee, a short description of the work done, and the number of hours spent.
- Save the ticket. The new entry is now permanently linked to this ticket and will also appear in the Timesheets app under the employee's normal timesheet records.
18. Help desk - Livechat
Cyllo Helpdesk Livechat is a seamless integration module that bridges LiveChat functionality with the Cyllo Helpdesk system. It enables support staff and visitors to create helpdesk tickets directly from live chat conversations.This module extends the discuss.channel model to provide a command-based interface (/ticket) that allows users to convert chat conversations into formal support tickets.
Ideal Use Cases:
- Real-time Support: Convert ongoing chat discussions into tracked support tickets
- Customer Context: Preserve chat history and visitor information in the ticket
- Workflow Integration: Move seamlessly from real-time chat to formal ticket tracking
- Multi-channel Support: Works across channels, chats, groups, and livechat conversations
18.1 Configuration
Configure Helpdesk Team Settings
- Navigate to Helpdesk → Configuration → Teams
- Create or edit a team
- Enable: 'Use Livechat Ticket Creation'
- Assign team members
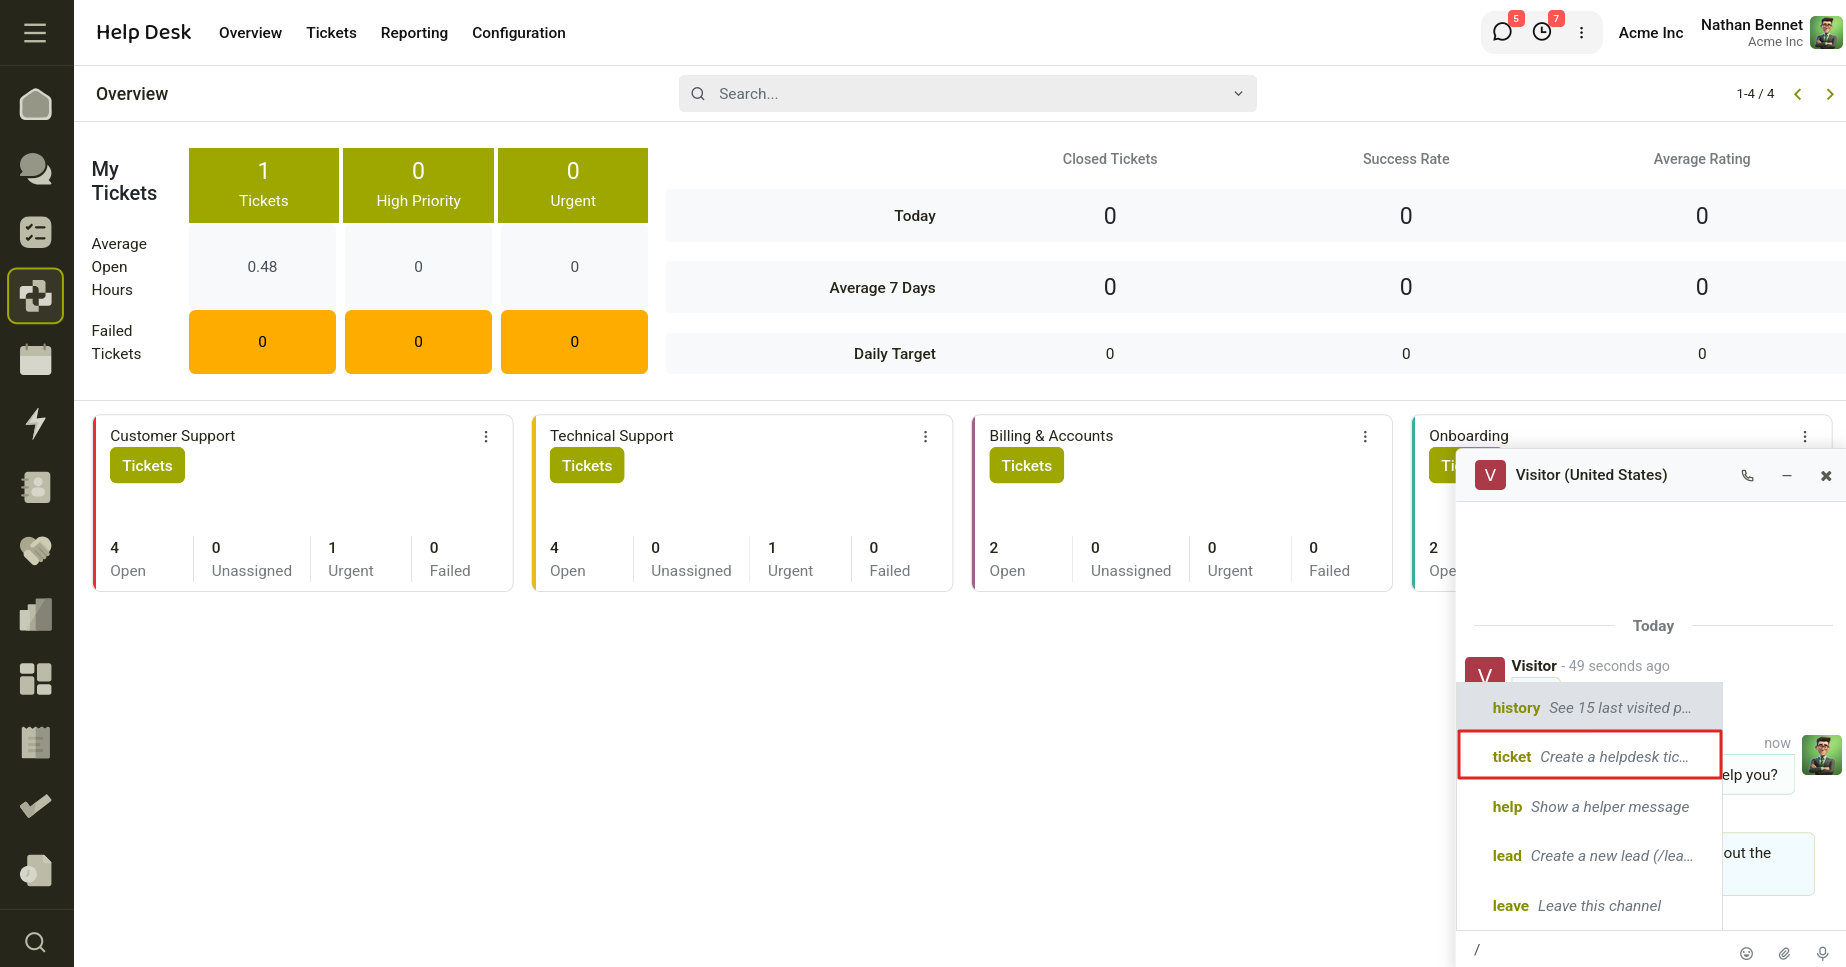
Fig 18.1 — Create ticket from livechat.
19. Help Desk - Account
Cyllo Helpdesk Account is a lightweight bridge between the Helpdesk module and Accounting (Invoicing) . It allows support agents and managers to handle invoice‑ and credit‑note‑related tasks directly from a Helpdesk ticket, without switching to the Accounting app. From a single ticket, an agent can:
- See how many invoices and credit notes exist for the ticket's customer (a smart‑button count).
- Open the customer's full invoice and credit note list with one click.
- Attach a specific invoice to the ticket and review its line items.
- Start a refund (credit note) for that invoice directly from the ticket.
- See and reopen any credit notes that were created from that ticket.
19.1 Enabling Credit Notes for a Helpdesk Team
Most of the screens added by this module — the Invoice field, the Create Refund button, and the Refunds smart‑button — are tied to a per‑team setting called Credit Notes. They will not appear on a ticket until this setting is switched on for the ticket's Helpdesk Team.
- Go to Helpdesk → Configuration → Helpdesk Teams.
- Open the team that handles billing‑related tickets.
- In the team settings, enable the Credit Notes option.
- Save the team. Tickets that belong to this team will now show the invoice and refund tools described in this manual.
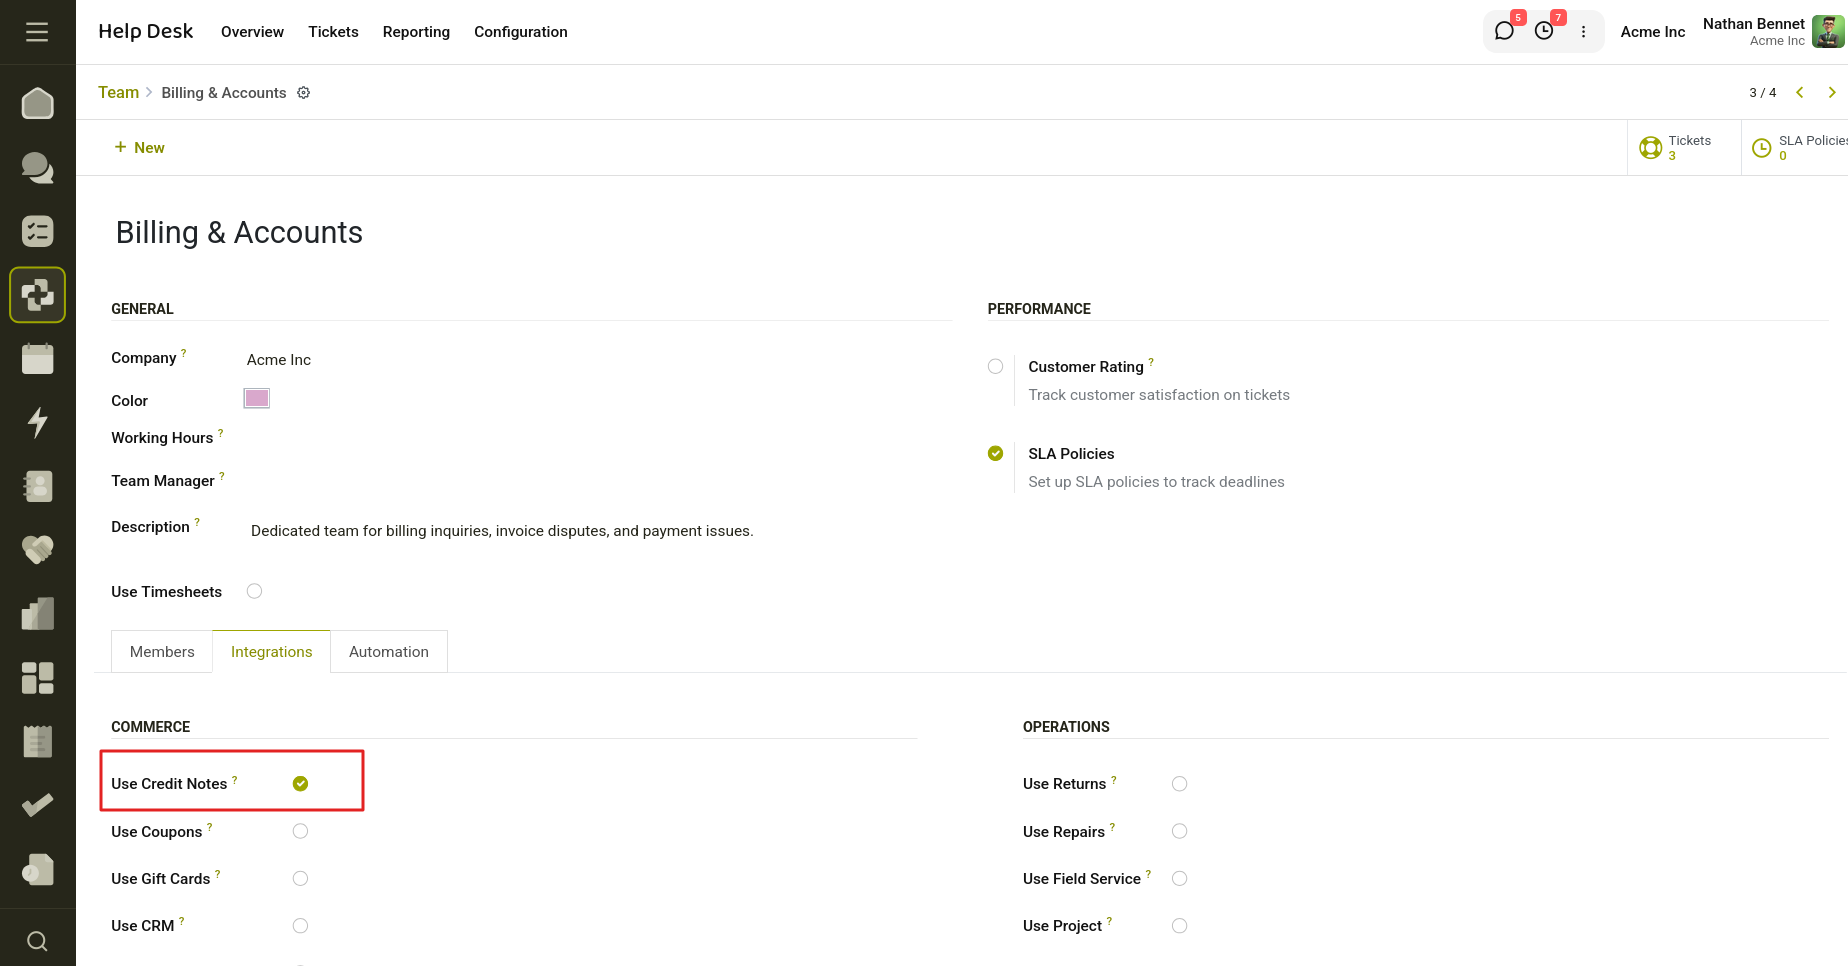
Fig 19.1 — Enable credit notes for a helpdesk team
19.2 Creating a refund / credit note from a ticket
Once an invoice is linked to the ticket, an agent can start a credit note directly, instead of going to the Accounting app and looking the invoice up again.
- Open the ticket and confirm it has a Customer and a linked Invoice.
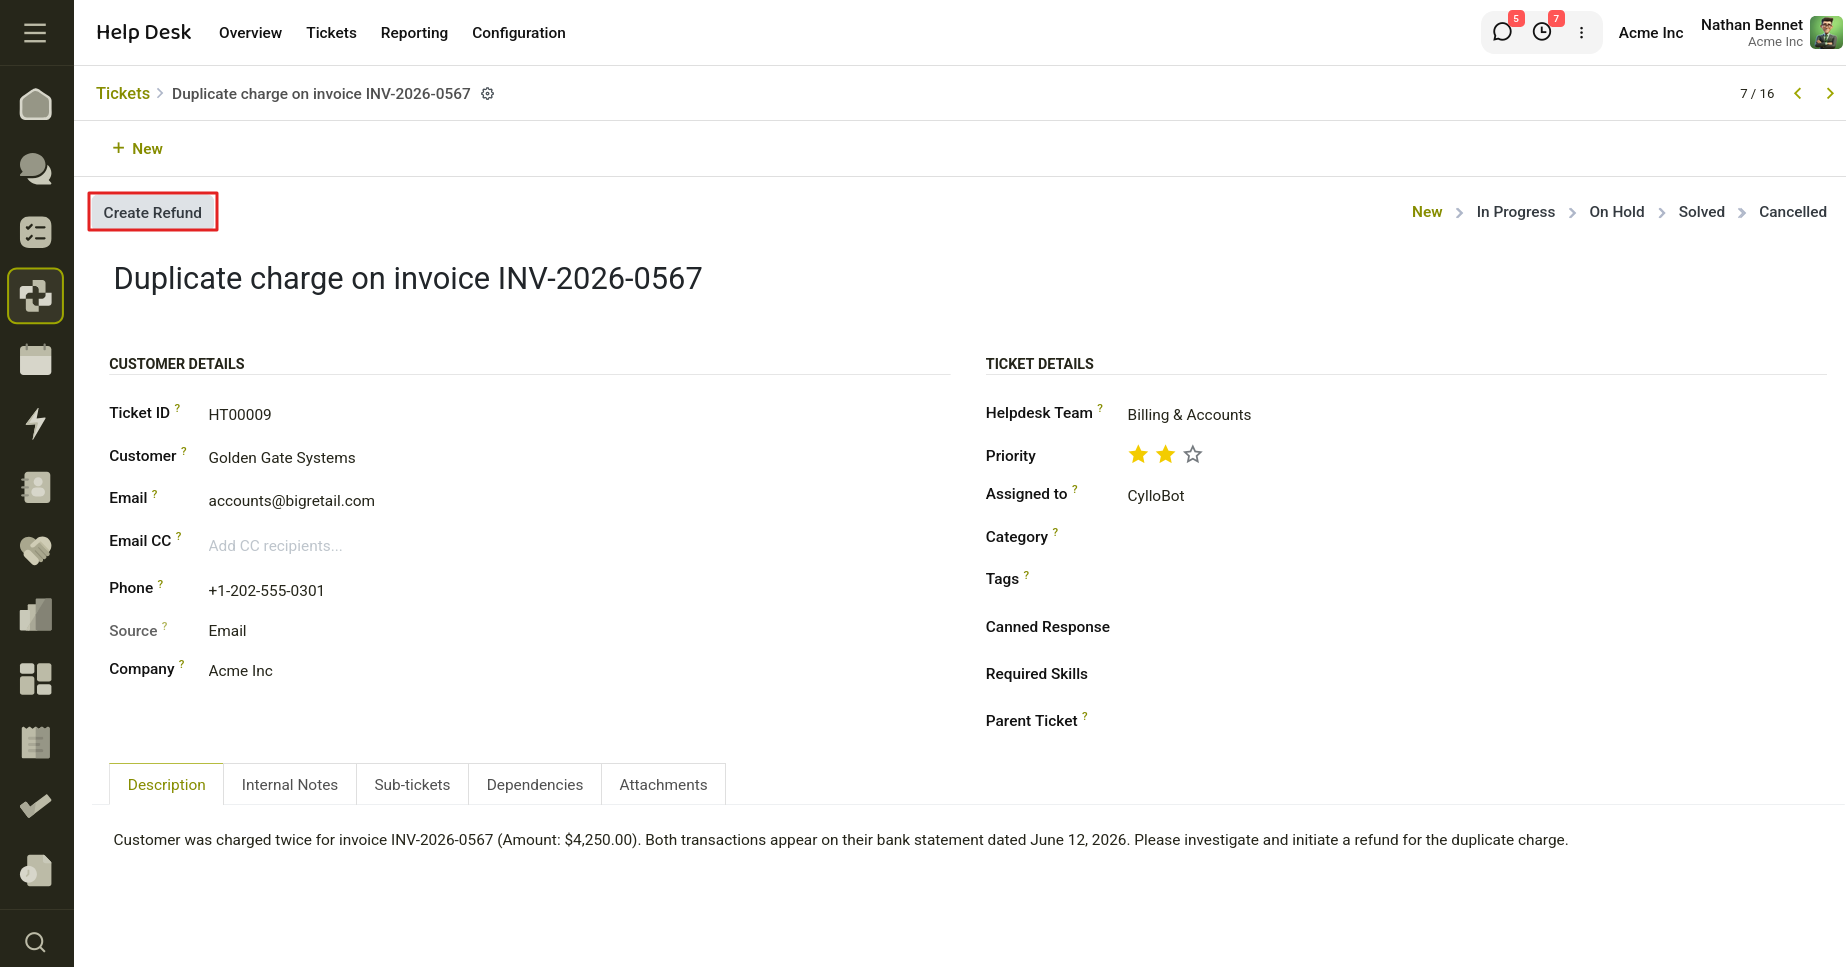
Fig 19.2 — Create refund from a ticket.
- Click the Create Refund button in the ticket header.
- Cyllo opens the standard Reverse Moves wizard, pre‑filled with the linked invoice.
- Complete the wizard as usual (reason, reversal date, etc.) and confirm to generate the credit note.
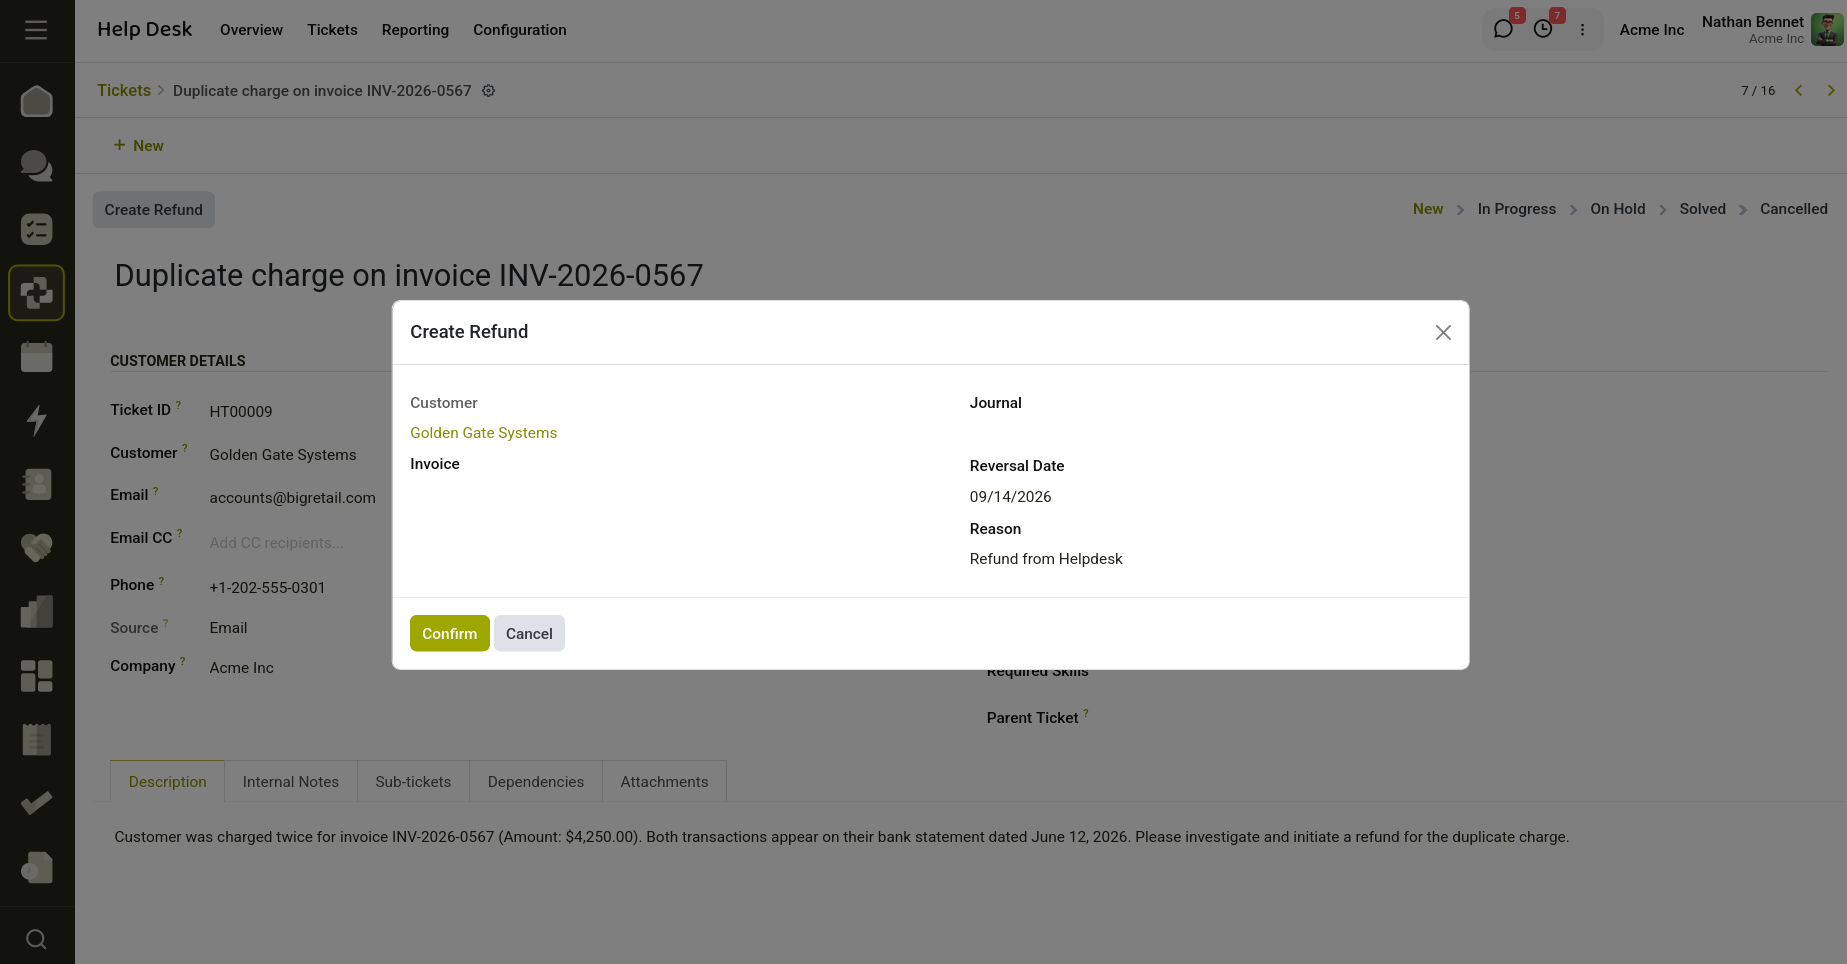
Fig 19.3 — Give the Reason for the credit note.
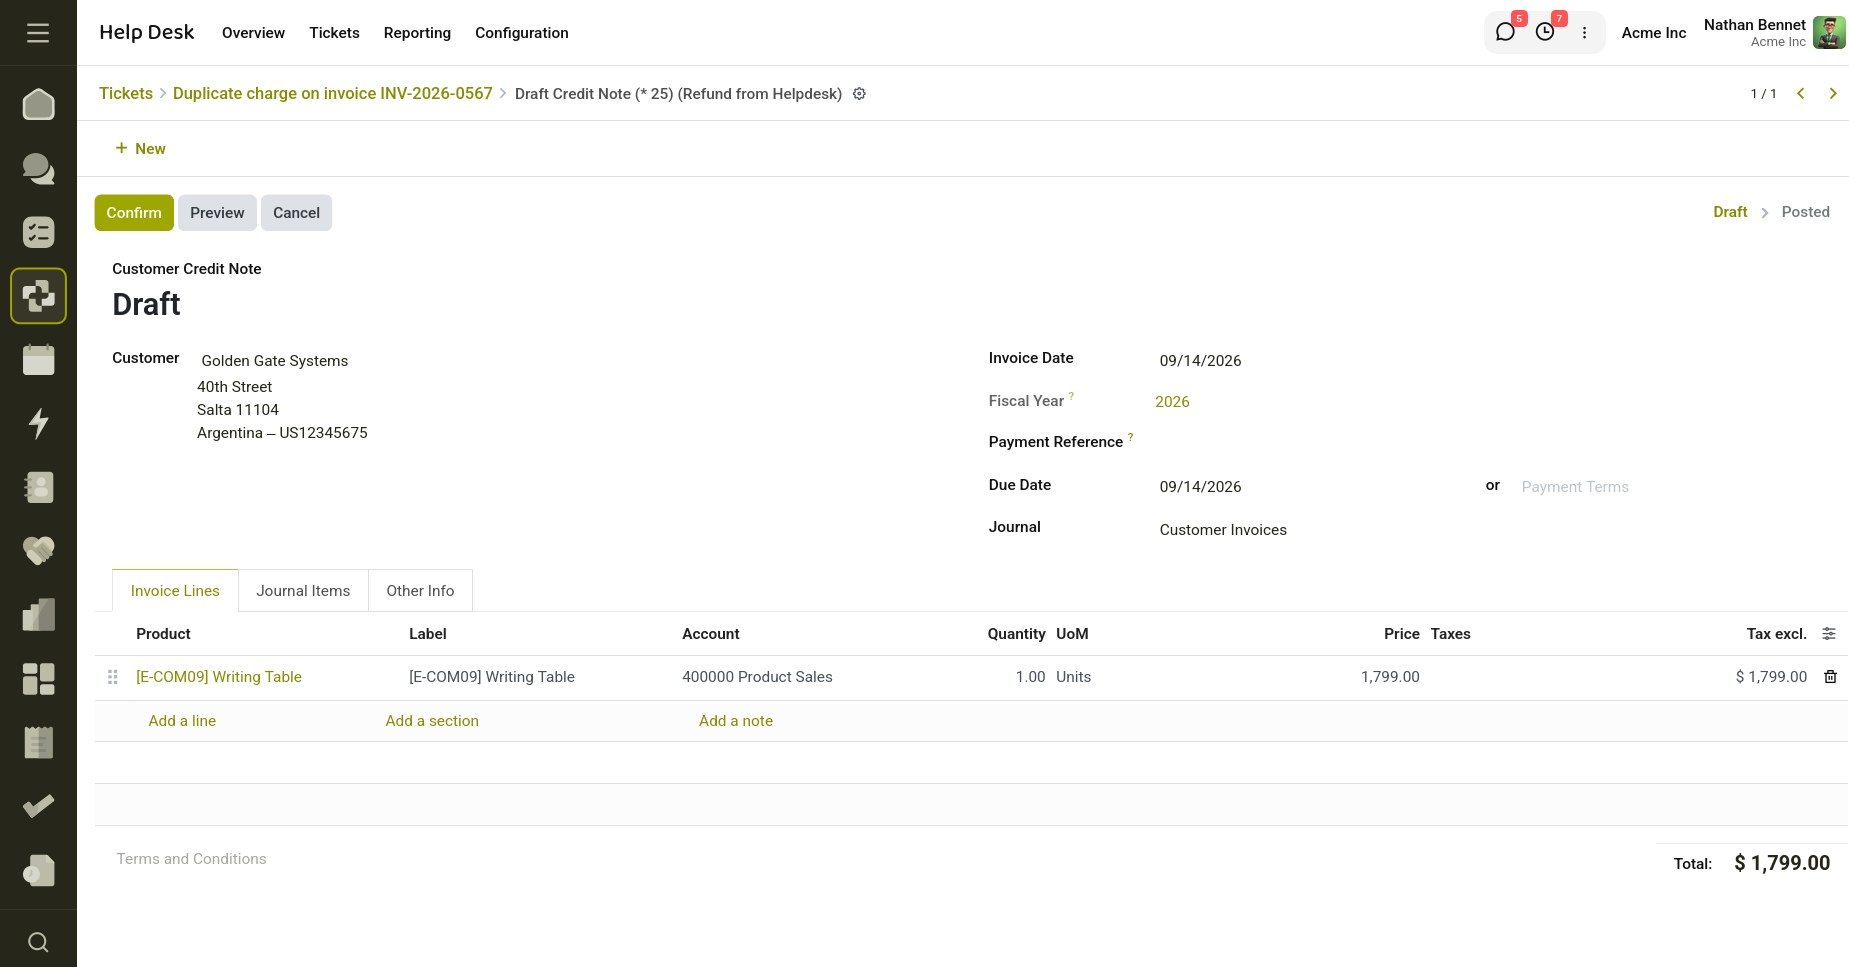
Fig 19.4 — Create the draft invoice.
- A note is automatically posted to the ticket's chatter recording that a refund was initiated, so the rest of the team can see the activity in the ticket history.
Note
If you click Create Refund before selecting an Invoice, cyllo will show an error asking you to select an invoice first.