

Cyllo Email Marketing Documentation
Introduction
The Cyllo Email Marketing module provides a complete platform for creating, managing, and analyzing email campaigns from within your ERP. It enables marketing teams to design professional emails using a visual drag-and-drop editor, segment audiences into targeted mailing lists, schedule campaigns with precision, and track engagement in real time — all without leaving Cyllo. From simple newsletters to complex drip sequences, the module supports the full range of modern email marketing needs. Email Marketing connects natively with Cyllo's CRM, Marketing Automation, and Contact modules. Leads captured from email campaigns flow directly into CRM pipelines, contact records are updated automatically based on opt-in and subscription activity, and email actions can be embedded as steps in multi-channel marketing automations — eliminating the need for manual data transfer between departments. Together, these capabilities form a centralized email marketing framework powered by the Cyllo ERP database. Marketing teams gain full visibility into sender reputation management, delivery performance, and campaign ROI, while working from the same platform used by sales, customer service, and operations — ensuring that every email campaign is aligned with the broader business context.
1. Email Marketing Overview
This section introduces what the Email Marketing module is, what it can do, and how it fits into the Cyllo ecosystem.
1.1 What is Email Marketing in Cyllo
The Email Marketing module in Cyllo is a built-in campaign management tool that allows users to design, send, and track bulk email campaigns directly from the ERP. It is designed for marketing teams that need to reach large audiences with targeted, personalized messages while maintaining full control over deliverability, compliance, and performance analytics.
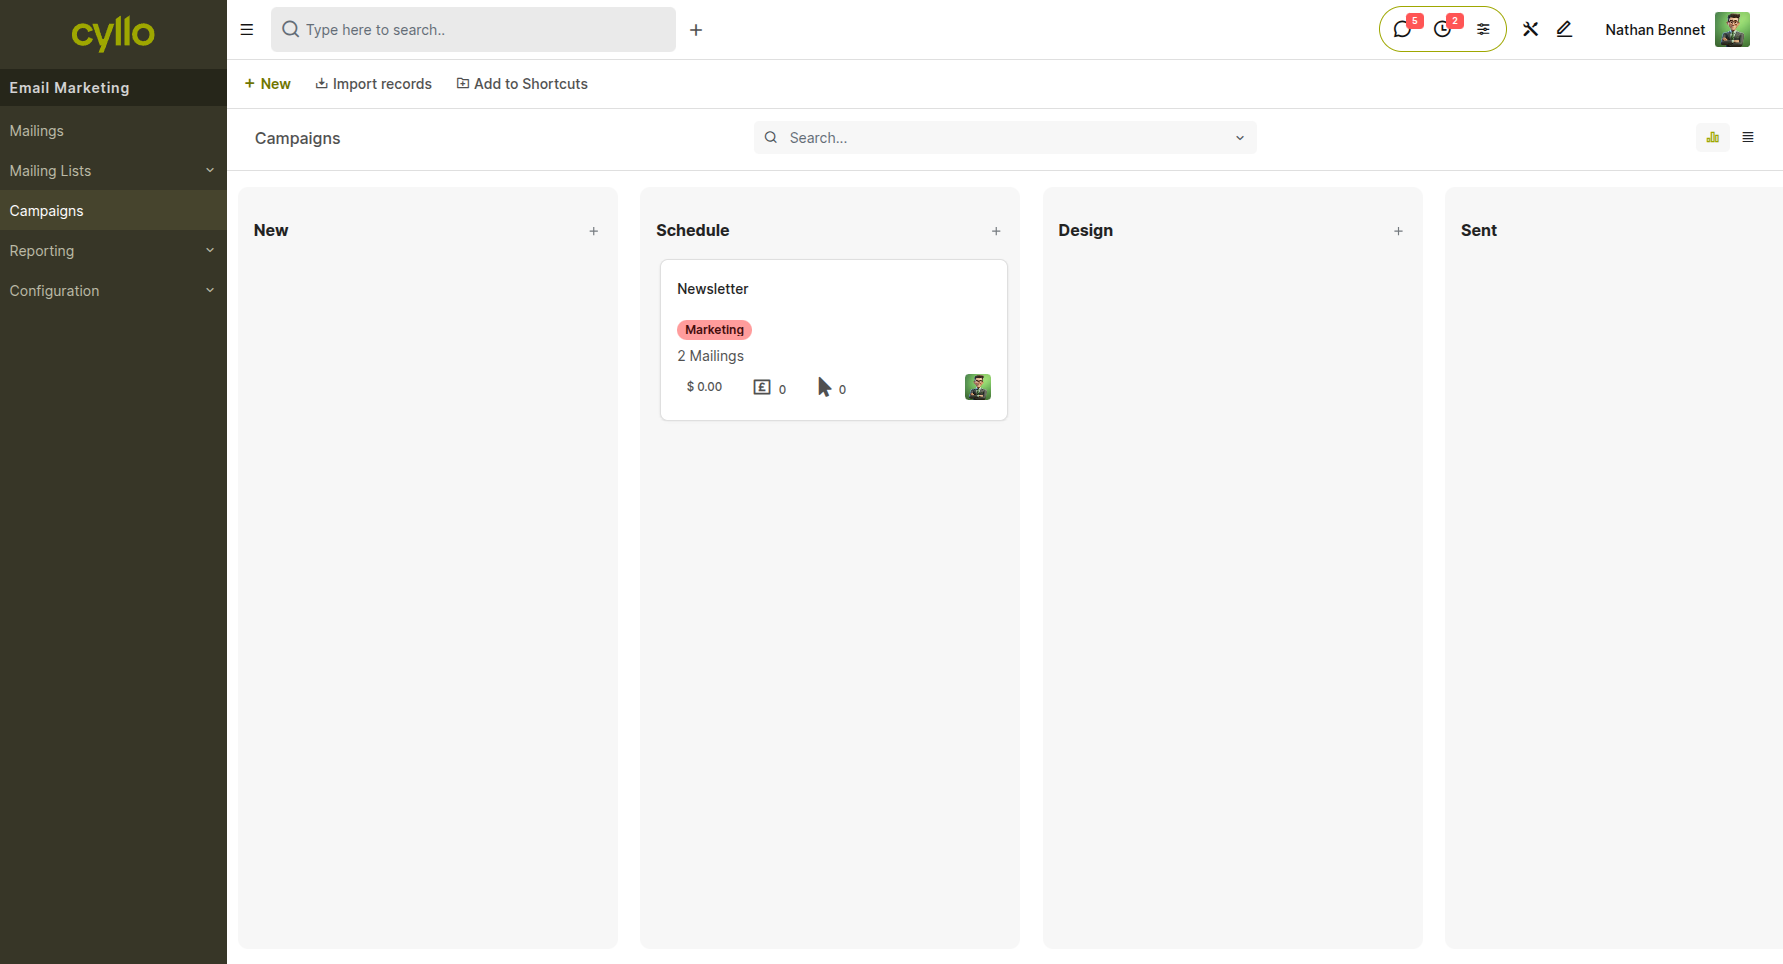
Fig 1.1 — Email Marketing module home screen showing campaign list in list view with status indicators (Draft, Scheduled, Sent)
How to access Email Marketing:
- Go to Email Marketing from the main application menu
- The module opens to the campaign list view by default
Key capabilities at a glance:
- Create campaigns with a visual drag-and-drop editor
- Manage segmented mailing lists for precise targeting
- Track sent, opened, clicked, and replied metrics per campaign
- Run A/B tests to optimize subject lines and content
- Automate sequences based on recipient behavior
- Configure custom SMTP servers for deliverability control
- Manage opt-outs and blacklists for compliance
Note
The Email Marketing module is available from the main app menu. If it is not visible, ask your system administrator to install and enable it from the Cyllo App Store.
2. Campaign Management
Campaign management covers the full lifecycle of an email campaign — from creation through completion. This section explains how to create, organize, and schedule campaigns using Cyllo's Kanban workflow.
2.1 Creating a Campaign
A campaign is the top-level container for an email marketing send. It defines the audience, the email content, the sender identity, and the schedule. Creating a campaign is the first step before composing or sending any emails.
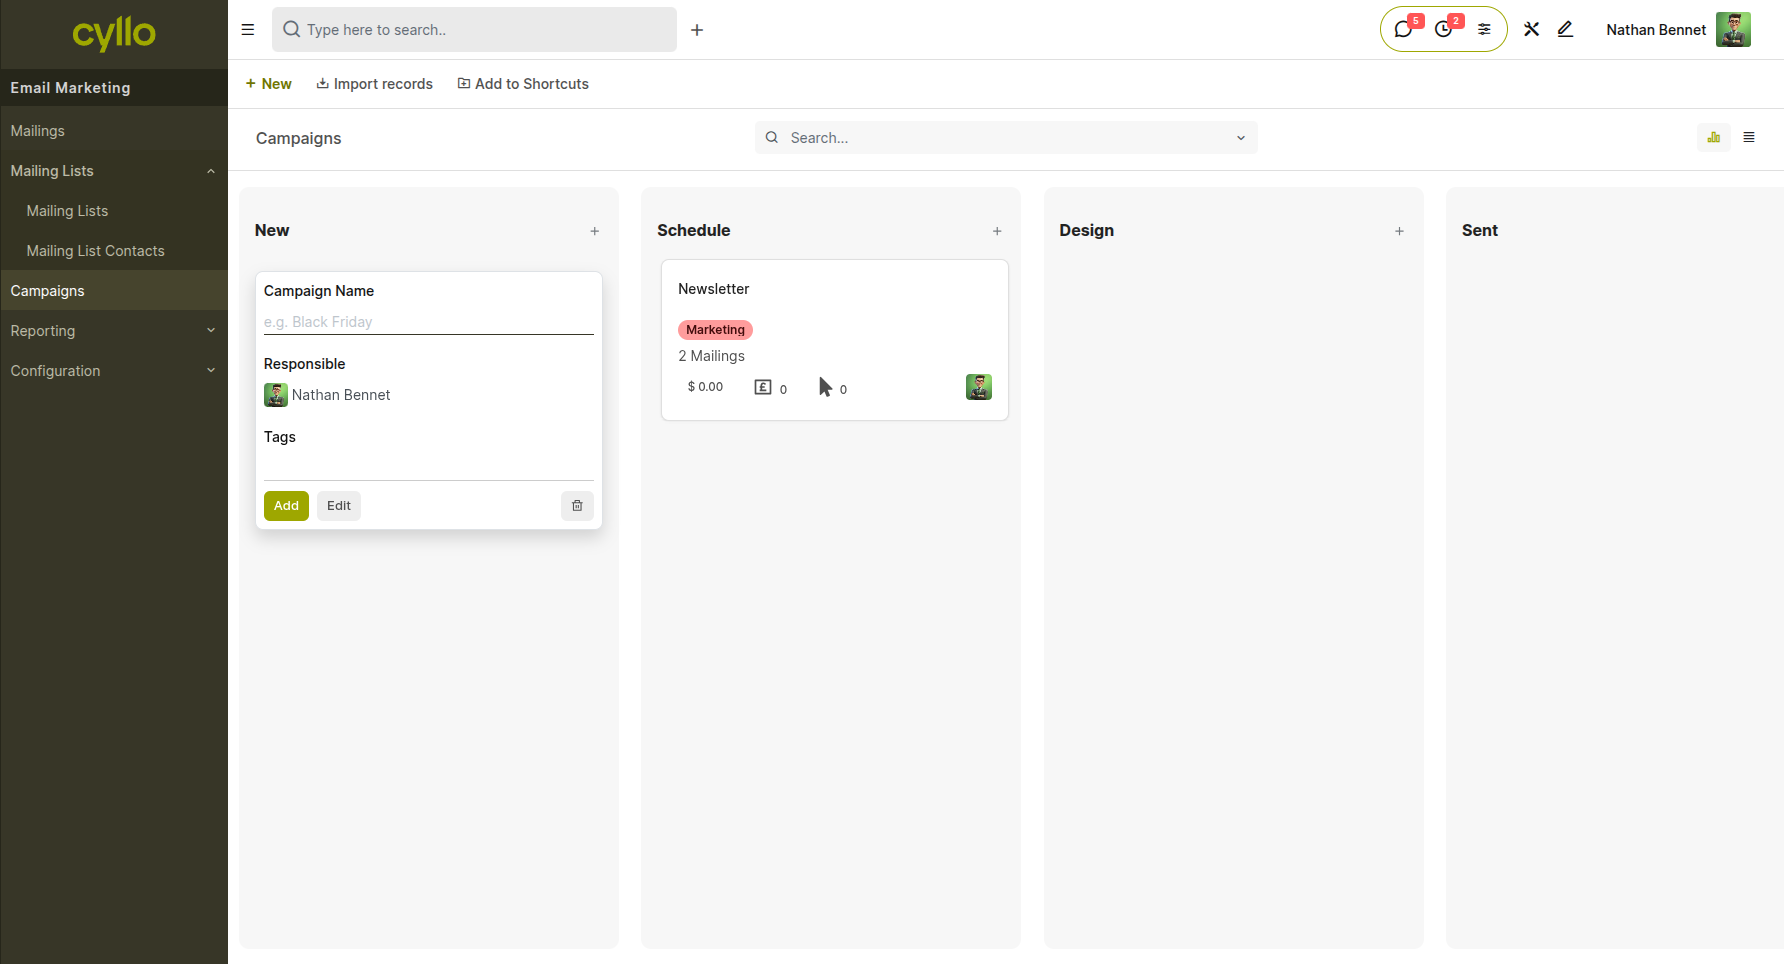
Fig 2.1 — New Campaign form showing fields for Campaign Name, Mailing List, From email, Subject, and email body area
How to create a campaign:
- Go to Email Marketing → Campaigns → New
- Enter a Campaign Name to identify this send internally
- Select the target Mailing List(s) from the dropdown
- Set the From name and email address that recipients will see
- Enter the Subject Line for the email
- Compose the email body using the drag-and-drop editor (see Section 3.1)
- Click Save to save the campaign as a draft
Key Fields:
- Campaign Name: Internal label for organizing campaigns — not visible to recipients
- Mailing List: One or more pre-configured contact lists (see Section 4.1)
- From: The sender name and email address recipients will see in their inbox
- Subject: The email subject line; directly impacts open rates
- Reply To: The email address that replies are directed to (can differ from From)
Note
A campaign must have at least one mailing list and a valid From address before it can be scheduled or sent.
2.2 Campaign Kanban Board
Cyllo's Email Marketing module includes a visual Kanban board that displays all campaigns organized by their current stage. This gives marketing teams an at-a-glance view of pipeline status — from drafts being prepared to campaigns already delivered.
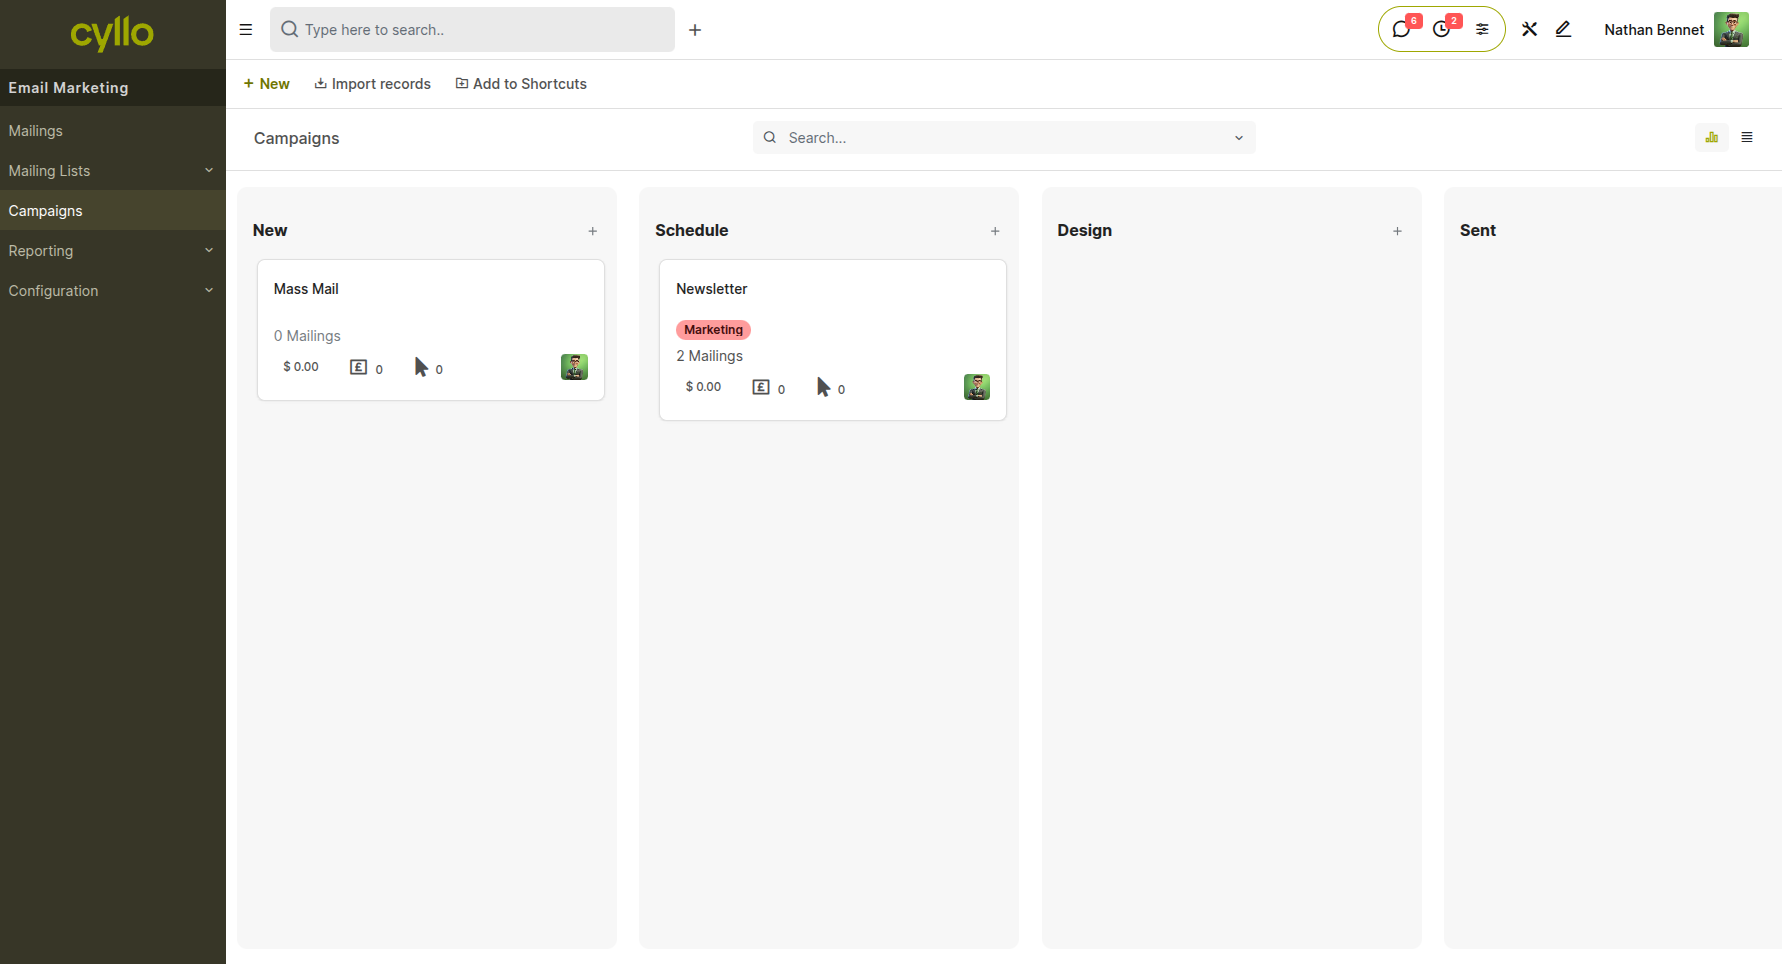
Fig 2.2 — Campaign Kanban board showing columns for Draft, Scheduled, In Progress, and Completed stages with campaign cards in each column
How to access the Kanban board:
- Go to Email Marketing → Campaigns
- Click the Kanban view toggle in the top-right corner
How to move campaigns between stages:
- Drag and drop a campaign card from one column to another
- Or open a campaign and update the stage from the status bar at the top of the form
Campaign stages:
- Draft: Campaign is being created or edited; not yet scheduled
- Scheduled: Campaign is set to send at a future date and time
- In Progress: Campaign is currently being sent (for large sends)
- Completed: All emails in the campaign have been sent
2.3 Scheduling a Campaign
Scheduling allows campaigns to go out at a specific date and time — ideal for time-sensitive promotions, newsletters, or event announcements. Once scheduled, Cyllo handles the send automatically without manual intervention.
How to schedule a campaign:
- Open the campaign in Email Marketing → Campaigns
- Confirm the mailing list, subject, and email content are finalized
- Click Schedule
- Set the Send Date and Time using the date/time picker
- Click Confirm to lock in the schedule
How to send immediately:
- Open the campaign and click Send Now
- Confirm the action in the popup dialog
Note
Campaigns can be unscheduled before the send date by clicking Cancel Sending and returning the campaign to Draft stage for further edits.
3. Email Composition
The email composition tools in Cyllo allow marketers to design professional, responsive emails without writing code. This section covers the visual editor, personalization through merge fields, and link tracking with UTM parameters.
3.1 Visual Drag-and-Drop Email Editor
Cyllo's email editor provides a fully visual interface for building email layouts by dragging content blocks into place. Users can create structured, branded emails using text blocks, images, buttons, dividers, and more — no HTML knowledge required.
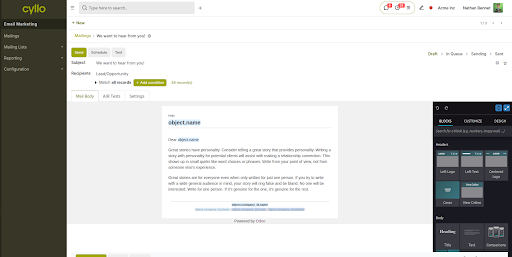
Fig 3.1 — Drag-and-drop email editor with left sidebar showing available content blocks (Text, Image, Button, Divider) and the email canvas area
How to use the email editor:
- Open a campaign and click inside the Email Body area
- The visual editor opens with a blank canvas and a block sidebar
- Drag a block type (Text, Image, Button, Divider, Columns, etc.) from the sidebar into the canvas
- Click on any block to select it, then edit its content in the right-side properties panel
- Rearrange blocks by dragging them up or down within the canvas
- Use the Column block to create multi-column layouts for sidebars or feature grids
- Click Save when the design is complete
Key block types:
- Text: Formatted paragraph or heading content with font and alignment controls
- Image: Upload or link to images; set alt text and click-through URL
- Button: Clickable CTA button with configurable label, link, and style
- Divider: Horizontal rule for visual section separation
- Columns: Multi-column layout container for structured content arrangements
Note
The editor saves content as responsive HTML that renders well across desktop and mobile email clients. Always send a test email (see Section 5.2) before sending to the full list.
4. Mailing Lists & Contact Management
Mailing lists are the audience segments for email campaigns. This section covers how to create lists, add contacts, manage subscriptions, and maintain a clean sender reputation through blacklist management.
4.1 Creating Mailing Lists
A mailing list is a named group of contacts who share a common targeting criterion — such as a product interest, customer segment, geographic region, or newsletter opt-in. Well-organized mailing lists allow precise targeting and avoid sending irrelevant emails to broad audiences.
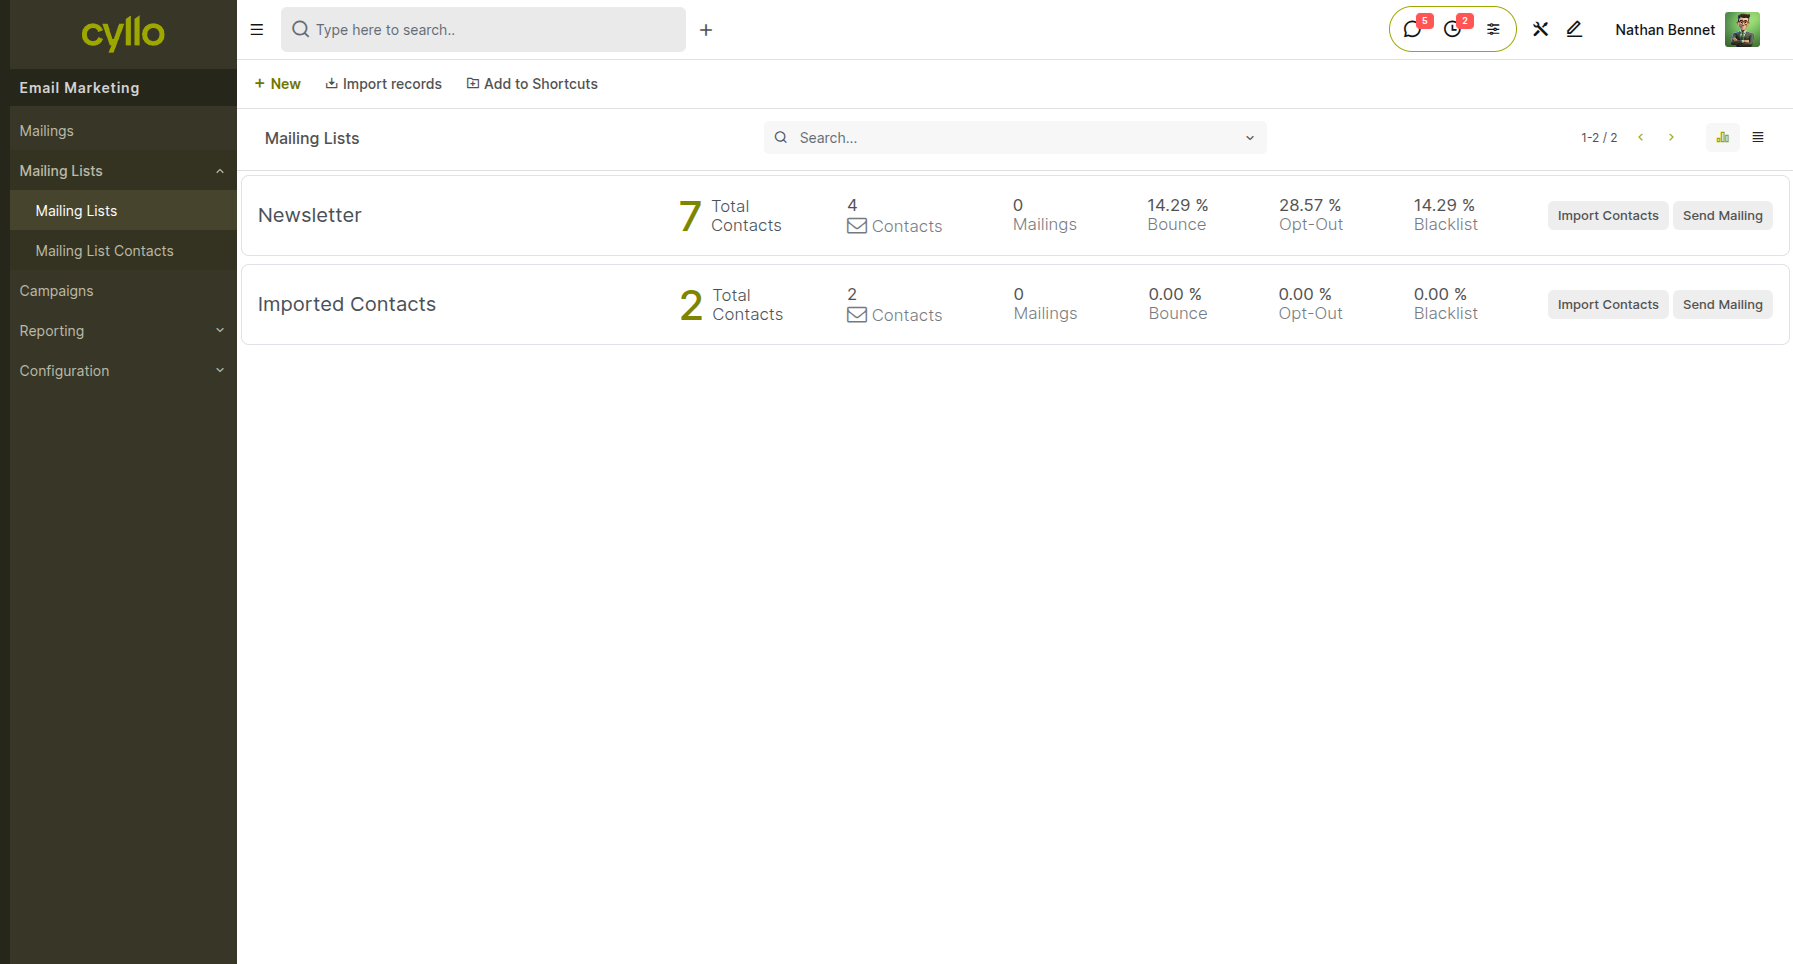
Fig 4.1 — Mailing List form showing the list name, contact count, and options for public visibility and subscription page link
How to create a mailing list:
- Go to Email Marketing → Mailing Lists → New
- Enter a List Name (e.g., "Newsletter Subscribers", "Enterprise Prospects")
- Set the list as Public if contacts should be able to self-subscribe via a landing page
- Click Save
Key Fields:
- List Name: Identifies the list in campaign targeting dropdowns
- Public: When enabled, generates a public subscription link for opt-in forms
- Contact Count: Automatically updated as contacts are added or removed
Note
Creating multiple focused lists (rather than one large list) allows campaigns to be precisely targeted, improving deliverability and engagement rates.
4.2 Adding Contacts to a Mailing List
Contacts can be added to mailing lists manually, by importing a file, or automatically through other Cyllo modules such as CRM and Website forms.
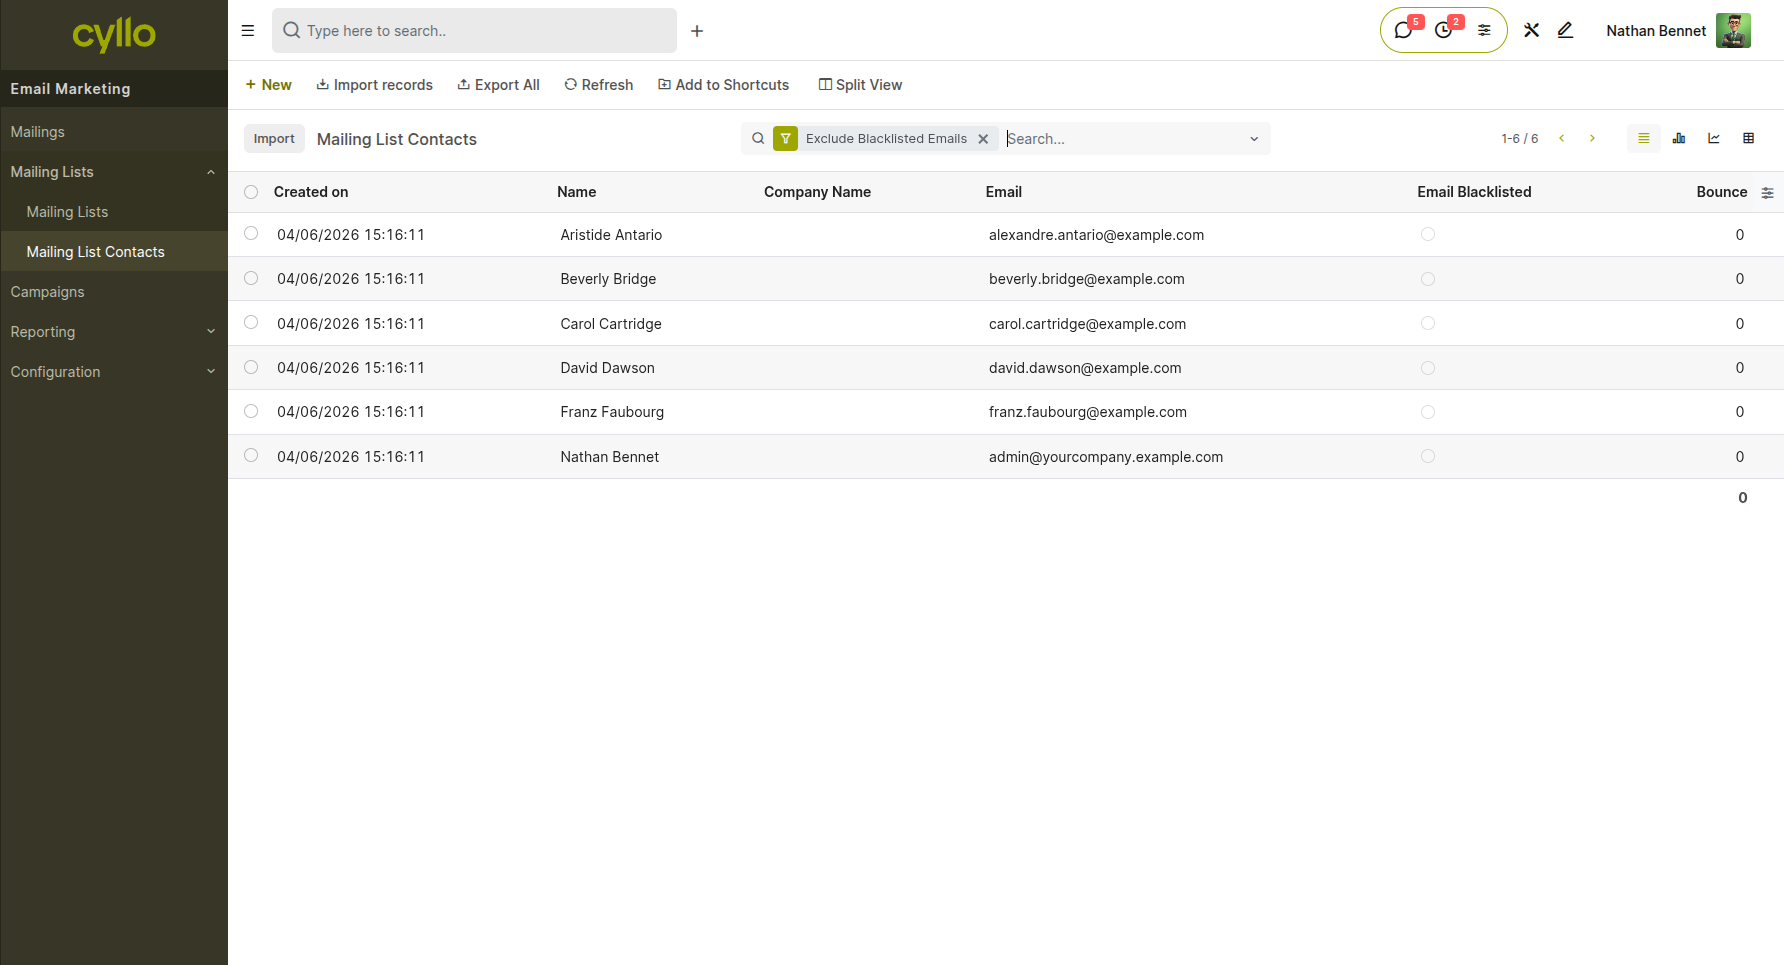
Fig 4.2 — Mailing list contacts view showing the contact table with Name, Email, and Subscription Status columns, and the Import and Add buttons
How to add contacts manually:
- Open the mailing list from Email Marketing → Mailing Lists
- Click Contacts to view the contact sub-list
- Click New to add a contact by entering their name and email address
How to import contacts from a file:
- In the Contacts sub-list, click Import
- Upload a CSV or Excel file with at least a Name and Email column
- Map the import columns to Cyllo fields and click Import
How to add contacts from CRM leads:
- Filter CRM leads by the desired segment
- Use the Action menu → Add to Mailing List to push selected leads into an existing list
Note
Duplicate email addresses within a list are automatically handled — Cyllo will not send duplicate emails to the same address in a single campaign.
4.3 Subscription Management
Cyllo's Email Marketing module includes built-in opt-in and opt-out compliance tools. Every campaign email automatically includes an unsubscribe link, and contacts who click it are immediately removed from the relevant mailing list — keeping your sends compliant with email regulations such as GDPR and CAN-SPAM.
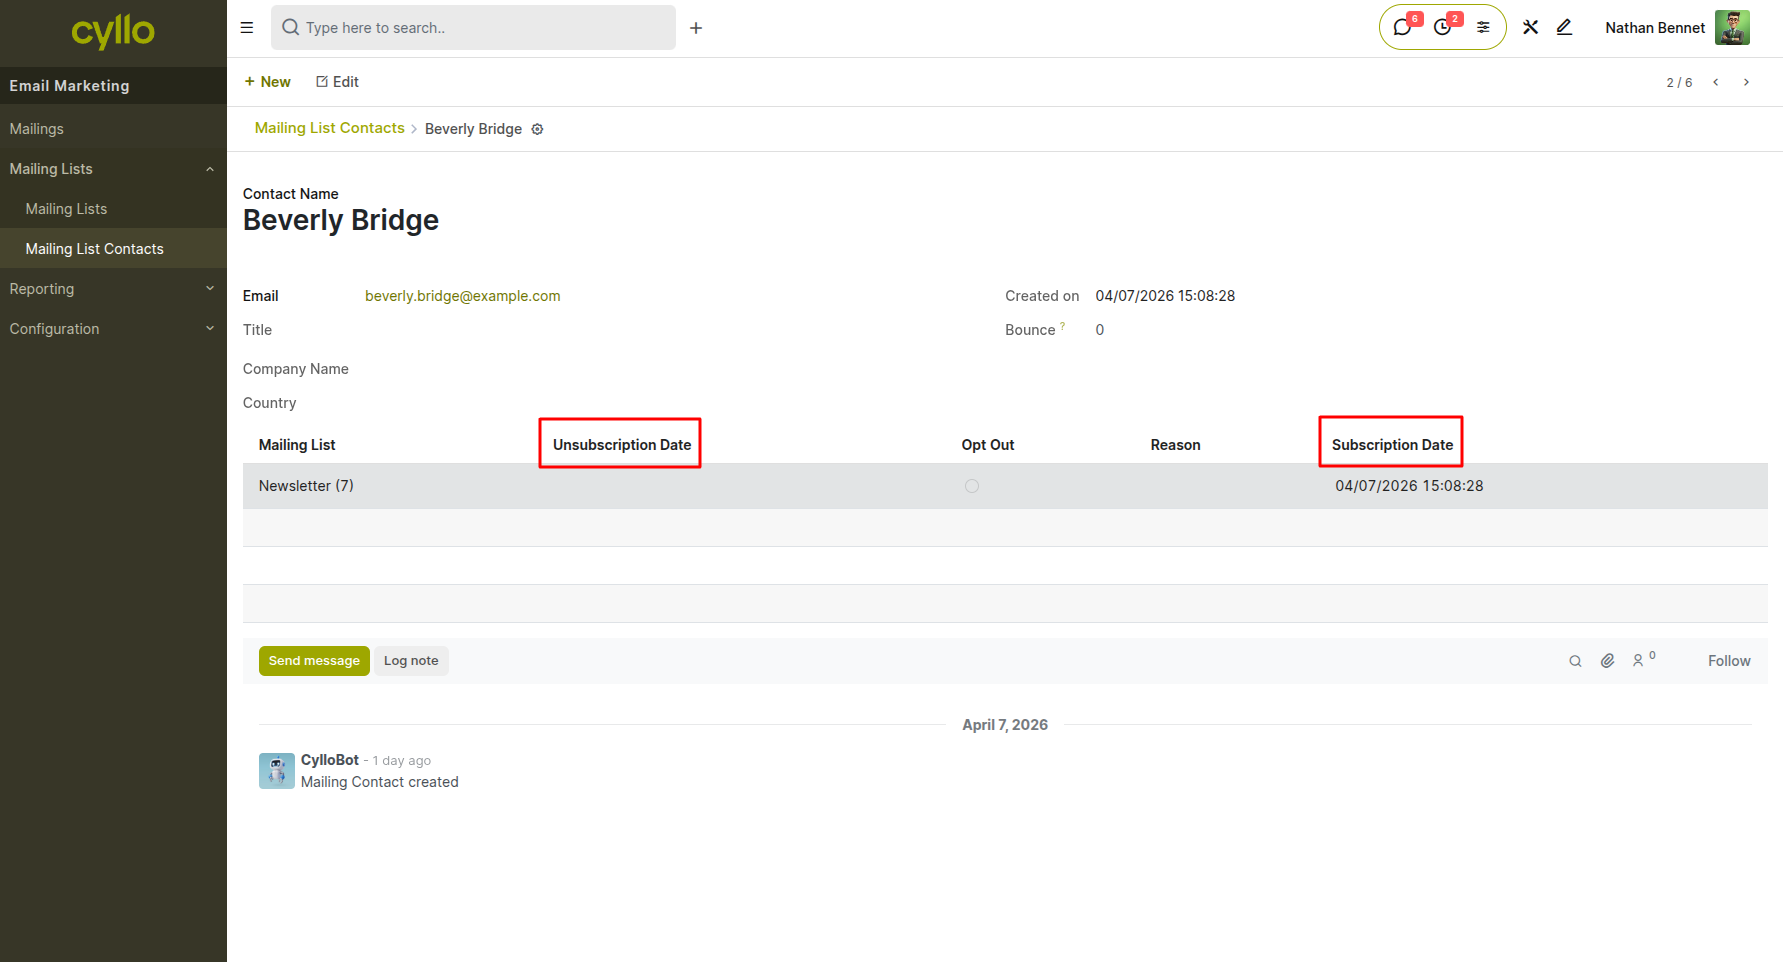
Fig 4.3 — Subscription management page showing a contact's subscription status across multiple mailing lists with toggle options
How Unsubscribe works:
- Every sent campaign includes a system-generated Unsubscribe link in the footer
- When a recipient clicks the link, their status on the relevant mailing list is updated to Unsubscribed automatically
- Unsubscribed contacts are excluded from all future sends to that list
How to manually update subscription status:
- Open Email Marketing → Mailing Lists → select the list → Contacts
- Find the contact and update their Subscription Status field to Subscribed or Unsubscribed
Note
Unsubscribed contacts are not deleted — they remain in the system with a status that prevents future emails. This ensures the opt-out history is preserved for compliance purposes.
4.4 Blacklist Management
The blacklist is a system-wide list of email addresses that Cyllo will never send to, regardless of which campaign or mailing list they appear in. Adding addresses to the blacklist protects your sender reputation by preventing sends to invalid, bounced, or complaint-flagged addresses.
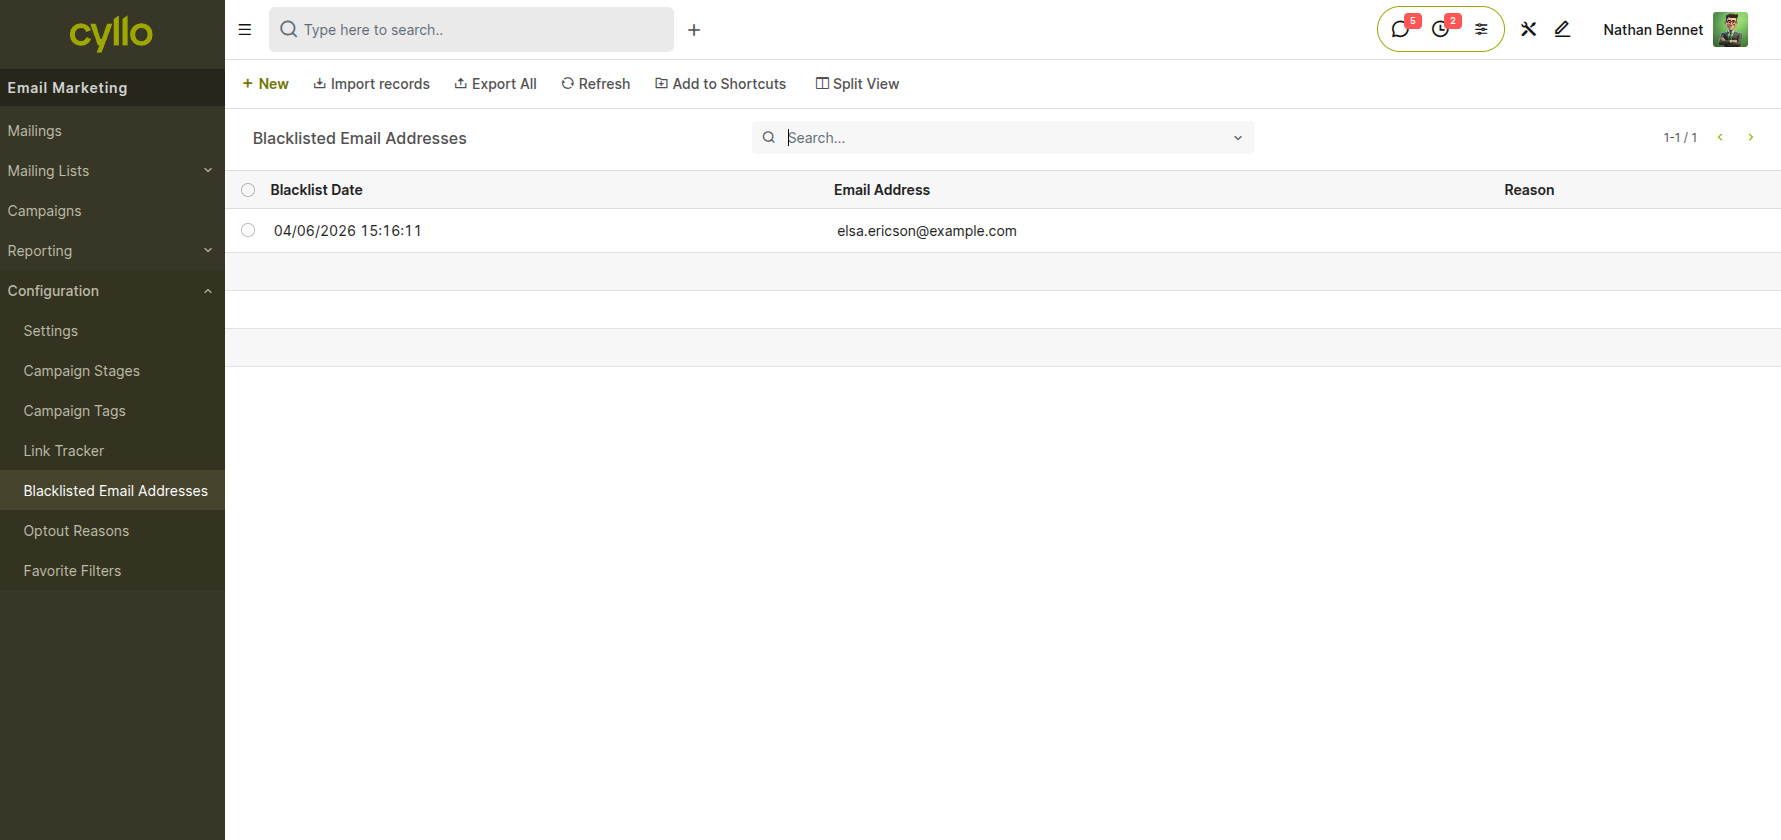
Fig 4.4 — Blacklist management screen showing the list of blacklisted email addresses with the reason and date they were added
How to add an address to the blacklist:
- Go to Email Marketing → Configuration → Blacklist
- Click New
- Enter the email address to blacklist
- Optionally add a reason for the record
- Click Save
How addresses are auto-blacklisted:
- When an email hard-bounces (permanent delivery failure), Cyllo automatically adds the address to the blacklist
- Contacts who mark your email as spam may also be added depending on your mail server feedback configuration
How to remove an address from the blacklist:
- Open the blacklist record and click Unblacklist
- Confirm the action; the address becomes eligible for sends again
Note
Regularly reviewing the blacklist and monitoring bounce rates is recommended to maintain a healthy sender score and maximize inbox deliverability.
5. Testing & Optimization
Before sending to an entire list, Cyllo provides tools to test email content and optimize performance through A/B comparisons. This section covers how to use both features effectively.
5.1 A/B Testing
A/B testing allows marketers to compare two or more variations of an email — such as different subject lines, from names, or email body content — and automatically send the best-performing version to the full audience. This reduces guesswork and improves open and click-through rates over time.

Fig 5.1 — A/B Test setup panel showing Version A and Version B fields for Subject Line, the percentage split configuration, and the winning condition dropdown (Most Opened, Most Clicked)
How to set up an A/B test:
- Open a campaign in Email Marketing → Campaigns
- Click A/B Test in the campaign toolbar
- Define Version A (the original) and Version B (the variant) — typically with different subject lines or email bodies
- Set the test audience split (e.g., 20% of list to Version A, 20% to Version B)
- Set the winner selection criteria: Most Opened, Most Clicked, or Most Replied
- Set the test duration (e.g., 24 hours after sending the test batches)
- Click Schedule or Send; Cyllo sends the test variants and automatically delivers the winning version to the remaining audience after the test period
Note
A/B tests require a sufficiently large mailing list to produce statistically meaningful results. For lists under 500 contacts, differences in results may not be reliable indicators of true performance.
5.2 Sending Test Emails
Before a campaign is sent to the full mailing list, it is best practice to send a test email to yourself or a review team to verify layout, links, merge field rendering, and mobile appearance.
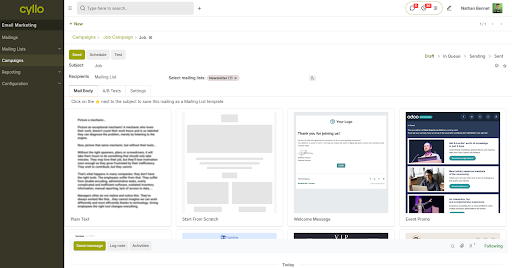
Fig 5.2 — Send Test Email dialog with a field to enter one or more test recipient email addresses and a Send Test button
How to send a test email:
- Open the campaign from Email Marketing → Campaigns
- Click Send Test Email (or the test/preview button in the toolbar)
- Enter one or more recipient email addresses in the test dialog
- Click Send
- Check the received email for layout accuracy, clickable links, correct merge field values, and mobile rendering
Note
Test emails are not counted in campaign statistics and are not tracked for open/click metrics. They are for content review purposes only.
6. Automation
The Email Marketing module supports automated email sequences that trigger based on recipient behavior or time-based rules. This section covers built-in automation within Email Marketing and integration with Cyllo's dedicated Marketing Automation module.
6.1 Behavior-Triggered Email Sequences
Cyllo can send automated follow-up emails based on a recipient's behavior — such as opening an email, clicking a link, or not responding within a set time window. This enables marketers to build drip campaigns, onboarding sequences, and re-engagement flows without manual effort.
How to configure a behavior-triggered sequence:
- Open a campaign in Email Marketing → Campaigns
- Click Automation or the Follow-Up section in the campaign form
- Click Add a Follow-Up
- Set the Trigger: e.g., Email Opened, Link Clicked, Not Opened After X Days
- Set the Delay: number of days/hours after the trigger to wait before sending the follow-up
- Select or create the Follow-Up Email content
- Repeat to add more steps in the sequence
- Save and send the initial campaign; automated emails will fire as triggers are met
Common sequence types:
- Welcome sequence: Sends a welcome email immediately on subscription, then a product guide 3 days later
- Drip campaign: Delivers educational content weekly over a set period
- Re-engagement: Sends a special offer to contacts who have not opened any email in 30 days
Note
Behavior-triggered sequences run automatically after the initial campaign is sent. Monitor the sequence performance from the campaign's Statistics panel to see which steps are engaging recipients.
6.2 Integration with Marketing Automation
For more complex, multi-channel automation flows, Cyllo's Email Marketing module integrates directly with the Marketing Automation module. Email sending actions can be embedded as steps in a broader automation that also includes SMS messages, CRM opportunity creation, and conditional branching logic.
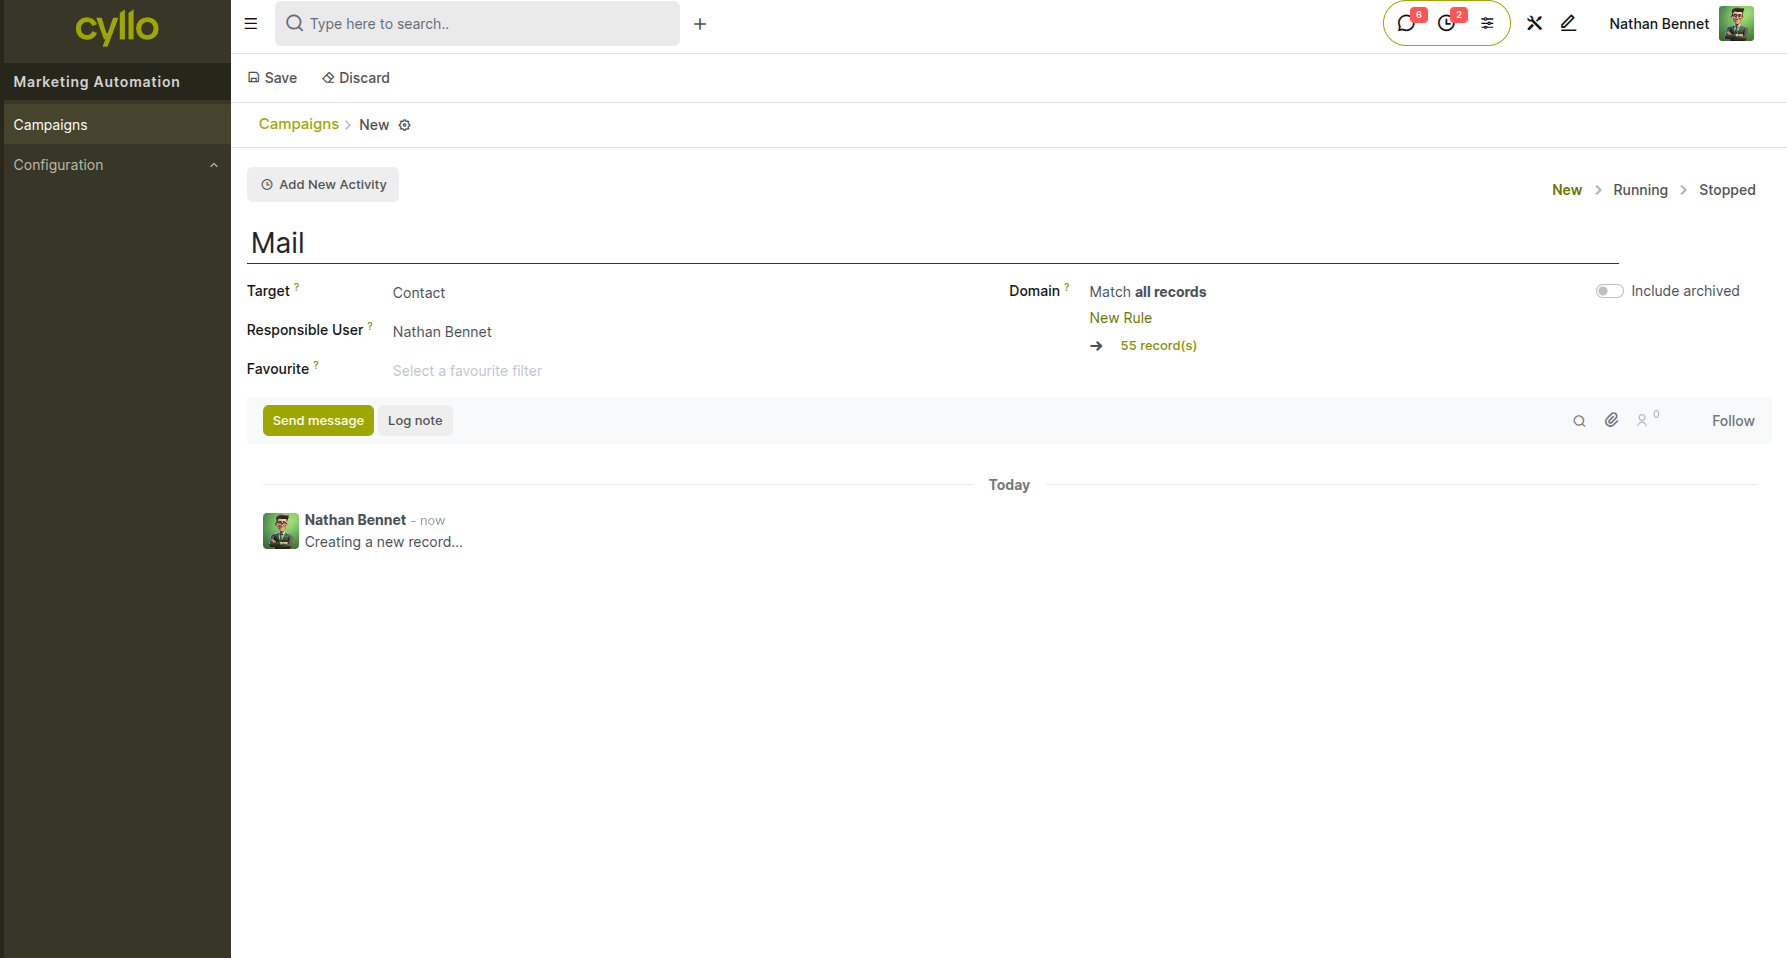
Fig 6.1 — Marketing Automation campaign builder showing a flow with a Send Email step connected to conditional branches for Opened and Not Opened paths
How to use Email Marketing inside Marketing Automation:
- Go to Marketing Automation → Campaigns → New
- Select the target model (e.g., Contacts, Leads)
- Add an Activity step and set the Activity Type to Email
- Select an existing Email Marketing campaign or compose a new email inline
- Connect additional activity steps (Send SMS, Create CRM Lead, Wait X Days) using the visual step builder
- Set trigger conditions and click Start to activate the automation
Note
See the Cyllo Marketing Automation documentation for a full reference on campaign builders, conditional triggers, and participant tracking.
7. Configuration & Settings
This section covers the technical configuration options available in Email Marketing, including outbound mail server setup and email alias management.
7.1 Custom SMTP Servers
By default, Cyllo sends emails using its internal mail server. For organizations that require control over sender domain, deliverability, and reputation — such as those sending large volumes or with strict brand requirements — a custom SMTP server can be configured. This routes all outbound campaign emails through the organization's own email infrastructure.
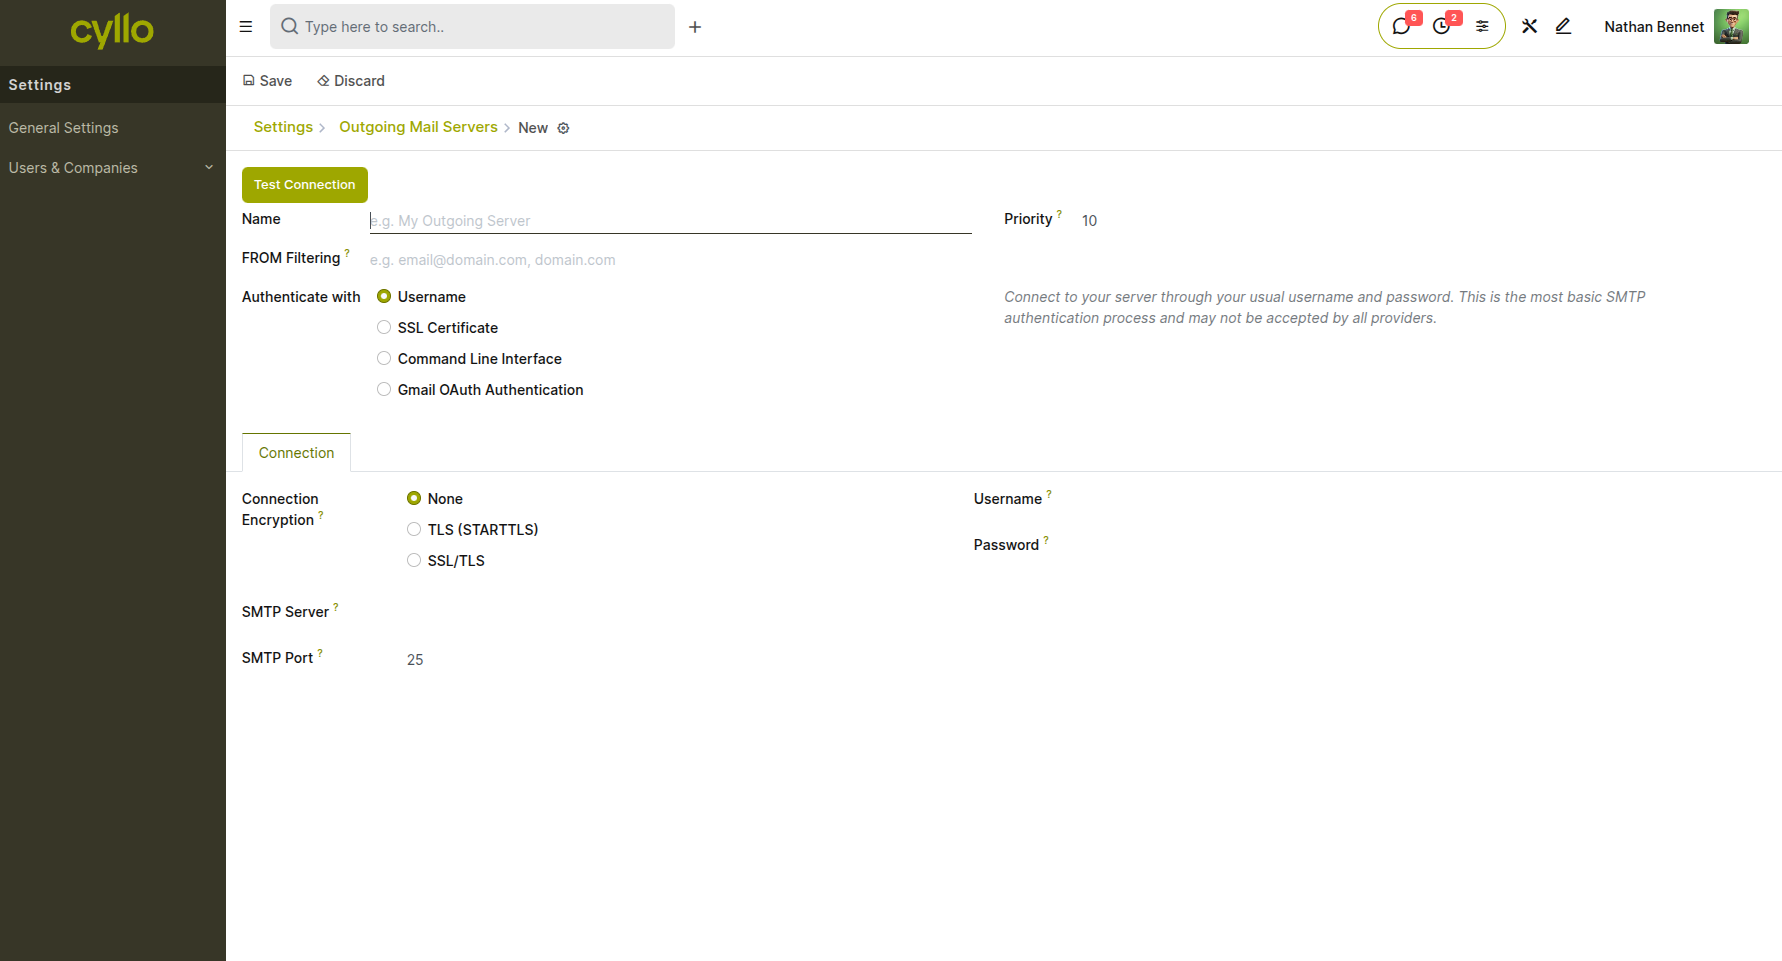
Fig 7.1 — SMTP server configuration form showing fields for SMTP Host, Port, Encryption, Username, and Password with a Test Connection button
How to configure a custom SMTP server:
● Go to Settings → Technical → Outgoing Mail Servers → New
● Enter the SMTP Server hostname (e.g., smtp.yourdomain.com)
● Set the Port (typically 465 for SSL or 587 for TLS)
● Select Encryption type: SSL/TLS or STARTTLS
● Enter the Username and Password for the SMTP account
● Click Test Connection to verify the settings
● Click Save; Cyllo will use this server for outgoing campaign emails
Key Fields:
● SMTP Server: The hostname or IP address of the outbound mail server
● Port: Communication port; must match the server's configuration
● Encryption: Security protocol used for the connection
● Username / Password: Authentication credentials for the mail server
● Priority: Lower number = higher priority when multiple servers are configured
Note
Ensure SPF, DKIM, and DMARC DNS records are configured for your sending domain to maximize deliverability and avoid spam classification.
8. Integrations
The Email Marketing module is deeply integrated with other Cyllo modules, allowing campaign activity to flow into CRM records, trigger automation sequences, and align with broader marketing and sales workflows.
8.1 CRM Integration
Email campaigns can serve as a lead generation tool, with recipient engagement data flowing automatically into Cyllo CRM. Clicks, replies, and form submissions from email campaigns can create new CRM leads or update existing ones — giving the sales team visibility into which prospects are actively engaging with marketing content.
How campaign interactions appear in CRM:
- When a contact linked to a CRM lead opens or clicks an email campaign, the activity is logged in the lead's Chatter automatically
- When a Marketing Automation sequence creates a CRM lead from an email interaction, it appears in the CRM pipeline immediately with the lead source attributed to the campaign
How to attribute a campaign to a lead manually:
- Open a CRM lead → scroll to the Marketing section
- Set the Source and Campaign fields to the relevant Email Marketing campaign
- This attribution is visible in CRM reports for ROI tracking
Note
For automated lead creation from email interactions, configure the Marketing Automation module with a Create CRM Lead action step triggered by email opens or clicks.
8.2 Marketing Automation Integration
Email Marketing integrates as an action type within Cyllo's Marketing Automation module, enabling campaign emails to be part of structured, rule-based marketing journeys. This connection allows marketers to combine emails, SMS, WhatsApp messages, and CRM actions into a single coordinated campaign flow.
How emails from Email Marketing are used in automation:
- In Marketing Automation → Campaigns, an activity step with type Email pulls from the Email Marketing campaign library
- Performance data (opens, clicks) from the automation-triggered emails is tracked in both the Marketing Automation participant view and the Email Marketing campaign statistics
Supported automation triggers from email behavior:
- Email Opened: Advance the participant to the next step if the email was opened
- Email Not Opened (after X days): Send a follow-up or re-engagement message
- Email Clicked: Route high-intent contacts into a CRM-focused sub-sequence
Note
See the Cyllo Marketing Automation documentation for a full reference on building multi-channel campaign journeys and conditional participant routing.