

Cyllo Time Off Documentation
Introduction
The Cyllo Time Off module provides a comprehensive leave management system that enables organizations to efficiently manage employee absences, vacation requests, sick leave, and other types of time away from work. Employees can submit time off requests through an intuitive interface, while managers receive automated notifications for approval. The module supports multiple time off types (vacation, sick leave, compensatory time, unpaid leave), configurable accrual rules, balance tracking, and public holiday management.
Time Off seamlessly integrates with other Cyllo modules including Employees (for employee records and department hierarchies), Attendance (to automatically record absences in daily attendance logs), Payroll (to calculate unpaid leave deductions and process salary adjustments), Planning (to visualize team availability and schedule shifts around time off), and Timesheets (to prevent timesheet entries during approved leave periods). All leave data flows automatically across these connected modules, eliminating manual data entry and ensuring consistency across HR operations.
Cyllo's Time Off module provides a comprehensive framework for managing the entire employee absence lifecycle—from initial request submission and manager approval to balance tracking, accrual processing, reporting, and compliance. Organizations gain complete visibility into team availability, can enforce leave policies automatically, and maintain accurate records for auditing and compliance purposes, all within the centralized Cyllo ERP database.
1. Time Off Operations
This section covers the core day-to-day operations for managing employee time off requests, approvals, and allocations.
1.1 Time Off Request
Employees can submit time off requests for vacation, sick leave, personal days, or any other configured leave type. The request specifies the dates, duration (full day or half day), and an optional description. Upon submission, the request is automatically routed to the employee's manager for approval. Employees can view their current balance for each leave type before submitting to ensure they have sufficient days available.
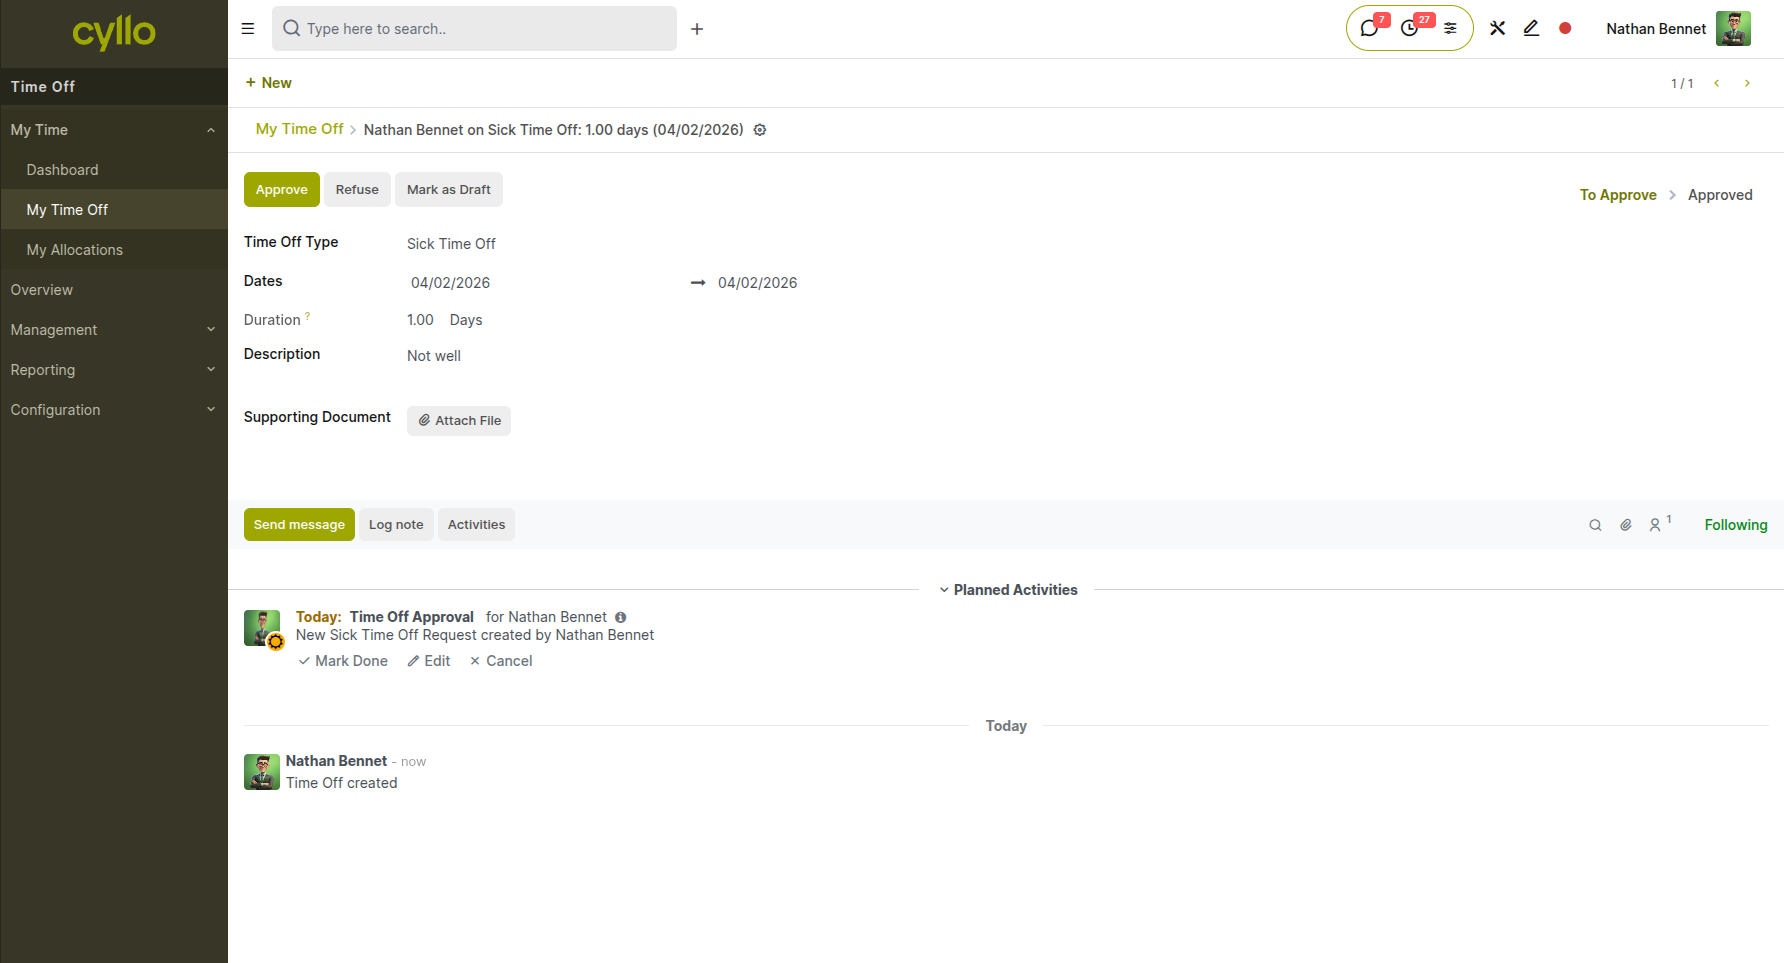
Fig 1.1 — New Time Off Request form showing Time Off Type, date range, duration selector, and calculated number of days
How to Submit a Time Off Request:
- Go to Time Off → My Time Off → New
- Select the Time Off Type (e.g., Paid Time Off, Sick Leave)
- Enter the Start Date and End Date
- Specify the Duration (Full Day, Morning, or Afternoon for half-day options)
- Add an optional Description explaining the reason for leave
- Review the calculated Number of Days
- Click Confirm to submit the request
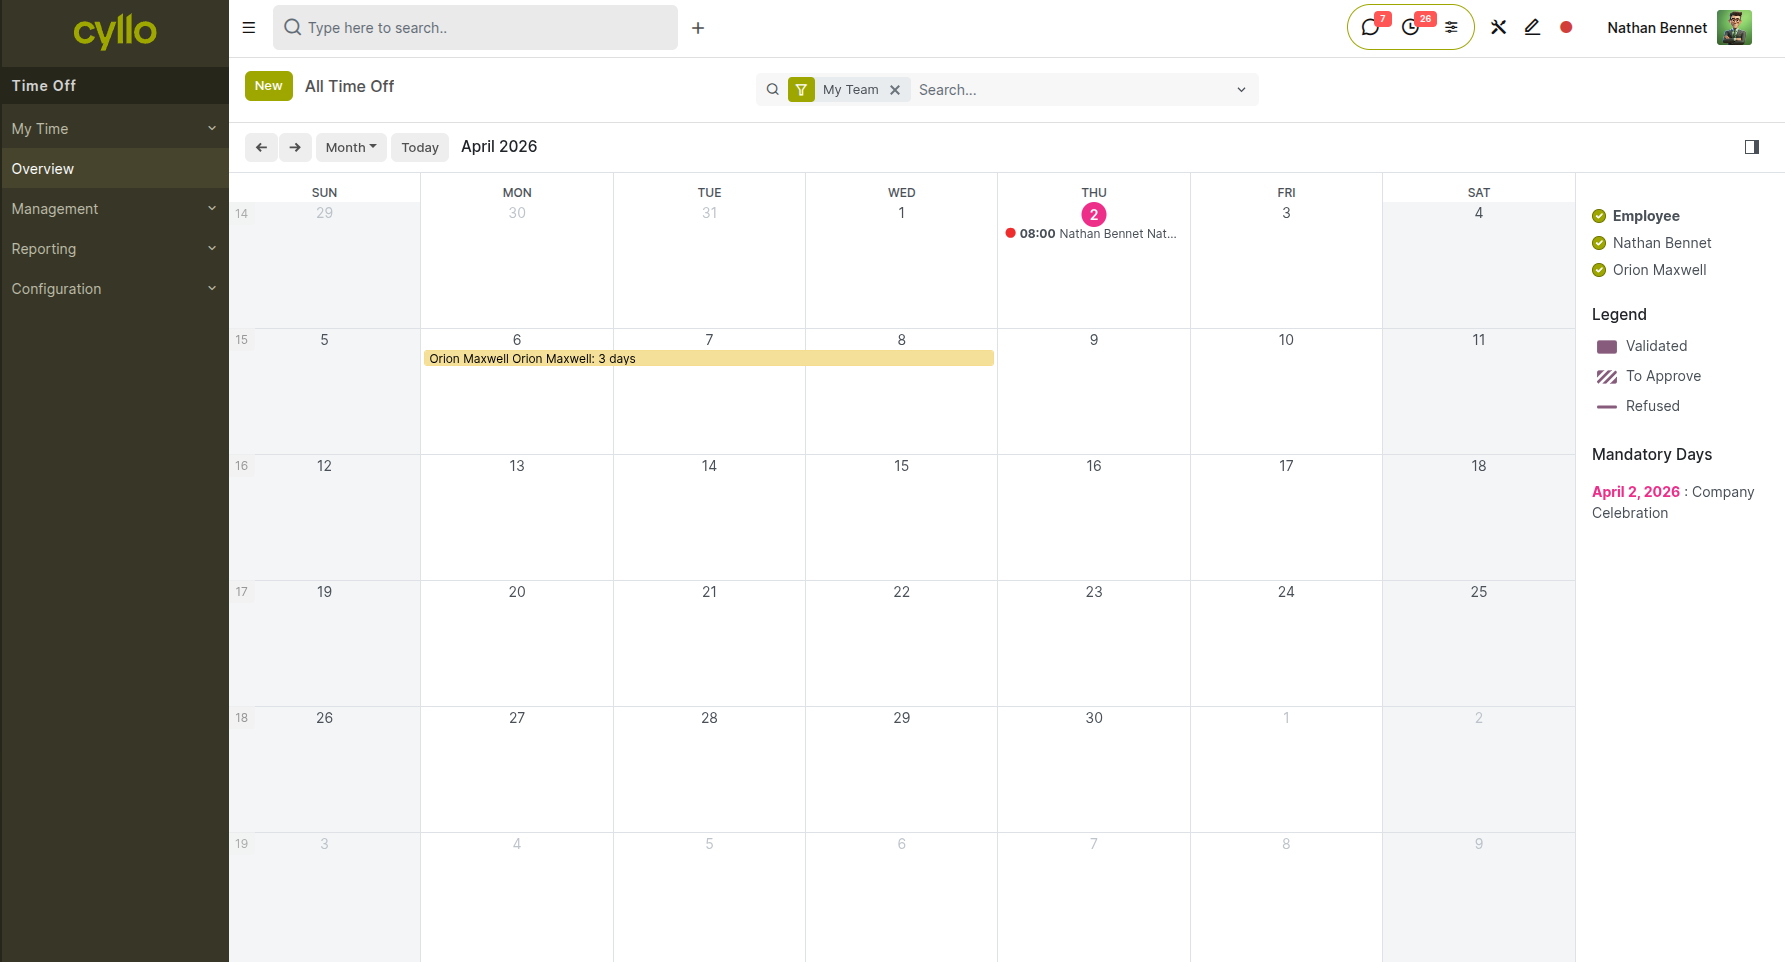
Fig 1.2 — Submitted request in 'To Approve' status showing employee balance summary and status bar
Key Fields:
- Time Off Type: The category of leave (Vacation, Sick, Personal, etc.)
- Start Date / End Date: The period of absence
- Duration: Full Day or Half Day (Morning/Afternoon)
- Number of Days: Auto-calculated based on dates and duration, excluding weekends and public holidays
- Description: Optional explanation or notes
- Status: Draft, To Approve, Approved, or Refused
Note
Employees can cancel a request in 'To Approve' status before manager approval. Once approved, cancellation requires manager action.
1.2 Time Off Approval
Managers receive notifications when their direct reports submit time off requests. The approval workflow allows managers to review the request details, check team availability, verify the employee's remaining balance, and either approve or refuse the request with optional comments. Approved requests automatically update the employee's time off balance and create corresponding attendance records.
Fig 1.3 — Manager approval screen showing pending request details, employee balance, and Approve / Refuse buttons
How to Approve or Refuse a Time Off Request:
- Go to Time Off → Management → Time Off
- Open the pending request to review details
- Check the employee's current balance and team calendar
- Click Approve to accept the request, or click Refuse to deny it
- Add optional comments in the Reason field if refusing
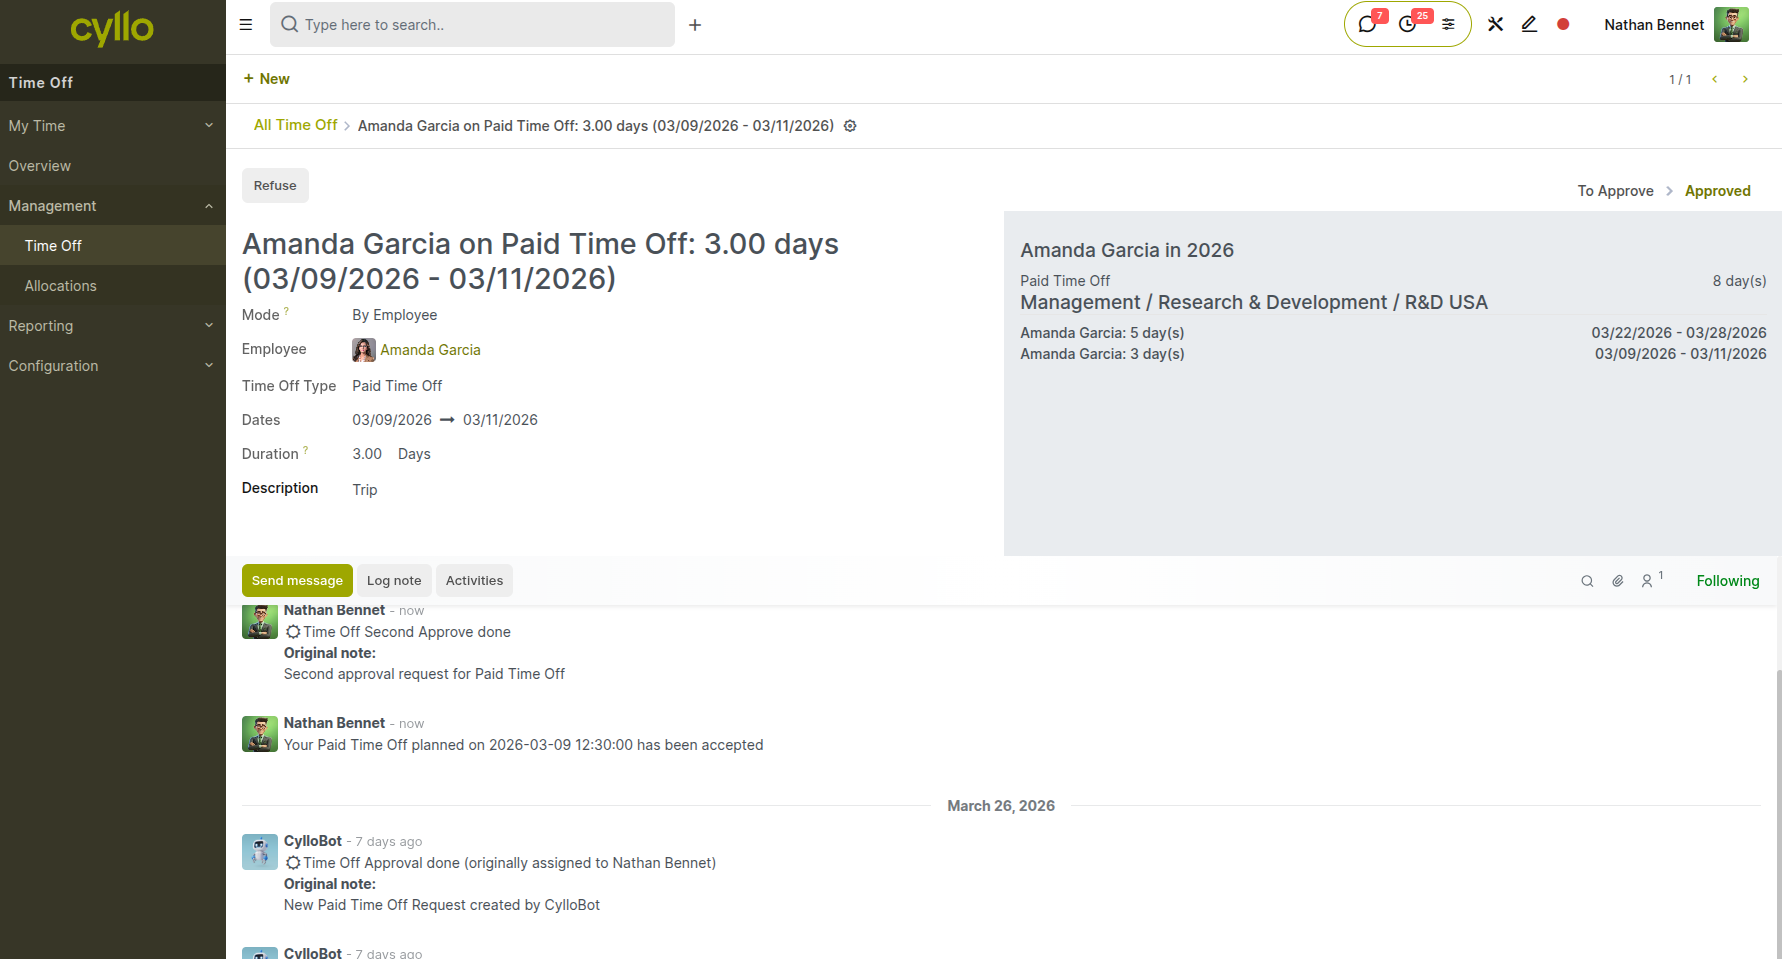
Fig 1.4 — Refusal dialog showing the Reason field and confirmation prompt
Note
Managers can also validate time off directly from email notifications. Approved requests automatically deduct from the employee's balance and appear on the team calendar.
1.3 Time Off Dashboard
The Time Off Dashboard provides a comprehensive overview of all time off activity across the organization. Employees can view their own request history and current balances for each leave type. Managers see a team calendar showing all upcoming absences, pending approval requests, and team availability. The dashboard includes filters for date ranges, departments, and time off types, making it easy to plan projects and identify coverage gaps.
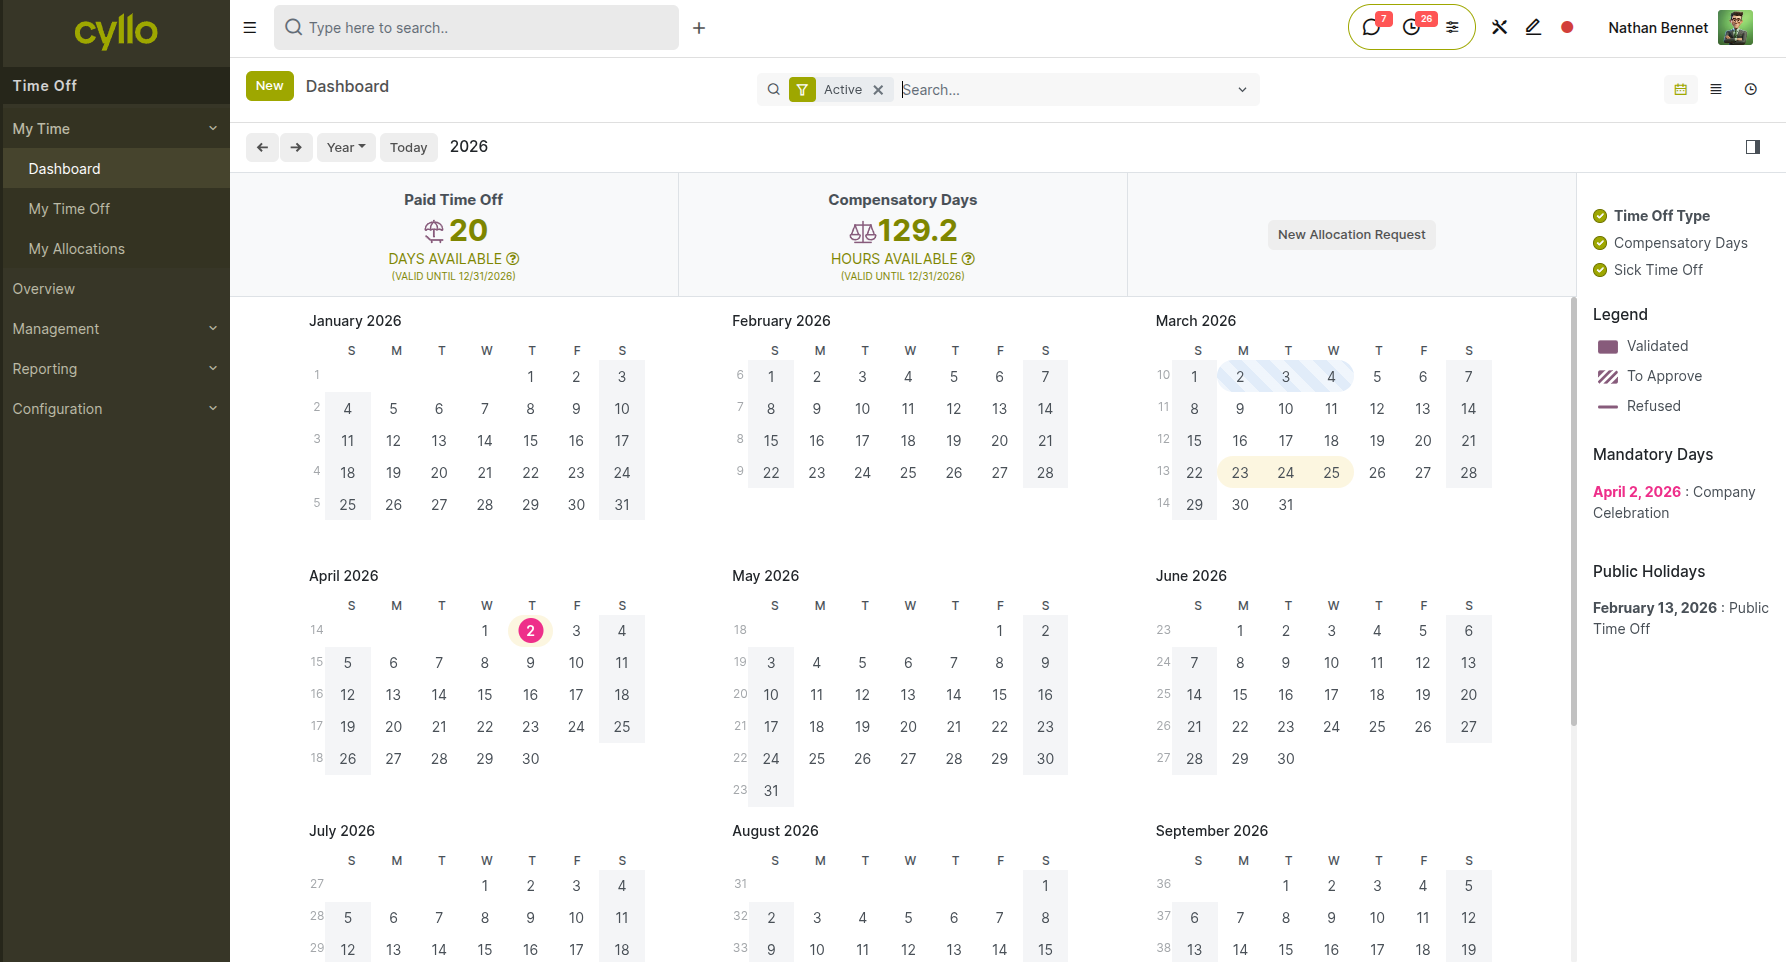
Fig 1.5 — Time Off Dashboard in Calendar view showing team absences color-coded by leave type
How to Access the Dashboard:
- Go to Time Off → Overview → Dashboard
- Switch between Calendar, List, or Pivot view using the view selector
- Filter by Department, Time Off Type, or Employee
- Select date range to view past or upcoming time off
Note
The dashboard automatically updates in real-time as requests are submitted, approved, or refused. Color coding helps distinguish between different leave types at a glance.
1.4 Time Off Allocation
Time Off Allocations define how many days of each leave type are available to employees. Allocations can be created manually by HR administrators or generated automatically through accrual plans. Each allocation specifies the time off type, validity period, number of days granted, and whether the allocation mode is 'by employee' or 'by company' (for company-wide allocations). Unused allocations may carry over to the next period based on the time off type configuration.
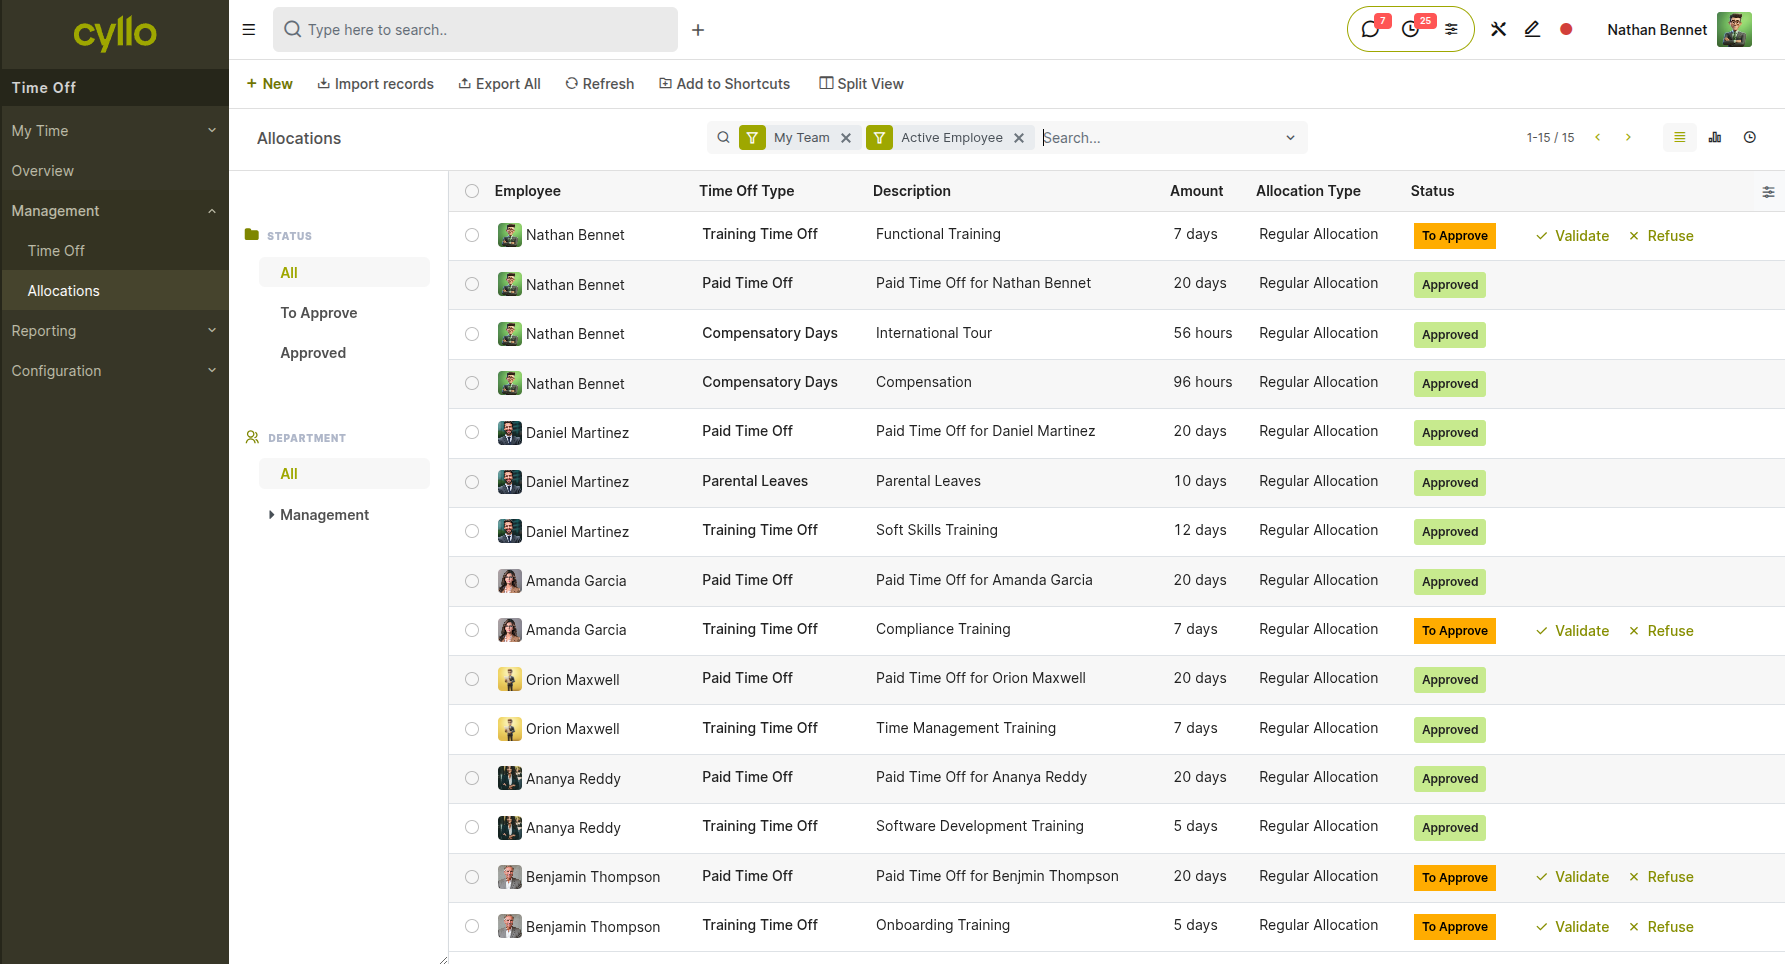
Fig 1.6 — TimeOff allocation with status
How to Create a Manual Allocation:
- Go to Management→ Allocations → New
- Select the Employee or choose 'By Company' for organization-wide allocation
- Choose the Time Off Type
- Enter the Number of Days to allocate
- Set the Validity Period (Start Date and optional End Date)
- Add optional Description or notes
- Click Confirm to activate the allocation
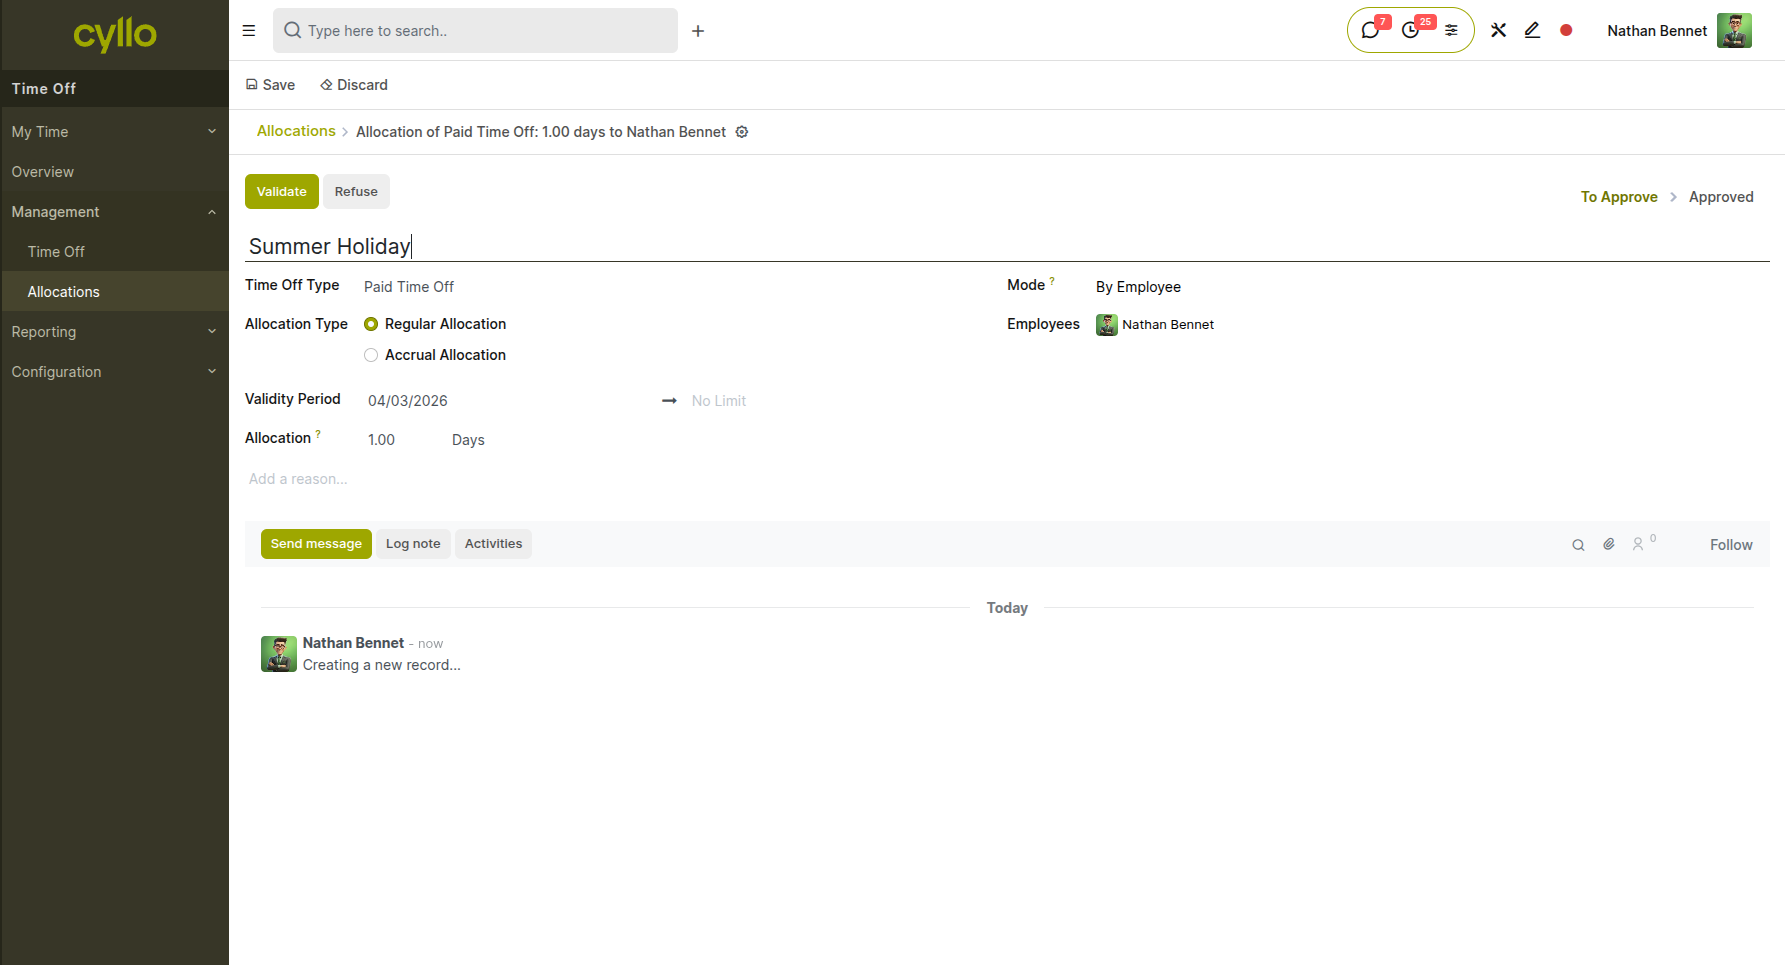
Fig 1.7 — New Allocation form showing Employee, Time Off Type, Number of Days, and Validity Period fields
Key Fields:
- Allocation Mode: By Employee (individual) or By Company (all employees)
- Employee: The recipient of the allocation (if By Employee mode)
- Time Off Type: The category of leave being allocated
- Number of Days: Total days granted
- Validity Period: When the allocation can be used (Start/End dates)
Note
Allocations created via accrual plans are automatically generated based on employee hire dates and the accrual schedule. Manual allocations are useful for bonuses, corrections, or special circumstances.
2. Configuration & Settings
This section covers the administrative setup and configuration options for the Time Off module, including defining leave types, accrual rules, and public holidays.
2.1 Time Off Types
Time Off Types define the different categories of leave available in your organization (e.g., Paid Time Off, Sick Leave, Parental Leave, Compensatory Time Off). Each type can be configured with specific rules including approval requirements, whether it requires allocation, request notice period, maximum consecutive days, color coding for calendar display, and whether it's counted as unpaid time. Time Off Types are the foundation of the leave management system and should be configured before employees can submit requests.
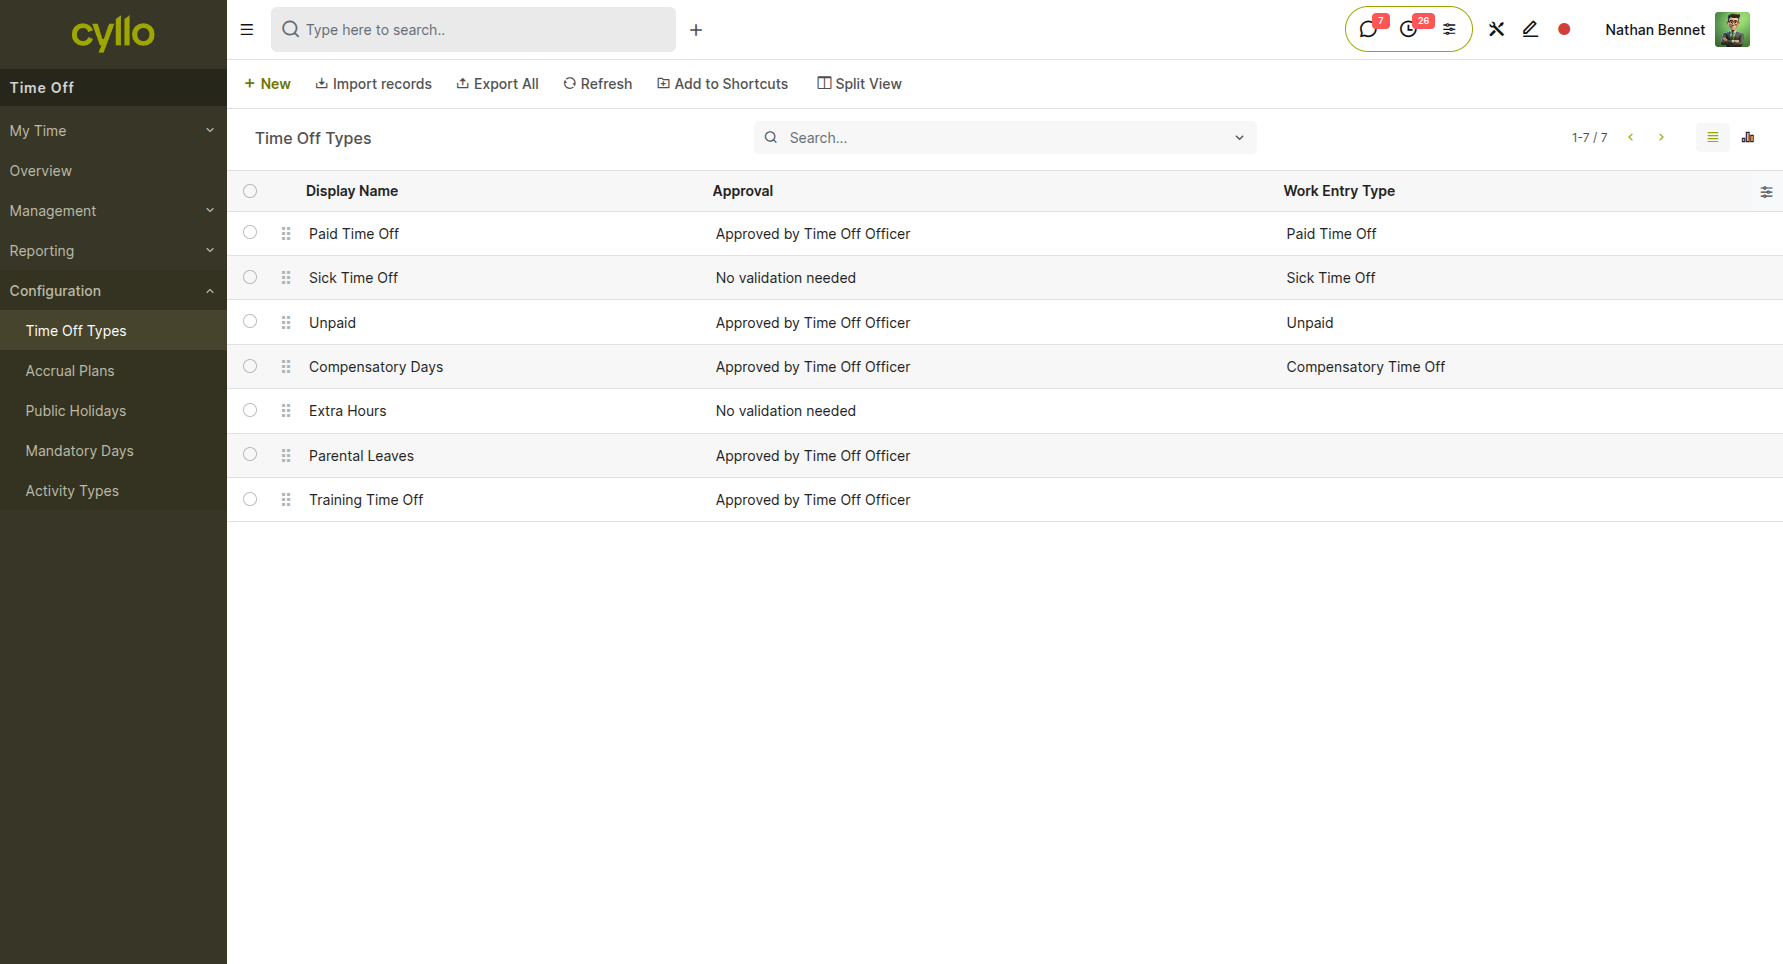
Fig 2.1 — Time Off Types list showing configured leave categories with approval method
How to Create a Time Off Type:
- Go to Time Off → Configuration → Time Off Types → New
- Enter the Time Off Type Name (e.g., 'Paid Time Off', 'Sick Leave')
- Set the Approval requirement (No validation, Approved by Time Off Officer, or Approved by Manager)
- Configure Allocation Mode (No allocation needed, or Allow employees to request allocation)
- Select a Color for calendar visualization
- Enable Take Time Off in Half Days if needed
- Set Negative Cap (minimum balance allowed) and Maximum Leaves (max consecutive days)
- Configure if this is Unpaid Time Off
- Click Save
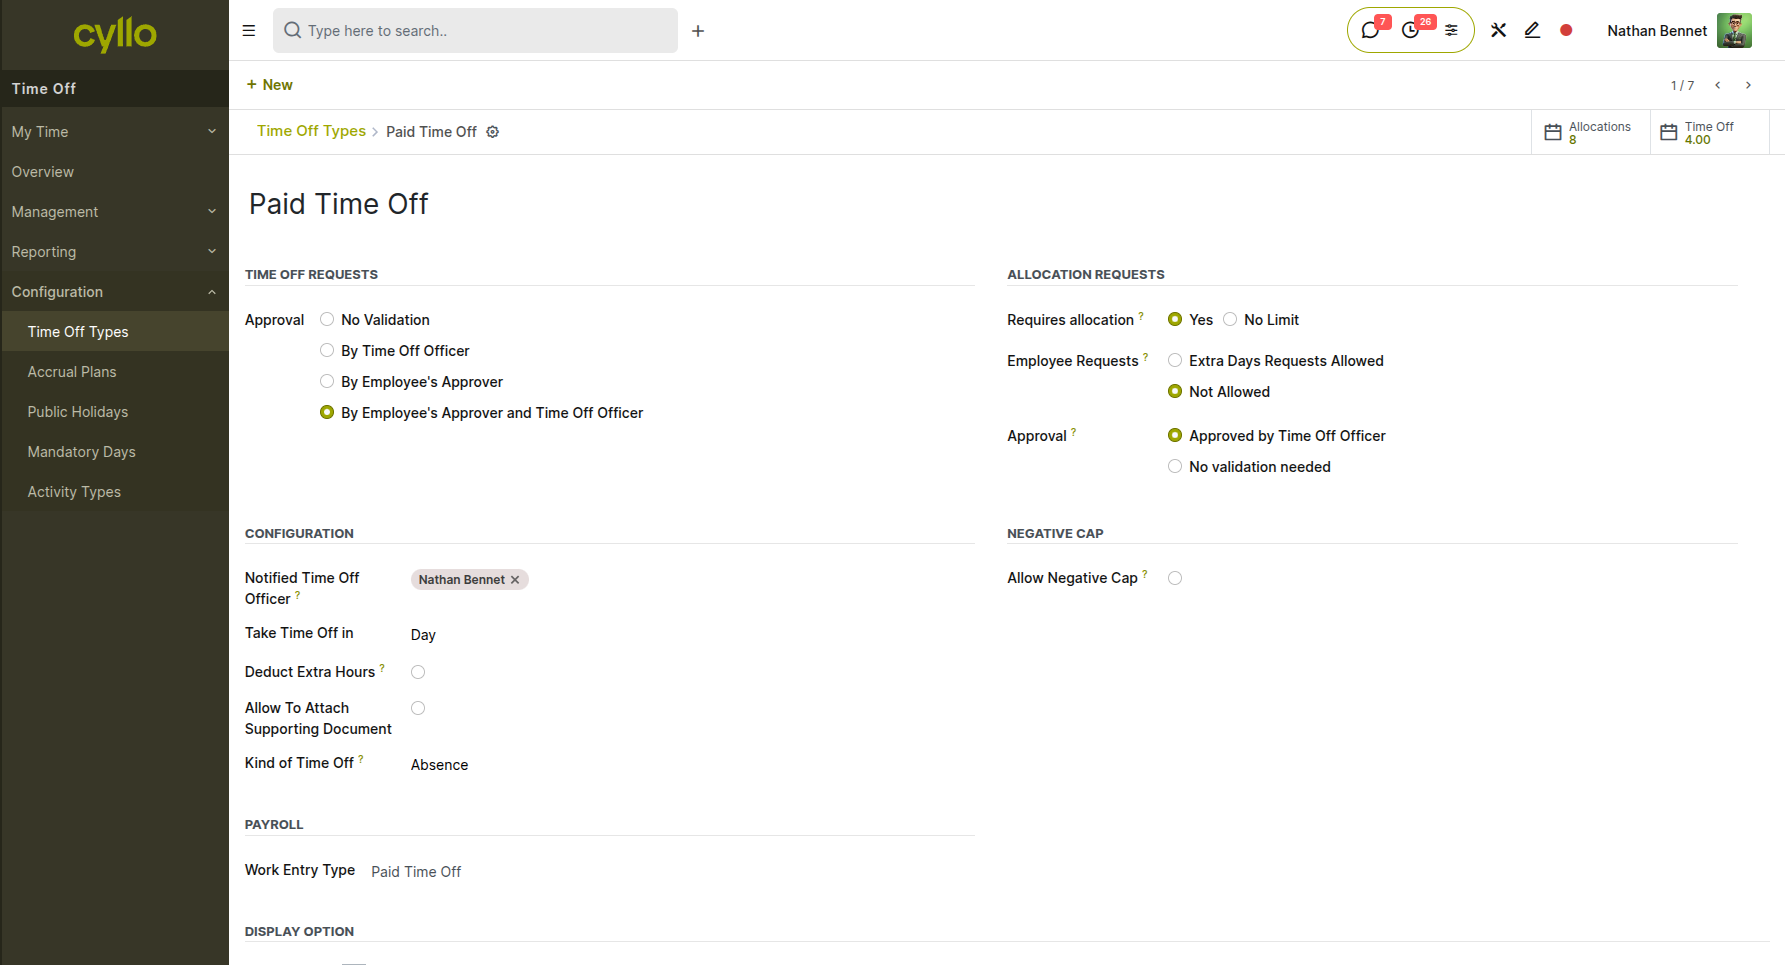
Fig 2.2 — Time Off Type configuration form showing Approval, Allocation, Color, and Unpaid settings
Key Fields:
- Time Off Type: The name of the leave category
- Approval: Defines who can approve requests (No validation, Time Off Officer, or Manager)
- Allocation: Whether employees need allocated days before requesting
- Color: Display color in calendars and dashboards
- Take Time Off in Half Days: Allow morning/afternoon options
- Negative Cap: Minimum allowed balance (negative for overdraft allowance)
- Maximum Leaves: Maximum consecutive days allowed
- Unpaid: Mark if this leave type should not be paid
- Company: Restrict to specific company in multi-company setups
Note
Cyllo includes pre-configured time off types (Paid Time Off, Sick Leave) that can be customized or used as-is. Additional types can be created to match your organization's leave policies.
2.2 Accrual Plans
Accrual Plans automate the allocation of time off based on employee tenure or other triggers. Instead of manually creating allocations each period, accrual plans define rules that automatically grant leave days at regular intervals (e.g., 1.67 days per month, 20 days per year). Plans can be configured with waiting periods (e.g., 90 days before first accrual), proration for mid-period hires, carryover limits, and maximum balance caps. Cyllo runs accrual calculations automatically based on the configured schedule.
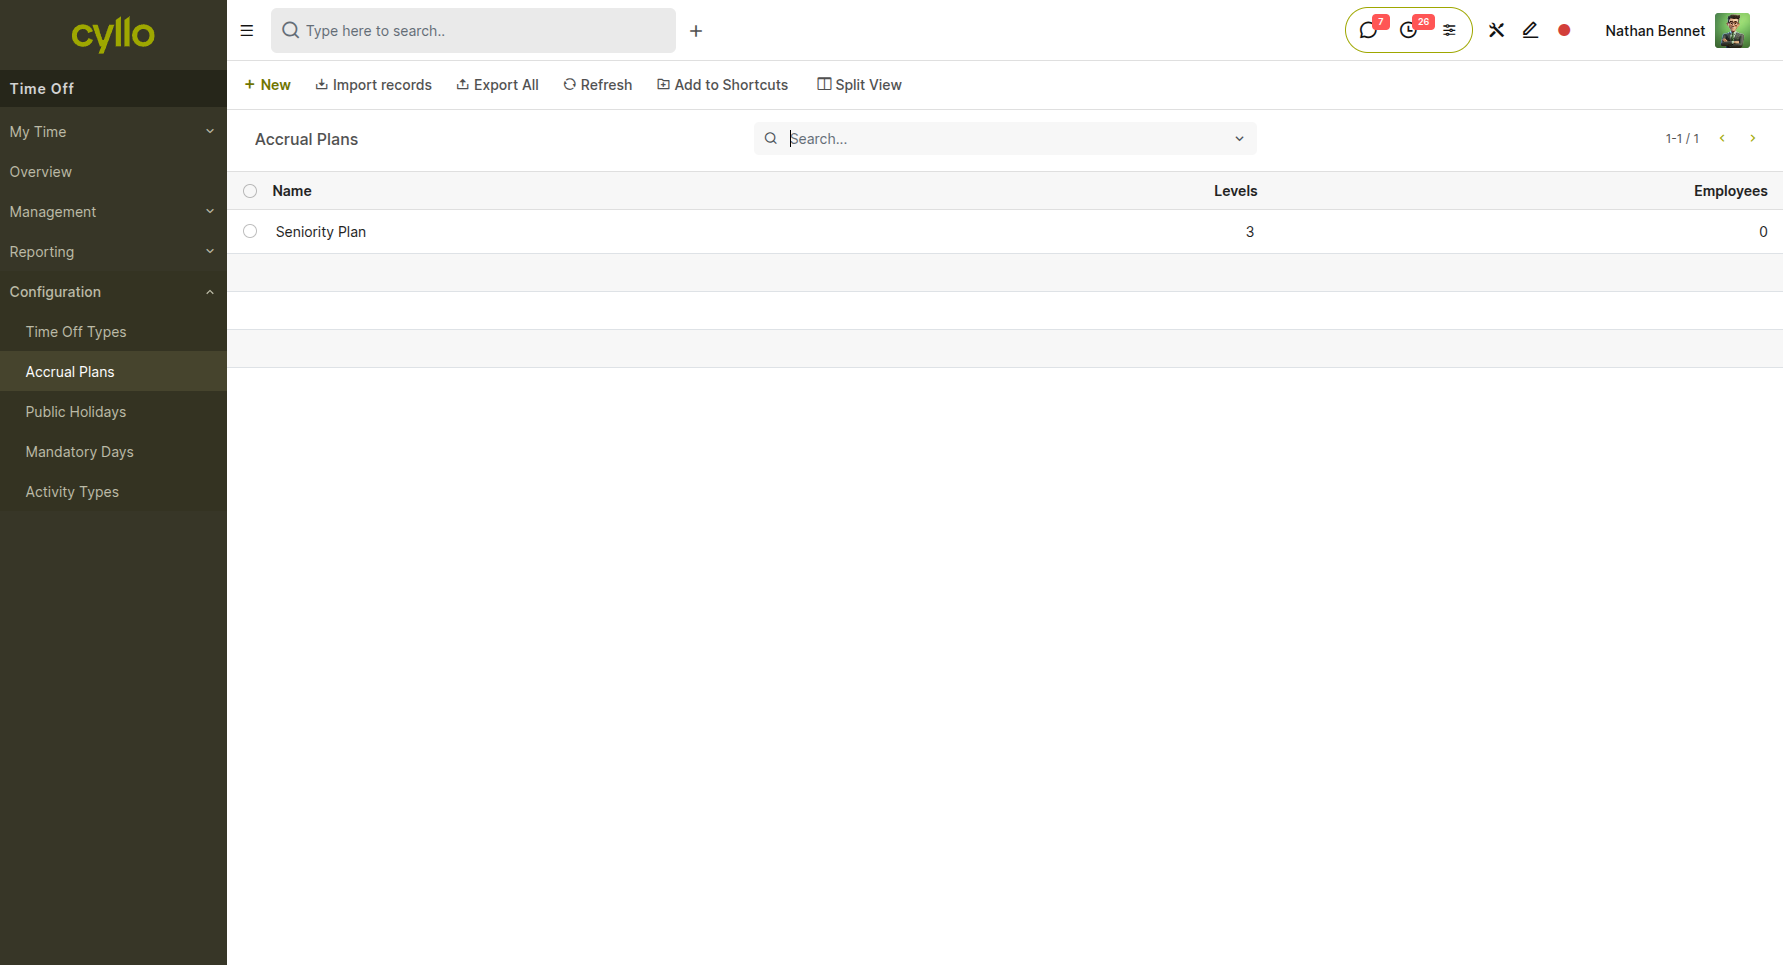
Fig 2.3 — Accrual Plans list showing plan names, associated Time Off Types, and accrual frequency
How to Create an Accrual Plan:
- Go to Time Off → Configuration → Accrual Plans → New
- Enter the Plan Name (e.g., 'Standard PTO Accrual')
- Select the Time Off Type this plan applies to
- Set the Accrual Frequency (Daily, Weekly, Monthly, or Yearly)
- Enter the Number of Days accrued per period
- Configure Waiting Period if employees must wait before accruing (e.g., 90 days)
- Set Maximum Accrual if there's a balance cap
- Enable Carryover if unused days can be carried to next period
- Click Save
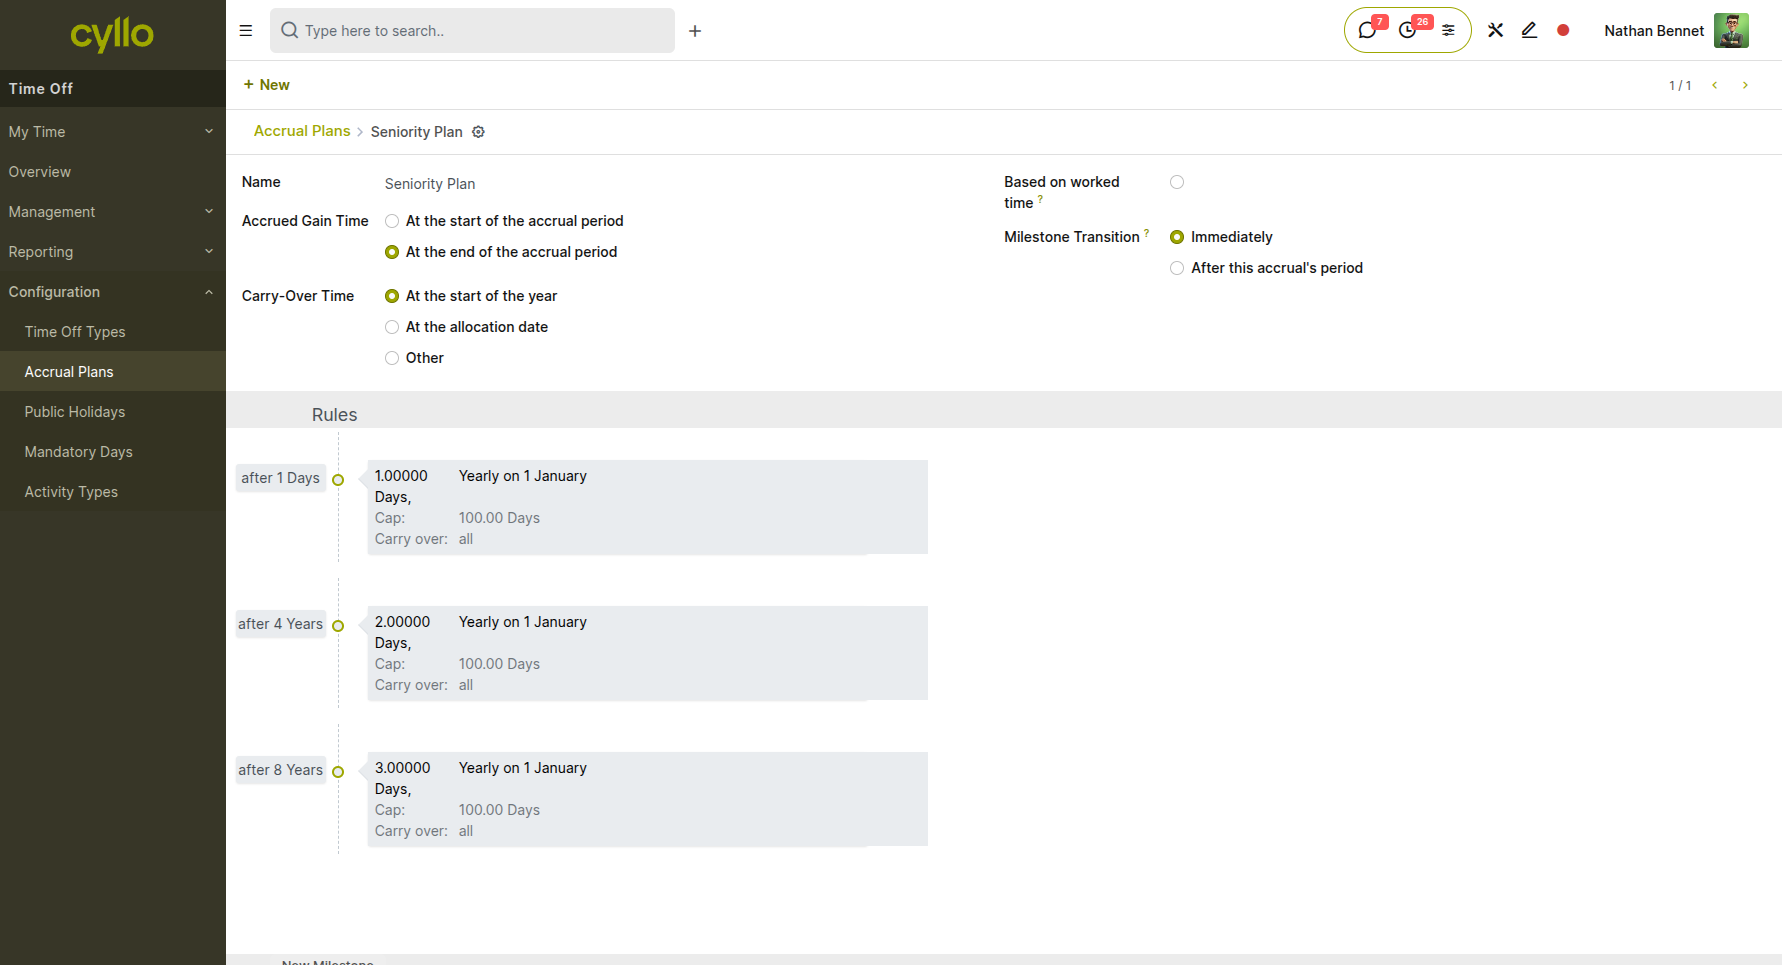
Fig 2.4 — Accrual Plan form showing Frequency, Number of Days, Waiting Period, and Carryover settings
Key Fields:
- Plan Name: Descriptive name for the accrual schedule
- Time Off Type: Which leave category this plan applies to
- Accrual Frequency: How often days are granted (Daily/Weekly/Monthly/Yearly)
- Number of Days: Amount accrued per period
- Waiting Period: Days before first accrual (for new hires)
- Maximum Accrual: Cap on total balance (optional)
- Carryover: Whether unused days roll to next period
- Carryover Limit: Maximum days that can be carried over
Note
Accrual plans are automatically applied to employees when they are assigned the corresponding Time Off Type. Cyllo calculates accruals based on each employee's hire date or plan start date.
2.3 Public Holidays
Public Holidays define the non-working days for your organization (e.g., Christmas, New Year, Independence Day). These dates are automatically excluded from time off calculations—if an employee requests leave from December 23-27 and December 25 is a public holiday, only 4 days will be deducted from their balance instead of 5. Public holidays can be configured globally for all employees or restricted to specific companies or locations. They also appear on the team calendar for planning purposes
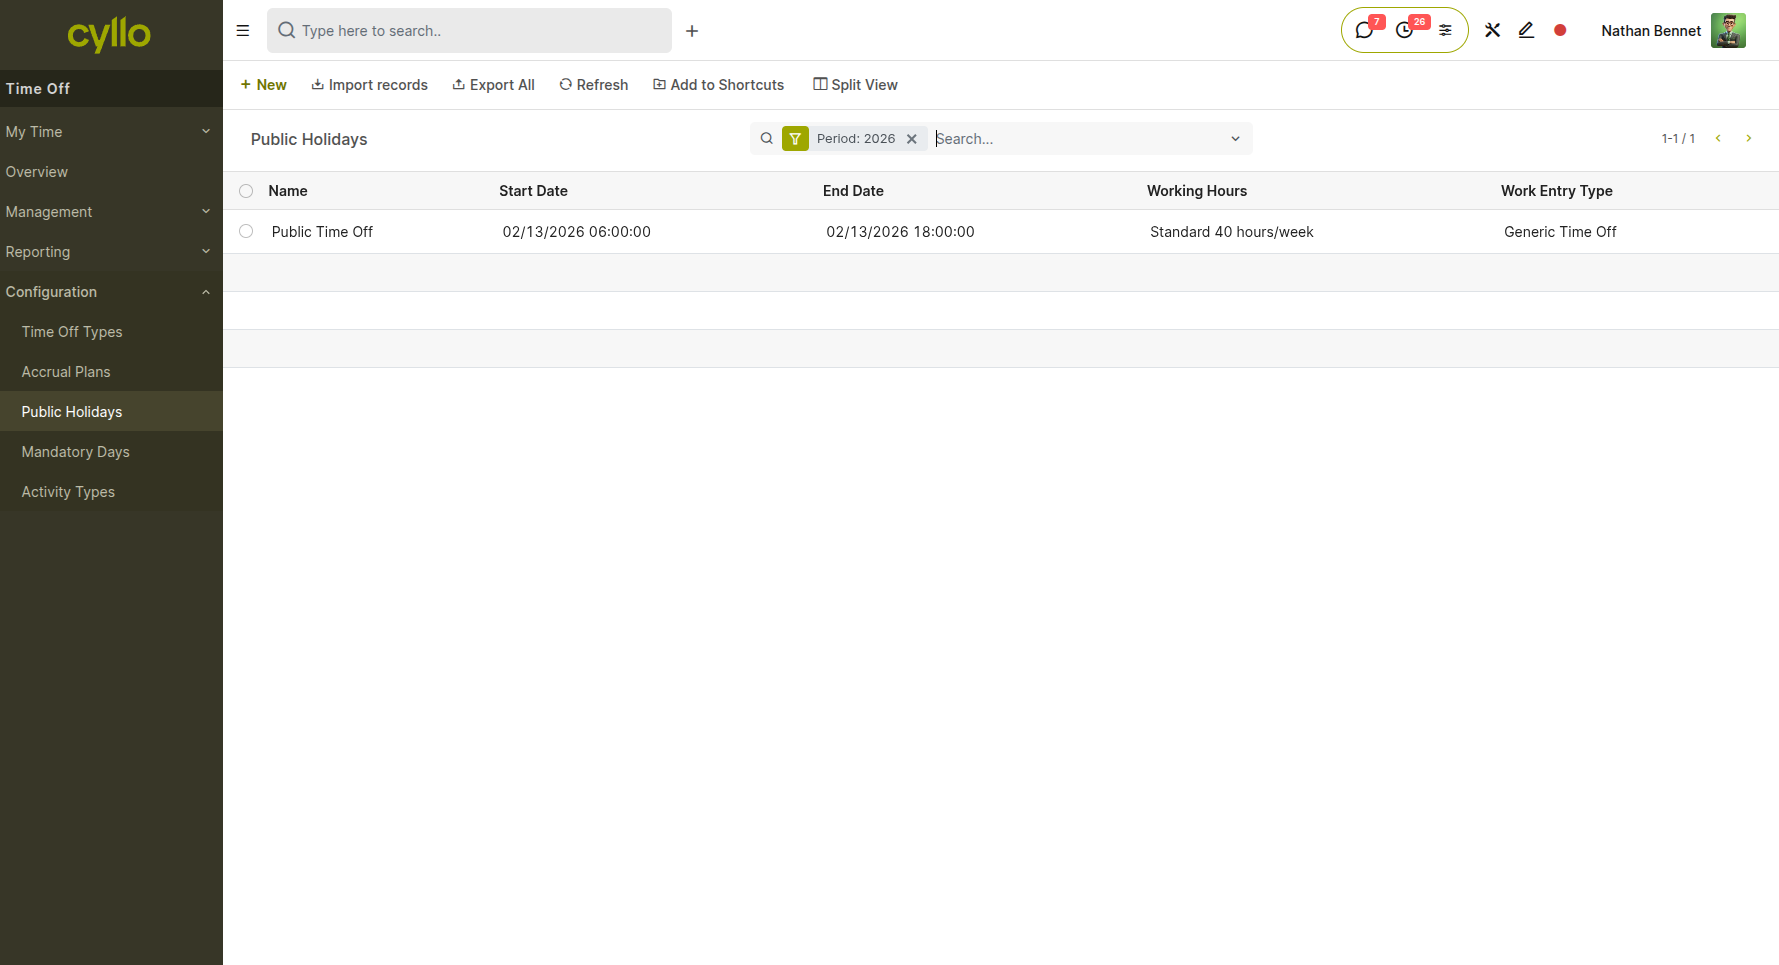
Fig 2.5 — Public Holidays list showing holiday names, dates, and company assignments
How to Add Public Holidays:
- Go to Time Off → Configuration → Public Holidays → New
- Enter the Holiday Name (e.g., 'Christmas Day', 'Labor Day')
- Select the Date
- Choose the Company (or leave blank for all companies)
- Click Save
Note
Cyllo can import standard holiday calendars for your country/region. Holidays are automatically factored into all time off duration calculations and cannot be selected as leave days.
2.4 Mandatory Days
Mandatory Days allow organizations to define specific dates when employees are required to take time off or when certain activities must occur. Unlike public holidays which simply exclude dates from leave calculations, mandatory days can enforce company shutdowns, mandatory vacation periods, or required activities. These can be configured for the entire company or specific departments, ensuring consistent scheduling across teams.
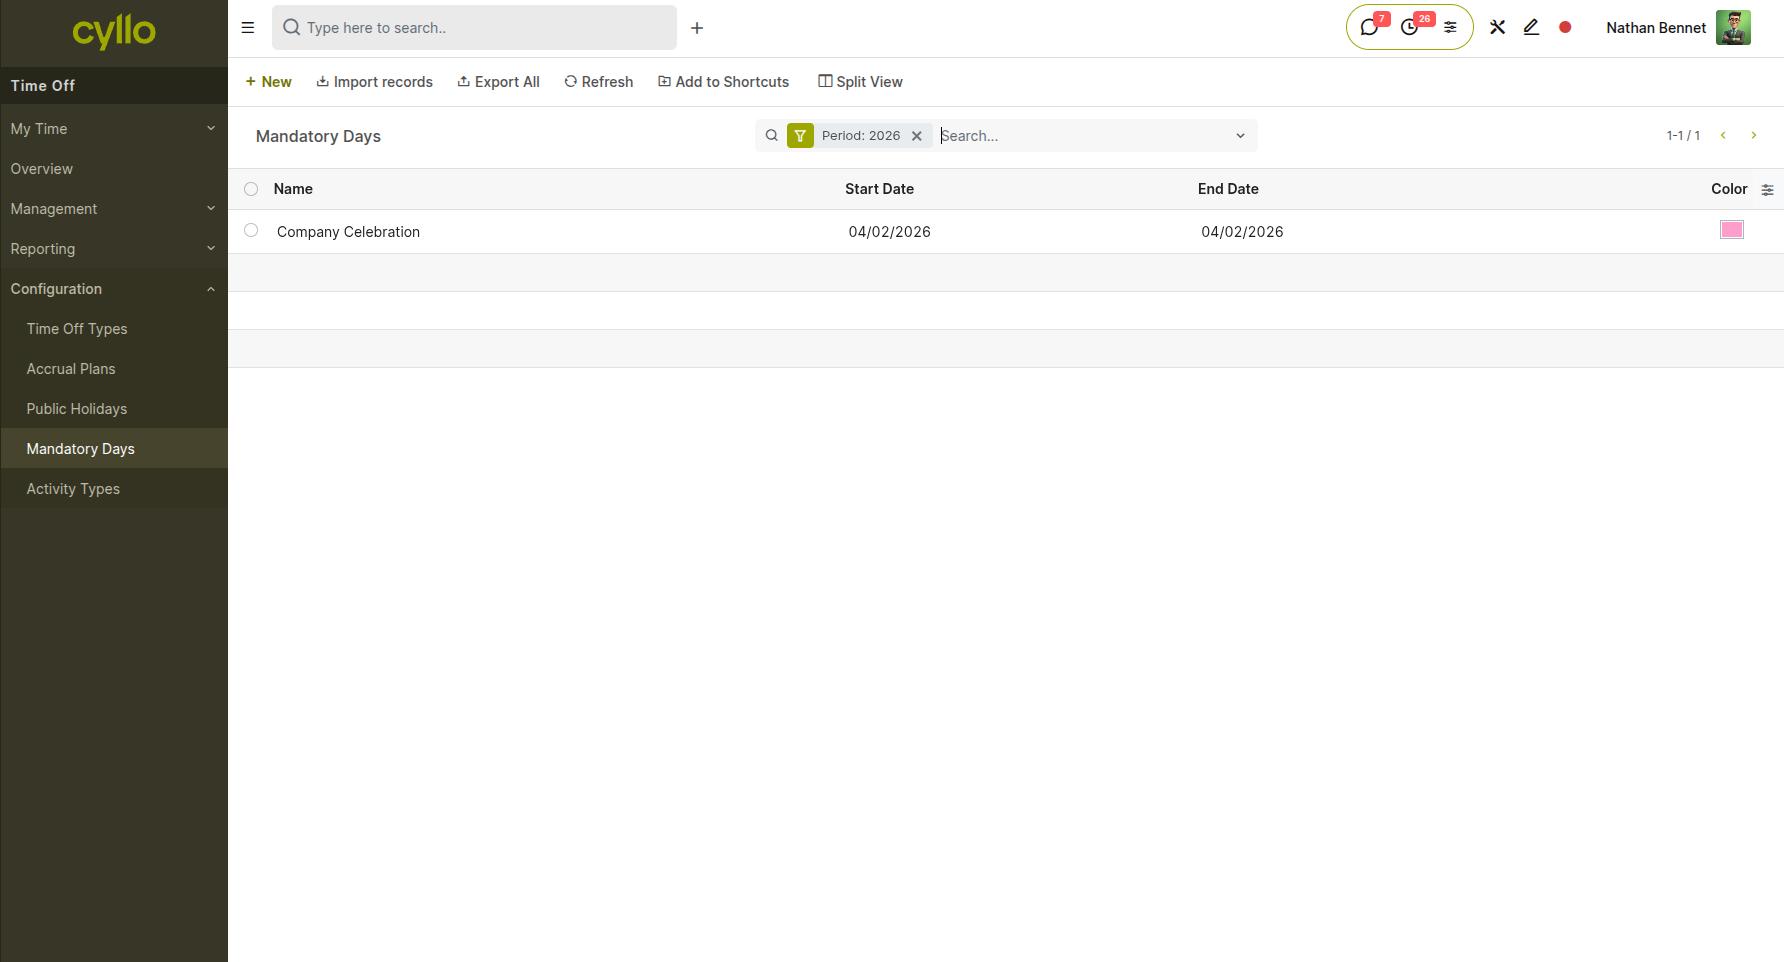
Fig 2.6 — Mandatory Days configuration screen showing a company shutdown period with start and end dates
How to Configure Mandatory Days:
- Go to Time Off → Configuration → Mandatory Days → New
- Enter the Name describing the mandatory period
- Set the Start Date and End Date
- Select the Company or leave blank for all companies
- Add optional Description or notes
- Click Save
Note
Mandatory days appear on employee calendars and can be used to plan company-wide shutdowns, training periods, or other required activities.
2.5 Activity Types
Activity Types allow you to categorize time off requests beyond the standard leave types. While Time Off Types define broad categories like 'Paid Time Off' or 'Sick Leave', Activity Types provide more granular classification such as 'Conference', 'Training', 'Medical Appointment', or 'Personal Errands'. This additional layer of categorization enables more detailed reporting and analysis of how employees are using their time off.
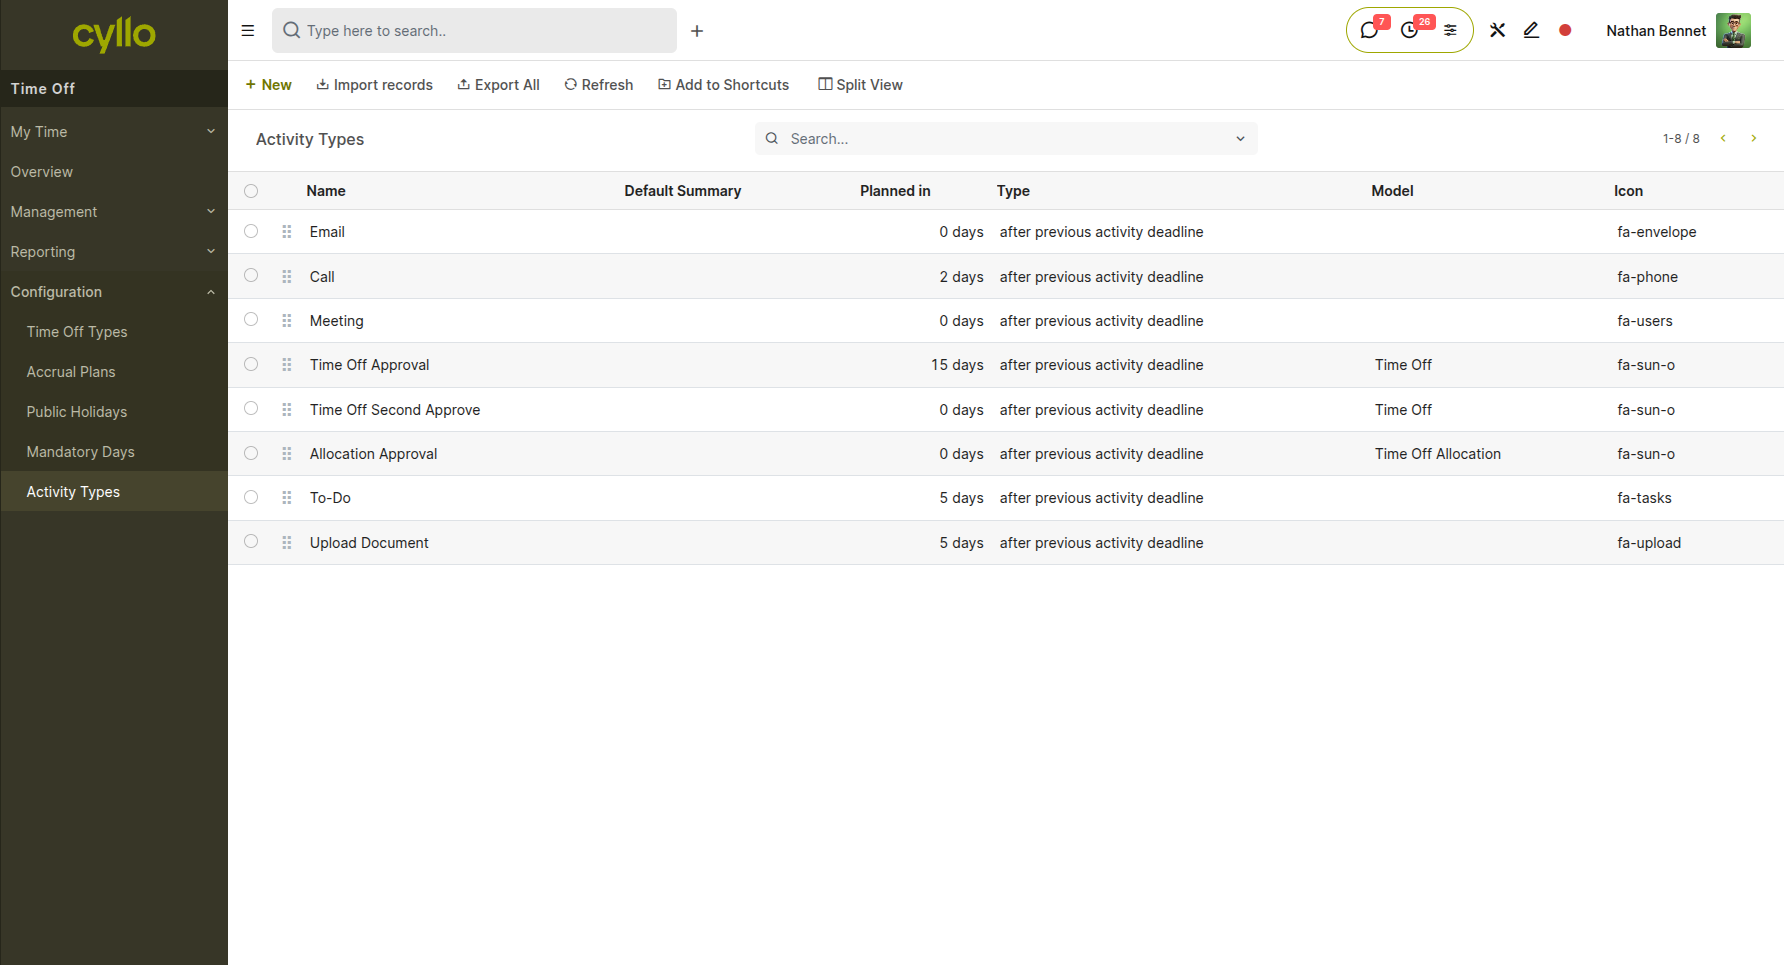
Fig 2.7 — Activity Types list showing type names and their associated Time Off Type categories
How to Create an Activity Type:
- Go to Time Off → Configuration → Activity Types → New
- Enter the Activity Type Name (e.g., 'Conference', 'Training', 'Medical Appointment')
- Select the associated Time Off Type
- Add optional Description
- Click Save
Note
Activity Types are optional but provide valuable granularity for reporting purposes. Employees can select an activity type when submitting time off requests to better categorize their absence.
3. Reporting & Analytics
This section covers the reporting and analysis tools available for tracking time off usage, balances, and trends across your organization. The Reporting menu provides two main analysis views: By Employee and By Type.
3.1 By Employee
The By Employee report shows time off data organized by individual employees. This view displays each employee's time off requests, total days taken, days remaining, and balance for each leave type. The report is particularly useful for HR administrators who need to verify individual employee allocations, track usage patterns, or identify employees who may be approaching balance limits or haven't taken sufficient time off.
How to View Employee Report:
- Go to Time Off → Reporting → by Employee
- Filter by specific Employee, Department, or Time Off Type using the search filters
- Switch between List, Graph, or Pivot view using the view selector
- Group data by different dimensions (Department, Time Off Type, Date) for deeper analysis
- Export to Excel or PDF for external reporting
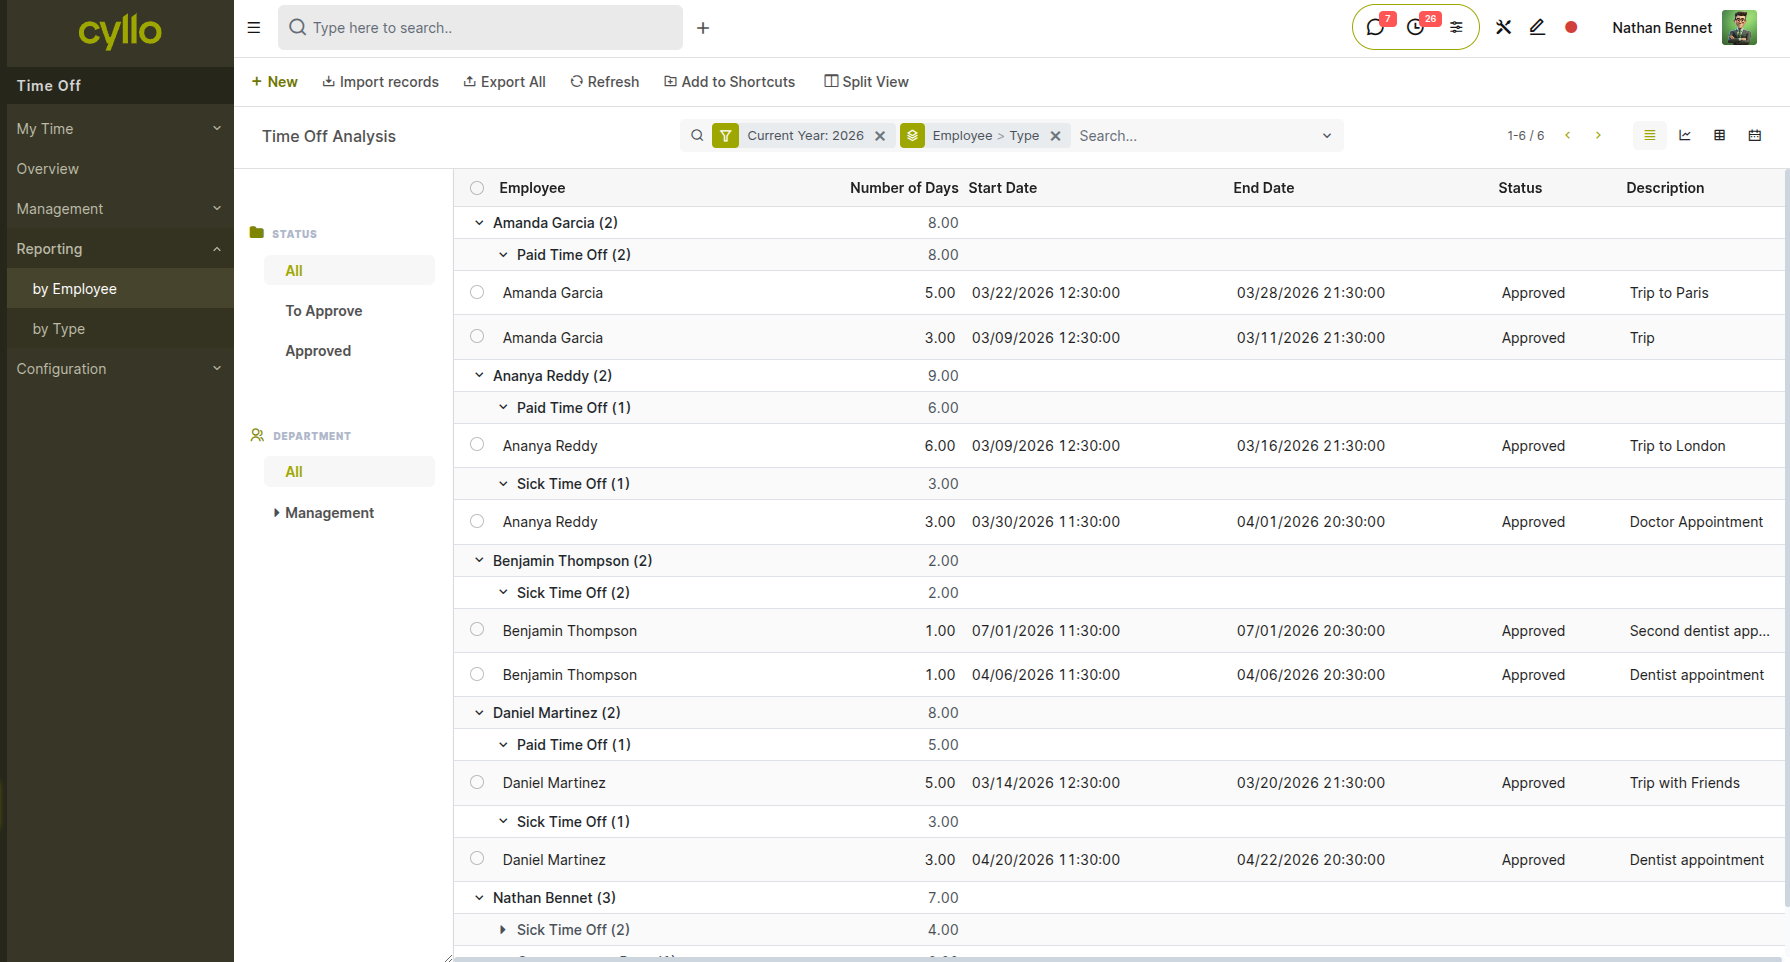
Fig 3.1 — By Employee report in List view showing each employee's leave requests, days taken, and remaining balance by type
Note
The employee report updates in real-time as requests are submitted and approved. Use filters to focus on specific employees, departments, or date ranges for targeted analysis.
3.2 By Type
The By Type report analyzes time off usage organized by leave type categories (Paid Time Off, Sick Time Off, Compensatory Days, Parental Leaves, Training Time Off). This view provides insights into which types of leave are most utilized across the organization, helps identify trends in specific leave categories, and allows managers to see the total duration of each leave type taken across all employees. The report supports bar chart, line graph, and pivot table views for comprehensive analysis.
How to Generate Type Analysis:
- Go to Time Off → Reporting → by Type
- Select the date range for analysis using the Type dropdown and Search filters
- Choose Graph view to see bar charts or line graphs of leave type usage
- Use Pivot view for detailed cross-tabulation of leave types by department or date
- Apply filters to focus on specific time off types or departments
- Click Measures to customize which metrics are displayed (Duration in Days, Number of Requests, etc.)
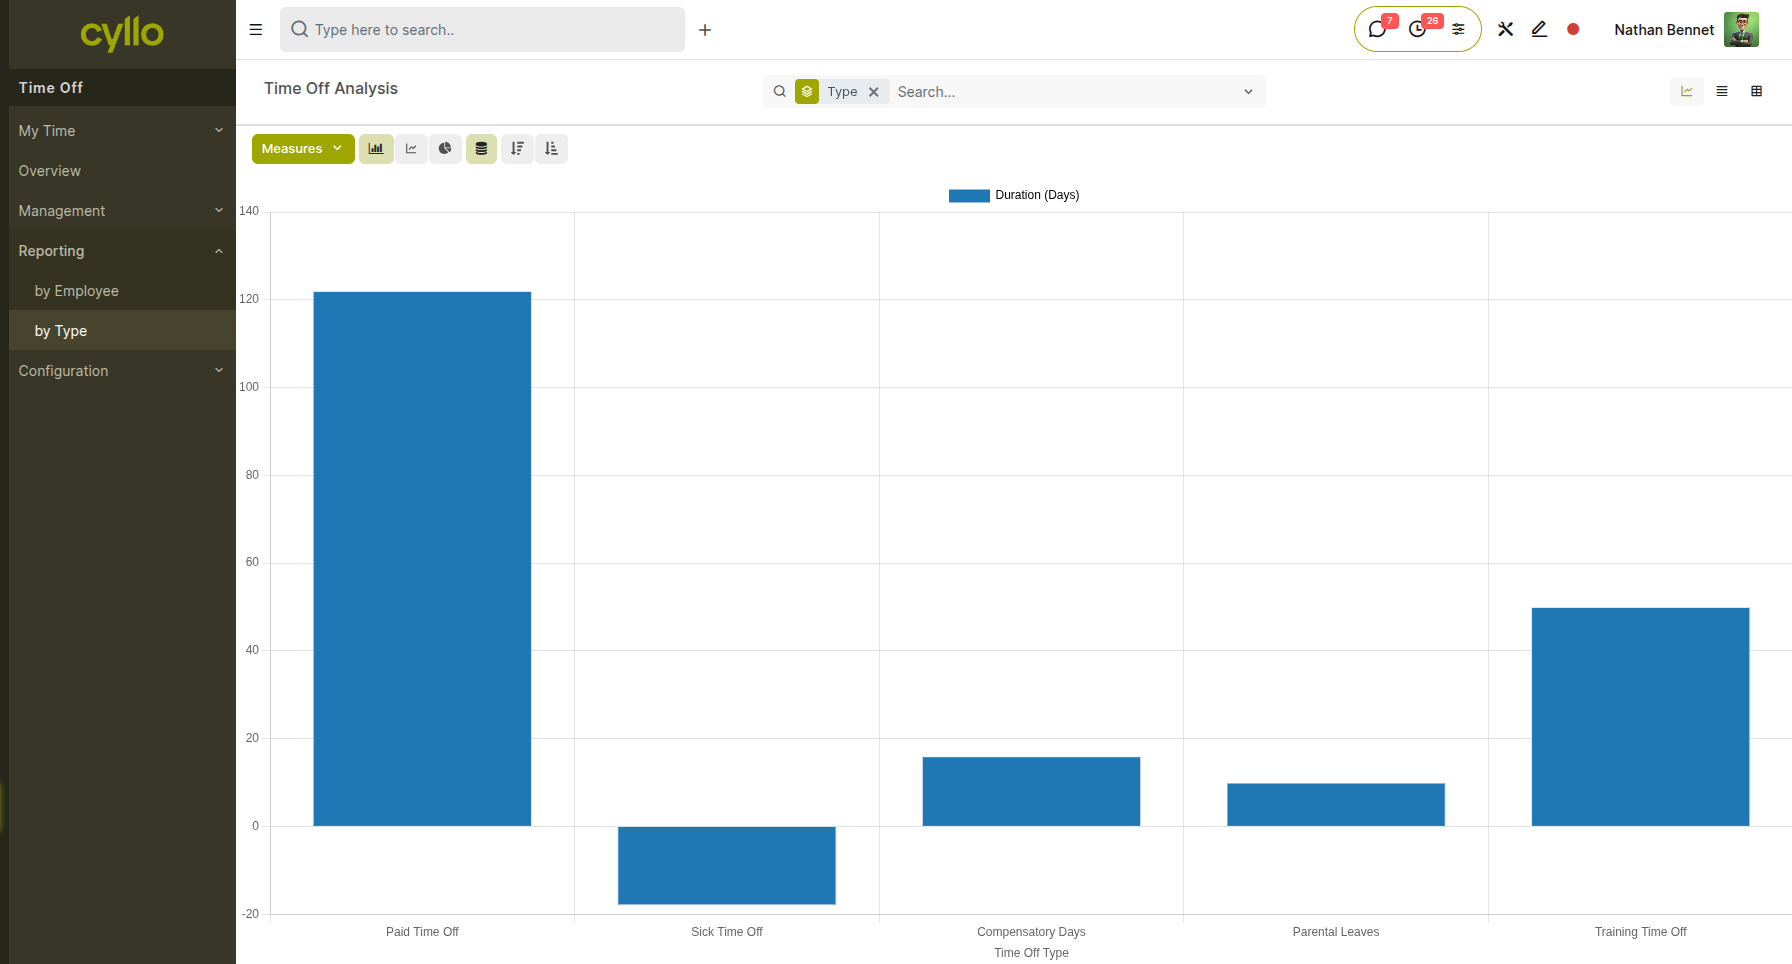
Fig 3.2 — By Type report in Bar Chart view showing total days taken per leave type across the organization
Note
Use the By Type analysis to identify patterns such as seasonal peaks in certain leave types, underutilized leave categories, or departments with unusually high usage of specific leave types. Custom reports can be created using Cyllo Analytics for more advanced analysis.
4. Integrations
The Time Off module integrates seamlessly with other Cyllo modules to provide a unified HR management experience.
Employees Module: Time Off pulls employee records, department hierarchies, and manager relationships from the Employees module. Employee profiles display current leave balances and quick links to submit time off requests. Manager assignments determine approval routing.
Attendance: Approved time off requests automatically create absence records in the Attendance module. When employees are on leave, their attendance status is marked as 'Time Off' for those days, preventing duplicate check-ins and ensuring accurate attendance tracking.
Payroll: Unpaid time off automatically affects payroll calculations. When processing payslips, Cyllo deducts pay for unpaid leave days taken during the period. Paid time off is included in normal salary calculations without deductions.
Planning: The Planning module displays time off on team calendars and shift schedules. When scheduling shifts, managers can see who is on leave to avoid assignment conflicts. Approved time off blocks appear on the planning view, helping with resource allocation.
Timesheets: Time Off prevents timesheet entry conflicts during approved leave periods. If an employee is on approved leave, they cannot log hours on those days in Timesheets. This ensures accurate time tracking and prevents double-counting of time.
Calendar: All time off requests appear in the Cyllo Calendar, synchronized with employee personal calendars and team calendars. Approved leave shows on calendar views with color coding by leave type, providing visibility for meeting scheduling and team coordination.