

Cyllo POS Documentation
Introduction
The Point of Sale module in Cyllo ERP provides retail businesses with a fast, intuitive, and fully integrated checkout experience. From launching a session at the start of a shift to closing and reconciling at the end of the day, the POS module handles every step of the sales transaction process — product selection, payment collection, receipt printing, and real-time stock updates — all from a single streamlined interface accessible on any device, including tablets, touchscreen terminals, and desktop computers.
Because the POS module is tightly integrated with the rest of the Cyllo ERP database, every sale completed at the counter is immediately reflected across Inventory, Accounting, and Sales with no manual data transfer required. A product sold through POS automatically reduces stock in the Inventory module. Payments are posted directly to the linked accounting journals. Customer loyalty points and eWallet balances are updated in real time. This deep integration ensures that front-of-house and back-office operations stay aligned at all times.
Cyllo's POS module is designed for both simplicity and depth. Cashiers interact with a minimal, touch-optimized interface that keeps the checkout flow fast and error-free. Behind the scenes, administrators have full control over payment methods, product categories, pricelists, receipt formats, tax configurations, hardware peripherals, and session closing procedures. Whether you operate a single retail outlet or multiple locations, the POS module provides the framework to standardize, monitor, and grow your point-of-sale operations from within the centralized Cyllo ERP platform.
1. Getting Started
1.1. What is the Point of Sale Module?
The Point of Sale module in Cyllo is a browser-based retail checkout system that operates directly within the ERP. It replaces standalone POS software by integrating checkout operations — sales, payments, and receipts — into the same platform used by your inventory, accounting, and customer management teams. Unlike traditional POS systems that require separate hardware or software licenses, Cyllo POS runs in any modern web browser and connects to a shared product and customer database in real time. Changes made in the back-end — new products, updated prices, adjusted pricelists — are reflected in the POS interface immediately when the next session opens.
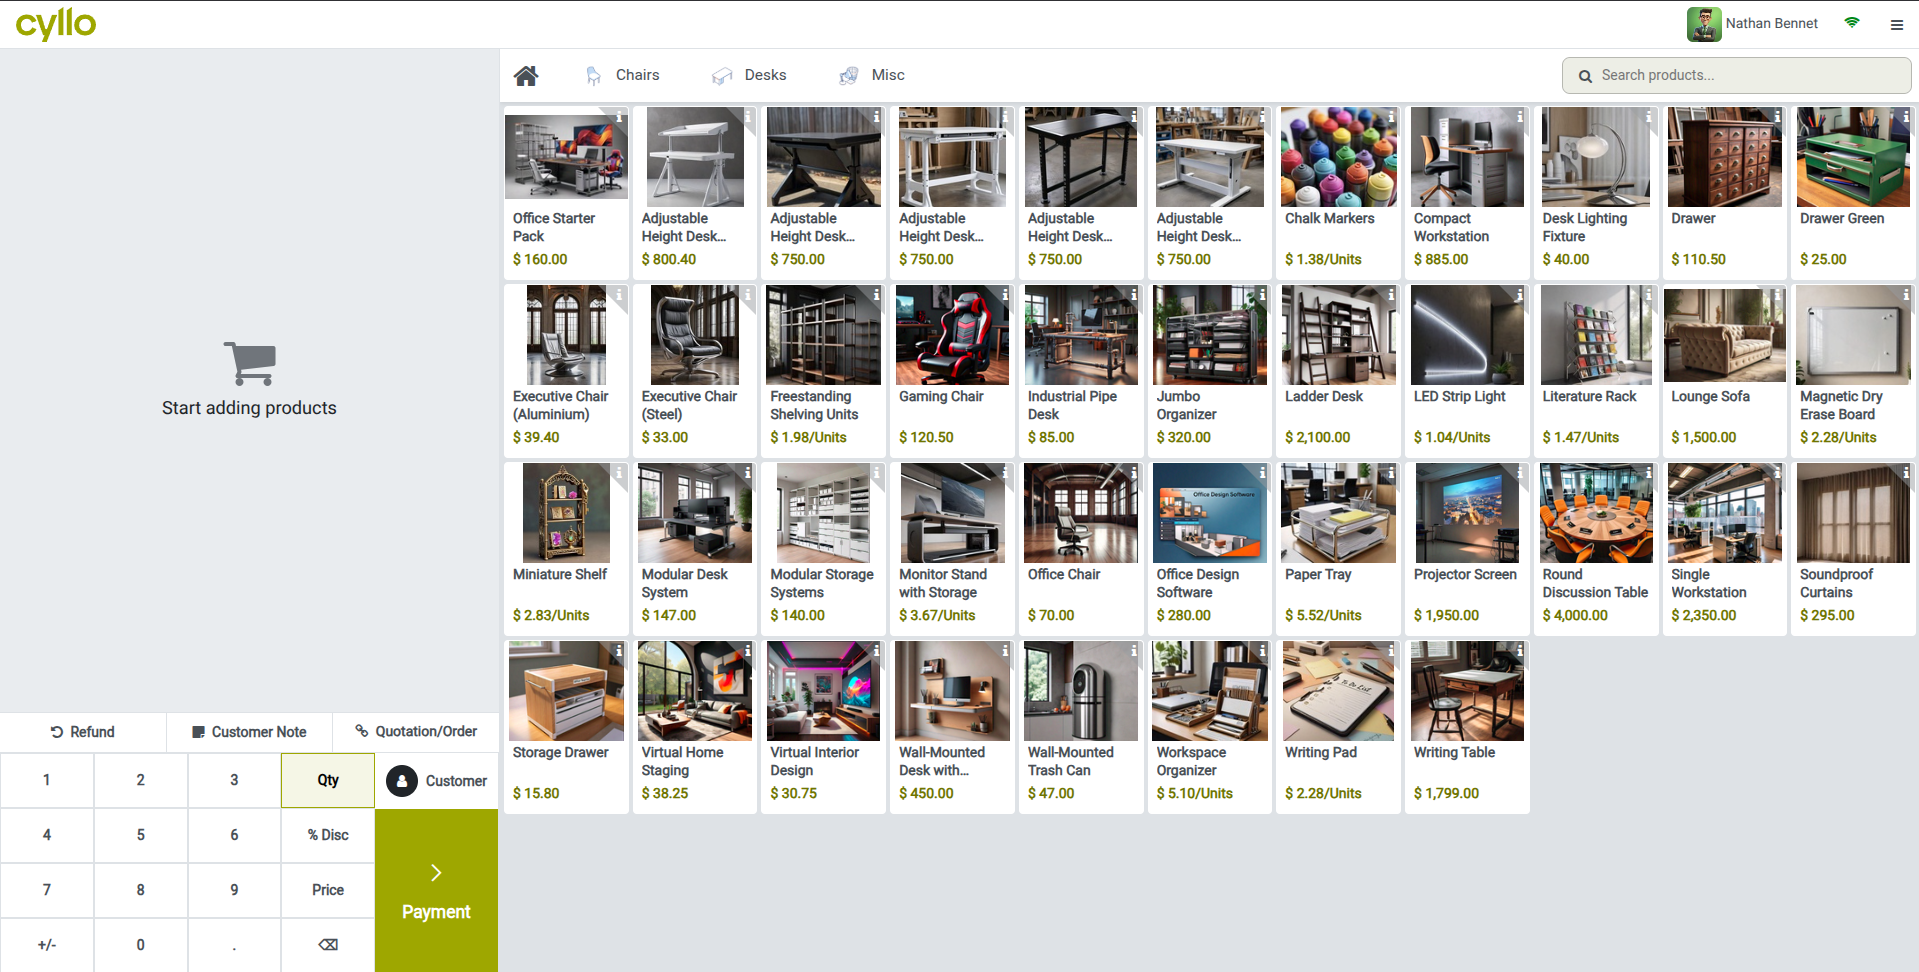
Fig 1.1 — Cyllo POS session interface — product selection grid with category filters on the left and order summary panel on the right
Note
The POS module needed to be installed first from apps. Cyllo automatically creates a default POS shop called Shop for you to configure.
1.2. Configuring a POS Shop
Each physical retail location or checkout point is represented as a separate POS shop in Cyllo. You can create and configure multiple shops from the POS Configuration menu, with each shop having its own products, payment methods, receipt format, and session settings.
- Go to Point of Sale → Configuration → Point of Sale.
- Click New to create a new shop or open an existing one to edit it.
- Enter the Shop Name (e.g. Main Counter, Warehouse Outlet).
- Under the Connected Devices tab, link your receipt printer, customer display, and other peripherals.
- Click ‘Configurations > Settings’ for more settings.
- Under the Payment tab, select the allowed payment methods for this shop.
- Configure additional options under the Sales, Inventory, and Bill & Receipt tabs as needed.
- Click Save. The shop is now available to open as a session.
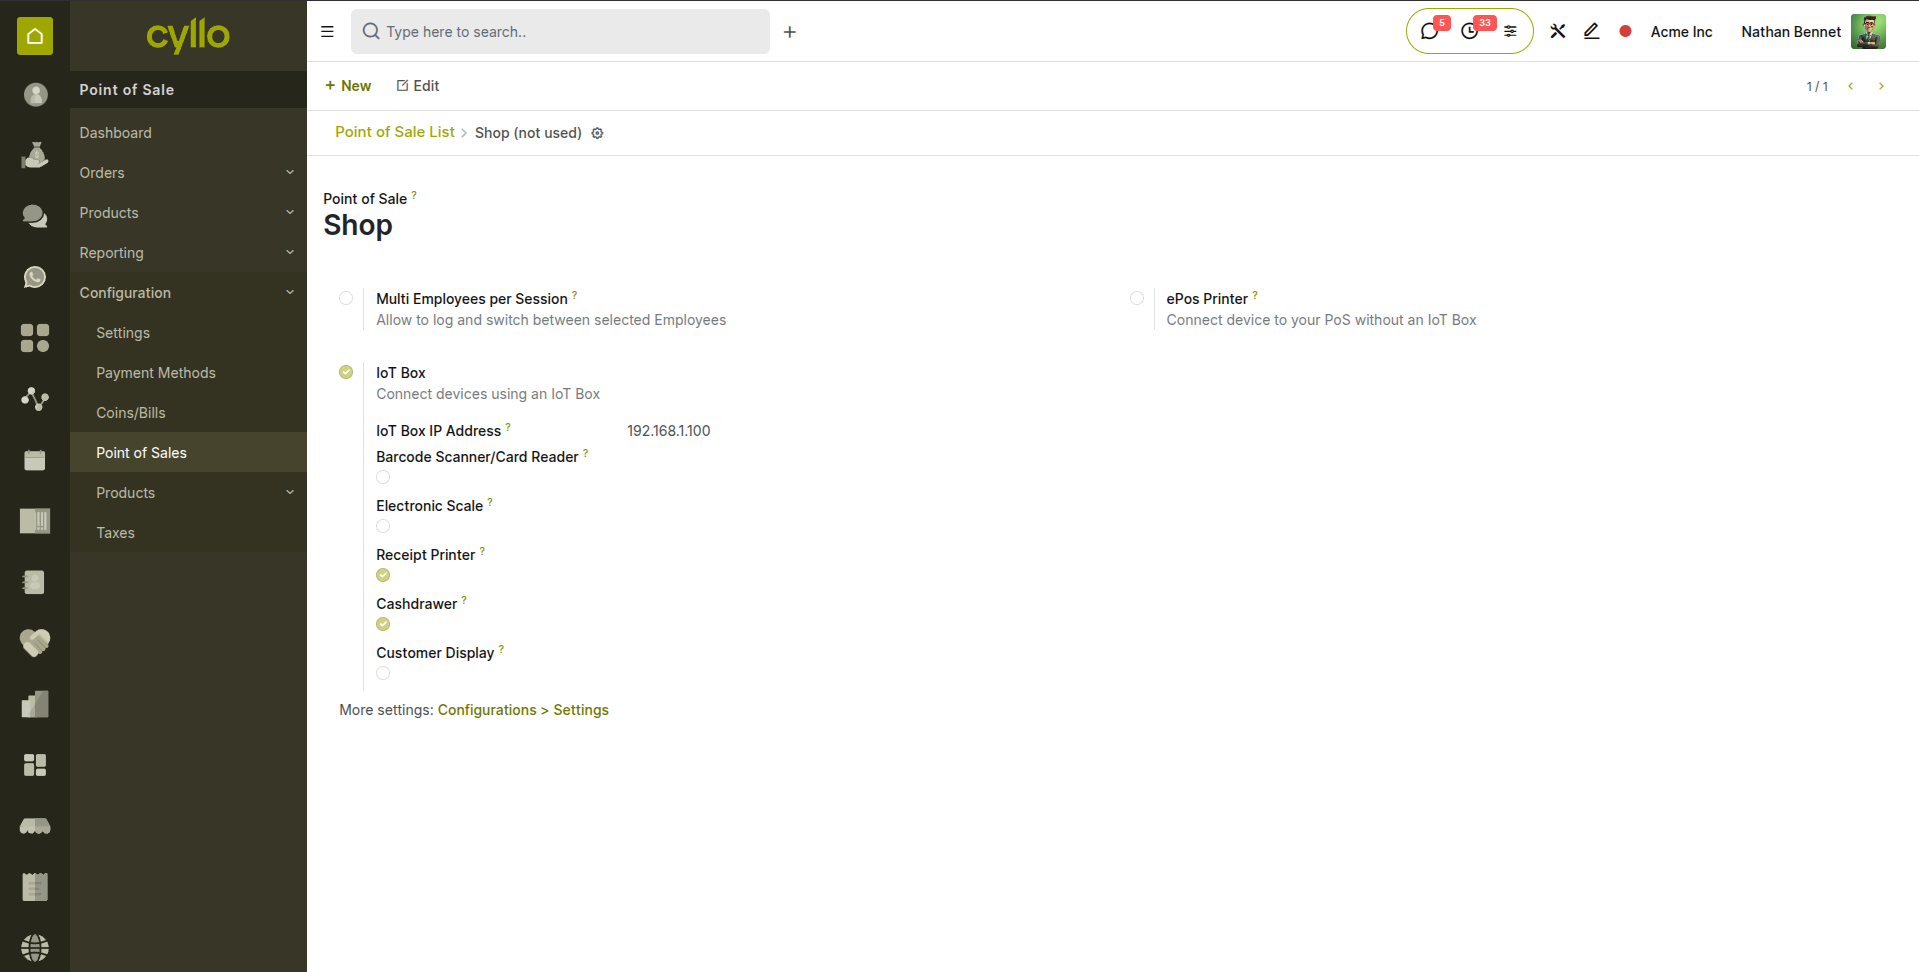
Fig 1.2 — POS Configuration form — shop name, connected devices, and ‘Configurations > Settings’ button
TIP
Create a separate POS shop for each checkout location (e.g. till 1, till 2). This keeps session reports, drawer balances, and receipts separate per counter.
1.3. Setting Up Payment Methods
Payment methods define how the POS accepts money from customers — cash, card, UPI, eWallet, or any custom method you configure. Each method is linked to an accounting journal that records the transactions for reconciliation.
- Go to Point of Sale → Configuration → Payment Methods.
- Click New to create a new payment method.
- Enter the Name (e.g. Cash, Card, UPI).
- Select the Journal to link for accounting purposes.
- If using a card payment terminal, enable Payment Terminal and select the terminal type.
- Save the payment method.
- To assign it to a shop, go to Point of Sale → Configuration → Point of Sale, open the shop, and add the method under the Payment tab.

Fig 1.3 — Payment Method form — name, journal, and payment terminal fields configured for card payment
1.4. Receipt & Bill Customization
The printed bill and receipt can be customized with the restaurant's branding — logo, header text, footer message, and VAT or tax registration number. These settings are configured in the Bill & Receipt tab of the shop configuration.
- Go to Point of Sale → Configuration → Settings and select the related shop.
- Go to the Bill & Receipt tab.
- Enable Custom Header & Footer.
- Enter Header text — typically the shop name, address, and phone number.
- Enter Footer text — a thank-you message, return policy note, or social media handle.
- Save. The updated design applies to all bills and receipts in the next session.
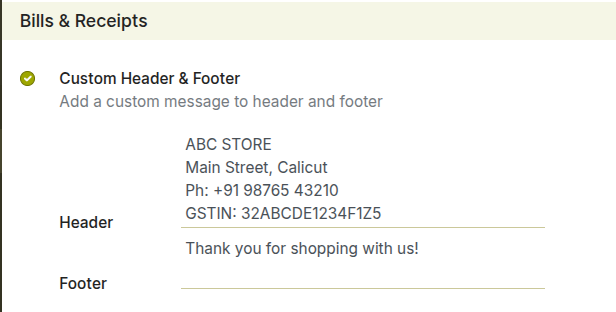
Fig 1.4 — POS Bill & Receipt tab — Header and Footer text fields
Note
Add a logo in the company settings. It will be automatically available in POS receipt.
1.5. Employee & Waiter Access
The Restaurant module supports staff-level access control through the Employee Login feature. When enabled, each waiter identifies themselves at the start of the session or at each order, allowing management to track individual sales performance and control which staff can access manager functions such as discounts and refunds.
- Go to Point of Sale → Configuration → Settings and select the related shop.
- Under the PoS Interface tab, enable ‘Multi Employees per Session’.
- Set employees for Basic rights and Advanced rights.
- To set employee PINs, go to the Employees module → open each employee record → HR settings tab → set the PIN.
- Save the shop configuration. On the next session open, staff must identify themselves before taking orders.
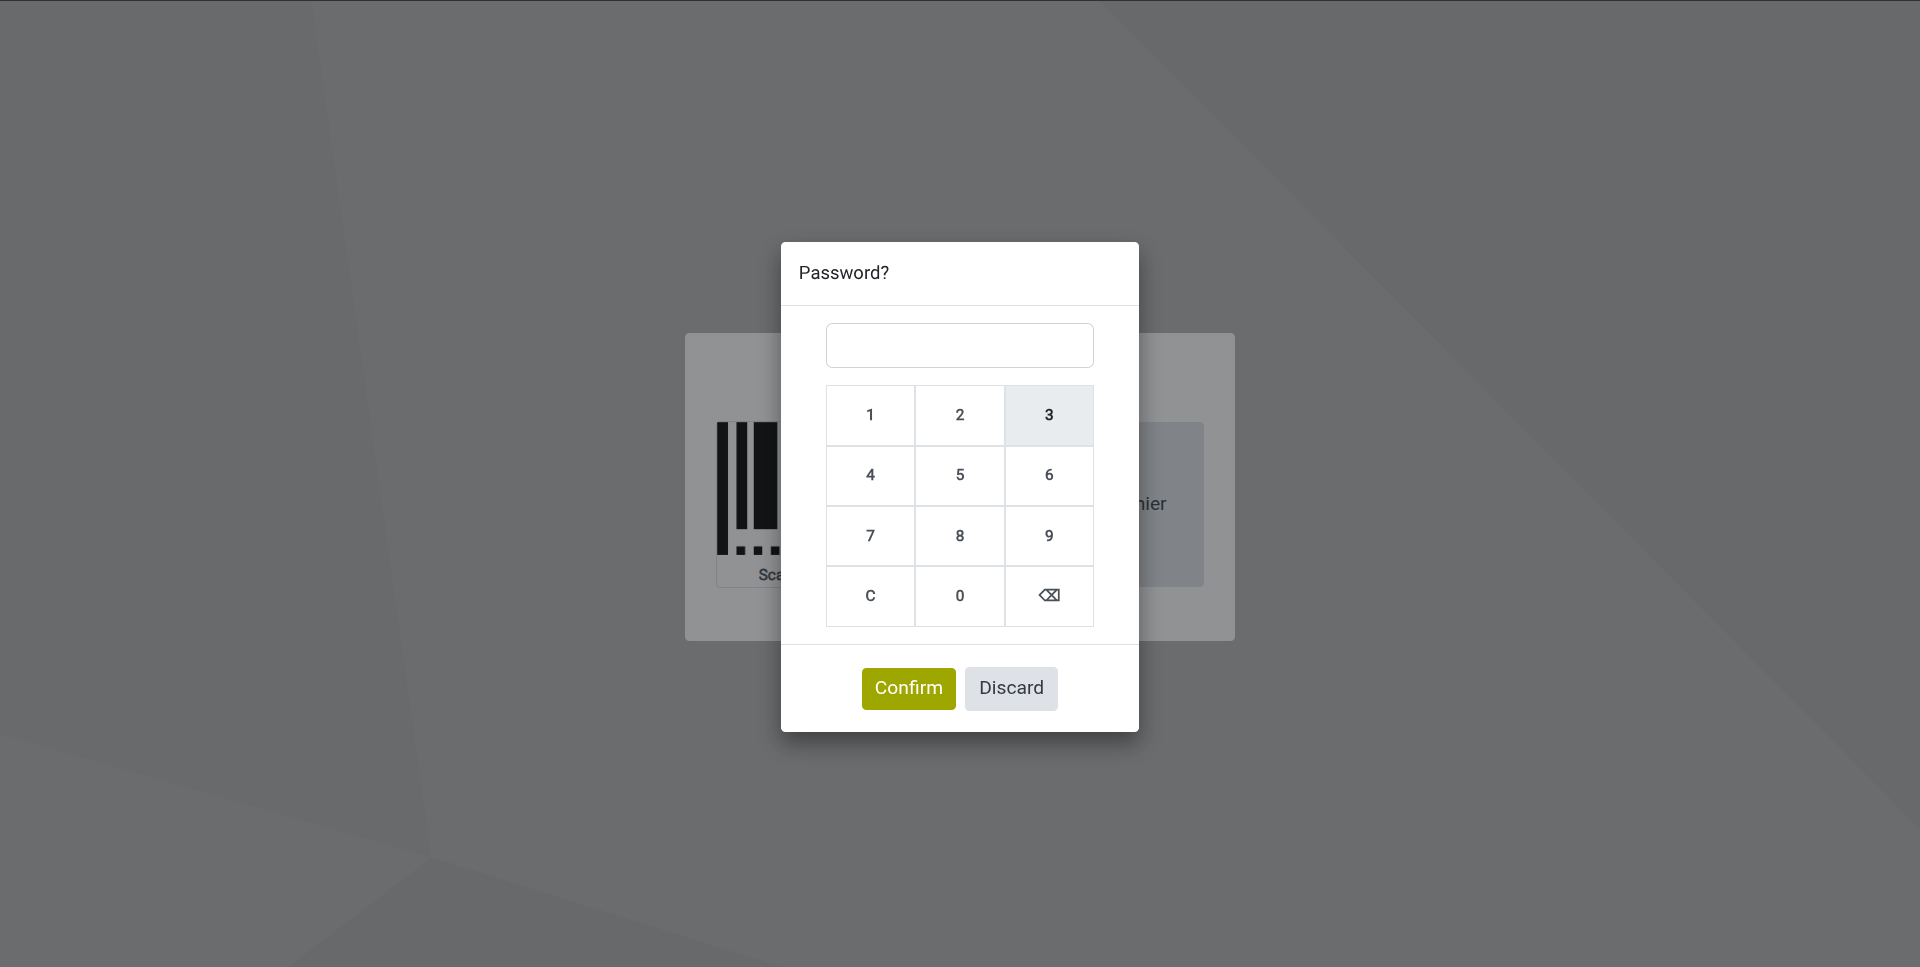
Fig 1.5 — Employee login screen at session start — staff name tiles displayed for selection, with PIN entry for the selected employee
1.6. Hardware Requirements
Cyllo POS runs in any modern web browser and is compatible with a wide range of checkout hardware. The table below summarizes supported peripherals and their connection types.
| Hardware | Connection Type | Notes |
|---|---|---|
| ePOS Receipt Printer | Network (LAN/WiFi) | Use Epson ePOS SDK compatible printers for direct printing without an IoT Box. |
| USB Receipt Printer | USB via IoT Box | Connect to Cyllo IoT Box for USB printer support. |
| Customer Display | Network / IoT Box | Shows order total and line items to the customer. |
| Barcode Scanner | USB / Bluetooth (HID mode) | Plug-and-play; scanner emulates keyboard input. |
| Cash Drawer | Printer port / IoT Box | Opens automatically on cash payment confirmation. |
| Card Payment Terminal | Network | Configured via Payment Terminal settings in the payment method. |
| Tablet / Touchscreen | WiFi (browser) | Open the POS session in a browser — no app installation needed. |
Note
IoT Box is required for USB printers and USB cash drawers. Network-connected ePOS printers work without an IoT Box using the Epson ePOS driver.
2. Session Management
A POS session represents one working period on a checkout — from when the cashier opens the till to when they close and reconcile at the end of shift. All sales, payments, and cash movements during a session are tracked together and reported as a unit.
2.1. Opening a POS Session
Each working period begins by opening a session. When a session opens, Cyllo loads the product catalog, customer database, and active pricelists into the POS interface. The cashier may be prompted to enter an opening cash balance for the till.
- Go to Point of Sale from the Cyllo main menu.
- Select the shop you want to open (if multiple shops are configured).
- Click Open Session. Cyllo launches the POS interface.
- If configured, enter the Opening Cash Balance — the physical cash counted in the drawer before the first sale.
- Click Open to confirm. The POS product grid is now active and ready for sales.
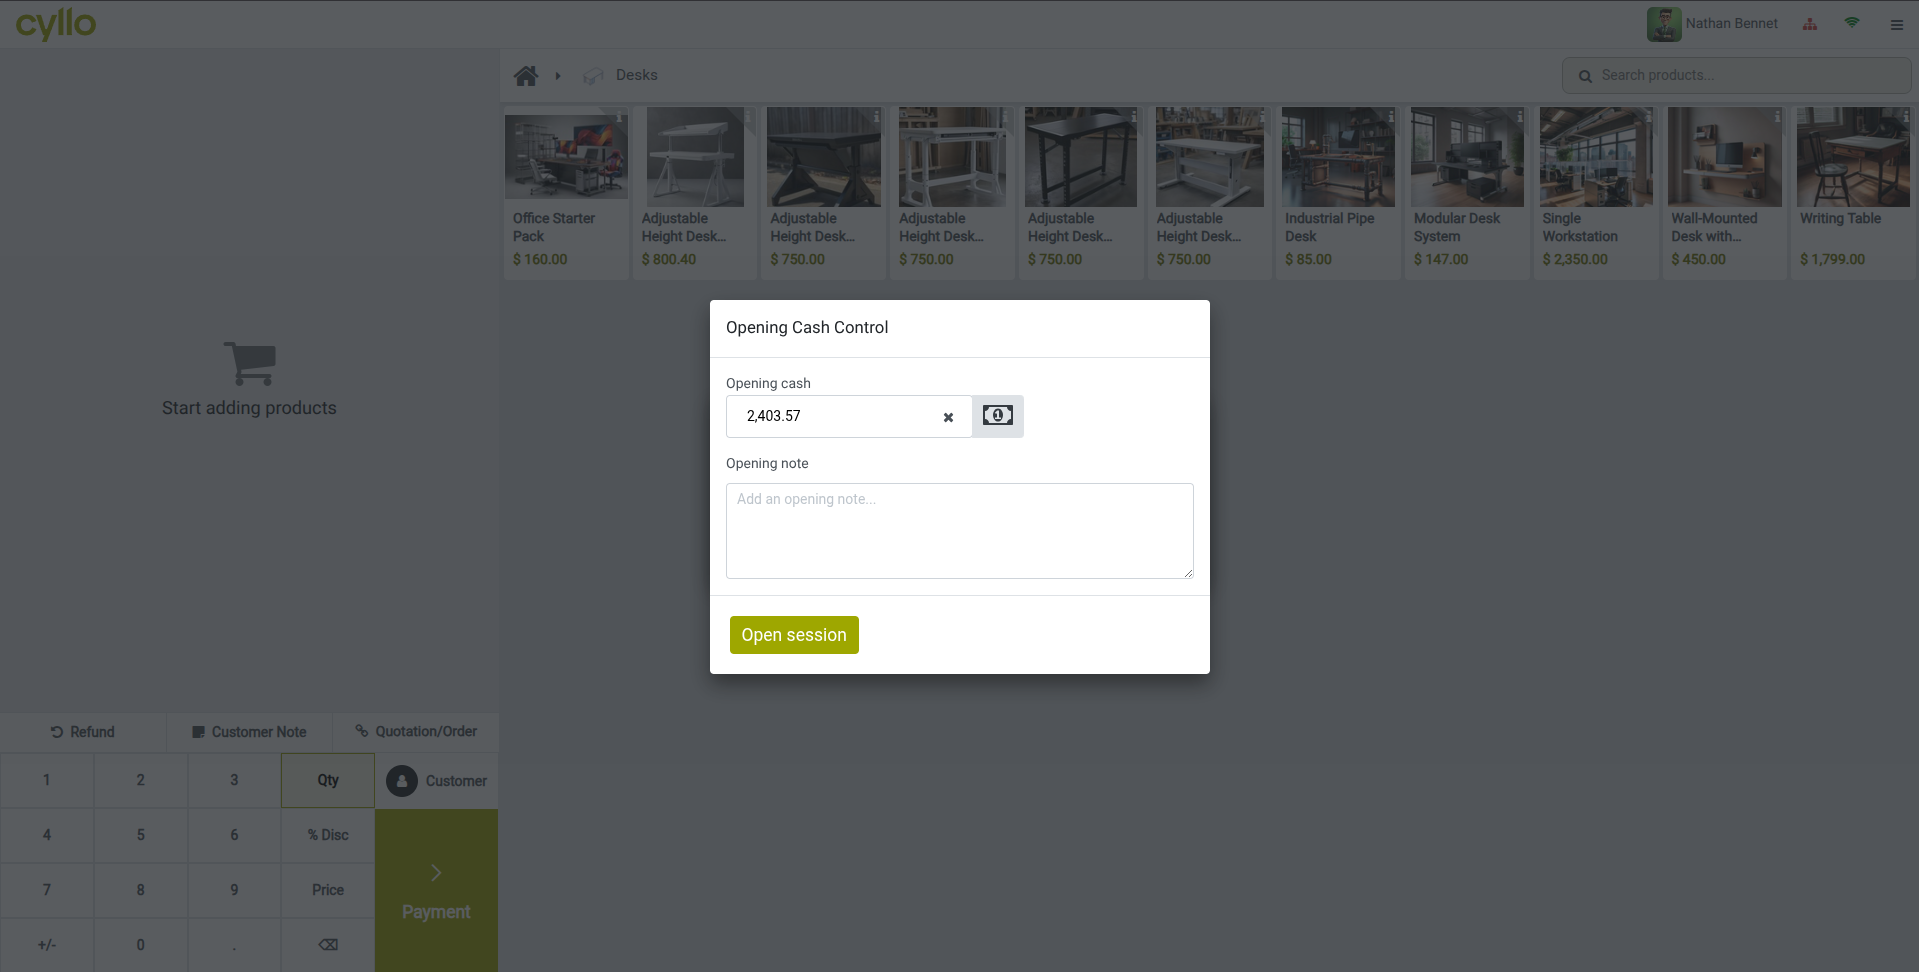
Fig 2.1 — Opening balance popup — cash entry with description and Open button
Note
Always enter an accurate opening cash balance. This figure is used to calculate the expected cash total at session close and helps identify discrepancies.
TIP
Assign a specific login PIN to each waiter so that orders are tracked per employee. Enable the Employee Login setting in the POS shop configuration before starting the session.
2.2. Session Dashboard Overview
The POS interface is divided into three main areas: the product selection grid on the right, the active order panel on the left, and the top navigation bar. Cashiers spend most of their time on this screen.
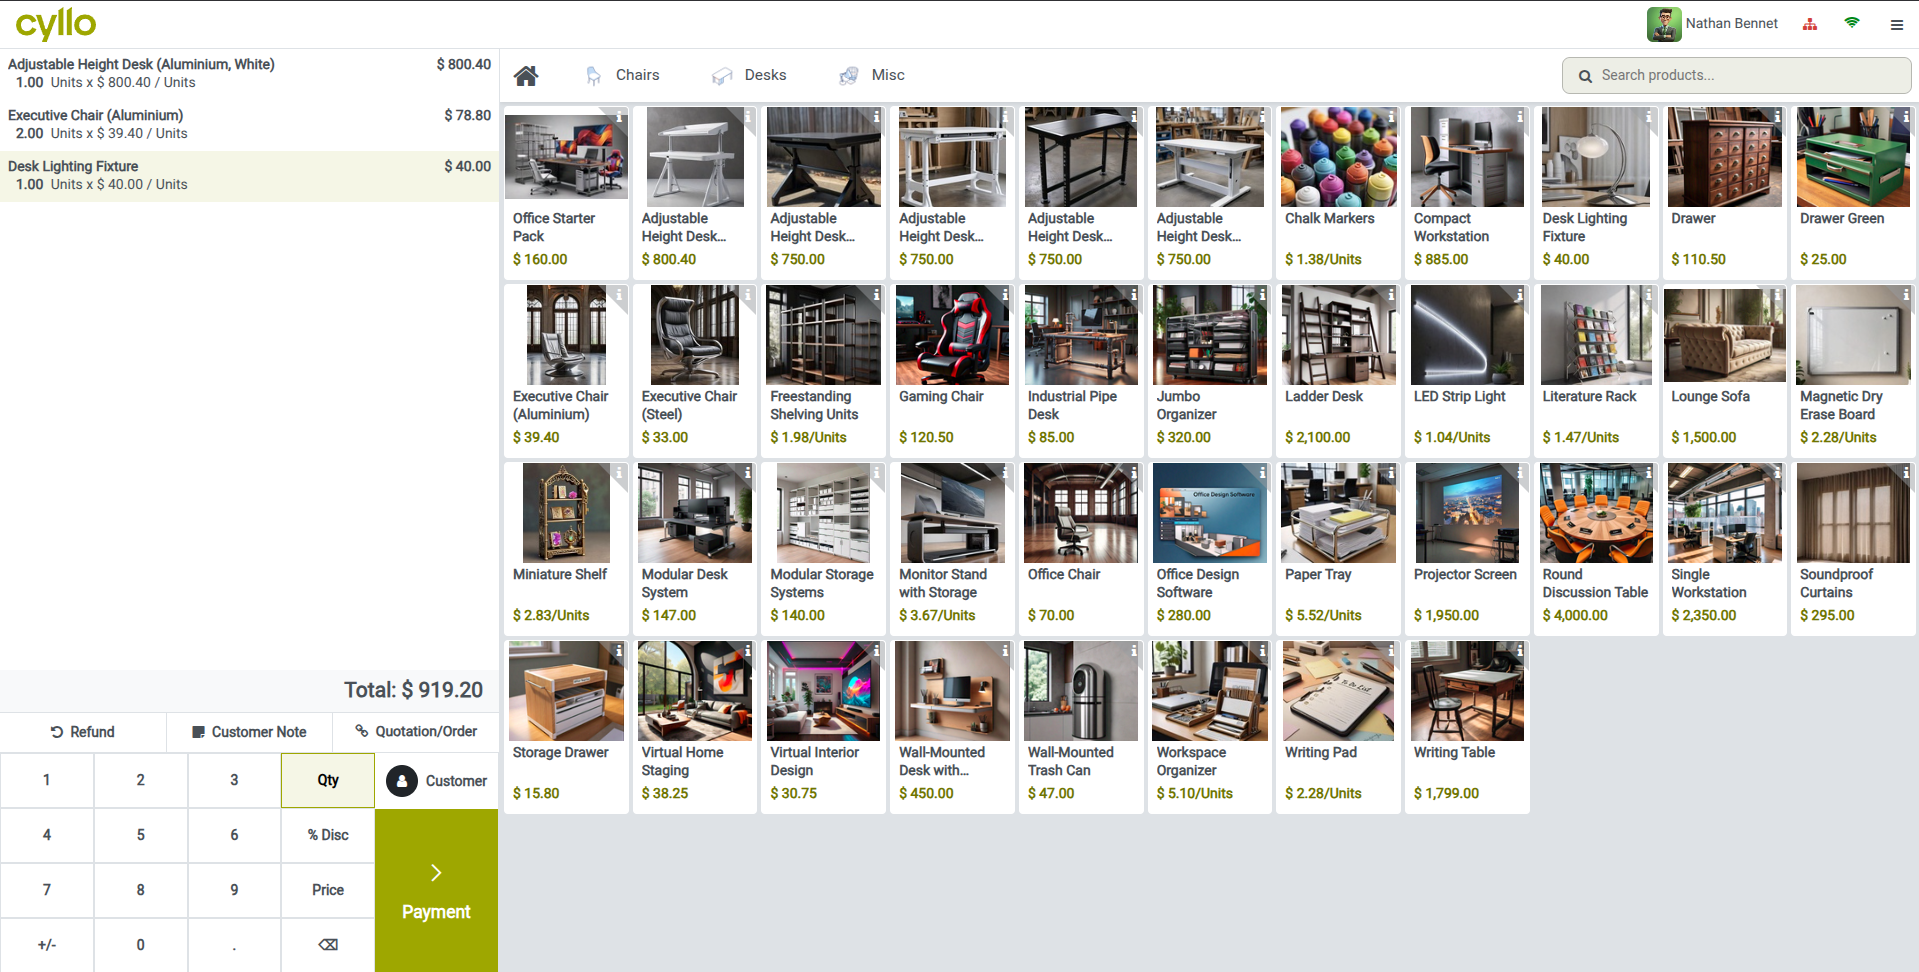
Fig 2.2 — Annotated POS session screen — product grid (right), order panel (left), payment button highlighted
Key Interface Areas
- Product Grid: Displays all POS-enabled products, organized by category tabs at the top.
- Order Panel: Shows the current order lines — product, quantity, unit price, and line total.
- Customer Field: Assigns a customer to the order for loyalty tracking and invoice generation.
- Numpad: Adjusts quantity, price (if permitted), and discount on the selected order line.
- Payment Button: Opens the payment screen to collect and confirm the transaction.
2.3. Cash In / Cash Out
Cash In and Cash Out movements record physical cash added to or removed from the drawer during a session — for example, adding change from a safe at the start of a busy period, or removing cash for a petty expense. These movements are recorded separately from sales and appear in the session report.
- In the active POS session, click the hamburger menu (≡) in the top-right corner.
- Select Cash In or Cash Out.
- Enter the Amount being added or removed.
- Add a Reason note (e.g. Safe drop, Petty cash).
- Click Confirm. The movement is recorded and the session balance is updated.
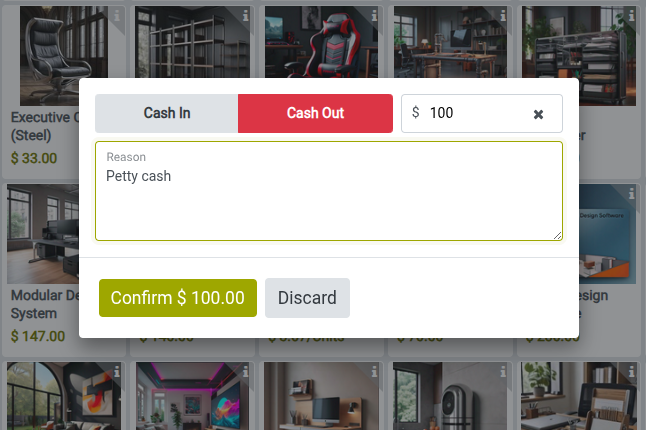
Fig 2.3 — Cash In / Cash Out dialog — amount field, reason text box, and Confirm button
Note
Cash In/Out transactions are visible in the session report under Cash Movements. They are not counted as sales revenue.
2.4. Closing a Session
Closing a session reconciles the day's sales with the cash in the drawer and posts all transactions to the accounting journals. A session closing report is generated showing total sales, payment method breakdown, and any cash discrepancy.
- Click the hamburger menu (≡) in the top-right corner of the POS screen.
- Select ‘Close Session’.
- Count the physical cash in the drawer and enter the Closing Cash Balance per denomination.
- Review the Difference shown between expected and counted cash.
- Click Close POS. Cyllo posts all transactions to accounting and archives the session.
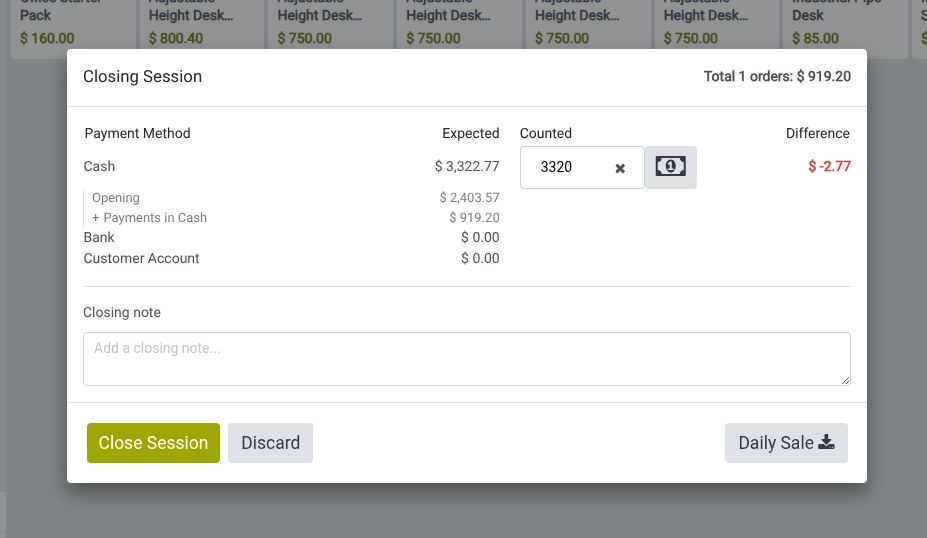
Fig 2.4 — Session closing screen — closing cash denomination entry, expected vs counted cash comparison, and Close POS button
Warning
Closing a session cannot be undone. Verify that all payments have been processed and no active orders remain before closing.
3. Processing Sales
This section covers the core transaction workflow — from adding products to an order through to payment collection, receipt issuance, and handling returns.
3.1. Creating an Order
Creating an order is the primary action in every POS session. Products are added to the order by tapping them on the product grid, scanning their barcode, or searching by name. Multiple orders can be kept open simultaneously, allowing the cashier to serve several customers in parallel.
- In the active POS session, tap a product on the product grid to add it to the order.
- Tap the product again to increase quantity by one, or use the numpad to type the exact quantity.
- To add a different product, tap it on the grid — it is added as a new order line.
- To scan a product, focus the cursor on the order panel and scan the barcode — the product is added automatically.
- To search by name, use the search bar at the top of the product grid.
- When the order is complete, click Payment to proceed to checkout.
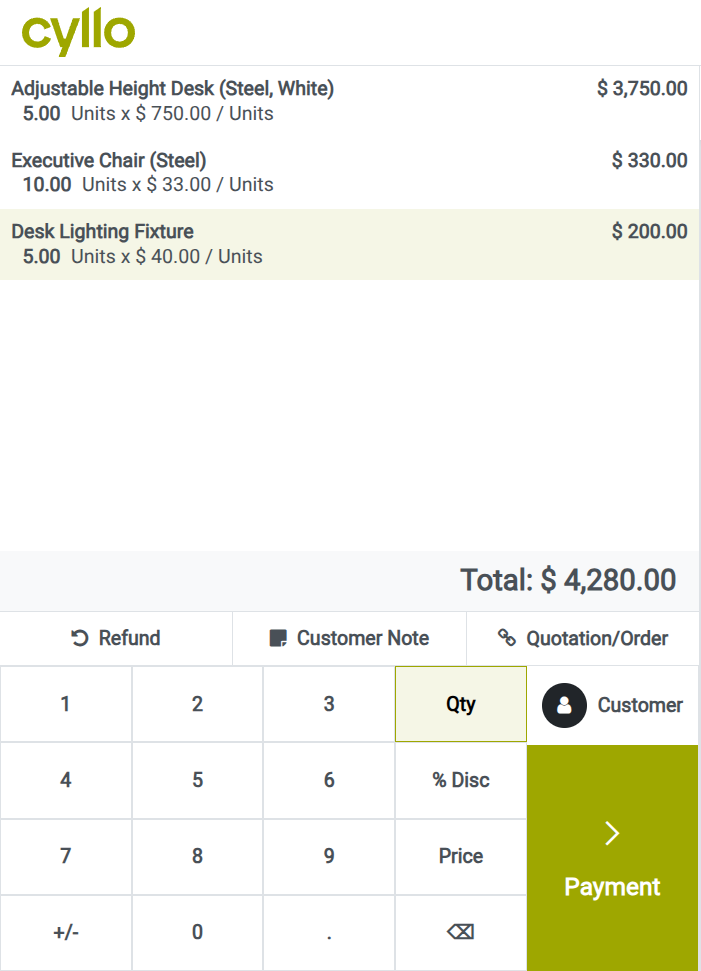
Fig 3.1 — POS order panel — multiple product lines added with quantities, unit prices, and line totals visible
TIP
To open a new order while keeping the current one on hold, click the ‘Orders’ button in the hamburger menu (≡) in the top-right corner, then click ‘New Order’. Also switch between active orders from here.
3.2. Applying Discounts
Discounts can be applied per order line to reduce the price of individual products. The discount feature must be enabled in POS settings before it appears in the session interface.
Enabling Discounts:
- Go to Point of Sale → Configuration → Point of Sale and open the shop.
- Under the Pricing tab, enable ‘Line Discounts’ to allow cashiers to set a discount per line and ‘Global Discounts’ to add a button to set a global discount.
- Click Save. How to Apply a Discount:
- Line discounts:
- In the POS session, select the order line you want to discount.
- On the numpad, tap the Disc button.
- Type the discount percentage (e.g. 10 for 10%).
- The discounted price updates on the order line immediately.
- Global Discounts
- In the POS session, click the ‘Discount’ button.
- On the popup, type the discount percentage (e.g. 10 for 10%).
- Click ‘Confirm’.
- A discount product is added with a global discount.
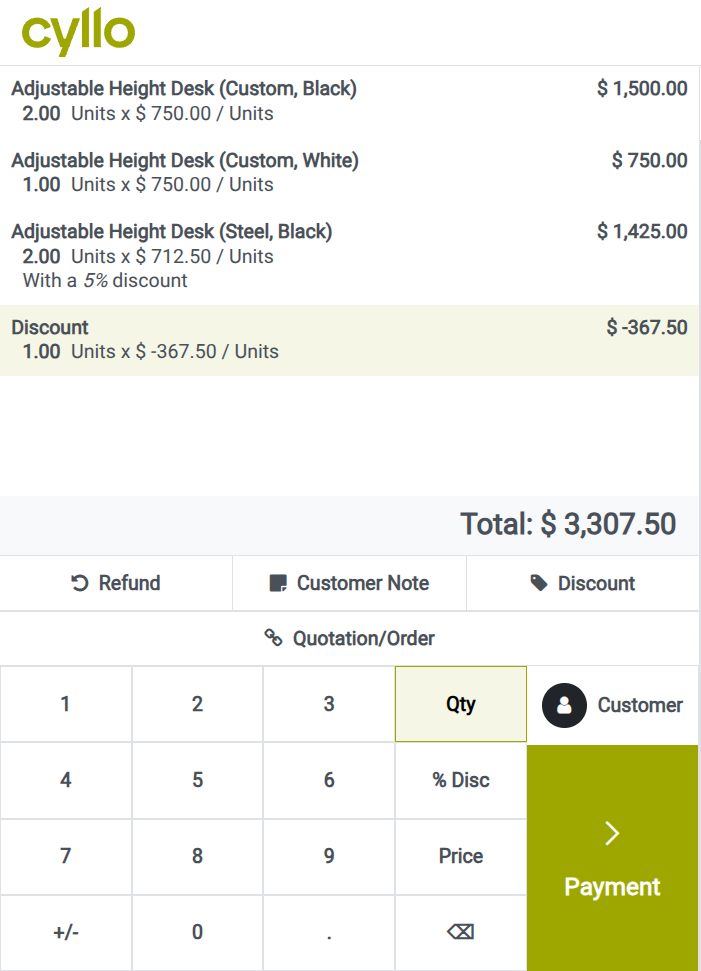
Fig 3.2 — POS numpad with Discount button — order line showing original price, discount percentage, discounted total and global discount.
3.3. Processing Payments
Once an order is ready, the cashier opens the payment screen to collect payment. Cyllo displays the order total, available payment methods, and calculates change due automatically for cash payments.
- With the order complete, click the Payment button (green button, bottom-right of order panel).
- The payment screen opens showing the order total.
- Select the payment method (Cash, Bank, etc.).
- For cash: enter the amount tendered — Cyllo calculates and displays the change due.
- For card: the payment terminal processes the charge automatically if integrated.
- Click Validate to confirm the payment. A receipt is generated.
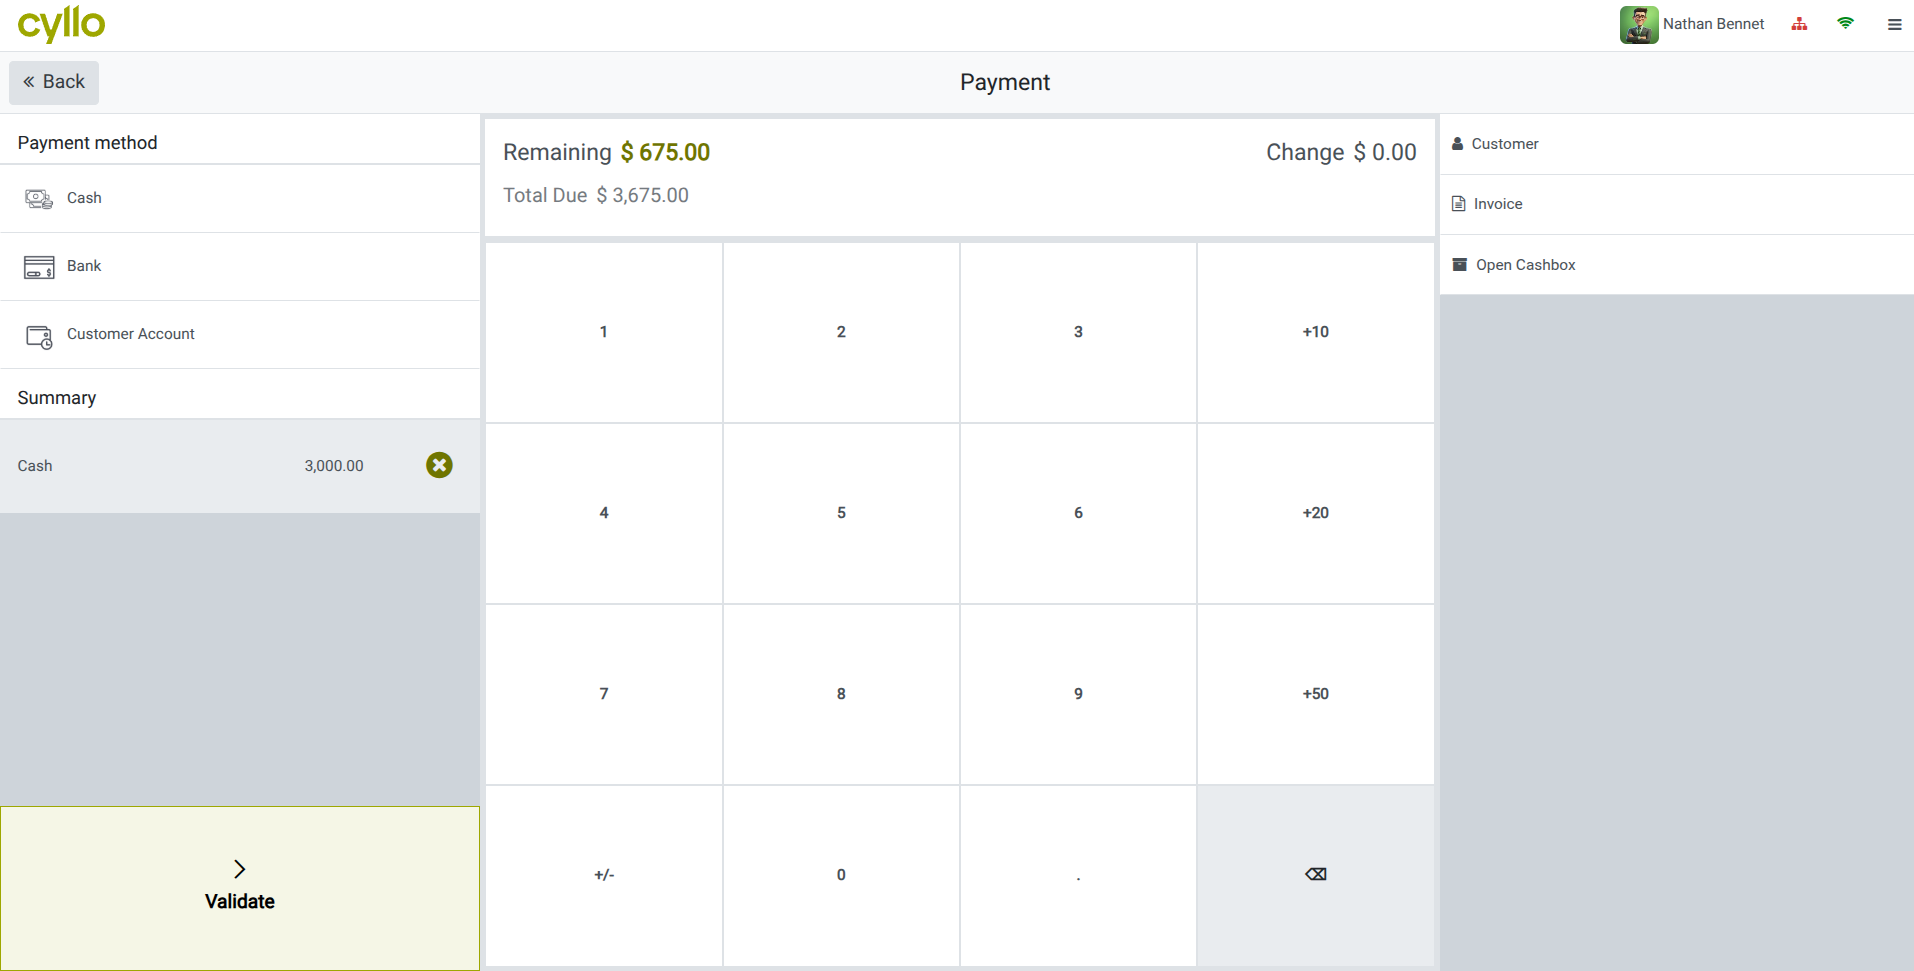
Fig 3.3 — POS payment screen — order total, cash payment method selected, tendered amount entered, change due displayed
Note
If a customer prefers no printed receipt, click Send by Email or simply close the receipt screen. Digital receipt sending requires the customer's email address to be on file.
3.4. Split Payments
Split payments allow the customer to pay using more than one payment method in a single transaction — for example, part cash and part card. This is handled directly on the payment screen.
- On the payment screen, select the first payment method.
- Enter the partial amount the customer is paying with that method.
- Click the second payment method.
- Cyllo automatically calculates the remaining amount and fills it in.
- Confirm the second amount and click Validate to finalize the transaction.
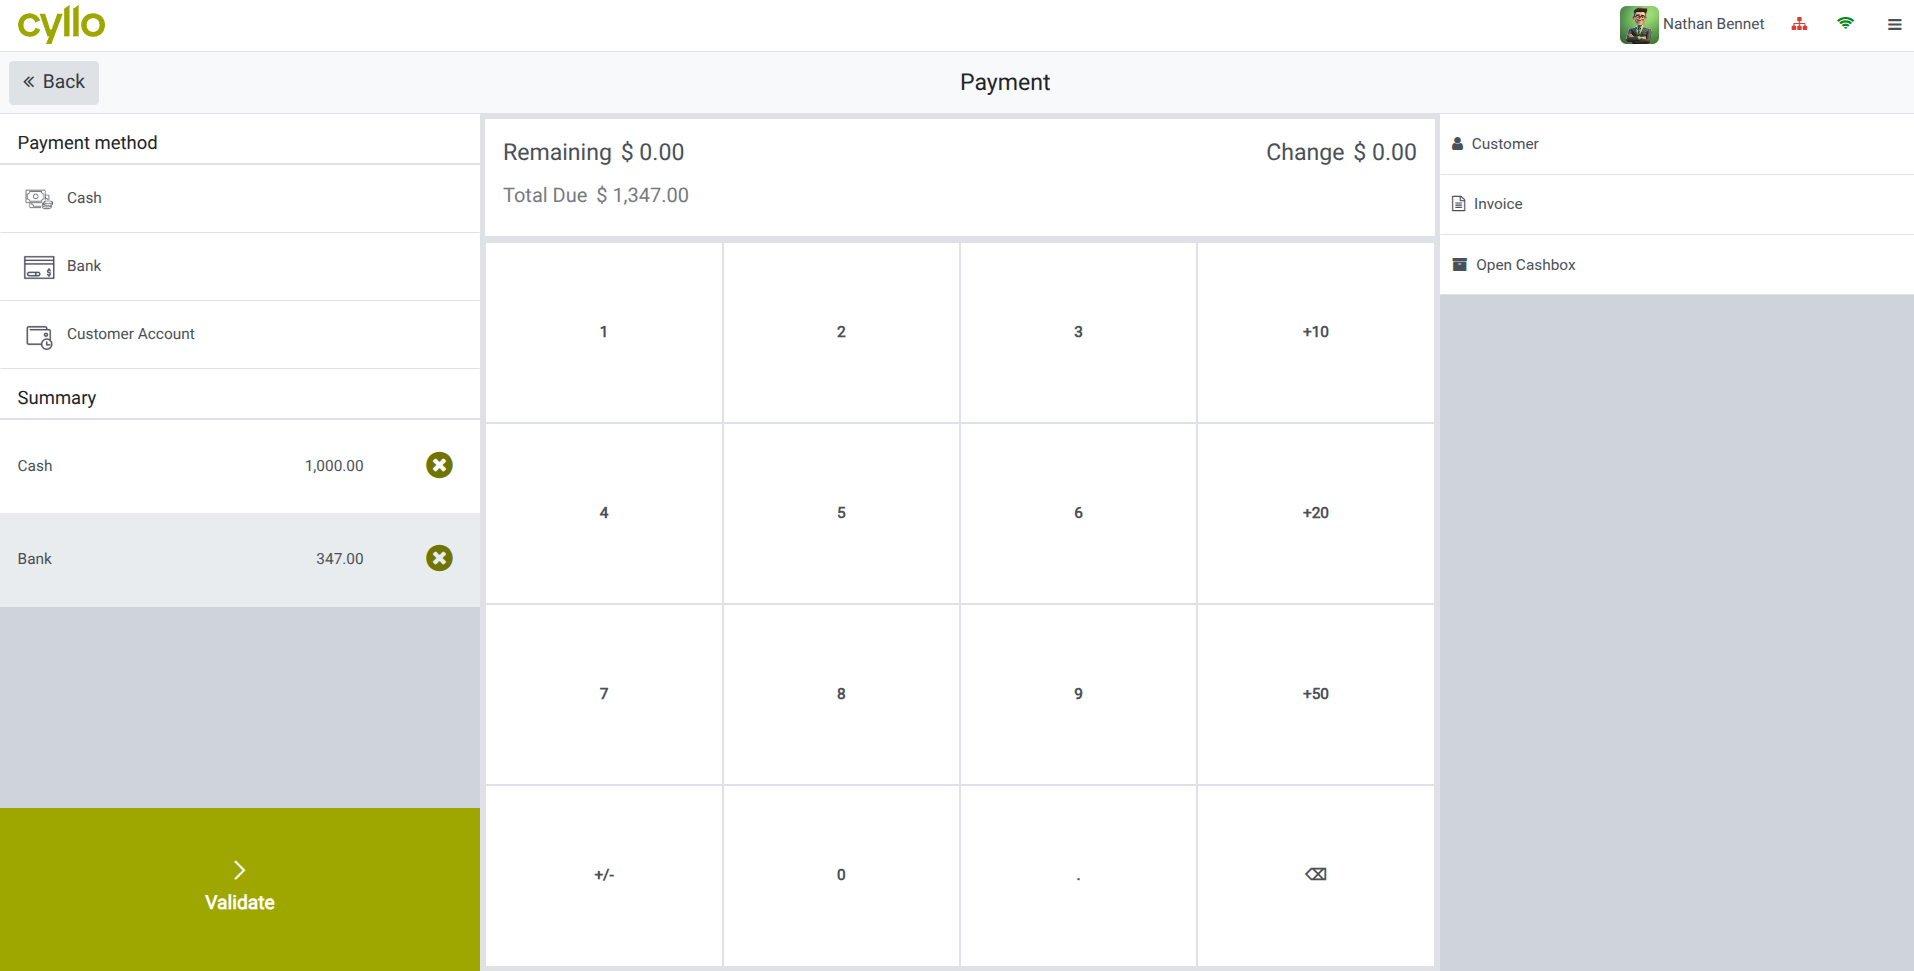
Fig 3.4 — POS payment screen — two payment methods listed with partial amounts, remaining balance updating in real time
3.5. Refunds & Returns
When a customer returns a product or a transaction needs to be corrected, Cyllo POS supports refunds directly within the session. Refunds create a negative transaction that reverses the original sale and updates stock accordingly.
- In the active session, click the hamburger menu (≡) and select Order..
- Select the original order to refund from the paid order list.
- Select the products and quantities to return.
- Click ‘Refund’. A refund order is created with negative amounts.
- Process the refund on the payment screen using the same or a different payment method.
- Click Validate to complete the refund. Stock is automatically returned to inventory.
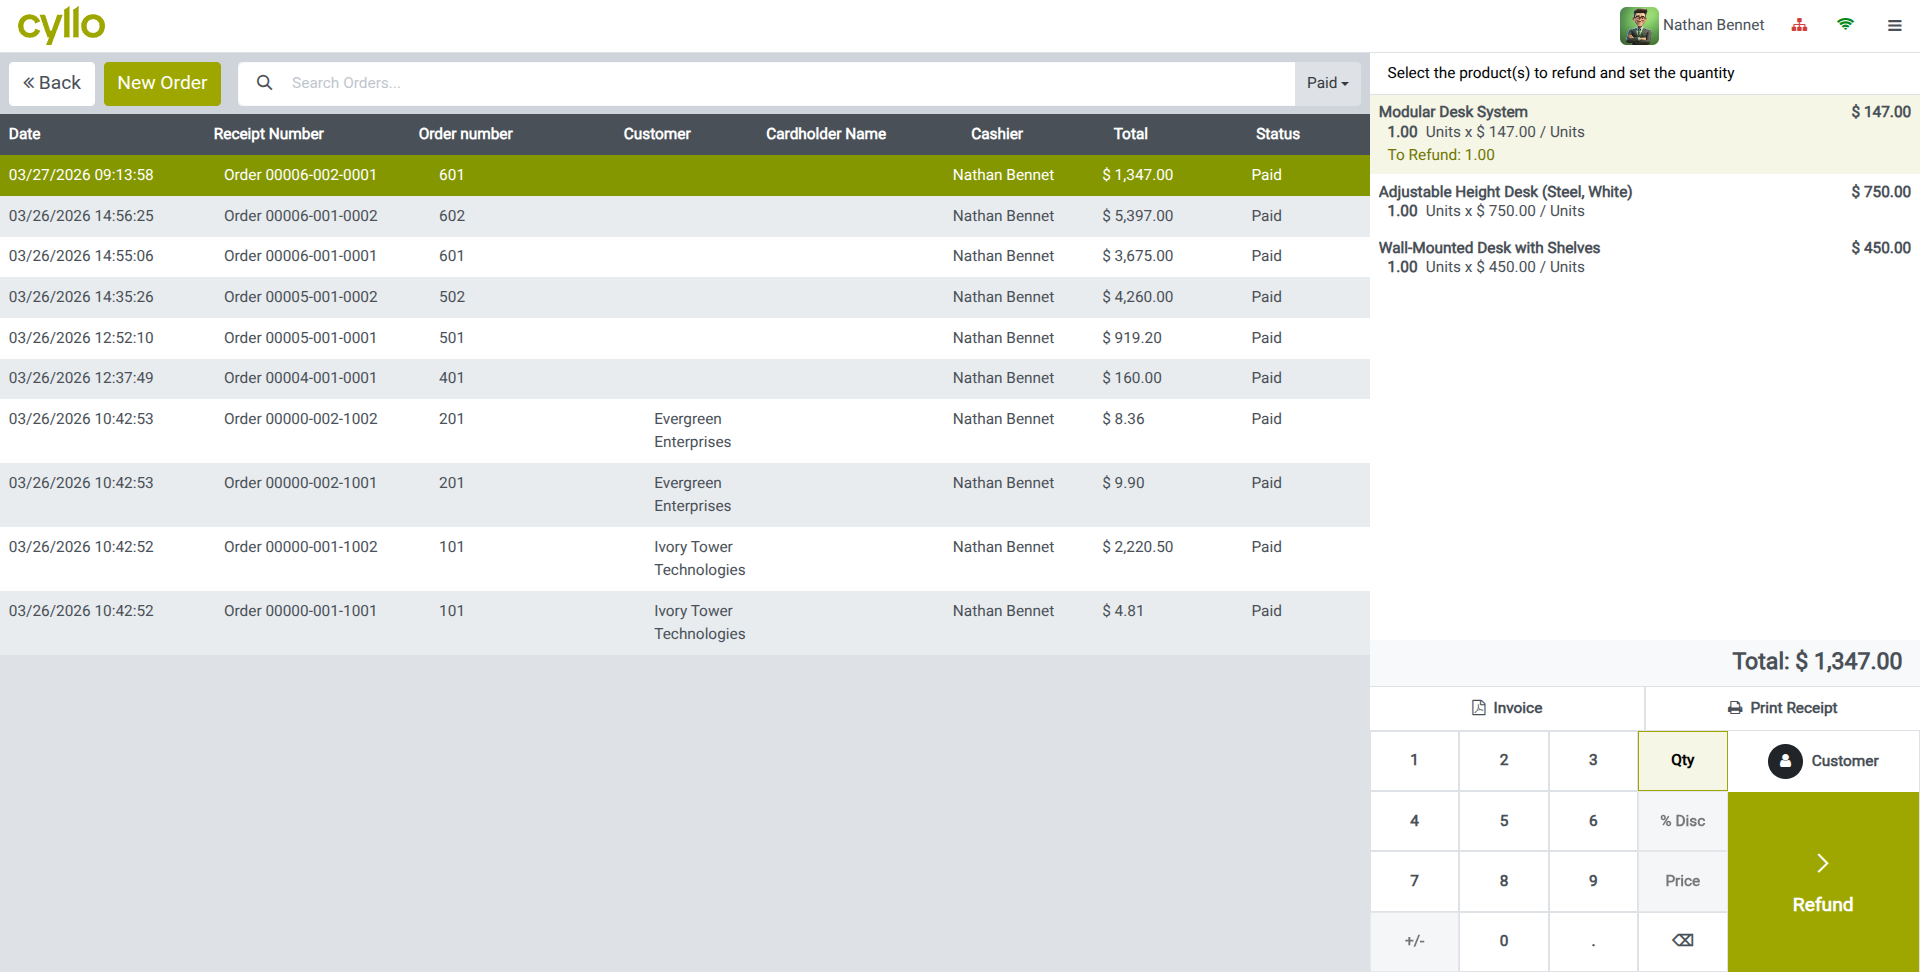
Fig 3.5 — POS refund screen — original order lines with return quantity selectors and Return button
WARNING
Refunds reduce the session revenue totals. Ensure the correct order is selected before confirming to avoid reversing the wrong transaction.
4. Customer Management
Cyllo POS integrates with the customer database to enable personalized pricing, loyalty rewards, eWallet balances, and customer-linked receipts. All managed from within the session interface.
4.1. Linking a Customer to an Order
Assigning a customer to an order enables loyalty point tracking, eWallet usage, customer-specific price lists, and the option to generate an invoice instead of a receipt. Customers can be looked up by name, phone number, or email from within the POS screen.
- In the active POS session, click the Customer field at the top of the order panel.
- Search for the customer by name, phone, or email.
- Select the customer from the results list. Their name appears on the order.
- If the customer is new, click Create to add them on the spot with basic details.
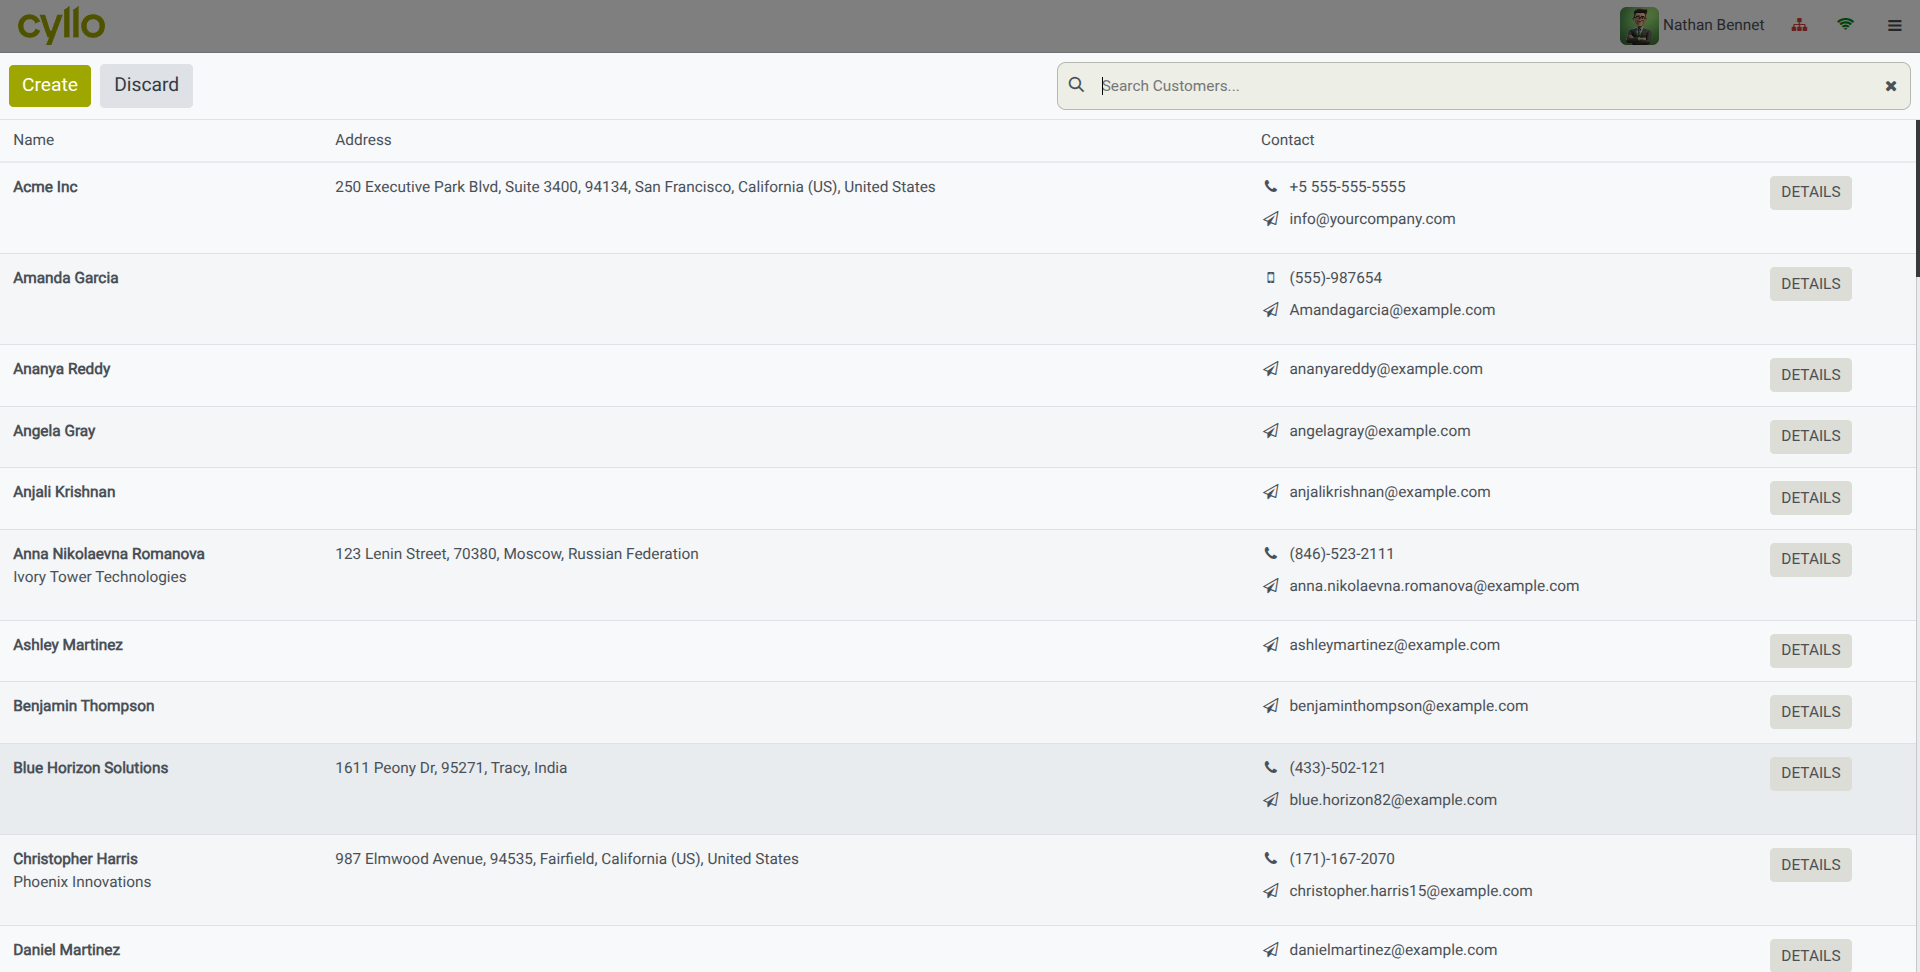
Fig 4.1 — POS customer search dialog — search bar with results list showing customer name, phone, and email
4.2. Loyalty Program
Cyllo's Loyalty Program allows customers to earn points on purchases and redeem them for discounts or free products on future orders. The loyalty program is shared between POS and the Sales module, so points earned online or in-store accumulate in the same account.
Enabling the Loyalty Program:
- Go to Point of Sale → Configuration → Point of Sale and open the shop.
- Under the Pricing tab, enable the ‘Promotions, Coupons, Gift Card & Loyalty Program’.
- Select or create a loyalty program from the dropdown. Set reward rules, points per spend, and redemption conditions in the loyalty program form.
- Save the configuration.
How Loyalty Works in a Transaction:
- When a customer is assigned to an order, their available loyalty points are shown.
- Cyllo automatically calculates points earned on the current order based on the program rules.
- If the customer has enough points to redeem, a reward option appears on the payment screen.
- Points are awarded and updated in the customer profile after the transaction is validated.
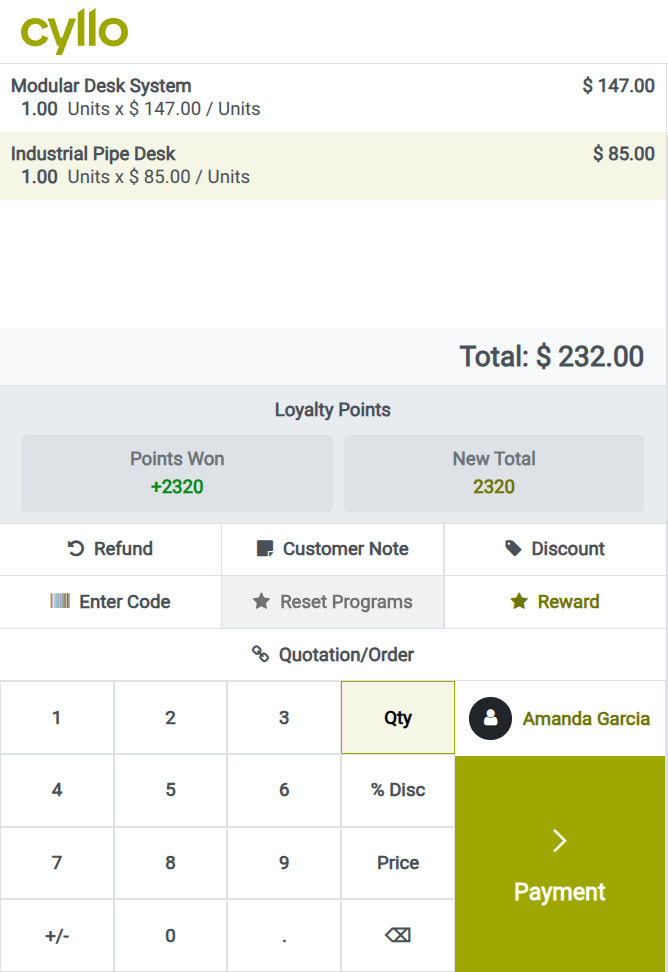
Fig 4.2 — POS order screen — loyalty points earned on current order and redemption option displayed
4.3. Gift Cards & eWallet
Gift Cards allow customers to purchase a stored-value card and use it as payment in future transactions. eWallet works similarly. Customers can load funds into their eWallet and spend from it in POS. Both are configured as part of the Loyalty & Gift Card programs in Cyllo.
Selling a Gift Card:
- Add the Gift Card product to the order (set up as a POS product in the gift card program).
- Enter the gift card value.
- Process payment as normal. Cyllo generates and prints a gift card code.
Redeeming a Gift Card / eWallet:
- Assign the customer to the order.
- On the payment screen, select Gift Card or eWallet as the payment method.
- Enter or scan the gift card code. The available balance is deducted from the order total.
- Click eWallet to pay with the customer's eWallet.
- Pay any remaining amount with another payment method if needed.
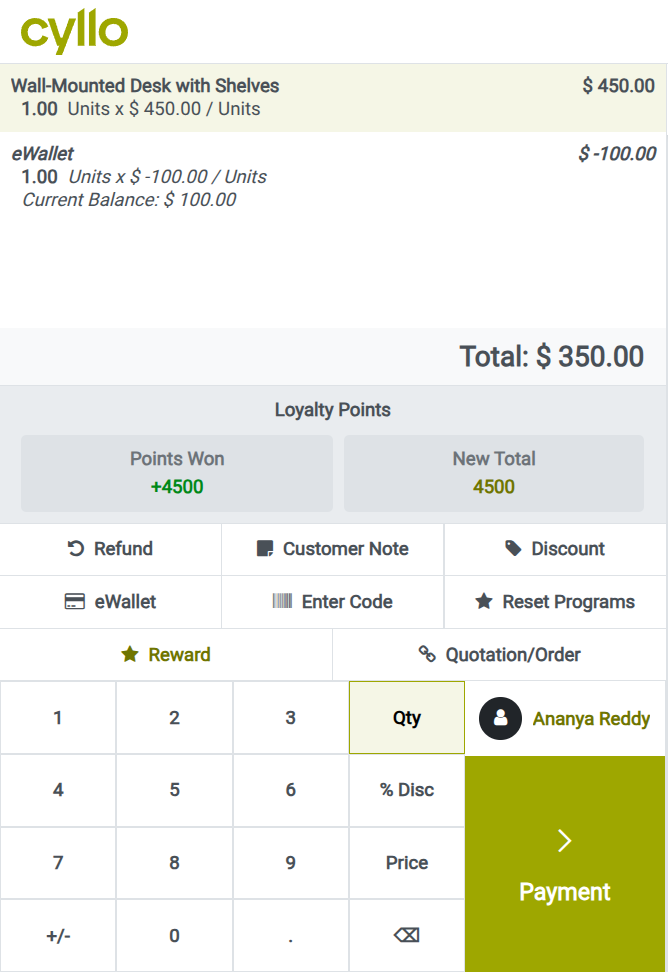
Fig 4.3 — POS order screen — eWallet payment method selected with balance applied and remaining total shown
4.4. Pricelists
Pricelists allow you to apply different pricing to different customers or customer groups automatically. When a customer with an assigned pricelist is added to a POS order, Cyllo automatically applies their pricelist prices to all applicable products.
Enabling Pricelists:
- Go to Point of Sale → Configuration → Point of Sale and open the shop.
- Under the Pricing tab, enable Pricelists.
- Select the available pricelists from the dropdown (configure pricelists under Sales → Configuration → Pricelists).
Once enabled, the cashier can manually select a pricelist from the POS session, or it is applied automatically when a customer is linked to the order if they have a default pricelist set on their profile.
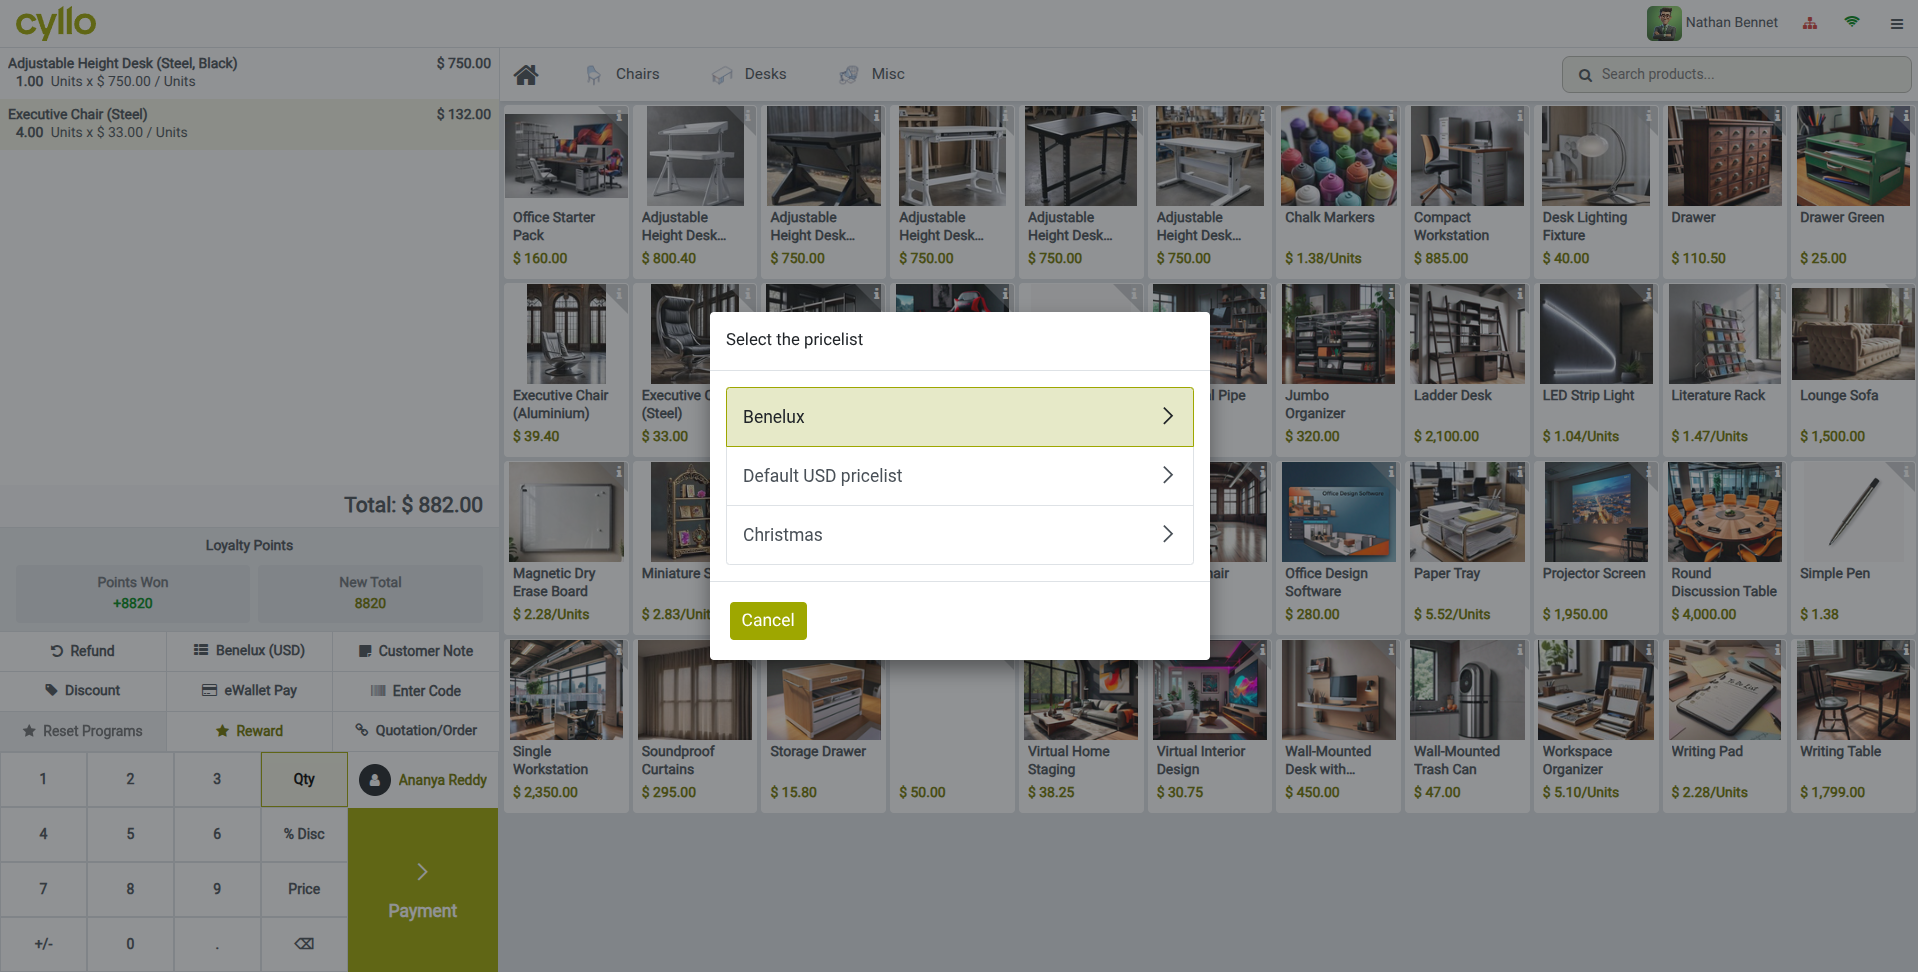
Fig 4.4 — Pricelist selector — POS order panel visible at back, custom pricing applied to product lines
5. Product Management
Products available in POS are managed from the central Cyllo product catalog. This section explains how to configure products for POS use, handle variants, and organize the product display grid.
5.1. Adding Products to POS
Products are not automatically available in all POS shops — they must be explicitly marked as available for Point of Sale. This allows you to restrict which products can be sold at the counter, keeping the POS grid clean and relevant.
- Go to Point of → Products → Products.
- Remove the ‘Available in POS’ filter from search panel(to get all products).
- Open the product to add to POS.
- Under the Sales tab, enable Available in POS.
- Optionally, set a POS Category to control where the product appears on the POS grid.
- Save the product. It is immediately available in all open POS sessions on the next screen refresh.
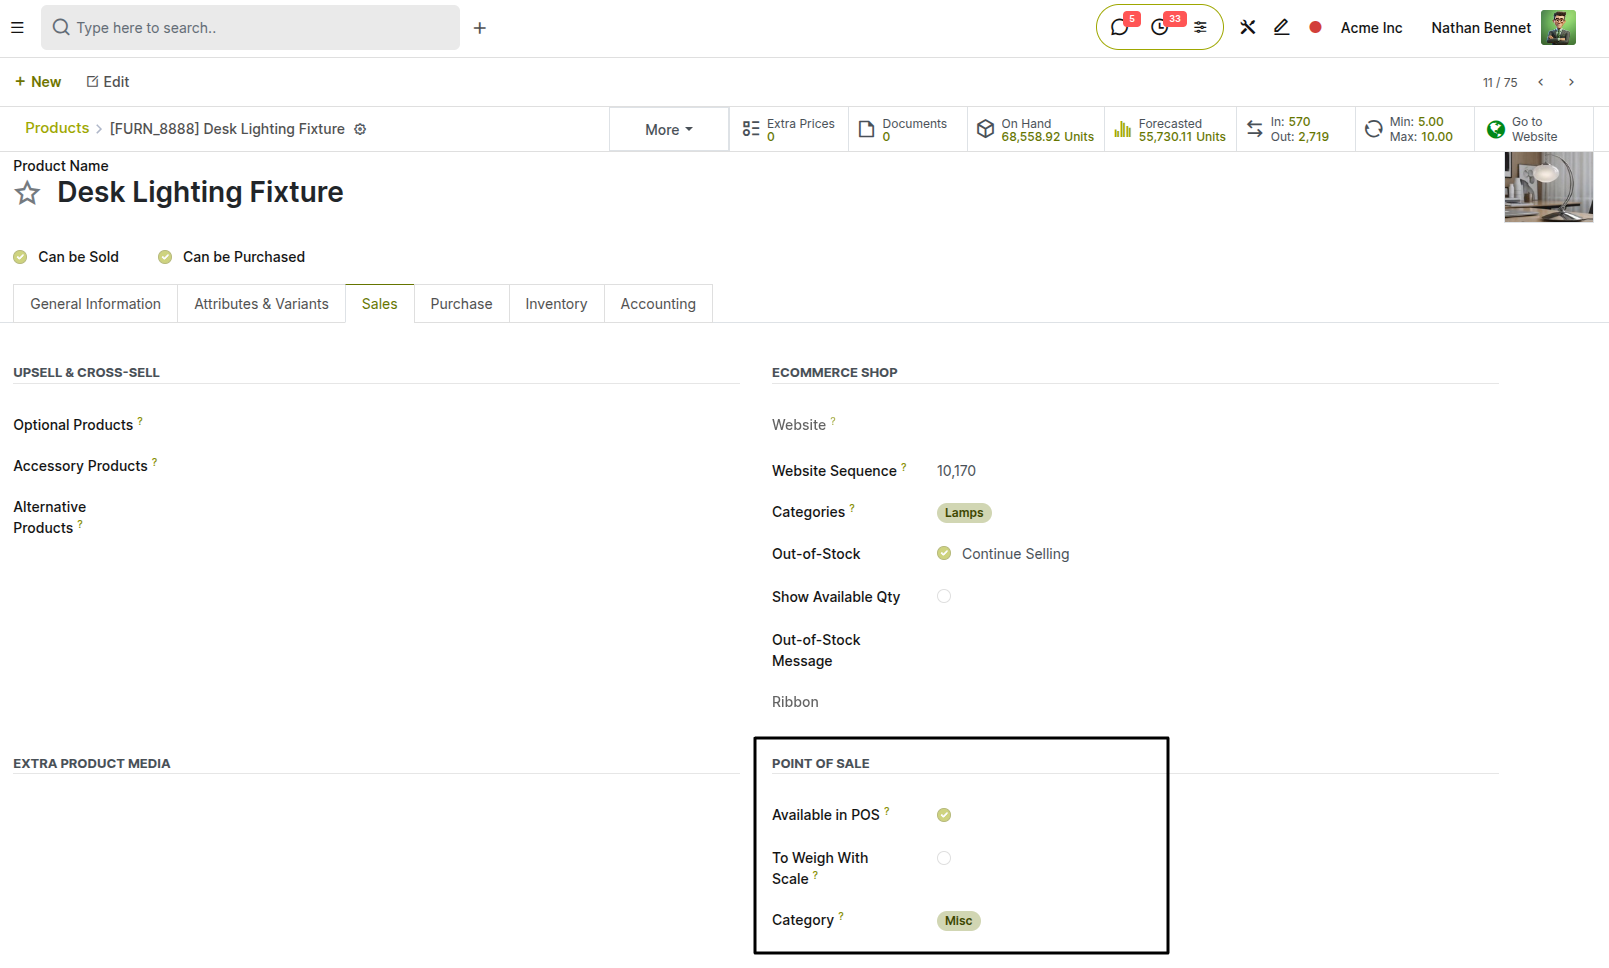
Fig 5.1 — Product form — Sales tab with 'Available in POS' toggle enabled and POS Category field filled
Note
Products without a POS Category appear under All Products. Assigning a category makes the POS grid easier to navigate for cashiers.
5.2. Product Categories & Display
POS Product Categories organize the product grid into tabs at the top of the POS interface, making it faster for cashiers to locate and select items. Categories can be nested and assigned display orders, icons, and colors.
- Go to Point of Sale → Configuration → Products → POS Product Categories.
- Click New to create a category.
- Enter the Category Name and optionally select a Parent Category for nesting.
- Set the Sequence to control display order on the POS grid.
- Assign products to this category by editing each product's POS Category field.
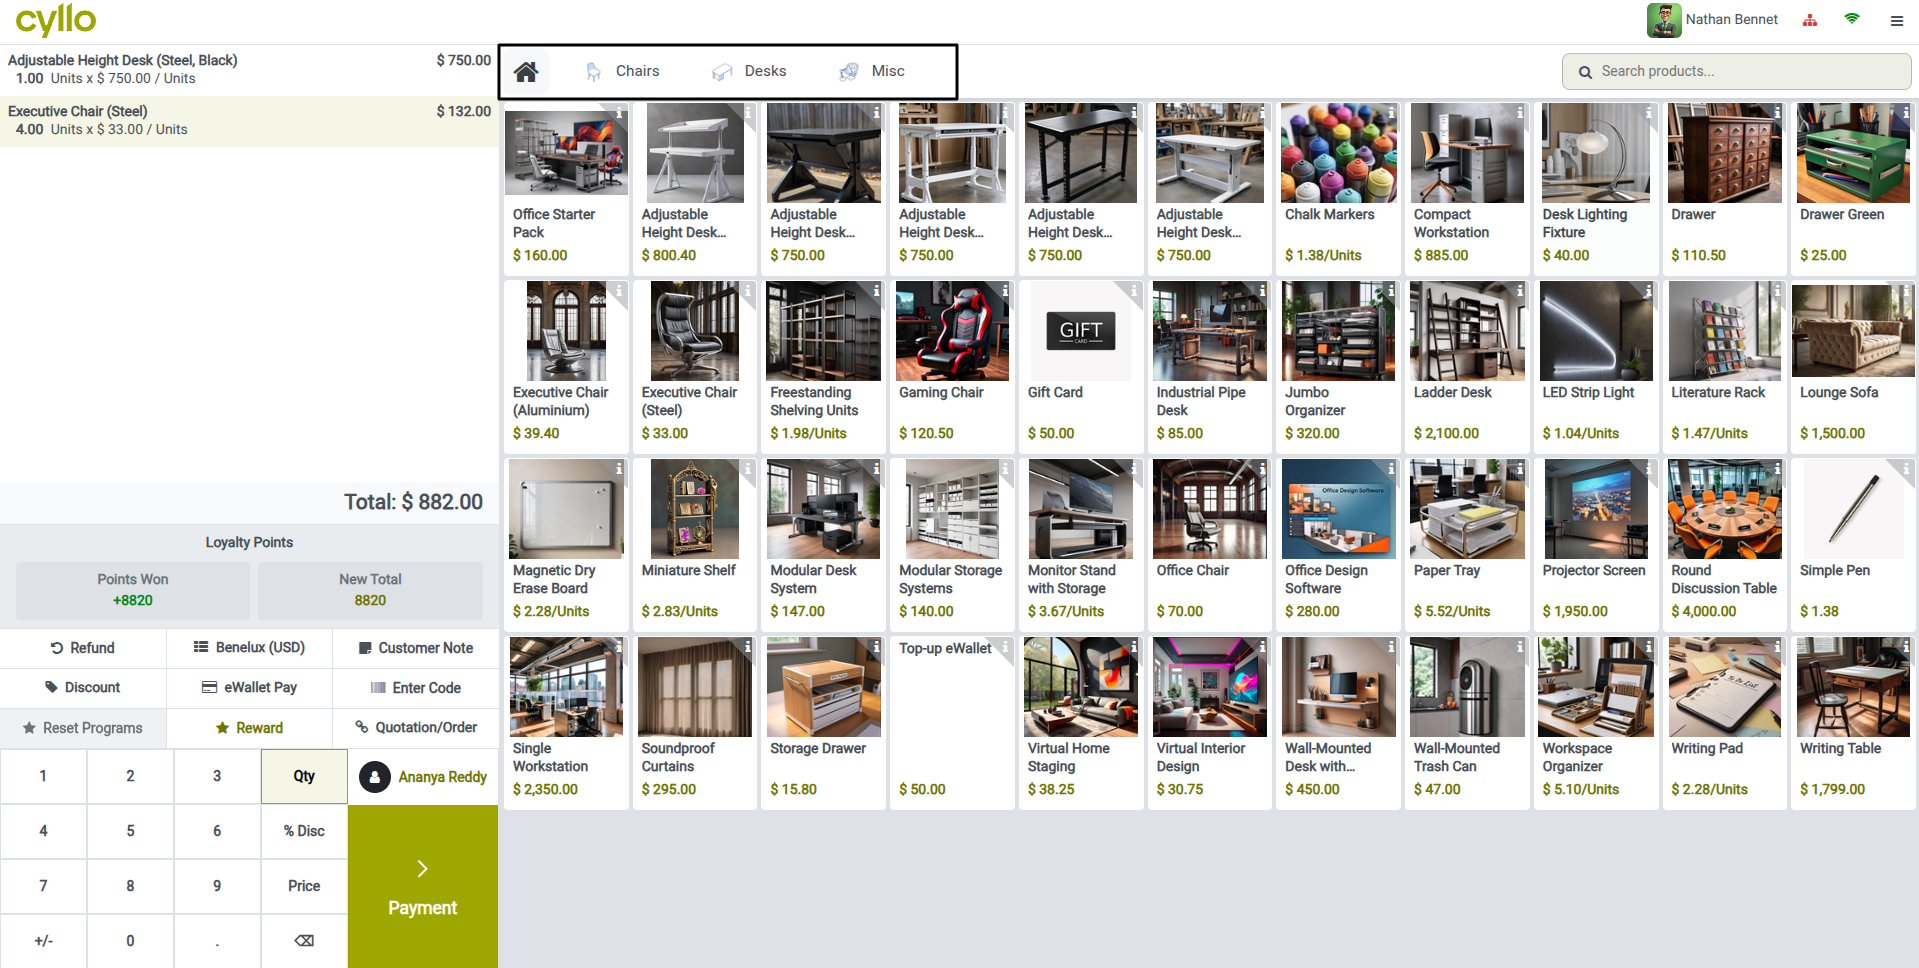
Fig 5.2 — POS session — category tabs across the top of the product grid (e.g. Mics, Desks, chairs)
6. Offline Mode
Cyllo POS is designed to continue operating even when internet connectivity is lost. This section explains how offline mode works and how session data is synchronized when the connection is restored.
6.1. How Offline Mode Works
When the POS session loses connection to the Cyllo server, it automatically switches to offline mode. In this state, the POS continues to accept orders and process payments using locally cached data. Product catalog, pricing, and customer records loaded at session open.
- A warning indicator appears in the top navigation bar when the POS is offline.
- Sales, payments, and orders continue to be recorded locally in the browser.
- Actions that require a live server connection — such as sending email receipts or updating loyalty points — are queued and executed when the connection returns.
- The offline state is transparent to the cashier for standard transactions; checkout speed is unaffected.
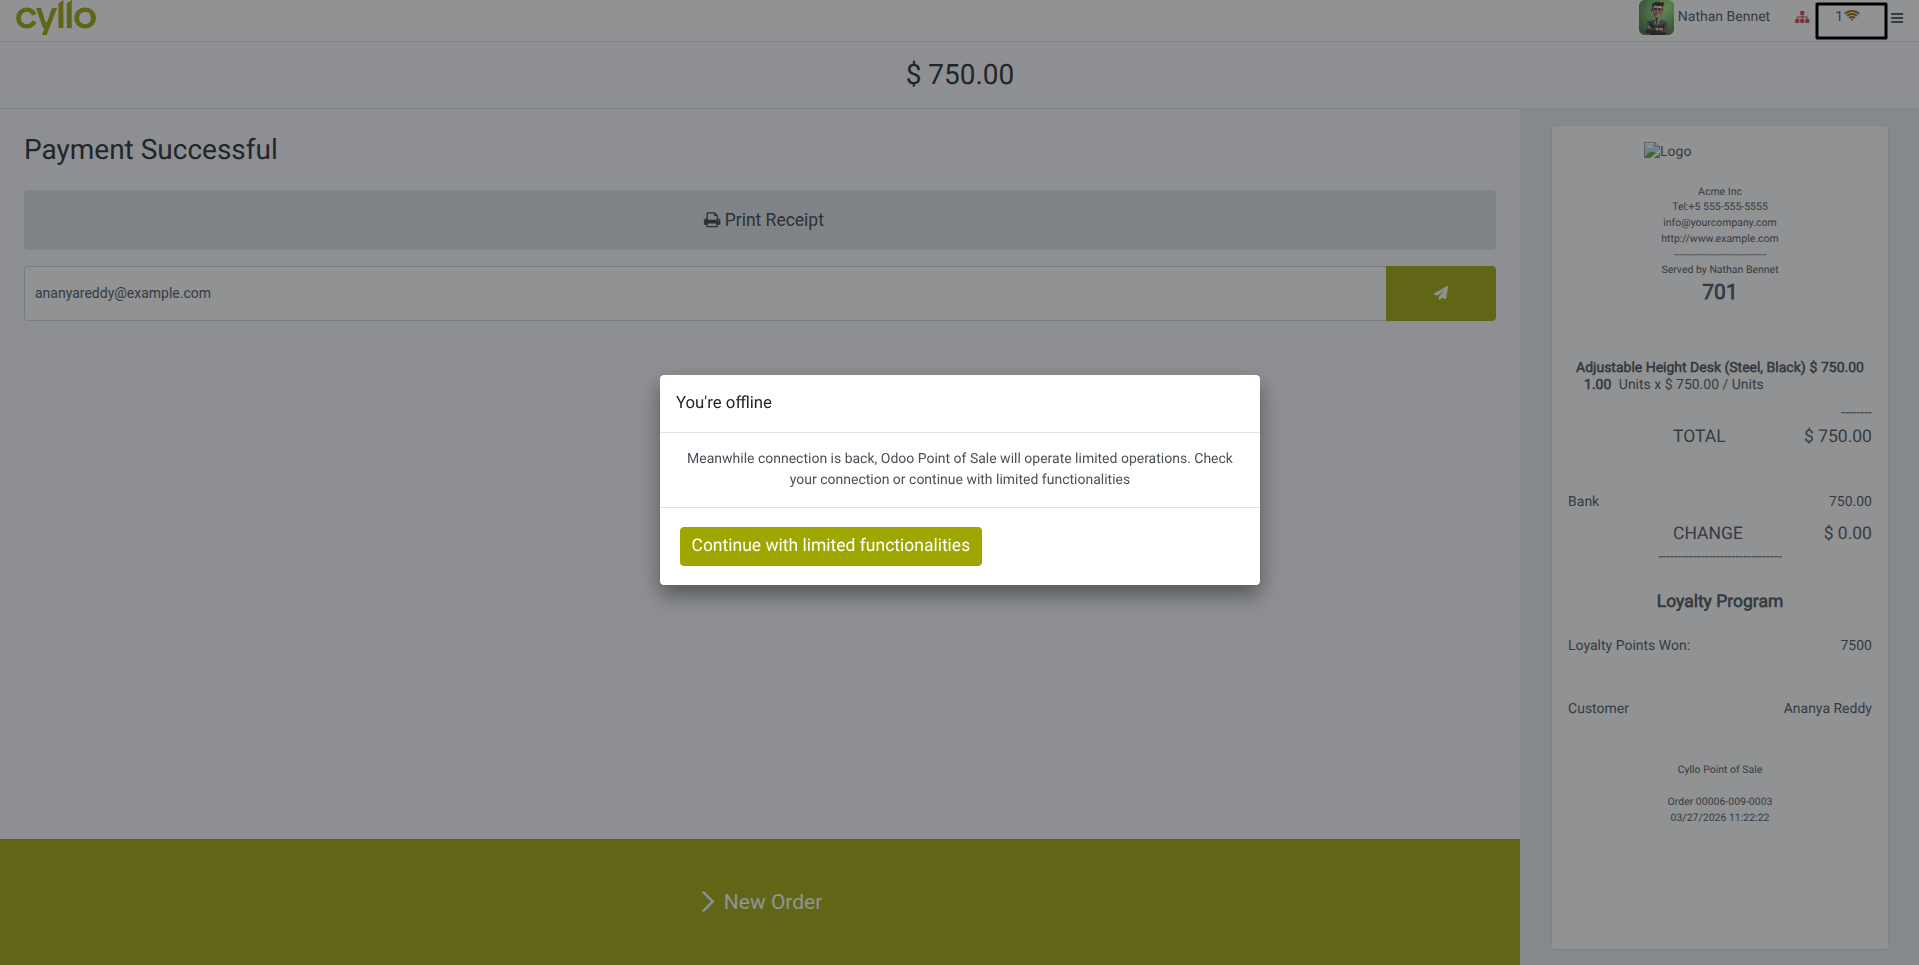
Fig 6.1 — POS session top bar — offline indicator icon displayed with 'No connection' tooltip
WARNING
Offline mode relies on data cached at session open. Products, prices, or customers added to the back-end after the session started will not be available until the session is closed and reopened.
6.2. Syncing After Reconnection
When the internet connection is restored, Cyllo POS automatically synchronizes all locally stored orders and payments to the central database. No manual action is required from the cashier.
- Queued orders are uploaded to the server in sequence.
- Stock deductions, accounting journal entries, and loyalty point updates are processed automatically.
- The offline indicator disappears once synchronization is complete.
TIP
To verify that all offline orders were synced successfully, open the session report after reconnection and confirm that the order count matches your physical records.
7. Hardware & Peripherals
Cyllo POS supports a range of checkout hardware including receipt printers, customer displays, barcode scanners, and IoT Box integration. This section provides setup guidance for each peripheral type.
7.1. ePOS Printer Setup
Cyllo supports Epson ePOS SDK-compatible network printers for direct receipt printing without additional middleware. The printer connects over the local network and is configured in the POS shop settings.
- Connect the ePOS printer to your local network and note its IP address.
- Go to Point of Sale → Configuration → Point of Sale and open the shop.
- Under the Connected Devices tab, enable ‘ePos Printer’.
- Enter the Printer IP Address.
- Save and test by opening a session and processing a test receipt.
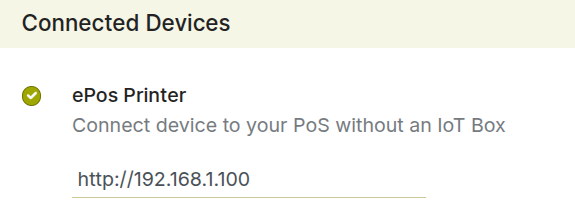
Fig 7.1 — POS shop Connected Devices tab — ePOS printer with IP address
7.2. Customer Display
A customer-facing display shows the current order lines and total to the customer in real time during checkout. It is connected via the IoT Box or as a secondary screen on the cashier's device.
- Connect the customer display to the IoT Box or configure it as a secondary monitor.
- Go to Point of Sale → Configuration → Point of Sale and open the shop.
- Under the Connected Devices tab, enable Customer Display.
- Select the IoT Box device it is connected to.
- Save. The display activates automatically when the next session opens.

Fig 7.2 — Customer display screen — order lines and total shown in large clear text from the customer's perspective
7.3. Barcode Scanner in POS
Any USB or Bluetooth barcode scanner operating in keyboard emulation (HID) mode works with Cyllo POS out of the box. Scanning a product barcode in the active session adds the product to the current order instantly, with no additional configuration required.
- Plug a USB scanner into the cashier's device — no driver installation is needed.
- Pair a Bluetooth scanner and set it to HID (keyboard emulation) mode.
- In the active POS session, scan any product barcode — the product is added directly to the order.
- Products must have their barcode field populated in the product form barcode module.
Note
If a scanned barcode is not recognized, Cyllo displays a 'Product Not Found' message. Check that the barcode is correctly assigned to the product in Inventory → Products.
7.4. IoT Box Integration
The Cyllo IoT Box is a small network device that bridges USB and serial hardware with the Cyllo POS session over a local network. It is required for USB receipt printers, USB cash drawers, and some card terminals that do not support direct network connection.
- Connect the IoT Box to your local network and power it on.
- Attach USB peripherals (printer, cash drawer) to the IoT Box USB ports.
- In Cyllo, go to Point of Sale → Configuration → IoT Boxes.
- Enable and enter the IoT Box IP address to register it.
- Go to the POS shop configuration and link devices to the IoT Box under the Connected Devices tab.
- Reporting & Analytics Cyllo POS provides built-in session reports and integrates with Cyllo Analytics for deeper sales analysis. This section covers the reports available and how to access them.
8.1. Session Reports
The session report is generated automatically when a session is closed. It provides a complete summary of all transactions during that session — total sales, payment method breakdown, cash movements, and any discrepancy between expected and counted cash.
- Go to Point of Sale → Reporting → Session Report.
- Select the session you want to review.
- Click print to generate the report.
- The report shows: Total Sales, Sales by Payment Method, Opening and Closing Cash Balance, Cash Movements, and Net Cash Difference.
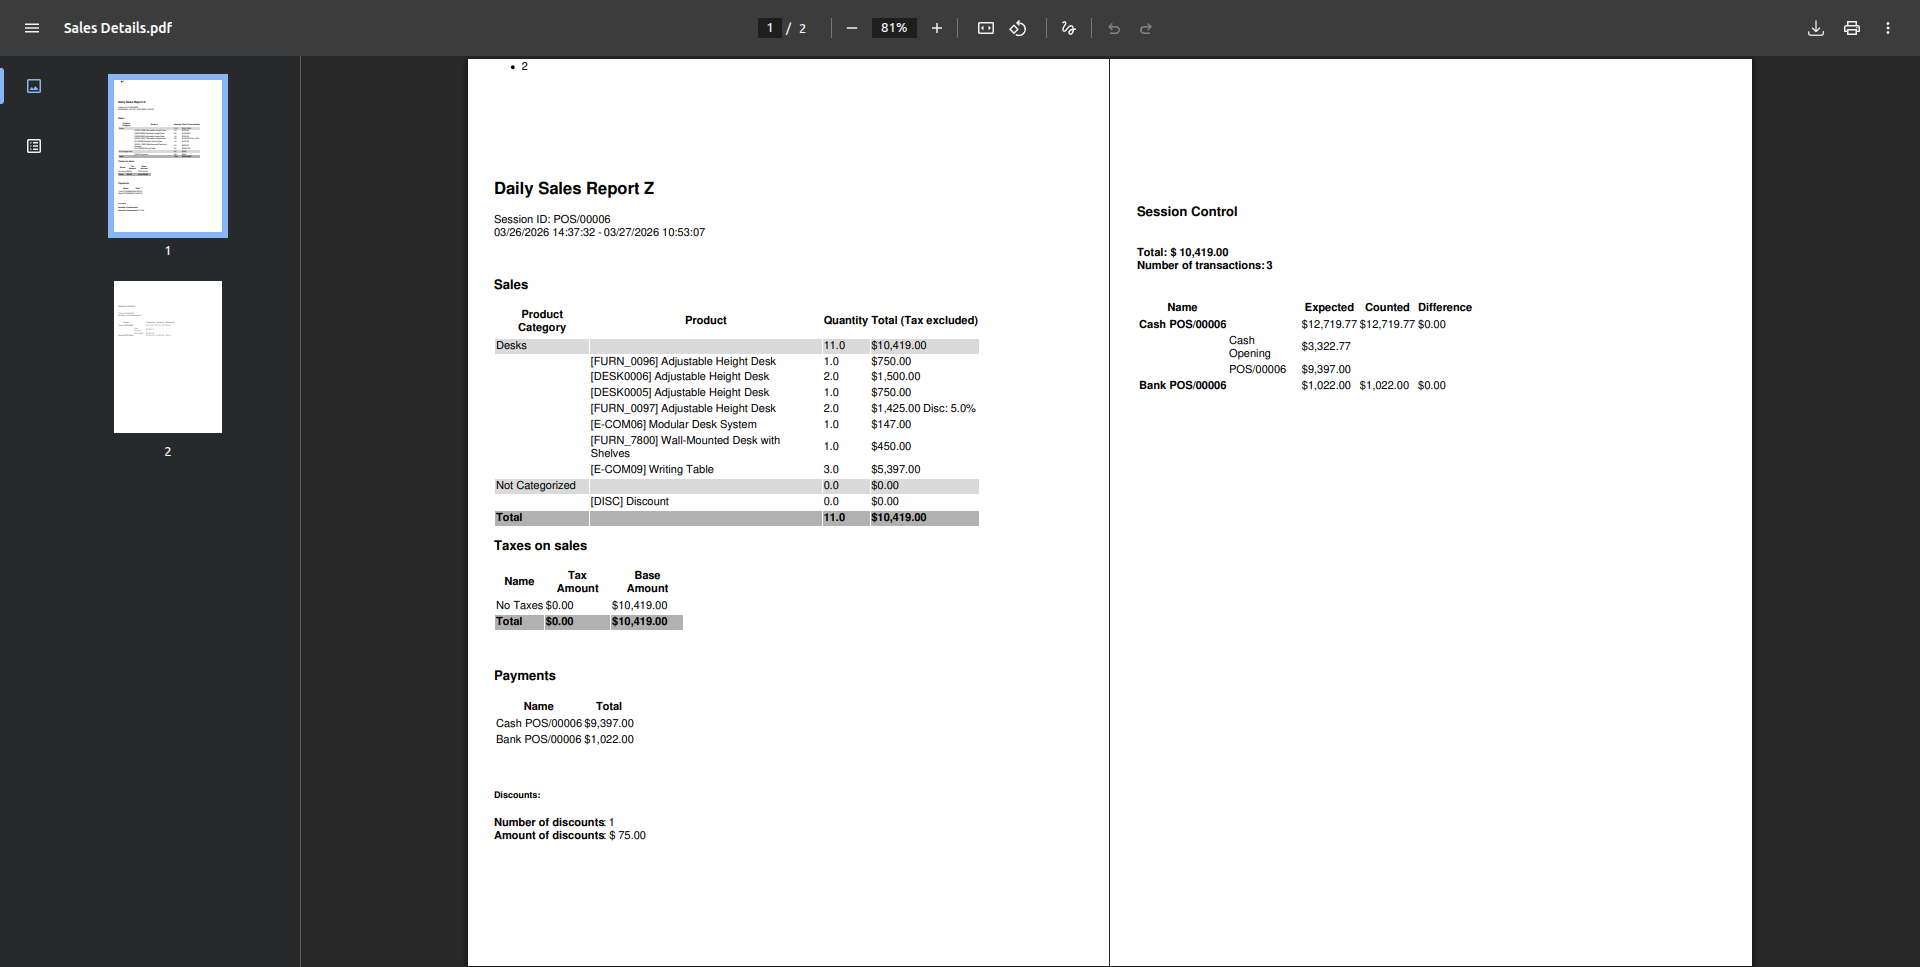
Fig 8.1 — POS session report — summary page showing total sales, payment breakdown, cash movements, and closing balance
8.2. Sales Reports
POS sales reports provide analysis across multiple sessions, shops, and date ranges. They allow managers to review product performance, revenue trends, and cashier productivity without accessing individual session records.
- Go to Point of Sale → Reporting → Orders.
- Use the Filters and Group By options to segment data by shop, product, employee, or date.
- Switch between List, Pivot, and Graph views to analyze the data.
- Export to Excel using the export icon for offline analysis or management reporting.

Fig 8.2 — POS Orders report in graph view — grouped by product and date with revenue
TIP
Use Group By → Product to quickly identify your top-selling items. Use Group By → Employee to review sales performance per cashier.
9. Troubleshooting
This section covers the most common issues encountered during POS operation and the steps to resolve them, as well as guidance on recovering a session that failed to close correctly.
9.1. Common Issues & Solutions
| Issue | Likely Cause | Solution |
|---|---|---|
| Product not found when barcode is scanned | Barcode not assigned to the product or wrong format | Open the product form and verify the Barcode field matches the printed label exactly. |
| Payment terminal not responding | Terminal not connected or session not linked | Check network connection to the terminal. Reopen the payment method settings and verify the terminal IP. |
| Receipt printer not printing | ePOS printer IP changed or IoT Box offline | Verify the printer IP in POS shop settings. Check IoT Box status at Point of Sale → Configuration → IoT Boxes. |
| Session stuck in 'Opening' state | Browser cache issue or server timeout | Refresh the browser. If the issue persists, close the browser tab, clear cache, and reopen the session from the POS back-end. |
| Cash drawer not opening | Drawer not connected to printer or IoT Box | Verify the cash drawer is connected to the receipt printer's cash drawer port, and that the printer is configured correctly. |
| POS shows 'Error loading data' | Session loaded with stale or corrupted cache | Close the session, clear browser cache and cookies, and reopen. If data is missing, check the server connection. |
| Loyalty points not updating | Customer not linked or loyalty program misconfigured | Ensure a customer is assigned to the order before payment. Verify the loyalty program is active for the shop. |
9.2. Session Recovery
If a POS session crashes, the browser closes unexpectedly, or the device loses power mid-session, Cyllo automatically saves session data locally. When the cashier reopens the browser and navigates back to POS, the session resumes from where it left off.
- Go to Point of Sale from the main menu.
- If an interrupted session exists, Cyllo prompts you to Resume Session. Click Resume.
- The session restores with all pre-crash orders and cash movements intact.
- If the session cannot be resumed normally, go to Point of Sale → Sessions, locate the interrupted session, and click Recover Session from the back-end.
WARNING
If a session recovery is not possible and the session must be force-closed, contact your Cyllo administrator. Force-closing without reconciliation may leave accounting entries unposted.