

Cyllo Marketing Automation Documentation
Introduction
The Marketing Automation module in Cyllo ERP transforms manual outreach into a coordinated, multi-channel engagement engine that works continuously in the background. Using a visual campaign journey builder, marketing teams can design step-by-step automated workflows that send emails, dispatch SMS messages, deliver WhatsApp notifications, create CRM opportunities, and execute server actions — all triggered automatically based on contact behaviour, timing conditions, or the outcome of a previous campaign activity. Campaigns target precisely defined audience segments using Cyllo's domain-based filter system, ensuring every automated message reaches only the contacts it is designed for.
Because the Marketing Automation module shares the Cyllo ERP database with CRM, Email Marketing, SMS Marketing, WhatsApp, and the Website module, every campaign action is connected to the broader customer record. A lead generated by a campaign form on the website enters the CRM pipeline automatically. An email opened by a prospect can trigger a follow-up SMS the next day and a CRM activity reminder for the assigned salesperson — all from a single campaign workflow without any manual handoff. Campaign engagement data flows directly into the contact record, giving sales teams full visibility into which campaigns a prospect has interacted with before they make first contact.
This documentation covers the Marketing Automation module comprehensively — from enabling the module and understanding its core concepts through building campaigns, configuring triggers and activities, using Test Mode to verify workflows before launch, managing participants, integrating WhatsApp into multi-channel campaigns, and analysing performance through the campaign dashboard and Cyllo Analytics. It is written for marketing managers designing campaign strategy, campaign executives building and operating workflows day to day, and administrators configuring the module's technical settings.
1. Getting Started
This section covers what the Marketing Automation module does, how to enable it, and the key concepts that underpin how campaigns, triggers, and activities work in Cyllo.
1.1. What is Marketing Automation?
Marketing Automation in Cyllo is a rule-driven campaign engine that executes marketing actions automatically based on defined conditions — without any manual intervention after the campaign is launched. Instead of sending emails one by one or scheduling individual follow-up tasks, a marketing team builds a campaign workflow once — defining the audience, the sequence of actions, the timing between each step, and the conditions that determine which path a contact follows — and Cyllo executes that workflow continuously for every contact that meets the entry criteria. The core use cases include lead nurturing drip sequences that educate prospects over days or weeks, onboarding workflows that welcome new customers with a timed series of messages, re-engagement campaigns targeting inactive contacts, and post-sale follow-up sequences that drive repeat purchase. Because campaigns are built on any Cyllo data model — not just contacts — automation can also be applied to internal processes, such as notifying a salesperson when a deal moves to a specific stage.
1.2. Key Concepts
Understanding the following concepts is essential before building campaigns. They define how Cyllo selects contacts, executes actions, and moves participants through a campaign journey.
| Concept | Definition |
|---|---|
| Campaign | The top-level container for an automated workflow — defines the target audience, responsible user, and the sequence of activities to execute. |
| Activity | A single automated action within a campaign — sending an email, dispatching an SMS, creating a CRM opportunity, or running a server action. |
| Trigger | The condition or timing rule that determines when an activity fires — immediately on entry, after a set delay, or based on the outcome of a previous activity. |
| Participant | A contact (or record) that has entered the campaign and is currently progressing through its workflow. Participants can be in different steps simultaneously. |
| Filter / Domain | A set of rules applied to a data model (e.g. Contacts) that determines which records enter the campaign. Only records matching the filter become participants. |
| Condition | A branch rule on an activity that checks whether a contact meets a defined criterion — for example, whether they opened the previous email — and routes them down different workflow paths accordingly. |
| Test Mode | A safe simulation environment where the campaign runs against a defined test contact to verify triggers, conditions, and actions before going live. |
| Model | The Cyllo data record type the campaign operates on — most commonly Contacts (res.partner), Leads (crm.lead), or any other Cyllo model. |
2. Creating a Campaign
A campaign is created by defining its audience, assigning a responsible team member, and configuring the entry point. Activities are then added to build the workflow — this is covered in Section 3. This section focuses on the campaign-level setup.
2.1. Campaign Overview
Each Marketing Automation campaign has a header section that defines its scope and ownership, and an Activities section below it where the workflow steps are built. Campaigns move through a lifecycle of Draft → Running → Stopped, and can be paused and resumed at any time without losing participant progress.
- Go to Marketing Automation → Campaigns.
- Click New to create a new campaign.
- Enter the Campaign Name — a descriptive internal label (e.g. Generate Lead/Opportunity, New Lead Nurture — Q2 2026, Post-Purchase Follow-Up).
- Set the Target Model — the Cyllo record type this campaign will operate on (typically Contact or Lead/Opportunity).
- Set the Responsible User — the team member accountable for this campaign's performance.
- Configure the Filter to define which records enter the campaign (see Section 2.3).
- Click Save. The campaign is created in the ‘New’ state. Add activities before launching.
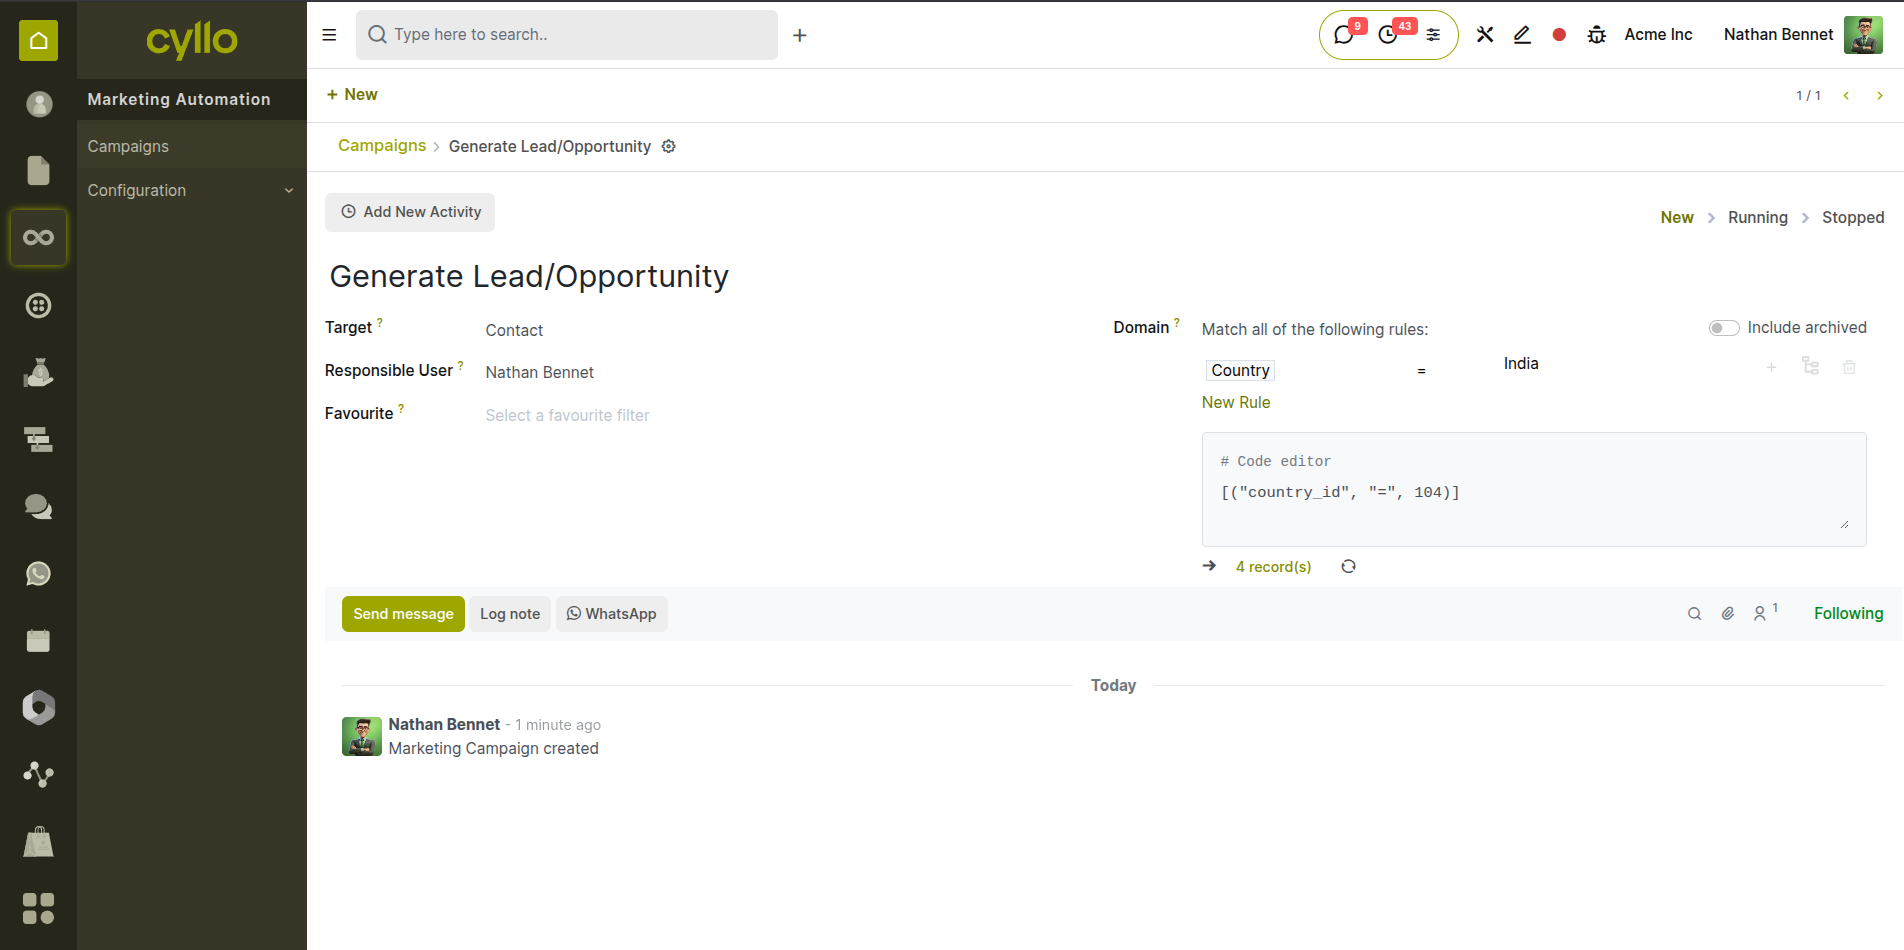
Fig 2.1 — New campaign form — Campaign Name, Target Model (Contact), Responsible User, and Domain fields in the header section
Key Fields
- Campaign Name: Internal identifier. Visible in the campaign list and in participant records. Choose a name that clearly identifies the campaign's purpose and audience.
- Target Model: Determines which type of Cyllo record enters the campaign. Most campaigns use Contact or Lead/Opportunity. Custom models are also supported.
- Responsible: The Cyllo user assigned to own this campaign. They receive notifications about campaign performance and errors.
- Domain: The domain filter that selects which records from the Target Model become participants. See Section 2.2 for details.
Note
The Target Model determines which fields are available for filtering and activity personalisation. A campaign on the Contact model can use contact name, email, city, and tag fields. A campaign on the Lead model can also use pipeline stage, salesperson, and expected revenue fields.
2.2. Campaign Filters & Segmentation
The campaign filter is a domain rule — a set of field conditions — that precisely defines which records from the Target Model enter the campaign as participants. Only records matching all filter conditions at the time the campaign runs will be included. Filters support any field on the target model including tags, country, lifecycle stage, and custom fields.
- In the campaign form, click the Domain field to open the domain builder.
- Click Add a condition and select a field from the target model (e.g. Tags, Country, Lifecycle Stage, Email is set).
- Set the operator (is, is not, contains, greater than, etc.) and the comparison value.
- Click Add a condition again to add further conditions. By default all conditions use AND logic — a record must match all conditions to qualify.
- To use OR logic, click the AND label between conditions to toggle it to OR.
- The contact count shown next to the filter updates in real time — use it to validate that the filter selects the intended number of records.
- Click Save.
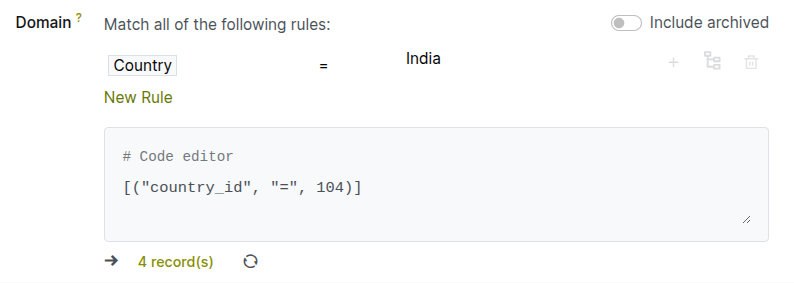
Fig 2.2 — Campaign filter builder — Country = India; record count badge showing 4 matching contacts
TIP
Always check the record count after setting your filter before launching. A filter that returns zero records means no participants will enter the campaign. A filter that returns your entire database may indicate the conditions are too broad — refine them to target a meaningful segment.
Note
The Responsible field does not restrict who can edit or view the campaign — access is controlled by user permissions. It is an ownership indicator used for notification routing and accountability tracking in the campaign list.
3. Campaign Activities
Activities are the individual action steps that make up a campaign workflow. Each activity defines what happens — which message is sent, which opportunity is created — and how it is triggered relative to the campaign entry or a previous activity. This section covers each activity type available in Cyllo Marketing Automation.
3.1. Activity Types Overview
Cyllo Marketing Automation supports four core activity types, plus the WhatsApp message type when the WhatsApp Marketing Automation extension is installed. Each type is configured with its own delivery content and trigger timing.
| Activity Type | What It Does |
|---|---|
| Send Email | Sends an automated email to the participant using a selected email template. Supports personalisation via merge fields. |
| Send SMS | Sends an automated SMS to the participant's phone number using the configured SMS gateway. |
| Send WhatsApp Message | Sends a WhatsApp template message to the participant via the Cyllo WhatsApp Business integration. Requires WhatsApp Marketing Automation module. |
| Create CRM Opportunity | Creates a new lead or opportunity in the CRM pipeline linked to the participant contact. Used to hand off engaged leads to the sales team. |
| Server Action | Executes a configured Cyllo server action — update a field, send a notification, call a method. Used for advanced automation steps beyond messaging. |
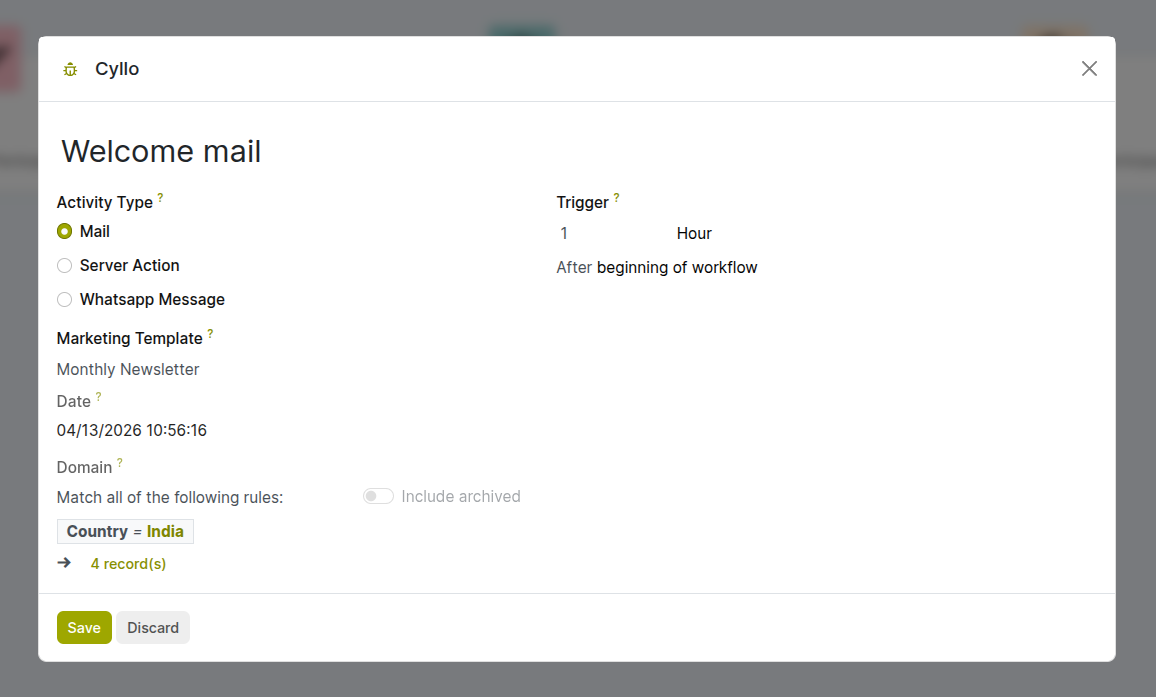
Fig 3.1 — Add Activity panel — activity type options shown as selectable cards: Email, WhatsApp, Server Action
3.2. Send Email Activity
The Send Email activity is the most commonly used activity type. It sends a personalized email to each participant using a pre-built email template from the Email Marketing module. Templates support dynamic merge fields — the participant's name, company, and any field from the target model can be inserted automatically into the email content.
- In the campaign's Activities section, click Add an Activity.
- Select Send Email as the activity type.
- Enter an Activity Name to identify this step in the campaign journey (e.g. Welcome Email, Day 3 Follow-Up).
- In the Email field, select an existing email template or click New Template to create one using the drag-and-drop email editor.
- Set the Trigger — when this email should send relative to campaign entry or the previous activity (see Section 4 for trigger configuration).
- Optionally, add an Expiry duration — if the participant has not been processed within this time, skip this activity and move to the next.
- Click Save.
Key Fields
- Email Template: The message that will be sent. Templates are created and managed in Email Marketing → Templates. Use merge fields like (object.name) to personalise content with participant data.
- Trigger: When the email is sent — immediately on campaign entry, after X days from the previous activity, or based on the outcome of the previous activity (see Section 4).
- Expiry Duration: If set, participants who have not reached this activity step within the expiry window are skipped past it. Useful for time-sensitive offers.
Note
Create dedicated email templates for each campaign step rather than reusing general newsletter templates. Campaign emails benefit from a single focused message and CTA rather than the multi-section newsletter format — this improves click-through rates significantly.
3.3. Server Action Activity
The Server Action activity executes a pre-configured Cyllo server action when a participant reaches this step. Server actions can update field values on the participant's record, send internal notifications, call custom Python functions, or trigger any other programmatic behaviour defined in Cyllo's server action framework. This activity type is used for advanced automation steps that go beyond messaging.
- Activate ‘Developer mode’.
- Go to Settings → Technical → Server Actions and create or identify the server action to use.
- In the campaign, click Add an Activity and select Server Action.
- Enter an Activity Name describing what this step does (e.g. Tag as Marketing Qualified, Update Lead Score).
- Select the Server Action to execute from the dropdown.
- Set the Trigger timing.
- Click Save.
Common Server Action Uses
- Update a Field: Set a tag, change a status field, or increment a counter on the participant record when they reach a certain campaign step.
- Internal Notification: Send a Cyllo Discuss message or email to an internal user when a participant completes a key step — for example, alerting a salesperson when a lead requests a demo.
- Webhook / API Call: Trigger an external integration — post data to a CRM, notify a third-party tool, or call an endpoint — via a server action that makes an HTTP request.
Note
The WhatsApp Marketing Automation extension (cyllo_whatsapp_marketing_automation) allows WhatsApp template messages to be added as activities in Marketing Automation campaigns. This adds a Send WhatsApp Message activity type to the standard Marketing Automation module — all coordinated within the same campaign workflow.
4. Trigger Configuration
Triggers define when each activity fires relative to the campaign or a previous activity. Getting triggers right is the most important configuration step — they determine the pacing of the campaign journey and which contacts receive which messages based on their behaviour.
4.1. Trigger Types Overview
Each activity in a campaign has a trigger that defines its firing condition. Cyllo supports three categories of trigger: entry-based (fires when a contact joins the campaign), time-based (fires after a delay), and outcome-based (fires based on what happened in the previous activity). These can be combined across a multi-step campaign to create sophisticated conditional journeys.
| Trigger Category | Description |
|---|---|
| Beginning of workflow | The activity fires as soon as the participant enters the campaign (for the first activity). |
| Another activity | The activity fires after a set number of hours, days, or weeks after the previous activity was executed. |
| Based on Mail Activity | The activity fires based on the outcome of the previous email activity — specifically whether the email was Opened, Clicked, Not Opened, or Not Clicked. |
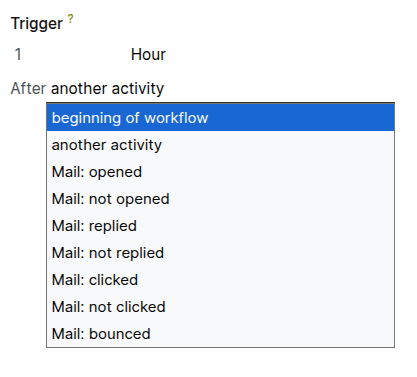
Fig 4.1 — Trigger selector dropdown on an activity — showing options
4.2. Time-Based Triggers
Time-based triggers are the backbone of drip campaign sequences. They allow precise spacing between activities — sending a welcome email immediately on entry, a follow-up after two days, a case study on day five, and a demo invitation on day ten. The delay is measured from the moment the previous activity was executed for that specific participant, not from the campaign launch date.
- On the activity form, click the Trigger field.
- Select the timing mode — for a delay after the previous activity, select After a Delay.
- Enter the Delay value and unit — for example, 3 Days, 1 Week, 6 Hours.
- The delay begins counting from the moment Cyllo processes the previous activity for this participant.
- Click Save.
TIP
Use a mix of short and long delays to mirror natural human communication patterns. A welcome email immediately on sign-up, followed by a value-focused email after 2 days, a social proof email after 5 days, and a call-to-action after 10 days generally outperforms an aggressive daily email sequence in terms of open rates and unsubscribe rates.
4.3. Activity-Outcome Triggers
Activity-outcome triggers fire based on what the participant did — or did not do — with the previous activity. They are the key mechanism for creating branching, behavioural campaign flows: engaged contacts follow a different path from unresponsive contacts. This allows a single campaign to deliver relevant messaging to both high-intent prospects and contacts who need more nurturing.
- Mail: Opened: Fires when the participant opens the email sent in the previous activity. Indicates interest — typically routes to a more sales-forward next step.
- Mail: Not Opened: Fires when the participant has not opened the email after a defined wait period. Typically routes to a resend with a different subject line or an SMS nudge.
- Mail: Clicked: Fires when the participant clicks a tracked link in the previous email. High intent signal — often used to trigger a CRM opportunity creation.
- Mail: Not Clicked: Fires when the participant opened the email but did not click. Routes to further nurturing content addressing the same topic.
Note
Email open and click tracking requires that tracking pixels and link wrappers are enabled in the email template. Ensure the Cyllo mail server is configured with a publicly accessible tracking domain for open tracking to work. Without this, 'Mail: Opened' and 'Mail: Clicked' triggers will never fire.
5. Campaign Journey Builder
The campaign journey builder is the visual interface for assembling a campaign's activity steps into a structured workflow. It provides a graphical representation of the campaign path — showing each activity, its trigger, and the branch points where participants diverge based on their behaviour.
5.1. Visual Designer Overview
The campaign form displays activities in a step-by-step visual layout. Each activity appears as a card showing its name, type (email, SMS, CRM), trigger condition, and the number of participants currently at that step. Connecting lines between cards show the flow — including branches when outcome-based triggers create parallel paths.
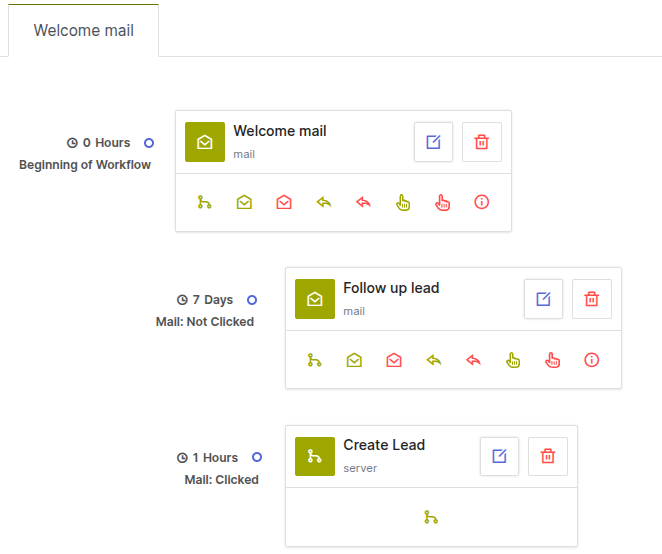
Fig 5.1 — Campaign journey builder — activity cards arranged vertically; a branch point showing two paths from one email activity based on 'Clicked' and 'Not Clicked'
- Each activity card shows: Activity name, type icon (email/SMS/CRM/action), trigger description, and a participant count badge.
- Branch points: When an activity has two or more outcome-based child activities, the journey displays them as side-by-side parallel branches.
- Editing: Click any activity card to open its configuration panel and edit its settings.
- Reordering: Activities within a linear chain can be moved up or down using the drag handle on the card.
- Deleting: Click the trash icon on any activity card to remove it. Participants currently at that step are moved to the next step.
5.2. Building a Multi-Step Workflow
A well-structured campaign workflow typically has three to seven activity steps — enough to build a meaningful nurturing sequence without overwhelming participants. This subsection walks through building a complete five-step lead nurture workflow as a practical example.
- Create the campaign and set the Target Model and Filter (see Section 2).
- Click ‘Another Activity’ on the current activity card and add the first activity — a Send Email for the Welcome Email with trigger set to Immediately.
- Click ‘Another Activity’ again and add a second Send Email for a Day 3 Follow-Up with trigger set to After 3 Days.
- Click ‘Another Activity’ to add a third activity — another Send Email for Day 7 Case Study with trigger After 4 Days (4 days after the Day 3 email = Day 7 total).
- Click ‘Another Activity’ to add a fourth step. This time select Create CRM Opportunity with trigger set to Mail: Clicked — this fires only for participants who clicked the Day 7 email, handing off high-intent leads to the sales team.
- Add a fifth activity for participants who did not click — a Send SMS with trigger Mail: Not Clicked as a final re-engagement nudge.
- Review the journey layout. The builder should show a linear sequence up to the Day 7 email, then two parallel branches — one for clicked (CRM) and one for not clicked (SMS).
- Save the campaign.
5.3. Editing & Reordering Steps
Campaign activities can be edited, reordered, or deleted at any time — even after the campaign has been launched and participants are active. Changes take effect for participants who have not yet reached the modified step.
Editing an Activity:
- Click the activity card in the journey builder.
- The activity configuration panel opens. Edit any field — name, template, trigger, expiry.
- Click Save on the activity panel.
Deleting an Activity:
- Click the trash icon on the activity card.
- Confirm deletion. Participants currently waiting at this step are moved to the next available step in the journey.
WARNING
Deleting an activity from a running campaign removes it permanently for all future participants. Participants who have already completed the activity are not affected, but participants currently waiting at the deleted step will be advanced. Always pause a campaign before making structural edits to avoid unintended participant routing.
6. Test Mode & Validation
Test Mode is a critical step before launching any campaign. It simulates the full workflow against a designated test contact without sending real messages to real participants, allowing the campaign team to verify that every trigger, condition, and action works exactly as intended.
6.1. What is Test Mode?
Test Mode runs the campaign workflow against a single designated test contact in a controlled simulation. Each activity fires as it would in production — the email is sent (to the test contact's email address), the trigger conditions are evaluated, and the participant moves through the journey step by step. The difference is that only the test contact is affected — no real campaign participants are enrolled or messaged.
- Emails in Test Mode are sent to the test contact's actual email address — useful for visually reviewing the email content as it will appear in an inbox.
- CRM opportunity creation in Test Mode creates a real opportunity in the CRM pipeline — delete it after testing.
- Server actions in Test Mode execute against the test contact record — use a dedicated test contact to avoid modifying real customer data.
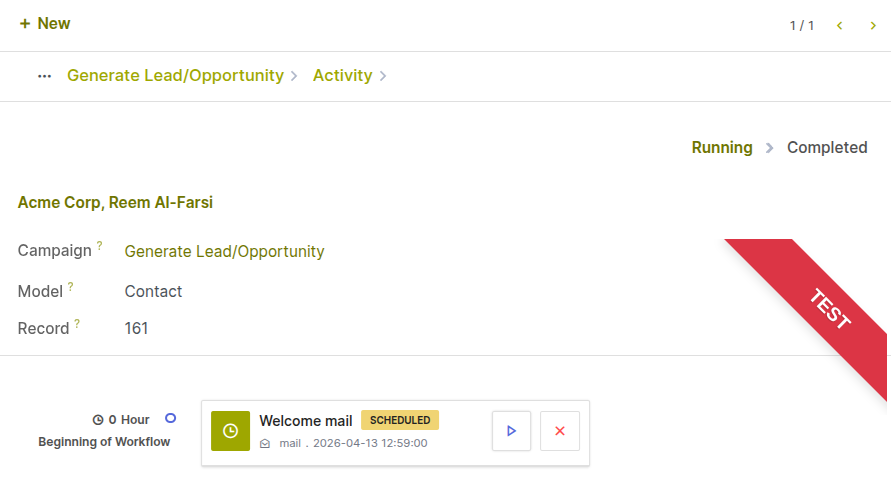
Fig 6.1 — Activity form — Test Mode enabled; Showing next activity to be done
6.2. Running a Test
Running a test is a straightforward process: click ‘Launch Test’ on the right top corner, designate a test contact, launch the campaign, and observe the journey step by step. The participant tracker shows the test contact progressing through each activity in real time.
- With the campaign in New state, click ‘Launch Test’ on the right top corner of the campaign form. Test Mode activates and the campaign status changes to Test.
- Click Add a Test Contact and search for the contact record to use as the test participant. Use a dedicated internal test contact — not a real customer record.
- Click Start to launch the campaign in Test Mode. The test contact is enrolled as a participant.
- The first activity fires immediately (or after its configured delay). Monitor the participant tracker — the test contact's status shows their current position in the journey.
- Interact with the test email if testing outcome-based triggers — open the email from the test contact's inbox to simulate an 'Opened' trigger, or click the tracked link to simulate a 'Clicked' trigger.
- Observe which branch the test contact follows based on the actions taken.
- Click Stop to end the test. Review the results before making any adjustments.
6.3. Interpreting Test Results
After running a test, review the participant tracker and the activity execution log to verify that each step fired correctly and that branches routed the test contact as expected. Common issues to check for are listed below.
| What to Check | How to Verify | Common Fix |
|---|---|---|
| Email was sent correctly | Check test contact's inbox — email should arrive with correct formatting and merge fields populated. | Verify email template exists and merge fields reference valid model fields. |
| Correct branch was taken | Check participant status in the tracker — activity step should match the branch you expected based on actions taken. | Verify outcome trigger type (Opened vs Clicked) is set correctly on each branch activity. |
| CRM opportunity created | Go to CRM and check if an opportunity was created for the test contact. | Ensure CRM activity has the correct Sales Team and Opportunity Title set. |
| Delay timing respected | Check activity fire timestamps in the participant log — delays should match configured values. | If delays fire immediately, verify cron scheduler is running in Settings → Technical → Automation. |
| Conditional filter applied | If a conditional filter should have skipped the activity, verify the test contact does not meet the filter condition. | Adjust the test contact's data to test both the 'passes' and 'fails' scenarios of the condition. |
TIP
Test the campaign twice — once taking the 'positive' path (opening emails, clicking links) and once taking the 'negative' path (ignoring emails). This ensures both branches of every conditional split work as expected.
7. Launching & Managing Campaigns
Once a campaign has been built and tested, it is launched from the campaign form. This section covers the launch process, how to monitor an active campaign, how to pause or stop it, and how to manage the participant list.
7.1. Starting a Campaign
Launching a campaign enrolls all contacts currently matching the campaign filter as participants and begins processing the first activity for each one. From this point, the campaign runs automatically — Cyllo's scheduler evaluates trigger conditions and fires activities continuously without further manual input.
- Ensure the campaign is in New state and has been tested successfully in Test Mode.
- Click Start. Cyllo evaluates the filter and enrolls all matching contacts as participants.
- The campaign status changes from New to Running. The participant counts badge updates to show the number of enrolled records.
- The first activity begins processing for all participants immediately (or after the configured delay for the first step).
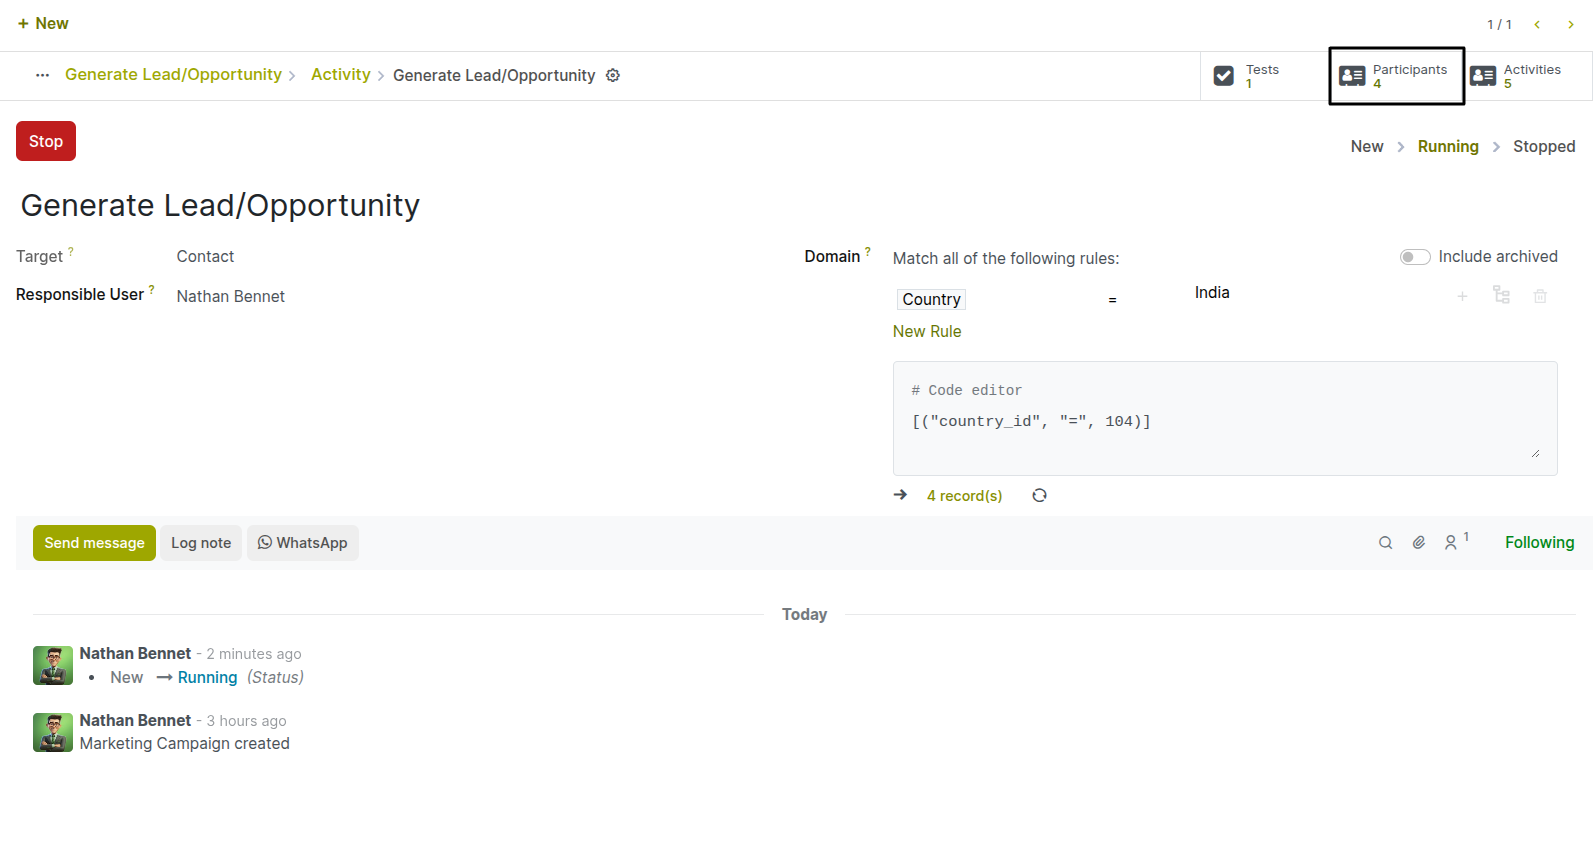
Fig 7.1 — Campaign form — status badge changed from Draft to Running; participant count badge showing 4 active participants after launch
Note
New contacts that match the campaign filter after the campaign is running are not enrolled automatically by default. To add new participants continuously, enable the Add new records option if available, or configure a Workflow Automation rule that adds matching new contacts to the campaign as they are created.
7.2. Monitoring Active Campaigns
During a running campaign, the campaign form provides a real-time view of participant progress across all activities. This dashboard helps marketing teams identify bottlenecks — activities where participants are stalling — and measure the effectiveness of each step.
- Each activity card shows a participant count badge — the number of participants currently waiting at or having passed through that step.
- Click any activity card's participant count to open the full list of participants at that step, showing each contact's name, enrollment date, and current status.
- The overall campaign participant count at the top of the form shows total enrolled, total completed, and total failed.
- Failed participants — those where an email bounce, missing phone number, or action error occurred — are flagged for review.
TIP
Check the failed participant count regularly during the first 48 hours after launch. Most failures are caused by missing email addresses, invalid phone numbers, or email server misconfiguration — catching and fixing these early prevents the issue from compounding across subsequent campaign steps.
7.3. Pausing & Stopping Campaigns
Campaigns can be paused at any time to temporarily halt activity processing — useful when content needs to be updated, the email server requires maintenance, or the campaign needs to be reviewed before continuing. Stopping a campaign permanently ends it and archives all participant records.
Pausing a Campaign:
- On the running campaign form, click Stop. The campaign transitions to Stopped state.
- All pending activity timers are suspended. Participants do not progress while the campaign is paused.
- To resume, click Restart. All pending timers resume from where they were suspended — participants are not re-queued to the beginning.
Stopping a Campaign Permanently:
- Stop the campaign by clicking Stop.
- Once satisfied that the campaign should not be restarted, the Stopped state is final for most configurations. Archive the campaign from the Actions menu to remove it from the active campaign list.
WARNING
Stopping and restarting a campaign does not re-enrol participants who have already completed the campaign or been removed. If the campaign logic has changed significantly since the original launch, it may be better to create a new campaign rather than restart the existing one, to avoid sending participants inconsistent messaging.
8. Reporting & Analytics
Marketing Automation provides built-in reporting on campaign participation and activity performance. For deeper cross-channel and cross-module analysis, the Cyllo Analytics module can be used to build custom dashboards.
8.1. Campaign Dashboard
The campaign dashboard is the primary monitoring view for an active or completed campaign. It shows an aggregate summary of participant movement through the campaign, making it easy to identify which steps are performing well and which are losing engagement.
- Open a campaign from Marketing Automation → Campaigns.
- Click on the ‘Activities’ smart button.
- The campaign header shows: Total Participants, Running Participants, Completed Participants.
- Each activity card in the journey shows its own participant count — how many contacts have reached or are waiting at that step.
- Click any activity's participant count to view the list of contacts at that step and their individual statuses.
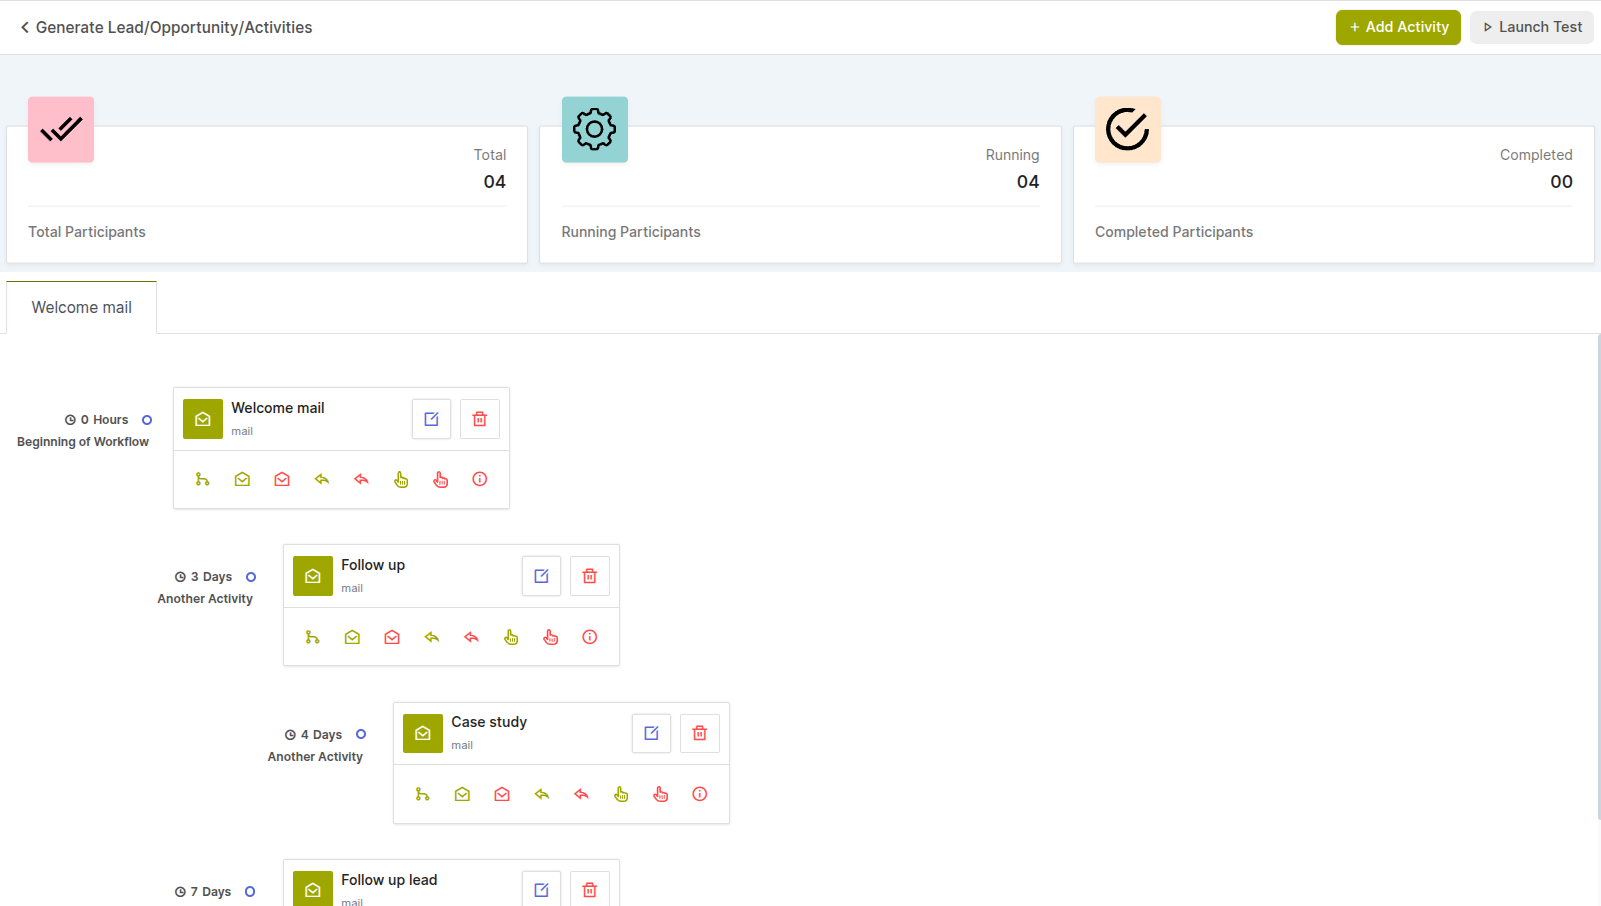
Fig 8.1 — Campaign overview — header cards showing total participants, in progress, completed counts; activity cards with step-level counts below
8.2. Participant Tracking
The participant tracker provides a per-contact view of campaign progress — showing exactly where each individual contact is in the workflow, when they were enrolled, and what activities have been processed for them. It is the primary tool for diagnosing individual delivery issues or customer queries.
- From the campaign form, click Participants.
- The participant list shows all enrolled contacts with columns for Name, Current Step, Enrolment Date, and Status.
- Use the search and filter bar to find a specific contact by name or filter by status (In Progress, Completed, Failed).
- Click a participant row to open the individual participant record — a full activity log showing every action taken for this contact, with timestamps, outcomes, and any error messages.
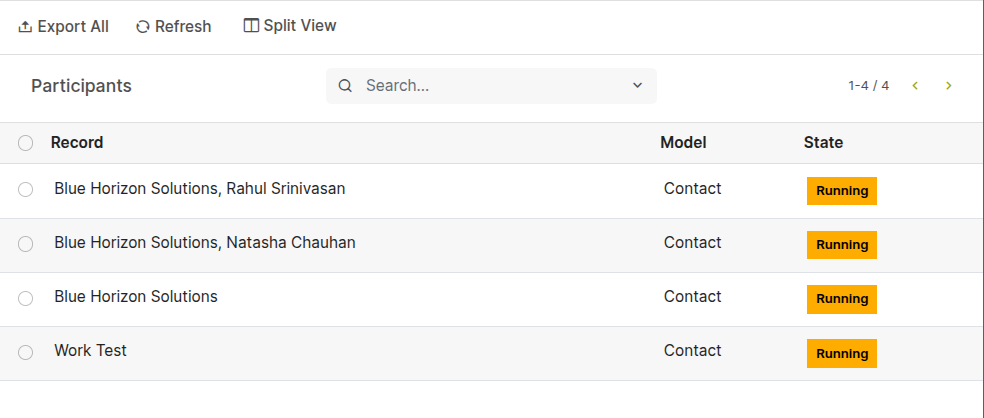
Fig 8.2 — Participants list view — activity log showing 'Welcome Email Sent' with timestamp, 'Email Opened' event, 'Day 3 Follow-Up Sent' with timestamp for a single contact
Note
Failed participant records include an error description explaining why the activity could not be processed. Common reasons include missing email address, invalid phone number, bounced email, or WhatsApp template not approved. Use this log to identify and fix data quality issues in the contact database.
9. Troubleshooting
This section addresses the most common issues encountered when building and running Marketing Automation campaigns — campaigns that do not trigger, emails that do not send, and WhatsApp messages that fail to deliver.
9.1. Common Issues & Solutions
| Issue | Likely Cause | Solution |
|---|---|---|
| Campaign shows 0 participants after launch | Filter matches no records | Review the campaign filter — check the record count badge. Widen or correct the filter conditions. |
| Activity shows 0 participants after campaign start | Trigger delay has not elapsed yet | Check the trigger delay on the activity. Participants only appear after the delay period from enrolment. |
| Emails not arriving in test mode | Test contact email not set or mail server down | Verify the test contact has a valid email. Check Settings → Outgoing Mail Servers for errors. |
| Outcome trigger never fires (Mail: Opened) | Email open tracking not configured | Verify tracking pixel is enabled in Settings and the Cyllo URL is publicly accessible. |
| Campaign stuck in Stopped state after Restart | Cron scheduler not running | Go to Settings → Technical → Automation → Scheduled Actions. Find the Marketing Automation cron and verify it is active and running on schedule. |
| Participant marked as Failed with no error | Missing required field (email/phone) | Open the participant detail log — the error message identifies the missing field. Update the contact record. |
| New contacts not enrolling after campaign starts | Auto-enrolment not configured | Marketing Automation does not enrol new matching records automatically unless configured. Use a Workflow Automation rule to add new contacts to the campaign on creation. |
| Conditional filter skipping all participants | Condition evaluated before data is updated | Check the trigger timing — if data changes happen after the trigger fires, adjust the delay so the condition is evaluated after the expected data update. |
9.2. Campaign Not Triggering
When a campaign appears to be running but activities are not firing and participants are not progressing, the issue is almost always the Cyllo scheduled action (cron job) that processes campaign triggers. This runs on a configurable schedule and must be active for campaigns to work.
Go to Settings → Technical → Automation → Scheduled Actions.
Search for Marketing Automation or Automation Run Campaign. Open the scheduled action.
Verify that it is Active (the Active toggle should be on).
Check the Next Execution Date — if this is in the past by more than a few minutes, the cron is not running. Click Run Manually once to force execution and see if activities begin processing.
If the cron keeps failing, check the cron execution log for error messages. Common causes are database connection errors or Python exceptions in a server action.
After fixing any underlying issue, click Run Manually again to restart activity processing. 9.3. Emails Not Sending Campaign emails that do not send are usually caused by outgoing mail server errors, daily email send limits being reached, or the contact being on the email blacklist.
Go to Settings → Technical → Outgoing Mail Servers and verify the mail server is Active and the last test connection was successful.
Check Settings → Technical → Email → Emails (or the mail queue). Look for emails with Failed or Exception status. Open a failed email to read the error message — this identifies the specific delivery issue (authentication error, quota exceeded, SMTP timeout).
Verify the participant contact has a valid email address in their Contacts record. Campaign emails silently skip contacts without an email address unless the conditional filter 'Email is set' is applied (see Section 4.4).
Check whether the contact is on the Email Marketing blacklist — go to Email Marketing → Configuration → Blacklist and search for the email address. Blacklisted contacts are automatically excluded from campaign emails.
If using a transactional email provider (SendGrid, Mailgun), check the provider's activity log for the specific email to see whether it was accepted, bounced, or blocked on the provider side.
TIP
For campaigns sending to large audiences, check the daily email quota of your outgoing mail server provider. Free tiers of SendGrid, Mailgun, and similar services have strict daily limits. Upgrade the sending plan before launching a campaign to a large list to avoid mid-campaign quota exhaustion.