

Cyllo Company Setup & Configuration Documentation
Introduction
The Administration section of Cyllo provides system administrators and ERP managers with complete control over how the platform is configured to match their business structure, policies, and operational requirements. Company Setup & Configuration is the foundational layer of any Cyllo deployment — it establishes the identity of the business, defines who can access what, and governs global system behavior across all modules. Because Cyllo operates as a fully unified ERP, settings configured in this section automatically propagate across all connected modules — Sales, Accounting, Inventory, HR, CRM, Manufacturing, and more. A change to the company's default currency, for example, immediately reflects across invoices, purchase orders, and payroll — eliminating manual updates and ensuring consistency. This tight integration means that setting up the company correctly at the start saves significant effort across every business function. The Company Setup & Configuration section provides administrators with a comprehensive framework to define organizational structure, manage system users and their permissions, set up communication channels, configure localization preferences, and protect the business database with automated backup policies — all from a centralized, role-protected interface within Cyllo.
1. Company Setup & Configuration
Company Setup & Configuration covers everything needed to establish the foundational profile and operating rules of your business within Cyllo. Whether you are deploying Cyllo for a single company or managing a multi-entity group, this section is your starting point.
1.1 Company Information
The Company Information section stores the core identity details of the business. This information is used automatically across printed documents such as invoices, purchase orders, quotations, payslips, and delivery notes — ensuring all external communication is accurate and professional.
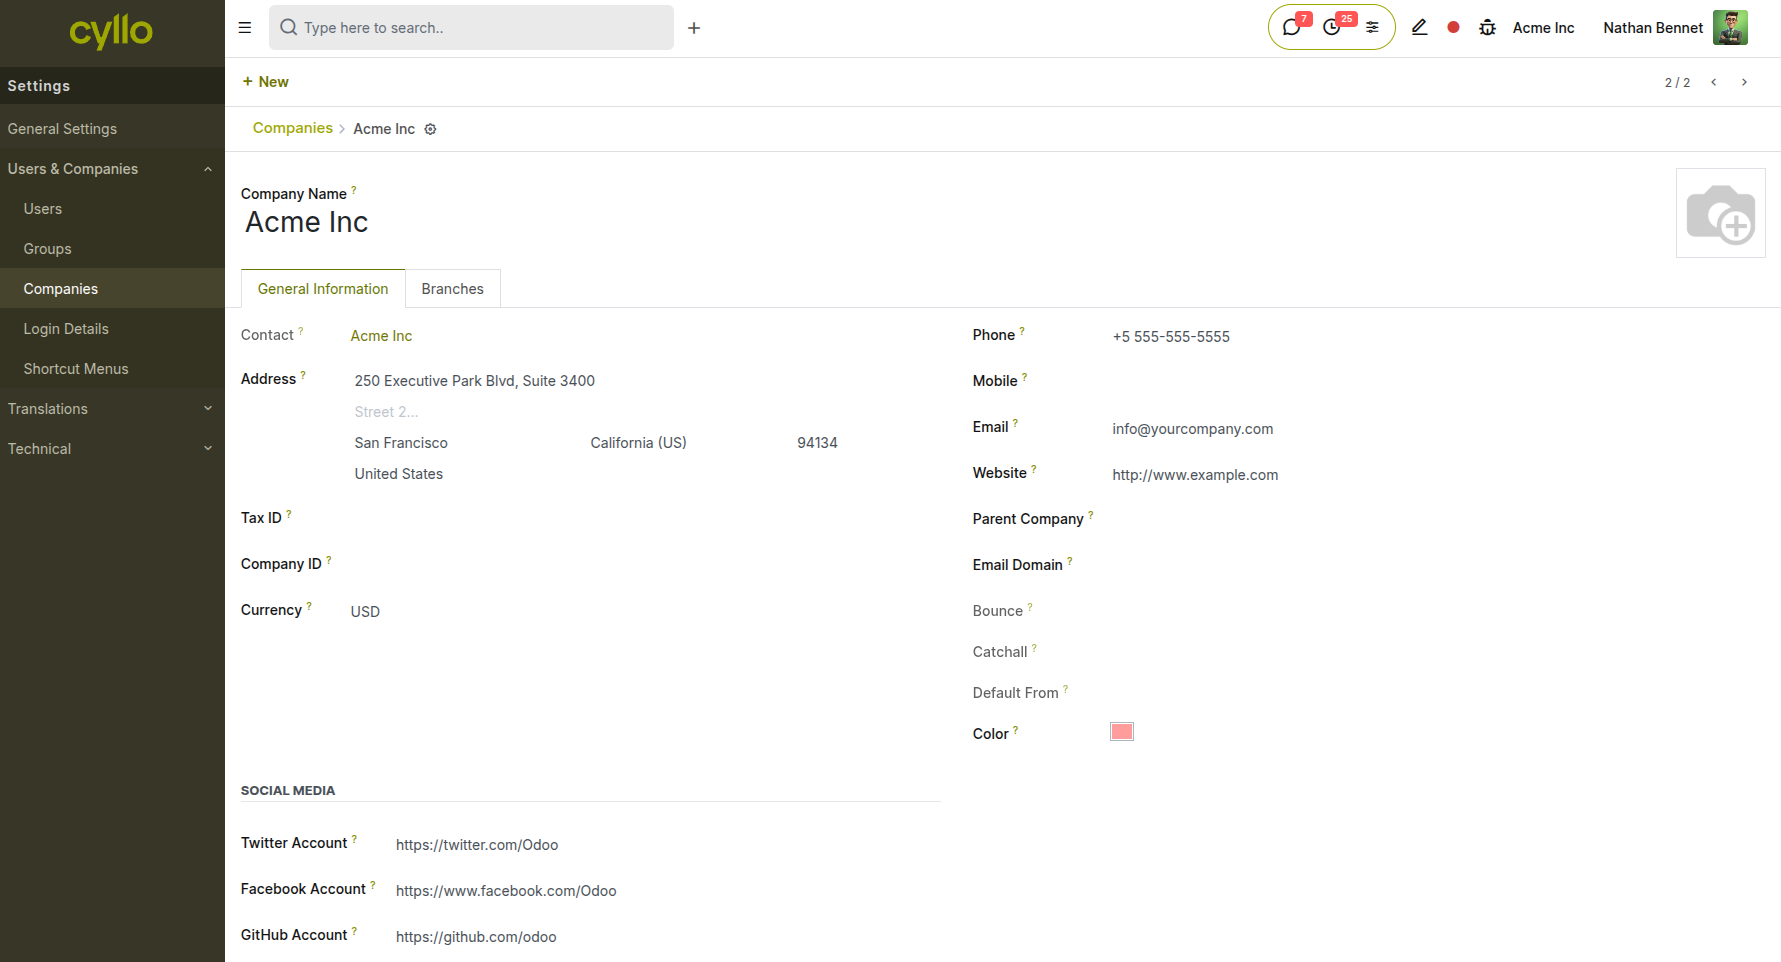
Fig 1.1 — Company form showing fields for company name, logo, address, tax ID, and contact details
How to configure Company Information:
- Go to Settings → General Settings → Companies → Update Info
- Enter the Company Name as it should appear on all official documents
- Upload the company Logo (recommended size: 150x50 px; PNG or JPG format)
- Fill in the registered Address, including street, city, state, zip, and country
- Enter the Tax ID / VAT Number used for invoicing and tax compliance
- Add Phone, Email, and Website for customer-facing communication
- Set the Company Currency (this becomes the default operating currency)
- Click Save to apply all changes Key Fields
- Company Name: The legal or trading name displayed on all documents and the top navigation bar
- Logo: Appears on invoices, quotations, purchase orders, payslips, and the login screen
- Tax ID / VAT: Used in statutory reports, tax filings, and customer-facing invoices
- Currency: The primary currency for all financial transactions unless overridden by pricelists or multi-currency settings
- Address: Printed on all outgoing documents and used as the default pick-up/origin address in deliveries
Note
Changes to company name, logo, and tax ID take effect immediately on all newly generated documents. Existing confirmed documents retain the information that was in place at the time of creation.
1.2 Multi-Company Management
Cyllo supports operating multiple companies from a single database instance. Each company has its own independent chart of accounts, settings, users, and documents, while sharing a common product catalog and partner database. This is ideal for business groups, subsidiaries, or franchises that want centralized oversight with company-level separation.
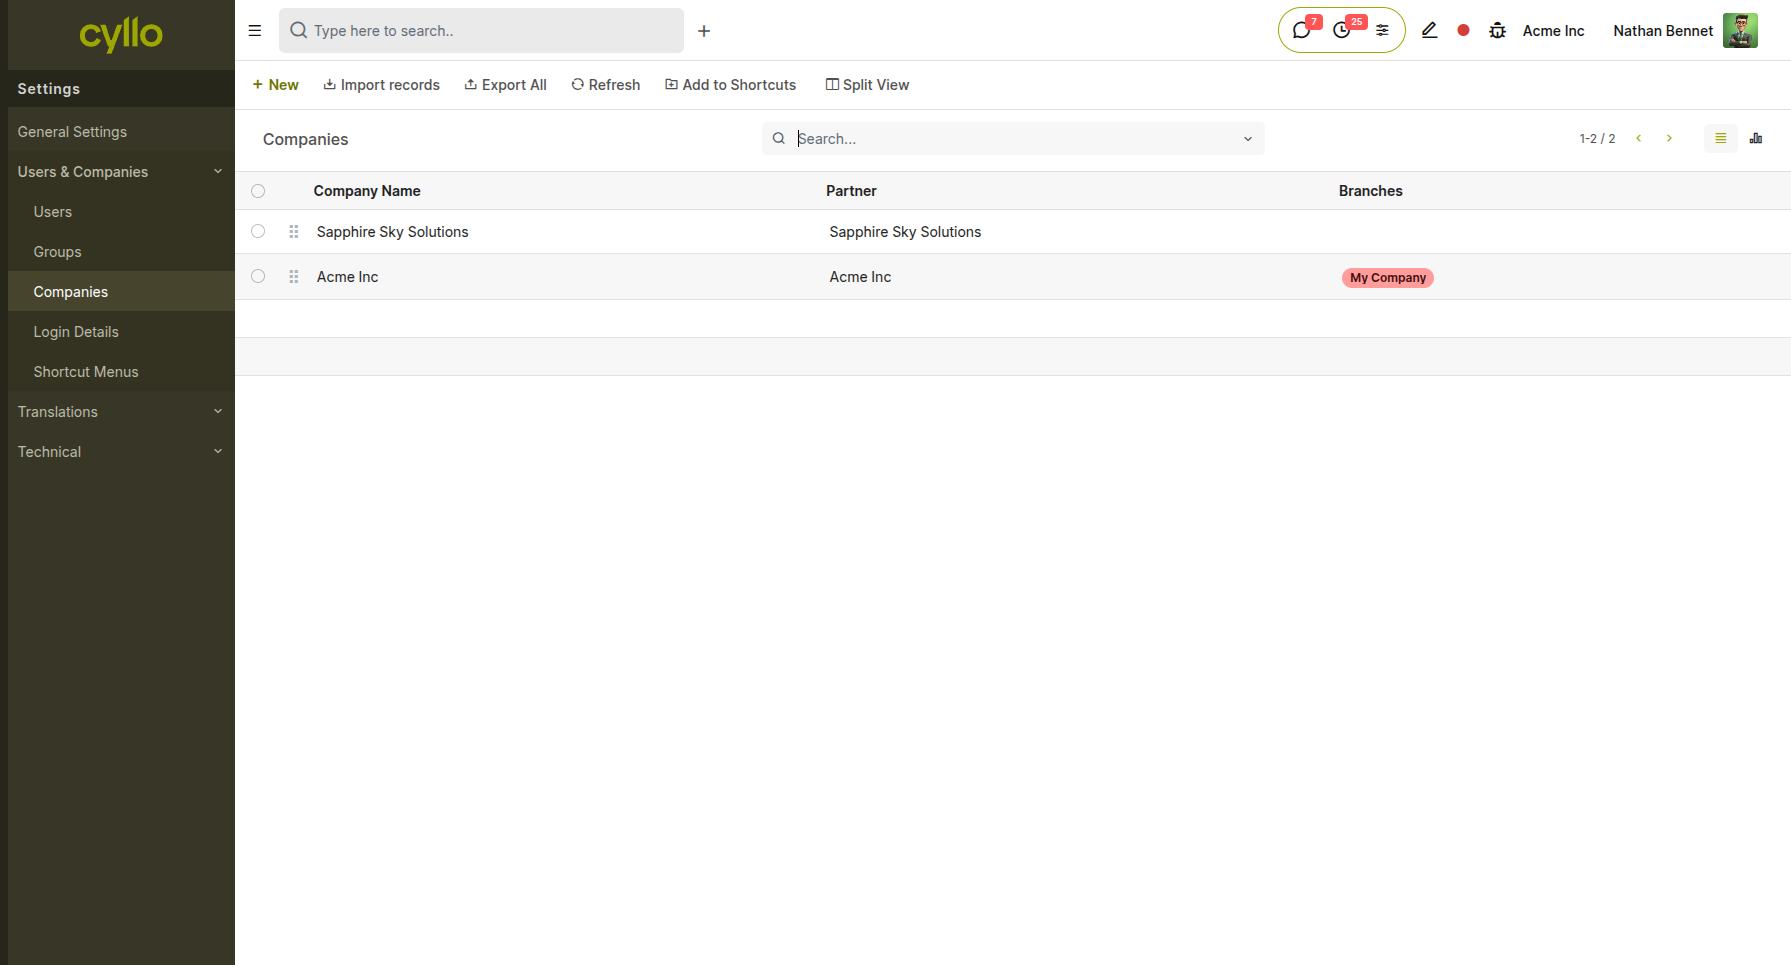
Fig 1.2 — Companies list view showing multiple company records with their currencies and parent/child relationships
How to create a new company:
- Go to Settings → General Settings → Companies → Create
- Fill in the company profile as described in Section 1.1
- Set the Parent Company if this entity is a subsidiary
- Define the company-specific Currency, Fiscal Positions, and Chart of Accounts
- Click Save How to switch between companies:
- Click the company name in the top navigation bar
- Select one or more companies from the dropdown to activate them
- Cyllo will display records and reports filtered to the active company context Key Fields
- Parent Company: Links a subsidiary to its parent for consolidated reporting
- Sequence Prefix: Defines the prefix for document sequences (e.g., INV/CompanyA/)
- Intercompany Rules: Control whether purchase orders in one company auto-generate sales orders in another
Note
Users must be granted access to each company individually. A user not assigned to a company will not see that company's records, even as an administrator of another branch.
1.3 Users & Access Rights
User management controls who can log into Cyllo, which modules they can access, and what actions they are permitted to perform. Cyllo uses a group-based permission model, extended further by Cyllo Studio's access control layer.
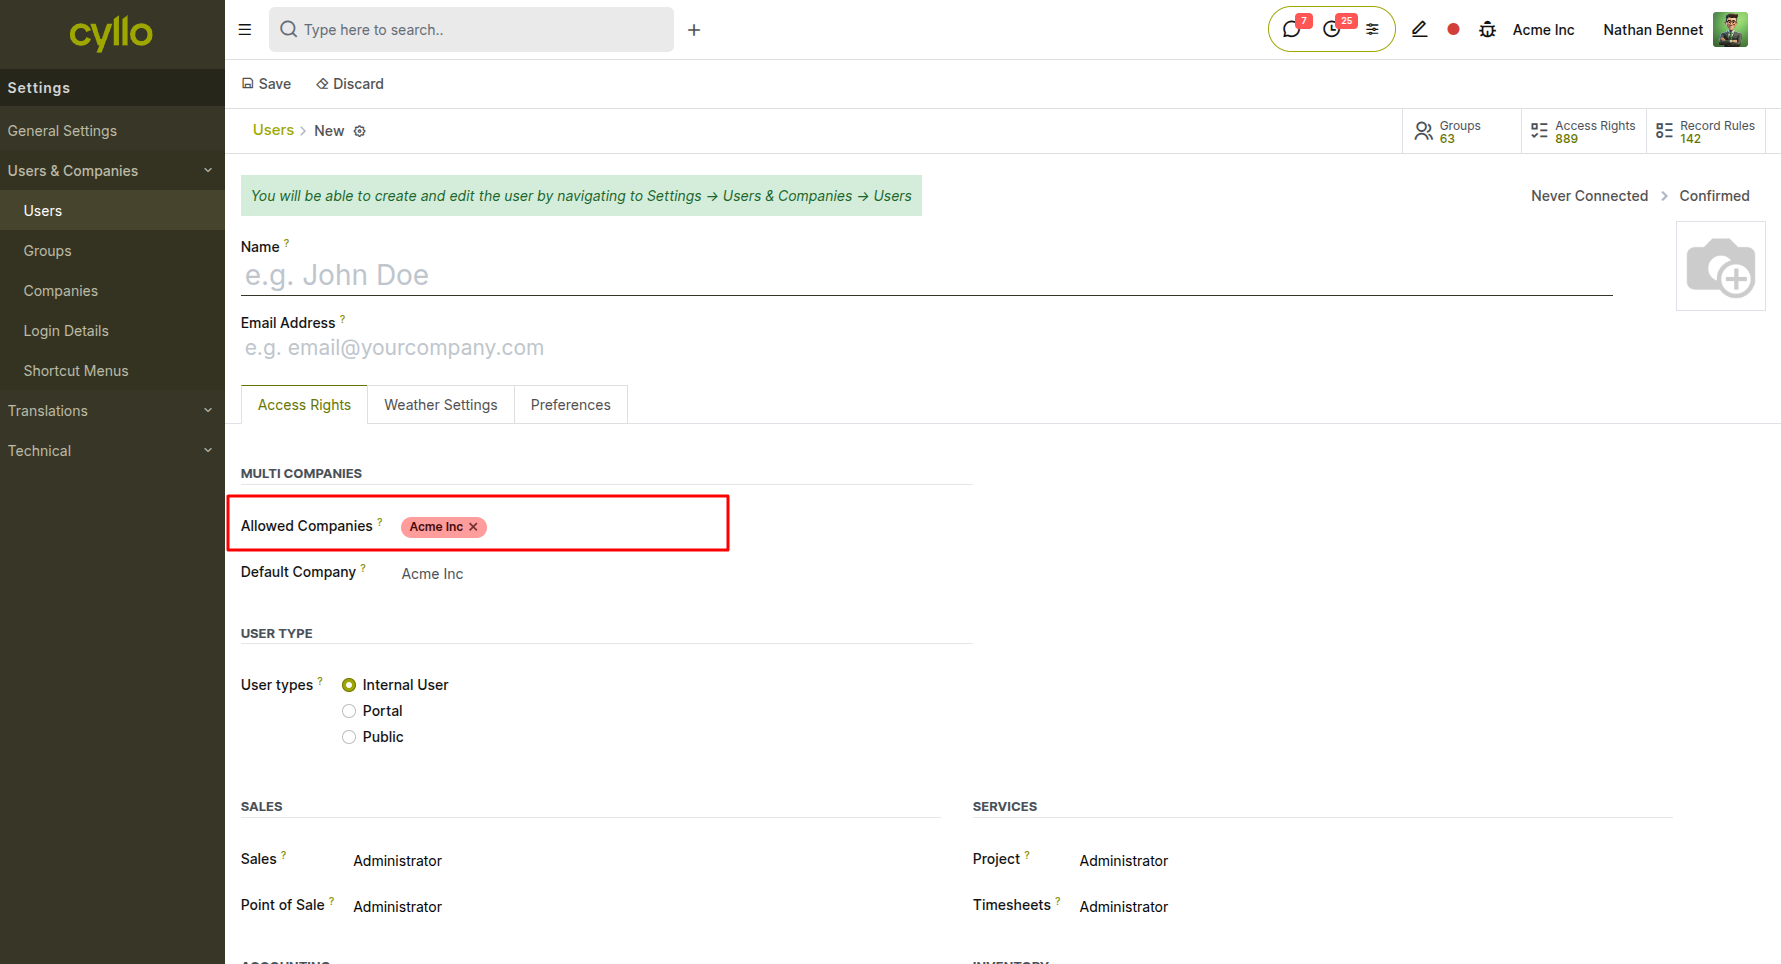
Fig 1.3 — User form showing assigned groups, access rights tabs, and active company access
How to create a new user:
- Go to Settings → Users & Companies → Users → New
- Enter the user's Name and Email Address (used as login)
- Assign the appropriate Access Rights by selecting the relevant module roles (e.g., Sales: User, Accounting: Manager)
- Under Companies, check all companies this user is allowed to access
- Click Save — Cyllo will send an invitation email to the user to set their password
How to modify an existing user's permissions:
- Go to Settings → Users & Companies → Users
- Click the user record
- Adjust their module access rights and company assignments
- Click Save
Key Fields
- Email (Login): The unique identifier used to log in and receive system notifications
- Language: Sets the interface language for this specific user
- Access Rights: Role-based permissions per module (e.g., User, Manager, Administrator)
- Companies: List of companies the user can access and switch between
- Active: Deactivate to revoke access without deleting the user record
Note
To grant full administrative access across all modules, assign the user the Administration: Settings right. For ERP-level customization access (Cyllo Studio), assign the ERP Manager group.
1.4 General Settings
General Settings is the central control panel for system-wide behavior. It covers interface preferences, feature toggles for all major modules, security policies, and integration options. Changes here apply globally unless overridden at the company or user level.
How to access General Settings:
- Go to Settings → General Settings
- Navigate through the categorized sections (Sales, Invoicing, Inventory, HR, etc.)
- Toggle features on or off using the checkboxes or switches
- Click Save after making changes in each section
Common settings to configure during initial setup:
- Default Language & Timezone: Set the base language for the database and the server timezone to ensure all scheduled actions and timestamps align with your operating location
- Customer/Vendor Invoicing: Enable or disable features like electronic invoicing, SEPA, or installment payments
- Sales Features: Enable discounts, pricelists, coupons, loyalty programs, and customer portal
- HR & Payroll: Enable leave management, attendance tracking, payslip generation, and gratuity calculation
- Cyllo AI: Configure the AI assistant with the preferred LLM (ChatGPT, Gemini, or OpenRouter) and API key
Note
Some settings in General Settings require activating a module if it is not already installed. Cyllo will prompt for installation when you save the setting for the first time.
1.5 Email & Outbound Mail Configuration
Cyllo sends emails for a wide range of business events: sales order confirmations, invoice delivery, payslip distribution, leave approvals, and automated follow-ups. To enable these features, an outbound mail server must be configured.
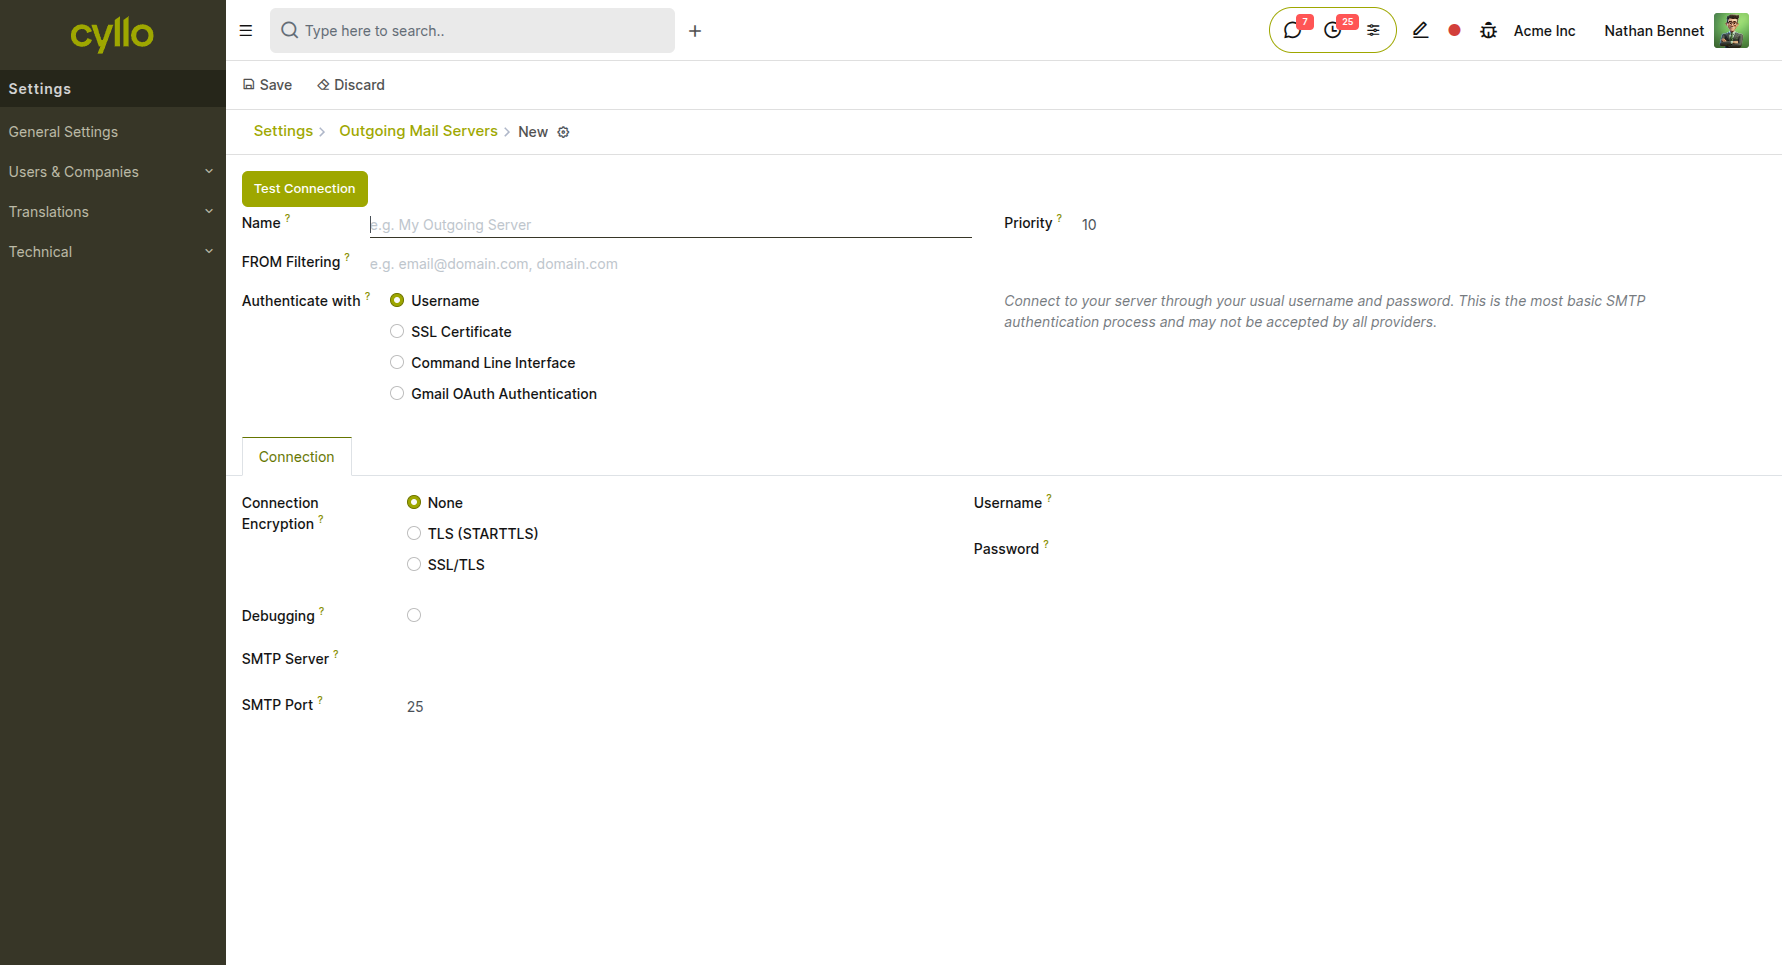
Fig 1.4 — Outbound Mail Server form showing SMTP fields, encryption options, and connection test button
How to configure an outbound mail server:
- Go to Settings → Technical → Outbound Mail Servers → New
- Enter a Server Name to identify this configuration
- Set the SMTP Server address (e.g., smtp.gmail.com) and Port (465 for SSL, 587 for TLS)
- Select the Encryption type: SSL/TLS or STARTTLS
- Enter the Username (usually the full email address) and Password
- Click Test Connection to verify credentials
- Click Save and set this server as the Default if using a single mail server
How to configure incoming mail (email aliases):
- Go to Settings → Technical → Inbound Mail Servers → New
- Select the server type: IMAP or POP3
- Enter server address, port, login credentials, and the destination model (e.g., CRM Lead, Support Ticket)
- Set the polling frequency for automatic email retrieval
Note
If using Gmail, enable "Less Secure App Access" or use an App Password generated from your Google account security settings. For Microsoft 365, OAuth2 authentication is recommended.
1.6 Localization & Language Settings
Localization settings allow Cyllo to be adapted to the language, date formats, number separators, and tax conventions of any country or region. This is especially important for businesses operating across multiple geographies or with international customers.
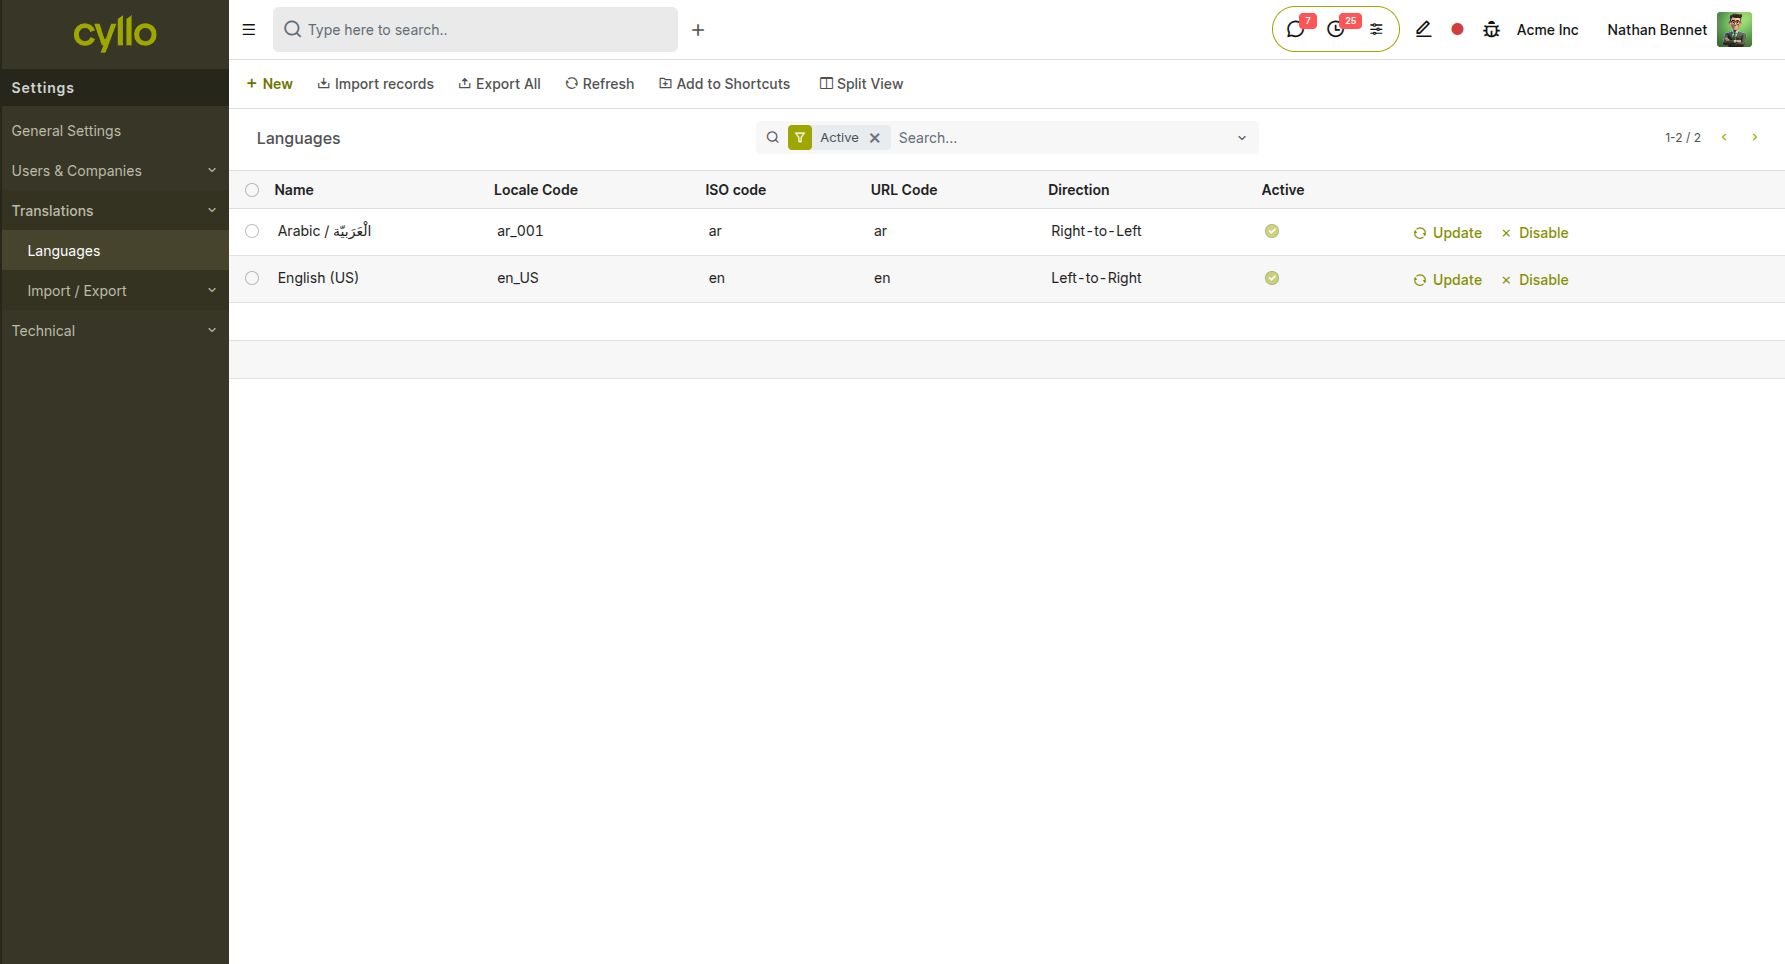
Fig 1.5 — Language settings showing installed languages list and the option to activate additional languages
How to install and activate a language:
- Go to Settings → Translations → Languages → Add a Language
- Select the desired language from the dropdown list
- Click Activate — Cyllo downloads and installs the language pack
- Go to Settings → Users & Companies → Users to assign the language to specific users
How to set the system default language:
- Go to Settings → General Settings → Language
- Select the default language from the dropdown
- Click Save — this applies to all new users unless individually overridden
Key localization elements:
- Date Format: Controls how dates appear across the interface (DD/MM/YYYY vs. MM/DD/YYYY)
- Decimal Separator: Period (.) or comma (,) depending on the locale
- Fiscal Positions: Map taxes and accounts based on customer/vendor geography — automatically applies the correct tax treatment without manual adjustment (configured in Accounting → Configuration → Fiscal Positions)
- Country-Specific Payroll Rules: HR modules adapt payroll computation based on the company's country setting
Note
Translating custom module labels or fields added via Cyllo Studio requires running a manual translation export and re-import from Settings → Translations → Export / Import Translation.
1.7 Currency & Exchange Rate Settings
Cyllo supports multi-currency transactions across all modules. The primary company currency is set during company creation, but additional currencies can be activated for customer invoicing, vendor payments, and financial reporting.
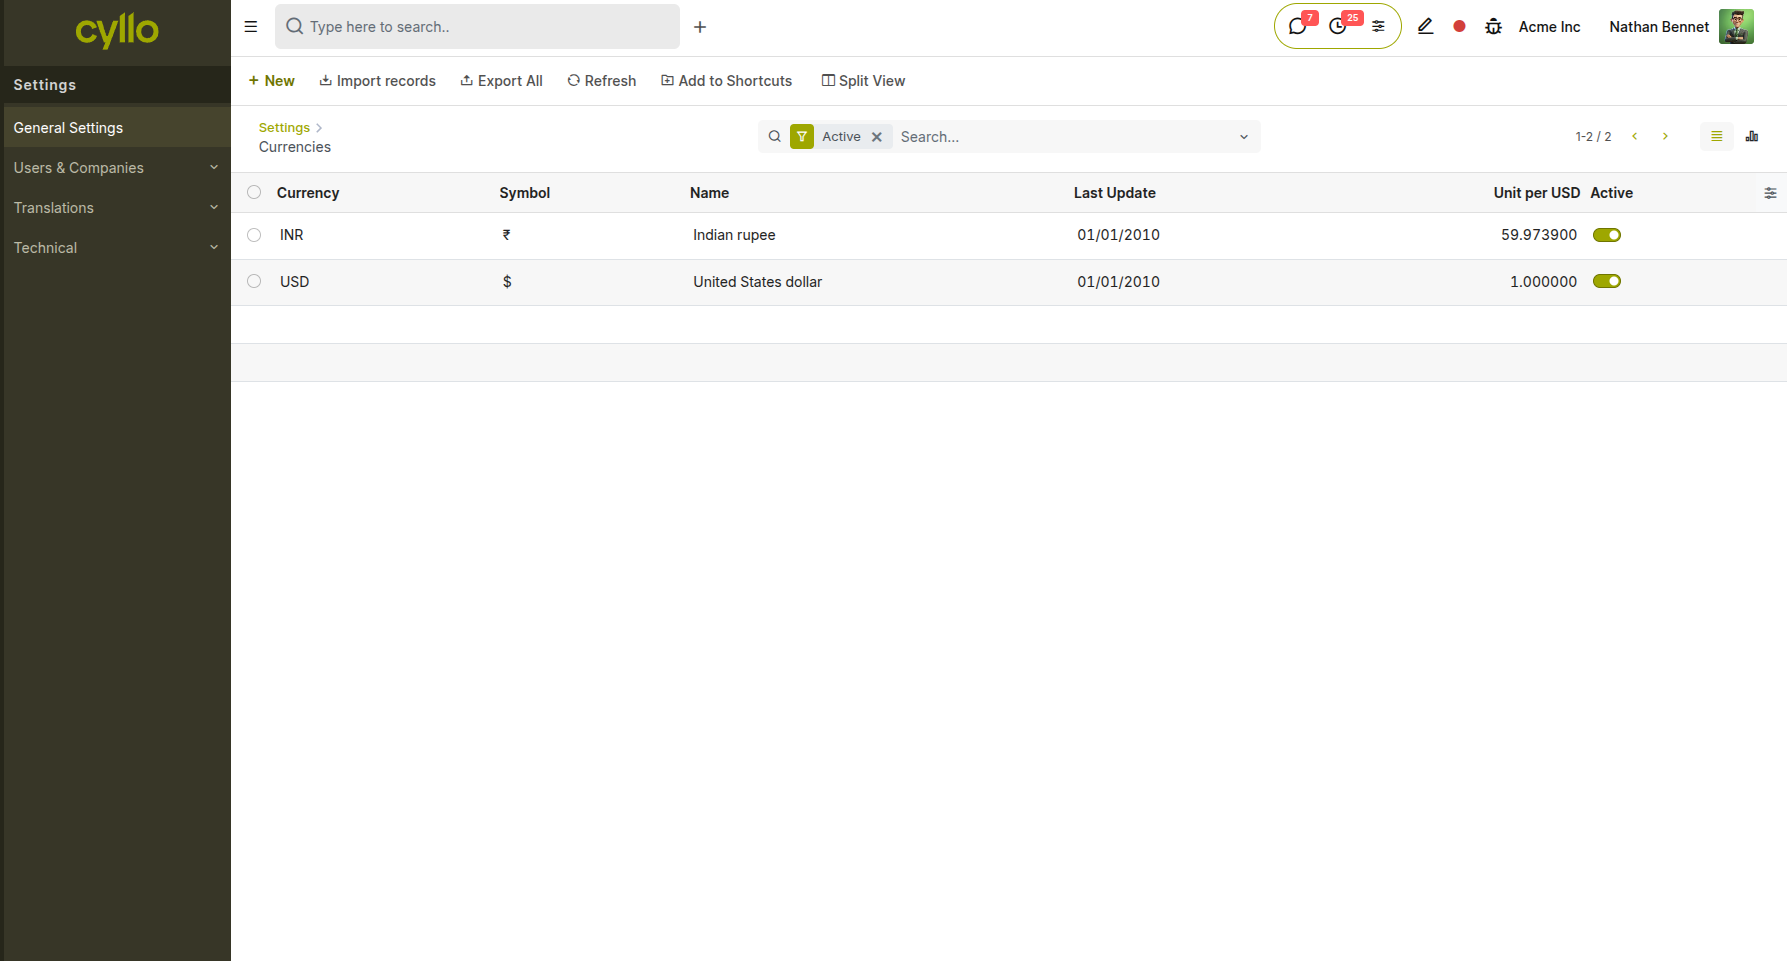
Fig 1.6 — Currency list showing active currencies with current exchange rates and the auto-update toggle
How to activate additional currencies:
- Go to Accounting → Configuration → Currencies
- Click the toggle next to any currency to activate it
- Set the exchange rate manually or enable automatic updates
How to enable automatic exchange rate updates:
- Go to Settings → General Settings → Currencies → Automatic Currency Rates
- Enable the toggle and select the update frequency: Daily, Weekly, or Monthly
- Click Save — Cyllo will automatically fetch updated rates from the configured rate provider
Manual rate update:
- Go to Accounting → Configuration → Currencies
- Click on the currency to open its record
- Click Update to fetch the latest rate immediately
Note
Exchange rates apply to all multi-currency transactions at the time of record creation. Confirmed invoices and orders retain the exchange rate at which they were originally recorded. The Auto Currency Rate feature is provided by the cyllo_currency_rate module and must be installed for automatic updates to work.
1.8 Fiscal Years & Accounting Periods
Defining the correct fiscal year structure ensures that financial reports, budget comparisons, and period-based analytics are accurate and aligned with the business's statutory reporting cycle.
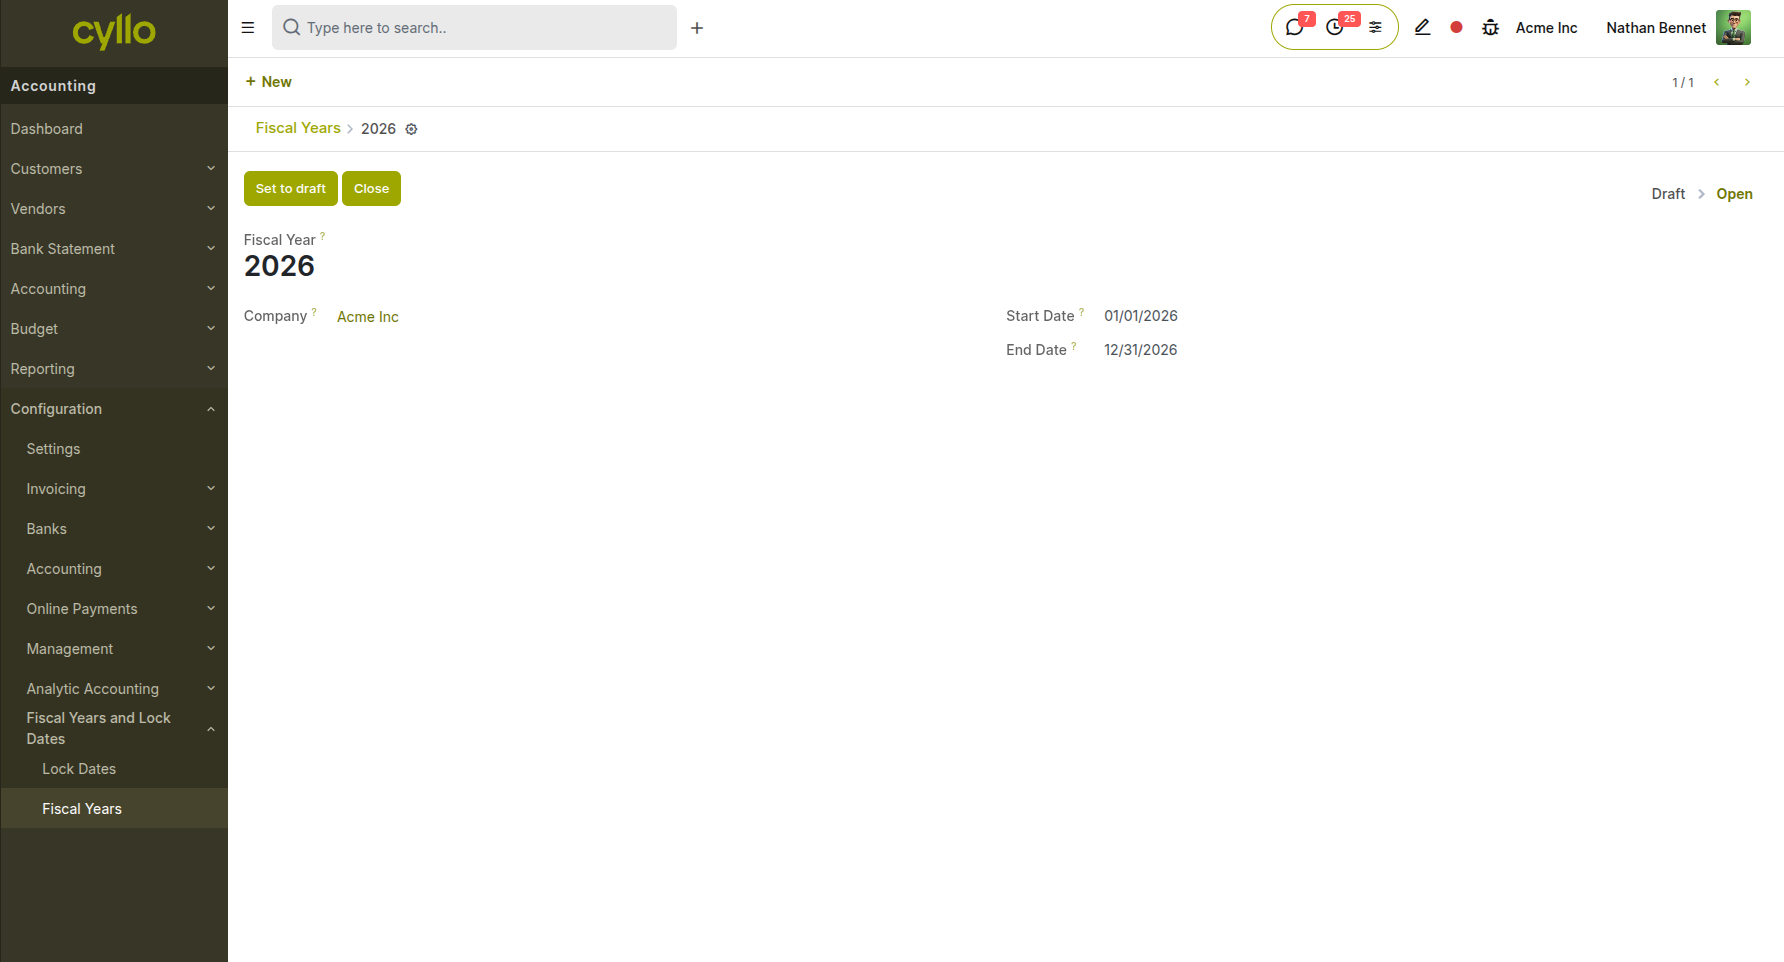
Fig 1.7 — Fiscal year configuration showing start and end dates, lock date settings, and the accounting period list
How to configure the fiscal year:
- Go to Accounting → Configuration → Fiscal Year and Lock dates→ Fiscal Year
- Set the Fiscal Year Start Date (e.g., April 1 for an April–March fiscal year)
- Cyllo automatically generates accounting periods based on this setting
- Click Save
How to lock a past accounting period:
- Go to Accounting → Accounting → Lock Dates
- Set a Lock Date to prevent any new journal entries from being posted to periods before that date
- This protects finalized periods from accidental changes
How to close and open fiscal periods:
- Go to Accounting → Reporting → Fiscal Years
- Select the period to review its posted entries and balance
- Use Close Period when all entries for that period have been validated and reconciled
Note
Cyllo does not enforce a strict year-end close in the way some legacy ERPs do. Locking journal entry dates is the recommended practice to protect finalized periods while keeping the system flexible for corrections.
1.9 Database Backup Configuration
Protecting business data is a critical administrative responsibility. Cyllo includes a built-in automated backup manager that sends encrypted database snapshots to one or more storage destinations on a configurable schedule — no third-party backup tools required.

Fig 1.8 — Database Backup Configuration form showing database name, format, schedule, and destination list
How to configure automated database backup:
- Go to Settings → Database Backup Management → New
- Enter a descriptive Configuration Name
- Select the Database Name to back up
- Enter the Master Password (the Cyllo database manager password)
- Choose the Backup Format: Zip (smaller, compressed) or Dump (raw SQL, larger)
- Set the Schedule: Daily, Weekly, or Monthly
- Under Backup Destinations, click Add a Line and configure one or more of the following:
| Destination Type | Required Details |
|---|---|
| Local Storage | File system path on the server |
| Google Drive | OAuth credentials and target folder |
| Dropbox | Dropbox App key and secret |
| Amazon S3 | AWS bucket name, access key, and secret |
| OneDrive | Microsoft account credentials |
| NextCloud | Server URL, username, and password |
| Remote SFTP | Host, port, username, password, and remote path |
| FTP | Host, port, username, password, and remote path |
- Click Save
- Click Backup Now to trigger an immediate manual backup and verify the configuration Viewing backup history:
- Open the backup configuration record
- Scroll to the Backup History section to view a log of all past backup runs with success or failure status
Note
At least one backup destination should be off-site (e.g., Google Drive, S3, or Dropbox) to protect against local server failure. Cyllo supports multiple simultaneous destinations — enabling both local and cloud backup in a single configuration is strongly recommended.
1.10 App Installation & Module Management
Cyllo ships with 80+ modules. Not all modules are installed by default — administrators activate the modules that match their business needs. On a new database, the App Mass Install interface simplifies this process with a guided onboarding experience.
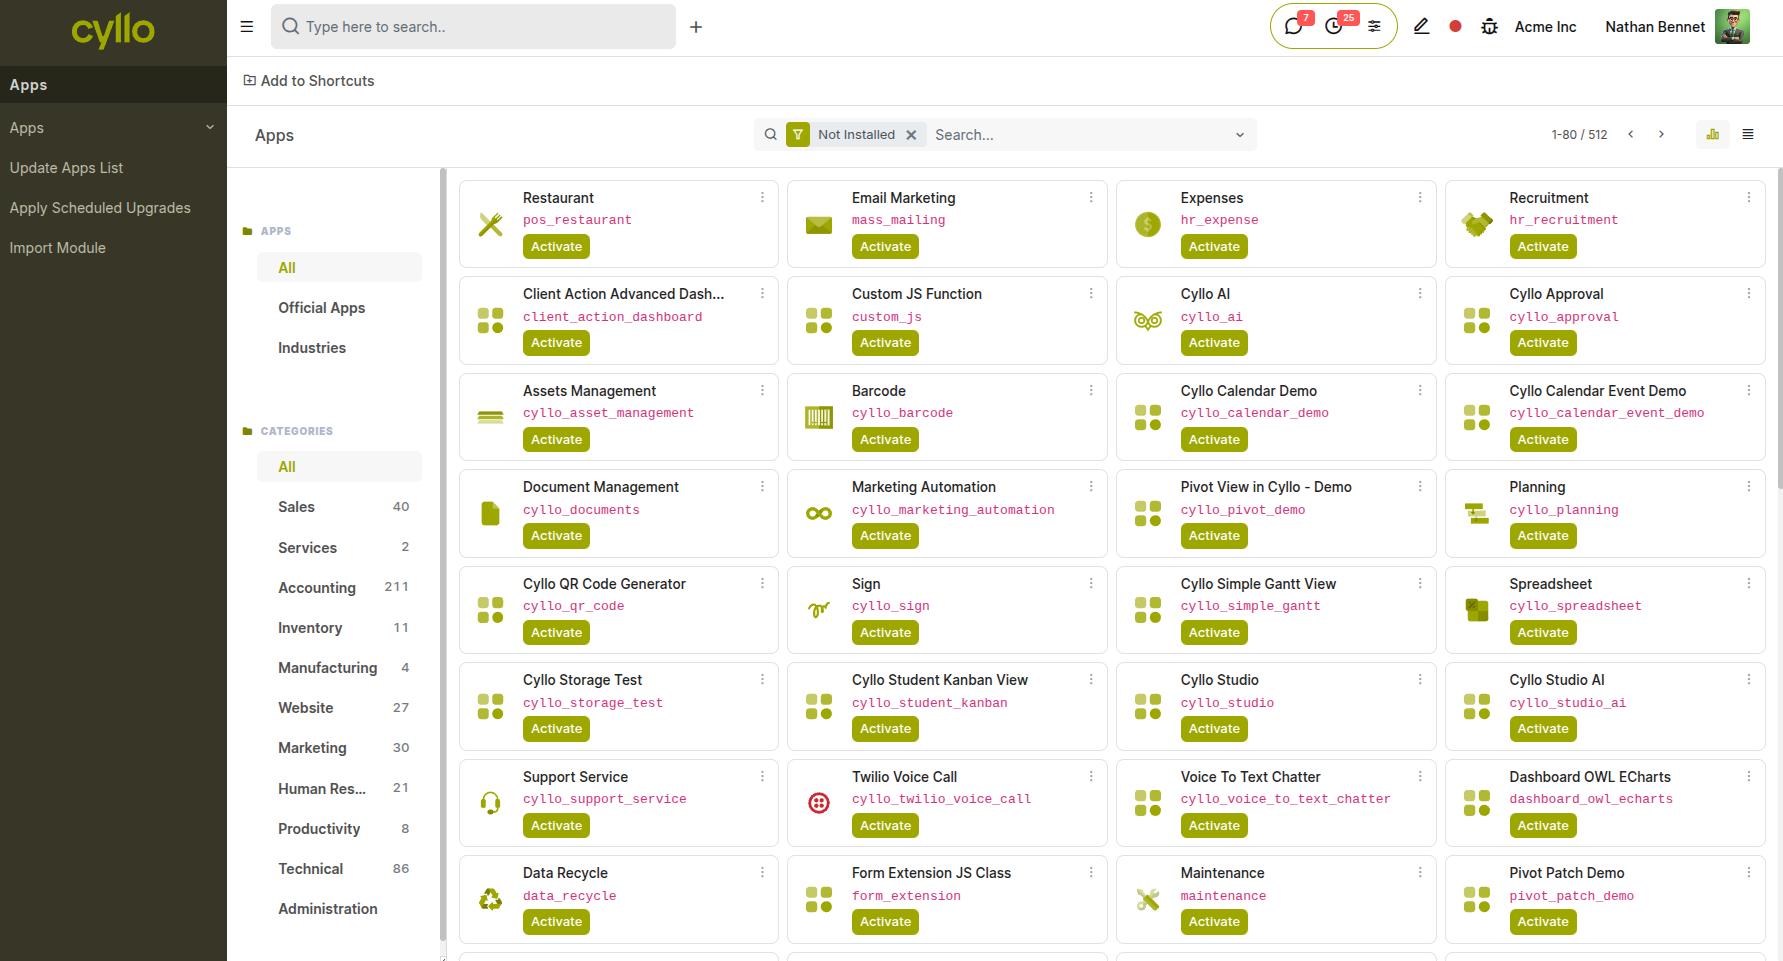
Fig 1.9 — Cyllo Apps screen showing module cards with Install buttons, category filters, and search bar
How to install a new module:
- Go to Settings → Apps (or the Apps menu from the main screen)
- Search for the module by name or browse by category
- Click Install on the desired module card
- Cyllo installs the module and any required dependencies automatically
- The module's menu items appear in the navigation bar immediately after installation
Using App Mass Install (new databases):
- On first login after creating a new database, Cyllo displays the App Mass Install screen
- Select all modules needed for your deployment by checking the appropriate boxes
- Click Install Selected — all chosen apps install in a single operation
- This significantly reduces the time required to set up a new Cyllo instance
How to uninstall a module:
- Go to Settings → Apps
- Search for the installed module
- Click Uninstall — Cyllo removes the module and its data (this action is irreversible for module-specific records)
Note
Uninstalling a module permanently removes all data associated with that module from the database. Always create a full database backup before uninstalling any module. Modules with interdependencies will prompt for confirmation before removal.