

Cyllo Lead to cash Documentation
Introduction
The Lead-to-Cash flow is the end-to-end business process that begins the moment a potential customer first makes contact and ends when their payment has been received, posted, and reconciled in the company's accounts. In Cyllo ERP, this entire process runs through a single connected system — CRM, Sales, Inventory, and Accounting share one database, so data created at any stage flows automatically to the next without re-entry, duplication, or manual handoffs between departments.
This document walks through every stage of the flow in sequence — lead capture, quotation, sales order, delivery, invoice, payment, and bank reconciliation. Each stage is explained with the exact steps a user takes in Cyllo, the system events that happen automatically, and a consistent working example that runs through the entire document so the reader can see how the same transaction looks at each stage of its lifecycle.
Where the eCommerce channel handles a stage differently from the standard back-office flow, the difference is shown inline in an eCommerce Variant callout — so teams that manage both channels can follow the same document for reference.
Working Example Used Throughout This Document
To make each stage concrete and easy to follow, this document uses a single example transaction that progresses through the entire Lead-to-Cash flow:
Working Example
Customer: Acme Corp — a returning B2B customer based in Dubai. Products: 10 units of Office Chair Pro at AED 850 each. Total: AED 8,500 (excluding VAT). Salesperson: Nathan Bennet, Sales Executive. Payment Terms: 30 days.
Acme Corp enquired by email about purchasing office chairs for their new branch. The salesperson creates a CRM lead, qualifies it, sends a quotation, confirms the order, arranges delivery, raises an invoice, and collects payment — all within Cyllo.
Every stage below shows exactly what happens to this transaction as it moves through the system.
Flow Overview
The diagram below summarises the full Lead-to-Cash flow and which Cyllo module handles each stage:
| Stage | Module & Outcome |
|---|---|
| 1. Lead Capture & Qualification | CRM — Lead created, qualified, and converted to an Opportunity linked to the customer. |
| 2. Quotation | Sales — Quotation drafted with products and pricing, sent to the customer for acceptance. |
| 3. Sales Order | Sales — Customer confirms. Quotation becomes a Sales Order. Delivery order auto-created. |
| 4. Delivery | Inventory — Goods picked, packed, and dispatched. Stock reduced. Delivery validated. |
| 5. Invoice | Accounting — Invoice generated from the Sales Order. Posted and sent to the customer. |
| 6. Payment | Accounting — Customer payment received and registered against the invoice. |
| 7. Bank Reconciliation | Accounting — Bank statement imported. Payment matched. Invoice marked Paid. |
Stage 1: Lead Capture & Qualification (CRM)
The process begins in the CRM module when a potential customer makes contact. A lead is created to record the enquiry, qualified to confirm it is a genuine sales opportunity, and then converted into an Opportunity that the salesperson actively pursues.
1.1. Creating a Lead
A lead records the initial contact from a potential customer. It can be created manually by the salesperson, auto-generated from a website contact form, or captured from an incoming email to the company's sales inbox.
- Go to CRM → Sales → My Pipeline (or All Leads).
- Click New to create a new lead.
- Enter the Contact Name — the person who made the enquiry.
- Enter the Company Name — the customer's business.
- Set the Email and Phone so the salesperson can follow up directly.
- Enter the Lead Title — a short description of what the customer is enquiring about (e.g. Office Chair Purchase — Dubai Branch).
- Assign the Salesperson — the team member responsible for following up.
- Assign the Sales Team.
- In the Notes or Internal Notes tab, record details from the initial conversation.
- Click Save.
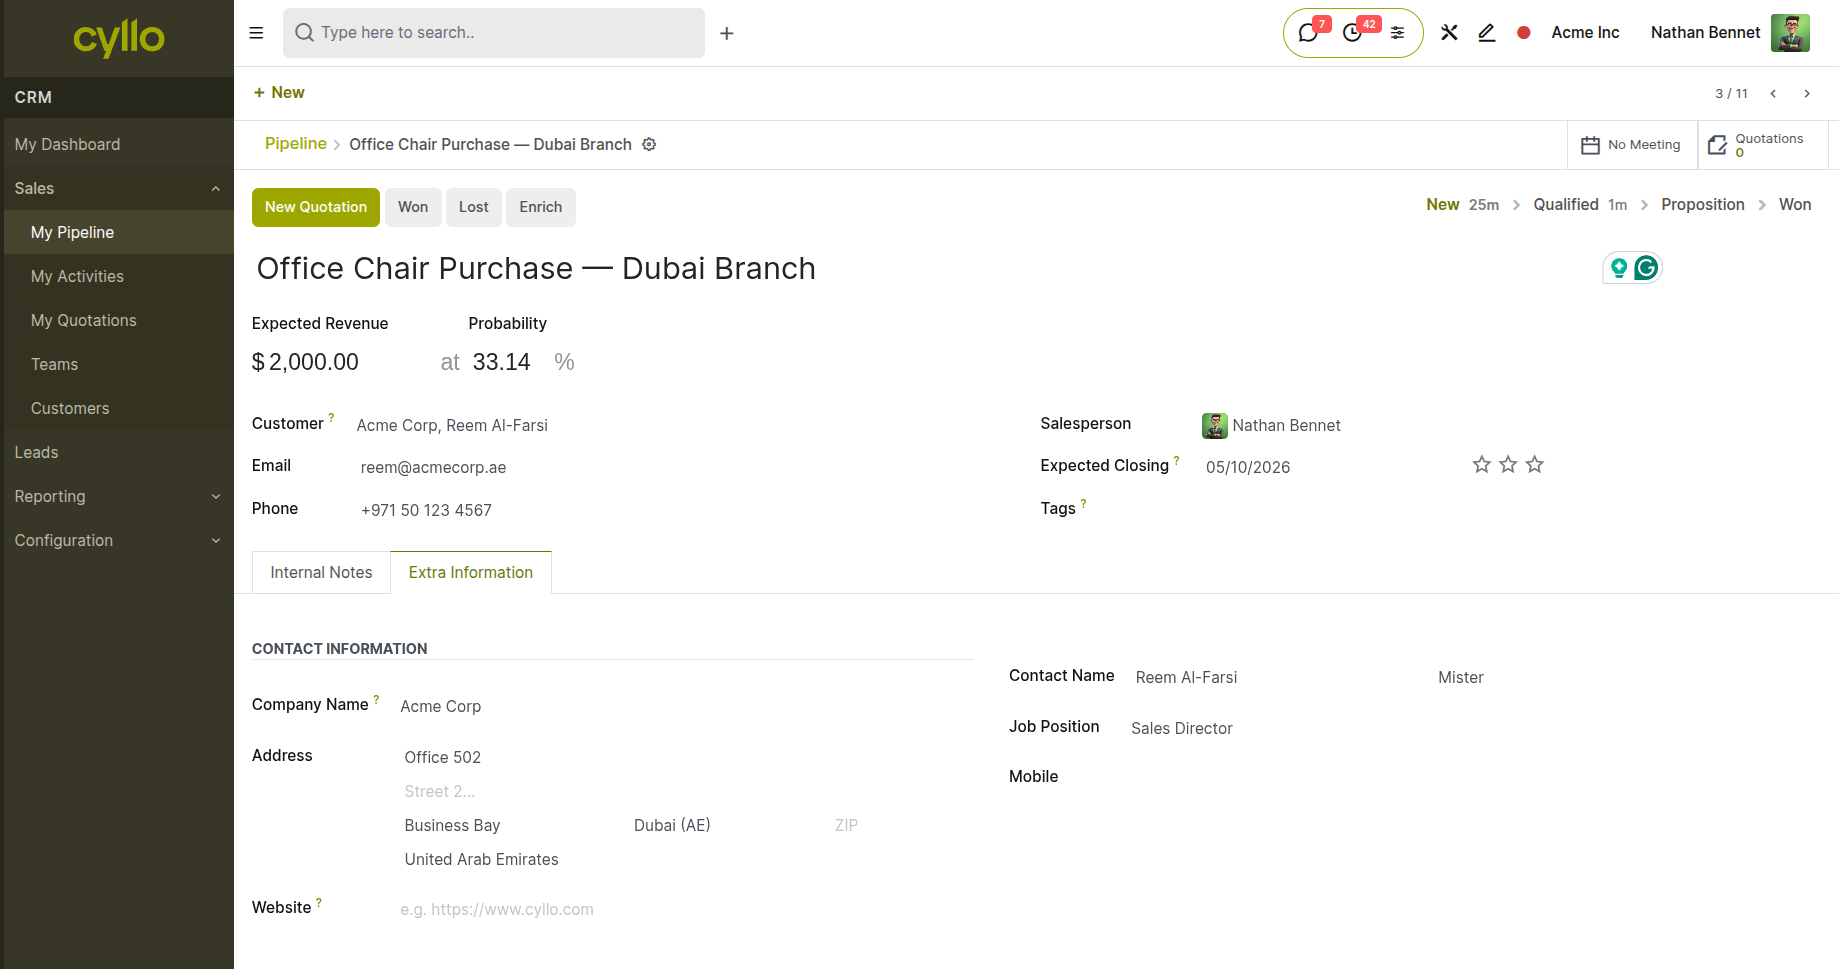
Fig 1.1 — CRM new lead form — Contact Name, Company, Email, Phone, Lead Title, Salesperson, and Sales Team fields filled in
Working Example
Lead Title: Office Chair Purchase — Dubai Branch Customer: Reem Al-Farsi (Acme Corp) Email: reem@acmecorp.ae | Phone: +971 50 123 4567 Salesperson: Nathan Bennet Expected Revenue: $ 1000.0/-
eCommerce Variant
In the eCommerce flow, no manual lead is created at this stage. The customer browses the website independently. The Lead-to-Cash flow begins at Stage 2 when they add items to their cart and proceed to checkout.
1.2. Qualifying the Lead
Qualifying a lead means confirming that the enquiry has genuine potential — the contact has a real need, a budget, and the authority to purchase. In Cyllo, this is reflected by moving the lead through the CRM pipeline stages and logging activities.
- Open the lead. In the pipeline Kanban view, drag it to the Qualified stage — or open the lead form and change the Stage field to Qualified.
- Log a follow-up activity by clicking the Activity button — schedule a call or email to gather more details (product specification, quantity needed, delivery timeline, budget).
- Record the outcome of the follow-up in the lead's chatter by posting an internal note.
- Update the Expected Revenue field with the estimated deal value once confirmed.
- Update the Probability percentage — Cyllo can calculate this automatically from historical win rates, or it can be set manually.
- Update the Expected Closing Date — the date by which the deal is expected to close.
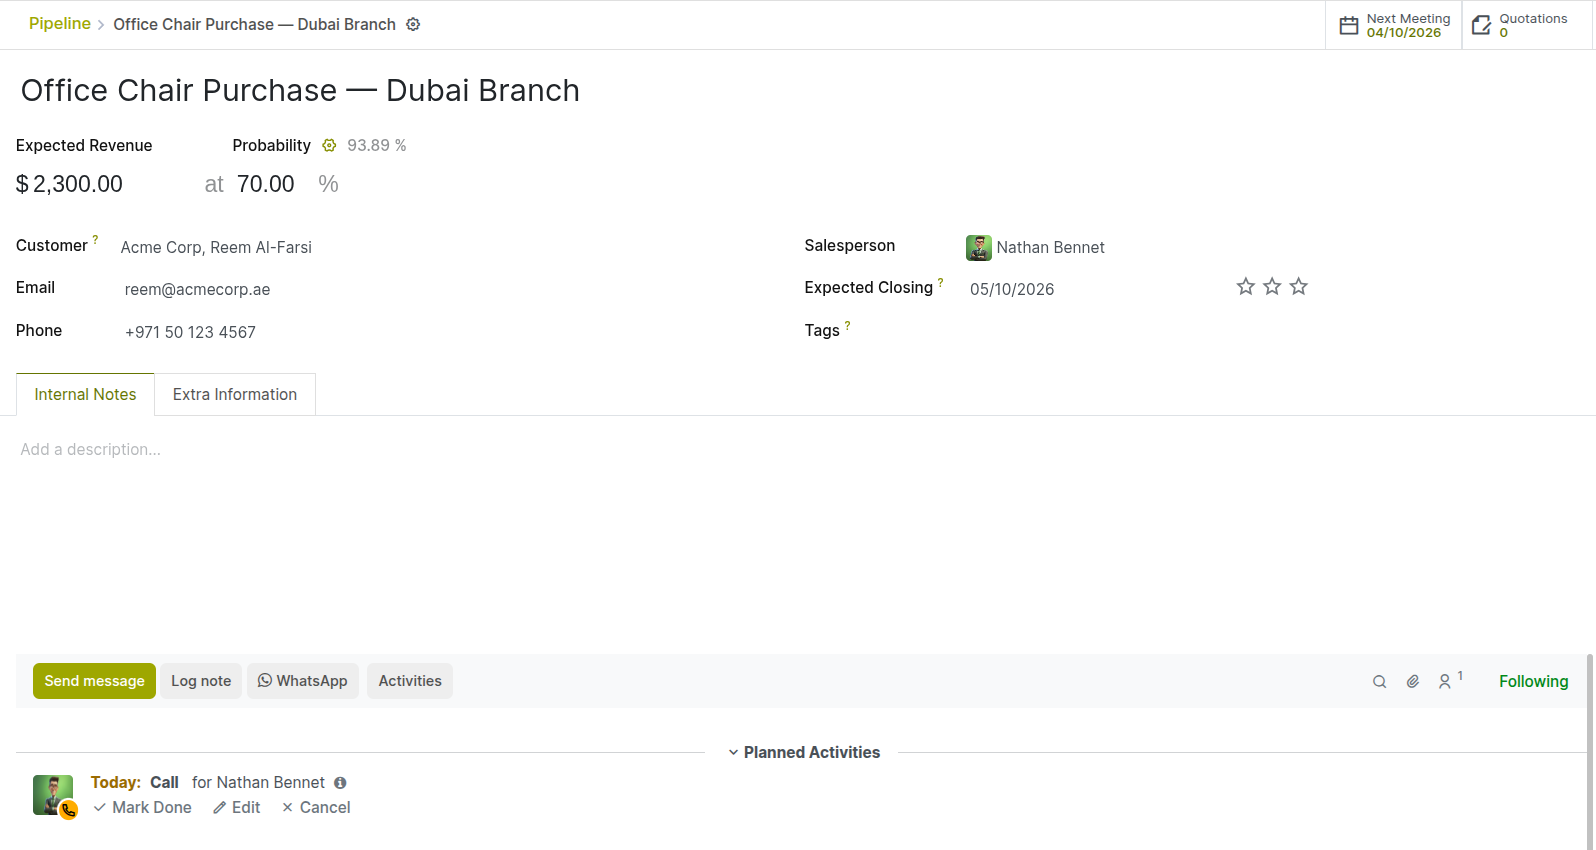
Fig 1.2 — CRM lead form — Stage set to Qualified, Expected Revenue field showing USD 2300.00, Probability 70%, and logged call activity in the chatter
Working Example
Call outcome logged: Acme Corp needs 10 office chairs for a new branch opening on 20 May. Budget approved internally. The decision maker confirmed (Reem Al-Farsi). Expected Revenue: USD 2300.00 | Probability: 70% | Closing Date: 10 May 2026
1.3. Converting to an Opportunity
Once a lead is qualified, it is marked as Won (if the customer is ready to order immediately and a quotation will be raised at once) or it continues in the pipeline as an Opportunity until a formal quotation is requested. In either case, the next action is to create a quotation — which can be done directly from the lead or opportunity record.
- On the qualified lead, click the New Quotation button at the top of the lead form.
- Cyllo opens a new draft quotation pre-filled with the customer's name, email, and contact details from the lead.
- The lead in CRM remains open and is linked to the quotation. When the quotation converts to a sales order, the lead is automatically marked as Won.
Note
Clicking New Quotation from the lead does not close or mark the lead as Won immediately. The lead stays open and its status updates automatically when the resulting sales order is confirmed and marked Won. This preserves the pipeline view for accurate forecasting during the negotiation period.
Stage 2: Quotation
A quotation is the formal document presented to the customer that lists the products, quantities, prices, and payment terms being offered. The customer reviews it and either accepts, negotiates, or declines. In Cyllo, a quotation is a Sales Order in Draft state.
2.1. Creating a Quotation from an Opportunity
The quotation form is pre-filled from the CRM lead data when created via the New Quotation button. If created standalone (without a CRM lead), the salesperson fills in the customer details manually.
- The quotation form opens with the Customer field pre-filled from the CRM lead. Verify the name, billing address, and contact details are correct.
- Set the Quotation Date — the date the quotation is being issued.
- Set the Expiration Date — the date after which the quoted prices are no longer guaranteed (commonly 15 or 30 days from the quotation date).
- Set the Payment Terms — for Acme Corp, 30 days.
- Set the Pricelist if the customer is on a special pricing tier (e.g. a wholesale or VIP pricelist). Leave as the default public pricelist if no special pricing applies.
- Assign the Salesperson and Sales Team if not already pre-filled.
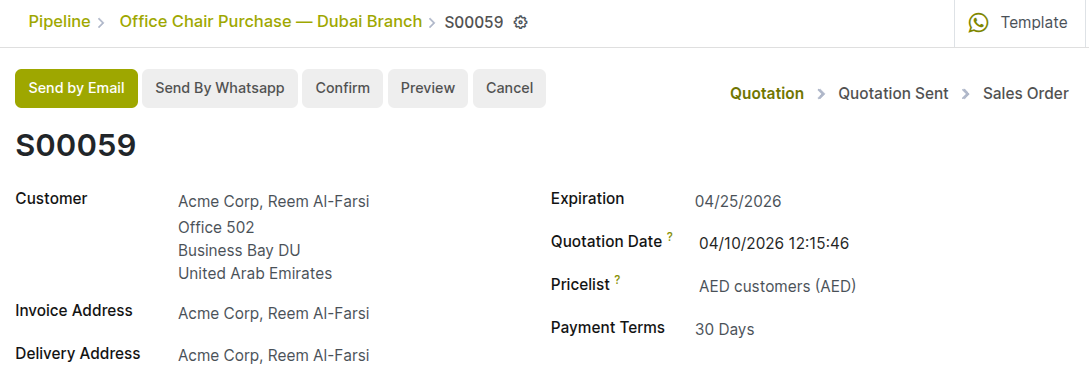
Fig 2.1 — Quotation form — Customer set to Acme Corp, Quotation Date, Expiration Date, Pricelist and Payment Terms (30 Days) fields filled
Working Example
Quotation Date: 10 April 2026 Expiration Date: 25 April 2026 (15 days) Payment Terms: Net 30 Days Pricelist: AED customers (AED) Salesperson: Riya Sharma | Sales Team: Direct Sales
2.2. Adding Products & Pricing
Products are added to the quotation as line items. Each line specifies what is being sold, at what price, and in what quantity. The system calculates line totals, applies taxes, and shows the overall quotation total automatically.
- Under the Order Lines tab, click Add a Product.
- In the product search field, type the product name and select it from the results. Cyllo fills in the Description, Unit Price, and Tax automatically from the product configuration.
- Enter the Quantity — the number of units the customer wants.
- If needed, adjust the Unit Price — the price may be different from the list price if a special rate was agreed during negotiation. The salesperson can edit this directly on the line.
- Verify the Tax field. Cyllo applies the tax from the product configuration but it can be adjusted per line if needed.
- Add additional product lines if the customer is ordering more than one product type.
- Review the Untaxed Amount, Taxes, and Total at the bottom of the order lines section.
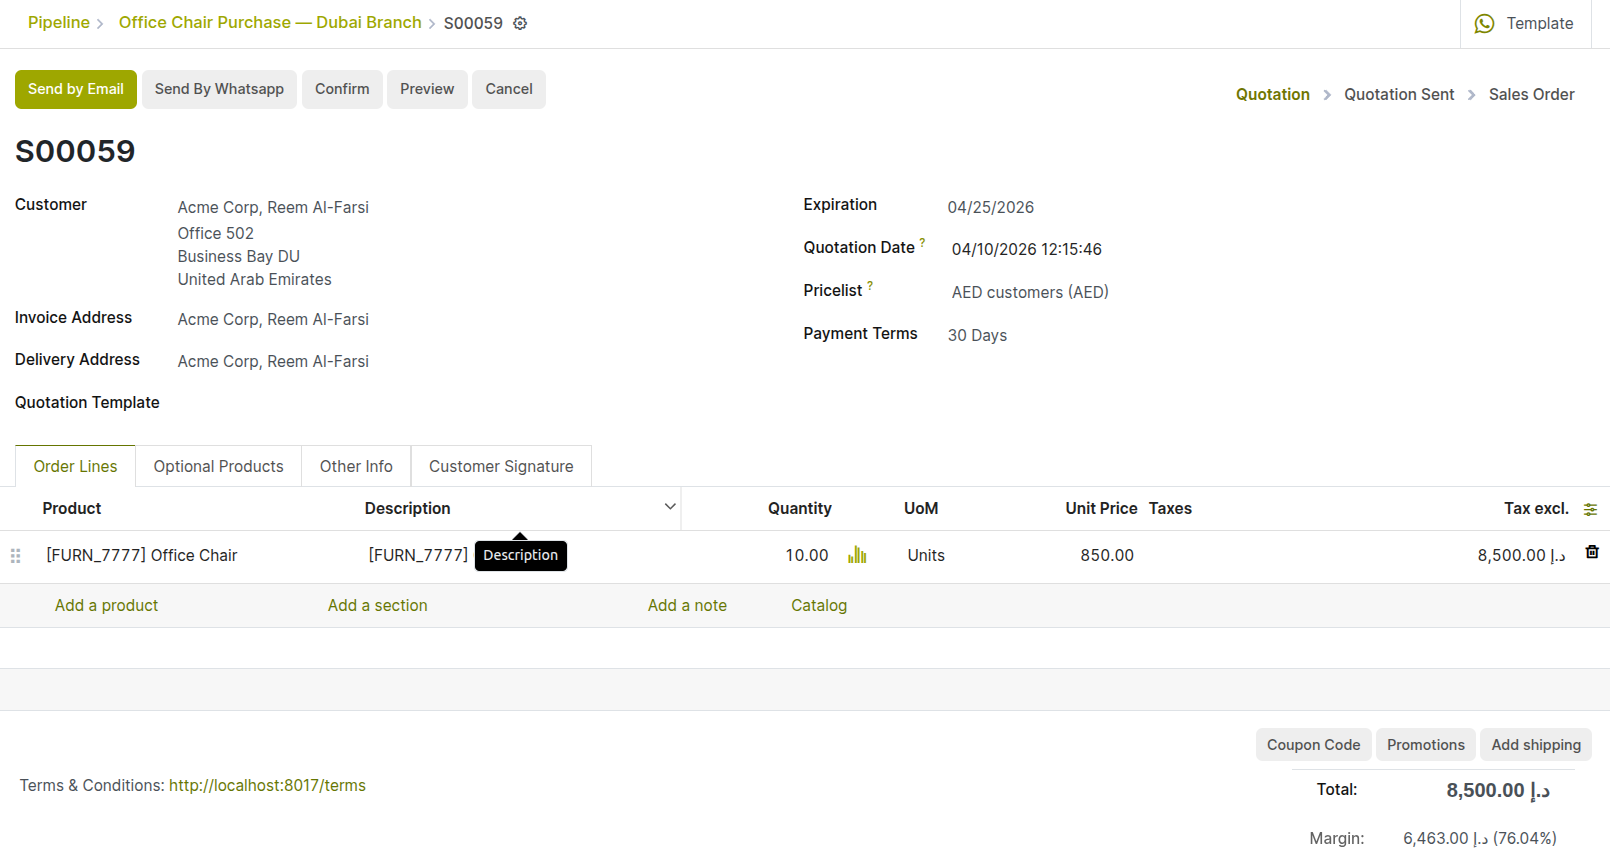
Fig 2.2 — Quotation order lines — product 'Office Chair’ added with Quantity 10, Unit Price AED 850, total row showing AED 8,500
Working Example
Product: Office Chair Pro Quantity: 10 | Unit Price: AED 850 Line Total: AED 8,500
TIP
If the customer wants a discount on the list price, enable the Discounts feature in Sales → Configuration → Settings. Once enabled, a Discount % column appears on each order line — enter the percentage and the unit price adjusts automatically.
2.3. Sending the Quotation to the Customer
Once the quotation is complete, it is sent to the customer for review. Cyllo generates a professional PDF quotation and sends it by email directly from the quotation form. The customer receives an email with the PDF attached and a link to view it in the Customer Portal.
- Review the quotation one final time — check the products, quantities, prices, expiry date, and payment terms.
- Click Send by Email.
- Cyllo opens an email composer pre-filled with the customer's email address and a standard quotation email template. The quotation PDF is attached automatically.
- Edit the email subject or body if needed for a personalised message.
- Click Send. The email is dispatched and the quotation status changes from Draft to Sent.
- The activity log in the chatter shows the email was sent, when, and to which address — providing a permanent record of the communication.
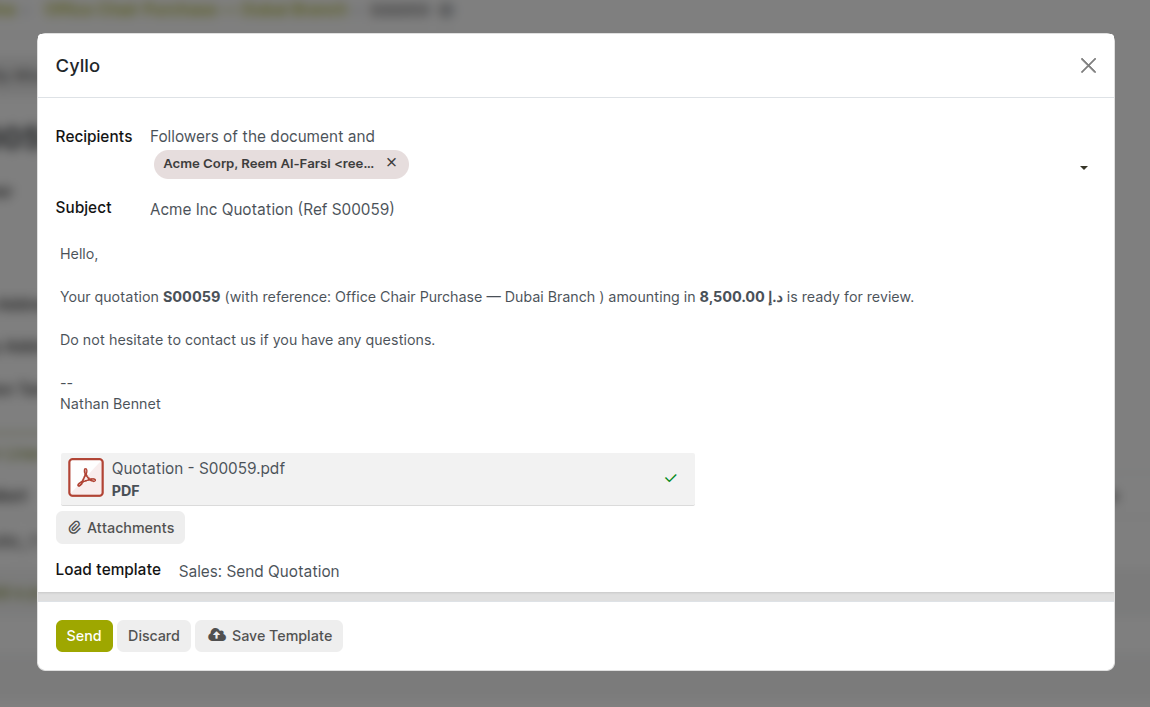
Fig 2.3 — Send by Email dialog — pre-filled customer email, quotation PDF attached, email body with quotation summary; Send button
Working Example
Email sent to: reem@acmecorp.ae Subject: Acme Inc Quotation (Ref S00059) Attachment: S00059_Quotation.pdf Quotation status changes from Draft → Sent
eCommerce Variant
In the eCommerce flow, there is no quotation document. The customer sees product prices, adds items to their cart, and proceeds directly to checkout. The 'quotation' is effectively the cart — the customer self-serves and confirms their own order. The flow jumps directly to Stage 3 when they click Place Order at the end of checkout.
2.4. Customer Reviews & Accepts the Quotation
The customer receives the quotation PDF by email and can also view it in the Cyllo Customer Portal — a secure self-service page where they see all their quotations and orders. When they are ready to proceed, the customer notifies the salesperson or accepts directly through the portal.
- Via email reply: The customer replies to confirm acceptance. The salesperson sees the reply in Cyllo's chatter (if the sales email inbox is configured) and proceeds to confirm the order manually.
- Via Customer Portal: The customer clicks the link in the quotation email, opens the portal view of the quotation, reviews the details, and clicks Accept & Sign or Confirm Order. The quotation is confirmed from the customer's side automatically.
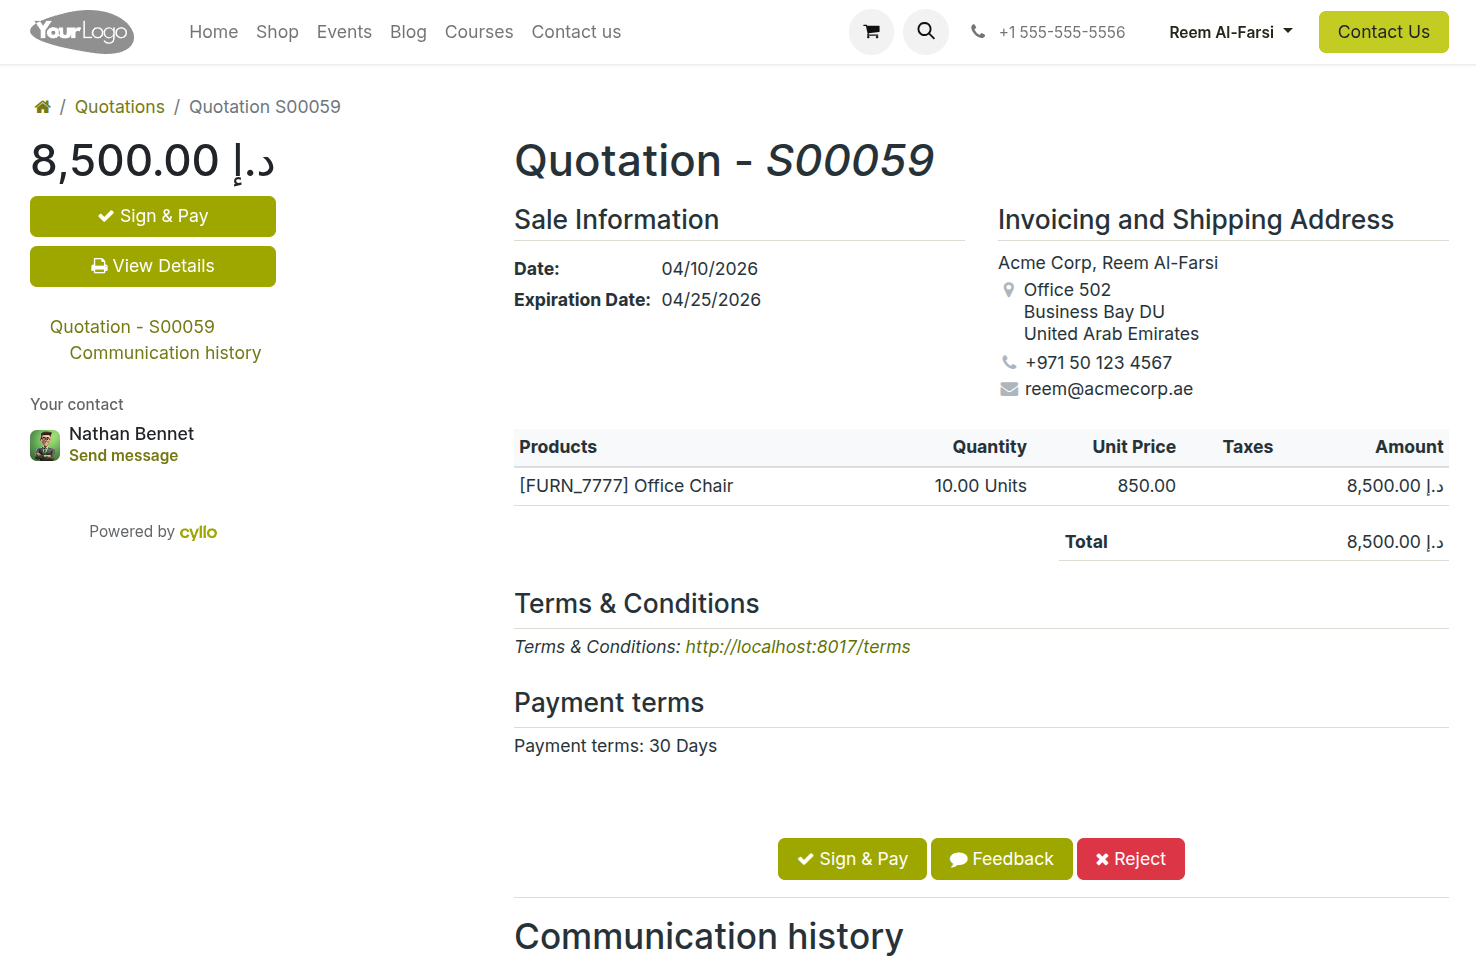
Fig 2.4 — Customer Portal quotation view — quotation details displayed cleanly with Accept Order button and optional electronic signature field
Working Example
Acme Corp's Reem Al-Farsi clicks the portal link and reviews the quotation. She confirms it looks correct and clicks Accept Order in the portal. Cyllo records her acceptance in the chatter with a timestamp. The salesperson (Riya Sharma) receives a notification that the quotation was accepted.
Note
To activate a portal for customers, go to contact form → gear icon at top → click grant portal access → click Grant access button. An email will be sent to customer with portal invitation.
Stage 3: Sales Order Confirmation
When the customer confirms the quotation, the salesperson confirms it in Cyllo. This single action converts the quotation into a confirmed Sales Order and triggers several automatic events across the system.
3.1. Confirming the Sales Order
Confirming a quotation is a one-click action. It signals that the deal is agreed and that the business should now proceed with fulfilling the order — picking goods, arranging delivery, and preparing to invoice.
- Open the accepted quotation in Sales → Orders → Quotations.
- Review the order one final time — verify the products, quantities, delivery address, and payment terms are all correct. This is the last point at which the order can be freely edited.
- Click Confirm. Cyllo converts the quotation into a Sales Order and changes the status from Quotation to Sales Order.
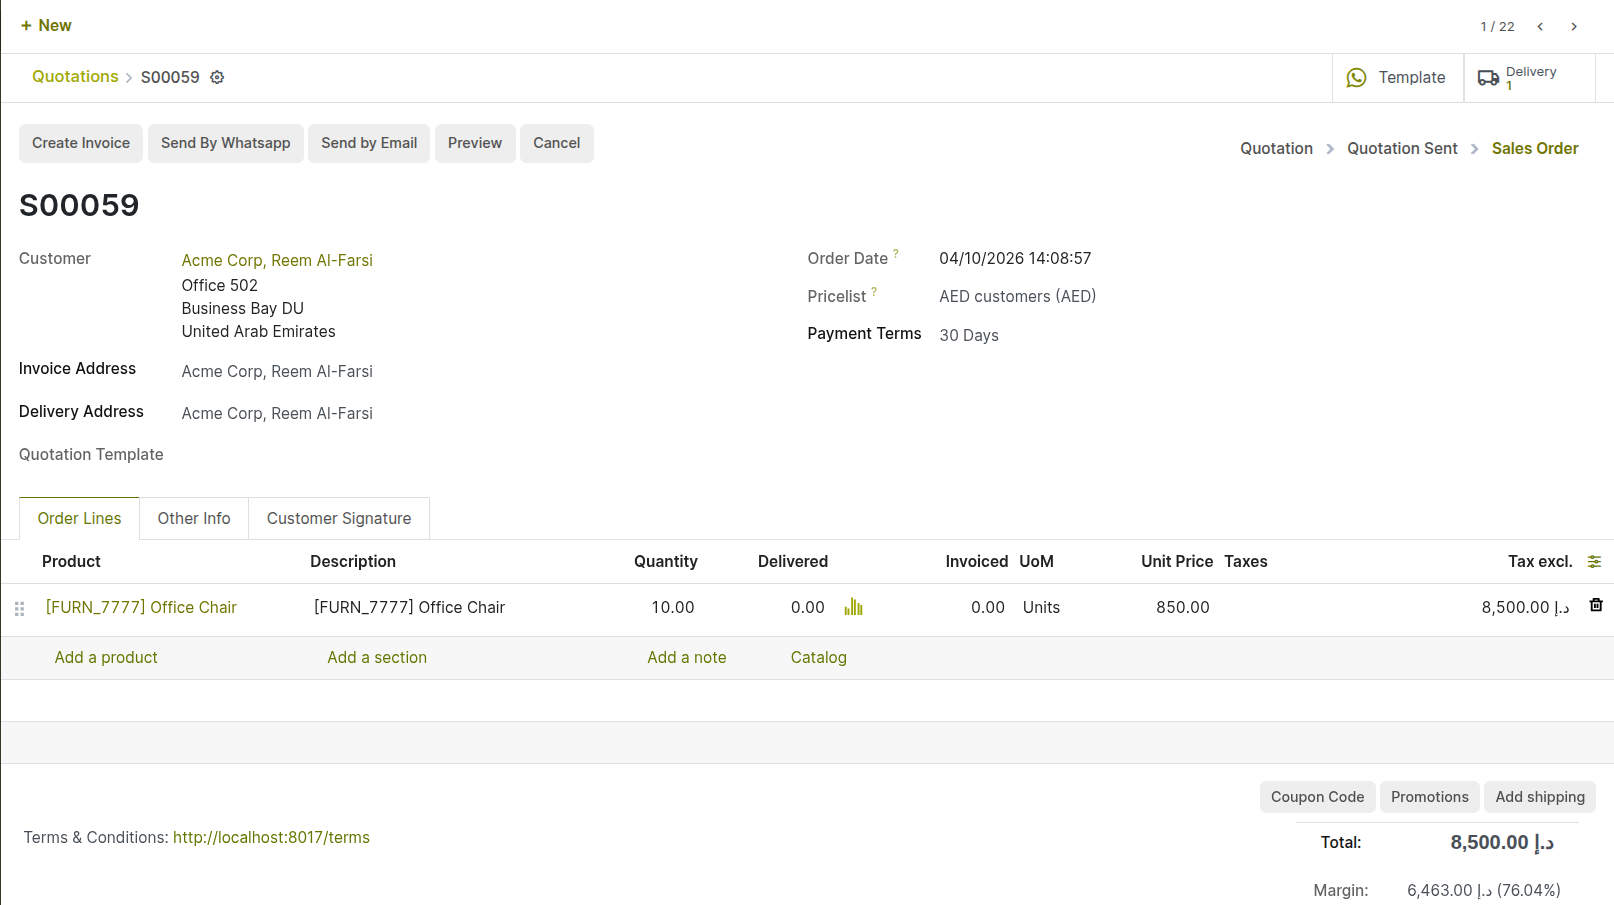
Fig 3.1 — Sales Order S00059 confirmed — status bar showing Sales Order state; order number assigned; Delivery and Invoice smart buttons visible at the top
Working Example
Quotation S00059 → confirmed → becomes Sales Order S00059 Status: Sales Order (confirmed) Customer receives a confirmation notification
eCommerce Variant
In the eCommerce flow, the customer clicks Place Order at checkout — this is equivalent to the Confirm action. Cyllo automatically creates a confirmed Sales Order in the back-end the moment the customer completes payment online. No manual confirmation by the salesperson is needed.
Note
The Delivery smart button at the top of the confirmed sales order shows how many delivery orders have been created. Click it to open the delivery order directly without navigating to the Inventory module.
Stage 4: Delivery & Fulfillment
The delivery stage is handled in Cyllo's Inventory module. The warehouse team receives the delivery order, picks the goods from stock, and validates the delivery when the goods leave the warehouse. This validation updates stock levels and — depending on the invoicing policy — triggers invoice creation.
4.1. Delivery Order Created Automatically
When the sales order is confirmed, a Delivery Order is created automatically in the Inventory module. The delivery order lists the products, quantities, and the customer's delivery address. Stock is reserved against the delivery immediately — preventing the same units from being allocated to another order.
- From the confirmed sales order, click the Delivery smart button to open the delivery order — or go to Inventory → Operations → Deliveries.
- The delivery order shows the product lines, the Demand quantity (what was ordered), the Quantity (what has been picked — starts at 0), and the delivery address.
- The delivery status is Ready if sufficient stock is available and reserved. If stock is insufficient, it shows Waiting — the delivery cannot be validated until stock is replenished or the quantities are adjusted.
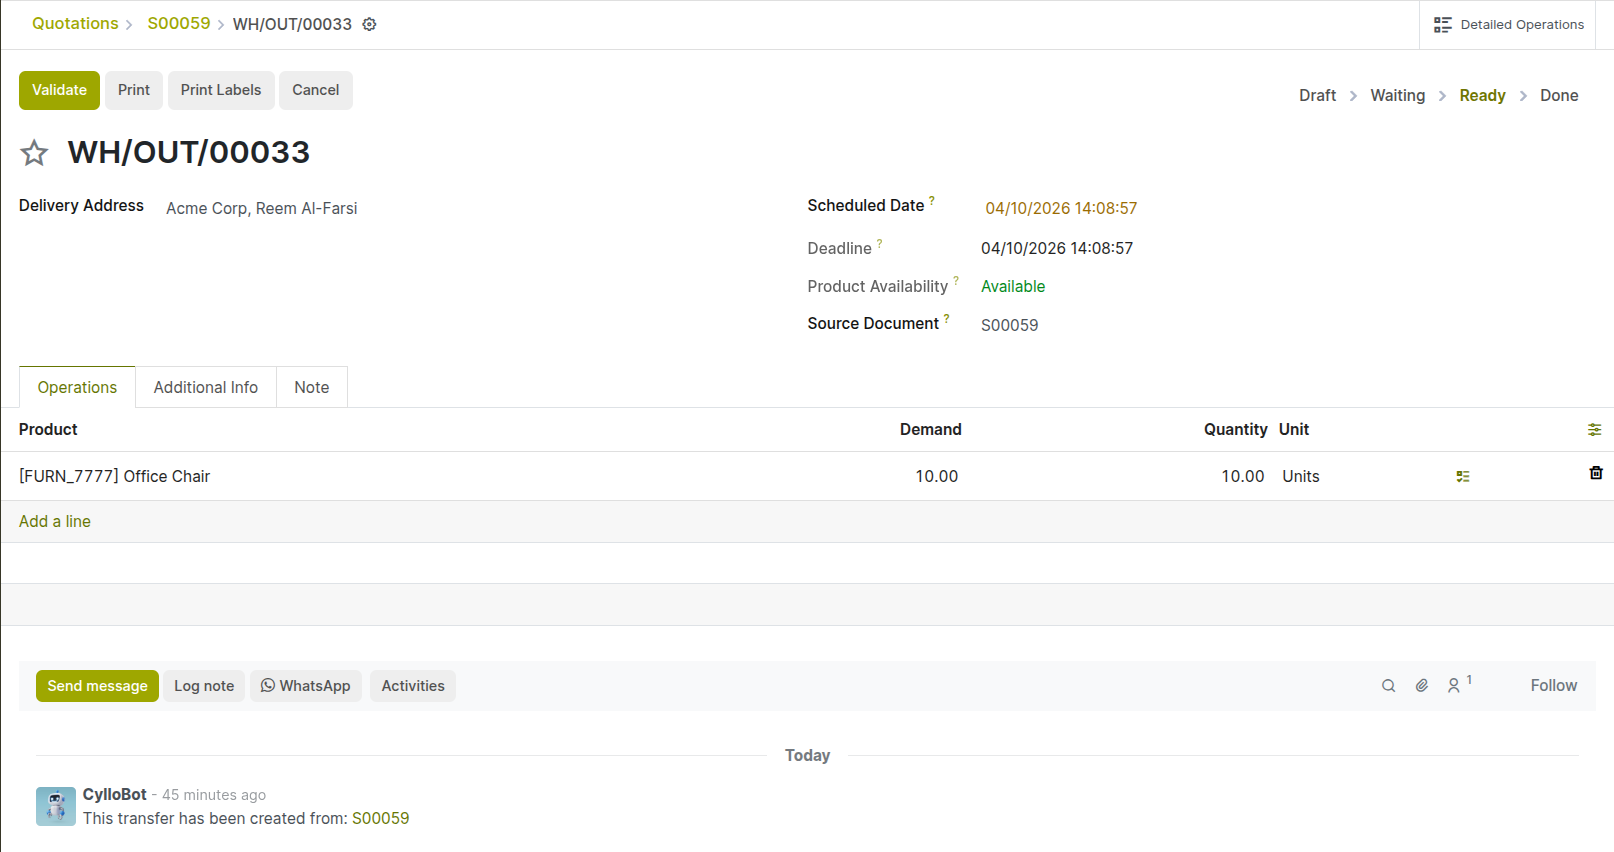
Fig 4.1 — Delivery order — product 'Office Chair Pro', Demand: 10, Quantity: 10; Delivery Address: Acme Corp, Reem Al-Farsii; Status: Ready
Working Example
Delivery Order WH/OUT/00033 created automatically from Sales Order S00059 Product: Office Chair Pro | Demand: 10 units | Reserved from: WH/Stock Delivery Address: Acme Corp, Dubai Investment Park, Dubai, UAE Status: Ready (10 units available in stock)
4.2. Validating the Delivery
Validating the delivery is the formal confirmation that the goods have left the warehouse. This is a critical step — it updates stock levels, creates the stock movement record, and unlocks invoice creation from the sales order.
- Fill the Done quantities based on availability and pickings, click Validate at the top of the delivery order.
- If the Done quantity is less than the Demand, Cyllo asks: Create a Backorder? Click Create Backorder to generate a new delivery order for the remaining items, or No Backorder to close the delivery with a partial shipment.
- The delivery status changes to Done. The stock count for Office Chair Pro decreases by 10 in the Inventory module.
- The delivery order is archived as a permanent record of what was shipped, when, and to whom.
- Back on the sales order, the Delivery smart button now shows Done — and the Invoice smart button is now active, showing that invoicing can proceed.
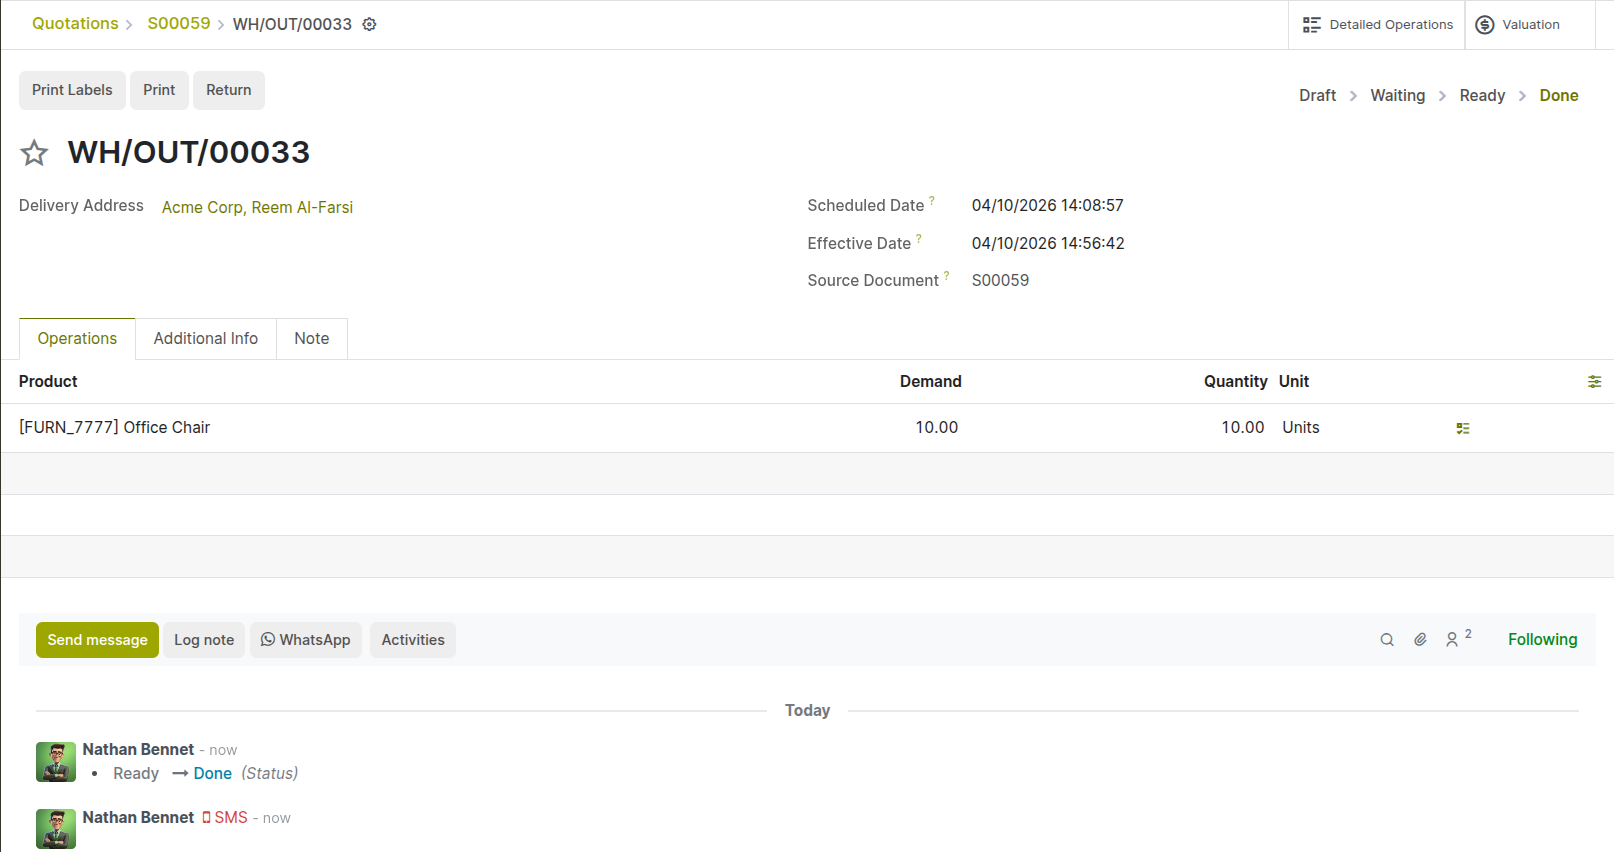
Fig 4.2 — Validated delivery order — status Done; detailed operations smart button visible
Working Example
Mark clicks Validate. All 10 chairs were confirmed as dispatched. Stock: Office Chair Pro | Previous: 47 units → After: 37 units Delivery WH/OUT/00033 status: Done Sales Order S00059 — Invoice button now active and ready to bill
eCommerce Variant
In the eCommerce flow, the delivery process is identical — a delivery order is auto-created when the order is placed, and the warehouse team validates it in the same way. The difference is that for digital products (downloads), no delivery order is created — the invoice is generated immediately on order confirmation and the product is delivered electronically.
Stage 5: Invoicing
With the delivery validated, the business can now invoice the customer for the goods shipped. In Cyllo, the invoice is created directly from the sales order — all products, quantities, prices, and tax details are pre-filled automatically from the confirmed order. There is no re-entry of data.
5.1. Creating the Invoice from the Sales Order
The invoice is created from the sales order in the Sales module. Cyllo generates a draft invoice pre-filled with all the order details — the accountant only needs to review and confirm it.
- Open the confirmed Sales Order S00059 in Sales → Orders → Orders.
- Click the Create Invoice button (top-right area of the sales order).
- A dialog appears asking what to invoice: a. Regular Invoice (default): Creates an invoice for all delivered quantities. This is the standard option — it invoices exactly what was shipped. b. Down Payment (percentage): Creates an invoice for a percentage deposit of the order total. c. Down Payment (fixed amount): Creates an invoice for a fixed advance amount.
- A draft customer invoice is created in the Accounting module, pre-filled with: the customer's name, billing address, payment terms, the product lines and quantities that were delivered, the unit prices from the sales order, and the applicable taxes.
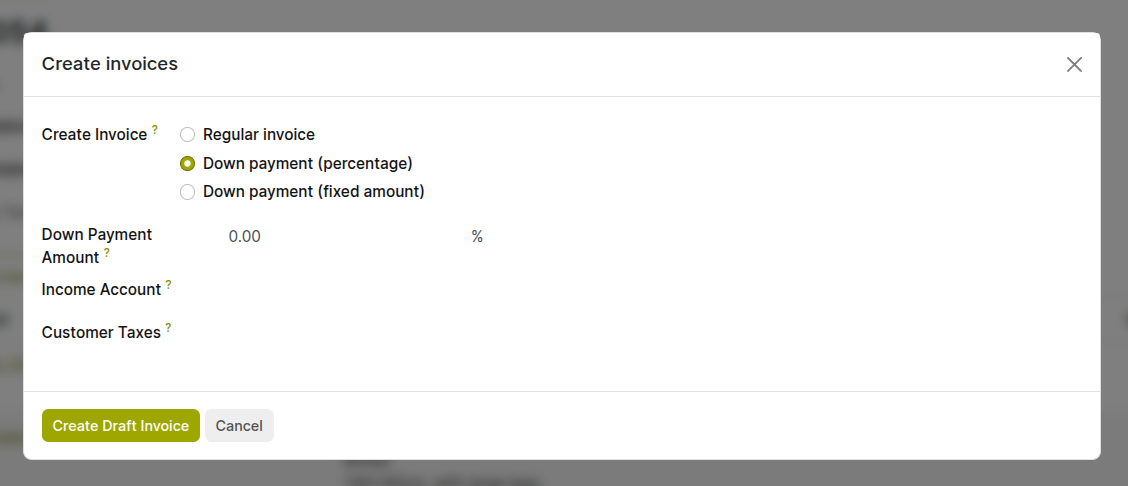
Fig 5.1 — Create Invoice dialog — Down Payment (percentage) selected
5.2. Reviewing & Confirming the Invoice
The draft invoice must be reviewed before it is posted to the accounting ledger. Once posted (confirmed), the invoice creates journal entries in the accounting system and an invoice number is assigned. It becomes a legally binding receivable document.
- Review the draft invoice carefully: a. Customer billing address — verify it matches the address on file for Acme Corp. b. Journal — Verify it is correct. c. Product lines — confirm the quantities match what was delivered, not what was ordered (in case of a partial delivery). d. Total amounts — verify the tax calculation is correct.
- Once satisfied, click Confirm.
- An invoice number is assigned (e.g. INV/2026/00008).
- A journal entry is posted to the Sales journal: Debit Accounts Receivable (Acme Corp) USD 2,295.00 | Credit Product Sales USD 2,295.00 (amount is converted to company currency automatically based on conversion rate in currency model).
- The invoice status changes from Draft to Posted (open and awaiting payment).
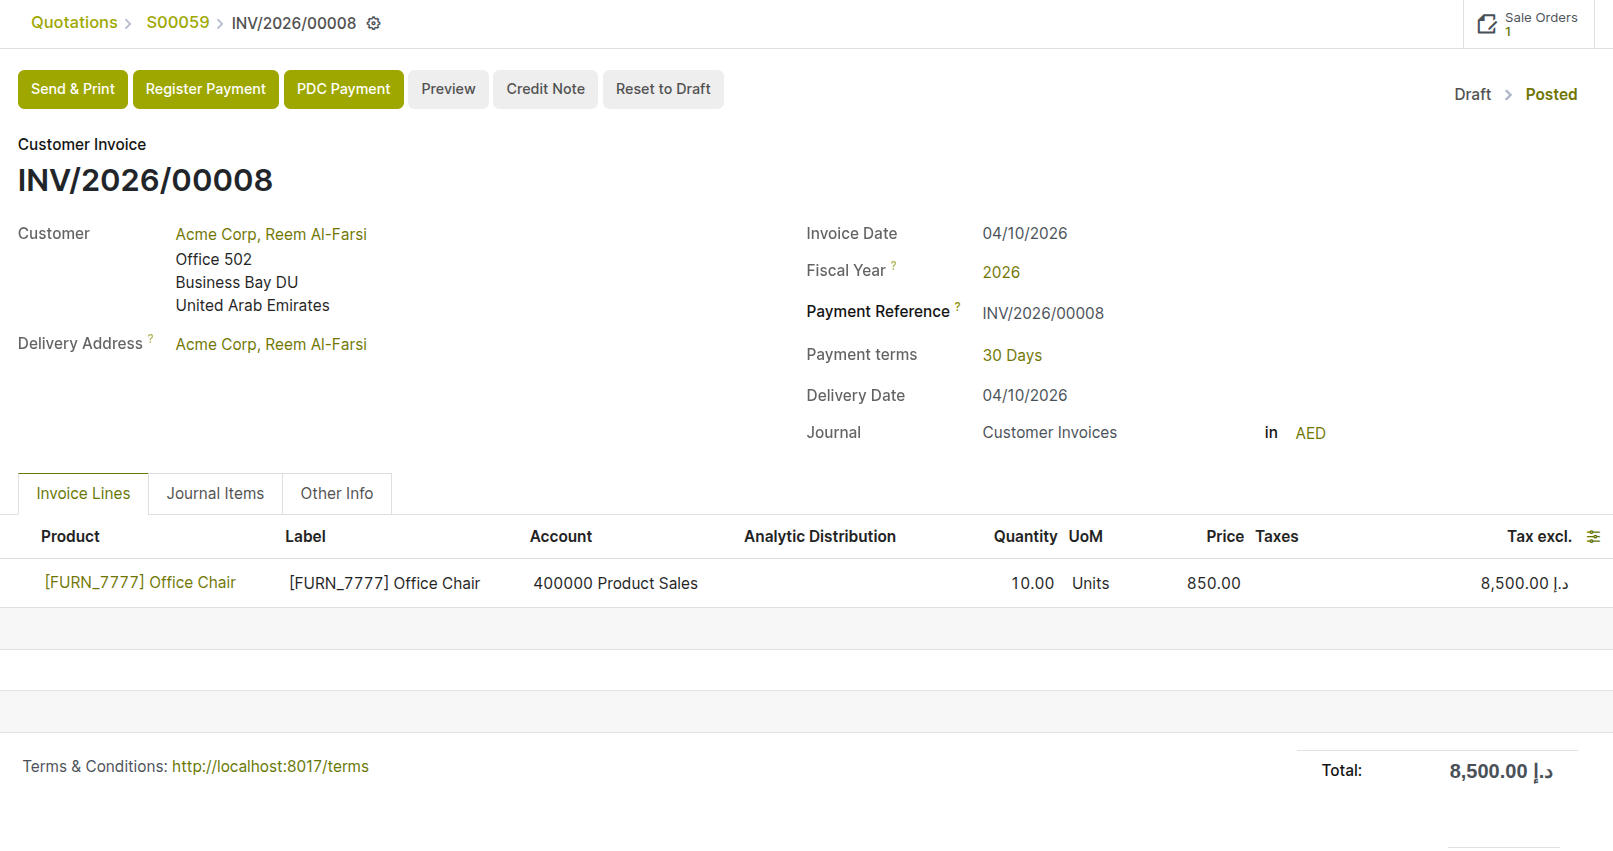
Fig 5.2 — Confirmed invoice INV/2026/00008 — status Posted; journal entry summary visible; Send & Print and Register Payment buttons active
Working Example
Invoice INV/2026/00008 confirmed and posted Journal Entry: Dr Accounts Receivable USD 2,295 Cr Product Sales USD 2,295 Invoice status: Posted (Open)
5.3. Sending the Invoice to the Customer
With the invoice posted, it is sent to the customer. Cyllo generates a professional PDF invoice and emails it directly from the invoice form. The customer also receives access to view and download it from the Customer Portal.
- On the confirmed invoice, click Send & Print.
- Cyllo opens an email composer with the customer's billing email pre-filled and the PDF invoice attached.
- Review and personalise the email body if needed.
- Click Send. The invoice email is dispatched and the send event is recorded in the invoice chatter.
- The customer receives the email with the PDF attached and a portal link to view the invoice online, download it, or pay it directly if an online payment method is configured.
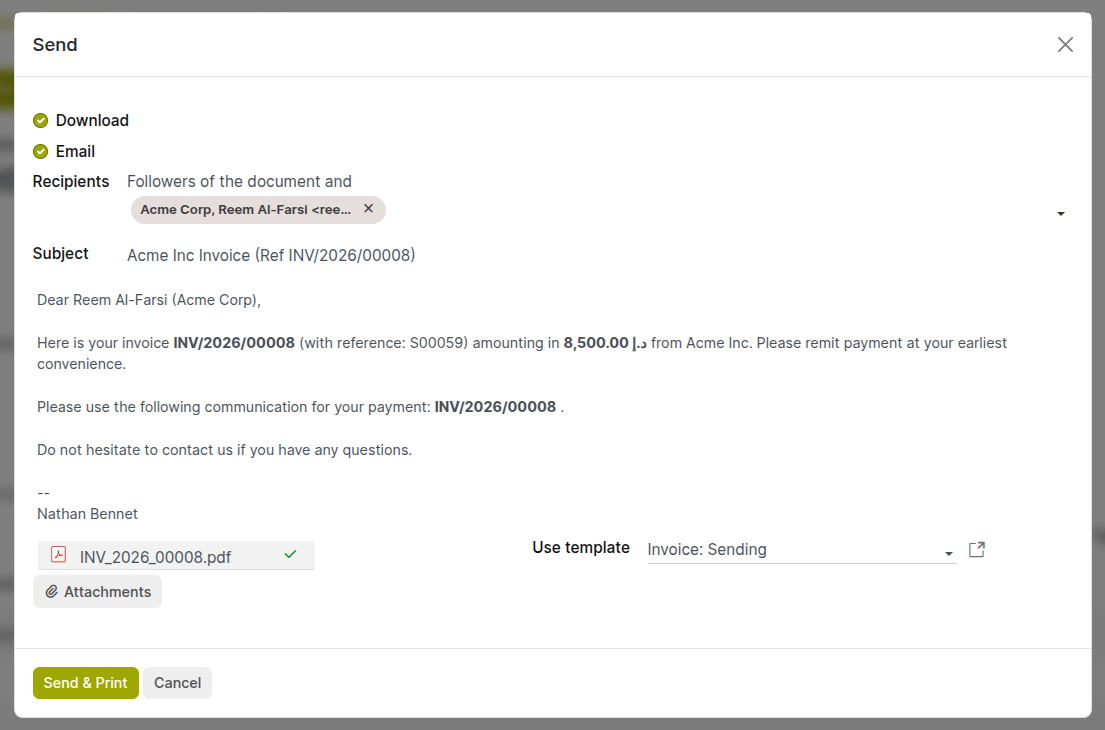
Fig 5.3 — Invoice email composer — Acme Corp email address, invoice PDF attached; email body showing invoice number, amount due
Working Example
Email sent to: reem@acmecorp.ae Subject: Invoice INV/2026/00008 — AED 8,500 Attachment: INV_2026_00008.pdf Customer can view, download, or pay via the portal link
eCommerce Variant
In the eCommerce flow, the invoice is generated automatically at the moment the order is confirmed and payment is processed. It is sent instantly by email to the customer with no action required from the finance team. The invoice is already in Paid status because the payment gateway confirmed payment during the checkout process.
Stage 6: Payment Collection
The customer pays the invoice by the due date. Payment is typically received as a bank transfer, cheque, or online payment. Once received, the payment is registered in Cyllo against the specific invoice — this links the incoming funds to the outstanding receivable.
6.1. Customer Makes Payment
Acme Corp's finance team processes the payment on or before the due date. They send a bank transfer for the full invoice amount — AED 8,500 — referencing the invoice number INV/2026/00008 in the payment description.
From Cyllo's perspective, the payment has not yet been recorded until the finance team registers it in the system. The invoice remains in Posted (open) status until a payment is registered and matched.
Working Example
22 April 2026: Acme Corp bank transfers AED 8,500 to Our Company's bank account. Transfer reference: INV/2026/00008 — Acme Corp The funds arrive in Our Company's bank account on 23 April 2026. Invoice INV/2026/00008 still shows as Open in Cyllo — not yet recorded.
eCommerce Variant
In the eCommerce flow, payment is collected automatically during checkout via the payment gateway (PayPal, Stripe, Razorpay, etc.). Cyllo registers the payment instantly when the gateway confirms the transaction. Stage 6 and Stage 7 are effectively combined — the invoice is Paid the moment the checkout completes. No manual payment registration is needed.
6.2. Registering the Payment in Cyllo
Once the funds are confirmed as received, the finance team registers the payment in Cyllo against the open invoice. This creates the accounting entry that clears the receivable and records the incoming cash.
- Open the invoice INV/2026/00008 from Accounting → Customers → Invoices.
- Click Register Payment.
- In the payment dialog, verify the Amount — it should match the full invoice total of AED 8,500. For a partial payment, adjust the amount to what was received.
- Set the Payment Date — the date the funds were received in the bank account (23 April 2026).
- Select the Journal — the bank journal for the account into which the funds were transferred.
- Enter a Memo — include the customer's payment reference for traceability (e.g. INV/2026/00008 — Acme Corp bank transfer).
- Click Pay.
- A payment record is created. The invoice status changes to In Payment. A journal entry is posted: Debit Bank Account AED 8,500 | Credit Accounts Receivable (Acme Corp) AED 8,500.
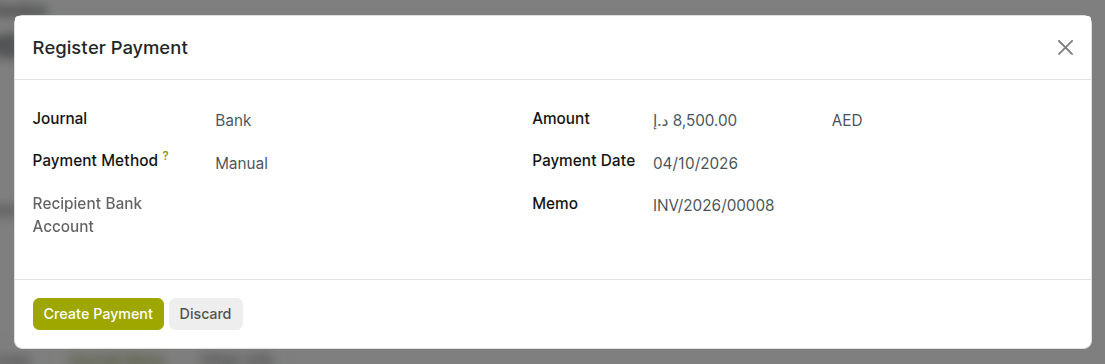
Fig 6.1 — Register Payment dialog — Amount AED 8,500, Payment Date 15 April 2026, Journal: Bank, Memo: INV/2026/00008; Create payment button
Working Example
Payment registered: AED 8,500 | Date: 15 April 2026 Journal: Bank Journal Entry: Dr Outstanding Receipts USD 2,295 | Cr Accounts Receivable (Acme Corp) USD 2,295 Invoice INV/2026/00008 status: In Payment (pending bank reconciliation)
Note
The invoice moves to In Payment — not fully Paid — because the payment entry exists in Cyllo but has not yet been matched to an actual bank statement line. It becomes Paid after bank reconciliation confirms that the funds physically appeared in the bank account. This distinction matters for accurate cash position reporting.
Stage 7: Bank Reconciliation & Closure
Bank reconciliation is the final step — it matches the payment registered in Cyllo against the actual transaction that appeared on the bank statement, confirming that the funds have physically arrived. This step moves the invoice from In Payment to the final Paid status and ensures the bank balance in the books matches the real bank account.
7.1. Importing the Bank Statement
The bank statement for the period (downloaded from the online banking portal) is imported into Cyllo. This creates the bank statement lines that Cyllo will match against registered payments.
- Download the bank statement from the bank for the period including 15 April 2026 in OFX or CSV format.
- In Cyllo, go to Accounting → Bank Statements, or open the Bank journal from the Accounting dashboard and click Import Statement.
- Click Import, upload the file, and select the correct format (OFX or CSV).
- Click Import. Cyllo creates bank statement lines — one for each transaction on the statement.
- The statement opens in the reconciliation view. One of the lines shows: 15 April 2026, USD 2,295, Reference: INV/2026/00008 Acme Corp.
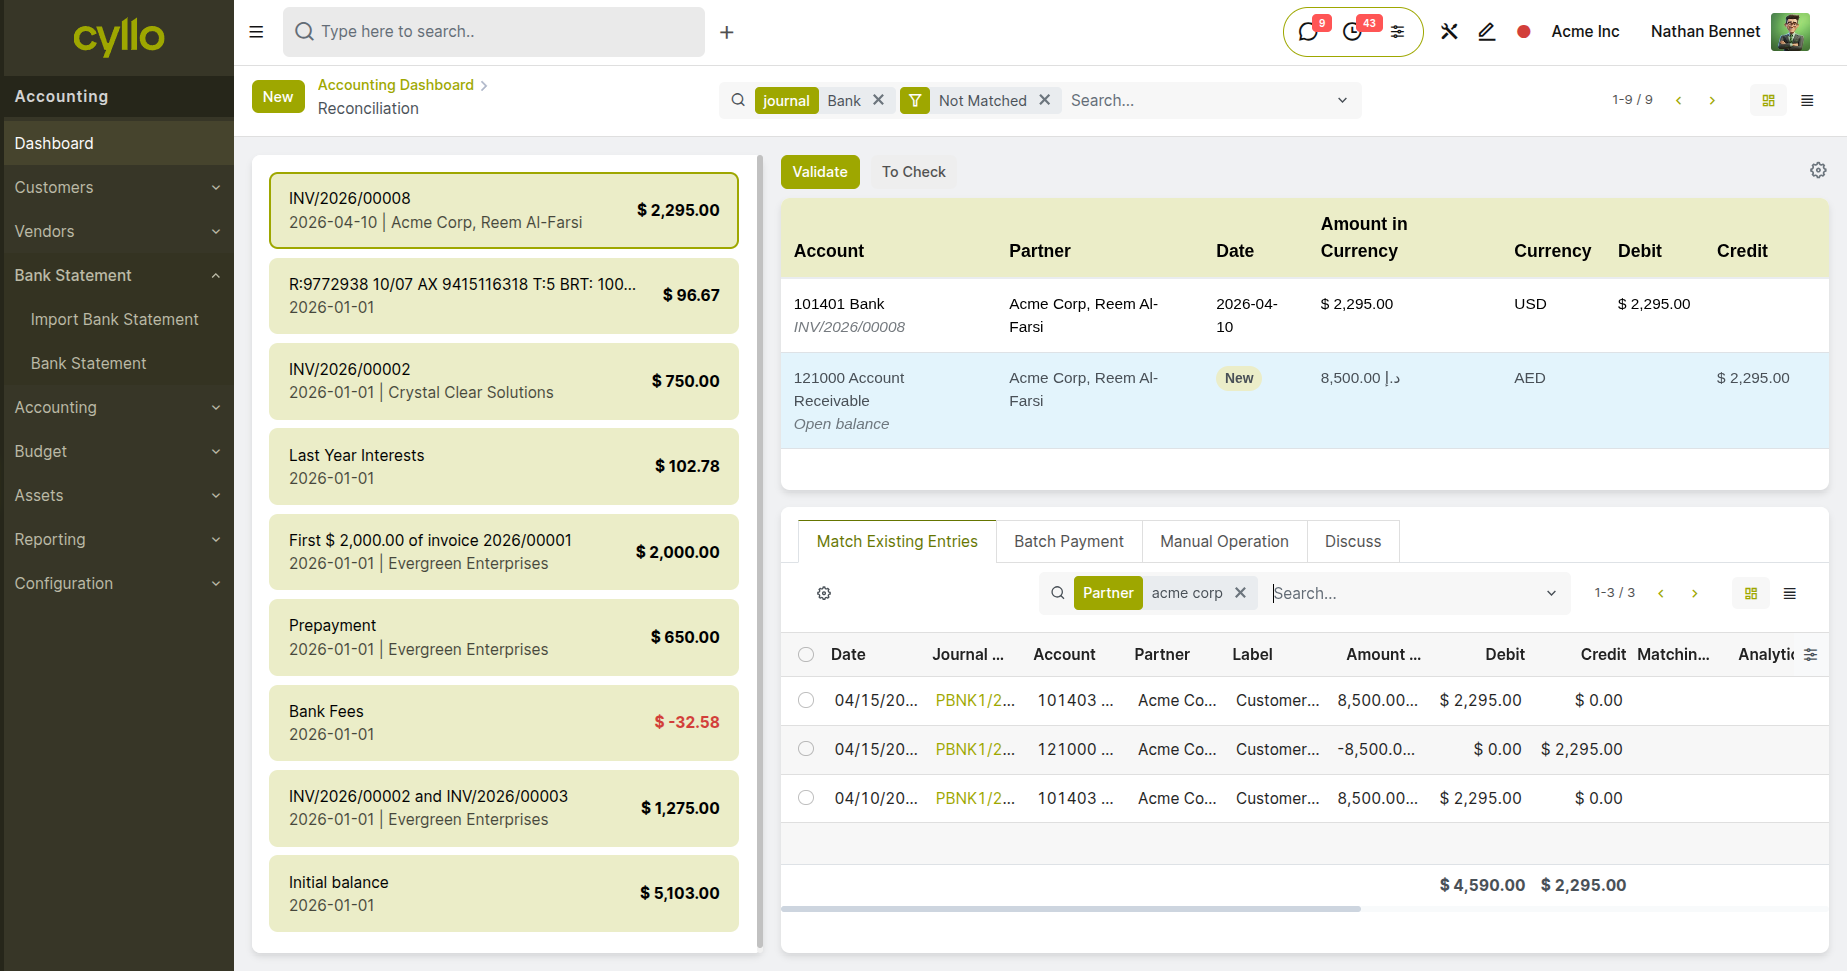
Fig 7.1 — Bank statement import — OFX file uploaded; reconciliation view showing the imported lines including the USD 2,295 credit from Acme Corp
Working Example
Bank statement imported: April 2026 Statement line visible: 15 Apr 2026 | Credit USD 2,295 | Ref: INV/2026/00008 Acme Corp
7.2. Matching the Payment
With the bank statement loaded, Cyllo's automatic reconciliation engine scans each statement line and proposes a match from the registered payments. Because the amount and reference match exactly, the payment registered in Stage 6 is proposed automatically.
- In the reconciliation view, the USD 2,295 credit line from Acme Corp shows a blue background — Cyllo has automatically found the registered payment from Stage 6 as the match.
- Click the line to expand it and review the proposed match — the payment record for INV/2026/00008 appears alongside the statement line.
- Verify the details are correct: amount, date, partner (Acme Corp), and reference.
- Click Validate to confirm the match.
- The bank statement line is marked as reconciled. The payment is confirmed as having physically arrived in the bank account.
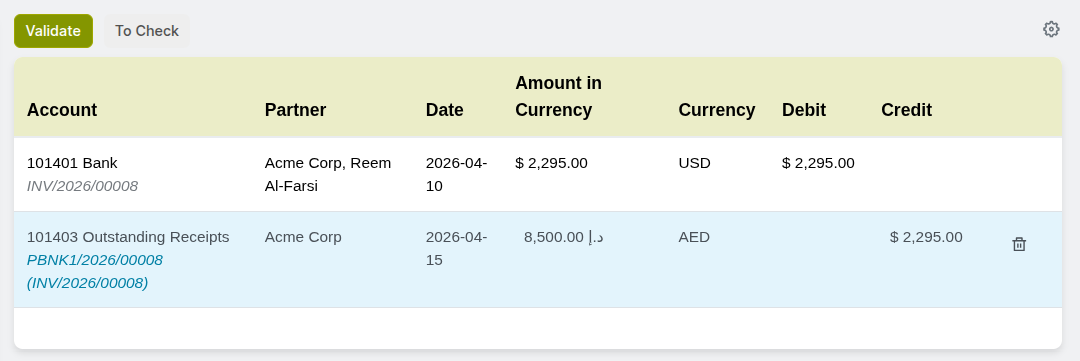
Fig 7.2 — Bank reconciliation view — USD 2,295 statement line; registered payment for INV/2026/00008 proposed on the right; Validate button
Working Example
Reconciliation: Bank statement line USD 2,295 (15 Apr) matched to payment for INV/2026/00008 — Acme Corp Click Validate → line reconciled → payment confirmed
7.3. Invoice Marked as Paid — Flow Complete
With the bank statement line reconciled, the invoice moves from In Payment to the final Paid status. The Lead-to-Cash flow for this transaction is now complete. Every stage has a full audit trail in Cyllo — from the initial CRM lead through to the reconciled bank payment.
- Open invoice INV/2026/00008. The status now shows Paid with a green badge.
- The Outstanding balance on the invoice is AED 0.00.
- The invoice chatter shows the full history: quotation sent, order confirmed, delivery done, invoice posted, payment registered, and payment reconciled — all with timestamps.
- The Accounts Receivable balance for Acme Corp is now zero — no amount is outstanding.
- The UAE Bank journal balance has increased by AED 8,925 — reflecting the received funds.
Fig 7.3 — Invoice INV/2026/00087 — status Paid (green badge); outstanding balance AED 0.00; chatter showing full lifecycle from quotation to reconciliation with timestamps
Working Example
Invoice INV/2026/00008 — STATUS: PAID Acme Corp Accounts Receivable balance: AED 0.00 Bank balance: increased by USD 2,295 Flow complete: Lead captured 10 Apr → Payment reconciled 15 Apr 2026
eCommerce Variant
In the eCommerce flow, the invoice is already Paid by the time the customer sees their order confirmation — the payment gateway handles collection during checkout. The bank reconciliation still happens (the bank statement shows the gateway settlement), but the invoice moves directly from Posted → Paid without passing through the In Payment interim state.
Full Flow at a Glance
The table below summarises every stage of the Lead-to-Cash flow using the Acme Corp example — showing the stage, what the user does, what Cyllo does automatically, and the outcome of each step.
| Stage & Module | User Action | Automatic Cyllo Action & Outcome |
|---|---|---|
| 1. CRM Lead Capture | Creates a lead for Acme Corp's enquiry; logs follow-up call; qualifies the lead. | Lead saved in CRM pipeline. Activity reminder set for follow-up call. Probability and expected revenue tracked. |
| 2. Sales Quotation | Clicks New Quotation from the lead; adds 10 x Office Chair Pro at AED 850; sets Net 30 terms; sends to customer. | Quotation PDF generated. Email sent to Acme Corp. Customer views and accepts via portal. Quotation status: Sent. |
| 3. Sales Sales Order | Clicks Confirm on the accepted quotation. | Quotation → Sales Order S00059. Delivery order WH/OUT/00318 auto-created. Stock reserved. CRM opportunity marked Won. |
| 4. Inventory Delivery | Warehouse team picks 10 chairs; enters Done: 10 in the delivery order; clicks Validate. | Stock reduced by 10 units. Delivery status: Done. Invoice button on sales order becomes active. |
| 5. Accounting Invoice | Clicks Create Invoice on the sales order; reviews draft; clicks Confirm; clicks Send. | Invoice INV/2026/00087 posted. Journal entry: Dr Receivable AED 8,925. Invoice emailed to Acme Corp. Status: Posted. |
| 6. Accounting Payment | Registers payment of AED 8,925 received on 23 April via bank transfer. | Payment record created. Journal entry: Dr Bank AED 8,925 / Cr Receivable AED 8,925. Invoice status: In Payment. |
| 7. Accounting Reconciliation | Imports April bank statement; validates the auto-matched bank line for AED 8,925. | Bank line reconciled to payment. Invoice status: Paid. Bank balance updated. Acme Corp receivable: AED 0.00. |
Troubleshooting
Common Issues & Solutions
| Issue | Likely Cause | Solution |
|---|---|---|
| Delivery button not appearing after confirming the sales order | Product is a service type — service products do not create delivery orders | Check the product type. For physical goods, set the product type to Storable Product. Re-confirm the order if needed. |
| Invoice button is greyed out after delivery is validated | Invoice policy on the product is set to 'Ordered Quantities' not 'Delivered Quantities' | Go to the product form → Sales tab → Invoicing Policy. Set to Delivered Quantities. The invoice button activates after delivery. |
| Quotation expiry date has passed — customer wants to still proceed | Quotation has expired and cannot be confirmed | Open the quotation, update the Expiration Date to a current or future date, then confirm the order. |
| Bank payment does not auto-match during reconciliation | Amount mismatch (e.g. bank deducted a fee) or reference not included by customer | Match manually in the reconciliation view. For recurring fee deductions, configure a Match & Writeoff reconciliation model. |
| Invoice shows In Payment but customer says they have paid | Payment registered but bank statement not yet imported or reconciled | Import the latest bank statement and reconcile. The invoice moves to Paid once the bank line is matched and validated. |
| Sales Order cannot be edited after confirmation | Confirmed orders are locked to protect the financial record | Use Lock/Unlock (if enabled) for minor changes, or cancel and recreate the order. For quantity increases, add a new order line. |
| Customer did not receive the quotation email | Email server misconfigured or customer email address incorrect | Check the chatter for a send error. Verify the customer email address and outgoing mail server configuration in Settings. |
| Delivery stuck in Ready state — warehouse cannot validate | One or more products are out of stock and the quantity on hand is insufficient | Check stock availability in Inventory. Replenish stock or adjust the done quantity to what is available and create a backorder. |