

Cyllo HRMS Documentation
Introduction
Cyllo's HRMS module provides complete workforce management — from the moment a candidate applies for a position through their entire employment journey to offboarding. Built on a fully integrated HR engine, it connects seamlessly with Payroll, Accounting, Project, and Fleet so that every employee record, attendance entry, leave balance, and salary computation flows through the system without manual re-entry. Whether you are managing a small team or a large multi-department organisation, Cyllo HRMS gives you full visibility into who is working, when they are working, what they are owed, and how your workforce is performing. Recruitment pipelines, contract management, attendance tracking, leave approvals, payroll processing, gratuity settlements, and incident management are all built in — making it a complete solution for HR teams looking to move away from spreadsheets and disconnected tools into a single unified platform.
1. HR Operations
1.1 Employee Record
An Employee Record is the central profile for each staff member in Cyllo. It consolidates personal information, job details, contract linkage, and HR settings in one place. All other HRMS modules reference this record.
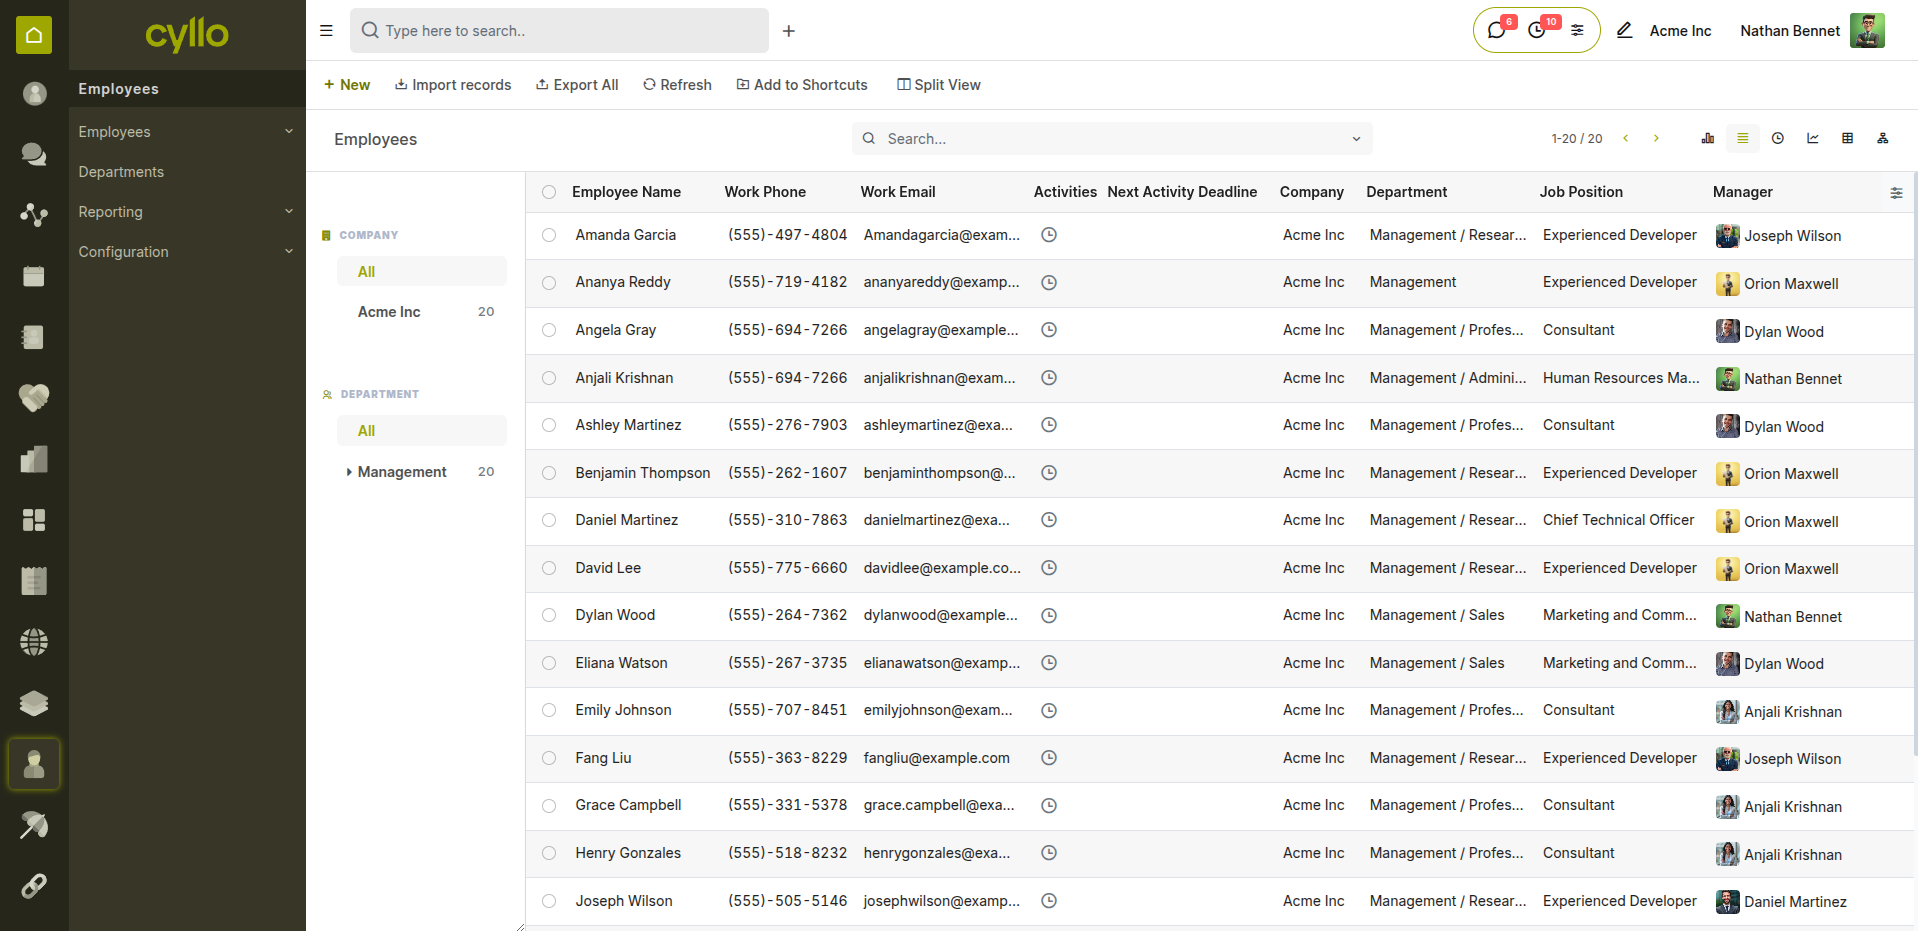
Fig 1.1 — Employee list view with availability status indicators
How to Create an Employee Record:
- Go to Employees → Employees → New
- Enter the Employee Name and upload a profile photo
- Set Job Position, Department, and assign a Manager
- Configure the Work Information tab: work location, work schedule, timezone
- Fill in the Private Information tab: date of birth, identification, emergency contact
- Link or create a Contract from the top smart button
- Save the record
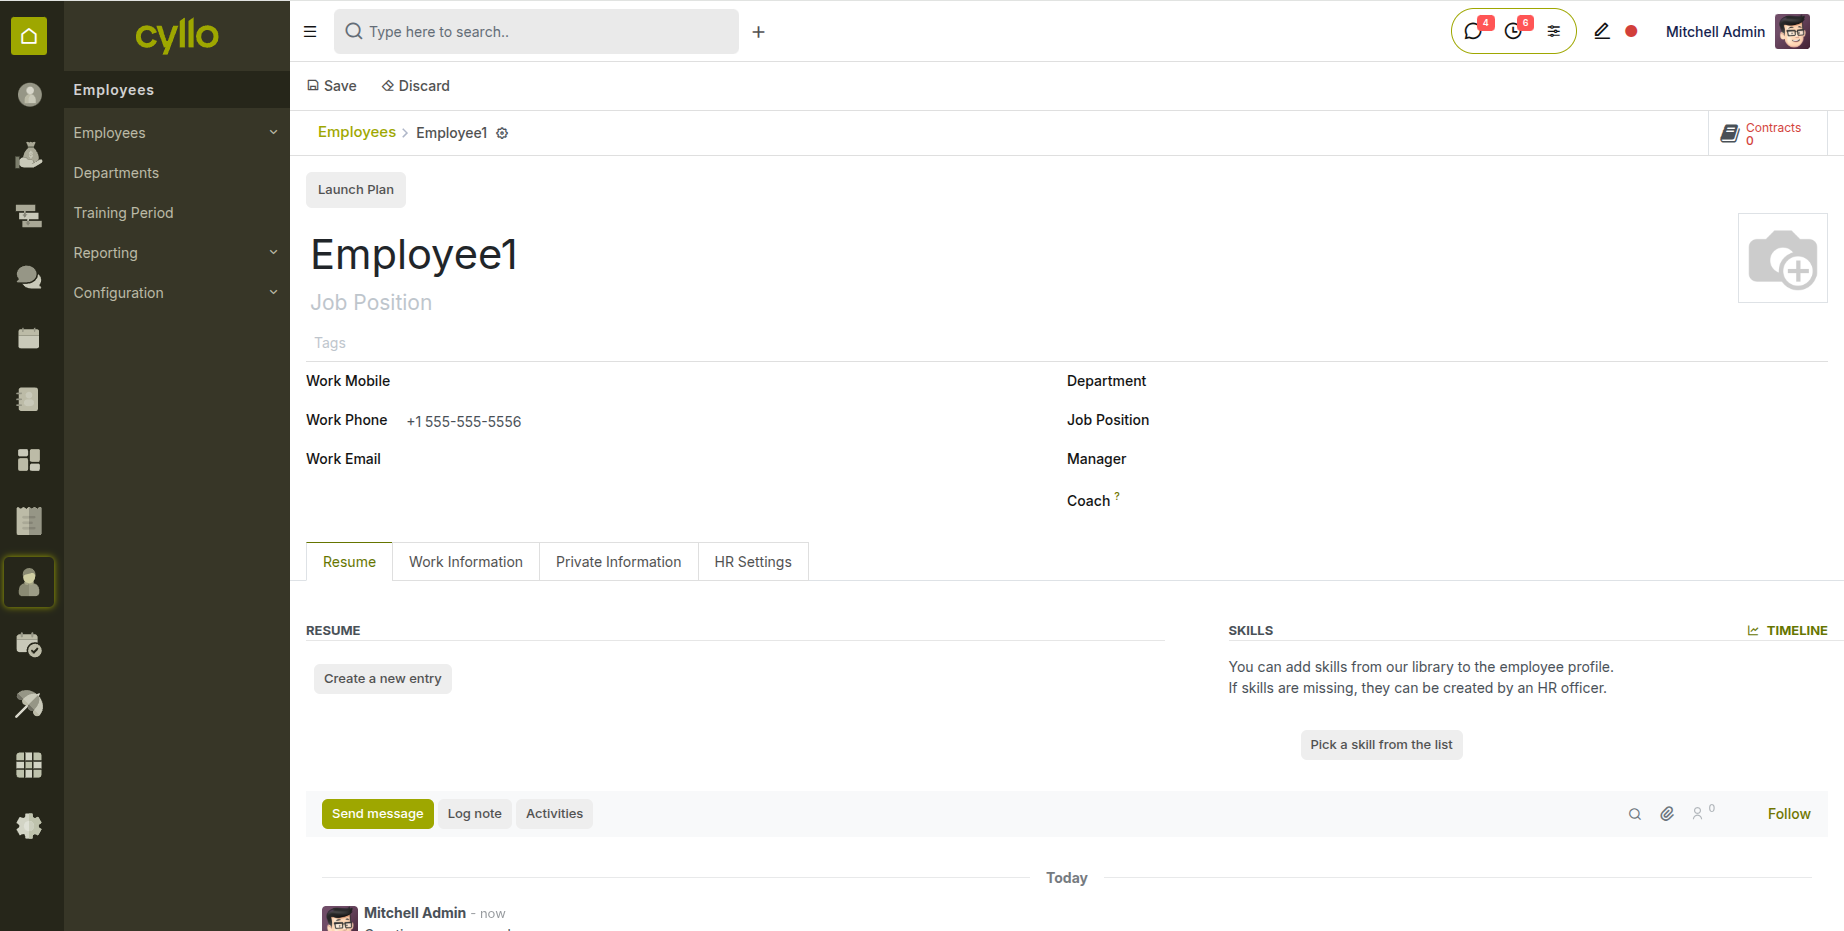
Fig 1.2 — Employee form view showing all configuration tabs
Key Fields Employee Name: Full name as it appears on contracts and payslips. Job Position: The role or title assigned to the employee. Department: The business unit the employee belongs to. Manager: Direct reporting manager — used in approval chains. Work Schedule: Defines working hours and days; drives attendance and payroll. Contract: Linked employment contract with salary and terms. Status: Active → On Leave → Resigned / Archived.
Note
You can configure a default Work Schedule and Contract Type per department from Employees → Configuration → Settings.
1.2 Recruitment
The Recruitment module manages job postings, candidate applications, and the full hiring pipeline. It integrates with the company website for online applications and converts successful hires directly into employee records.
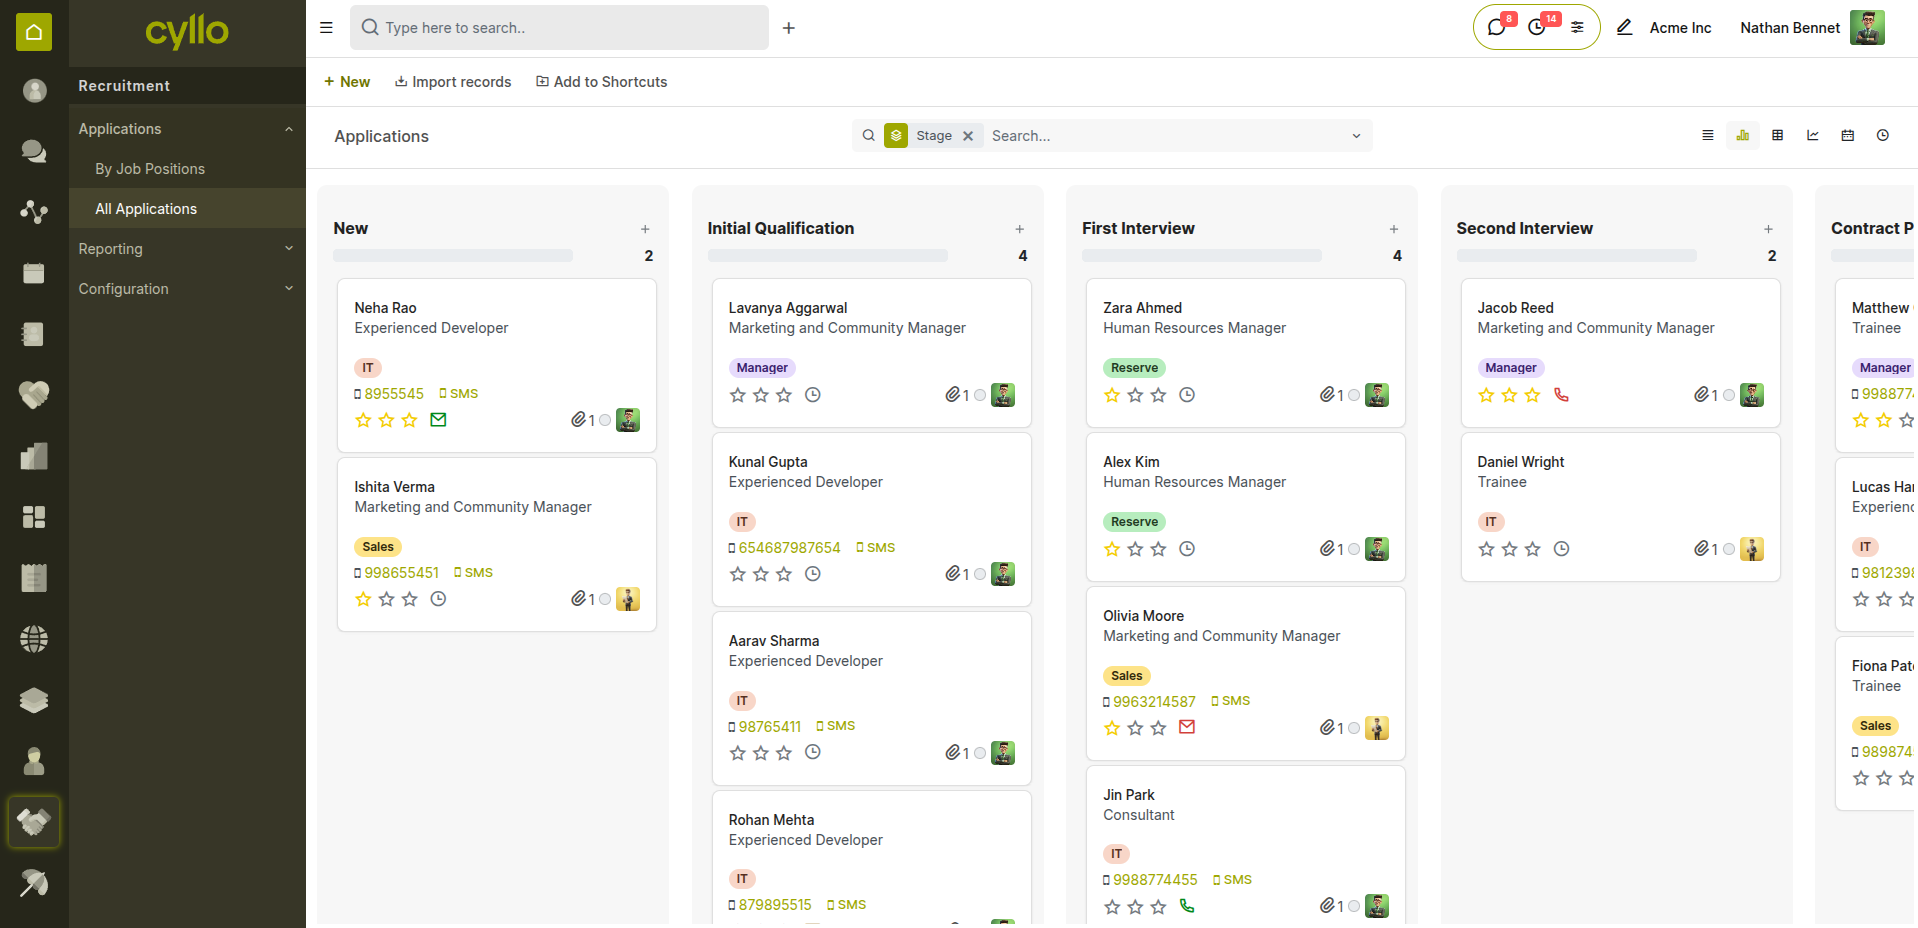
Fig 1.3 — Recruitment pipeline in Kanban view with application stages
How to Create a Job Opening:
- Go to Recruitment → Job Positions → New
- Enter the Job Position title and select the Department
- Set the Expected New Employees count
- Click Start Recruitment to open the pipeline for this position
- Share the link or publish to the company website with one click
- Incoming applications appear automatically in the Kanban pipeline

Fig 1.4 — Job application form with interview stages and candidate details
Recruitment Pipeline Stages New Application: Candidate has applied — awaiting initial review. Initial Qualification: Screened against job requirements. First Interview: Interview scheduled or completed. Second Interview: Follow-up interview stage. Contract Proposed: Offer letter or contract sent to candidate. Contract Signed: Employment contract executed. Hired: Candidate converted to an employee record.
::: Once a candidate reaches the Contract Signed stage, click 'Create Employee' to auto-populate the employee form with the candidate's details — no re-entry required. :::
1.3 Contracts
The Contracts module provides a central repository for all employment contracts, tracking terms, duration, salary details, and status throughout the employee lifecycle.
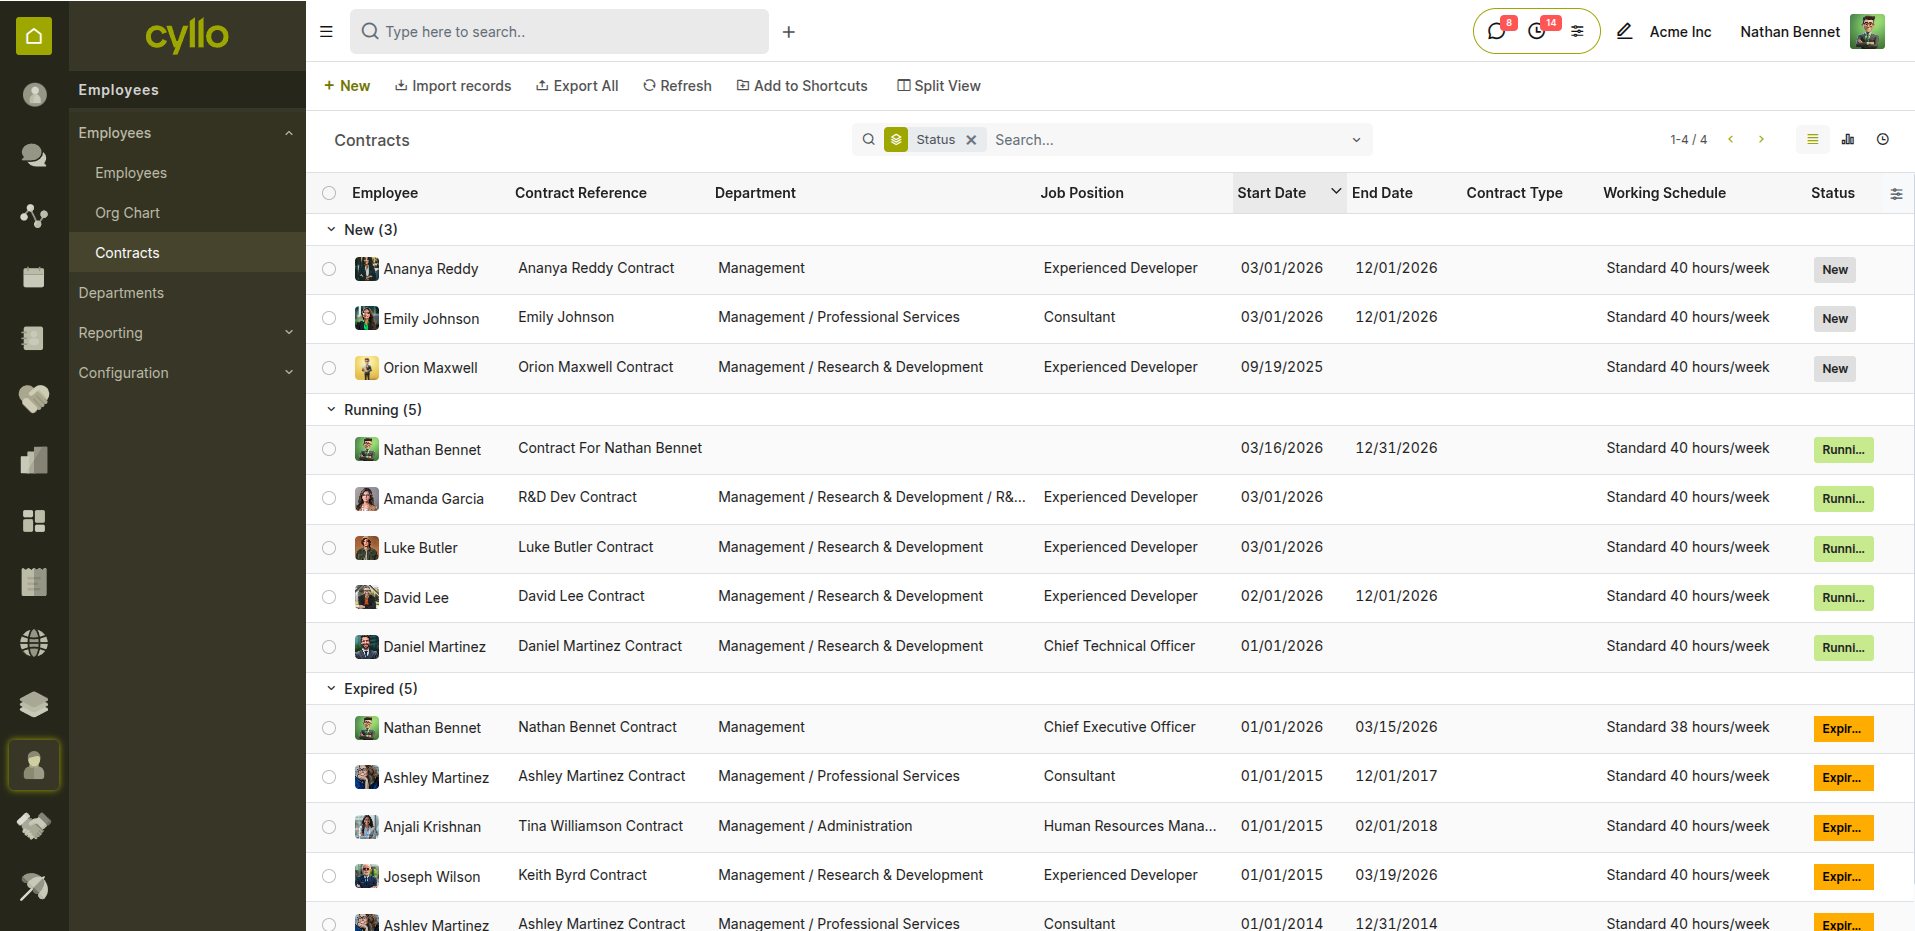
Fig 1.5 — Contract list view with status and expiry indicators
How to Create a Contract:
- Go to Employees → Employees → Open an employee record
- Click the Contracts smart button at the top of the form
- Click New
- Enter Contract Reference, Start Date, and optionally an End Date
- Select the Contract Type: Limited (fixed-term) or Open (indefinite)
- Set the Wage and Salary Structure
- Save and set to Running
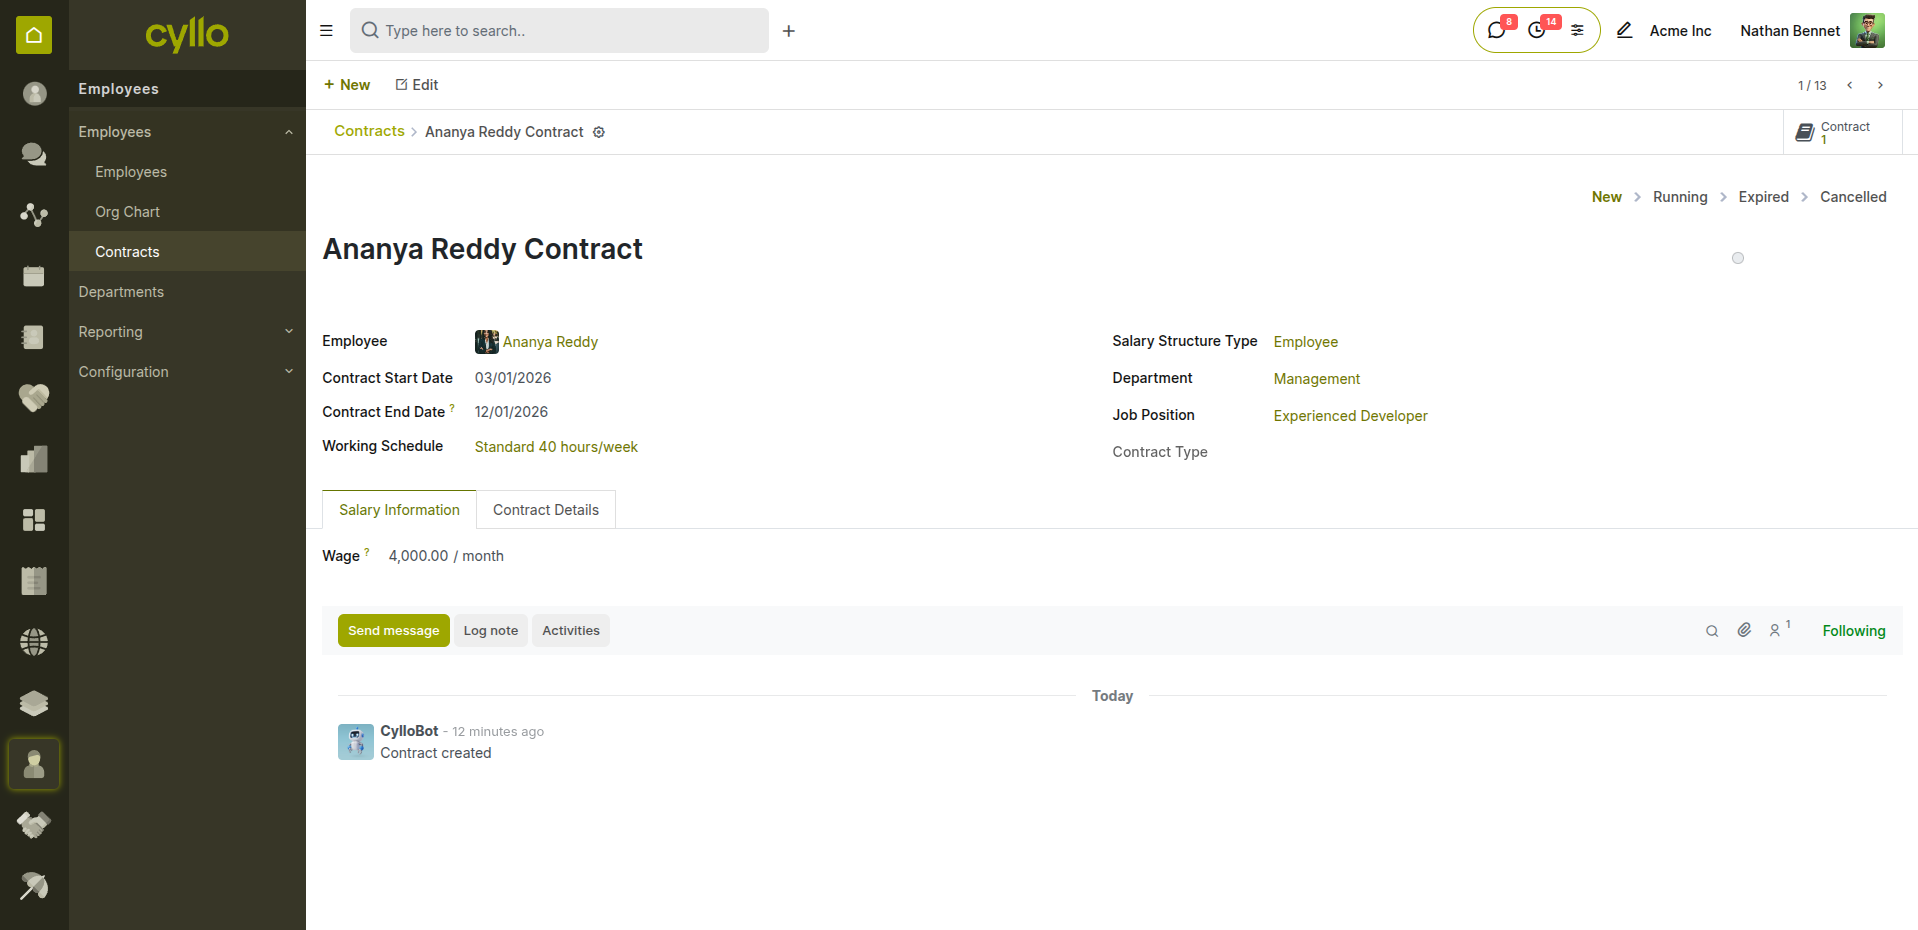
Fig 1.6 — Contract form with salary structure and wage configuration
Key Fields Contract Reference: Unique identifier for the contract record. Contract Type: Limited (fixed end date) or Open (indefinite). Start Date: First day of employment under this contract. End Date: Expiry date — leave blank for open contracts. Wage: Monthly or hourly gross salary. Salary Structure: Determines which rules and deductions apply to payslips. Status: New → Running → Expired / Cancelled.
Note
The contract type directly affects how gratuity and end-of-service benefits are calculated.
2. Attendance
2.1 Check-In / Check-Out
The Attendance module provides real-time workforce clock-in and clock-out tracking. Attendance data feeds directly into payroll calculations, ensuring compensation is based on verified working hours.
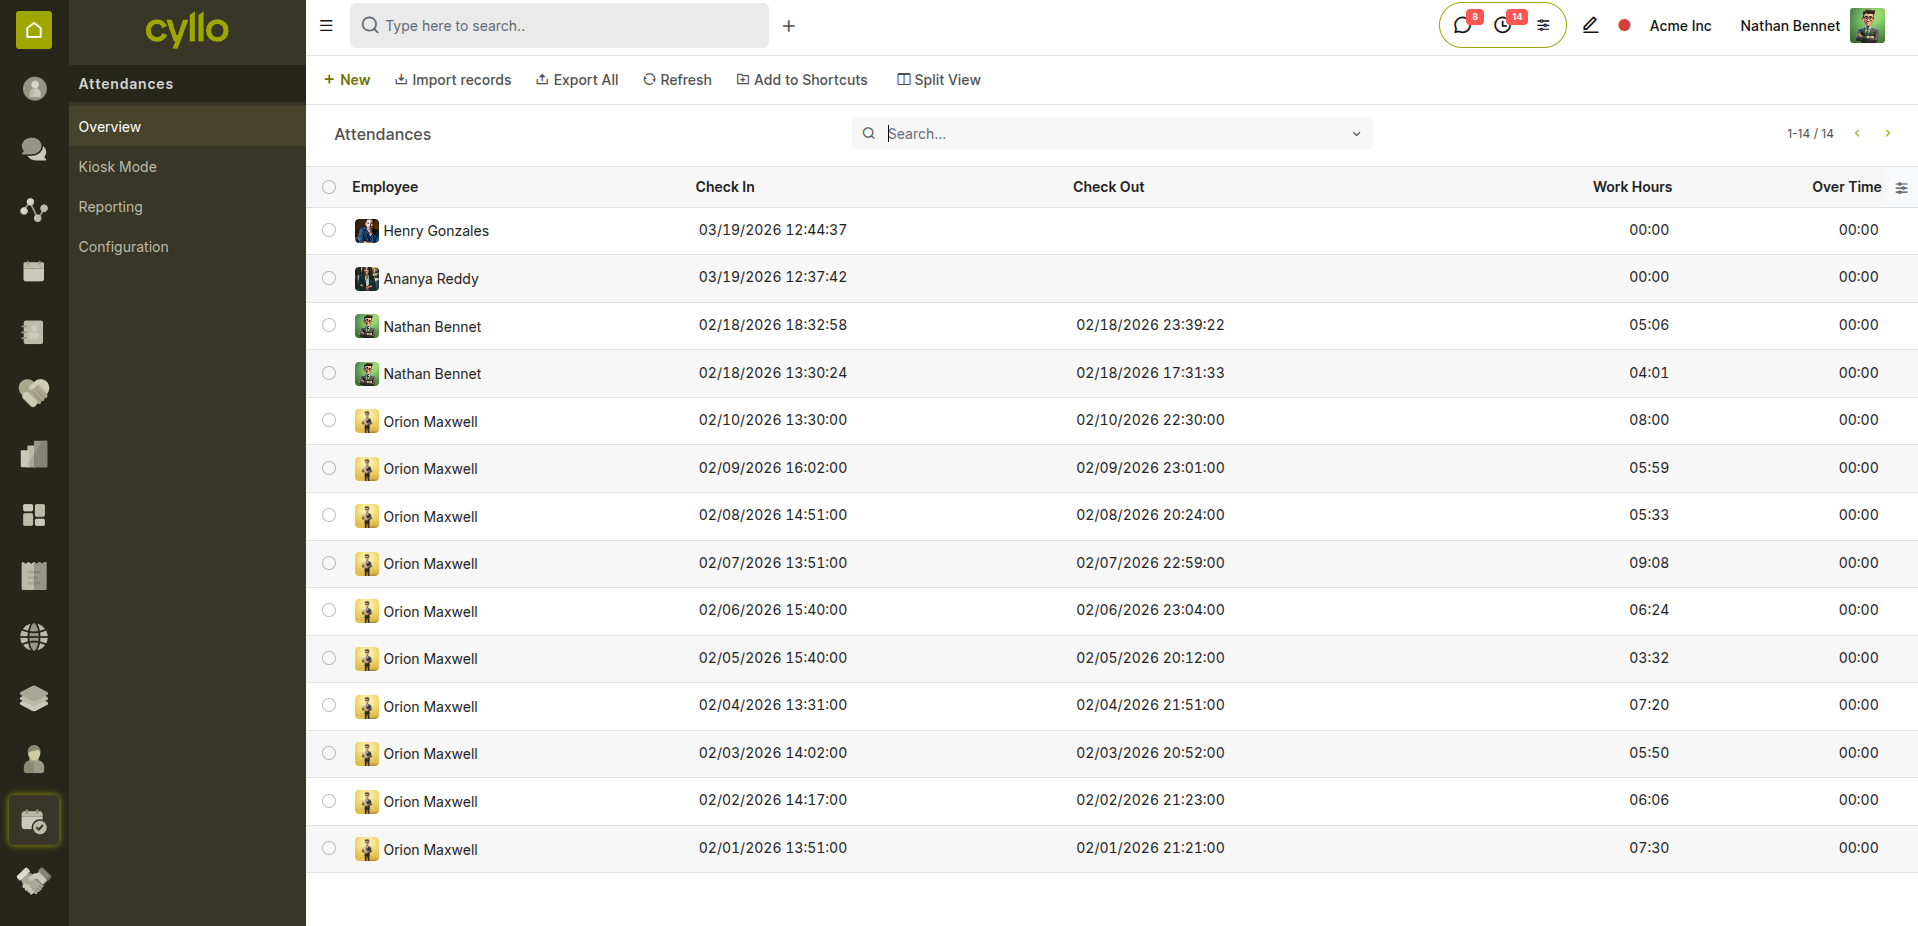
Fig 2.1 — Attendance overview showing live check-in status per employee
How to Record Attendance:
- Go to Attendances → Attendances → New (for manual entry)
- Select the Employee
- Set the Check In date and time
- Set the Check Out date and time
- Save the record — worked hours are calculated automatically
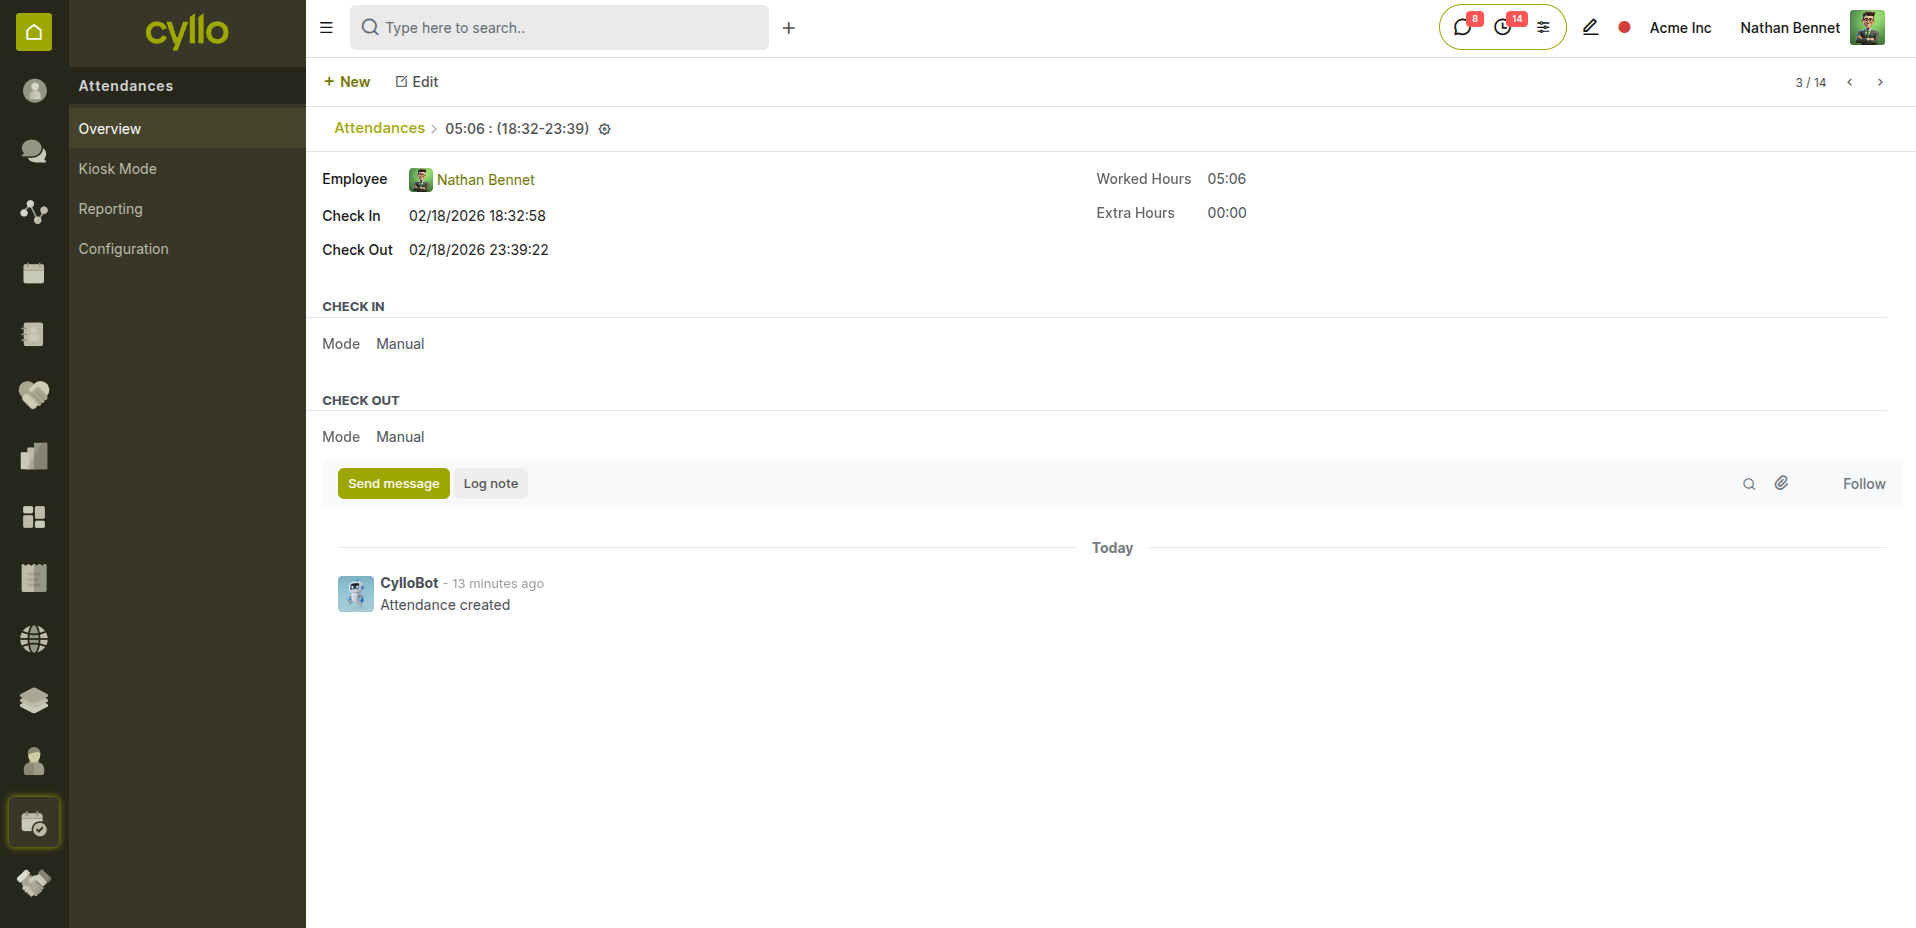
Fig 2.2 — Attendance form with check-in/check-out time entry
Key Fields Employee: The staff member whose attendance is being recorded. Check In: Date and time the employee started work. Check Out: Date and time the employee finished work. Worked Hours: Automatically calculated from check-in to check-out. Overtime: Hours worked beyond the scheduled work schedule.
Note
Attendance data feeds directly into payroll calculations — ensure records are validated before running the monthly payroll batch.
2.2 Kiosk Mode
Kiosk Mode provides a shared touchscreen station for employees to clock in and out without requiring individual logins. It is ideal for factory floors, warehouses, and reception areas.
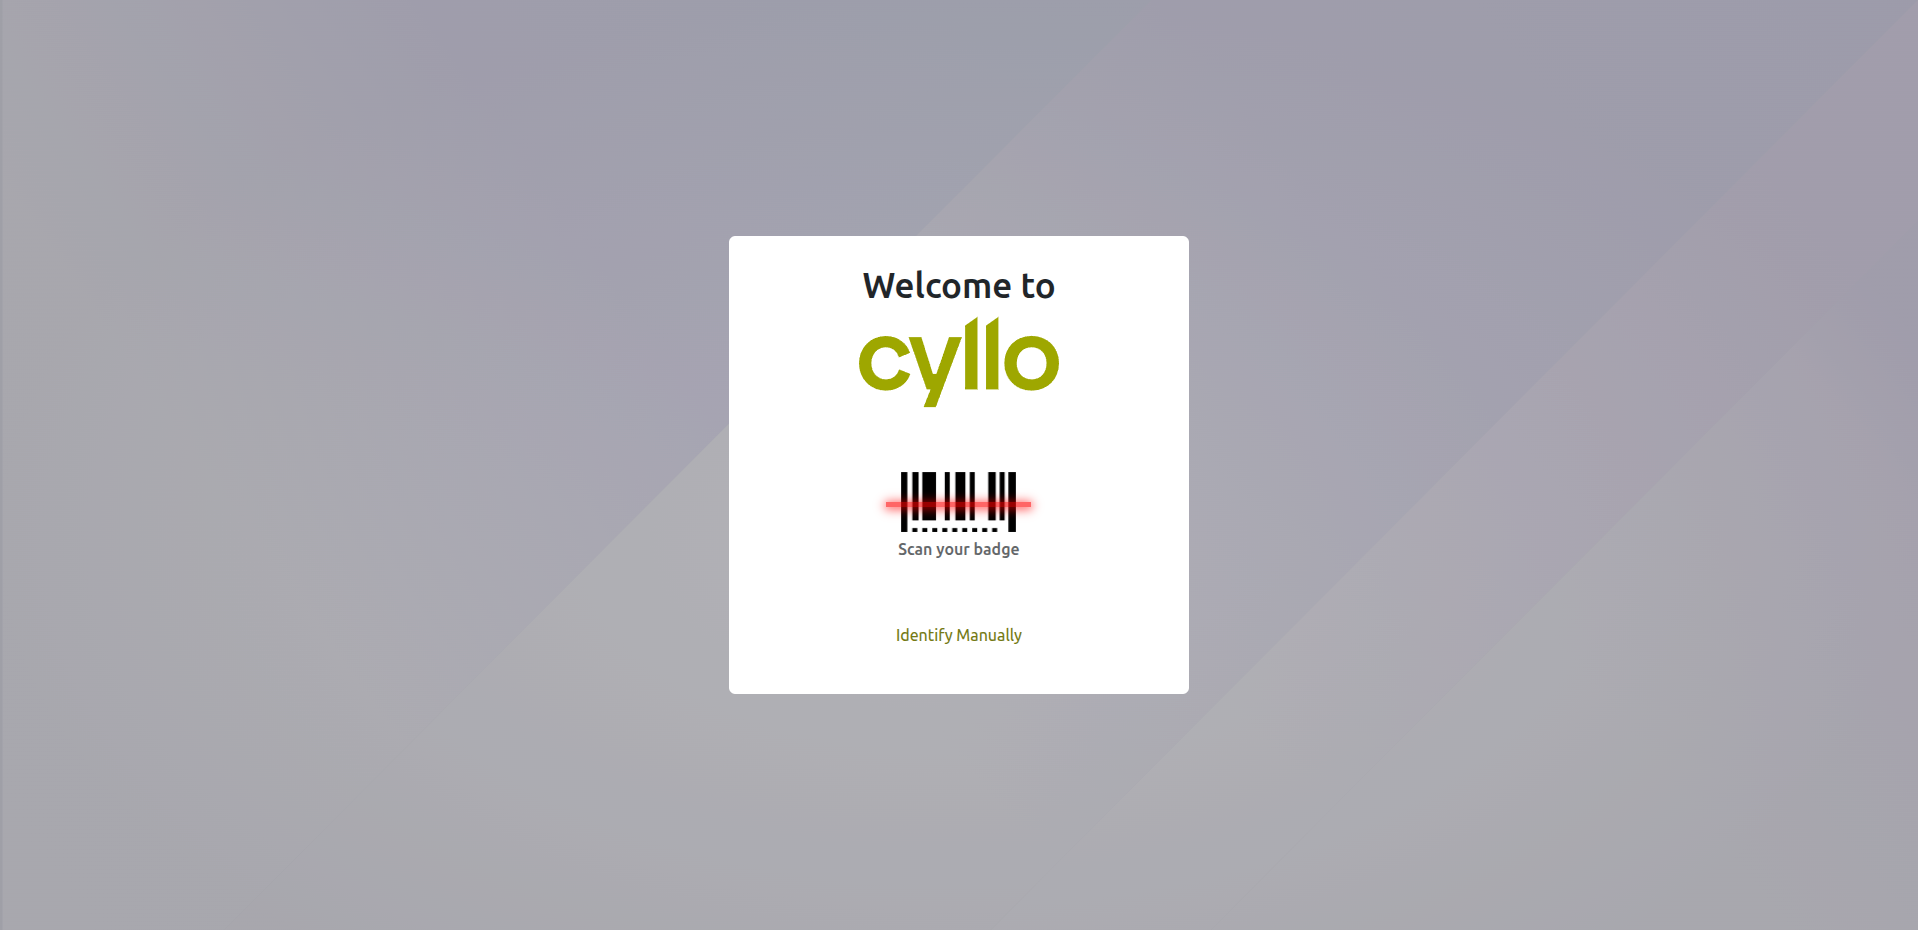
Fig 2.3 — Kiosk mode interface for employee badge scan or PIN entry
How to Set Up Kiosk Mode:
- Go to Attendances → Configuration → Settings
- Enable Attendance Kiosk Mode
- Choose identification method: PIN, RFID badge, or manual selection
- Open Attendances → Kiosk Mode to launch the kiosk screen
- Employees enter their PIN or scan their badge to check in or out
Note
Set each employee's attendance PIN in their employee record under the HR Settings tab. PINs are 4 digits and must be unique across employees.
3. Timesheets
3.1 Logging Time
The Timesheet module enables precise tracking of employee working hours against specific tasks, projects, and activities. It bridges HR and Project Management for accurate billing and productivity analysis.
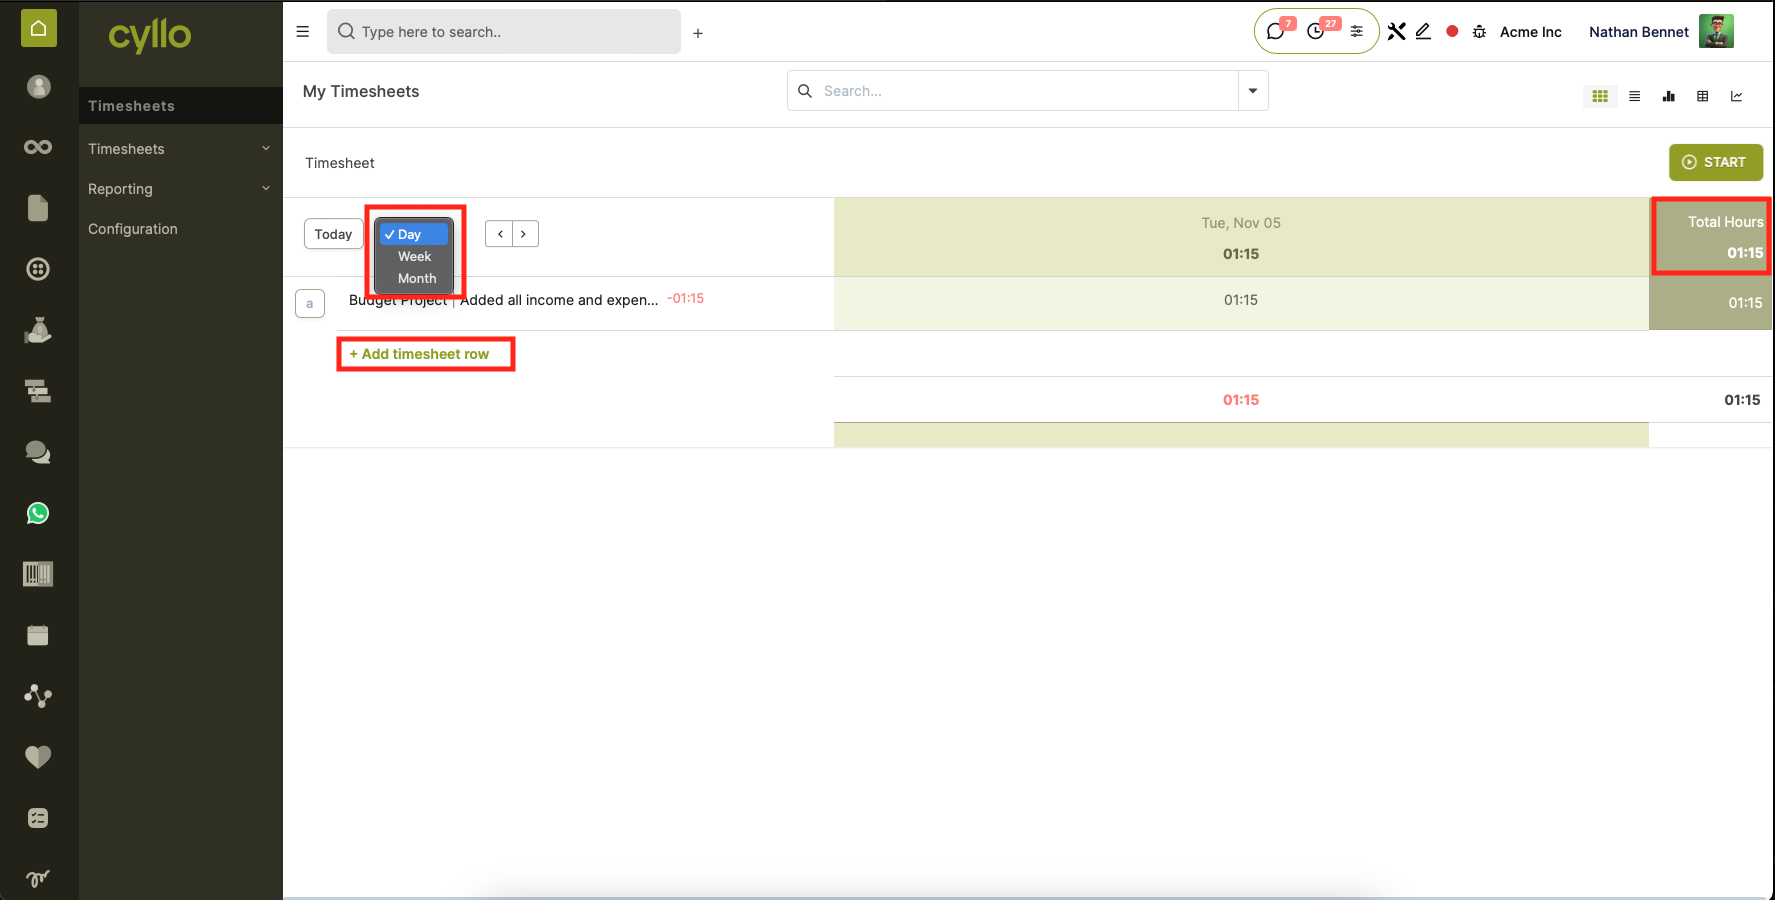
Fig 3.1 — Timesheet list view with project, task, and hours breakdown
How to Log Timesheet Hours:
- Go to Timesheets → All Timesheets → New
- Select the Date
- Select the Employee
- Select the Project and Task
- Enter a description of the work done
- Enter the Duration (hours)
- Save the entry
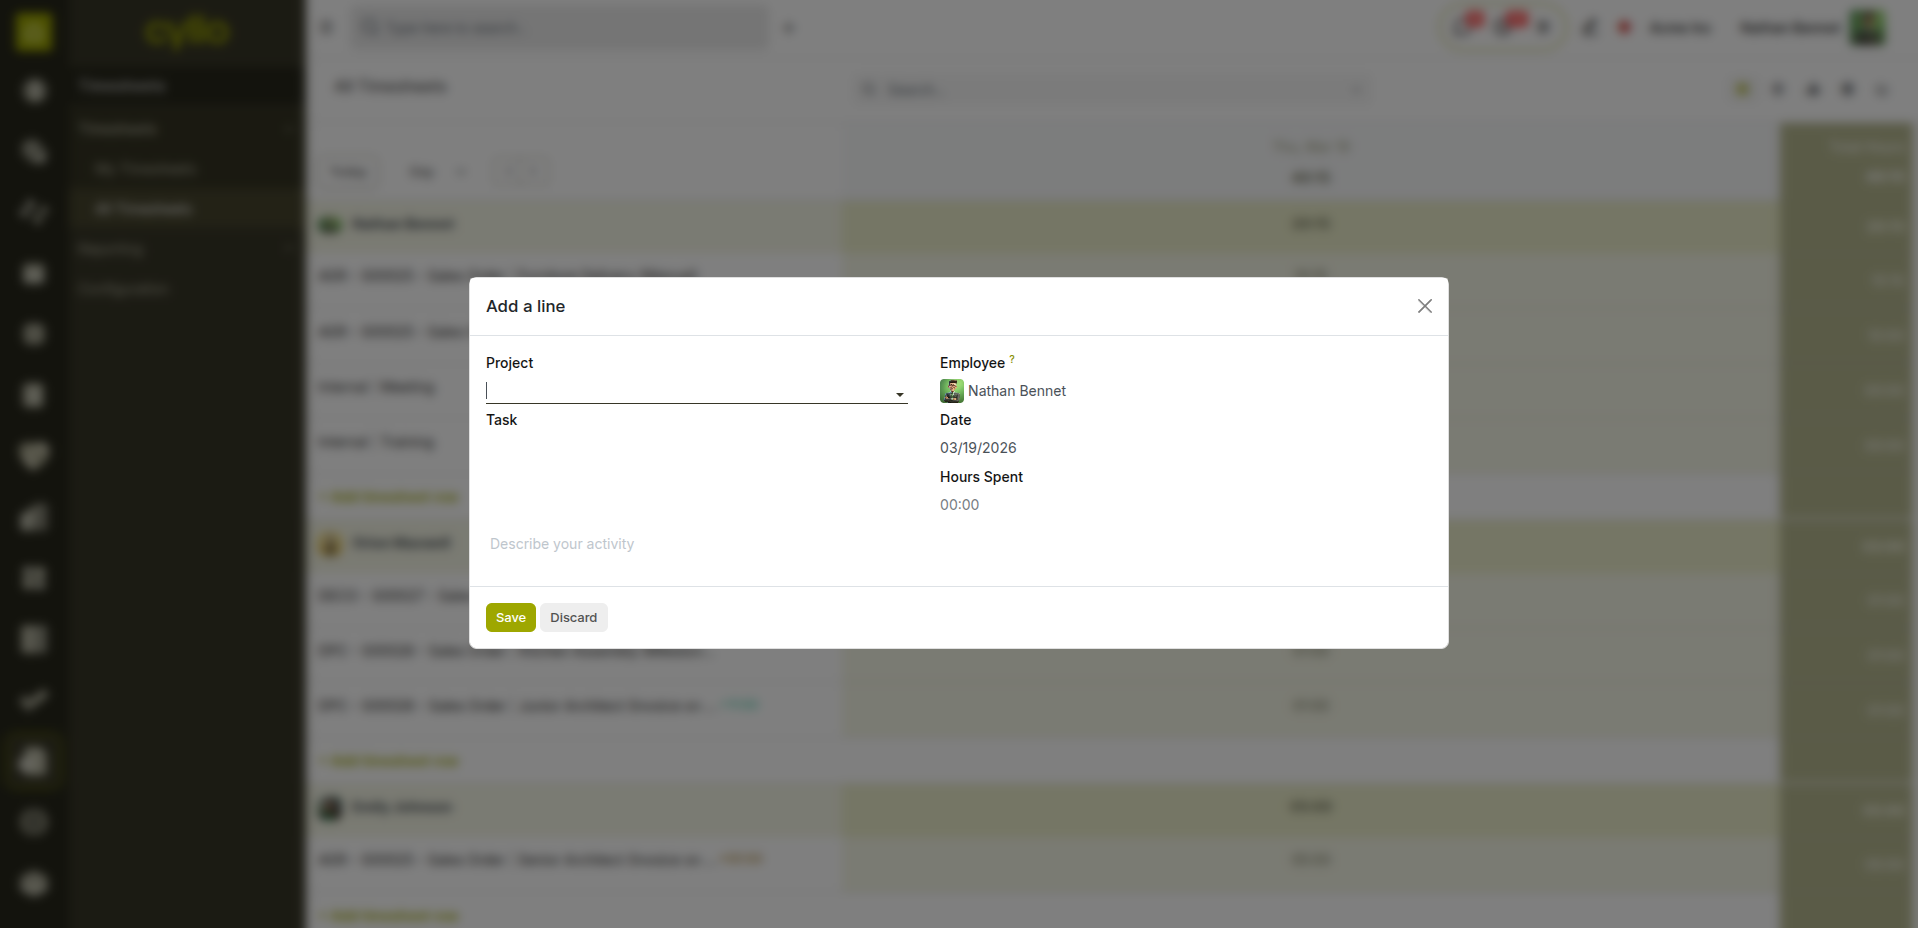
Fig 3.2 — Timesheet entry form with project and task linkage
3.2 Grid View
The Grid View presents a weekly timesheet matrix, allowing employees to enter hours across multiple days and projects in a single view — ideal for end-of-week time submission.
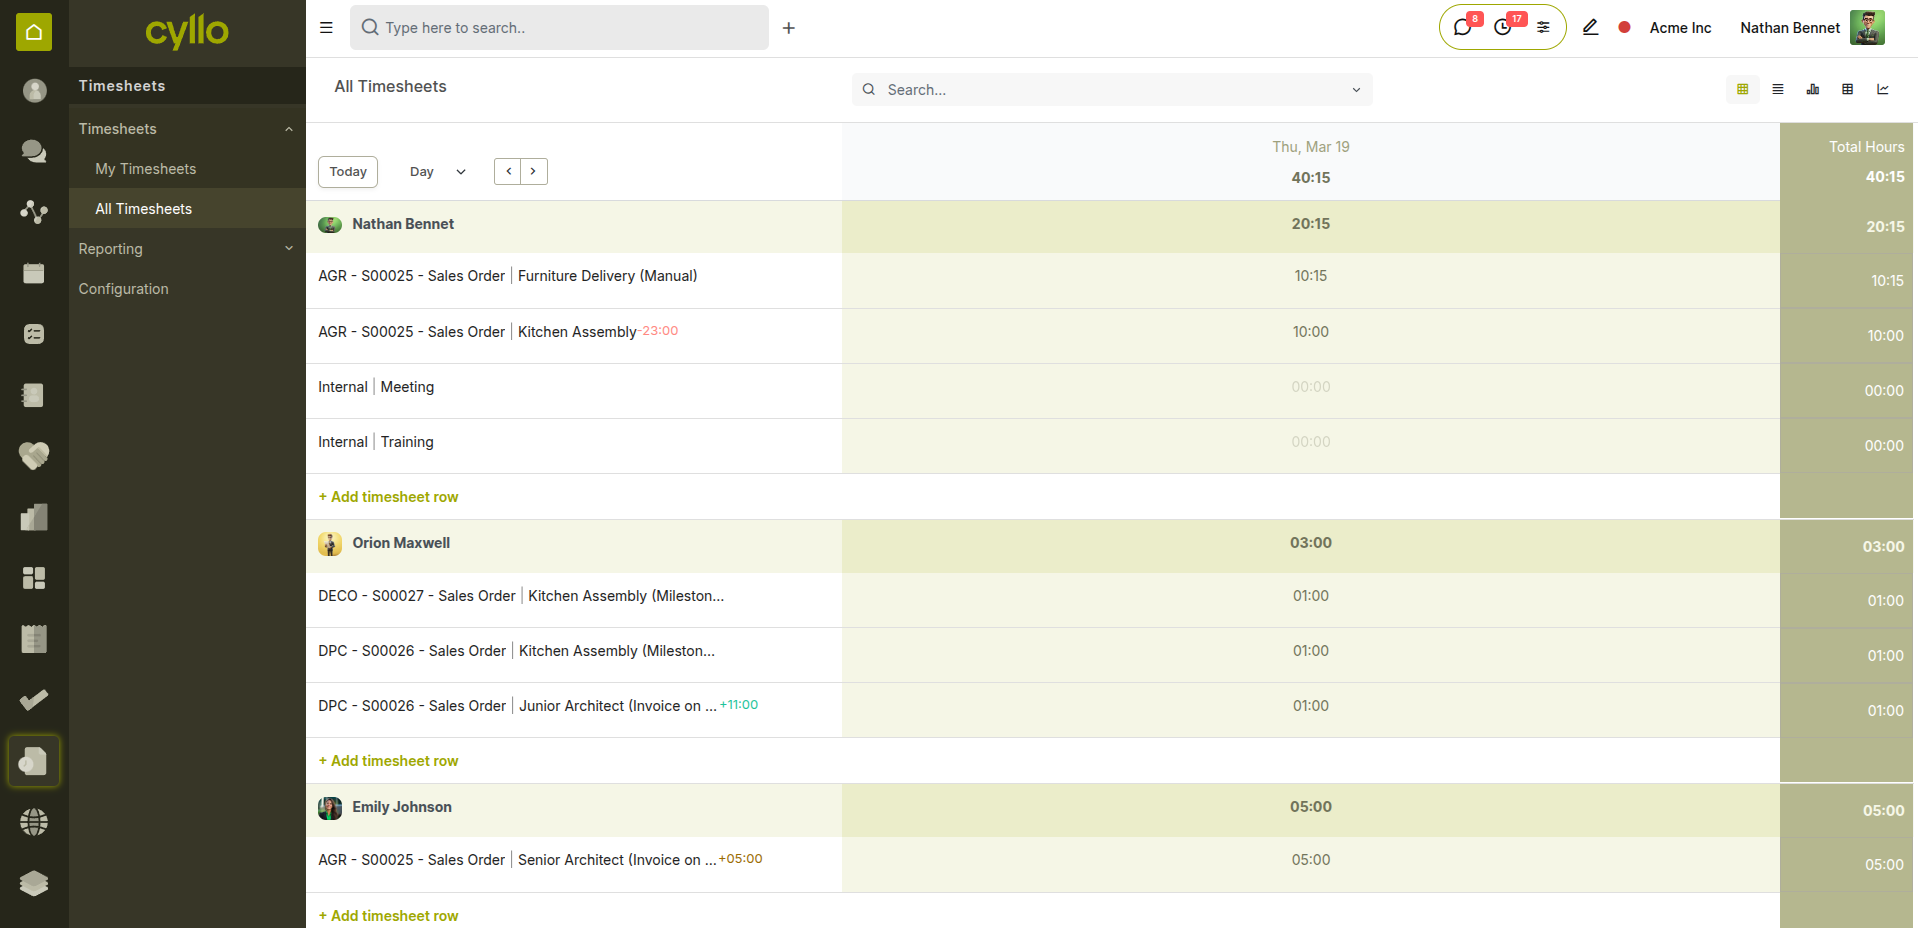
Fig 3.3 — Weekly grid view for bulk timesheet entry across multiple days
How to Use Grid View:
- Go to Timesheets → My Timesheets
- Switch to Grid view (icon in top-right)
- Select the week using the date navigator
- Enter hours per project/task in each day column
- Row totals and week total update automatically
- Click Save to submit the week's entries
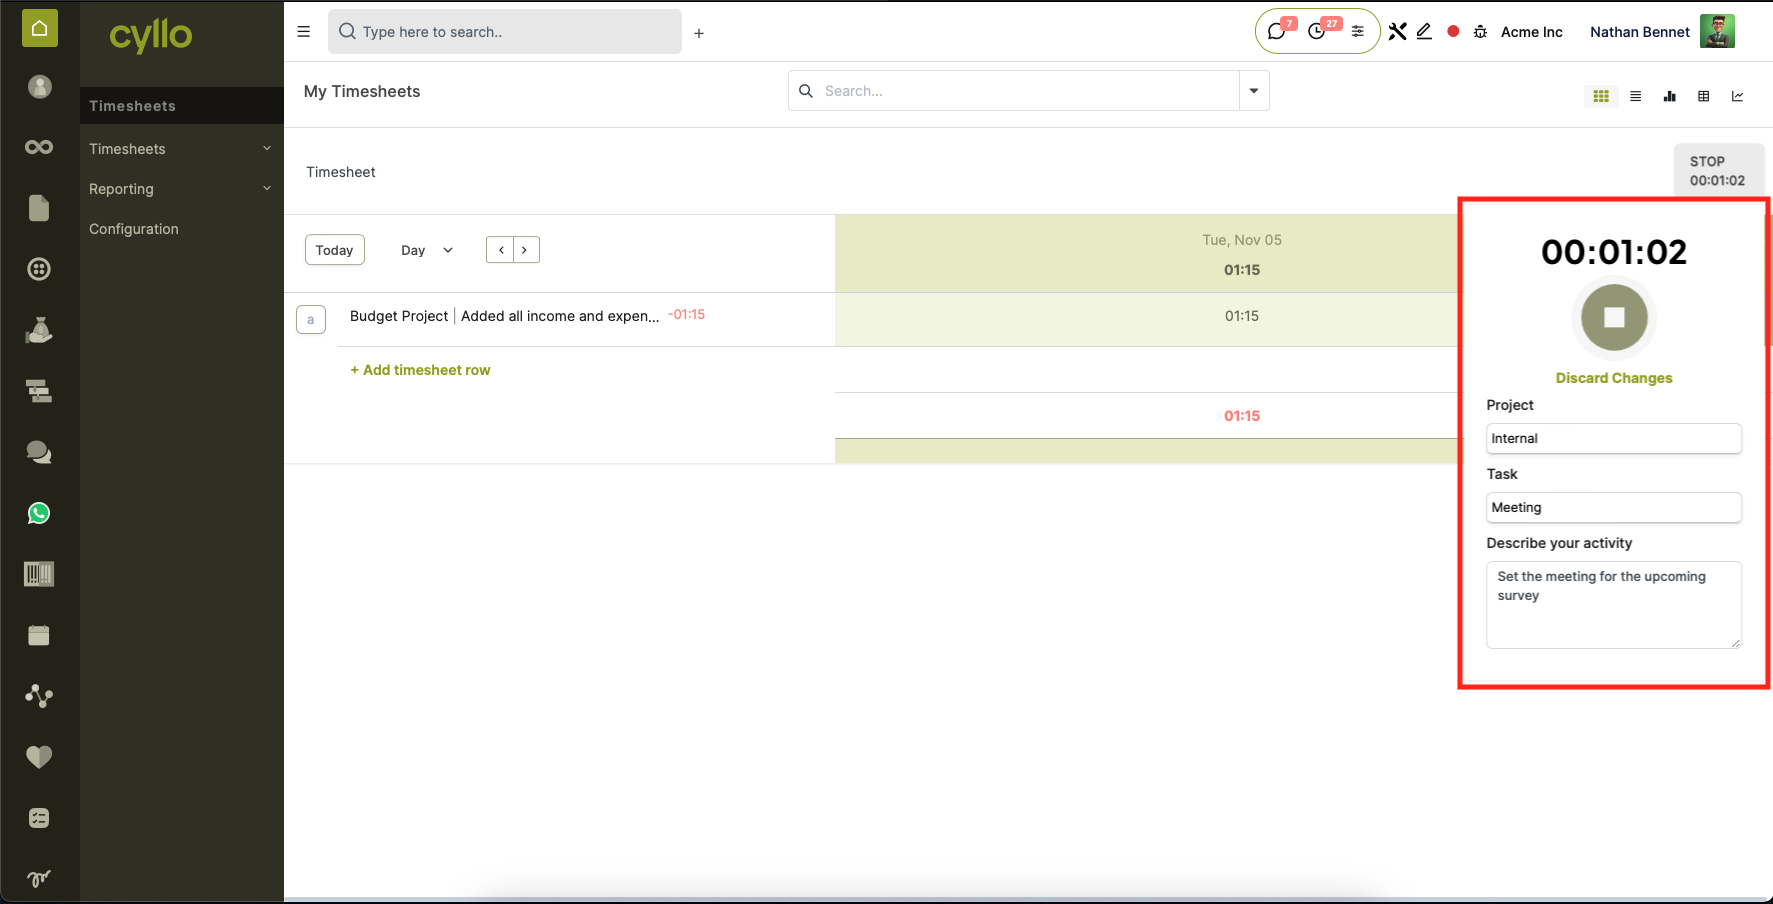
Fig 3.4 — Live timer active on a task in the Project module
Note
Managers can view all team timesheets under Timesheets → All Timesheets. Use the Group By filter to segment by Employee, Project, or Date for productivity analysis.
4. Time Off Management
4.1 Leave Request
Employees submit leave requests directly from the Time Off module or their employee portal. Requests route through the configured approval chain and automatically deduct from leave balances on approval.
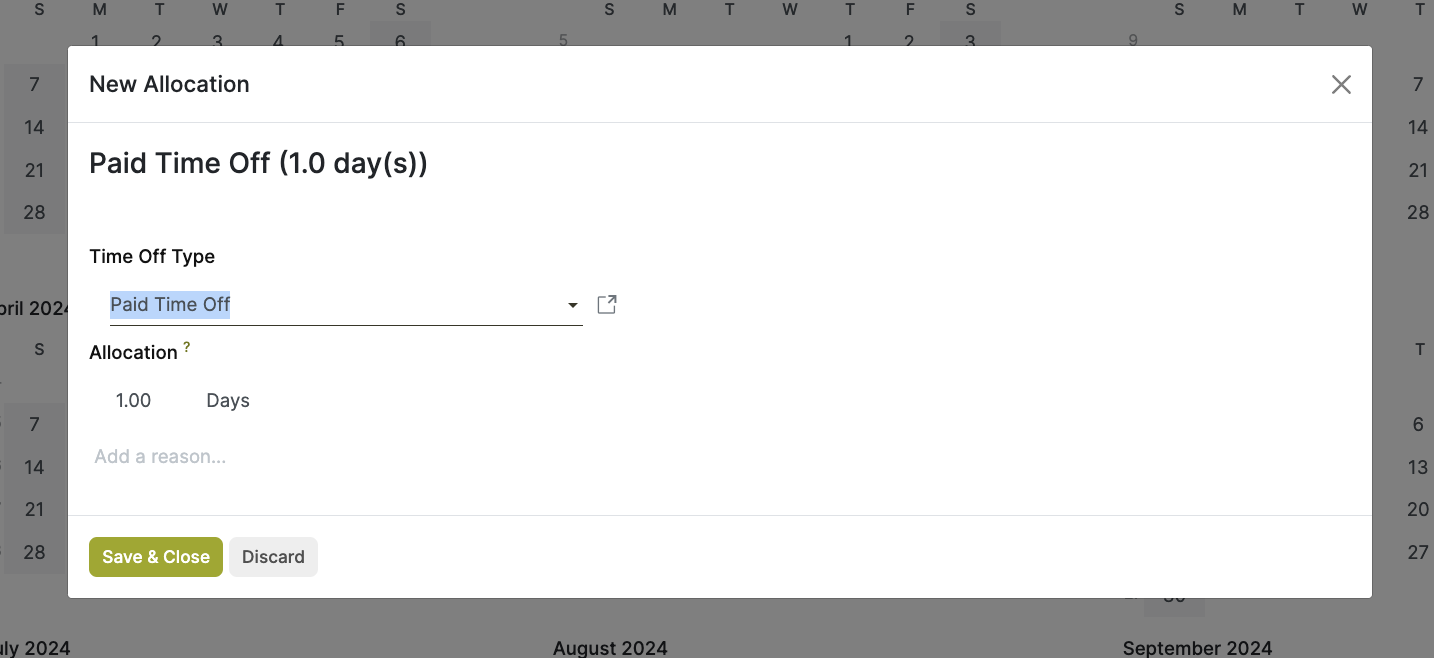
Fig 4.1 —Leave request form with leave type, dates, and approval status
How to Submit a Leave Request:
- Go to Time Off → New
- Select the Leave Type (e.g., Annual Leave, Sick Leave, Unpaid)
- Set the From and To dates
- Choose Half Day if applicable
- Enter a Description/Reason if required
- Click Save and then Confirm to submit for approval
- The manager receives a notification to approve or refuse

Fig 4.2 —Leave calendar view showing team absences and pending approvals
Key Fields Leave Type: Category of absence — determines rules and approval flow. From / To: Start and end dates of the requested leave period. Duration: Calculated in working days, respecting the work schedule. Remaining Days: Balance remaining for the selected leave type. Status: Draft → Confirmed → Validated (or Refused).
4.2 Leave Types
Leave Types define the rules for each category of absence — including allocation method, approval requirements, and whether the balance accrues over time.
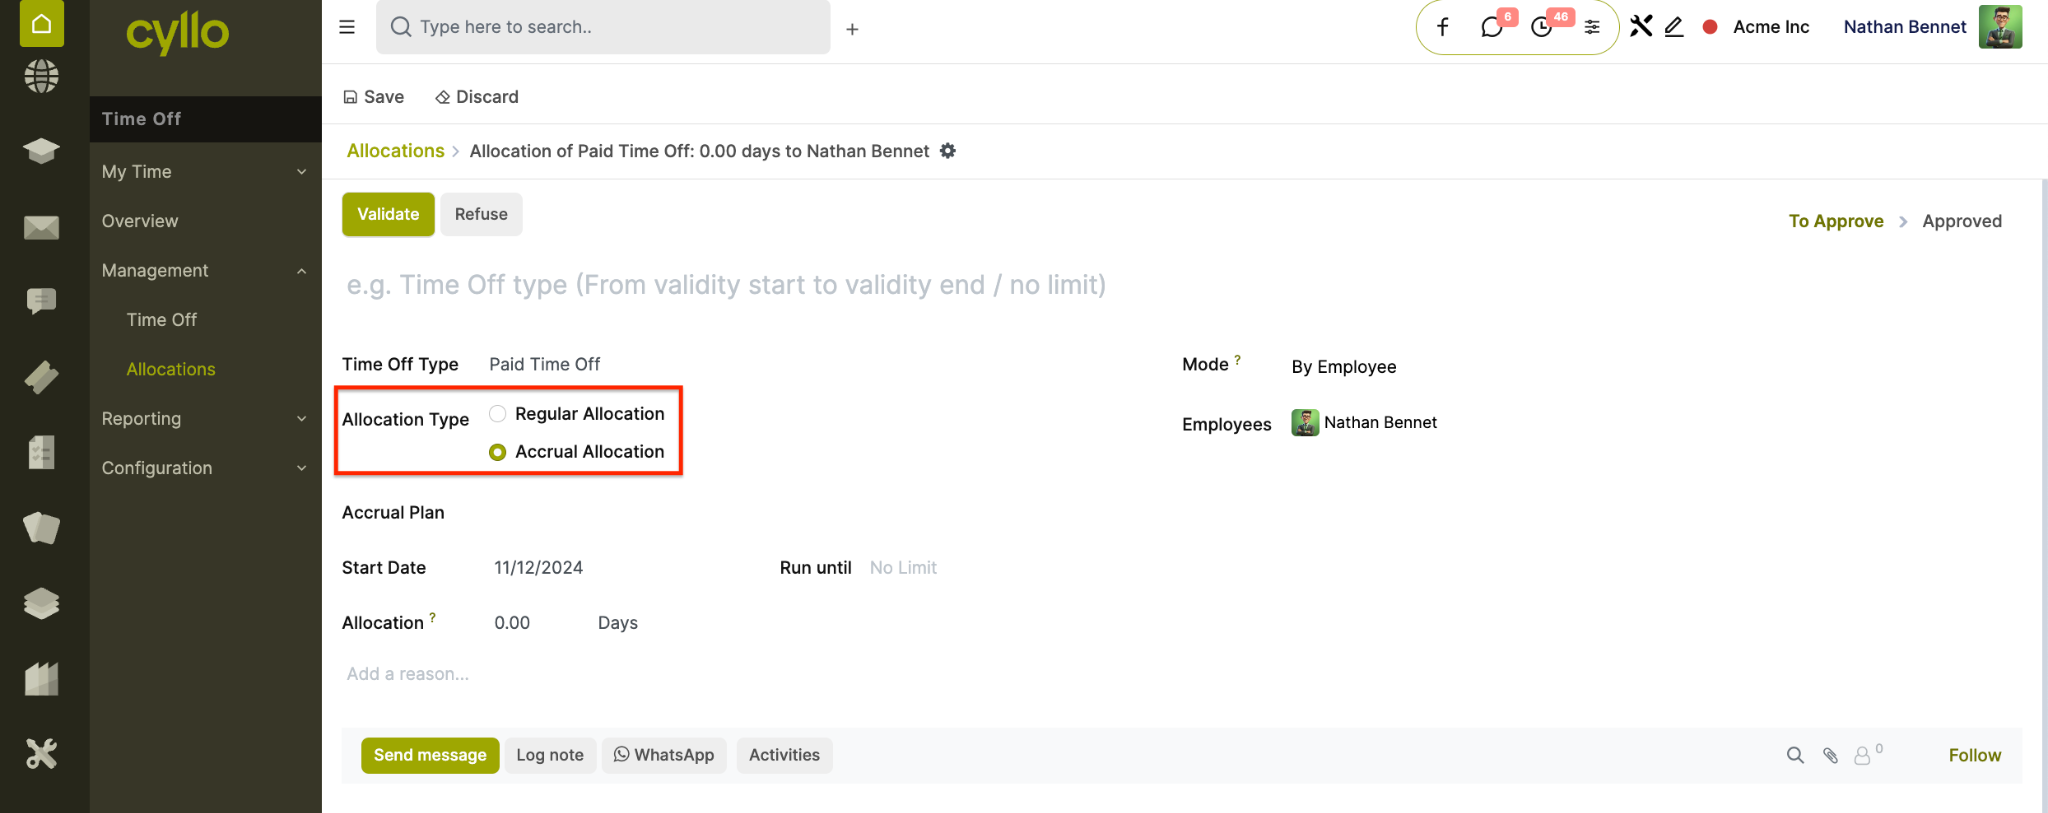
Fig 4.3 — Leave type configuration with approval and accrual settings
How to Configure Leave Types:
- Go to Time Off → Configuration → Activity Types
- Click New or open an existing leave type
- Enter the Leave Type Name (e.g., Annual Leave, Sick Leave, Compensatory)
- Set Approval: No Validation, By Time Off Manager, or Set by Time Off Manager
- Enable Requires Allocation if employees must be allocated leave before using it
- Enable Accrual if leave builds up over time
- Save and publish for employees to use
Note
Each leave type can have its own approval chain, accrual plan, and time-off limit. For example, Annual Leave can accrue monthly while Sick Leave can be freely allocated.
4.3 Accrual Plans
Accrual Plans automatically calculate and add leave balances over time — so employees earn leave progressively rather than receiving it all at once.
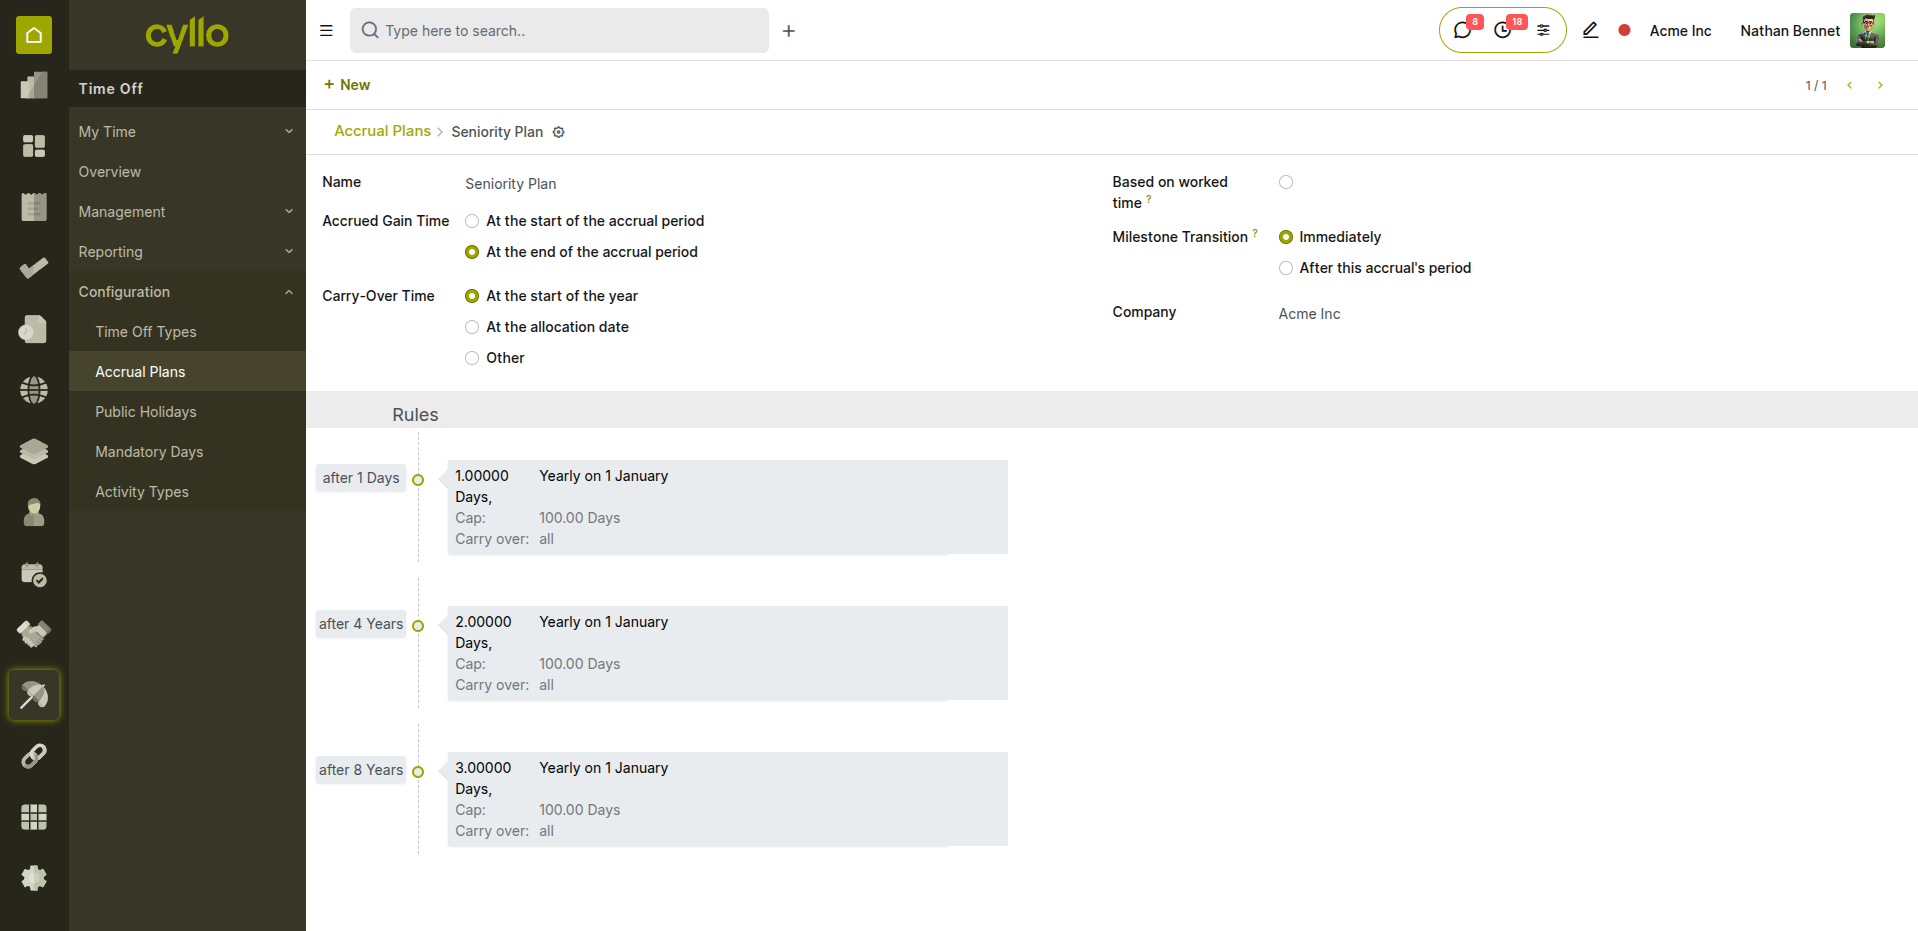
Fig 4.4 — Accrual plan configuration with frequency and carry-over rules
How to Set Up an Accrual Plan:
- Go to Time Off → Configuration → Accrual Plans → New
- Enter the Plan Name (e.g., Monthly Accrual — 1.5 days/month)
- Add Accrual Rules: set Frequency (daily, weekly, monthly)
- Set the Number of Days added per accrual period
- Configure Maximum Accrual limit and Carry-Over rules
- Save and link the plan to the relevant Leave Type
4.4 Allocations
Allocations assign a defined number of leave days to an employee for a specific period. They can be created manually by HR or triggered automatically by an accrual plan.
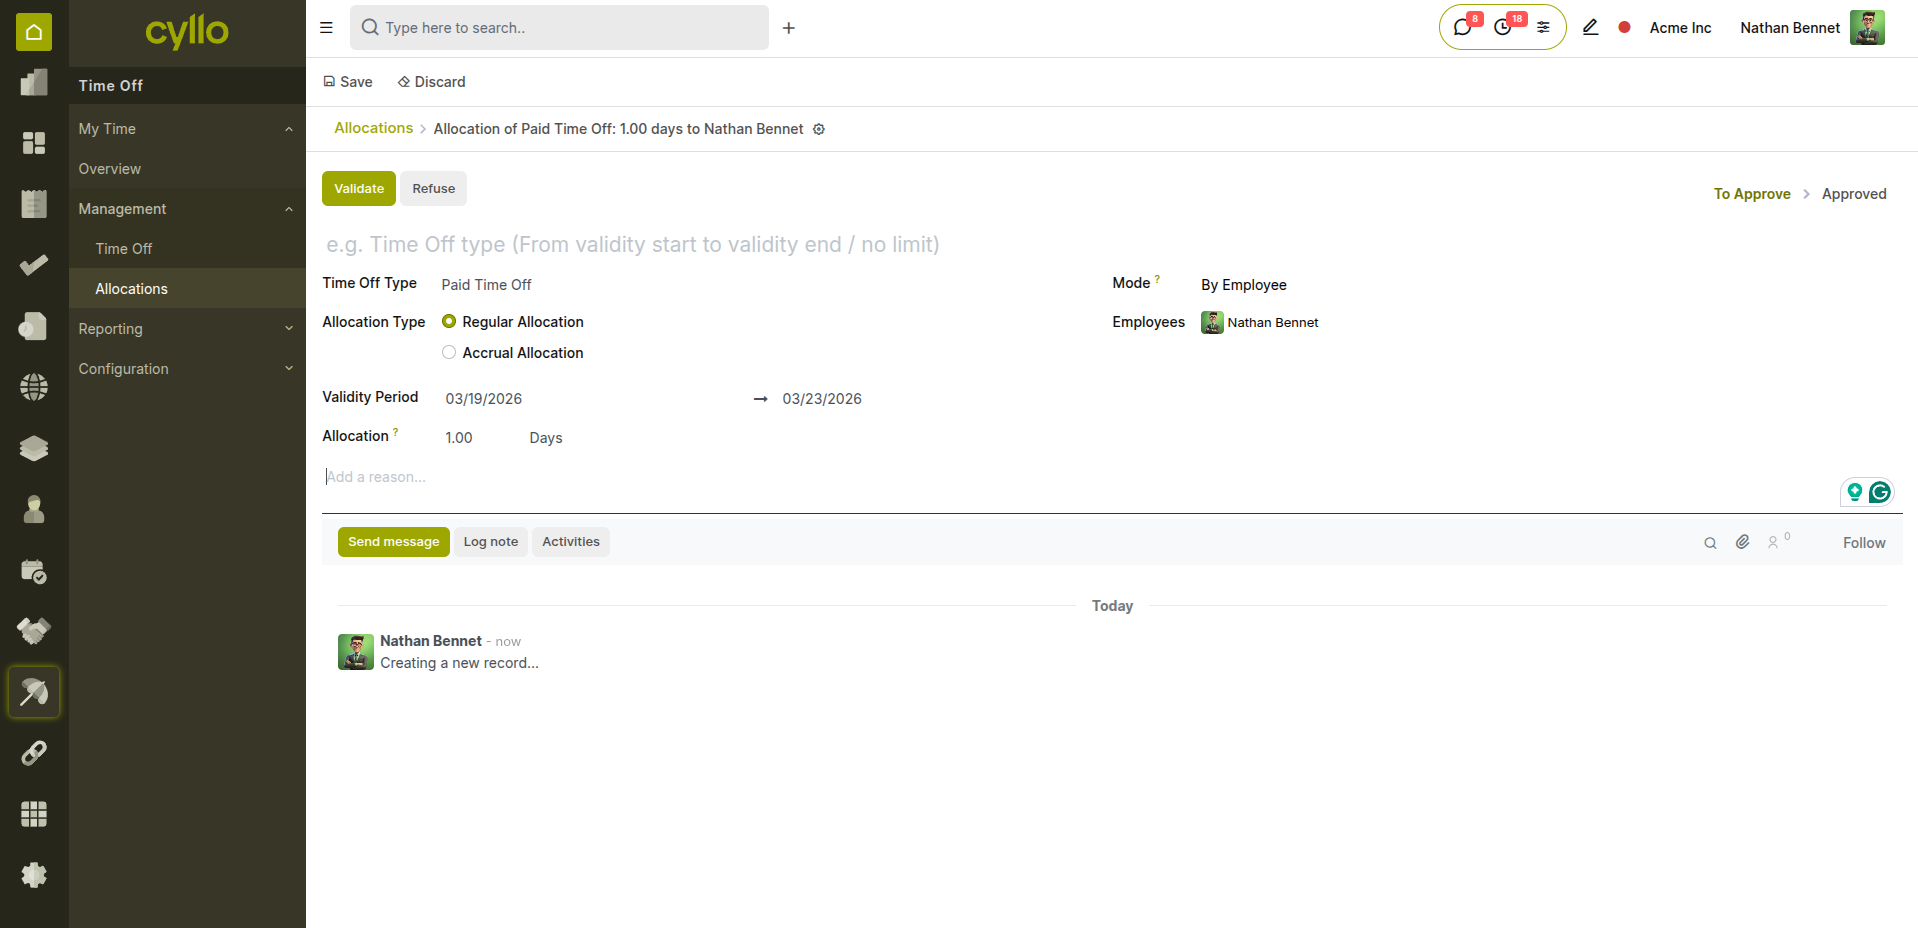
Fig 4.5 — Leave allocation view with employee, type, and balance details
How to Create a Manual Allocation:
- Go to Time Off → Managers → Allocation Requests → New
- Select the Employee
- Select the Leave Type
- Enter the Number of Days to allocate
- Set the Validity Period (start and end date)
- Click Validate to approve the allocation
Note
Use 'By HR' allocation mode to let managers allocate leave without employee requests. Use 'By Employee' mode to allow employees to request their own allocations subject to approval.
4.5 All Time Off
The time off extension provides team-level visibility to Time Off management — giving managers a consolidated view of all planned absences before approving new requests.
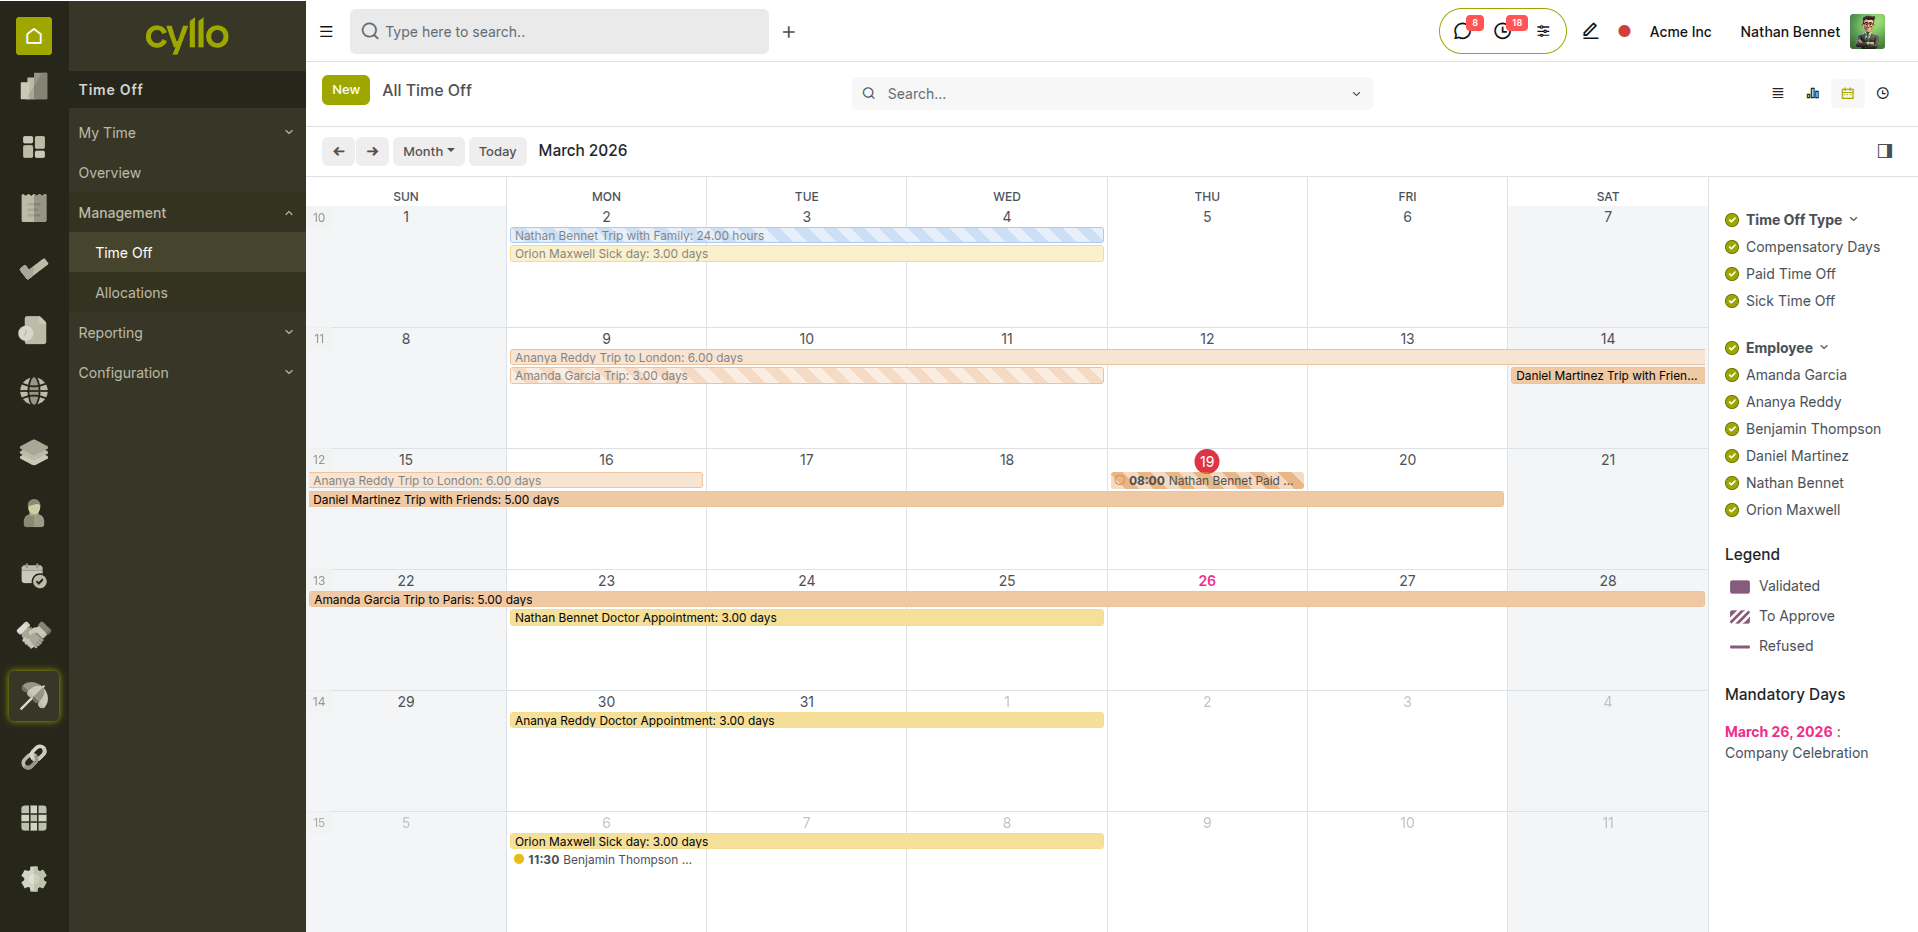
Fig 4.6 — TIme off calendar showing team absences
How to Use:
- Go to Time Off → Management → Time off
- Select the Date Range
- View a calendar of all approved and pending leaves per team member
- Identify coverage gaps before approving further requests
- Approve or refuse pending requests directly from this view
5. Payroll
5.1 Salary Structures
Salary Structures define how employee compensation is computed — which earnings, allowances, and deductions apply for each contract type and payroll period.
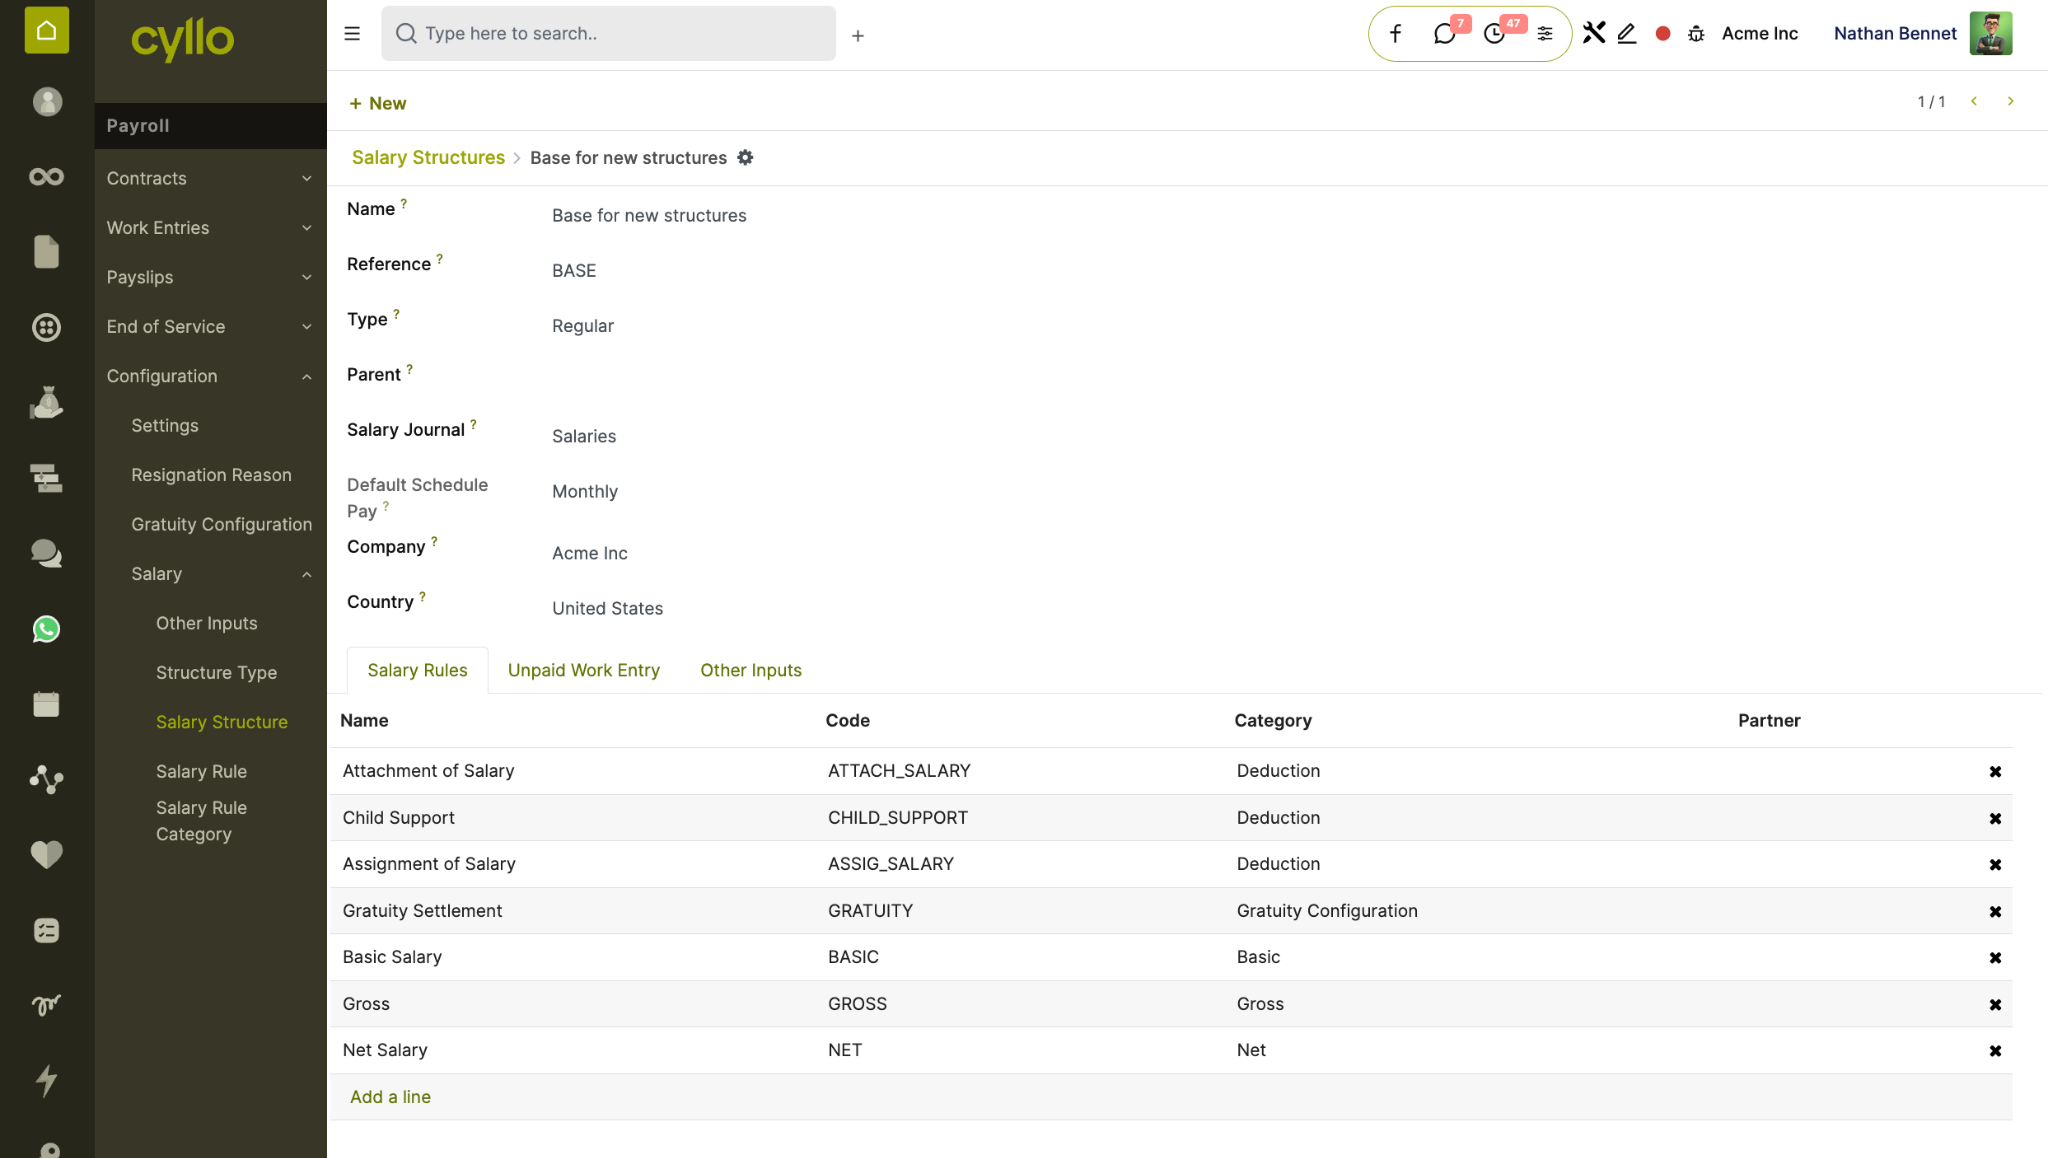
Fig 5.1 — Salary structure form with rules for earnings and deductions
How to Configure a Salary Structure:
- Go to Payroll → Configuration → Salary Structures → New
- Enter the Structure Name (e.g., Employee Monthly, Hourly Contractor)
- Select the Structure Type: Employee or Worker
- Add Salary Rules — each rule represents an earning or deduction line
- For each rule, set: Code, Category (Basic, Allowance, Deduction, Net), Computation type
- Set the Python Condition if the rule is conditional
- Save the structure and link it to employee contracts
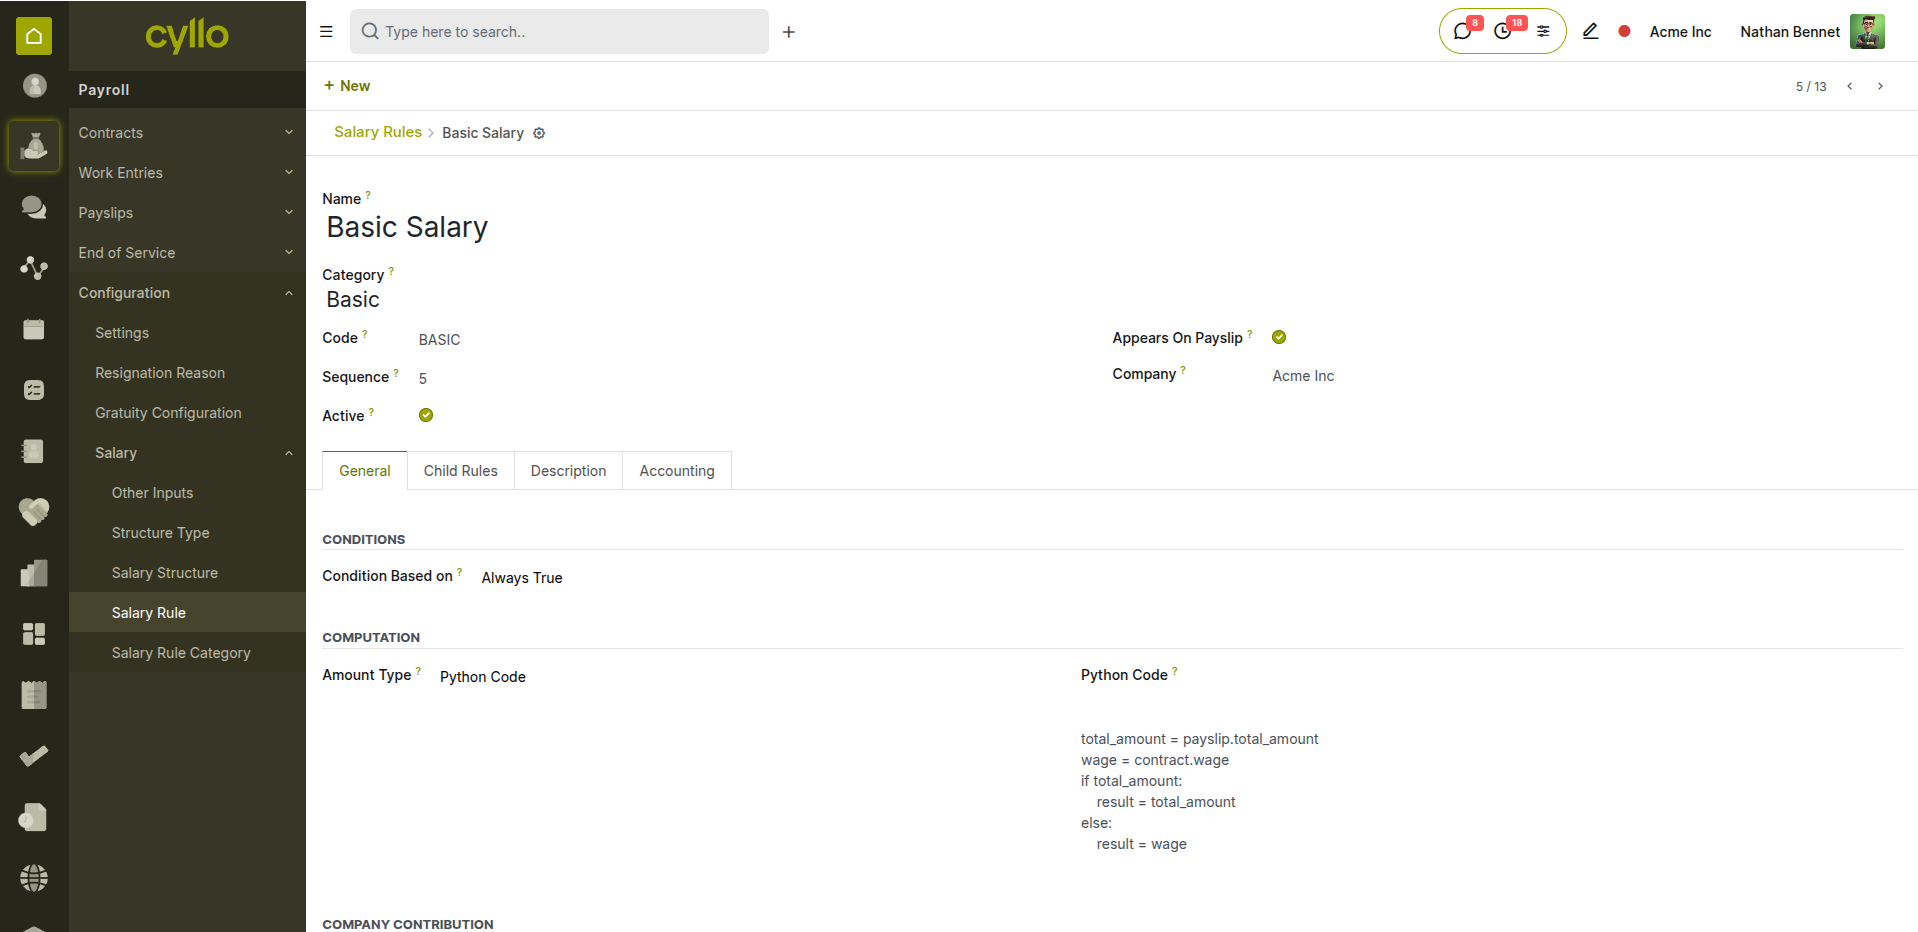
Fig 5.2 — Salary rules list with computation types and conditions
Key Fields Structure Name: Identifies the payroll structure (e.g., Monthly Employee). Salary Rules: Individual lines for Basic Pay, HRA, Transport, Tax, Net Pay. Rule Category: Groups rules — Basic, Allowances, Deductions, Gross, Net. Computation: Fixed amount, % of another rule, or Python expression. Condition: Always True, Range (based on contract wage), or Python code.
Note
Each contract is linked to one Salary Structure. When a payslip is computed, Cyllo evaluates all rules in the structure in order — earlier rules can be referenced by later ones.
5.2 Payslip Generation
Individual payslips are generated per employee per pay period. Cyllo computes all salary rule values automatically from the linked contract, attendance records, and work entries.
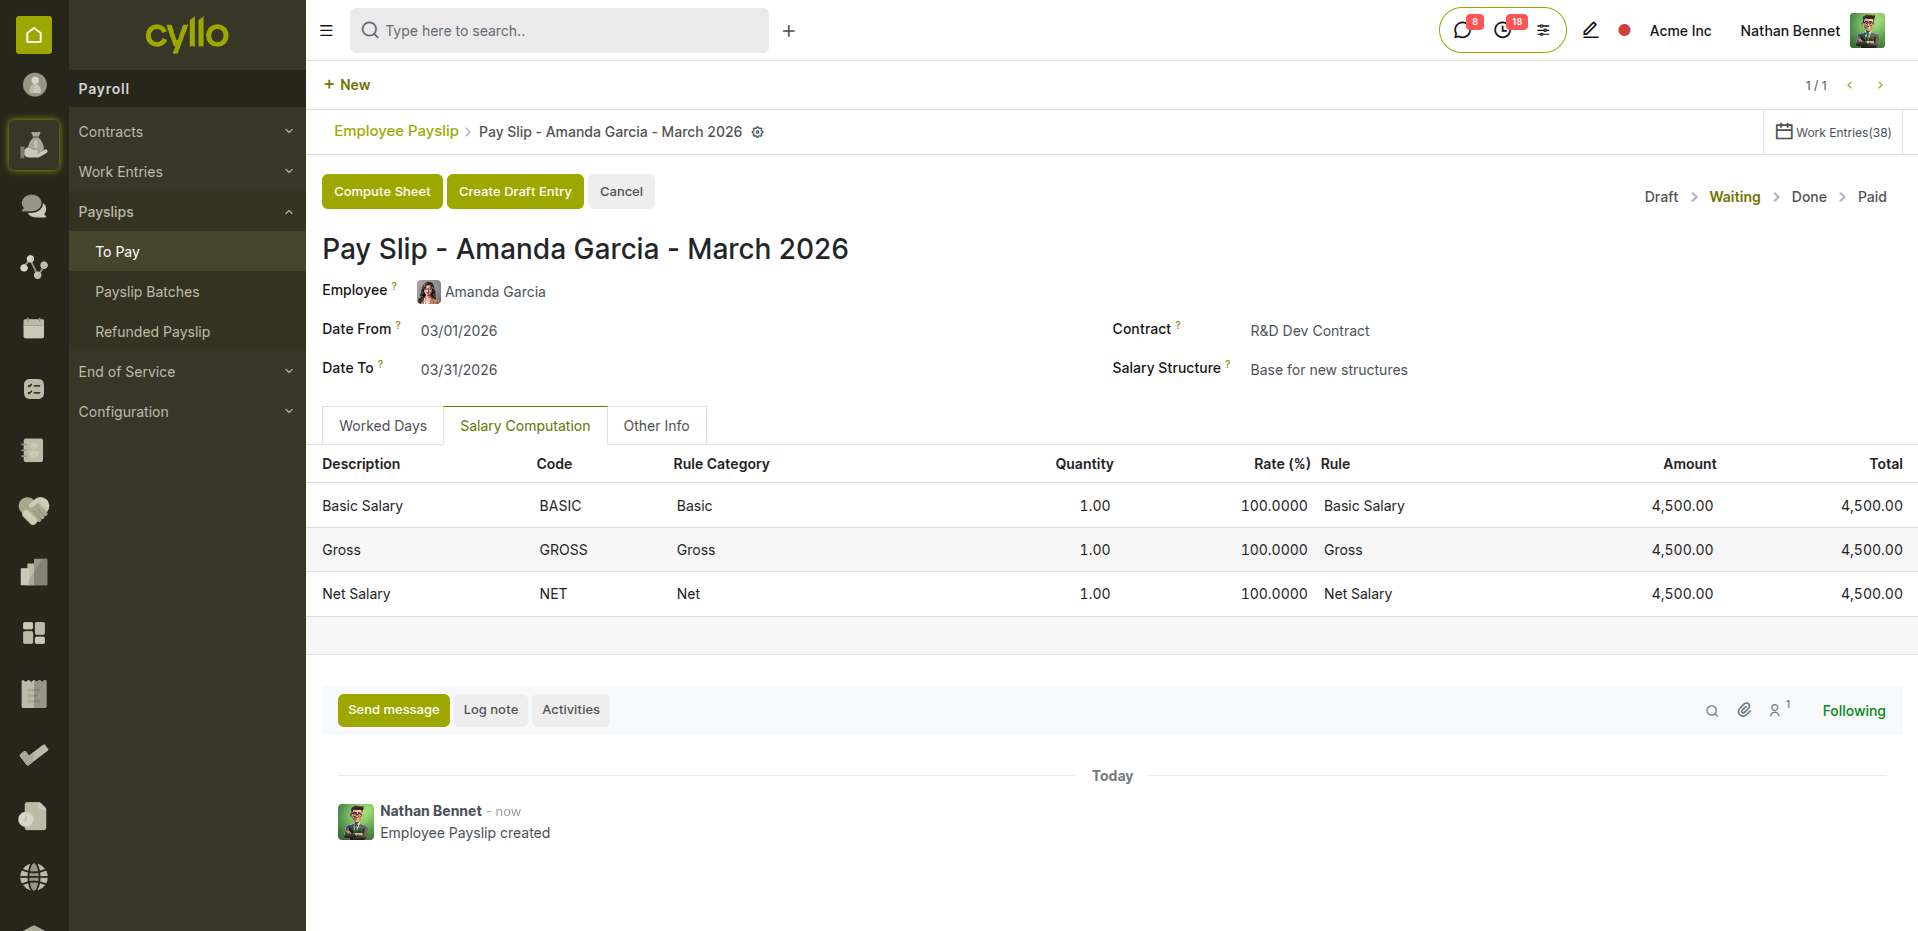
Fig 5.3 — Payslip form showing computed salary lines for an employee
How to Generate a Payslip:
- Go to Payroll → Payslips → All Payslips → New
- Select the Employee
- Set the Pay Period (from and to dates)
- Click Save — the salary structure and contract are loaded automatically
- Click Compute Sheet to calculate all salary rule values
- Review the Salary Computation tab — verify earnings and deductions
- Click Confirm to post the payslip and create the accounting entry
Key Fields Employee: The staff member this payslip belongs to. Pay Period: The from and to dates covering this payroll cycle. Contract: The active contract — determines wage and structure. Salary Structure: Defines which rules and computations apply. Basic Pay: The base wage from the contract. Net Salary: Final amount after all earnings and deductions. Status: Draft → Confirmed → Done → Paid.
5.3 Batch Payslips
Batch Payslips allow HR to process payroll for multiple employees at once — significantly reducing time for monthly payroll runs.
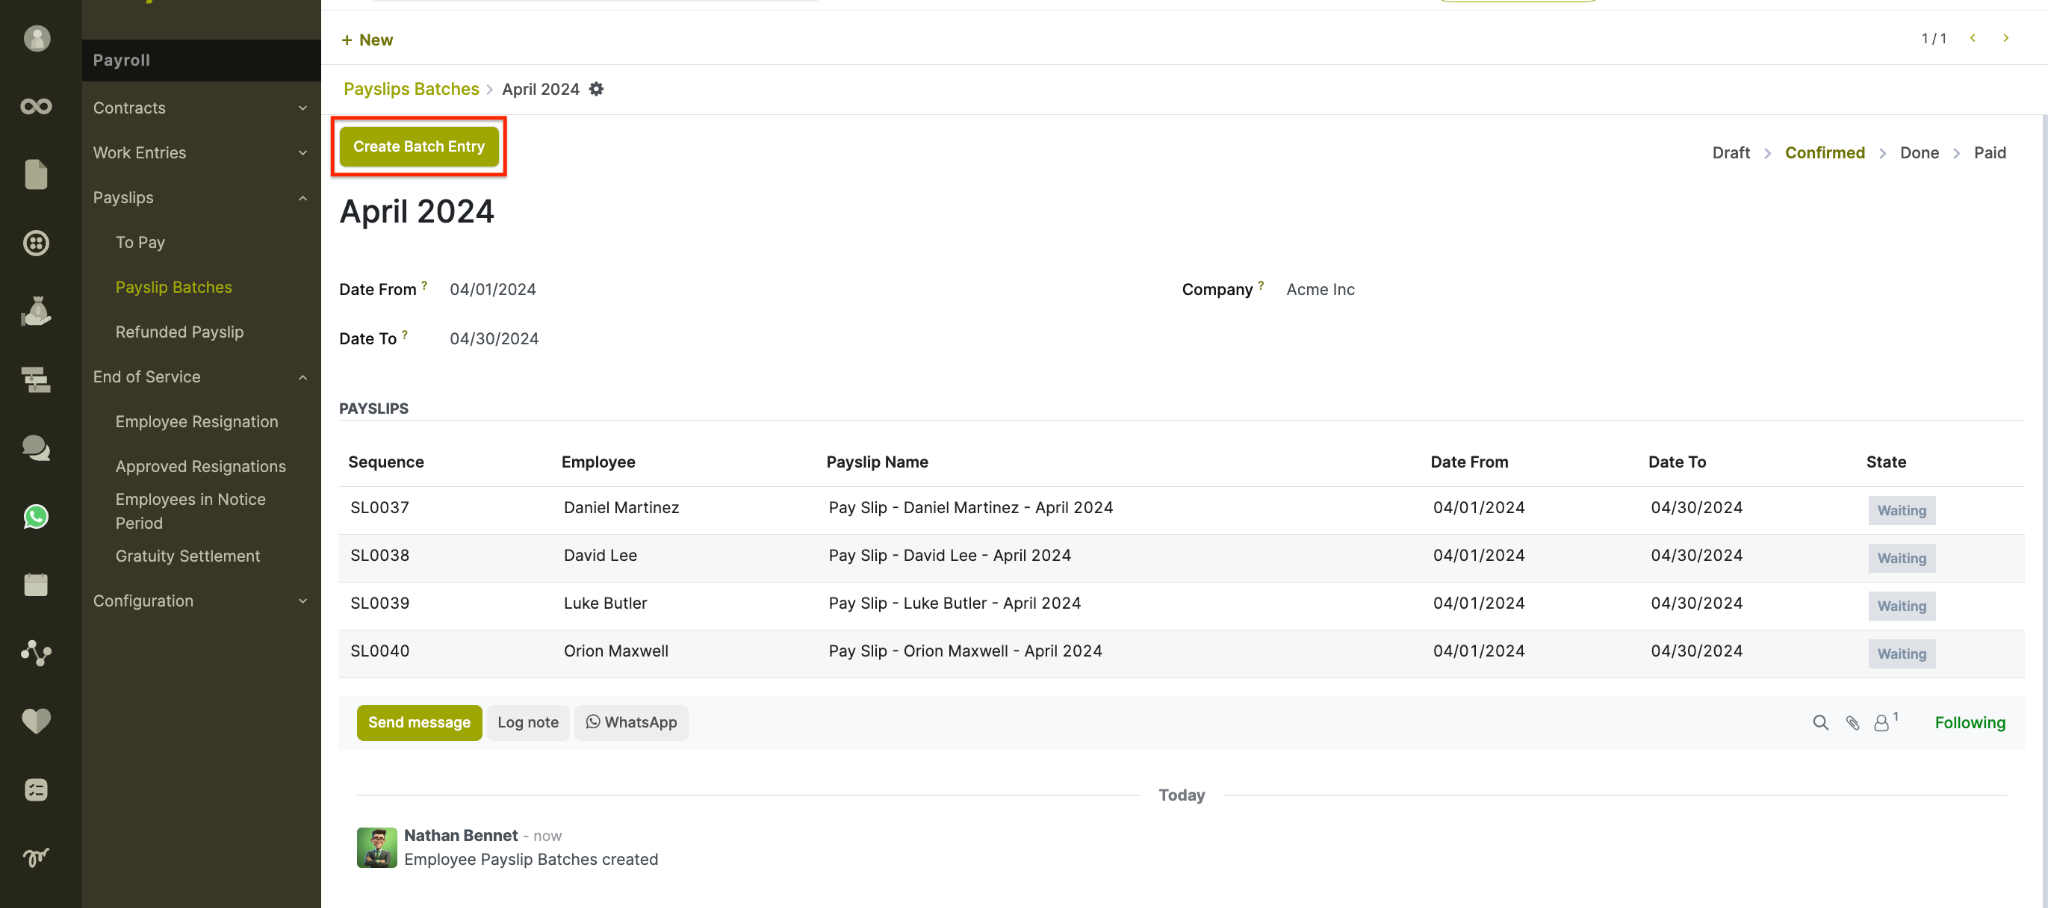
Fig 5.4 — Payslip batch with employee list and batch confirmation controls
How to Run a Payslip Batch:
- Go to Payroll → Payslips → Batches → New
- Enter the Batch Name (e.g., March 2026 Payroll)
- Set the Pay Period dates
- Click Generate Payslips — select the department or employees to include
- Cyllo creates individual draft payslips for each selected employee
- Click Confirm to compute all payslips in the batch
- Review and click Validate to post all payslips and create journal entries
- Mark as Paid once bank transfers are completed
Batch States Draft: Batch created; payslips not yet generated or computed. Confirmed: All payslips computed and reviewed; ready for validation. Done: Payslips validated and accounting entries posted. Paid: Salary disbursed to employees; batch closed.
5.4 Salary Attachments
Salary Attachments allow HR to record deductions or additions to an employee's payslip for a specified period — such as loan repayments, court orders, or one-time bonuses.
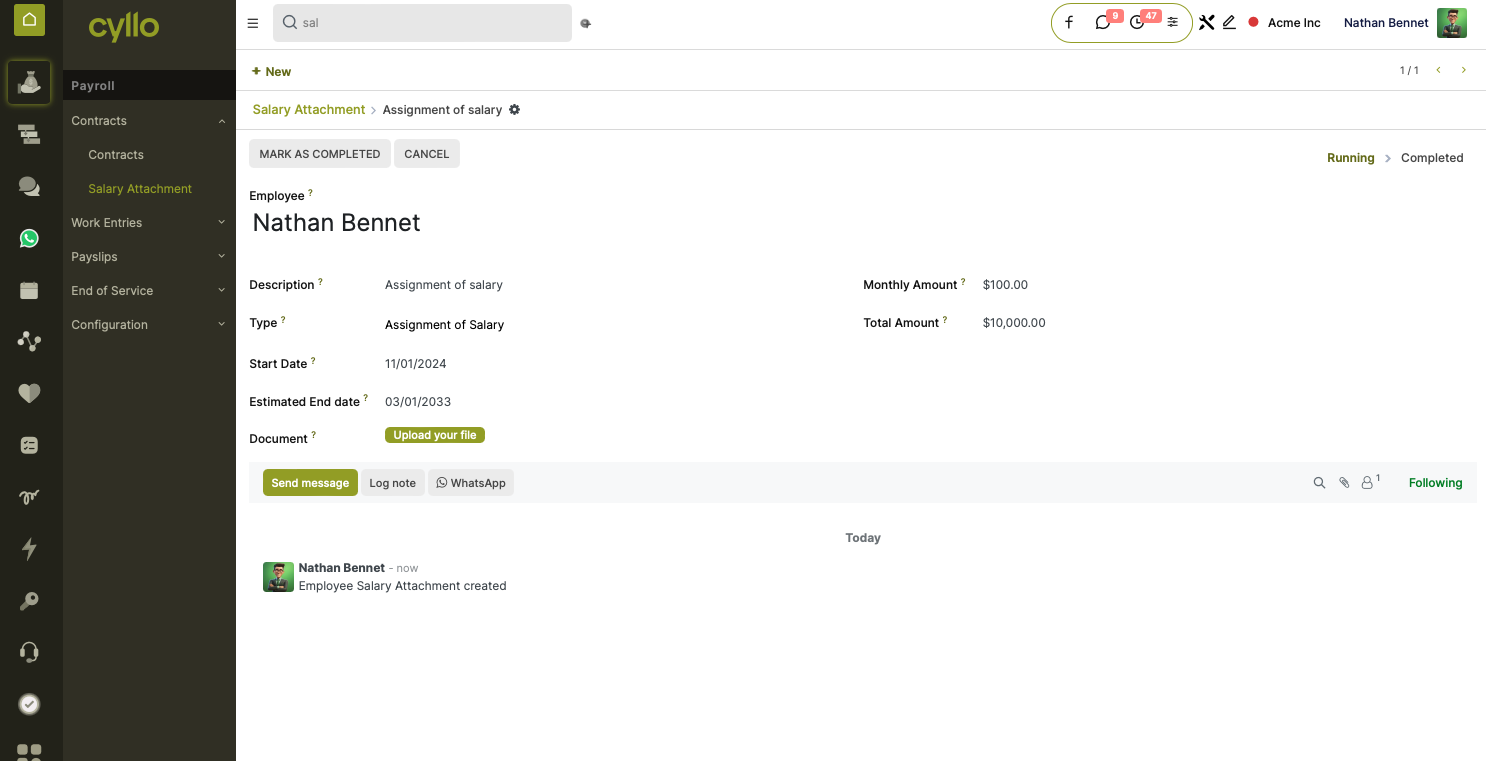
Fig 5.5 — Salary attachment form with amount, type, and supporting document
How to Create a Salary Attachment:
- Go to Payroll → Employees → Open the employee record
- Click the Salary Attachments smart button
- Click New
- Select the Type: Attachment of Salary, Assignment of Salary, or Child Support
- Enter the Monthly Amount or Total Amount (balance is tracked automatically)
- Set the Start Date and optionally an End Date
- Attach supporting documents (court order, loan agreement)
- Save — the attachment feeds directly into future payslip computations
Note
If you enter a Total Amount instead of a Monthly Amount, Cyllo divides the total across payslips until the balance reaches zero — no manual tracking needed.
6. Resignation & Gratuity
6.1 Resignation Management
The Resignation Management module provides a structured, auditable workflow for employee departures — tracking the full timeline from submission through HR approval and employee record update.
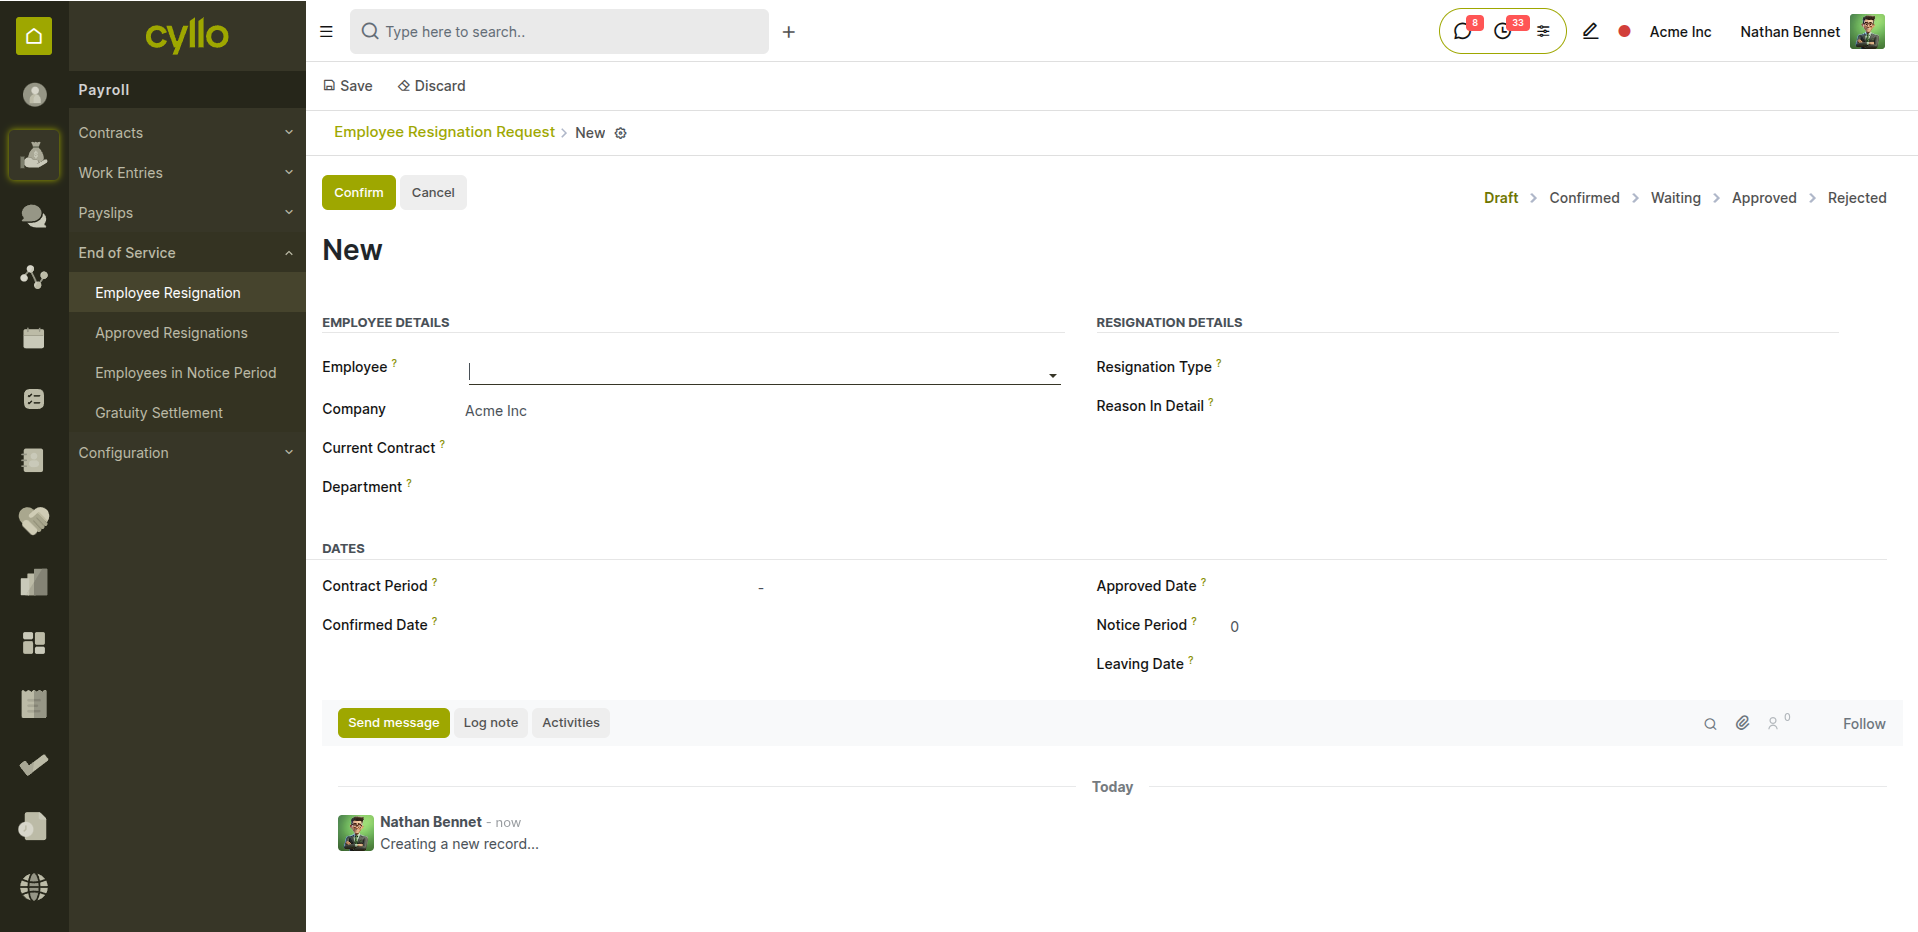
Fig 6.1 — Resignation request form with status, employee, and leaving date
How to Create a Resignation Request:
- Go to Payroll → Resignation → Resignation Requests → New
- Select the Employee
- Set the Resignation Date (date employee submits notice)
- Enter the Notice Period (days)
- Select the Resignation Type (e.g., Voluntary Resignation, End of Contract)
- Enter a Reason description
- Click Confirm to advance from Draft to Confirmed state
- HR reviews and clicks Approve — employee record is marked as resigned
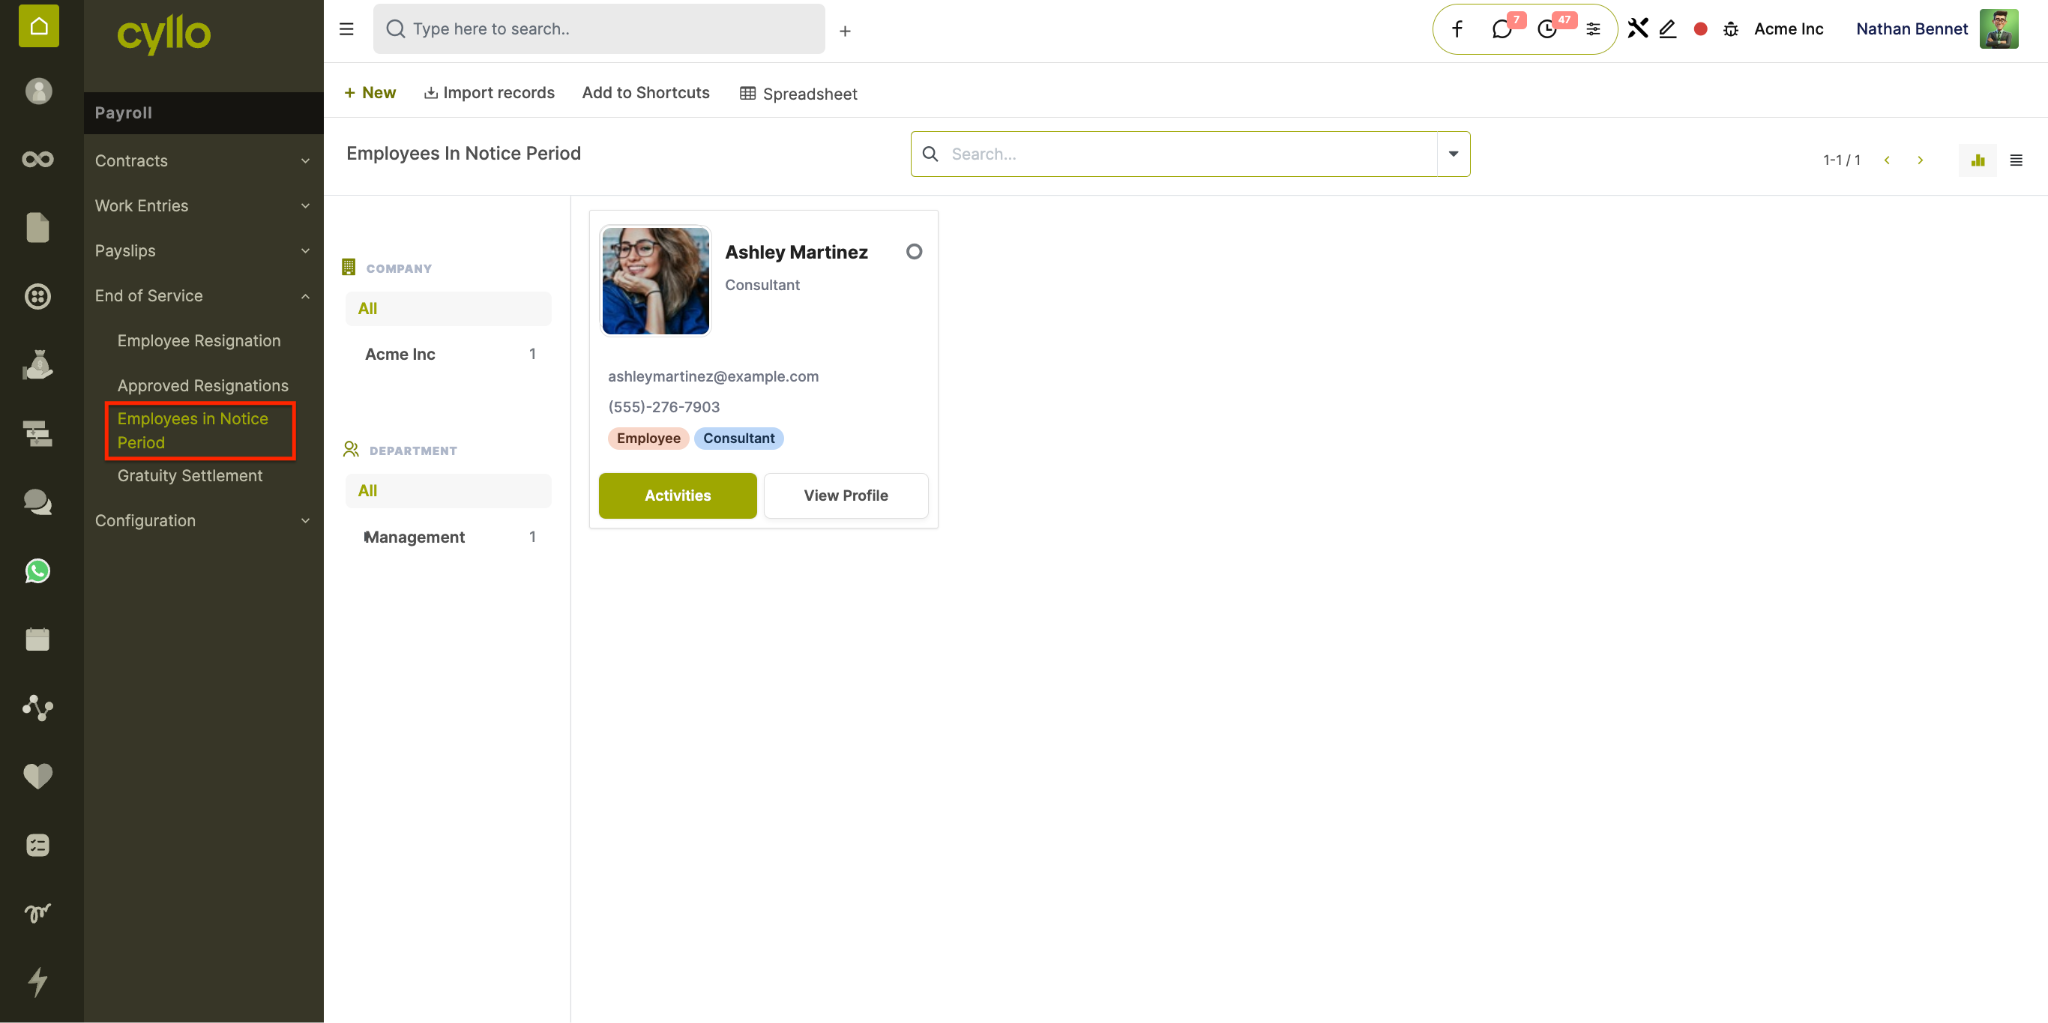
Fig 6.2 — Resignation form showing notice period, type, and approval timeline
Resignation States Draft: Resignation request created and saved — not yet submitted. Confirmed: Employee confirms and formally submits the resignation. Waiting: Pending manager or HR review and action. Approved: HR approves — employee marked as resigned on their HR record. Refused: Request rejected or withdrawn.
Note
Resignation Type categories are configurable per company from Payroll → Configuration → Resignation Reasons.
6.2 Gratuity Settlement
Gratuity Settlement automates end-of-service benefit calculation based on total working years, contract type, and company-configured rate brackets — eliminating manual spreadsheet calculations.
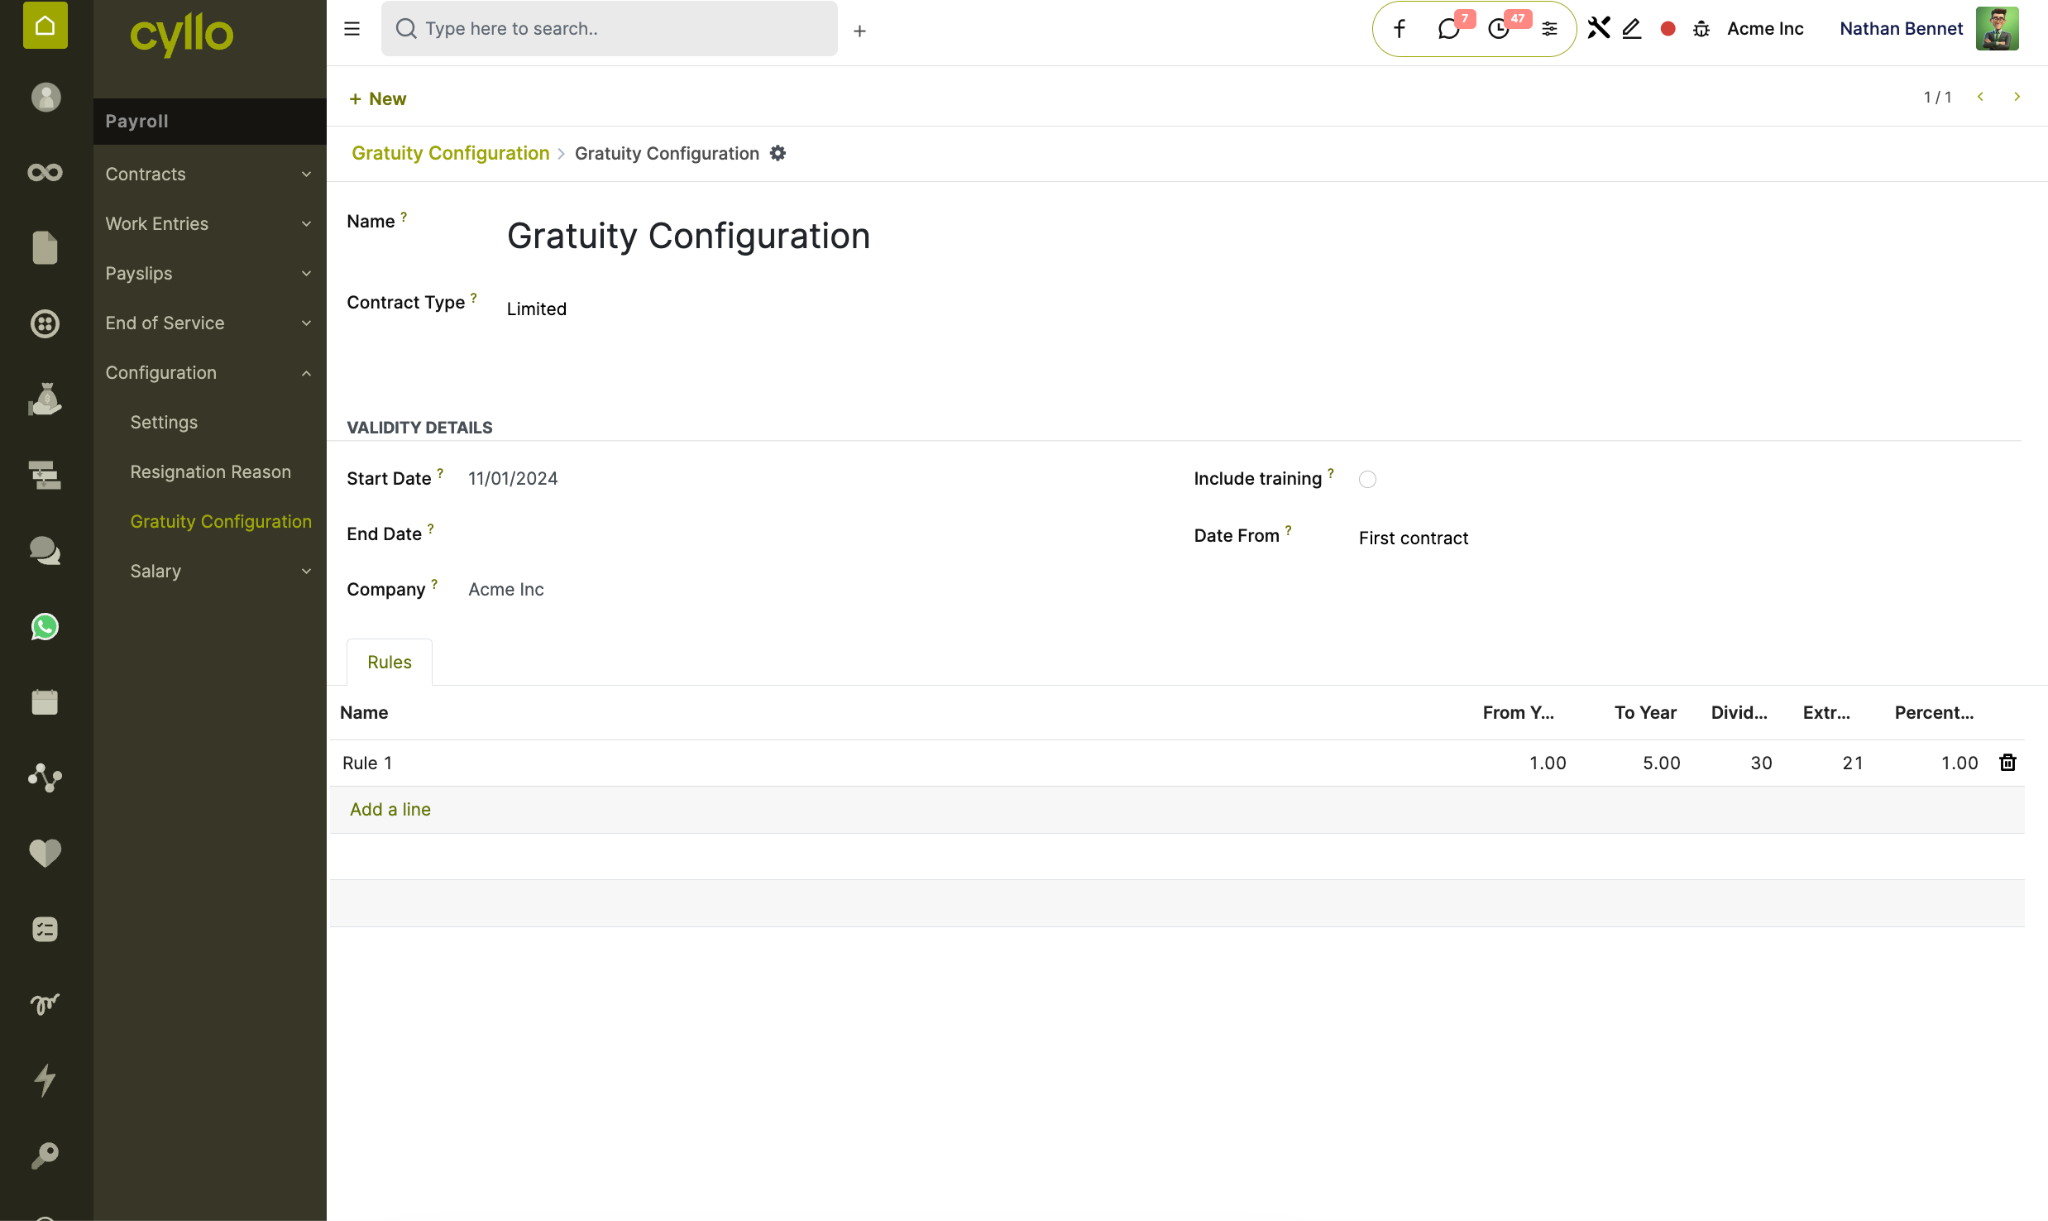
Fig 6.3 — Gratuity settlement form
How to Create a Gratuity Settlement:
- Go to Payroll → Resignation → Gratuity Settlements → New
- Select the Employee
- The system auto-fills: joining date, leaving date, and total working years
- Training period (leave taken) is auto-deducted from gratuity years
- Select the Contract Type: Limited or Open
- The Gratuity Amount is calculated automatically from configured rate brackets
- Click Confirm → Approve → Mark as Paid after disbursement
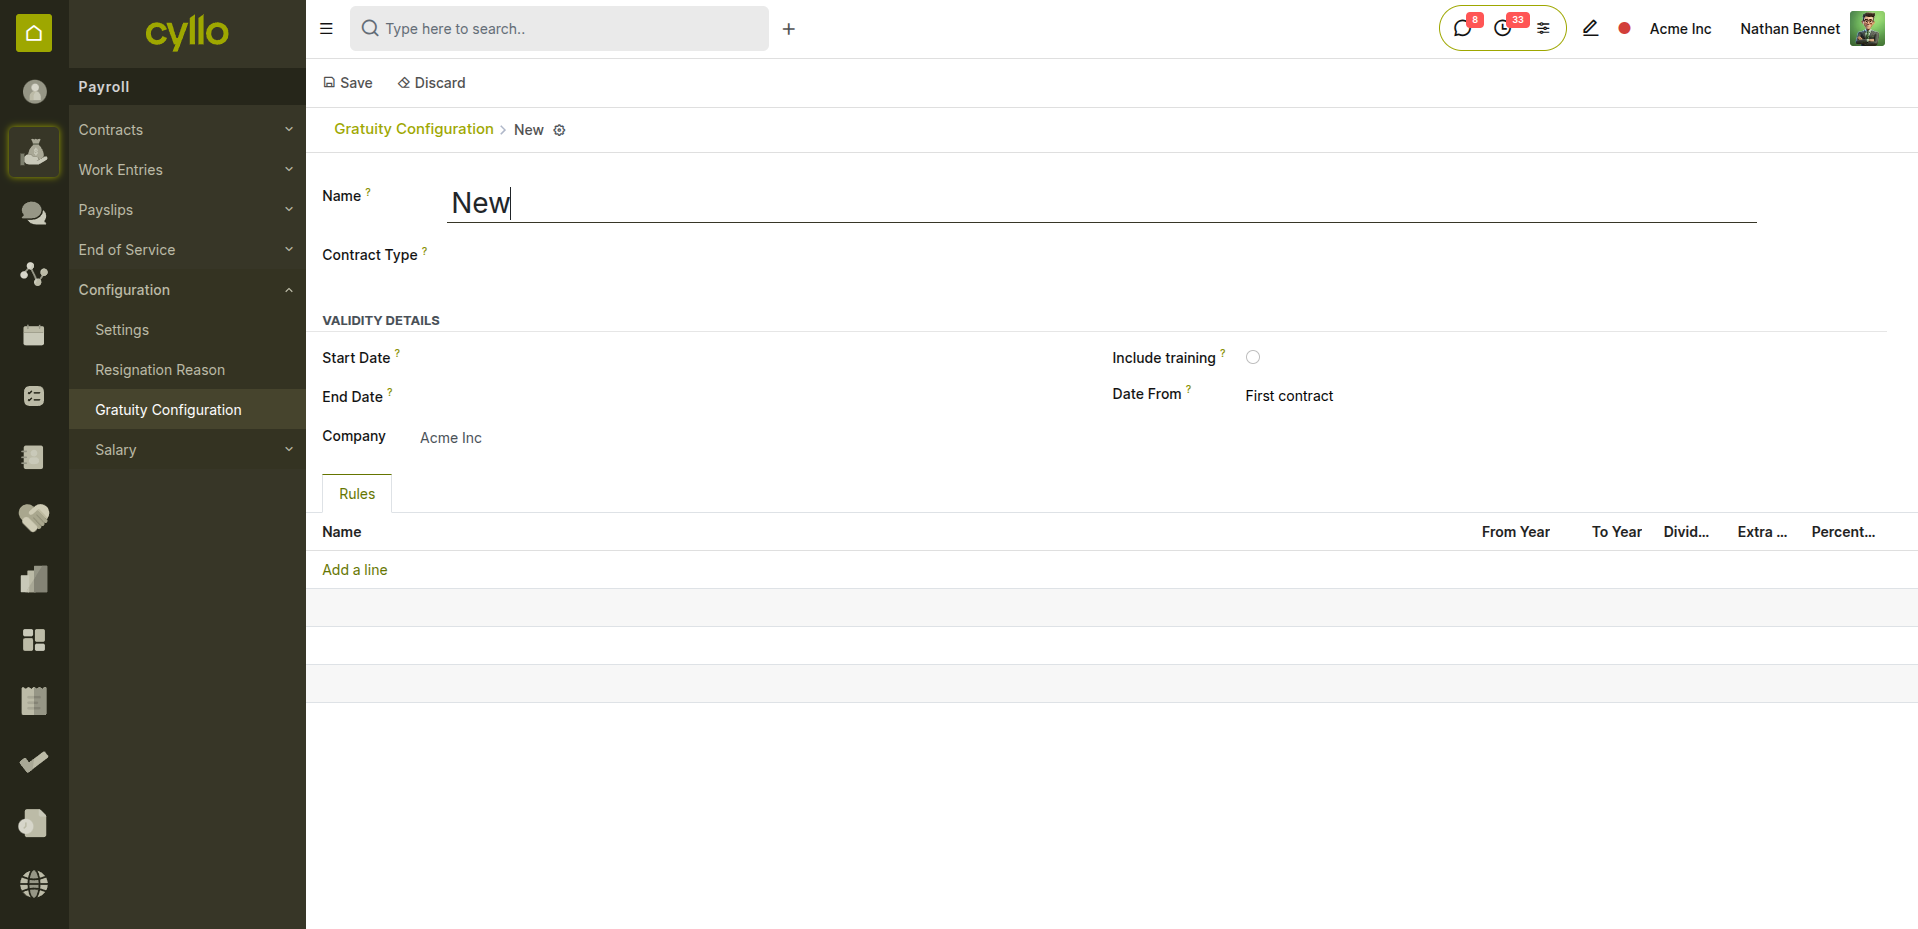
Fig 6.4 — Gratuity configuration with rate brackets per duration tier
Gratuity States Draft: Settlement created; calculations not yet reviewed. Confirmed: Gratuity amount reviewed and confirmed by HR. Approved: Approved by Finance or management for payment. Paid: Gratuity amount disbursed to the employee. Cancelled: Settlement cancelled (e.g., employee rescinds resignation).
Note
Gratuity rate brackets are configured per company from Payroll → Configuration → Gratuity Settings. Different rates can apply for 0–5 years, 5–10 years, and 10+ years of service.
7. Planning & Fleet
7.1 Planning
The Planning module enables HR managers to create and manage employee work schedules, allocate resources to projects or roles, and maintain a visual calendar of all workforce assignments.
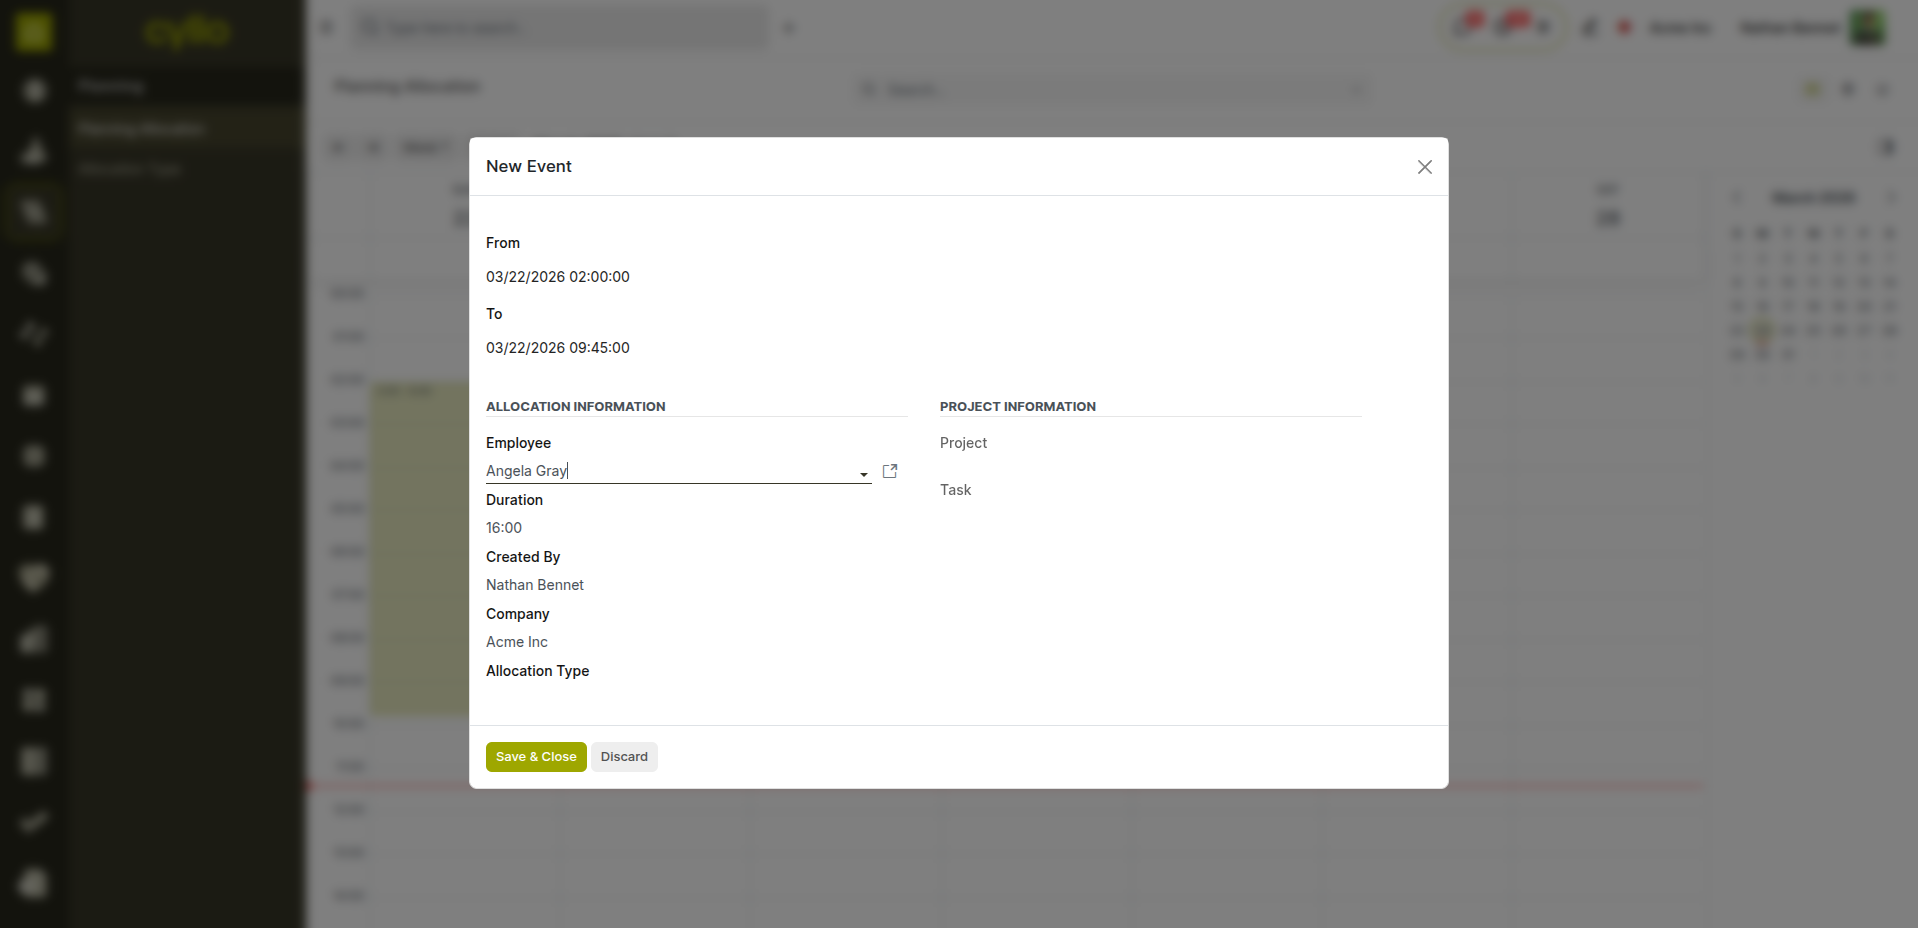
Fig 7.1 — Planning calendar view showing shift allocations per employee
How to Create a Work Schedule Slot:
- Go to Planning → Schedule → New
- Select the Employee
- Select the Project or Department the slot is assigned to
- Set the Start Date/Time and Stop Date/Time
- Enter an optional Note about the assignment
- Click Save — the slot appears in the planning calendar
- Send the schedule to employees using 'Send Schedule' to notify them by email
Key Fields Employee: The staff member being assigned to this shift. Role: Job function for the slot — used when employee is not yet assigned. Project / Dept: The work area this shift is allocated to. Start / Stop: Date and time boundaries of the scheduled shift. Allocated Hours: Total hours in the shift — used for resource utilisation reports.
Note
Work Entry Contract Planning (cyllo_hr_work_entry_contract_planning) links planning slots directly to the employee's contract for accurate pay period hour computation.
7.2 Fleet Management
The Fleet module manages the complete lifecycle of company vehicles — from the initial request and contract through maintenance scheduling, service records, and expense tracking.
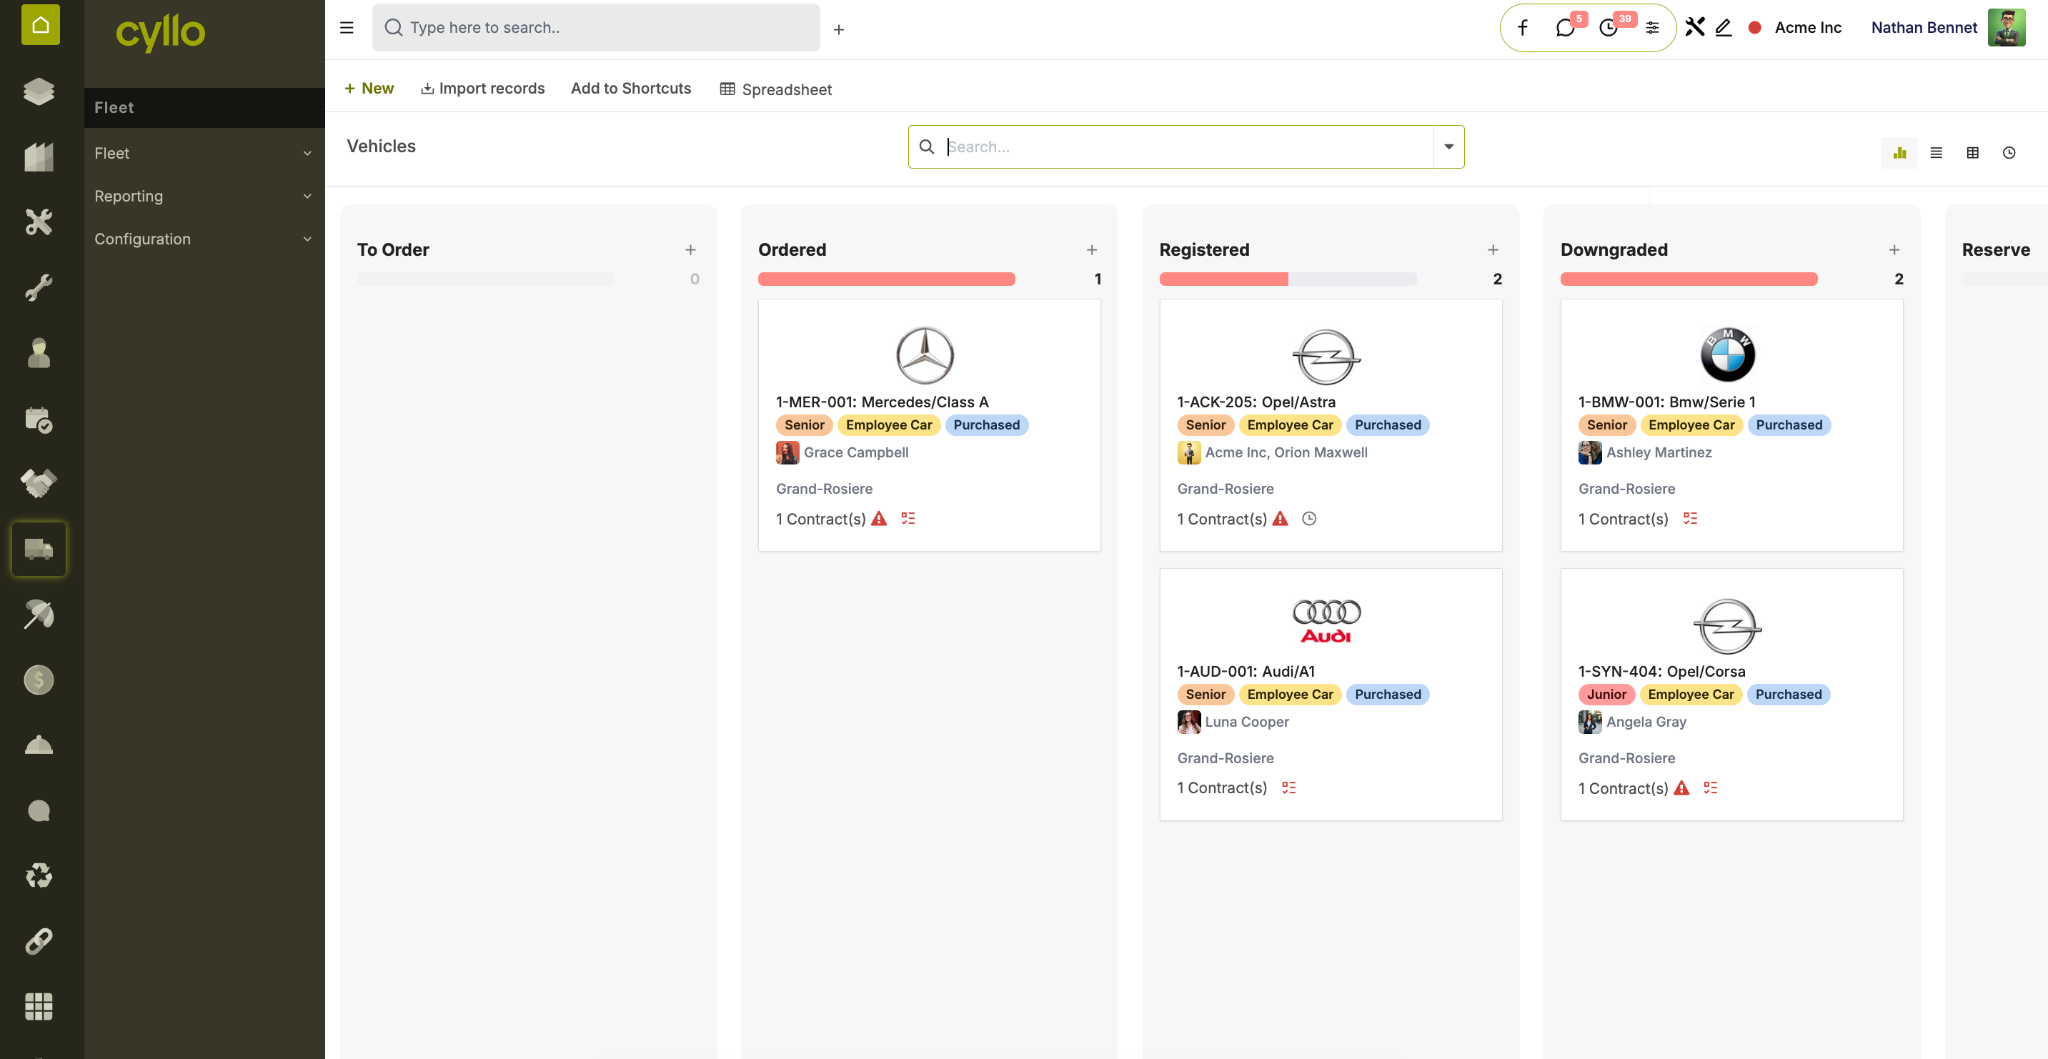
Fig 7.2 — Fleet vehicle list with contract status and mileage indicators
How to Register a Vehicle:
- Go to Fleet → Fleet → Vehicles → New
- Enter the Vehicle Model and Licence Plate
- Assign a Driver (employee linked to the vehicle)
- Set the First Contract date
- Add tags (e.g., Company Car, Pool Vehicle) for filtering
- Go to the Contract tab to add fuel type, acquisition value, and insurance details
- Save the vehicle record
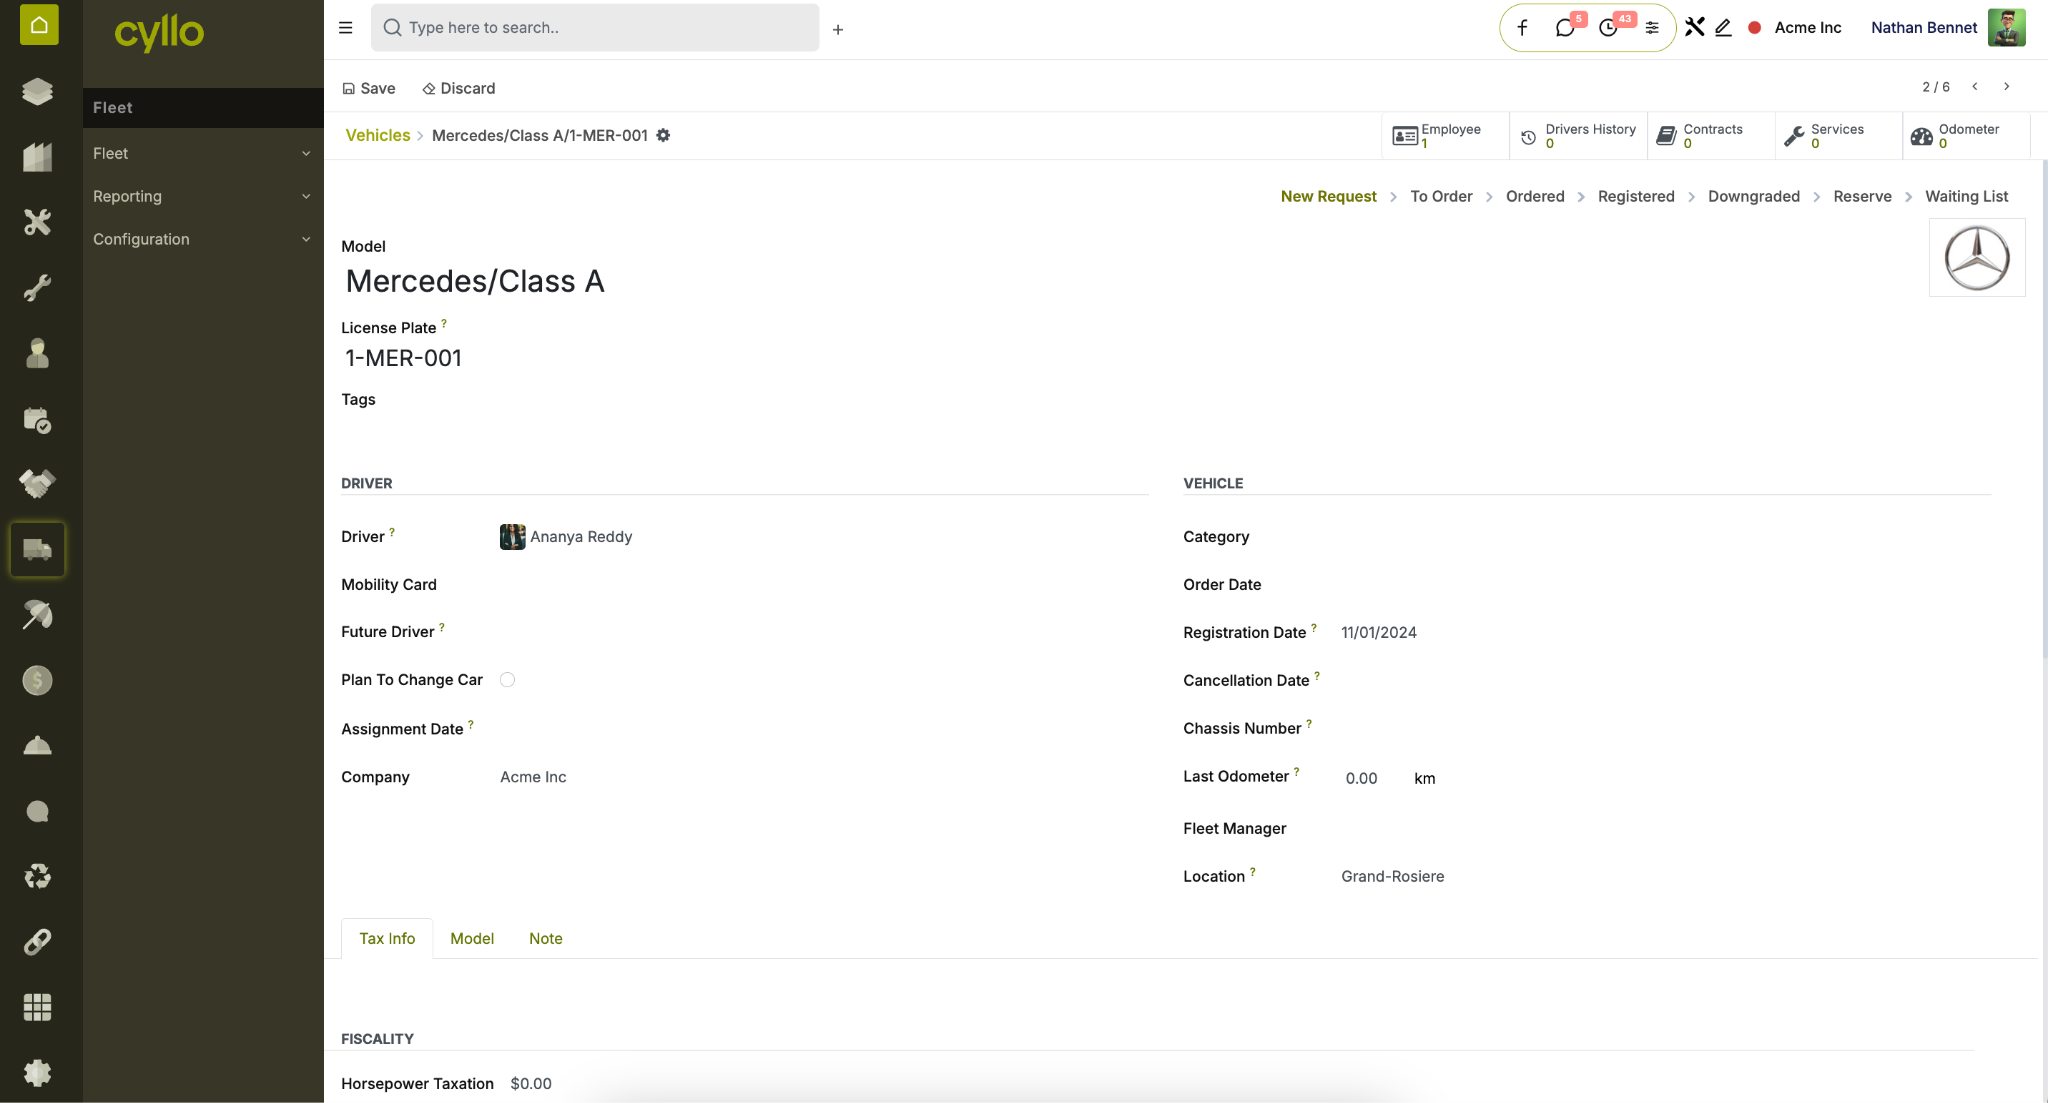
Fig 7.3 — Fleet vehicle list with contract status and mileage indicators
Vehicle Request Workflow New Request: Employee submits a vehicle request for HR/manager review. To Order: Request approved — vehicle procurement initiated. Ordered: Purchase order placed with vendor or dealer. Registered: Vehicle received, registered, and assigned to the driver. How to Create a Service Record:
- Go to Fleet → Fleet → Service → New
- Select the Vehicle
- Select the Service Type (e.g., Oil Change, Tyre Replacement, Insurance Renewal)
- Enter the Date, Odometer reading, and Cost
- Set the Next Service Date or Next Service Odometer for scheduling
- Save — the record appears in the vehicle's service history
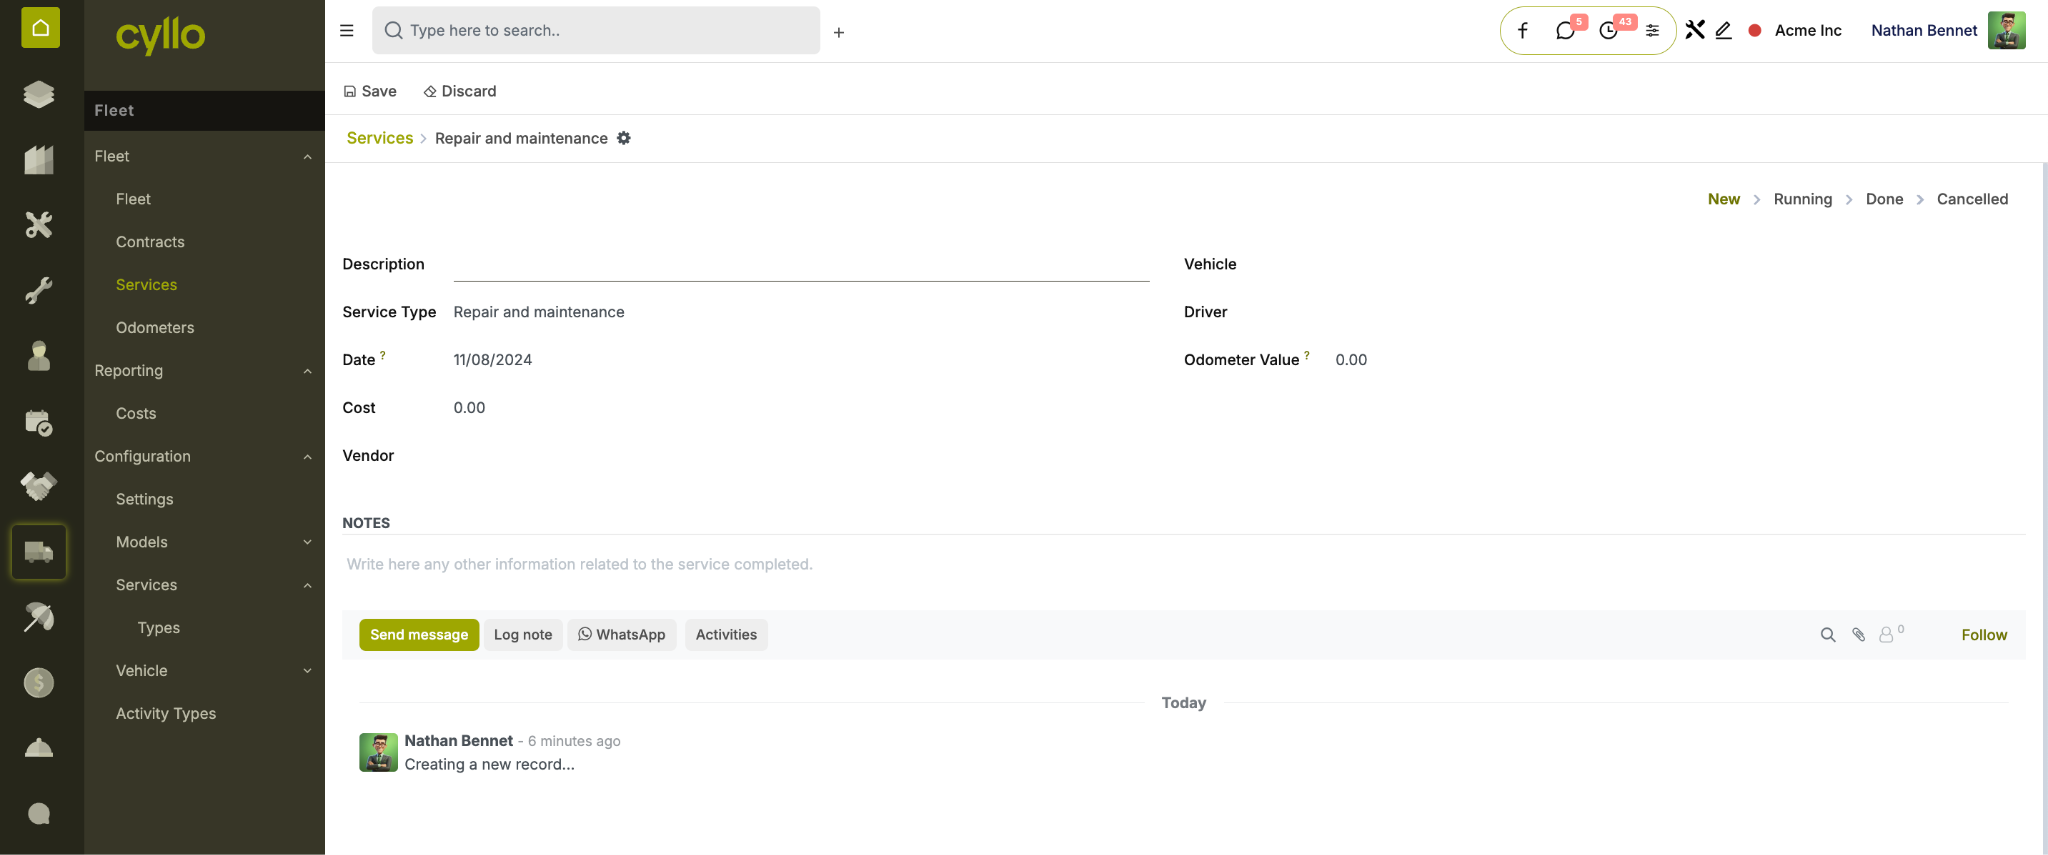
Fig 7.4 — Fleet service record with cost, type, and next maintenance schedule
Note
Assign a default Driver and Vehicle Category to each department to streamline pool vehicle allocation and cost reporting by business unit.
8. Incident & Custody Management
8.1 Employee Incident Management
The Employee Incident Management module provides a structured system for reporting, categorising, and resolving workplace incidents — supporting HR compliance and employee safety obligations.
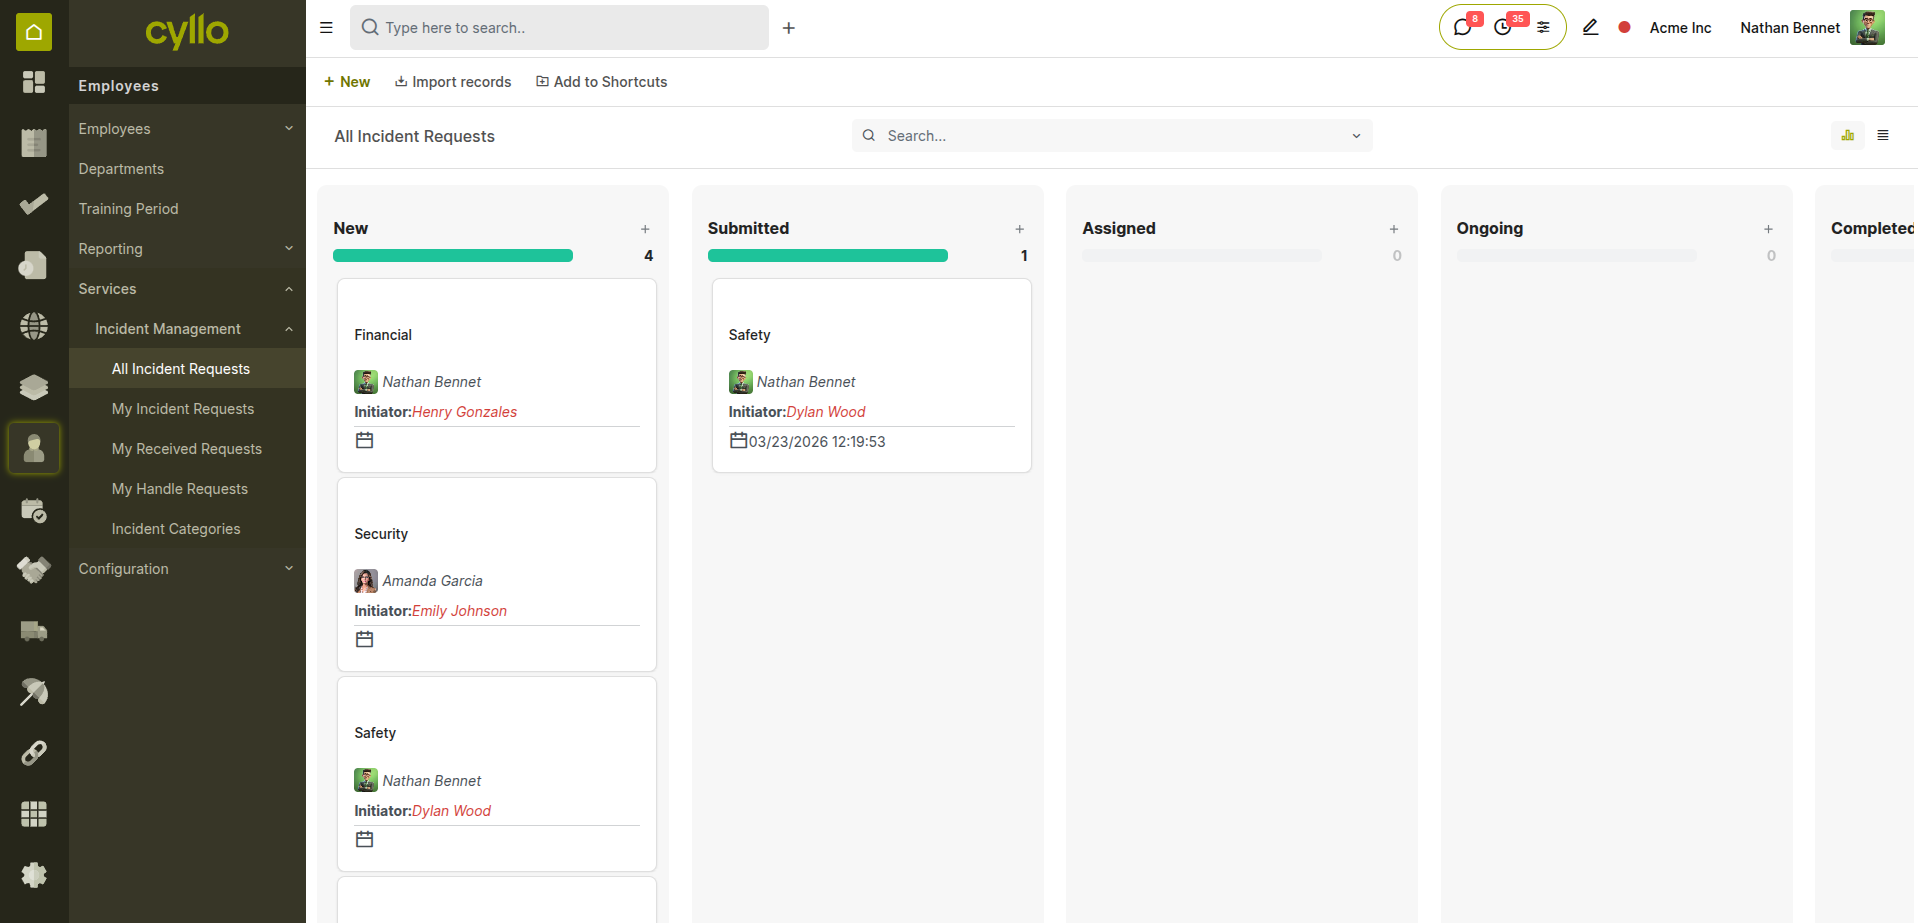
Fig 8.1 — Incident view with category, status, and resolution date
How to Report an Incident:
- Go to Employees →Services→ Incidents → New
- Enter the Incident Title and select the Incident Category
- Select the Initiator (who raised the incident)
- Select the Receptor (the employee the incident involves)
- Select the Handler (HR manager or department head responsible)
- Set the Submission Date
- Describe the incident and action taken in the Description fields
- Save — track resolution progress through status updates
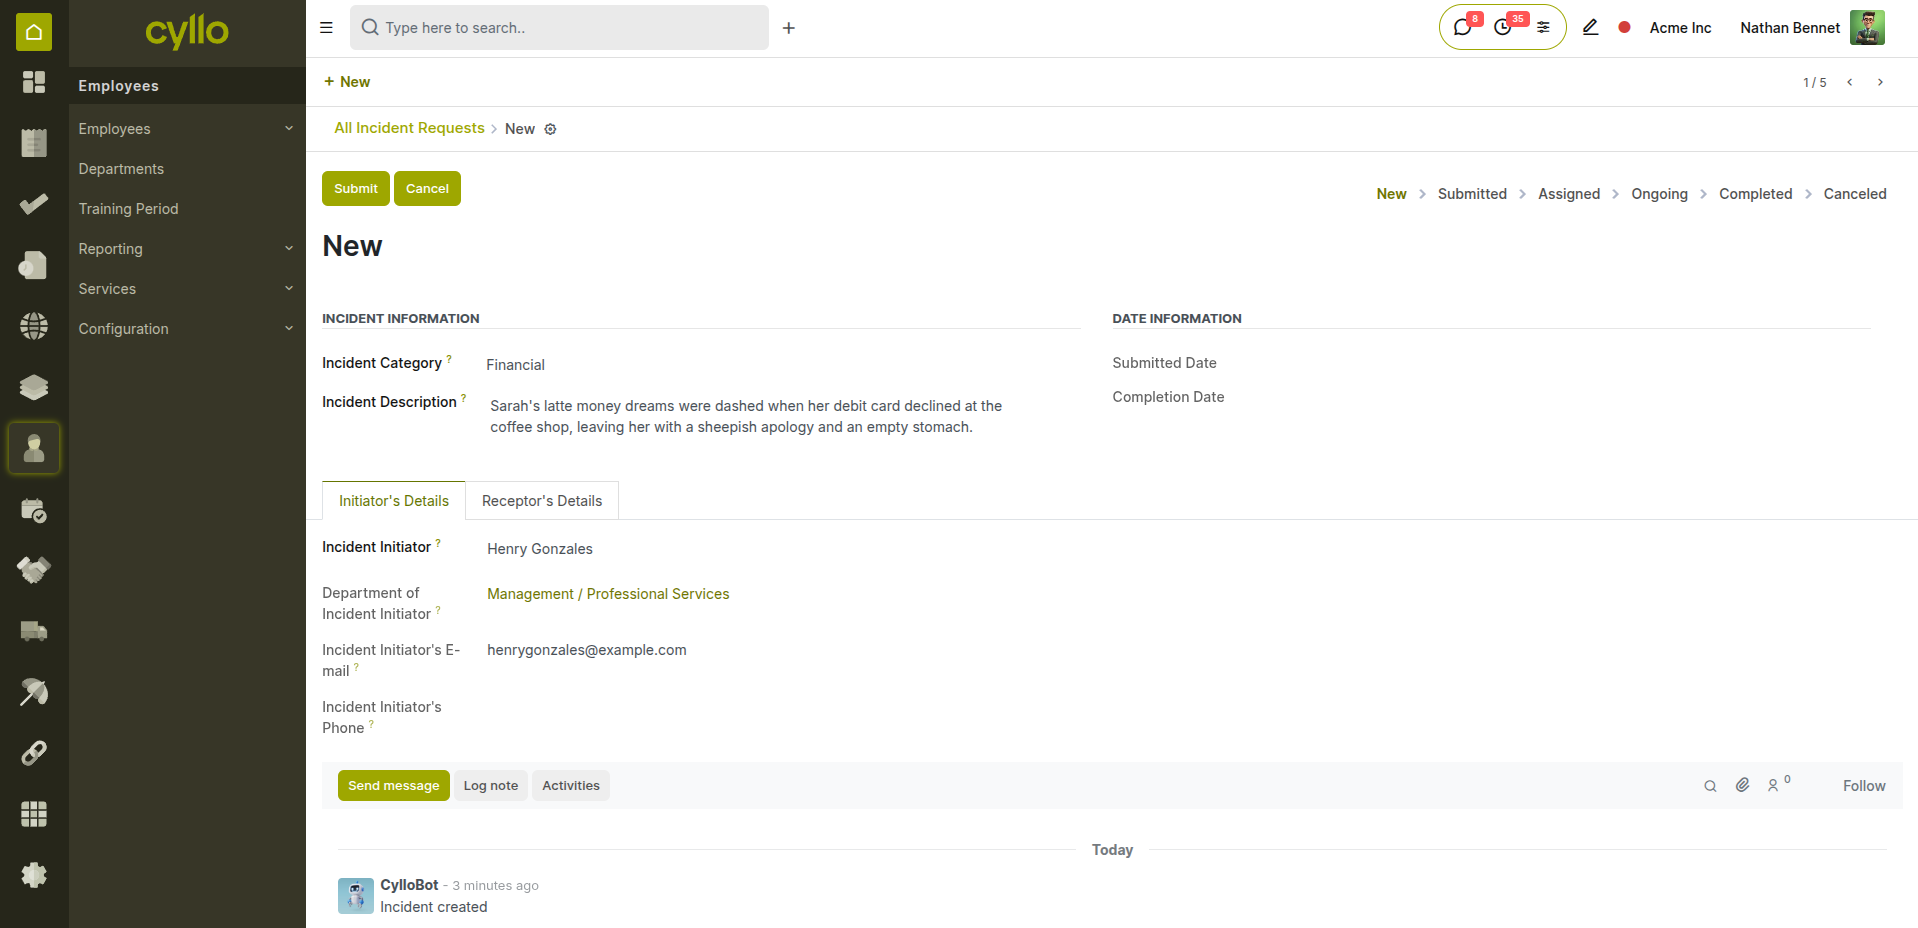
Fig 8.2 — Incident form with initiator, receptor, handler, and description
Key Fields Incident Title: Brief descriptive name of the incident. Category: Classification type — configurable (Safety, Conduct, Equipment). Initiator: The employee who reported or raised the incident. Receptor: The employee the incident involves or is about. Handler: HR/manager responsible for investigating and resolving. Submission Date: Date the incident was formally reported. Completion Date: Date the incident was resolved and closed.
Note
Incident categories are configurable from Employees → Configuration → Incident Categories.
8.2 Service & Custody Management
The Service/Custody Management module tracks company assets and equipment allocated to employees — ensuring full accountability for physical resources throughout their custody period.
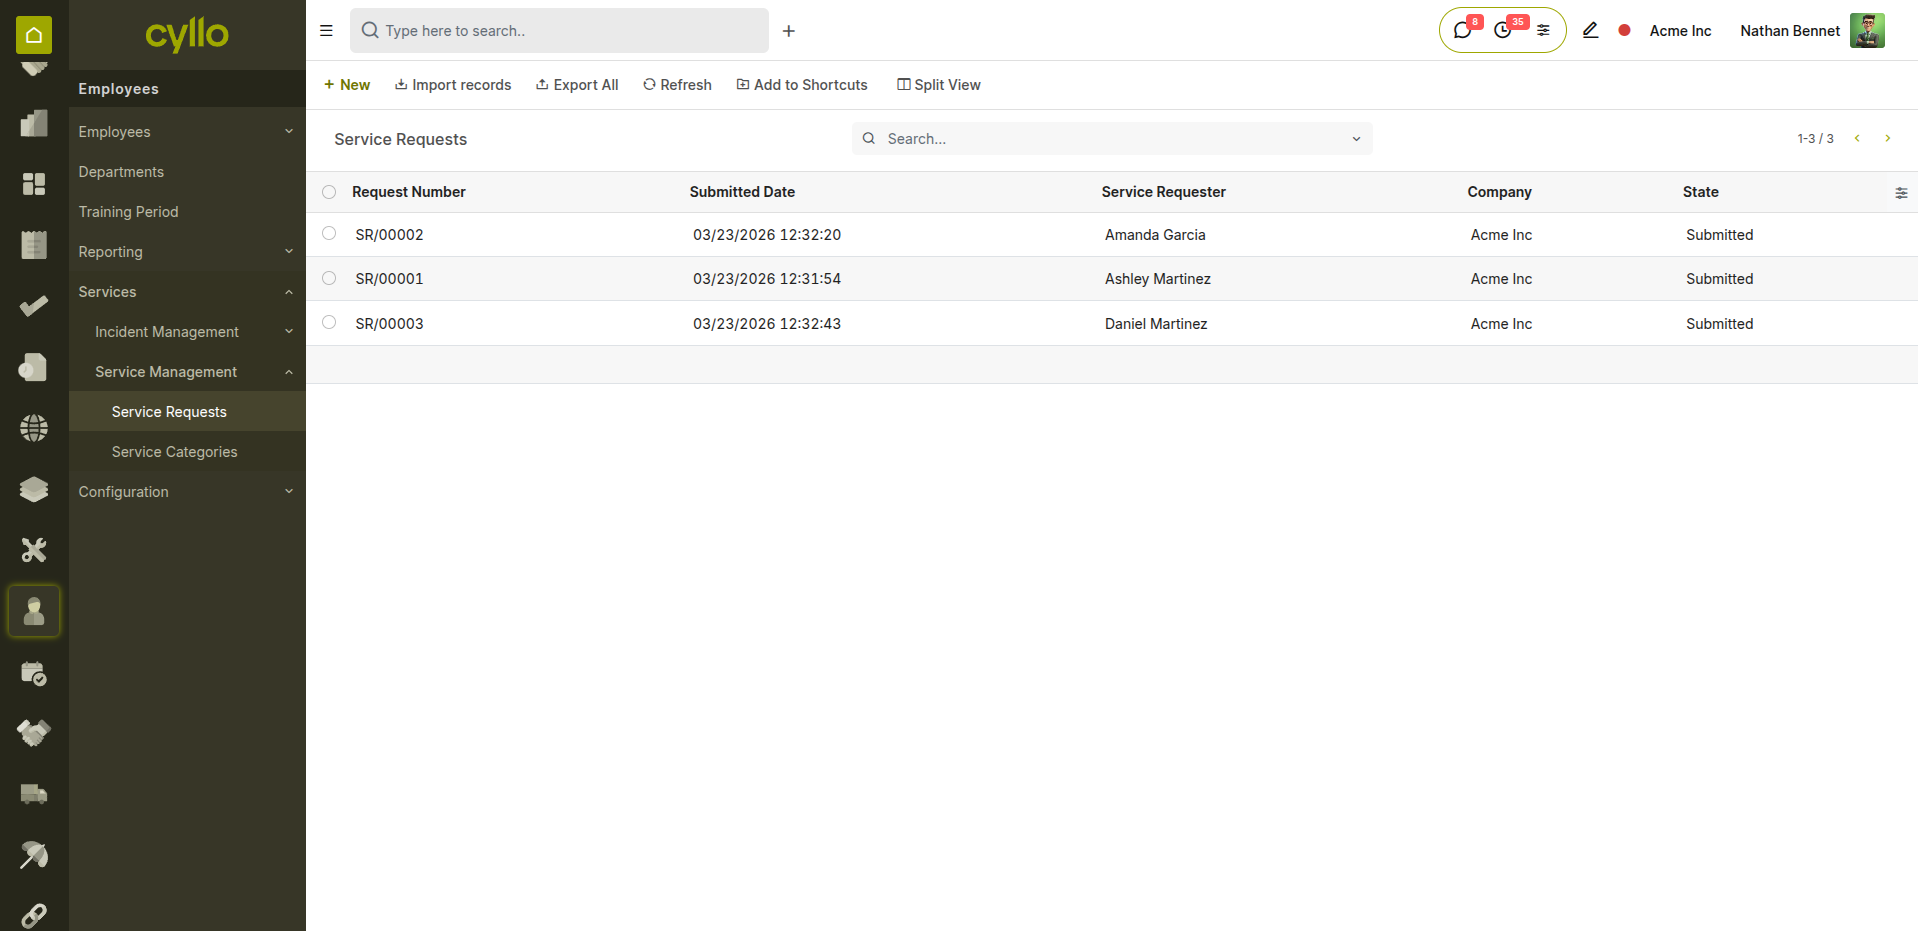
Fig 8.3 — Service request list with employee, asset type, and return status
How to Create a Service / Custody Request:
- Go to Employees →Services→ Service Requests → New
- Select the Employee who is requesting or receiving the asset
- Select the Service Category (e.g., IT Equipment, Vehicle, Uniform)
- Describe the item or service in the Description field
- Set the Issue Date (when the asset is handed over)
- Set the Expected Return Date
- Approve the request — asset is now in employee custody
- On return, update the Actual Return Date to close the record
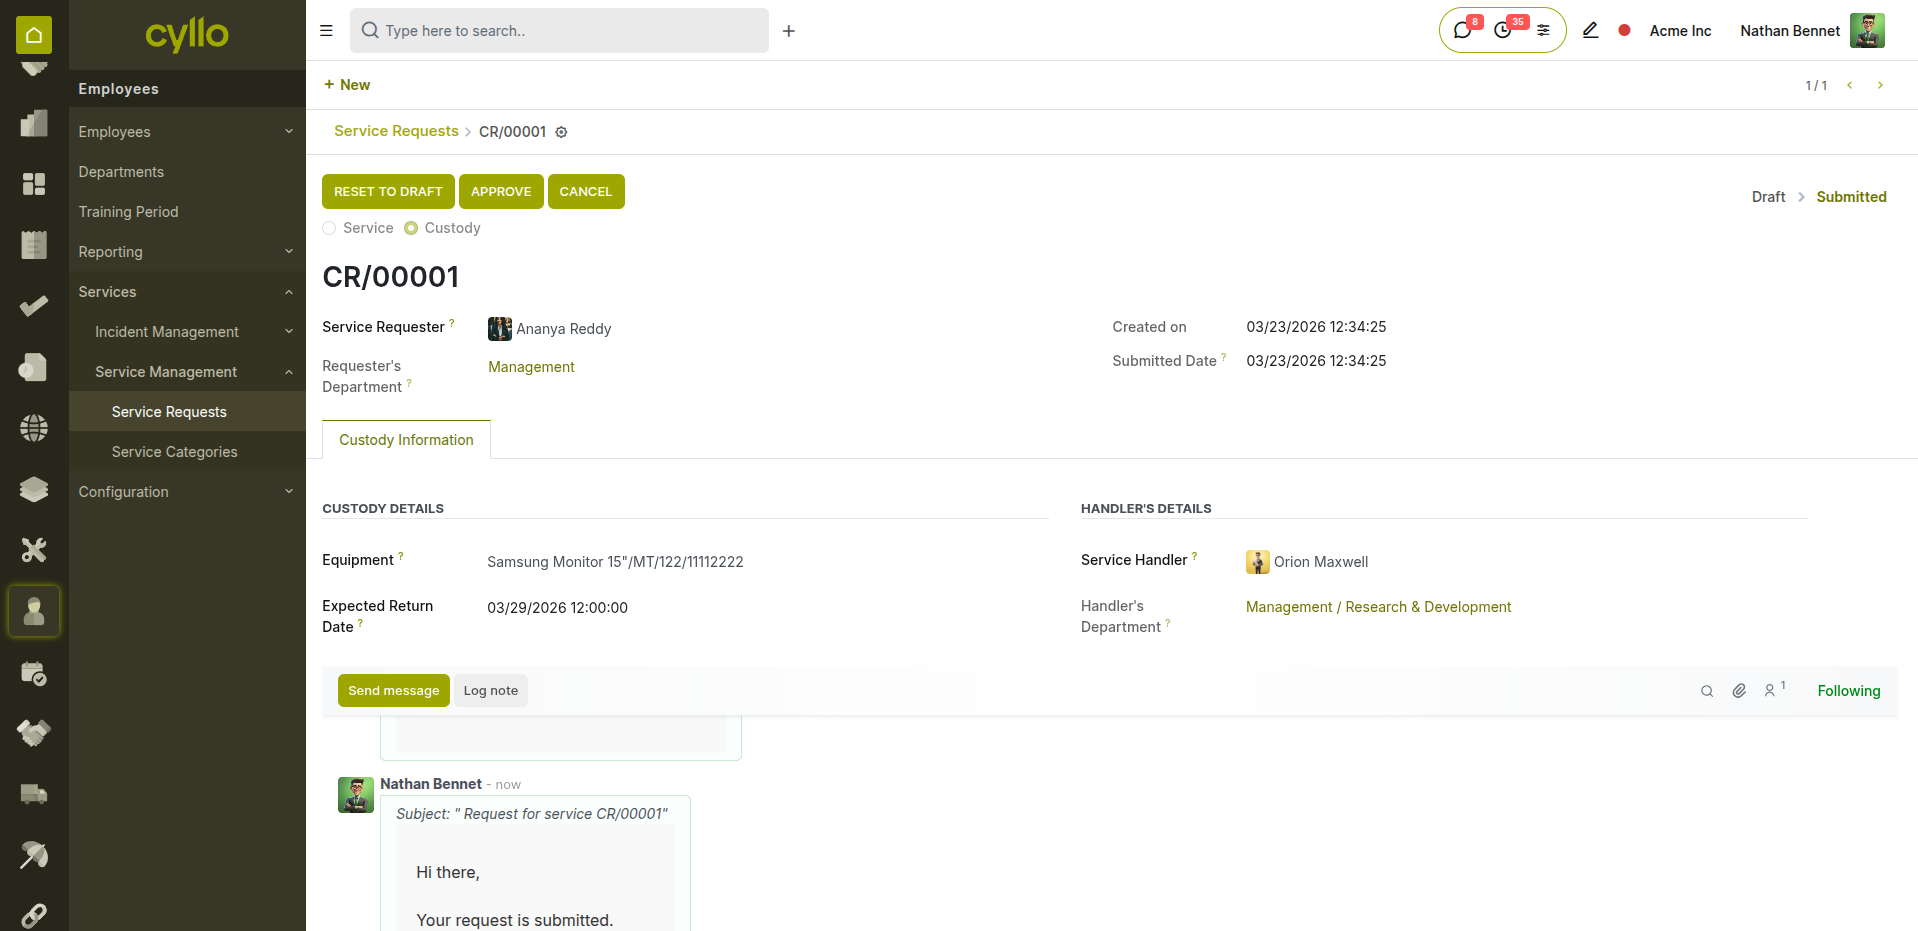
Fig 8.4 — Service request form with issue date, return date
Asset Custody States Requested: Employee submits a request for a company resource. Approved: HR or manager approves the service request. Issued: Asset physically handed over to employee on the issue date. In Use: Asset is in active custody — return date being tracked. Returned: Employee returns asset on or before the expected return date. Late Return: Return date exceeded — late return wizard activated for documentation.
Note
Note: When an asset is returned late, use the Late Return Wizard to document the reason. Print the service request report for physical records and compliance audits.
9. Reporting & Analytics
9.1 Attendance Reports
Attendance reports show worked hours, overtime, and absence patterns per employee or team — essential for payroll validation and workforce productivity analysis.

Fig 9.1 — Attendance analysis report showing hours by employee and week
How to Access Attendance Reports:
- Go to Attendances → Reporting
- Group By Employee, Department, or Check In Month
- Filter by Date Range to focus on a specific payroll period
- Review Total Worked Hours and Overtime per employee
- Export as XLSX for payroll validation or audit purposes
9.2 Leave Analysis
Leave analysis reports give HR visibility into leave usage trends, remaining balances, and allocation history across the organisation.
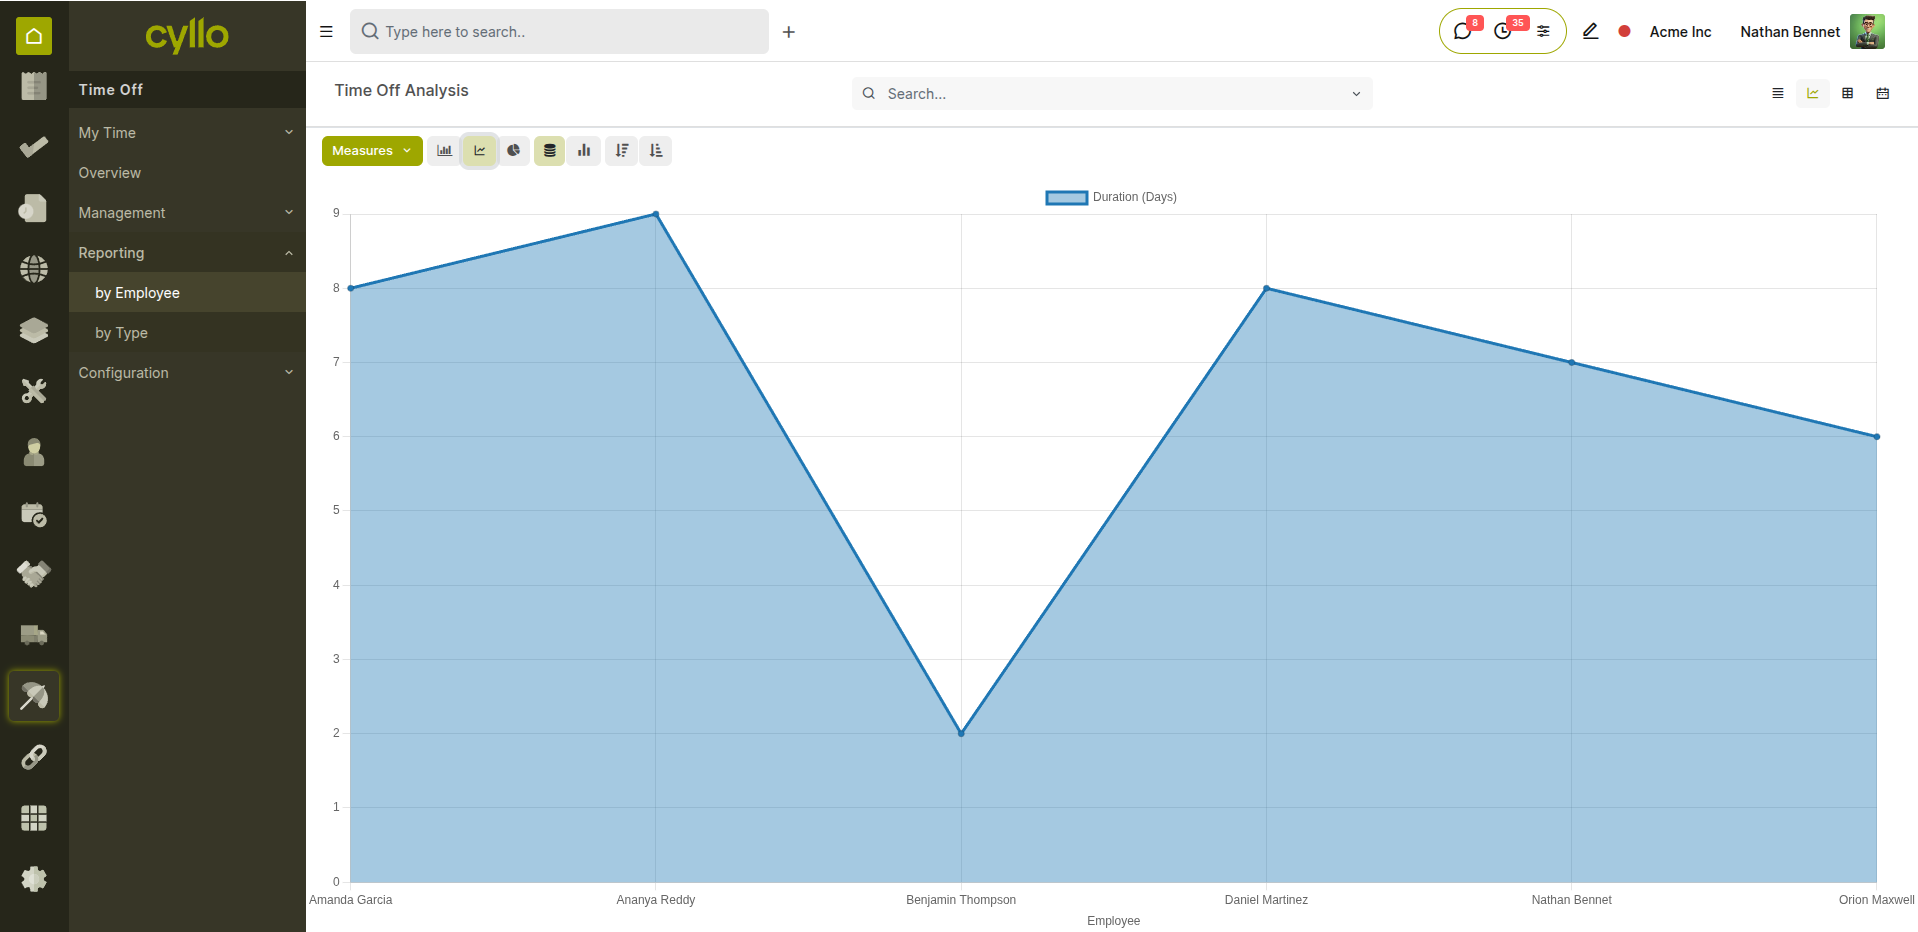
Fig 9.2 — Leave analysis by leave type and department
How to Access Leave Reports:
- Go to Time Off → Reporting → by Employee or by Type
- Filter by Leave Type, Department, or Date
- Use the Pivot view to compare leave usage across teams
- Export as PDF or XLSX for HR records