

Cyllo Green Metrics Documentation
Introduction
1. Green Metrics
Cyllo Green Metrics is a comprehensive sustainability management module designed to help organizations measure, monitor, and improve their environmental performance. It centralizes the collection of sustainability data, automates greenhouse gas (GHG) emissions calculations using configurable emission factors, and provides meaningful insights to support environmental reporting and strategic decision-making.
The module enables businesses to define emission sources, manage emission factors, capture activity data from various operations, and calculate emissions across different categories with accuracy and consistency. With support for customizable methodologies, regional emission factors, and structured reporting, organizations can align their sustainability initiatives with recognized environmental standards and regulatory requirements.
Whether tracking emissions from fuel consumption, electricity usage, transportation, waste, or other operational activities, Cyllo Green Metrics provides a unified platform to simplify carbon accounting, improve data reliability, and drive continuous progress toward sustainability goals.
2. Dashboard
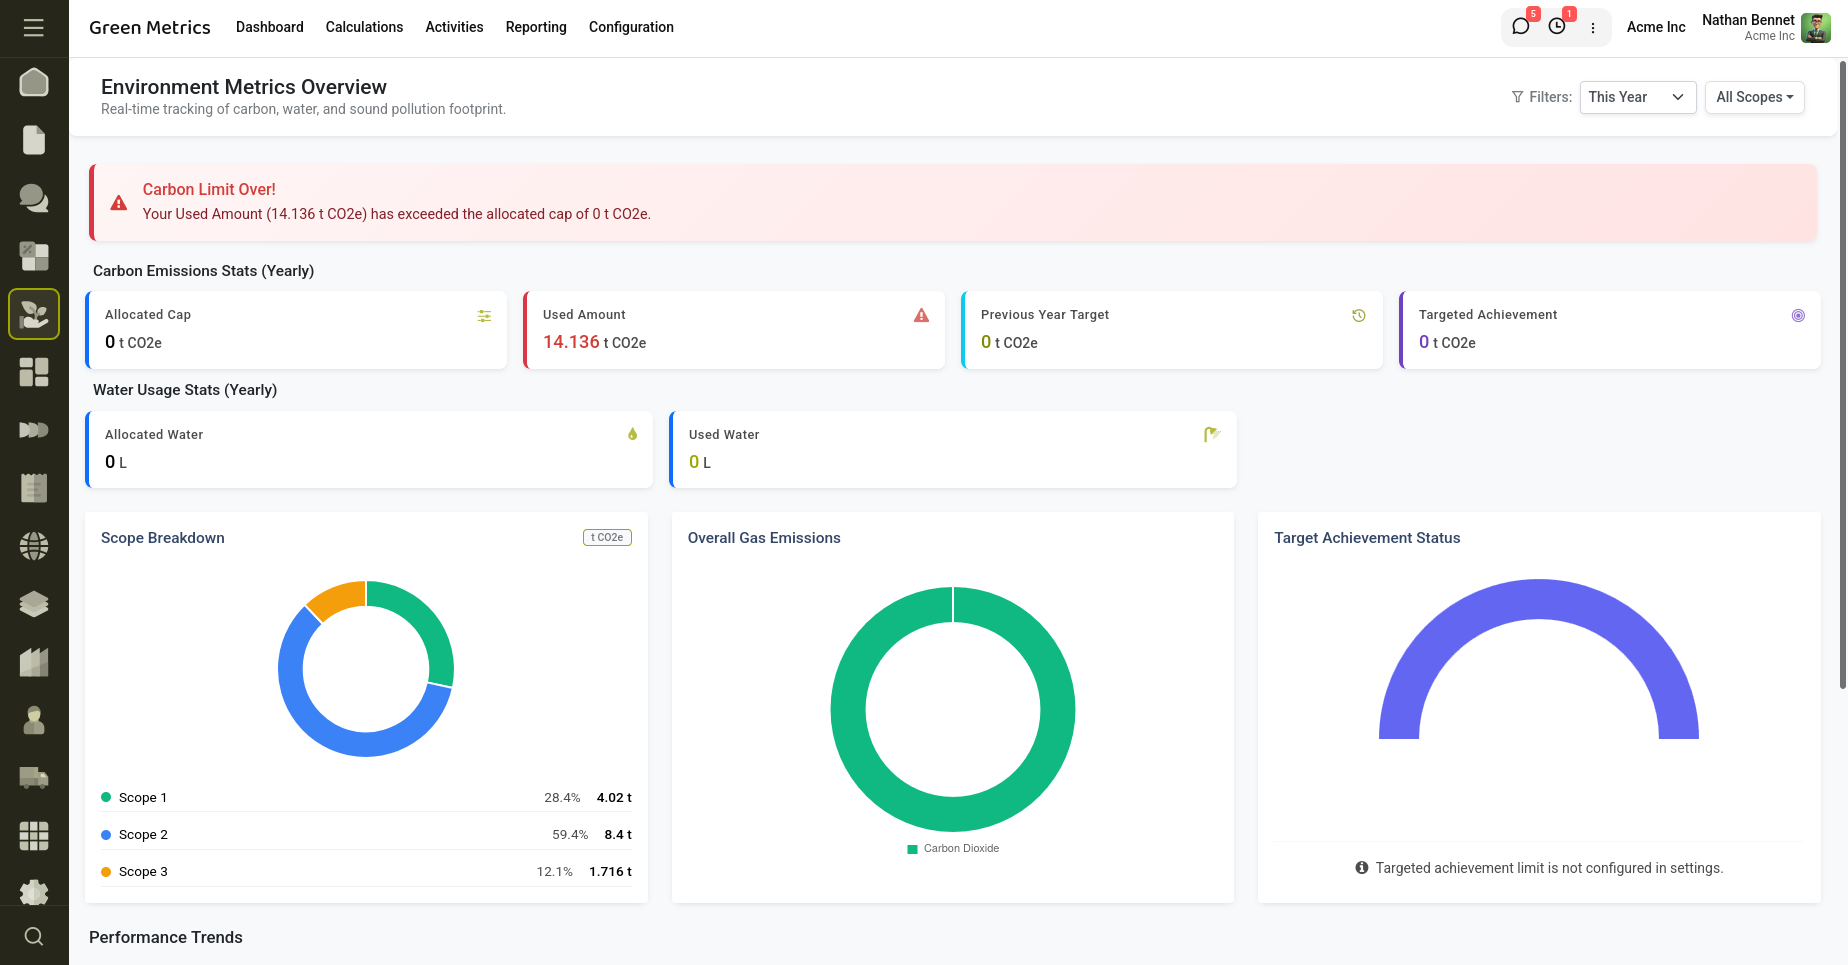
Fig 2.1 — Green Metrics Dashboard.
The Dashboard serves as the central hub for monitoring your organization's sustainability performance by providing a real-time overview of key environmental metrics. It consolidates carbon emission statistics, water usage, emission scope distribution, greenhouse gas emissions, target achievement status, and monthly environmental trends into a single interactive interface. Users can easily switch between different reporting periods and apply scope-based filters to analyze data relevant to specific emission categories. With intuitive charts, summary cards, and trend visualizations, the dashboard enables organizations to monitor resource consumption, measure progress against sustainability targets, identify environmental trends, and make informed decisions to support their sustainability and carbon reduction initiatives.
3. Carbon Calculations
The Calculations menu is used to create and manage carbon calculation records for a specific reporting period. Each calculation consolidates multiple sustainability activities and automatically computes the total emissions generated from them using the associated emission factors. In addition to calculating overall emissions, the module summarizes air, water, and sound pollution, identifies the highest emitting source, and maintains an approval workflow to ensure data accuracy before it is finalized. Calculation records also support configurable PDF reporting options, allowing organizations to generate reports based on selected emission types and activity details.
How to Create a Calculation
Navigate to Green Metrics → Calculations.
Click New.
Enter a Calculation Name.
Select the Date for the reporting period.
Choose the Company for which the calculation is being created.
Add one or more Activities under the Activities tab. Each activity contributes to the overall emission calculation based on its configured emission factor.
(Optional) Add internal remarks in the Notes tab.
Configure the PDF Report Options by selecting:
- Emission Type to Print
- Print Notes
- Print Activity Details
Save the record.
Move the calculation through the workflow:
- Draft → Submitted → Approved → Done
Once approved or completed, the calculation automatically updates the emission summaries and becomes available for reporting and dashboard analysis.
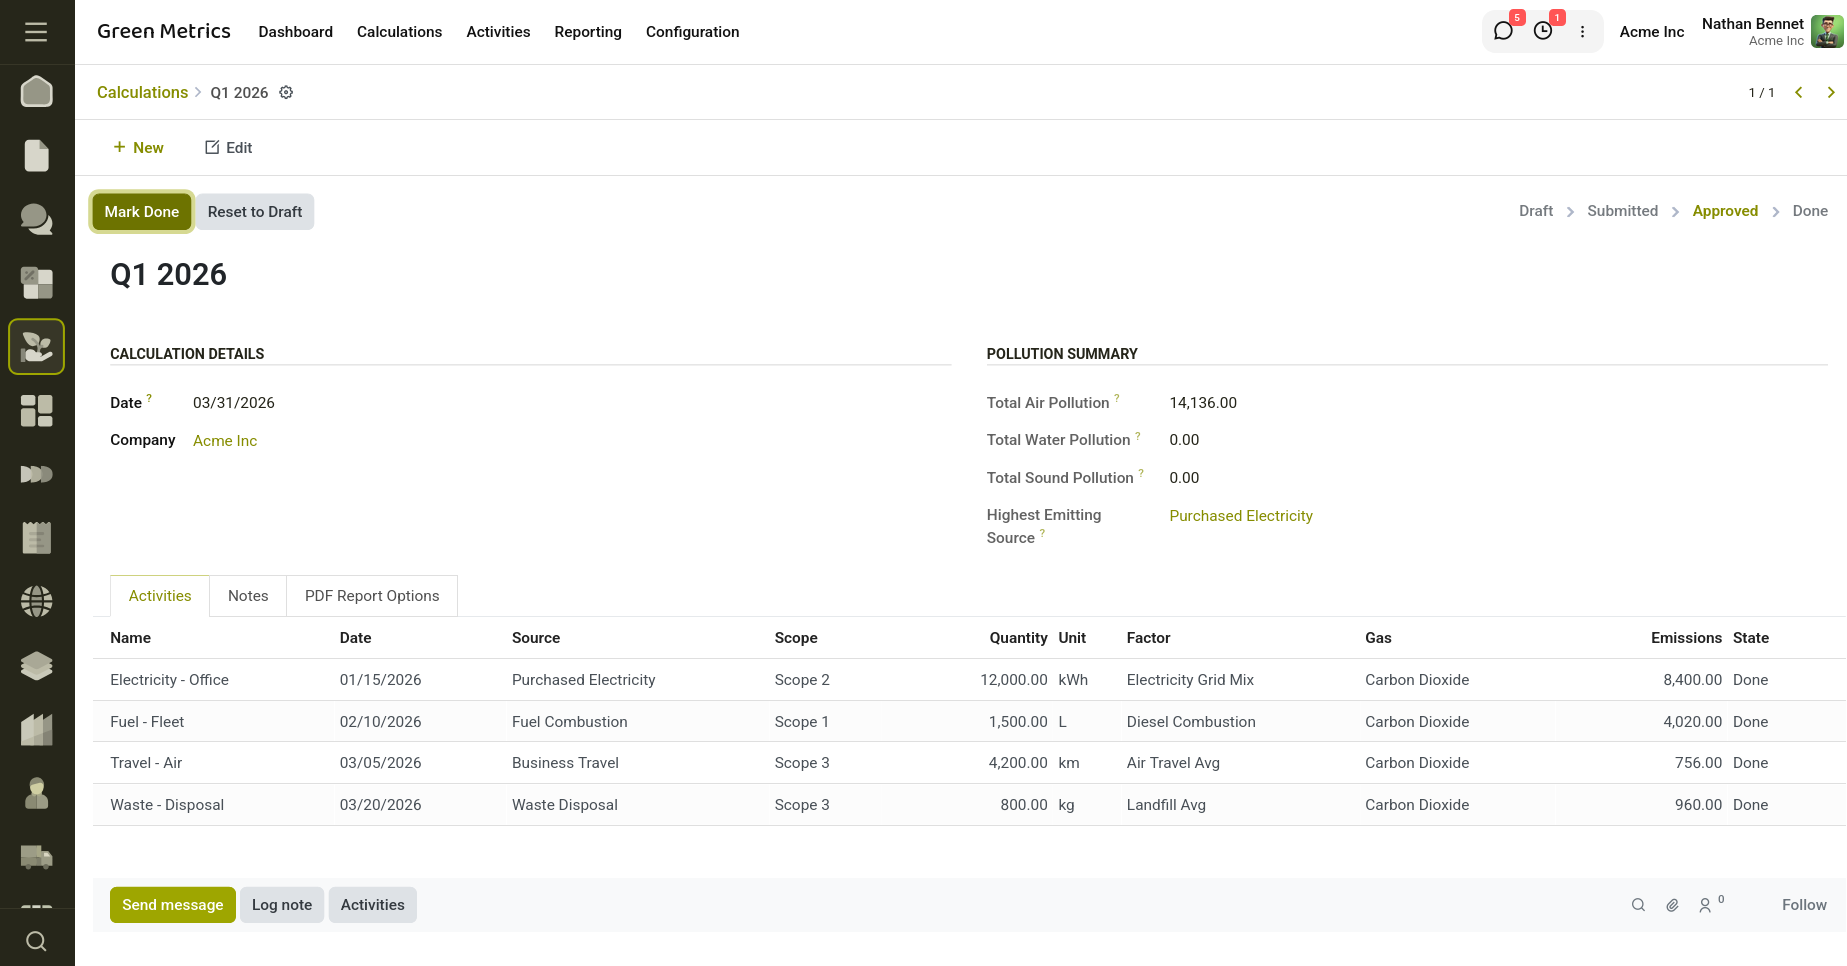
Fig 3.1 — Carbon calculations with Emission Activities
Key Fields
- Name: Specifies the name of the calculation record, typically representing a reporting period such as Q1 2026.
- Date: Defines the reporting date for which the emissions are calculated. Company: Indicates the company whose sustainability activities and emissions are being tracked.
- Activities: Contains all carbon activities included in the calculation. The module automatically computes emissions based on the associated emission factors.
- Total Emissions: Displays the total emissions generated from all recorded activities.
- Total Air Pollution: Shows the cumulative air (carbon) emissions calculated from the activities.
- Total Water Pollution: Displays the total water pollution generated during the reporting period.
- Total Sound Pollution: Shows the total sound or noise pollution calculated from the activities.
- Highest Emitting Source: Automatically identifies the emission source responsible for the highest amount of emissions.
- State: Represents the current workflow status of the calculation, progressing through Draft, Submitted, Approved, and Done.
Note
Allows users to record additional remarks or supporting information related to the calculation.
Actions
- Compute Emissions: Calculates emissions for all activities linked to the calculation using their configured emission factors. The system automatically updates the total emissions, air pollution, water pollution, sound pollution, and identifies the highest emitting source.
- Submit: Moves the calculation from Draft to Submitted, indicating that it is ready for managerial review and approval.
- Approve: Approves the submitted calculation after verification. Only users with the Green Metrics Manager role can perform this action.
- Reset to Draft: Moves the calculation back to the Draft state, allowing users to update or correct the recorded information before resubmitting.
4. Carbon Activities
The Carbon Activities records individual emission-generating activities that contribute to an organization's overall sustainability calculations. Each activity represents a specific operational event, such as electricity consumption, fuel usage, business travel, or waste disposal, and is associated with an emission source, scope, emission factor, and greenhouse gas. It automatically calculates emissions based on the entered quantity and the selected emission factor, ensuring accurate and consistent carbon accounting. Carbon activities can be linked to calculation records, accounting entries, and approval workflows, providing complete traceability from data entry to environmental reporting.
How to Create a Carbon Activity
- Navigate to Green Metrics → Activities.
- Click New.
- Enter a Name for the activity.
- Select the Date on which the activity occurred.
- Choose the Calculation to which the activity belongs.
- Select the Emission Source.
- The Scope and Unit of Measure are automatically populated based on the selected source.
- Enter the Quantity of the activity.
- Select the appropriate Emission Factor. The corresponding Greenhouse Gas and Factor Value are automatically populated.
- Verify the automatically calculated Emissions value.
- (Optional) Link the activity to an Accounting Journal Entry or Journal Item if applicable.
- Add any additional information in the Notes tab.
- Save the record.
- Click Apply Rules if you want the system to automatically assign an emission source and factor based on configured assignment rules.
- Click Done to validate and finalize the emission calculation.
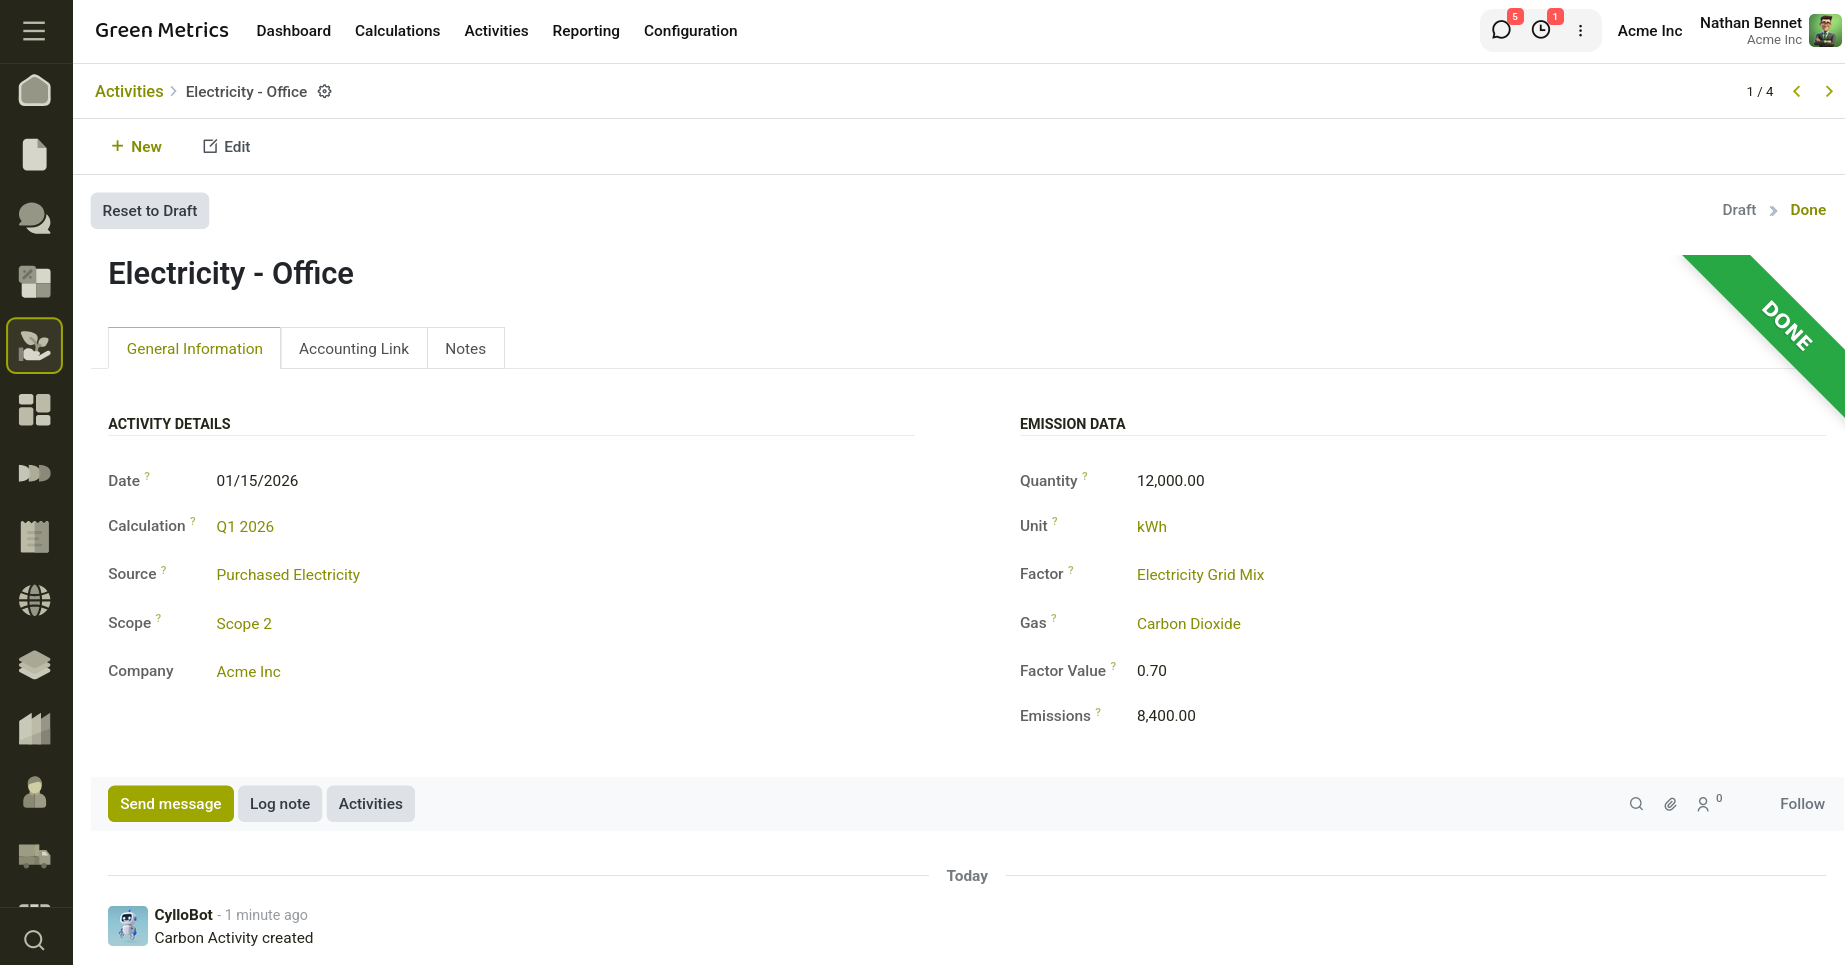
Fig 4.1 — Carbon Activities
Key Fields
- Name: Specifies the name of the carbon activity.
- Date: Indicates when the emission-generating activity occurred.
- Calculation: Links the activity to a carbon calculation record.
- Source: Identifies the emission source responsible for the activity.
- Scope: Displays the emission scope associated with the selected source.
- Quantity: Specifies the measured quantity of the activity.
- Factor: Specifies the emission factor used to calculate emissions.
- Gas: Indicates the greenhouse gas associated with the selected emission factor.
- Factor Value: Displays the emission factor value applied during the calculation.
- Emissions: Automatically calculates the total emissions based on the entered quantity and factor value.
- Related Journal Entry: Links the activity to the corresponding accounting journal entry.
- Related Journal Item: Links the activity to a specific journal item for accounting integration.
Actions
- Apply Rules: Automatically assigns the appropriate emission source, emission factor, and greenhouse gas based on configured assignment rules.
- Compute: Validates the selected emission factor and computes the emission value. If the factor is valid, the activity is moved to the Done state.
5. Configuration
5.1 Emission Sources
The Emission Sources defines and manages the various sources that generate environmental emissions within an organization. Each emission source represents a specific operational activity, such as fuel combustion, electricity consumption, transportation, waste disposal, or material usage. Every source is associated with an emission scope, activity unit, and one or more emission factors for air, water, and sound pollution. These sources serve as the foundation for carbon activities, ensuring that emissions are calculated accurately using standardized factors and consistent measurement units.
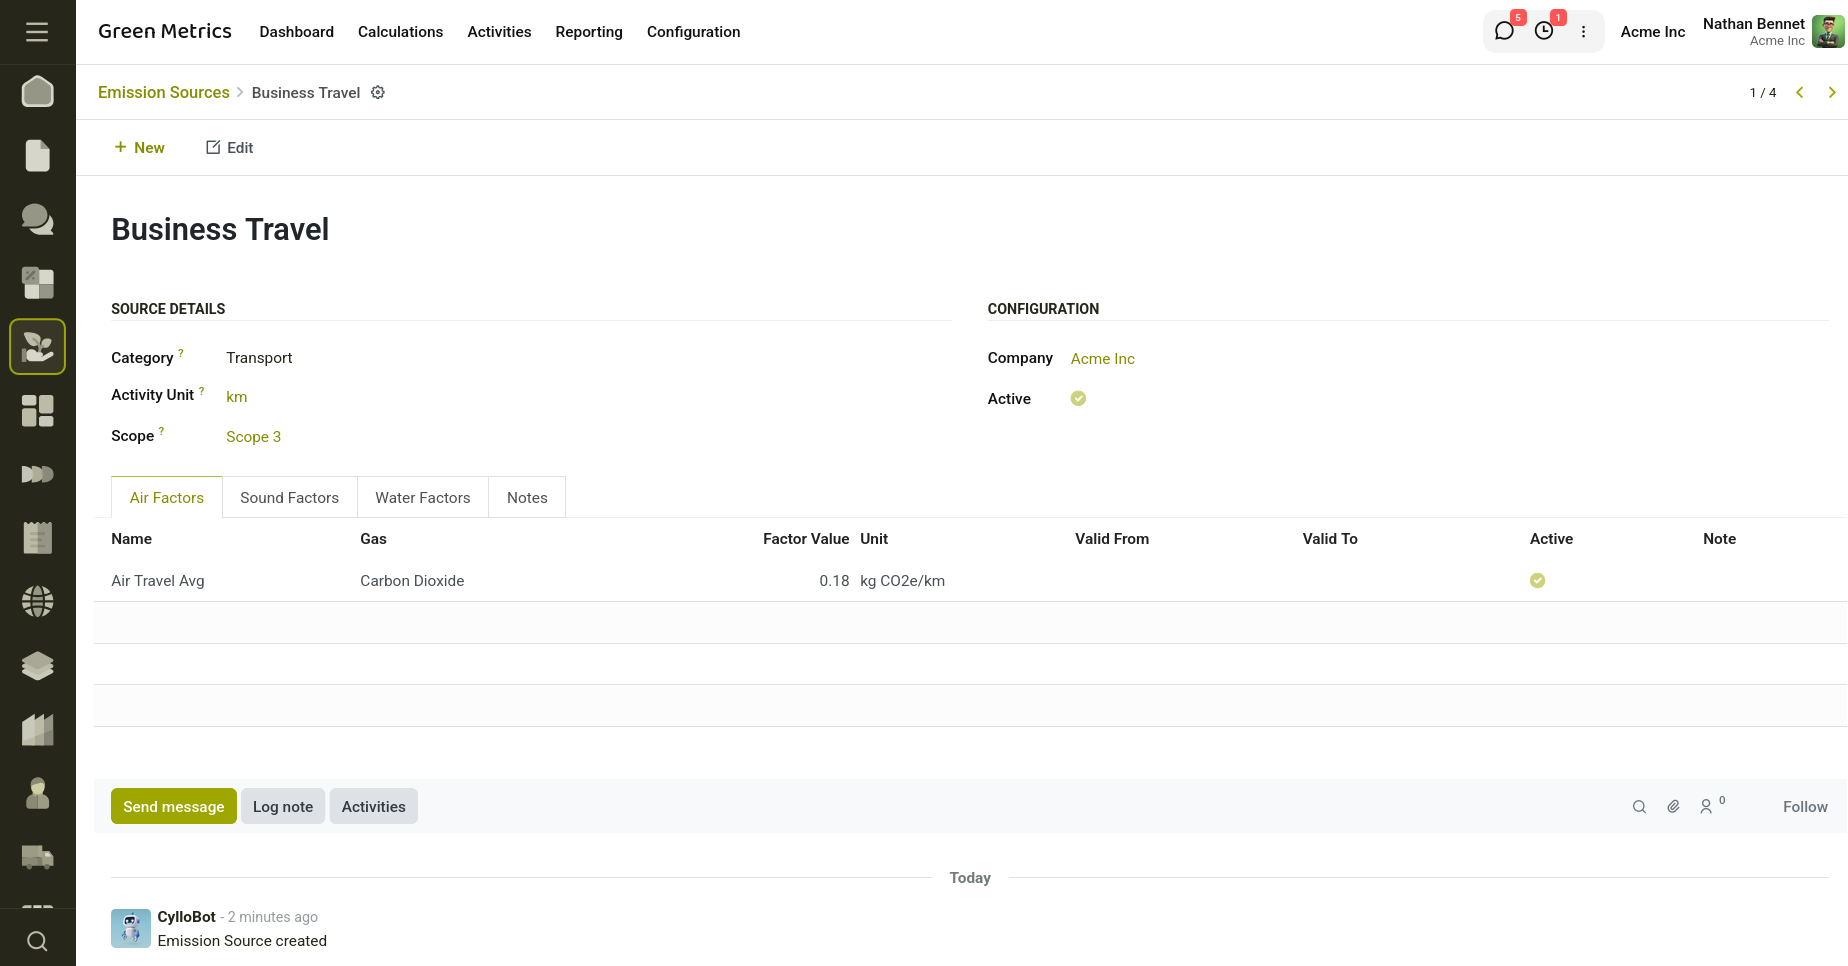
Fig 5.1 — Emission Sources
How to Create an Emission Source
- Navigate to Green Metrics → Configuration → Emission Sources.
- Click New.
- Enter the Name of the emission source.
- Select the appropriate Category.
- Choose the Activity Unit used to measure the activity.
- Select the applicable Emission Scope.
- Choose the Company for which the source is applicable.
- Add the required Air Factors, Water Factors, and Sound Factors by specifying the emission factor, greenhouse gas, factor value, validity period, and any notes.
- Click Save.
Key Fields
- Name: Specifies the name of the emission source.
- Category: Classifies the emission source into categories such as Energy, Transport, Materials, Waste, Services, or Other.
- Activity Unit: Defines the unit used to measure the activity, such as liters, kilograms, or kilowatt-hours.
- Scope: Specifies the emission scope associated with the source.
- Air Factors: Lists the emission factors used for calculating air (carbon) emissions associated with the source.
- Water Factors: Contains emission factors used to calculate water pollution.
- Sound Factors: Contains emission factors used to calculate sound or noise pollution.
5.2 Assignation Rules
The Assignation Rules feature automates the assignment of emission sources and emission factors to carbon activities based on predefined conditions. Instead of manually selecting the appropriate source and factor for every activity, users can configure rules that evaluate activity data and automatically apply the matching emission source and factor. Rules are processed according to their priority, ensuring that the most relevant rule is applied first. This automation improves consistency, reduces manual effort, and ensures accurate emission calculations across the organization.
How to Create an Assignation Rule
- Navigate to Green Metrics → Configuration → Assignation Rules.
- Click New.
- Enter a Rule Name.
- Specify the Domain (condition) that determines when the rule should be applied.
- Select the Emission Source to assign when the rule matches.
- Choose the Method for assigning emissions (Factor or Direct).
- If the Factor method is selected, choose the appropriate Emission Factor.
- Set the Priority of the rule. Rules with lower priority values are evaluated first.
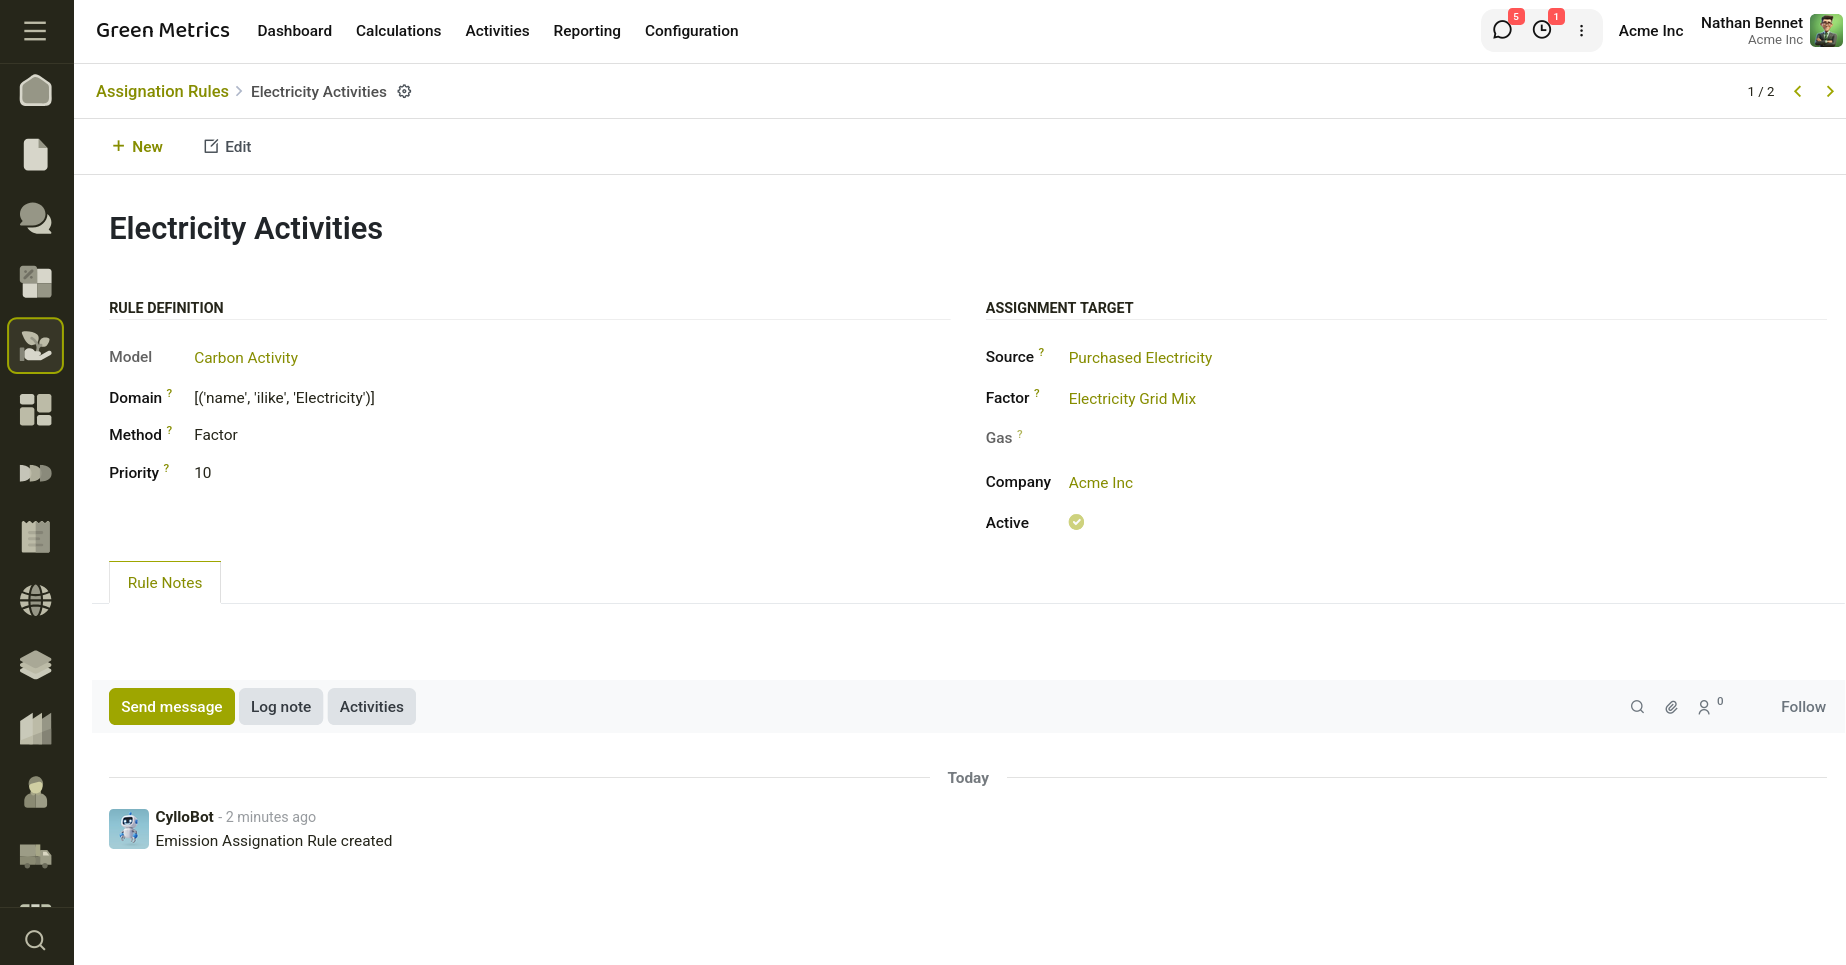
Fig 5.2 — Assignation Rules
Key Fields
- Name: Specifies the name of the assignation rule.
- Domain: Defines the condition used to determine whether the rule should be applied to a carbon activity.
- Emission Source: Specifies the emission source that will be automatically assigned when the rule matches.
- Emission Factor: Defines the emission factor to apply when the selected method is Factor.
- Method: Determines how emissions are assigned. Available options are Factor and Direct.
- Priority: Controls the order in which rules are evaluated. Lower priority values are processed before higher ones.
Assignation rules are applied to Carbon Activities to automatically determine the appropriate emission source and emission factor based on predefined conditions. This eliminates the need for users to manually select these values for every activity, ensuring consistent and accurate emission calculations.
When a carbon activity is created, the user can click the Apply Rules button. The system then evaluates all active assignation rules for the current company in priority order (lowest priority number first). For each rule, the configured Domain is checked against the activity. As soon as a matching rule is found:
- The configured Emission Source is assigned to the activity.
- If the rule uses the Factor method, the configured Emission Factor is also assigned automatically.
- The associated Greenhouse Gas is populated from the selected emission factor.
- Rule evaluation stops after the first successful match.
- If no rule matches the activity, no values are assigned automatically, and the user - can manually select the emission source and factor.
5.3 Scopes
Emission scopes classify greenhouse gas emissions based on their source, helping organizations organize, monitor, and report emissions according to recognized carbon accounting standards. Once created, scopes can be assigned to emission sources and are automatically inherited by carbon activities, enabling accurate categorization, filtering, dashboard analysis, and sustainability reporting.
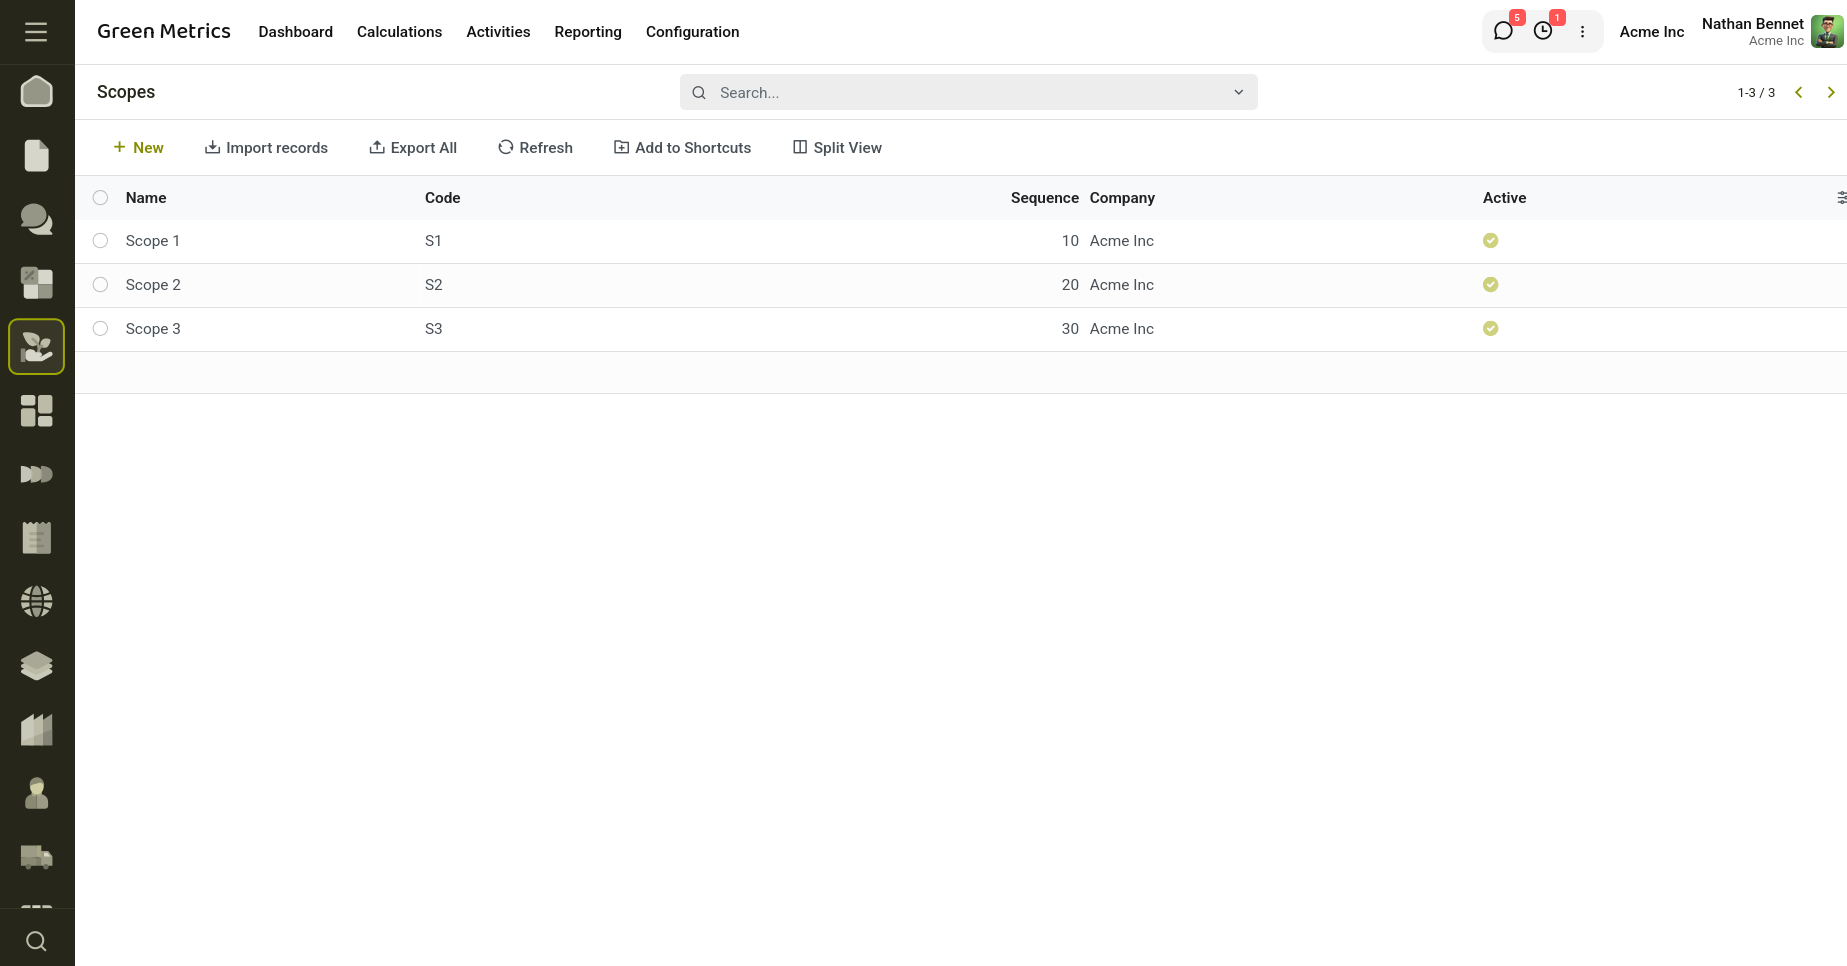
Fig 5.3 — Scopes
How to Create a Scope
- Navigate to Green Metrics → Configuration → Scopes.
- Click New.
- Enter the Scope Name.
- Specify a unique Code for the scope.
- Set the Sequence to control the display order.
- Select the Company to which the scope belongs.
- (Optional) Enter additional information in the Description field.
- Click Save.
Key Fields
- Name: Specifies the name of the emission scope, such as Scope 1, Scope 2, or Scope 3.
- Code: Defines a unique identifier for the emission scope within the company.
- Sequence: Determines the order in which scopes are displayed throughout the system.
- Company: Indicates the company for which the emission scope is available.
5.4 Gases
The Gases menu defines the greenhouse gases tracked within the Green Metrics module. Each gas record stores essential information such as its code, chemical formula, Global Warming Potential (GWP), and measurement unit. These gases are linked to emission factors and carbon activities, ensuring that emissions are calculated and reported accurately. Maintaining a centralized list of gases promotes consistency across emission calculations and environmental reporting.
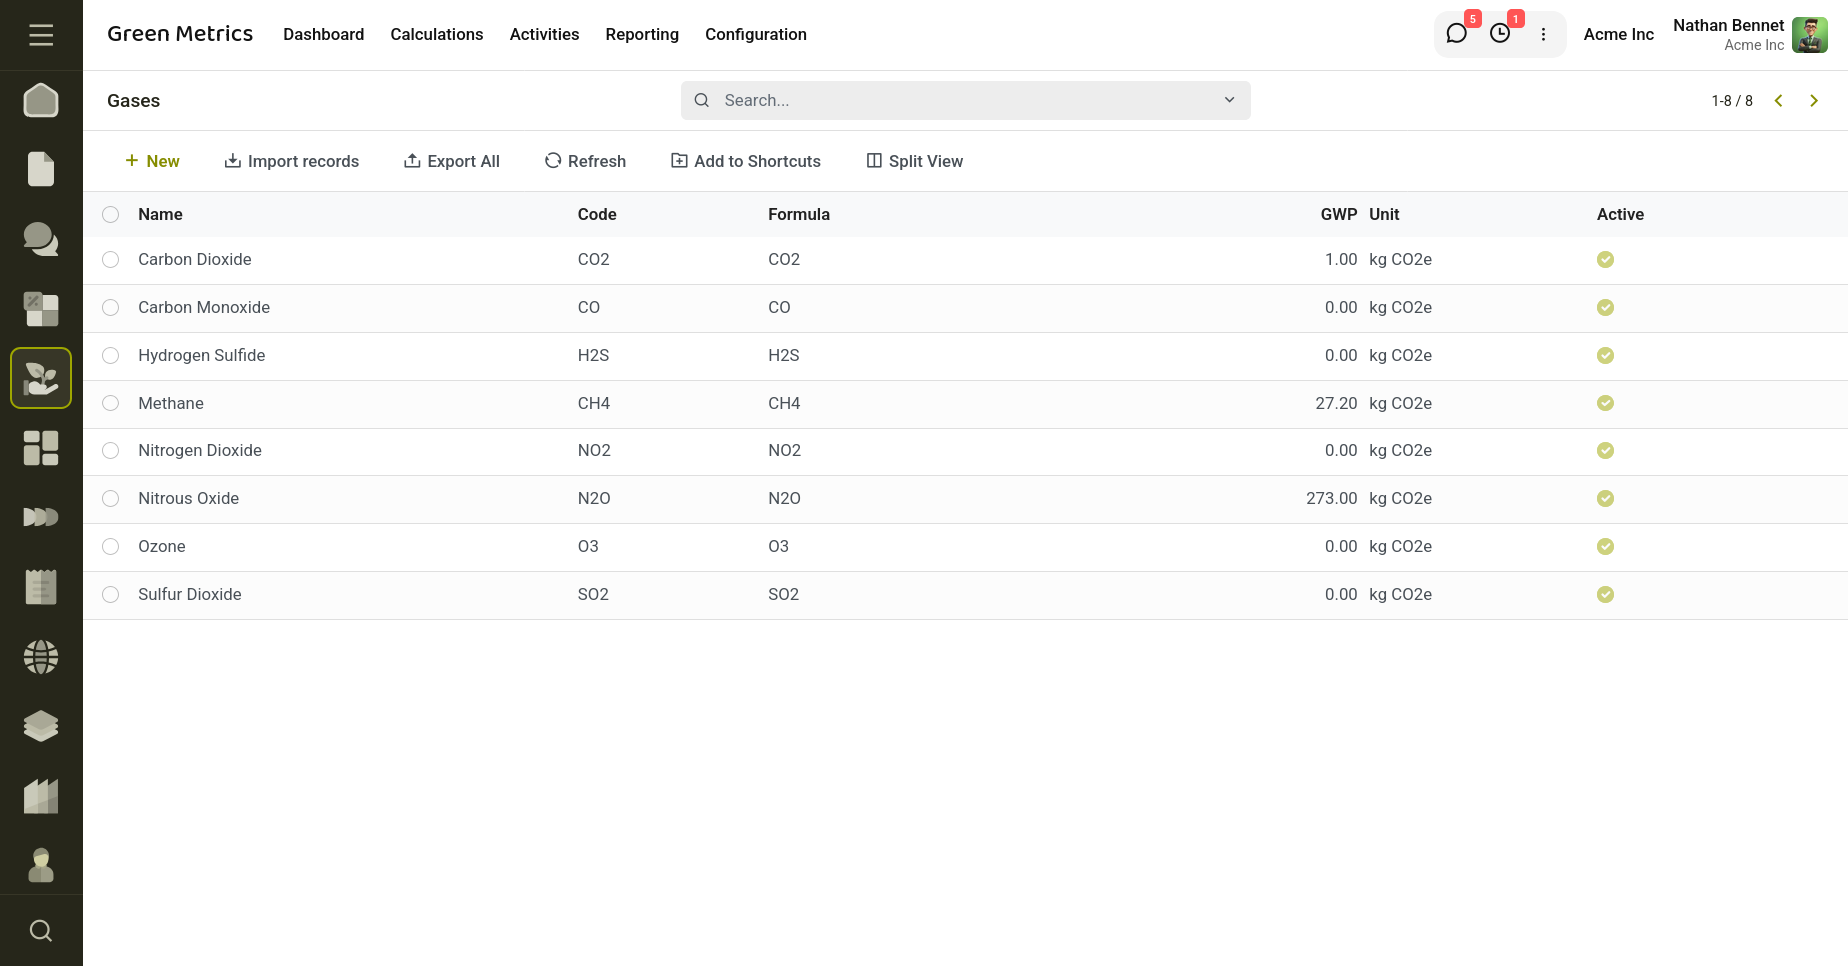
Fig 5.4 — Green House Gases
How to Create a Gas
- Navigate to Green Metrics → Configuration → Gases.
- Click New.
- Enter the Gas Name.
- Specify a unique Code for the gas.
- Enter the Chemical Formula.
- Provide the Global Warming Potential (GWP) value.
- Select the appropriate Unit of measurement.
Key Fields
- Name: Specifies the name of the greenhouse gas.
- Code: Defines a unique short code used to identify the gas, such as CO₂, CH₄, or N₂O.
- Formula: Stores the chemical formula of the greenhouse gas.
- Global Warming Potential (GWP): Indicates the relative warming effect of the gas compared to carbon dioxide (CO₂), which has a GWP of 1.
- Unit: Specifies the unit used to measure the gas or its associated emission factors.
6. Reporting
This Emissions Analysis report provides an analytical view of all Carbon Activities recorded in the system.
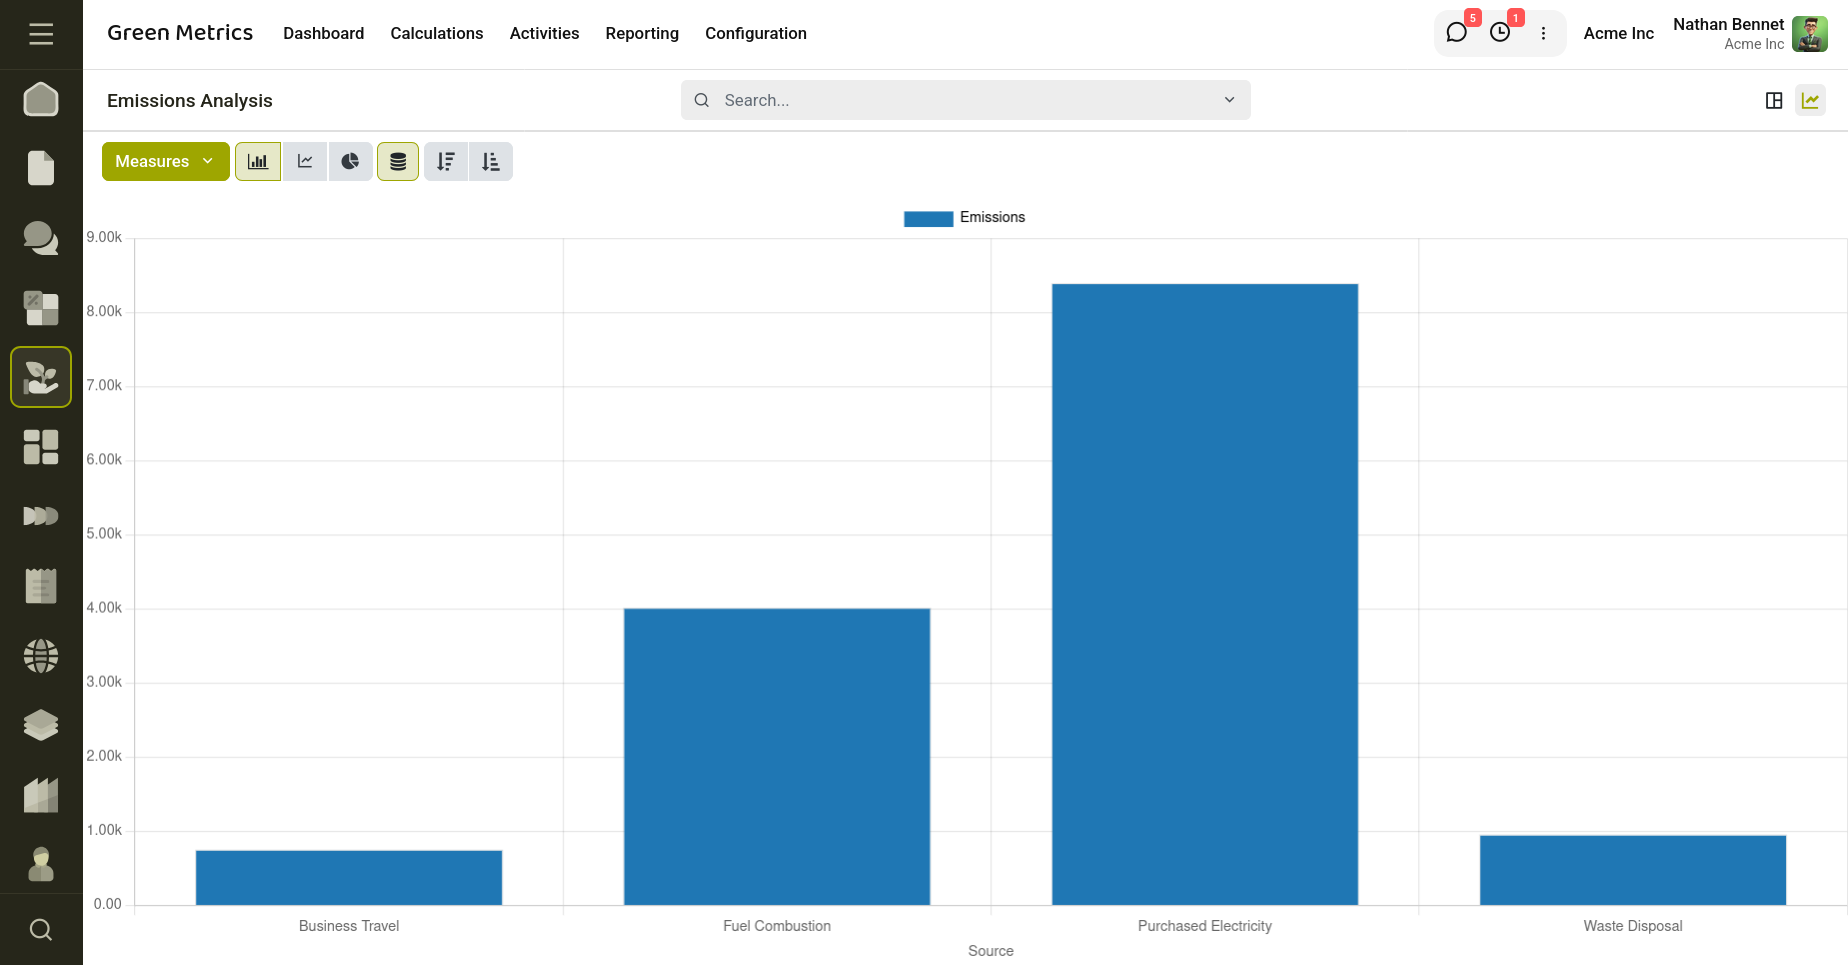
Fig 6.1 — Emission Analysis Report
It helps users understand emission trends, compare emission sources, and identify the largest contributors to greenhouse gas emissions.It summarizes emission data collected from carbon activities. It enables organizations to analyze total emissions by different dimensions such as emission source, scope, company, gas, or reporting period, making it easier to identify high-impact activities and support sustainability reporting.
7. Green Metrics MRP Integration
The MRP Integration links Manufacturing operations with Green Metrics to automatically track emissions generated during production. By associating carbon sources with manufacturing operations, the system creates carbon activity records based on work order duration and calculates emissions using the configured emission factors.
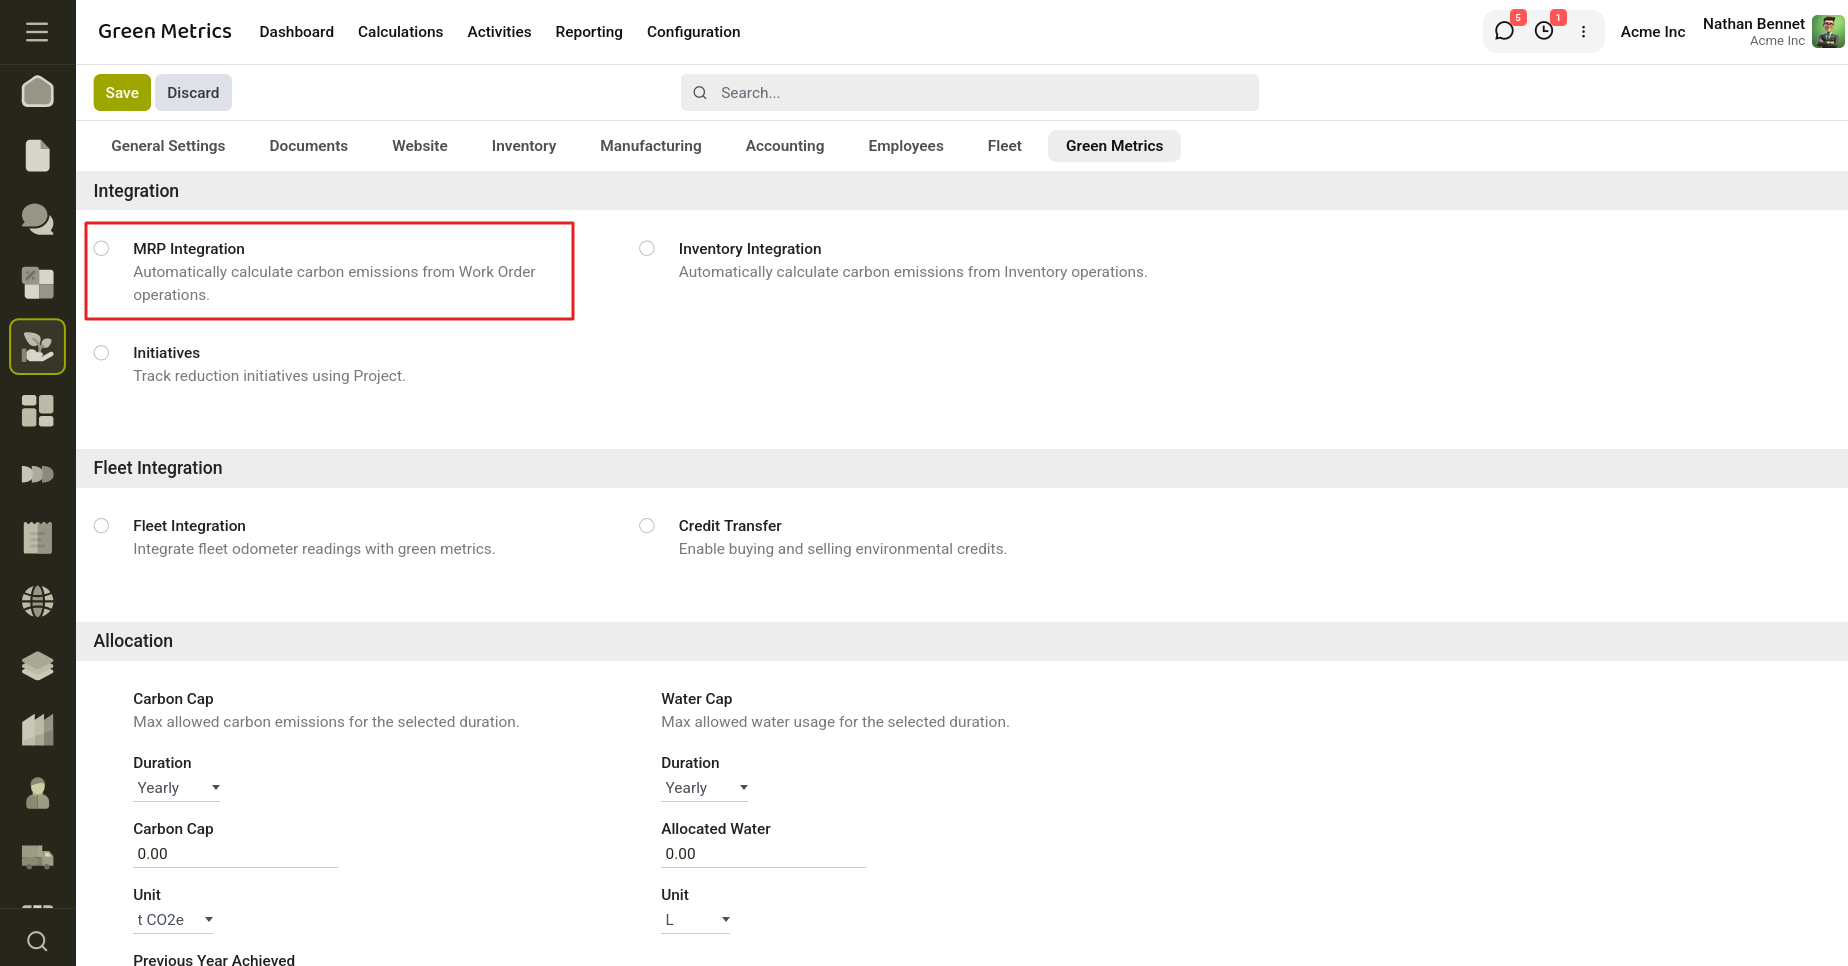
Fig 7.1 — Enable the MRP Integration from Settings
How to Configure
- Go to Green Metrics → Configuration → Settings and enable MRP Integration.
- Open the Manufacturing app and navigate to Configuration → Operations.
- Create or edit an operation and add one or more Carbon Sources.
- Save the operation.
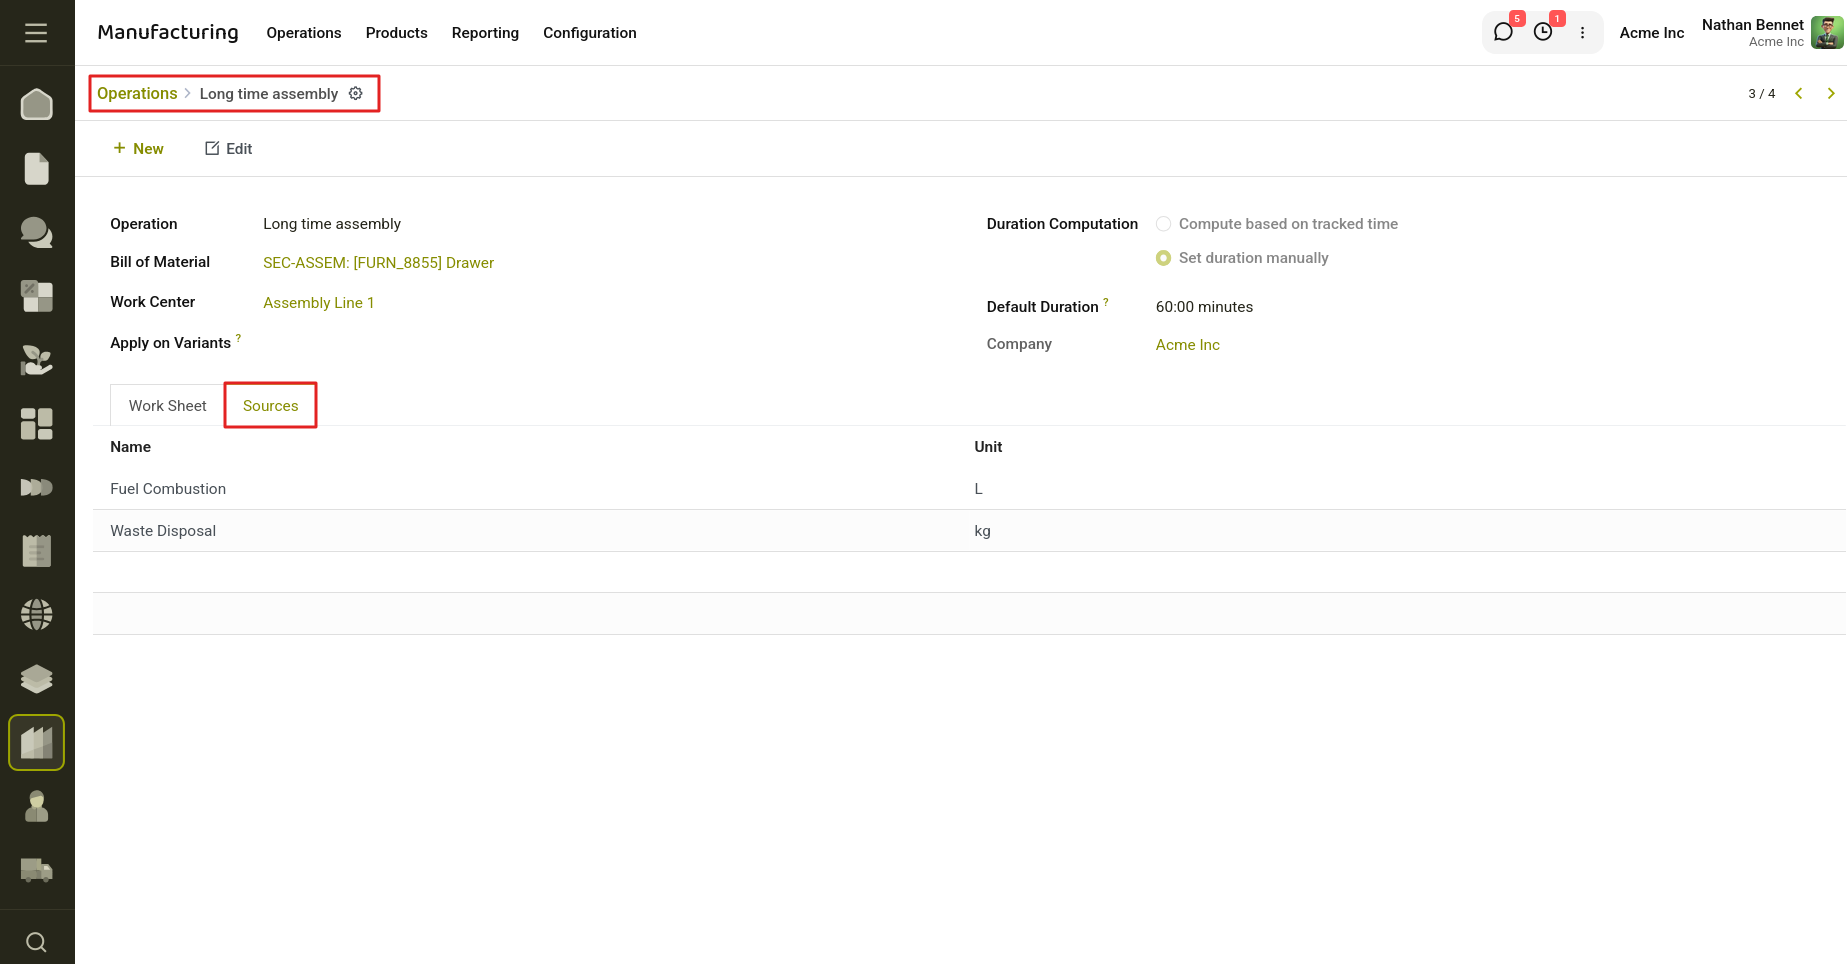
Fig 7.2 — Emission Sources tab is visible in Manufacturing Operations
- Create and confirm a Manufacturing Order for a product using that operation.
- Process the work order by starting and completing it.
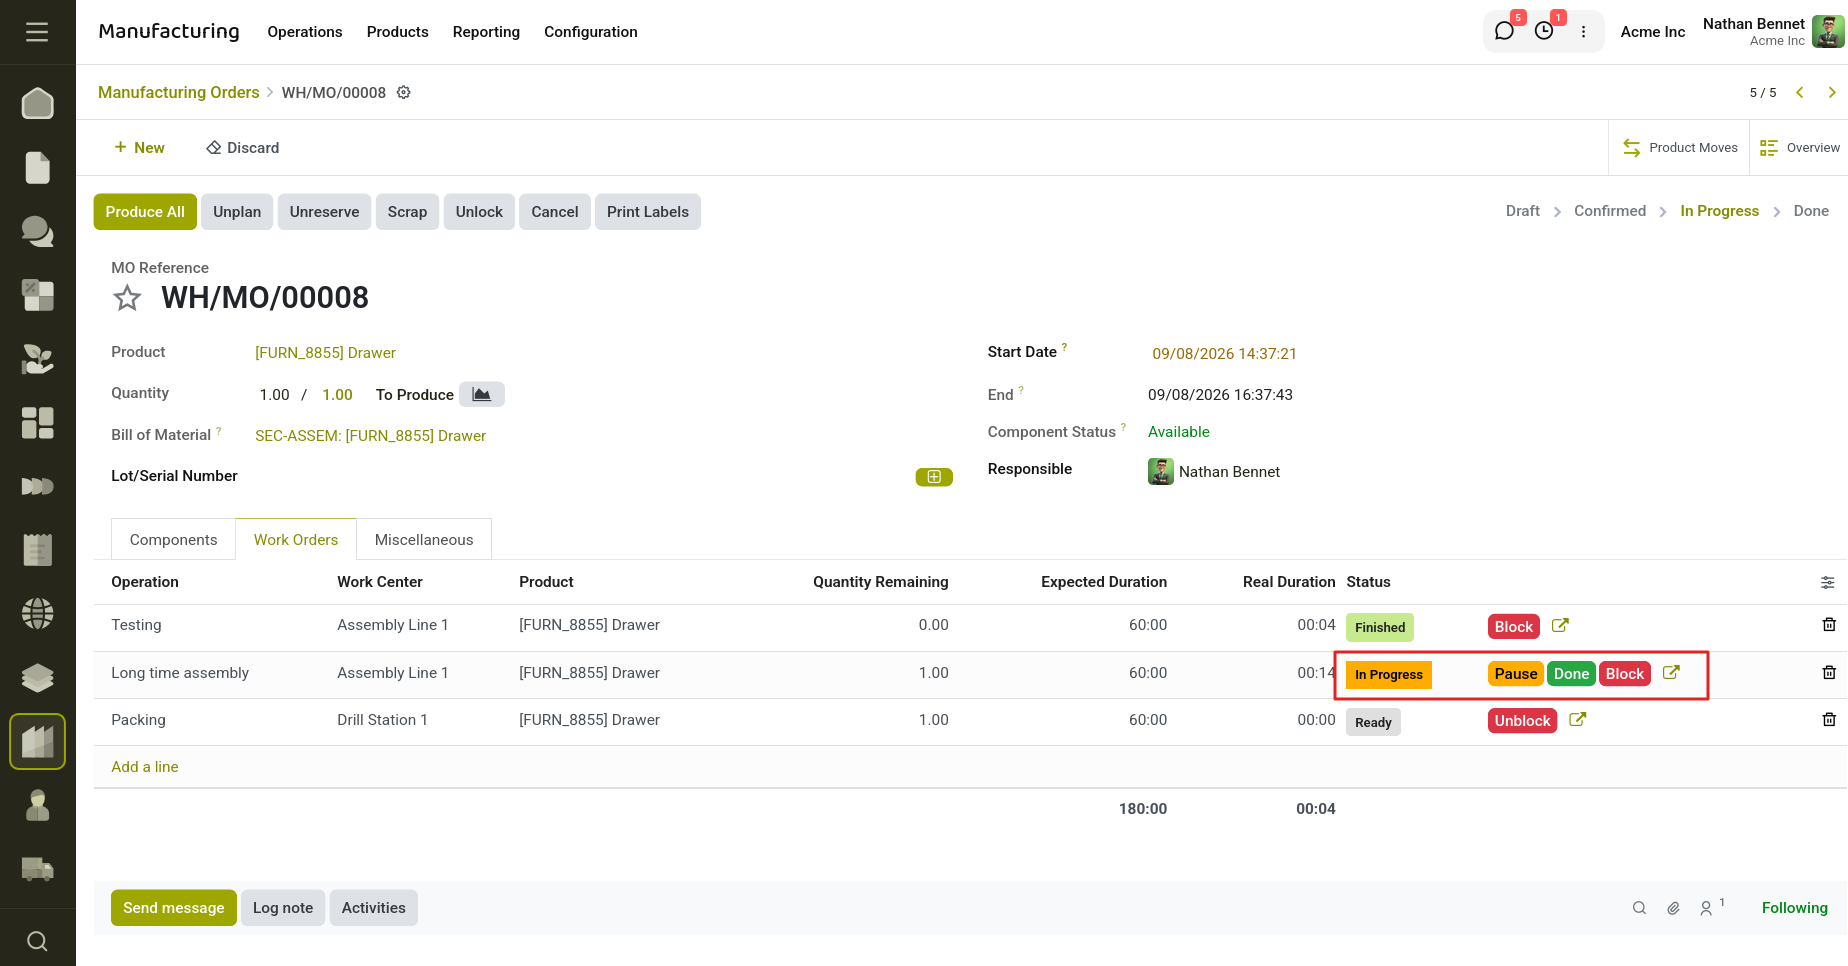
Fig 7.3 — Complete the Work Orders of a Manufacturing Order
- Open Green Metrics → Activities to view the automatically generated carbon activity records with calculated emissions.
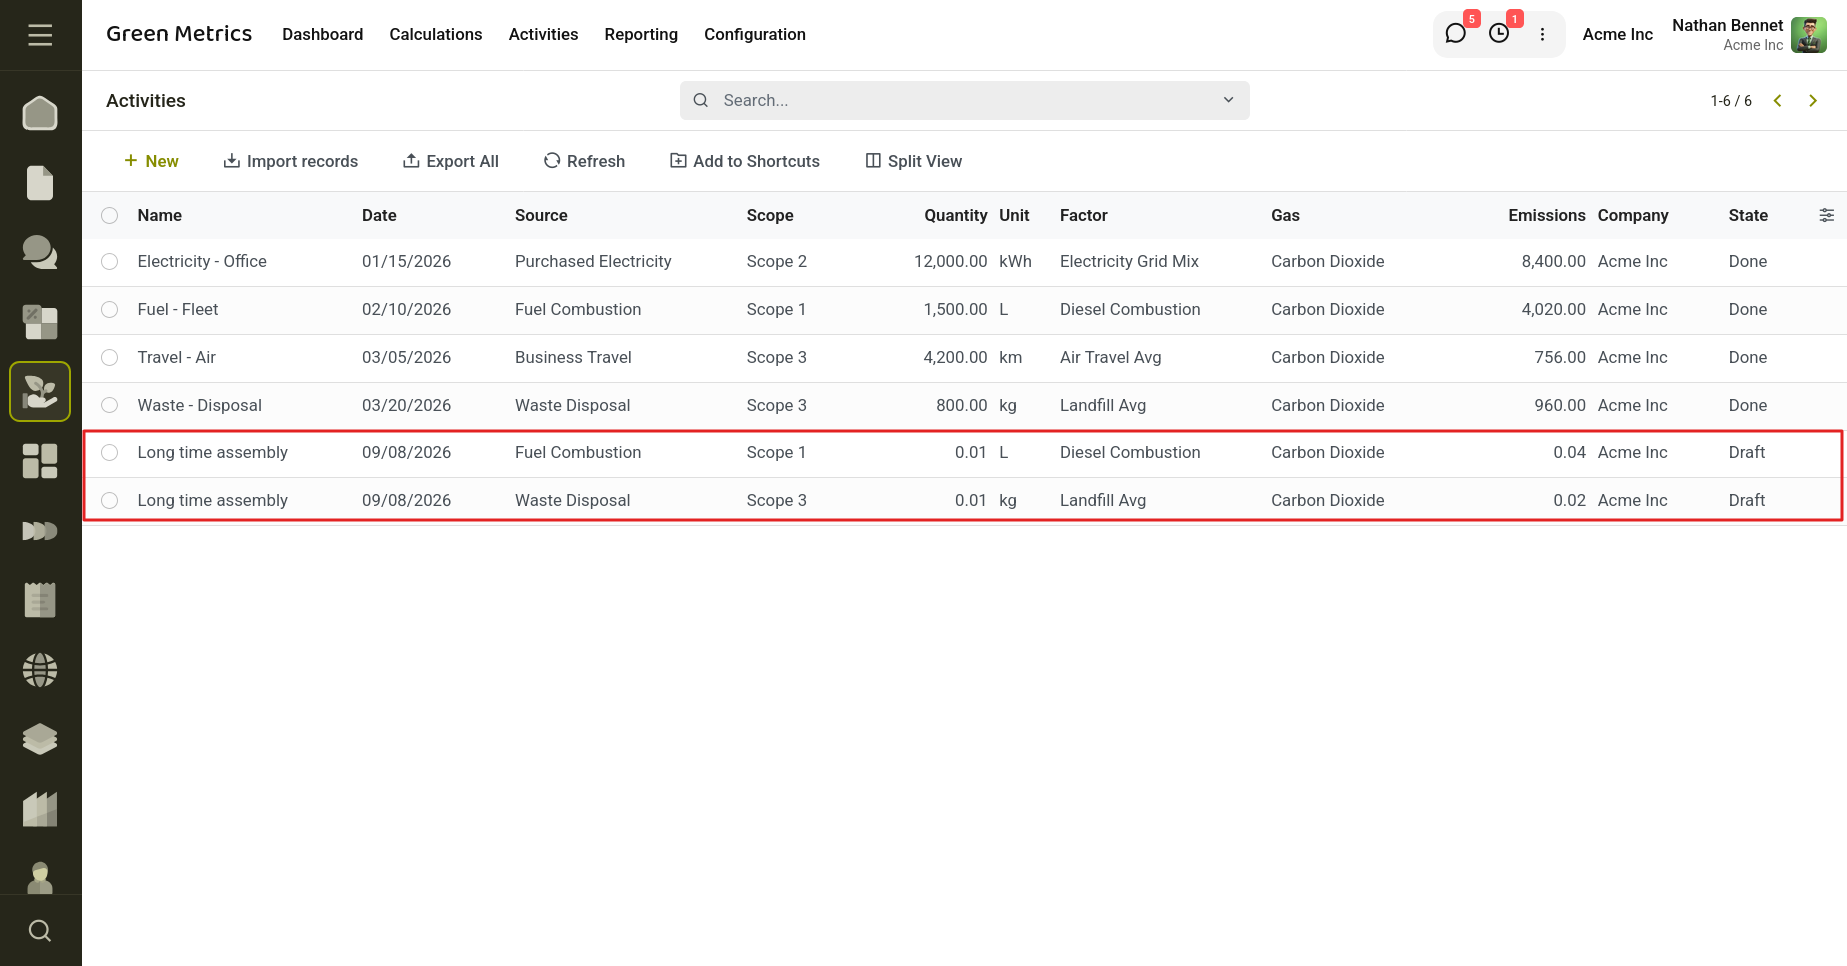
Fig 7.4 — New Carbon Activities has been created with the Operation name
8. Green Metrics Inventory Integration
The Inventory Integration connects the Inventory module with Green Metrics, enabling organizations to automatically track emissions generated during inventory operations such as receipts, deliveries, and internal transfers. By associating carbon sources with inventory operation types, the system automatically creates carbon activity records whenever a transfer is validated, ensuring accurate emission tracking without manual data entry.
How to Configure
- Go to Green Metrics → Configuration → Settings and enable Inventory Integration.
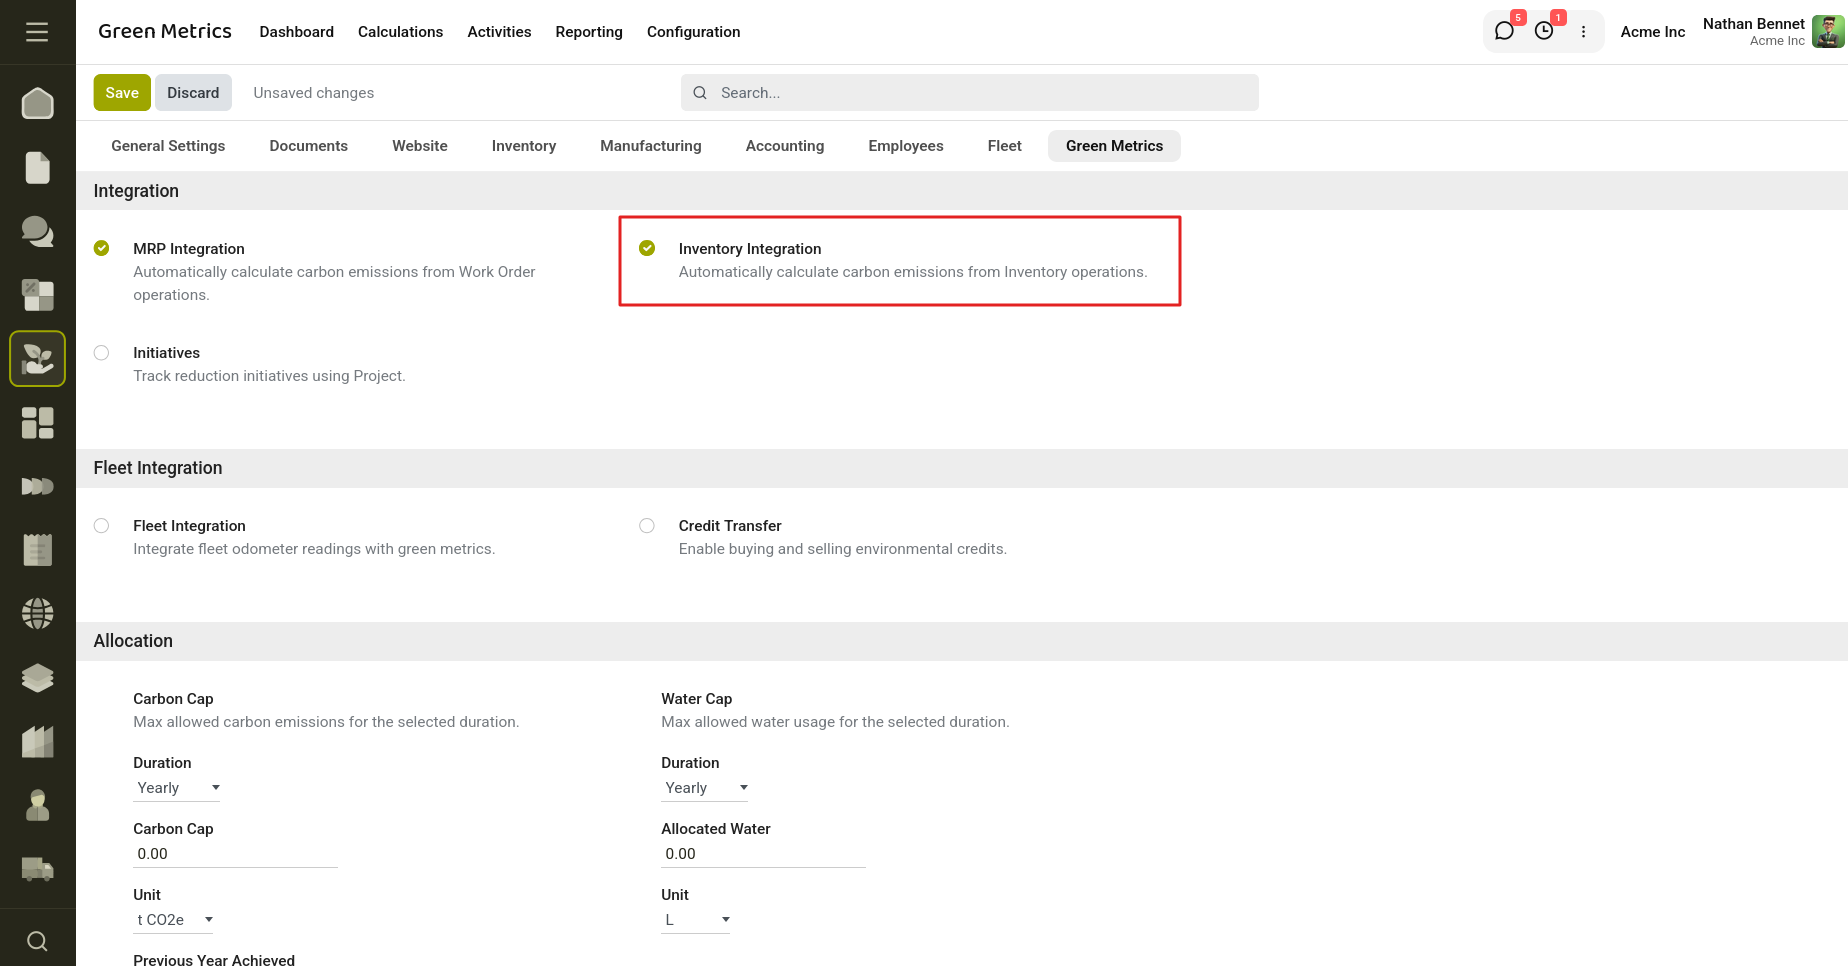
Fig 8.1 — Enable the Inventory Integration from Settings
- Open the Inventory app and navigate to Configuration → Operation Types.
- Create or edit an Operation Type.
- Under the Green Metrics section, add one or more Carbon Sources.
- (Optional) Specify applicable Partners or Products to restrict when the emission source is applied.
- Save the operation type.
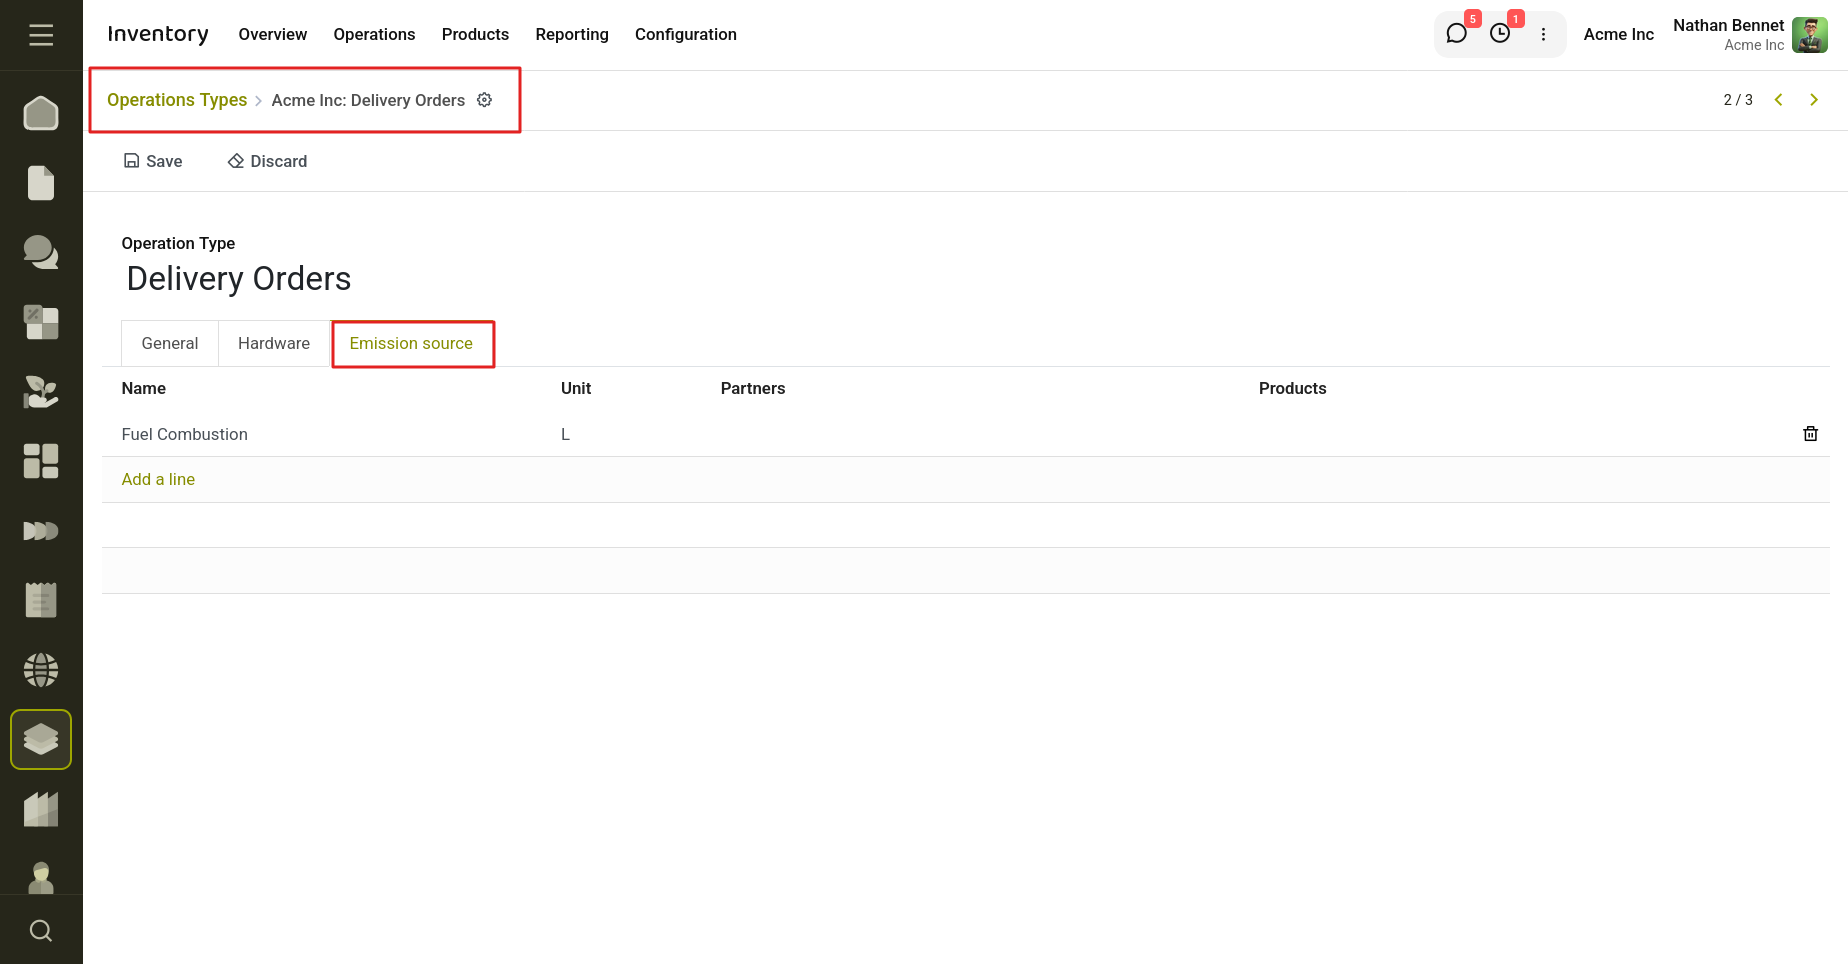
Fig 8.2 — Emission Source tab can be seen on Operation Types form view in Inventory.
- Create and process an Inventory Transfer.
- Validate the transfer.
- Open Green Metrics → Activities to view the automatically generated carbon activity records with calculated emissions.
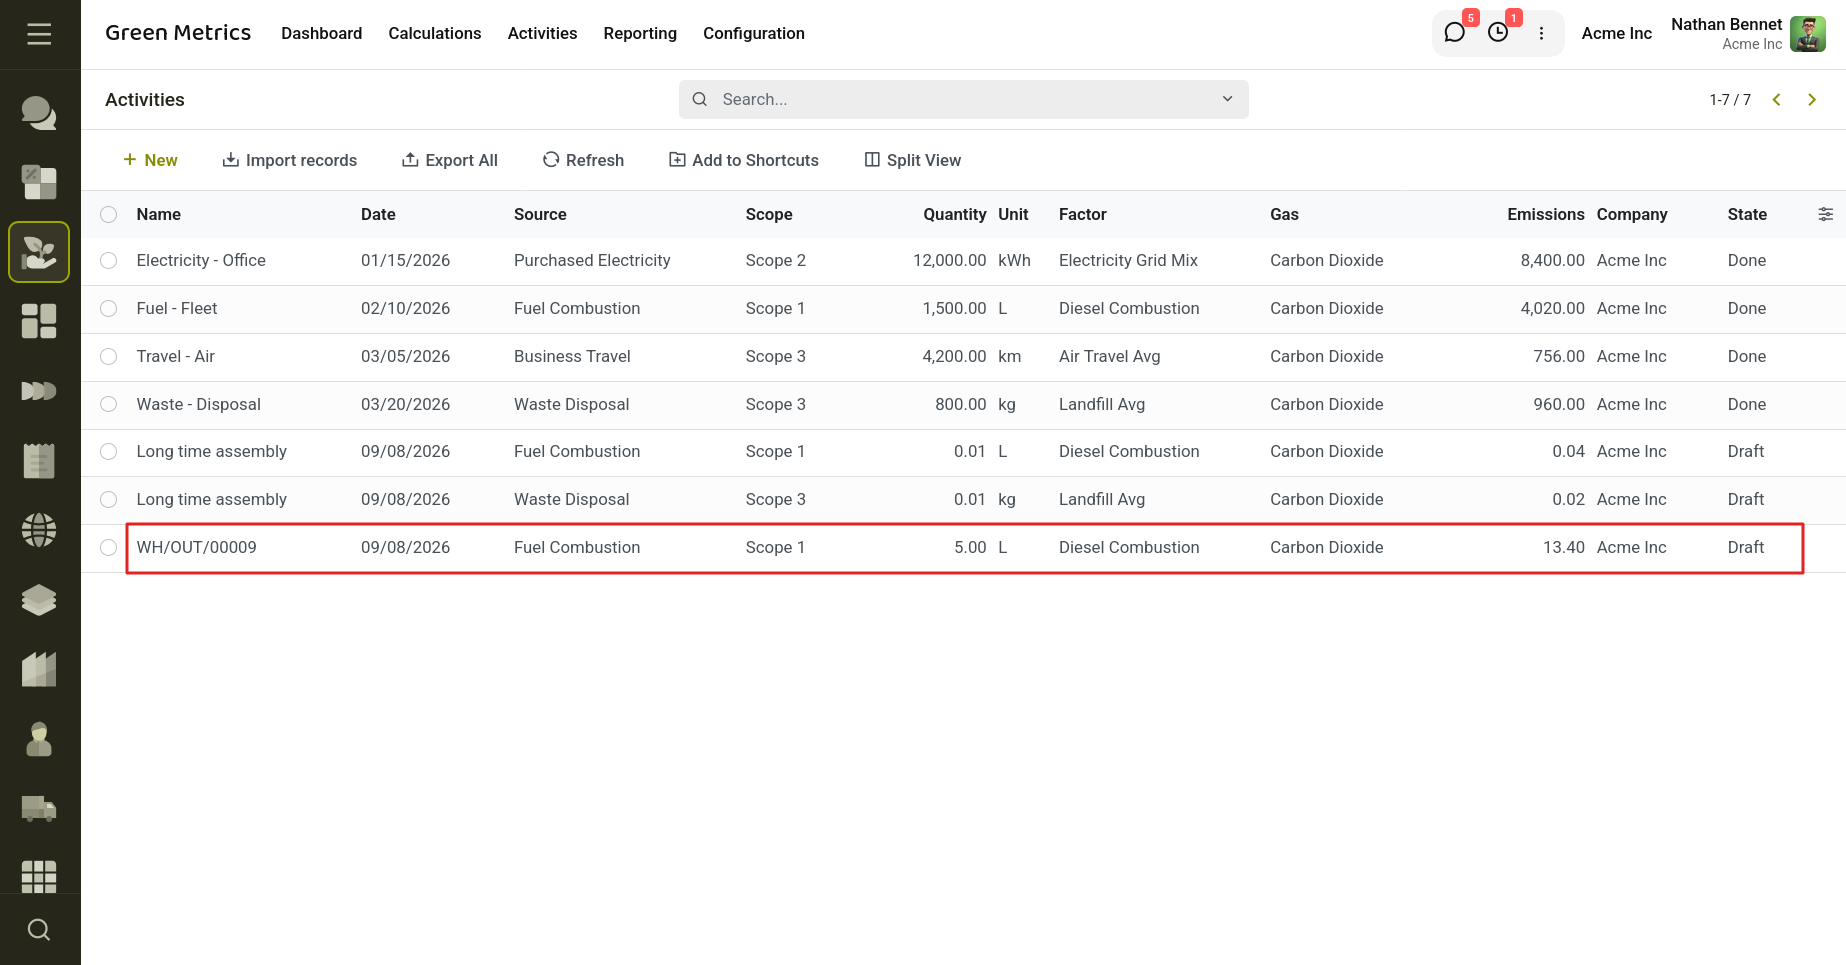
Fig 8.3 — New Carbon Activity is created with the Operation reference number.
9. Green Metrics Project Integration
The Initiatives integration connects the Green Metrics module with the Project application, enabling organizations to manage sustainability initiatives as projects and tasks. Once enabled from Settings, the system automatically creates dedicated projects for Green, Water, and Sound initiatives. Teams can track ideas, monitor implementation progress, and measure the environmental impact of completed initiatives. Completed tasks contribute to reduced emissions or recycled water values, which are reflected on the Green Metrics Dashboard and used to calculate available carbon or water credits.
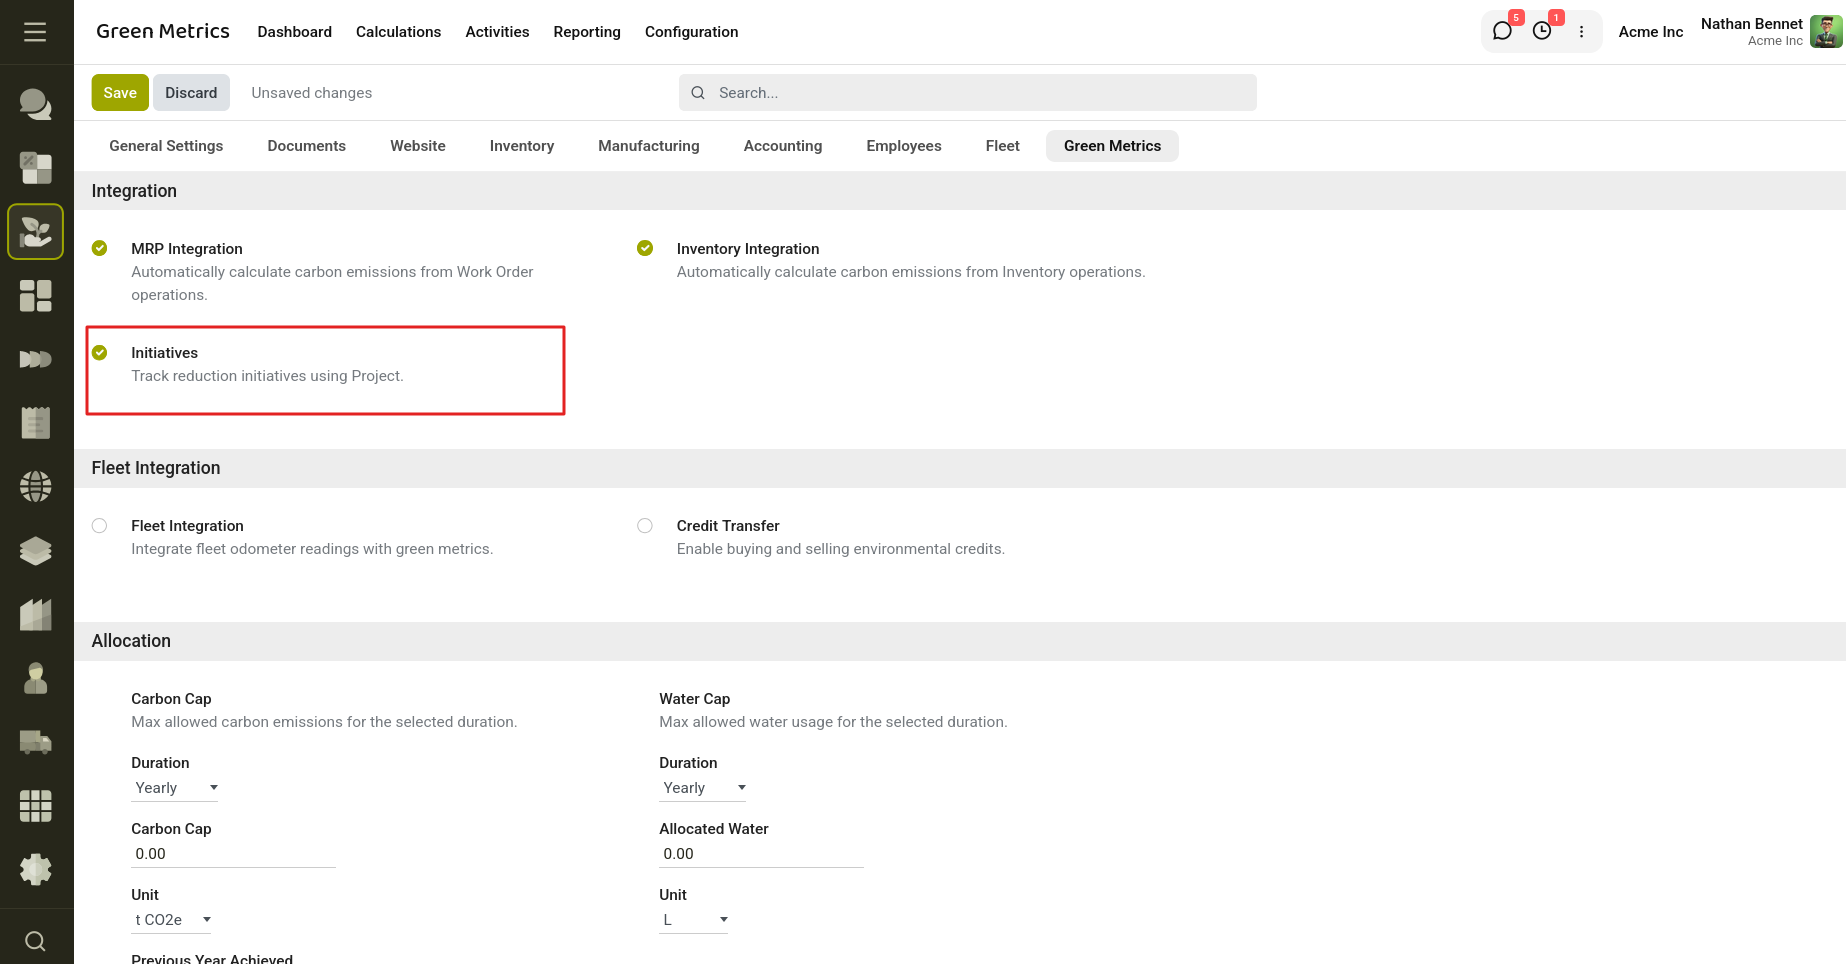
Fig 9.1 — Enable the Initiatives option from Settings
How to Configure
Go to Green Metrics → Configuration → Settings and enable Initiatives.
Save the settings. The Project integration module is installed automatically.
Open the Project application.
Locate the automatically created projects:
- Green Initiatives
- Water Initiatives
- Sound Initiatives
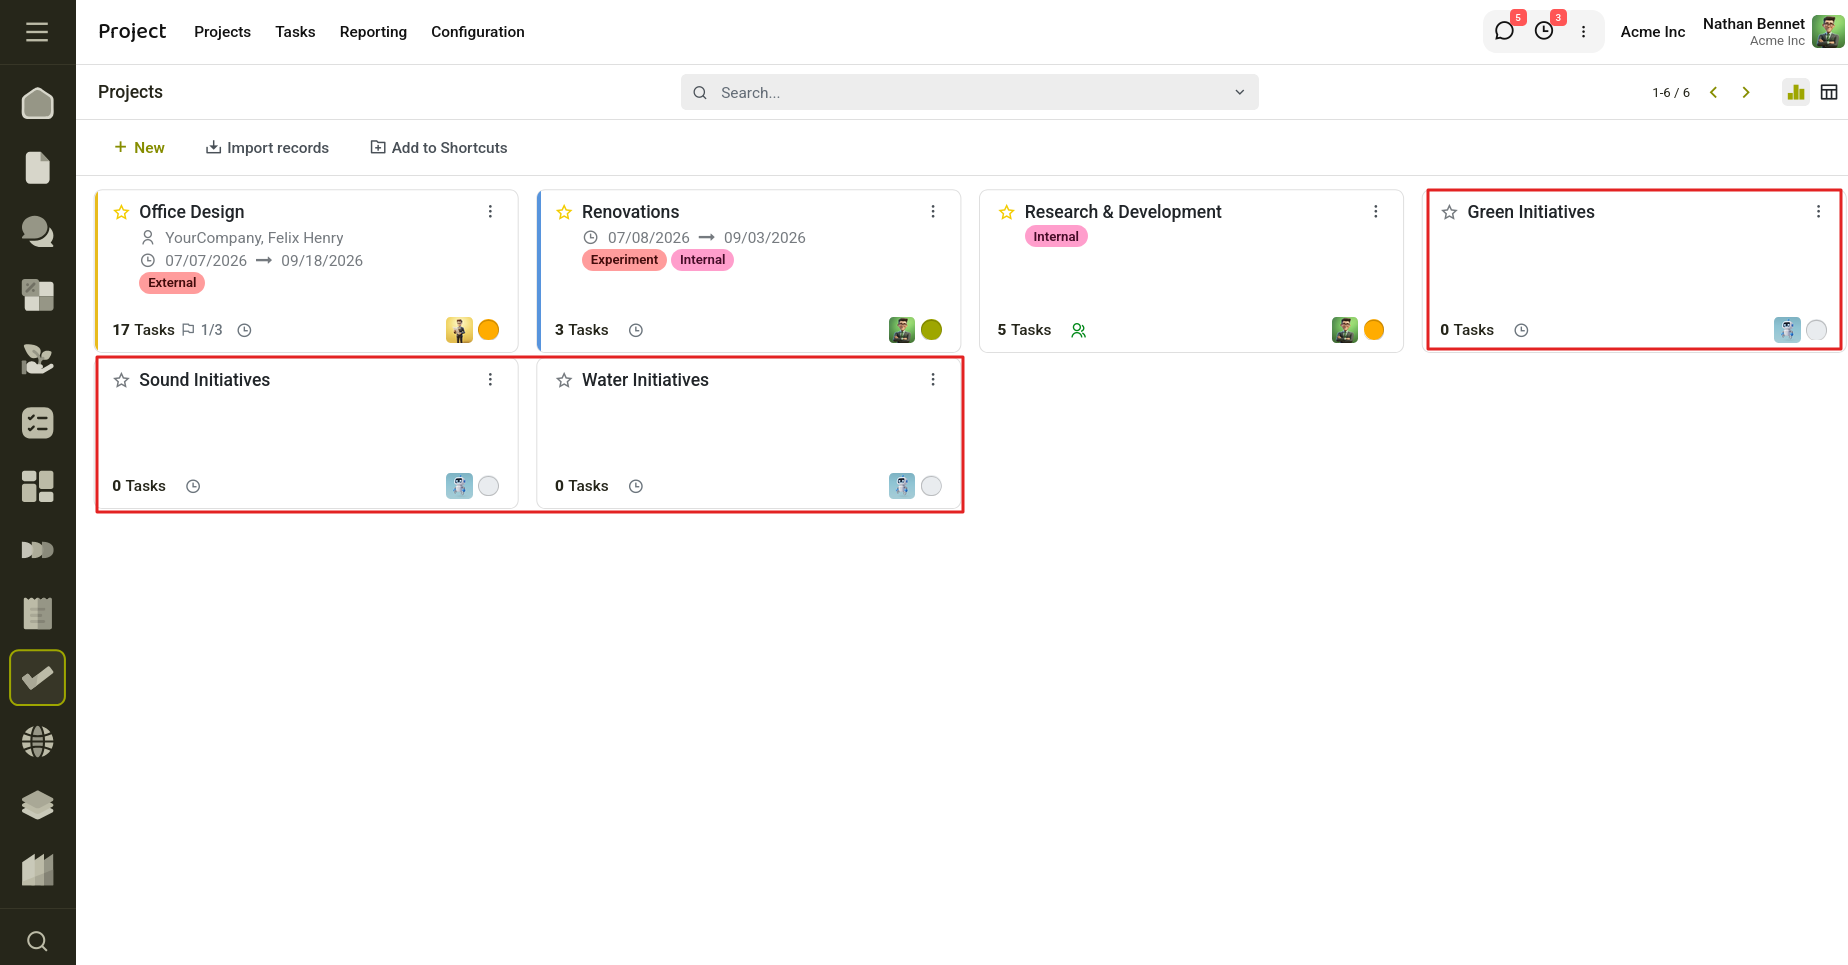
Fig 9.2 — Automatically created Projects when enabling Initiatives from Settings.
- Open the desired initiative project.
- Create a new task representing an environmental initiative.
- Enter the initiative details, including:
- Reduced Emissions
- Recycled Water (for water initiatives)
- Scope
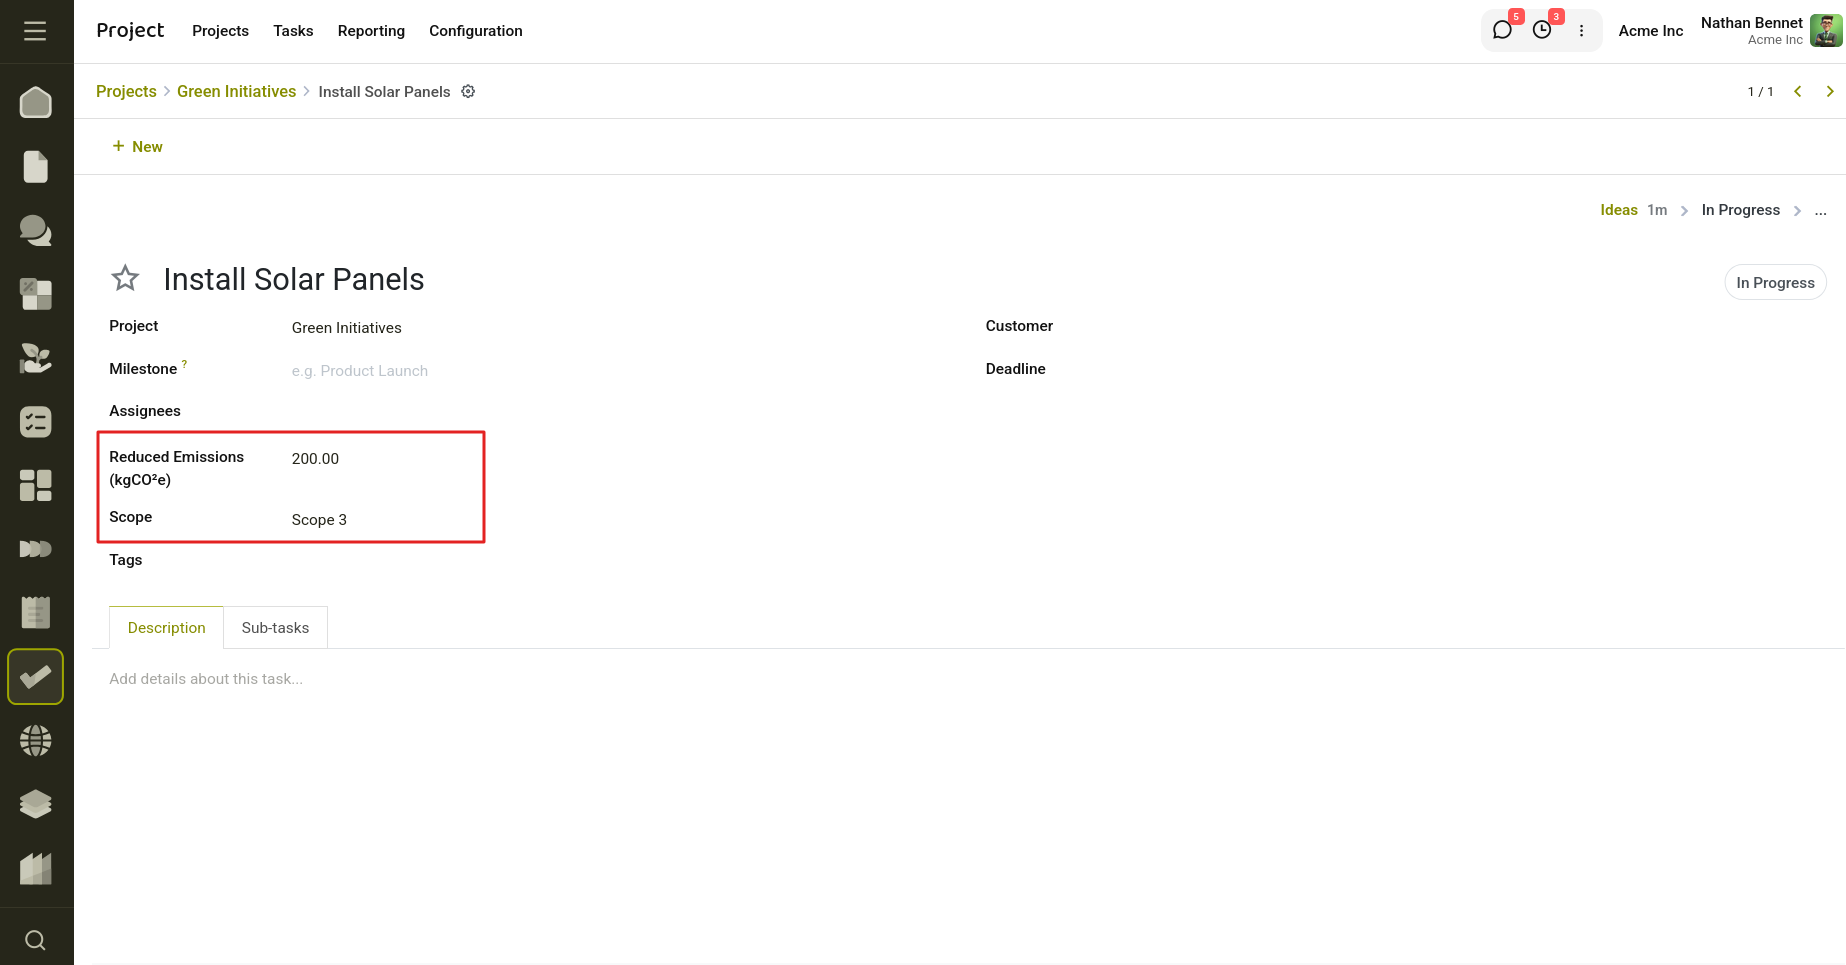
Fig 9.3 — Reduced emission and scope option is visible on Project Task
- Save the task.
- Move the task through the project stages (Ideas → Progress → Done).
- Once the task reaches the Done stage, its environmental benefits are automatically reflected on the Green Metrics Dashboard.
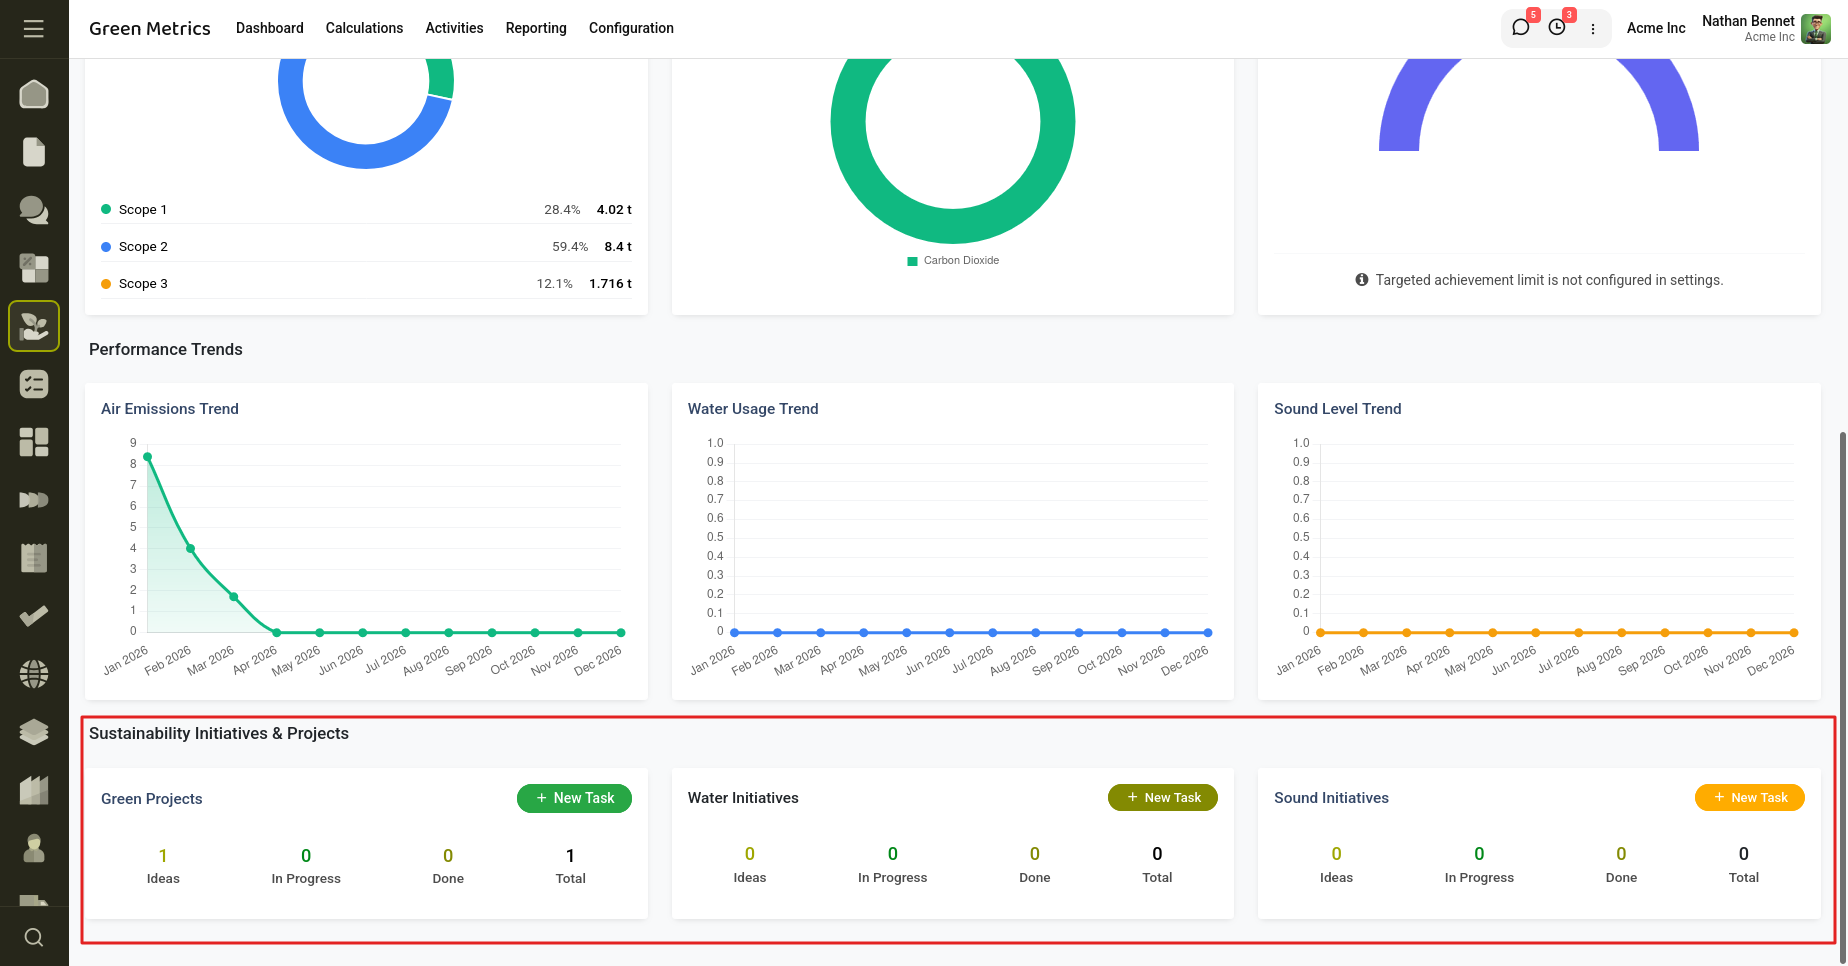
Fig 9.4 — Sustainability Initiatives and Projects on Green Metrics Dashboard
10. Fleet Integration
The Fleet Integration connects the Fleet module with Green Metrics to automatically synchronize vehicle emission data for sustainability tracking. When enabled from Settings, the system creates a dedicated emission source for vehicles (if it does not already exist) and generates emission factors for each fleet vehicle based on its configured CO₂ and sound emission values. This ensures that fleet-related emissions are readily available for carbon calculations and environmental reporting without requiring manual configuration.
How to Configure
- Go to Green Metrics → Configuration → Settings and enable Fleet Integration.
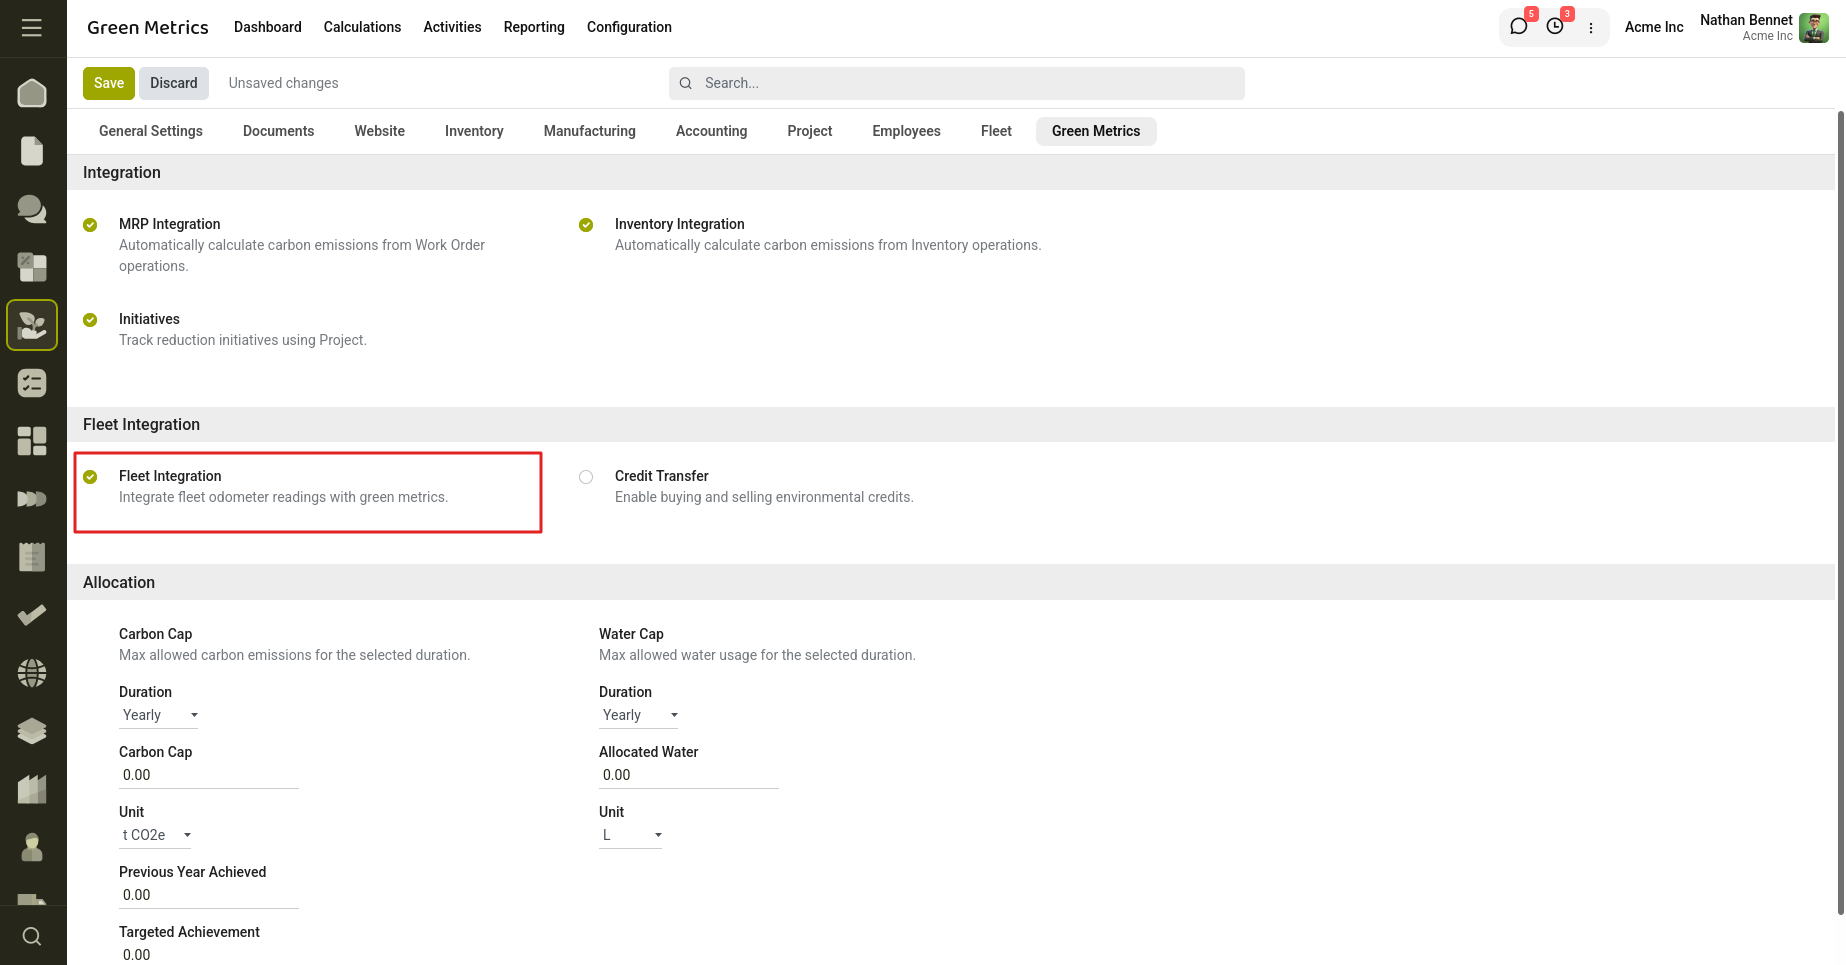
Fig 10.1 — Enable Fleet Integration from Settings.
- Save the settings to activate the integration.
- Open the Fleet application and ensure your vehicles have CO₂ Emissions and Sound Emissions configured.
- Return to Green Metrics → Configuration → Emission Sources.
- Open the automatically created Car Emission source.
- Verify that emission factors have been created for each vehicle under the Air Factors and Sound Factors tabs.
- These factors are now available for use in carbon activities and emission calculations.
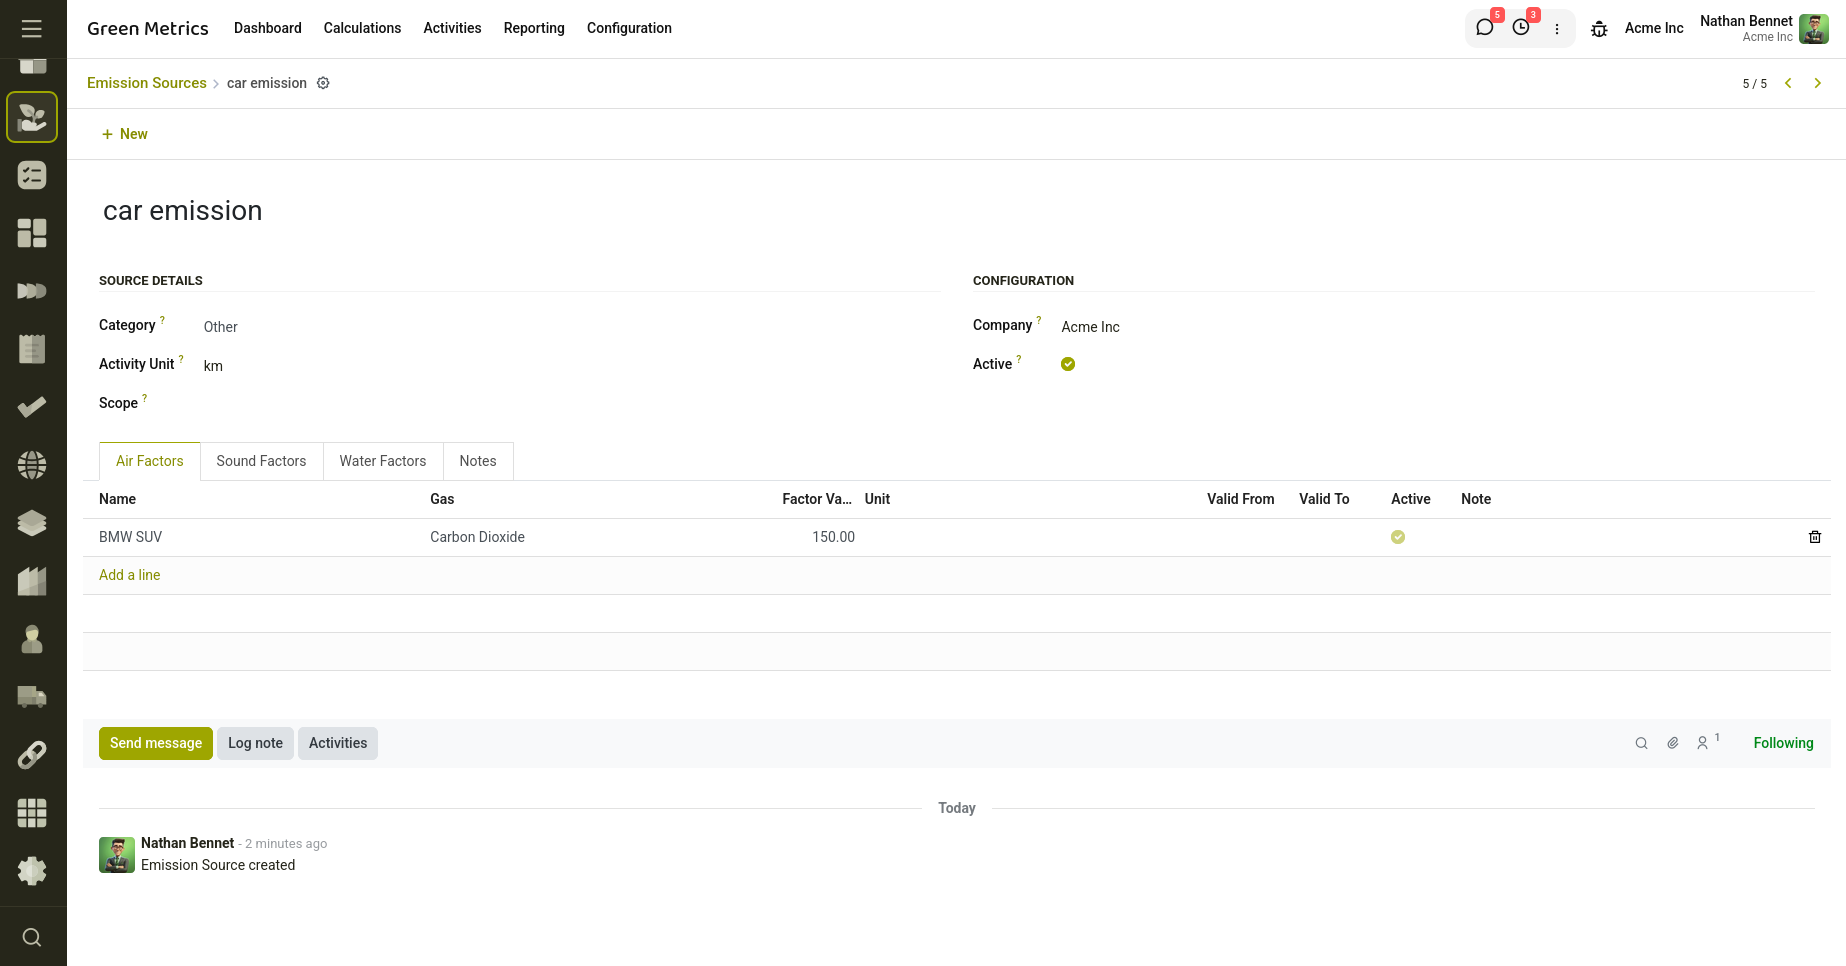
Fig 10.2 — A new Emission Source named Car Emission is created
When the Fleet Integration option is enabled from Green Metrics → Configuration → Settings, the system automatically installs the Fleet integration module and creates a scheduled cron job that synchronizes fleet emission data with Green Metrics. The cron job runs once every day and executes the fleet emission calculation process in the background. During each run, it checks all fleet vehicles, creates the required emission source and measurement unit if they do not already exist, synchronizes vehicle-specific air (CO₂) and sound emission factors, and updates the corresponding Green Metrics records. This automated synchronization ensures that any changes made to vehicle emission values in the Fleet application are reflected in Green Metrics without requiring manual intervention, keeping emission calculations accurate and up to date.
11. Credit Transfer
The Credit Transfer feature enables organizations to manage and exchange carbon credits between companies within the system. Carbon credits represent unused emission allowances that can be transferred when one company has excess credits while another requires additional capacity to remain within its emission limits. This feature helps organizations efficiently utilize available carbon allowances and maintain compliance with sustainability targets.
When the Credit Transfer integration is enabled, two new menus become available under the Green Metrics module:
- Buy Credits – Used to record the purchase or receipt of carbon credits from another company. Purchased credits are added to the company's available carbon cap and are considered during emission calculations and dashboard reporting.
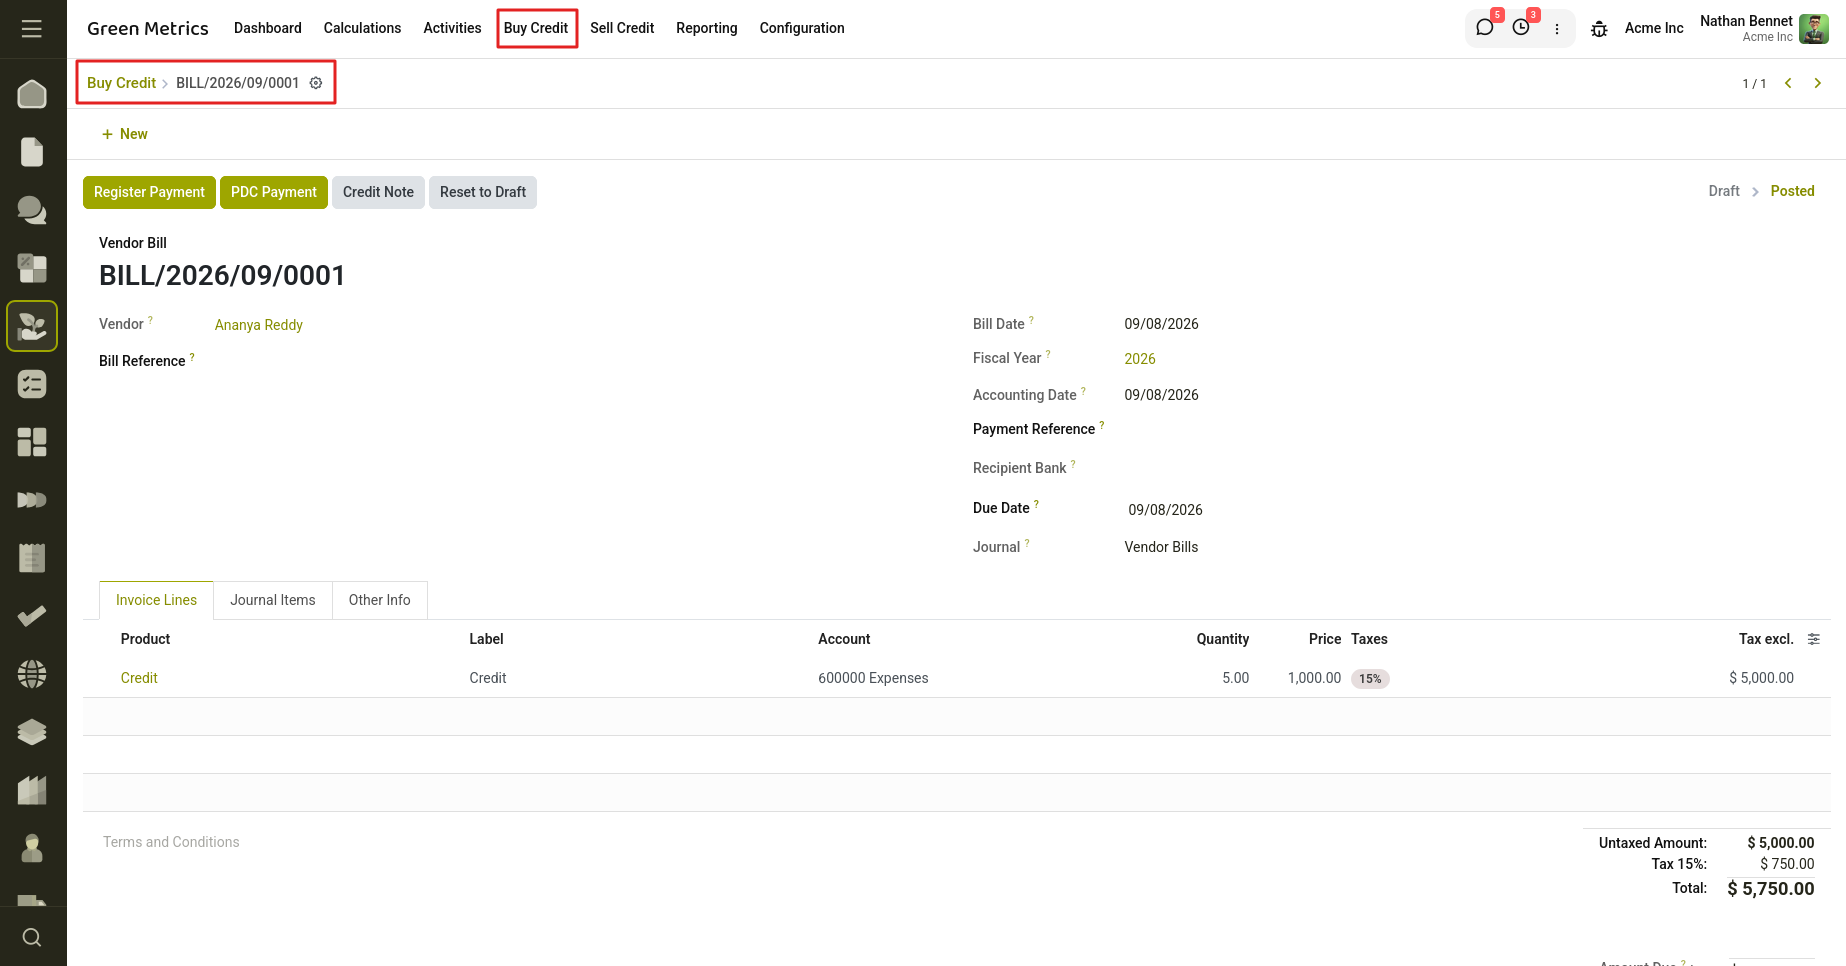
Fig 11.1 — Buy Credits
- Sell Credits – Used to transfer or sell available carbon credits to another company. The transferred credits are deducted from the seller's available balance and become available to the receiving company.
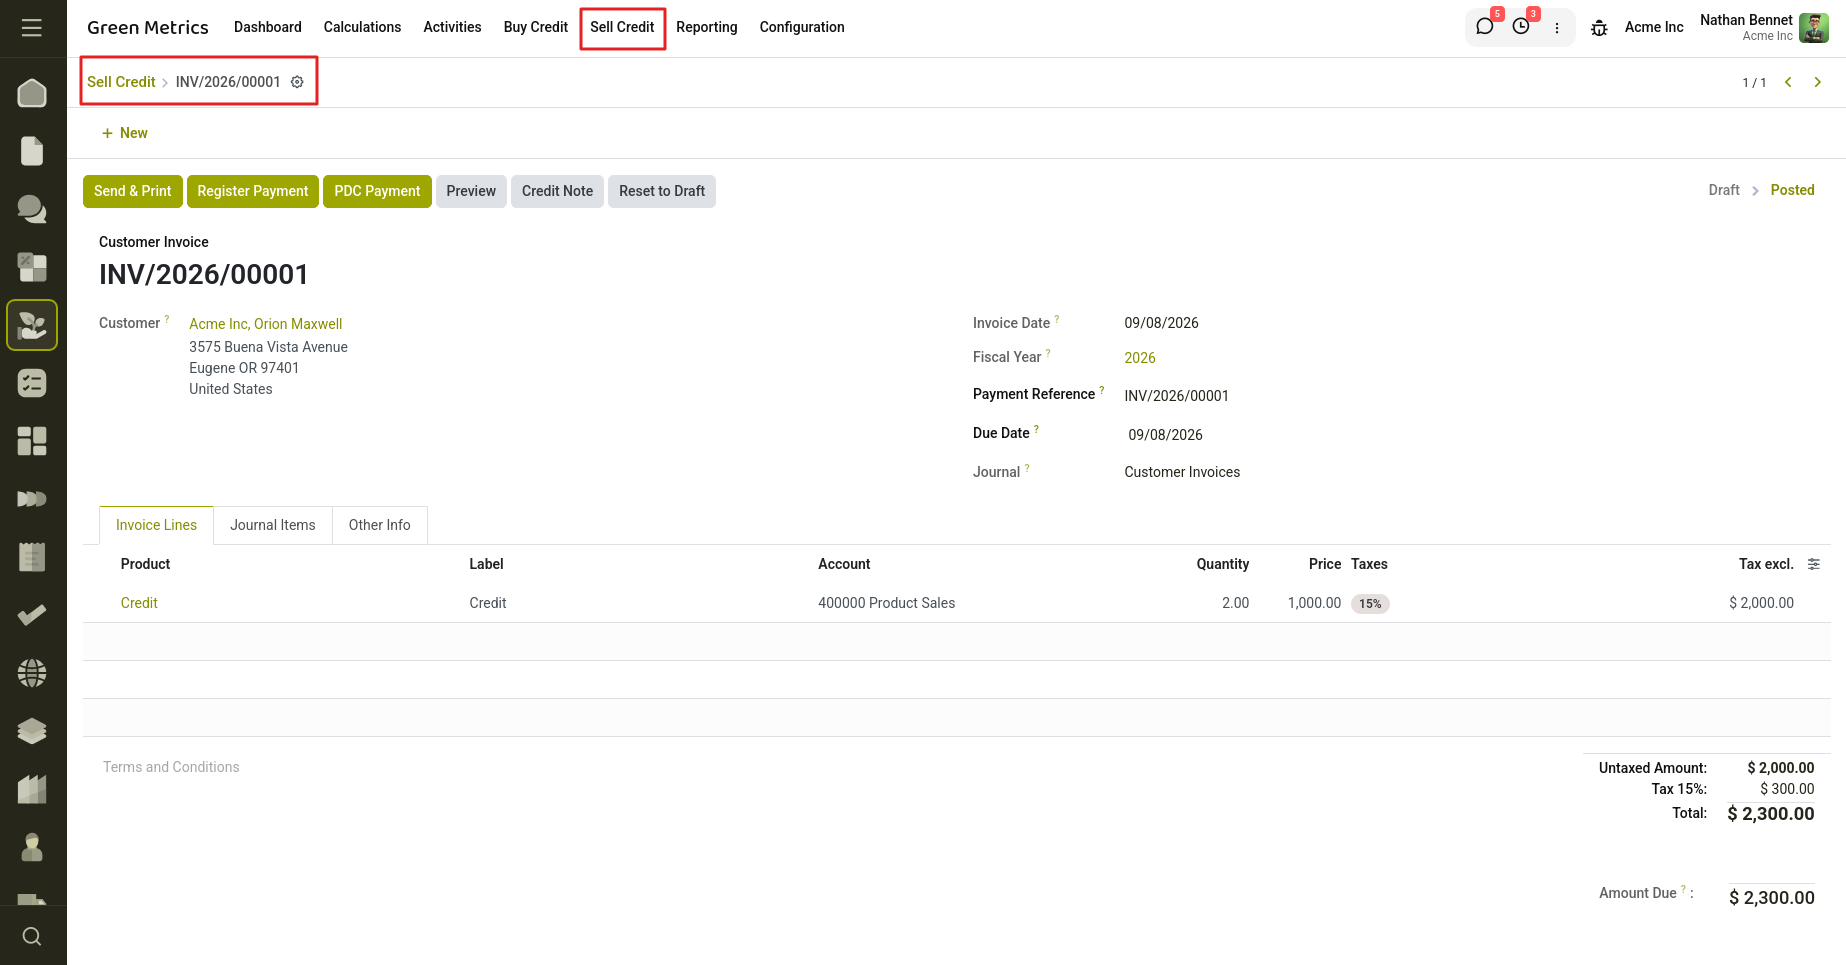
Fig 11.2 — Sell credits