

Cyllo Manufacturing Documentation
Introduction
Cyllo's Manufacturing module provides end-to-end production management — from raw material planning through shop floor execution to finished goods. Built on a fully integrated MRP (Material Requirements Planning) engine, it connects seamlessly with Sales, Inventory, Purchase, and Accounting so that every production order, component movement, and cost entry flows through the system without manual re-entry.
Whether you are running simple single-step production, complex multi-level assemblies, or outsourcing to subcontractors, Cyllo Manufacturing gives you full visibility into what is being made, what materials are needed, where production stands at any moment, and what it costs. Quality checks, work order dependencies, by-product tracking, and scrap management are all built in — making it a complete solution for small manufacturers and growing production operations alike.
1. Manufacturing Operations
1.1 Manufacturing Orders
A Manufacturing Order (MO) is the instruction to produce a specific product in a defined quantity. In Cyllo, MOs can be created manually or generated automatically from Sales Orders, reorder rules, or replenishment requests.
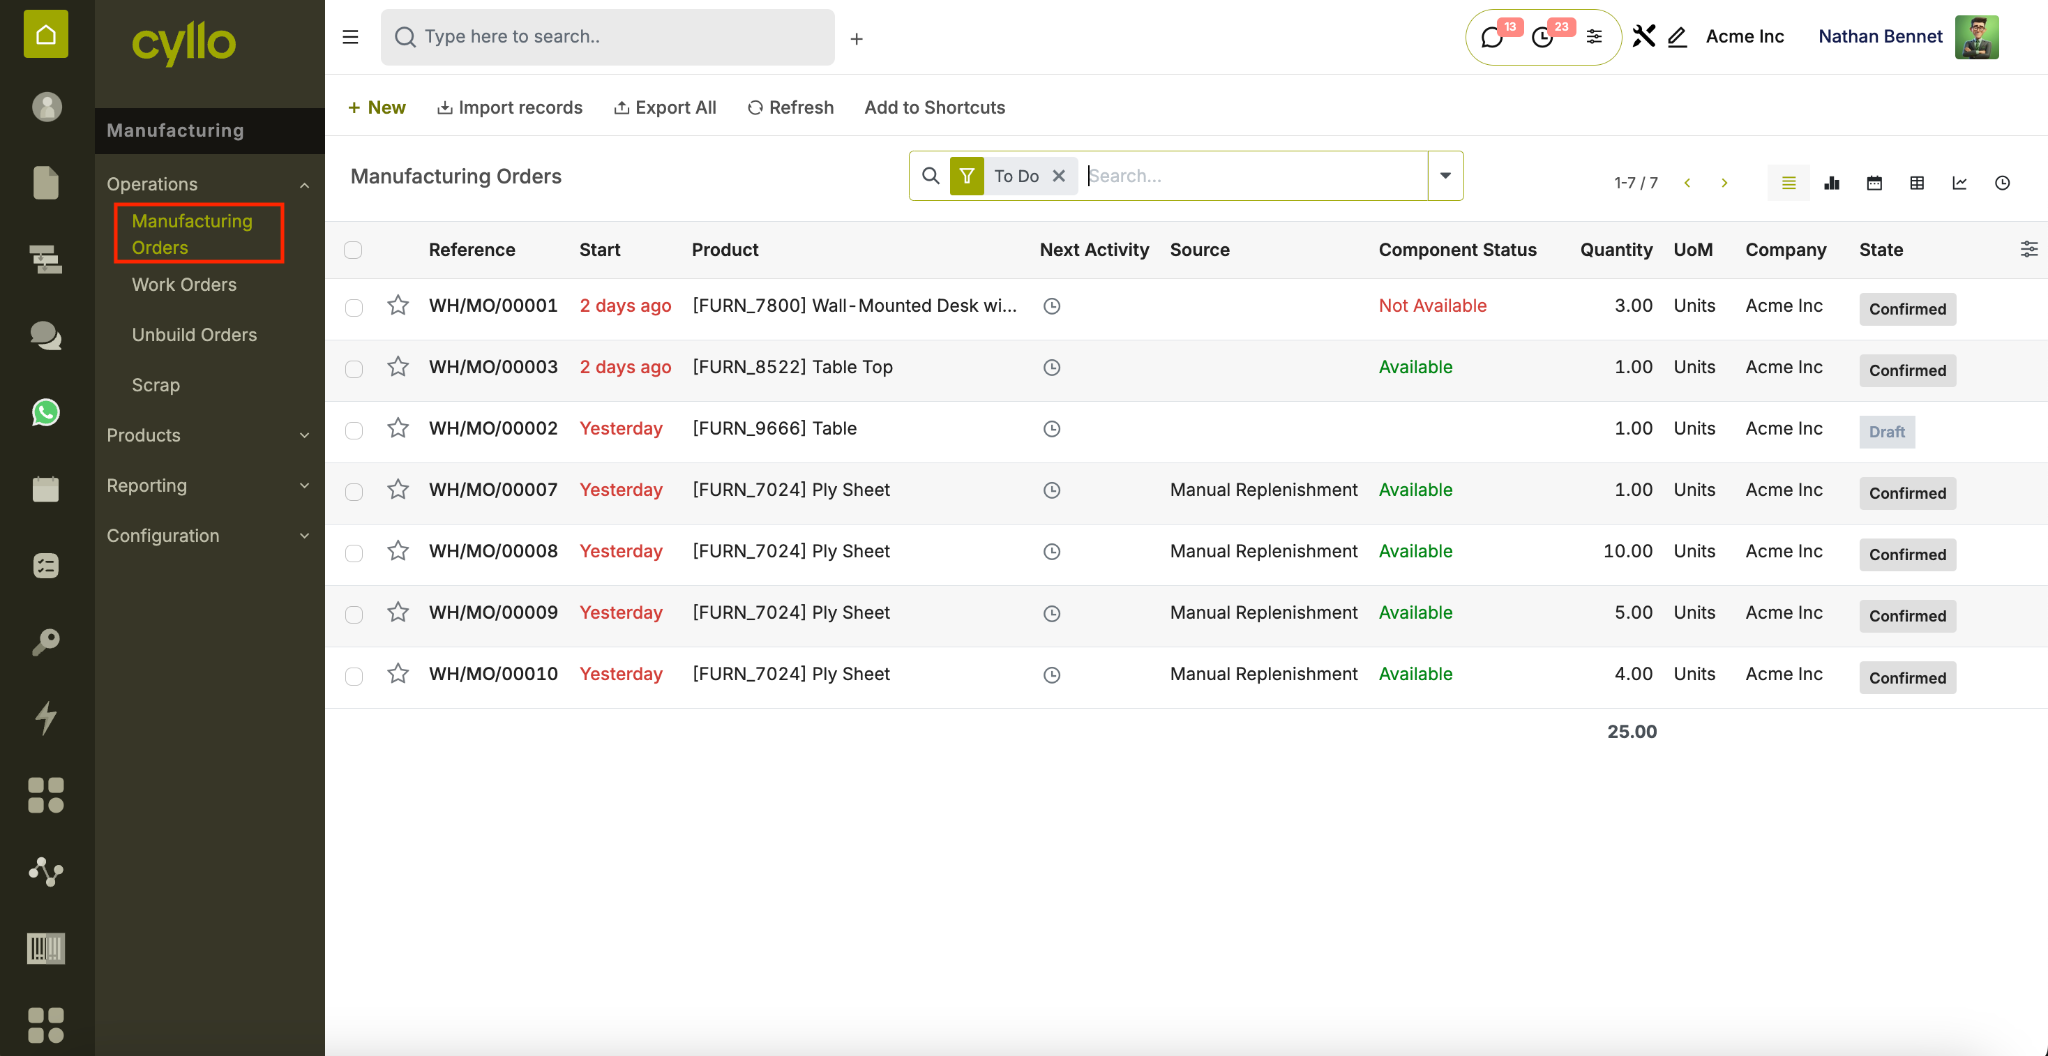
Fig 1.1 — Manufacturing Order list with status indicators
How to Create a Manufacturing Order:
- Go to Manufacturing → Operations → Manufacturing Orders → New
- Select the Product to manufacture
- Set the Quantity and Unit of Measure
- Select the Bill of Materials — components and operations load automatically
- Set the Scheduled Date
- Click Confirm to move the MO from Draft to Confirmed
- Click Produce to record actual production
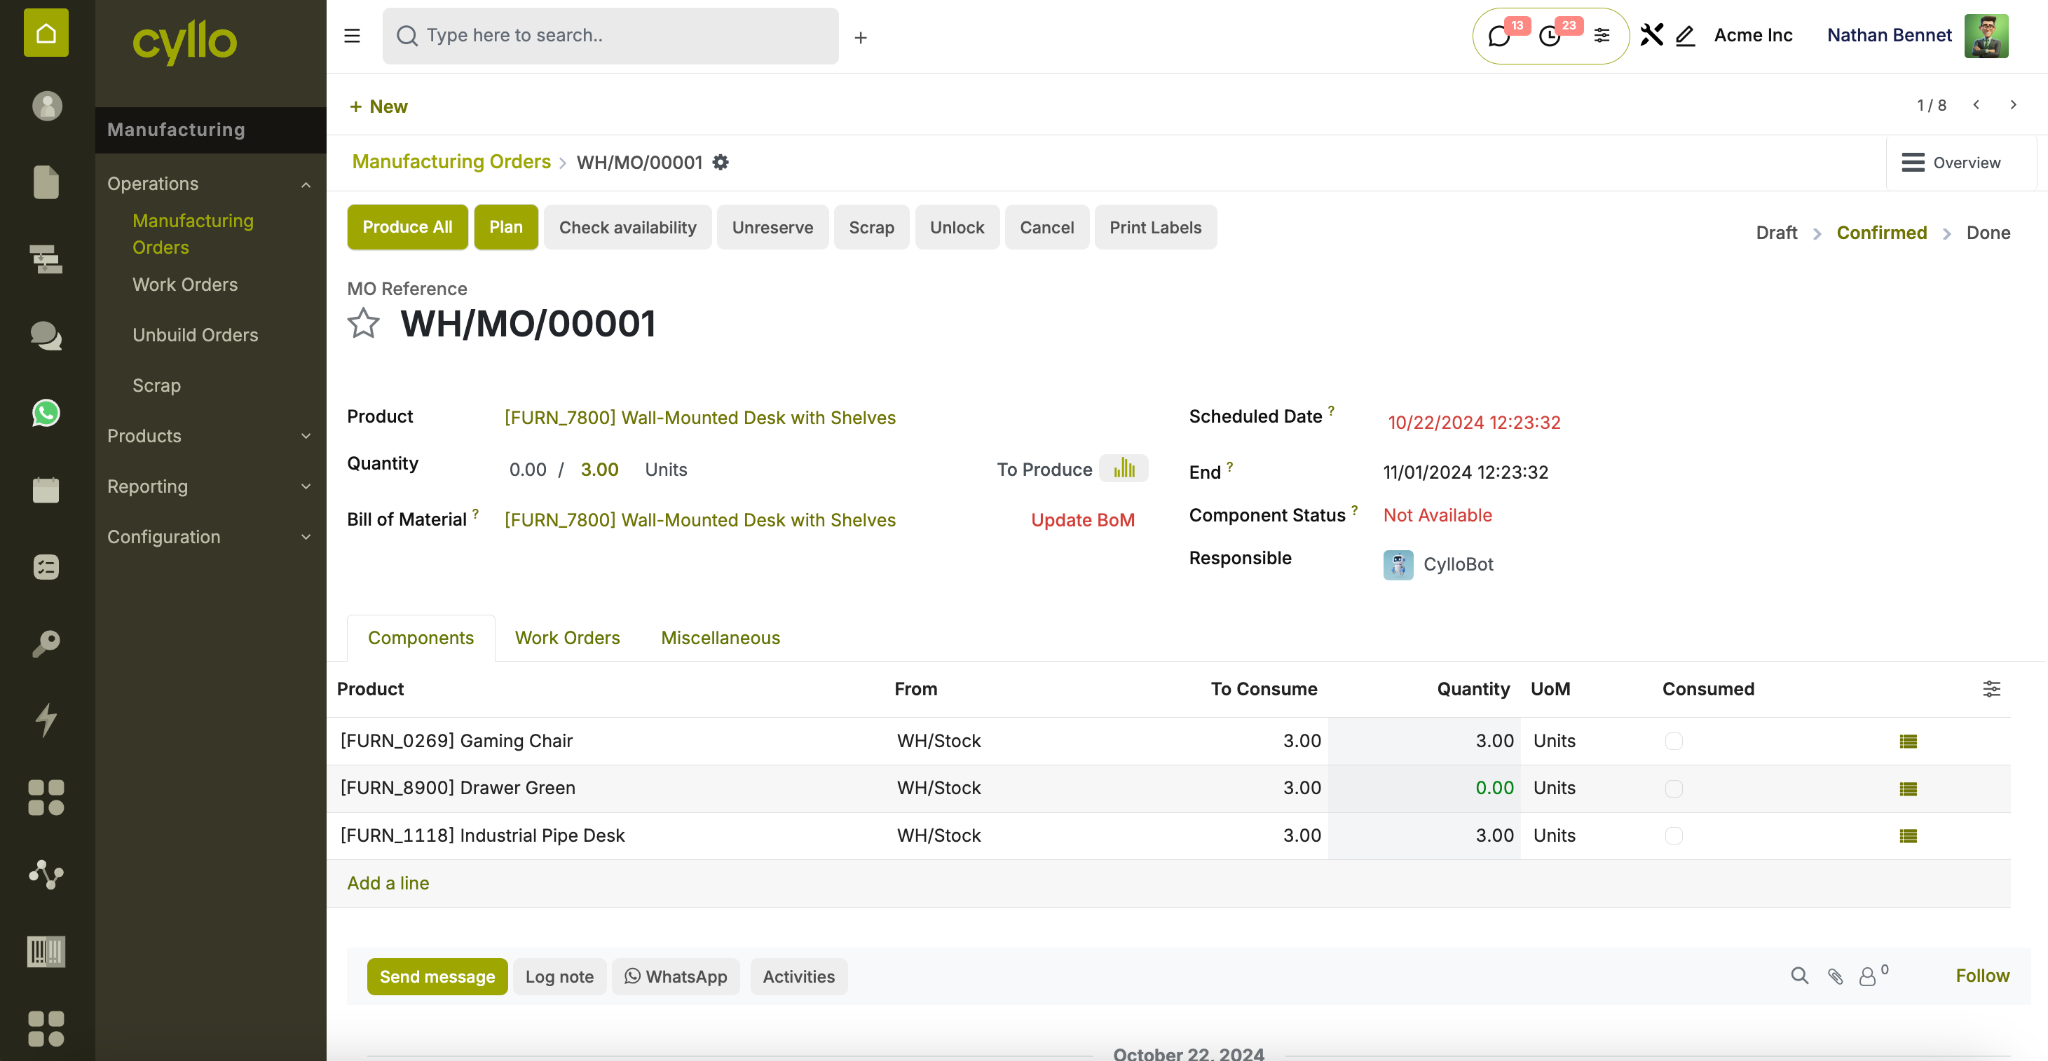
Fig 1.2 — Manufacturing Order form view
Key Fields Product: The finished good being manufactured. Bill of Materials: The recipe defining components and operations for this product. Quantity: How many units to produce in this order. Scheduled Date: The planned production date. Components: Raw materials or sub-assemblies required for production. Status: Draft → Confirmed → In Progress → Done.
Note
MOs can be auto-generated from Sales Orders when the product route is set to Manufacture. Go to the product form → Inventory tab → Routes → enable Manufacture.
1.2 Bill of Materials (BOM)
A Bill of Materials defines the components, quantities, and operations required to produce a finished product. It serves as the production blueprint and is referenced by every Manufacturing Order.
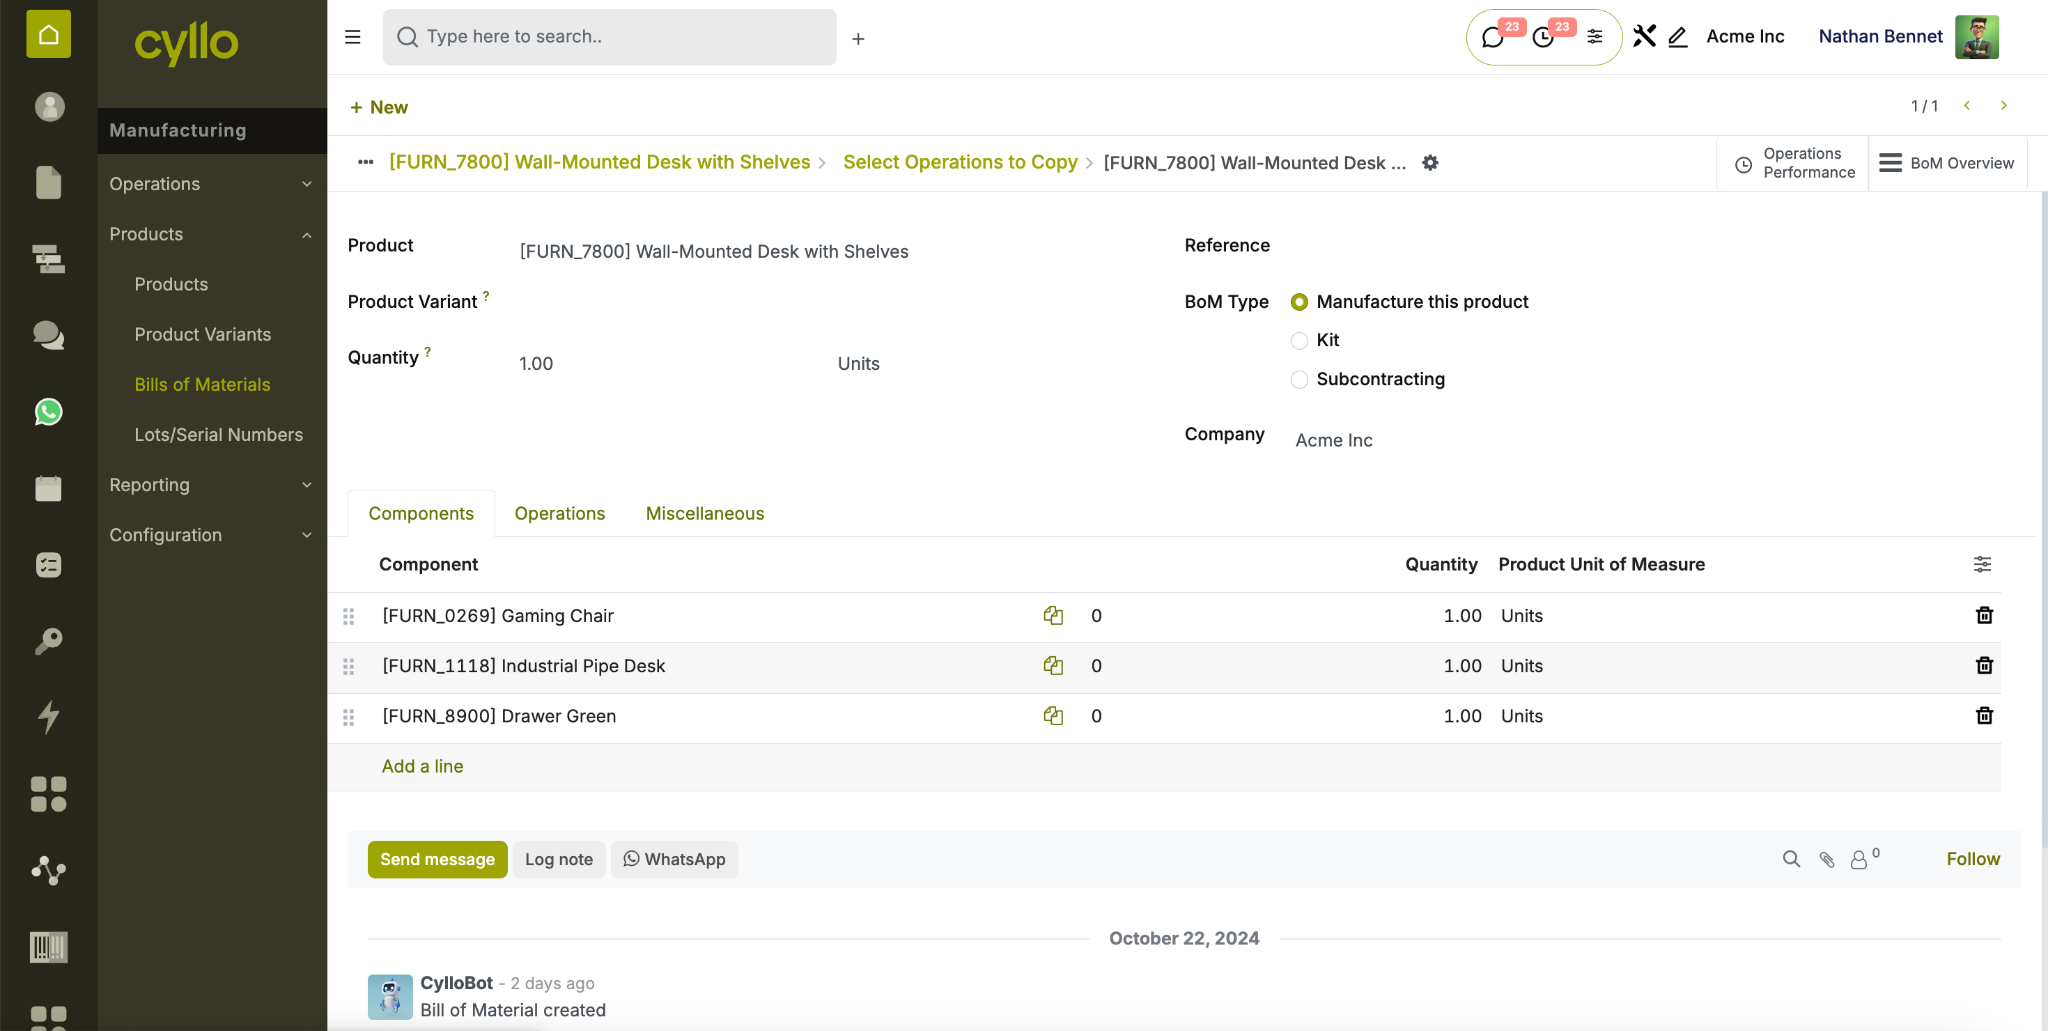
Fig 1.3 — Bill of Materials form with components and operations
How to Create a Bill of Materials:
- Go to Manufacturing → Products → Bills of Materials → New
- Select the Product the BOM applies to
- Set the BOM Type: Manufacture This Product, Kits, or Subcontracting
- Set the Quantity (the finished quantity this BOM produces)
- Add components in the Components tab — enter product, quantity, and UoM
- Add operations in the Operations tab — link to work centers
- Save the BOM
Key Fields
- Product: The finished good this BOM produces.
- BOM Type: Manufacture, Kit, or Subcontracting.
- Quantity: The output quantity one BOM run produces.
- Components: List of raw materials or sub-assemblies with quantities.
- Operations: Production steps linked to specific work centers.
Note
You can have multiple BOMs for the same product — useful for different production methods, seasonal variants, or different output quantities.
1.3 Multi-Level BOM
Multi-Level BOMs allow sub-assemblies to be defined as components within a parent BOM — enabling complex production structures where intermediate products are manufactured before the final product.
How to Set Up a Multi-Level BOM:
- Create a BOM for the sub-assembly product first
- On the parent product BOM, add the sub-assembly as a component
- Cyllo recognises it has its own BOM and generates a child MO automatically
- Both the parent MO and child MO are linked and tracked together
- Confirm the child MO first, then the parent MO
Note
Use multi-level BOMs for products that require pre-manufactured components — such as assembled parts used in a larger final product.
2. Work Orders & Work Centers
2.1 Work Centers
Work Centers represent the physical locations or machines where production operations are carried out — such as an assembly line, a cutting machine, or a painting station.
Fig 2.1 — Work center list with capacity and efficiency indicators
How to Create a Work Center:
- Go to Manufacturing → Configuration → Work Centers → New
- Enter the Work Center Name
- Set the Capacity (number of simultaneous operations)
- Set the Efficiency Factor (e.g., 100% = full capacity)
- Set the Time Efficiency for operations performed here
- Configure Costs per hour for production cost tracking
- Save the work center
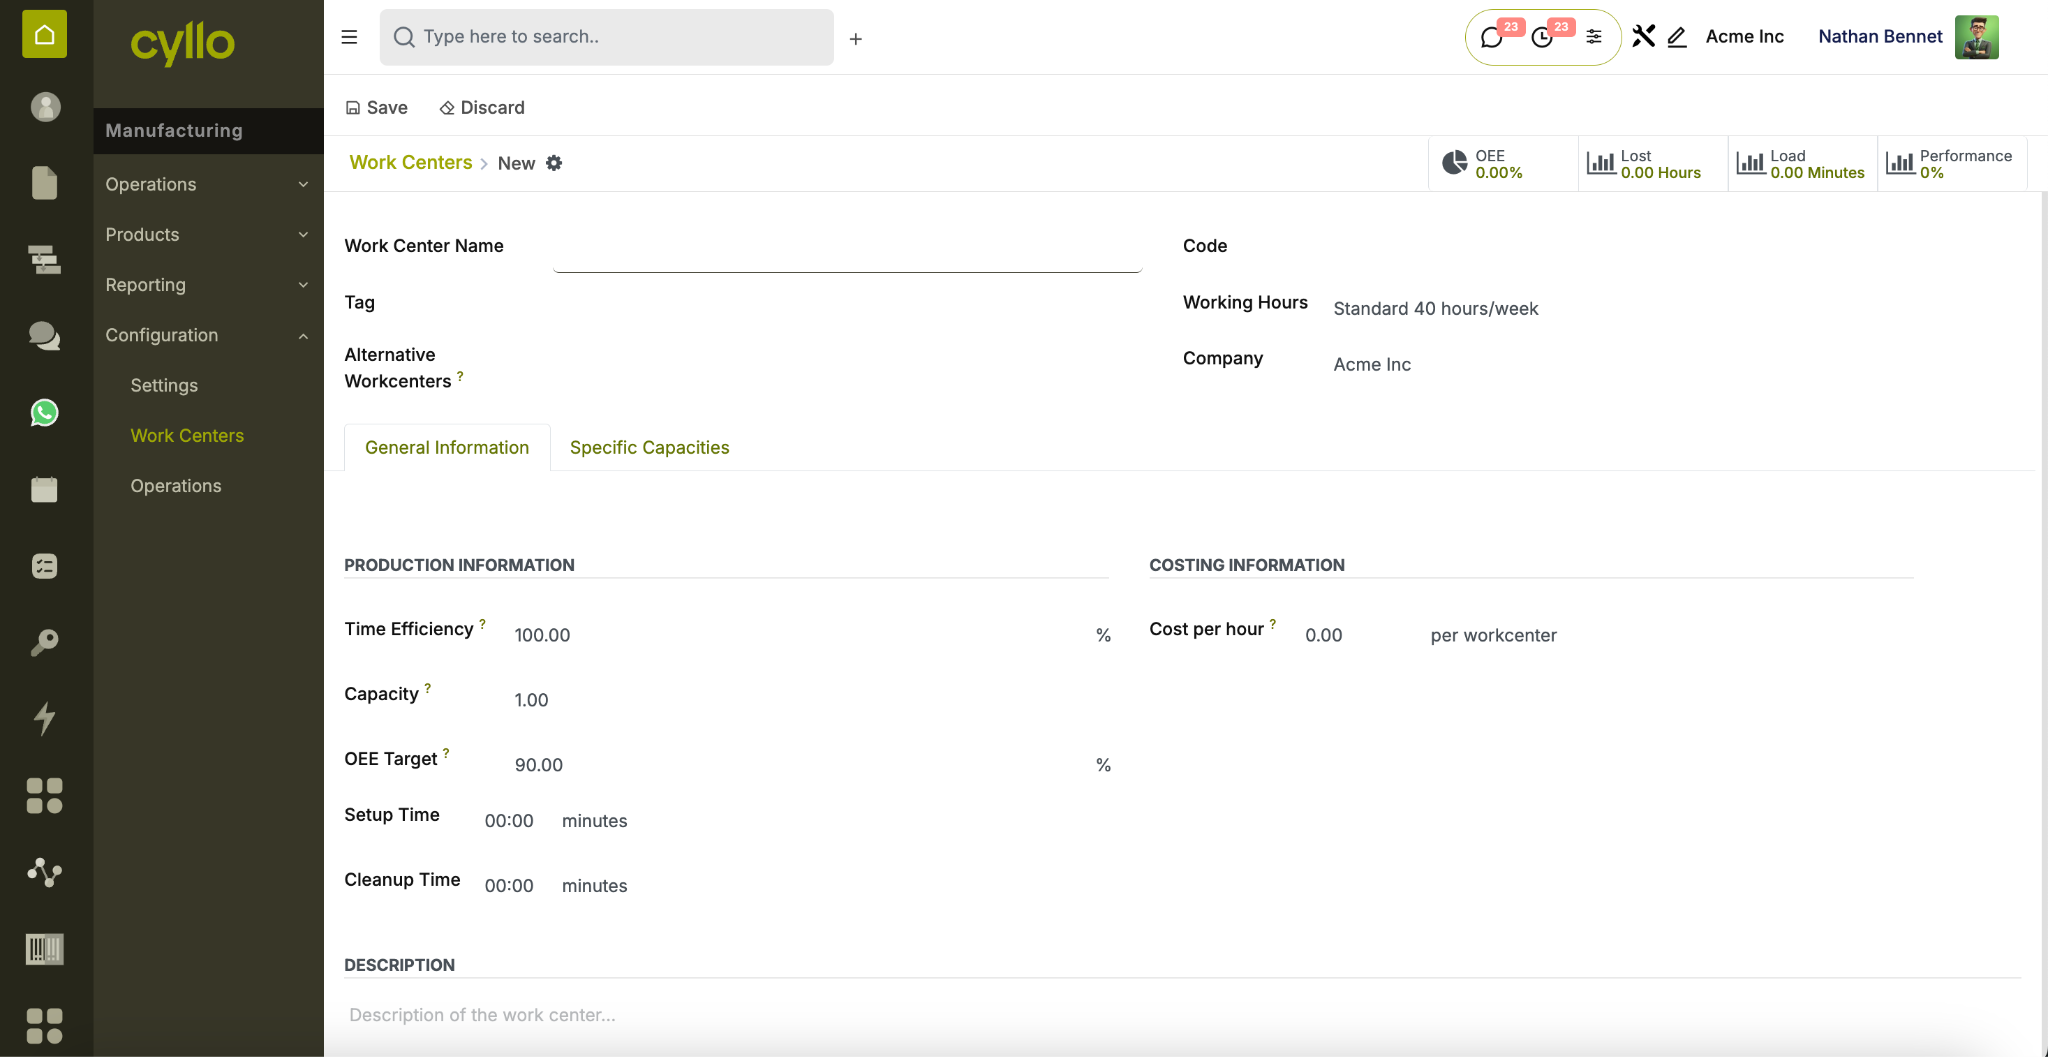
Fig 2.2 — Work center form with capacity and cost configuration
Key Fields
- Work Center Name:mIdentifier for the production station or machine.
- Capacity: Number of operations that can run simultaneously.
- Efficiency: Percentage of productive output relative to theoretical maximum.
- Cost per Hour: Used to calculate production costs per work order.
- Working Hours: Schedule defining when this work center is available.
Note
Assign working hours to each work center to enable accurate lead time calculation and production scheduling.
2.2 Work Orders
Work Orders are the individual production steps within a Manufacturing Order. Each work order is assigned to a work center and tracks time, progress, and completion status independently.
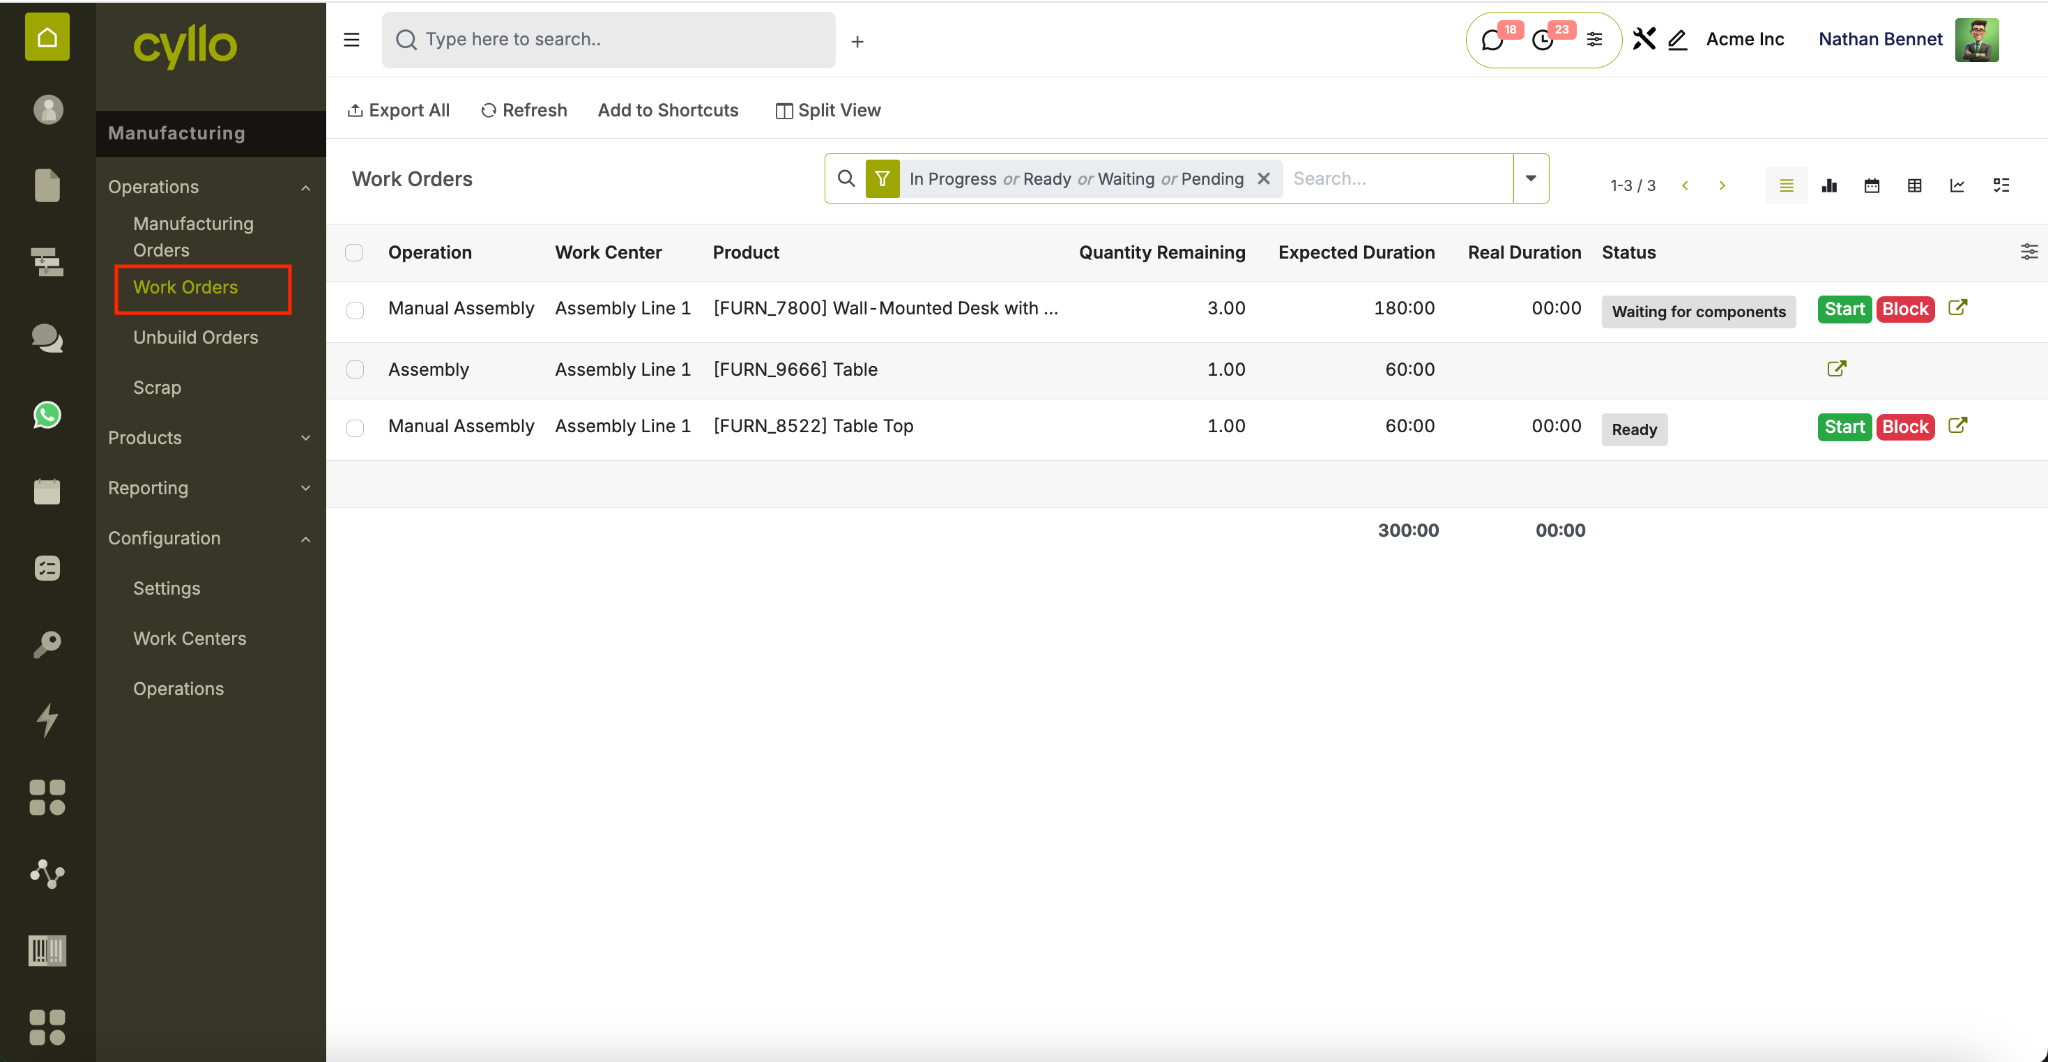
Fig 2.3 — Work order list showing status, work center, and duration
How to Manage Work Orders:
- Open a confirmed Manufacturing Order
- Go to the Work Orders tab
- Each operation from the BOM appears as a separate work order line
- Click the work order to open it
- Click Start to begin recording production time
- Click Done when the operation is complete
- All work orders must be completed before the MO can be finished
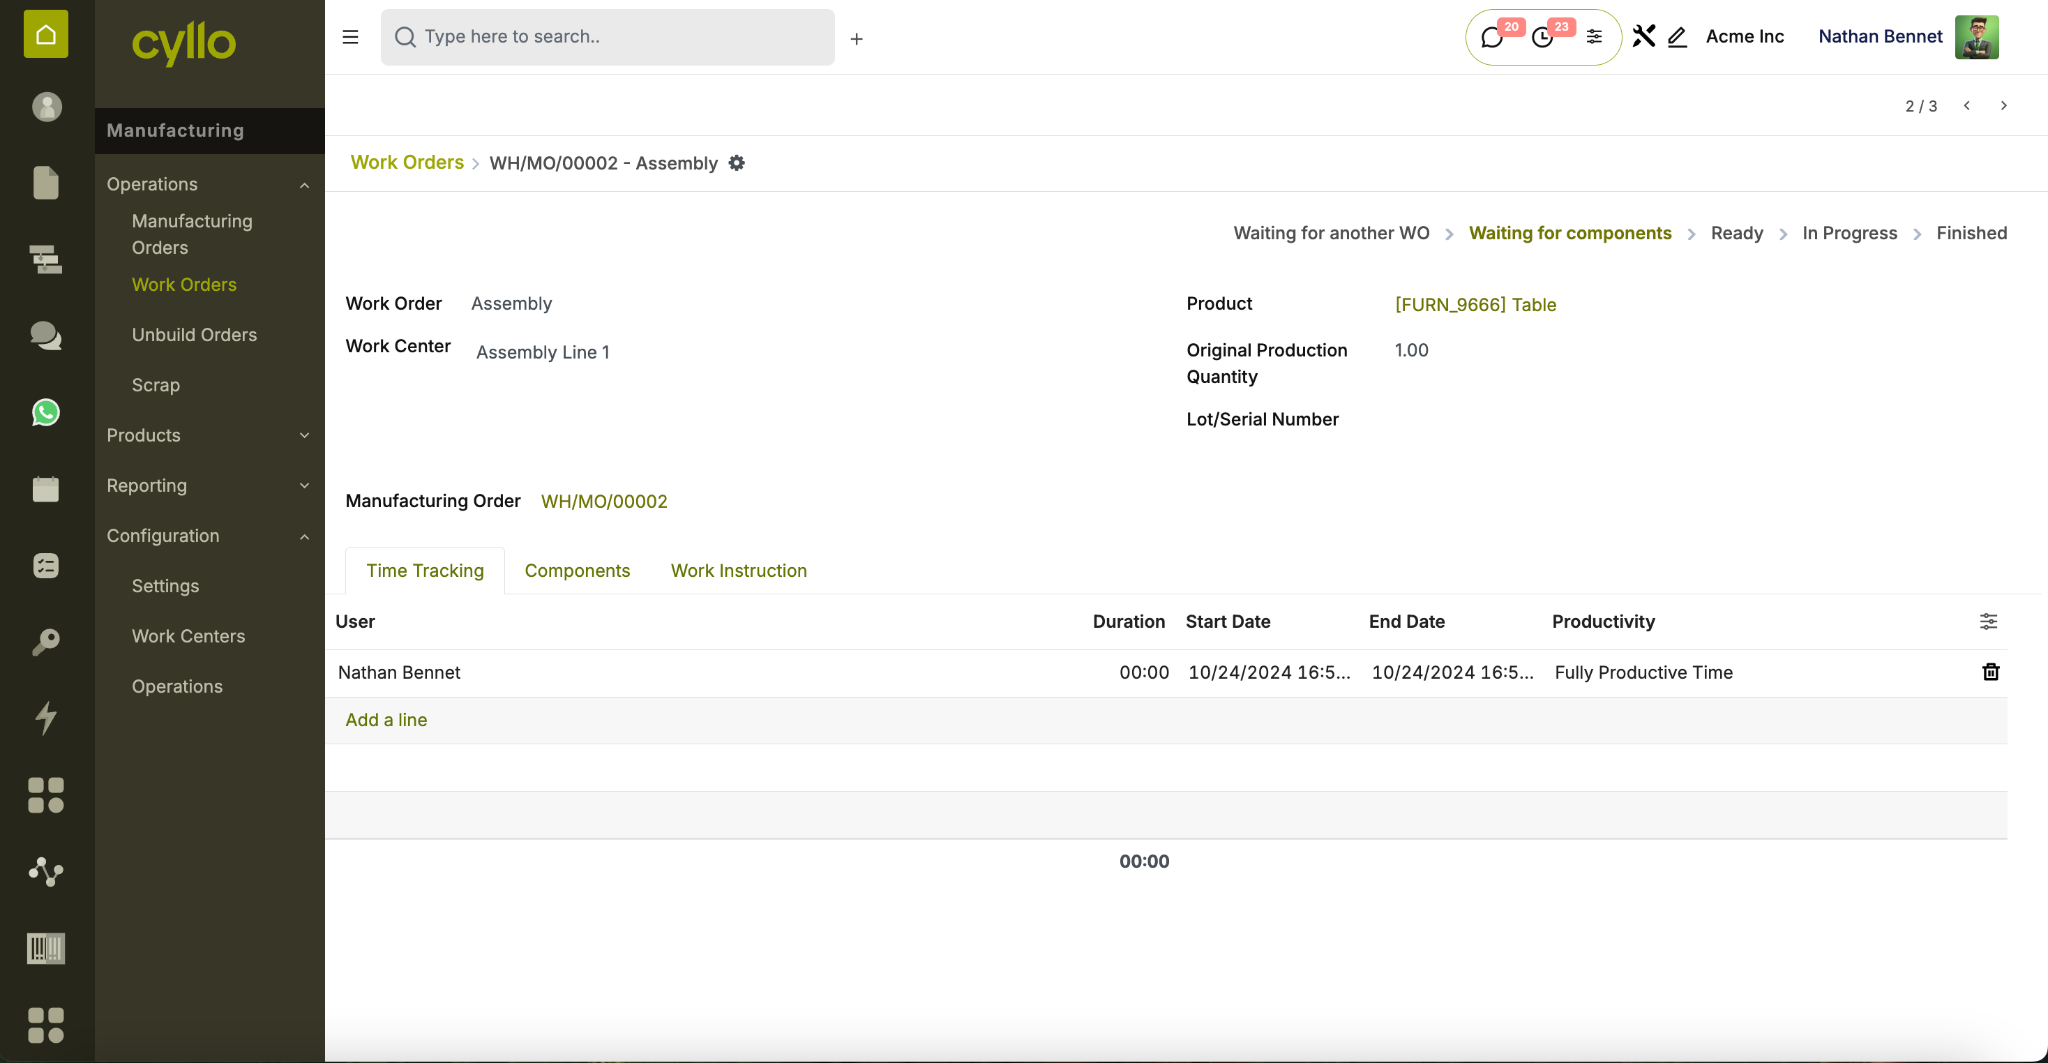
Fig 2.4 — Work order form with timer and instructions
Key Fields Operation: The production step being performed (e.g., Cut, Assemble, Paint). Work Center: The machine or station where this operation runs.
Duration Expected: Planned time from the BOM operation definition.
Duration: Actual time recorded during production. Status: Waiting → Ready → In Progress → Done.
2.3 Work Order Dependencies
Work Order Dependencies define the execution sequence of operations — ensuring a subsequent operation cannot begin until its prerequisite is completed.

Fig 2.5 — Work order dependency configuration showing blocked and unblocked states
How to Enable Work Order Dependencies:
- Go to Manufacturing → Configuration → Settings
- Enable Work Order Dependencies
- Save settings
- On the BOM, go to the Operations tab
- For each operation, set the Blocked By field to the preceding operation
- Cyllo enforces the order — blocked work orders cannot be started until prerequisites are done
Note
Dependencies are essential for complex assemblies where sequence matters — such as welding before painting, or sub-assembly before final assembly.
3. Advanced Manufacturing
3.1 Subcontracting
Subcontracting allows you to outsource the production of a component or finished product to an external vendor. Cyllo automatically manages component supply to the subcontractor and records the receipt of finished goods.
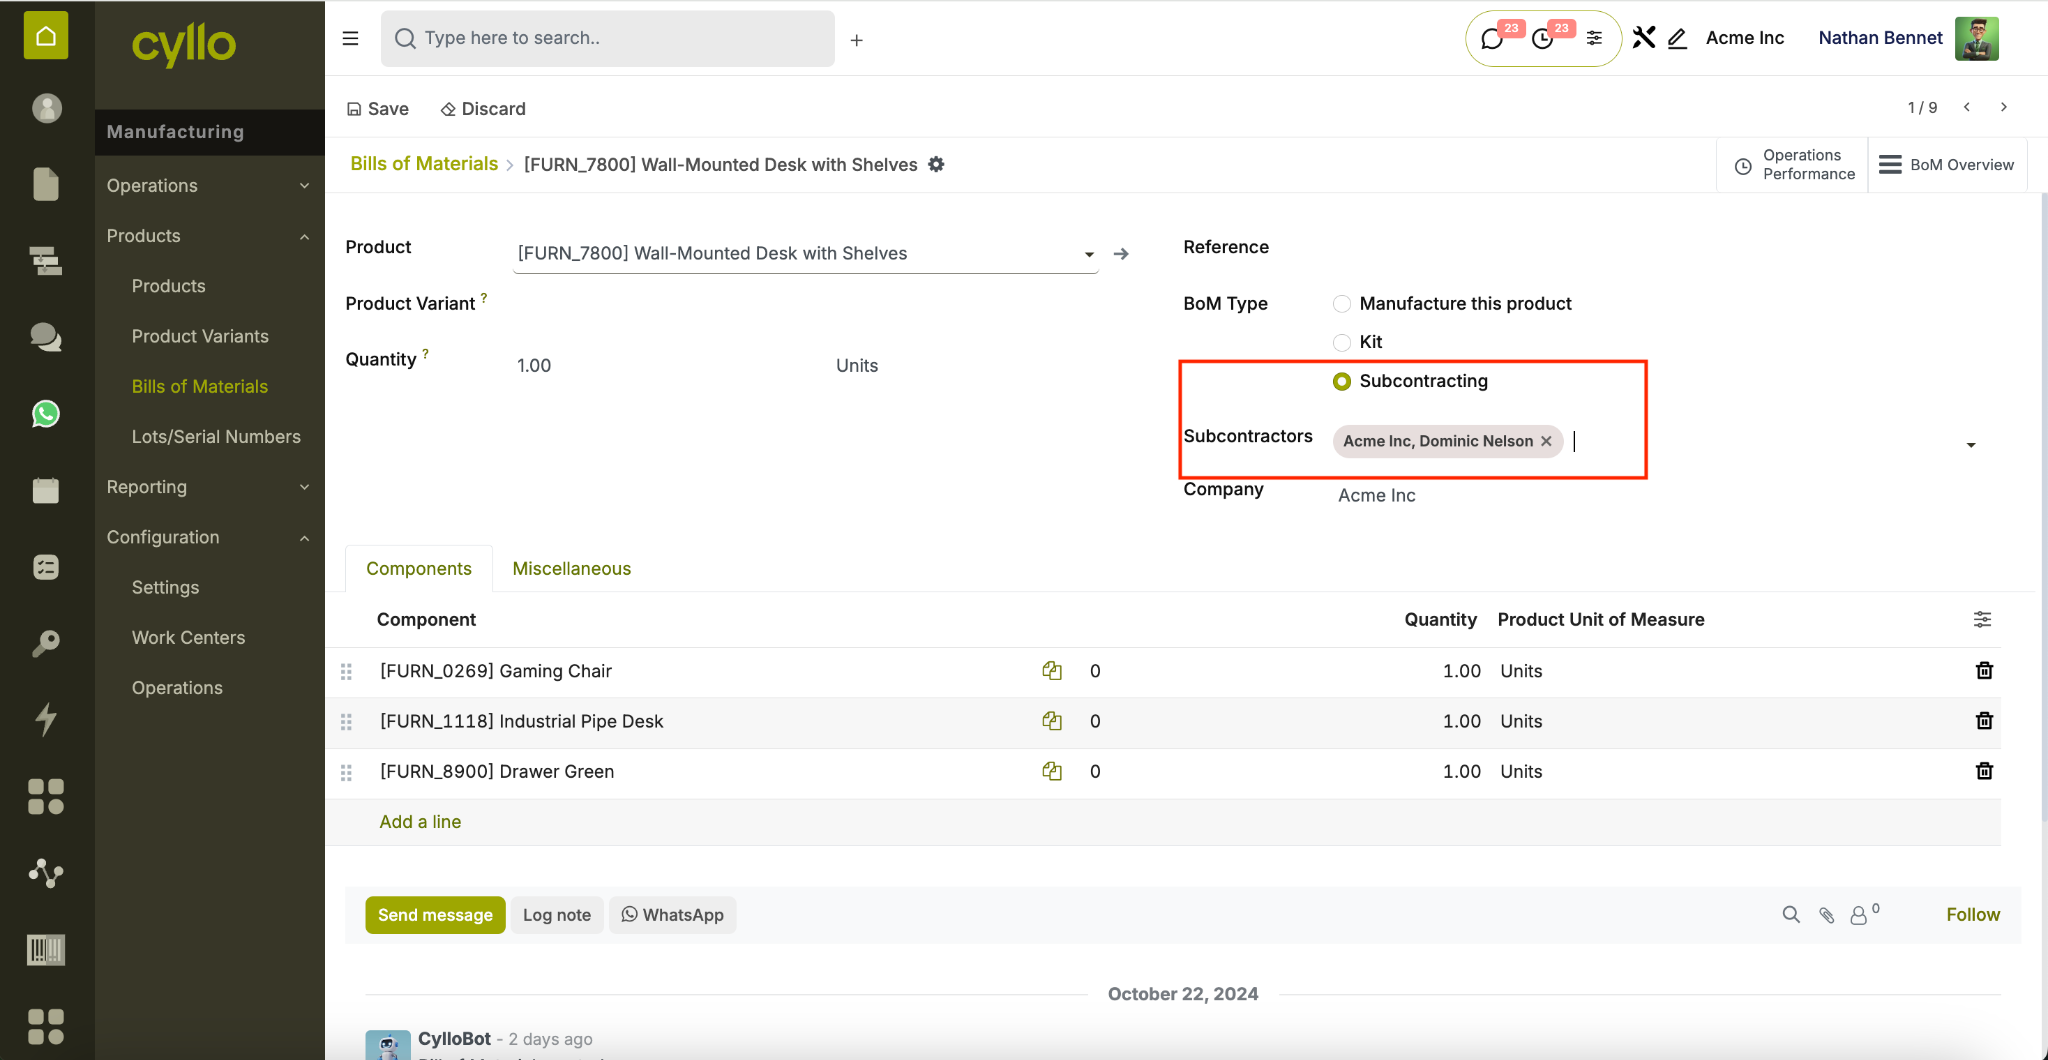
Fig 3.1 — Subcontracting BOM with vendor and component configuration
How to Set Up Subcontracting:
- Go to Manufacturing → Configuration → Settings → enable Subcontracting
- Create a BOM for the product
- Set the BOM Type to Subcontracting
- Add the Subcontractor in the Subcontractors tab
- Add the components the subcontractor needs to receive
- When a PO is created for the subcontracted product, Cyllo auto-generates component supply to the vendor
- On receipt validation, the finished product enters your stock automatically
Note
Cyllo tracks subcontracted stock at the vendor's location. You always know how many components are with each subcontractor and the status of in-progress orders.
3.2 By-Products
By-Products are secondary outputs generated during the manufacturing process alongside the main finished product — such as offcuts, waste material, or co-products.
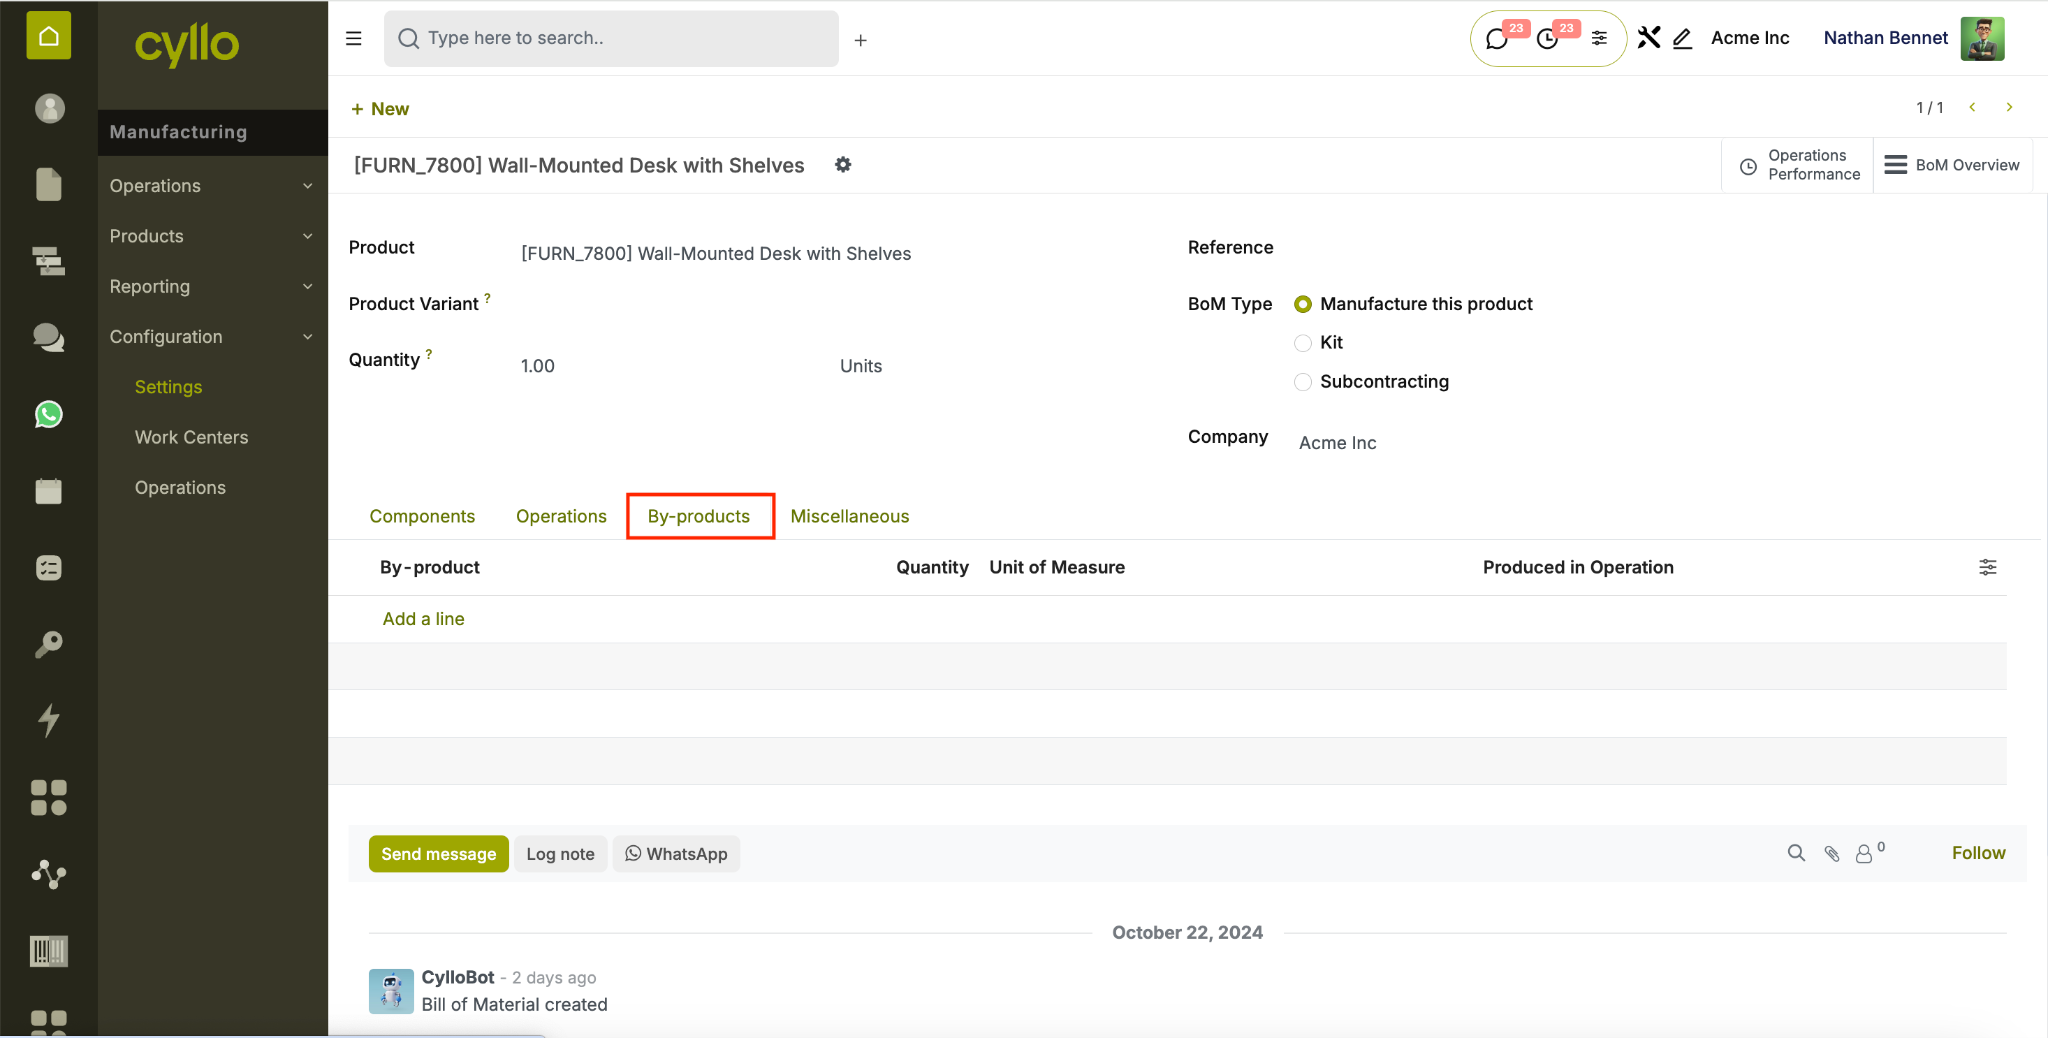
Fig 3.2 — By-product configuration on a BOM
How to Add By-Products to a BOM:
- Go to Manufacturing → Configuration → Settings → enable By-Products
- Open the relevant BOM
- Go to the By-Products tab
- Click Add a line
- Select the By-Product (the secondary output)
- Enter the Quantity produced and Unit of Measure
- Save — when the MO is completed, the by-product is added to stock automatically
Note
By-products can be set to go into a specific stock location — useful for separating scrap, waste, or secondary sellable outputs.
3.3 Unbuild Orders
Unbuild Orders reverse a Manufacturing Order — disassembling a finished product back into its component parts. This is used for returns, rework, or component recovery.
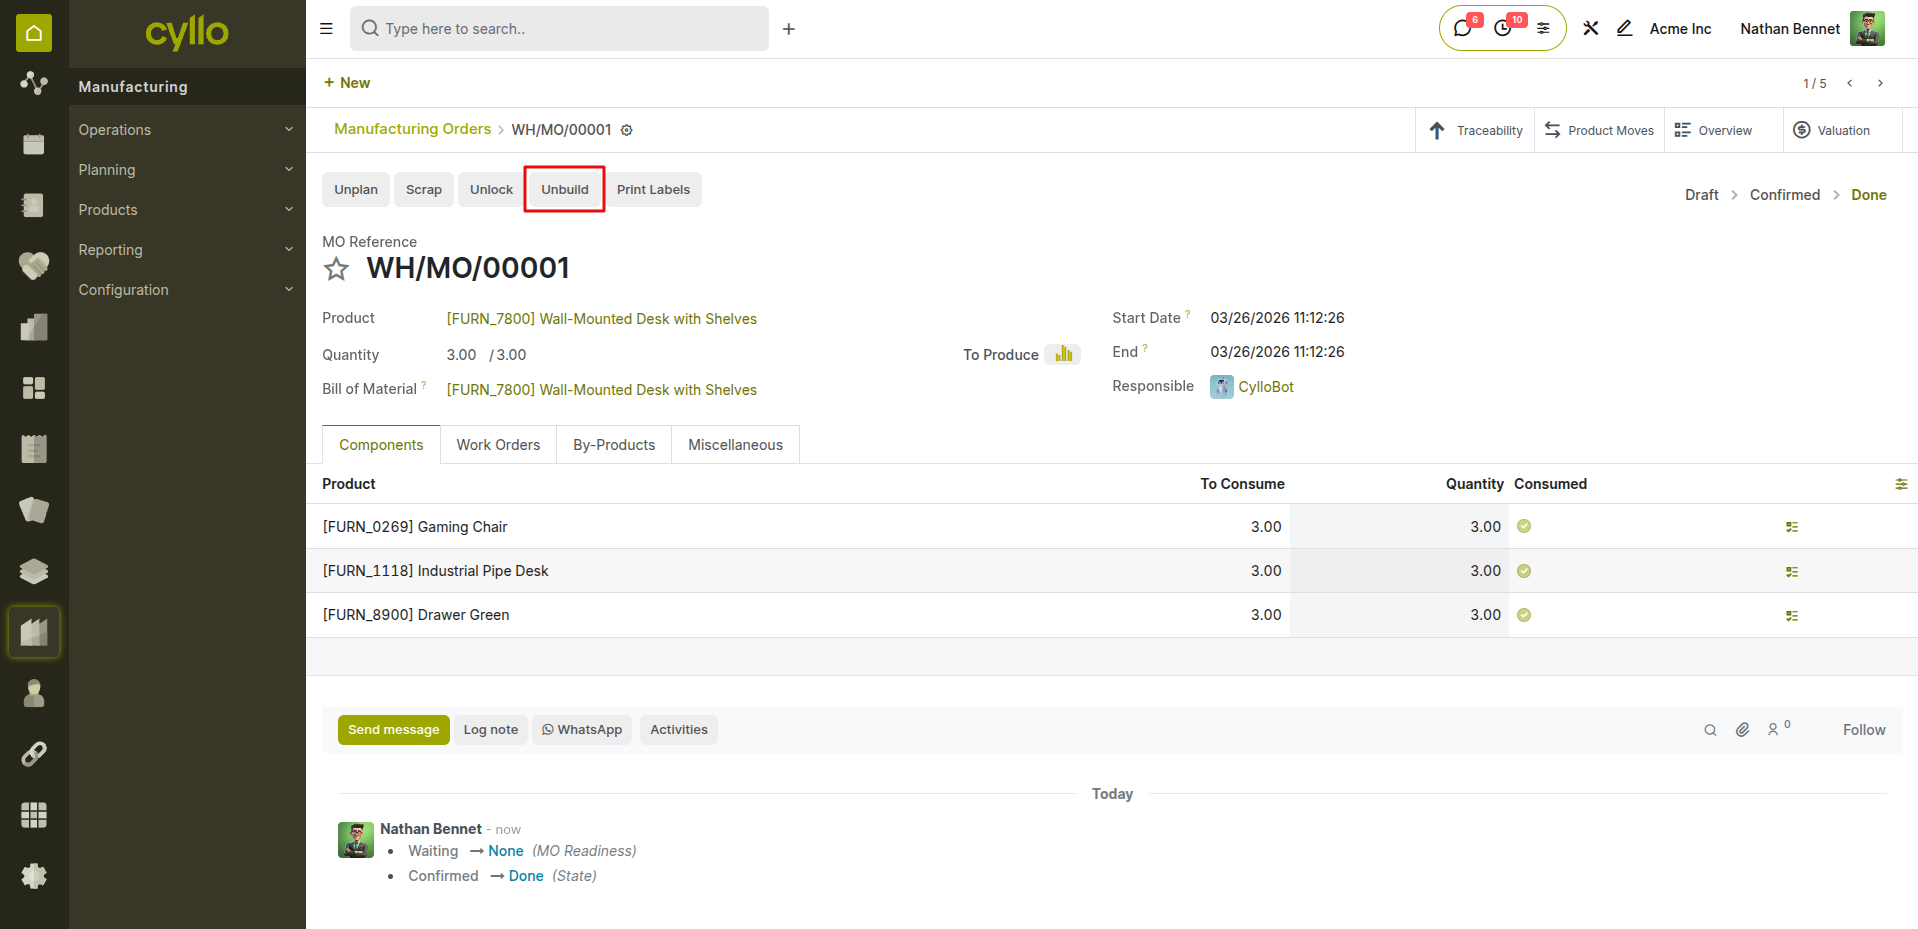
Fig 3.3 — Unbuild order form with product, BOM, and destination location
How to Create an Unbuild Order:
- Go to Manufacturing → Operations → Unbuild Orders → New
- Select the Product to disassemble
- Select the BOM to use as the disassembly blueprint
- Enter the Quantity to unbuild
- Set the Source Location (where the finished product currently is)
- Set the Destination Location (where components will go after disassembly)
- Click Validate — components are returned to stock automatically
Note
Unbuild orders are the correct way to reverse a completed MO — do not simply cancel a done MO, as this will not return components to stock.
4. Product Configuration for Manufacturing
4.1 Products
Products used in manufacturing require specific configuration — routes, lead times, and cost settings — to ensure they flow correctly through production and inventory.
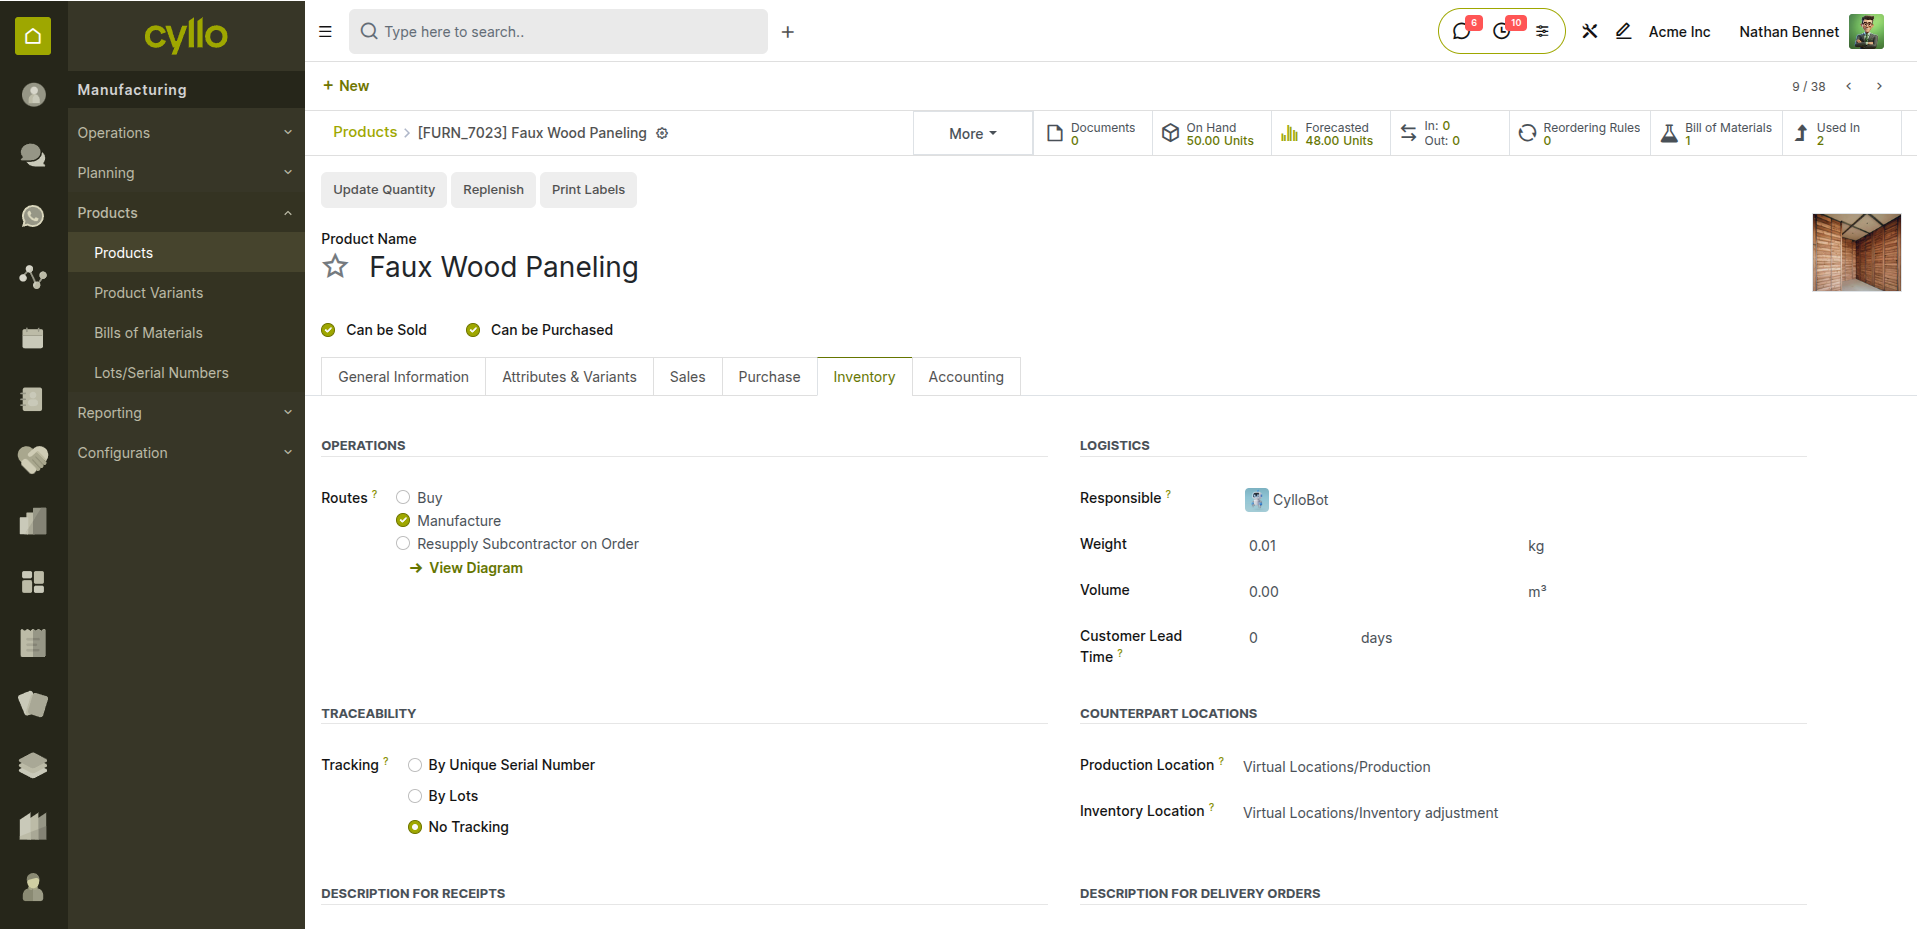
Fig 4.1 — Product form showing manufacturing route and lead time settings
How to Configure a Product for Manufacturing:
- Go to Manufacturing → Products → Products → Open or create a product
- Set Product Type to Storable Product
- Go to the Inventory tab
- Under Routes, enable Manufacture
- Set the Customer Lead Time (days from order to delivery)
- Go to the General Information tab and set the Cost (used for production valuation)
- Save
Note
Enabling the Manufacture route means Cyllo will suggest creating an MO instead of a purchase order when this product needs replenishing.
4.2 Scrap Management
Scrap orders record materials or finished products that are damaged, defective, or lost during production — adjusting stock levels and tracking waste costs.
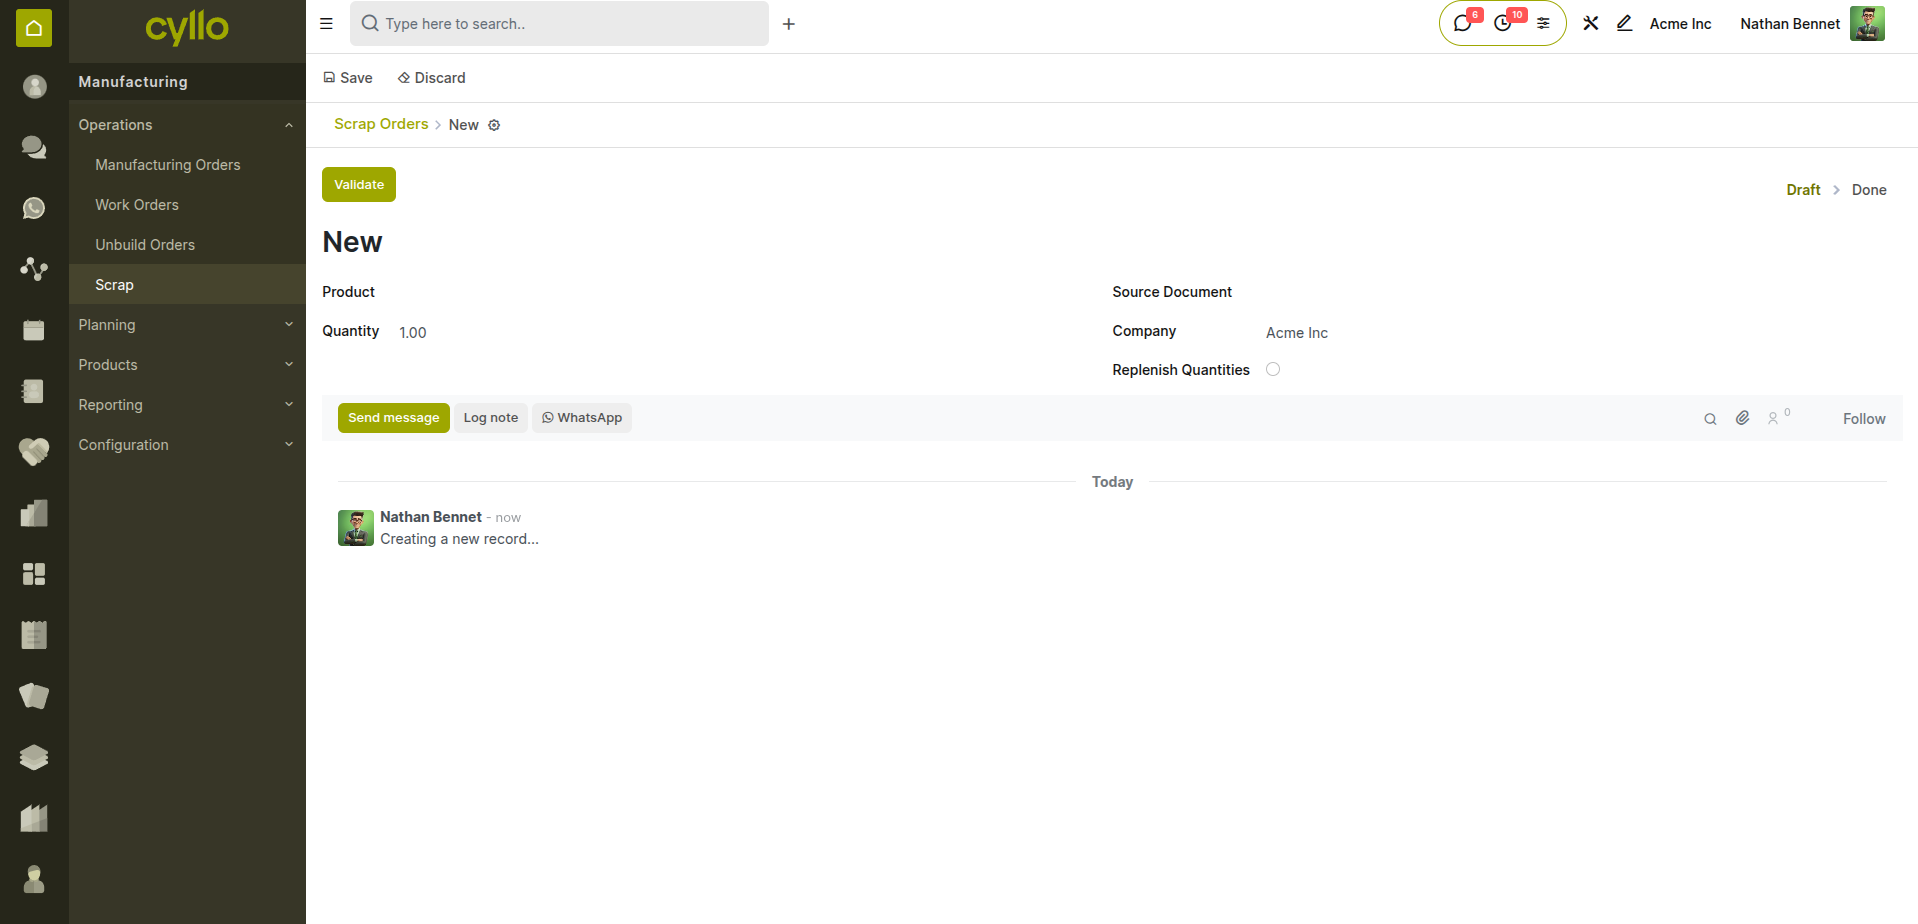
Fig 4.2 — Scrap order form with product, quantity, and scrap location
How to Create a Scrap Order:
- Go to Manufacturing → Operations → Scrap (or from inside an MO click Scrap)
- Select the Product being scrapped
- Enter the Quantity
- Select the Source Location (where the product currently is)
- The destination defaults to the Virtual/Scrap location
- Click Validate — stock is adjusted and the loss is recorded
Note
Scrap from inside an MO is linked to that order — giving you full traceability of waste per production run for cost and efficiency analysis.
5. Reporting & Analytics
5.1 Production Efficiency
The Production Efficiency report compares planned production time against actual time recorded on work orders — identifying bottlenecks and underperforming work centers.
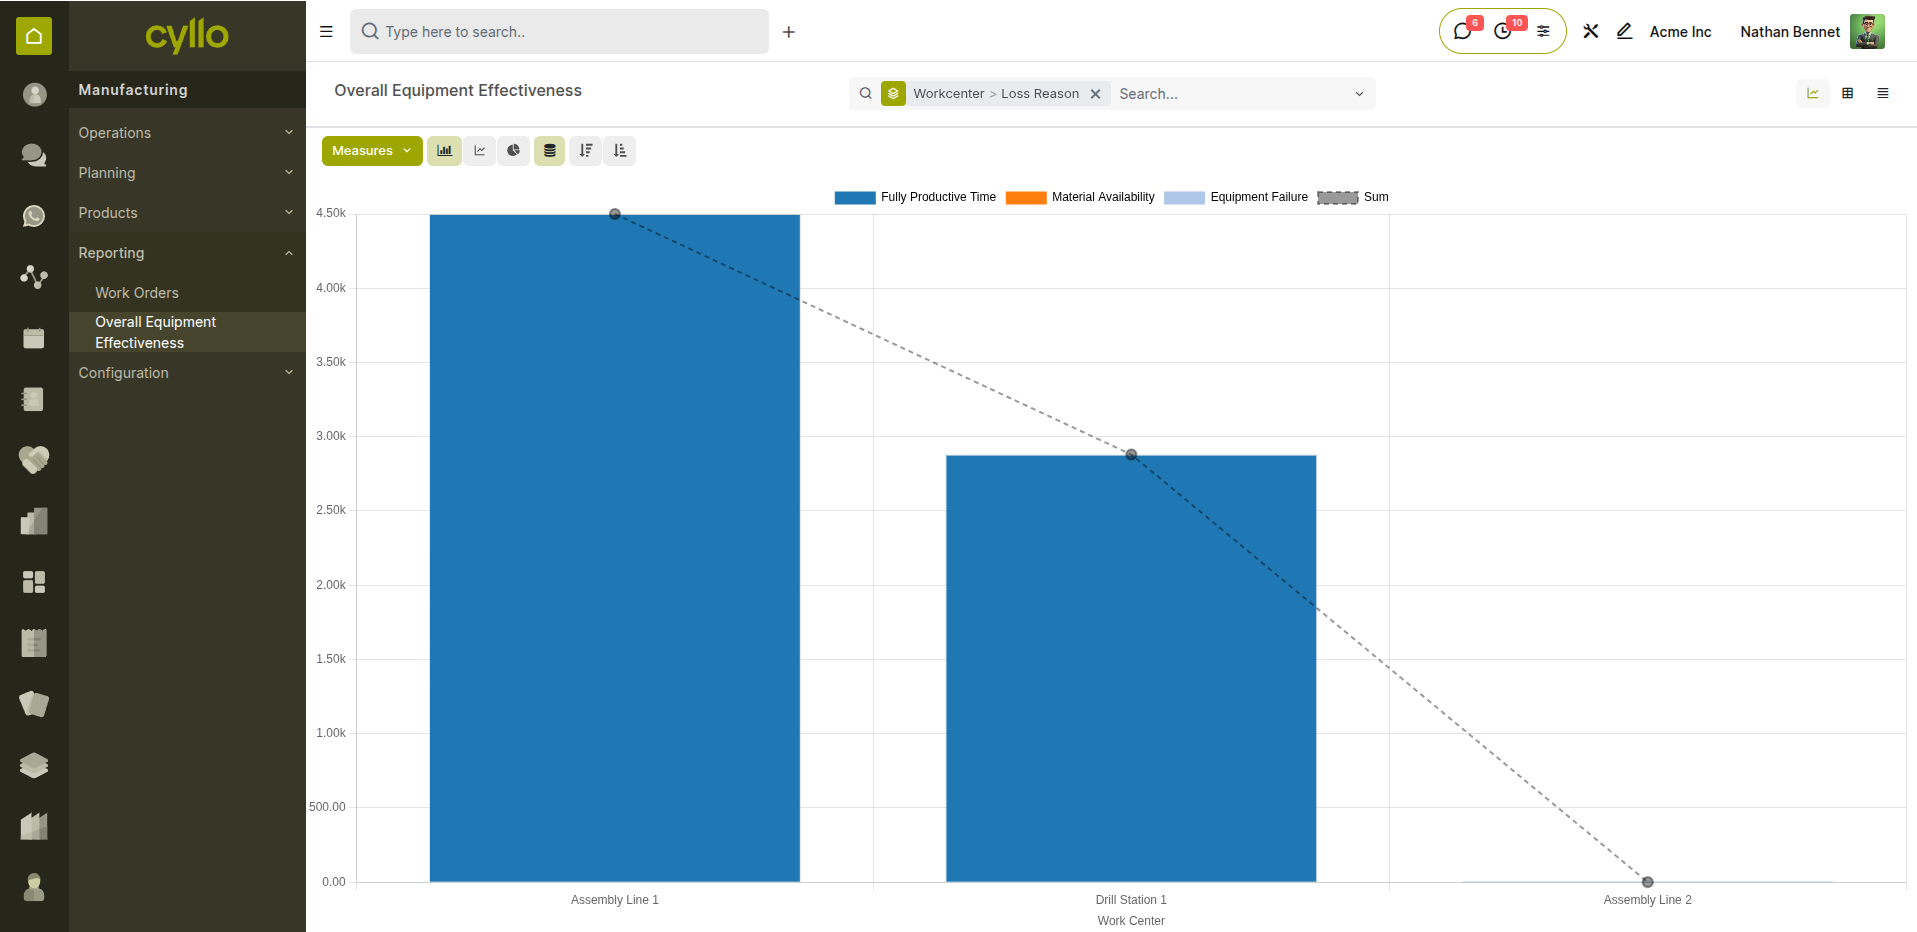
Fig 5.1 — Production efficiency report comparing expected vs. actual duration per work center
How to Access the Efficiency Report:
- Go to Manufacturing → Reporting → Overall Equipment Effectiveness (OEE)
- Filter by Work Center, Product, or Date Range
- Compare Expected Duration vs. Real Duration per work order
- Identify work centers consistently running over planned time
- Export for production management review
Note
Use Cyllo Analytics to build a custom manufacturing dashboard combining MO completion rates, scrap percentages, and work center efficiency in a single view.