

Cyllo Fleet Documentation
Introduction
The Cyllo Fleet module provides complete management of an organization's vehicle fleet — from initial vehicle requests through to day-to-day operations, maintenance tracking, and cost reporting. Fleet managers can track every vehicle through a visual Kanban pipeline, manage contracts and services, log odometer readings, and monitor all fleet-related expenses from a single centralized workspace.
The Fleet module integrates with other Cyllo modules to ensure seamless data flow across the organization. Vehicle contracts link to Accounting for cost visibility, driver assignments connect to the HR and Employees module, and the Field Service module can assign fleet vehicles to field workers for dispatch operations. All data flows through the shared Cyllo database, so updates made in Fleet are instantly reflected across connected departments without duplication. Together, these integrations make Fleet a reliable hub for all vehicle-related operations. Fleet managers, HR teams, and finance departments work from the same live data, ensuring accurate reporting, timely service scheduling, and full visibility over every vehicle in the organization's fleet.
1. Fleet
The Fleet section is the operational heart of the module, where all vehicles, contracts, services, and odometer readings are managed. Navigate here for all day-to-day fleet operations.
1.1 Vehicles (Kanban Workflow)
The Vehicles view presents all fleet vehicles in a Kanban board organized by stage. Each vehicle card displays the license plate, make/model, assigned driver, location, tags, and contract count — giving fleet managers an at-a-glance overview of the entire fleet and where each vehicle stands in its lifecycle.
Kanban Stages:
- New Request — A vehicle request has been submitted and is pending review
- To Order — The request has been approved and the vehicle is being procured
- Ordered — The vehicle has been ordered from the supplier and is in transit
- Registered — The vehicle has been received, registered, and is active in the fleet
- Downgraded— The vehicle has been downgraded
- Reserve– The vehicle has been reserved
- Waiting list– The vehicle has been in the waiting to be approved
Each vehicle card in the Kanban shows:
- Manufacturer logo and license plate / make / model
- Tags (e.g., Senior, Employee Car, Purchased)
- Assigned driver with profile avatar
- Location / site
- Number of active contracts with a status indicator (warning icon if a contract requires attention)
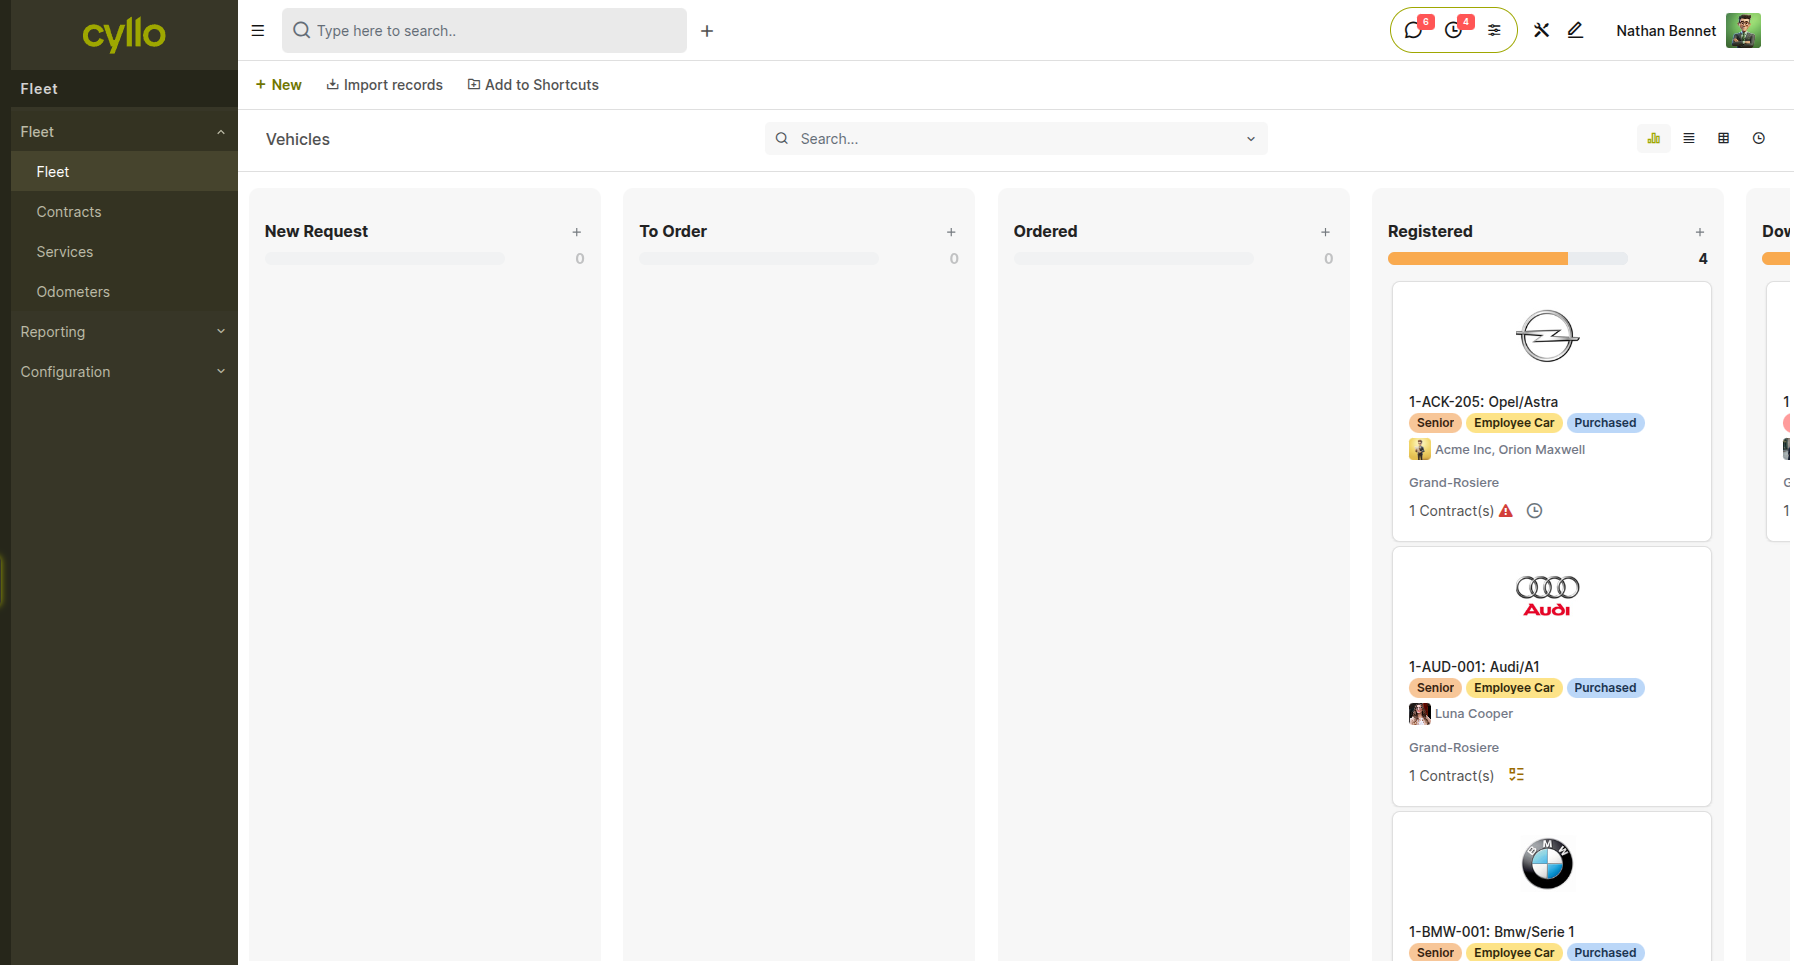
Fig 1.1 — Vehicles Kanban board showing New Request, To Order, Ordered, Registered, and Done columns with vehicle cards in the Registered column displaying driver, tags, location, and contract count
How to add a new vehicle:
- Go to Fleet → Fleet → Fleet → New
- Enter the License Plate, Make/Model, and Vehicle Type
- Set the Current Driver and location
- Add relevant Tags for classification
- Save the record — the vehicle appears in the New Request stage by default
- Drag the card or update the stage field to move it through the pipeline
How to move a vehicle through stages:
- Open the vehicle record
- Click the stage progress bar at the top of the form to advance to the next stage
- Or drag the vehicle card directly on the Kanban board
Key Fields on Each Vehicle Card
- License Plate / Make / Model: Unique vehicle identifier and model details
- Tags: Labels such as Senior, Employee Car, Purchased — used for filtering and reporting
- Driver: The employee currently assigned to operate the vehicle
- Location: Physical site or branch the vehicle is assigned to
- Contracts: Count of active contracts; a warning icon indicates a contract issue requiring attention
Note
The Vehicles screen supports list, Kanban, and activity views — switch between them using the view toggles at the top right of the screen.
1.2 Contracts
The Contracts section stores all formal agreements tied to fleet vehicles, such as insurance policies, lease agreements, and service contracts. Each contract is linked to a specific vehicle and tracks the full cost and term details.
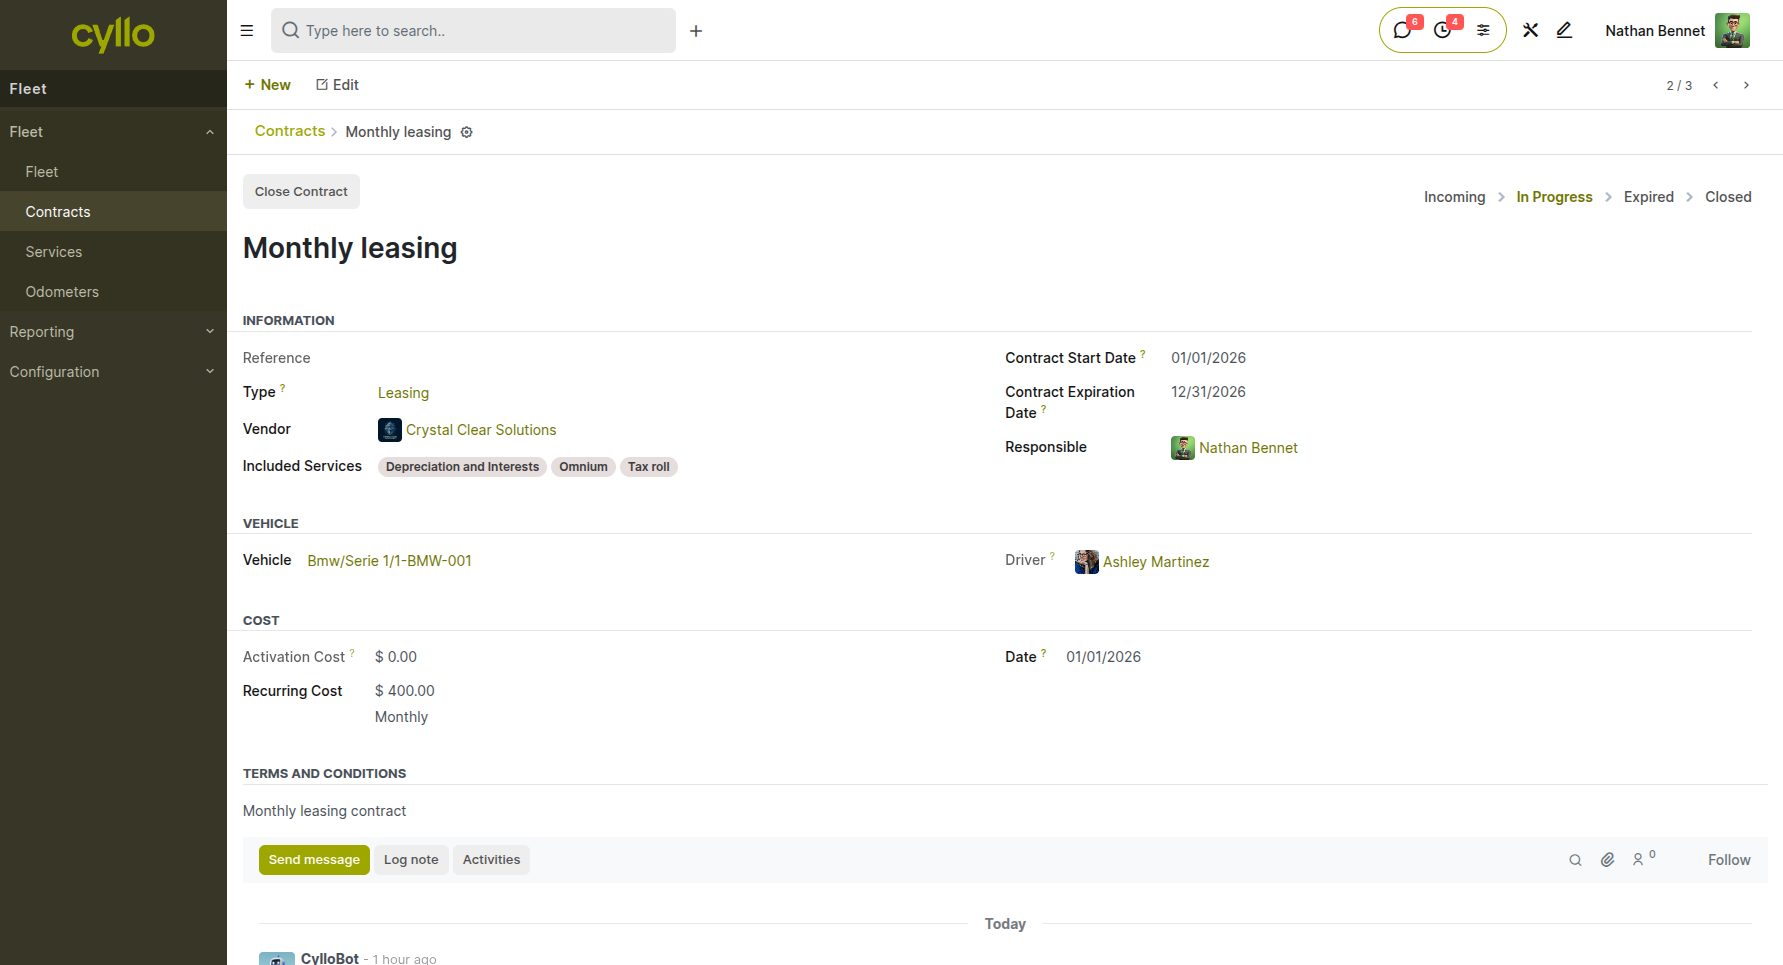
Fig 1.2 — Contracts Form view showing details
How to create a vehicle contract:
- Go to Fleet → Fleet → Contracts → New
- Select the Vehicle the contract applies to
- Choose the Contract Type (insurance, leasing, rental, maintenance, etc.)
- Set the Start Date and End Date
- Enter the Recurring Cost and Recurring Cost Frequency
- Assign a Responsible employee to manage the contract
- Save the record
Key Fields
- Vehicle: The fleet vehicle this contract covers
- Contract Type: Classifies the contract — insurance, leasing, service, rental
- Start Date / End Date: Active period of the contract
- Recurring Cost: Periodic payment amount and frequency (monthly, quarterly, annually)
- Responsible: The employee accountable for managing and renewing this contract
- State: Active, Expired, or Cancelled
Note
Contracts with issues — such as upcoming expiry or missing information — display a warning icon on the vehicle's Kanban card. Review the Contracts list regularly to avoid coverage gaps.
1.3 Services
The Services section records every maintenance and repair event for fleet vehicles, tracking the service type, date, vendor, odometer at time of service, and total cost. This history is essential for maintenance planning and cost analysis.
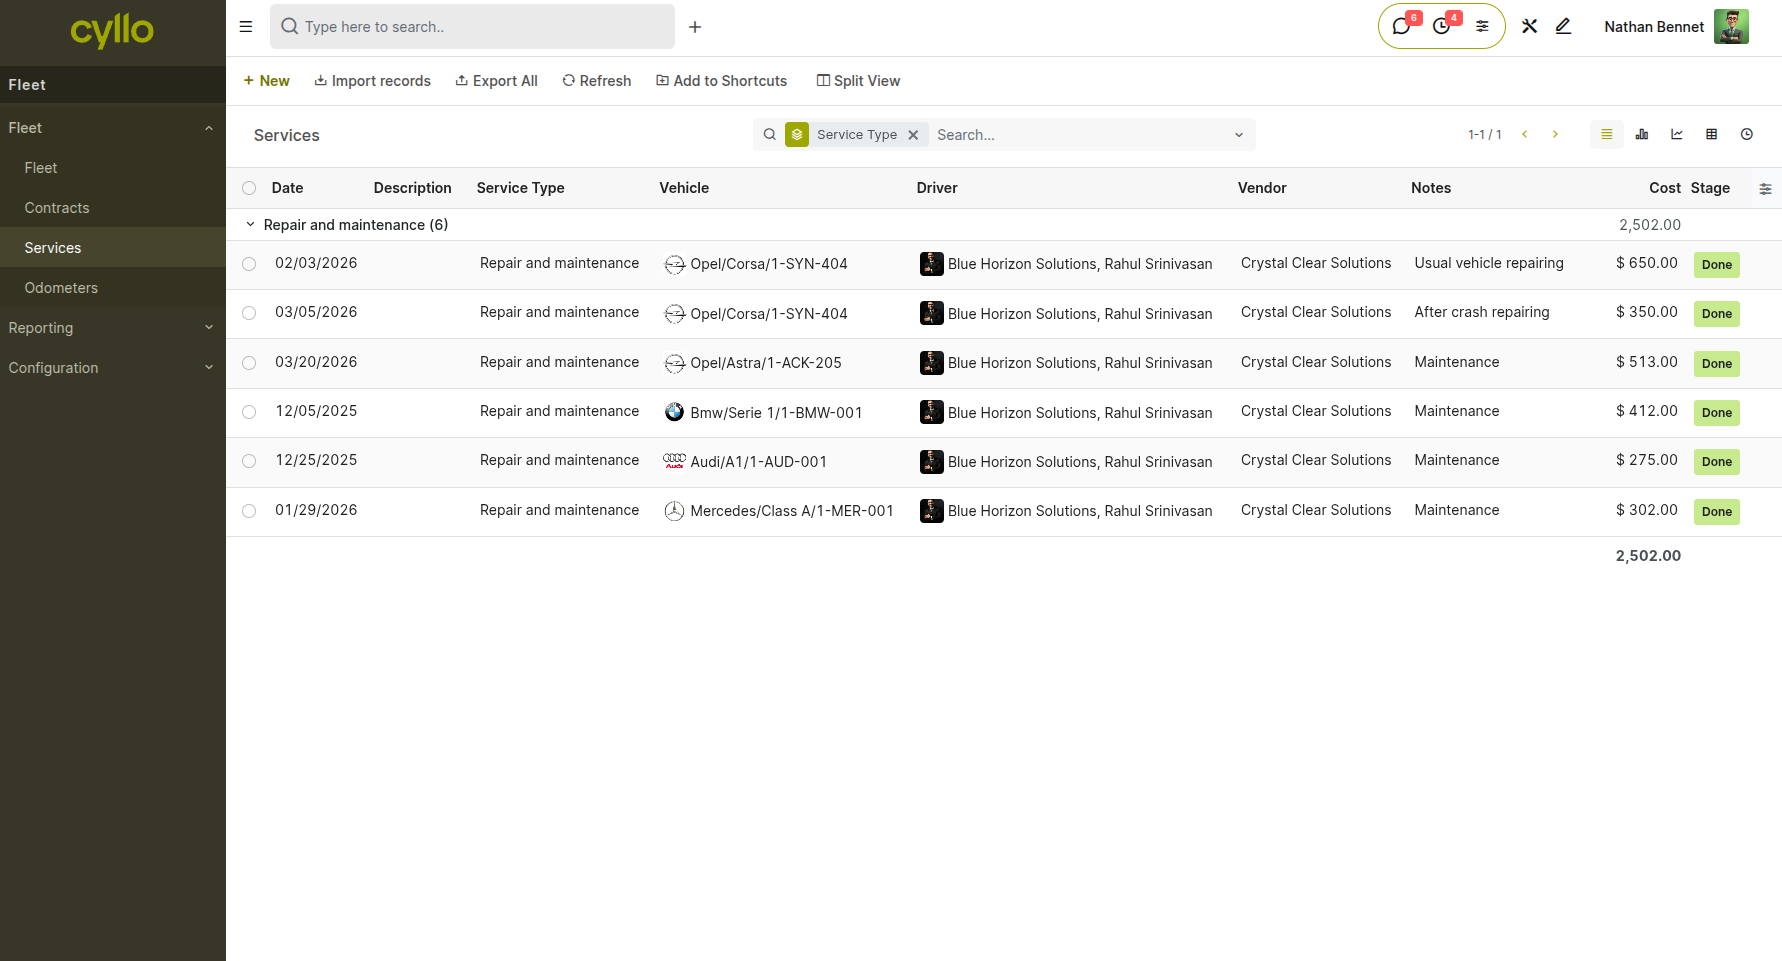
Fig 1.3 — Services list view showing vehicle, service type, date, odometer, cost, and vendor columns
How to log a service record:
- Go to Fleet → Fleet → Services → New
- Select the Vehicle that was serviced
- Choose the Service Type (oil change, tire rotation, brake service, inspection, etc.)
- Enter the Date and the Odometer reading at time of service
- Select the Vendor (service provider or workshop)
- Enter the Total Cost
- Add notes describing the work performed if needed
- Save the record
Key Fields
- Vehicle: The fleet vehicle that received the service
- Service Type: Category of work performed
- Date: Date the service was completed
- Odometer: Mileage at the time of service — used to track service intervals
- Vendor: External workshop or service provider
- Cost: Total billed amount — automatically included in fleet cost reporting
Note
Service costs flow directly into the Costs report under Reporting. Finance teams get an accurate view of total fleet maintenance expenditure without any manual data entry.
1.4 Odometers
The Odometers section maintains a chronological log of odometer readings for each vehicle. Regular odometer entries allow Cyllo to track mileage accurately, trigger mileage-based service reminders, and calculate fuel efficiency.
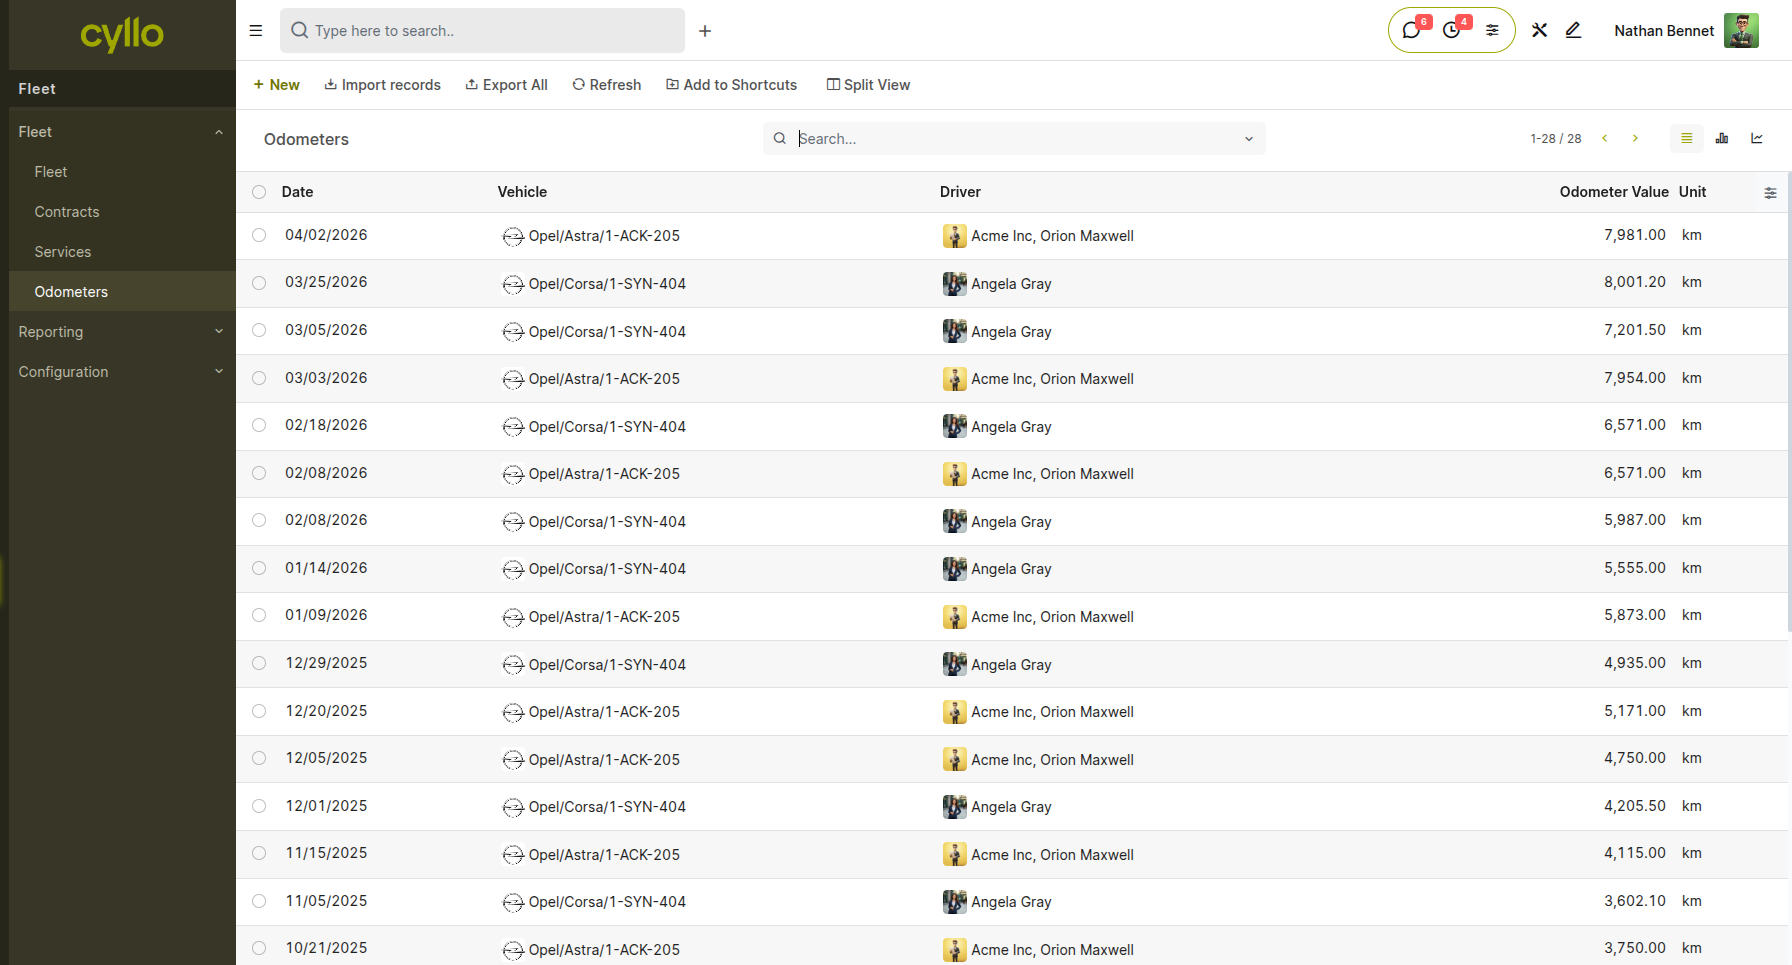
Fig 1.4 — Odometers list view showing vehicle name, odometer value, unit (km/mi), and date of reading
How to log an odometer reading:
- Go to Fleet → Fleet → Odometers → New
- Select the Vehicle
- Enter the Odometer Value (current mileage reading)
- Set the Date of the reading
- Confirm the Unit (km or miles — set globally in Configuration → Settings)
- Save the record
Key Fields
- Vehicle: The fleet vehicle the reading applies to
- Odometer Value: Current mileage recorded from the vehicle's instrument panel
- Unit: Kilometres or miles, as configured in Fleet Settings
- Date: The date the reading was taken
Note
Keeping odometer logs up to date is important for mileage-based maintenance reminders. If odometer readings are not logged regularly, distance-based service alerts will not fire accurately.
2. Reporting
The Reporting section provides financial insight into fleet performance. The Fleet module includes the Costs report, which consolidates all vehicle-related expenses into a single view.
2.1 Costs
The Costs report aggregates all fleet-related expenses — including contract costs, service records, and other vehicle expenses — into a single view. Fleet managers and finance teams use this report to monitor total fleet spend, identify high-cost vehicles, and plan maintenance budgets.

Fig 2.1 — Fleet Costs report in pivot or list view showing vehicle, cost type, date, and amount grouped by vehicle
How to access the Costs report:
- Go to Fleet → Reporting → Costs
- Apply filters to narrow results by date range, vehicle, cost type, or responsible employee
- Switch between list, pivot, and graph views using the view toggles at the top right
- Export to Excel or PDF for sharing with finance teams
Filtering and Grouping Tips:
- Group by Vehicle to compare total costs across the fleet side by side
- Group by Cost Type to break down spend by category (service, contract, other)
- Filter by Date to analyze costs within a specific period (month, quarter, year)
- Use the Pivot view to build cross-tabulated cost summaries for budget reviews
Note
All service records saved under Fleet → Fleet → Services and contract costs entered under Fleet → Fleet → Contracts automatically appear in this report. No manual data transfer is required.
3. Configuration
The Configuration section allows administrators to set up the Fleet module's global preferences and maintain the master data used across all fleet records — including settings, vehicle models, manufacturers, and categories.
3.1 Settings
Fleet Settings control module-wide defaults that apply to all vehicles, contracts, and service records throughout the Fleet module.
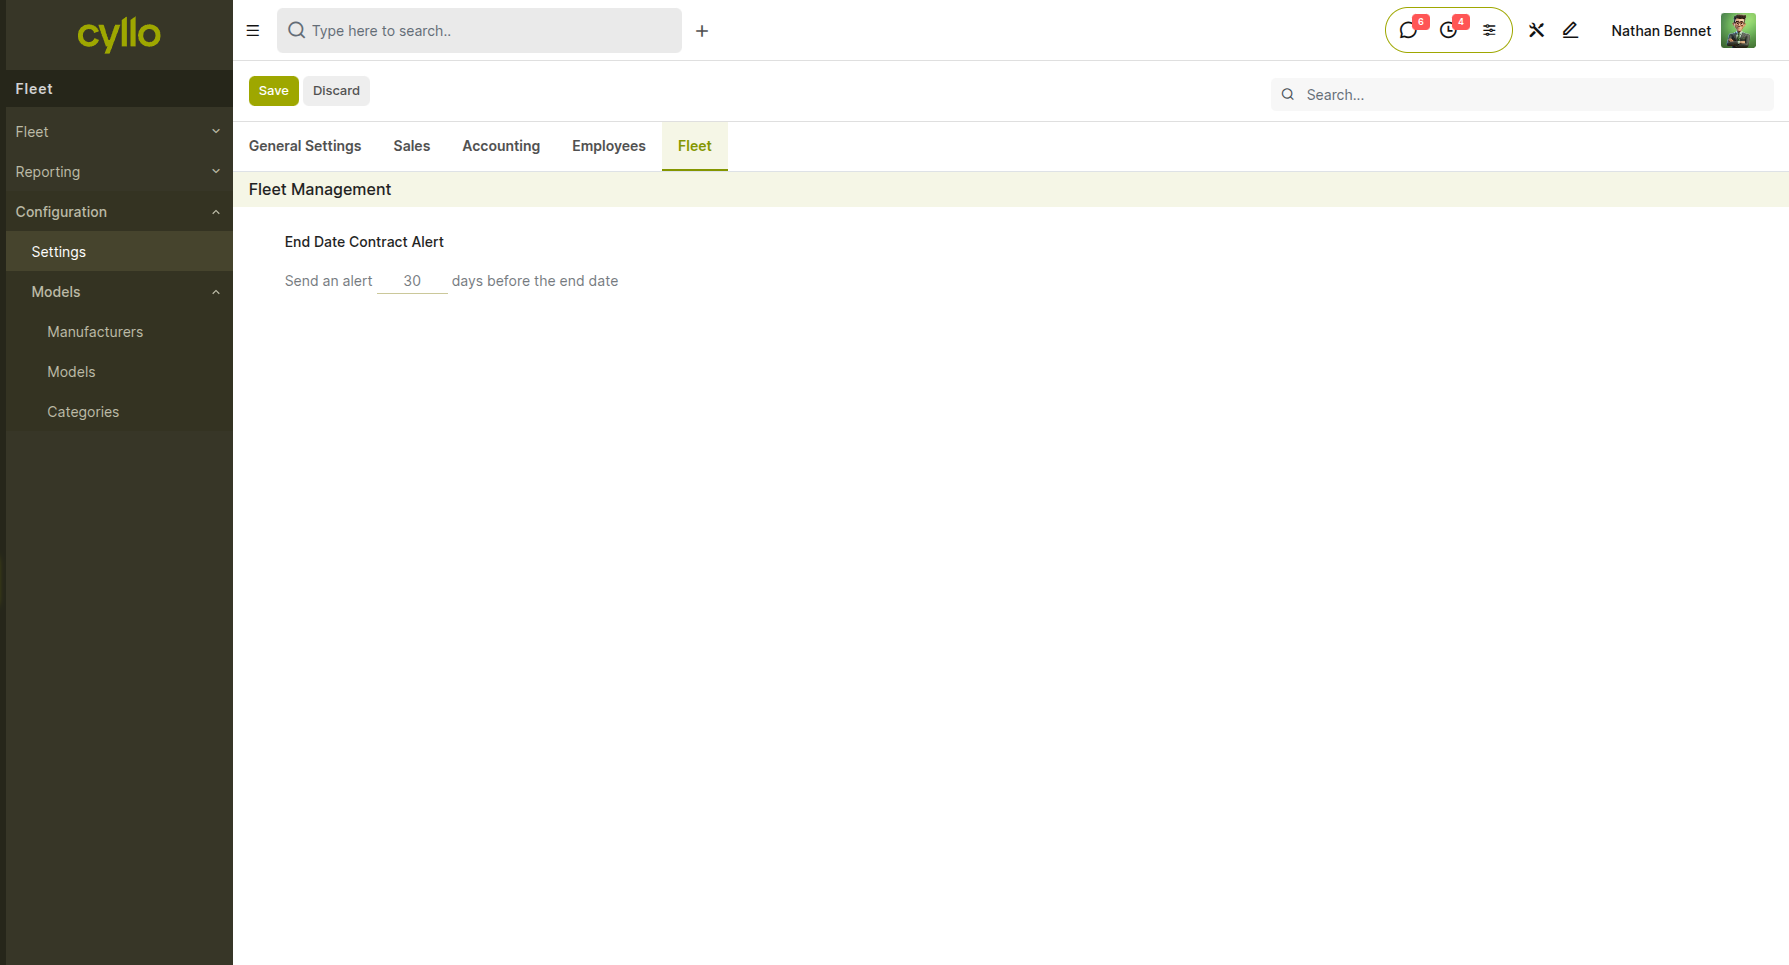
Fig 3.1 — Fleet Settings page showing the Odometer Unit option and any other available configuration fields
How to access Fleet Settings:
- Go to Fleet → Configuration → Settings
- Adjust the required options and click Save
Key Settings
- Odometer Unit: Sets the default unit of measurement — kilometres or miles — applied across all odometer logs and service records
Note
Changing the odometer unit in Settings updates the default for all new records going forward. Existing records retain the unit they were originally saved with.
3.2 Models
Models are the vehicle model records that define the make, physical specifications, engine details, and vendor associations for each type of vehicle in the fleet. Every vehicle registered in the Vehicles Kanban must be linked to a Model record.
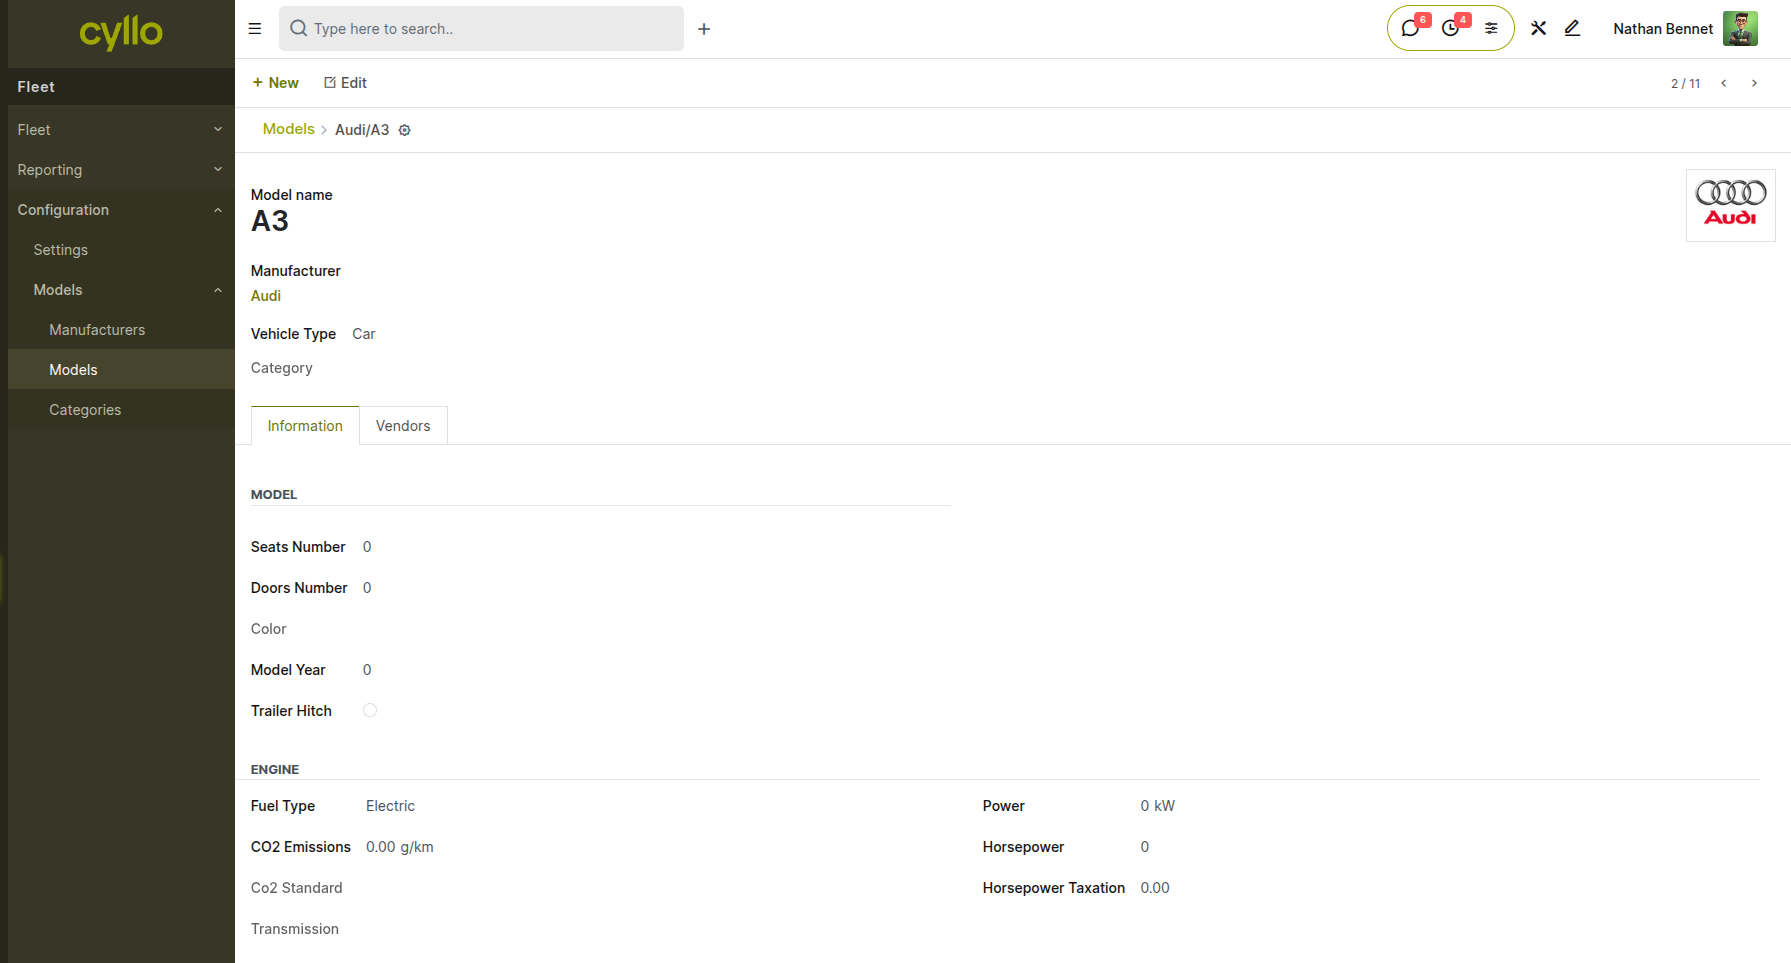
Fig 3.2 — Model form for Audi A1 showing Model Name, Manufacturer (Audi), Vehicle Type (Car), Category, and the Information and Vendors tabs with engine fields including Fuel Type (Electric), CO2 Emissions, Power, and Horsepower
The Model form is organized into two tabs:
Information Tab — Model Section
- Seats Number: Total number of passenger seats in this model
- Doors Number: Number of doors on the vehicle body
- Color: Default or standard color for this model
- Model Year: Year of manufacture for this model variant
- Trailer Hitch: Checkbox indicating whether the model supports a trailer hitch
Information Tab — Engine Section
- Fuel Type: The type of fuel this model uses (Electric, Petrol, Diesel, Hybrid, etc.)
- CO2 Emissions: Emissions value in g/km for environmental and tax reporting
- CO2 Standard: The applicable emissions standard for this model
- Power: Engine output in kilowatts (kW)
- Horsepower: Engine horsepower rating
- Horsepower Taxation: Taxable horsepower value used for vehicle tax calculations
- Transmission: Gearbox type — Manual or Automatic
Vendors Tab
- List of approved vendors or suppliers for purchasing or servicing this vehicle model
- Used for procurement reference and contract management How to create a vehicle model:
- Go to Fleet → Configuration → Models → New
- Enter the Model Name (e.g., A1, Serie 1, Class A)
- Select the Manufacturer (e.g., Audi, BMW, Mercedes)
- Set the Vehicle Type and Category
- Complete the Information tab with model and engine specifications
- Add vendors under the Vendors tab if applicable
- Save the record
Note
Create all required Model records before adding vehicles to the fleet. A vehicle cannot be saved without a linked model.
3.3 Manufacturers
Manufacturers is the master list of vehicle brands available for selection when creating vehicle models. Each manufacturer record stores the brand name and logo, which display automatically on vehicle cards in the Kanban board.
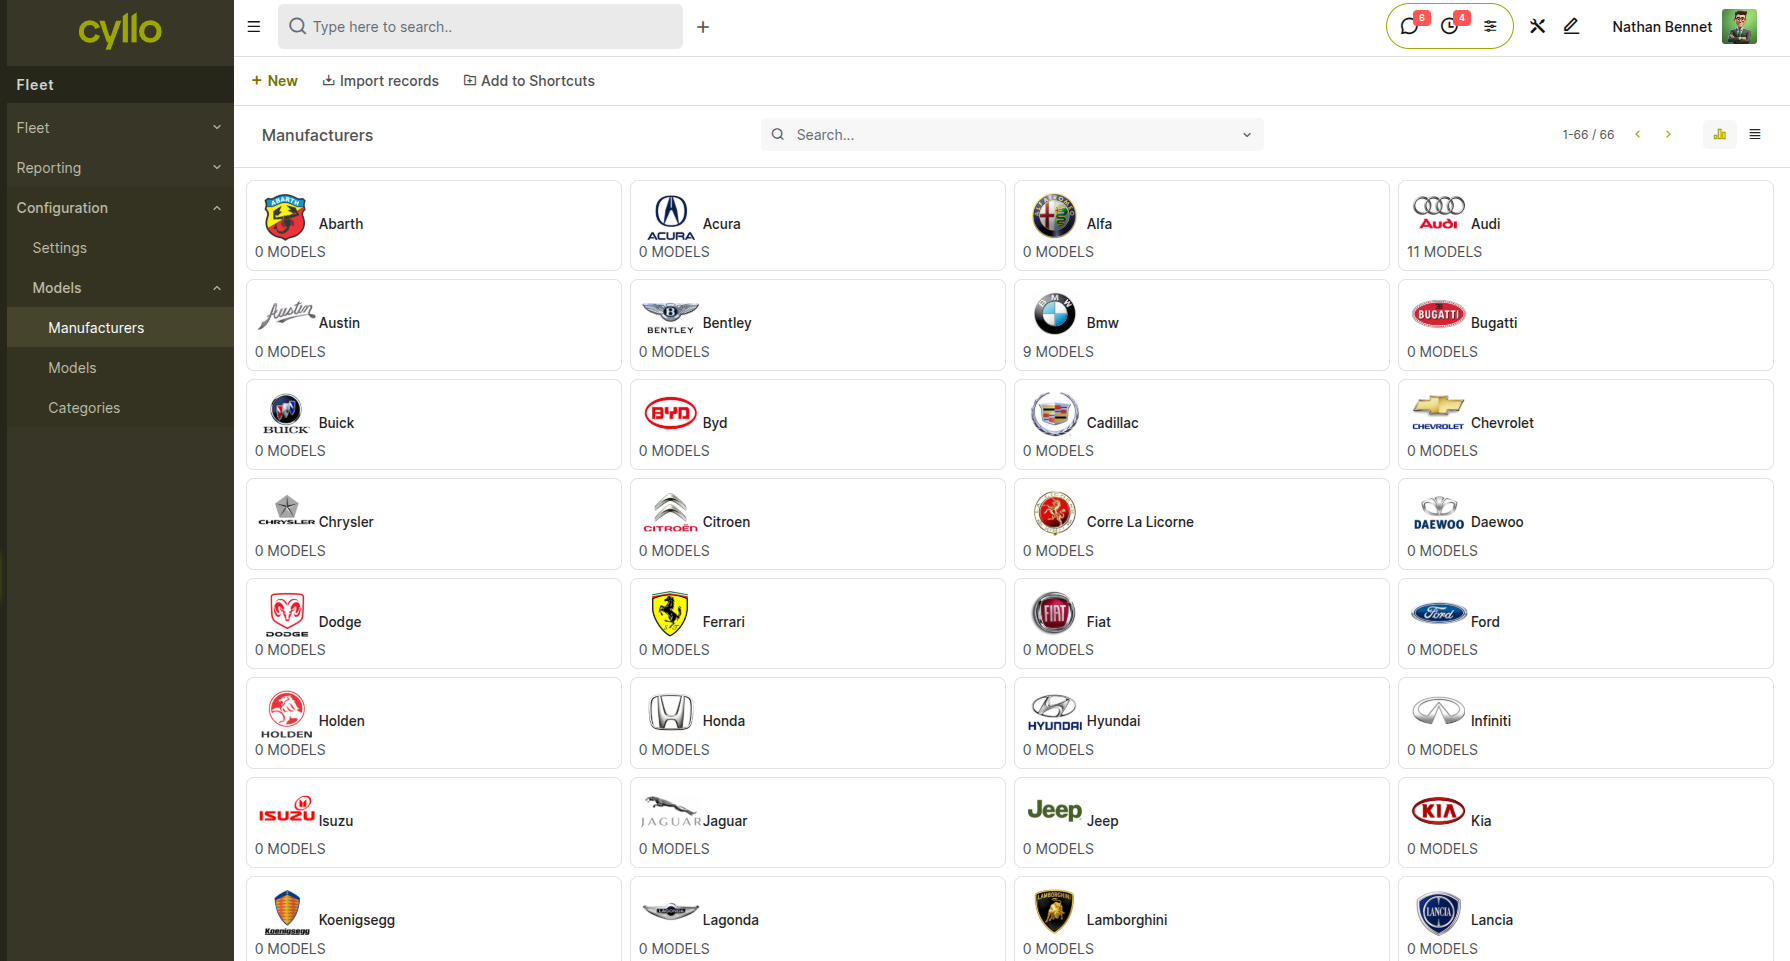
Fig 3.3 — Manufacturers list showing brand names such as Audi, BMW, Mercedes, and Opel with their logos
How to add a manufacturer:
- Go to Fleet → Configuration → Models → Manufacturers → New
- Enter the Manufacturer Name (e.g., Audi, Toyota, Ford)
- Upload the brand Logo — this logo appears on vehicle Kanban cards and model forms
- Save the record
Note
Manufacturer logos display on vehicle Kanban cards automatically once the manufacturer is linked to a model and that model is assigned to a registered vehicle.
3.4 Categories
Categories allow fleet managers to classify vehicle models into groups for filtering, reporting, and organizational purposes. Categories are assigned at the model level and flow through to all vehicles using that model.
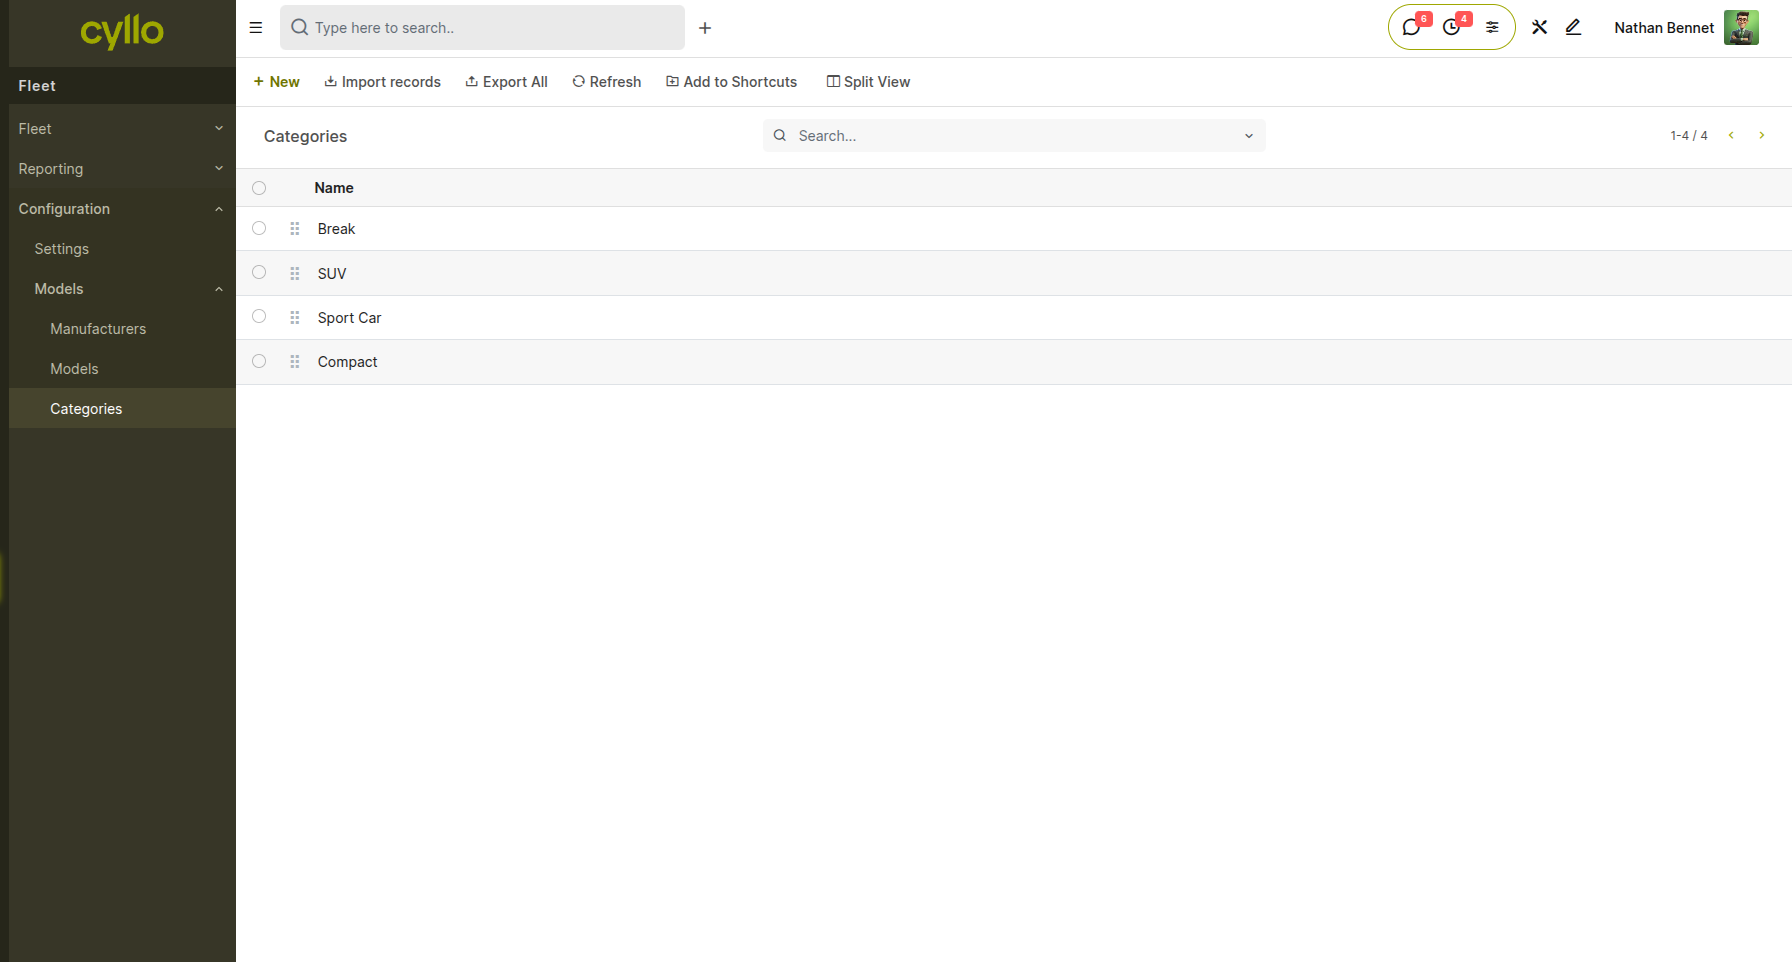
Fig 3.4 — Categories list view showing vehicle category names configured in the system
How to create a vehicle category:
- Go to Fleet → Configuration → Models → Categories → New
- Enter the Category Name (e.g., Sedan, SUV, Commercial Vehicle, Electric)
- Save the record
- Assign the category to a vehicle model from the Model form's Category field
Note
Categories and Tags serve different purposes. Categories provide a primary classification based on the vehicle model type (set at the model level), while Tags are applied directly on individual vehicle records for flexible operational labelling such as "Employee Car", "Purchased", or "Senior". Use both together for the most granular filtering and reporting.