

Cyllo Workflow Automation Documentation
Introduction
Cyllo Workflow Automation is a powerful visual process automation engine built into Cyllo ERP. It allows business users and administrators to design, build, and deploy complex automated processes directly from the browser — without writing code. Using an intuitive drag-and-drop canvas, teams can connect trigger nodes, condition nodes, and action nodes to create end-to-end business flows that run automatically based on record events or scheduled times. Key capabilities include sending emails, creating and updating records, sending in-app notifications, executing Python functions, and running custom code blocks — all orchestrated visually on a single canvas.
Workflow Automation integrates natively with every Cyllo module. Automations can target any model in the system — Sales Orders, CRM Leads, Invoices, Purchase Orders, Employees, Inventory, Projects, and more. Because Cyllo operates from a single unified database, actions triggered in one module automatically reflect across connected departments. A workflow that creates a Purchase Order when inventory drops below a threshold simultaneously updates the Inventory module, the Purchasing module, and notifies the responsible user — all in a single flow, with no manual intervention and no risk of data inconsistency between modules. Together, these capabilities provide a comprehensive process automation framework that addresses the most common bottlenecks in business operations: manual data entry, delayed notifications, inconsistent approvals, and repetitive task creation. Whether a team needs a simple one-step email trigger or a multi-branch conditional flow with Python-backed logic, Cyllo Workflow Automation scales to the requirement — centralized, auditable, and maintained entirely from within the Cyllo ERP interface.
This section covers how to navigate to Workflow Automation, create your first automation, and manage existing automations from the list view.
1. Getting started
1.1 Accessing Workflow Automation
Workflow Automation is accessible from the main Cyllo menu. The module presents automations as a list where each row represents one automation definition — its name, target model, active status, and last modification date. How to open Workflow Automation: Go to Settings → Technical → Workflow Automation, or access it from the Cyllo main menu if the module shortcut has been pinned. The list view displays all saved automations. Use the search bar to filter by name or target model. Click any automation row to open it in the visual canvas editor.
1.2 Creating a New Automation
Creating an automation begins by defining its name and the target Cyllo model it will act upon. Once saved, Cyllo opens the visual canvas where the full workflow logic is built by adding and connecting node blocks. The target model determines which records the automation monitors and operates on.
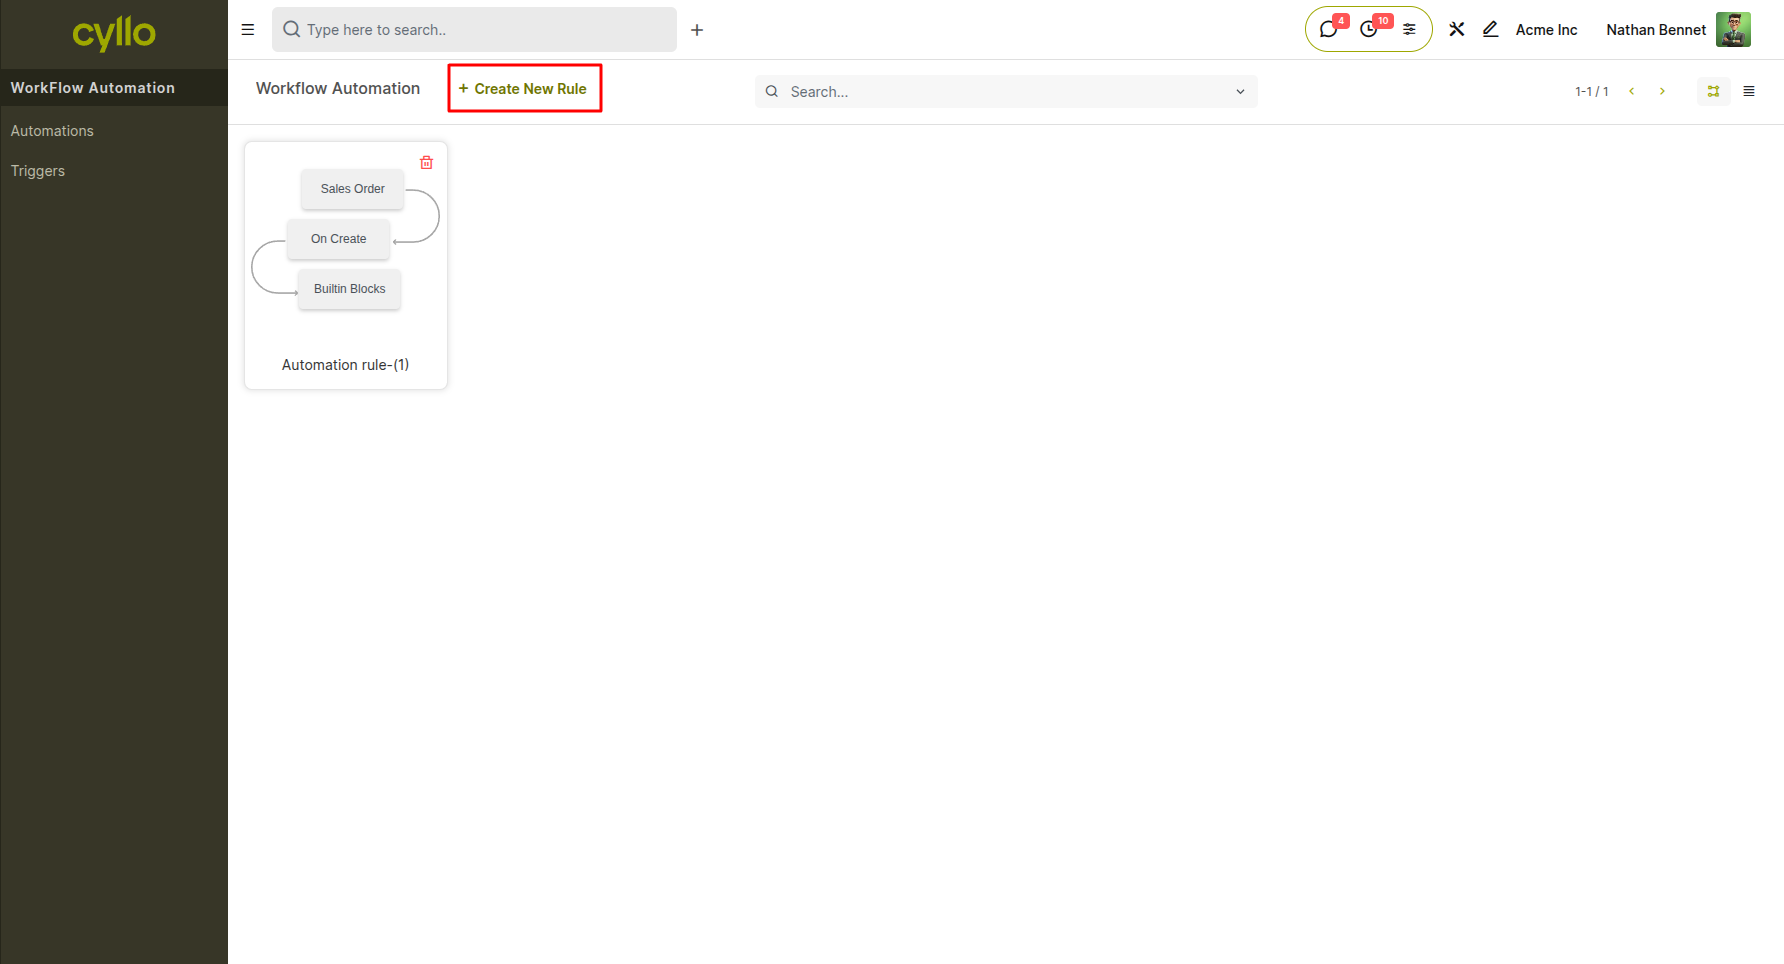
Fig 1.1 — New automation form with Name and Target Model fields before saving
How to create a new automation: Go to Workflow Automation → click New. Enter a descriptive name for the automation (e.g., "Welcome Email on Customer Create"). Select the Target Model — the Cyllo model this automation will monitor (e.g., res.partner for contacts, sale.order for sales orders). Click Save to open the workflow canvas. Add a Trigger node to define when the automation fires (see Section 2.3). Add and connect the desired action nodes to build the process flow. Click Save again to activate the automation. Key Fields
Name: A unique, descriptive label for the automation — used across the list view and logs.
Target Model: The Cyllo model this workflow listens to or acts on (e.g., sale.order, purchase.order, res.partner).
Active: Toggle to enable or disable the automation without deleting it.
Note
Only users with the ERP Manager role or Workflow Automation access can create or modify automations. Standard users can view automations but cannot edit them.
1.3 Managing Existing Automations
All automations can be enabled, disabled, edited, or deleted from the list view. Disabling an automation pauses it without removing any configuration, making it easy to temporarily suspend a flow during testing or maintenance periods.
How to manage automations:
Go to Workflow Automation to open the automation list.
Use the Active toggle on any row to enable or disable an automation instantly.
Click an automation name to open its canvas and edit the workflow logic.
To delete an automation, open it → click the Action menu → select Delete.
Note
Deleting an automation is permanent. Cyllo recommends disabling automations rather than deleting them during testing phases.
2. Trigger Nodes
Every automation must start with exactly one Trigger node. The trigger defines the event or schedule that causes Cyllo to begin executing the workflow. Cyllo Workflow Automation provides five trigger types, each suited to different automation scenarios.
2.1 On Create Trigger
The On Create trigger fires the automation every time a new record is created in the target model. It is the most common trigger for onboarding flows, notification pipelines, and follow-up automations — ensuring that every new record in the system immediately enters the defined process without any manual action.
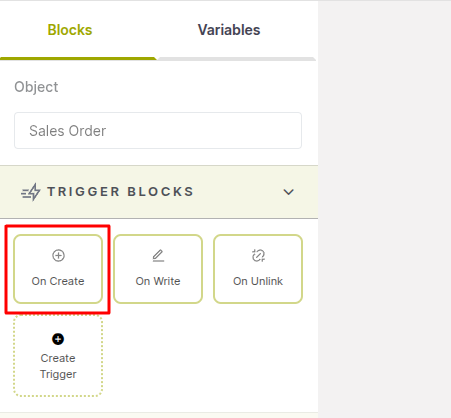
Fig 2.1 — On Create trigger configuration panel with Target Model selected on the workflow canvas
How to configure an On Create trigger:
- On the workflow canvas, add a Trigger node from the node palette.
- Click the Trigger node to open its configuration panel.
- Set Trigger Type to On Create.
- Confirm the Target Model matches the automation's intended model.
- Save and connect the Trigger node to the next node in the flow.
Key Fields:
- Trigger Type: Set to On Create — fires once each time a new record is created in the target model.
- Target Model: The model whose new records will initiate this workflow (auto-filled from the automation definition).
Note
The On Create trigger fires on every new record regardless of how it was created — through the interface, an import, an API call, or another automation. Use a Condition node immediately after the trigger to filter only the records that should proceed.
2.2 On Write Trigger
The On Write trigger fires the automation every time an existing record in the target model is saved with updated field values. This makes it ideal for automations that should respond to changes — such as sending a notification when an order status changes, updating a related record when a field is edited, or escalating a record when its priority is raised.
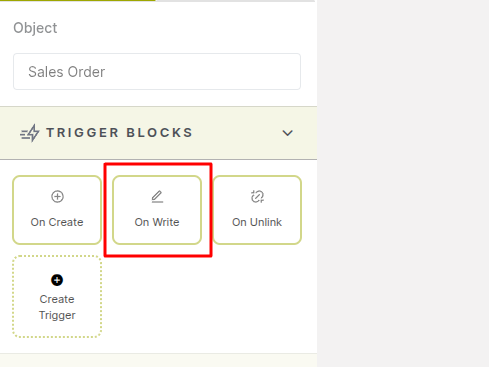
Fig 2.2 — On Write trigger configuration panel showing Trigger Type and Target Model fields
How to configure an On Write trigger:
- Add a Trigger node to the canvas and click it to open the configuration panel.
- Set Trigger Type to On Write.
- Confirm the Target Model.
- Save and connect the Trigger node to the next node in the flow.
Key Fields:
- Trigger Type: Set to On Write — fires each time any field on a record in the target model is saved.
- Target Model: The model whose record updates will initiate this workflow.
Note
The On Write trigger fires on every save of the record, regardless of which field changed. Use a Condition node immediately after to check the specific field or value that should actually initiate the flow, to avoid triggering the automation on unrelated saves.
2.3 On Unlink Trigger
The On Unlink trigger fires the automation when a record is deleted from the target model. It is useful for cleanup automations — such as archiving related records, notifying a manager when a key record is removed, or logging deletion events for audit purposes. The trigger can be set to fire either before or after the deletion takes place.
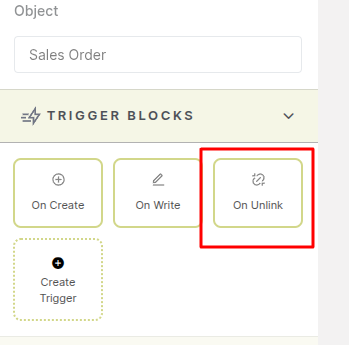
Fig 2.3 — On Unlink trigger configuration panel with Before/After timing options
How to configure an On Unlink trigger:
- Add a Trigger node to the canvas and click it to open the configuration panel.
- Set Trigger Type to On Unlink.
- Select whether the automation should fire Before or After the record is deleted.
- Save and connect the Trigger node to the next node in the flow.
Key Fields:
- Trigger Type: Set to On Unlink — fires when a record in the target model is deleted.
- Timing: Before fires the automation prior to deletion (the record is still accessible); After fires once the deletion is complete.
Note
When using the Before timing, the automation has access to the record's fields before it is removed. When using After timing, the record no longer exists, so action nodes that reference record fields should be placed before the deletion completes or use variables to store the needed values.
3. Logic & Control Nodes
Logic and control nodes give automations intelligence — they filter which records proceed, store intermediate values, look up related data, and repeat actions across collections of records. These nodes sit between the trigger and the action nodes to control exactly what happens and to whom.
3.1 Condition Node
The Condition node acts as a decision gate in the workflow. It evaluates field values on the target record and only allows execution to continue when the defined conditions are met. Records that do not match the filter are stopped at the Condition node, preventing unwanted actions from firing. Multiple conditions can be combined using AND/OR logic for precise filtering.
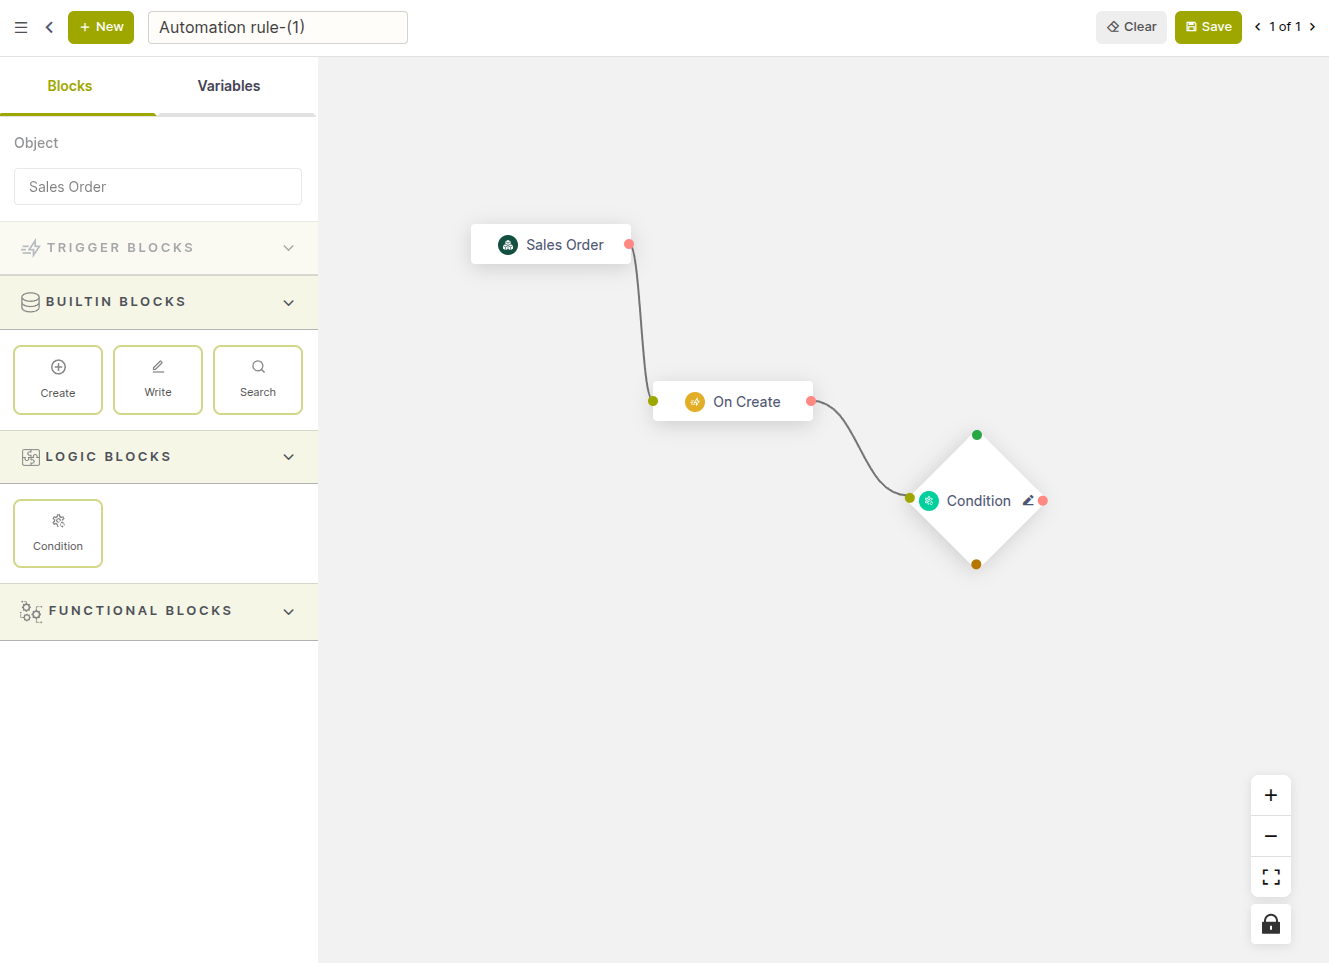
Fig 3.1 — A workflow automation example with connected nodes in the builder and a condition node configuration popup with setup options
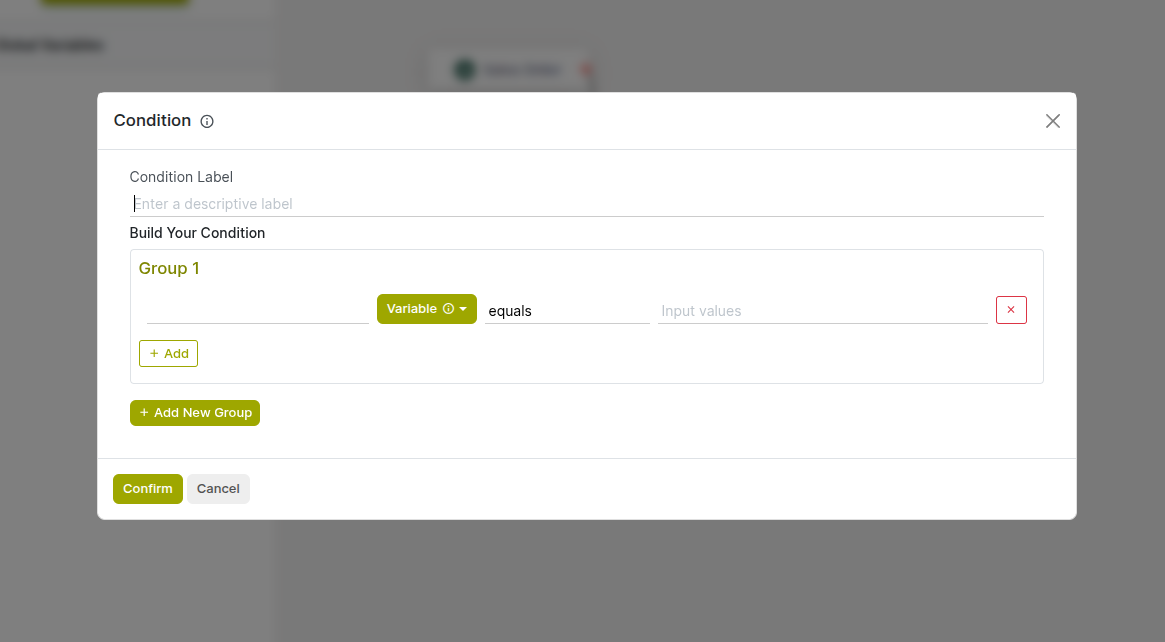
Fig 3.2 — Condition node filter builder with field, operator, and value rows and AND/OR logic toggle
How to configure a Condition node:
- Add a Condition node from the palette and connect it downstream of the Trigger.
- Click the Condition node to open its configuration panel.
- In the filter builder, select a Field, choose an Operator (equals, greater than, contains, is set, etc.), and enter the comparison Value.
- Add more conditions using Add Filter and set the AND/OR logic for the group.
- Save and connect the node's output to the next action node.
Key Fields:
- Field: The record field to evaluate (e.g., amount_total, state, partner_id).
- Operator: The comparison logic — equals, not equals, greater than, less than, contains, is set, is not set.
- Value: The comparison target — a fixed value or a field reference.
- AND / OR: Controls how multiple filter lines are combined — AND requires all conditions to be true, OR requires any one to be true.
Note
For complex multi-branch logic that cannot be expressed with the filter builder, use a Code node (Section 5.4) to write a custom condition and return a result to control flow.
3.2 Variable Node
The Variable node declares a named value that can be referenced by any downstream node in the workflow. Variables store intermediate results — such as a computed amount, a flag, a record reference, or a string built from field values — making complex multi-step workflows easier to construct and maintain without repeating the same expression across multiple nodes.
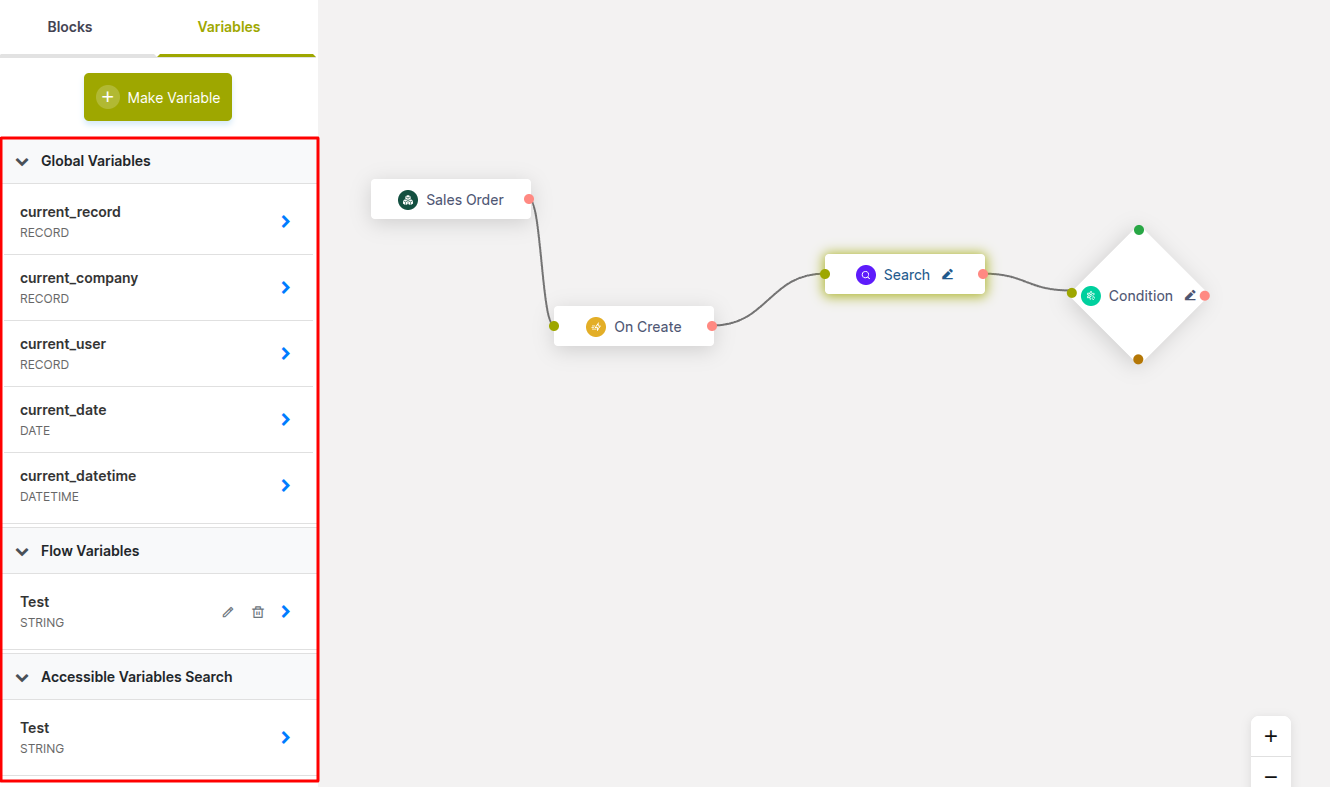
Fig 3.3- Variables panel highlighting global and flow variables available for use in the workflow
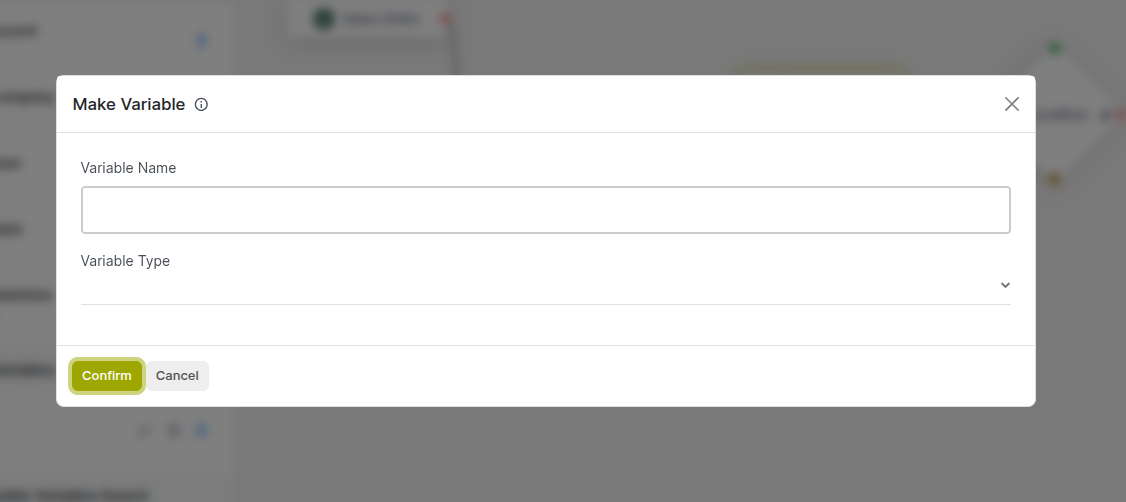
Fig 3.4 — Variable node configuration panel showing Variable Name, Type, and Initial Value fields
How to configure a Variable node:
- Add a Variable node early in the flow — before any nodes that will reference it.
- Click the Variable node to open its configuration panel.
- Enter the Variable Name — the identifier downstream nodes use to reference this value.
- Select the Variable Type: String, Number, Date, DateTime, Boolean, or Dynamic Values.
- Enter the Initial Value using a fixed value or a field expression from the triggering record.
- Save and connect the node into the flow.
Key Fields:
- Variable Name: The identifier used in downstream node expressions to retrieve this value.
- Type: The data type — String, Number, Date, DateTime, Boolean, or Dynamic Values (for record-based references).
- Initial Value: The value assigned at runtime — fixed text, a number, or a field expression from the triggering record.
3.3 Search Node
The Search node queries any Cyllo model for records matching a specified filter and stores the result in a named variable for use by downstream nodes. This enables automations to dynamically look up related records at runtime — such as finding the lowest-cost vendor for a product, retrieving all overdue invoices for a customer, or locating the assigned salesperson for a territory — without any manual steps.

Fig 3.5 — The Search node in a workflow automation example, with connected nodes illustrating how records are queried and passed to a condition node for further processing
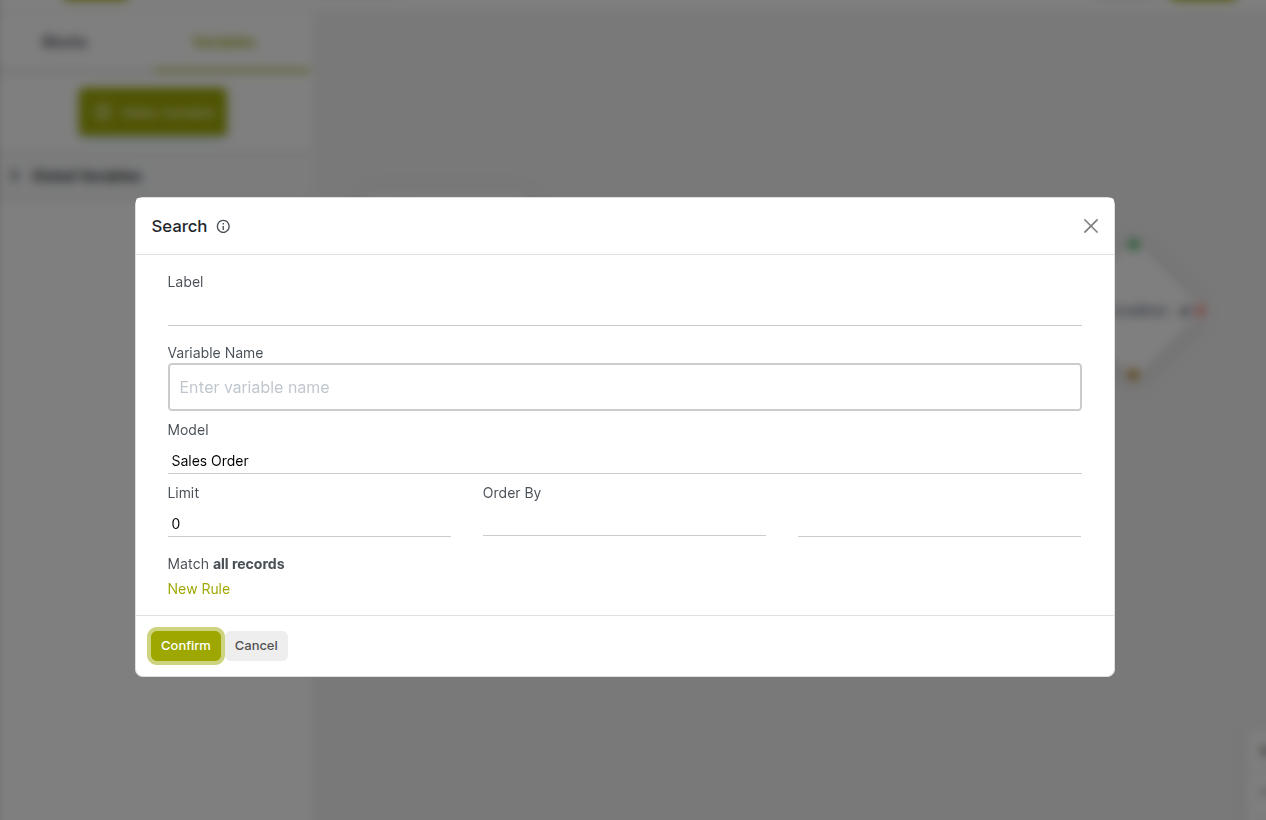
Fig 3.6 — Search node panel with model selector, filter builder, result limit, and result variable fields
How to configure a Search node:
- Add a Search node and connect it to the preceding node in the flow.
- Click the node to open its configuration panel.
- Select the Model to search — any installed Cyllo model (e.g., account.move for invoices, stock.quant for stock levels).
- Build the Filter to define which records to retrieve.
- Set an optional Result Limit to cap the number of records returned.
- Set the Sort Order (Ascending or Descending) and the field to sort by, if needed.
- Enter a Result Variable Name — downstream nodes reference this name to access the found records.
- Save and connect the node.
Key Fields:
- Model: The Cyllo model to query (e.g., res.partner, purchase.order, account.move).
- Filter: The conditions records must match.
- Result Limit: The maximum number of records to return (leave empty for all matching records).
- Sort Order: ASC or DESC — controls the ordering of returned records.
- Result Variable: The variable name under which the found records are stored for downstream use.
Note
The result stored by the Search node is a collection of records. Use a Loop node to iterate over the returned records and apply actions to each one individually.
3.4 Create Node
The Create block creates a new record in any Cyllo model as part of the automated flow. Field values can be set as fixed values or using expressions drawn from the triggering record or variables declared earlier in the workflow. This block enables automations to generate purchase orders, project tasks, CRM opportunities, delivery orders, and more without any manual input.
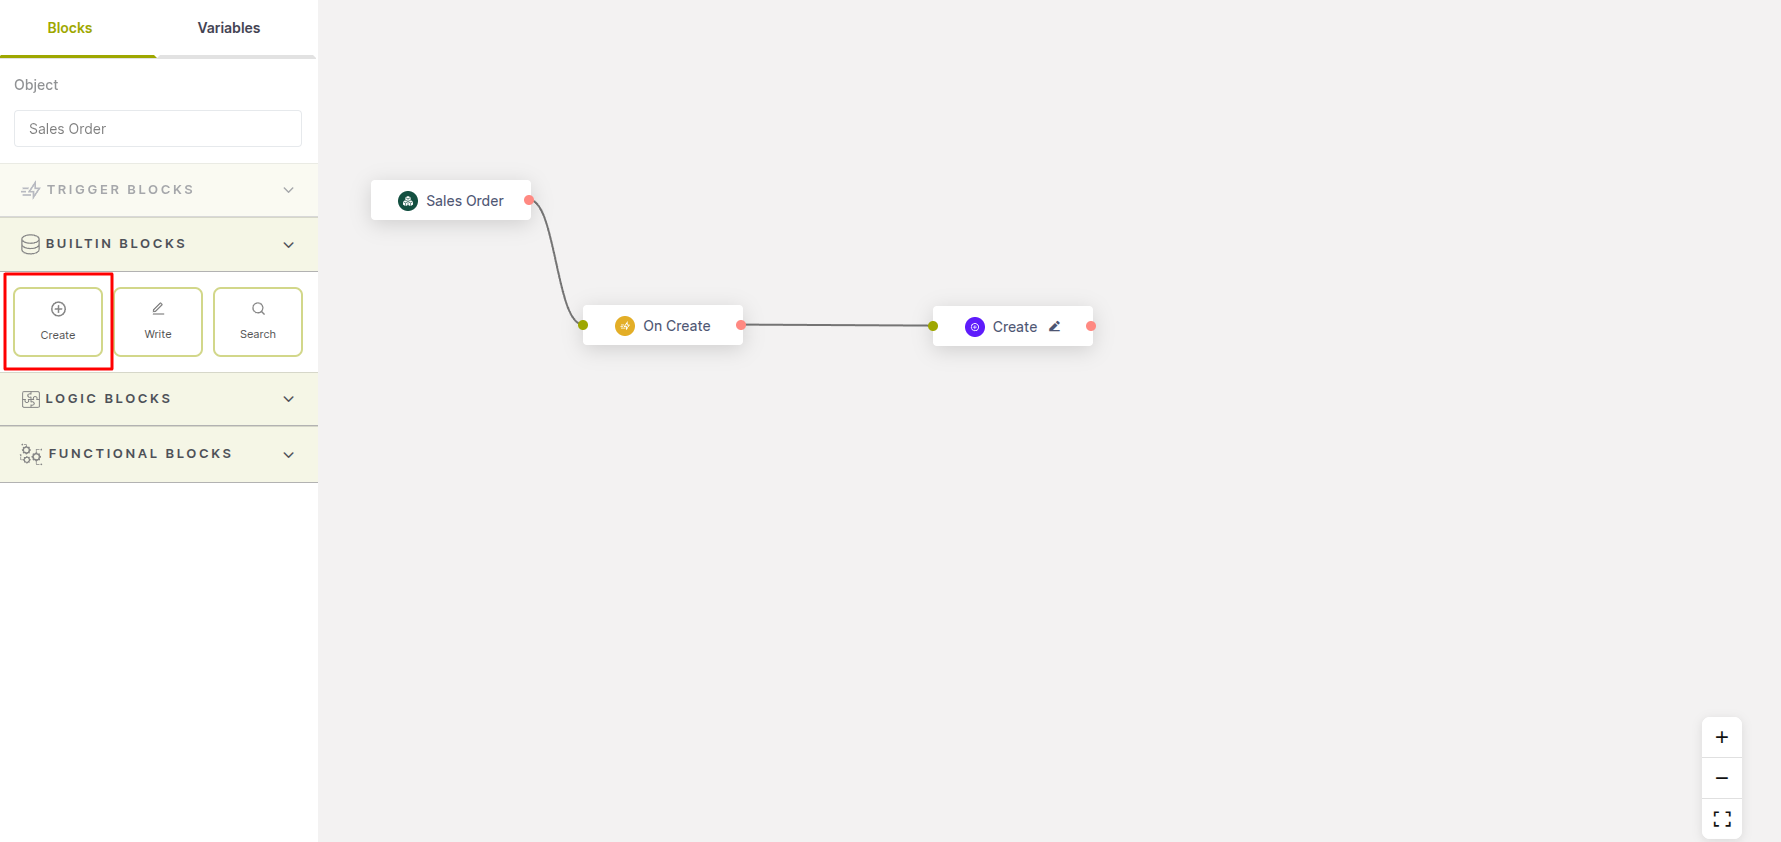
Fig 3.7 — Create node in a workflow automation example, with connected nodes illustrating record creation and its placement within the workflow builder
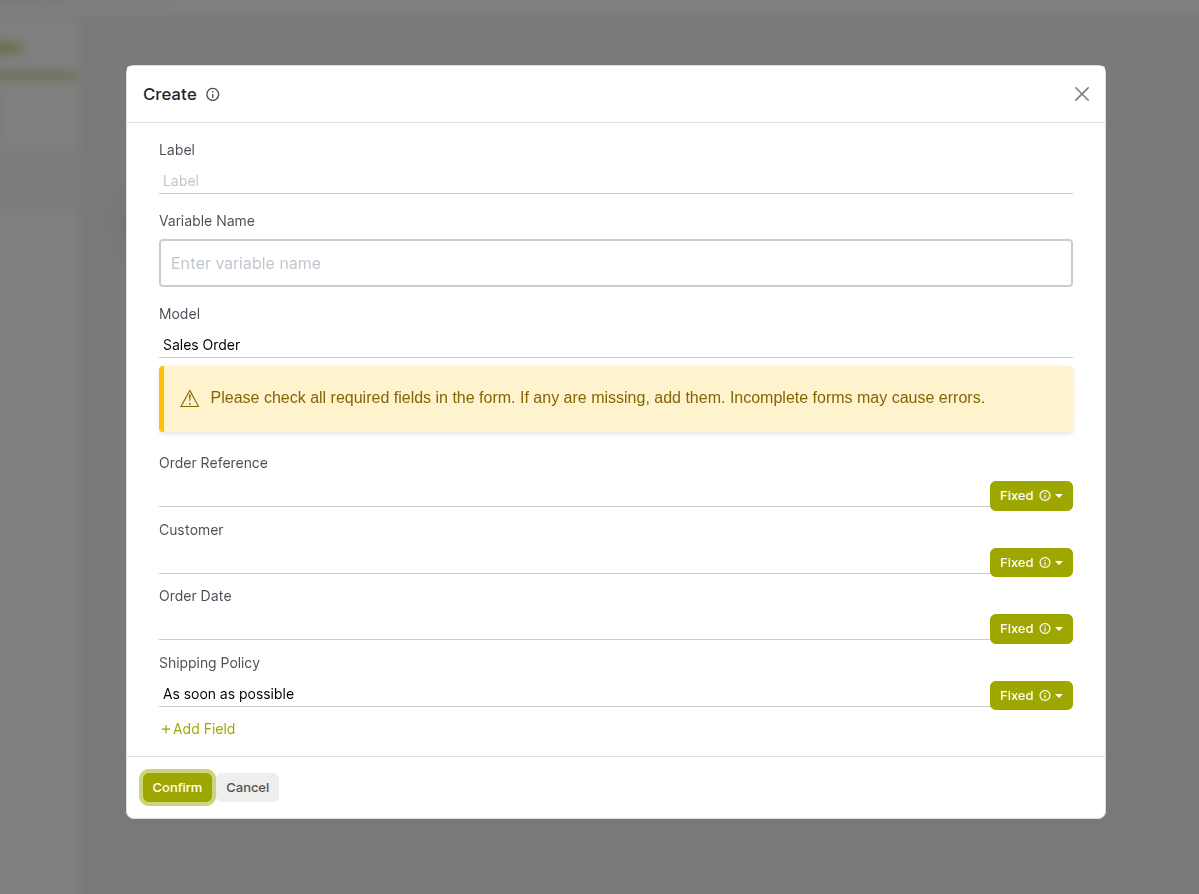
Fig 3.8 — Create block configuration panel with Target Model and field mapping table
How to configure a Create block:
- Drag the Create block from the Builtin Blocks section and connect it to the flow.
- Click the block to open its configuration panel.
- Select the Target Model — the model in which the new record will be created.
- In the field mapping table, add a row for each field to populate. Enter the field name and its value (fixed or a dynamic expression).
- Optionally assign the newly created record to a Variable so downstream blocks can reference it.
- Save the configuration.
Key Fields:
- Target Model: The model where the new record will be created (e.g., purchase.order, project.task, crm.lead). Field Mapping: A list of field and value pairs defining the new record's initial field values.
- Result Variable: An optional variable that stores the newly created record for use in downstream blocks.
Note
Dynamic field values can reference any field of the triggering record — for example, use the customer from the triggering order, or mirror the total amount onto the new record.
3.5 Write Node
The Write block updates field values on an existing record. It can act on the record that triggered the workflow, a record collection returned by a previous Search block, or any record identified by a variable or a fixed ID. This block is commonly used to advance a record's status, update a field after processing, or set assignment fields automatically.
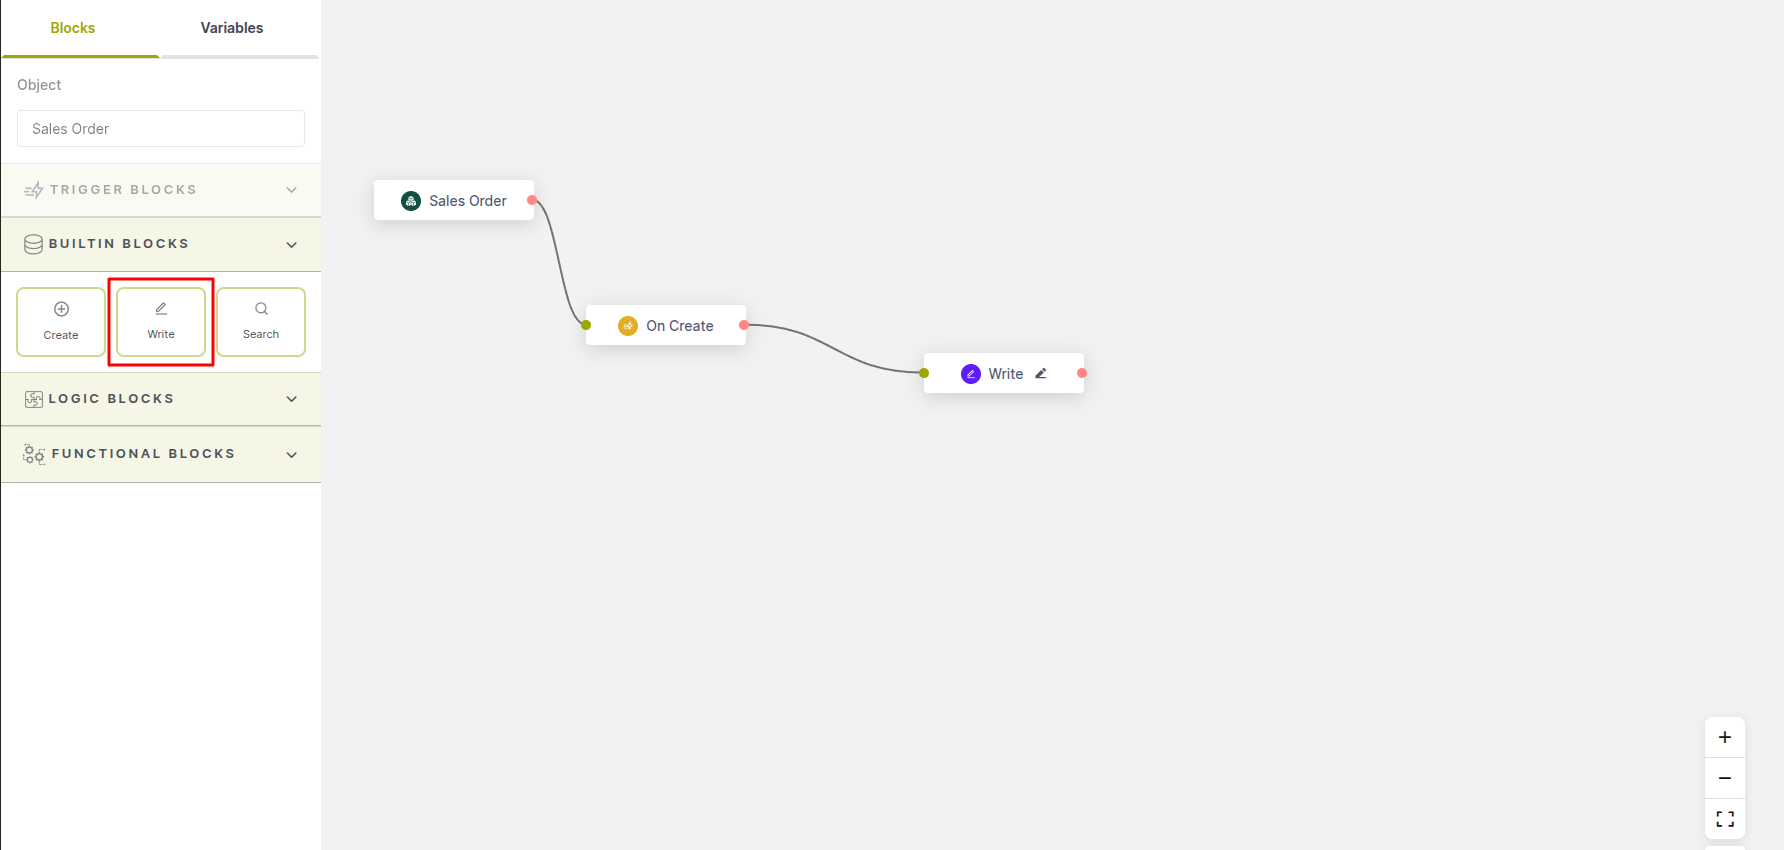
Fig 3.9 — Write node highlighted in the workflow builder, with connected nodes illustrating how existing records are updated within the automation flow
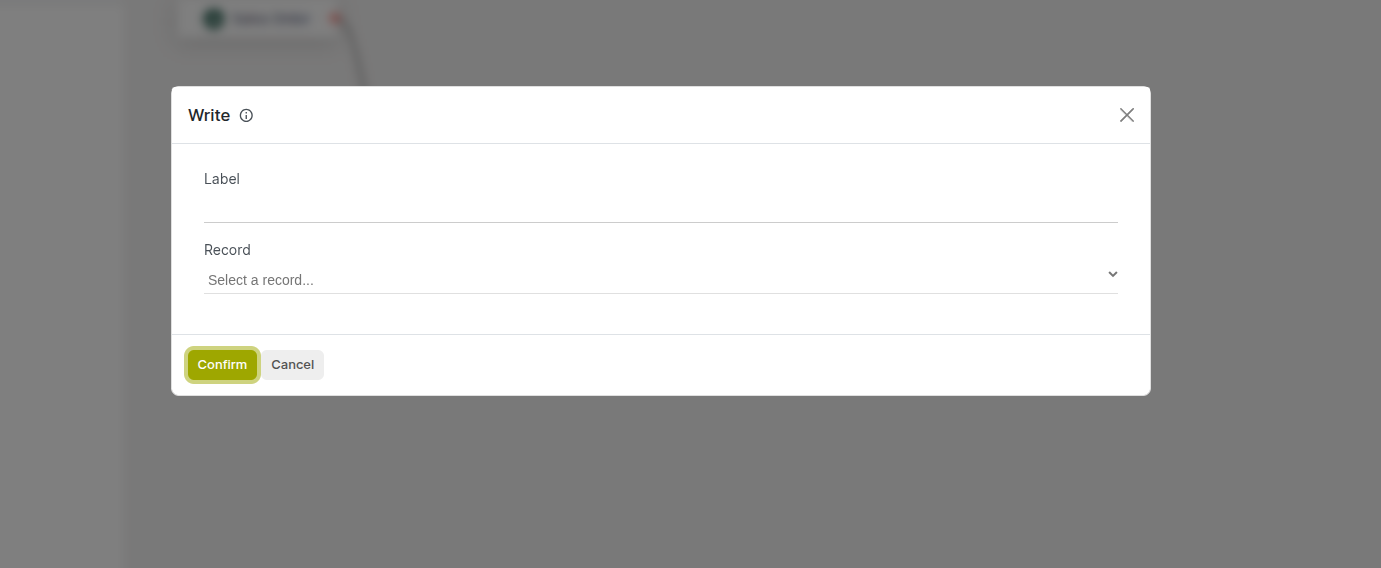
Fig 3.10 — Write block panel showing Record Target selector and field update table
How to configure a Write block:
- Drag the Write block from the Builtin Blocks section and connect it to the flow.
- Click the block to open its configuration panel.
- Select the Record Target: choose the trigger record, a named variable, or specify a record ID.
- In the field update table, add each field and the new value to write.
- Save the configuration.
Key Fields:
- Record Target: Which record to update — the trigger record, a variable, or a specific record ID.
- Field Updates: A list of field name and value pairs — the values to write to the target record.
Note
Writing to records in other modules is fully supported, since Cyllo operates on a single shared database. For example, an automation triggered on a Sales Order can update a CRM opportunity's stage in the same flow.
4. Action Nodes
Action nodes perform the actual work of an automation — sending messages, creating records, updating data, alerting users, scheduling activities, and managing followers. They are placed downstream of trigger and logic nodes and execute in sequence as the flow progresses.
4.1 Send Mail Node
The Send Mail node sends an email as part of the automation. Emails can use a pre-built Cyllo email template for consistent formatting and branding, or they can be composed with a custom subject and body using dynamic expressions drawn from the triggering record's fields. All sent emails are logged in the activity log of the related record for full visibility.
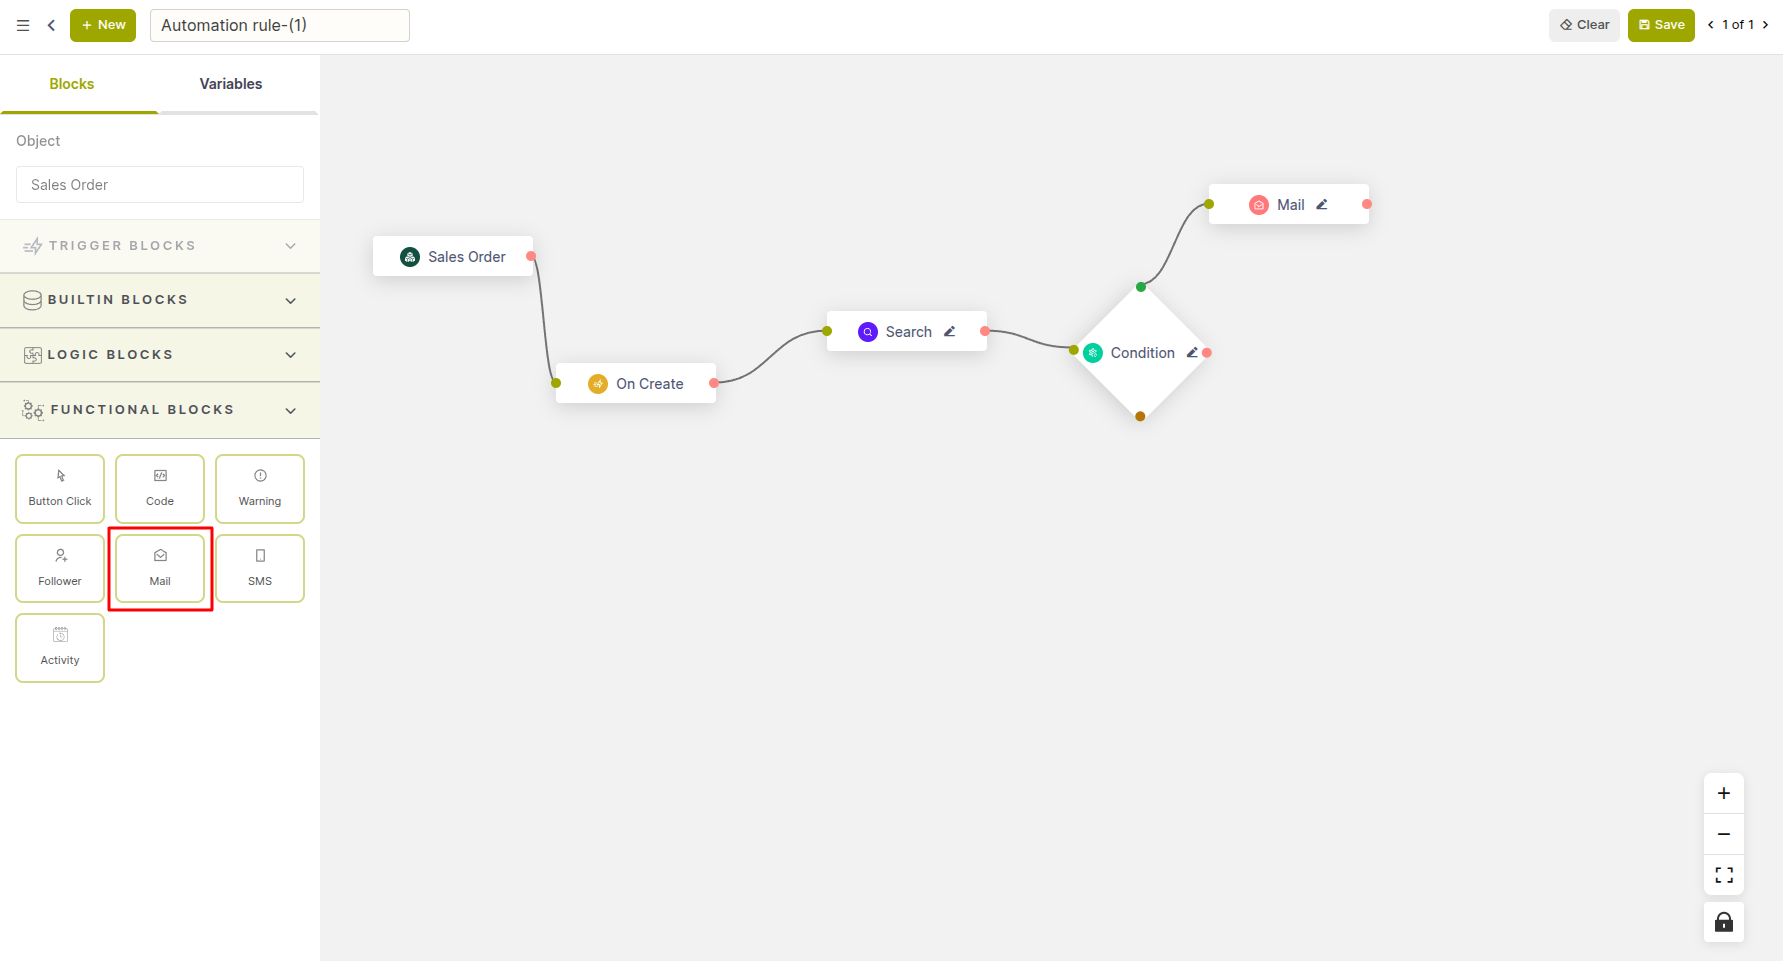
Fig 4.1 — The Send Mail node in a workflow automation example, with connected nodes illustrating email triggering as part of the workflow flow
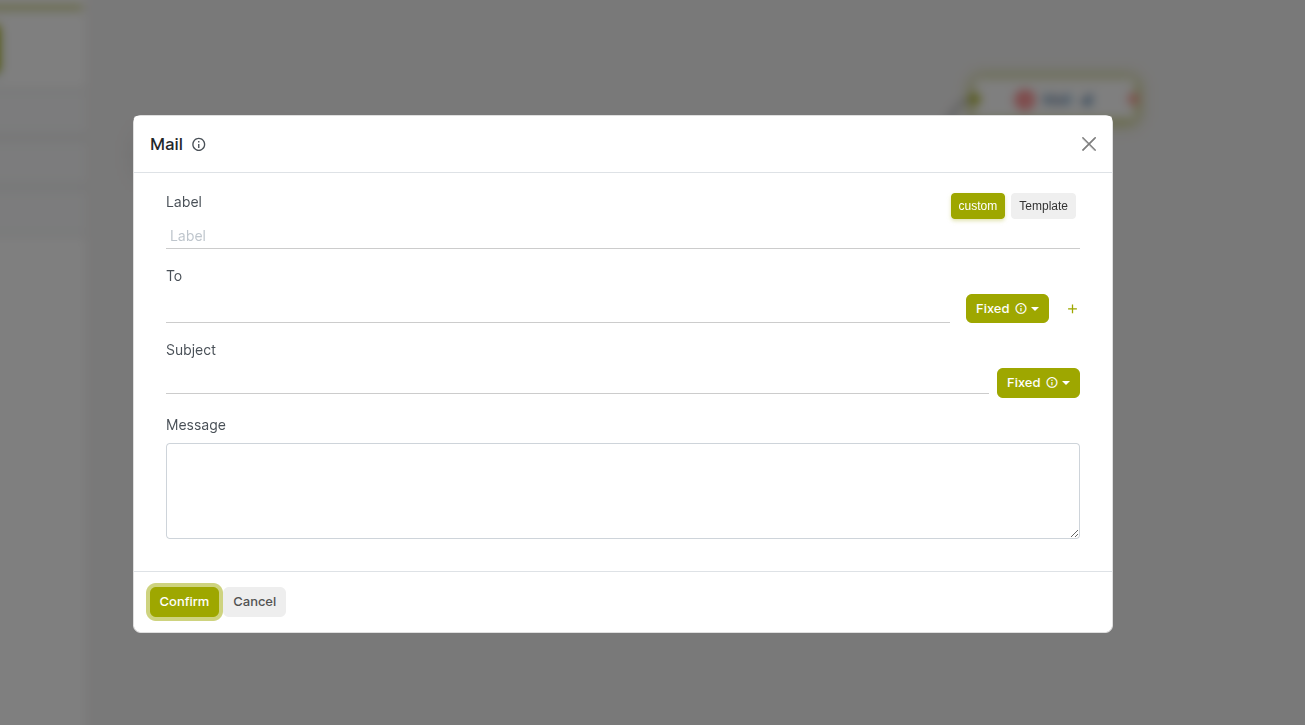
Fig 4.2 — Send Mail node configuration panel with template selector and recipient field expression
How to configure a Send Mail node:
- Add a Mail node and connect it to the workflow at the point where the email should be sent.
- Click the node to open its configuration panel.
- Select an existing Email Template, or choose Custom to write a bespoke subject and body.
- Set the Recipient using a field expression (e.g., record.partner_id.email) or a fixed email address.
- Optionally add CC and BCC addresses for additional recipients.
- Save the configuration.
Key Fields:
- Template: A pre-configured Cyllo email template — controls layout, branding, and base content.
- Recipient: The To address — supports field expressions from the triggering record.
- Subject: The email subject line — fixed text or a field expression.
- Body: The email body — supports formatting and field substitutions.
- CC / BCC: Optional additional recipients.
Note
Emails sent by this node are recorded in the activity log of the triggering record, providing a full auditable trail of every automated communication associated with each record.
4.2 Send SMS Node
The Send SMS node sends a text message to one or more recipients as part of the automation. Like the Send Mail node, it supports both pre-configured SMS templates and fully custom messages composed with dynamic field expressions from the triggering record.
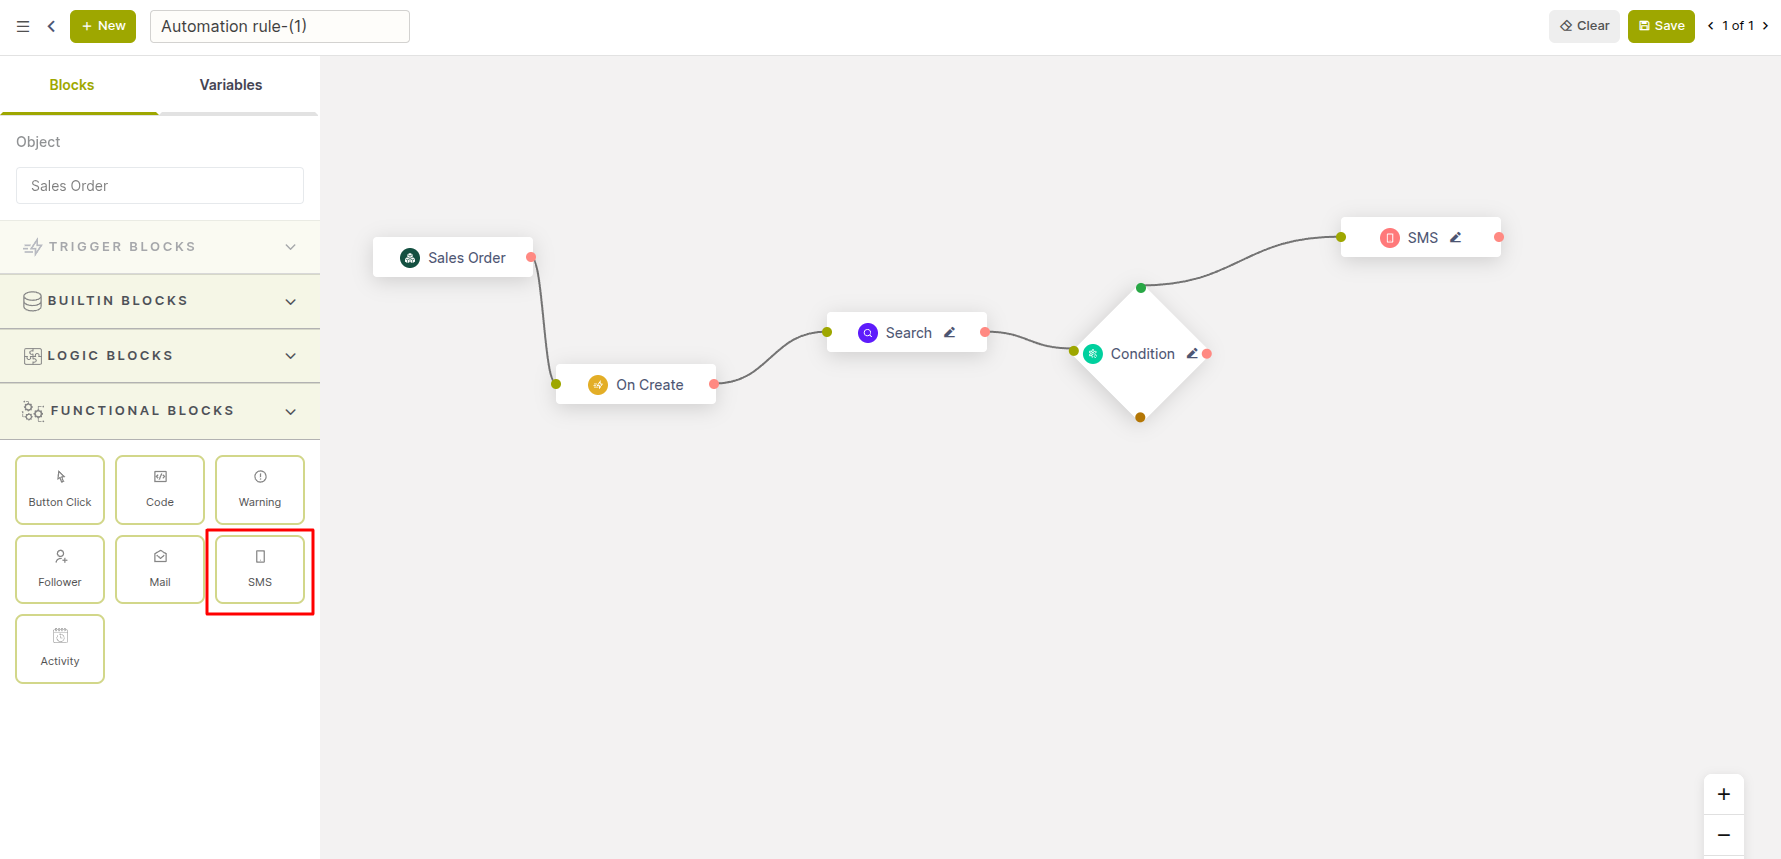
Fig 4.3 — the SMS node in a workflow automation example, with connected nodes illustrating message sending as part of the workflow flow

Fig 4.4 — Send SMS node panel in Custom mode showing recipients and message body with field expressions
How to configure a Send SMS node:
- Add an SMS node and connect it to the workflow at the point where the message should be sent.
- Click the node to open its configuration panel.
- Toggle between Template mode (to use a pre-built SMS template) and Custom mode (to write a bespoke message).
- Set the Recipients — one or more contacts or partner records who will receive the message.
- If using Custom mode, enter the Message text, using field expressions to personalise the content.
- Save the configuration.
Key Fields:
- Type: Template uses a saved SMS template; Custom allows a free-form message body.
- Recipients: The contacts or partner records who will receive the SMS.
- Message: The text content of the SMS — supports field expressions for personalisation.
Note
SMS delivery depends on the SMS gateway configured in your Cyllo instance. Verify that an active SMS provider is set up in Settings → Technical before deploying automations that use this node.
4.3 Button Click Node
The Button Click block invokes a specific button or action available on the target record's form view as part of the automation. This allows you to programmatically trigger actions that a user would normally click manually — such as confirming an order, validating a document, printing a report, or running a server action — without any human interaction.
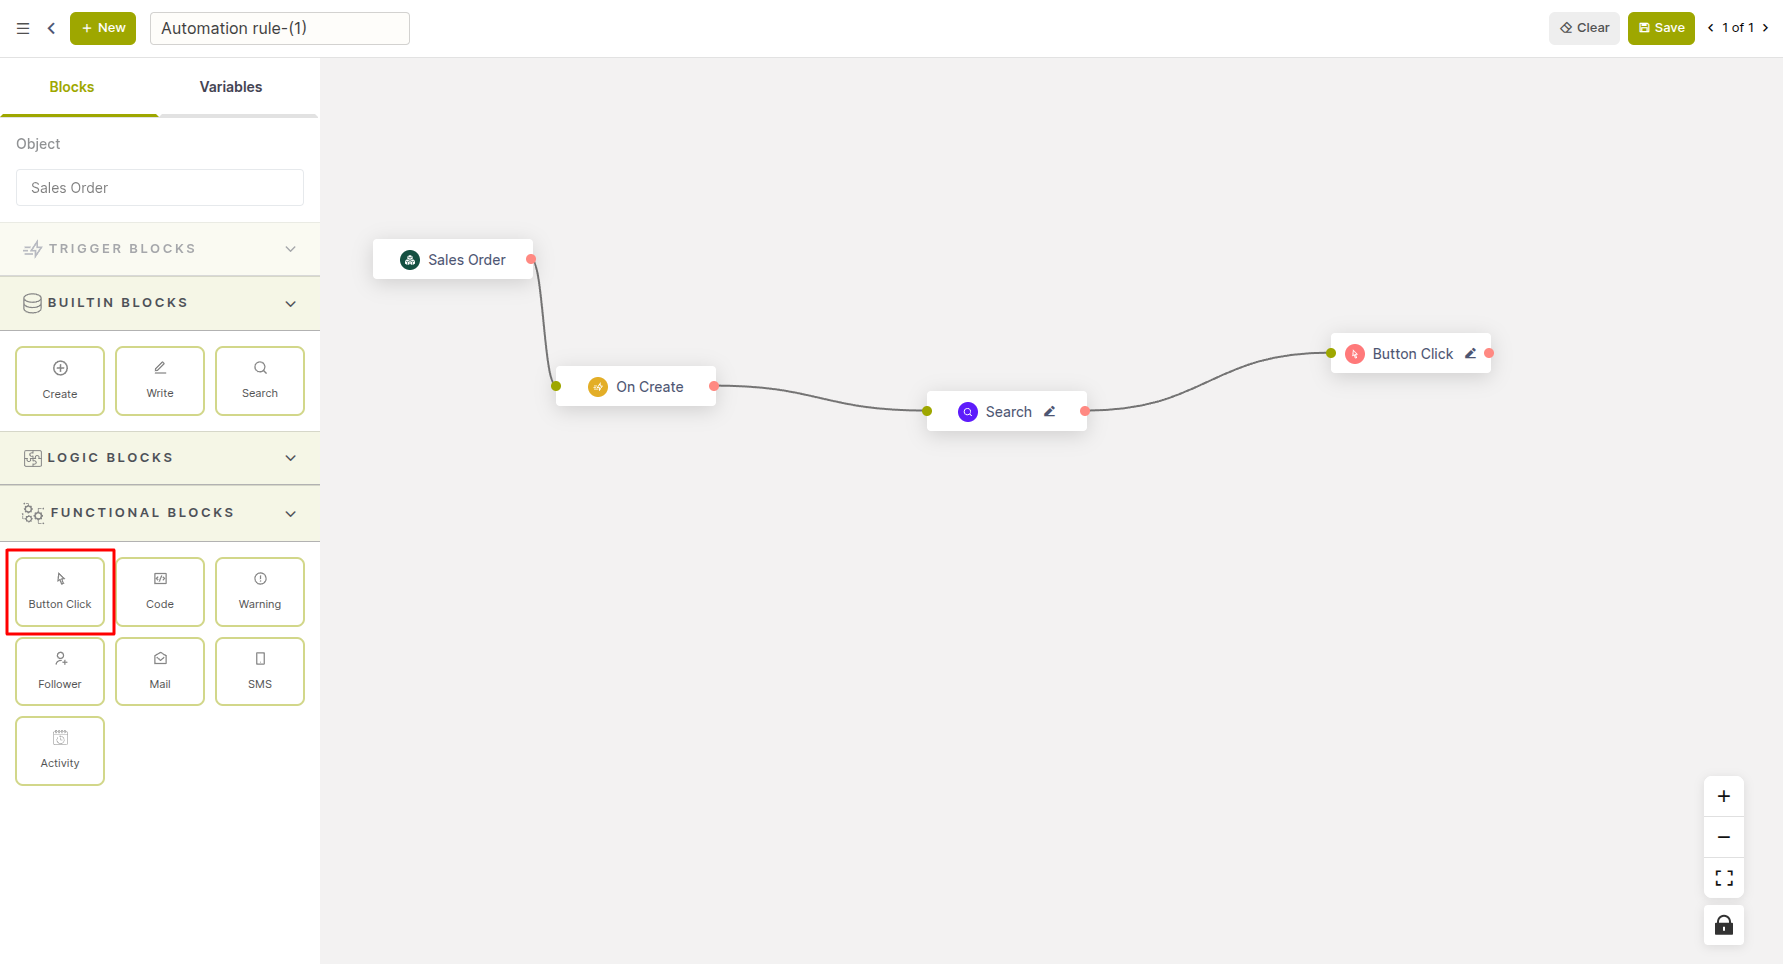
Fig 4.5 — the Button Click node in a workflow automation example, with connected nodes illustrating automated triggering of actions within the workflow
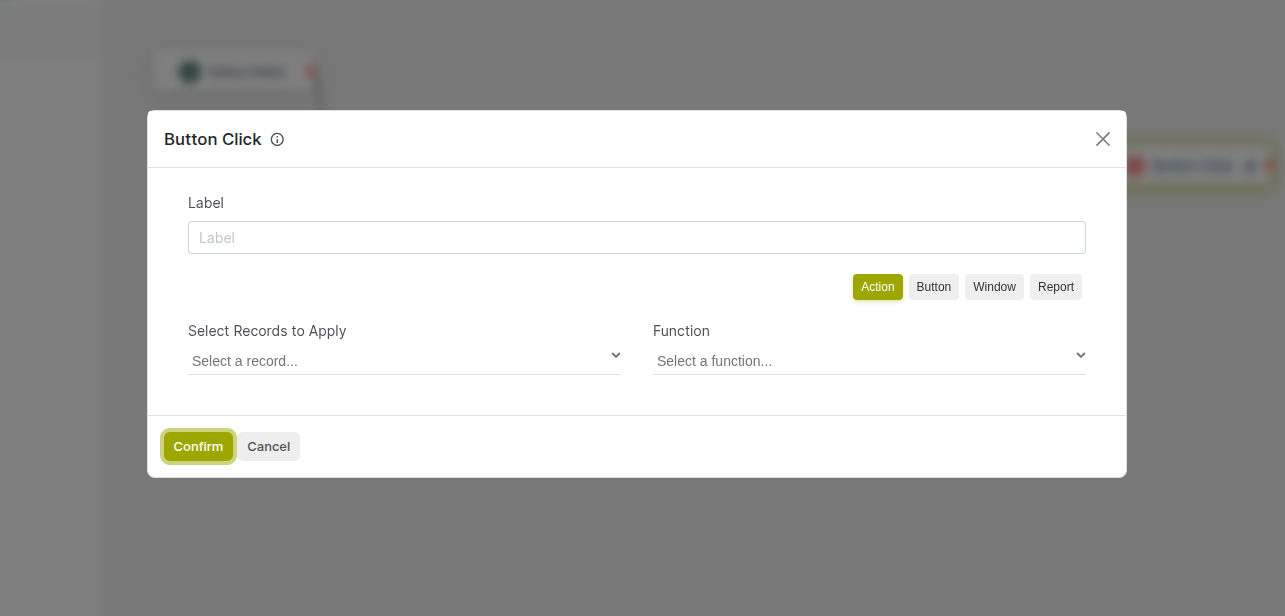
Fig 4.6 — Button Click block configuration panel with Target Record, Function Type, and Action dropdown
How to configure a Button Click block:
- Drag the Button Click block from the Functional Blocks section and connect it to the flow.
- Click the block to open its configuration panel.
- Select the Target Record — the variable holding the record whose button should be clicked.
- Select the Function Type: choose between Button (a form view button), Server Action, Window Action, or Report Action.
- Select the specific button or action to invoke from the dropdown list.
- Save the configuration.
Key Fields:
- Target Record: The record on which the button or action will be invoked.
- Function Type: The category of action — Button, Server Action, Window Action, or Report Action.
- Action: The specific button or action to execute on the target record.
Note
The available buttons and actions in the dropdown are automatically loaded from the target record's model. Only actions that are bound to the selected model will appear. If an expected action is not listed, verify that it is registered against the correct model in Cyllo.
4.4 Code Node
The Code block executes custom Python logic within the workflow, giving technical users full access to Cyllo's data environment for logic that cannot be expressed through the standard visual blocks. The code editor has access to the triggering record and the Cyllo data environment, enabling any data operation, calculation, or external call to be embedded directly in the flow.
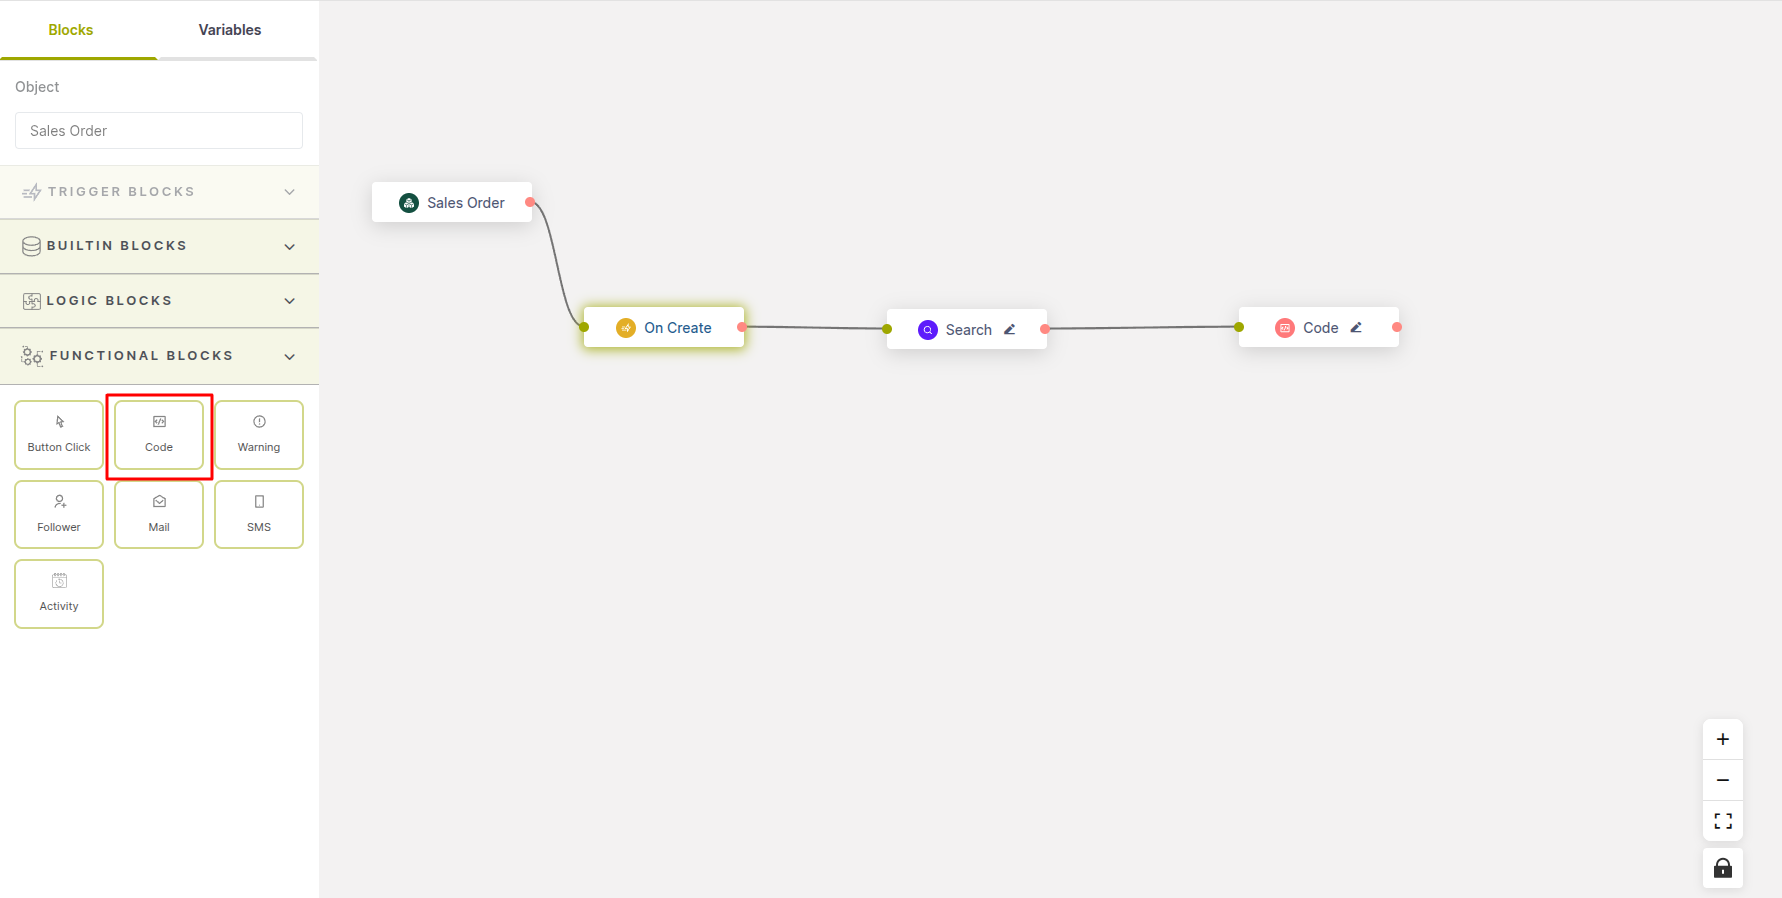
Fig 4.7 — the Code node in a workflow automation example, with connected nodes illustrating execution of custom logic within the workflow
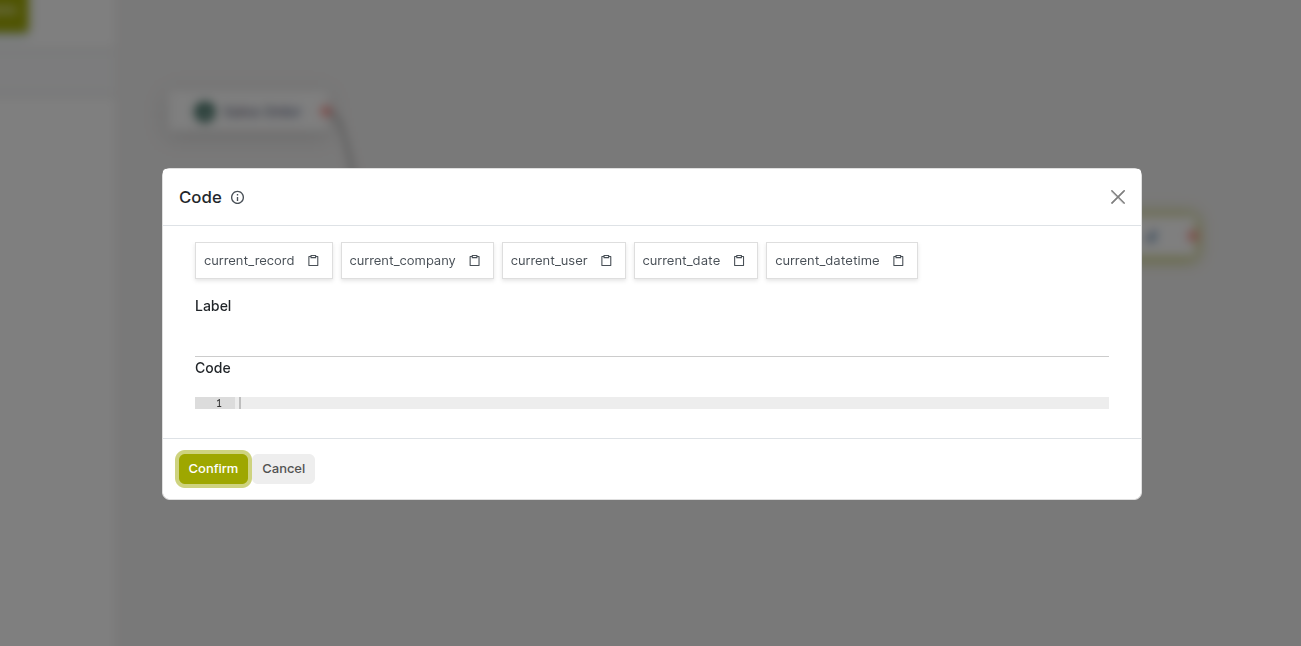
Fig 4.8 — Code block Python editor with env and record variables and Return Type selector
How to configure a Code block:
- Drag the Code block from the Functional Blocks section and connect it to the flow.
- Click the block to open the code editor.
- Write your logic using env for the Cyllo data environment and record for the triggering record.
- Select the Return Type if the code should pass a value to downstream blocks (String, Number, Date, DateTime, Boolean, Record, or RecordSet).
- Assign a value to result to pass that value downstream.
- Save the code and close the editor.
Key Fields:
- env: The Cyllo data environment — provides access to all models for searching, creating, or updating records.
- record: The record that triggered the automation — its fields are accessible as record.field_name.
- Return Type: Declares the data type of the value returned by the code block for downstream use.
- result: Assign this variable to return a value from the code block for use in downstream blocks.
Note
The Code block requires familiarity with Python and Cyllo's data model. For logic that will be reused across multiple automations, define it as a Work Function (Section 8) and invoke it via a Button Click block instead, to keep automations maintainable and avoid duplication.
4.5 Warning Node
The Warning node raises an error message that halts workflow execution and surfaces a message to the user. Three error types are supported — User Error, Validation Error, and Access Error — each communicating a different severity and context. Warning nodes are most effective when placed on branches where a Condition node has evaluated to false, blocking a record from progressing until the business rule is satisfied.
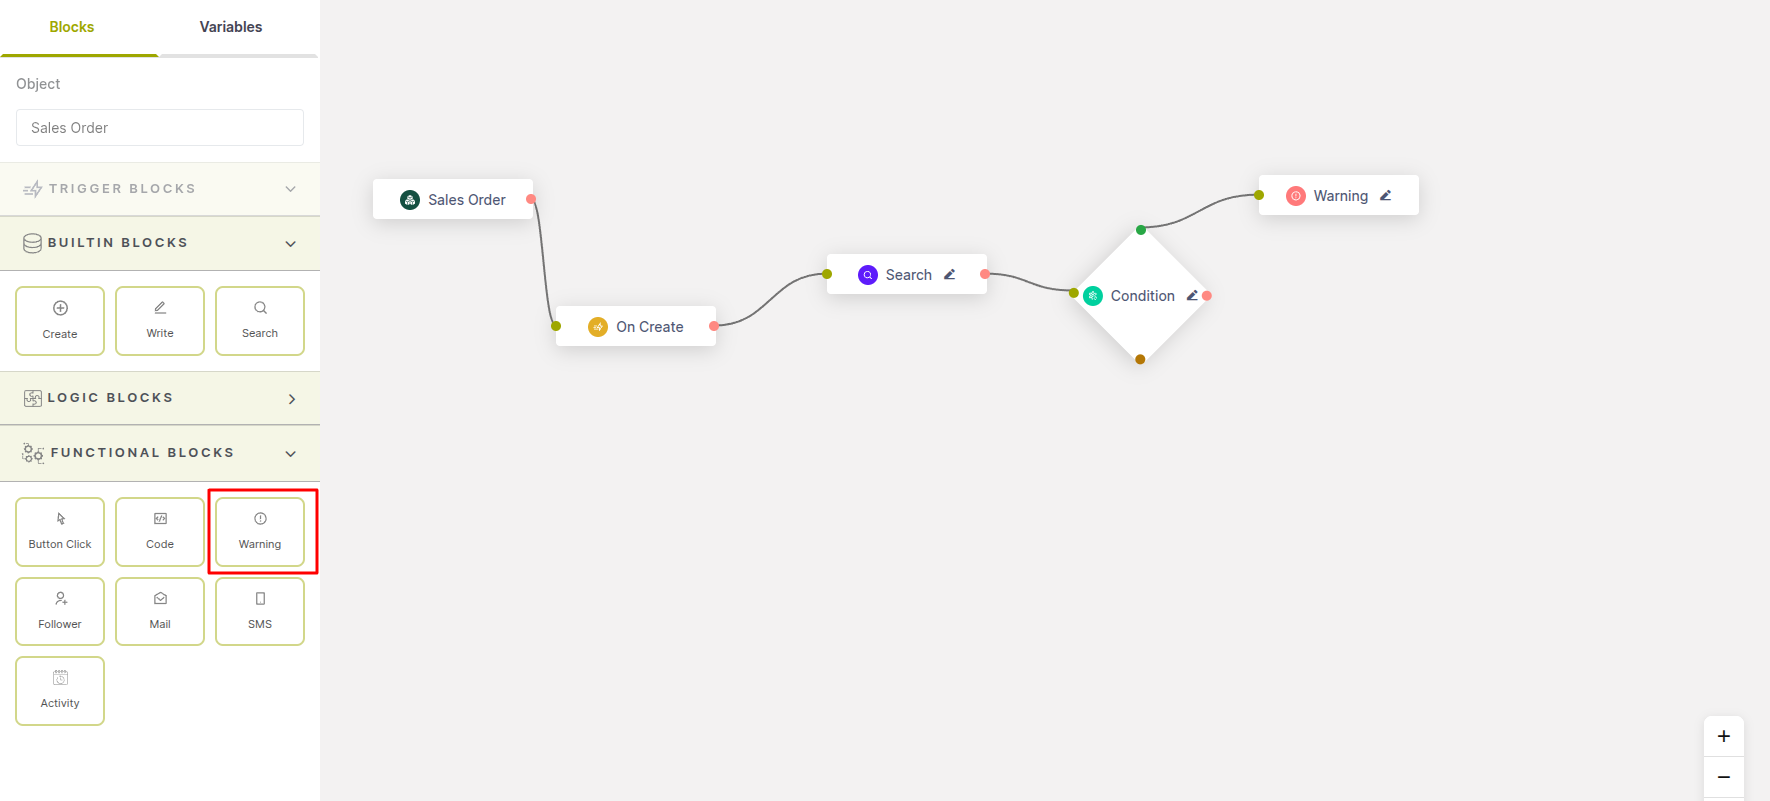
Fig 4.9 — Warning node in a workflow automation example, with connected nodes illustrating validation control that blocks progression until conditions are met
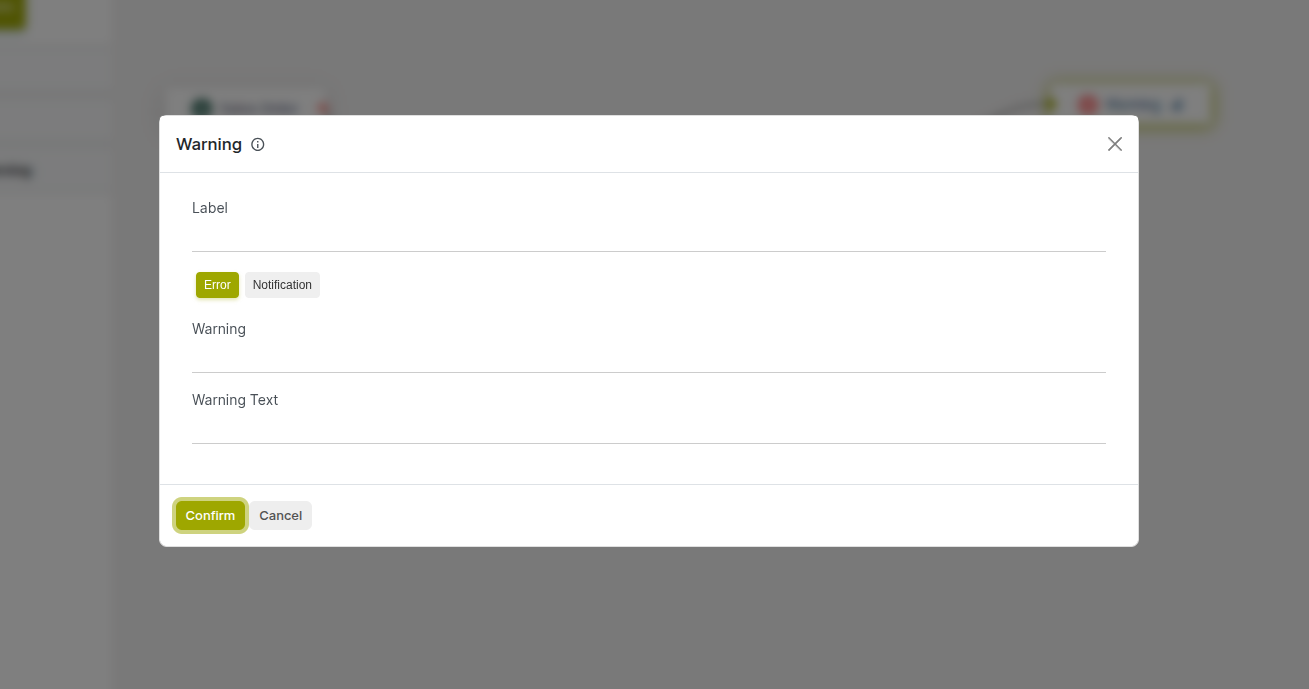
Fig 4.10 — Warning node configuration panel with Error Type dropdown and Message field
How to configure a Warning node:
- Add a Warning node and connect it to the branch where the error should be raised (typically the false branch of a Condition).
- Click the node to open its configuration panel.
- Select the Error Type: User Error, Validation Error, Access Error, Access Denied, or Missing Error.
- Enter the Message text displayed to the user when the error fires.
- Save the configuration.
Key Fields:
- Error Type: User Error for standard business rule violations; Validation Error for data integrity checks; Access Error for permission-related blocks; Access Denied for restricted actions; Missing Error for missing required records.
- Message: The explanation shown to the user — should clearly describe what went wrong and what action is needed.
Note
The Warning node terminates execution at that point. All changes made by nodes earlier in the same workflow run are rolled back if the Warning is raised within the same transaction.
4.6 Followers Node
The Followers node adds or removes followers on a record that supports Cyllo's messaging and activity threads (such as Sales Orders, CRM Leads, Invoices, and similar models). Adding followers ensures that the relevant users or teams automatically receive notifications and updates posted in that record's activity log, without anyone needing to manually subscribe.
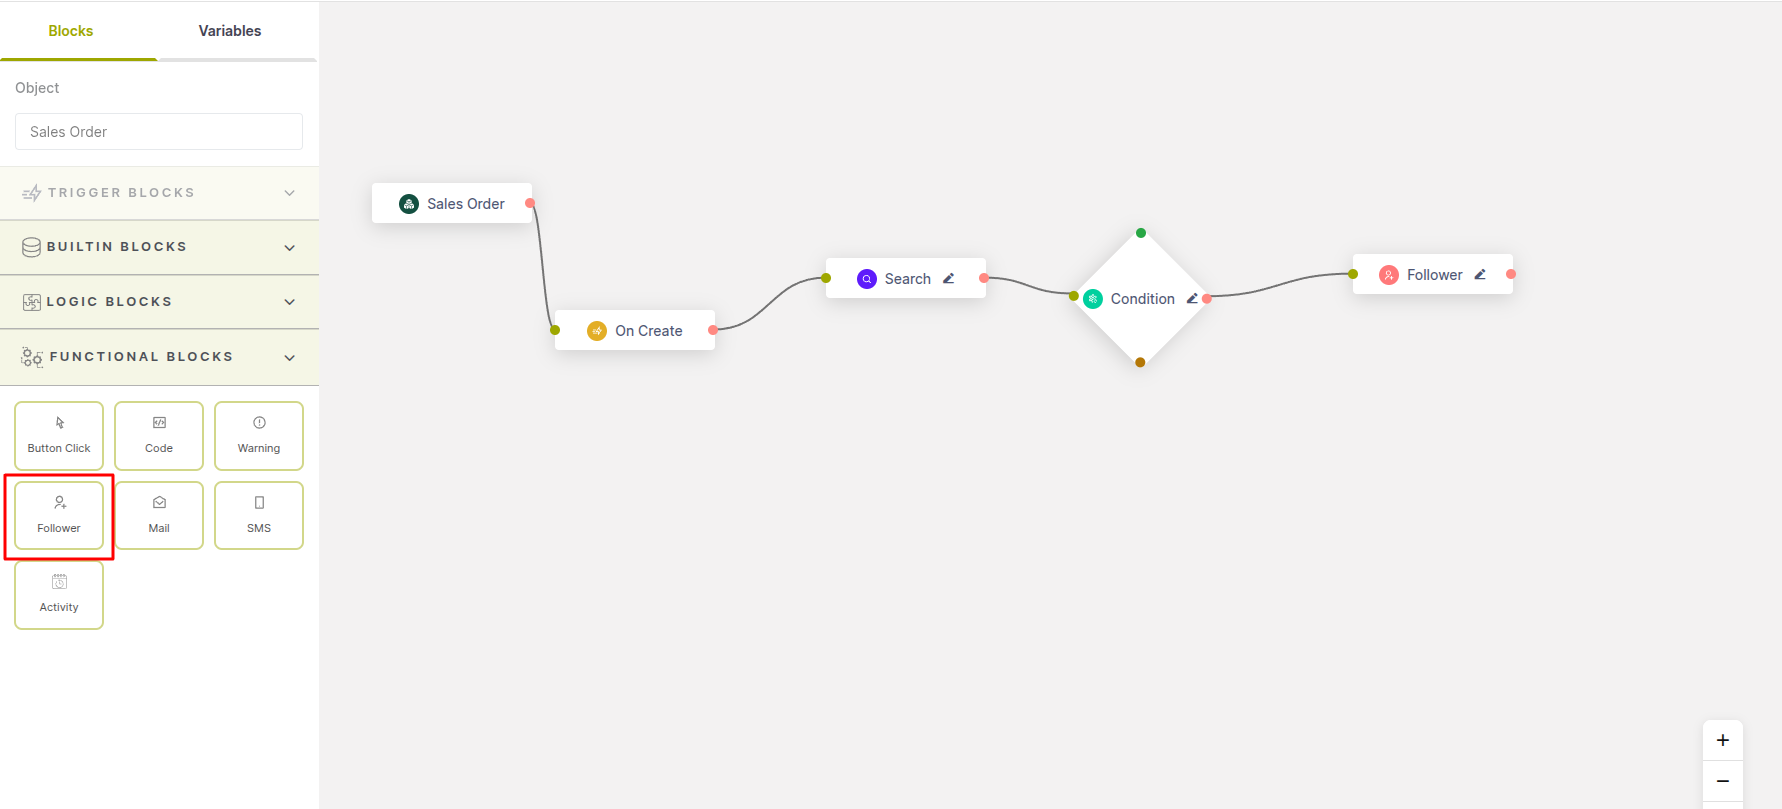
Fig 4.11 — Followers node in a workflow automation example, with connected nodes illustrating validation control that blocks progression until conditions are met
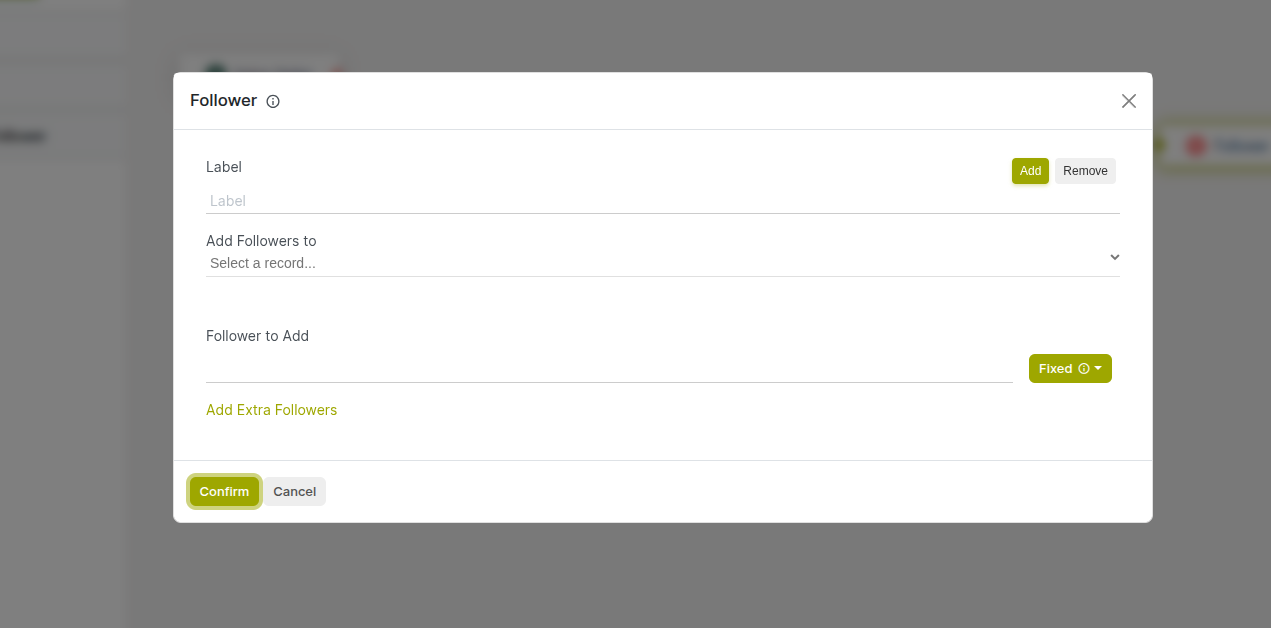
Fig 4.12 — Followers node panel showing Add/Remove action toggle, Target Record, and Followers selector
How to configure a Followers node:
- Add a Followers node and connect it in the flow.
- Click the node to open its configuration panel.
- Set the Action to Add (to subscribe followers) or Remove (to unsubscribe them).
- Select the Target Record — the record variable whose followers list should be updated.
- Select the Followers — the users or partner records to add or remove.
- Save the configuration.
Key Fields:
- Action: Add subscribes the selected followers to the record; Remove unsubscribes them.
- Target Record: The record whose follower list is being updated — must be a model that supports Cyllo's messaging thread.
- Followers: The users or contacts to add or remove as followers on the target record.
Note
Only records from models that support the Cyllo messaging thread (mail.thread) are available as the target record. If a variable is not shown in the target record list, verify that its model supports messaging.
4.7 Activity Node
The Activity node schedules a Cyllo activity on a record as part of the automation. Activities appear in the user's activity view and on the record itself, serving as actionable reminders or task prompts — such as a follow-up call to schedule, a document to review, or a meeting to book. The node lets you define the activity type, assign it to a user, set a deadline, and add a summary.
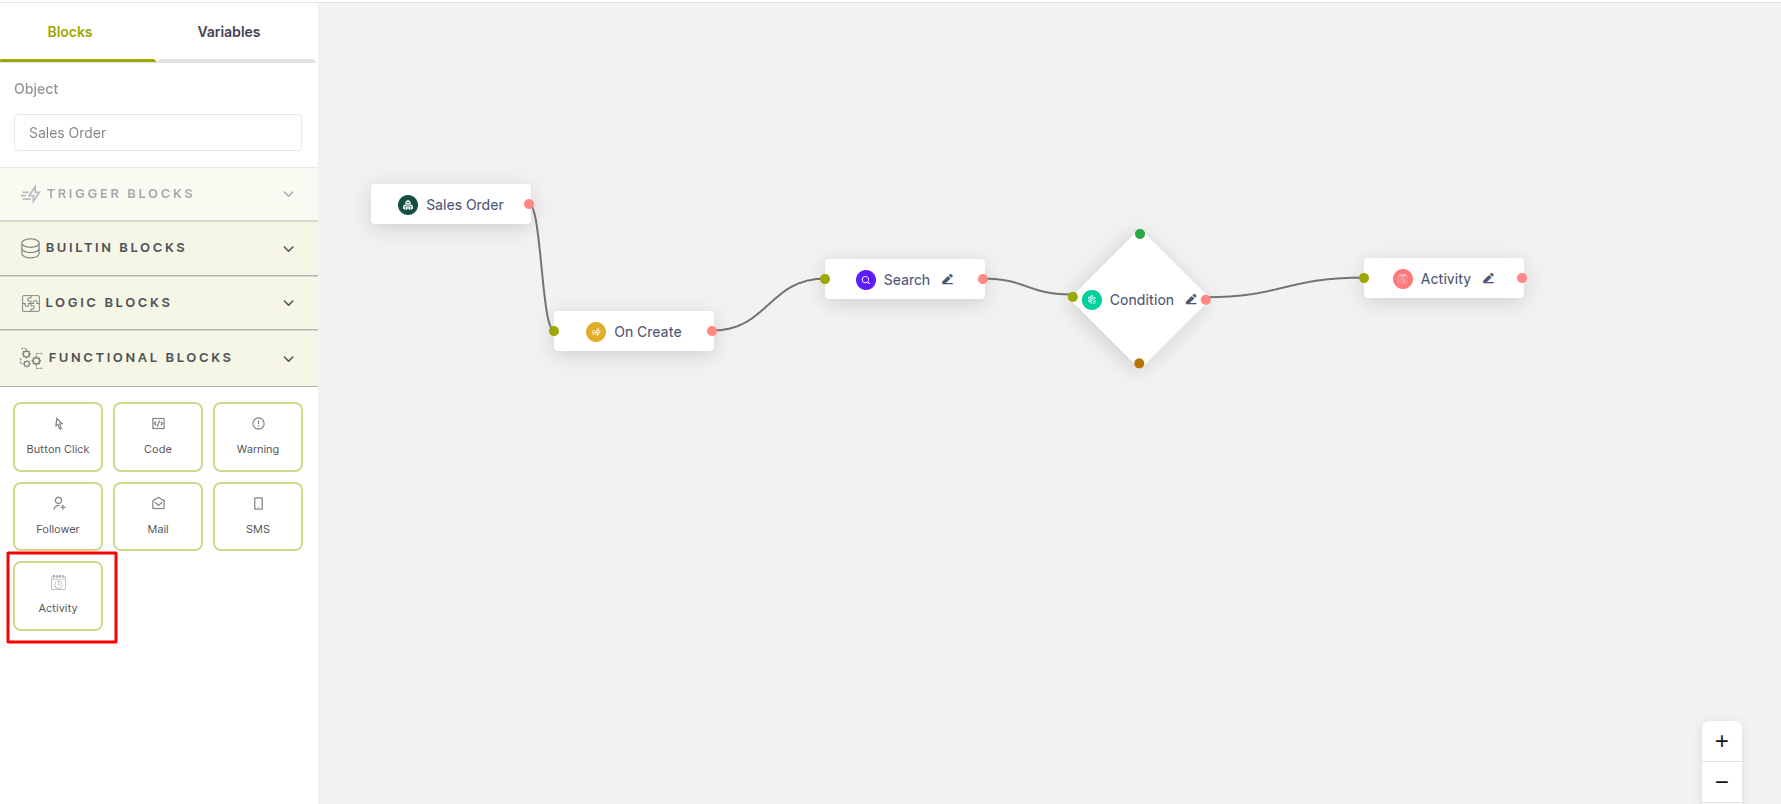
Fig 4.13 — Activity node in a workflow automation example, with connected nodes illustrating validation control that blocks progression until conditions are met
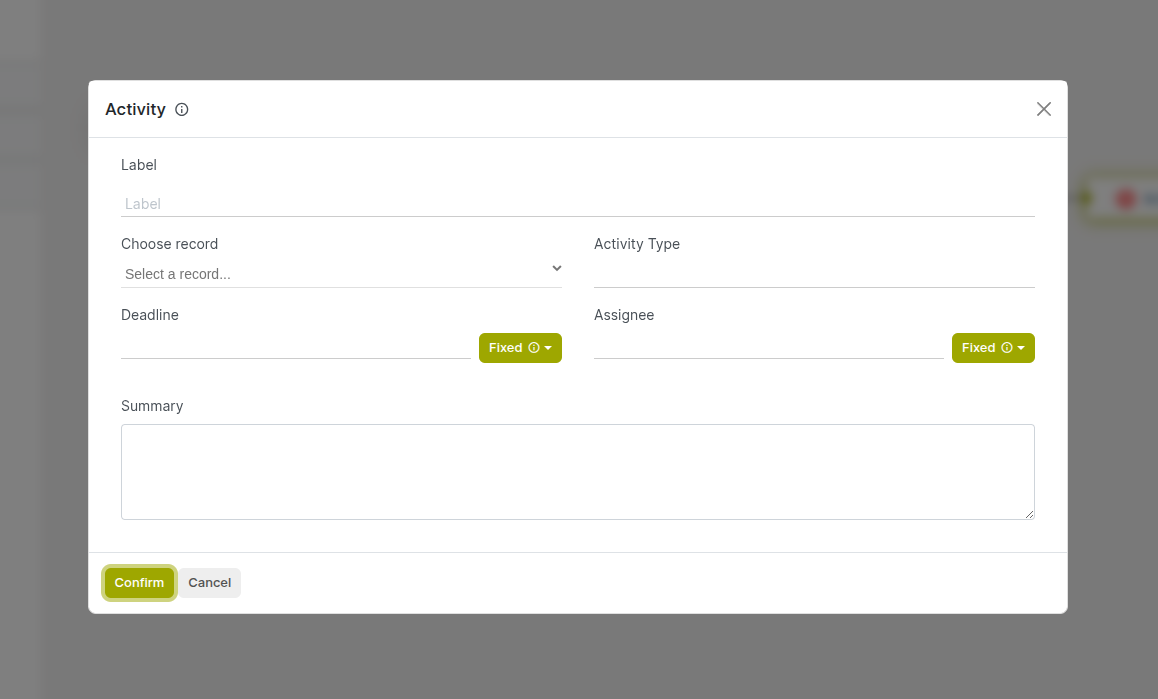
Fig 4.14 — Activity node configuration panel with Activity Type, Assignee, Deadline, and Summary fields
How to configure an Activity node:
- Add an Activity node and connect it in the flow.
- Click the node to open its configuration panel.
- Select the Target Record — the variable holding the record on which the activity should be scheduled.
- Select the Activity Type — the type of activity to create (e.g., Email, Phone Call, Meeting, To-Do).
- Set the Assignee — the Cyllo user responsible for completing the activity.
- Set the Deadline — a fixed date or a calculated date expression.
- Enter the Summary — a short description of the activity shown in the user's task view.
- Save the configuration.
Key Fields:
- Target Record: The record on which the activity is created — must be a model that supports Cyllo activities.
- Activity Type: The category of activity — controls the icon and default behaviour (e.g., Email, Call, Meeting).
- Assignee: The user to whom the activity is assigned — they will see it in their activity list.
- Deadline: The due date for the activity — can be a fixed date or derived from a field expression.
- Summary: A short description giving the assignee context about what action is needed.
Note
Activities created by this node are visible in the record's chatter as well as the assigned user's activity view under the main menu. If the deadline passes without the activity being completed, it will appear as overdue in red.
5. Common Use Cases
The following use cases demonstrate how to combine node types to solve the most frequently requested automation scenarios across Sales, Inventory, CRM, HR, and Accounting.
5.1 Send Welcome Email on Customer Creation
Automatically send a branded welcome email to every new customer contact the moment their record is created, ensuring consistent onboarding without any manual follow-up.
Canvas structure:
- Target Model: res.partner
- Trigger: On Create
- Condition: customer_rank > 0 (filters to customer contacts only)
- Send Mail: Welcome email template, recipient: record.email