

Cyllo Assets Management Documentation
Introduction
Cyllo Asset Management helps organisations efficiently manage, track, reserve, assign, and maintain company assets throughout their lifecycle. The module provides complete visibility into asset utilisation, ownership, reservations, assignments, depreciation, and operational status.
Asset Management enables businesses to monitor physical assets, prevent scheduling conflicts through reservation controls, manage employee or project allocations, and maintain accurate asset records. The module also supports depreciation tracking and reporting to help organisations maintain financial and operational control over their assets.
1. Asset Management
1.1 Assets
Assets represent physical resources owned or managed by the organisation, such as equipment, machinery, vehicles, tools, furniture, and other operational resources.
Each asset contains detailed information including identification details, purchase information, depreciation settings, warranty and insurance records, accounting configurations, and operational status.
How to Create an Asset
Go to Asset Management → Assets → New
- Enter the Asset Name
- Enter the Brand and Serial Number
- Select the Vendor and Purchase Date
- Enter the Original Value and Depreciatable Value
- Configure the Depreciation Method and Duration
- Select the Accounting Configuration:Fixed Asset Account, Depreciation Account, Expense Account, Asset Journal
- Enable Lease Asset if the asset can be leased
- Enable Rental Asset if the asset can be rented
- Configure Warranty and Insurance details if applicable
- Click Confirm to activate the asset and generate the depreciation schedule
- Or click Save to keep the asset in Draft status
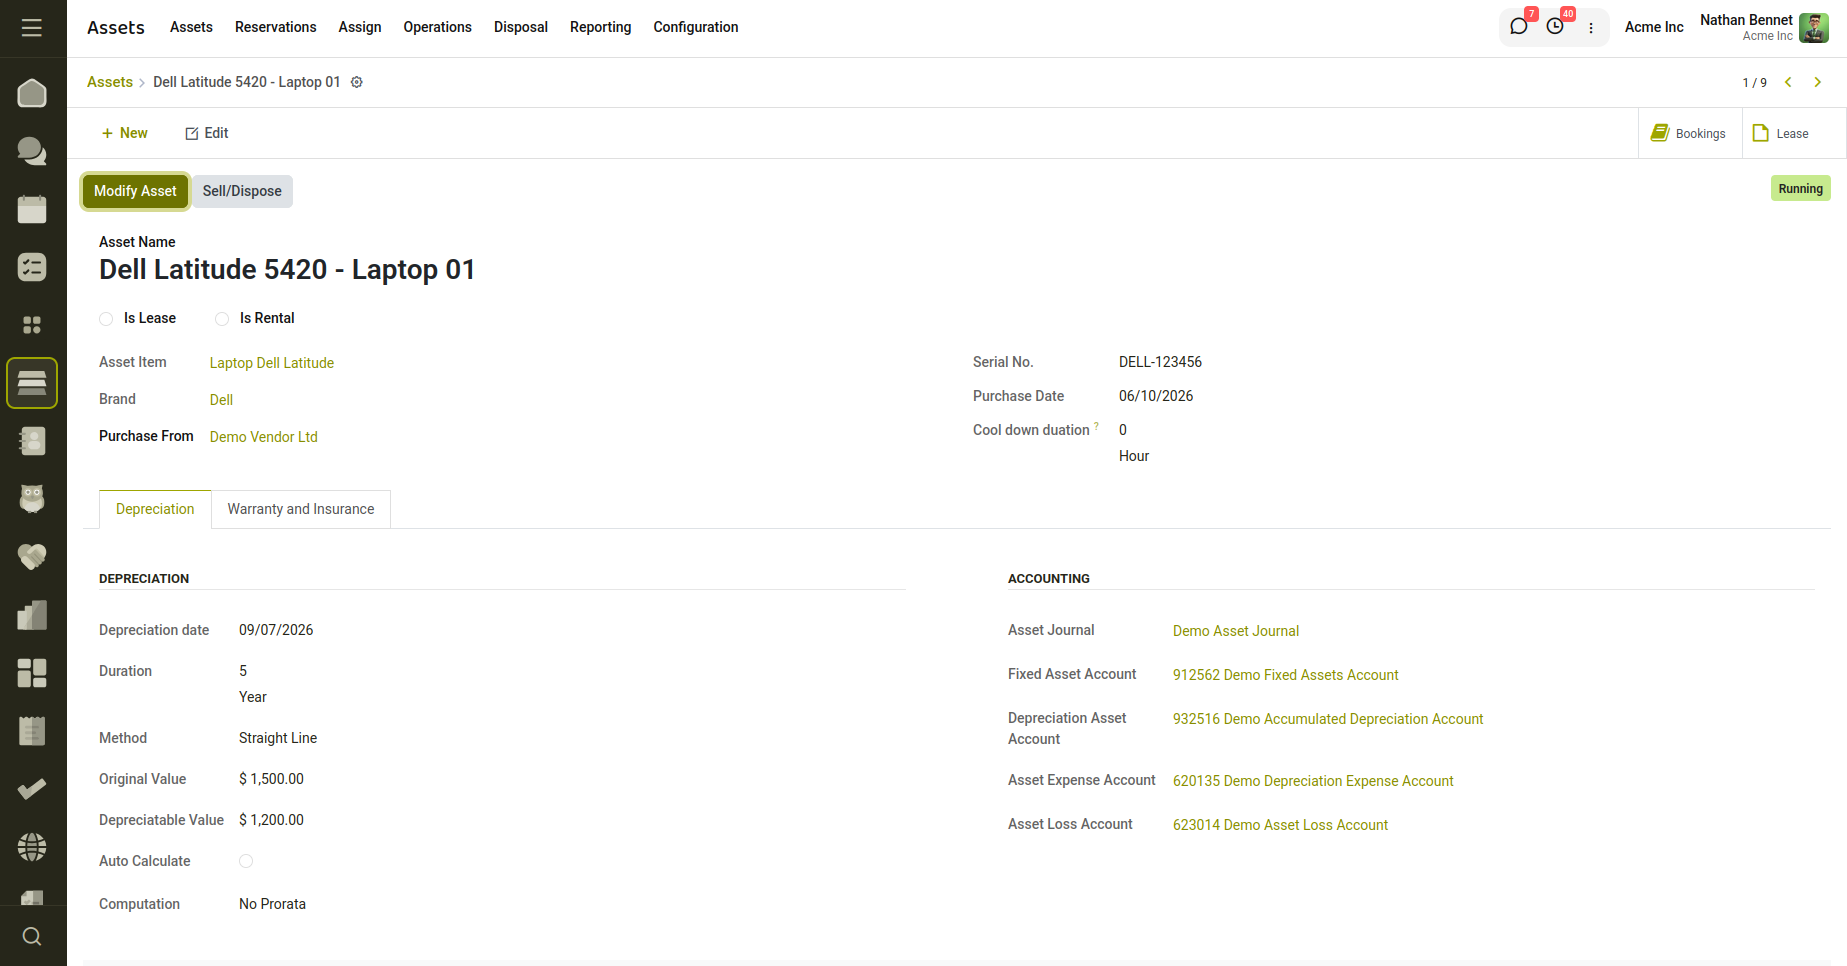
Fig 1.1 — Displays the Asset Form View screen.
Key Fields
- Asset: Name of the asset.
- Brand: Manufacturer or brand of the asset.
- Serial Number: Unique serial number used for identification.
- Purchase From: Vendor from whom the asset was purchased.
- Purchase Date: Date the asset was acquired.
- Original Value: Initial purchase value of the asset.
- Depreciatable Value: Value used for depreciation calculations.
- Status: Current lifecycle status of the asset.
- Lease Asset: Indicates whether the asset can be leased to customers.
- Rental Asset: Indicates whether the asset can be rented to customers.
- Warranty Included: Indicates whether the asset is covered under warranty.
- Warranty Expiry Date: Date until which the warranty remains valid.
- Insurance Type: Insurance policy associated with the asset.
- Depreciation Method: Method used to calculate asset depreciation.
- Duration: Number of periods over which depreciation is calculated.
- Rental: Add rental values per day.
1.2 Asset reservation
Asset Reservation allows users to reserve assets for employees during a specific period before assignment, leasing, or rental. Reservations help organisations plan asset usage, prevent scheduling conflicts, and ensure that assets are available when required.
During reservation, the system validates the selected date range and checks whether the asset is already reserved, assigned, leased, rented, or under maintenance during the requested period. Once confirmed, the asset status is updated to Reserved, and a reservation notification can be sent to the employee.
How to Create an Asset Reservation
Go to Asset Management → Reservation → New
- Select the Asset
- Select the Employee
- Enter the Start Date
- Enter the End Date
- Add reservation notes if required
- Review any availability warnings displayed by the system
- Click Reserve
- The asset status will be updated to Reserved
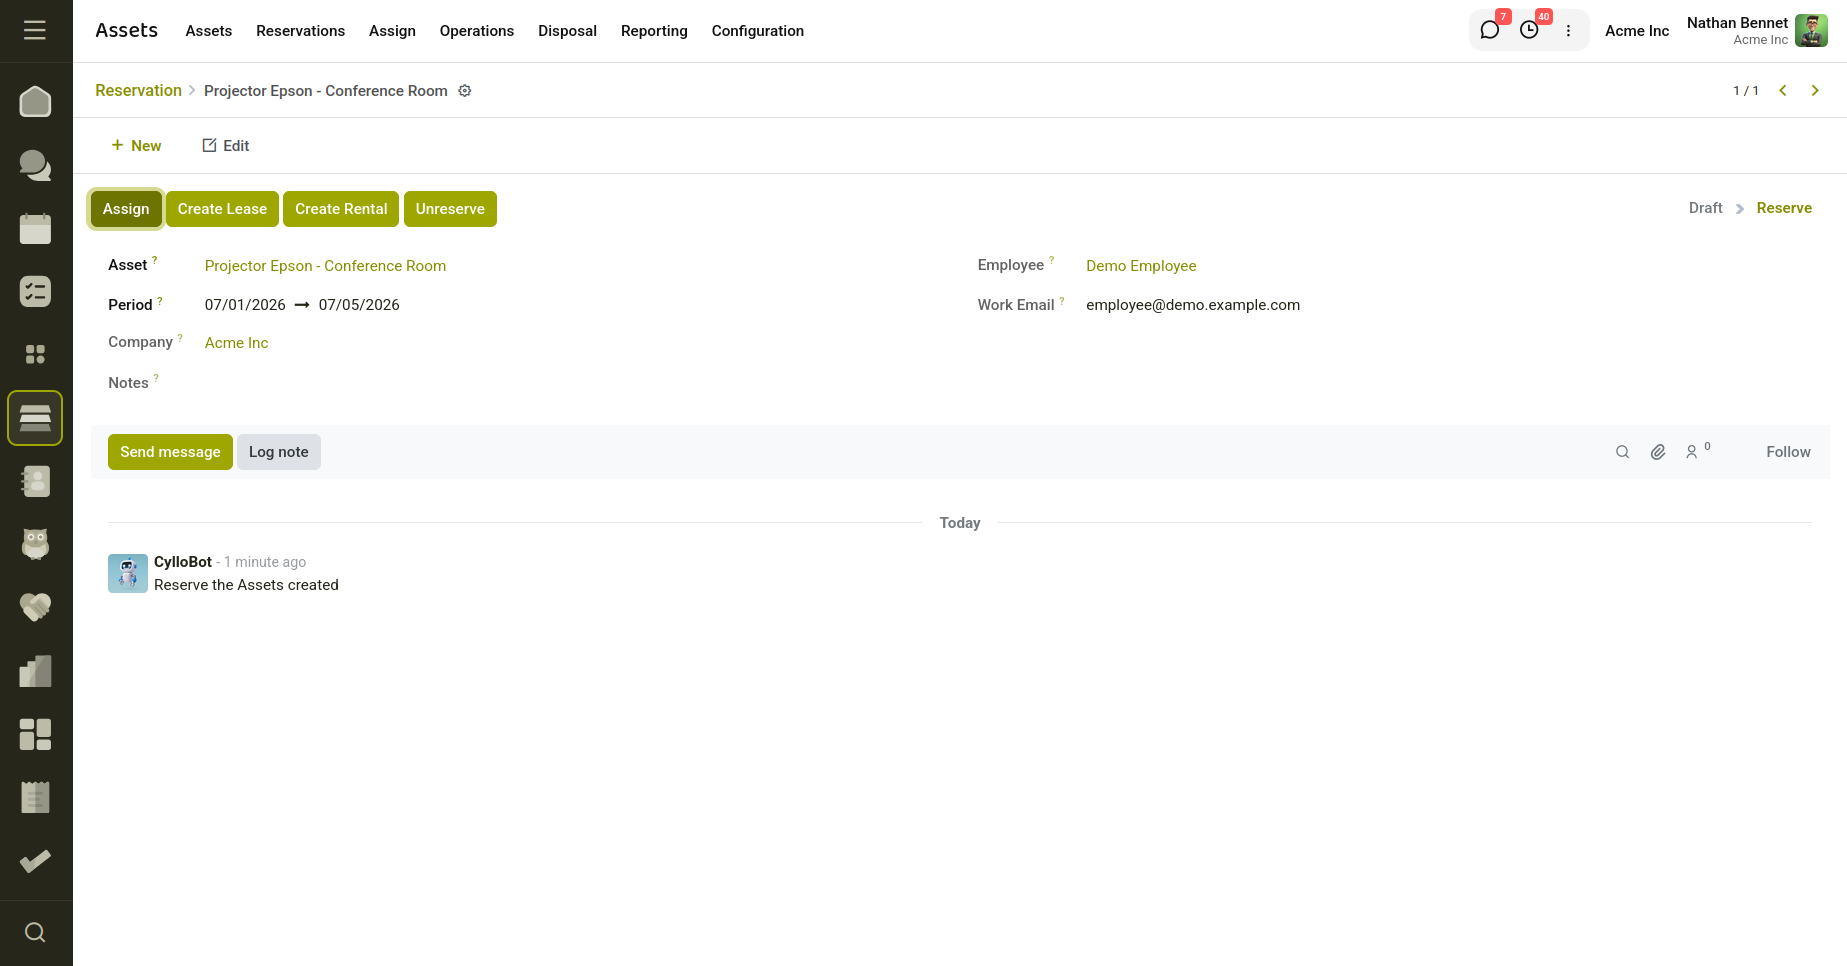
Fig 1.2 — Displays the reservation Form View.
Key Fields
- Asset: Asset being reserved.
- Employee: Employee for whom the asset is reserved.
- Start Date: Reservation start date.
- End Date: Reservation end date.
- Reservation Notes: Additional information related to the reservation.
- Status: Current reservation status.
- Availability Warning: Displays overlapping reservations, leases, or rentals for the selected period.
- Company: Company associated with the reservation.
Reservation Status
- Draft – Reservation is created but not yet confirmed.
- Reserve – Asset is successfully reserved for the selected period.
- Assign– Reserved asset has been assigned to an employee.
- Lease – Reserved asset has been converted into a lease.
- Rent – Reserved asset has been converted into a rental.
- Cancelled – Reservation has been cancelled.
Action Buttons
- Assign Asset Converts the reservation into an asset assignment for the selected employee.
- Lease Asset Create asset lease.
- Rental Asset Creates Rental for an Asset.
- Unreserve Cancels the reservation and restores the asset to its previous available state.
- Reset to Draft Moves the reservation back to Draft status.
1.3 Asset Assignment
Asset Assignment is used to allocate an asset to a specific employee for operational use. Assignments help organisations track asset ownership, maintain accountability, and ensure that assets are used by authorised personnel.
Assets can be assigned directly or through an existing reservation. During assignment, the system validates asset availability, checks for active maintenance requests, and verifies that the assignment date is valid. Once confirmed, the asset status changes to Assigned, and an assignment notification can be sent to the employee.
How to Create an Asset Assignment
- Go to Asset → Assigns → New
- Select the Asset
- Select the Employee
- Enter the Assignment Date
- Add assignment notes if required
- Click Assign
- The asset status will be updated to Assigned
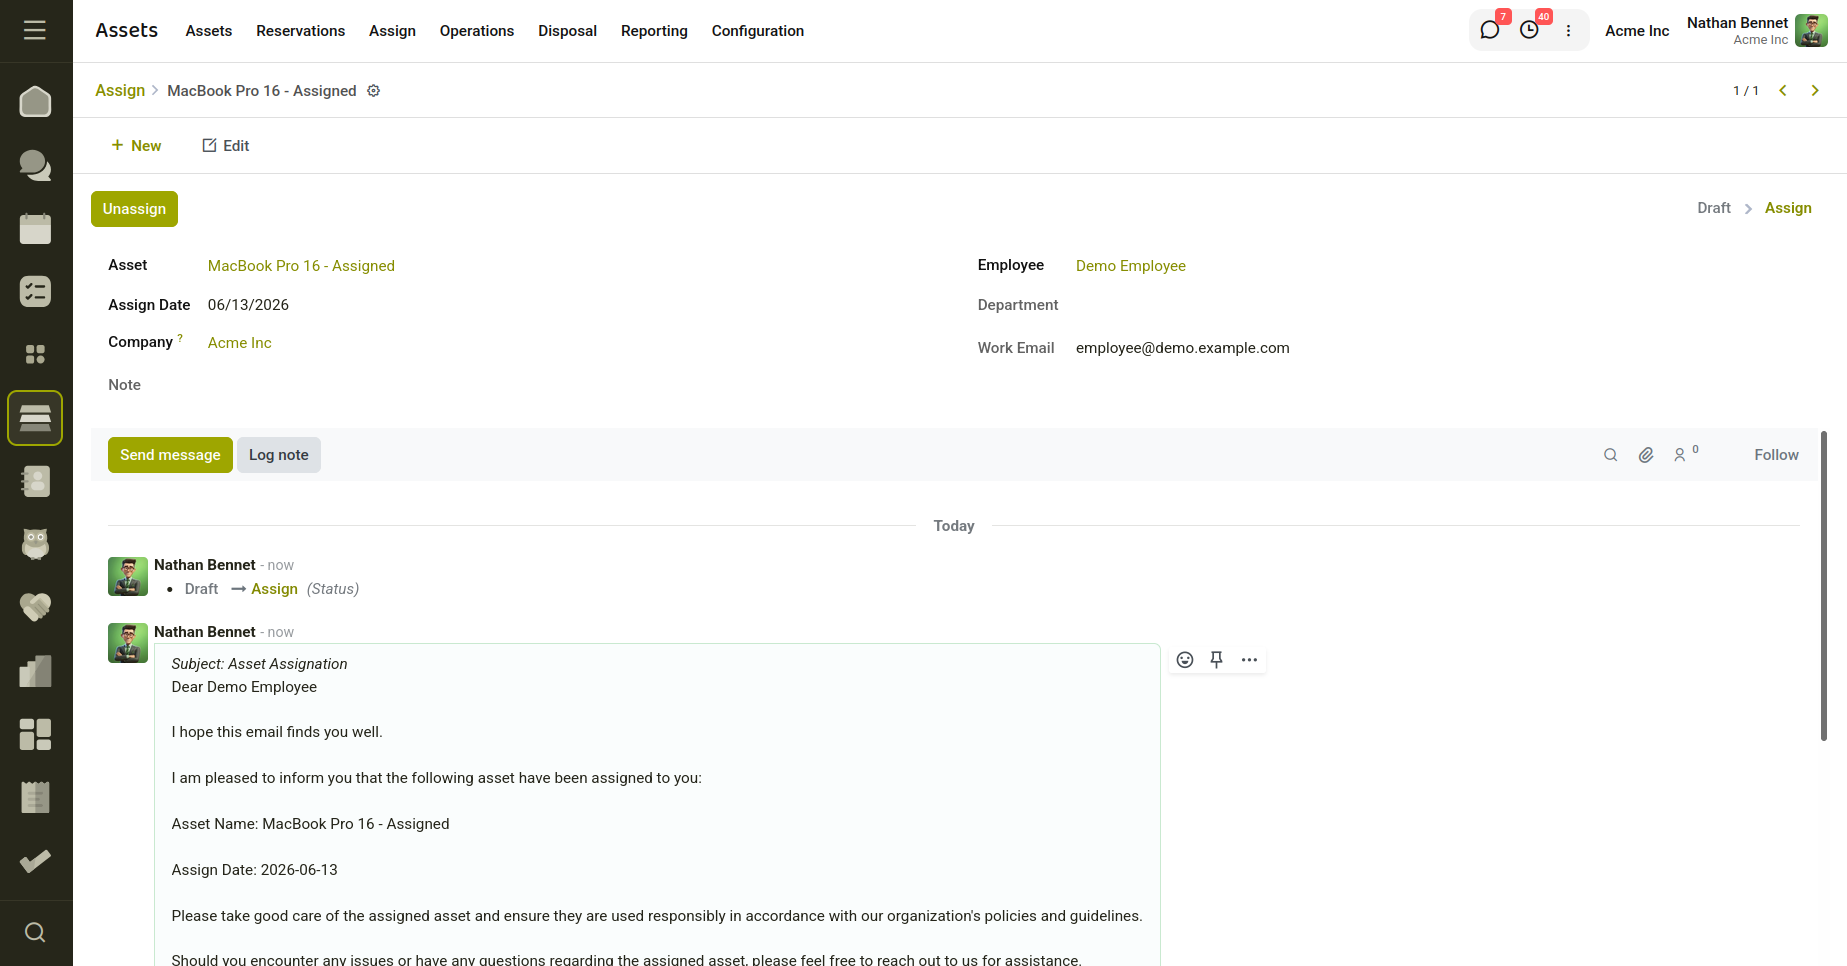
Fig 1.3 — Displays the Asset Assignment Form View.
Key Fields
- Asset: Asset being assigned.
- Employee: Employee receiving the asset.
- Department: Employee's department (automatically populated).
- Assignment Date: Date on which the asset is assigned.
- Assignment Note: Additional information regarding the assignment.
- Status: Current assignment status.
- Company: Company associated with the assignment.
Related Actions
- Assign Confirms the assignment and updates the asset status to Assigned.
- Unassign Removes the asset from the employee and restores the asset to the appropriate status based on existing reservations and asset conditions.
- Reset to Draft Moves the assignment back to Draft status.
2. Operations
2.1 Lease
Asset Leasing allows organisations to lease assets to customers for a specified period while maintaining complete visibility of asset availability and lease history. The leasing process helps track leased assets, manage lease periods, generate invoices, and monitor asset returns.Before a lease is confirmed, the system validates the selected date range and checks for overlapping reservations, leases, or rentals. Once the lease is created, the asset is marked as leased, a booking record is generated, and a customer invoice is automatically created.
How to Create an Asset Lease
Go to Asset Management → Operations → Lease →New
- Select the Asset
- Select the Customer
- Enter the Start Date
- Enter the End Date
- Enter the Lease Amount
- Review any availability warnings
- Click Create Lease
- The asset status will be updated to Leased
- An invoice will be generated automatically
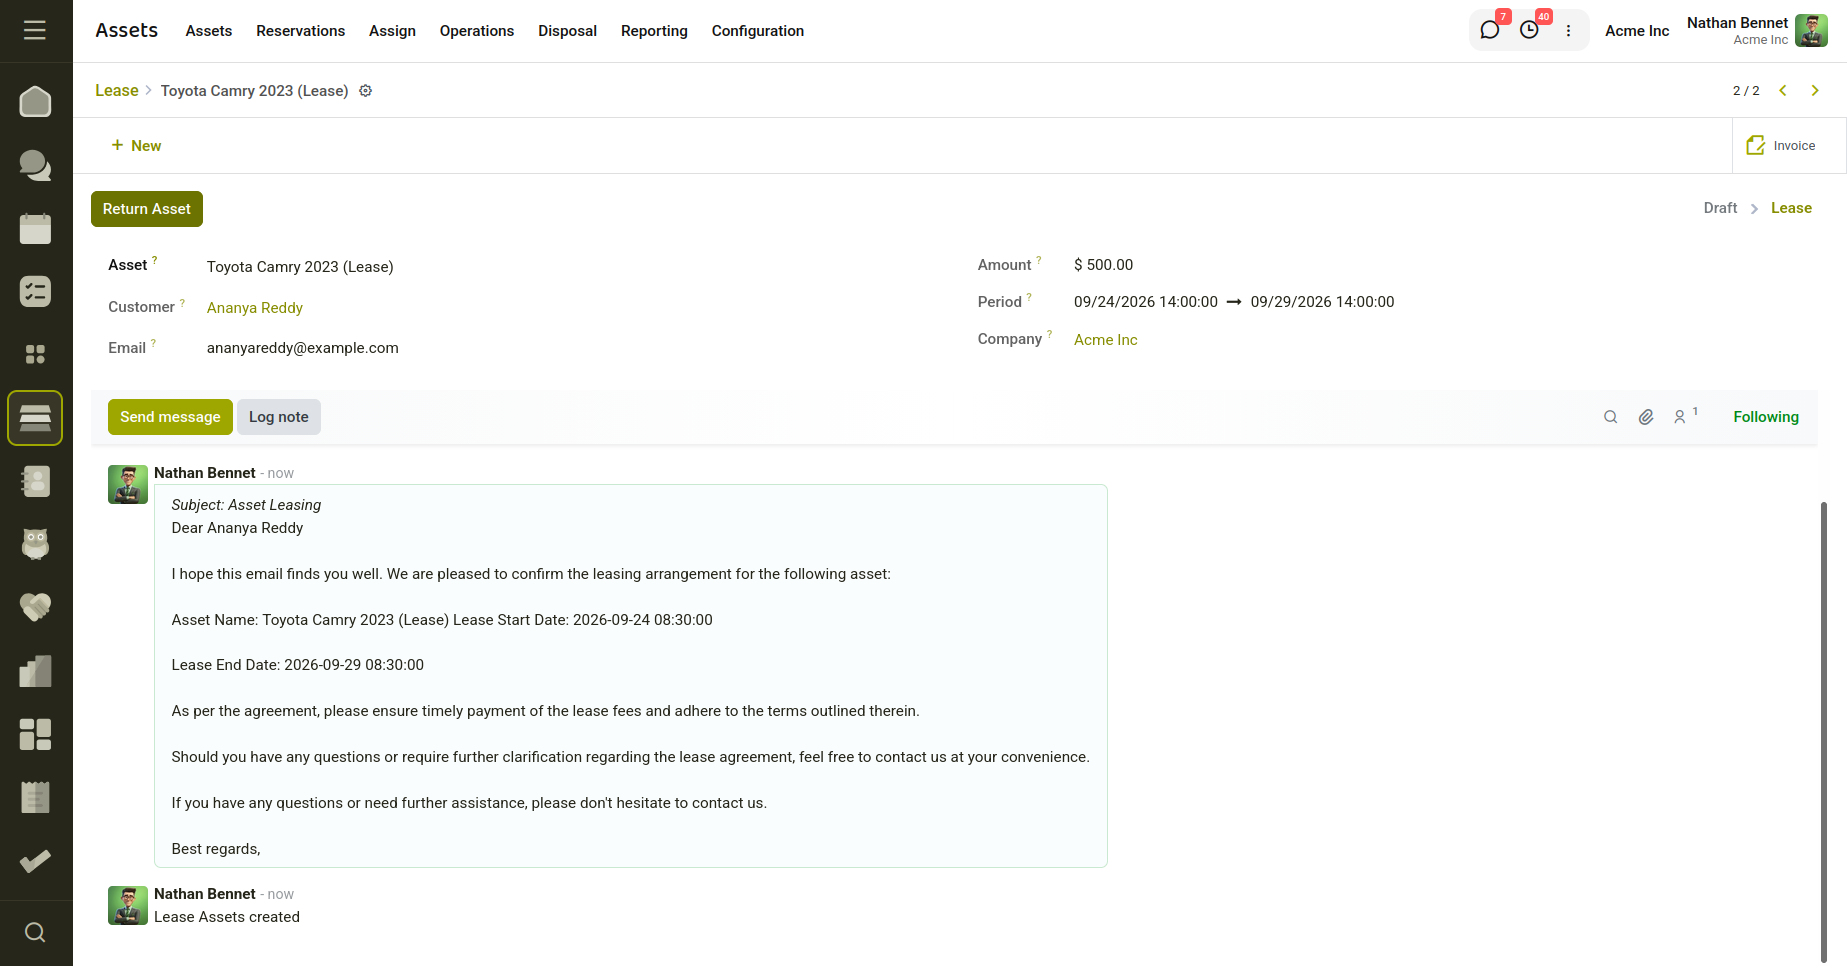
Fig 2.1 — Displays the Asset Lease Form View.
Key Fields
- Asset: Asset being leased.
- Customer: Customer leasing the asset.
- Start Date: Lease start date and time.
- End Date: Lease end date and time.
- Lease Amount: Amount charged for the lease.
- Status: Current lease status.
- Availability Warning: Displays overlapping reservations, leases, or rentals.
- Company: Company associated with the lease.
Related Actions
- Create Lease Confirms the lease, creates the booking record, updates the asset status, and generates a customer invoice.
- Return Asset Marks the asset as returned .
- Reset to Draft Moves the lease back to Draft status.
2.2 Rental
The Asset Rental feature allows organizations to rent assets to customers for a specific period and automatically manage availability, rental charges, invoices, bookings, and asset returns. It ensures that rented assets are not double-booked by validating overlaps with reservations, leases, and other rentals. The system supports multiple billing frequencies such as daily, weekly, monthly, and yearly rentals and can generate invoices automatically based on the selected payment method.
How to Create an Asset Rental
Go to Asset Management → Rentals → New
Select the Asset
Select the Customer
Enter the Rental Start Date and End Date
Choose the Payment Terms (Daily, Weekly, Monthly, or Yearly)
Select the Payment Type (Based on Payment Terms or Based on Usage)
Review any Availability Warnings displayed for overlapping reservations, leases, or rentals
Click Create Rental to confirm the rental
The system automatically:
- Creates a booking record
- Generates rental invoices based on the selected payment terms
- Sends a rental confirmation email to the customer
- Updates the asset status to Rented
Use View Invoices to review the generated invoices
Click Return Asset when the asset is returned by the customer
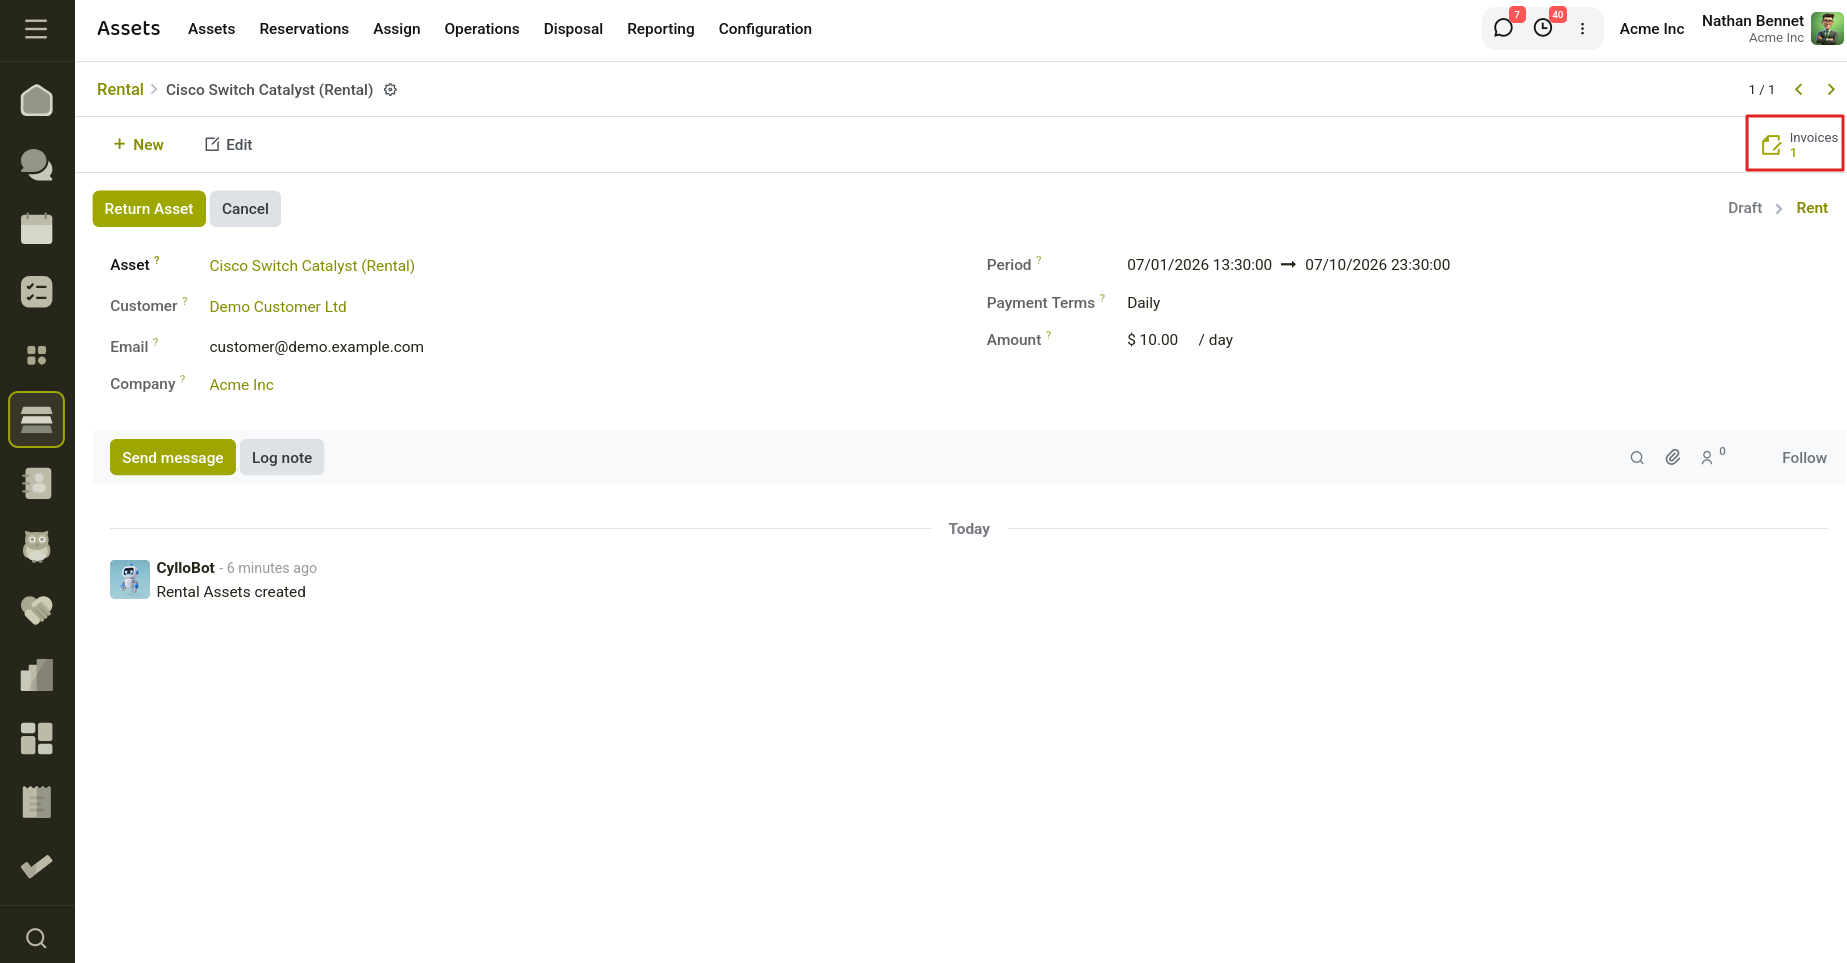
Fig 2.2 — Displays the Asset Rentals Form View.
Key Fields
- Asset – Asset being rented
- Customer – Customer renting the asset
- Start Date – Rental start date and time
- End Date – Rental end date and time
- Payment Terms – Daily, Weekly, Monthly, or Yearly billing frequency
- Payment Type – Billing based on usage or payment terms
- Rent Amount – Rental charge calculated from the selected payment terms
- Status – Draft, Rent, Return, or Cancel
- Availability Warning – Displays scheduling conflicts with existing reservations, leases, or rentals
2.3 Maintenance and Repair
The Maintenance & Repair feature allows users to schedule maintenance activities, manage repair operations, track repair expenses, process warranty and insurance claims, generate repair bills, and monitor maintenance progress. It ensures proper asset upkeep while maintaining complete financial and operational records.
How to Create a Maintenance / Repair Request
- Go to Assets → Operations →Maintenance & Repair.
- Click New.
- Select the Asset that requires maintenance or repair.
- Choose the Maintenance Type (Preventive or Corrective).
- Enter the Schedule Date and Duration.
- Select the Repair Partner
- Enter the Expense amount.
- Save the record.
- The system automatically creates an Asset Booking for the scheduled maintenance period.
- Move the request through the maintenance stages as work progresses.
- When maintenance is completed, move the stage to repaired.
- Create Bill by clicking on Create Bill.
- The asset status and booking record are automatically updated.
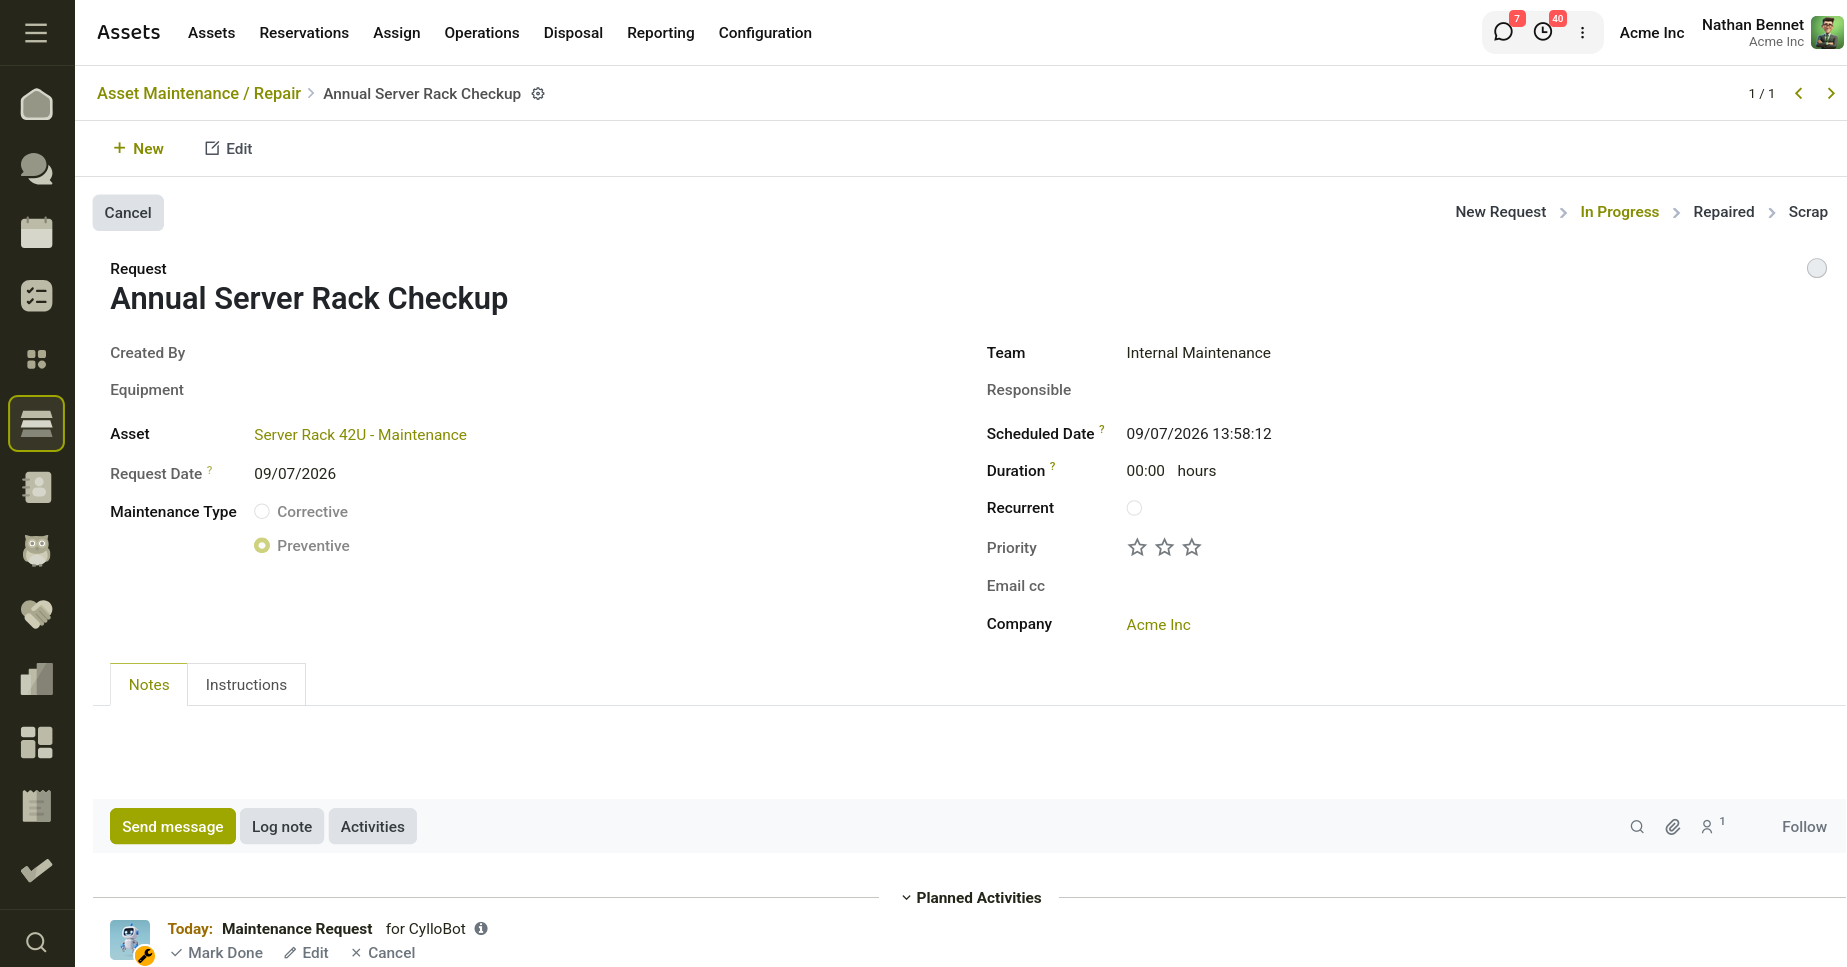
Fig 2.2 — Displays the Asset Maintenance Form.
Optional Actions
Claim Insurance
- Open the maintenance request.
- Ensure the asset has active insurance coverage.
- After Bill Creation Click Claim Insurance.
- Enter the claim details.
- Create the insurance invoice.
Scrap an Asset
- Open the maintenance request.
- Click Scrap Asset.
- The asset is marked as disposed and removed from active use.
3. Disposal
The Asset Sell & Dispose feature allows users to sell, dispose, scrap, or mark assets as lost. The system automatically updates asset statuses, calculates depreciation up to the disposal date, and generates the necessary accounting entries for asset sale or disposal. This ensures accurate asset tracking and financial reporting throughout the asset lifecycle.
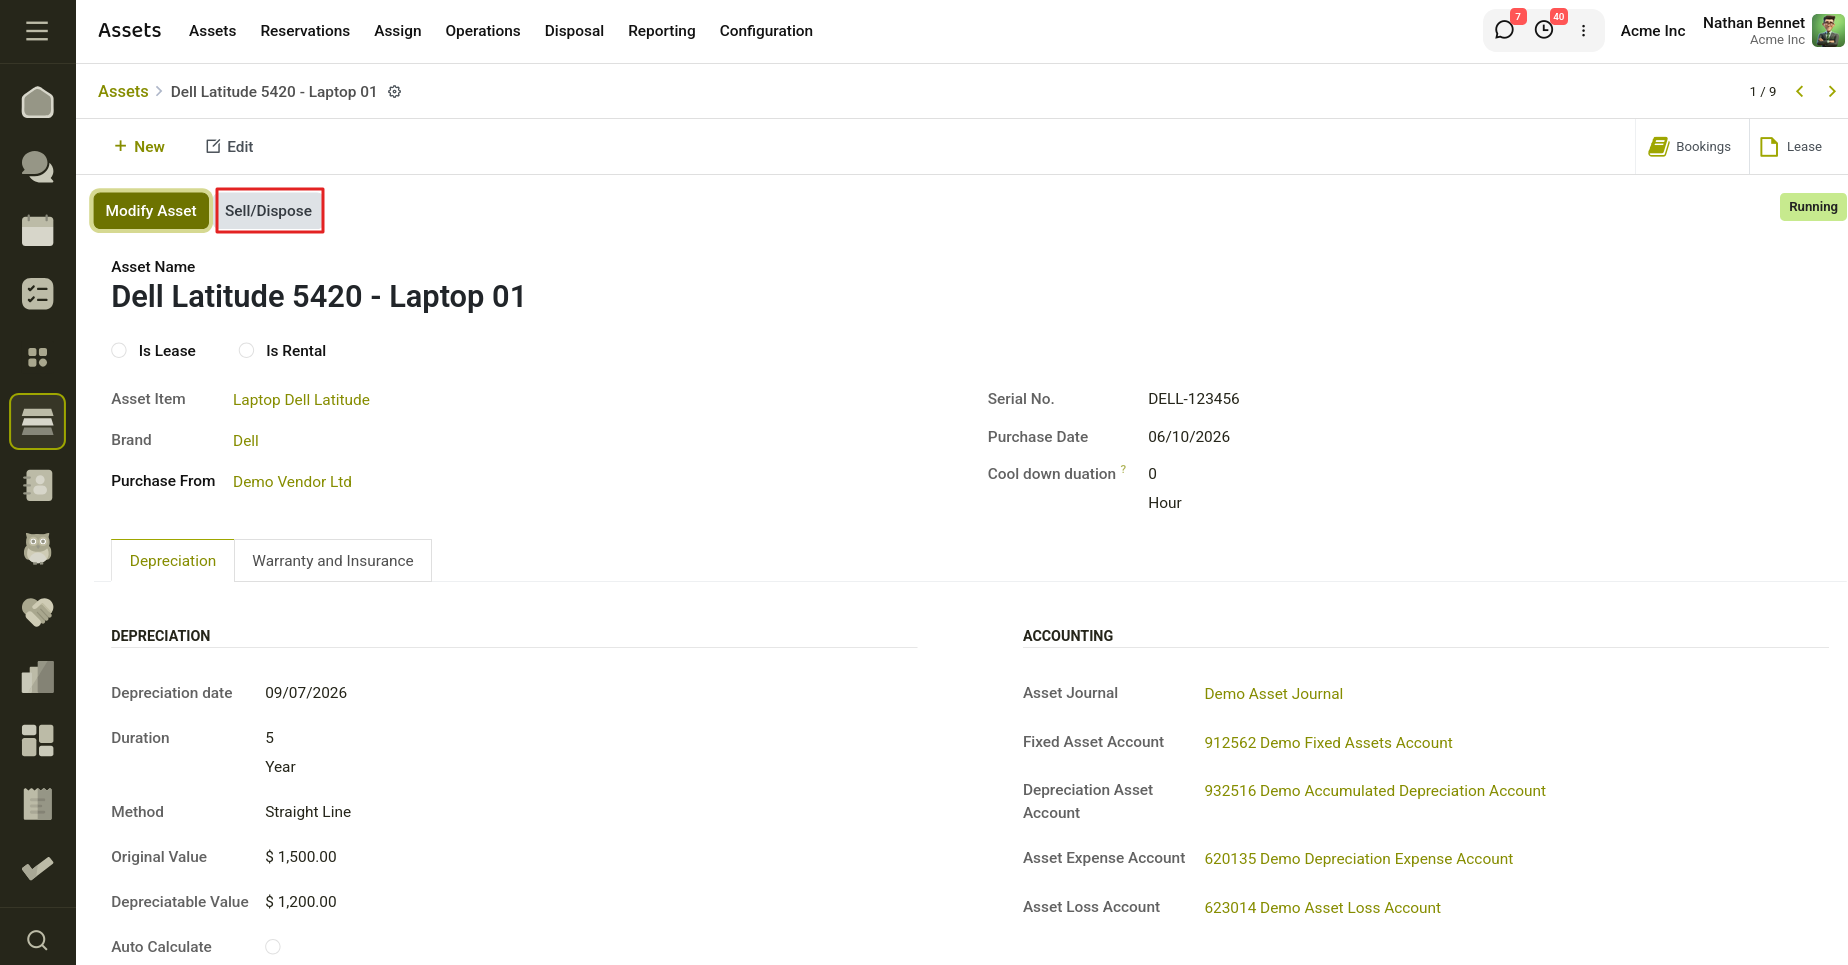
Fig 3.1 — Displays the Asset with Sell/Dispose Button.
3.1 Sell
How to Sell an Asset
- Go to Assets and open the required asset.
- Click the Sell / Dispose button.
- Select Sell as the action.
- Select Gain account
- Select the related Customer Invoice.
- Select the appropriate Invoice Line.
- Enter the Date of the sale.
- Add a Note if required.
- Click Sell.
- The asset status is updated to Sold.
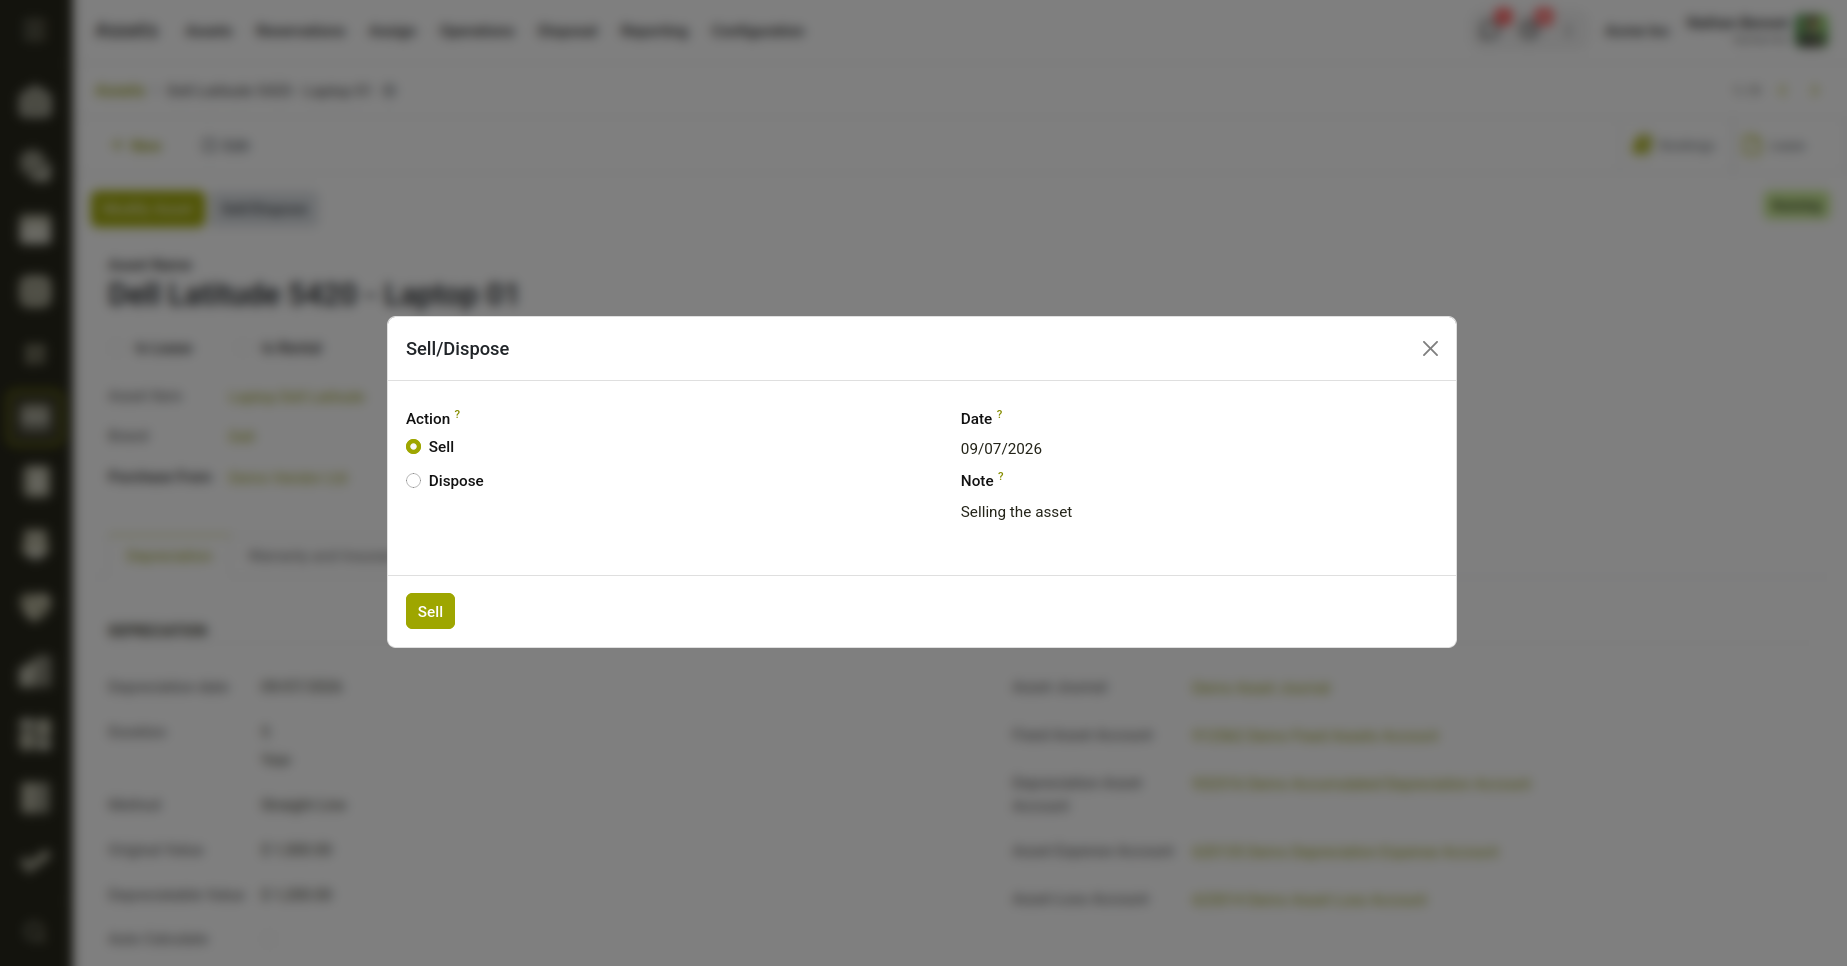
Fig 3.2 — Displays the wizard for selling the asset
Key Fields
- Asset – Asset selected for sale.
- Customer Invoice – Customer invoice related to the asset sale.
- Invoice Lines – Invoice lines used to determine the sale value.
- Date – Date on which the asset is sold.
- Note – Additional remarks regarding the sale.
- Company – Company associated with the asset sale.
3.2 Dispose
How to Dispose an Asset
- Go to Assets and open the required asset.
- Click the Sell / Dispose button.
- Select Dispose as the action.
- Select the Loss Account.
- Choose the Disposal Type:
- Dispose
- Lost
- Scrap
- Enter the Date of disposal.
- Add a Note if required.
- Click Dispose.
- The asset status is updated to Dispose.
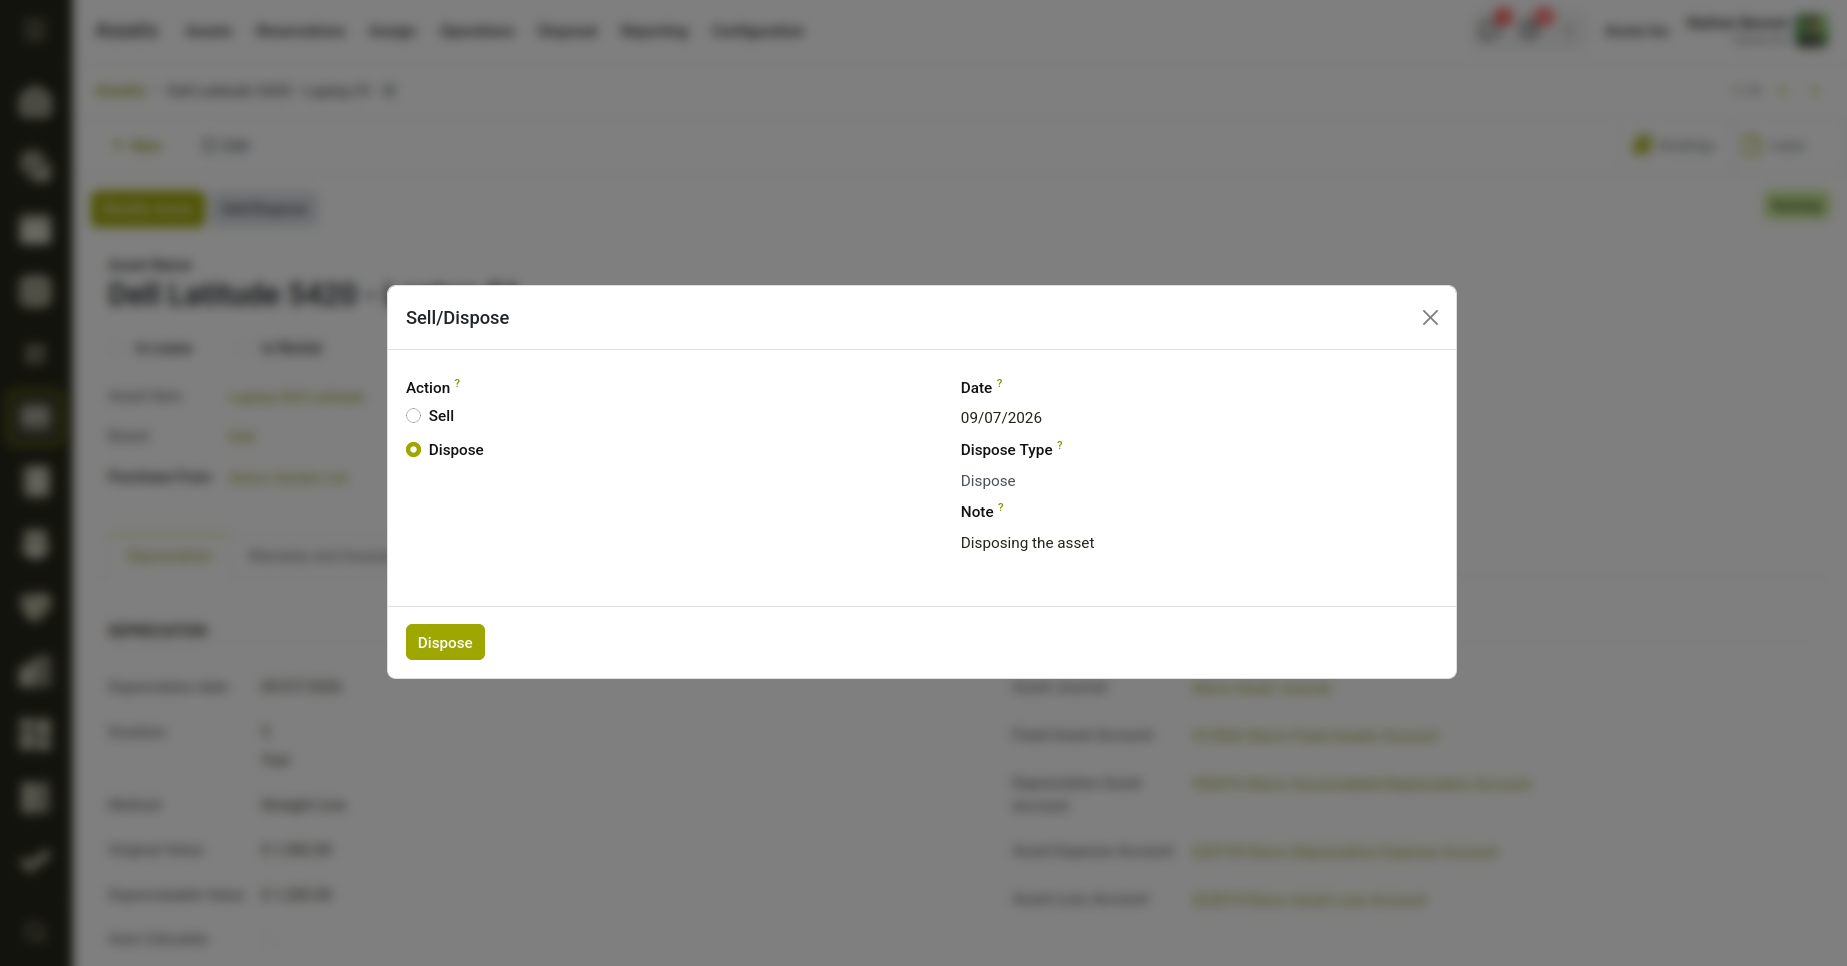
Fig 3.3 — Displays the wizard for Disposing the asset
Key Fields
- Asset – Asset selected for disposal.
- Loss Account – Account used to record disposal losses.
- Date – Date of the disposal transaction.
- Note – Additional remarks regarding the disposal.
- Company – Company associated with the disposal.
4. Reporting
4.1 Asset Operations
The Asset Activity Analysis report provides a graphical summary of asset operations, including Leasing, Rental, and Maintenance activities. It helps users monitor asset utilization and identify assets with the highest operational activity. The report can be accessed from Assets → Reporting → Asset Operations, where users can search, filter, group, and analyze asset records. The stacked bar chart displays the count of lease, rental, and maintenance operations for each asset, while the line graph shows the total number of activities, making it easier to track asset performance and usage trends.
How to Access
- Go to Assets → Reporting → Asset Operations.
- The system opens the Asset Activity Analysis dashboard.
- Use the search bar, filters, and grouping options to analyze asset activities based on your requirements.
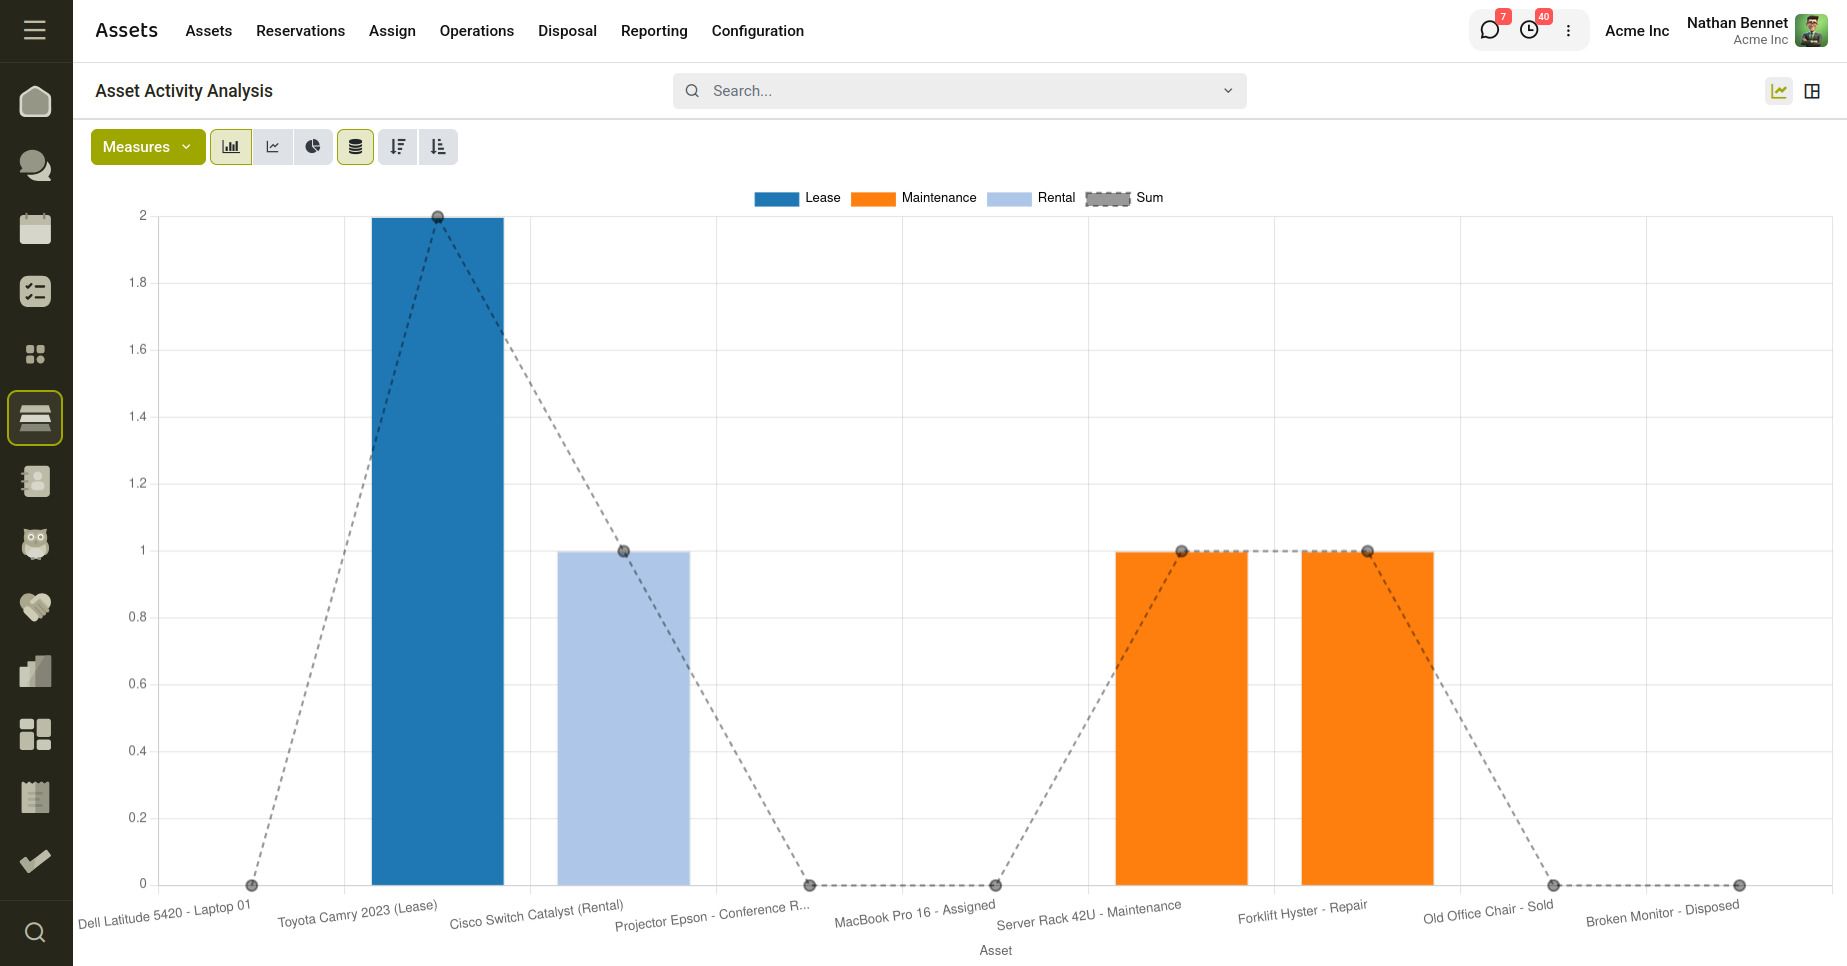
Fig 4.1 — Asset Activity Analysis Report.
5. Configuration
5.1 Asset Items
The Asset Item configuration is used to define asset templates and depreciation settings that will be applied when creating assets. It stores accounting information, depreciation methods, journals, and accounts required for asset management and depreciation calculations.
How to Create an Asset Item
- Navigate to Assets → Configuration → Asset Items.
- Click New.
- Enter the asset item details such as name, depreciation method, duration, accounts, and journal.
- Configure the required accounting and depreciation settings.
- Click Save. Once created, the asset item can be selected while creating asset records, allowing the system to automatically apply the configured depreciation and accounting settings.
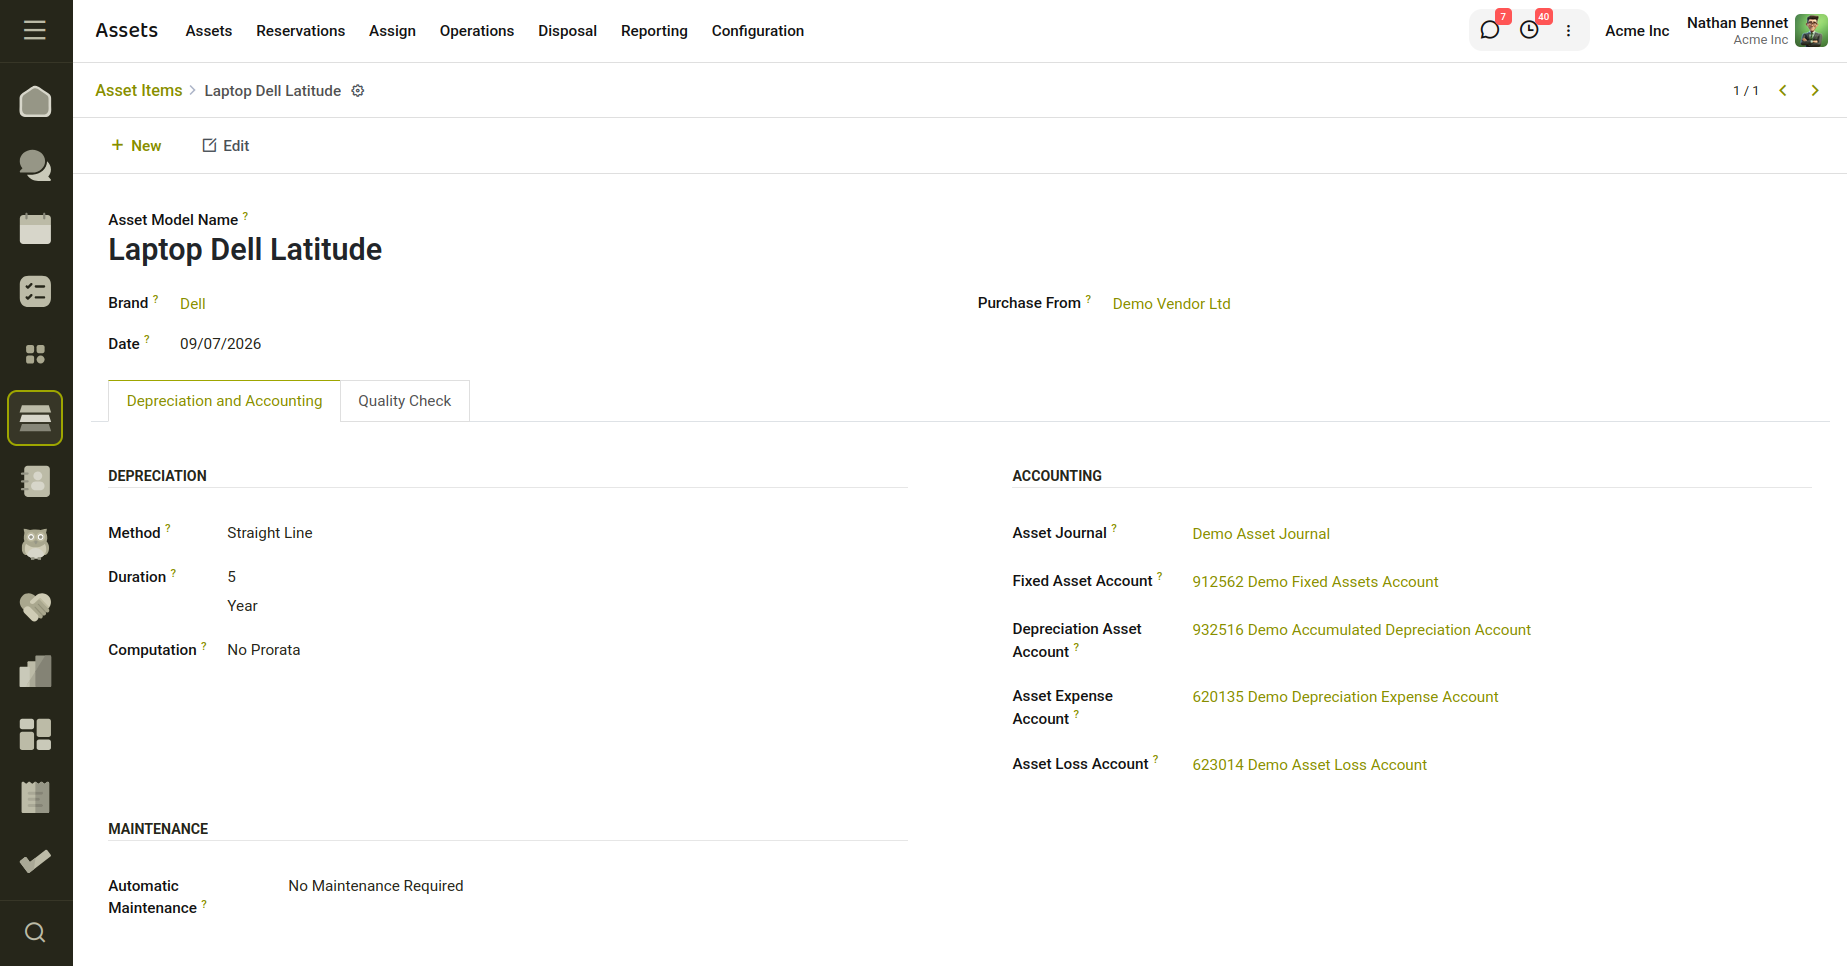
Fig 5.1 — Displays the Asset Item View Form.
Key Fields
- Assets – Name of the asset item/template.
- Brand – Brand associated with the asset.
- Purchase Date – Date of asset acquisition.
- Purchase From – Vendor from whom the asset was purchased.
- Depreciation Method – Method used to calculate depreciation (Straight Line, Declining Balance, Double Declining Balance, etc.).
- Duration – Number of depreciation periods.
- Duration Period – Depreciation period unit (Month or Year).
- Computation Method – Method used for depreciation calculation (No Prorata, Constant Period, or Daily Computation).
- Fixed Asset Account – Account used to record the asset value.
- Depreciation Asset Account – Account used to track accumulated depreciation.
- Expense Account – Account used for depreciation expenses.
- Loss Account – Account used for asset disposal or loss entries.
- Journal – Journal used for depreciation and asset accounting entries.
5.2 Insurance
The Asset Insurance configuration is used to define insurance providers and insurance types for assets. It helps track insured assets, manage insurance claims, and monitor invoices related to insurance-covered repairs and asset claims.
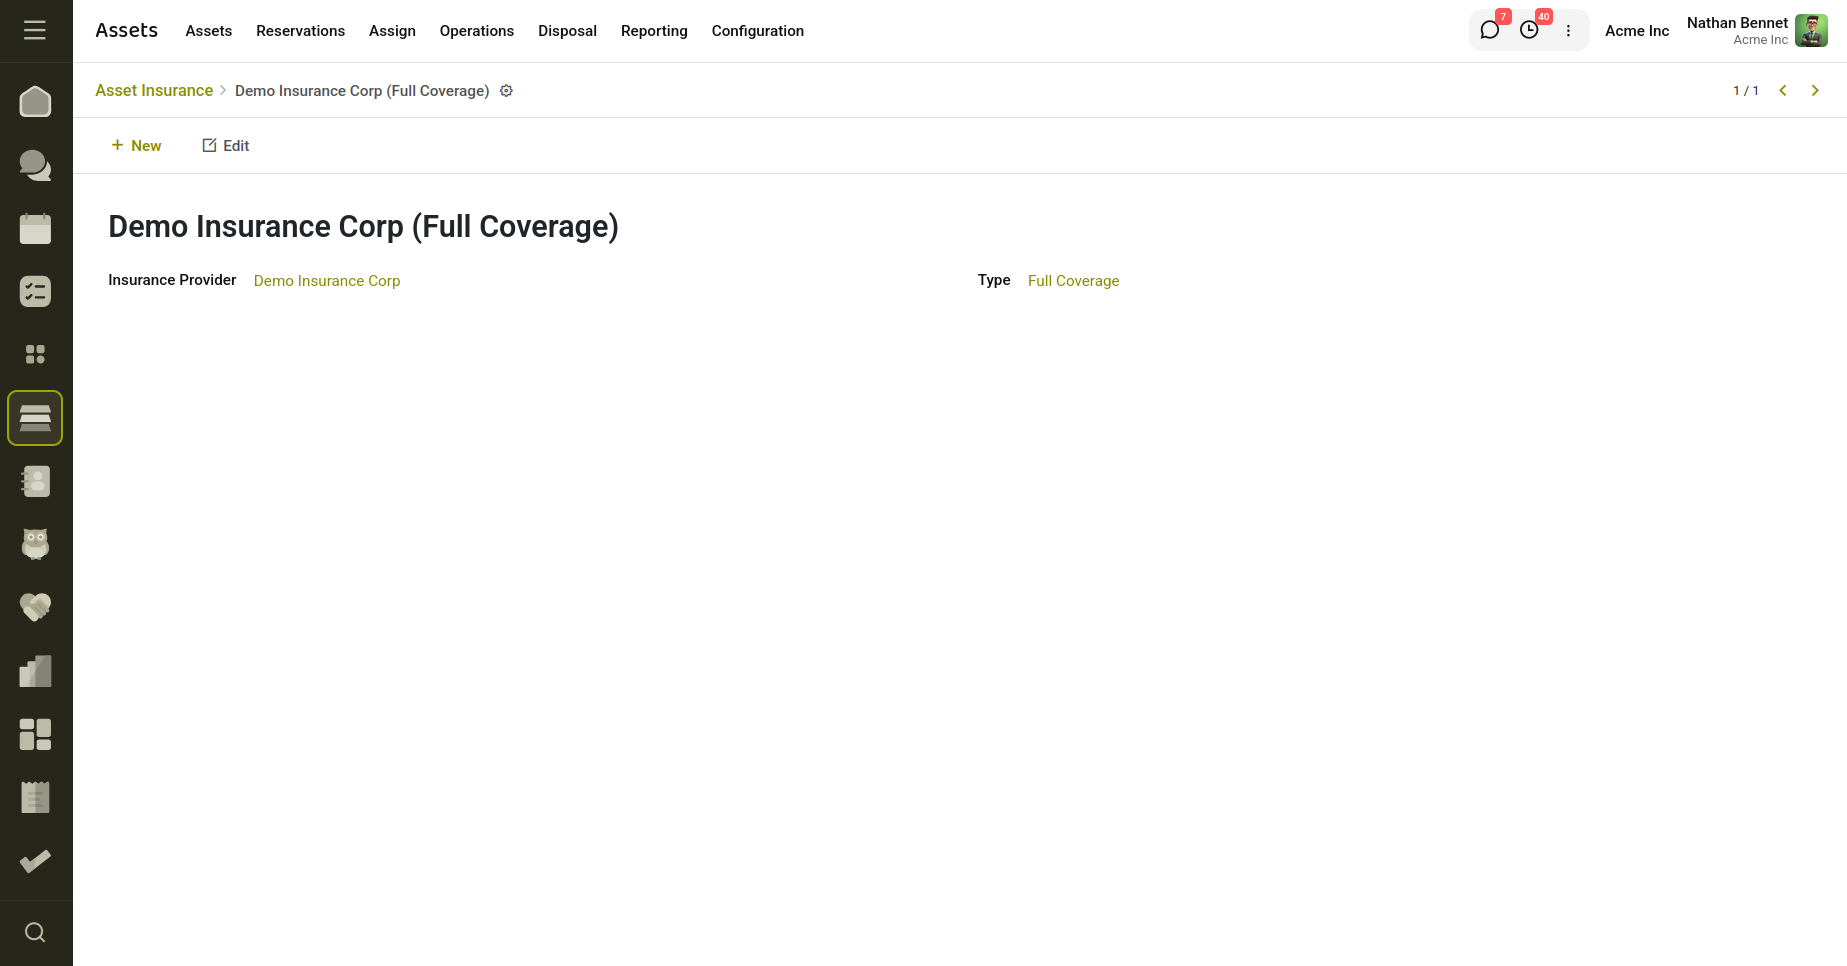
Fig 5.2 — Insurance Provider Creation.
How to Create an Insurance
- Navigate to Assets → Configuration → Insurance.
- Click New.
- Select the Insurance Provider.
- Select the Insurance Type.
- Click Save.
After saving, the insurance record can be linked to assets, allowing insurance information and claims to be tracked from the asset record.
Key Fields
- Insurance Provider – Insurance company or provider associated with the policy.
- Type – Insurance category or policy type.
- Name – Automatically generated from the selected provider and insurance type.
- Assets Count – Number of assets linked to the insurance provider.
- Invoice Count – Number of insurance-related claim invoices associated with the insured assets.
- Company – Company associated with the insurance record.
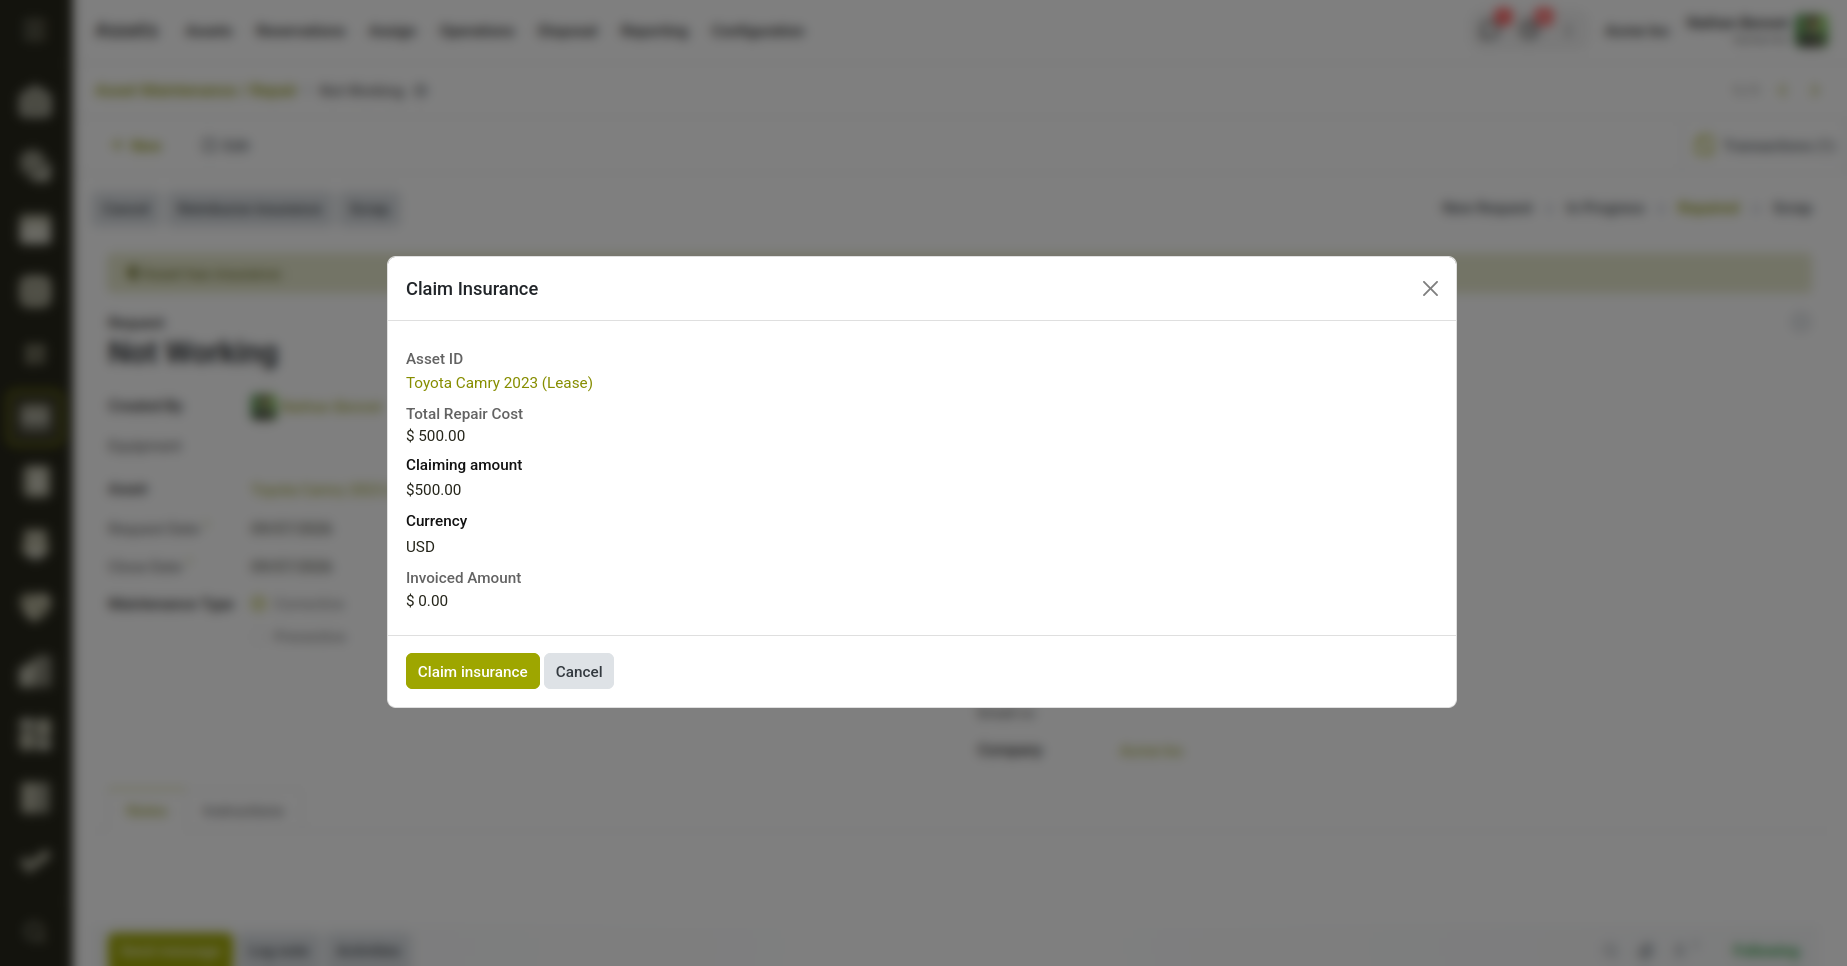
Fig 5.3 — Claim Insurance
When an asset under insurance requires repair, create a Maintenance/Repair request and enter the repair expense. Once the repair details are completed, click Claim Insurance. A wizard opens showing the Asset, Total Repair Cost, Claiming Amount and Currency.
Review the claim details and click Claim Insurance. The system automatically creates an Insurance Claim Customer Invoice for the selected insurance provider. If the insurance policy requires reimbursement only after the repair bill is generated, the system first creates the repair vendor bill and then creates the insurance claim invoice.
The created invoice is linked to the repair request and can be viewed from the Invoices/Bills smart button. Once the insurance provider pays the invoice, the claim amount is recorded against the repair, helping track recovered expenses and outstanding claim balances.
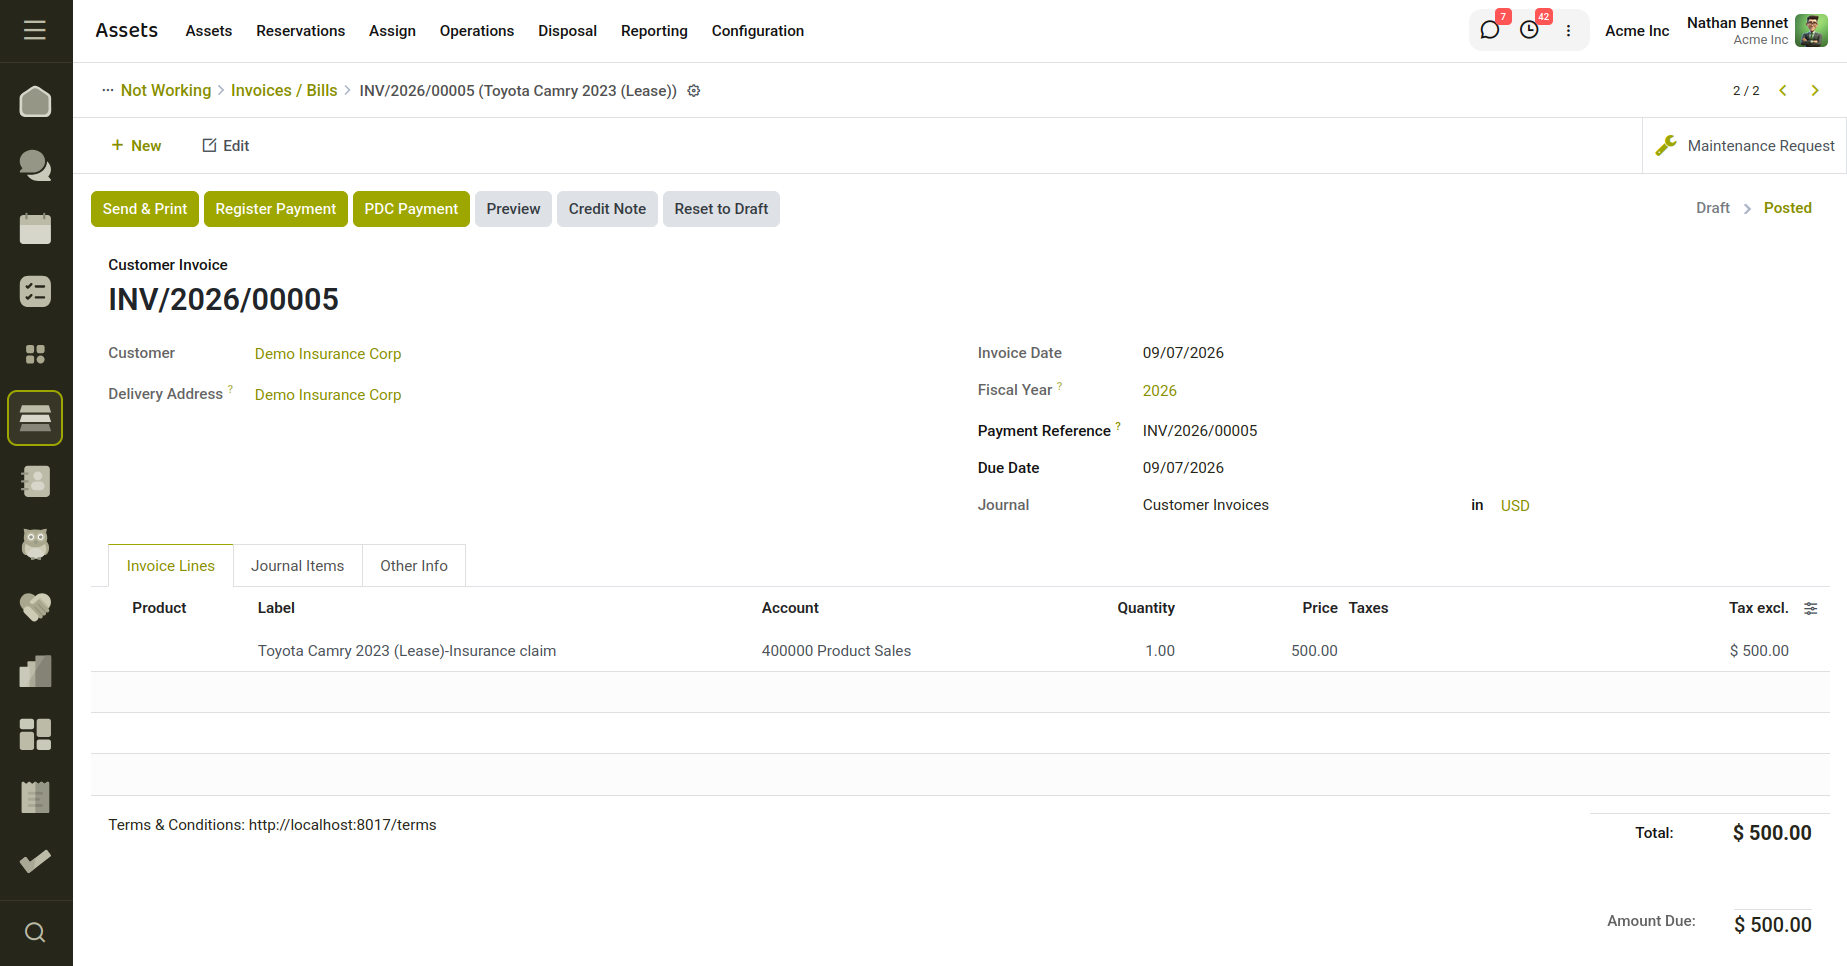
Fig 5.4 — Insurance claim Invoice.
6. Cyllo Asset Quality
The Cyllo Asset Quality module enhances asset management by integrating quality control processes into asset operations. It enables organizations to define quality control points, automatically generate quality checks, and validate assets during lease and rental workflows. This ensures that assets meet predefined standards before being delivered, leased, or rented.
Quality Control Integration: Integrates asset operations with quality management to ensure assets are inspected and validated based on predefined quality rules.
Multiple Quality Control Assignment: Supports assigning multiple quality control points to assets and asset items for flexible quality validation.
Lease Asset Quality Validation: Automatically generates quality checks for lease assets when validation actions are performed.
Rental Asset Quality Validation: Creates quality checks during rental processes to ensure asset conditions are verified before processing.
Automatic Quality Check Creation: Quality checks are generated dynamically based on configured quality control points, reducing manual intervention.
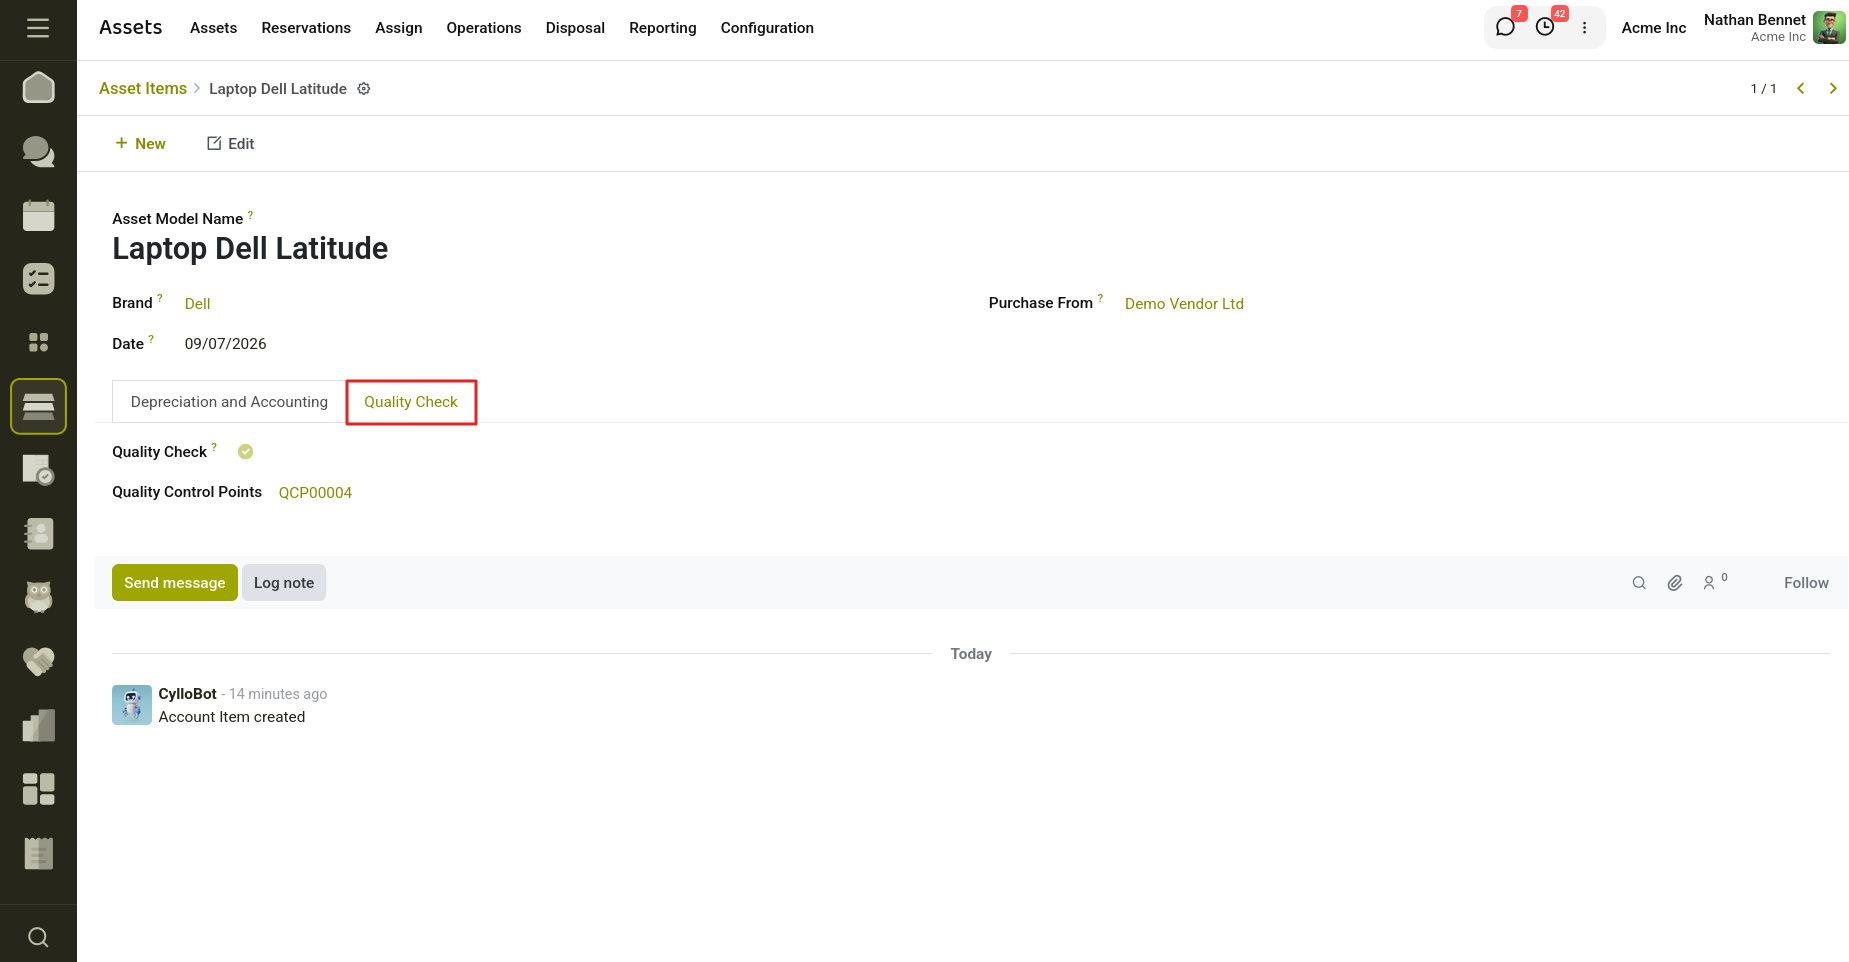
Fig 6.1 — Displays the tab to enable the Quality check in Asset Item.
The Asset Item includes a dedicated option to enable quality management through a boolean field. When quality is enabled for an asset item, the system automatically displays the Quality Control Point field. This allows users to configure and assign one or multiple quality control points to the asset item, ensuring that quality validation processes and inspections are properly applied during lease and rental operations.
When an asset item is selected in an asset record, the system automatically fetches and populates the associated Quality Control Points from the selected asset item. This reduces manual configuration and ensures consistency in quality management. The system also performs validation based on the configured operation type of the quality control points, such as Lease, Rental, or Both, and raises validation errors if the selected asset configuration does not match the required operation type.
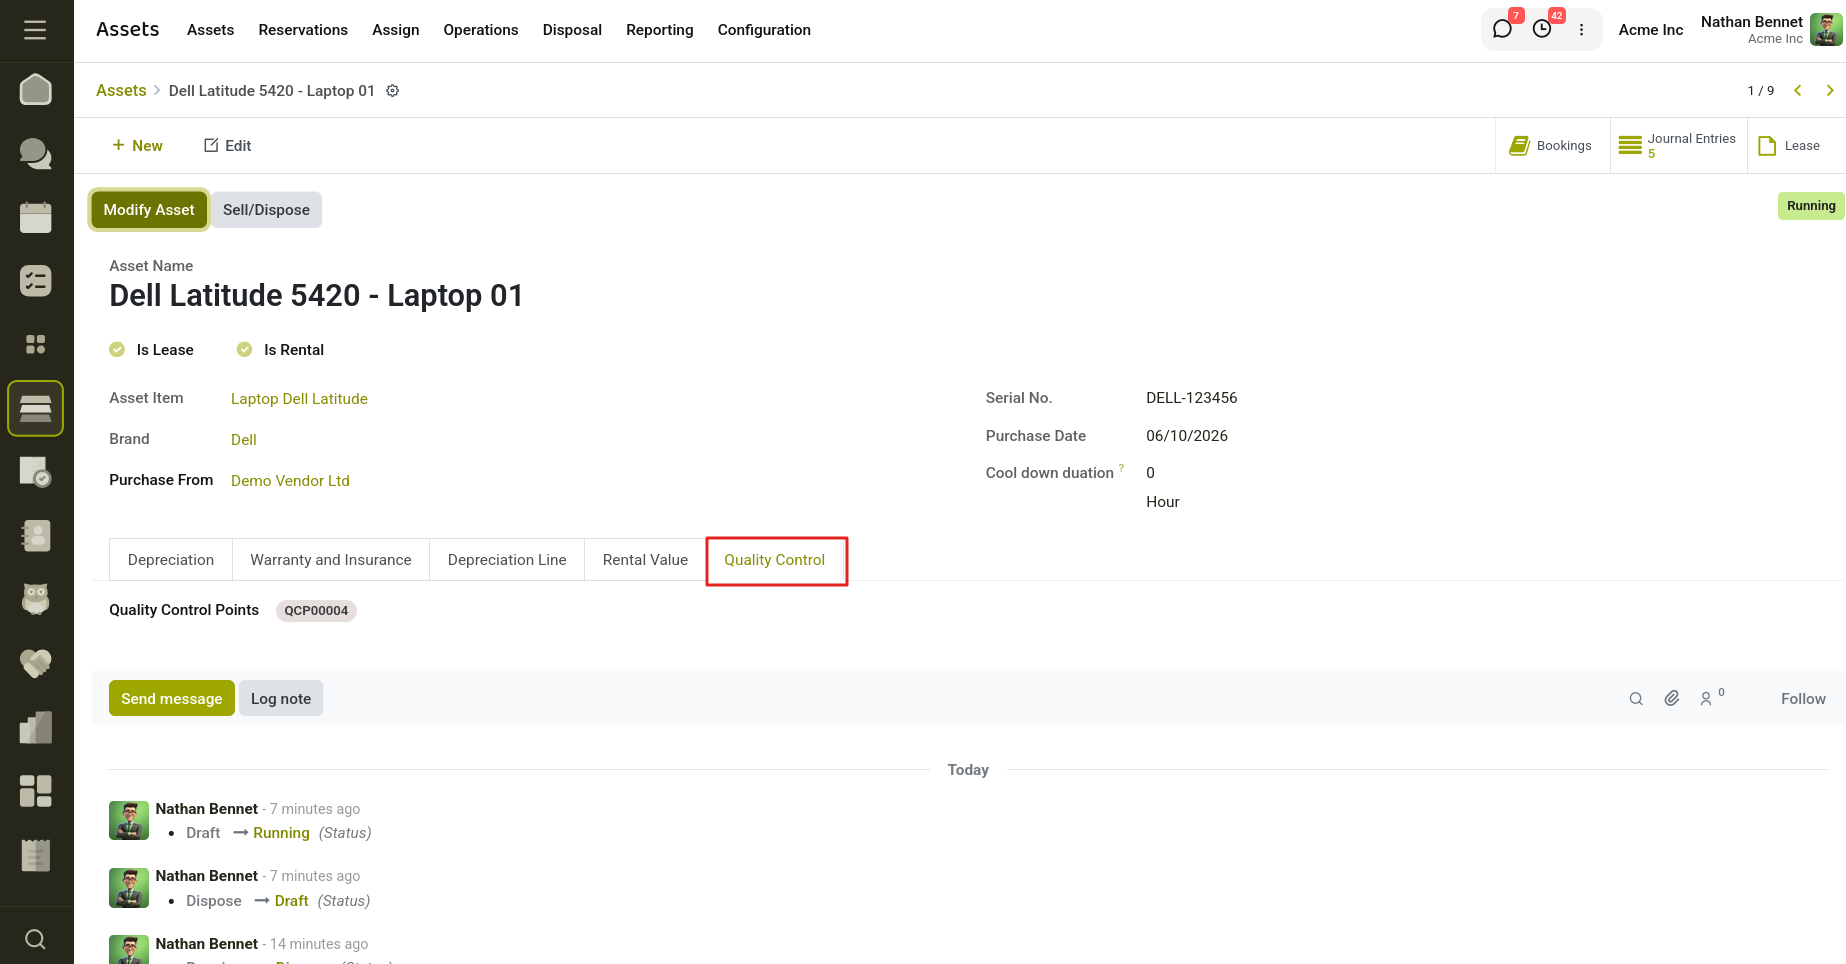
Fig 6.2 — Quality control Point Selection in Asset Form.
6.1 Quality Validation Workflow
When creating a Lease or Rental record, the system checks whether the selected asset has configured Quality Control Points. If quality controls are available, the Validate Quality button becomes visible. Upon clicking the button, the system automatically creates the required quality checks based on the configured control points. Users can then complete and validate these checks.
The system manages the workflow dynamically based on the quality check results:
- No quality checks available → Display Validate Quality button
- Pending quality checks exist → Continue displaying Validate Quality button
- Quality checks passed → Allow the process to continue and display the Return action
- Quality checks failed → Display Revalidate Quality button
- Revalidate Quality action → Automatically creates new quality check records for failed validations This process ensures that assets successfully pass quality requirements before completing lease or rental operations.
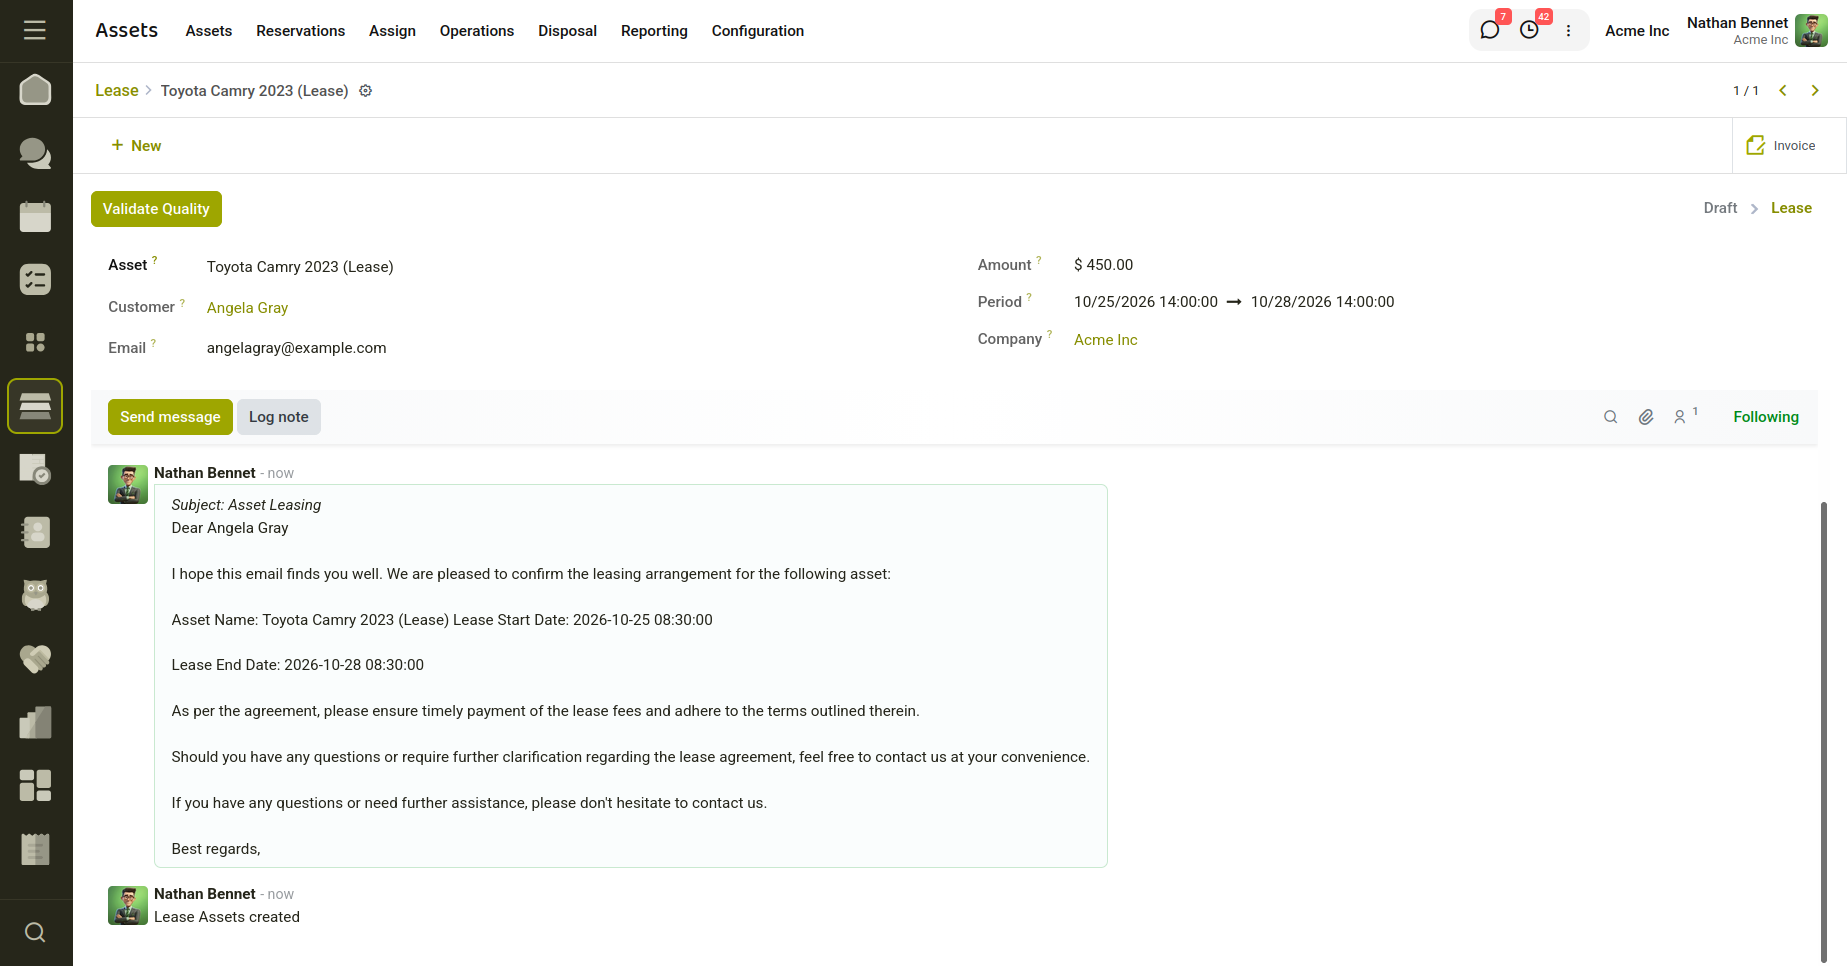
Fig 6.3 — Quality Check When Creating Asset Lease.
Rental / Lease Quality Check Workflow
- Navigate to Assets → Operations → Rental or Assets → Operations → Lease
- Create or open a rental or lease record and select the required asset.
- If the selected asset has configured Quality Control Points, the Validate Quality button becomes available automatically.
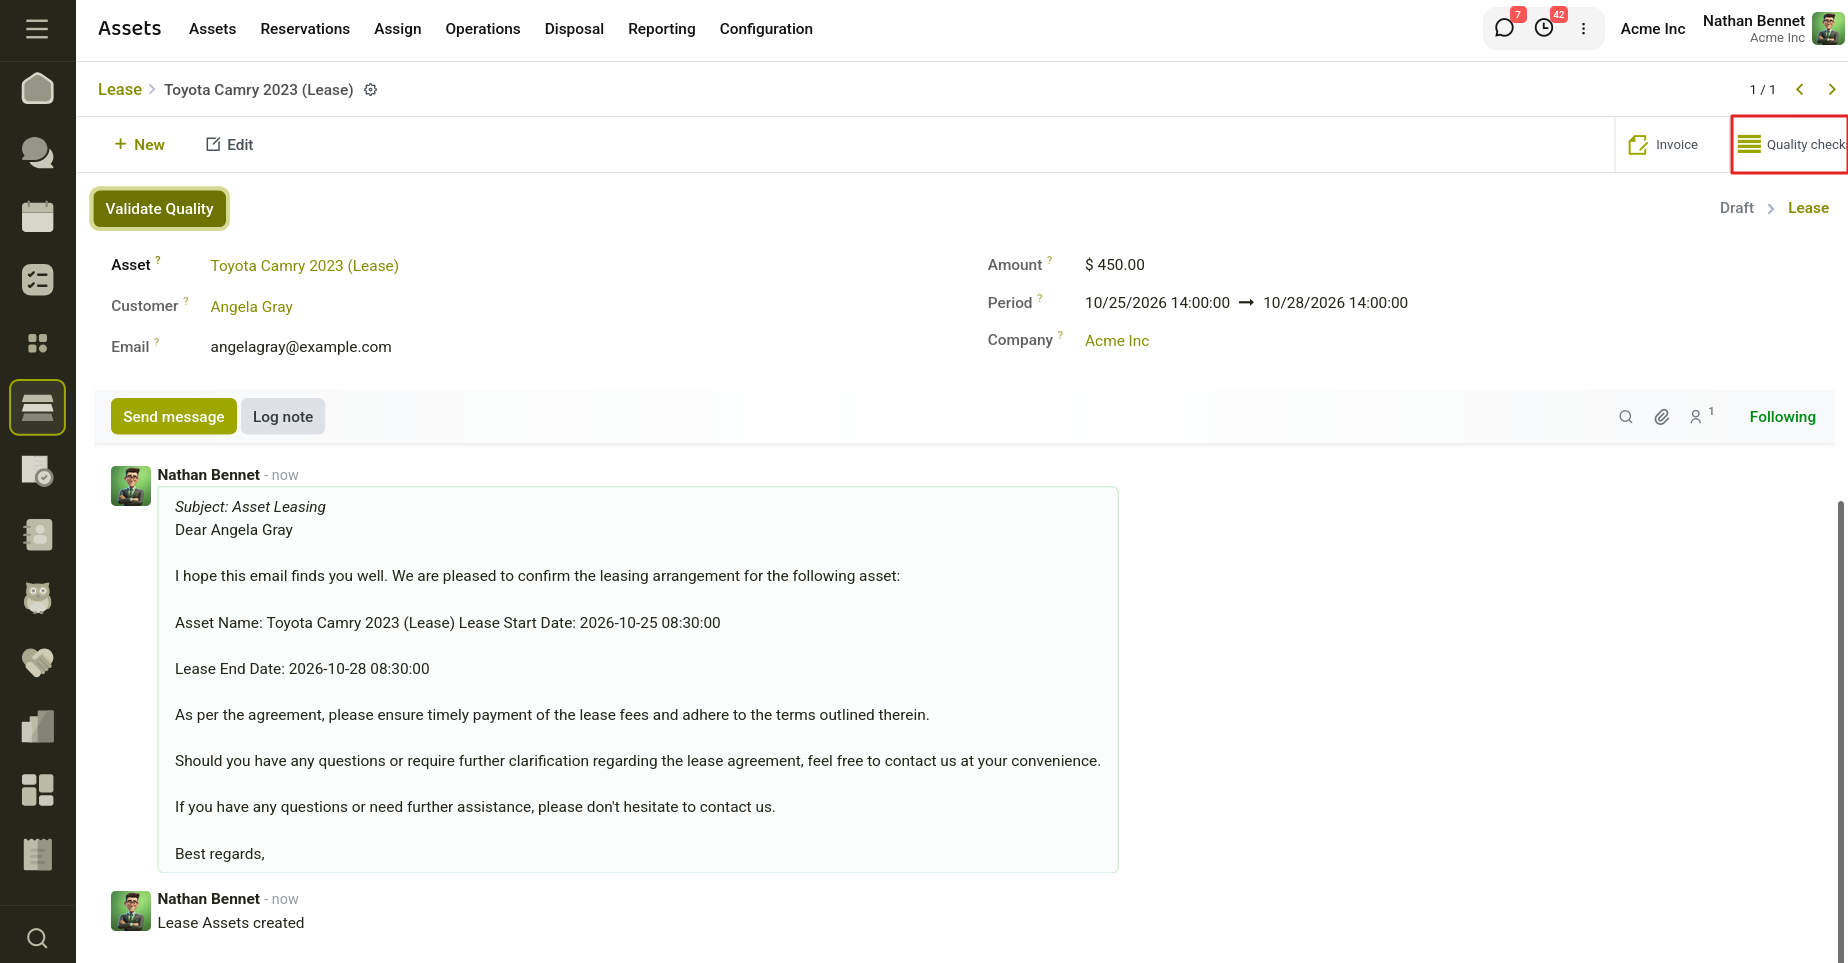
Fig 6.4 — Displays the Smart Button of Quality Checks created for an Asset.
- Click Validate Quality to generate quality check records based on the configured control points.
- Complete the generated quality inspections and validate the results.
- Use the Quality Checks smart button to view all quality checks associated with the rental or lease record.
- If all inspections are completed successfully, the rental process can continue normally and the Return action becomes available.
- If one or more inspections fail, the Revalidate Quality button appears.
- Clicking Revalidate Quality creates new quality check records for the failed inspections, allowing the asset to be re-inspected.
This workflow ensures that only assets meeting the defined quality standards proceed through rental operations.
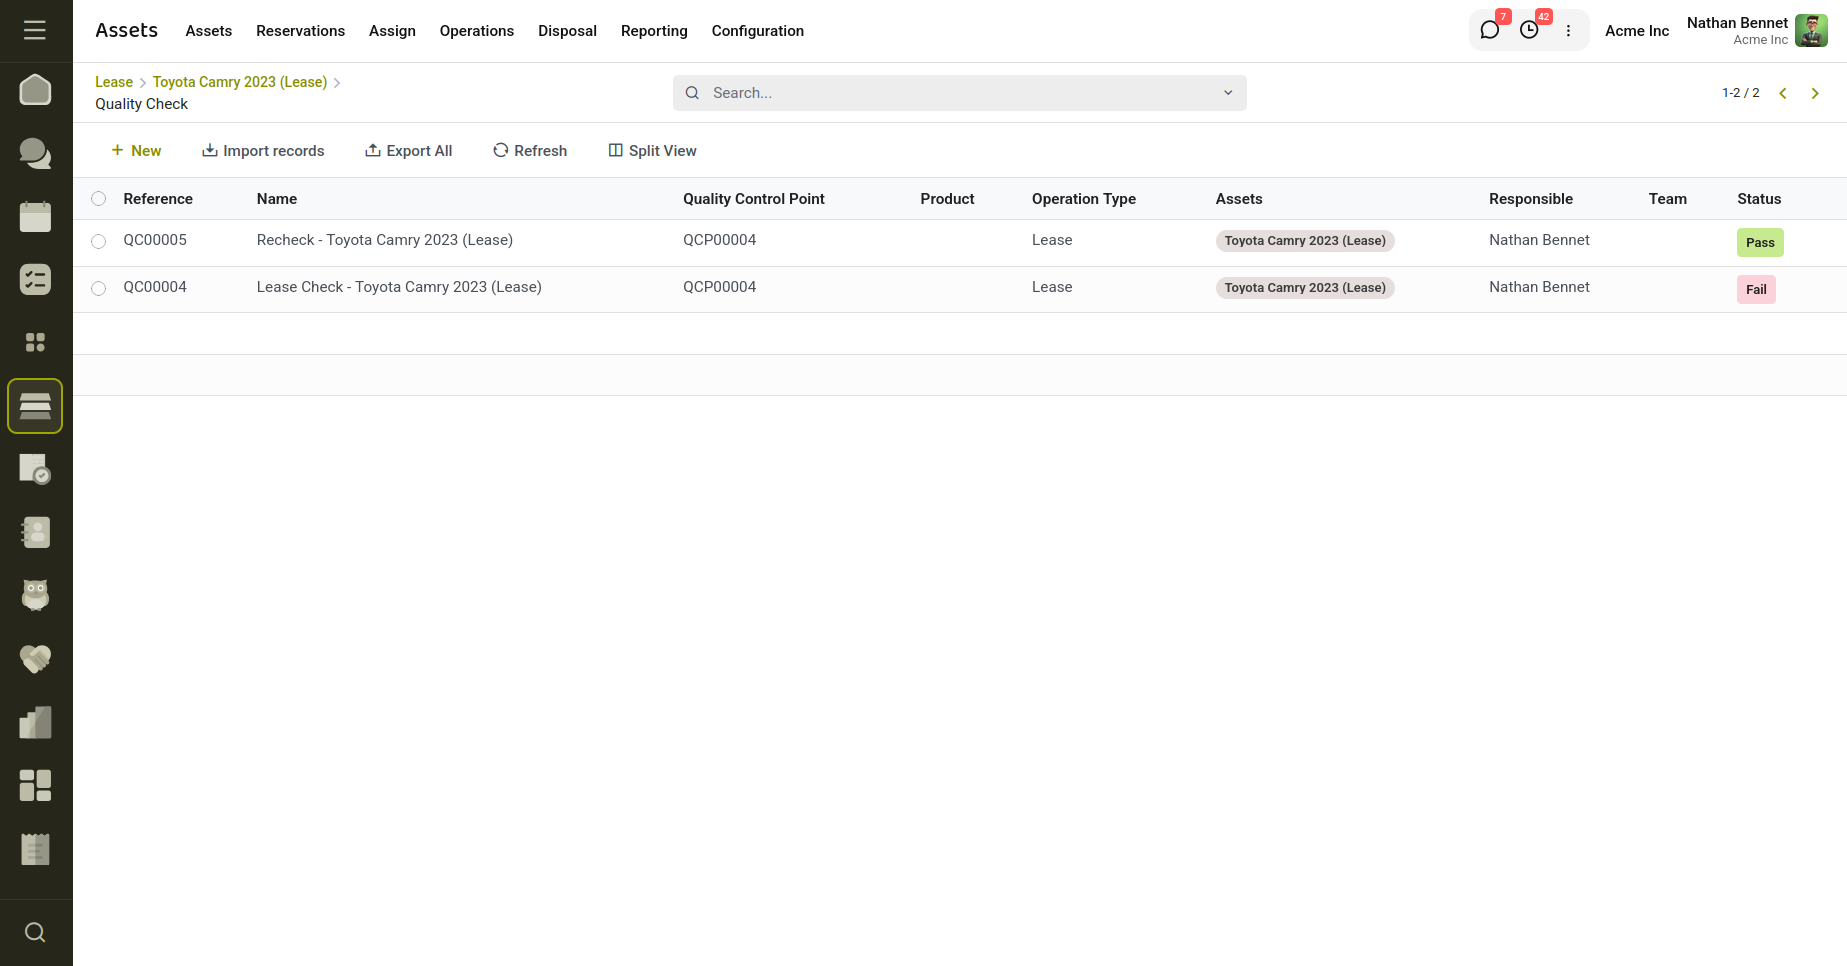
Fig 6.5 — Displays the Quality Checks created for an Asset.