

Cyllo Front Desk Documentation
Introduction
Cyllo Front Desk is a comprehensive visitor management solution that modernizes and streamlines your organization's reception process. Whether managing a single reception desk or multiple office locations, the module provides a centralized platform to register visitors, monitor check-ins and check-outs, schedule appointments, and maintain complete visitor records. By replacing manual logbooks with a digital workflow, Cyllo Front Desk enhances security, improves operational efficiency, and delivers a professional, seamless experience for both visitors and reception staff.
1. Front Desk
Key Concepts:
- Station - A physical reception desk or kiosk. All visitor records belong to a station.
- Visitor - Any person who checks in — either for a pre-arranged meeting or as a walk-in enquiry.
- Host - The employee whom the visitor has come to see. The host can approve or reject meeting requests via email.
- Enquiry - A structured record capturing the purpose and details of a walk-in query.
- Emergency Alert - A pre-configured notification broadcast that can be triggered instantly from a station.
Setup Checklist
An administrator should complete these steps before daily use:
- Create at least one Station.
- Add responsible employees to the station so they receive check-in notifications.
- Enable Host Selection and/or Offer Drinks on the station form if required.
- Configure at least one Emergency Alert and link it to the station.
- Add drinks to the station's drink list if hospitality features are used.
2. Visitor Management
Every person who arrives at your facility is recorded as a Visitor. There are two visitor types, each with its own flow.
2.1 Meeting Visitors
A Meeting visitor is someone with a pre-arranged appointment. The system sends an approval request to the host before the visit can proceed.
2.2 Creating a Meeting Visitor Record
- Go to Visitors → New.
- Set Visitor Type to Meeting.
- Enter the visitor's name, phone, email, and company.
- Select the Station (required).
- Choose the Host — the employee being visited.
- Fill in the Expected Arrival date/time and Meeting Purpose.
- Save the record. The status is automatically set to Draft.
Meeting Visitor Status Flow:
- Draft - Record created; approval email not yet sent to the host.
- Planned - Host has approved the visit; visitor is expected.
- Checked In - Visitor has physically arrived and been checked in by reception.
- Checked Out - Visitor has left. Visit duration is frozen.
- Cancelled - Visit was cancelled (by host rejection or manually).
Note
Meeting visitors cannot be checked in until the host has approved the request and the status is Planned. If a visitor arrives without prior approval, use the Check-In button only after obtaining verbal consent and updating the status manually.
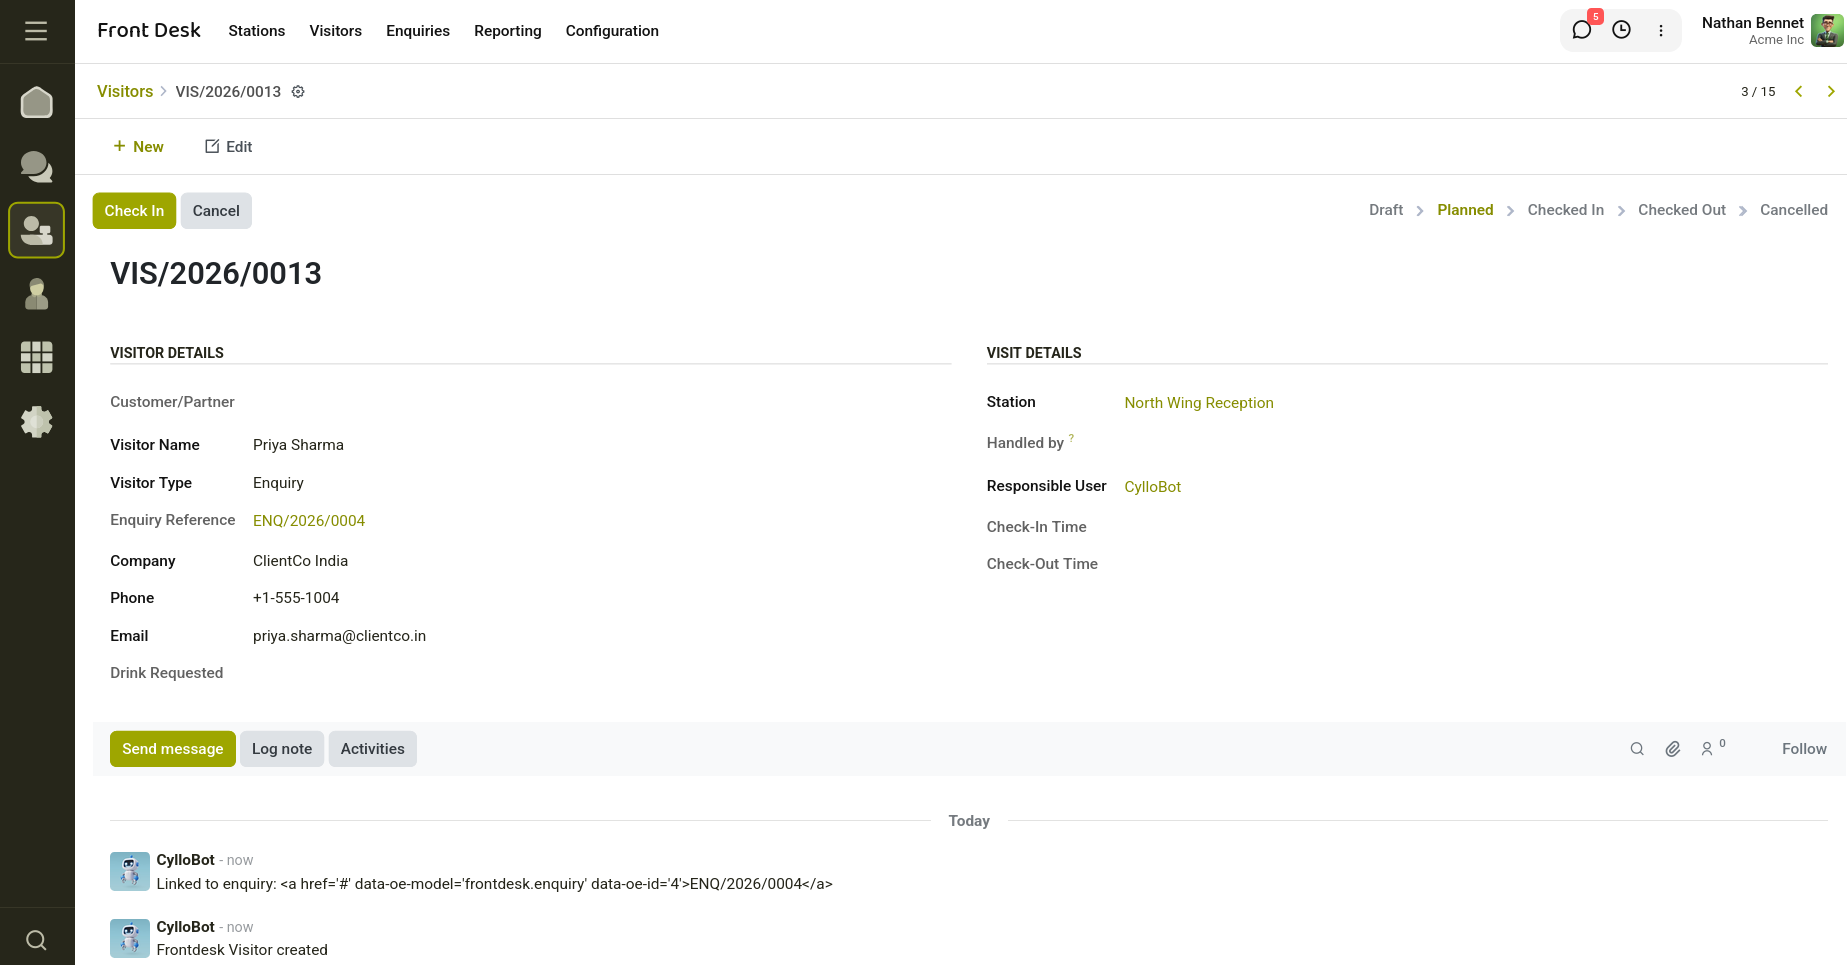
Fig 2.1 — Visitor management.
3. Enquiry Visitors
An Enquiry visitor is a walk-in with no prior appointment. These records start directly in Planned status, skipping the approval step.
Creating an Enquiry Visitor Record:
- Go to Visitors → New.
- Set Visitor Type to Enquiry.
- Enter the visitor's contact details.
- Select the Station.
- Optionally assign a Host (staff member handling the walk-in).
- Save. Status is immediately Planned — the visitor can be checked in right away.
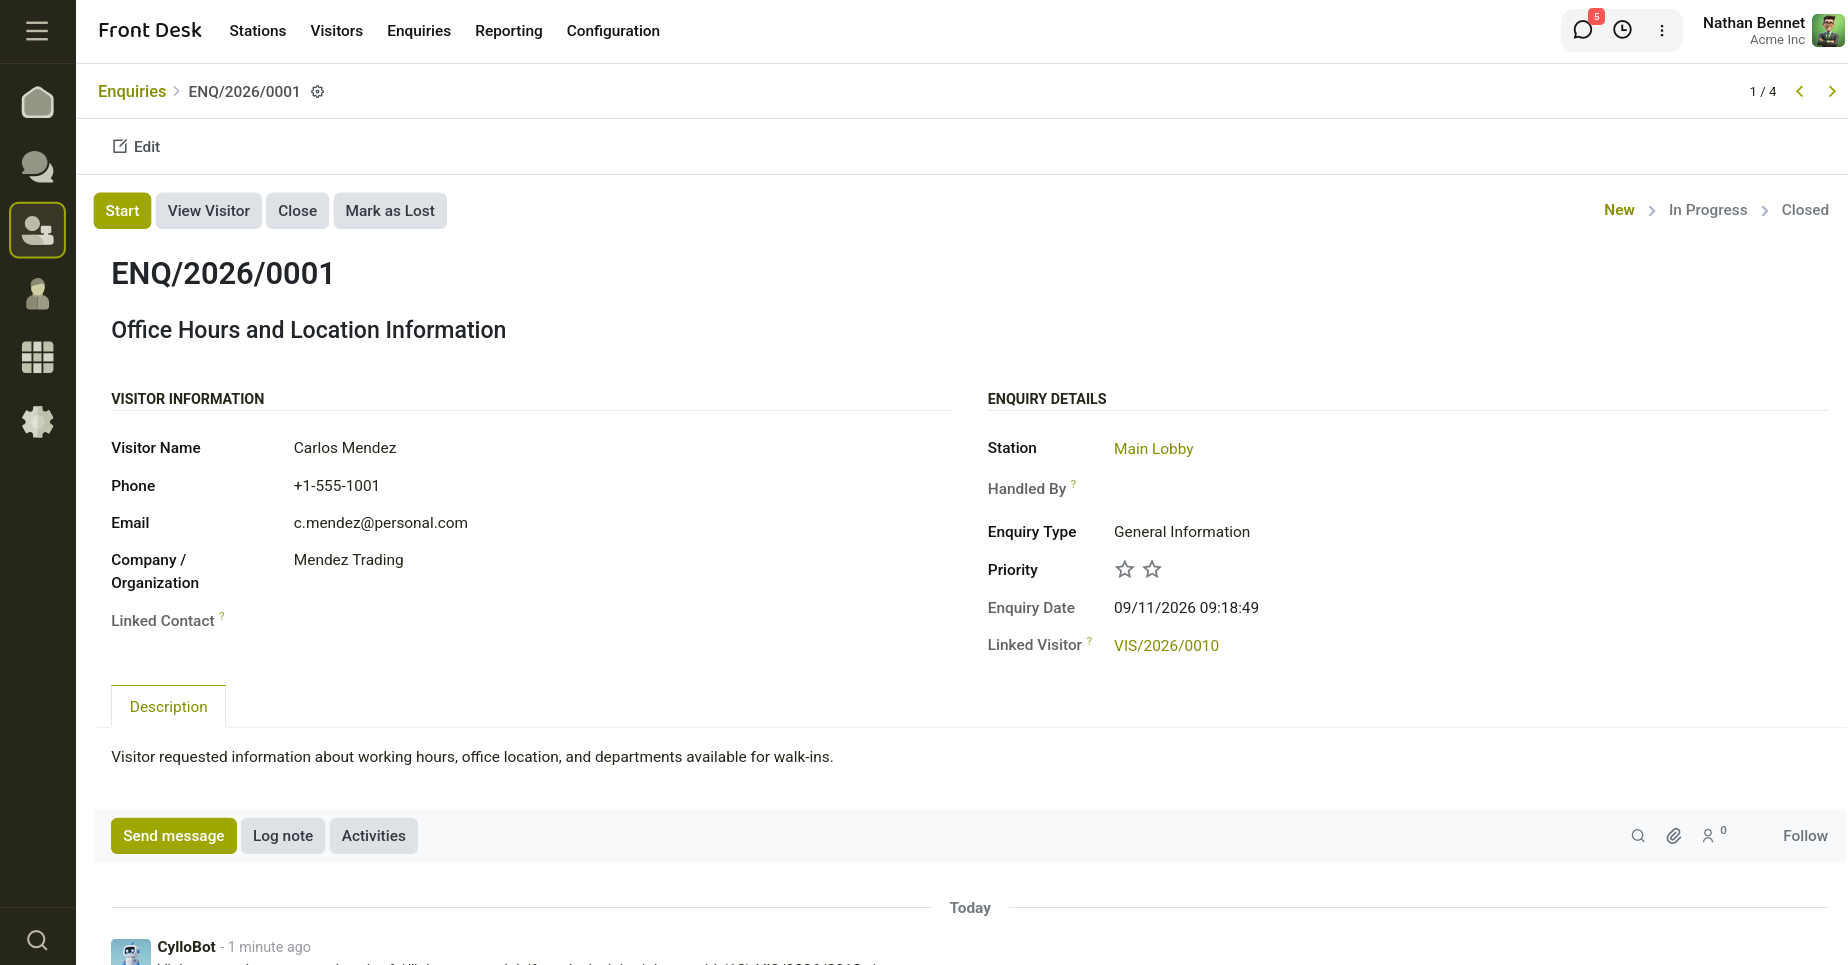
Fig 3.1 — Enquiry Visitors.
4. Meeting Approval Workflow
The approval workflow lets hosts decide whether to accept or decline a meeting before the visitor arrives. Everything happens via a single email click — no Cyllo login required.
Step-by-Step Workflow:
- Reception creates a Meeting visitor record and saves it (status: Draft).
- Reception clicks Send Approval Request. An email is dispatched to the host's work email address containing the visitor's name, meeting purpose, and expected arrival time.
- The email contains two buttons: Approve Meeting and Reject Meeting. Clicking either takes the host to a secure web page.
- If the host clicks Approve Meeting: the visitor status changes to Planned, the host's name and the approval timestamp are recorded, and a note is posted to the chatter.
- If the host clicks Reject Meeting: the visitor status changes to Cancelled, the rejection is logged, and a chatter note is added.
- If the approval link is clicked again after a decision has already been made, the page displays "Already Processed" — no further changes occur.
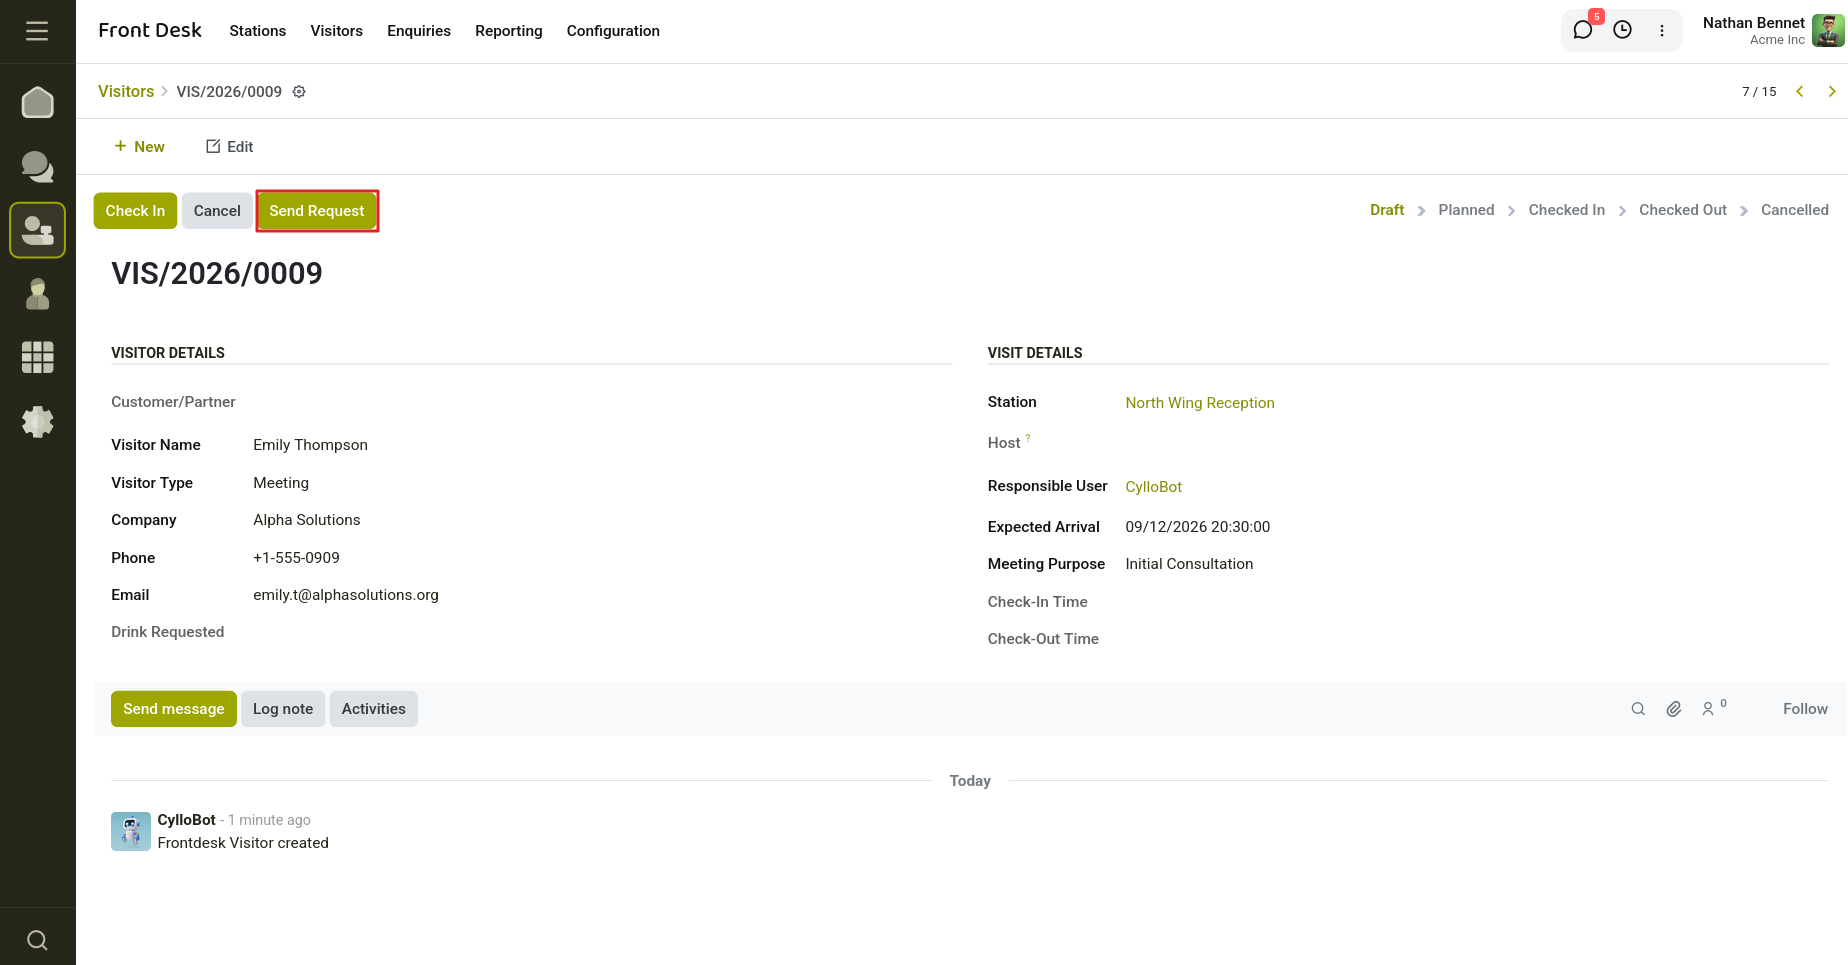
Fig 4.1 — Reception sends an approval request to the host via email.
5. Enquiry Management
Enquiries capture the details of walk-in queries — what the visitor wanted, who handled it, and what follow-up is needed. Every enquiry is automatically linked to a visitor record.
Creating an Enquiry
From an existing Enquiry Visitor record
- Open the visitor record (must be Enquiry type).
- Click Create Enquiry. A wizard opens pre-filled with the visitor's details.
- Add subject, enquiry type, and any additional notes.
- Click Create. The enquiry and visitor records are cross-linked.
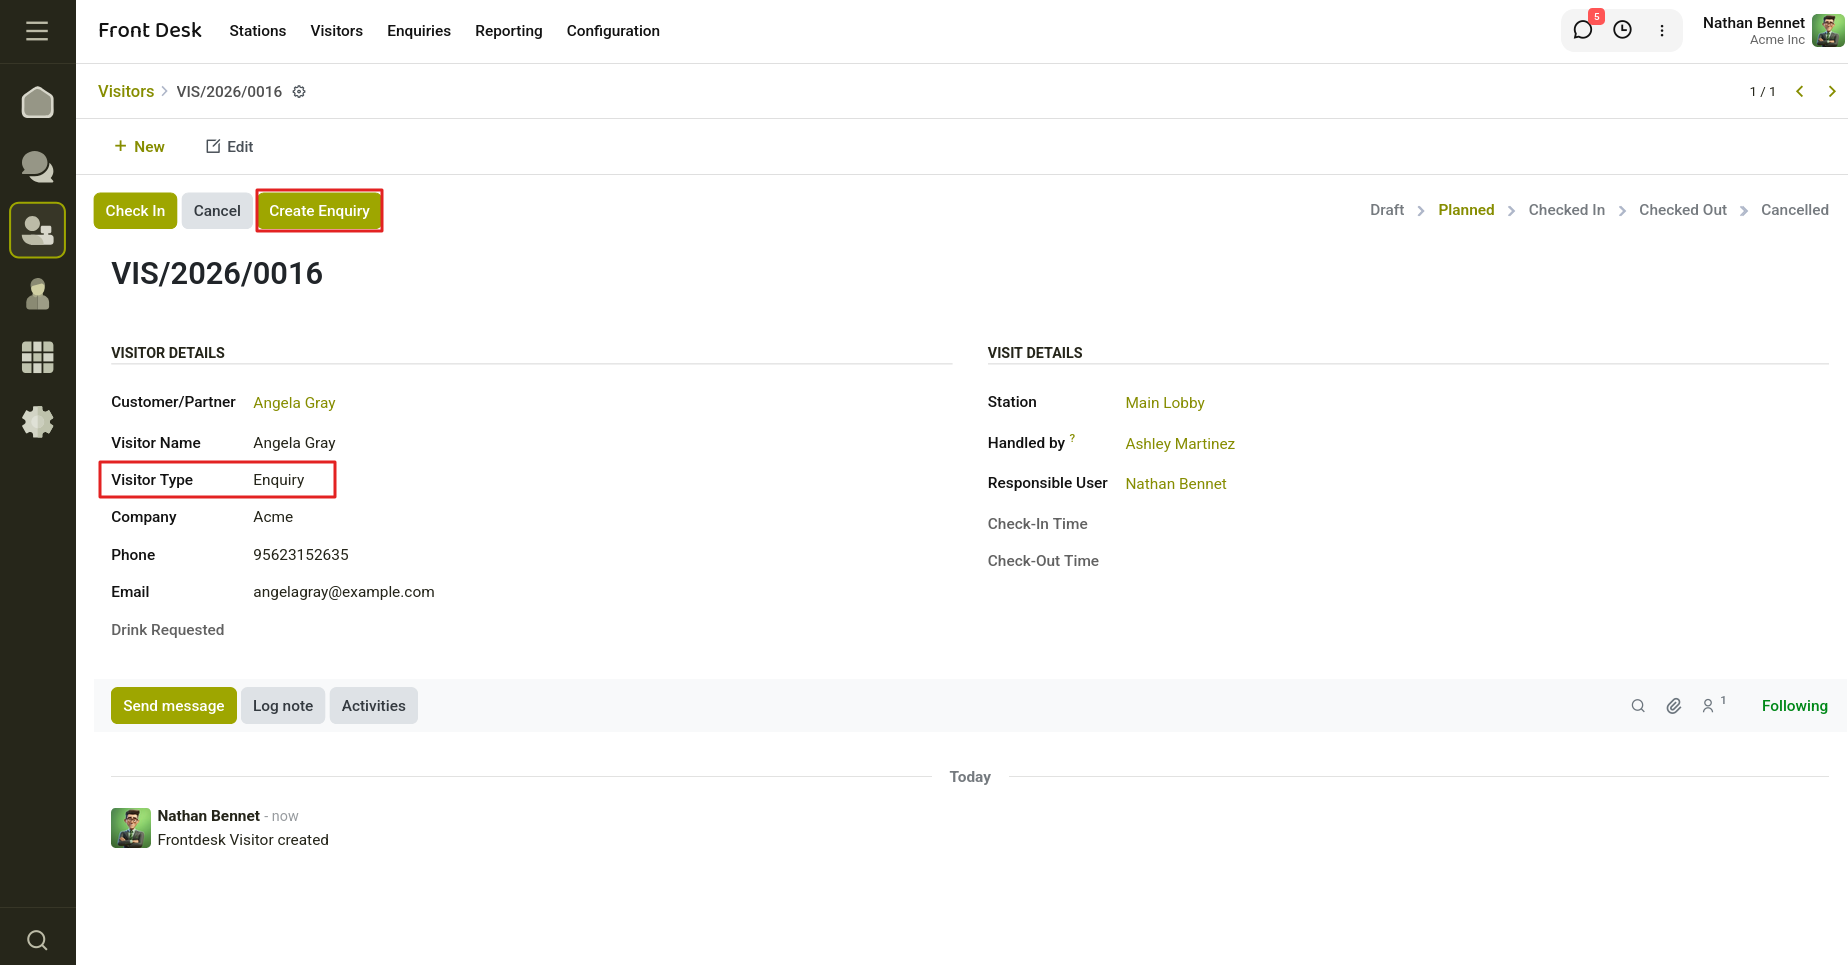
Fig 5.1 — Create Enquiry directly from Visitor Form.
6. Emergency Alerts
The Emergency Alert feature lets reception staff broadcast an urgent message to employees, Cyllo users, and Discuss channels instantly — no phone tree required.
Alert Configuration (Admin):
Administrators set up alert templates in advance. Each template defines who receives the notification and what the default message says.
Go to Emergency Alerts → New.
Enter an Alert Name (e.g., "Fire Evacuation", "Intruder Alert", "Medical Emergency").
Select the Stations where this alert can be triggered.
Choose recipients:
- Notify Specific Employees — employees with Cyllo user accounts receive a Discuss inbox notification.
- Notify Specific Users — Cyllo users receive a Discuss notification and a pop-up banner.
- Notify Discuss Channels — message is posted publicly in selected chat rooms.
Write a Default Message. Reception staff can edit this text at trigger time.
Ensure Active is ticked. Inactive alerts cannot be triggered.
6.1 Triggering an Emergency Alert
- Open the Station record for the affected location.
- Click Trigger Emergency Alert. The wizard opens.
- Select the Alert Type from the drop-down. The Default Message auto-fills.
- Edit the message if the situation requires specific details.
- Click Send Alert.
On success, a confirmation banner appears and the system automatically opens the new Emergency Log record.
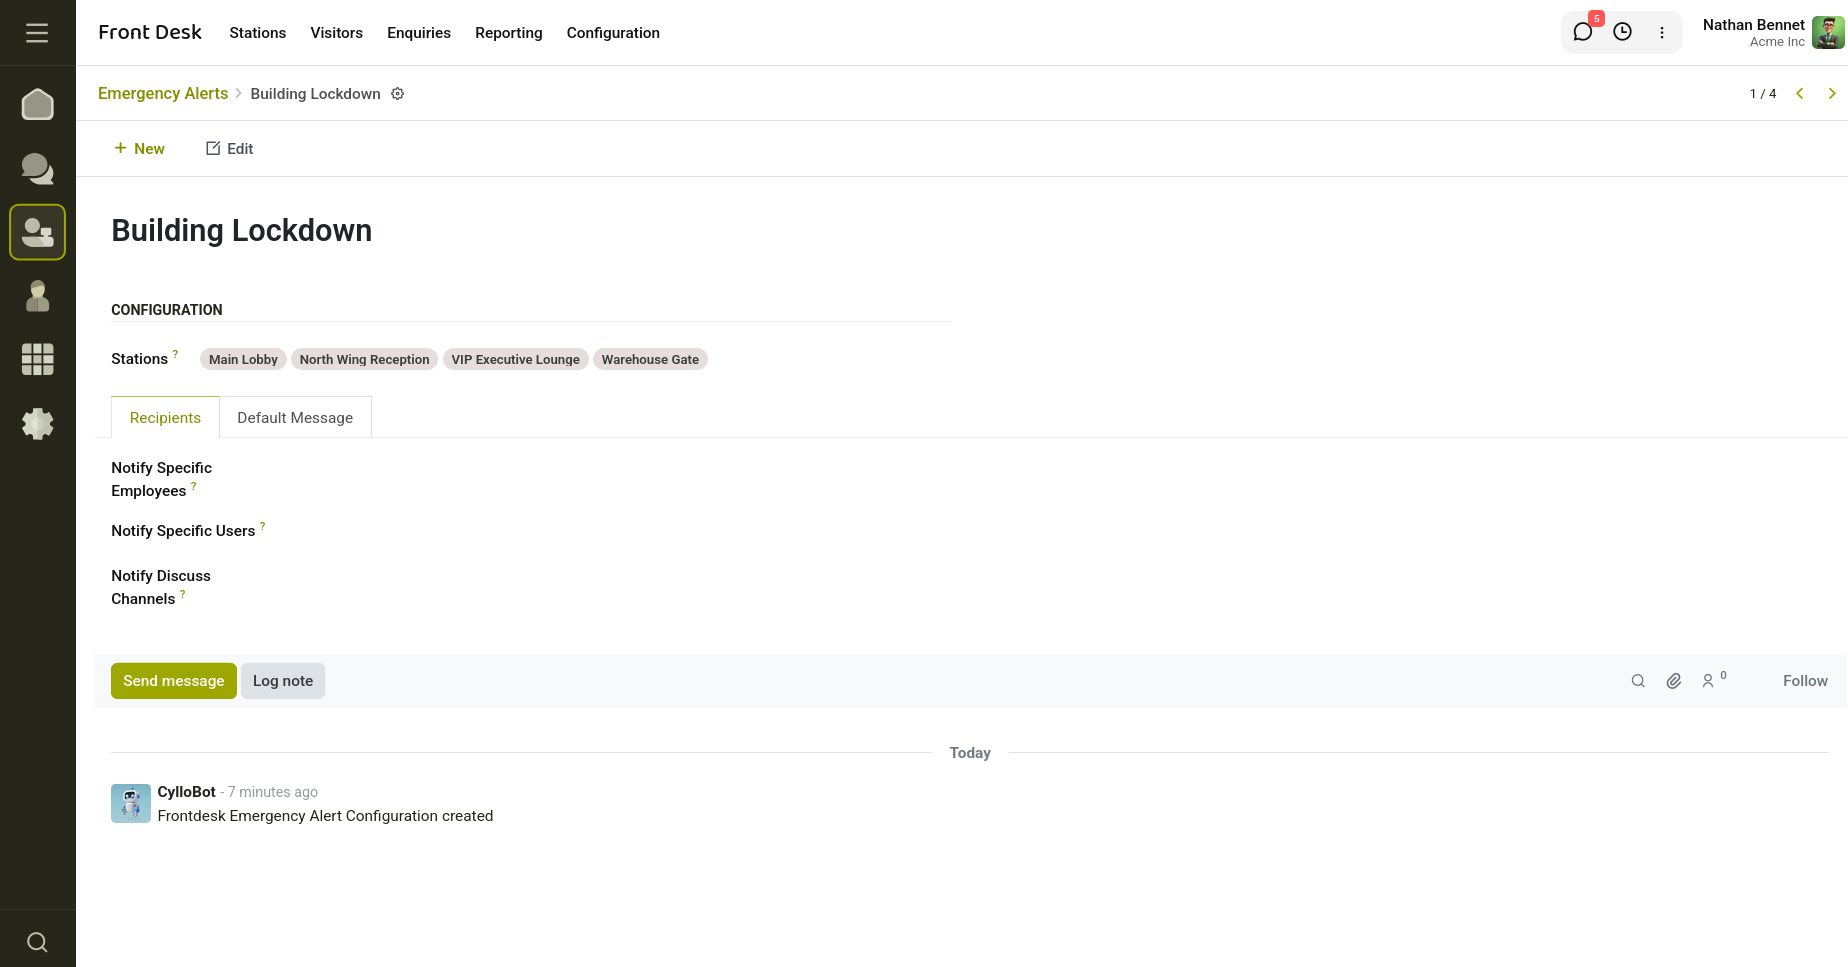
Fig 6.1 — Triggering an Emergency Alert.
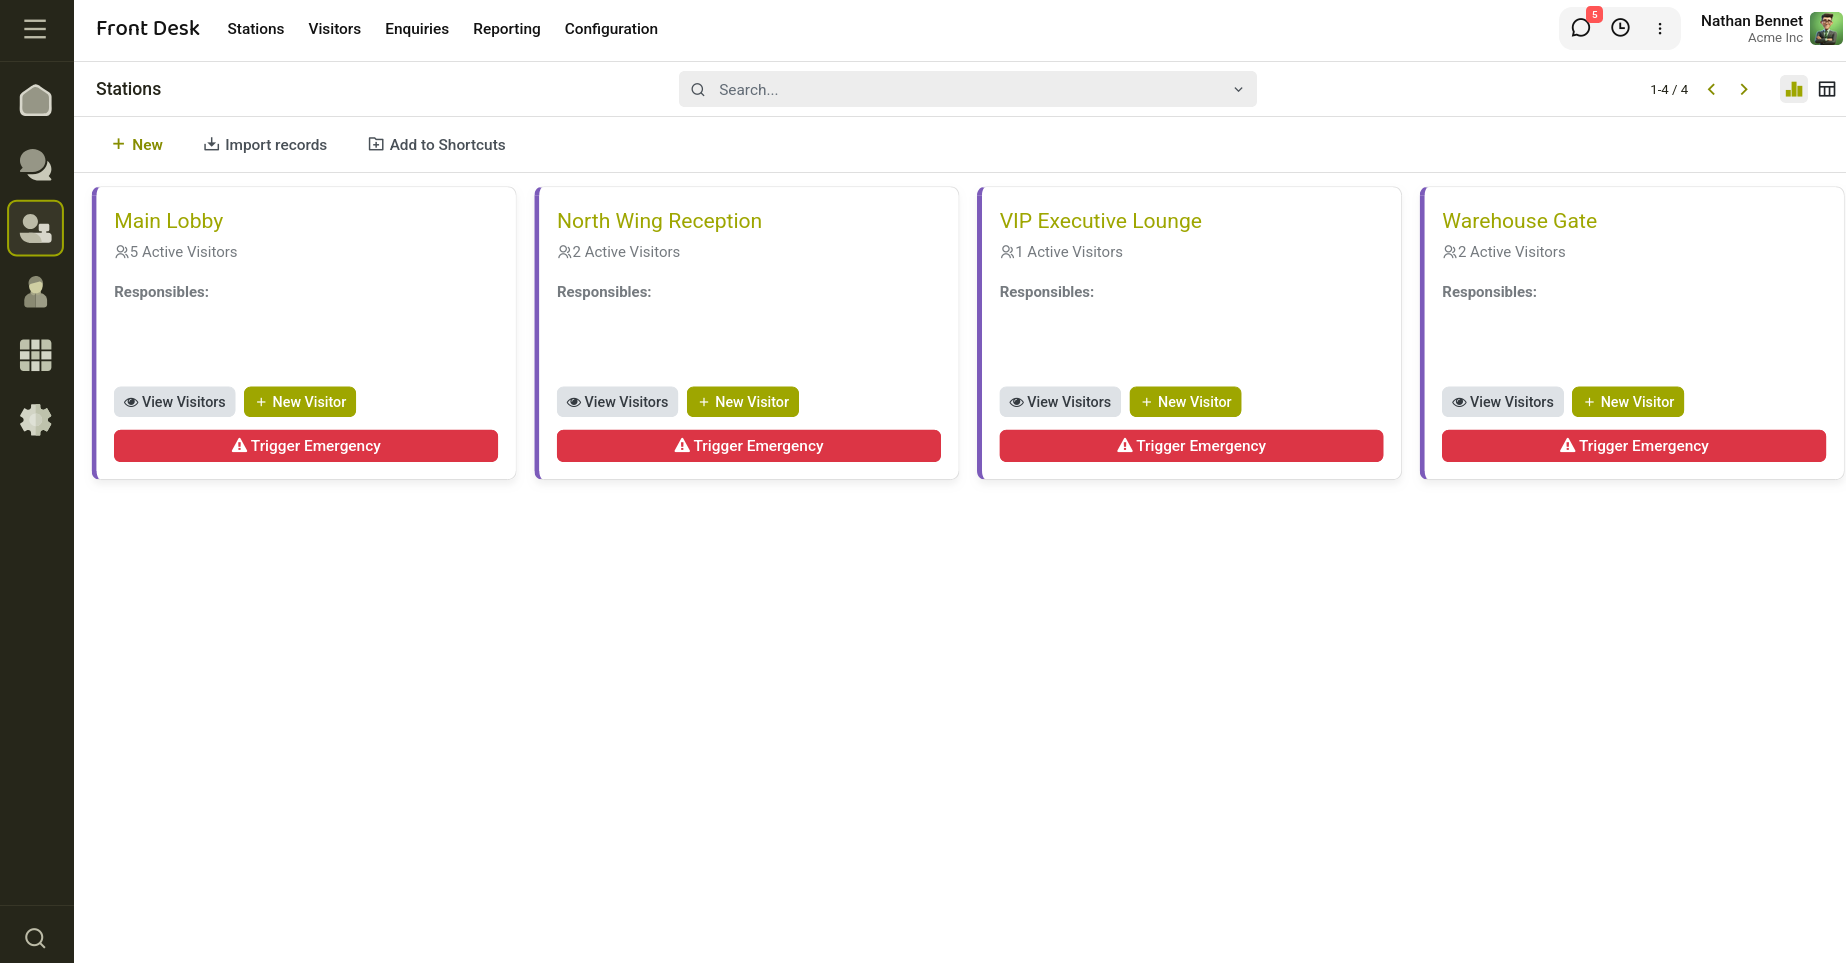
Fig 6.2 — Emergency Alert can be triggered from Stations Dashboard or Kanban View.
6.2 Emergency Log
Every triggered alert creates an Emergency Log entry with:
- Reference number (auto-sequenced).
- Station where the alert was triggered.
- Alert type and the exact message that was sent.
- Triggered By (the Cyllo user who sent it) and the Triggered timestamp.
- Notified Recipients summary listing all groups/employees/channels that received the alert. Access logs via Emergency Alerts → Emergency Logs in the menu.
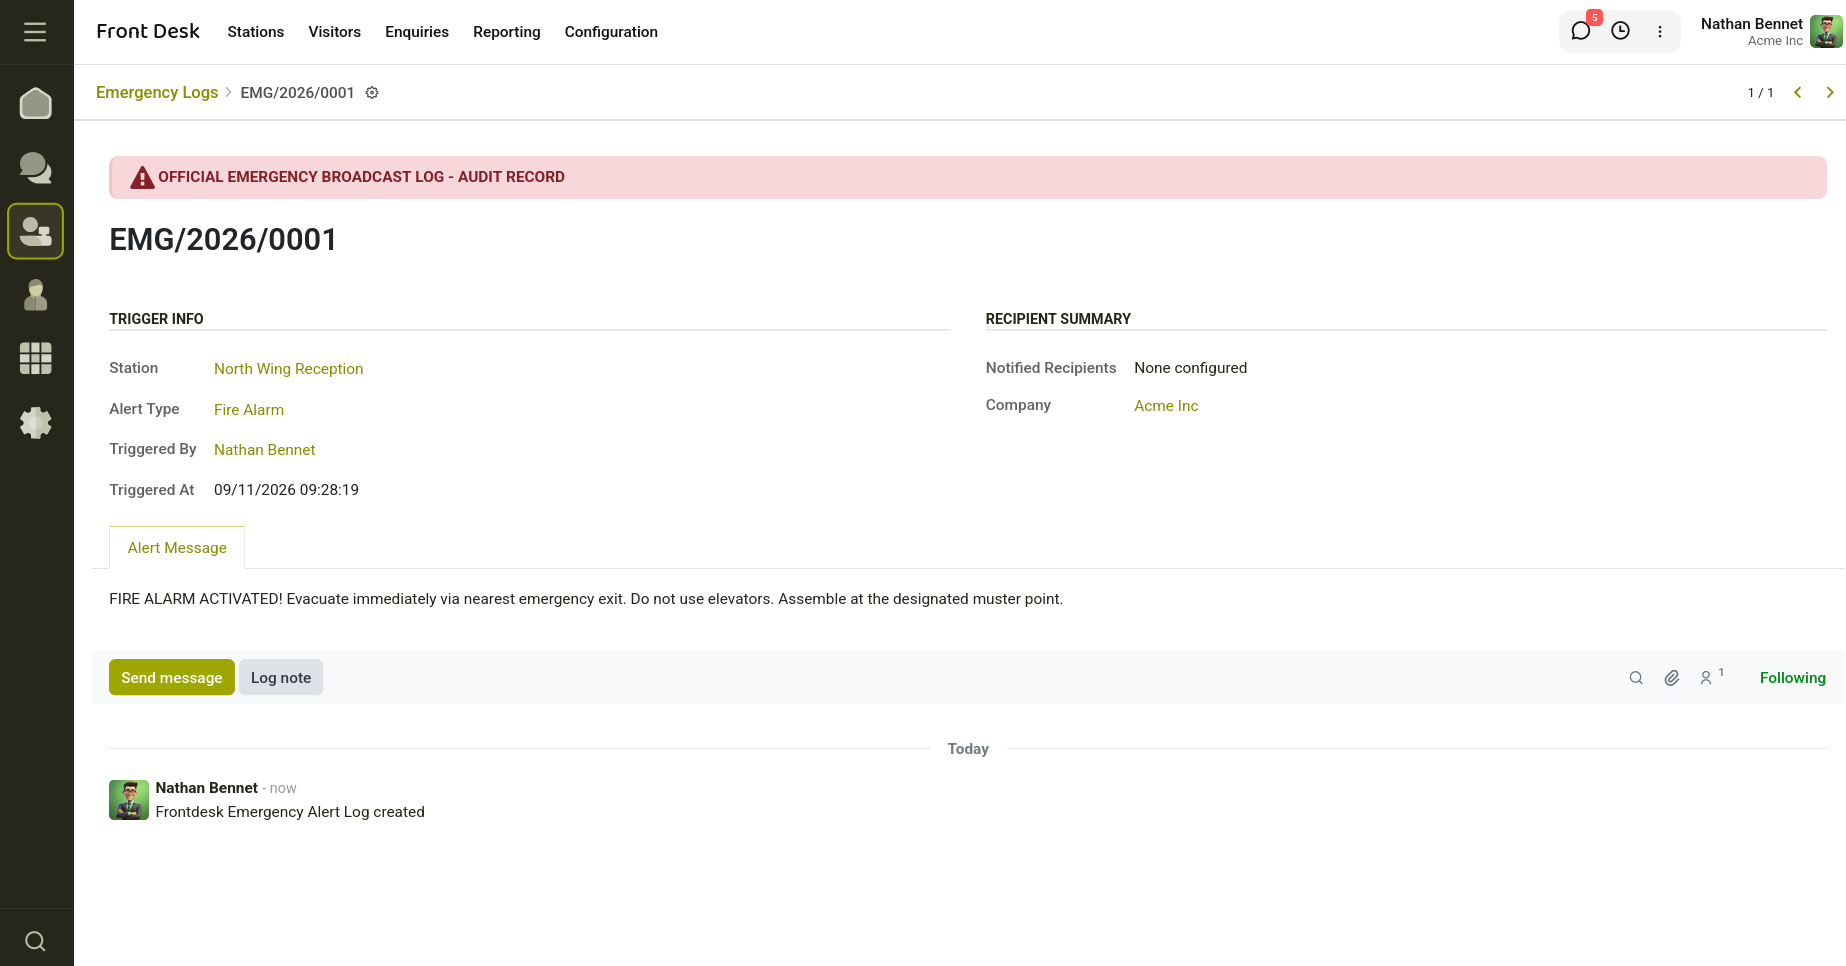
Fig 6.3 — Emergency Logs.
7. Station
Stations represent physical reception points. Administrators create and configure them; front desk staff select the appropriate station when registering visitors.
Creating a Station
- Go to Stations → New.
- Enter a Station Name.
- Select the Company.
- Add Responsible Employees — these people receive visitor check-in notifications.
- Configure notification preferences: Notify by Email, Notify by Discuss.
- Toggle Host Selection on or off. When on, receptionists can choose which employee the visitor is meeting.
- Toggle Offer Drinks on or off. When on, a drink selector appears on visitor forms.
- If Offer Drinks is on, add drinks to the Drinks Offered list.
- Save.
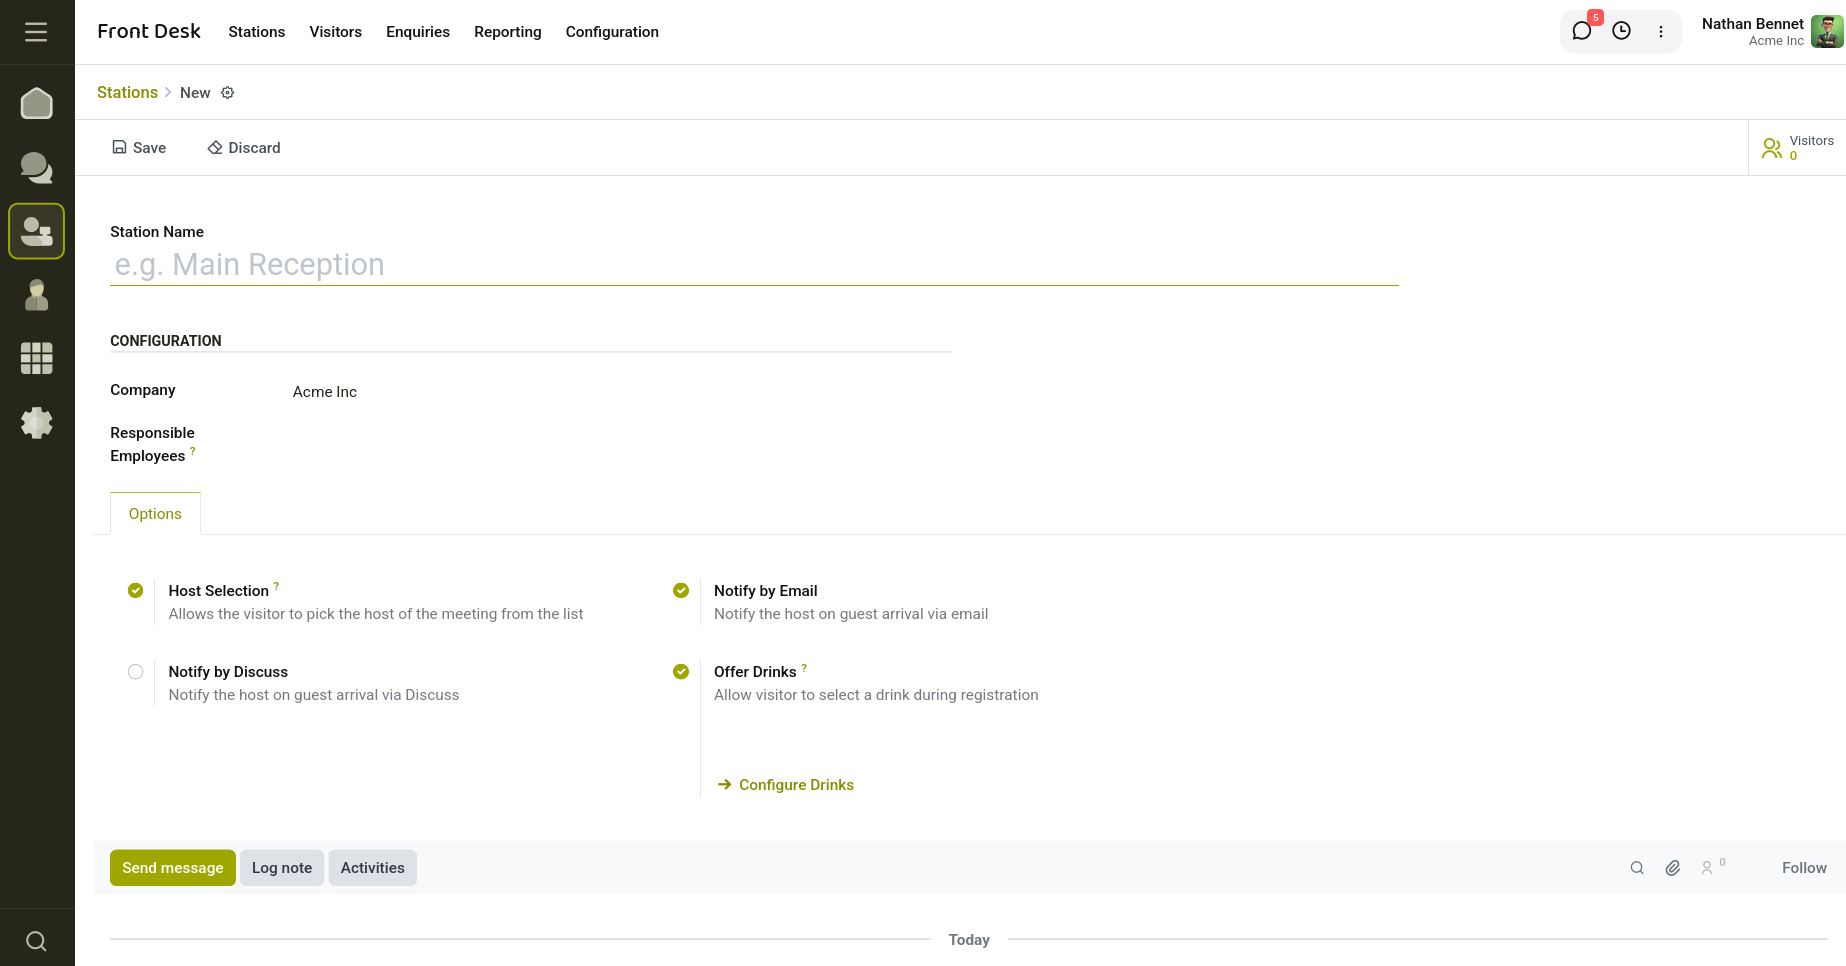
Fig 7.1 — Create a station with the required fields.
7.1 Station Dashboard
From the station form view, the Visitor Count smart button shows the number of current planned and checked-in visitors. Click it to open the filtered visitor list for that station.
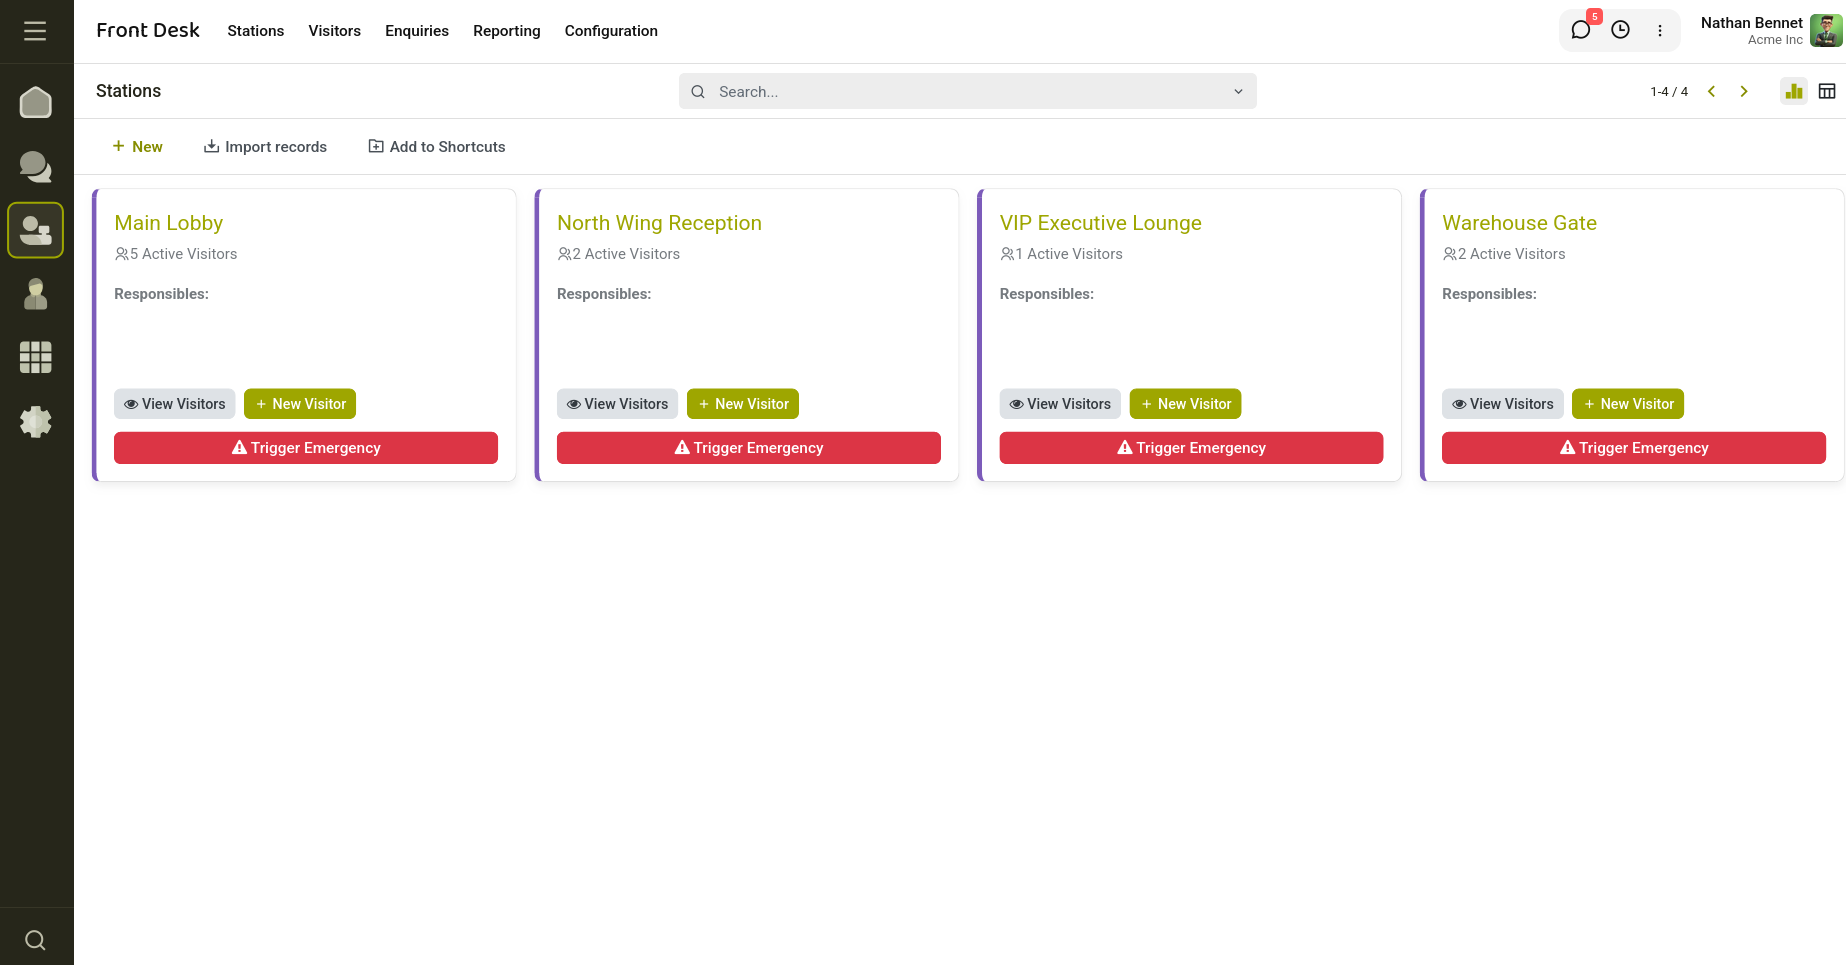
Fig 7.2 — Station Dashboard.
8. Drinks & Hospitality
When the Offer Drinks option is enabled on a station, receptionists can record a visitor's beverage preference at check-in. The designated team is notified automatically so refreshments are ready on time.
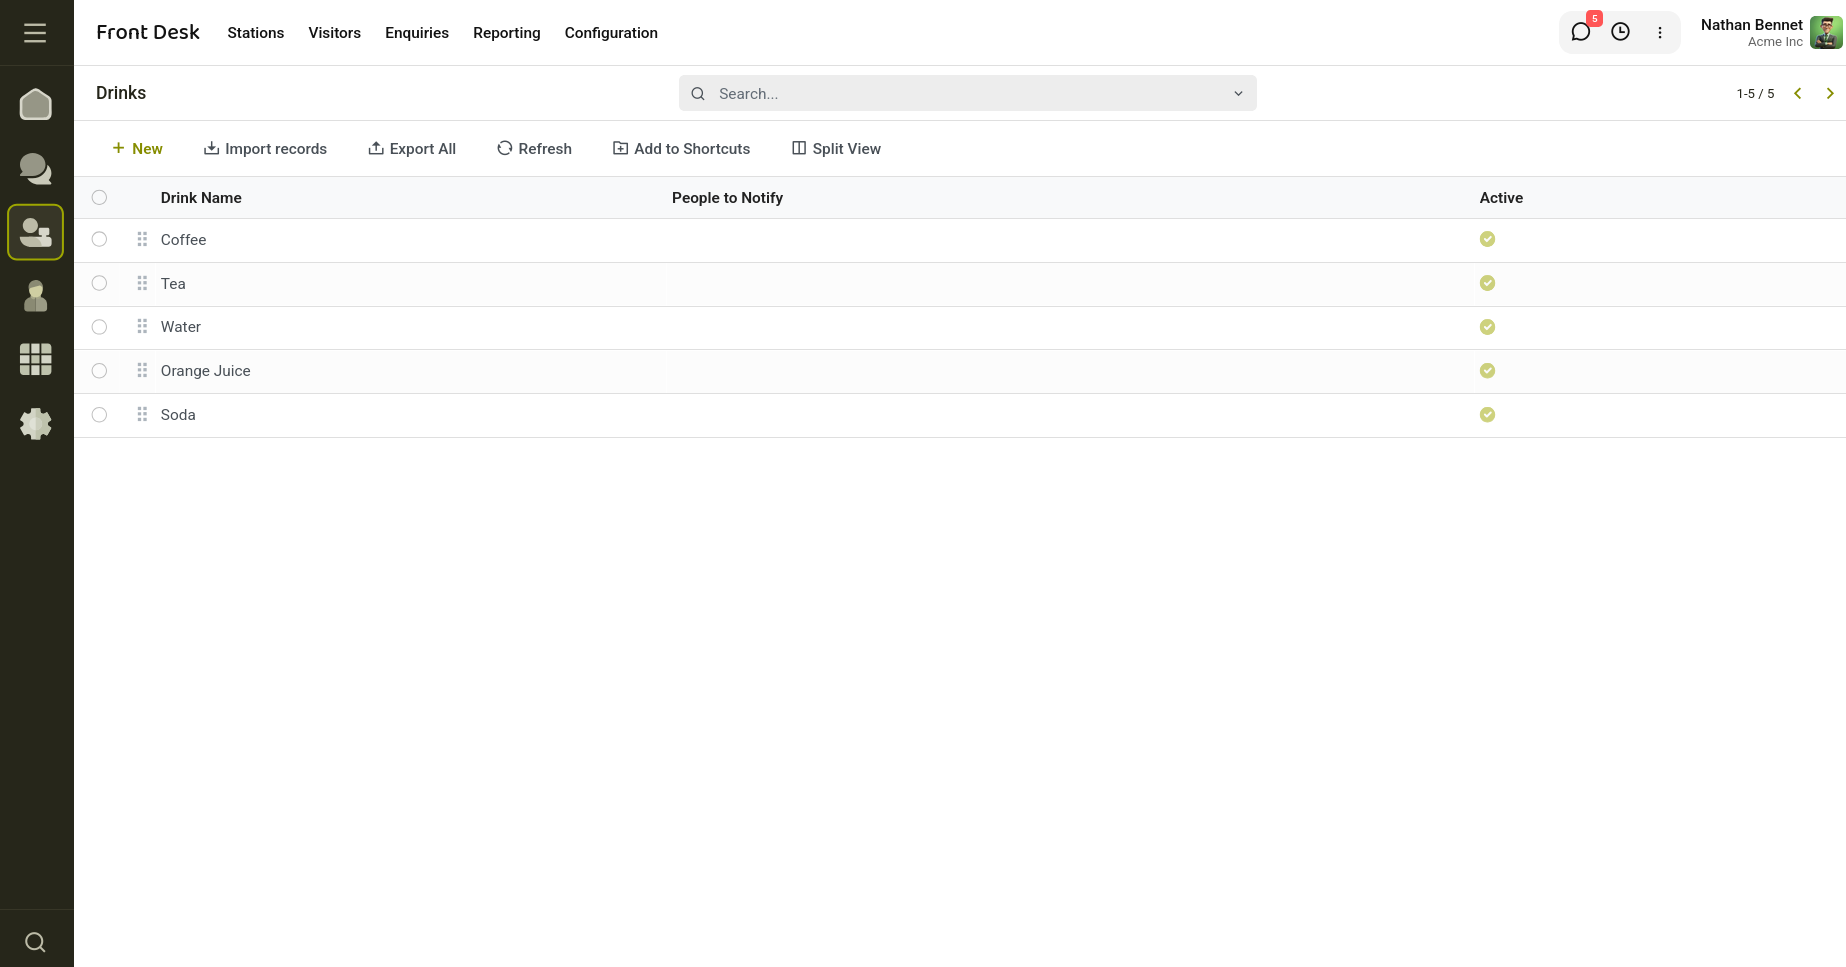
Fig 8.1 — Configure Drinks to serve the visitors.
Managing the Drinks Catalogue
- Go to Drinks → New (or click Configure Drinks from a station).
- Enter the Drink Name. Tick Translate if you support multiple languages.
- Set a Sequence number to control the display order in drop-downs.
- Add employees to People to Notify. These staff receive an email or Discuss message when the drink is requested.
- Optionally upload an Image for visual menus.
- Save. Archive a drink to hide it without deleting historical records.
Offering a Drink at Check-In
- When checking in a visitor, select a drink from the Drink Requested field (only visible if the station has Offer Drinks enabled and the drink is in the station's Drinks Offered list).
- Complete the check-in. The nominated drink prep team is notified immediately.
Marking a Drink as Served
- Open the visitor record.
- Click Drink Served.
- The Drink Served field is ticked and a chatter note is posted.
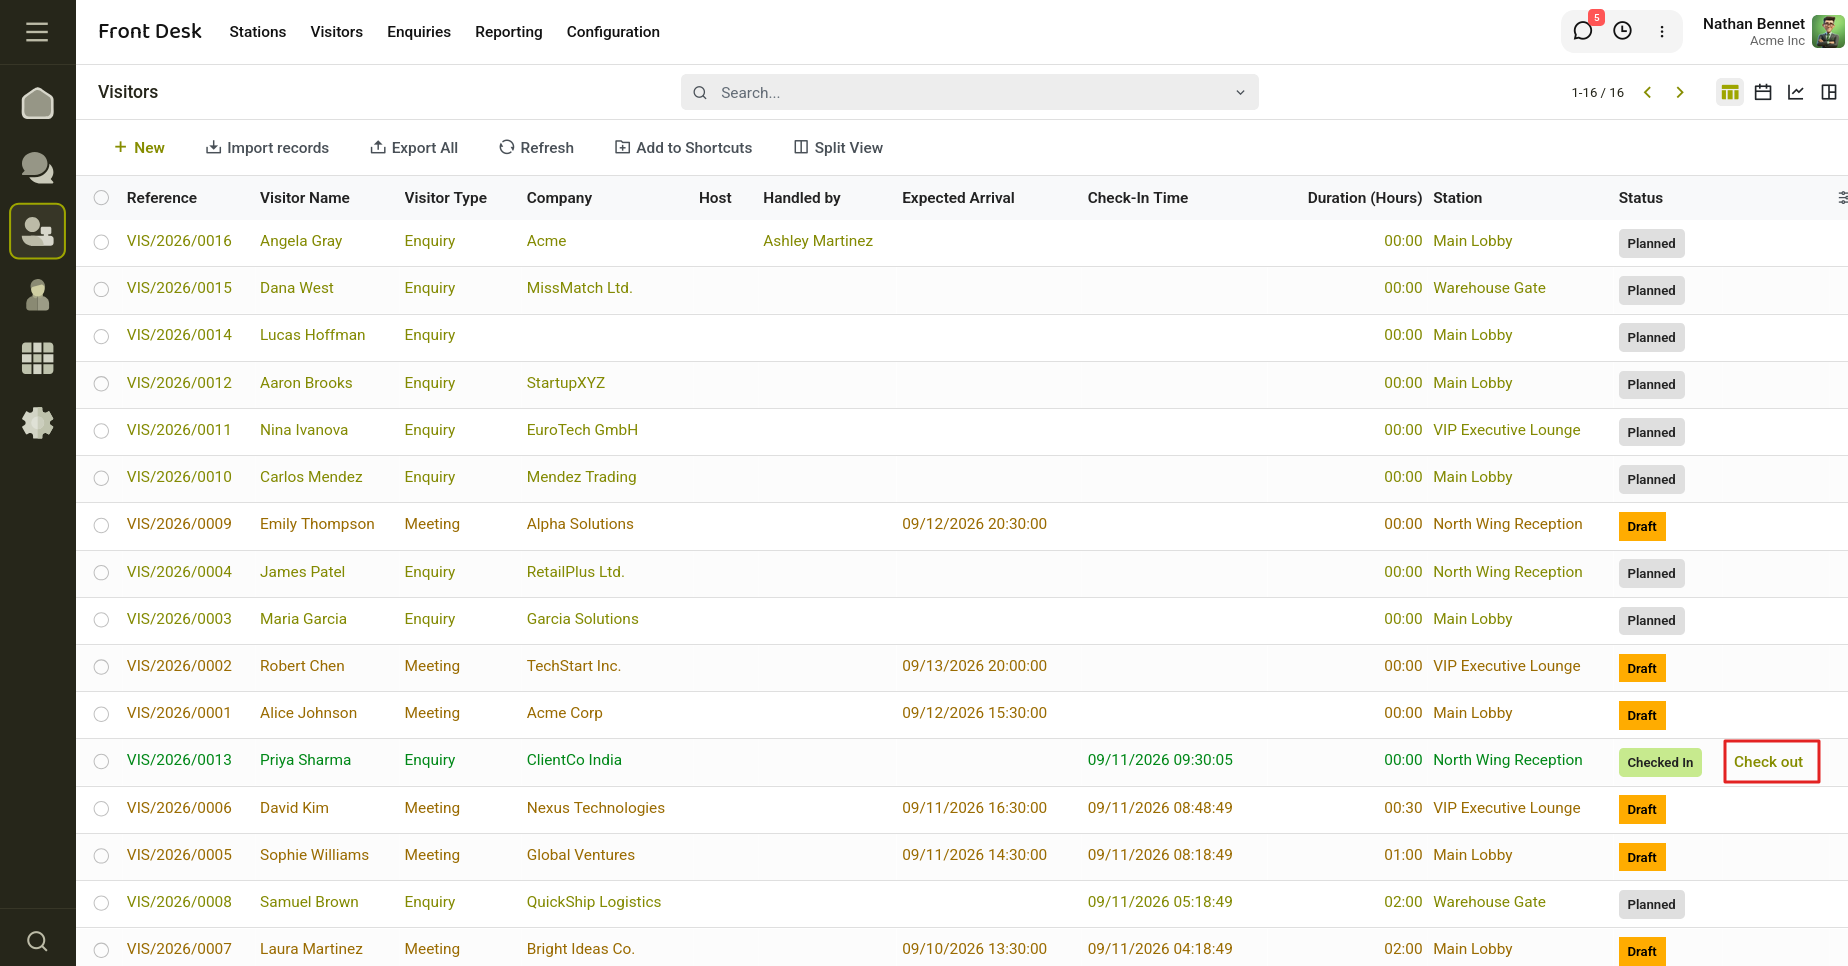
Fig 8.2 — Check out the visitor from the Visitors list view.
9. Frontdesk Appointment
The Cyllo Frontdesk – Appointment Integration connects the Frontdesk and Appointment applications to provide a seamless visitor management workflow. When appointments are created and confirmed, visitor records are automatically generated and synchronized with Frontdesk operations. The integration reduces manual work and ensures that appointment and visitor statuses remain aligned throughout the visit lifecycle.
9.1 Appointment and Station
The module extends appointment functionality by introducing frontdesk station support. When an appointment type is selected during appointment creation, the system automatically assigns the configured frontdesk station to the appointment. This removes the need for users to manually assign reception stations and ensures that appointments are directed to the appropriate frontdesk location.
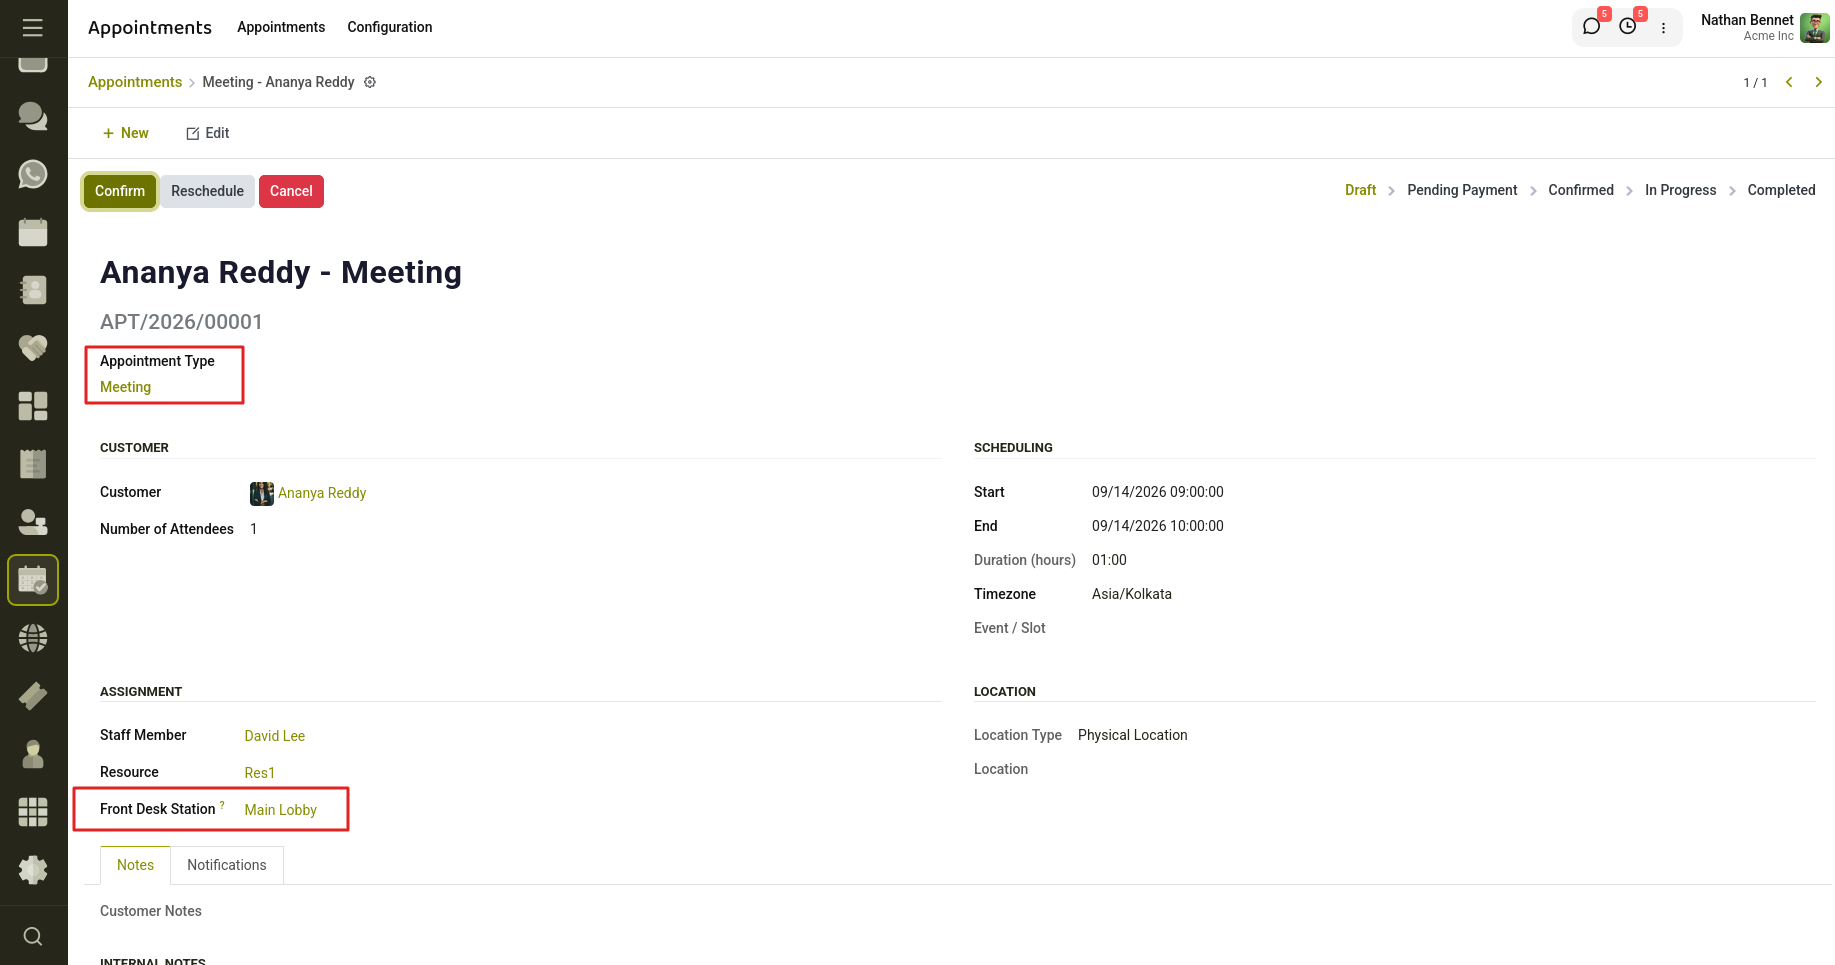
Fig 9.1 — Appointment with appointment type and frontdesk station
Once an appointment is confirmed, the system automatically creates a linked visitor record in the Frontdesk module using the appointment details such as visitor information, host details, contact information, expected arrival time, and assigned station. This ensures a smooth transition from appointment scheduling to visitor management without requiring manual intervention.
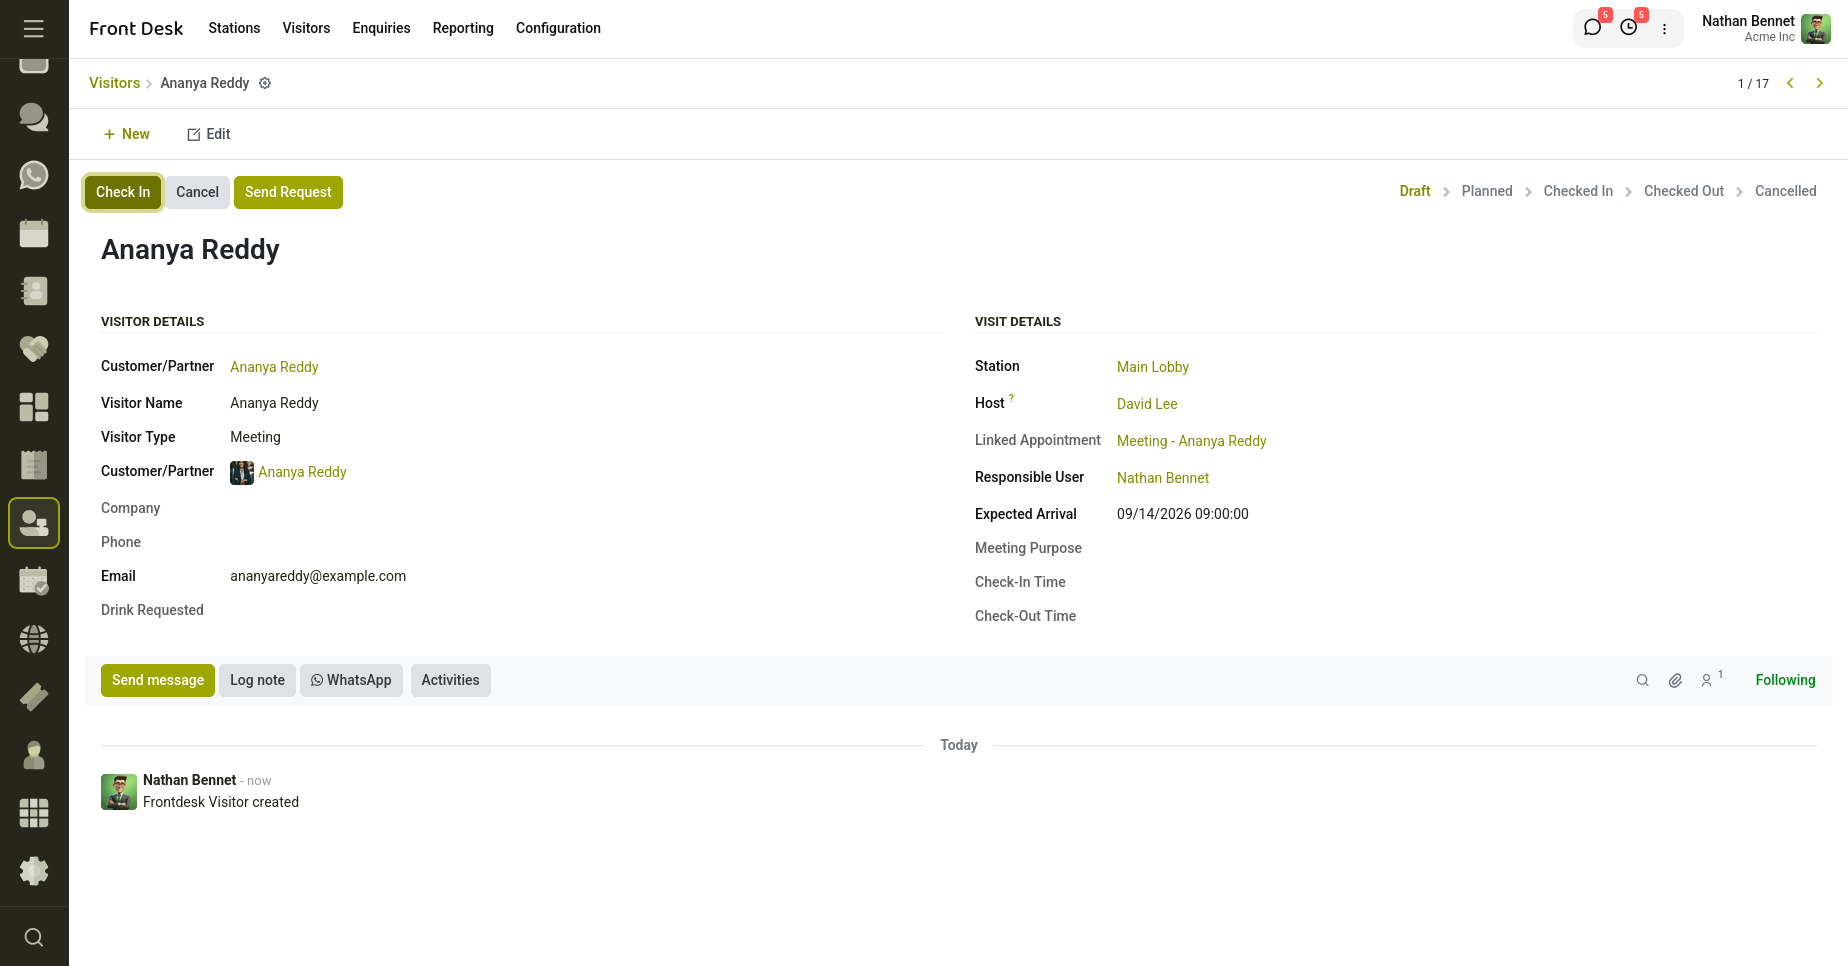
Fig 9.2 — Frontdesk Visitor.
When a visitor checks in from the Frontdesk application, the linked appointment automatically changes to the "In Progress" state. When the visitor checks out, the appointment moves to the completed state. If the visitor registration is cancelled, the linked appointment is also cancelled and a cancellation reason is recorded automatically.
9.2 Walk-In Appointment Booking
The Book Now feature enables reception staff to quickly schedule appointments for walk-in visitors without manually entering the same information multiple times. The system automatically creates or identifies the customer, opens a pre-filled appointment form, and populates relevant details to ensure a fast and efficient booking process.
- Open Front Desk and create or open a visitor record.
- Click Book Now on the visitor form.
- The system automatically creates or identifies the corresponding customer.
- A new appointment form opens with the relevant details pre-filled.
- Verify or update the customer, host, appointment type, station, and visitor information as needed.
- Save the appointment to complete the booking.
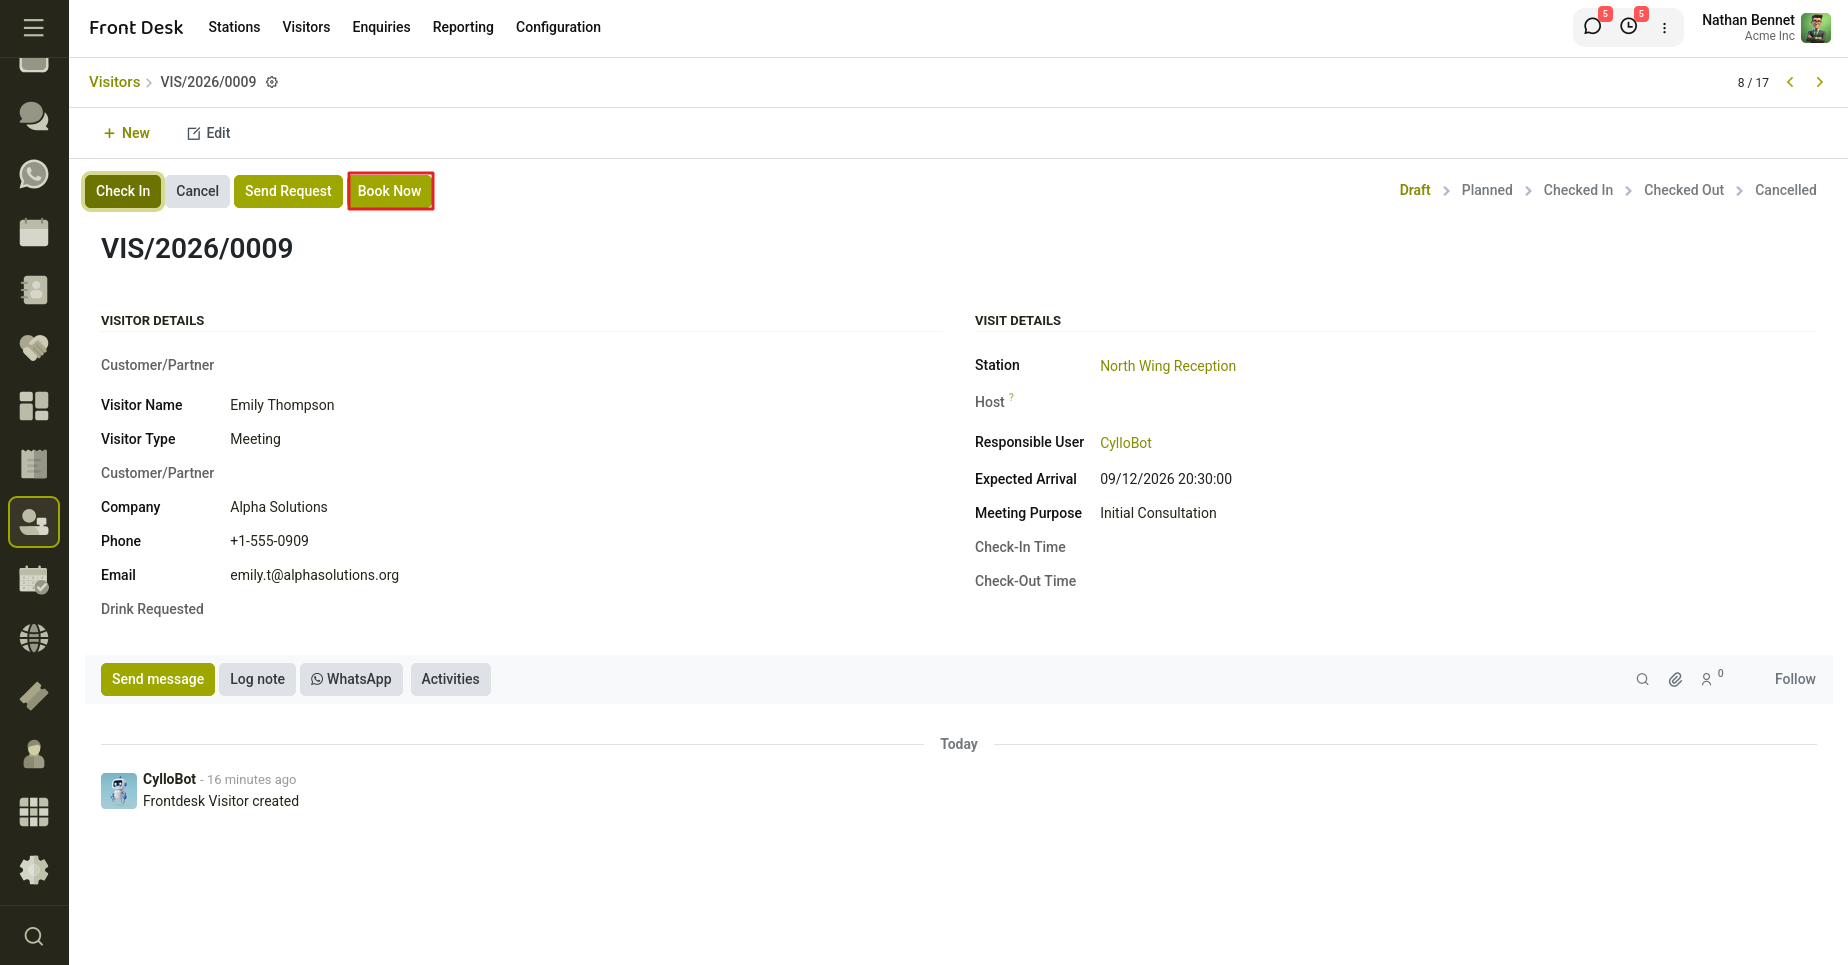
Fig 9.3 — Walk in Appointment Booking.
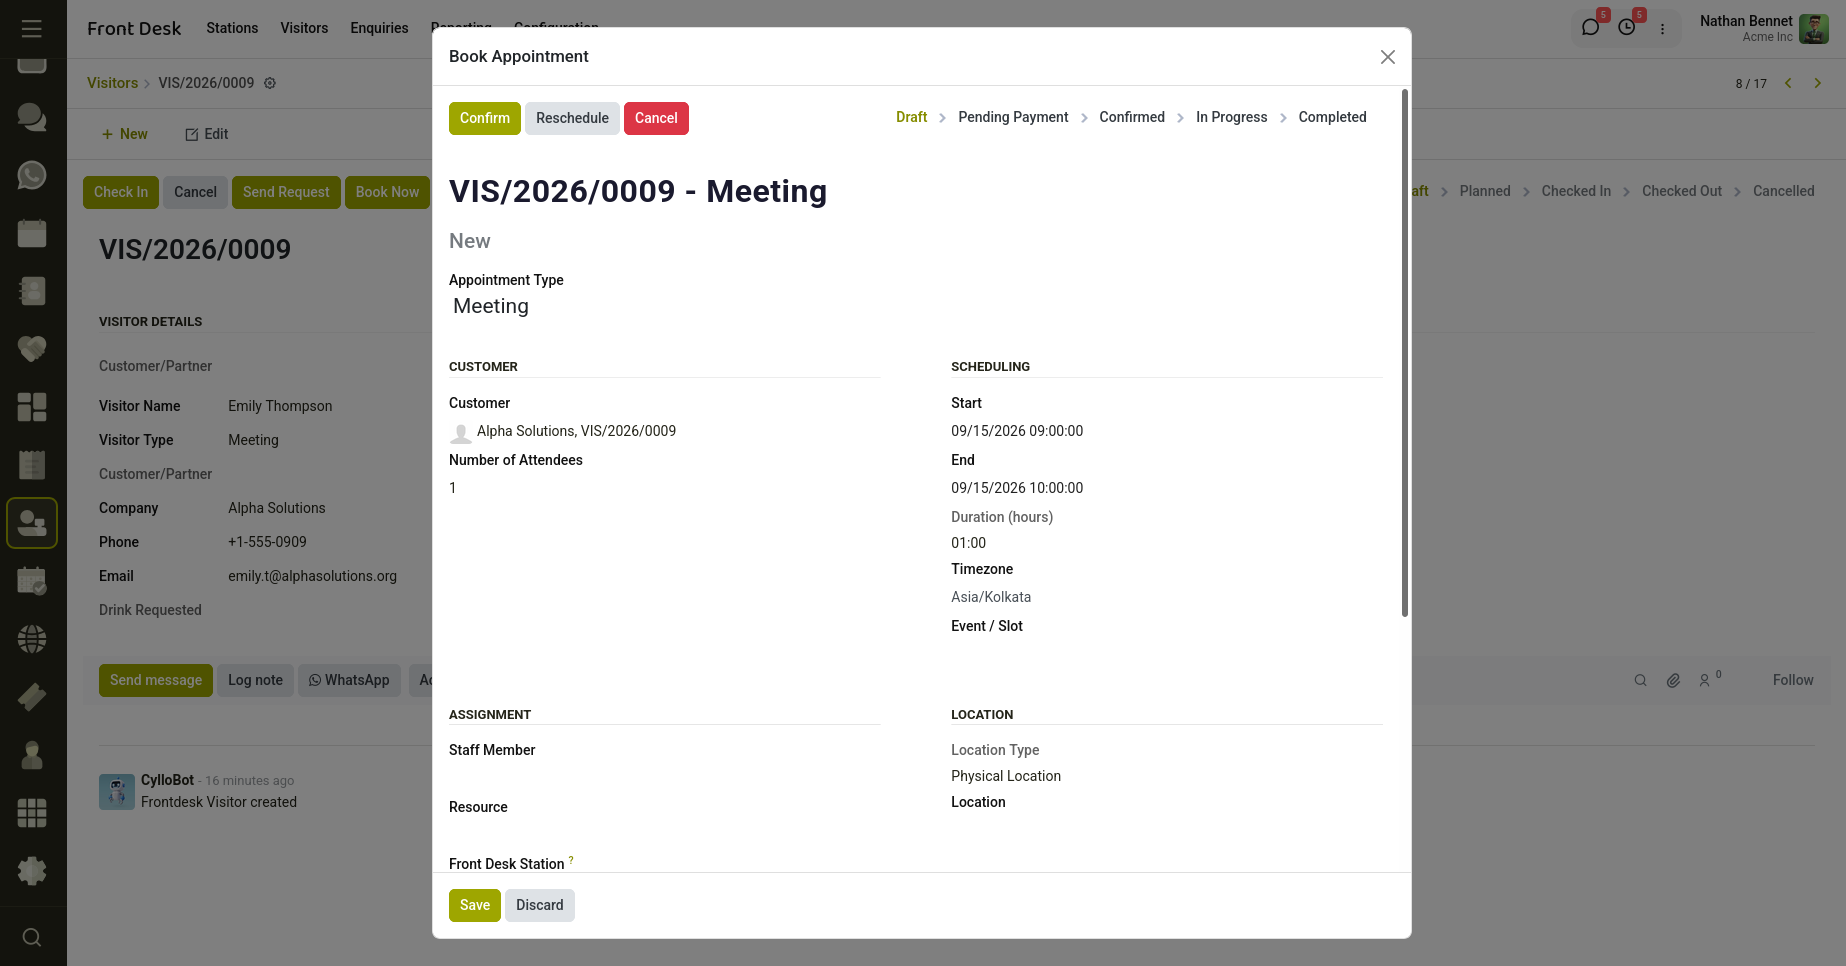
Fig 9.4 — Walk in appointment booking creation.