

Cyllo Appointment Documentation
Introduction
1. Appointment
The Cyllo Appointment module is an advanced appointment scheduling solution that enables organizations to manage customer bookings, staff schedules, resources, notifications, payments, and appointment lifecycles from a single platform.
The module supports both website-based self-service booking and internal appointment management through Cyllo. It is designed for businesses that offer consultations, services, meetings, training sessions, events, or any activity that requires scheduled appointments.
The solution helps organizations:
- Reduce manual scheduling efforts
- Avoid double bookings
- Manage staff and resource availability
- Automate customer communications
- Enable online appointment booking
- Collect payments before appointments
- Track appointment history and status changes
1.1 Business Process Overview
The typical appointment lifecycle is shown below:
- Administrator creates an Appointment Type.
- Staff members and resources are assigned.
- Booking rules and scheduling settings are configured.
- Appointment type is published on the website.
- Customer selects an appointment and books a slot.
- Appointment is created automatically.
- Payment is collected if required.
- Confirmation notifications are sent.
- Reminder notifications are sent before the appointment.
- Appointment is completed, cancelled, or rescheduled.
- Follow-up communication is sent.
2. Features
2.1 Appointment Type Management
Appointment Types act as templates that define how appointments should behave. Each appointment type can be configured with:
General Information
- Name
- Sequence
- Description
- Active Status
- Category
Available Categories
- Consultation
- Service
- Meeting
- Class / Training
- Event
- Other
The category helps classify appointments for reporting and management purposes.
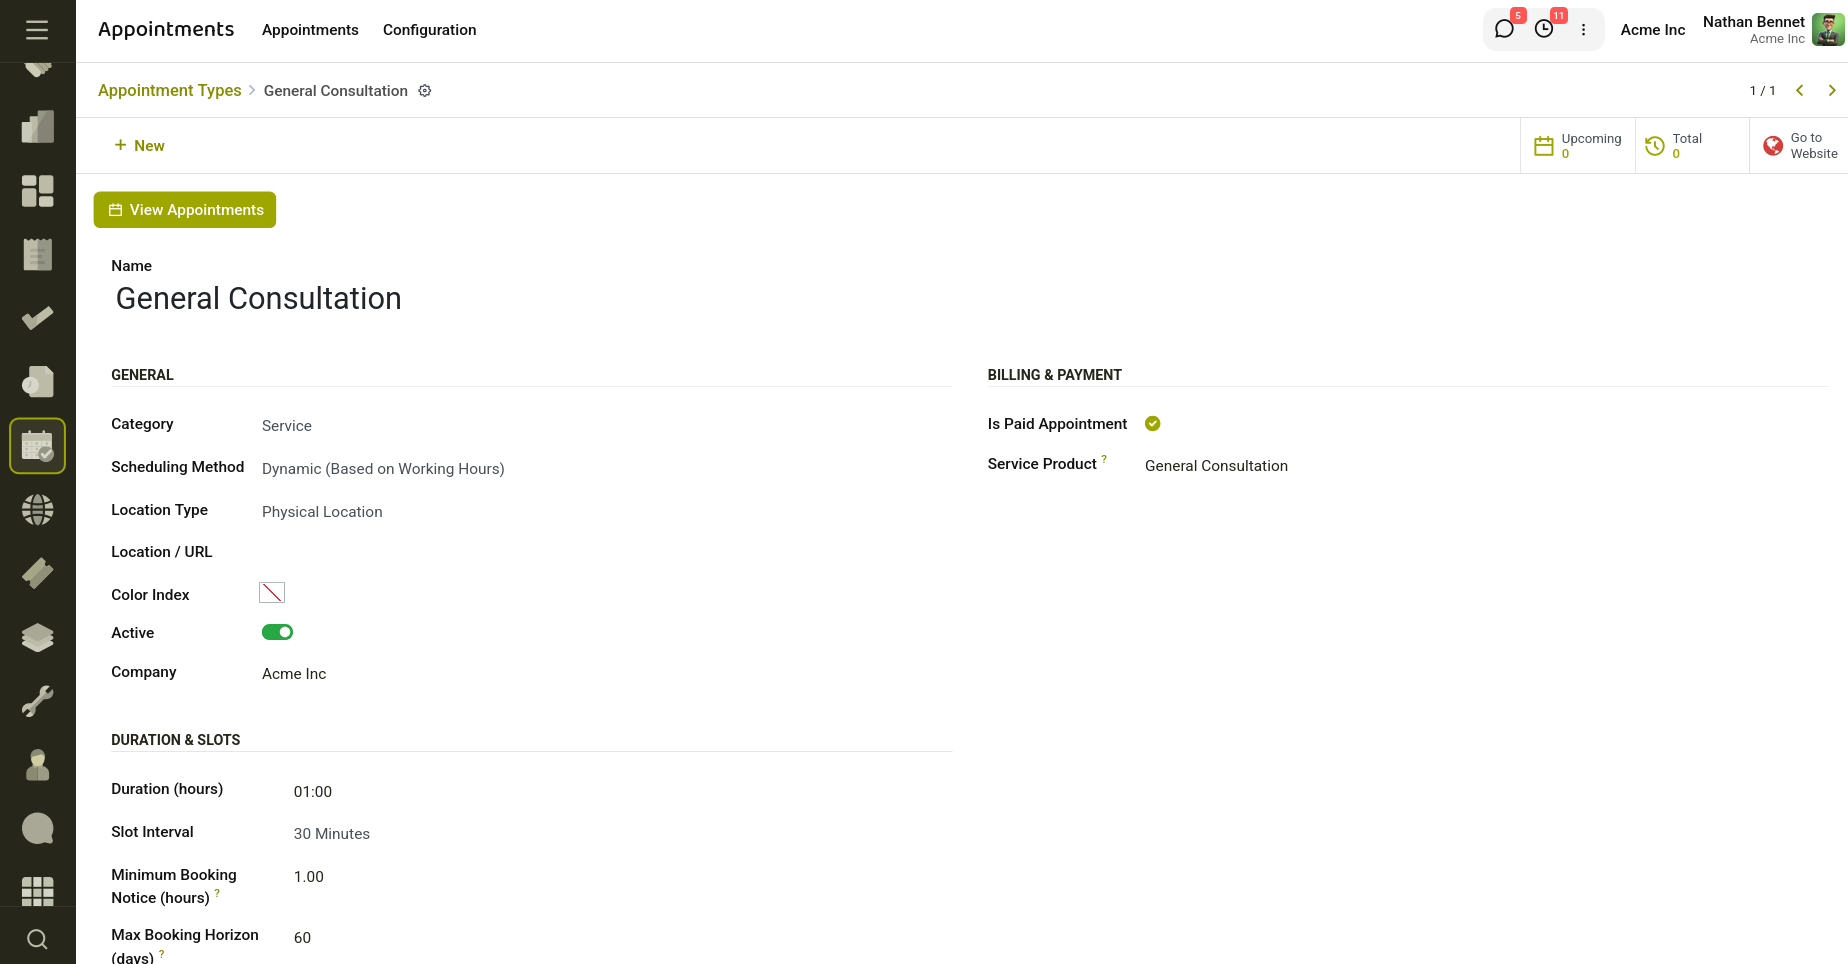
Fig 2.1 — Appointment Type Creation
2.2 Scheduling Methods
The system supports two scheduling approaches.
Dynamic Scheduling
In Dynamic Scheduling, available slots are generated automatically using:
- Employee working hours
- Resource availability
- Appointment duration
- Booking notice restrictions
- Maximum booking horizon
This approach is ideal when appointment times should be generated dynamically.
Benefits
- Minimal maintenance
- Automatic availability calculation
- Better utilization of staff schedules
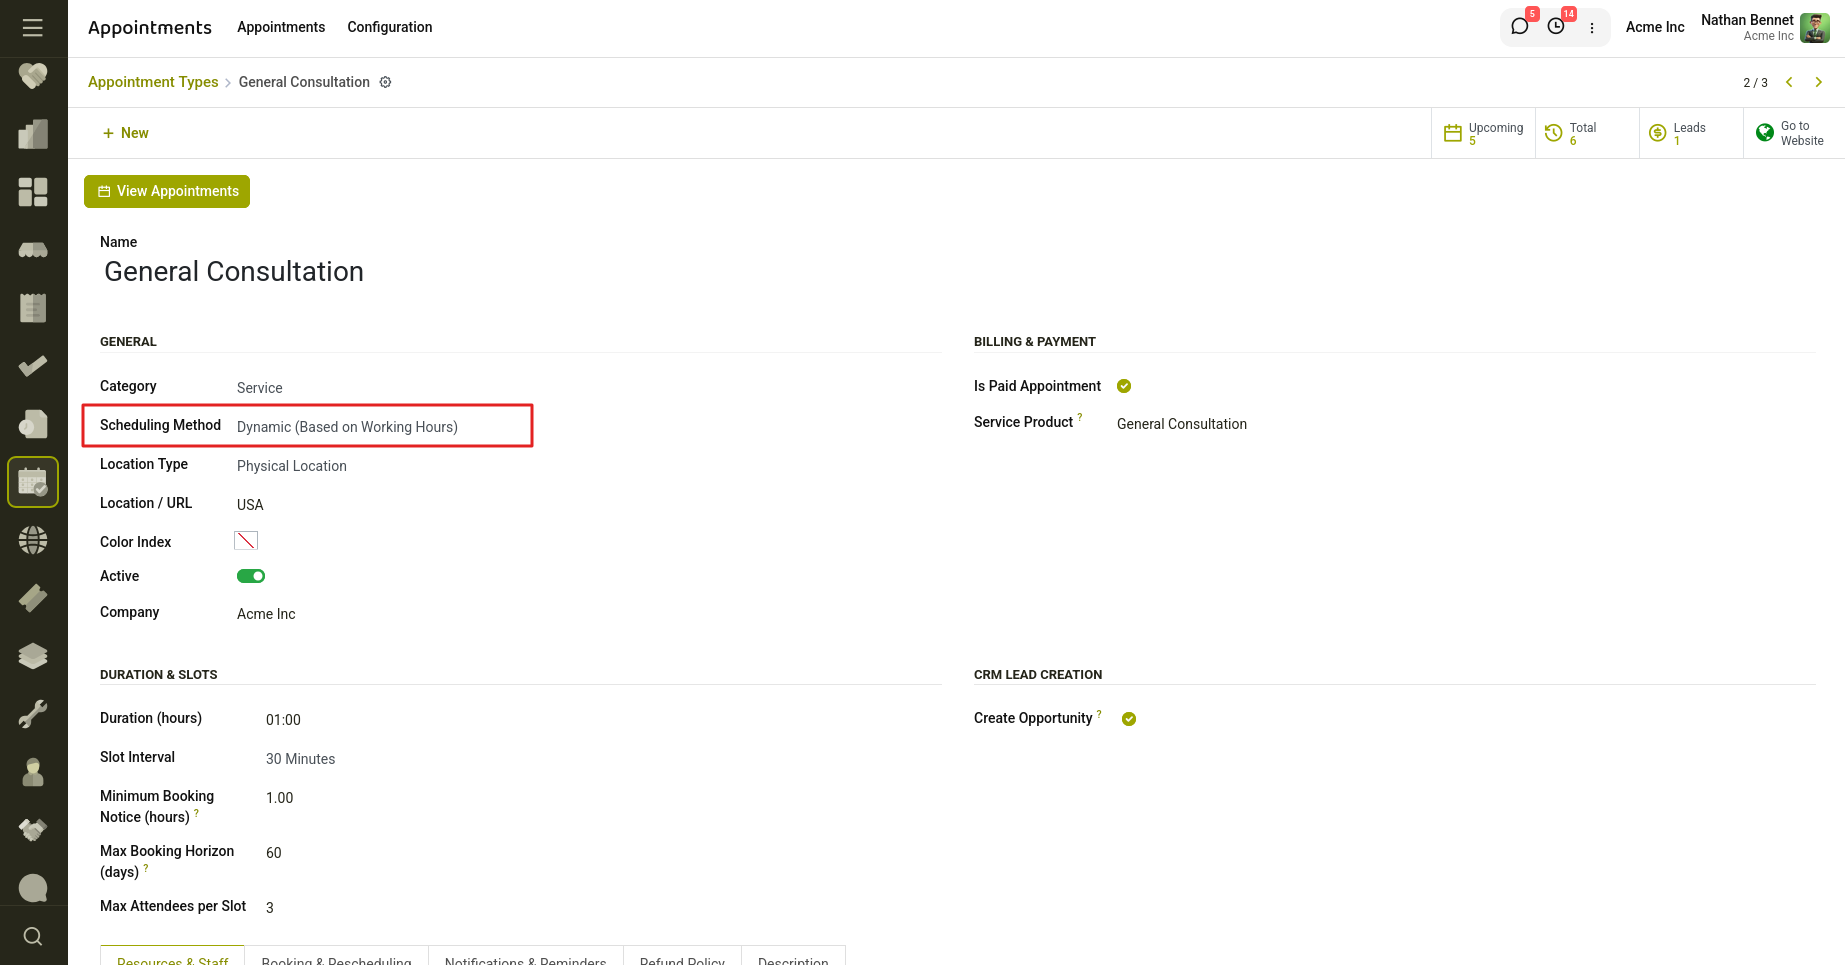
Fig 2.2 — Scheduling methods in Appointment Type
Predefined Slot Scheduling
In Predefined Scheduling, administrators create fixed appointment slots manually.
Each slot includes:
- Date
- Start Time
- End Time
- Assigned Staff
- Assigned Resource
- Capacity
This approach is suitable for:
- Training sessions
- Events
- Workshops
- Fixed consultation hours
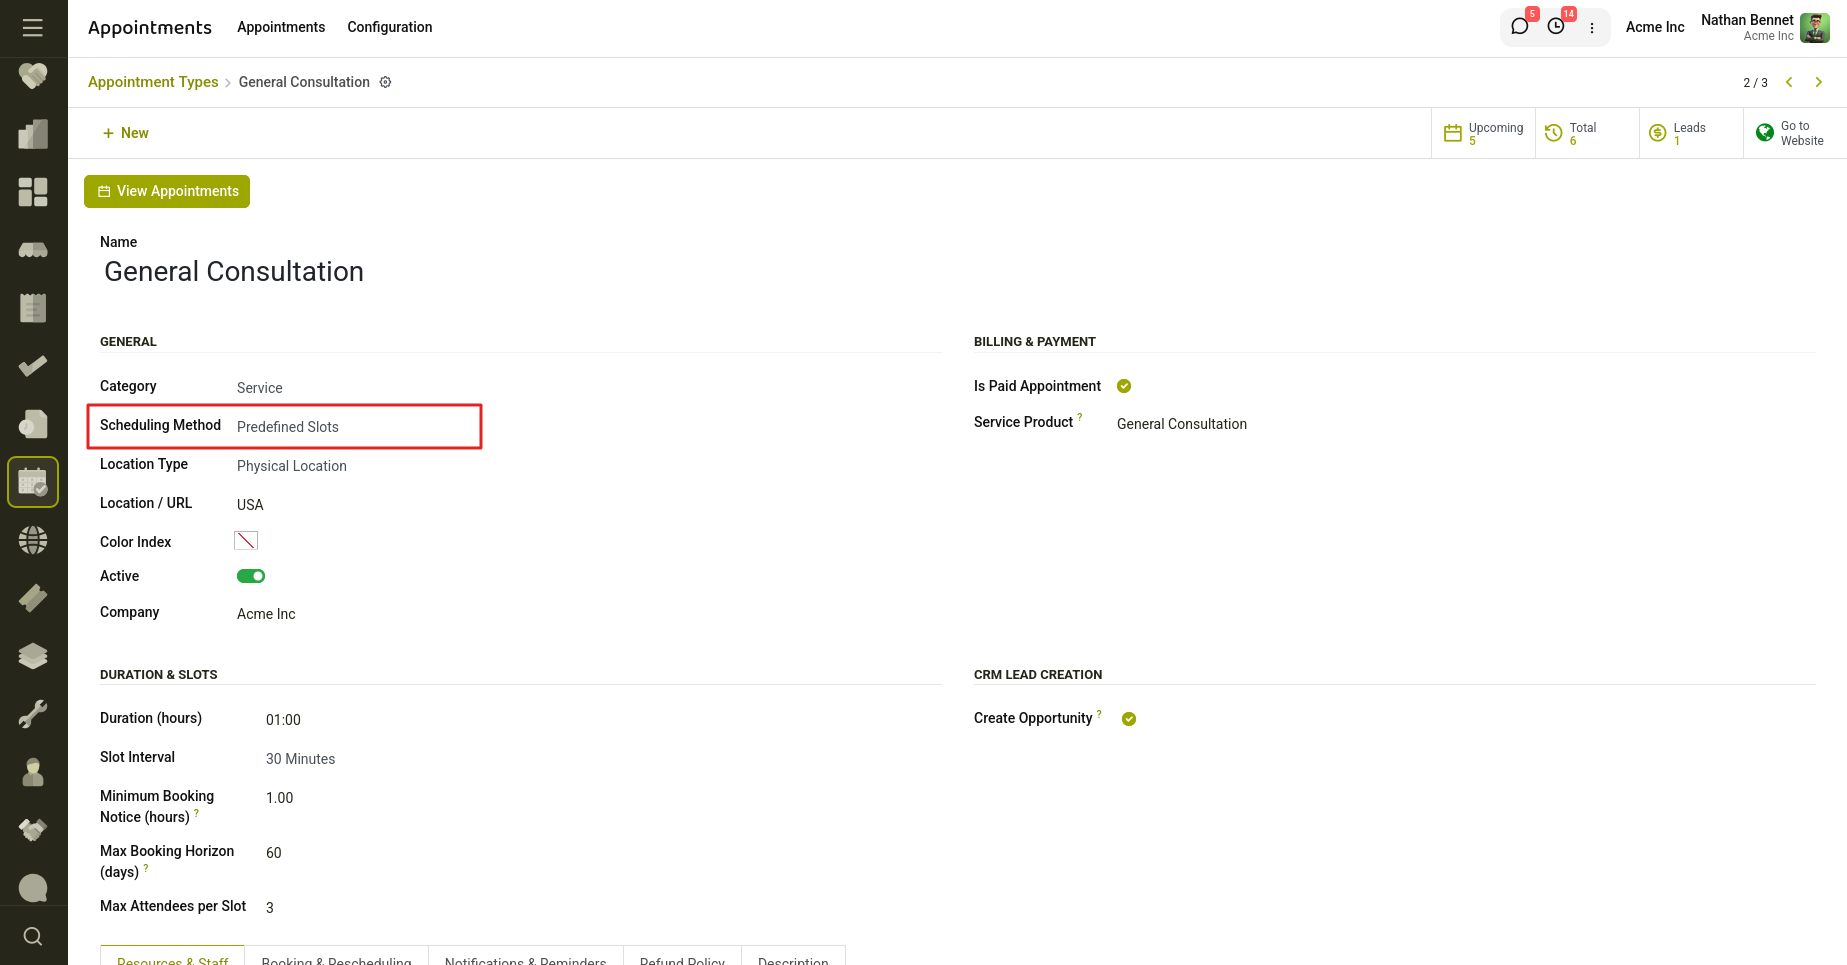
Fig 2.3 — Predefined Slot Scheduling.
In the following screenshot we see that predefined slots are created in the morning and evening for the appointment type Yoga Session. When bookings are created for this appointment type, these slots can be selected.
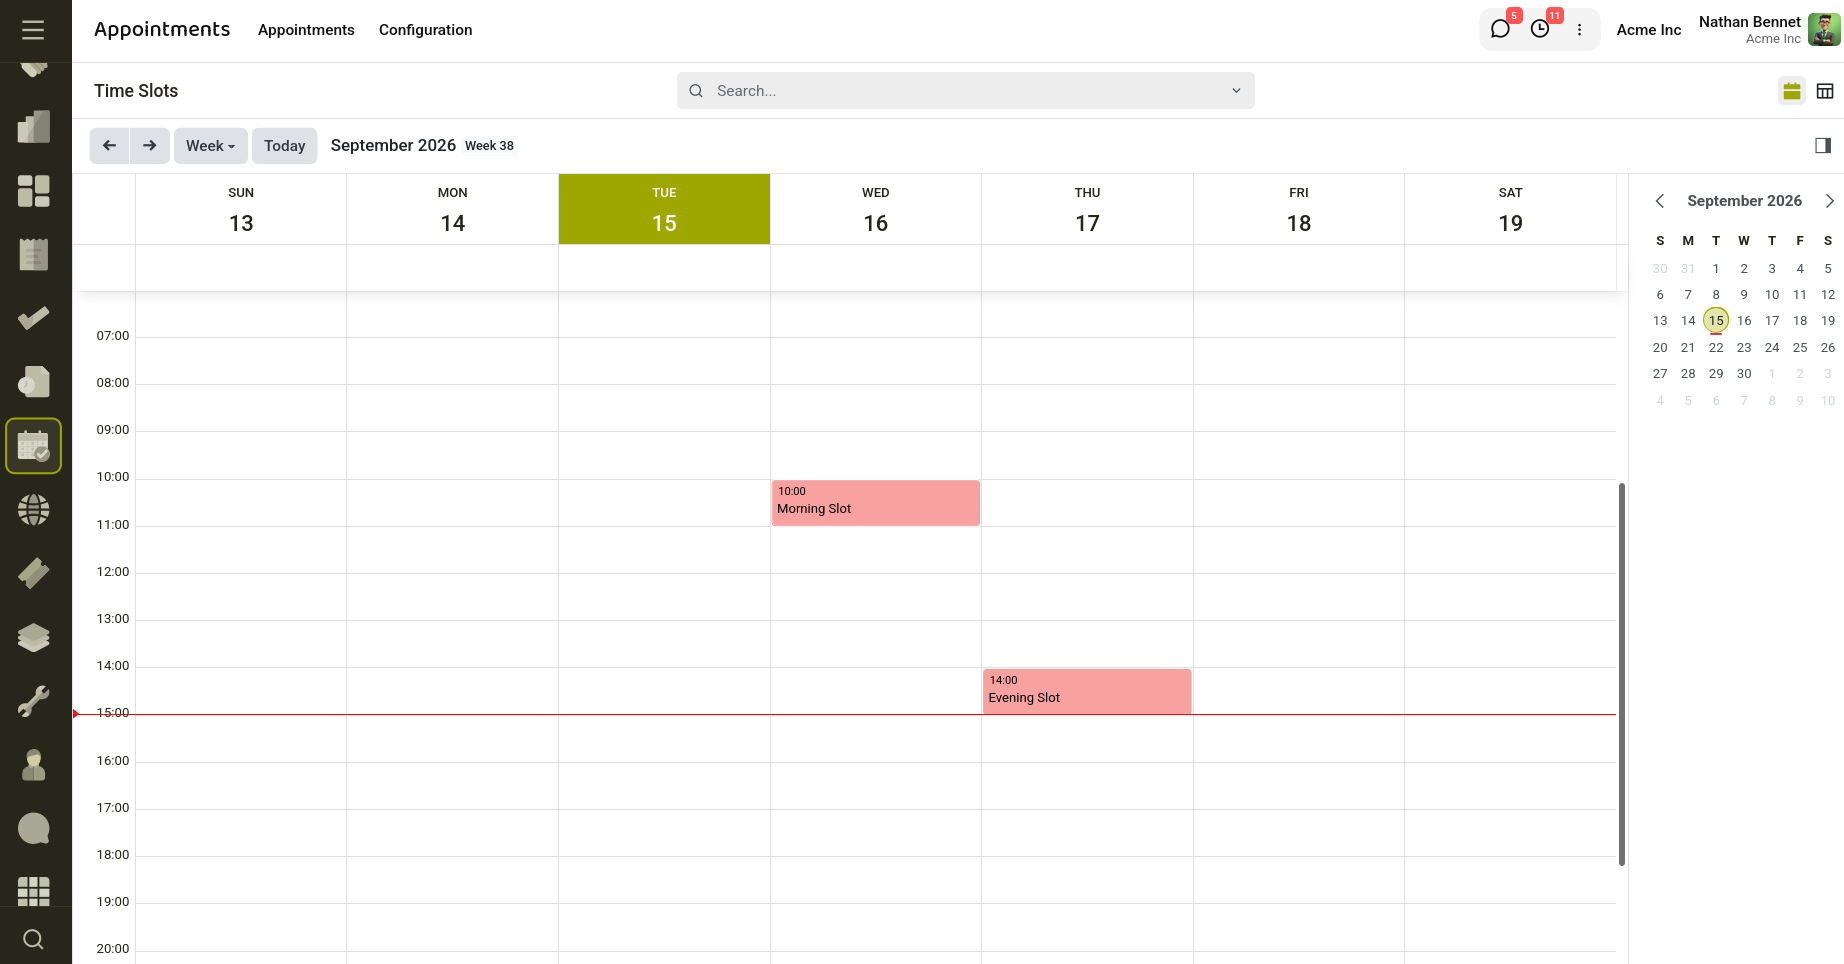
Fig 2.4 — Predefined slots are created
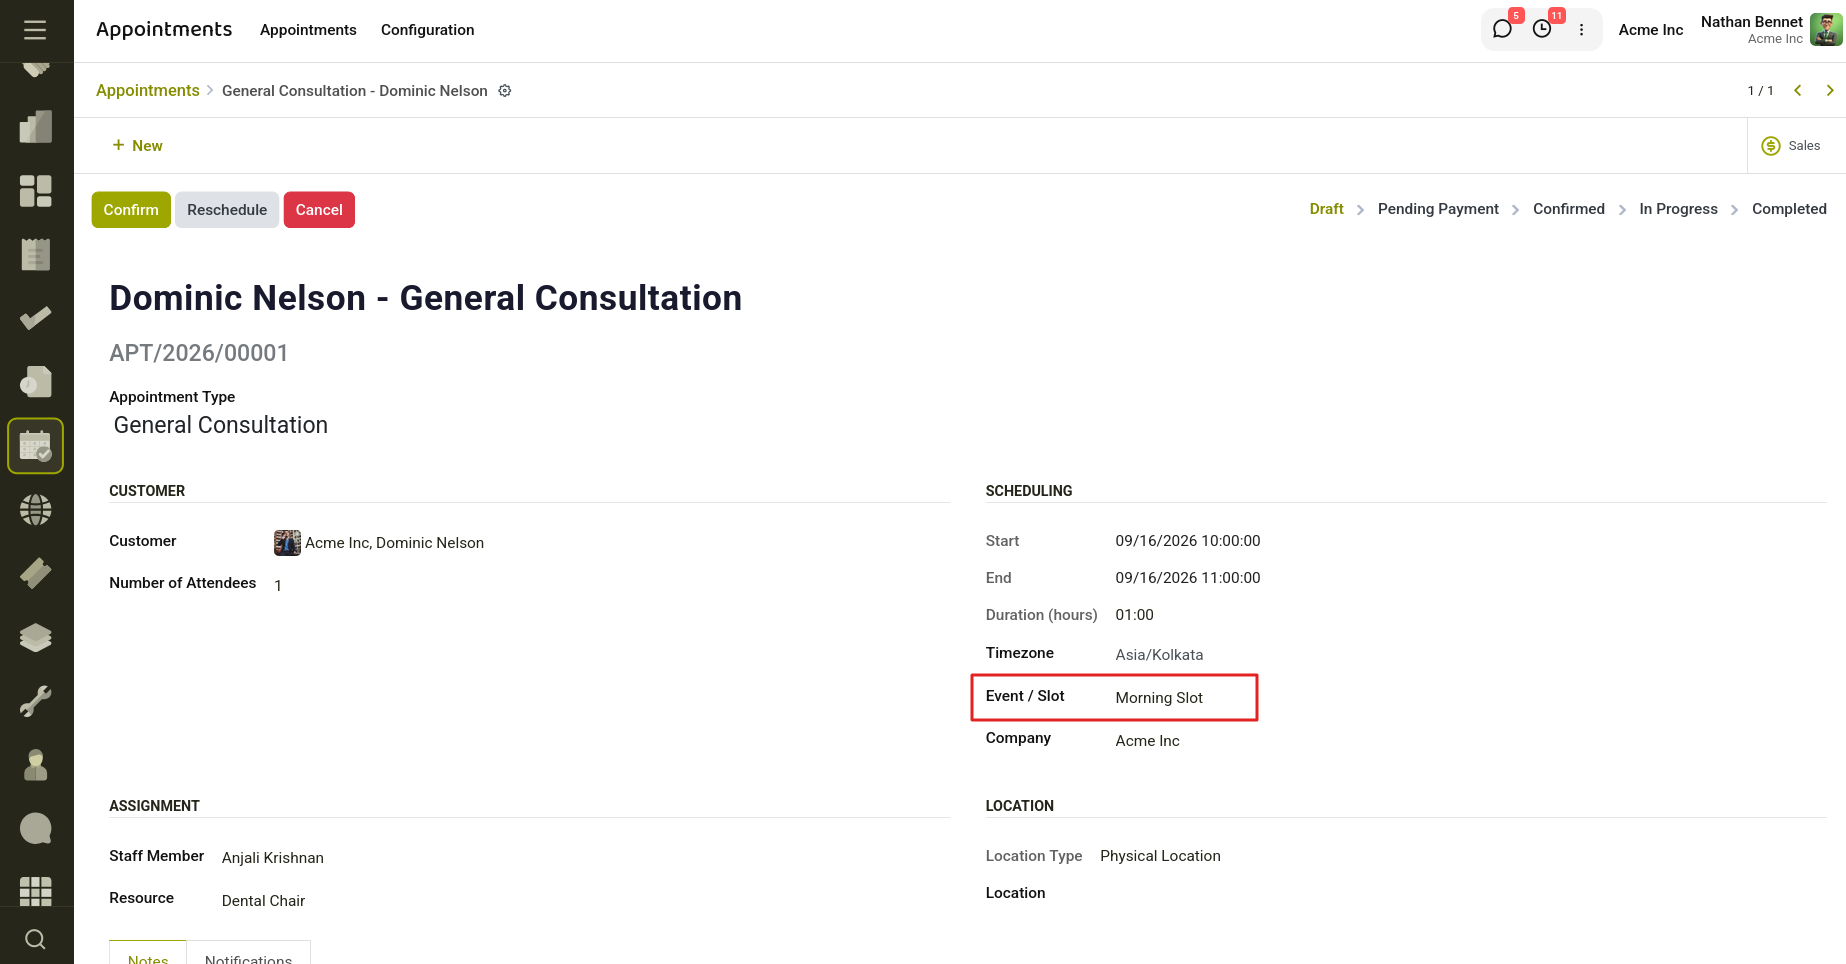
Fig 2.5 — When bookings are created for that appointment type, these slots can be selected.
2.3 Duration and Time Slot Management
Each appointment type can define:
Appointment Duration
Specifies how long the appointment lasts.
Examples:
- 30 Minutes
- 1 Hour
- 2 Hours
Slot Intervals
Available intervals include:
- 15 Minutes
- 30 Minutes
- 45 Minutes
- 60 Minutes
- 90 Minutes
- 120 Minutes
The slot interval determines how booking times are generated.
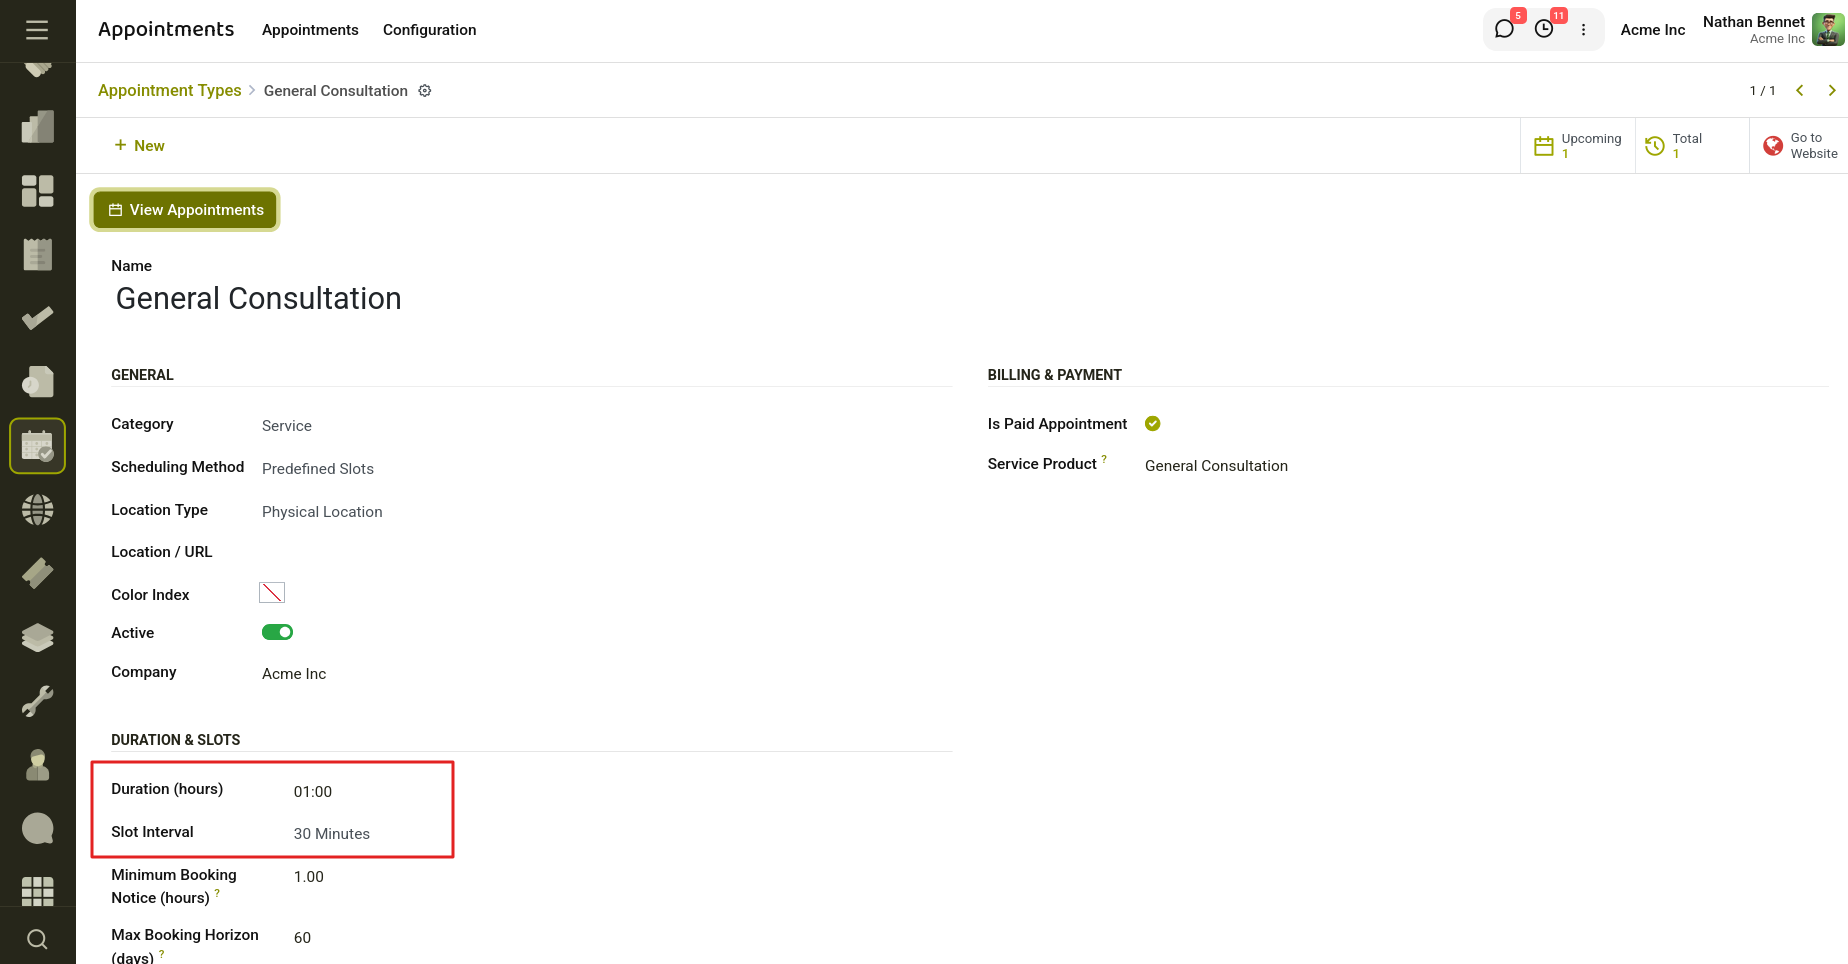
Fig 2.6 — Duration and Time Slot Management.
2.4 Booking Rules
Administrators can control when customers are allowed to book appointments.
Minimum Booking Notice
Defines how much advance notice is required before booking.
Example:
If minimum booking notice is 24 hours, customers cannot book appointments starting within the next 24 hours.
Maximum Booking Horizon
Defines how many days into the future appointments can be booked.
Example:
If set to 60 days, customers cannot book appointments more than 60 days ahead.
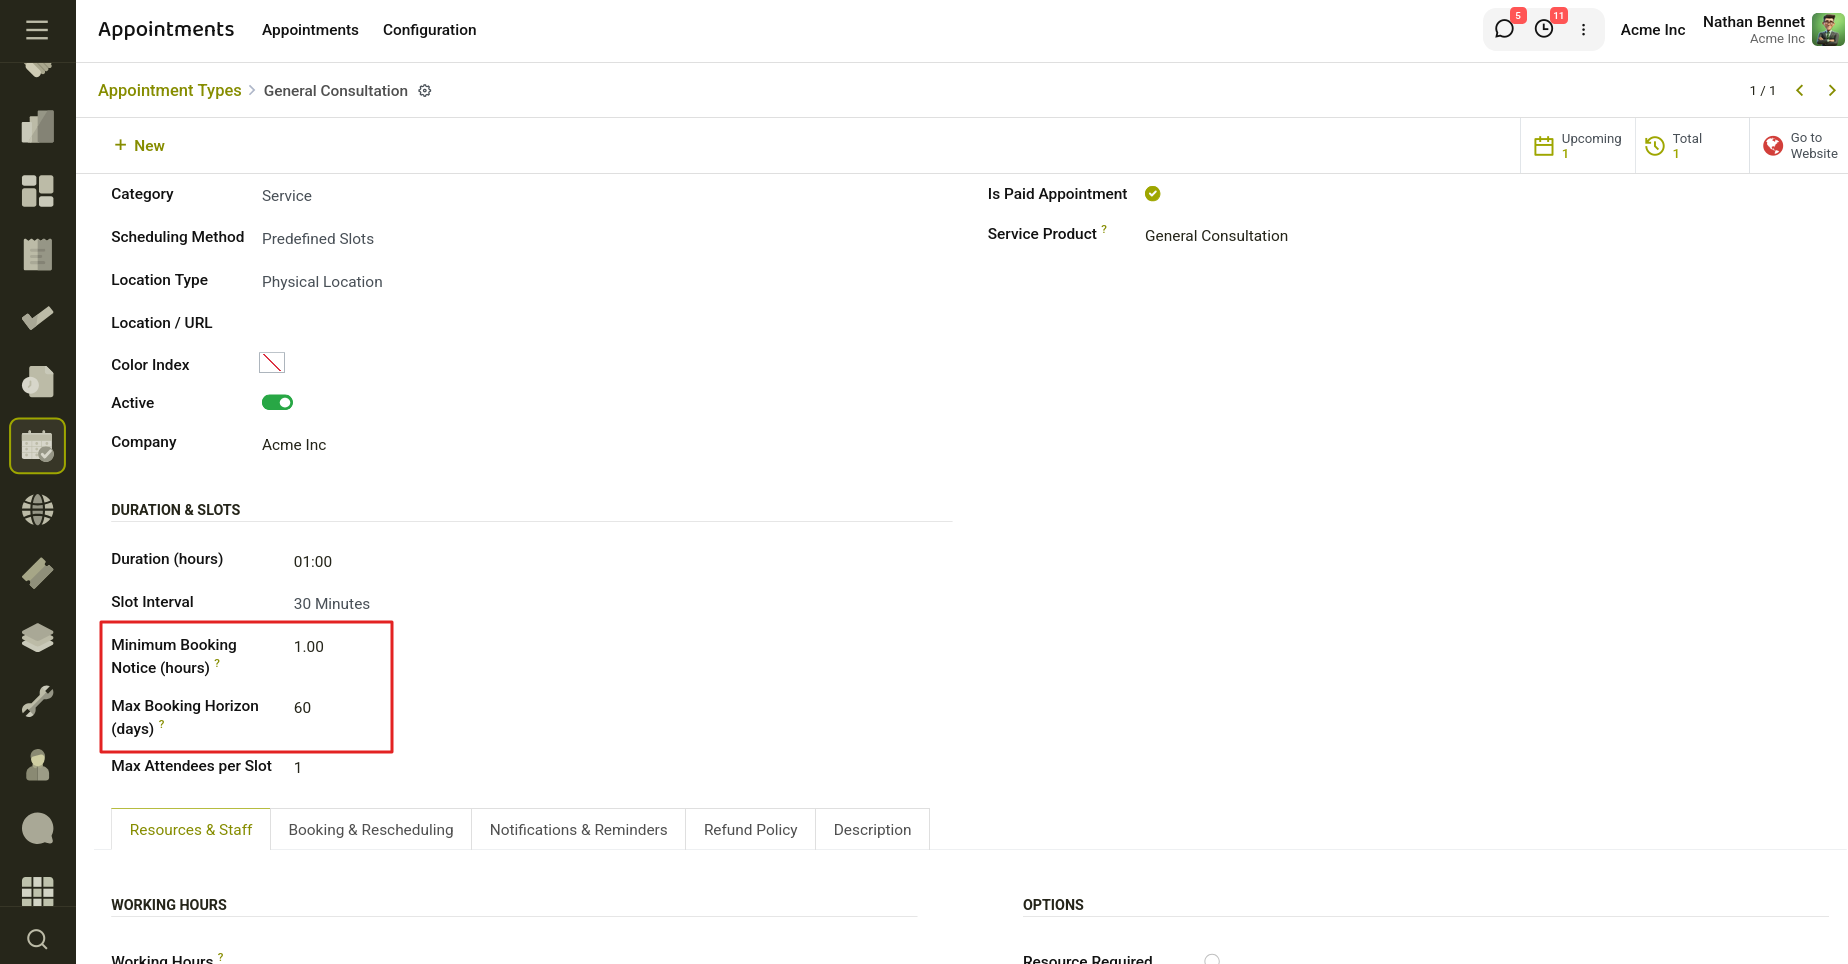
Fig 2.7 — Booking Rules with Maximum Booking Notice and Hours.
2.5 Staff Management
The Staff Management feature allows organizations to assign appointments to specific employees and manage their availability efficiently. It ensures that appointments are scheduled only when qualified staff members are available, preventing conflicts and improving resource utilization.
Each appointment type can be linked to one or more staff members who are responsible for providing the service. During the booking process, the system automatically considers employee schedules, working hours, existing appointments, leaves, and availability before presenting time slots to customers.
Key Features
Employee Assignment
Administrators can assign one or multiple employees to an appointment type. This allows appointments to be handled by designated staff members based on their expertise or responsibilities.
Example: General Consultation → Dr. Sarah, Dr. Mohamed Ali
Availability Checking
Before displaying available slots, the system verifies whether the selected employee is available during the requested time period. Employees who are unavailable due to existing appointments, leave requests, or schedule restrictions are automatically excluded.
Working Hour Validation
The module validates appointments against employee working schedules. Customers can only book appointments within the employee's configured working hours, ensuring appointments are not scheduled during non-working periods.
Example:
- Employee Working Hours: 9:00 AM – 5:00 PM
- Appointment Request: 7:00 PM
Result: The booking will not be allowed because it falls outside the employee's working schedule.
Conflict Prevention
The system prevents double-booking by checking for overlapping appointments. If an employee already has a confirmed appointment during a specific time slot, that slot will not be available for new bookings.
Staff-Based Appointment Scheduling
Customers may be allowed to choose their preferred staff member during booking, or the system can automatically assign an available employee based on scheduling rules.
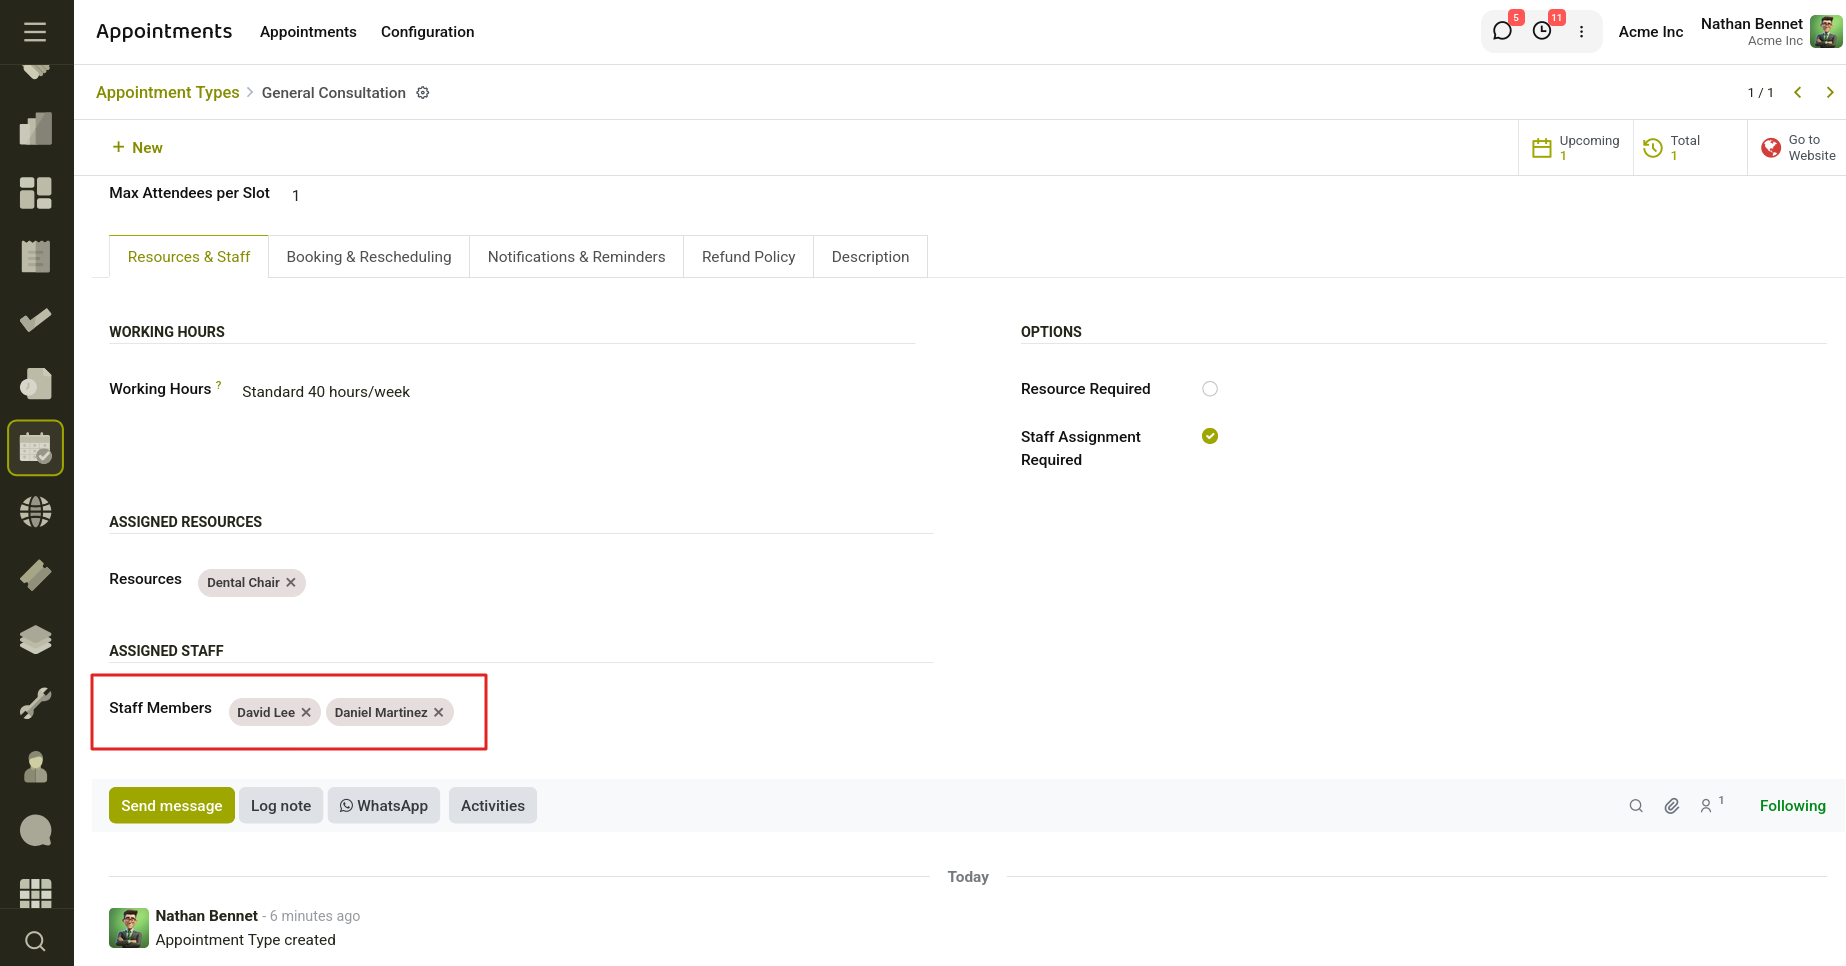
Fig 2.8 — Staff-Based Appointment Scheduling.
2.6 Resource Management
Resources represent physical or virtual assets required to conduct appointments. These resources can be assigned to appointment types to ensure that all necessary facilities, equipment, or locations are available when a booking is made.
Examples of resources include:
- Meeting Rooms
- Consultation Rooms
- Training Halls
- Vehicles
- Equipment
- Virtual Meeting Rooms
Resource Features
Resource Allocation
Resources can be assigned to appointment types so that they are automatically reserved when an appointment is booked.
Availability Tracking The system checks resource availability before displaying appointment slots, ensuring that only available resources can be booked.
Capacity Management
Resources can have a defined capacity, allowing them to support individual or group appointments.
Conflict Prevention The system prevents double-booking by validating resource availability before confirming an appointment.
Benefits
- Ensures required facilities and equipment are available.
- Prevents overlapping resource bookings.
- Improves utilization of business resources.
- Reduces manual scheduling effort.
- Supports efficient appointment planning.
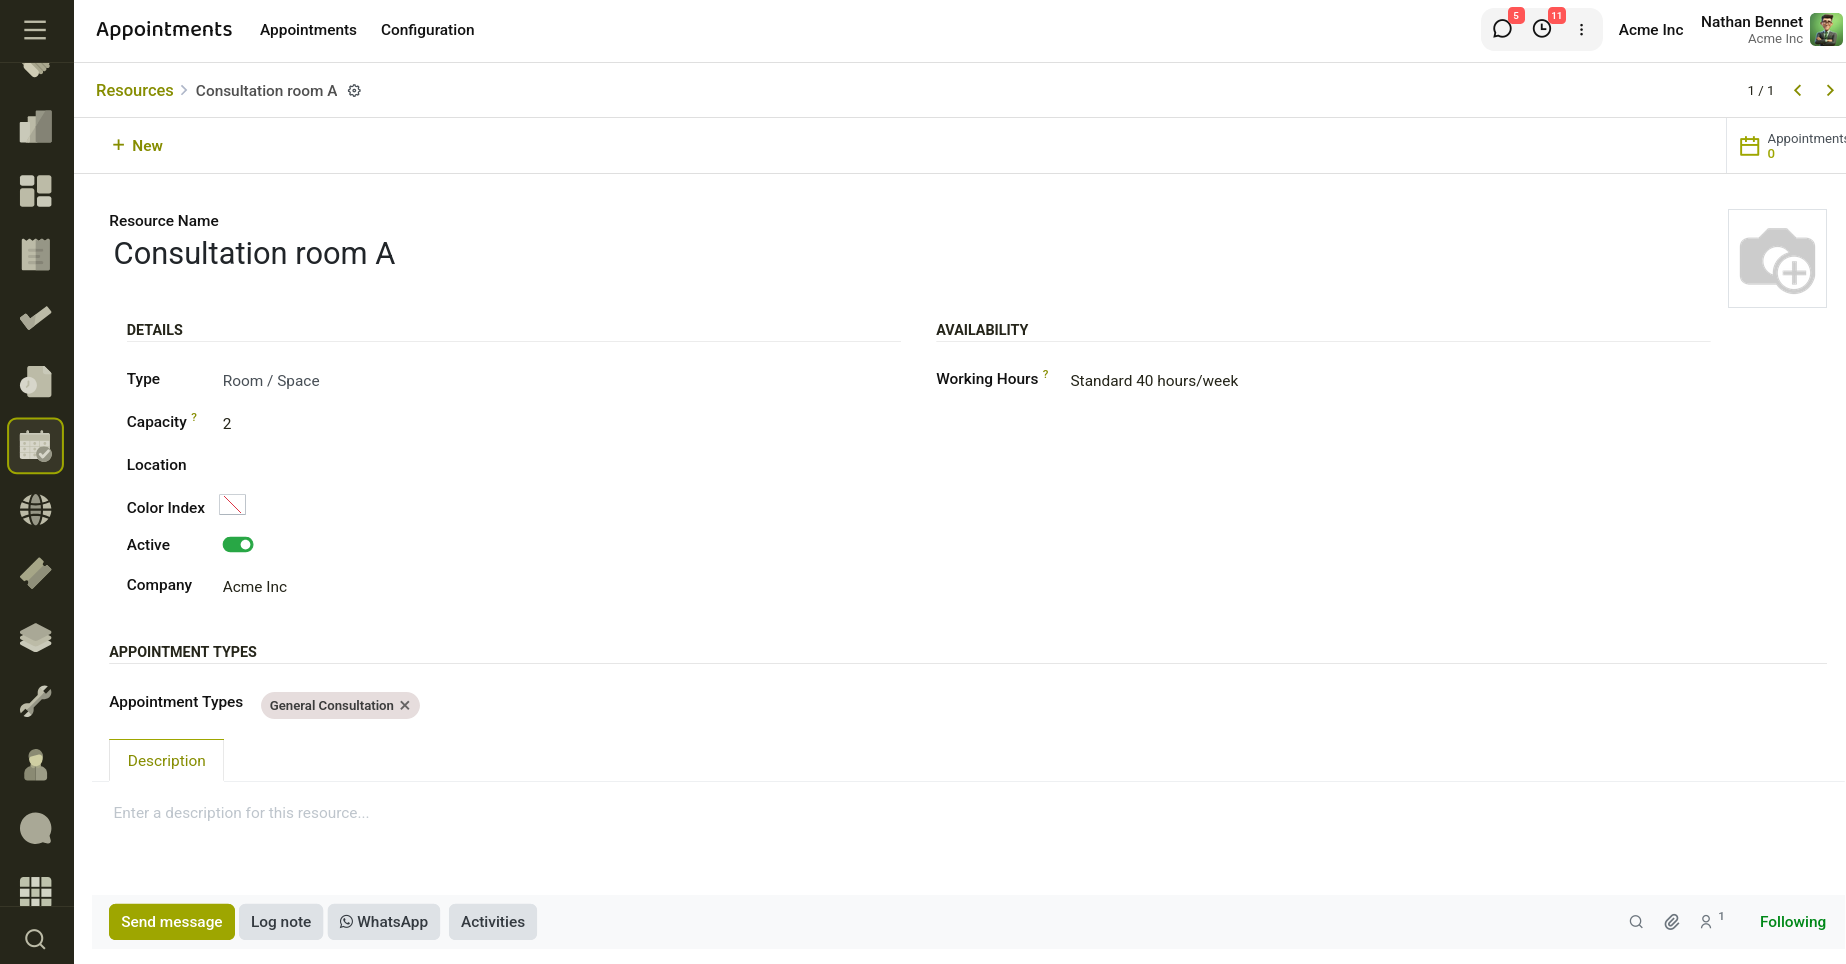
Fig 2.9 — Resource Management
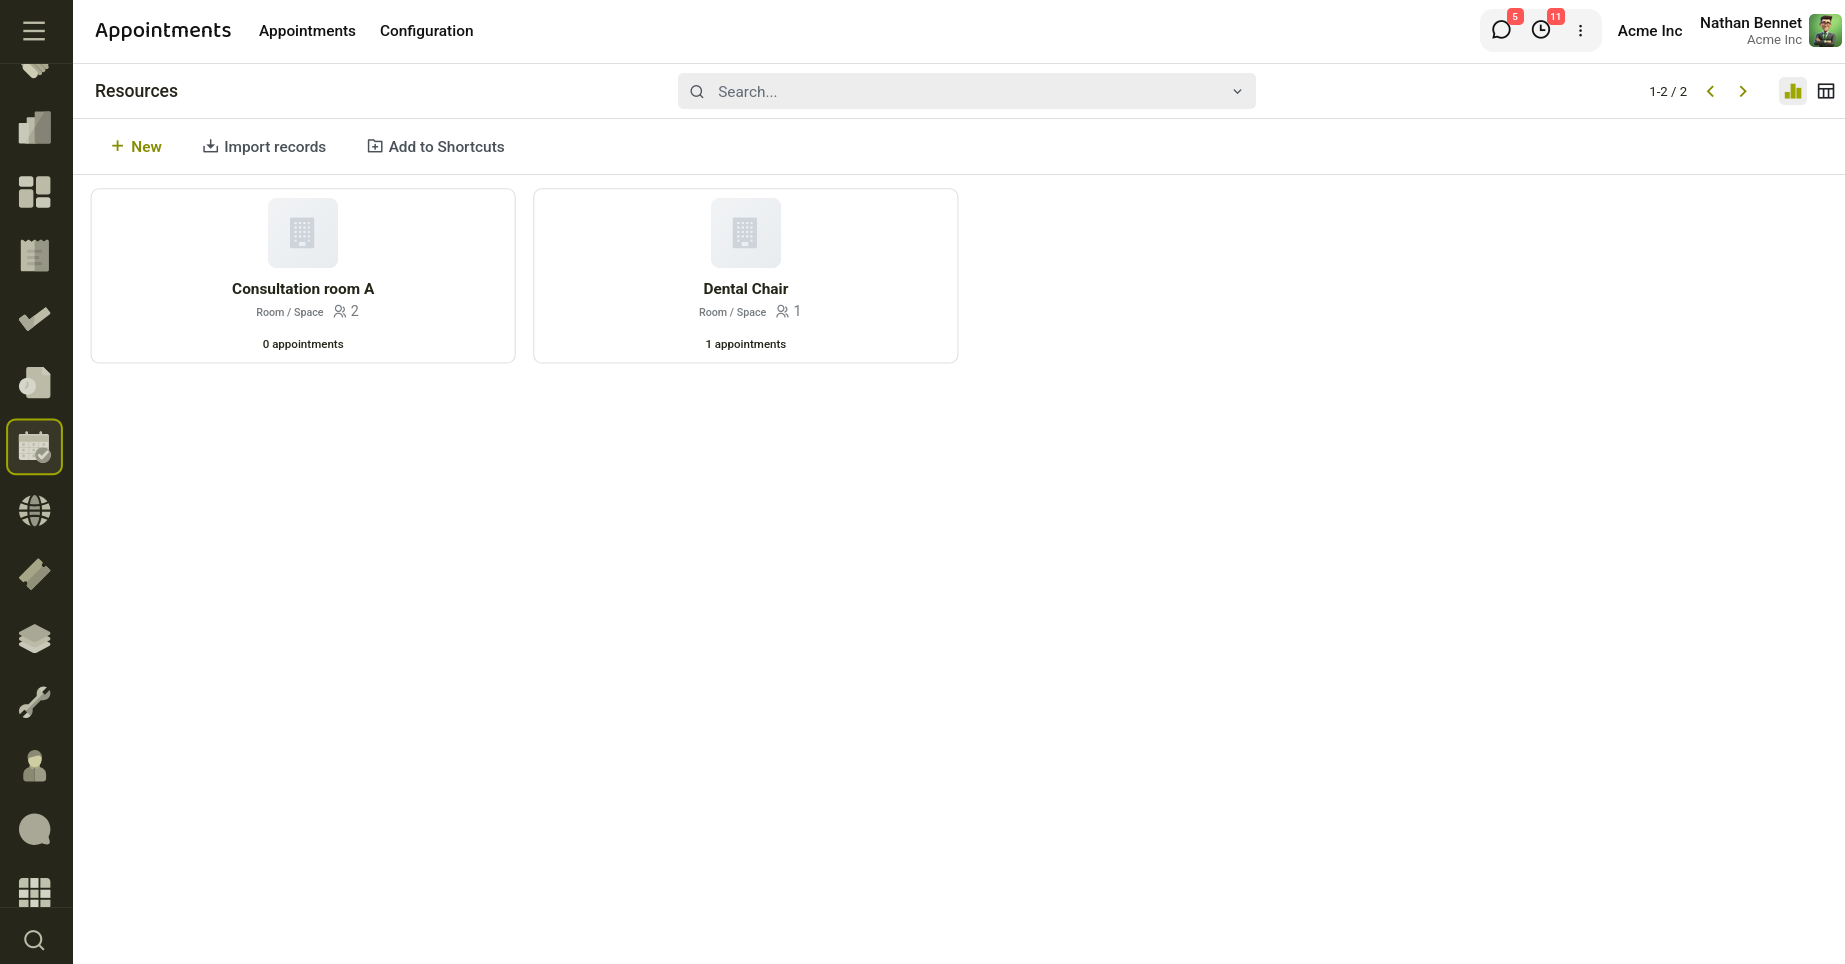
Fig 2.10 — Kanban View of Available Resources
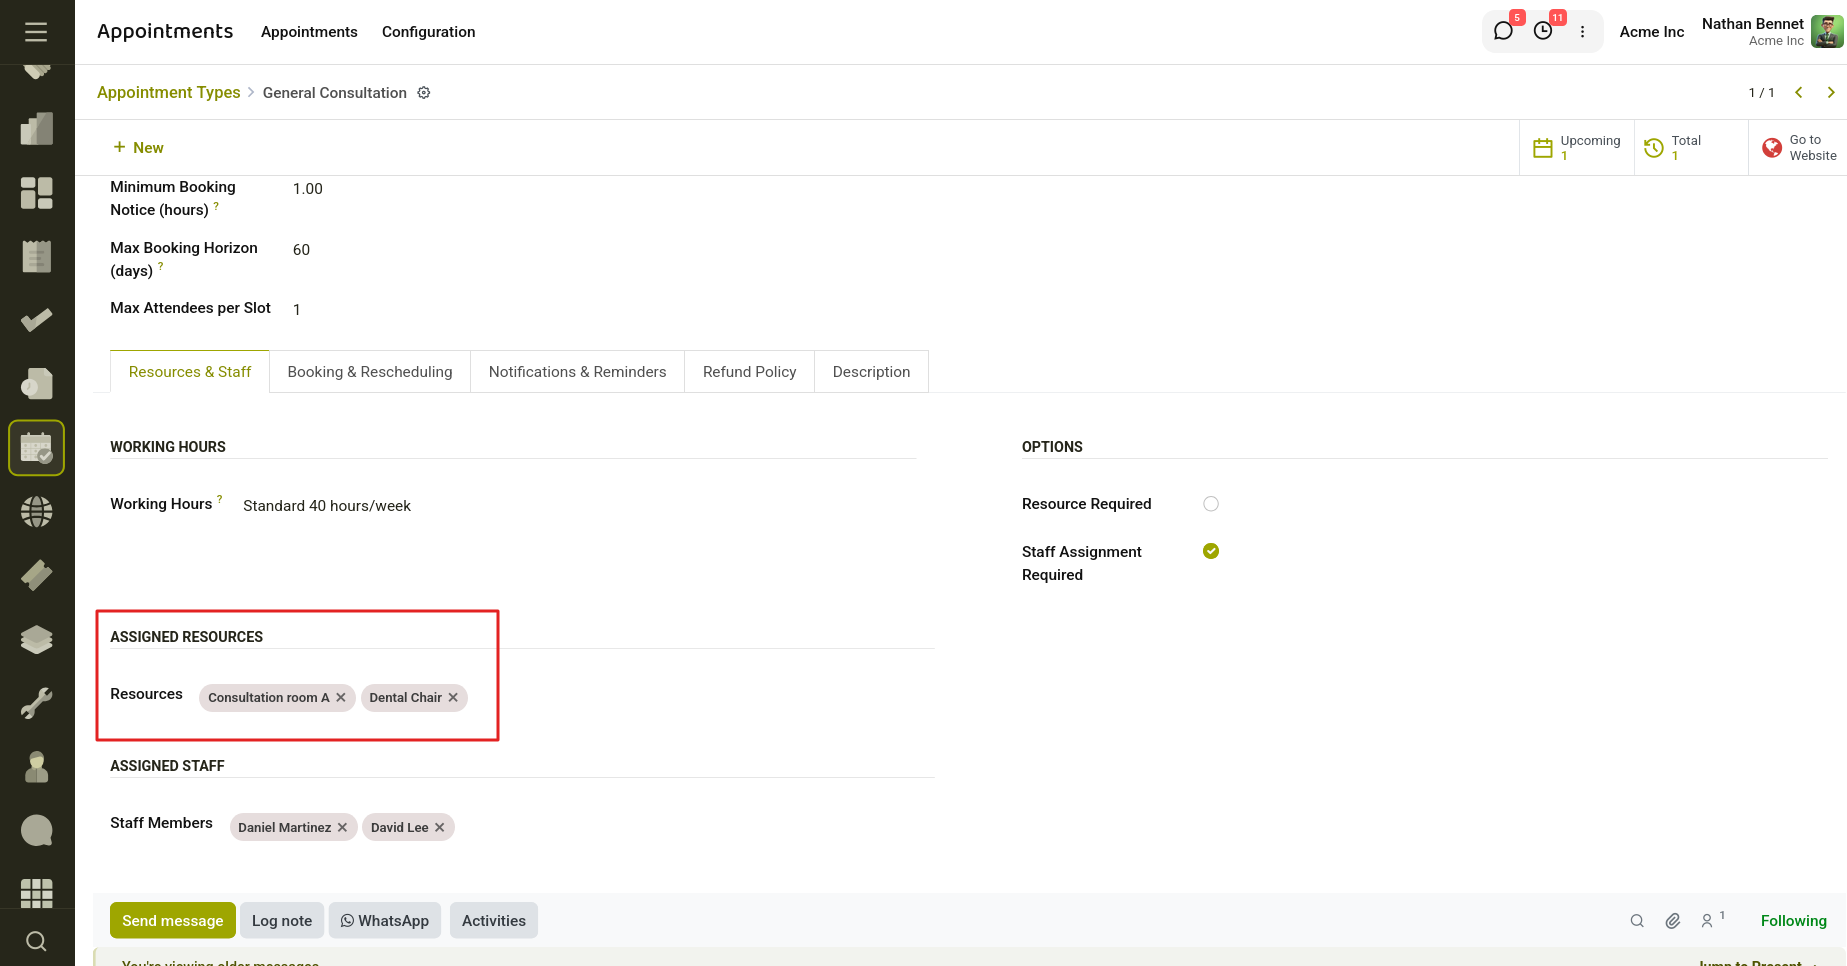
Fig 2.11 — Resource Selection in Appointment Type
2.7 Location Management
Appointment Types support multiple location methods.
- Physical Location : Appointments take place at a specific address.
- Online Meeting: Appointments occur through video conferencing platforms.
- Phone Call : Appointments are conducted via telephone.
- Custom Location : Custom instructions can be provided.
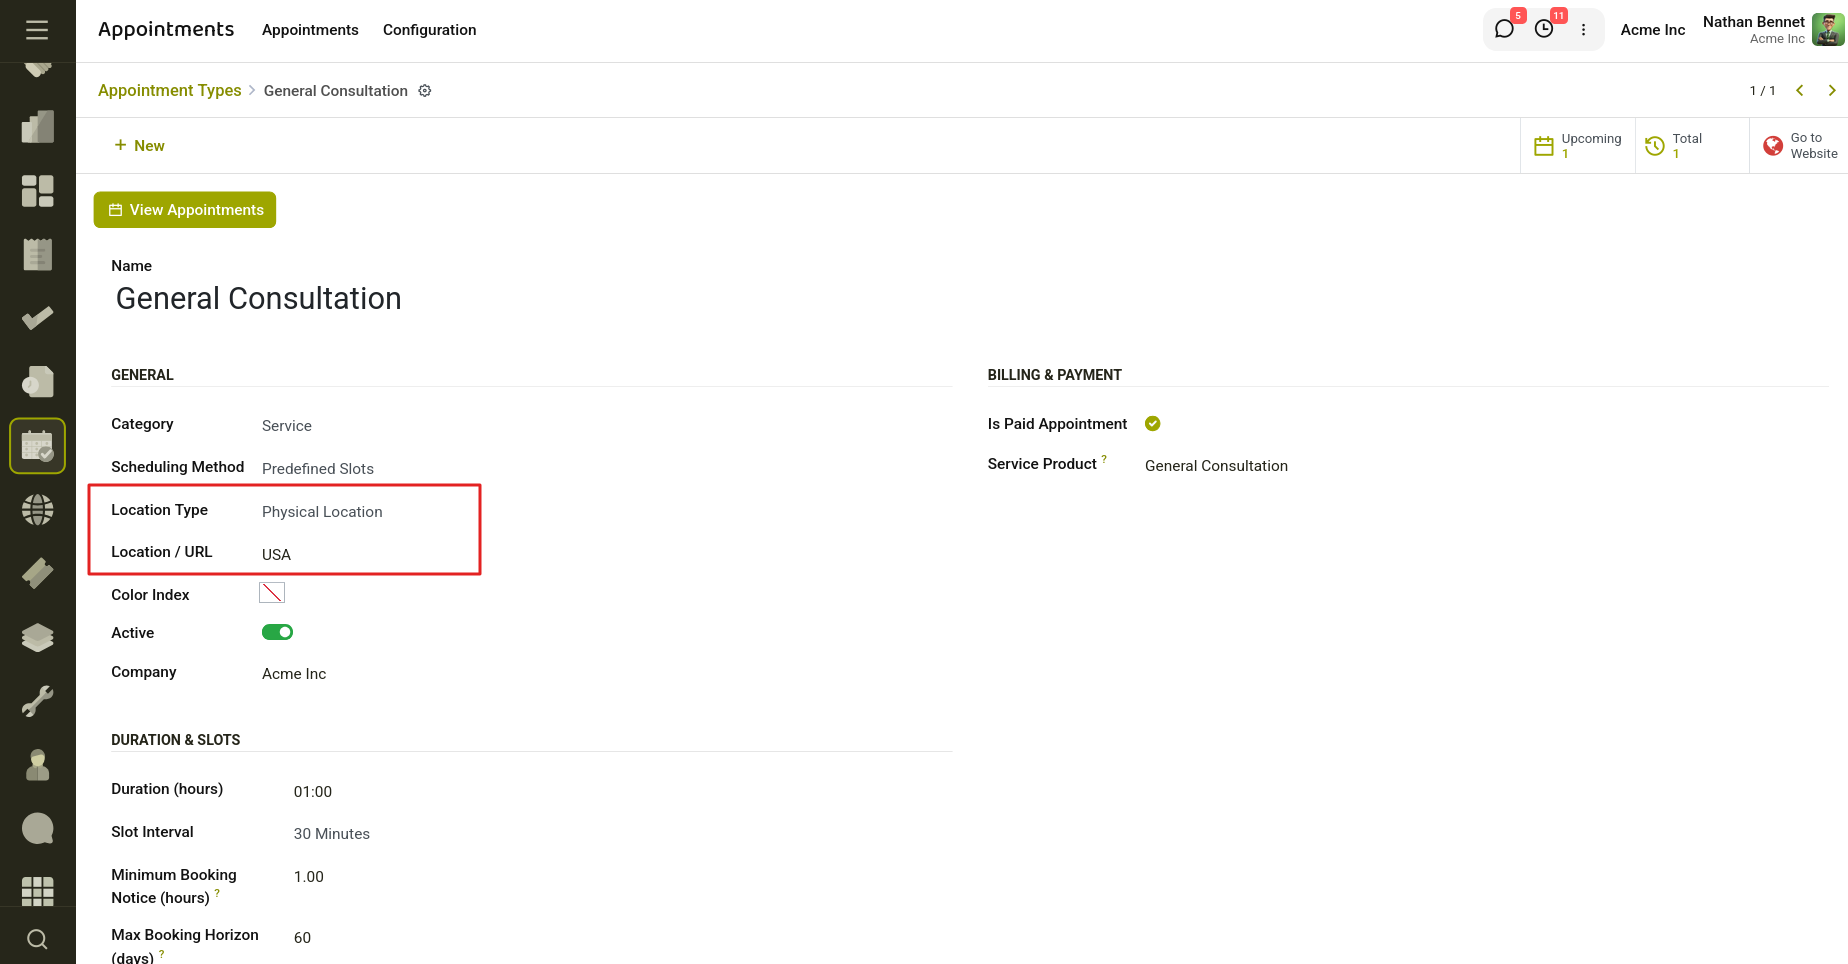
Fig 2.12 — Location Management with Location Type And Location or Url
2.8 Paid Appointments
Organizations can charge customers during booking.Each Appointment Type may be linked to a Service Product.
During booking:
- Sales Order is generated.
- Payment transaction is created.
- Appointment remains pending until payment is completed.
- Appointment is confirmed automatically after successful payment.
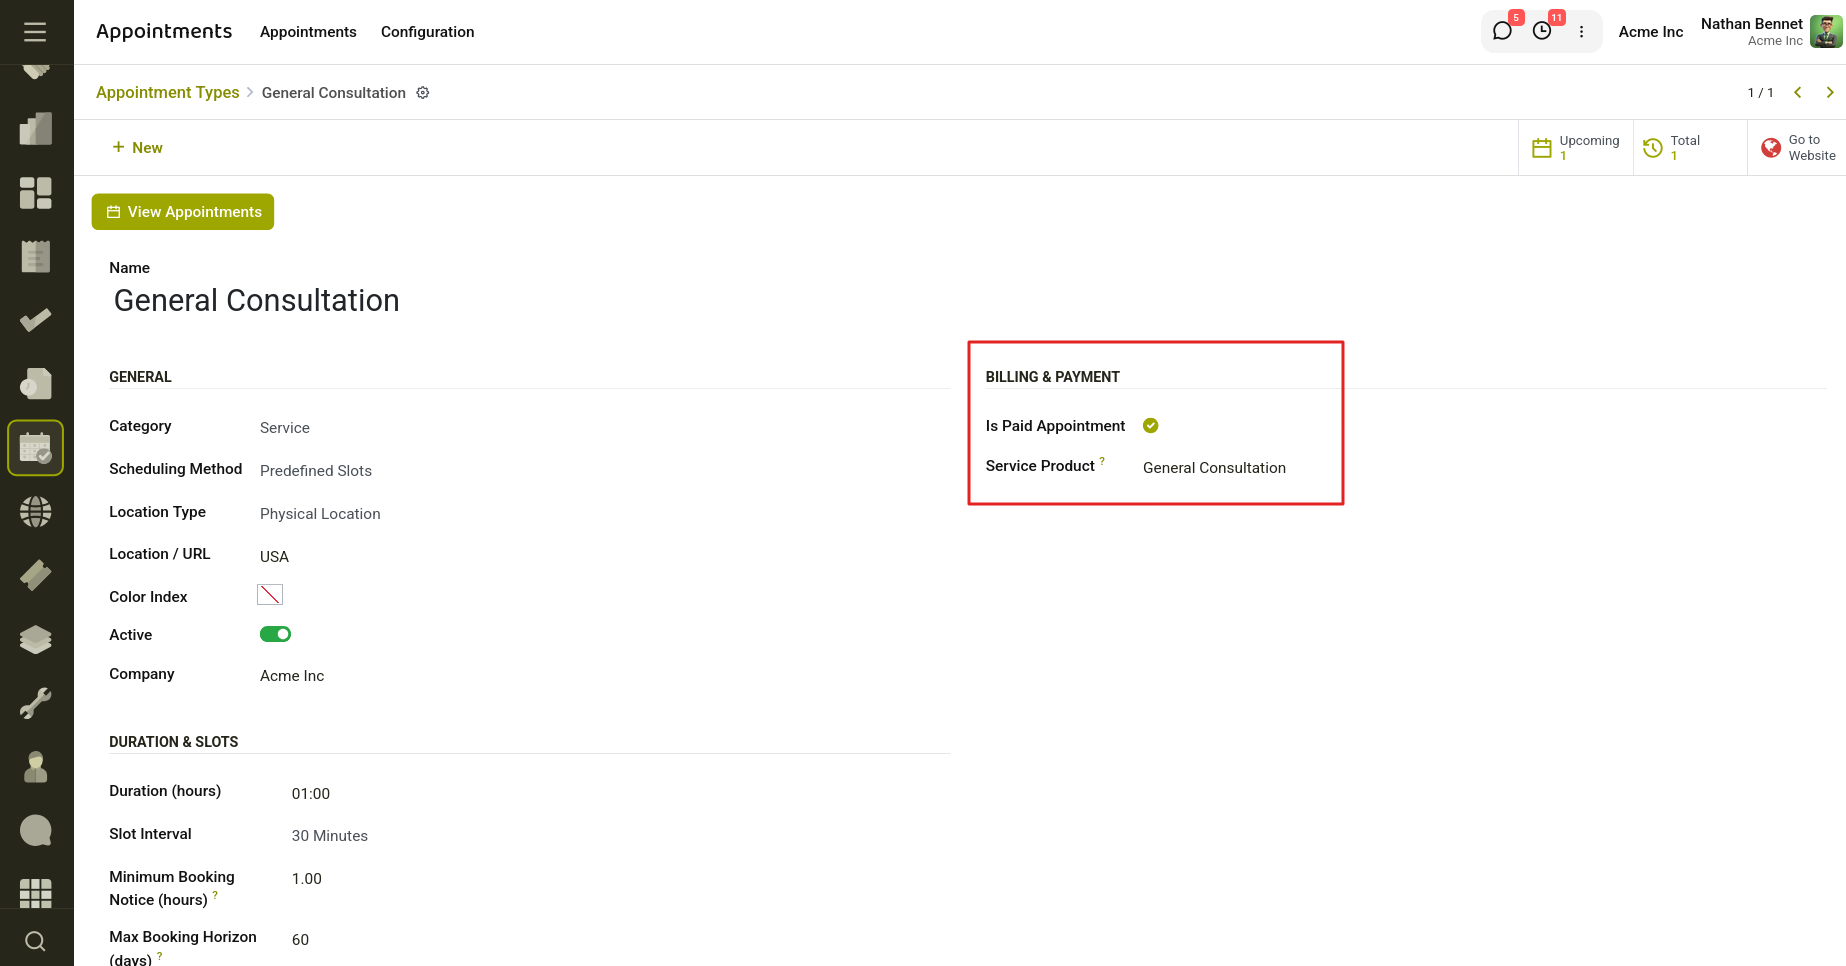
Fig 2.13 — Billing and Payment of Appointments
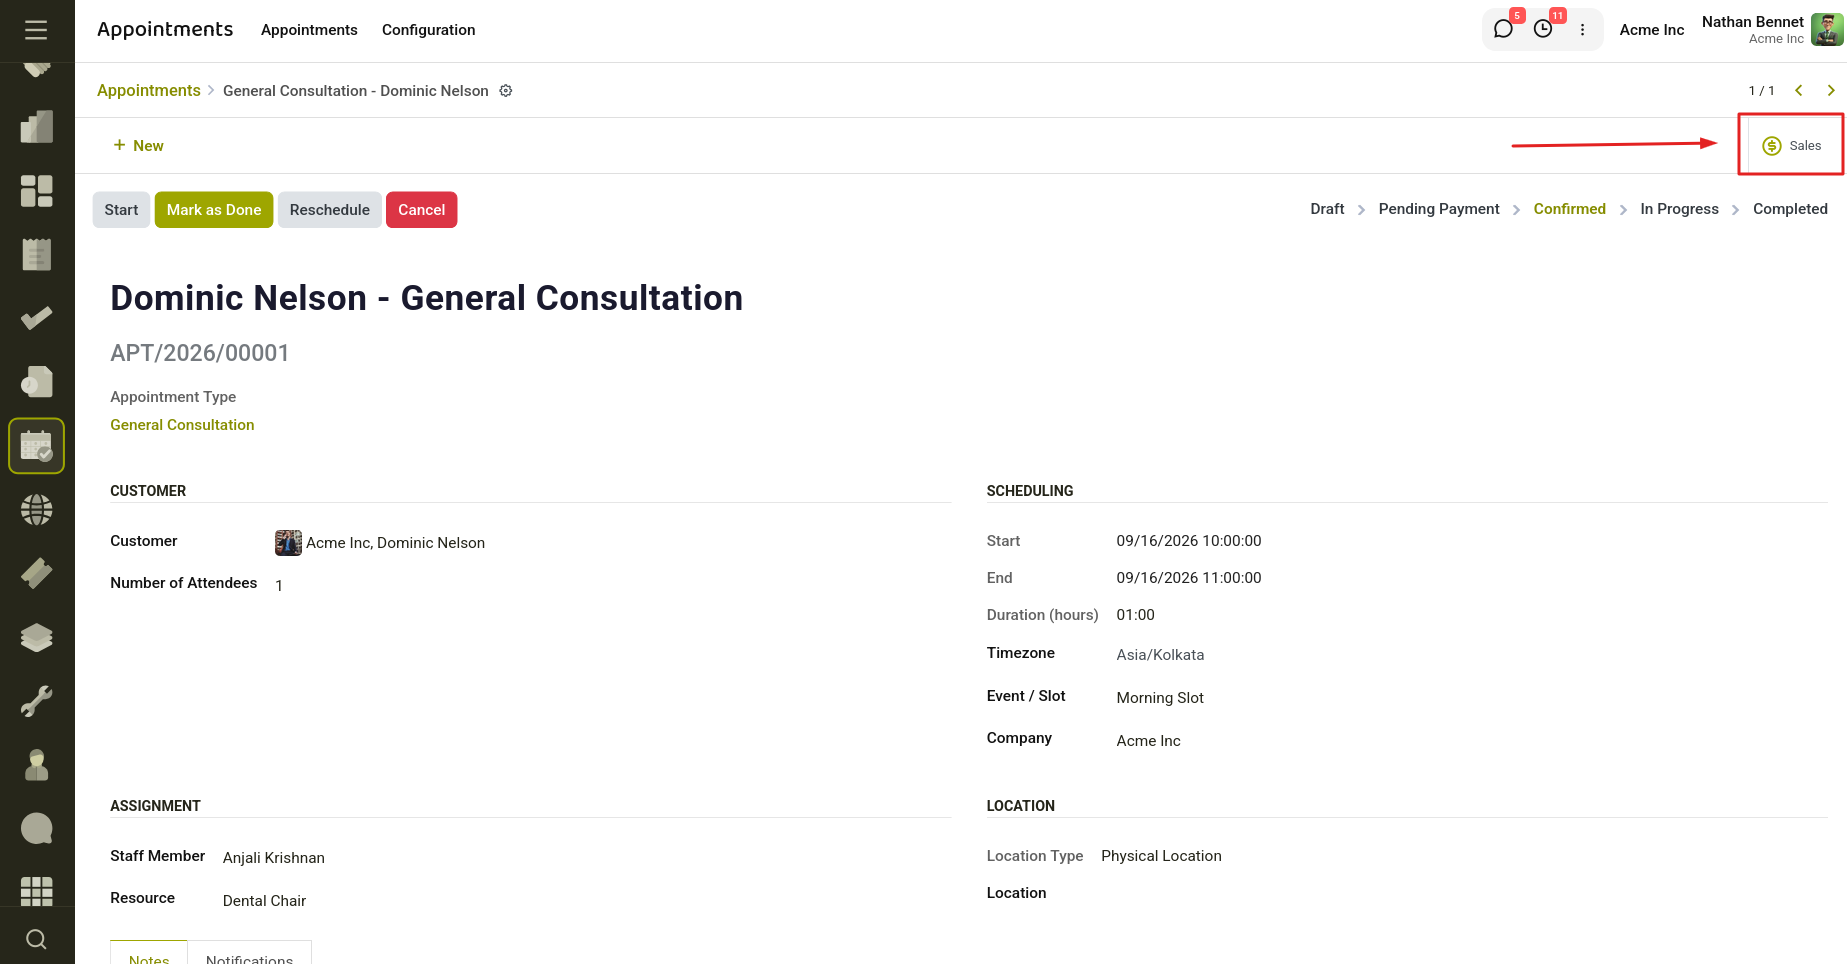
Fig 2.14 — Associated Order of the Appointment
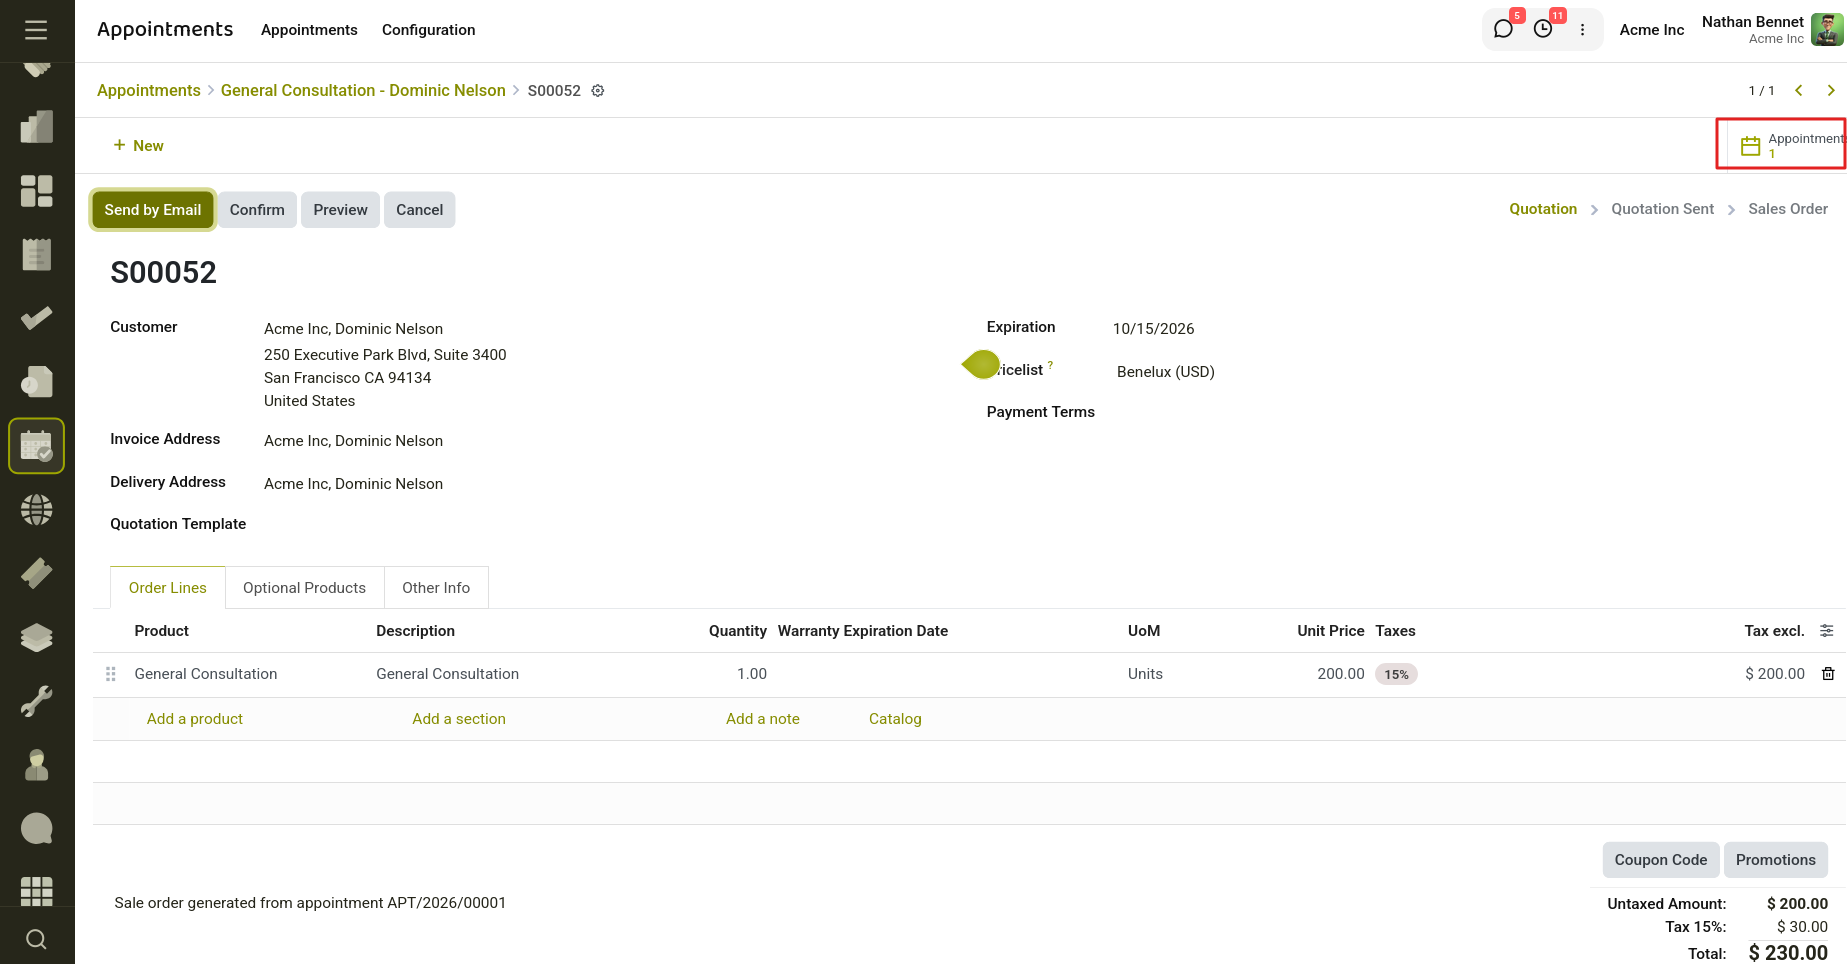
Fig 2.15 — Appointments of corresponding Sale Order
Benefits
- Advance payment collection
- Reduced no-shows
- Automatic revenue tracking
2.9 Capacity Management
The system supports attendee limits.
Maximum Attendees Per Slot
Administrators can specify how many attendees can book a slot.
Examples:
- One-to-one consultation → Capacity = 1
- Group workshop → Capacity = 20
- Webinar → Capacity = 100
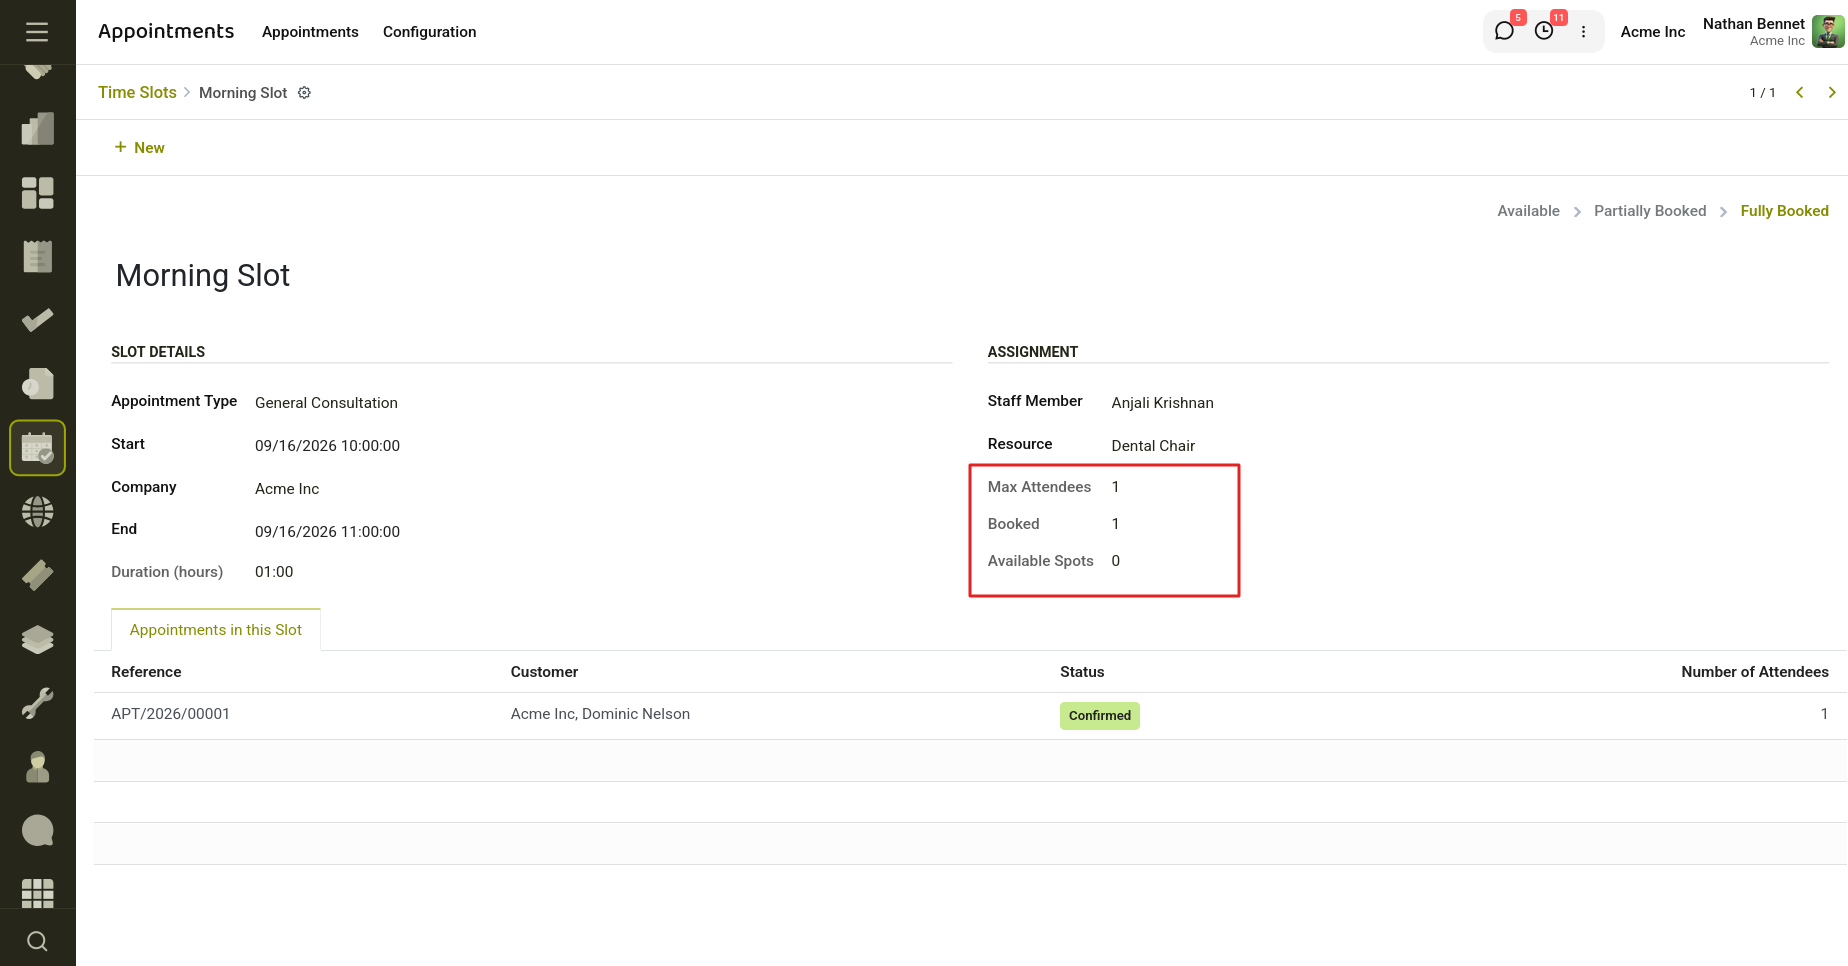
Fig 2.16 — Capacity Management in Slots
2.10 Rescheduling Management
The Rescheduling Management feature allows customers or administrators to modify an existing appointment and select a new date or time when necessary. This helps provide flexibility while ensuring that appointment schedules remain organized and compliant with business policies.
Administrators can configure rescheduling rules for each appointment type, controlling when and how appointments can be modified.
Configuration Options
Enable/Disable Rescheduling
Administrators can choose whether appointments of a particular type can be rescheduled. If disabled, customers must contact the organization directly or create a new booking.
Reschedule Deadline
A deadline can be configured to restrict how close to the appointment start time a reschedule request can be made.
Example:
- Appointment Date: 20 July 2026, 10:00 AM
- Reschedule Deadline: 24 Hours In this case, customers can reschedule until 19 July 2026, 10:00 AM.
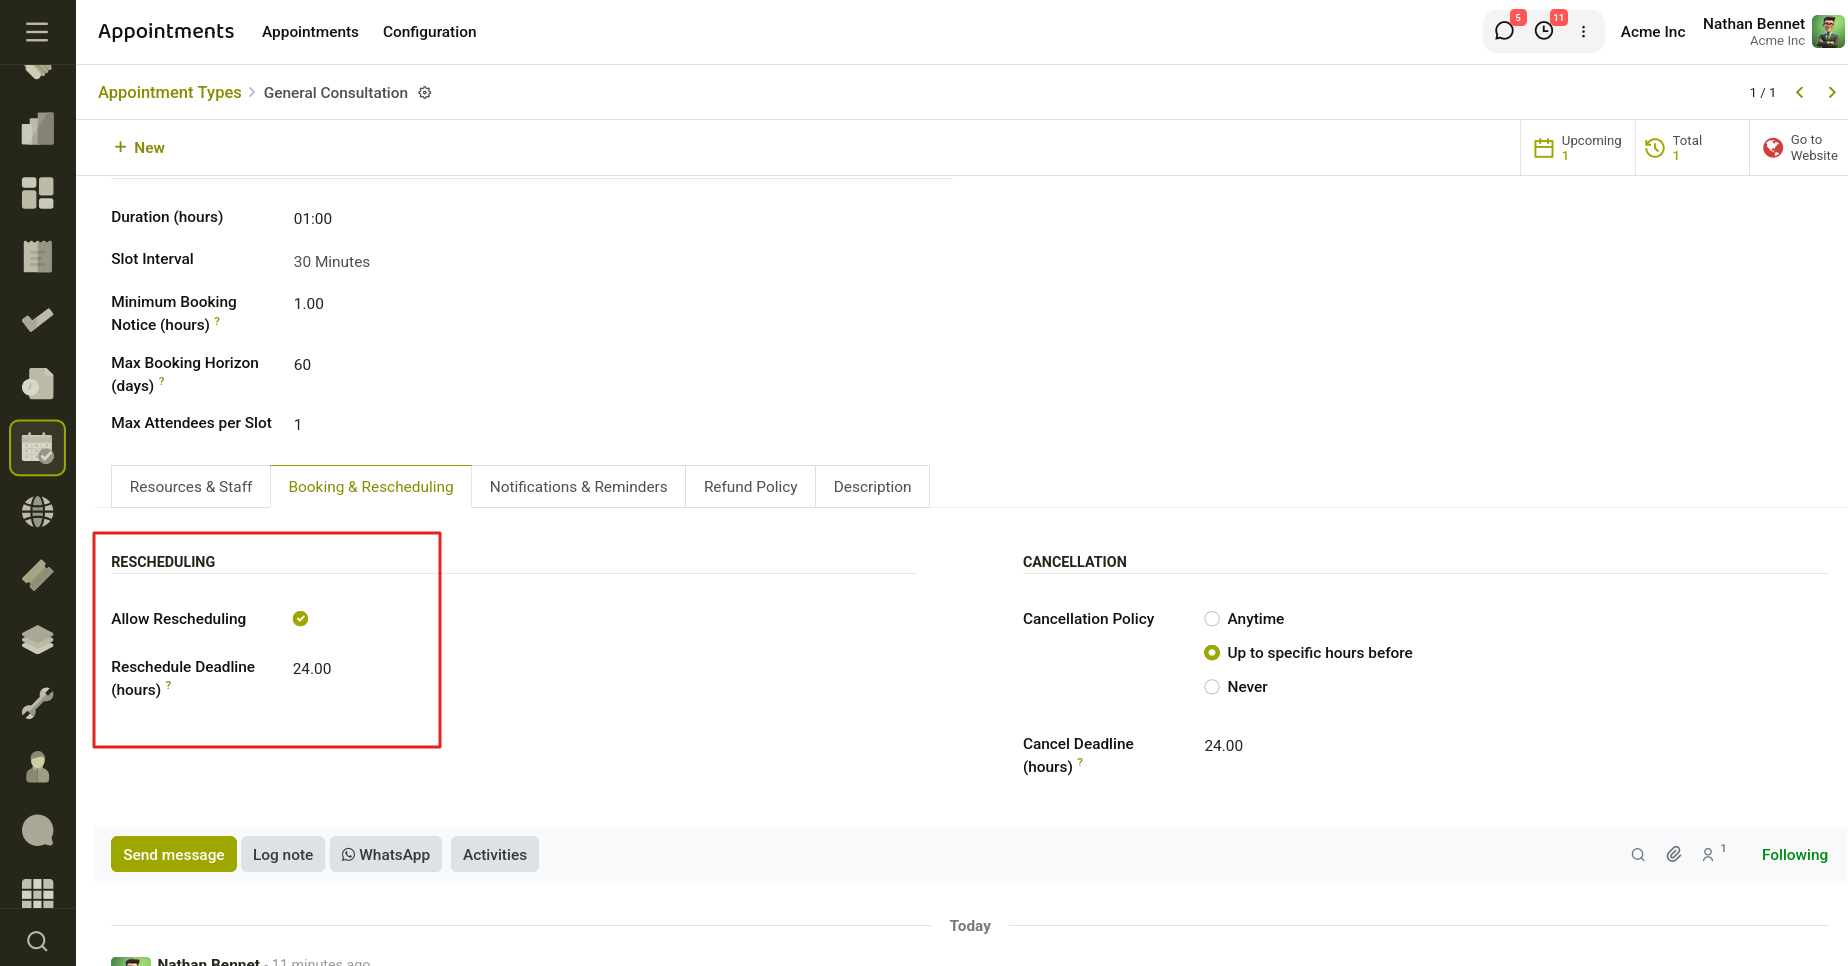
Fig 2.17 — Booking and Rescheduling
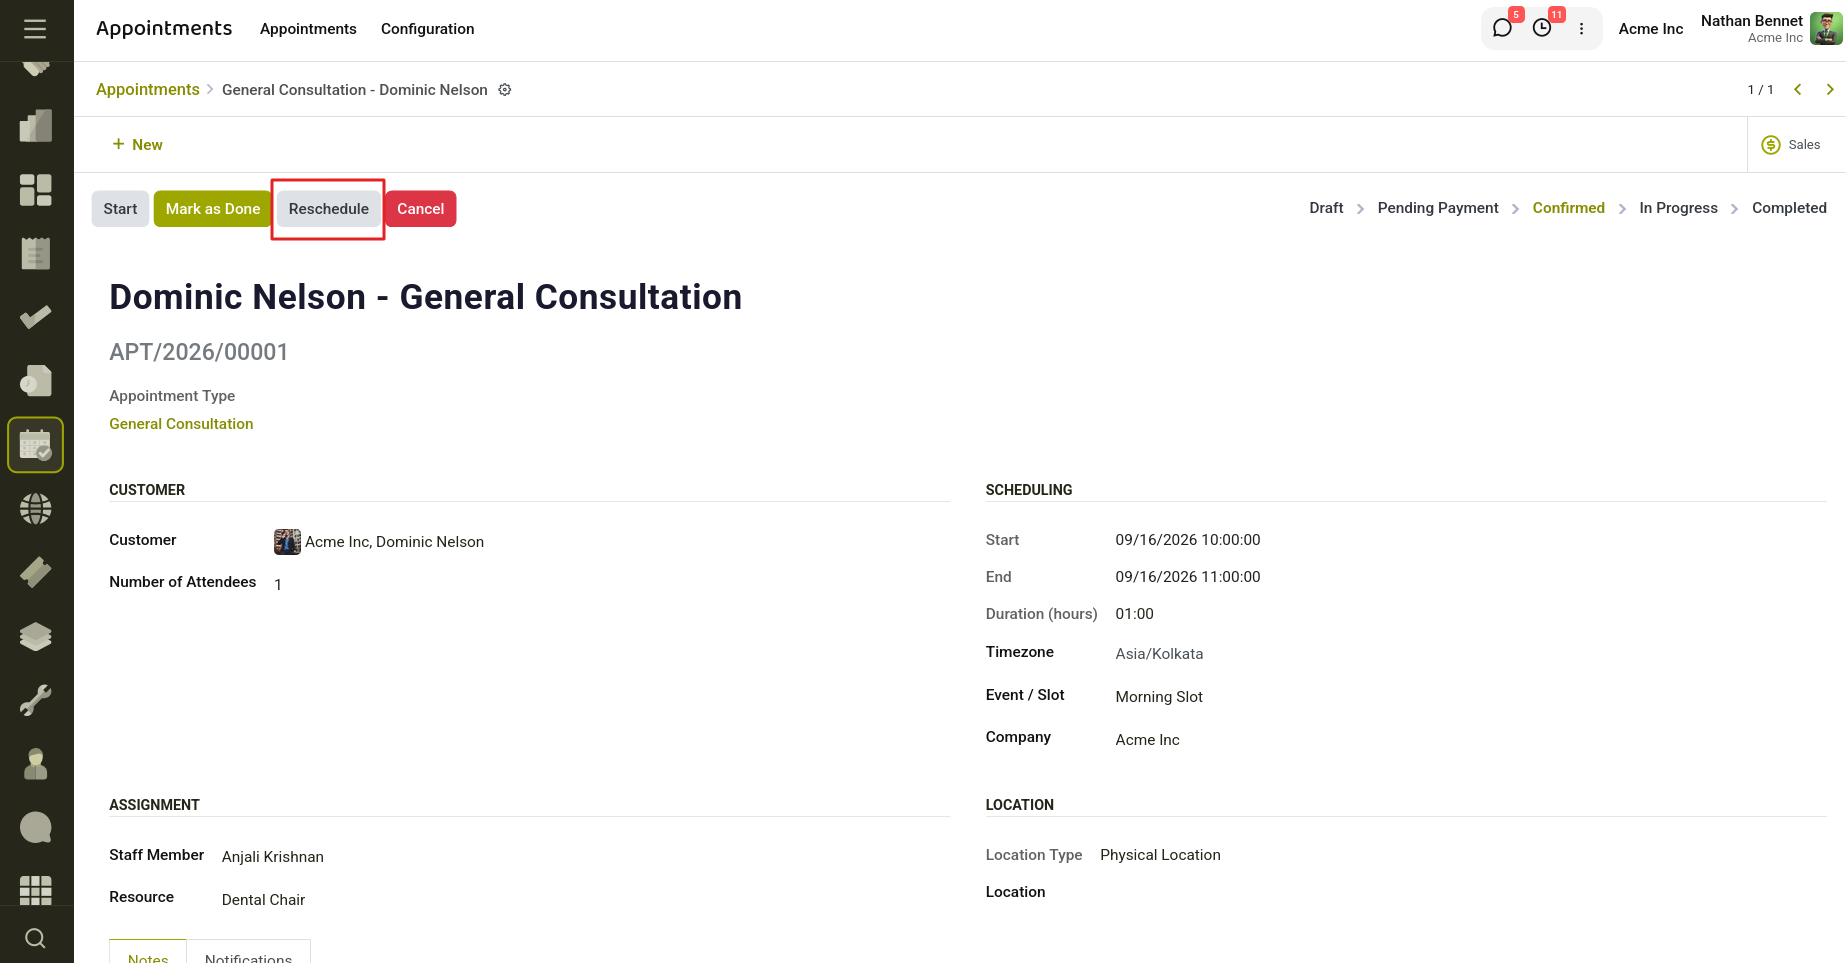
Fig 2.18 — Reschedule Button to reschedule the appointment
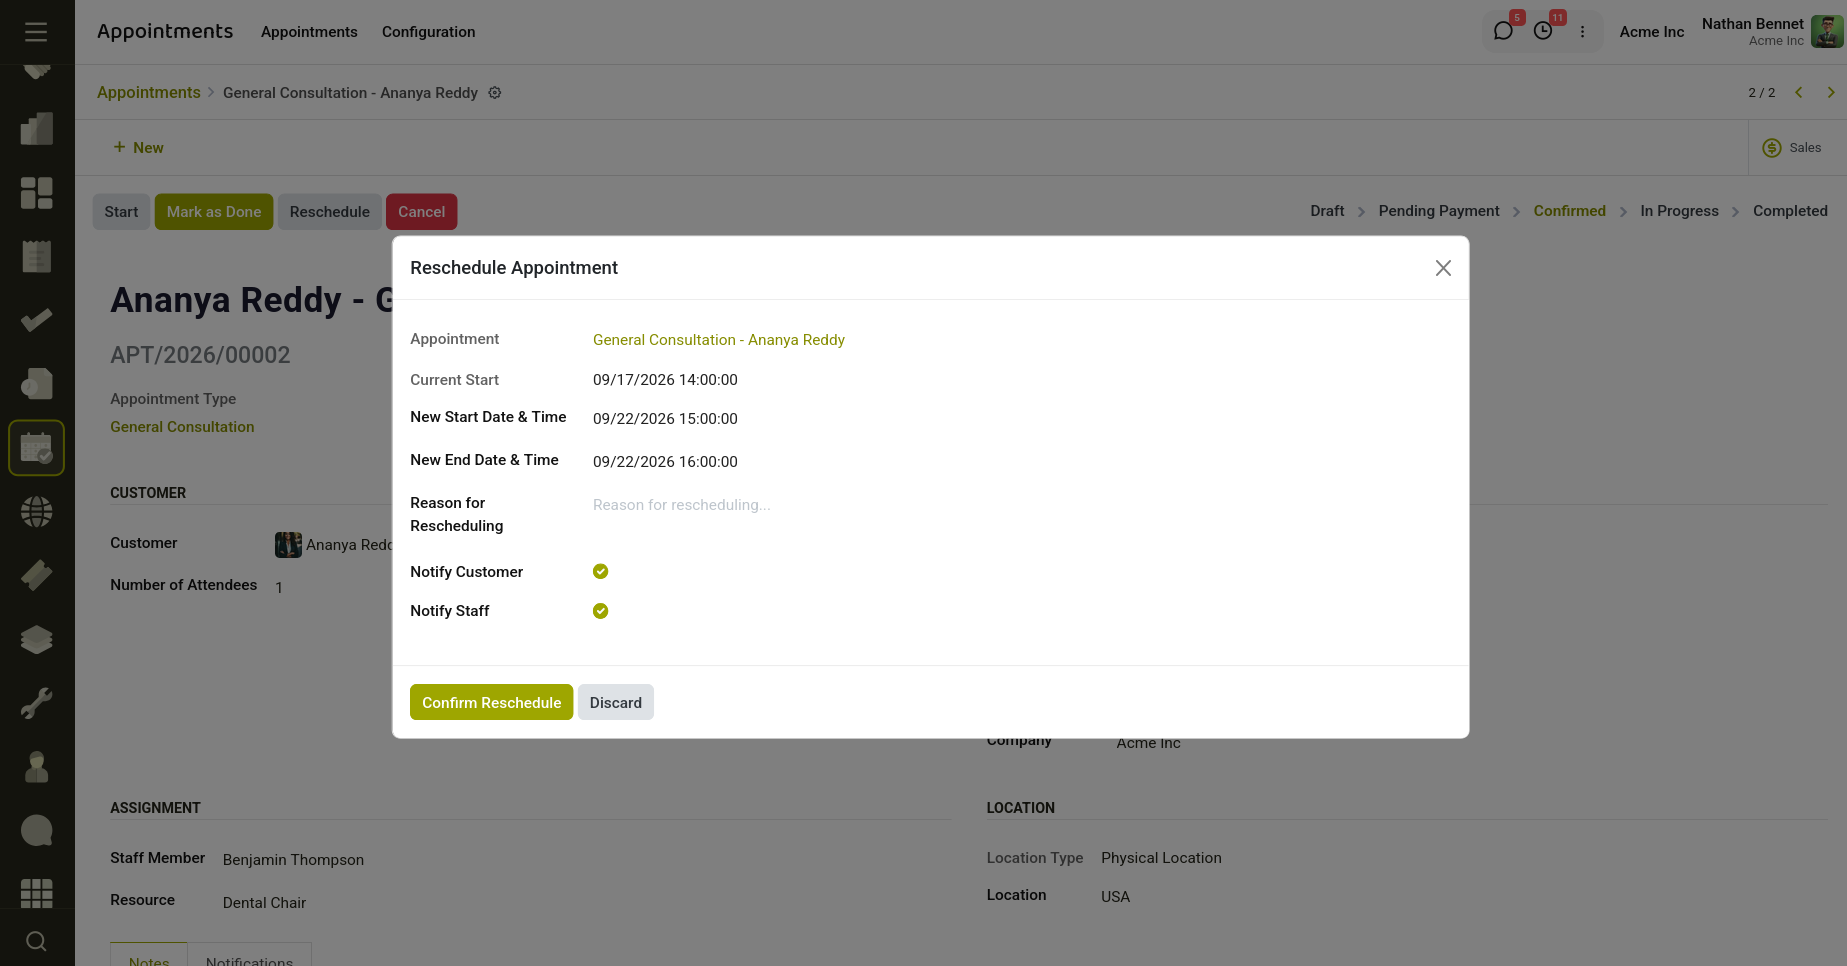
Fig 2.19 — Rescheduling Appointment Wizard
Reschedule Tracking
The system maintains a history of all rescheduling activities, allowing administrators to monitor appointment changes and maintain an audit trail.
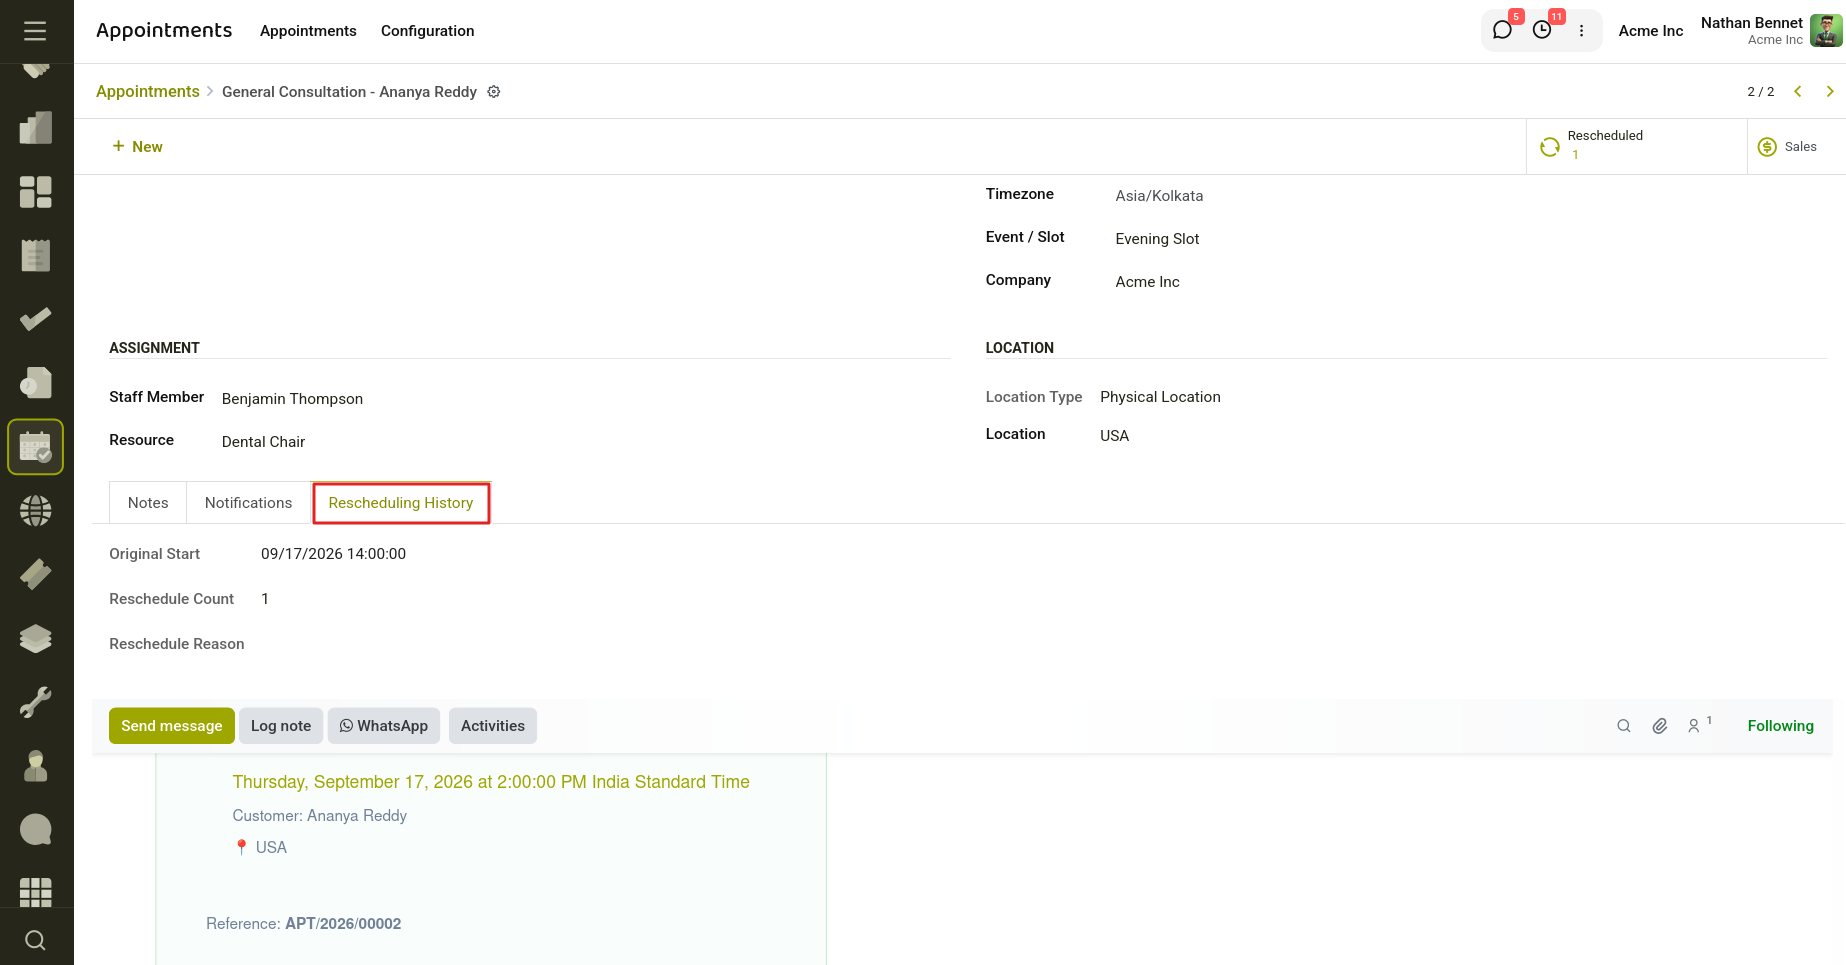
Fig 2.20 — Rescheduling History Tab
Tracked Information
For each rescheduled appointment, the following information is recorded:
- Original Appointment Date and Time
- New Appointment Date and Time
- Reschedule Count
- Reschedule Reason
- Date of Reschedule Request
- User Who Performed the Reschedule
Benefits
- Provides flexibility for customers and staff.
- Reduces appointment cancellations by allowing schedule adjustments.
- Maintains a complete history of appointment changes.
- Ensures rescheduling follows business-defined rules and deadlines.
- Improves appointment management and customer satisfaction.
2.11 Cancellation Management
The Appointment Management System provides flexible cancellation controls that allow administrators to define how and when customers can cancel their appointments. These policies help organizations minimize last-minute cancellations, manage resource availability effectively, and maintain operational efficiency.
Cancellation Policy Configuration
Administrators can configure a cancellation policy for each appointment type based on business requirements.
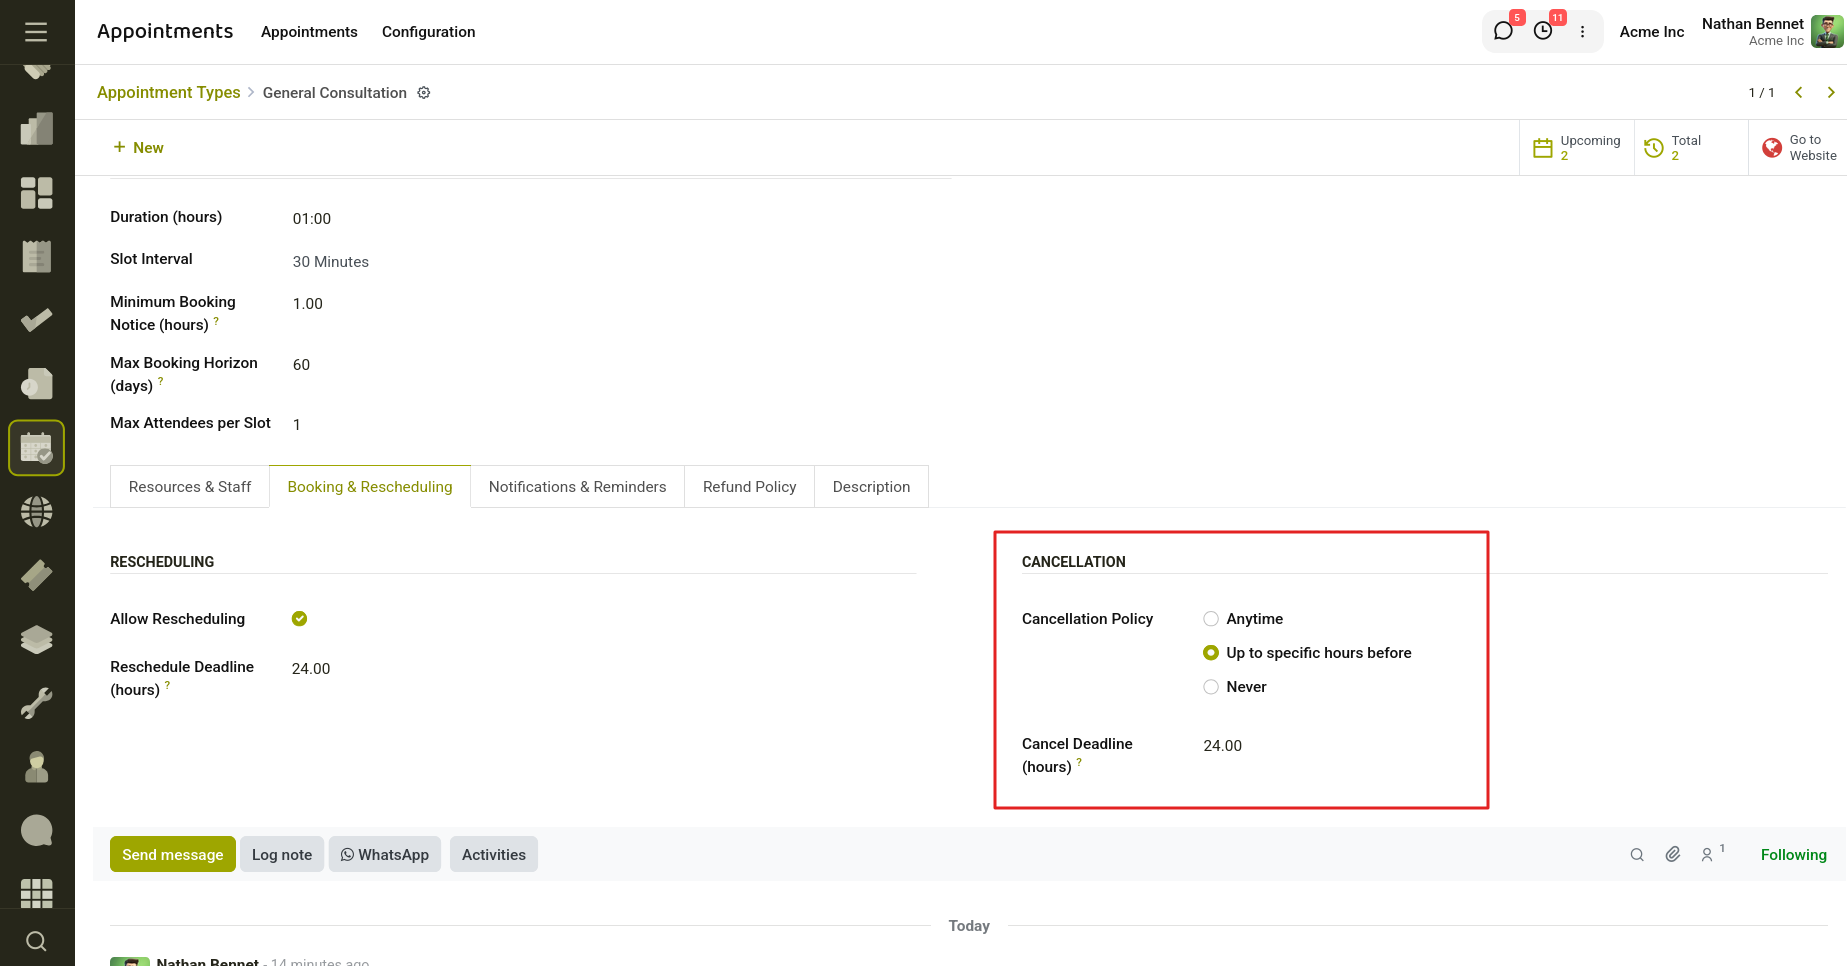
Fig 2.21 — Cancellation of Appointment
1.** Anytime** Customers are allowed to cancel their appointments at any time before the appointment starts.
Use Cases
- General consultations
- Free services
- Low-impact appointments
Behavior
- Cancellation option remains available until the appointment time.
- The appointment slot becomes available for new bookings immediately after cancellation.
- Notification emails or SMS can be sent automatically to staff and customers.
- Up To Specific Hours Before Customers may cancel appointments only before a predefined deadline.
Configurable Settings
- Cancellation deadline in hours (e.g., 24, 48, or 72 hours before the appointment).
- Optional cancellation reason requirement.
- Automated notification upon successful cancellation.
Behavior
- The system validates the cancellation request against the configured deadline.
- Cancellation requests submitted after the deadline are rejected.
- Customers receive a message explaining that the cancellation window has expired.
xample
If the deadline is configured as 24 hours and the appointment is scheduled for 10:00 AM on Friday, the customer can cancel only until 10:00 AM on Thursday.
- Never
Customers are not allowed to cancel appointments through the portal or website.
Use Cases
- High-value bookings
- Paid consultations
- Events with limited availability
- Services requiring manual approval
Behavior
- The cancellation button is hidden or disabled for customers.
- Only authorized staff or administrators can cancel the appointment.
- Customers may be instructed to contact support for cancellation requests.
2.12 Refund Management
The Appointment Management System supports automated refund processing when paid appointments are cancelled. Refund behavior is configured at the Appointment Type level and is executed automatically during cancellation.
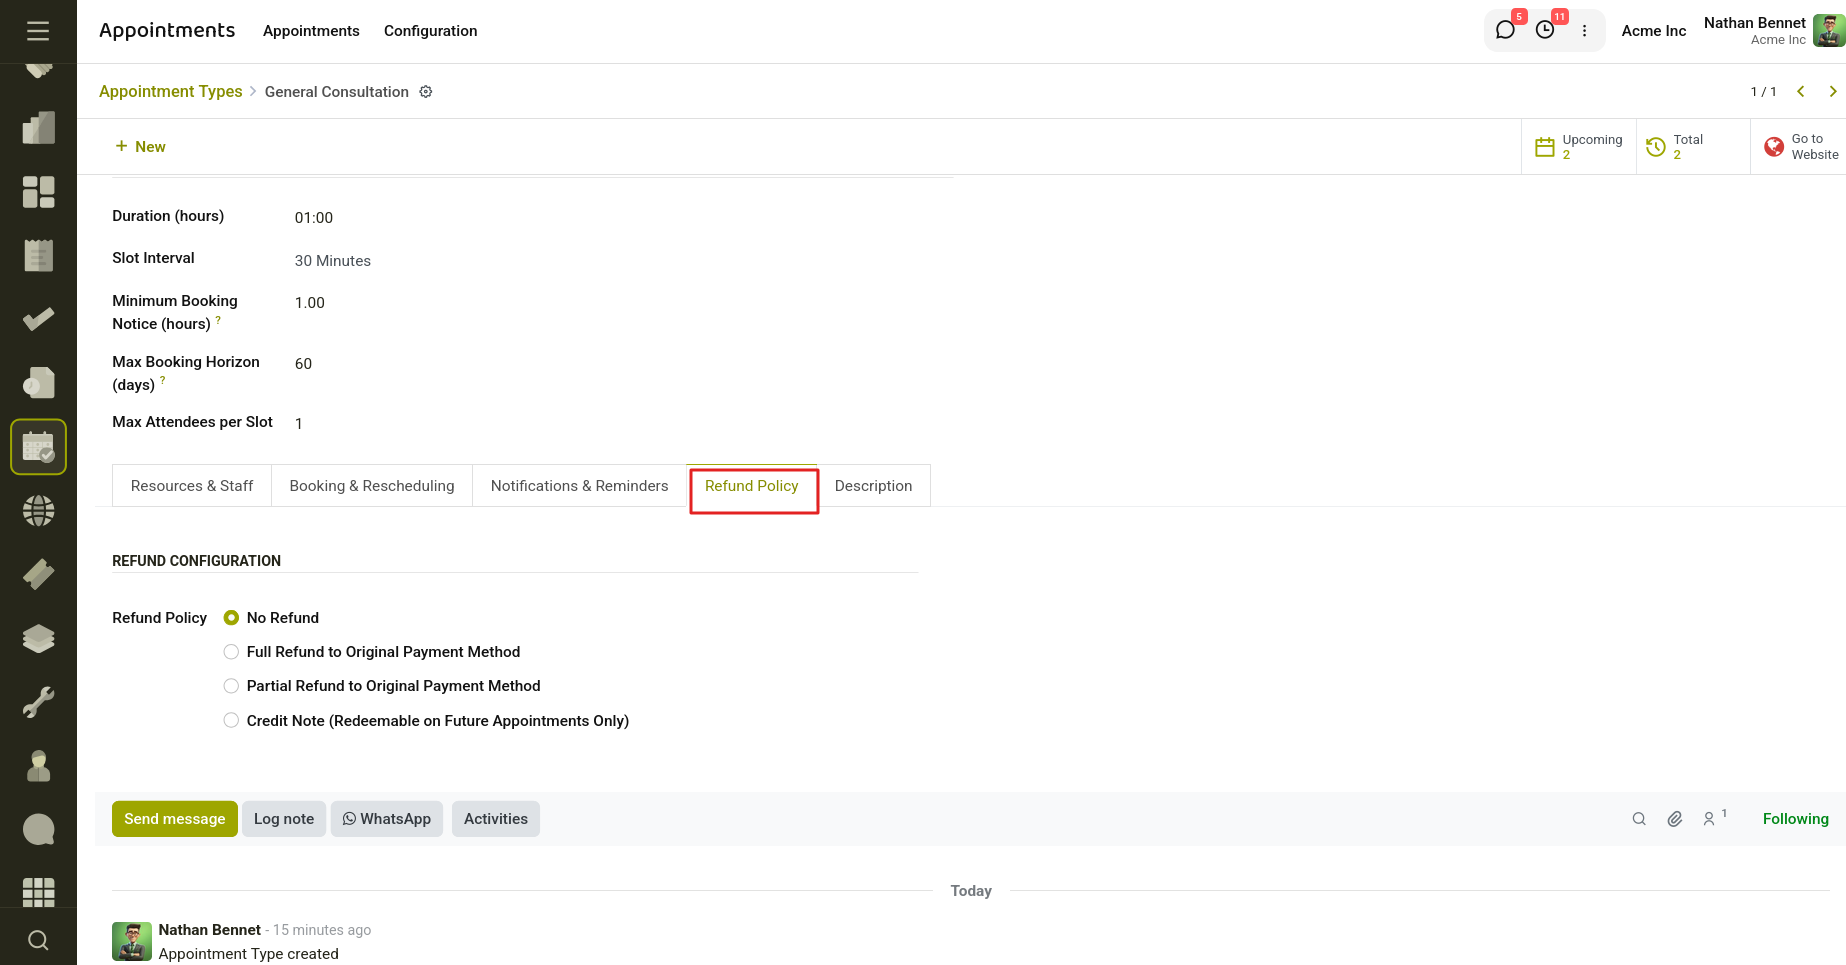
Fig 2.22 — Refund configuration of Appointment
Refund Processing
When a paid appointment is cancelled:
- The applicable refund policy is identified.
- The refund amount is calculated.
- A credit note is automatically generated from the original invoice.
- Based on the refund policy:
- Full Refund – Full amount is refunded to the original payment method and the generated credit note is automatically reconciled.
- Partial Refund – Refund amount is calculated using the applicable refund percentage. When refund tiers are configured, the matching tier percentage is applied based on the cancellation timing. If no refund tiers exist, the value from the Refund Percentage field is used. The generated credit note is automatically reconciled.
- Credit Note – A credit note is generated for the full appointment amount and remains unreconciled, allowing the customer to use it against future invoices or appointments.
- Refund details are linked to the appointment record.
Available Refund Policies
| Policy | Description |
|---|---|
| No Refund | No refund is issued. |
| Full Refund to Original Payment Method | Customer receives a 100% refund. |
| Partial Refund to Original Payment Method | Customer receives a configurable percentage refund. |
| Credit Note (Redeemable on Future Appointments Only) | Customer receives a credit note instead of a monetary refund. |
Refund Tier Configuration
For Partial Refund policies, administrators can configure refund tiers based on the cancellation time.
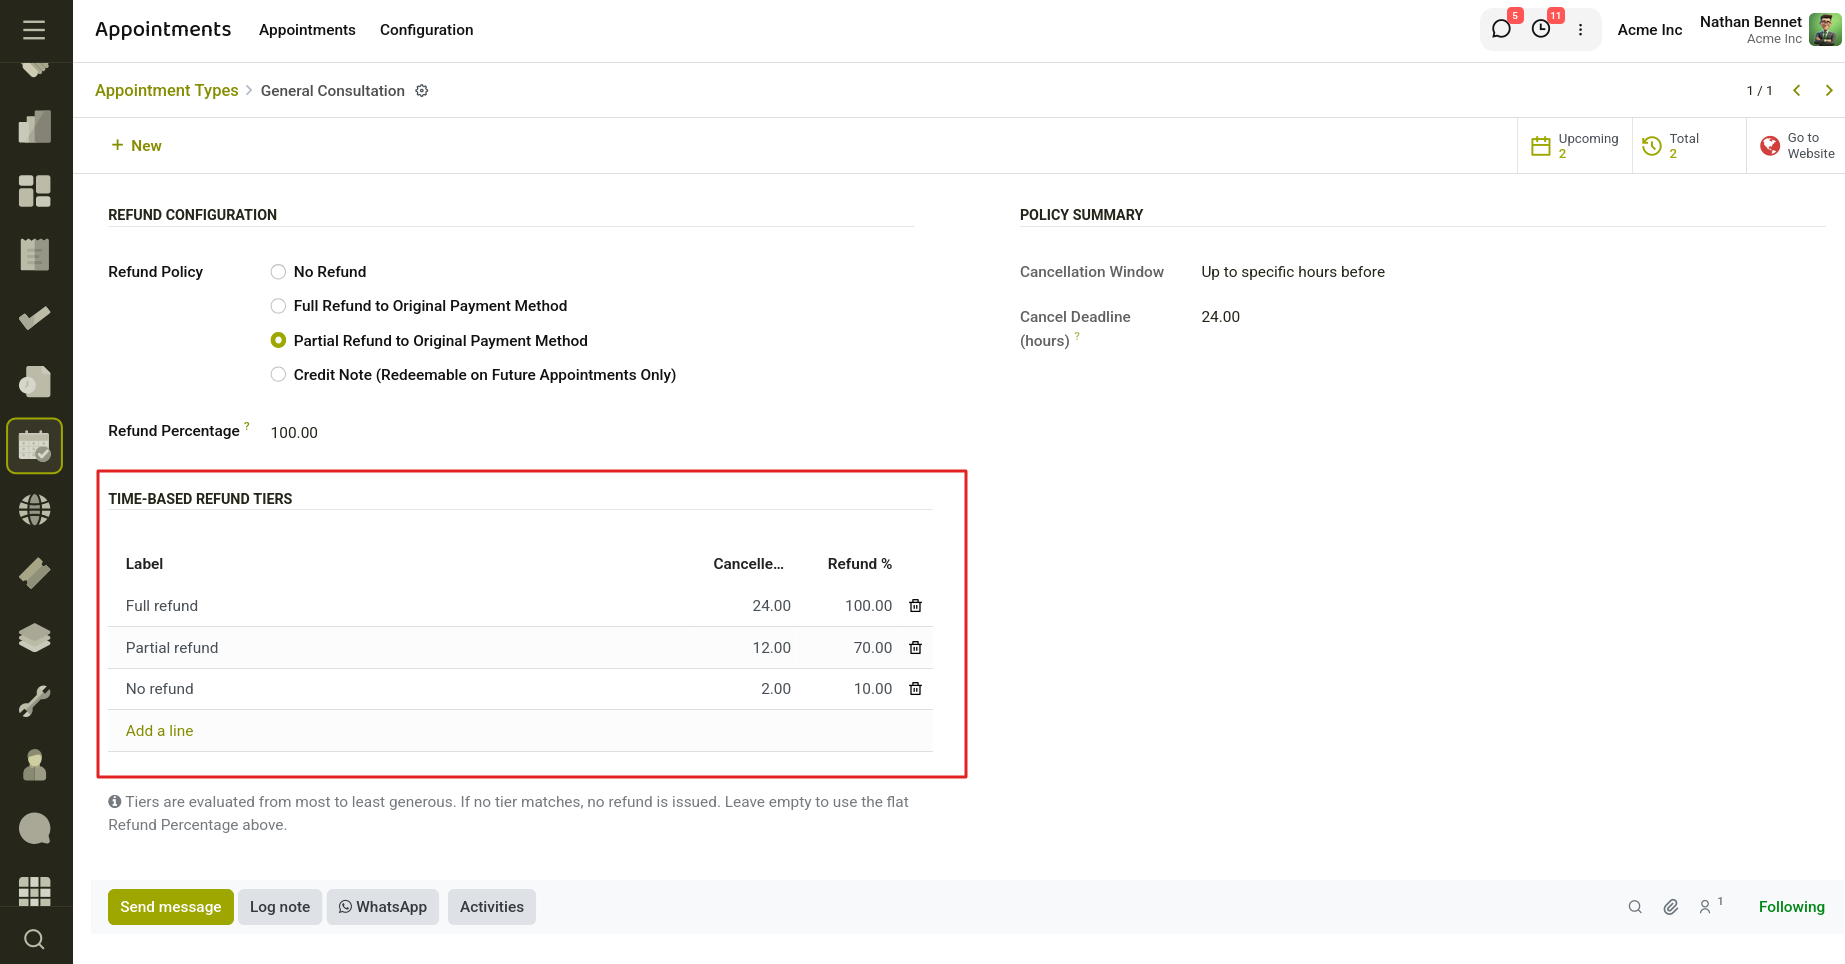
Fig 2.23 — Time based refund Tiers.
When an appointment is cancelled, the system calculates the remaining time before the appointment and automatically applies the matching refund tier.
Refund Tier Selection Logic
When an appointment is cancelled:
- The system calculates the number of hours remaining until the appointment start time.
- All configured refund tiers are evaluated.
- The highest matching tier is selected.
- The corresponding refund percentage is applied.
2.13 Website Appointment Booking Workflow
The Cyllo Appointment module allows customers to book appointments directly through the website without administrator intervention. Once an appointment type is configured and published, customers can browse available services, select a suitable date and time, provide their details, and confirm their booking.
Step 1: Publish the Appointment Type
Navigate to:
Appointments → Configuration → Appointment Types
Configure the appointment details and enable the Published option to make the appointment available on the website.
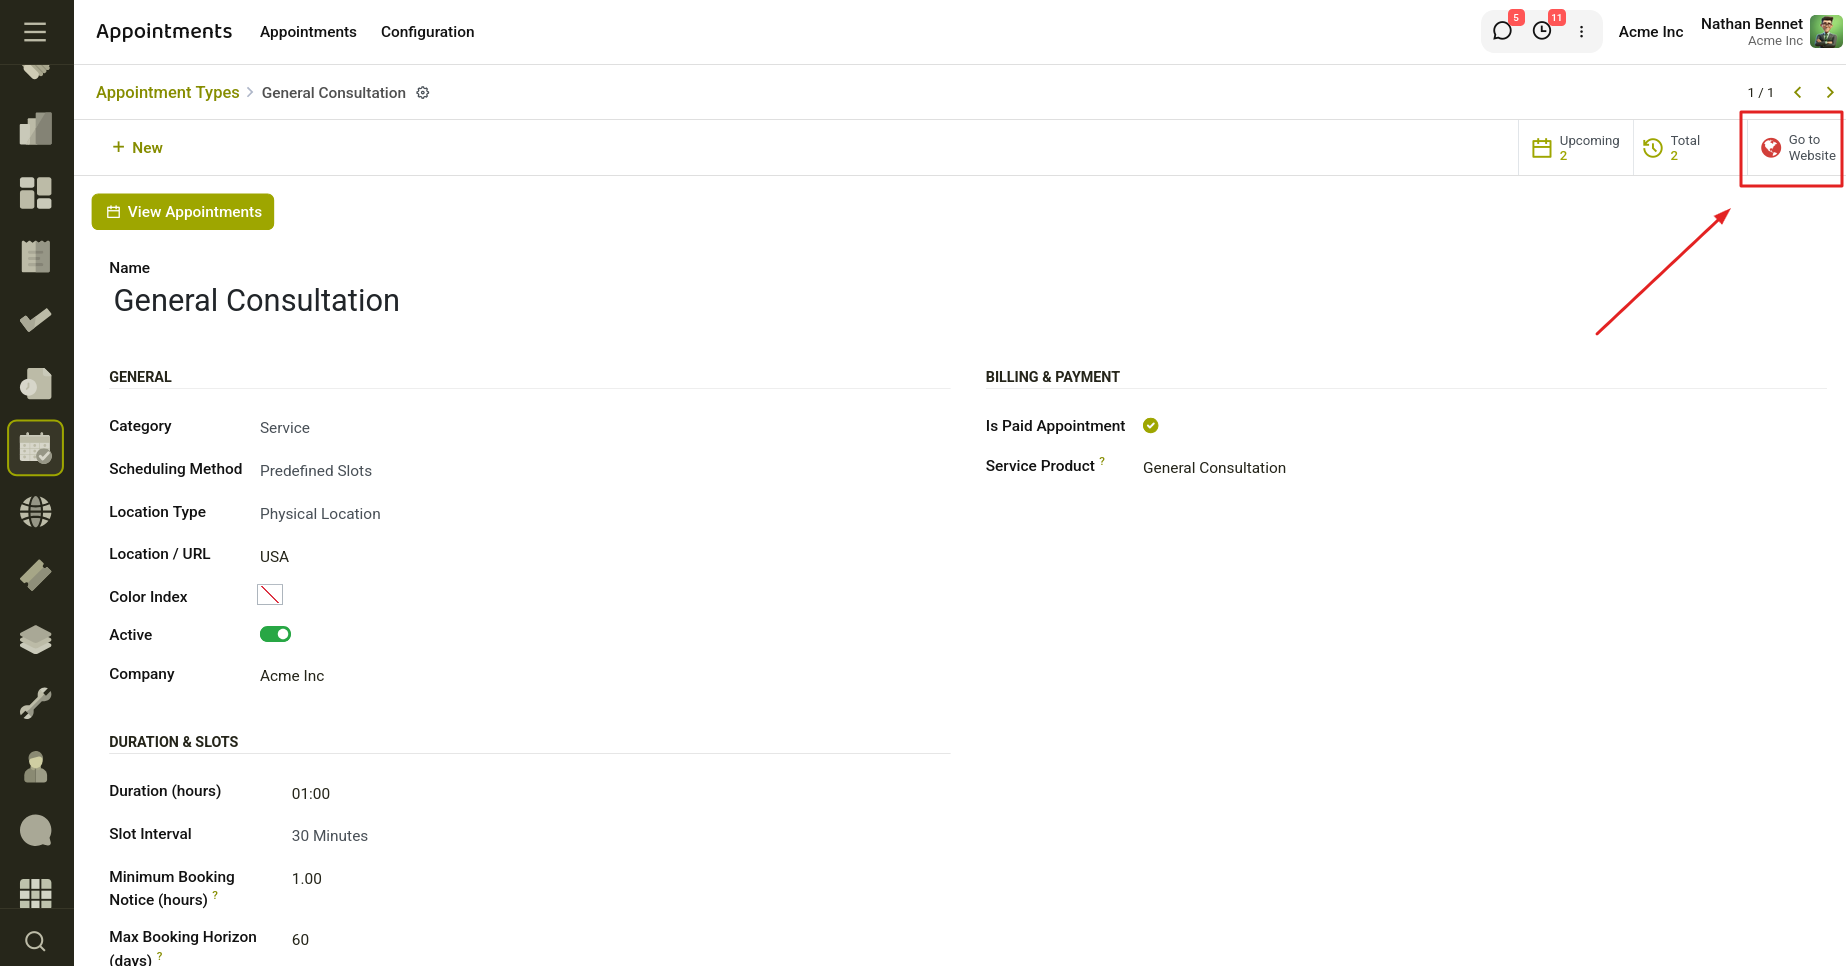
Fig 2.24 — Make Appointment Published on Website.
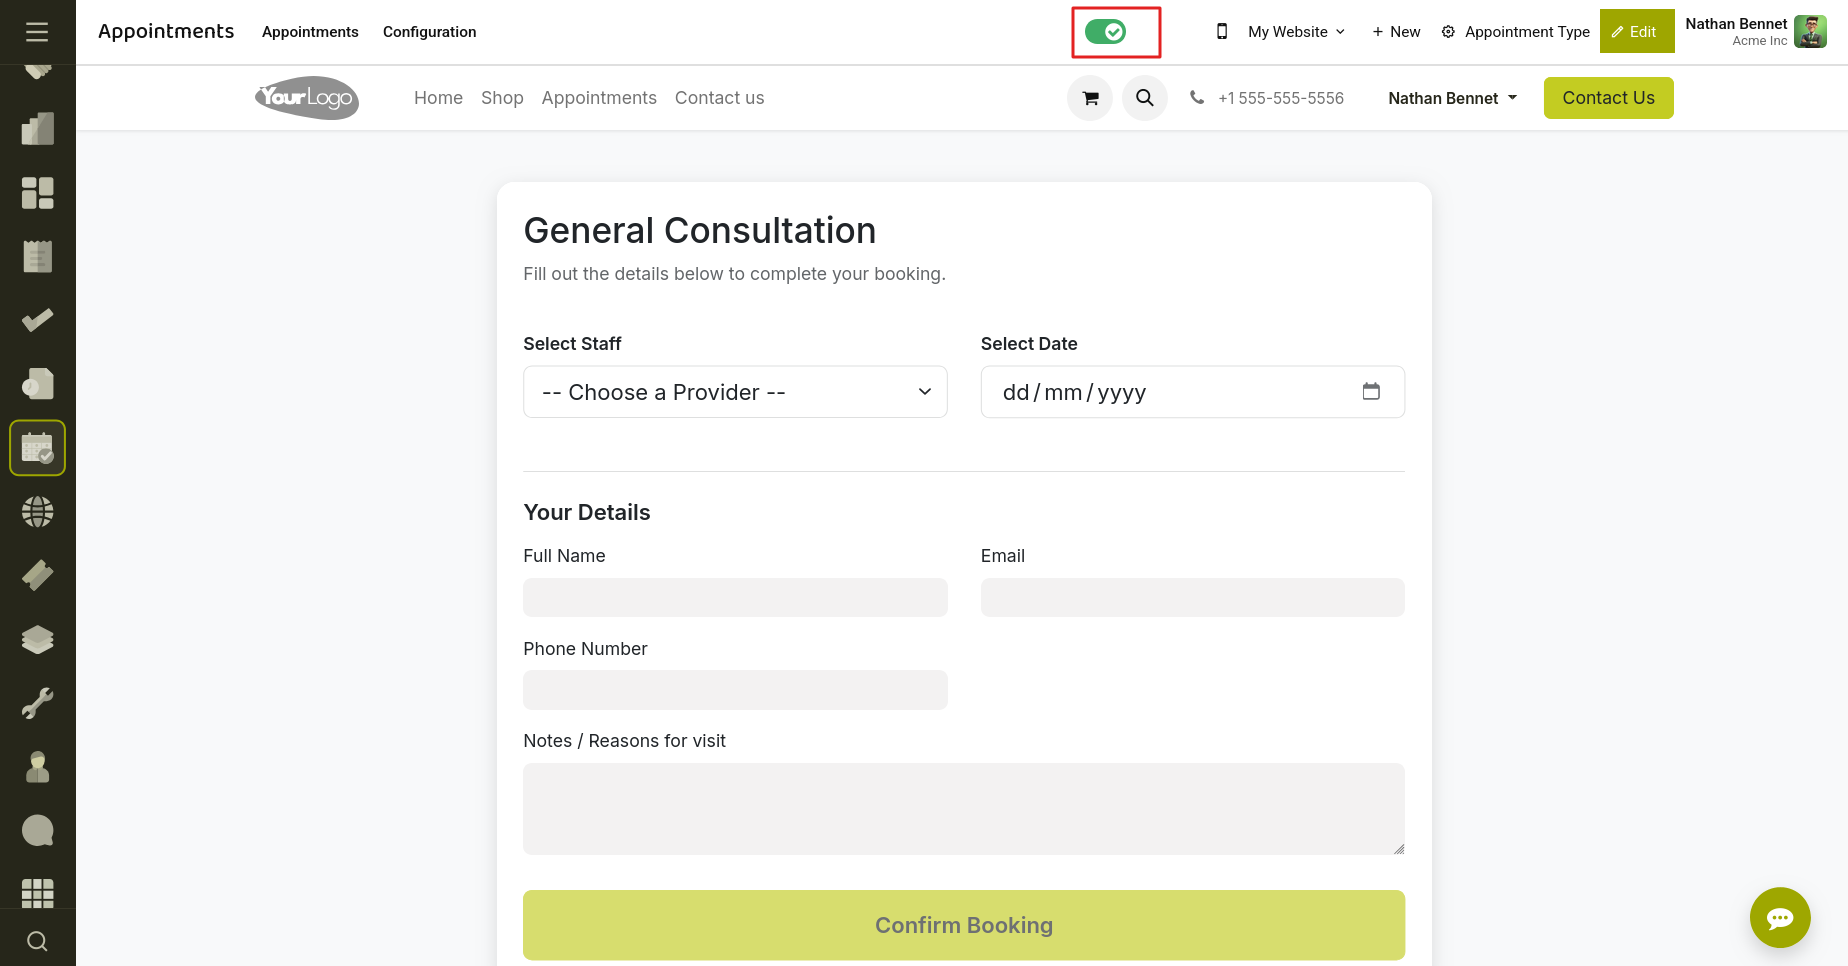
Fig 2.25 — Toggle the published button to publish on Website
Step 2: Access the Appointment Booking Page
Customers can access the appointment booking page from the website and view all published appointment types.
The page displays:
- Appointment Name
- Description
- Duration
- Price (if applicable)
Customers select the appointment they wish to book.
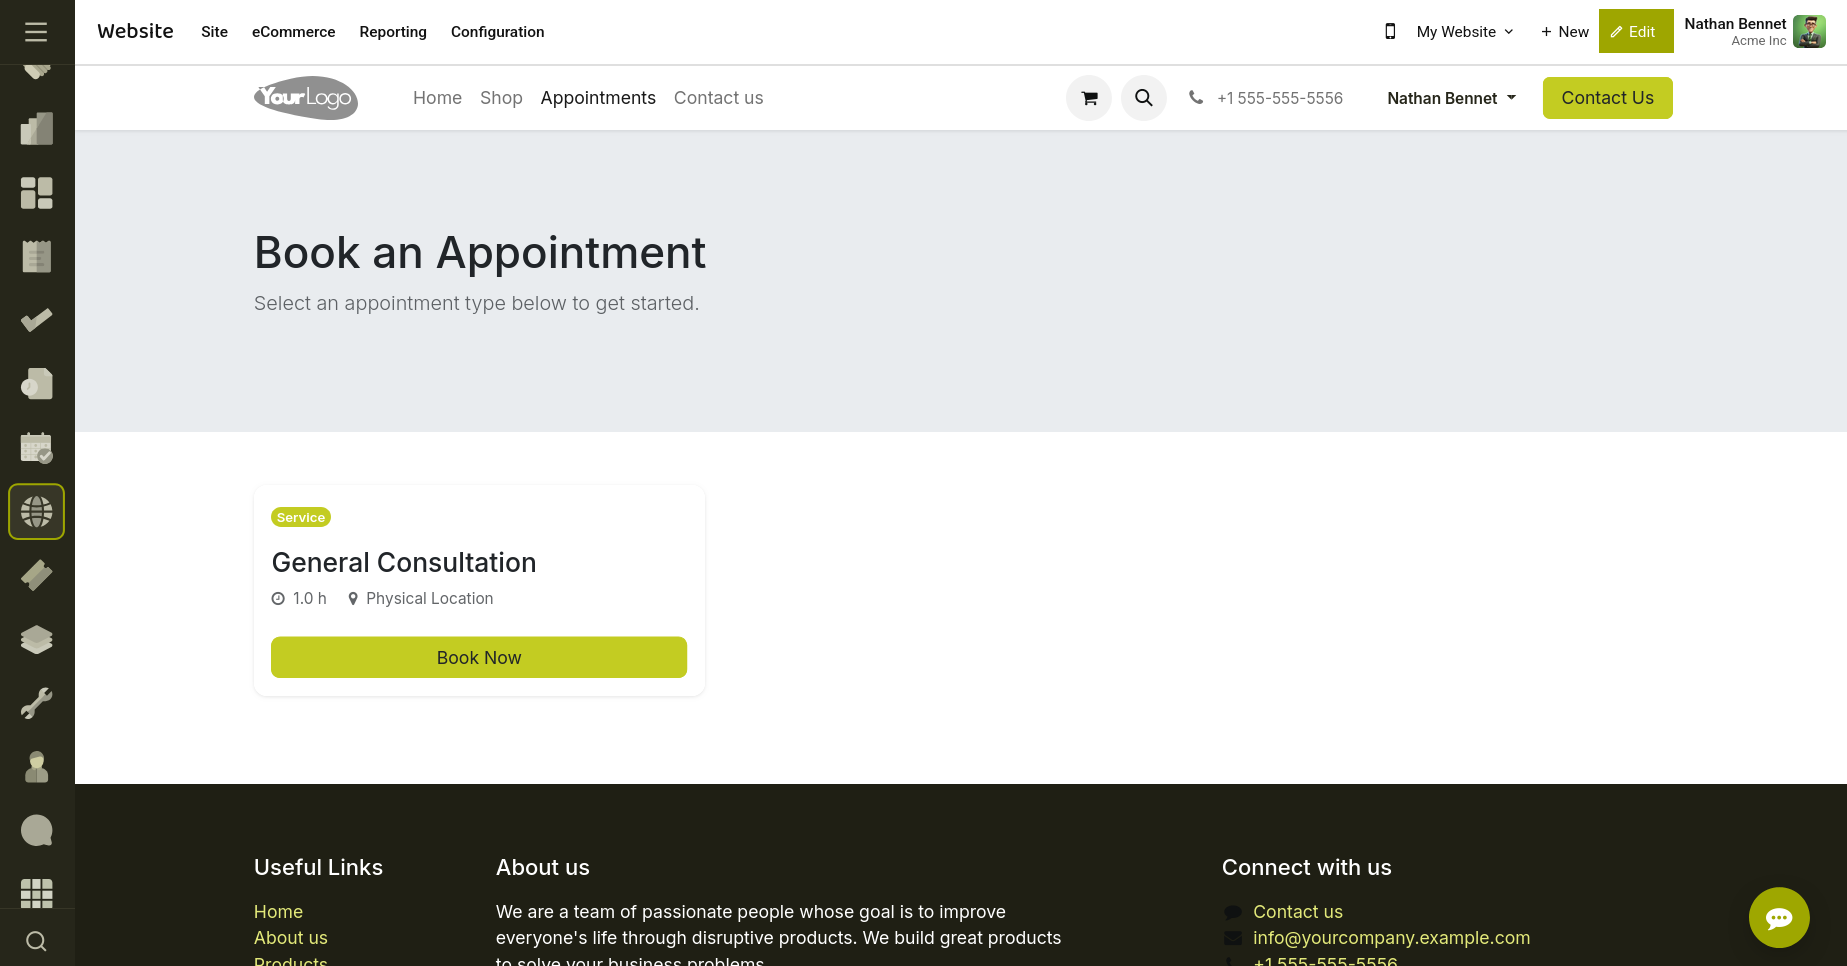
Fig 2.26 — Customers can easily view and book published appointments.
Step 3: Select Staff Member
If multiple staff members are assigned to the appointment type, customers can choose their preferred staff member.
Only available staff members are displayed.
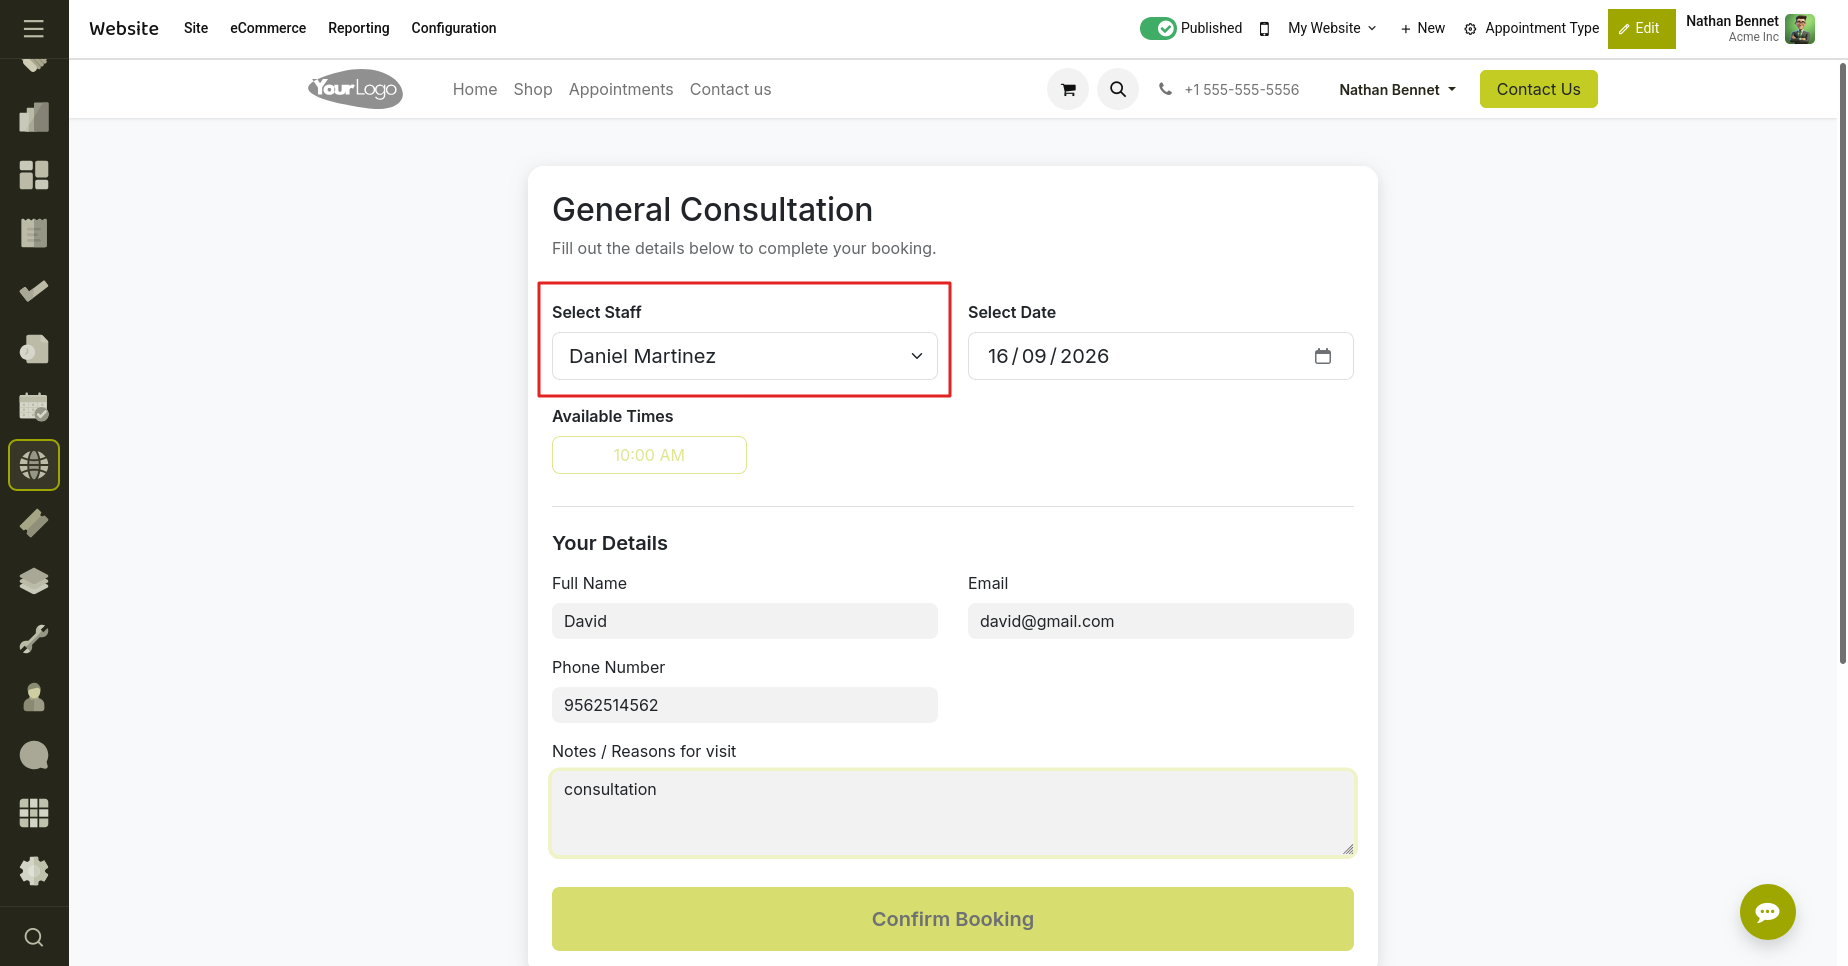
Fig 2.27 — Select your preferred staff from the available Staff members.
Step 4: Select Date and Time Slot
Available dates and time slots are displayed based on:
- Staff availability
- Resource availability
- Working hours
- Existing bookings
Customers select their preferred slot.
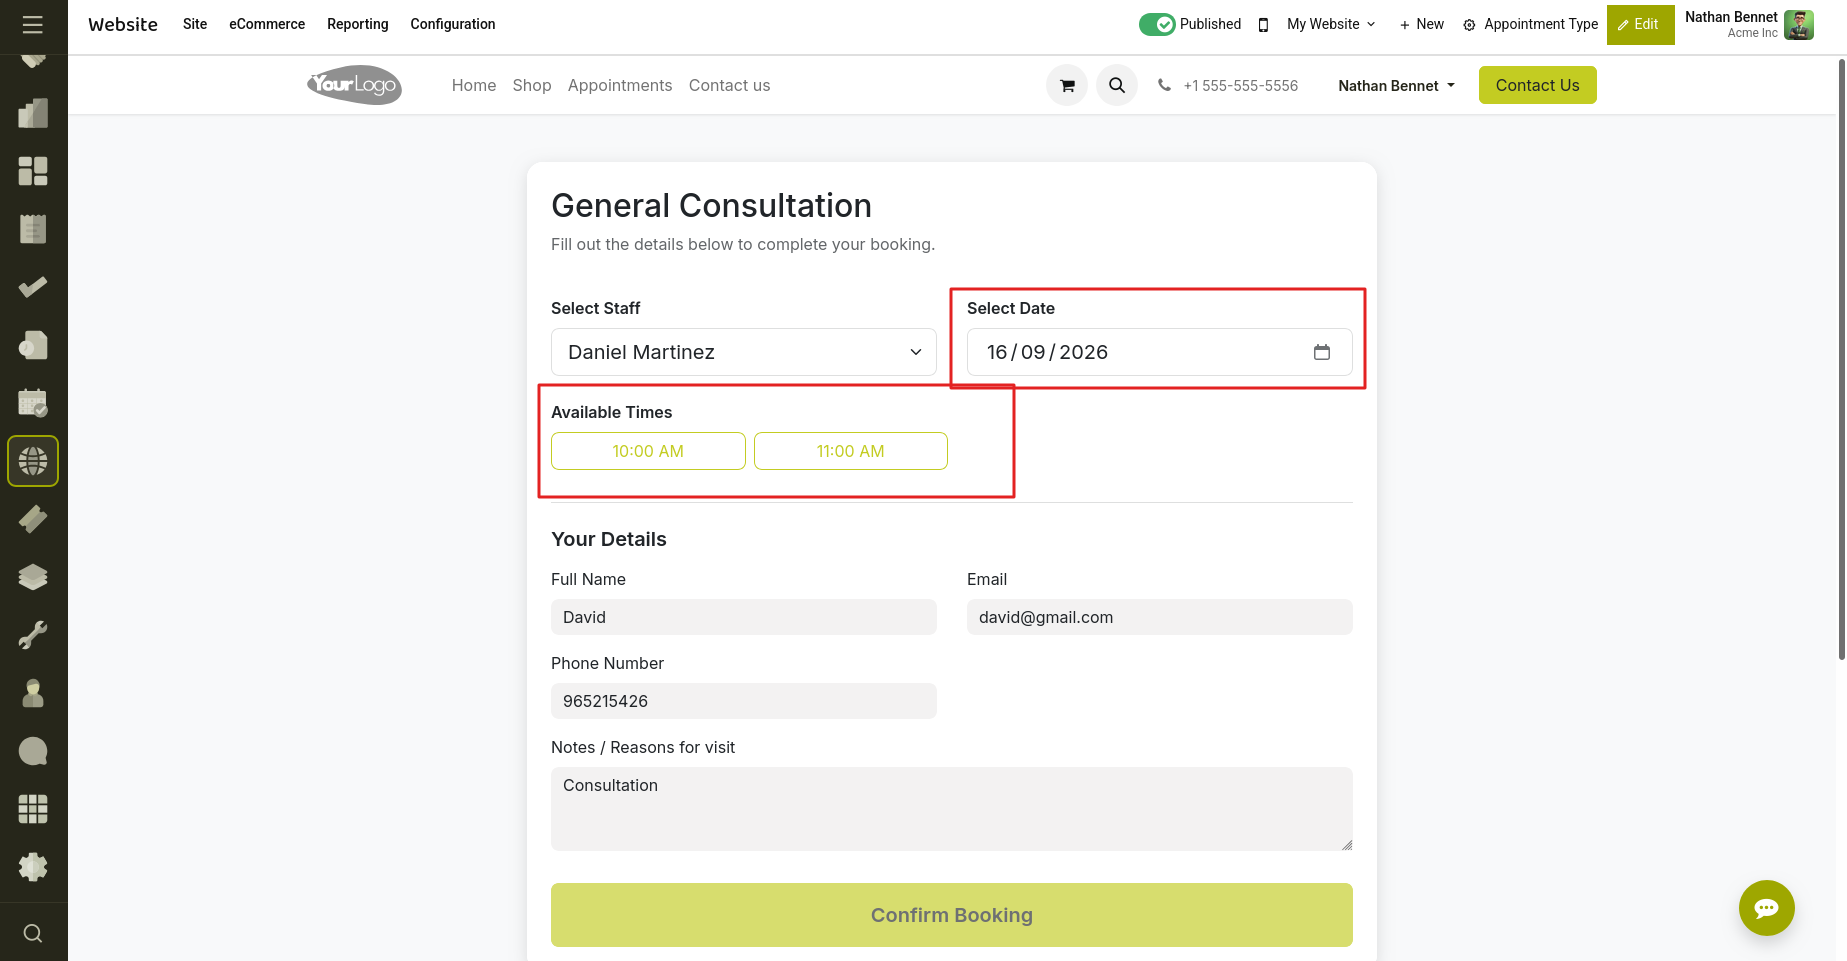
Fig 2.28 — Select the Date and Time Slot.
Step 5: Enter Customer Information
Customers provide the required information such as:
- Name
- Email Address
- Phone Number
- Additional Notes
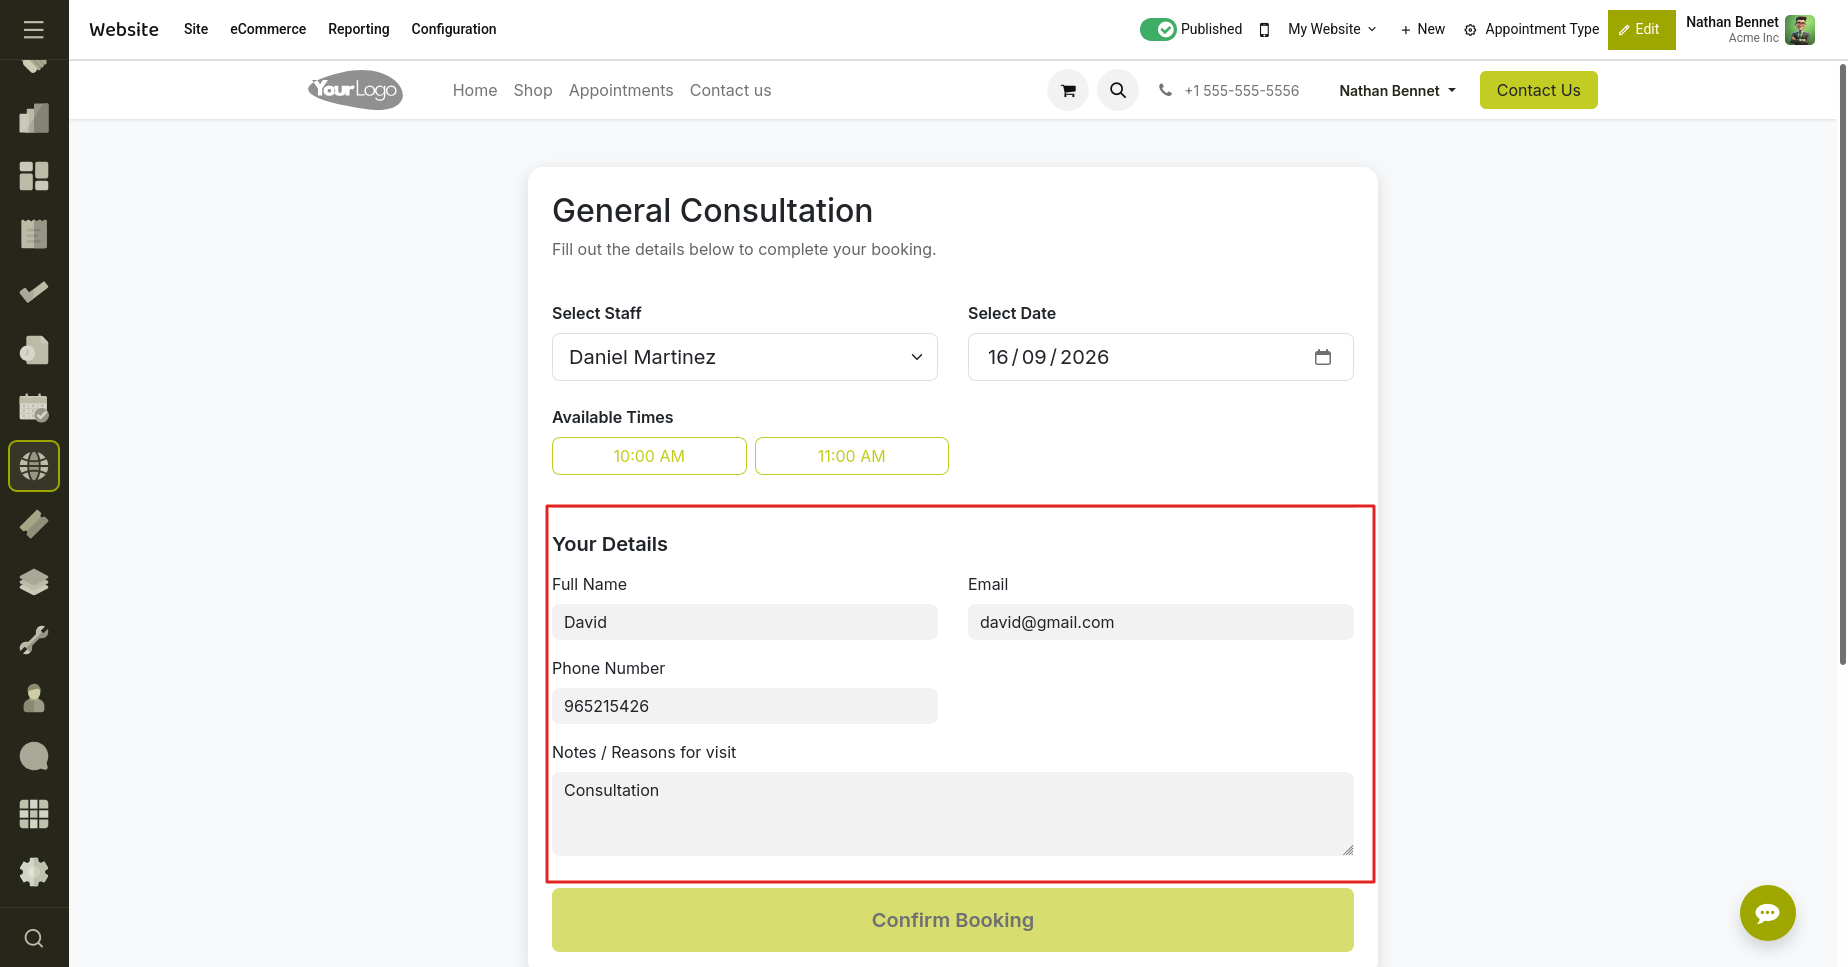
Fig 2.29 — Enter the Customer Information.
Step 6: Complete Payment (If Applicable)
For paid appointments, customers are redirected to the payment page to complete the transaction.
After successful payment, the appointment is automatically confirmed.
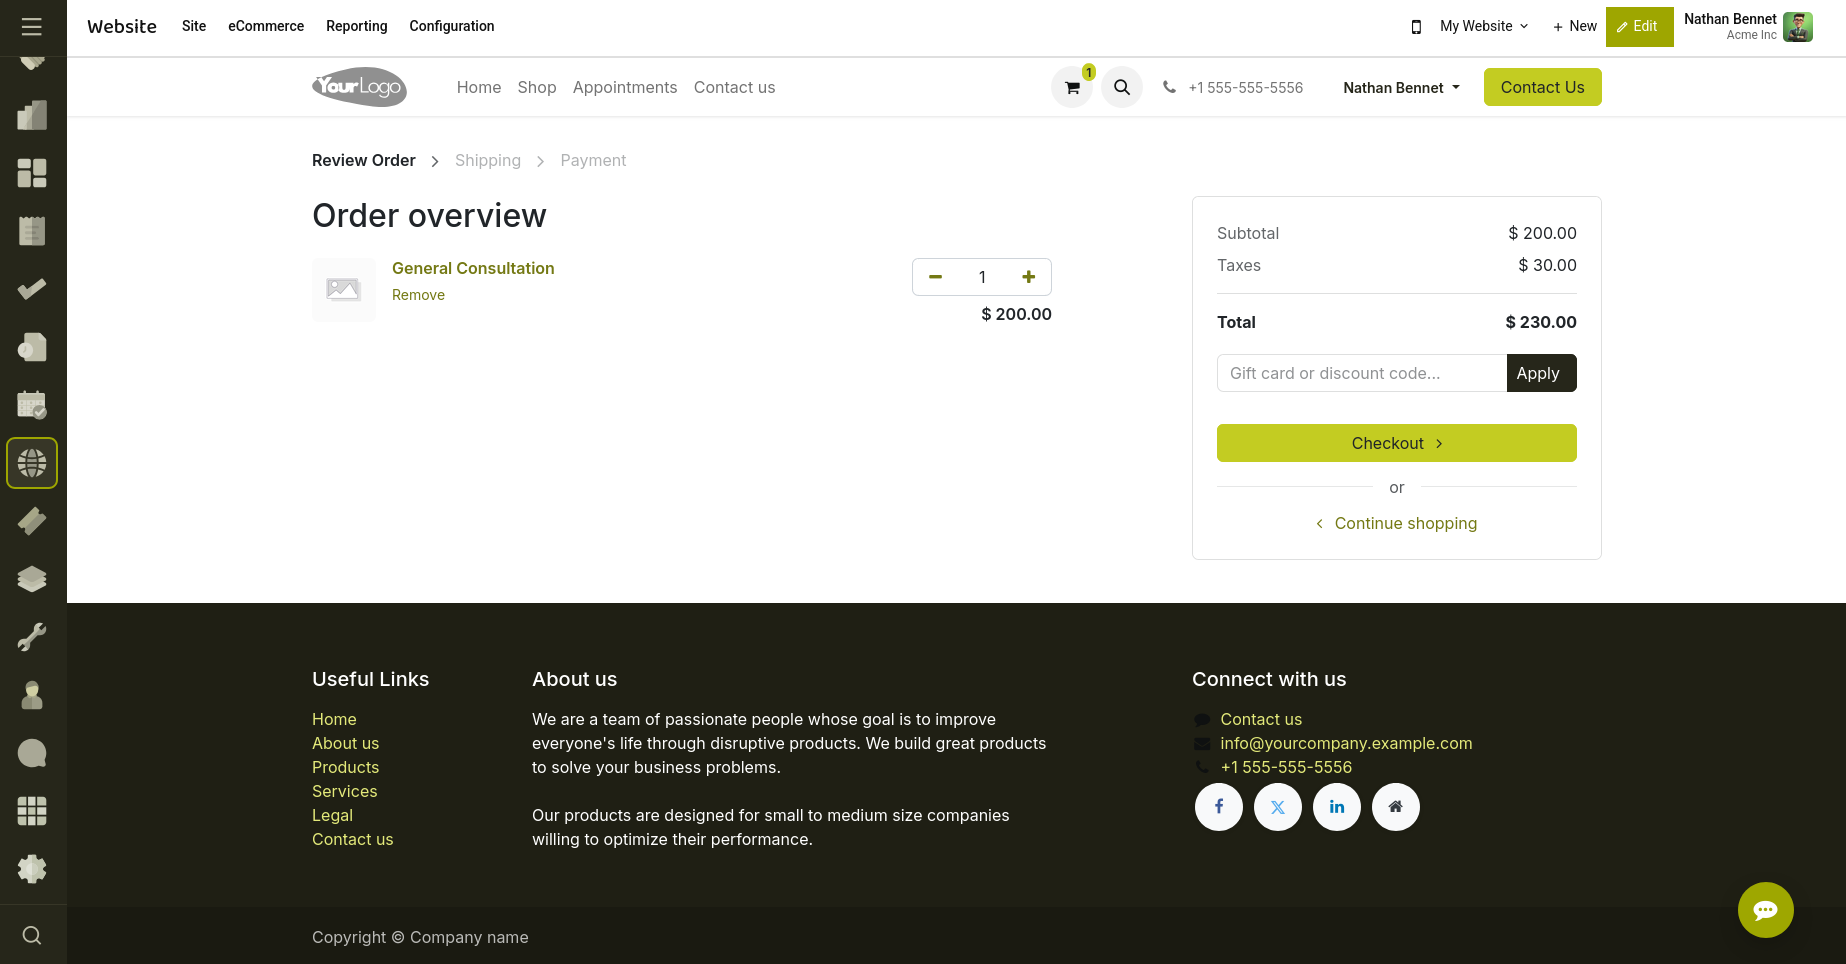
Fig 2.30 — Checkout with the Appointment.
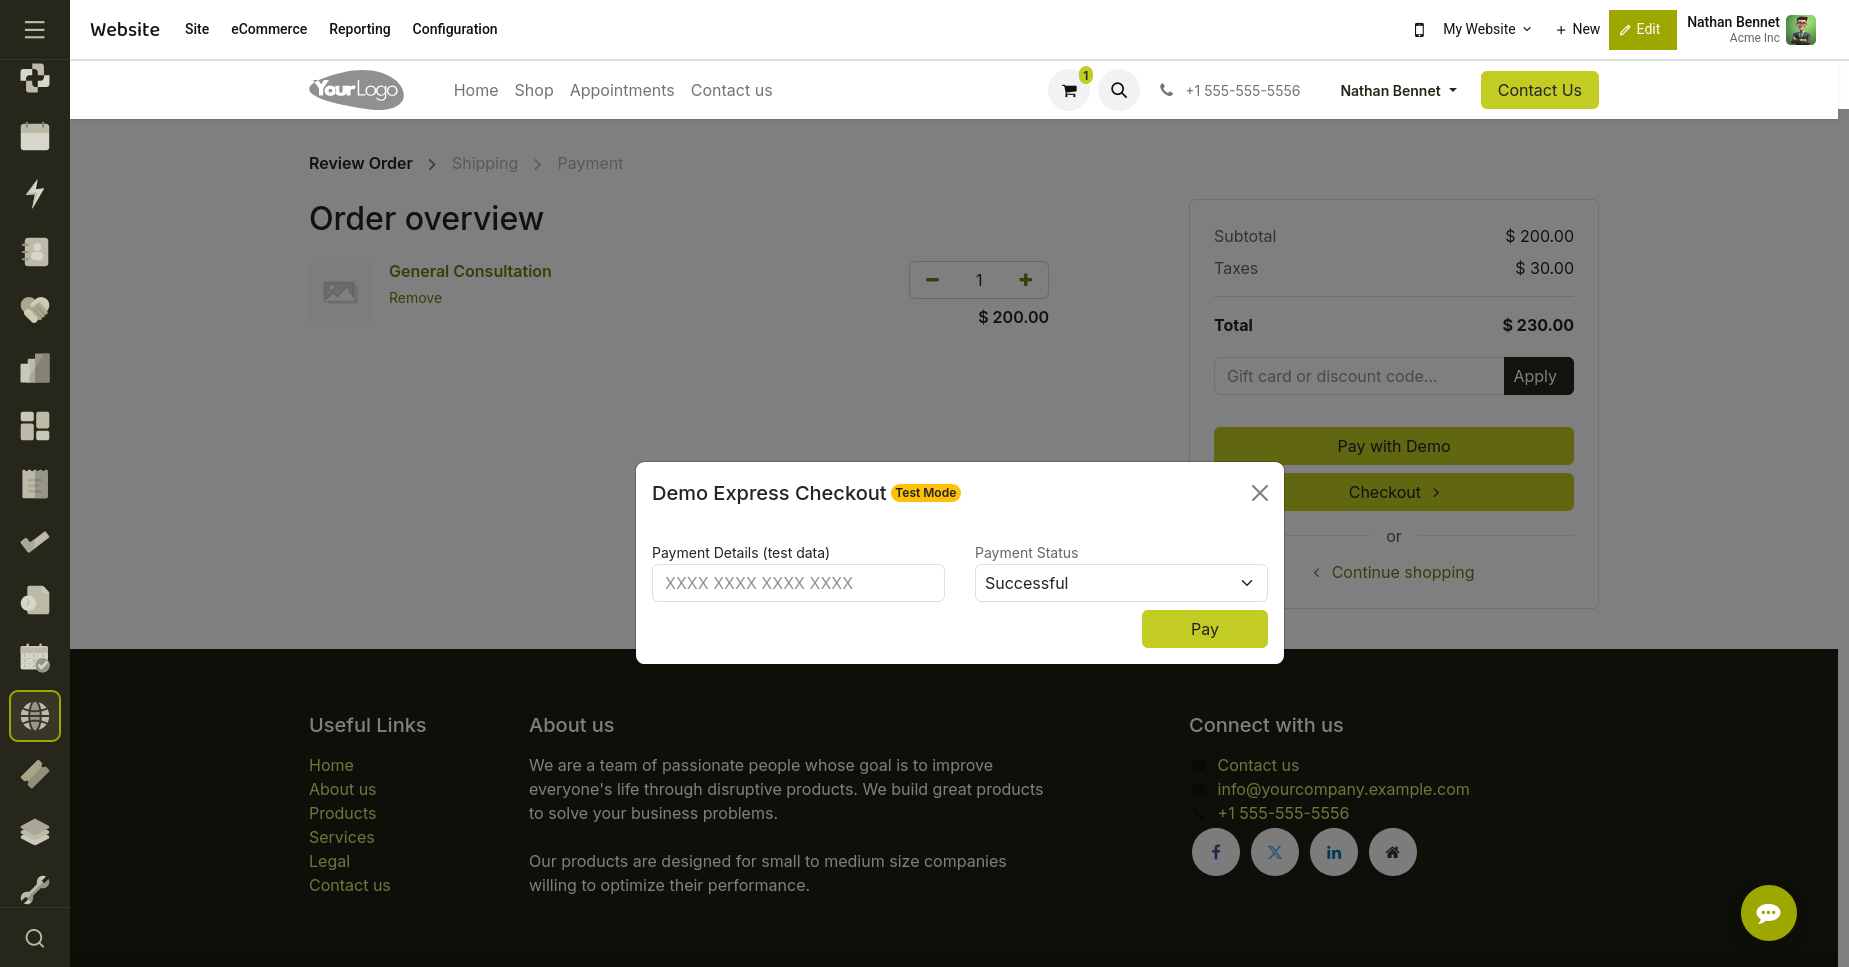
Fig 2.31 — Complete the Payment if Applicable.
Step 7: Appointment Confirmation
A confirmation page is displayed showing:
- Appointment Reference
- Appointment Details
- Booking Status
The appointment is also created in the backend system.
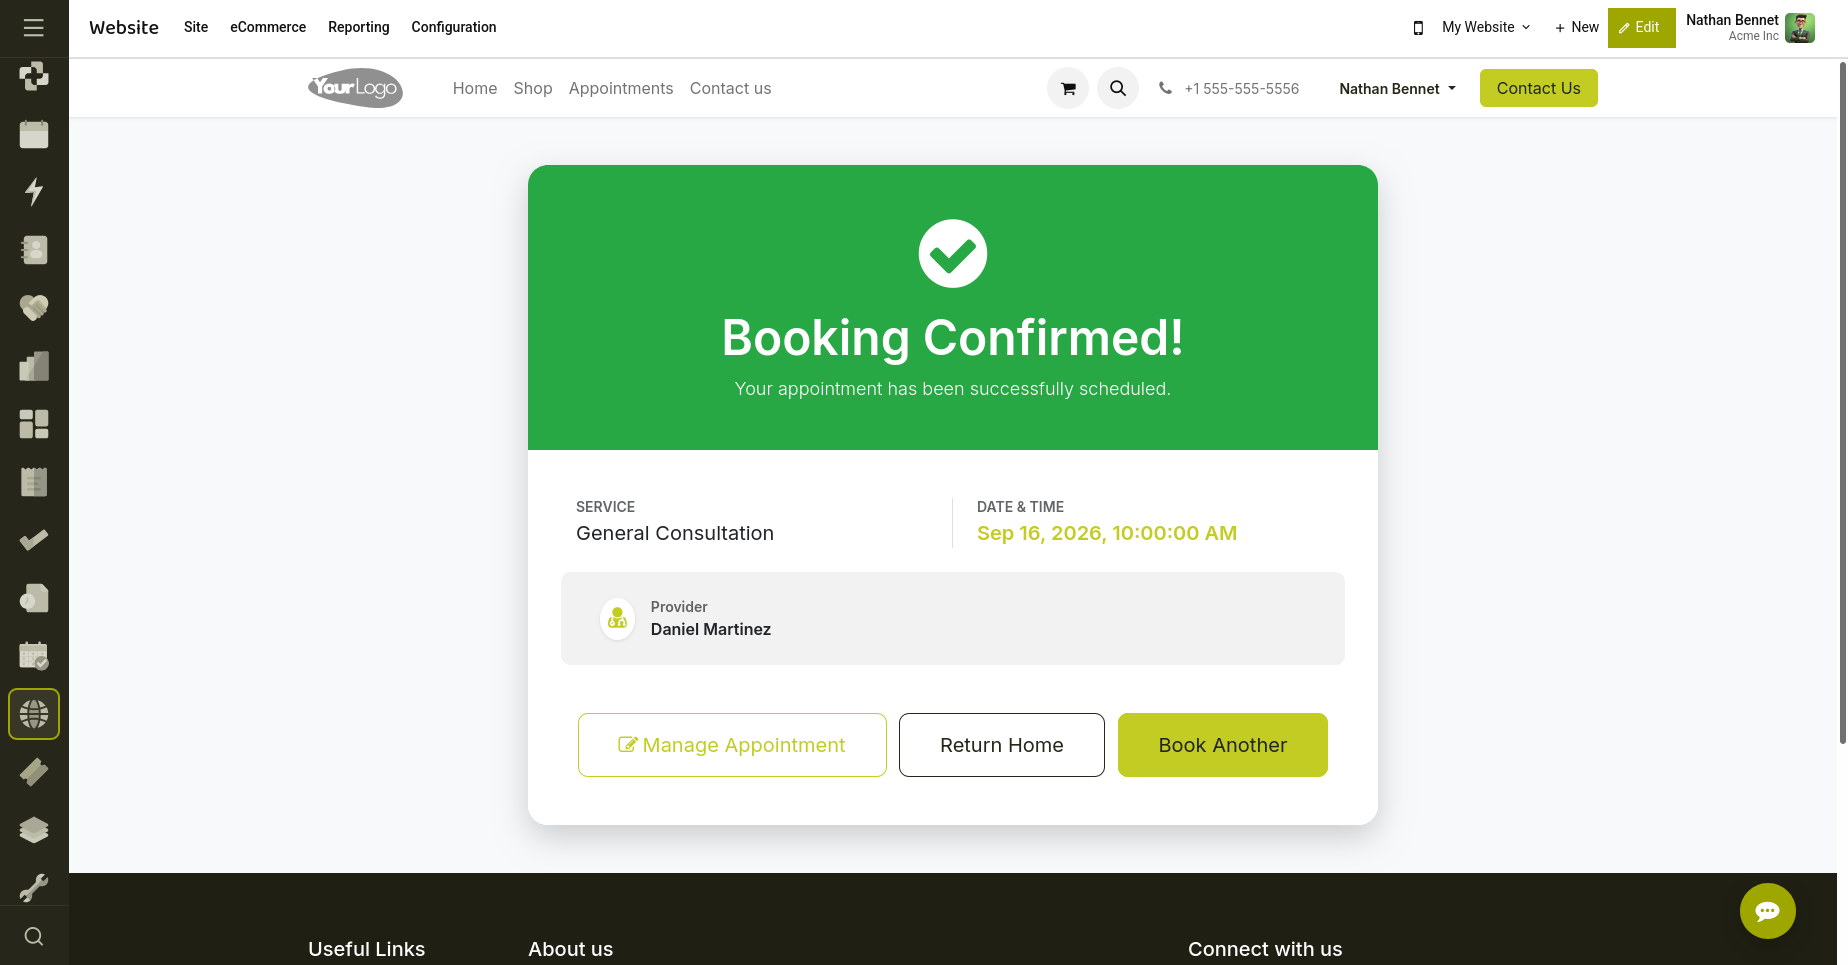
Fig 2.32 — Booking confirmation displayed after a successful appointment booking.
Step 8: Access Appointments from Customer Portal
After booking an appointment, customers can log in to the website portal and navigate to:
My Account → My Appointments
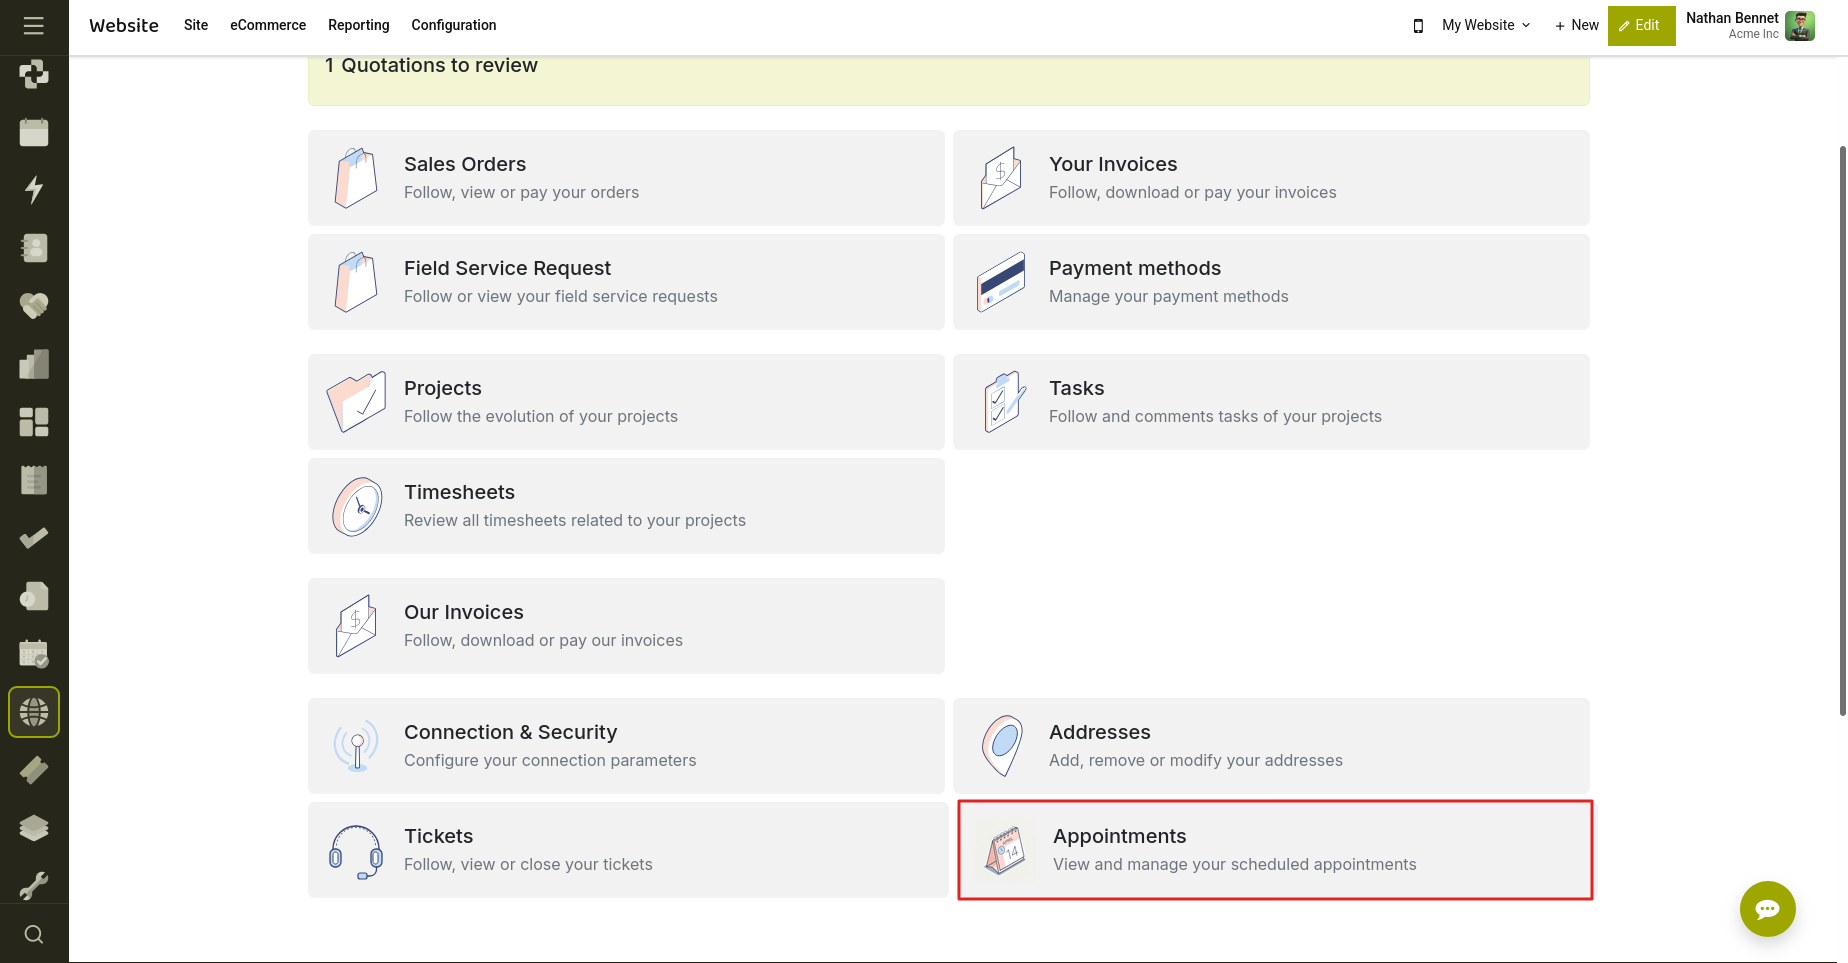
Fig 2.33 — Appointment Bookings from website portal.
The portal displays all appointments associated with the customer's account, including:
- Appointment Reference
- Appointment Type
- Date & Time
- Assigned Staff Member
- Appointment Status
- Payment Status
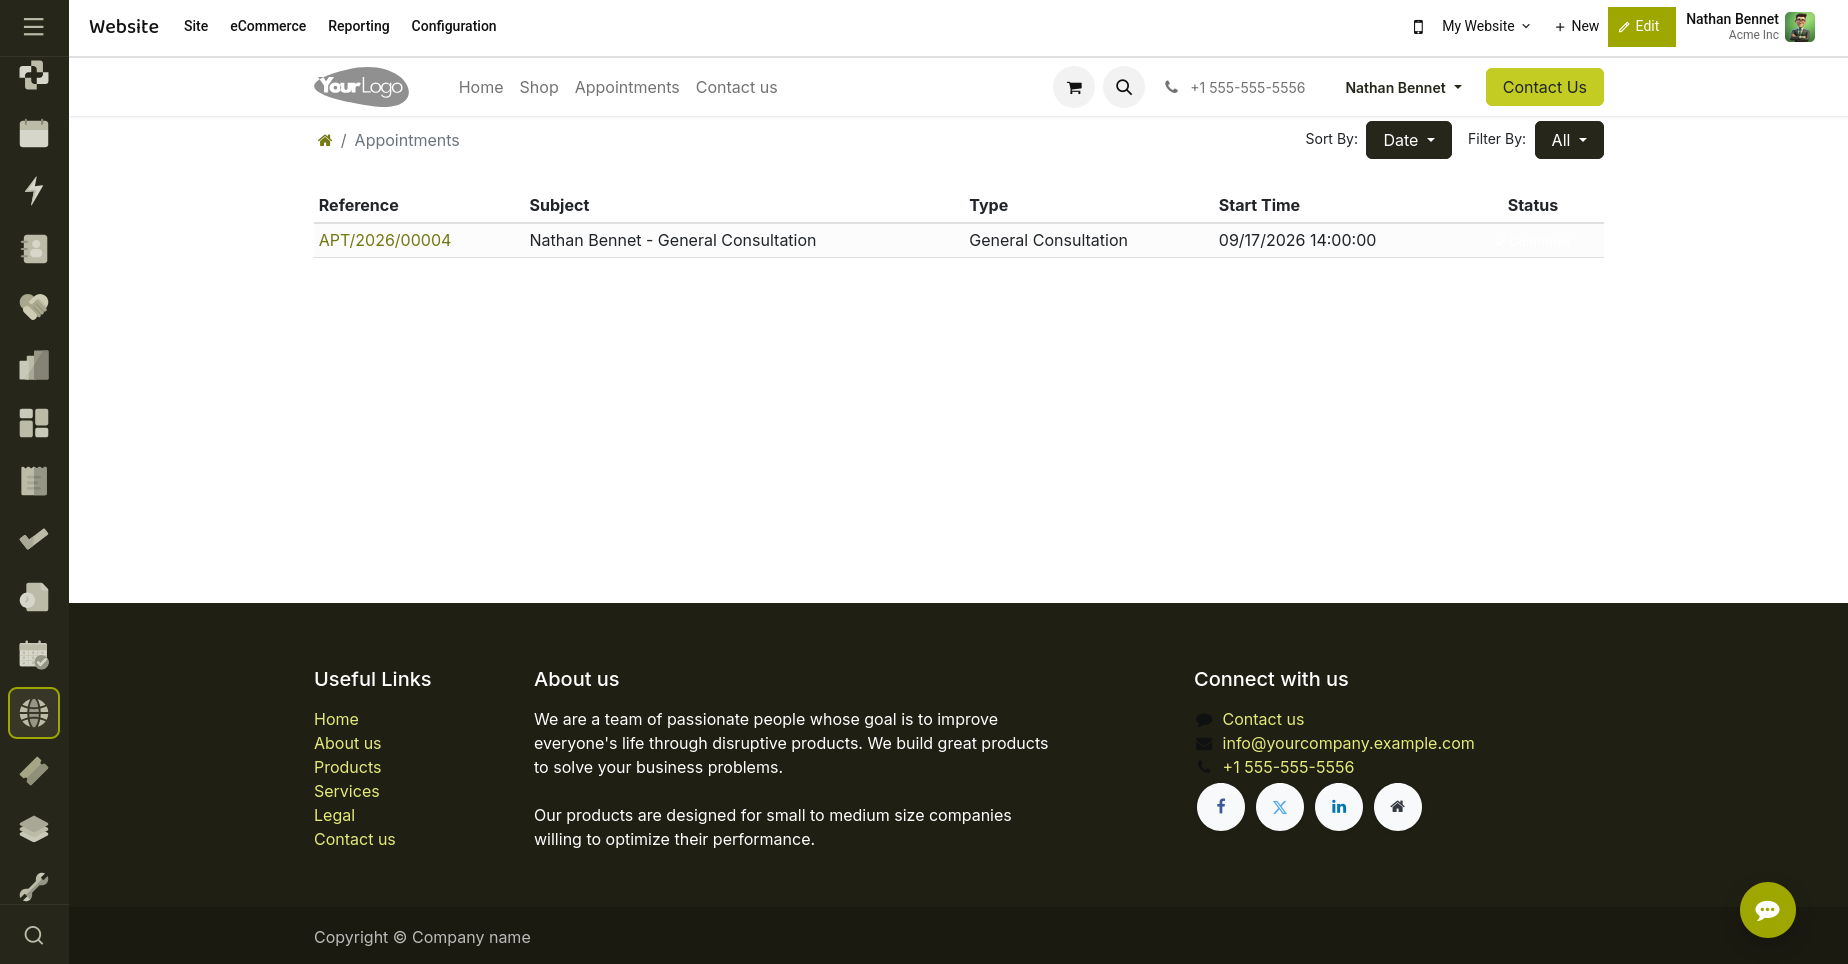
Fig 2.34 — The portal displays all appointments associated with the customer's account.
Step 9: View Appointment Details
Customers can access detailed information about their appointment, including:
- Appointment Information
- Staff Details
- Scheduled Date & Time
- Appointment Status
- Payment Information
- Notes and Instructions
Depending on the configured policies, options to reschedule or cancel the appointment may also be available.
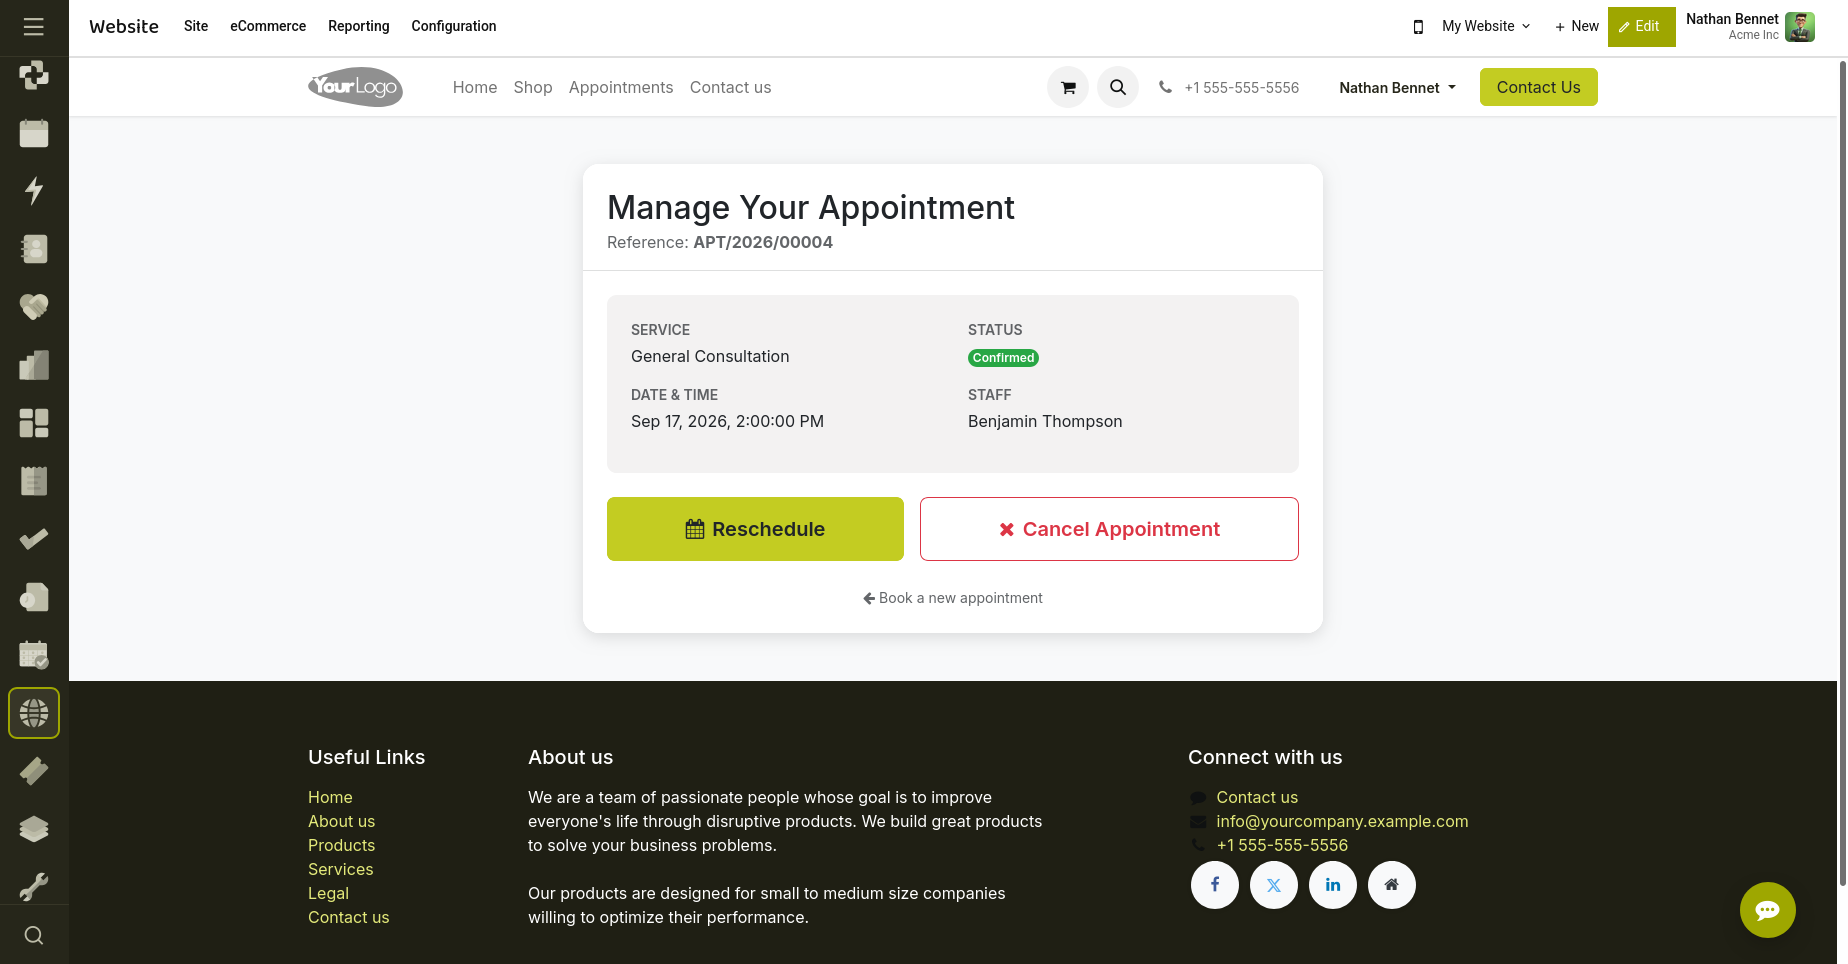
Fig 2.35 — Customers can access detailed information about their appointment.
Step 10: Reschedule Appointment
If rescheduling is enabled for the appointment type, customers can modify their booking directly from the portal.
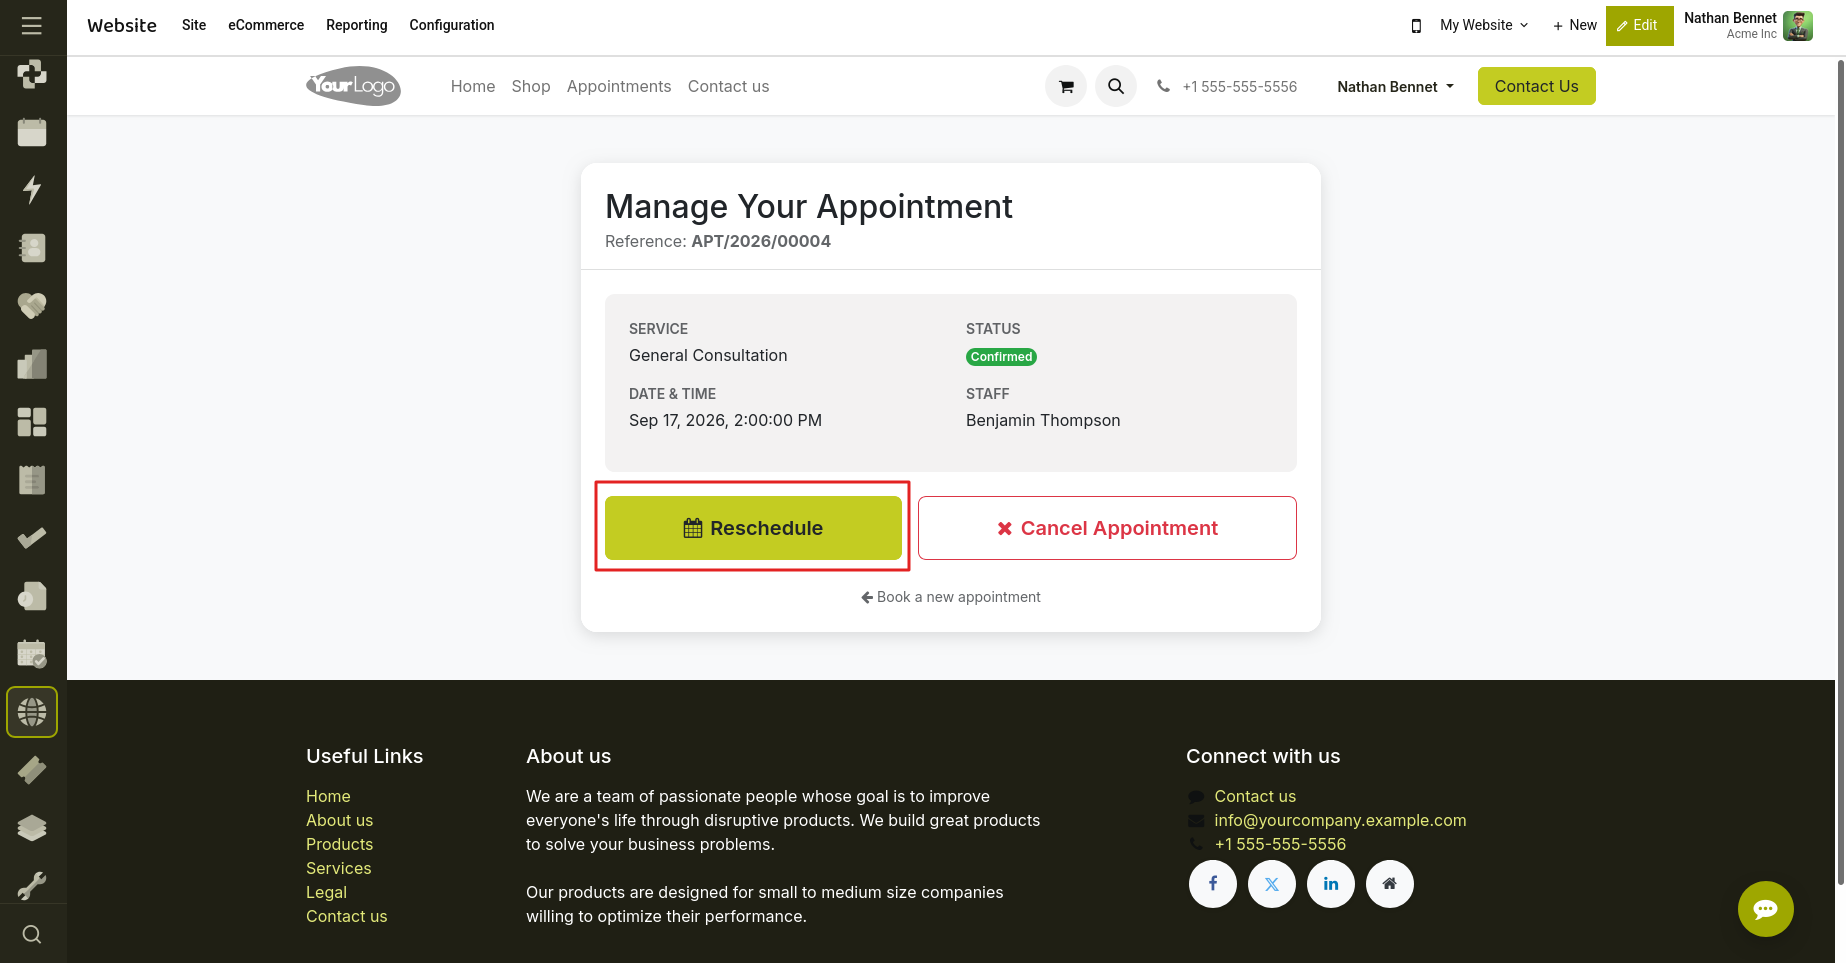
Fig 2.36 — Customers can reschedule appointments from the portal when enabled.
When the Reschedule option is selected:
- The system validates the rescheduling policy.
- Available dates and time slots are displayed.
- The customer selects a new date and time.
- The appointment is updated automatically.
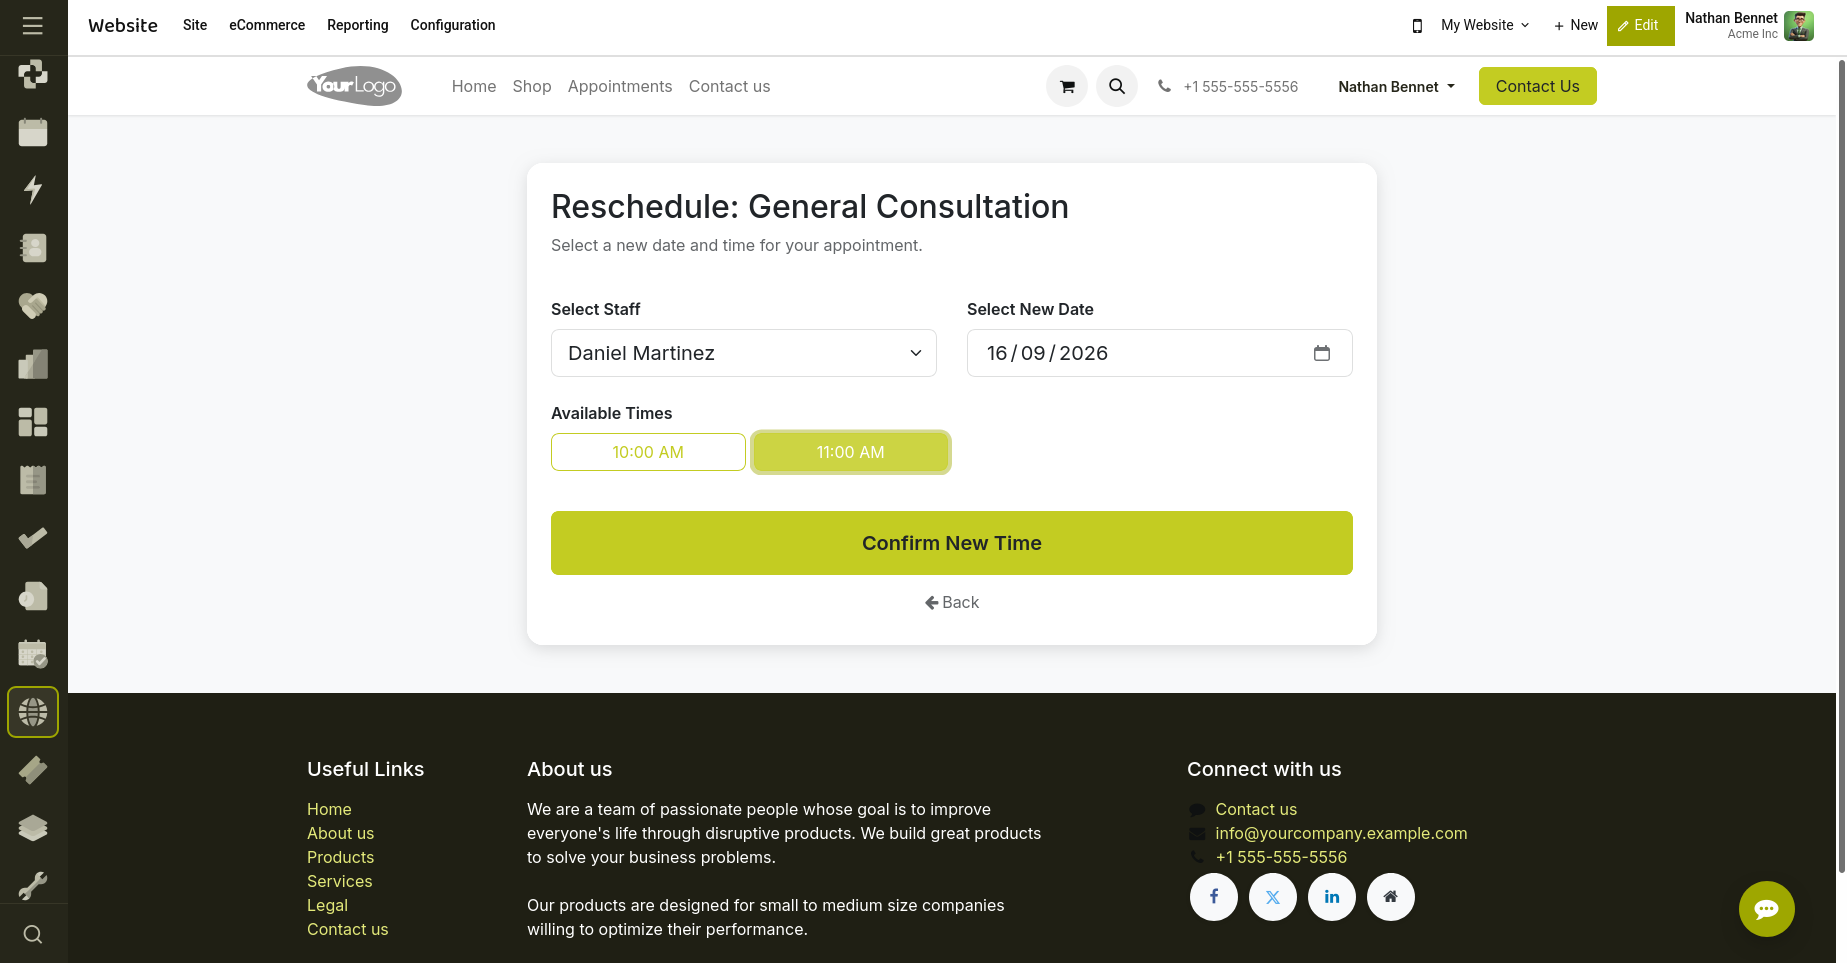
Fig 2.37 — hoose a new slot to reschedule the appointment.
The system verifies:
- Reschedule deadline
- Staff availability
- Resource availability
- Existing bookings After a successful reschedule, confirmation notifications are sent to the customer.
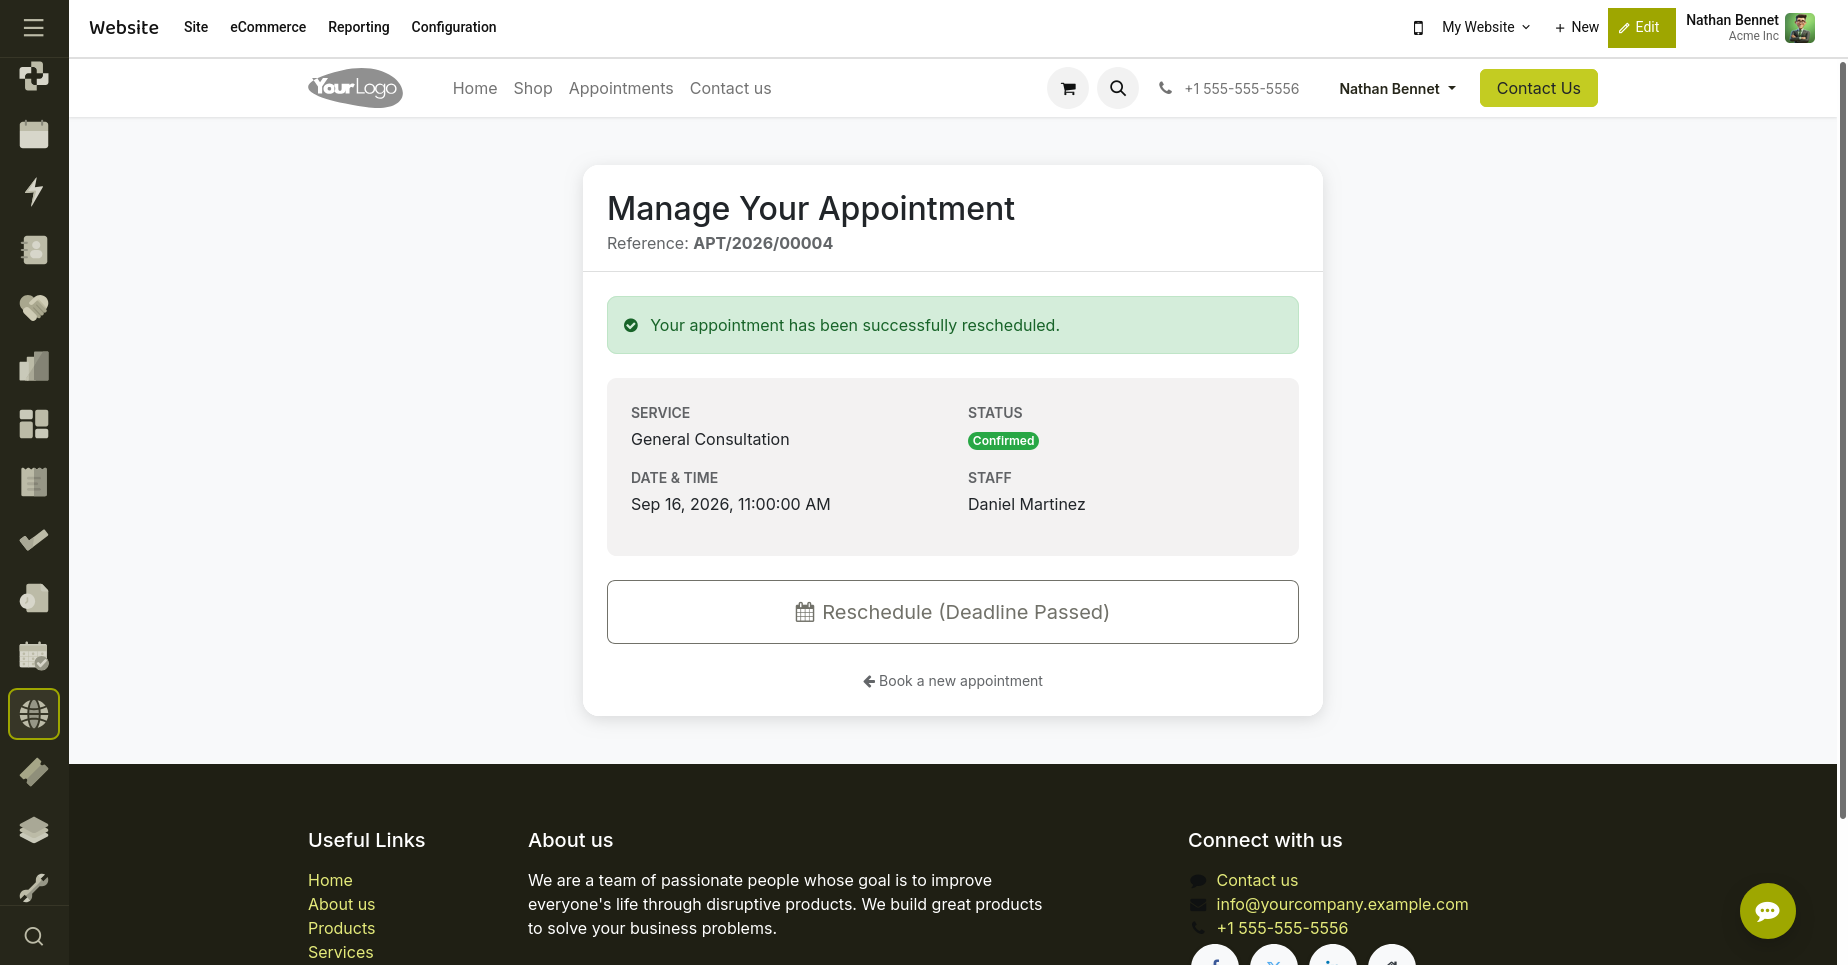
Fig 2.38 — Successful rescheduling message displayed.
Step 11: Cancel Appointment
If cancellation is allowed, customers can cancel appointments directly through the portal.
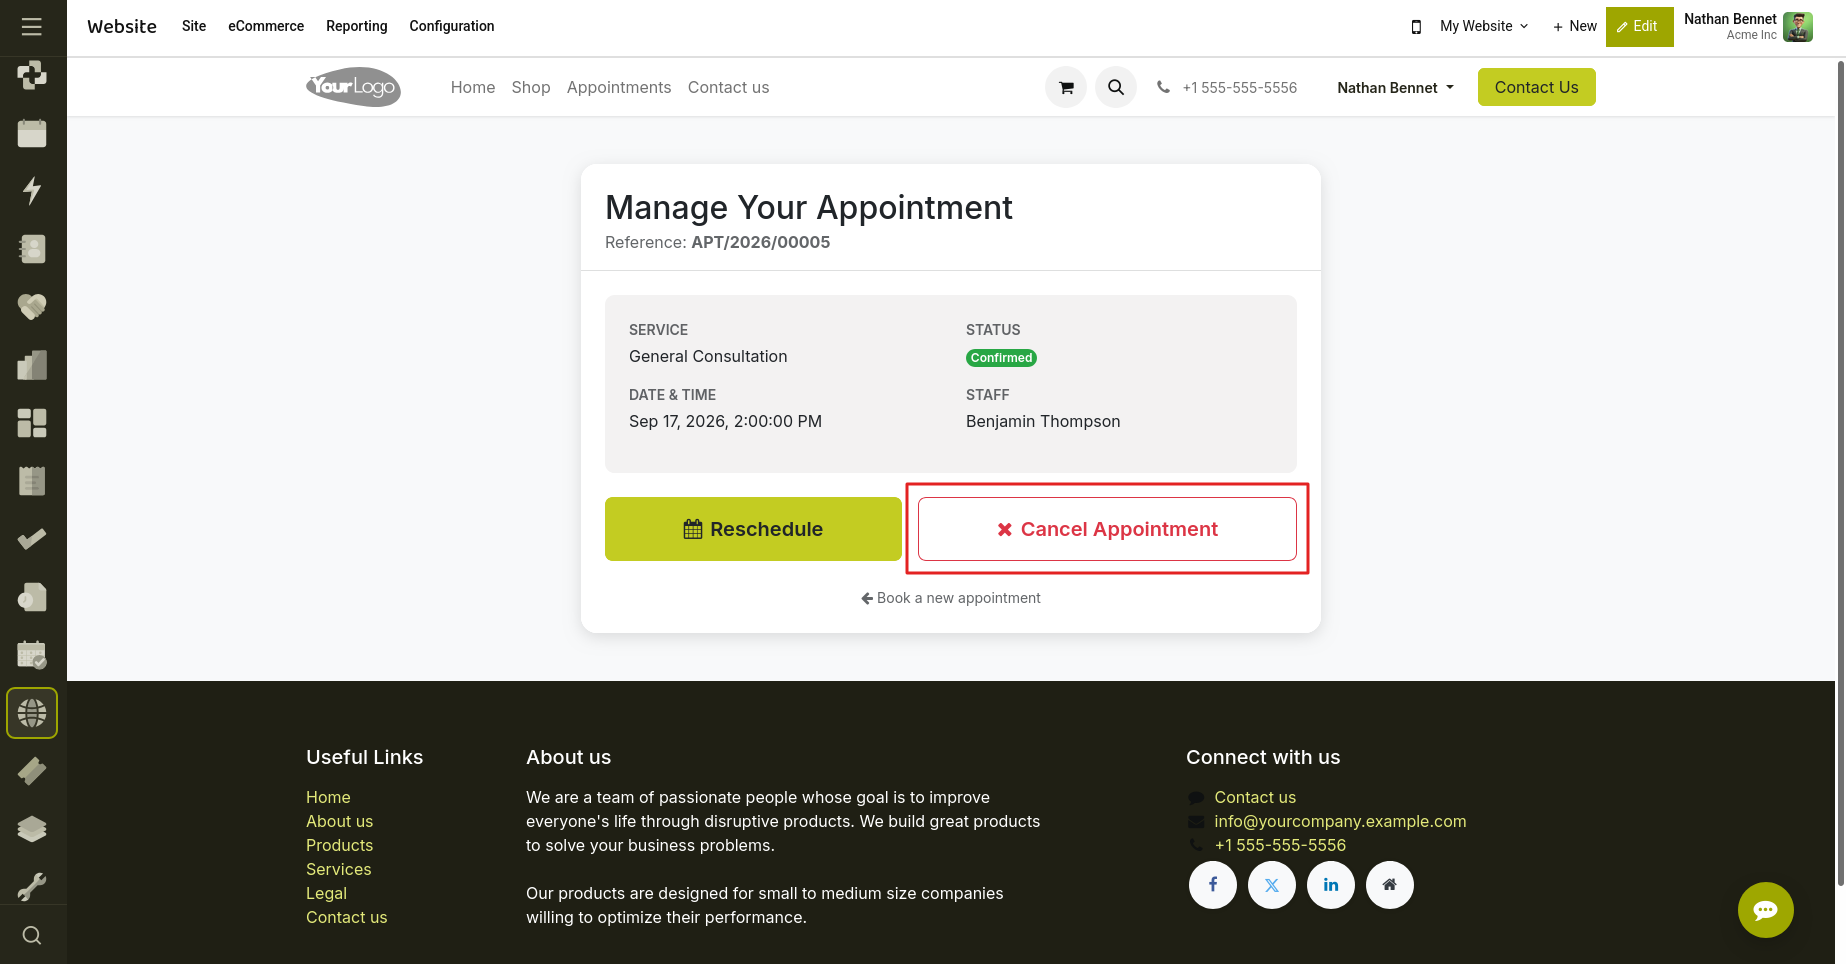
Fig 2.39 — Cancel appointments from the portal when enabled.
During cancellation:
- The customer selects Cancel Appointment.
- A cancellation reason may be provided.
- The system evaluates the configured cancellation and refund policies.
- The appointment status is updated to Cancelled.
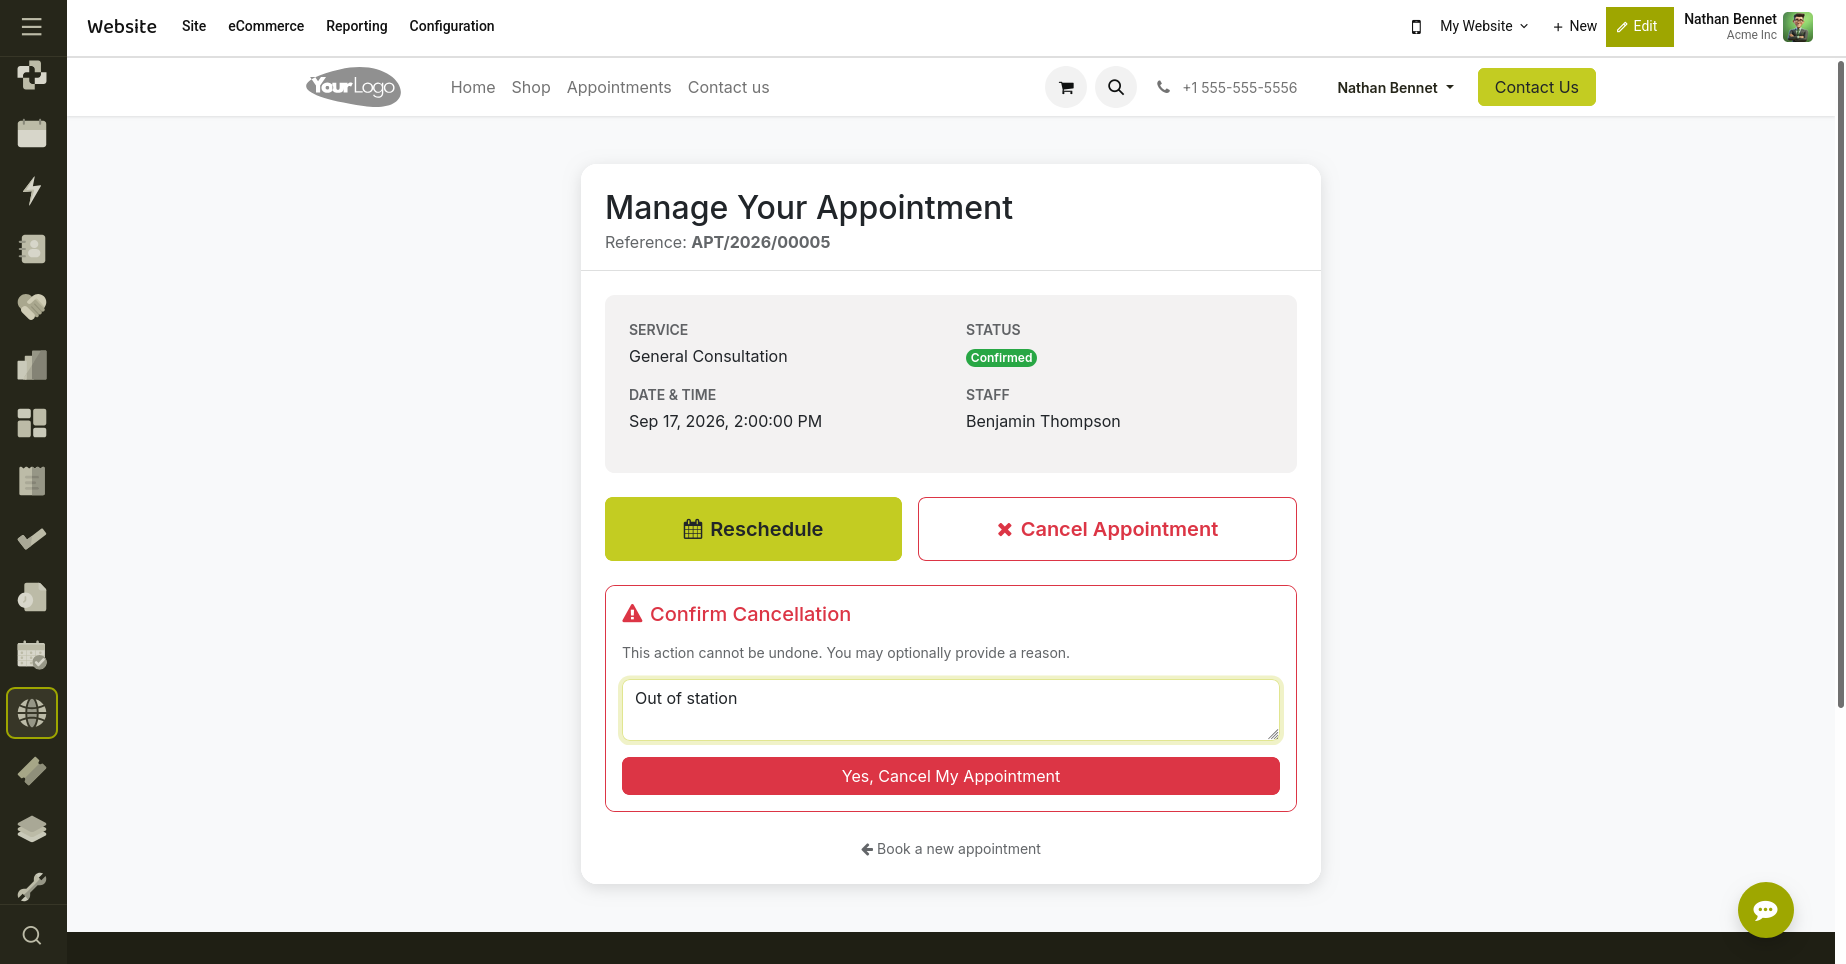
Fig 2.40 — Provide a cancellation message to cancel the appointment.
Depending on the appointment configuration:
- A refund may be processed.
- A credit note may be generated.
- No refund may be granted. Cancellation notifications are automatically sent to the customer.
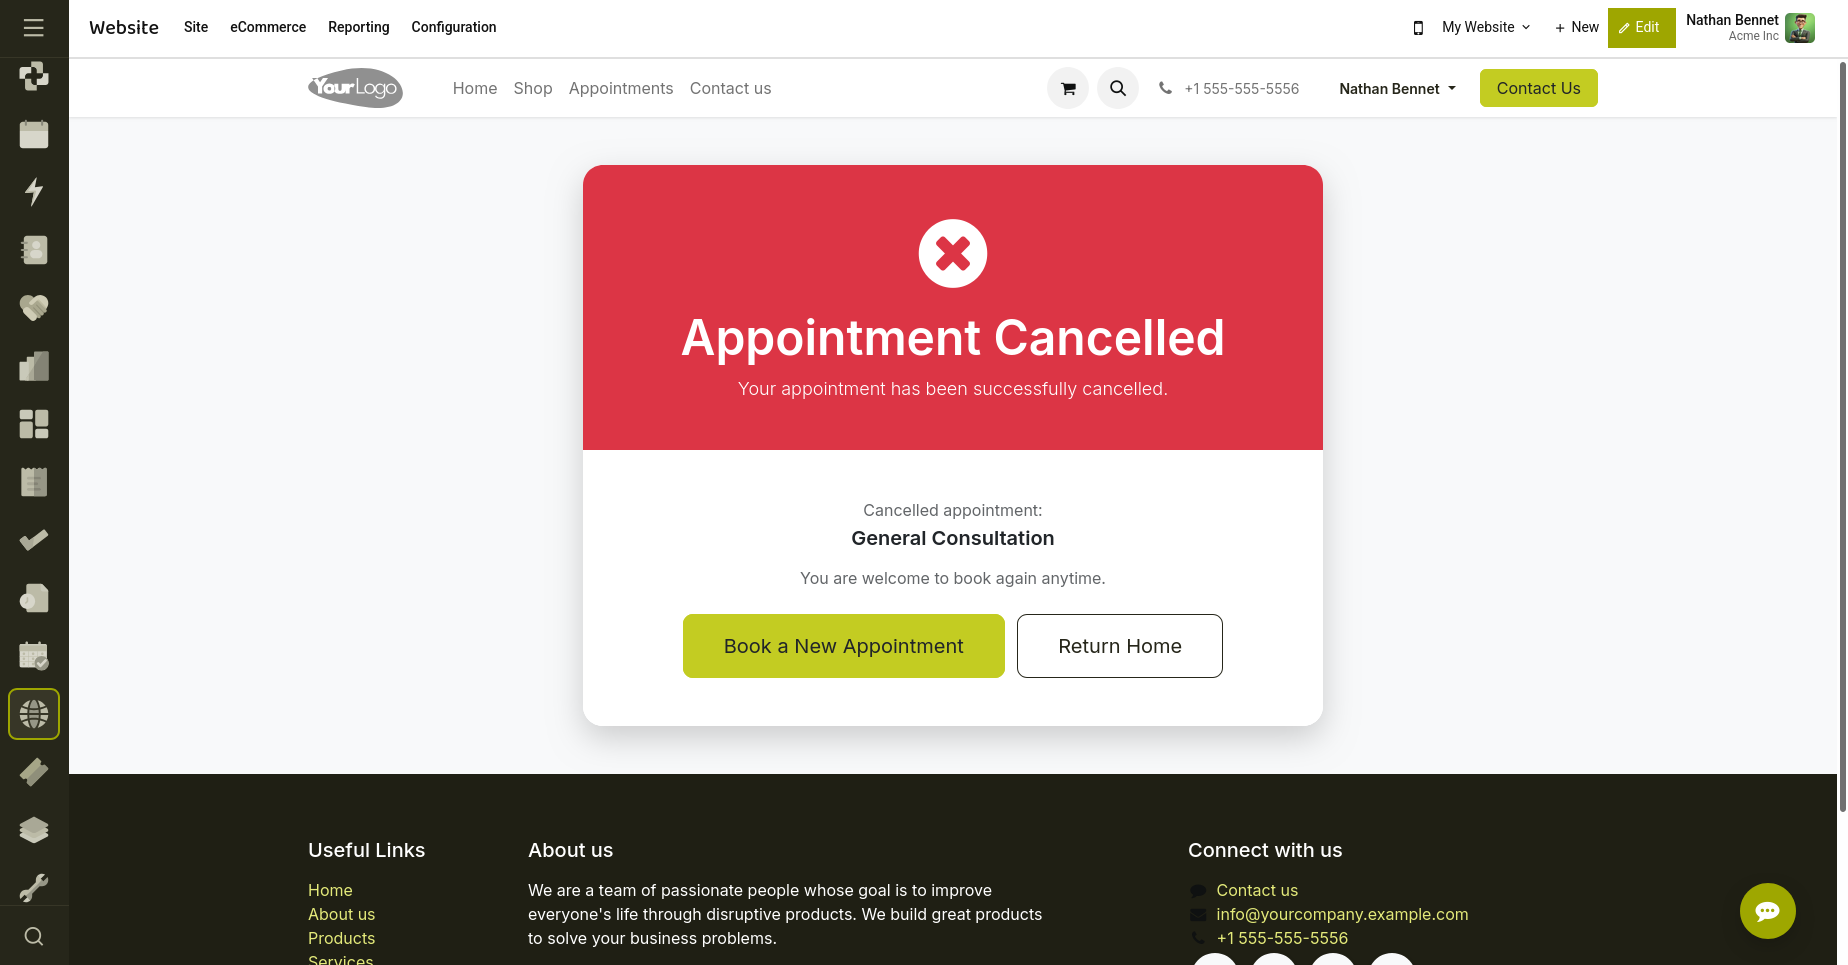
Fig 2.41 — Cancellation confirmation displayed.
2.14 Email Notifications
The system automatically sends email notifications during various stages of the appointment lifecycle.
Supported Notifications
Booking Confirmation
Sent immediately after a successful booking.
Appointment Reminder
Sent before the appointment according to the configured reminder schedule.
Reschedule Notification
Sent when an appointment is rescheduled.
Cancellation Notification
Sent when an appointment is cancelled.
Follow-Up Email
Sent after appointment completion.
2.15 WhatsApp Notifications
The Cyllo Appointment module can be integrated with WhatsApp to send automated appointment-related messages to customers.
Supported Events
- Appointment Confirmation
- Appointment Reminder
- Reschedule Notification
- Cancellation Notification
- Follow-Up Message
WhatsApp notifications help improve customer engagement and reduce missed appointments.
2.16 Google Calendar Synchronization
Appointments can be synchronized with Google Calendar, allowing both customers and staff to manage schedules more effectively.
Benefits
- Automatic event creation
- Calendar reminders
- Better schedule visibility
- Reduced scheduling conflicts
Whenever an appointment is created, updated, or cancelled, the corresponding calendar event can be synchronized automatically.
3. Appointment – Recruitment Tracking
3.1 . Introduction
The Cyllo Appointment – Recruitment Tracking module integrates the Recruitment and Appointment applications, allowing applicants to schedule interview appointments directly through a personalized booking link.
The module automatically connects interview appointments with applicant records, providing recruiters with complete visibility of interview schedules within the recruitment pipeline. This eliminates manual appointment creation, reduces scheduling effort, and enables candidates to select interview slots at their convenience.
3.2 Business Purpose
Recruitment teams often spend significant time coordinating interview schedules through emails and phone calls. This module streamlines the process by:
- Allowing applicants to self-schedule interviews.
- Automatically linking appointments to applicant records.
- Providing recruiters with direct access to interview information.
- Improving communication between recruiters and candidates.
- Maintaining complete interview history within the recruitment process.
3.3 Module Dependencies
The module depends on:
- Cyllo Appointment
- Recruitment (hr_recruitment)
4. Features of Appointment – Recruitment Tracking
4.1 Interview Appointment Type
A dedicated Interview appointment type is provided for scheduling recruitment interviews.
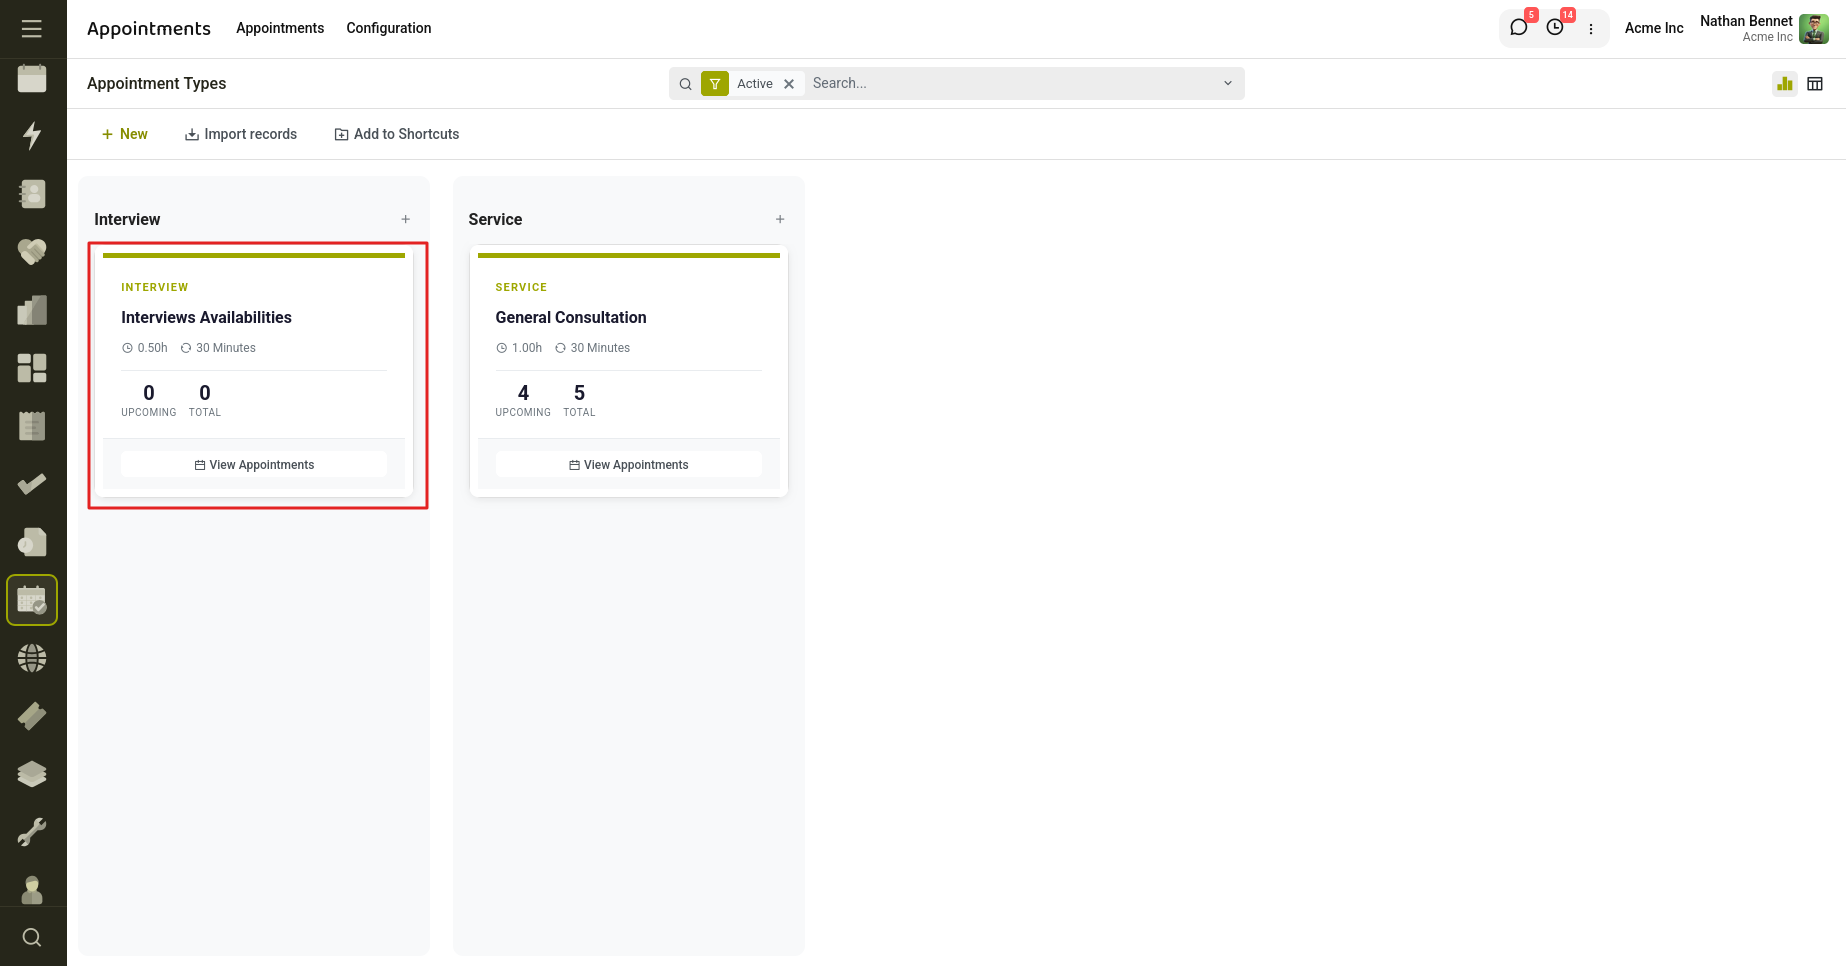
Fig 4.1 — Interview appointment type for recruitment.
4.2 Unique Booking Link
Each applicant receives a unique interview booking code and scheduling link that can be shared through email.
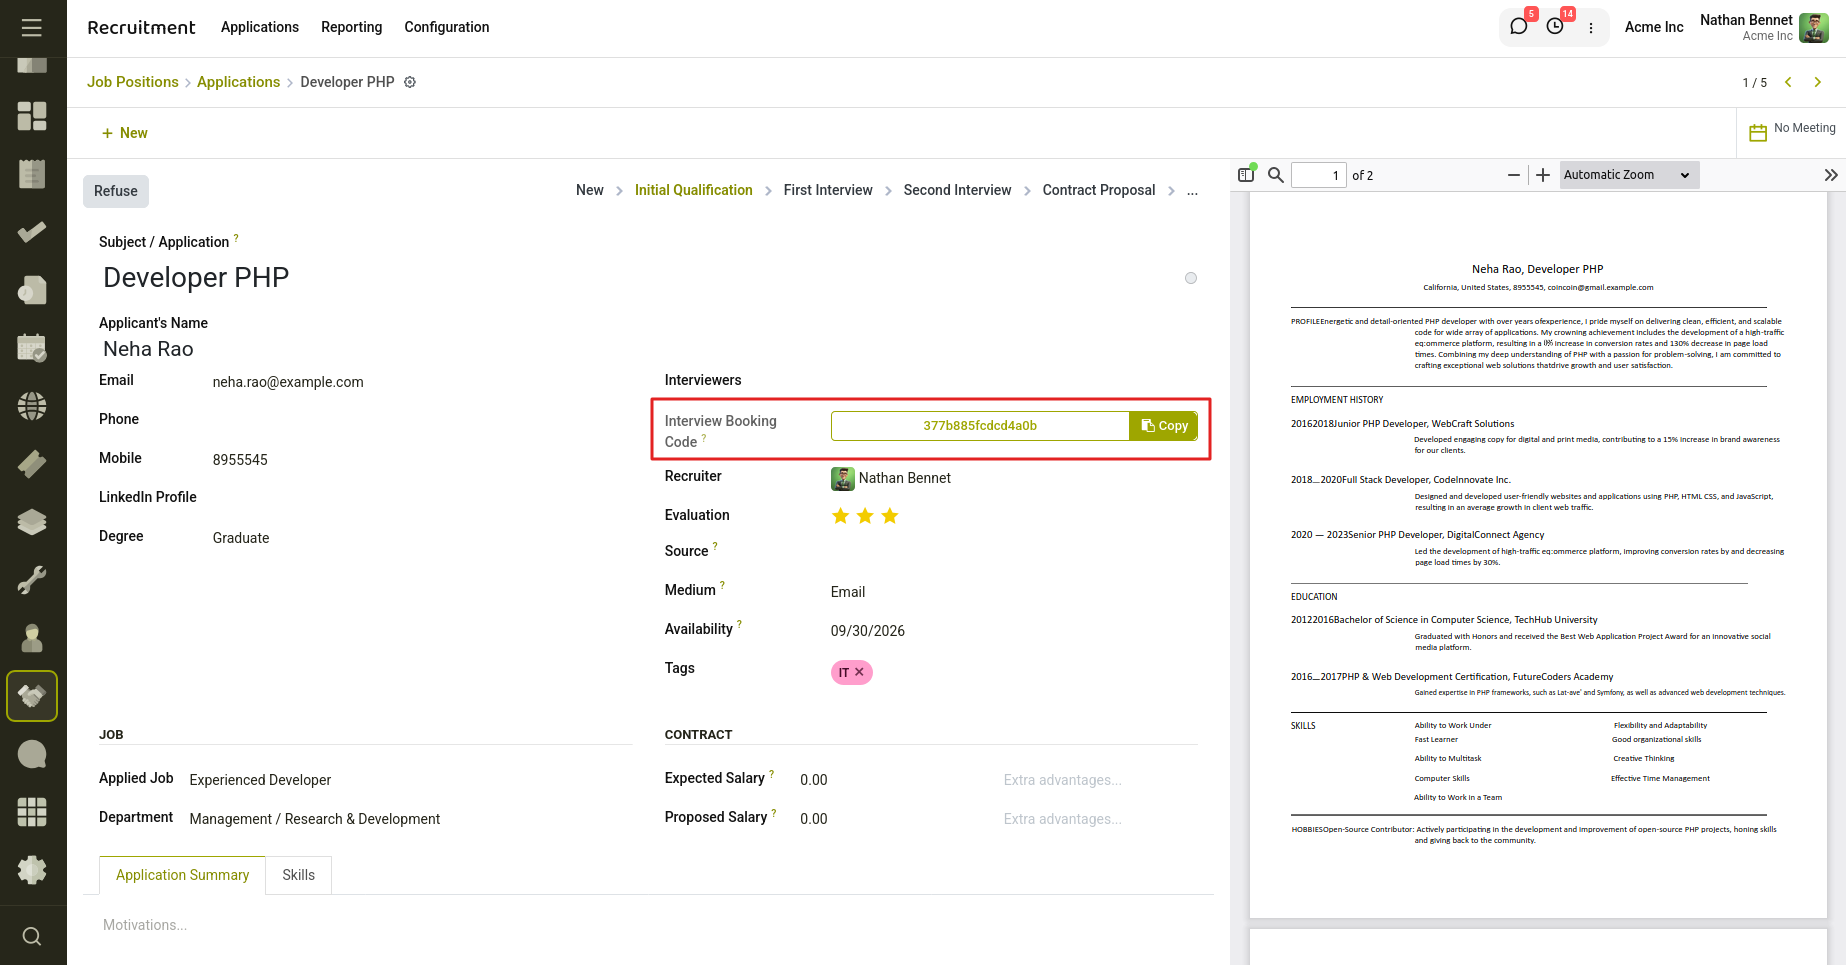
Fig 4.2 — Unique interview booking link and code for applicants.
4.3 Interview Invitation Email
A predefined email template allows recruiters to send interview scheduling invitations directly to applicants. When the application moves to the stage ‘Initial Qualification’, the mail is automatically sent to the applicant.
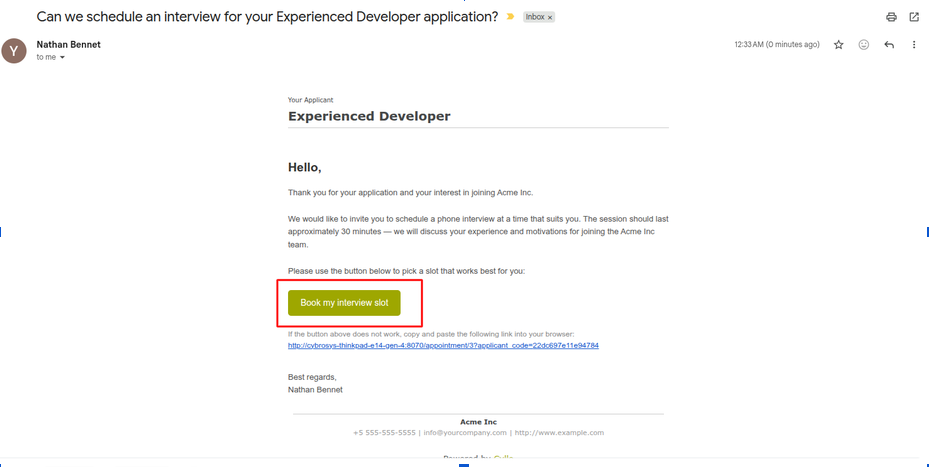
Fig 4.3 — Interview invitation email sent automatically at the Initial Qualification stage.
4.4 Self-Service Interview Booking
Applicants can select an available date and time slot and confirm their interview appointment online.
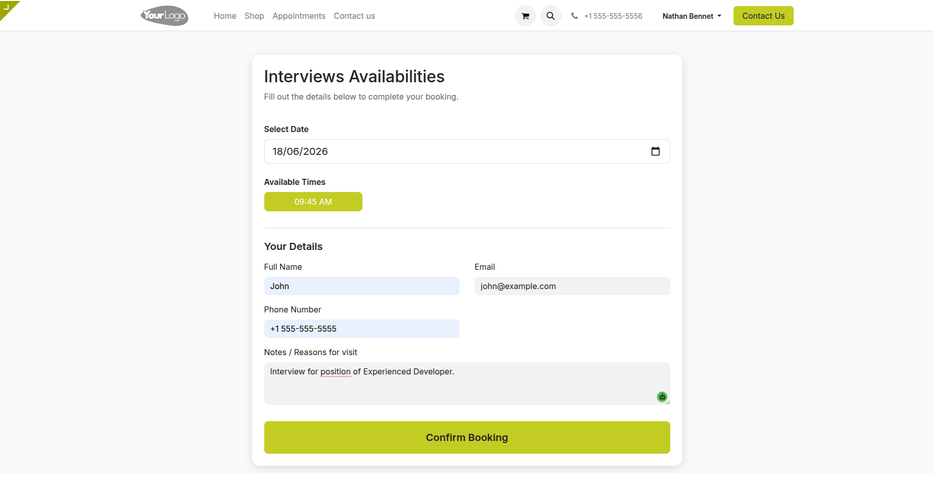
Fig 4.4 — Applicants choose a date and time to confirm their interview.
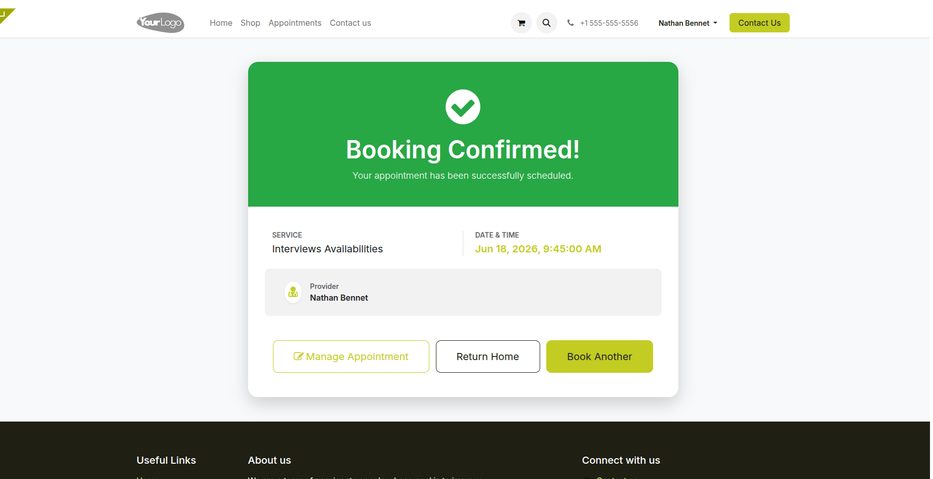
Fig 4.5 — Interview scheduled successfully.
4.5 Automatic Applicant Linking
Appointments created through the interview link are automatically connected to the corresponding applicant record.
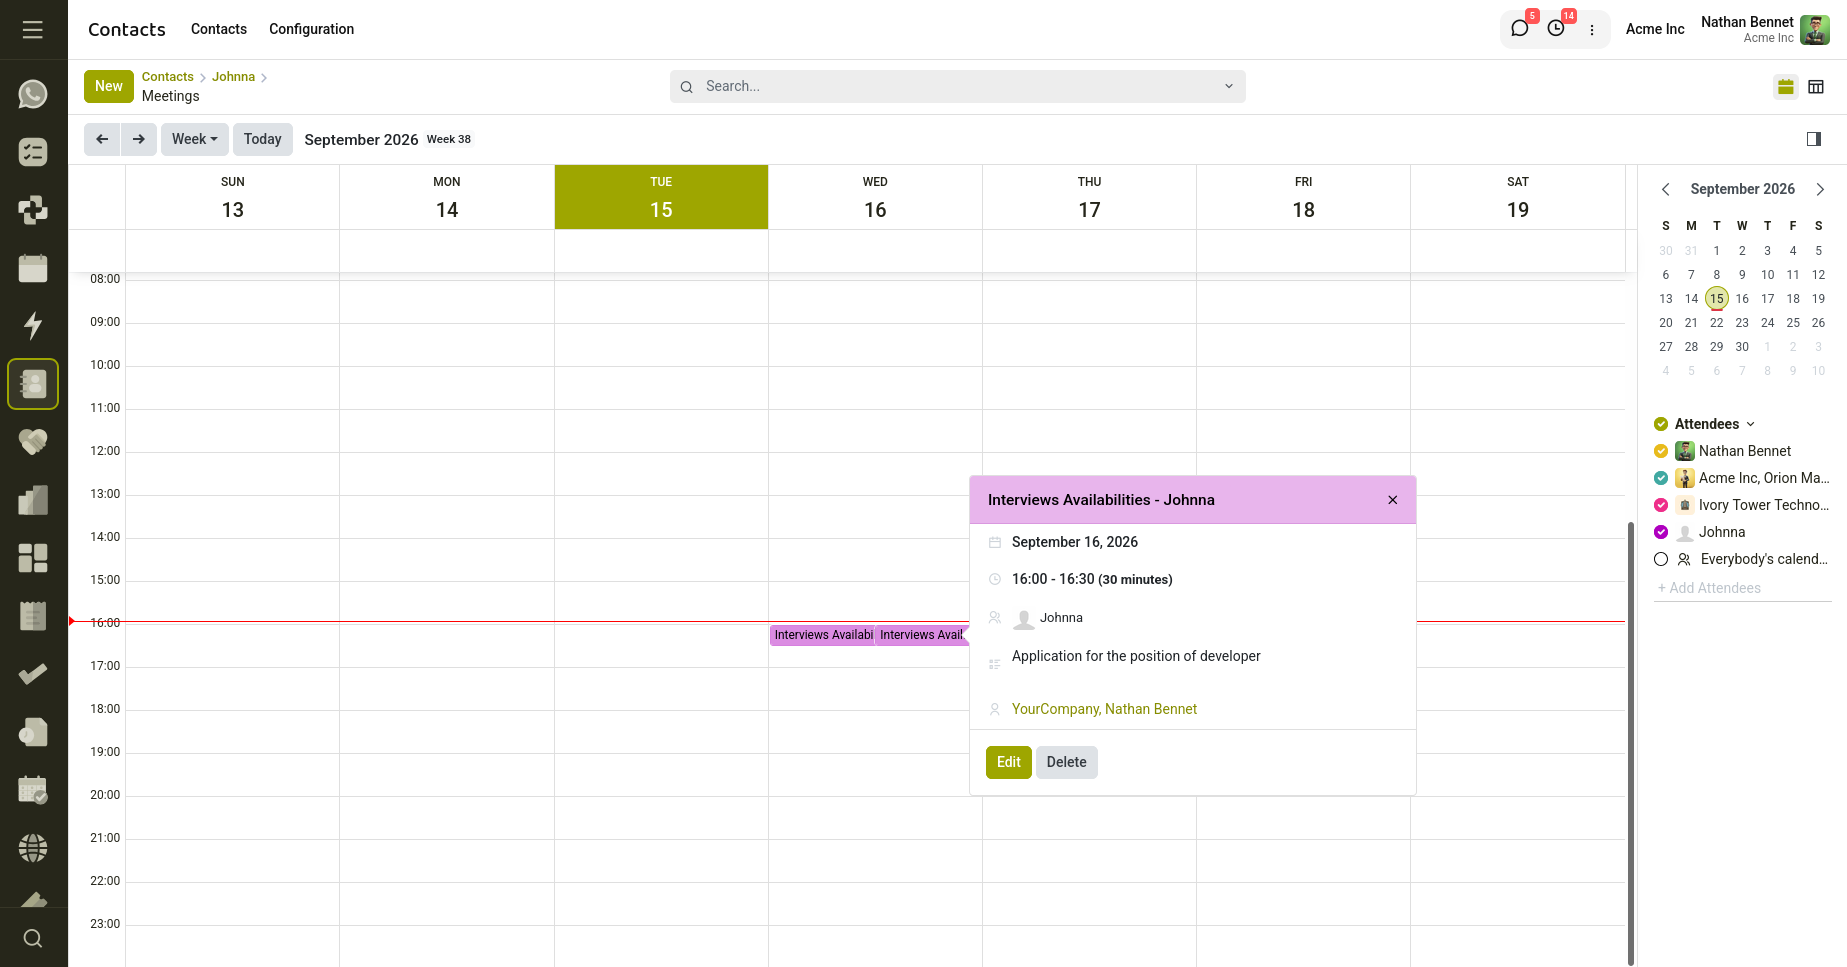
Fig 4.6 — Appointment automatically linked to the applicant.
4.6 Job Position Visibility
The appointment displays the job position for which the applicant has applied.
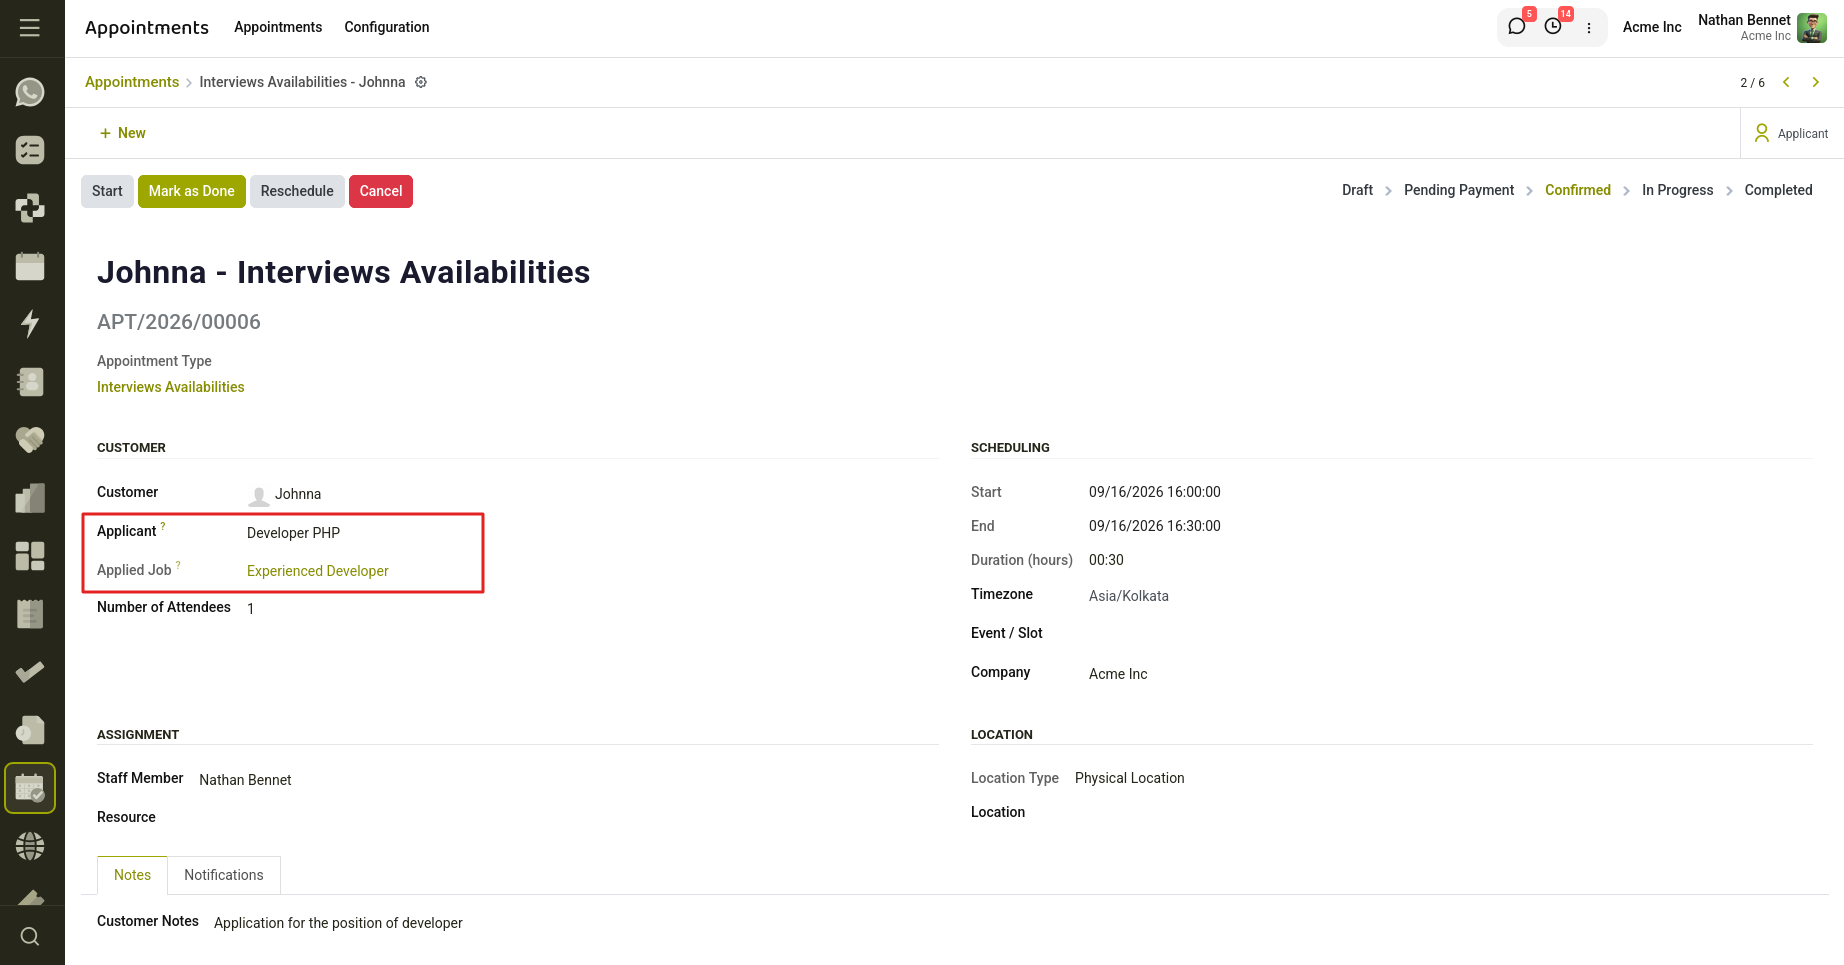
Fig 4.7 — Appointment includes the applicant's job position.
4.7 Smart Buttons
Smart buttons provide quick navigation between applicants and their interview appointments.
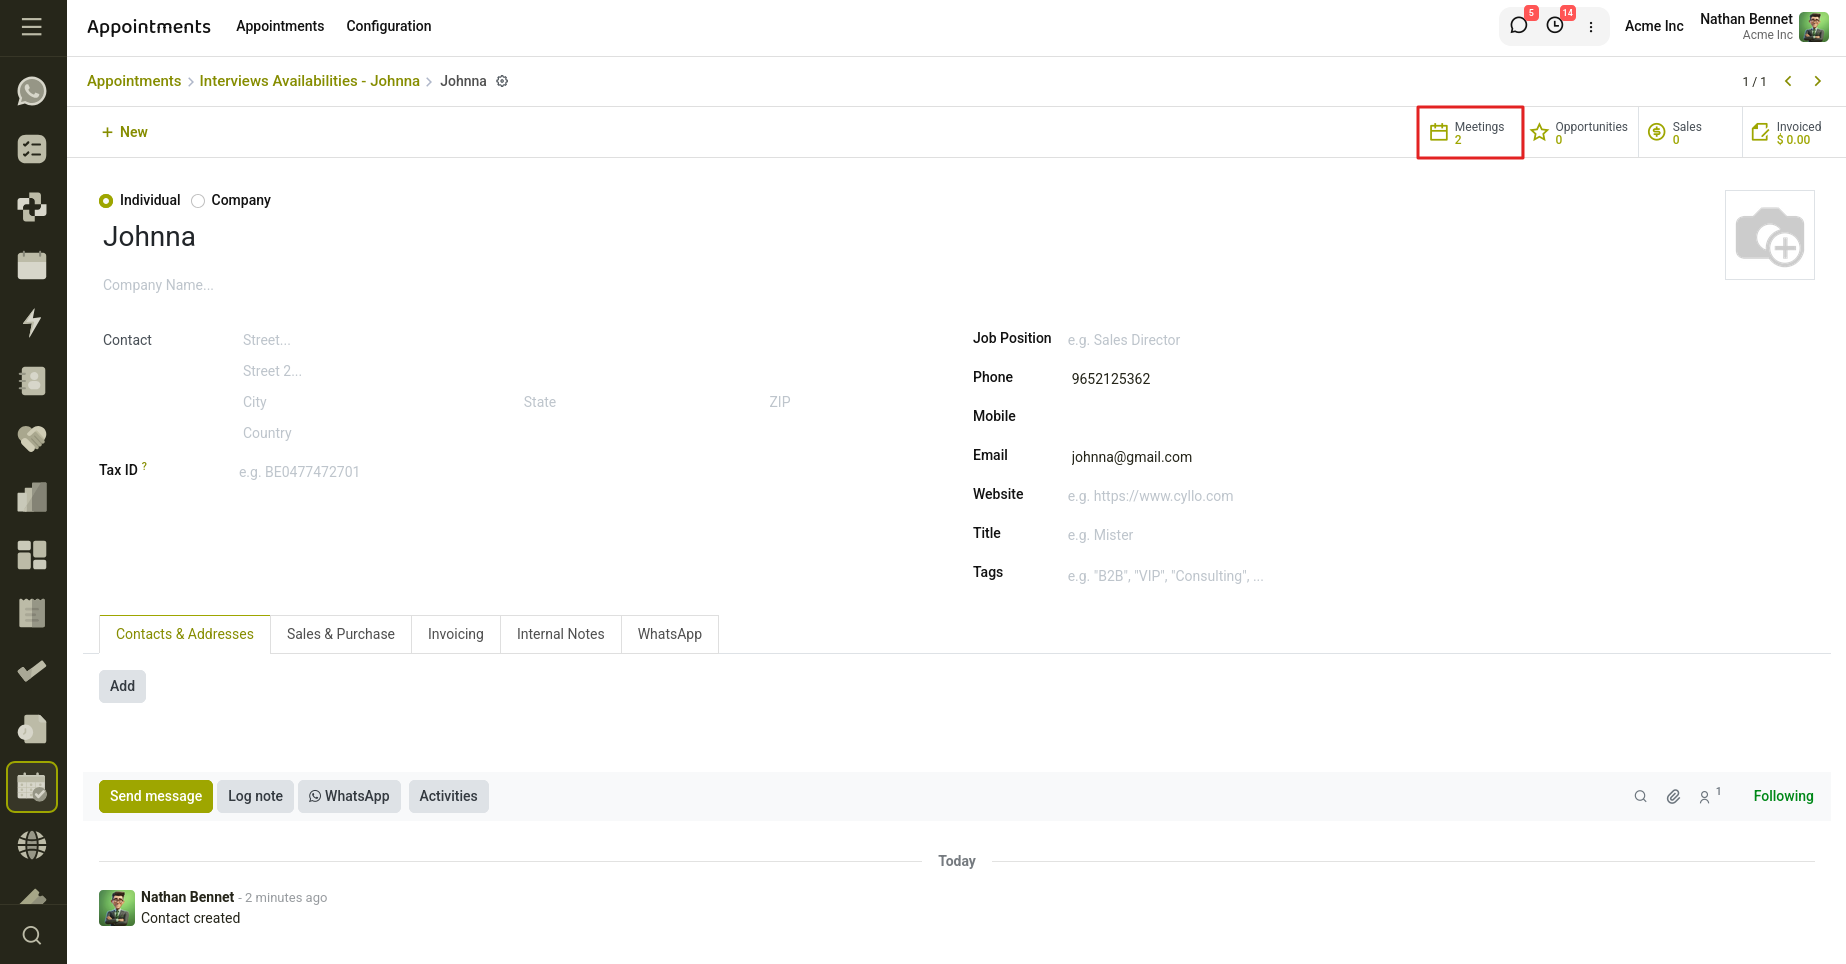
Fig 4.8 — Meetings are displayed in a smart button.
4.8 Interviewer Assignment
The assigned recruiter/interviewer is automatically set as the appointment staff member.
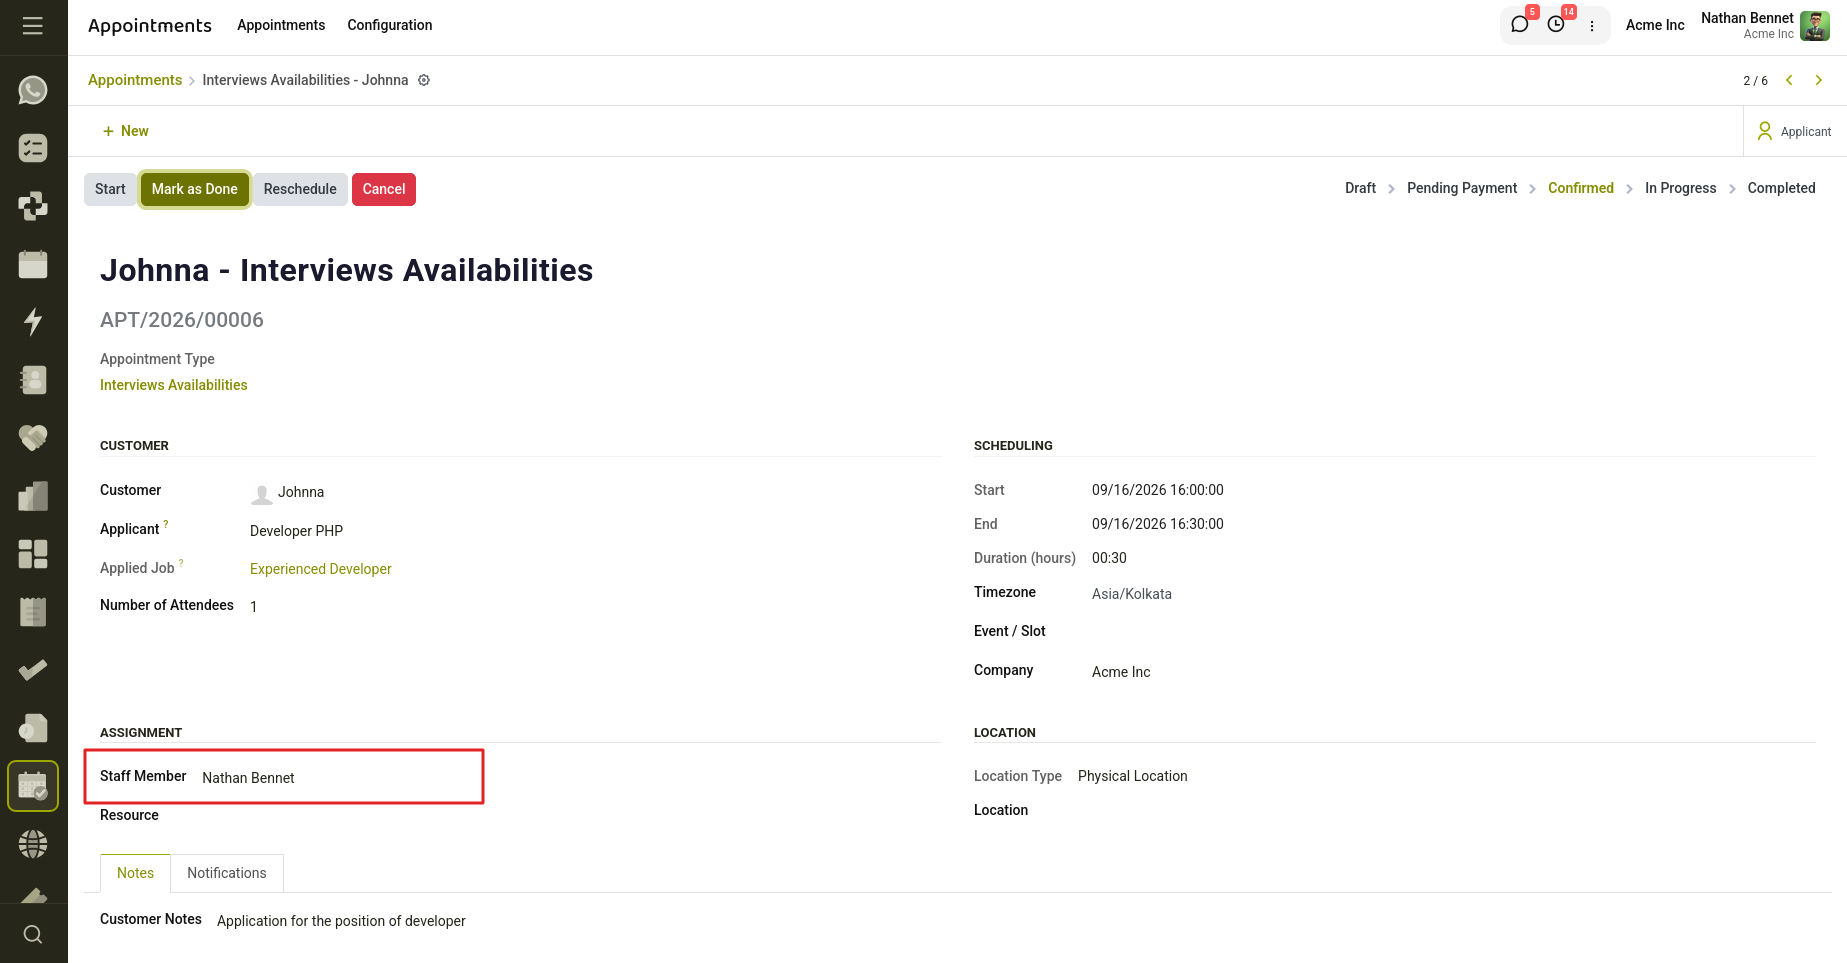
Fig 4.9 — Interviewer assigned as the appointment staff.
5. Appointment - CRM
It integrates the Appointment Management system with CRM, allowing appointments to automatically generate and manage CRM opportunities.
When an appointment is confirmed, the system can automatically create a CRM opportunity or link the appointment to an existing active opportunity for the same customer. This helps sales teams track customer interactions, avoid duplicate opportunities, and manage follow-ups efficiently.
5.1 Configure an Appointment Type
Steps
- Navigate to Appointments → Configuration → Appointment Types.
- Open an existing appointment type or create a new one.
- Enable Create Opportunity.
- Save the appointment type.
Confirmed appointments created using this appointment type will generate or link CRM opportunities automatically.
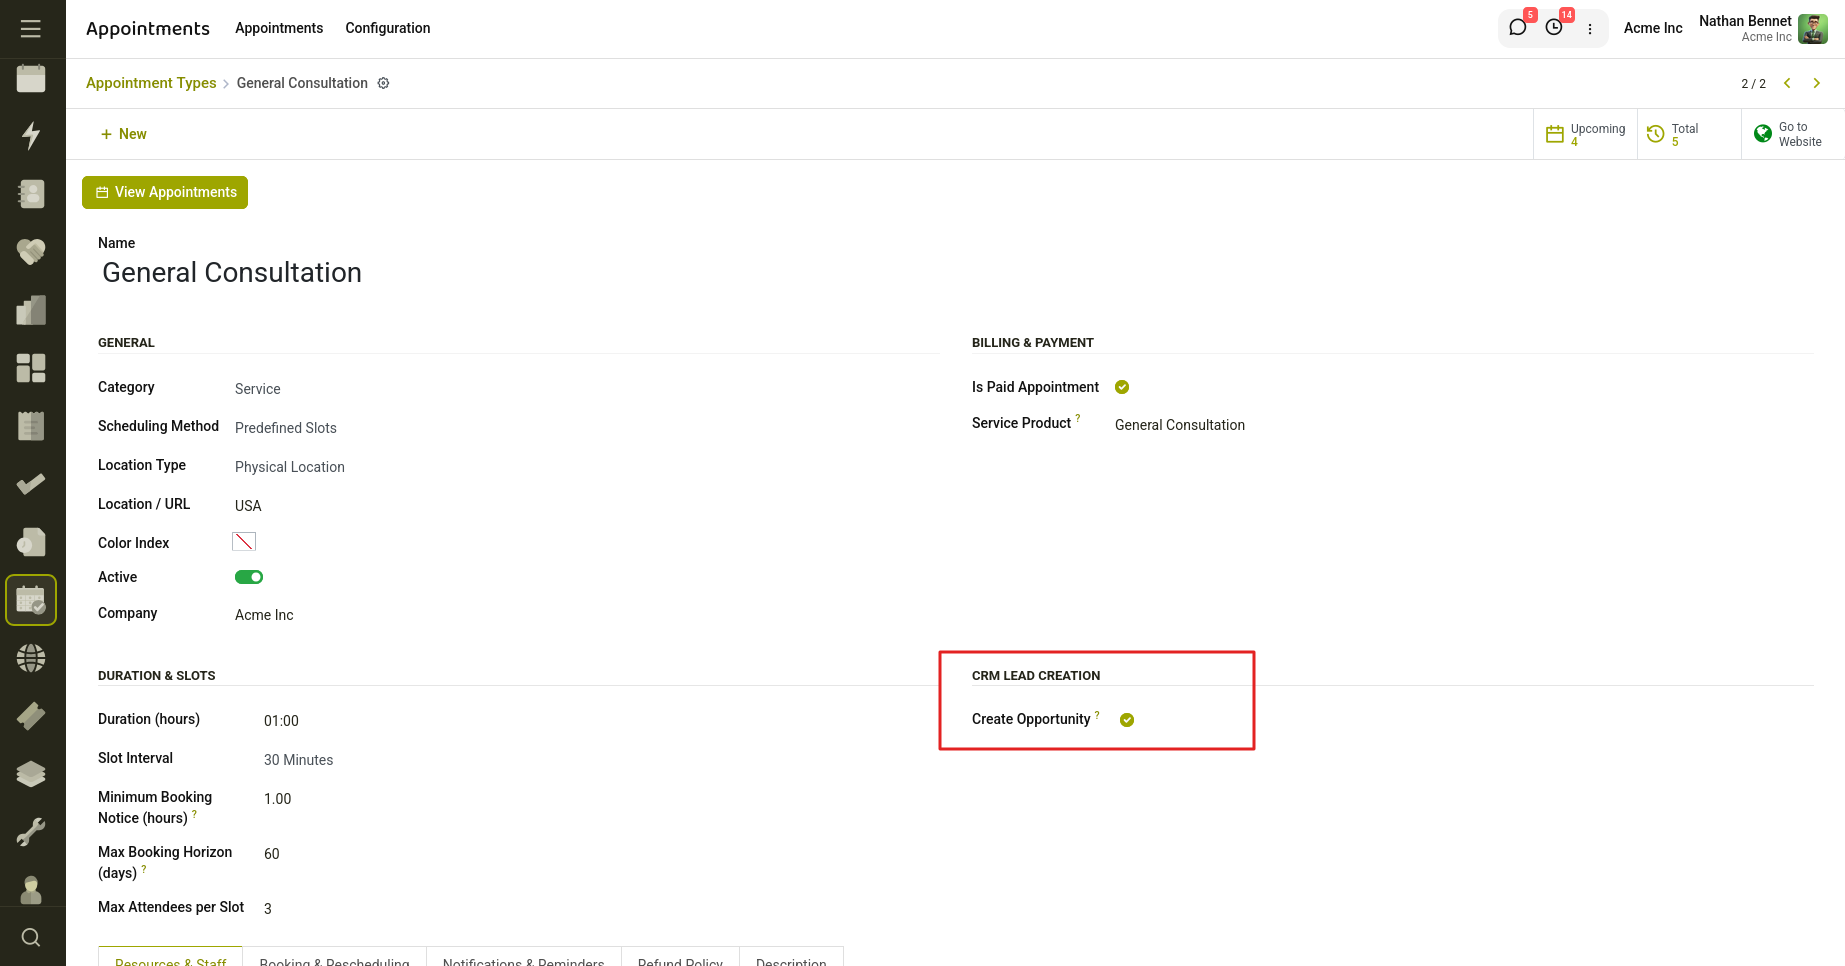
Fig 5.1 — Enable the Create opportunity from Appointment Type.
5.2 Confirm an Appointment
Steps
- Create a new appointment.
- Select a customer.
- Assign a staff member.
- Confirm the appointment.
The system automatically:
- Creates a new opportunity if none exists.
- Schedules a CRM meeting activity.
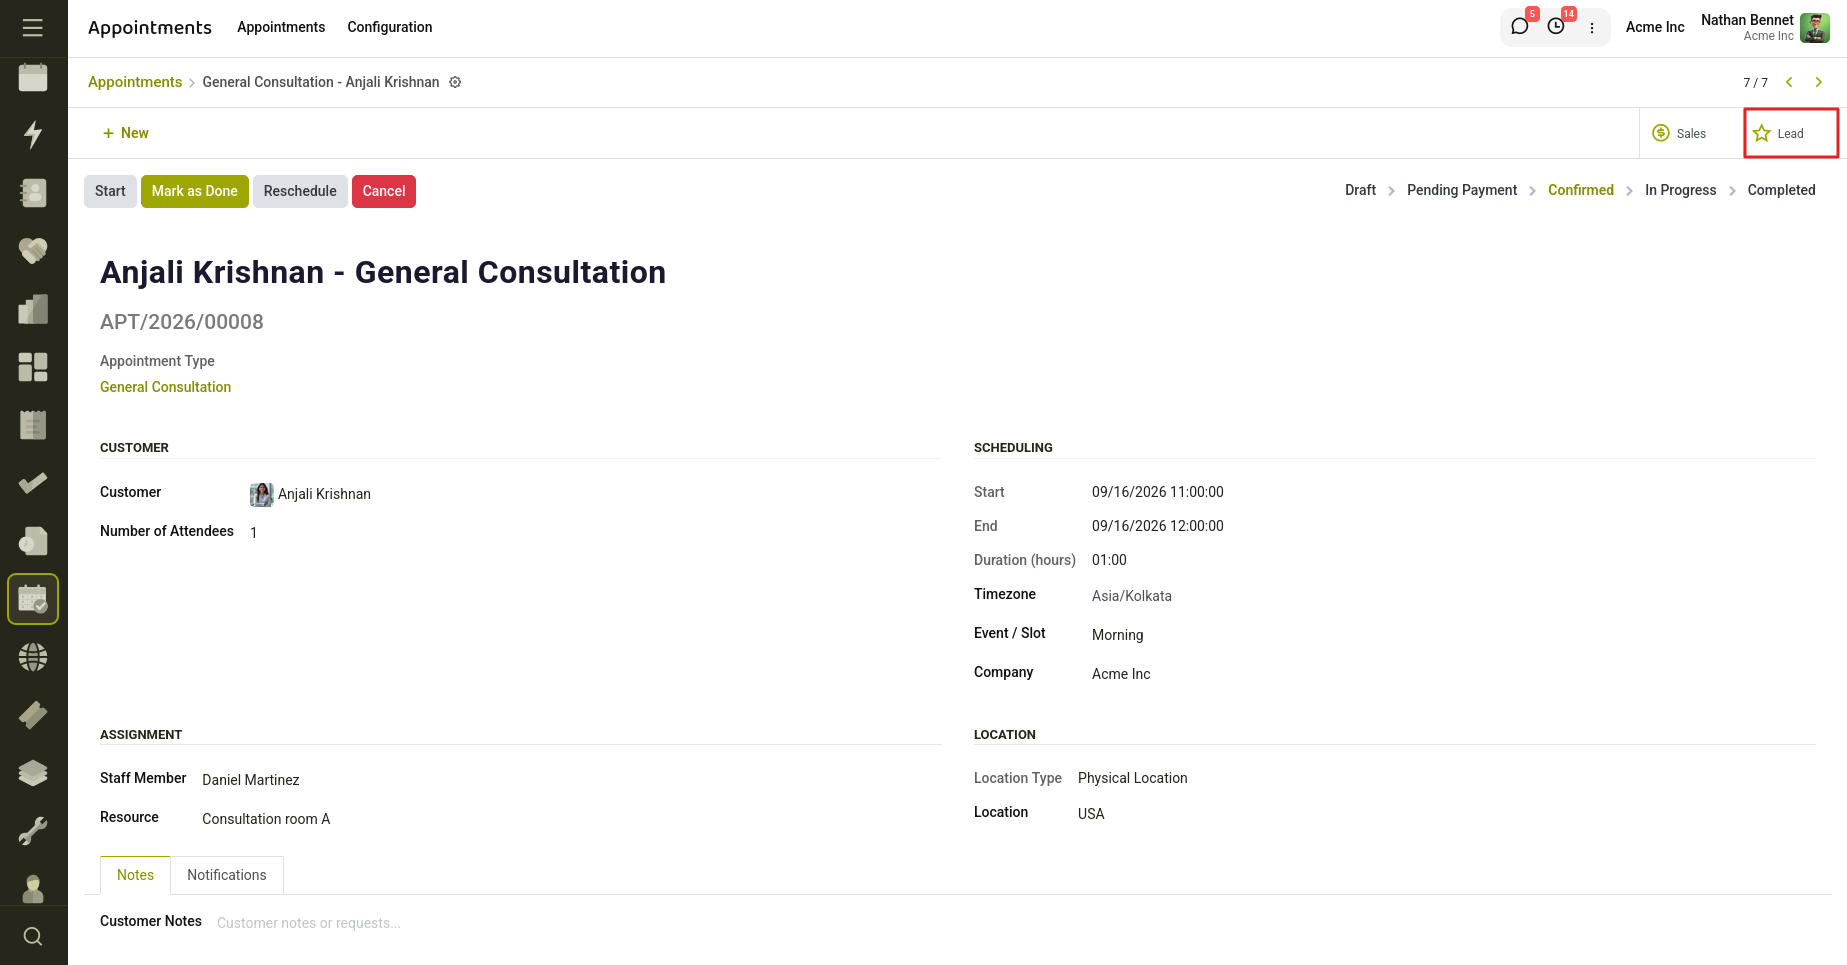
Fig 5.2 — A new lead will be created upon confirmation of appointment.
5.3 View the Linked Opportunity
Steps
- Open a confirmed appointment.
- Locate the Opportunity smart button.
- Click the button.
The linked CRM opportunity opens directly.
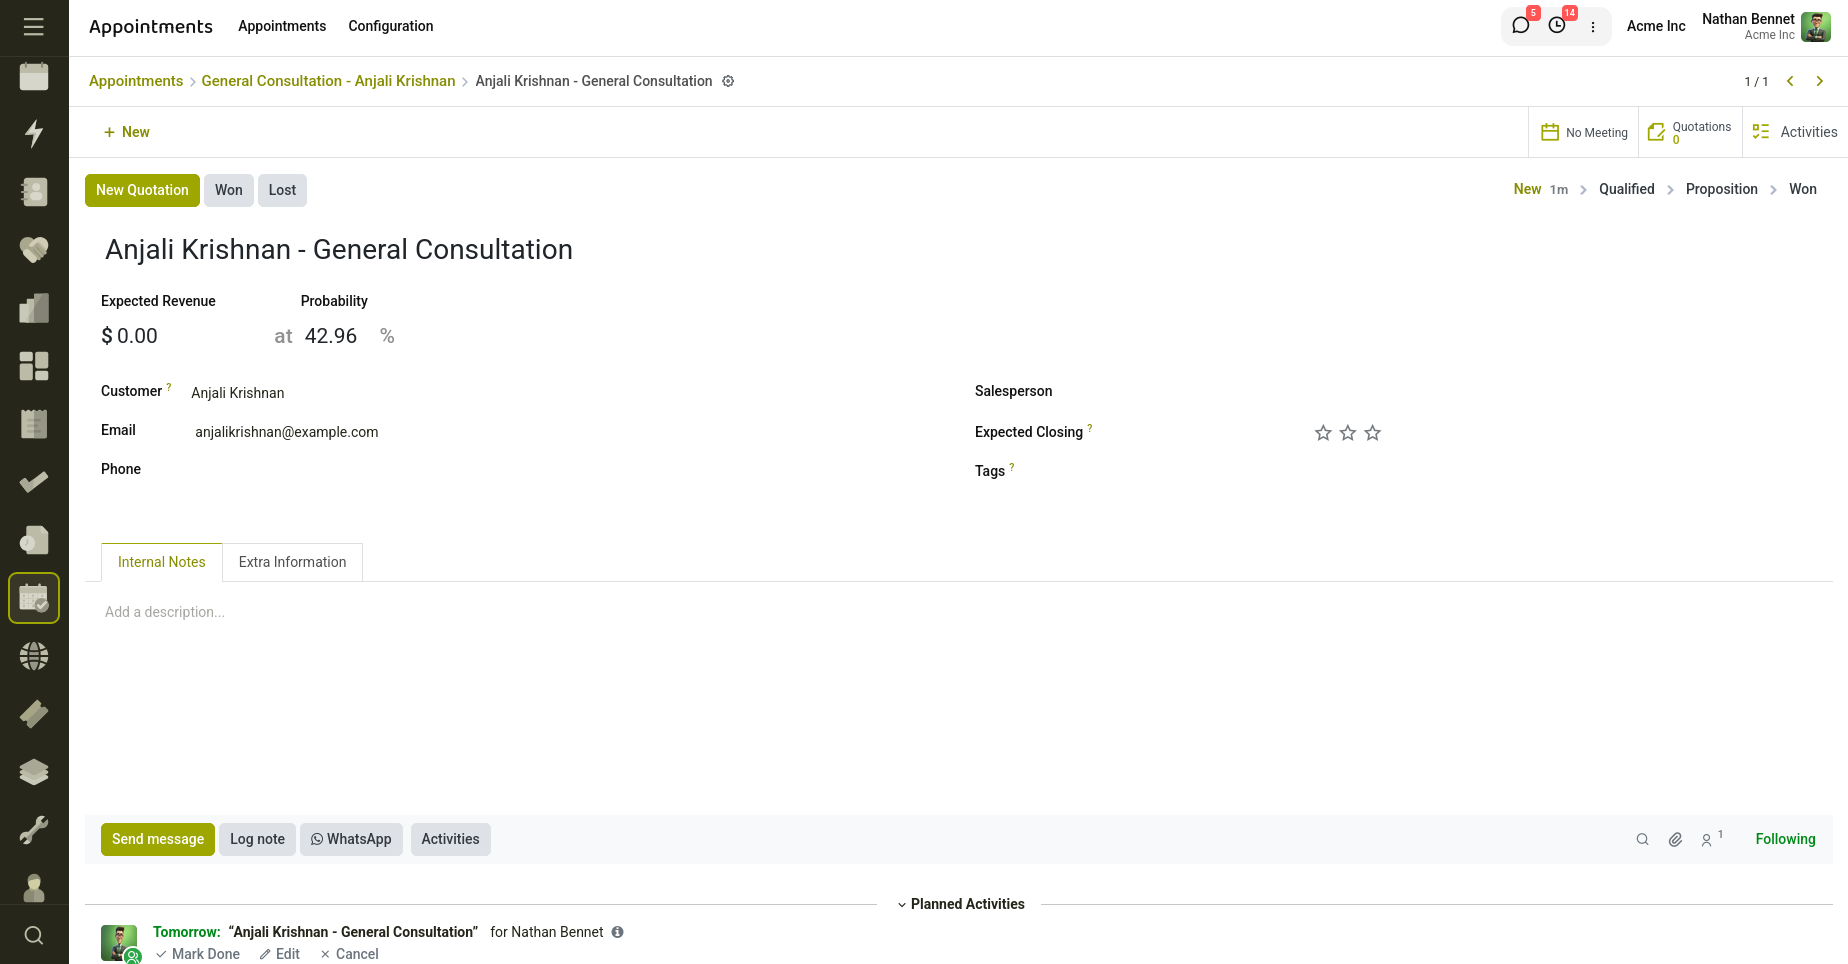
Fig 5.3 — View the linked opportunity created.
5.4 Review CRM Activities
Steps
- Open the linked CRM opportunity.
- Navigate to Activities.
A Meeting activity is automatically scheduled for the appointment date.
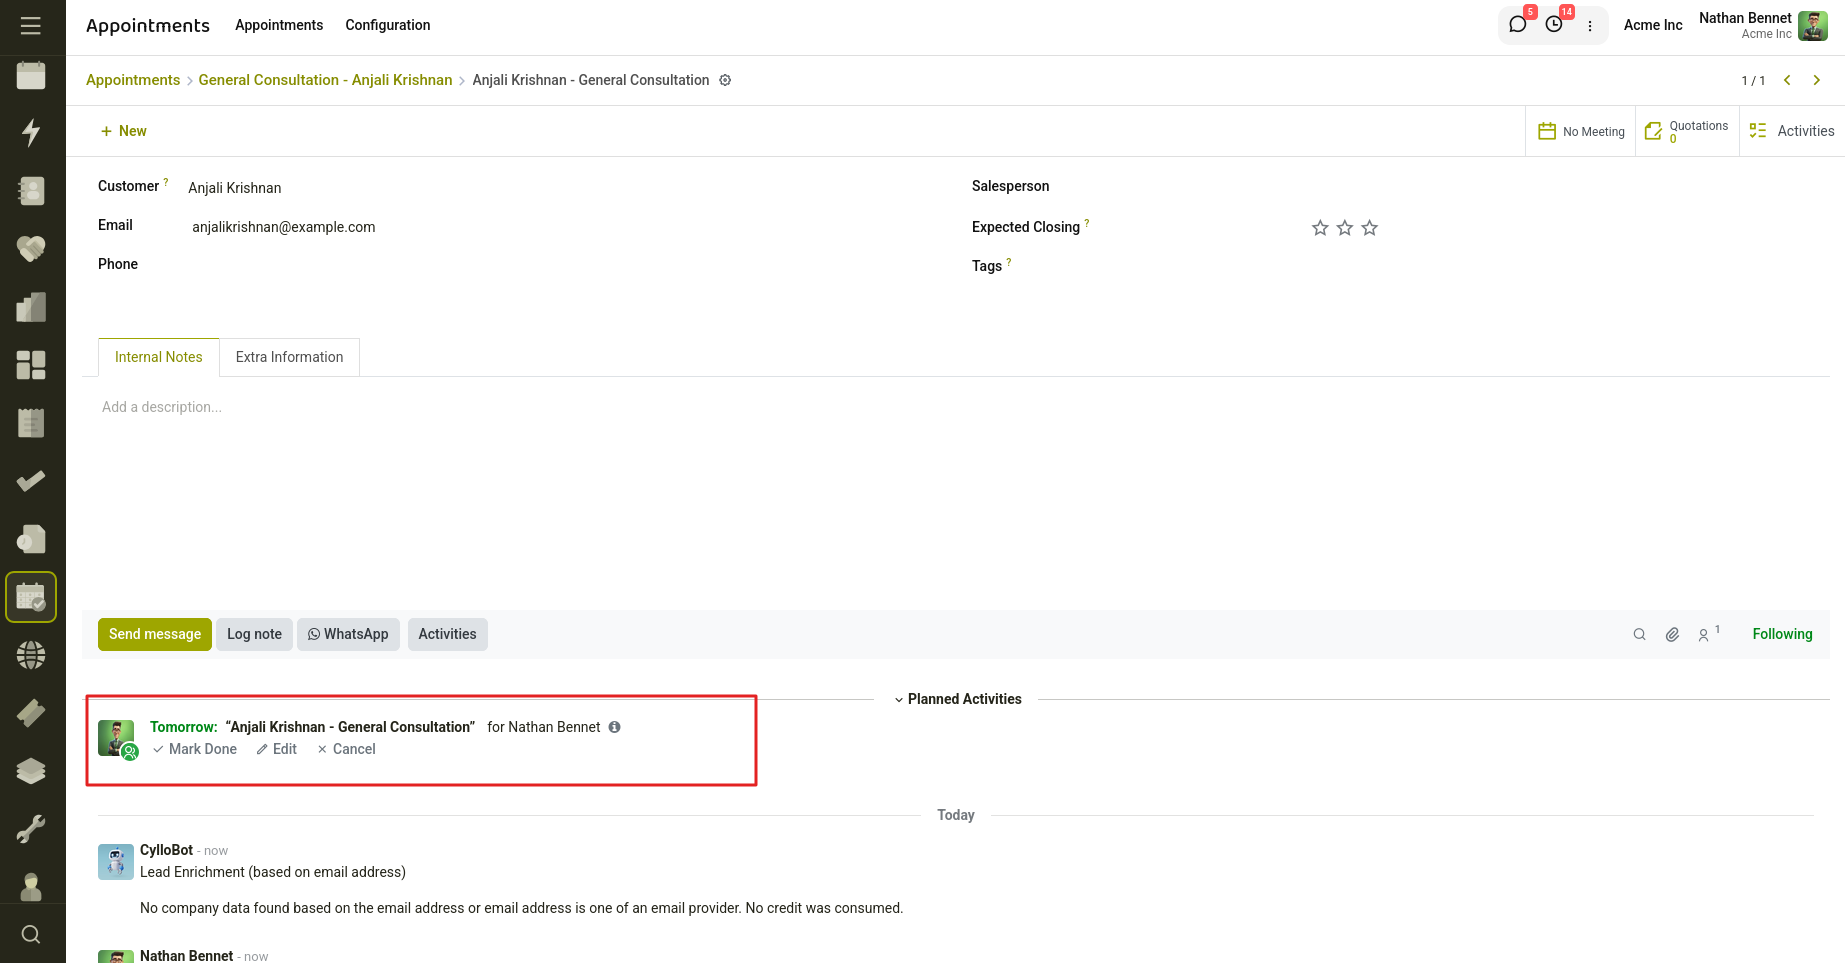
Fig 5.4 — A meeting activity is scheduled.
5.5 View Leads Generated by an Appointment Type
Steps
- Open an Appointment Type.
- Click the Leads smart button.
The CRM pipeline opens with opportunities generated from that appointment type.
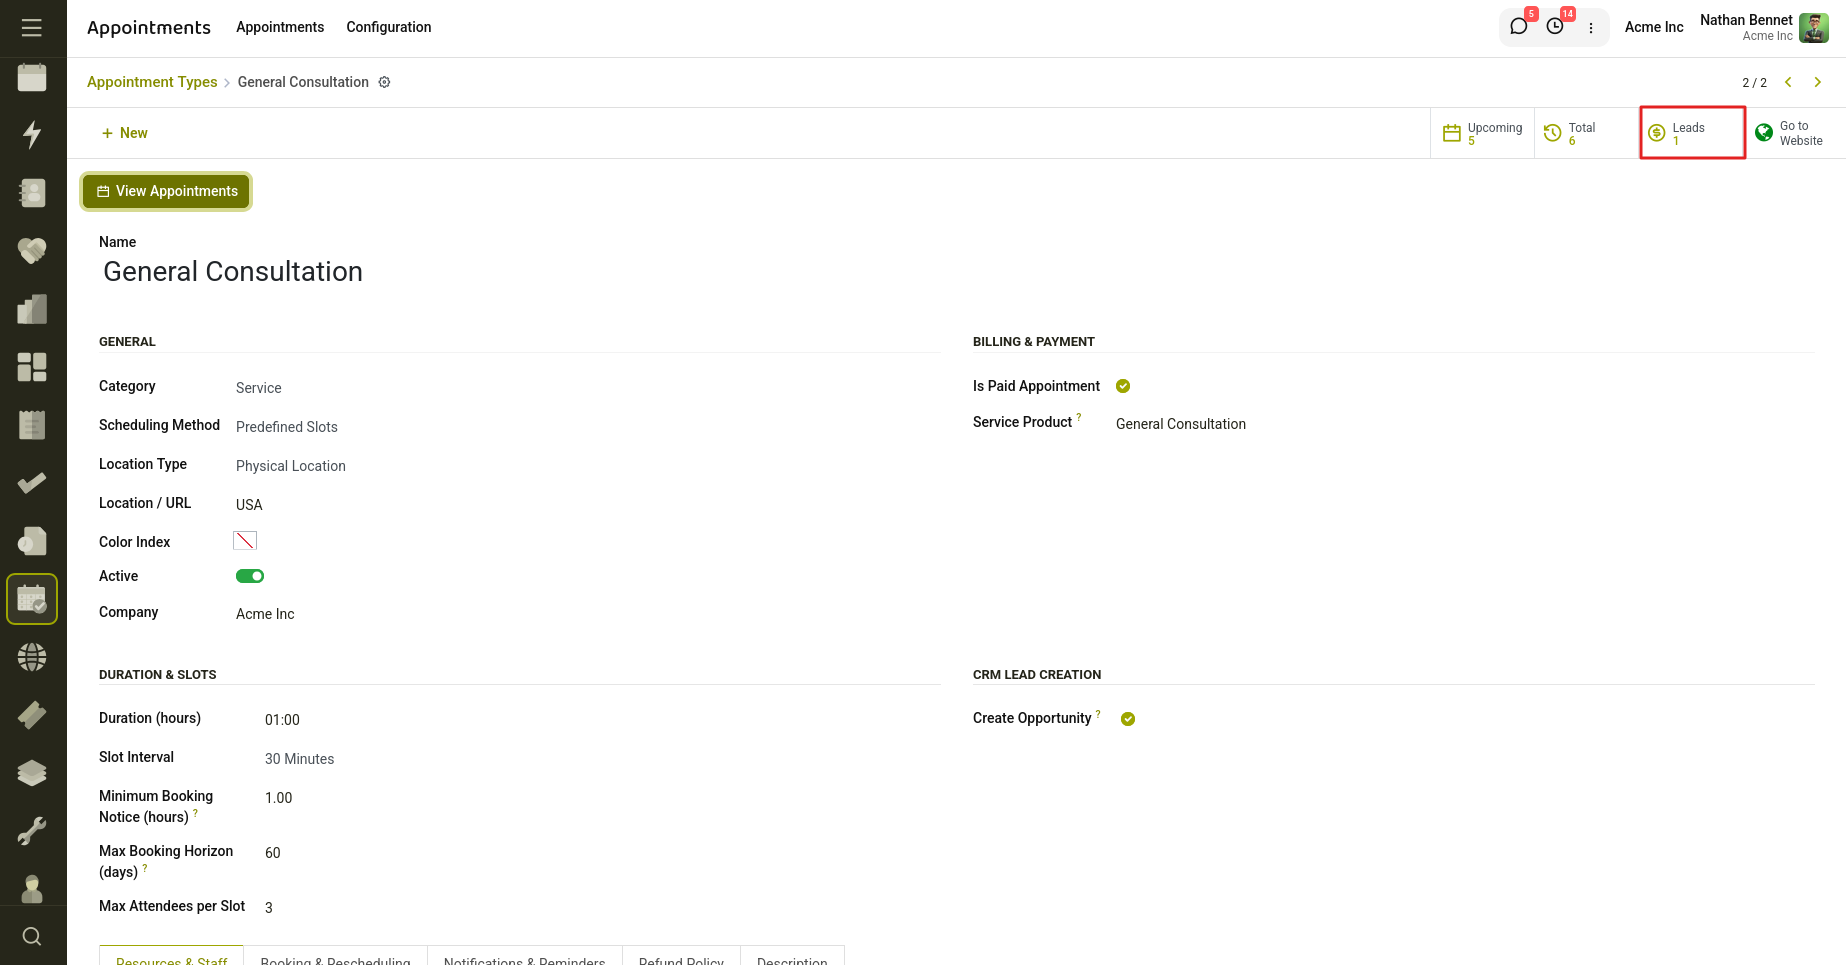
Fig 5.5 — View all leads of an appointment Type.
6. Appointment - Restaurant
This integrates the Restaurant Point of Sale (POS) with the Cyllo Appointment system. It allows restaurant tables to be managed as appointment resources, enabling table reservations through the appointment system while displaying booking information directly in the POS restaurant floor screen.
The module automatically creates and links appointment resources for restaurant tables and keeps reservation information synchronized between the Appointment and POS applications.
6.1. Features
Automatic Table Resource Creation
- Automatically creates an Appointment Resource when a restaurant table is created.
- Links each restaurant table with a corresponding appointment resource.
Table Reservation Management
- Restaurant tables can be booked through the Appointment module.
- Reservations are associated with specific tables.
POS Floor Integration
- Table reservations are displayed in the POS Restaurant Floor Screen.
- Reservation information is updated in real time.
Automatic Synchronization
- Changes to appointments are instantly reflected in POS sessions.
- Creating, updating, or cancelling appointments updates table availability.
Appointment Resource Tracking
- View all restaurant tables linked to an appointment resource.
- Quick access to related POS tables from the resource form.
Preconfigured Appointment Type
Includes a predefined appointment type called Table for restaurant reservations.
6.2 Configure Restaurant Tables
Navigate to:
Point of Sale → Configuration → Floors & Tables
Create or edit a table.
The system automatically creates and links an Appointment Resource to the table.
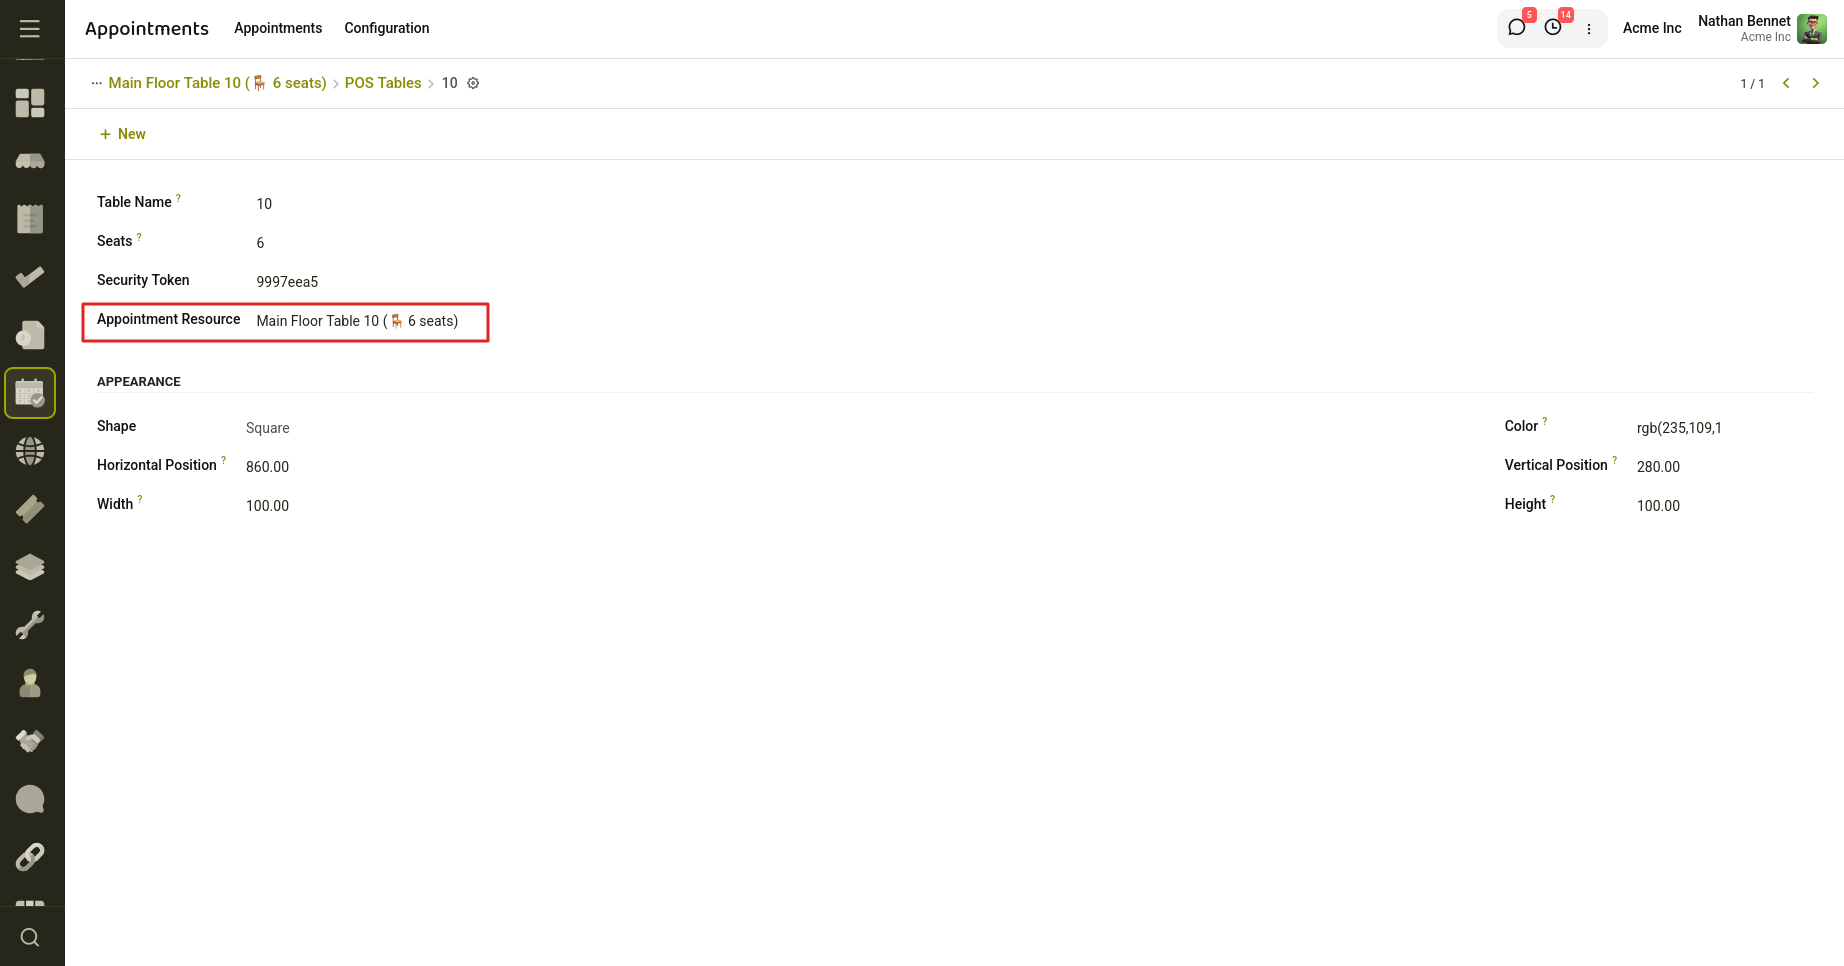
Fig 6.1 — Configure the Appointment resource in table form.
6.3 Verify Appointment Resource
Navigate to:
Appointments → Configuration → Resources
Open the automatically created resource.
The resource displays:
- Resource Name
- Capacity based on table seats
- Linked POS Table(s)
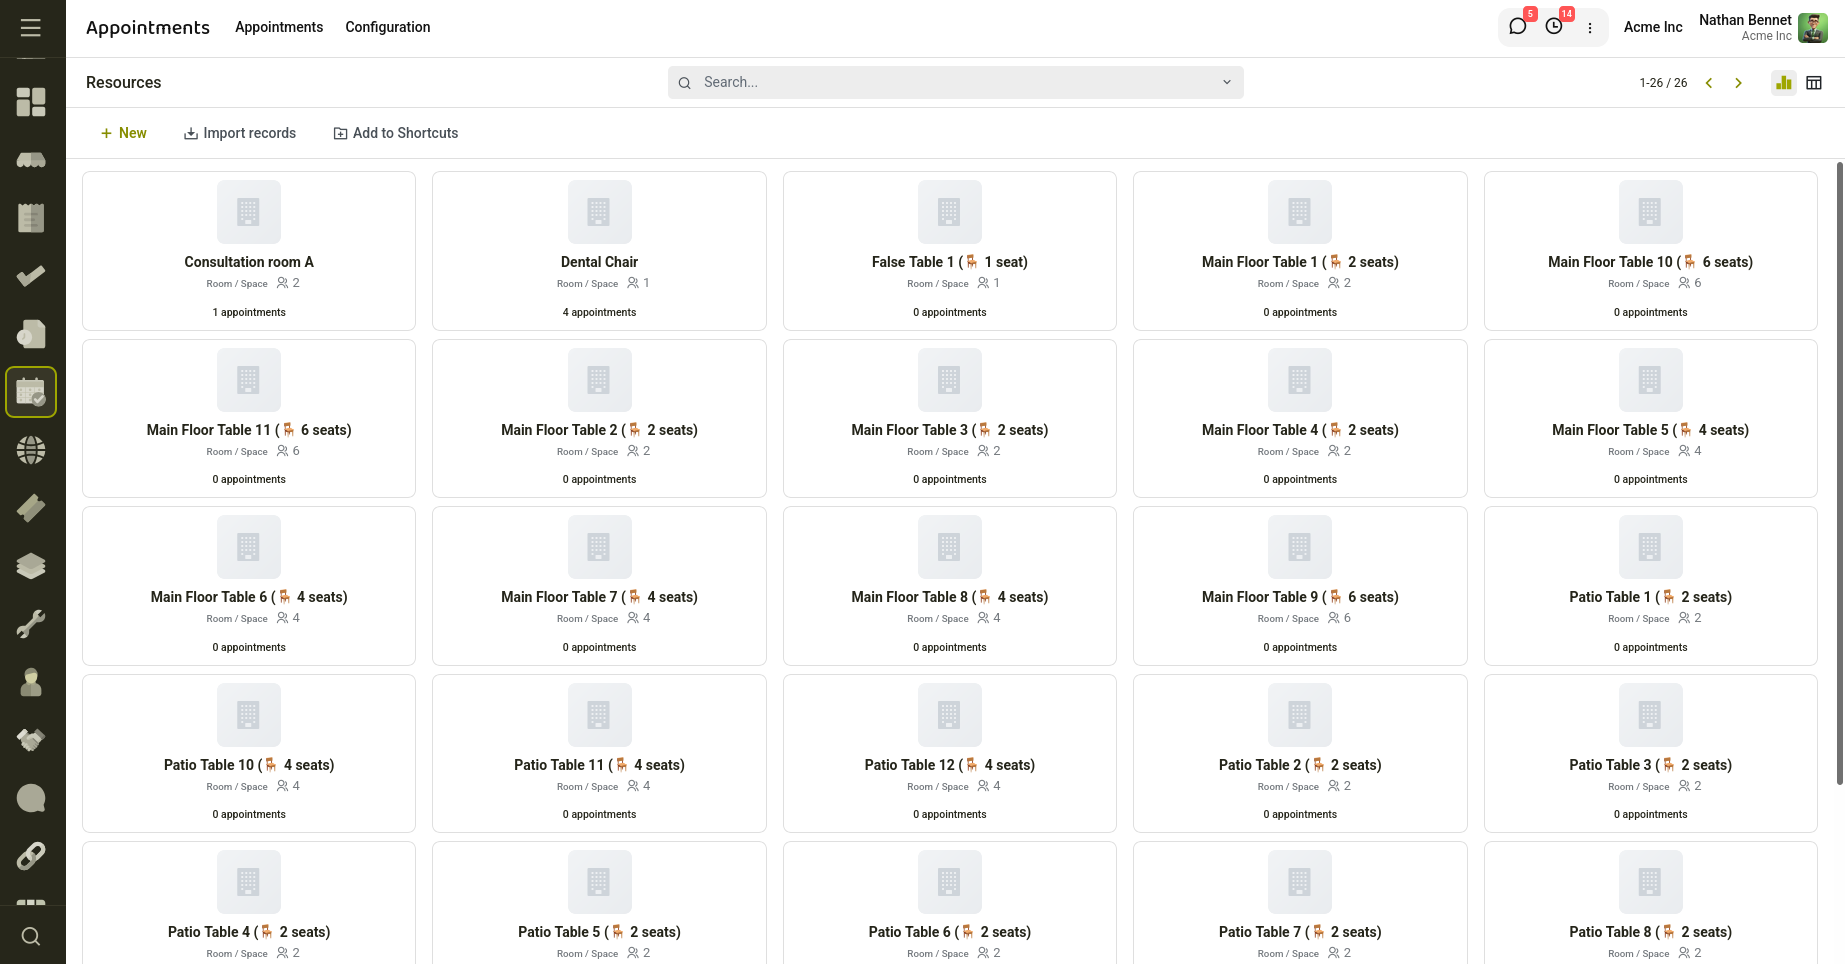
Fig 6.2 — POS Restaurant tables are automatically synchronized as appointment resources.
6.4 Configure Appointment Type
Navigate to:
Appointments → Configuration → Appointment Types
The module provides a predefined appointment type named Table.
Use this appointment type when creating restaurant reservations.
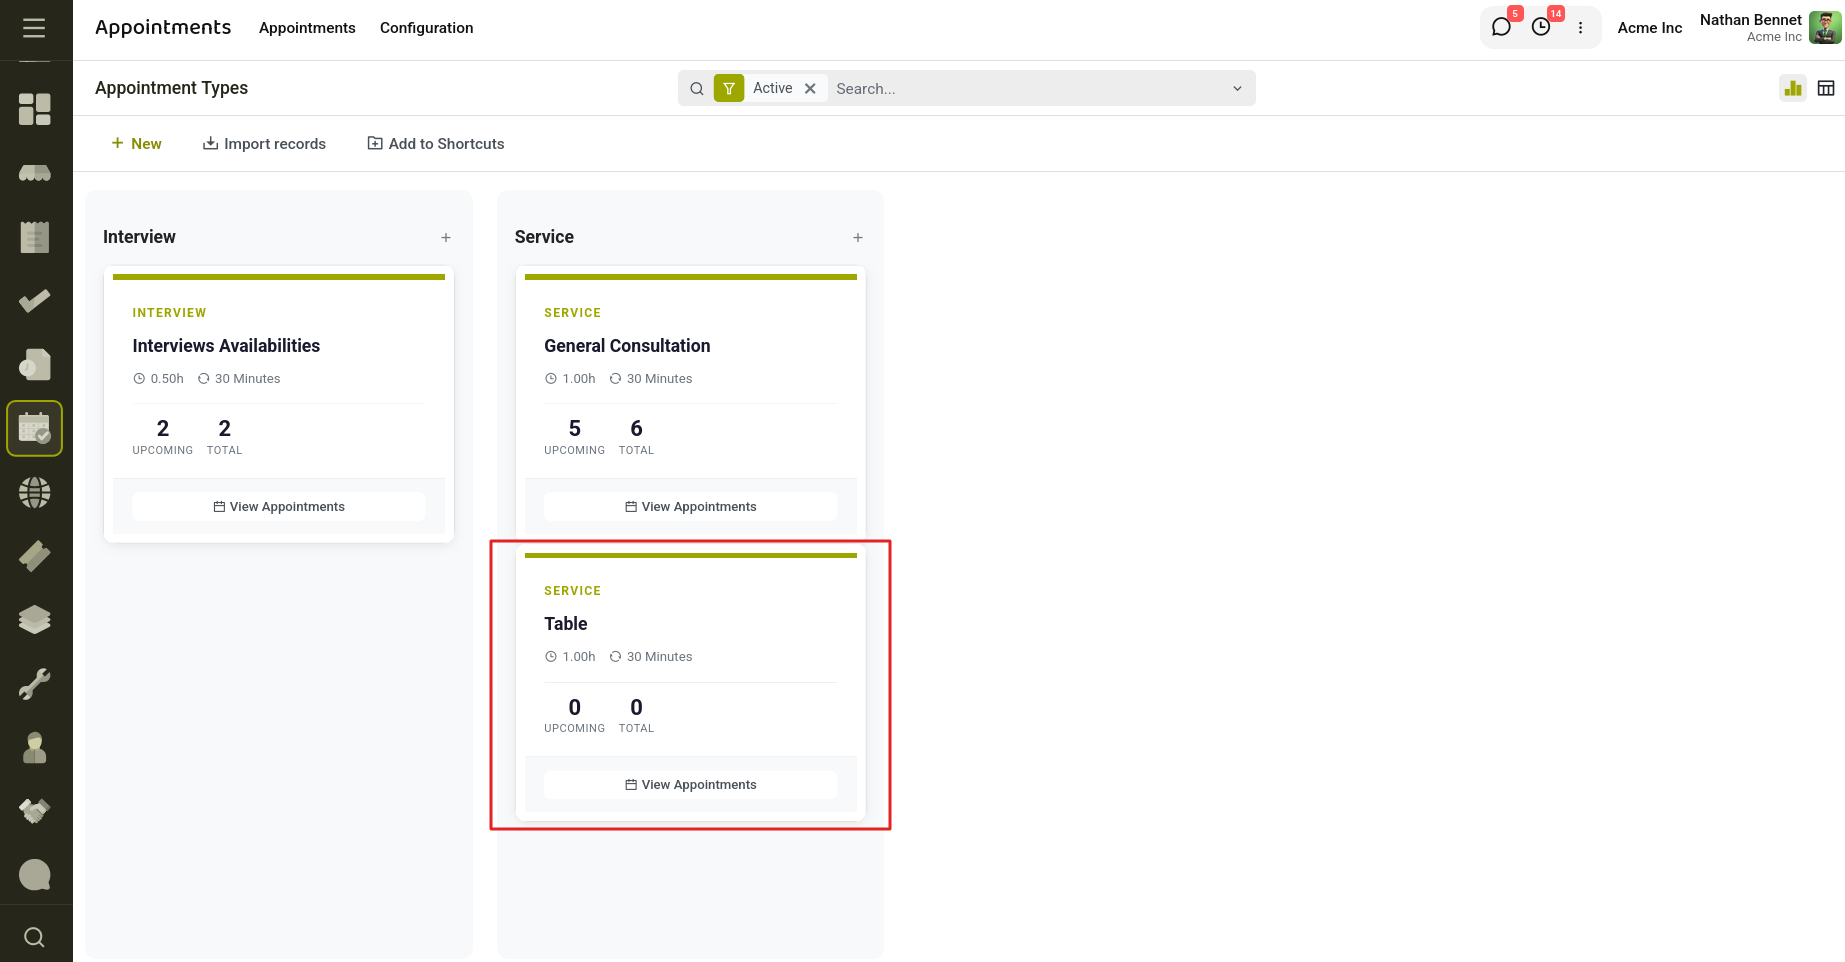
Fig 6.3 — A predefined appointment type, Table, is automatically created.
6.5 Create a Table Reservation
Navigate to:
Appointments → Appointments
Create a new appointment and:
- Select the Table appointment type.
- Choose the required table resource.
- Enter customer details.
- Set reservation date and time.
- Save the appointment.
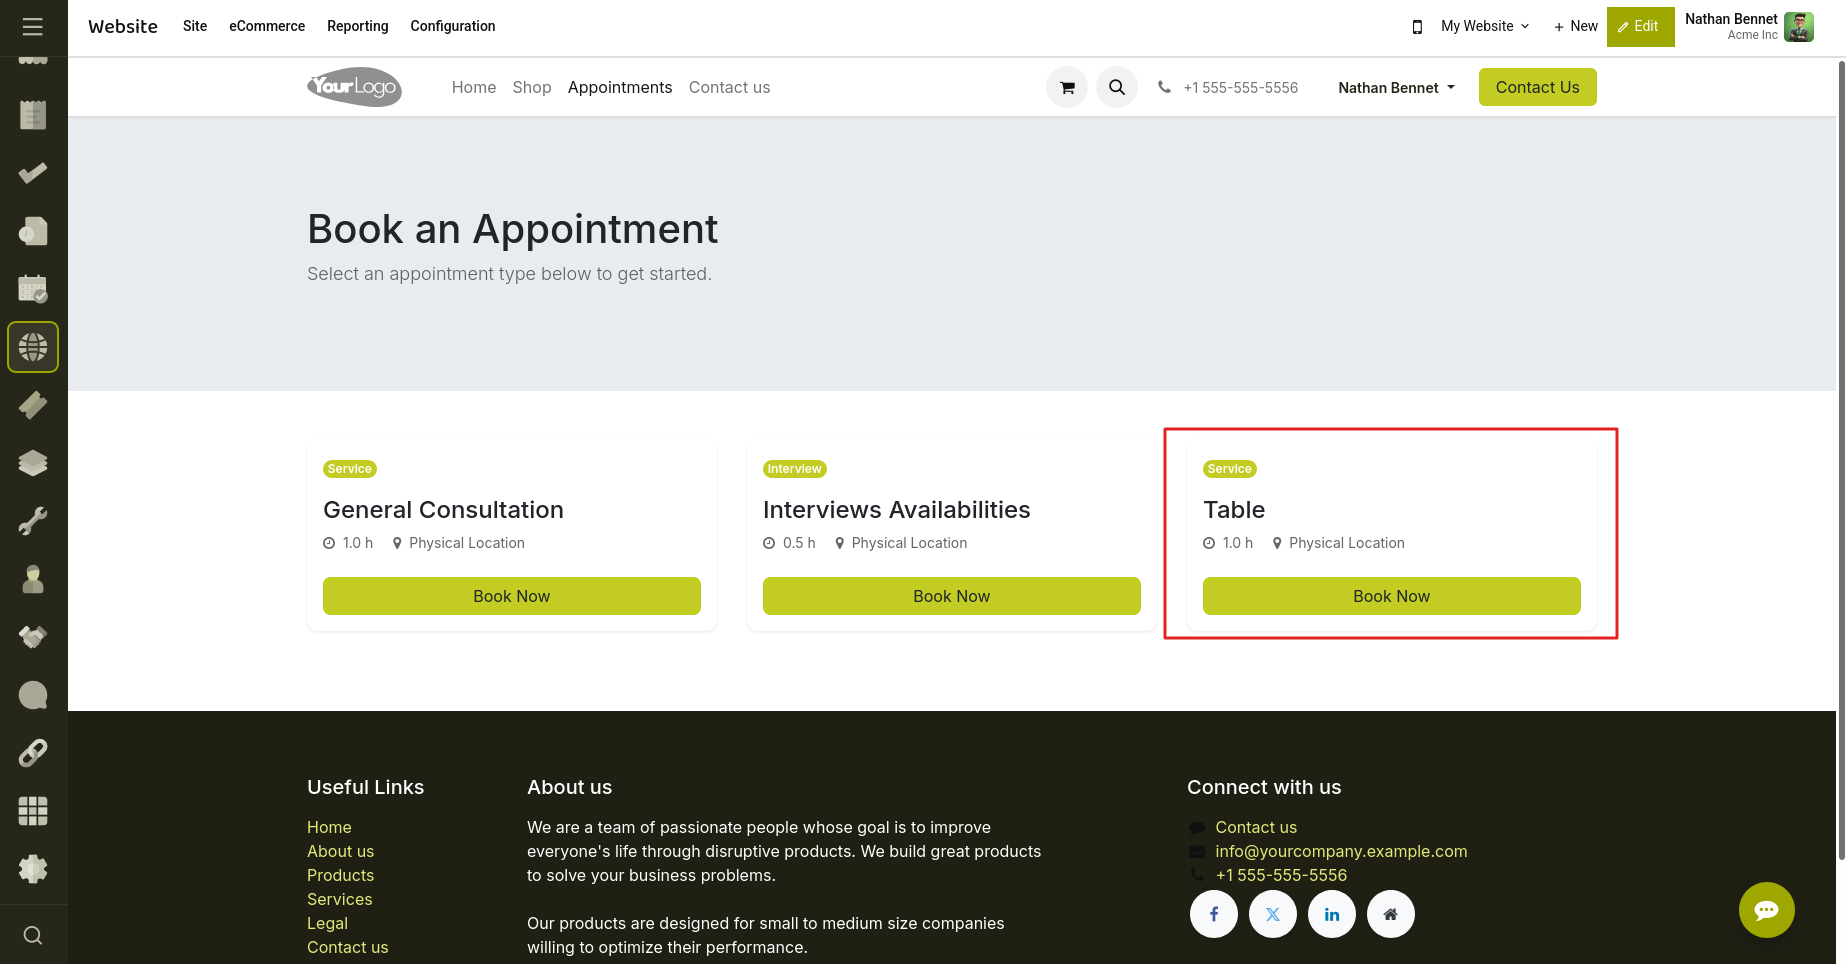
Fig 6.4 — Appointments from website portal.
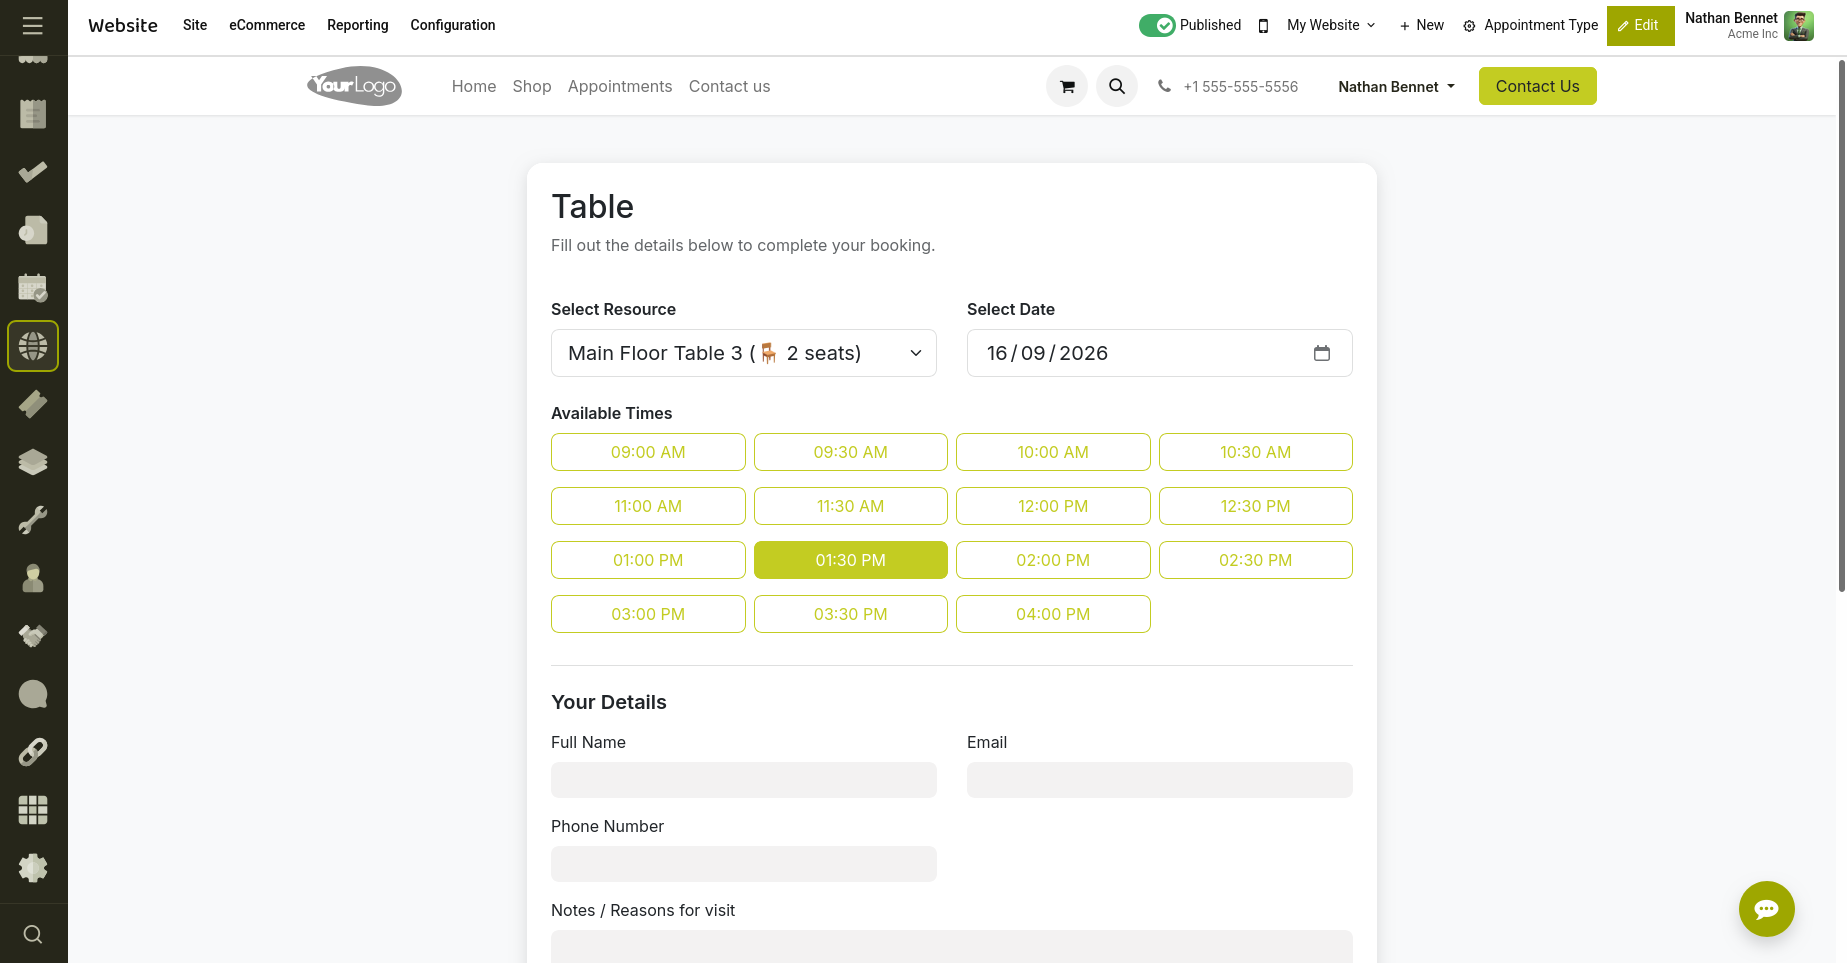
Fig 6.5 — Table appointment booking through the website portal.
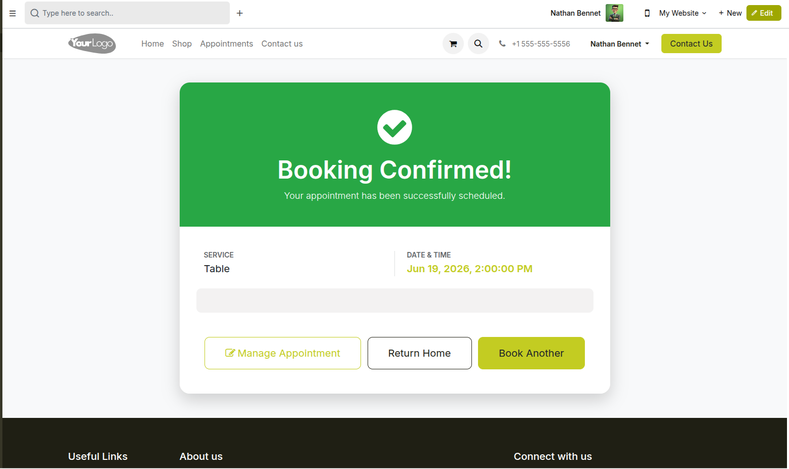
Fig 6.6 — Table appointment booking Confirmation.
6.6 View Reservations in POS
- Open a POS session configured for Restaurant mode.
- Navigate to the restaurant floor screen.
- Reserved tables are displayed based on the appointments scheduled for the upcoming period.
- Any appointment creation, modification, or cancellation is automatically synchronized with active POS sessions.
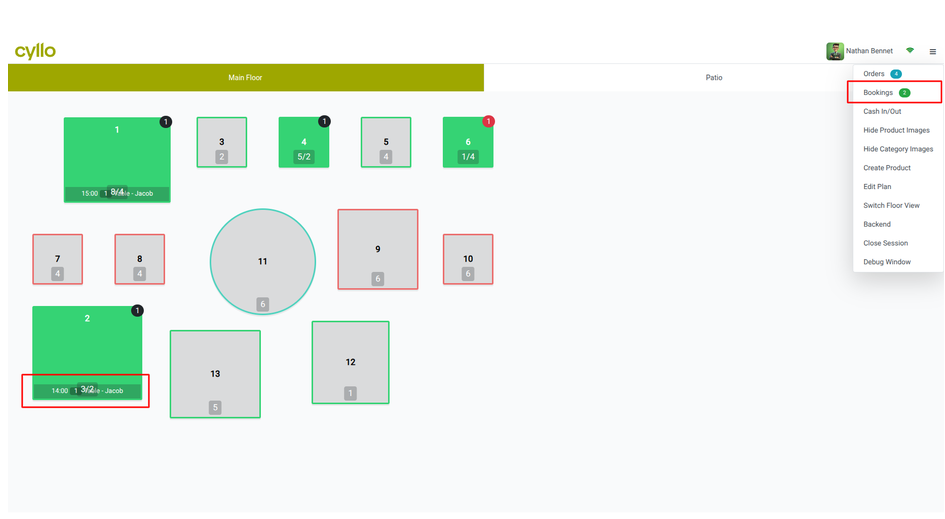
Fig 6.7 — Reserved Tables.
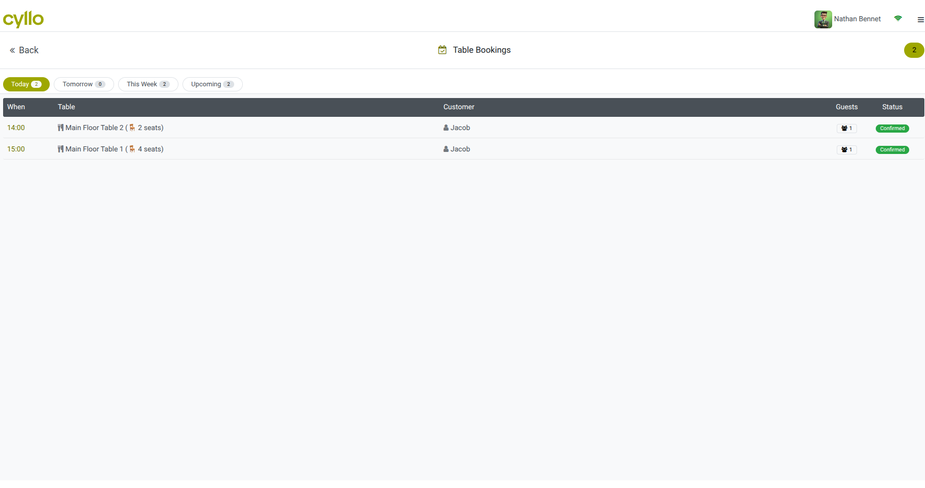
Fig 6.8 — Table Bookings.
6.7 View Linked Tables from Resource
- Open an Appointment Resource.
- Click the POS Tables smart button to view all restaurant tables linked to the resource.
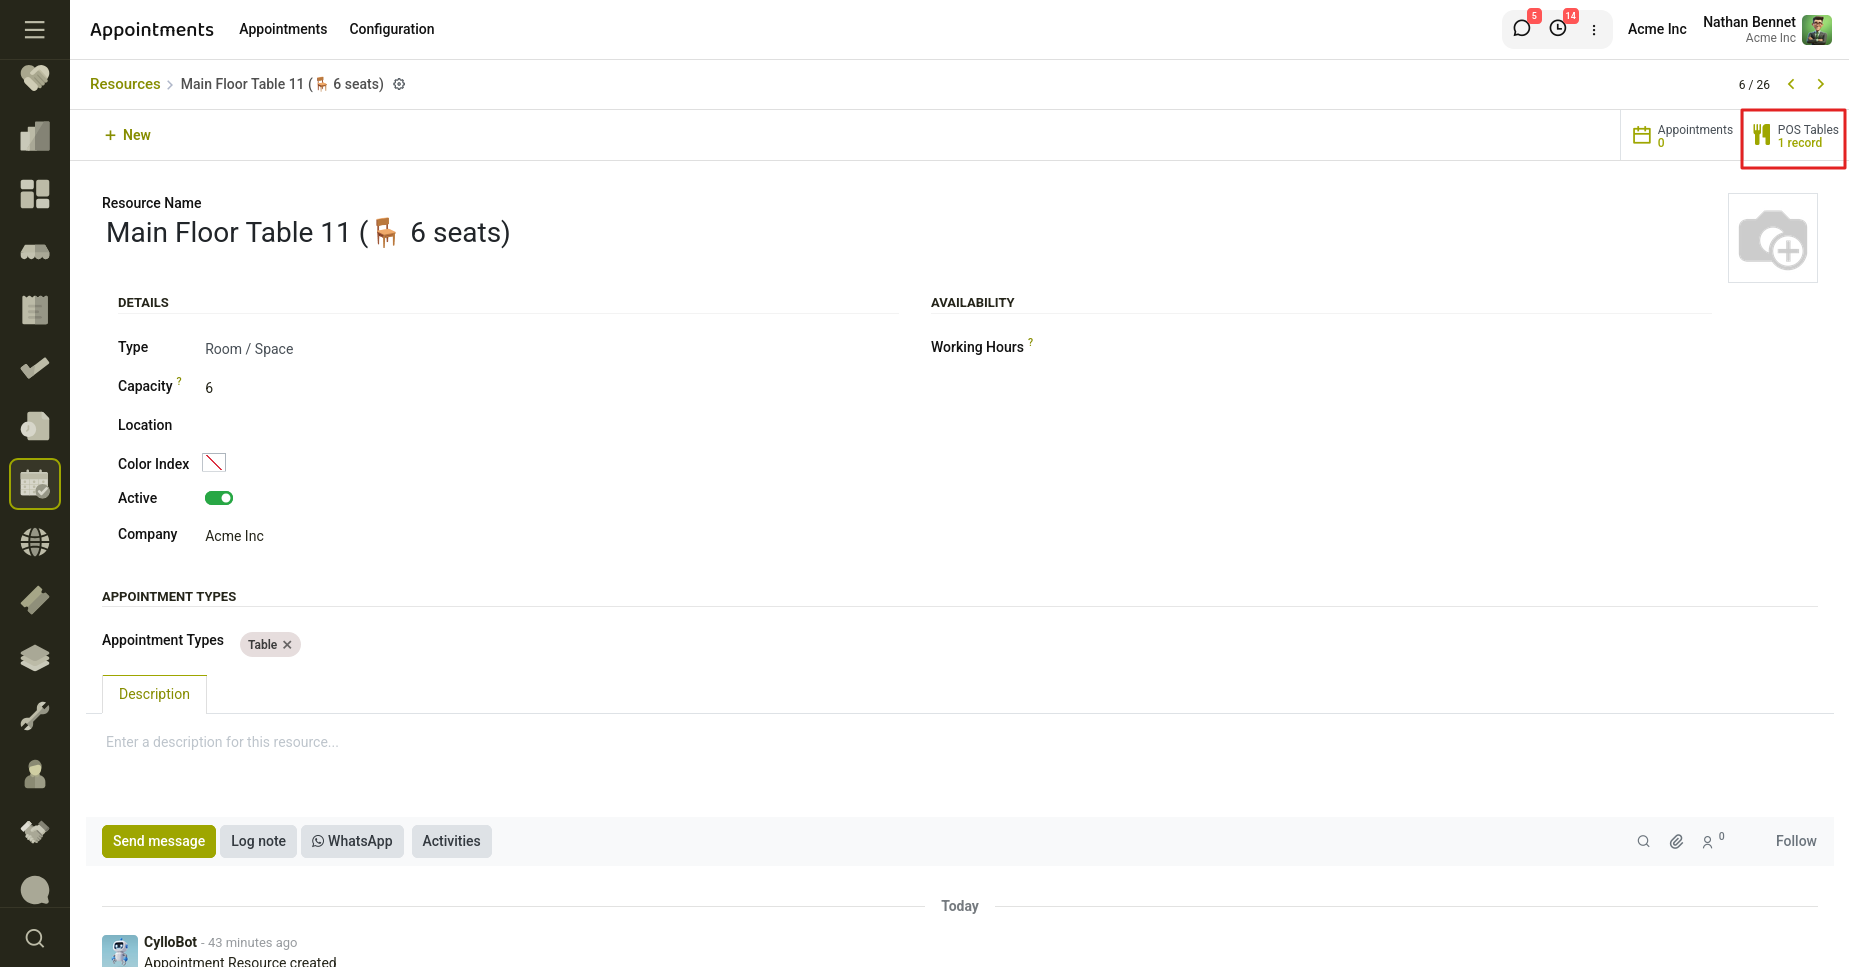
Fig 6.9 — View Table bookings from resources.