

Cyllo Project Documentation
Introduction
Cyllo Project is a comprehensive project management module that enables teams to plan, execute, and track work across every phase of a project lifecycle. From initial scoping to final delivery, the module provides a centralized workspace where project managers and team members can create projects, break work down into actionable tasks, assign responsibilities, set deadlines, and monitor progress in real time. Key capabilities include Kanban-style task boards, Gantt chart scheduling, milestone tracking, time logging, and detailed reporting — all within a single, integrated environment.
Cyllo Project is deeply integrated with the broader Cyllo ERP ecosystem. Projects linked to sales opportunities in CRM automatically carry customer and deal context into the workspace. Billable hours logged on tasks flow directly into Accounting and Invoicing, enabling accurate client billing without manual data entry. Helpdesk tickets can be escalated into project tasks, ensuring support issues are resolved through structured workflows. HR and Employee data power assignment logic and resource planning, so managers always know who is available and at what capacity.
Together, these capabilities give organizations a unified framework for managing project work end to end. Cyllo's centralized database ensures that every update — a task completed, an hour logged, a milestone reached — is instantly reflected across all connected departments. Whether managing internal initiatives, client deliverables, or cross-functional programs, Cyllo Project provides the structure, visibility, and collaboration tools teams need to deliver work on time and within budget.
1. Project Operations
This section covers the core operations for creating and managing projects in Cyllo. Projects are the top-level containers for all work, and configuring them correctly ensures teams have the right structure, visibility, and context from the start.
1.1 Creating a New Project
The New Project form is the starting point for creating a project in Cyllo Project. It allows users to define the project name, enable billable tracking for invoicing time and materials, and configure an email alias to automatically generate tasks from incoming emails. This streamlined setup ensures that essential project settings are established quickly, enabling teams to begin collaboration without unnecessary complexity.
How to Create a New Project:
- Go to Project → Projects
- Click New
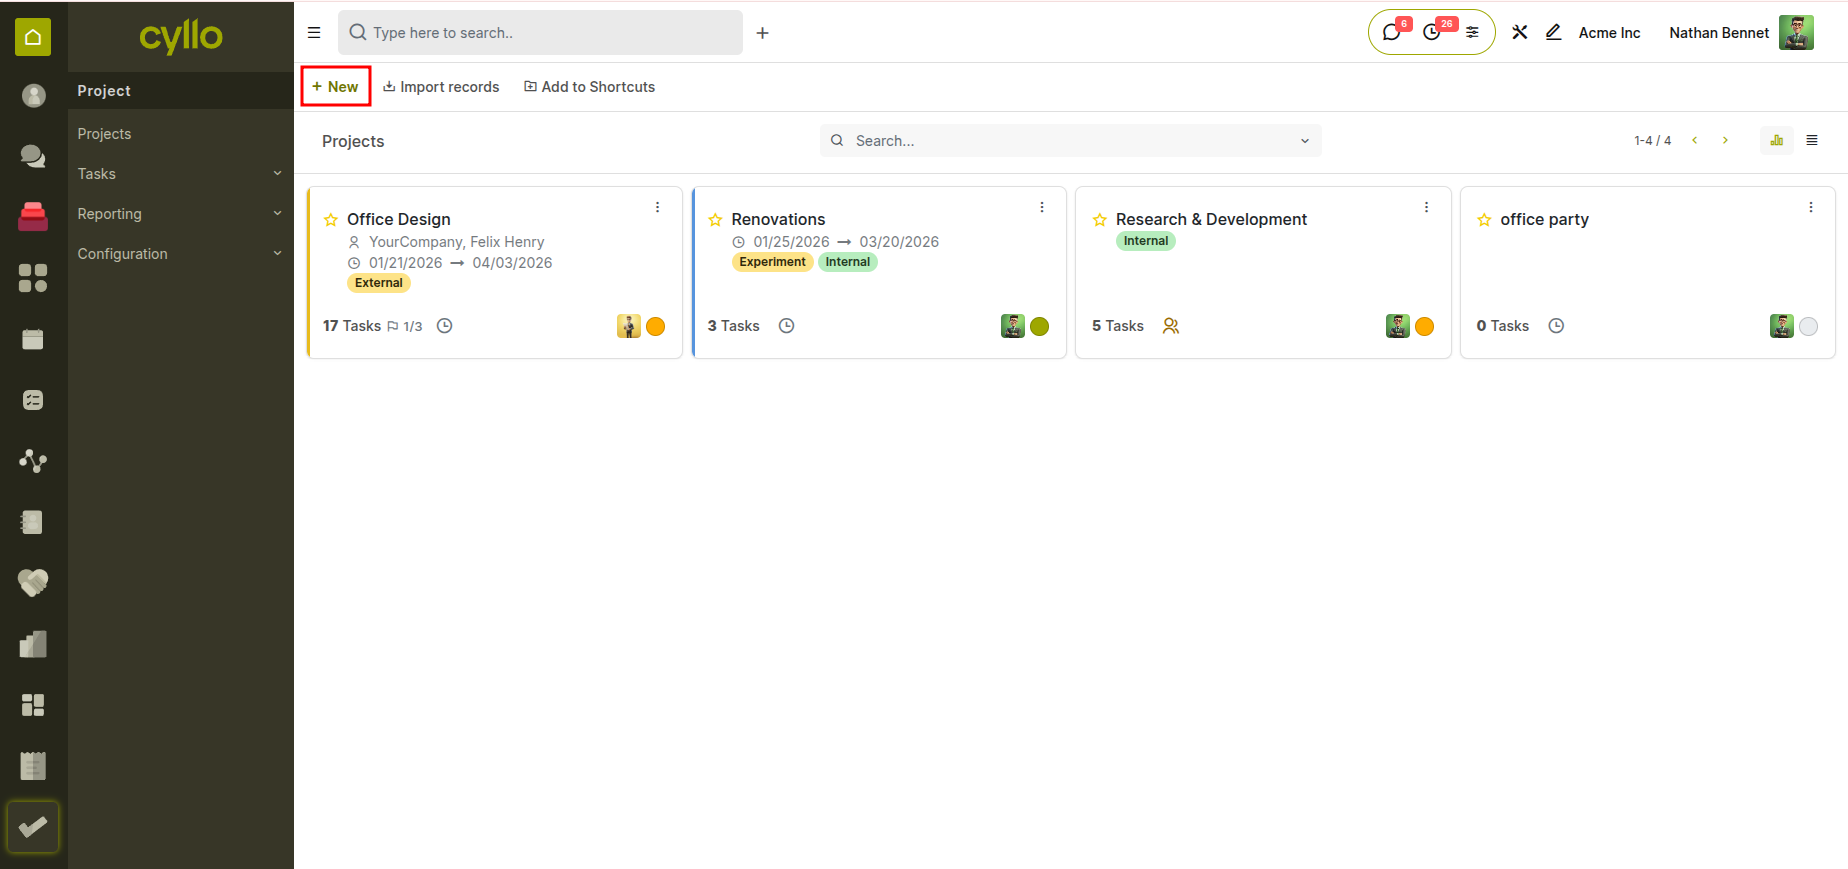
Fig 1.1 — Cyllo project kanban view
- Enter the Project Name
- (Optional) Enable Billable if you want to invoice time and materials
- (Optional) Configure an Email Alias to create tasks from incoming emails
- Click Create Project
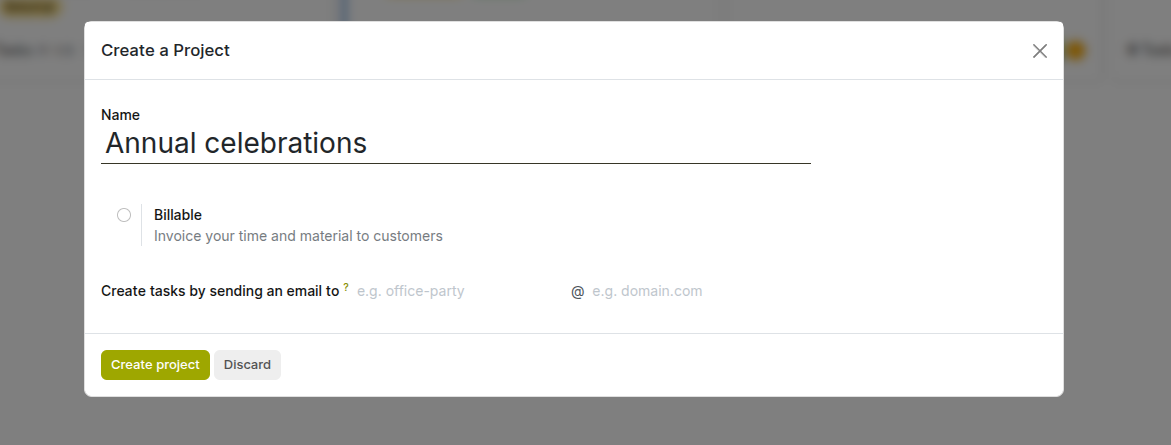
Fig 1.2 — Cyllo project creation widget
Note
After creating the project, you will be redirected to the Kanban view where you can create stages for the project.
1.2 Project Stages and Kanban View
In Cyllo Project, each project opens into a Kanban view of tasks, where tasks are organized into columns representing different stages (e.g., New, In Progress, Done). This view provides a clear overview of task progress within the project and helps teams manage their workload efficiently. Each column represents a task stage, and tasks can be easily moved between stages as work progresses.
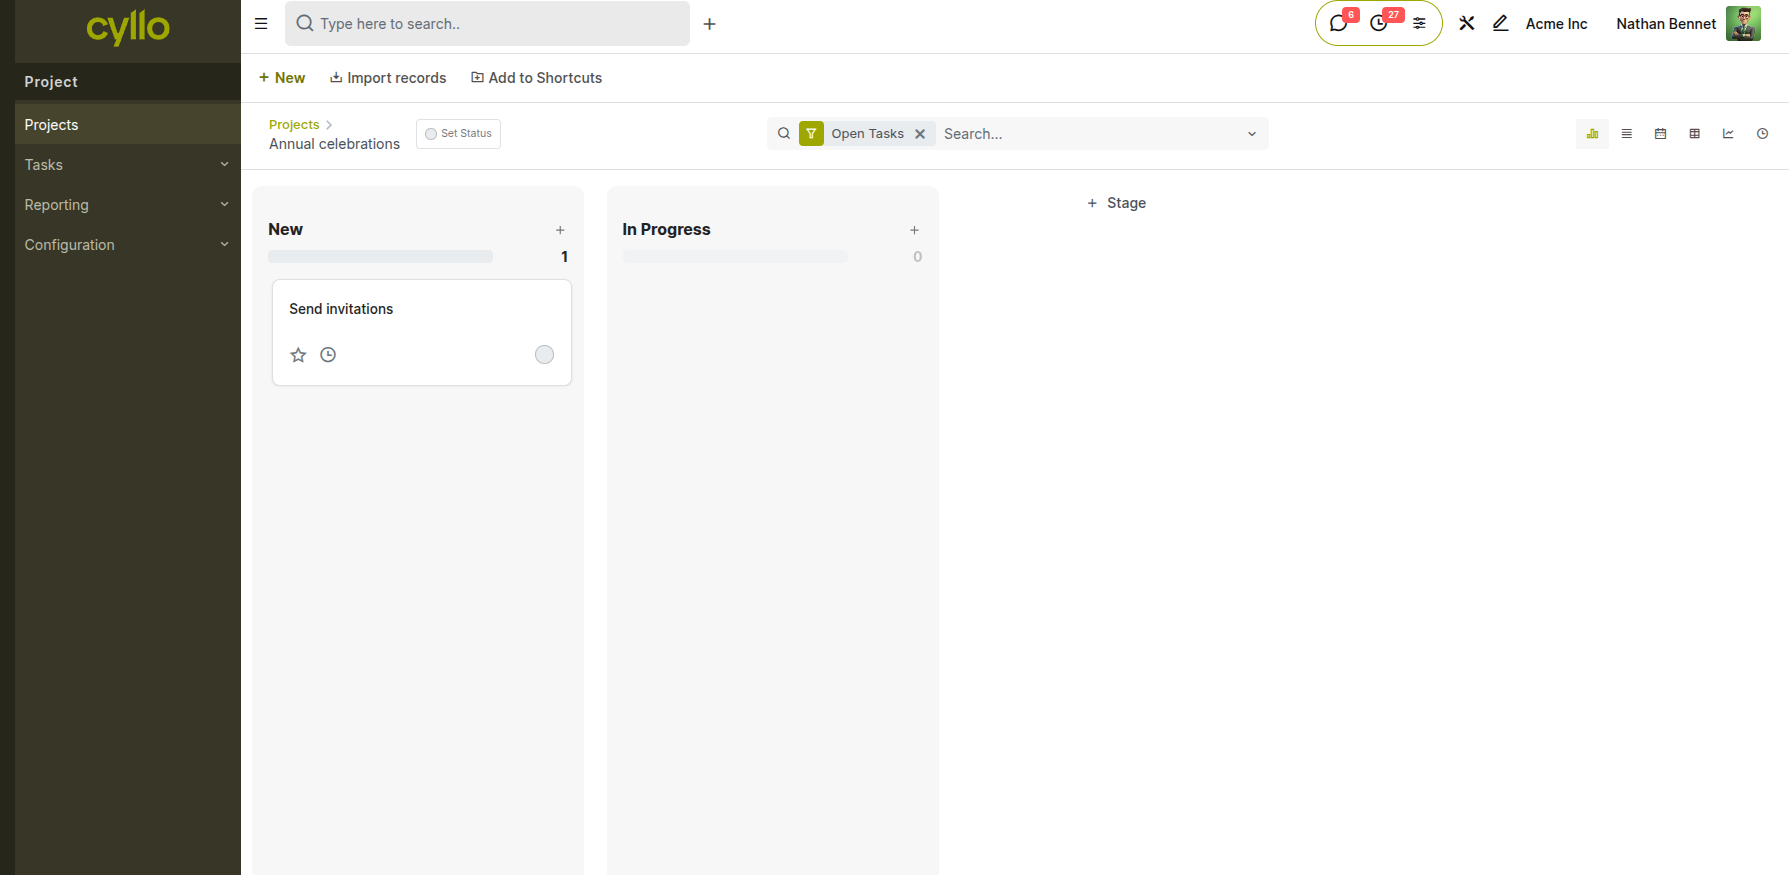
Fig 1.3 — kanban view of stages in Cyllo project
How to Move a Project Through Stages:
- Go to Project → Projects
- Open a specific project (e.g., Annual celebrations)
- View tasks in the Kanban layout, grouped by stages
- Drag and drop a task card from one column to another to update its stage
Additional Actions:
- Click the “+” icon next to a column to quickly create a new task
- Use filters (e.g., Open Tasks) to refine visible tasks
- Go to Projects → Configuration → Task stages to manage or customize task stages
1.3 Project Settings and Configuration
Each project has its own settings panel where managers can enable or disable features such as time tracking, billable hours, customer ratings, and task dependencies. These settings determine which tools are available to the project team and how the project integrates with other Cyllo modules.
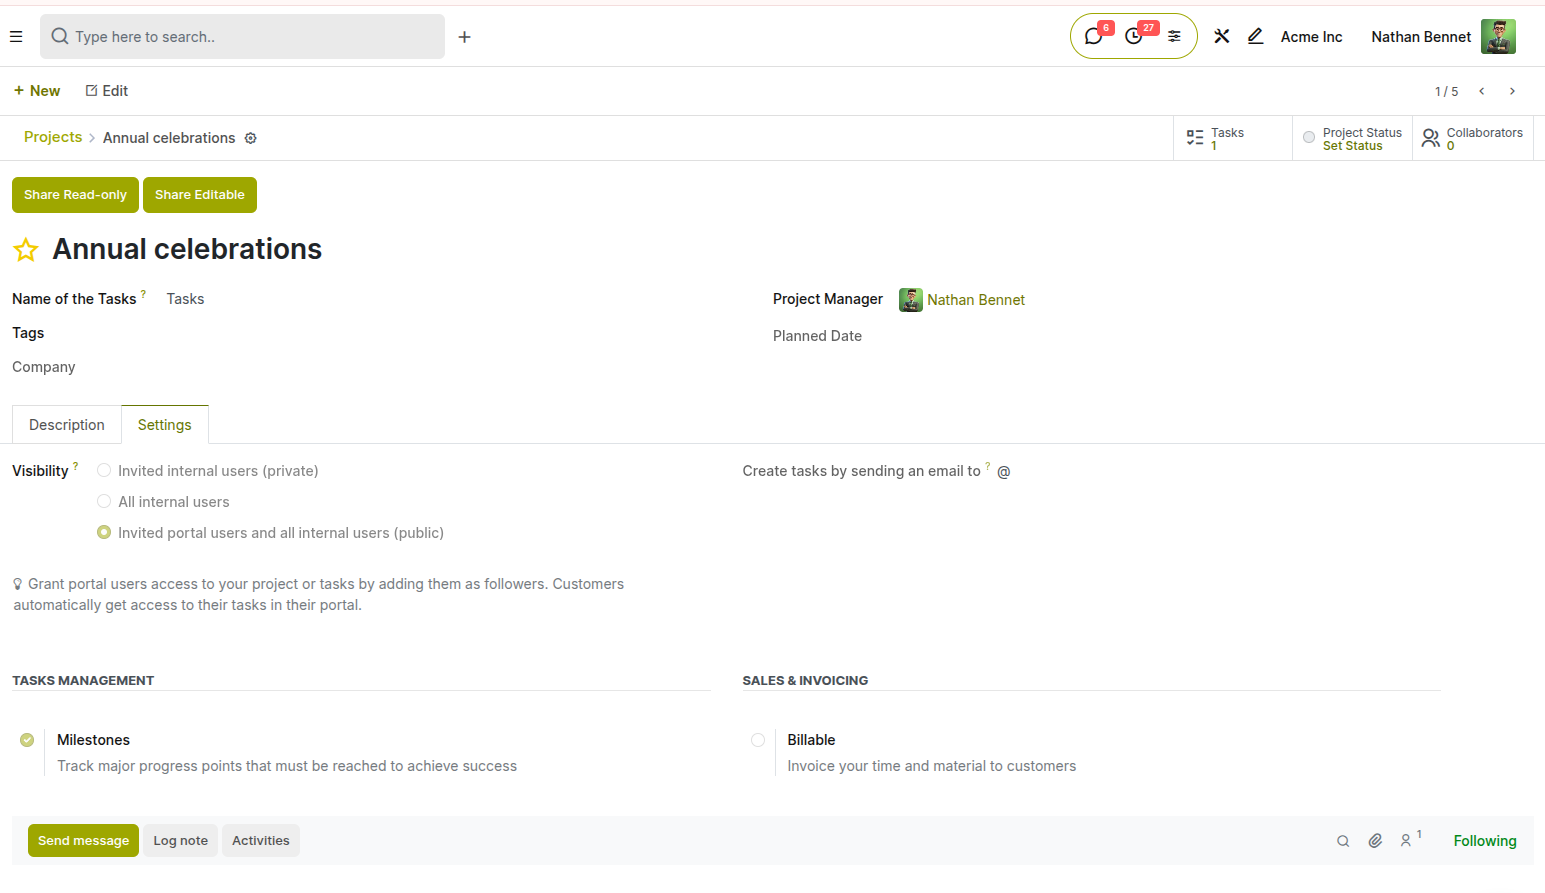
Fig 1.4 — Cyllo project settings
How to Access Project Settings:
- Go to Project → Projects
- Click the three-dot menu (⋮) on the project card and select Settings, or open the project and click the Settings tab
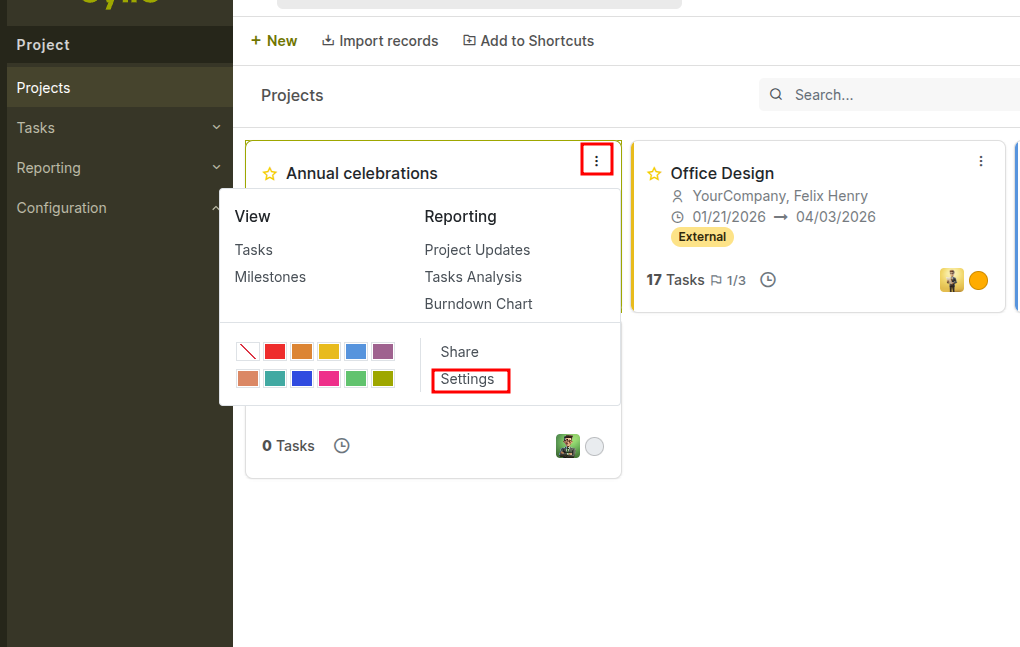
Fig 1.5 — Cyllo project settings icon
- Enable or disable features as required
- Click Save
Key Settings:
- Visibility: Controls who can access the project
- Invited internal users (private)
- All internal users
- Invited portal users and all internal users (public)
- Email Alias: Allows tasks to be created automatically by sending emails to a defined address
- Milestones: Enables milestone tracking to monitor key progress points in the project
- Billable: Marks the project as billable, allowing time and materials to be invoiced to customers
2. Task Management
Tasks are the primary unit of work in Cyllo Project. This section covers everything from creating and configuring individual tasks to advanced features such as sub-tasks, dependencies, and recurring schedules. Effective task management ensures work is clearly defined, assigned, and tracked from start to completion.
2.1 Creating Tasks
Tasks can be created directly from a project’s Kanban view using the quick-add option available in each stage column. This allows users to rapidly capture work items with minimal input and assign them to team members.
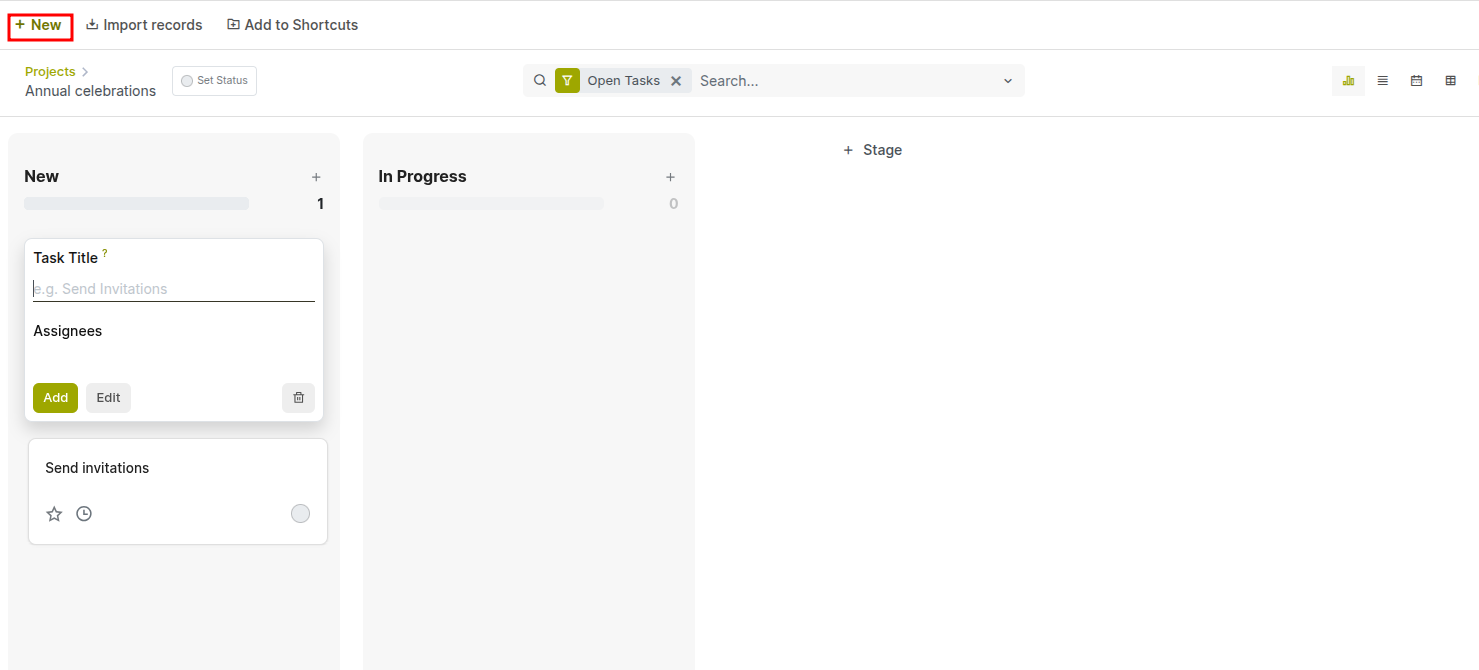
Fig 2.1 — creating task from a project
How to Create a Task:
- Open a project to access the Kanban view
- Click the “+” icon in any stage column (e.g., New, In Progress)
- Enter the Task Title
- (Optional) Select Assignees
- Click Add to create the task
2.2 Task Stages and Status
Every task moves through a sequence of stages that represent its progress from creation to completion. Stages are configured per project and displayed as columns in the Kanban view. The status bar at the top of each task form shows the current stage and allows one-click advancement.
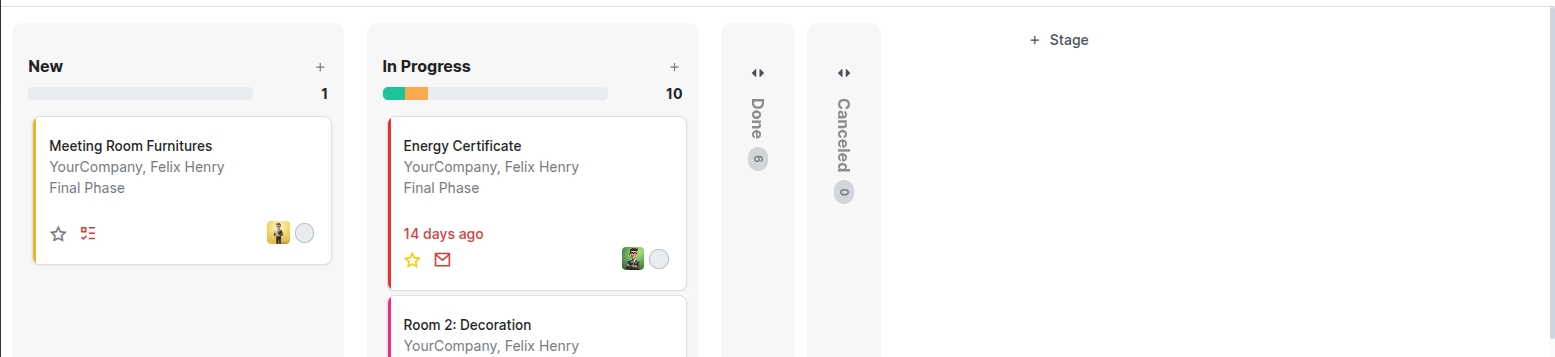
Fig 2.2 — Stages of task in kanban view
How to Move a Task to a New Stage:
- Open the task and click the target stage in the status bar at the top, or
- In Kanban view, drag the task card to the desired column
Note
Marking a task as Done moves it to the final stage and records a completion timestamp. Completed tasks can be restored to any active stage if rework is required.
2.3 Assigning and Scheduling Tasks
Proper assignment and scheduling ensures each team member knows their responsibilities and deadlines. Cyllo Project supports multiple assignees per task and provides a dedicated workload view to help managers distribute work evenly across the team.
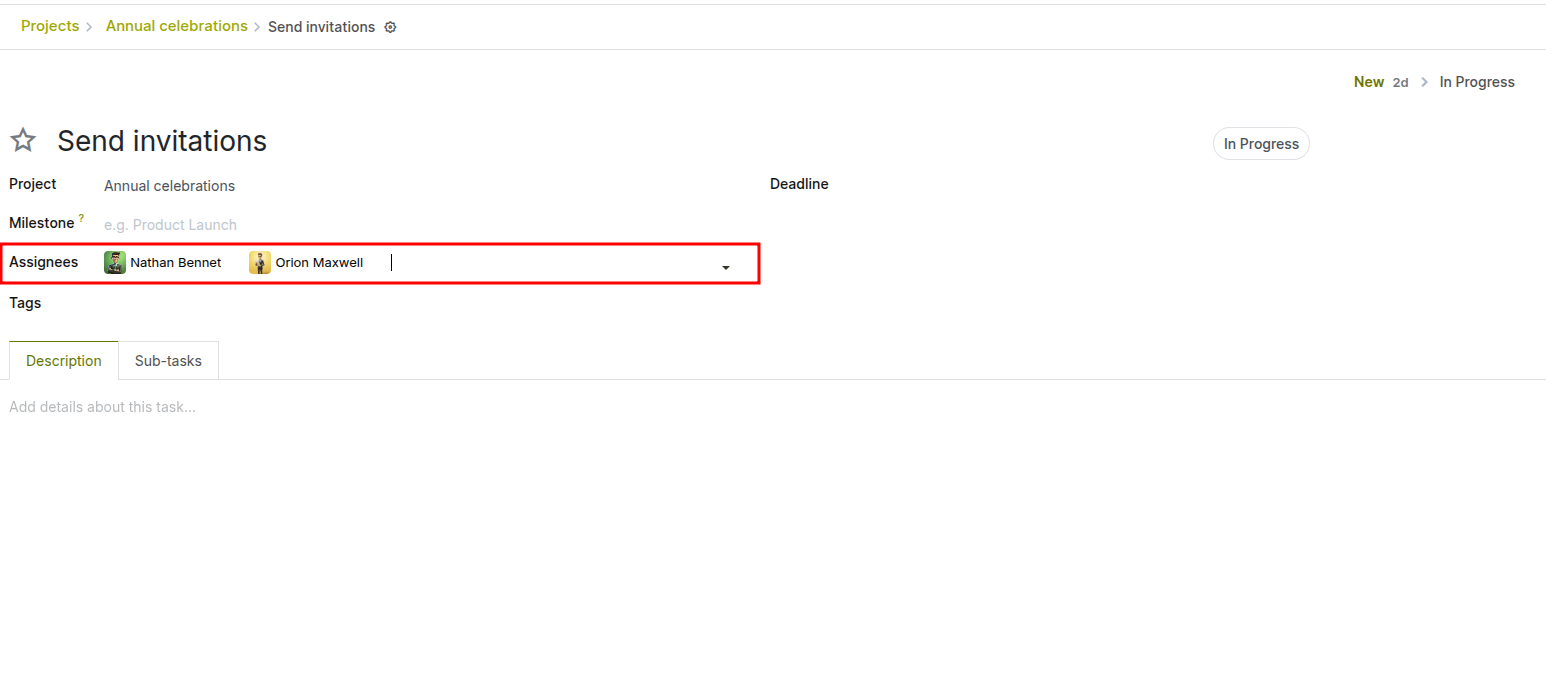
Fig 2.3 — assignees assigned to a task
How to Assign and Schedule a Task:
- Open the task form
- Click the Assignees field and search for team members by name
- Set the Deadline using the date picker
- Save the task
2.4 Task Dependencies
Task dependencies allow managers to define blocking relationships between tasks — ensuring that a downstream task cannot begin until its predecessor is complete. This feature is essential for projects with sequential workflows where the output of one task feeds directly into the next.

Fig 2.4 — Demonstrating the “Blocked By” Feature in an Cyllo Project Task.
Enabling Task Dependencies:
- Go to Project → Configuration → Settings → Enable Task Dependencies
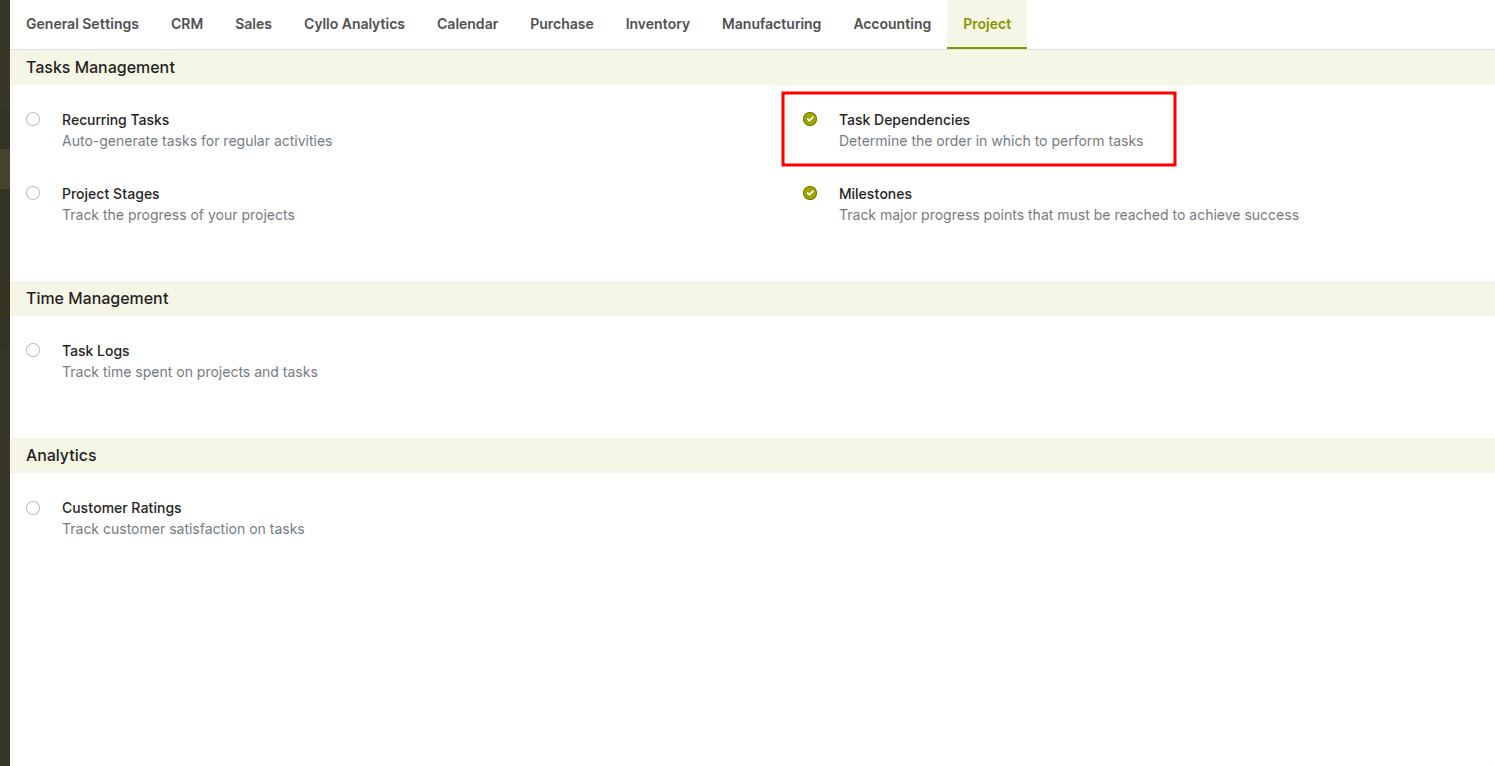
Fig 2.5 — Enabling Task dependencies feature from settings
How to Set a Task Dependency:
- Open the task that should be dependent on another task
- Navigate to the “Blocked By” tab in the task form
- Click Add a line
- Select the task that must be completed first (blocking task)
- Save the task Once configured, the task will be marked as Witing until the blocking task is completed.
Note
The “Blocked By” tab appears only when Task Dependencies is enabled in project settings. Blocked tasks are visually indicated (e.g., Waiting status), helping teams quickly identify bottlenecks and task sequencing.
2.5 Recurring Tasks
Recurring tasks automate the creation of repetitive work items such as weekly status reports, monthly reviews, or daily stand-up preparation. Once configured, Cyllo automatically generates a new task at the specified interval, ensuring routine activities are never missed.
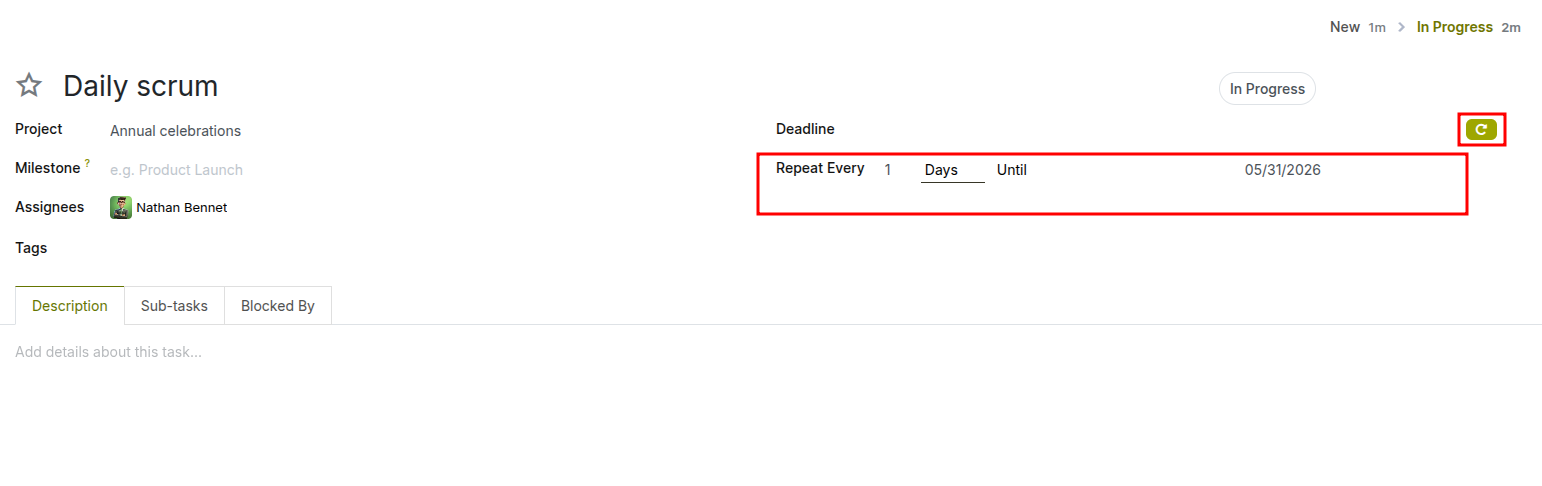
Fig 2.6 — Defining Task Recurrence inside task
Enabling Recurring Task:
- Go to Project → Configuration → Settings → Enable Recurring task
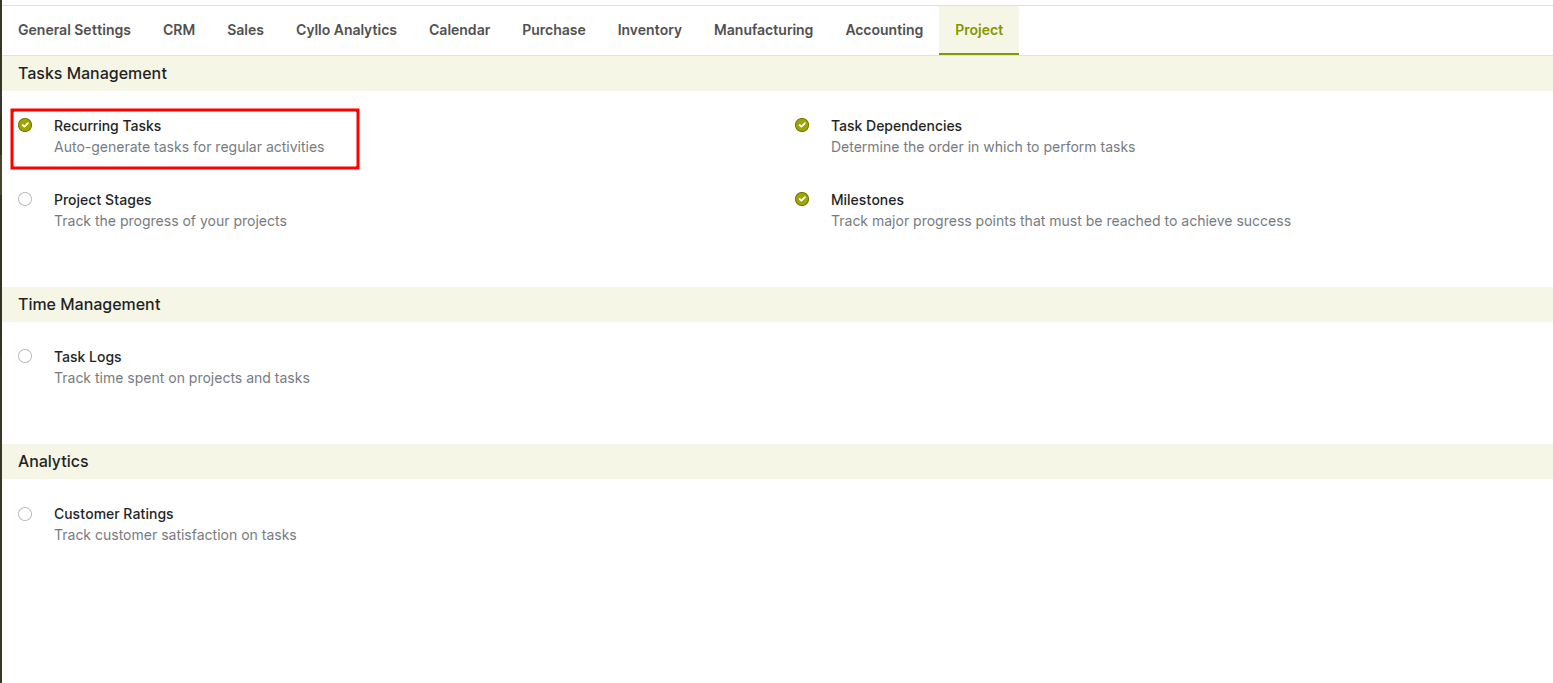
Fig 2.7 — Enabling recurring tasks option from settings
How to Configure a Recurring Task:
- Open an existing task or create a new one
- Click the Recurrence button on the task form

Fig 2.8 — recurring option inside a task
- Set the Recurrence Type (daily, weekly, monthly, yearly)
- Define the Recurrence Interval (e.g., every 2 weeks)
- Set an End Date or leave open for indefinite recurrence
- Save the task
2.6 Sub-tasks
Sub-tasks allow complex tasks to be broken down into smaller, independently assignable units of work. Each sub-task has its own assignee, deadline, and stage, enabling parallel execution within a single parent task. Sub-tasks appear nested under their parent in all views.
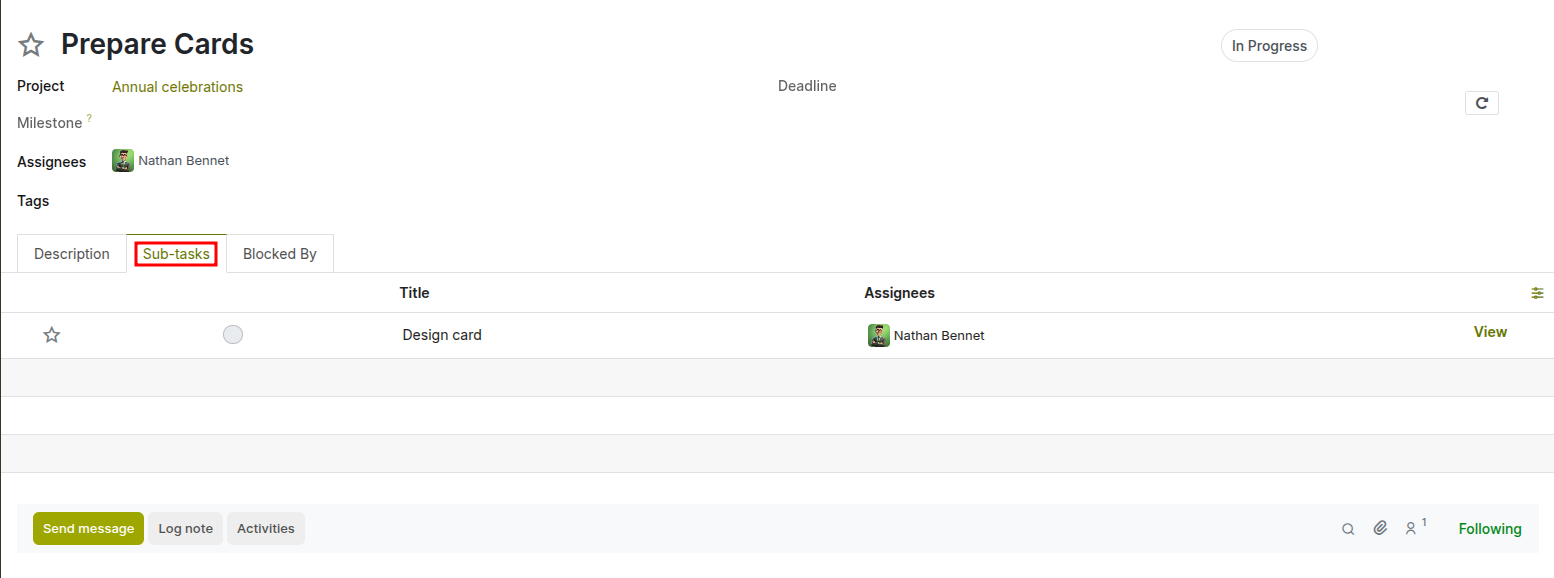
Fig 2.9 — configuring sub task from inside a task
How to Add Sub-tasks:
- Open the parent task
- Navigate to the Sub-tasks tab
- Click Add a Task and enter the sub-task title
- Assign an owner and set a deadline for each sub-task
- Save the parent task
3. Planning & Scheduling
Cyllo Project provides multiple planning views to help project managers schedule work, track timelines, and identify risks before they impact delivery. This section covers the milestone tracking, deadline management, and workload planning tools.
3.1 Milestone Tracking
Milestones mark significant points in a project timeline — such as a phase completion, a client review, or a product launch. Unlike regular tasks, milestones have no duration; they represent a single point in time.
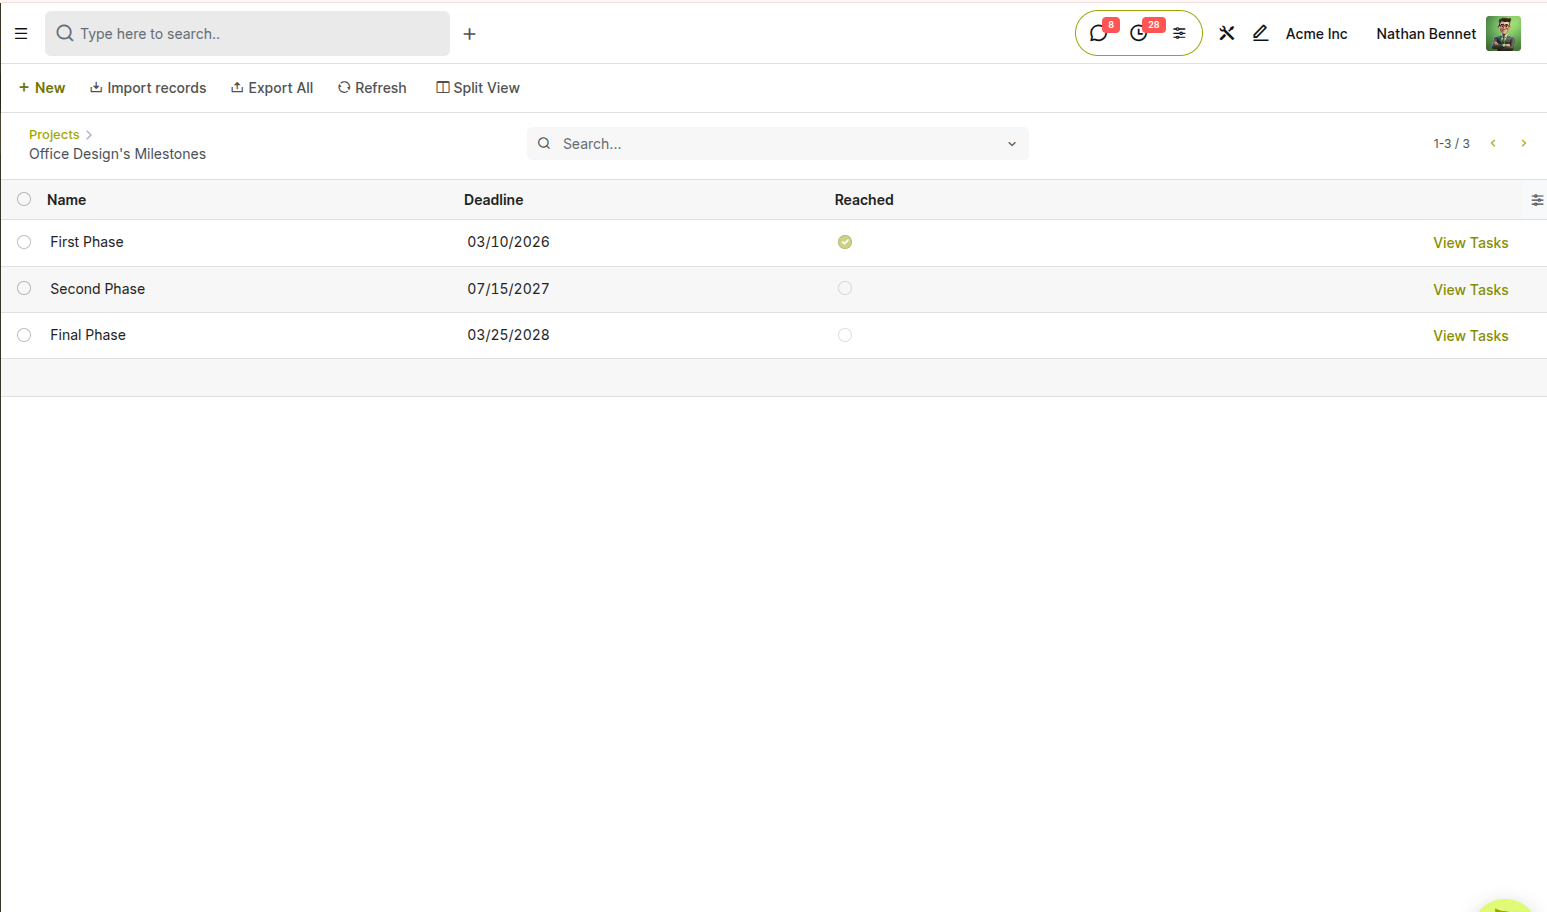
Fig 3.1 — Displaying milestones of a project
Enabling Milestones:
- Go to the project Settings tab and enable Milestones
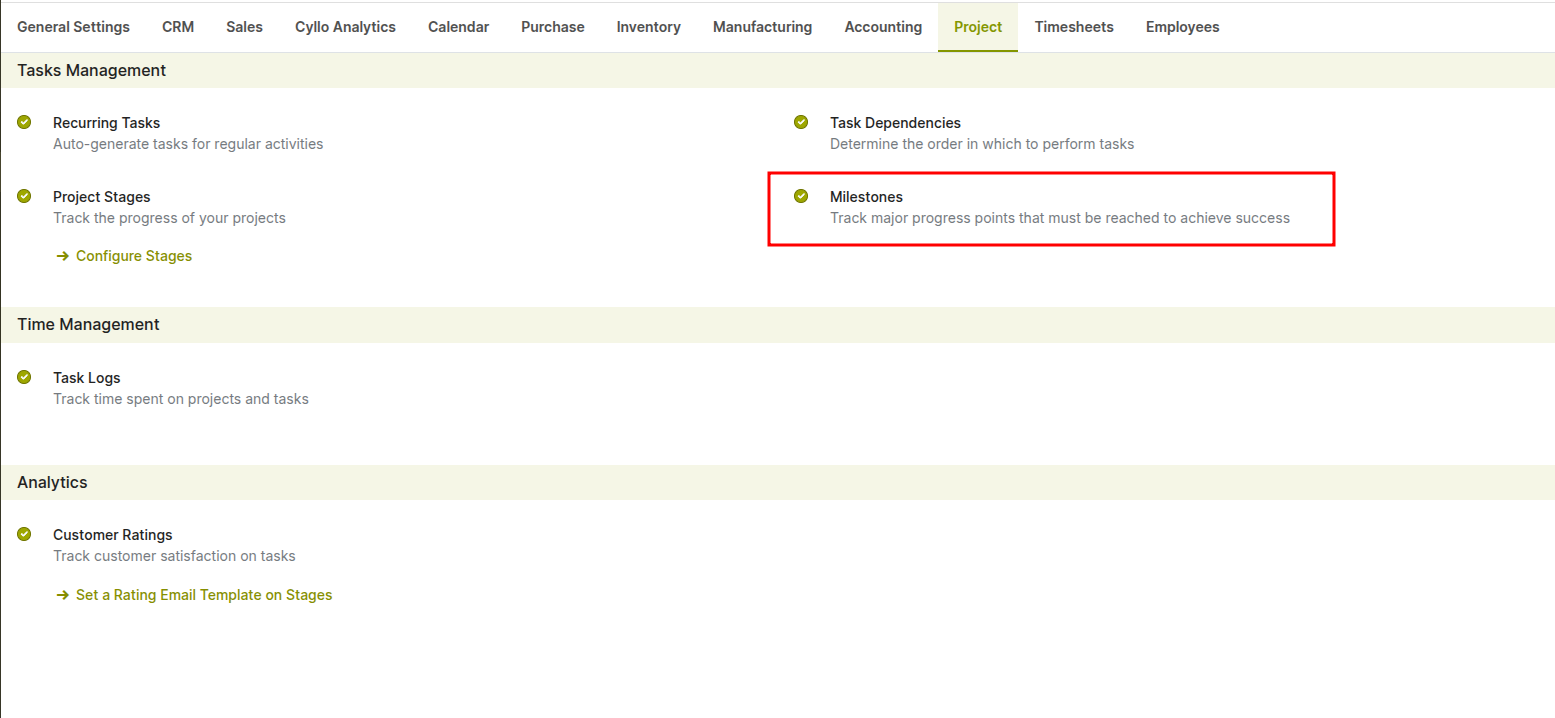
Fig 3.2 — Enabling milestone feature from settings
How to Add a Milestone:
- Go to Project → Projects
- Click the three-dot menu (⋮) on a project card
- Select milestones
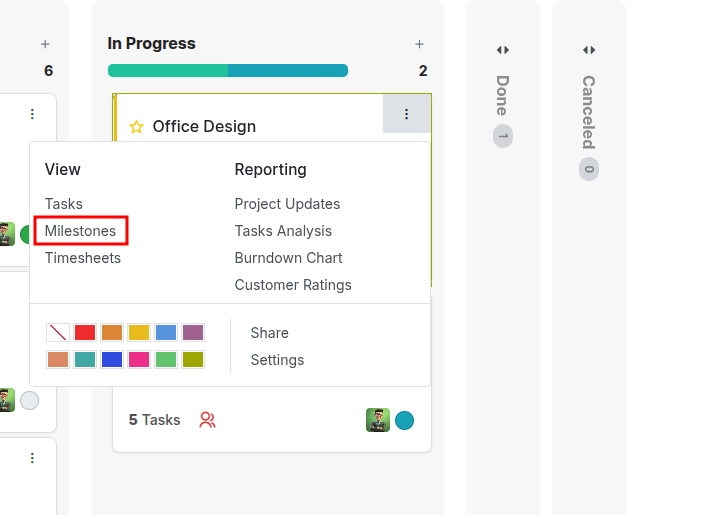
Fig 3.3 — Accessing milestone from project card in kanban view
- Click Add a line and enter the milestone name
- Set the Deadline for the milestone
- Save the project
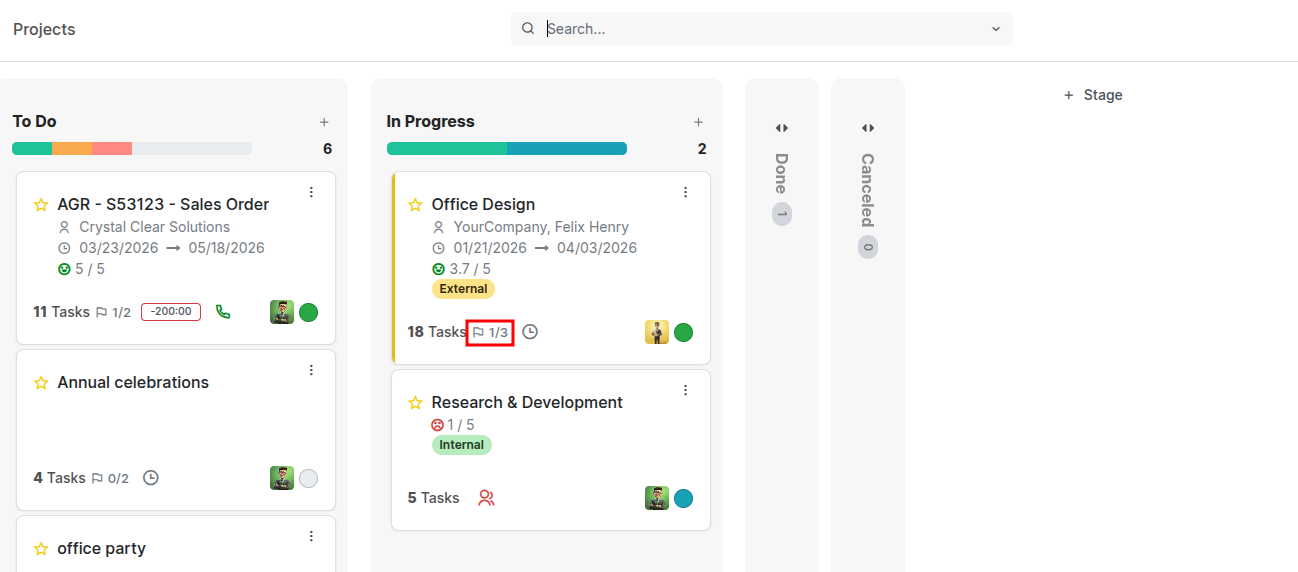
Fig 3.4 — milestone icon in the project
3.2 Deadline Management
Cyllo Project highlights task deadlines directly within the task form and Kanban view, making it easy to track time-sensitive work. When a task exceeds its deadline, it is clearly indicated in red, helping teams quickly identify overdue items. In the Kanban view, overdue tasks display the delay (e.g., “2 days ago”) in red on the task card, providing an immediate visual cue for follow-up.
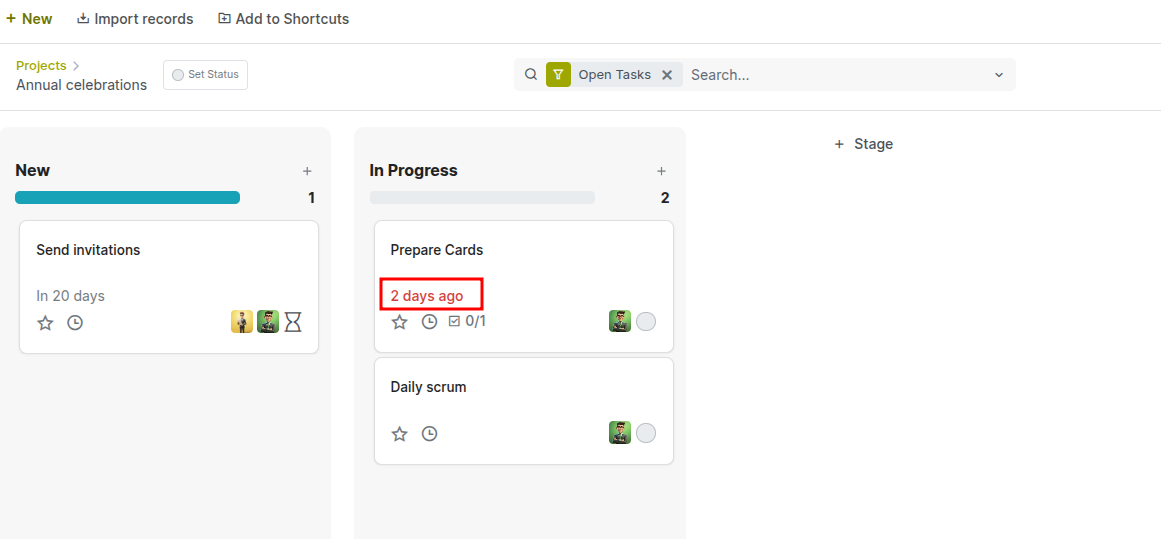
Fig 3.5 — showing deadline in the project
How to Review and Update Deadlines:
- Open a project and view tasks in the Kanban view
- Identify overdue tasks by the red deadline indicator on task cards
- Click on a task to open its detailed form
- Update the Deadline field as needed
- Changes are automatically reflected in the Kanban view
4. Collaboration & Communication
Effective project delivery requires clear, traceable communication between team members and stakeholders. Cyllo Project embeds collaboration tools directly within tasks and projects, so all decisions, updates, and file exchanges are captured in context — eliminating the need to switch between email, chat, and project tools.
4.1 Chatter and Activity Log
The Chatter panel at the bottom of every task and project record provides a chronological log of all messages, activity updates, and system events. Team members can post messages, reply to threads, and tag colleagues using @mentions to notify specific individuals. The activity log automatically records stage changes, deadline updates, and assignment modifications.
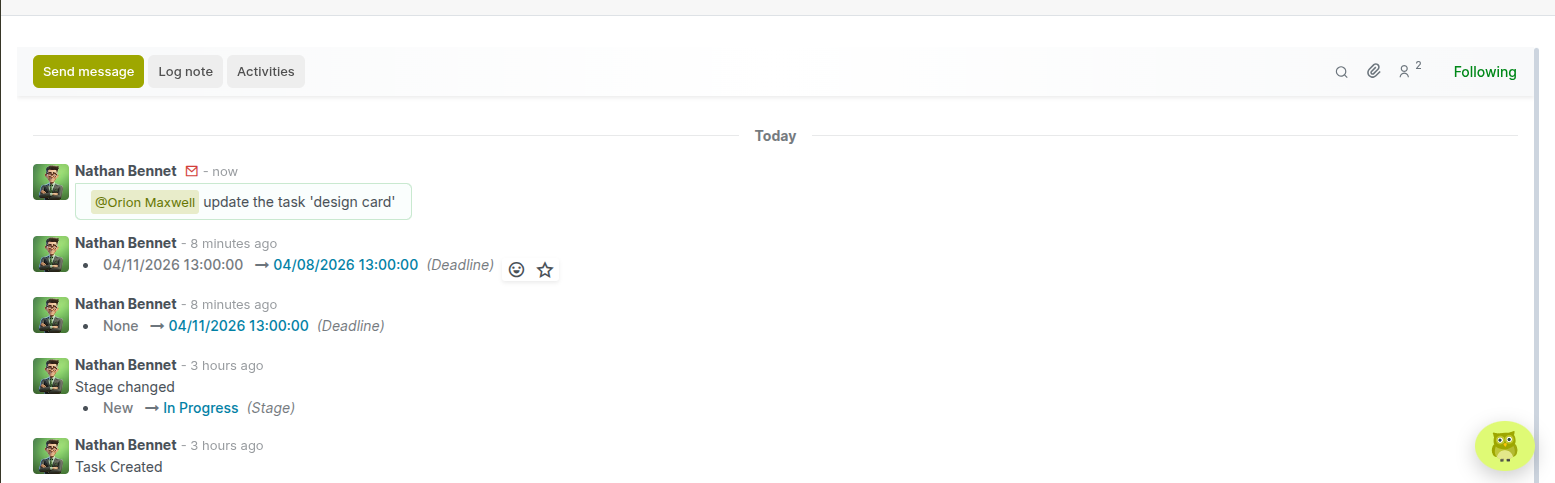
Fig 4.1 — chatter section of a project
How to Post a Message in the Chatter:
- Open the task or project record
- Click Send message in the Chatter panel
- Type the message and use @ to mention specific team members
- Attach files if needed, then click Send
4.2 Internal Notes and Messages
In addition to messages visible to all followers, team members can post internal notes that are visible only to internal users. This is useful for recording operational decisions or flagging concerns without exposing them to external stakeholders or customers who may have portal access.
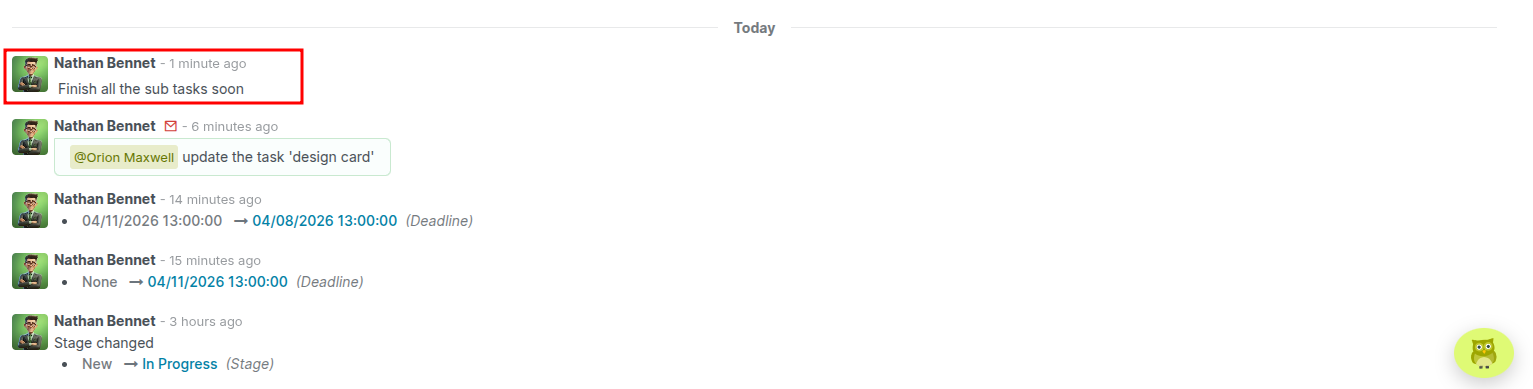
Fig 4.2 — internal note added in the project
How to Add an Internal Note:
- Open the task or project
- In the Chatter, click Log note instead of Send message
- Enter the note content
- Click Add — the note appears with a yellow background to distinguish it from regular messages
4.3 Followers and Notifications
Followers receive email and in-app notifications when a record they are following is updated. By default, the task creator and assignees are added as followers. Managers can manually add stakeholders — such as a client contact or department head — to keep them informed without granting full editing access.
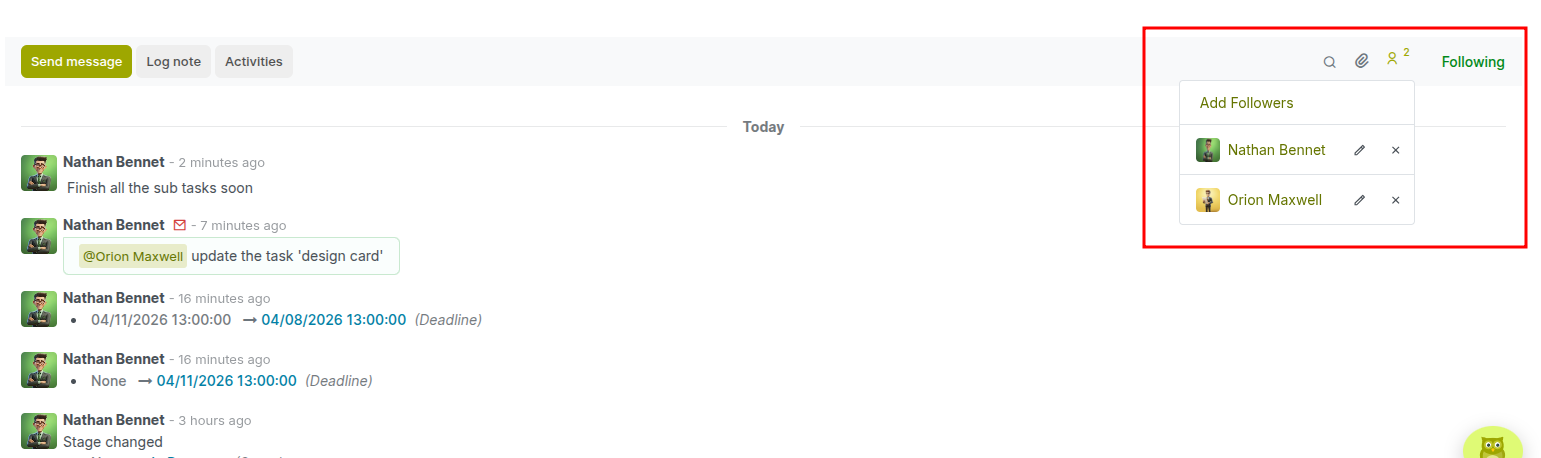
Fig 4.3 — displaying followers in a project
How to Add a Follower:
- Open the task or project
- Click the Followers icon (person icon near the top of the form)
- Search for and add the contact or internal user
- Select which notification events they should receive (comments, updates, deadlines)
- Click Apply
4.4 Document Attachments
Files, images, and documents can be attached directly to tasks and projects, keeping all project assets centralized and accessible. Attachments are visible to all followers and are stored in the Cyllo Document management system, ensuring they remain available throughout the project lifecycle.
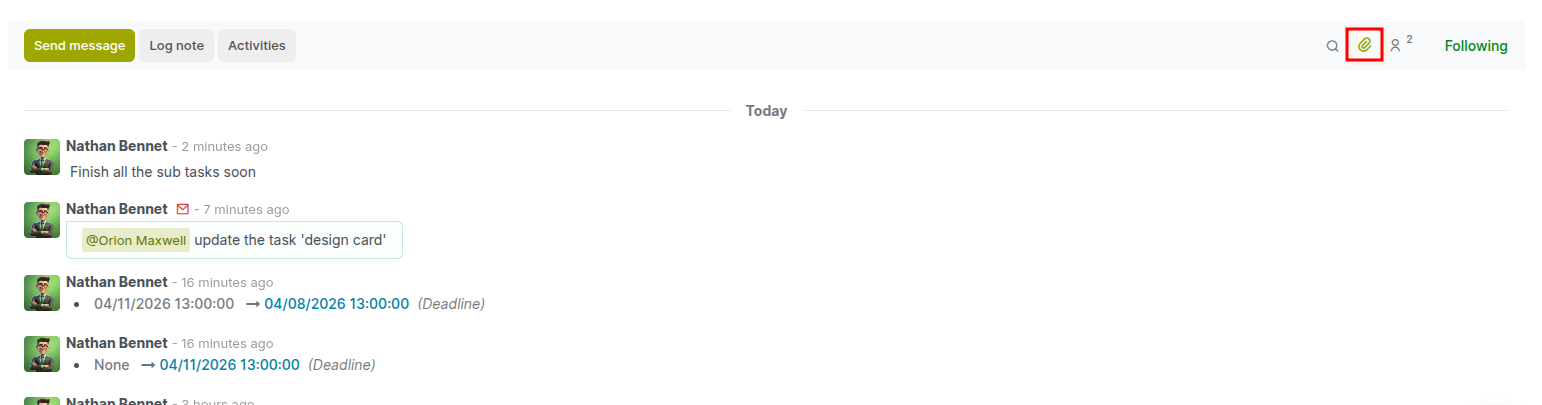
Fig 4.4 — attachments in a project
How to Attach a Document:
- Open the task or project
- Click the Attachment icon (paperclip) in the toolbar or drag files into the Chatter
- Select the file from your local device
- The attachment appears in the file list and is visible to all followers
5. Time Tracking & Timesheets
Cyllo Project provides built-in time tracking through the Timesheets feature, allowing users to record the time spent on tasks. When enabled in project settings, a Timesheets tab appears within each task, along with an Allocated Time indicator to compare planned versus actual effort.
5.1 Logging Time on Tasks
Team members can log time directly within a task using the Timesheets tab. Each entry records the work performed along with the time spent, providing clear visibility into task effort.
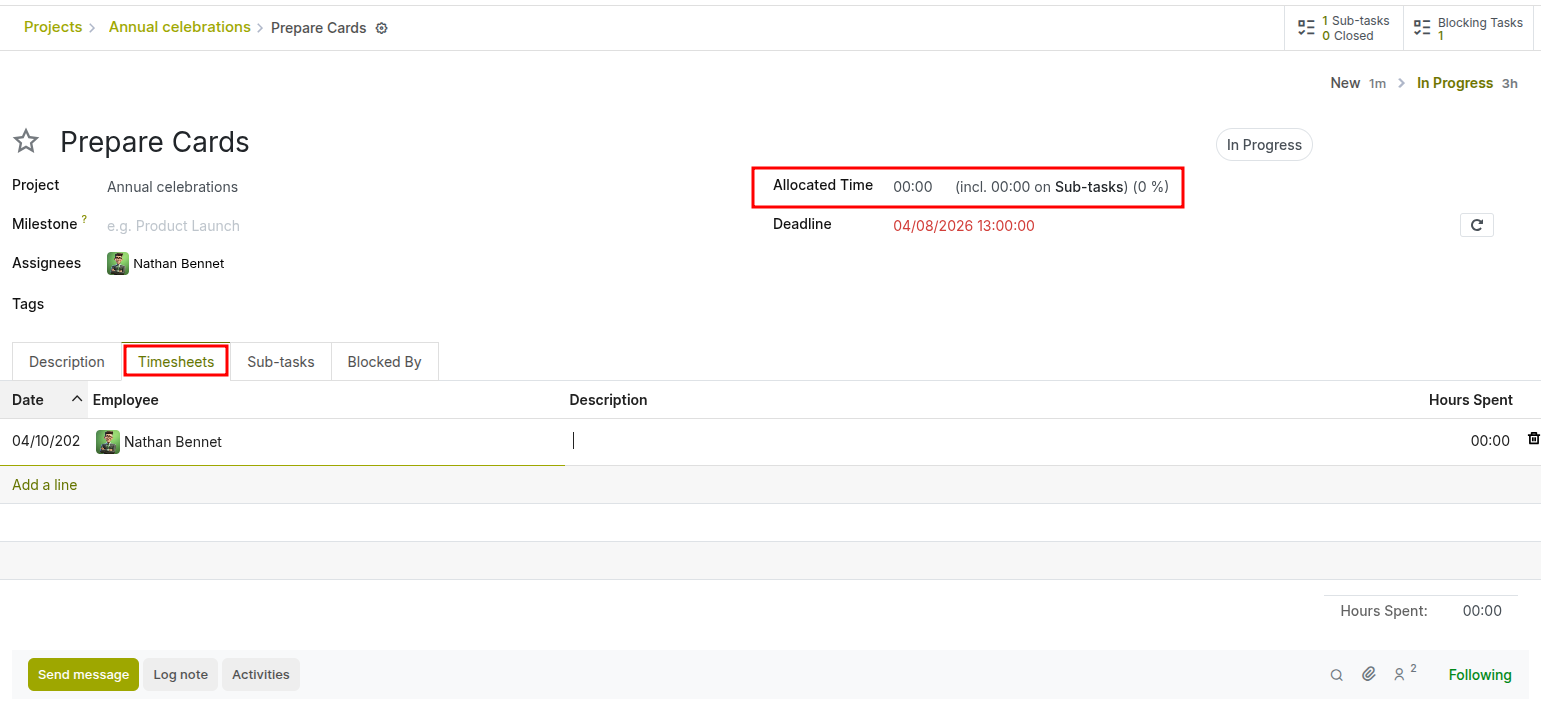
Fig 5.1 — specifying time in a project
Enabling Time Tracking:
- Go to the project Settings tab and enable Task Logs
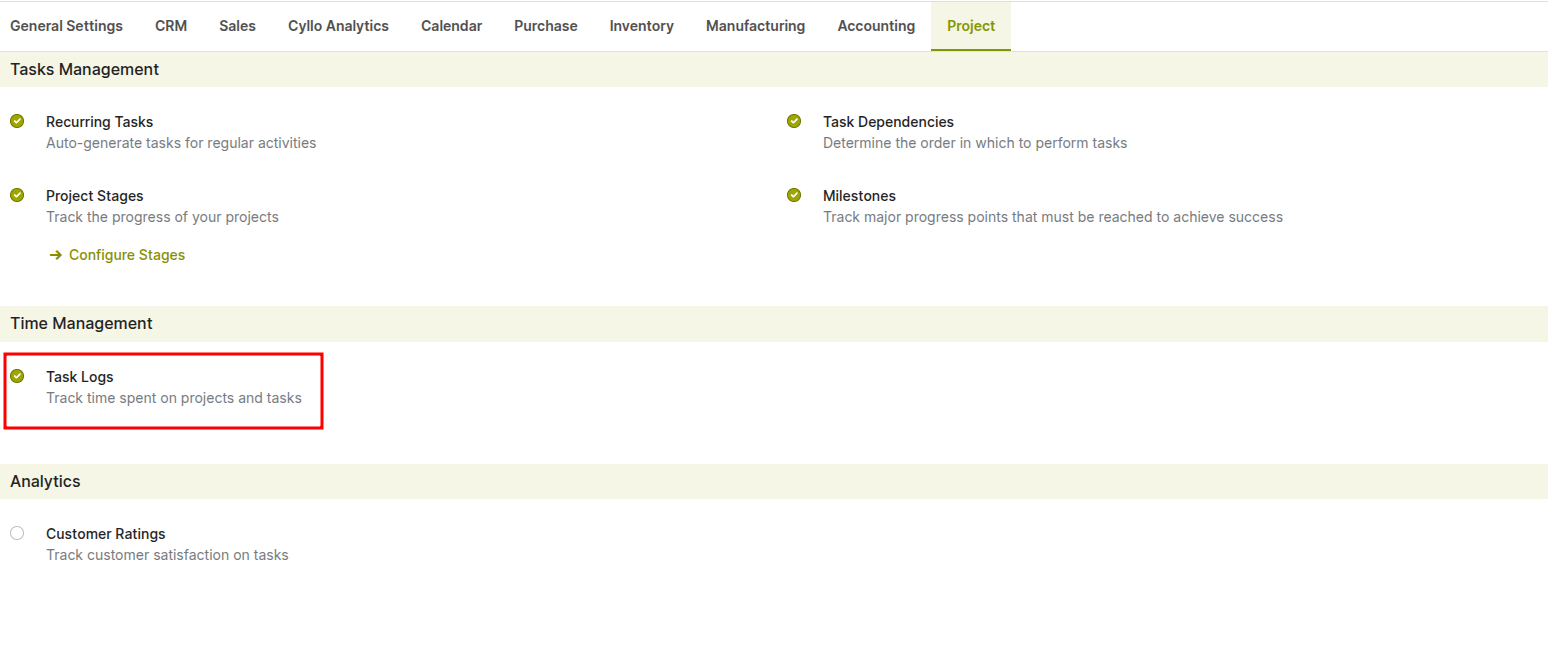
Fig 5.2 — enabling task logs from setting
How to Log Time on a Task:
- Open the task
- Navigate to the Timesheets tab
- Click Add a line
- Enter the Date, Description, and Hours Spent
- The Employee field is automatically filled based on the logged-in user
- Save the entry
5.2 Task Analysis
The Task Analysis report provides a visual overview of tasks across projects using charts and graphs. It helps managers track task distribution, monitor progress across stages (e.g., New, In Progress, Done), and analyze workload across different projects. The graph view displays task counts grouped by project and stage, making it easy to identify bottlenecks and workload imbalances.
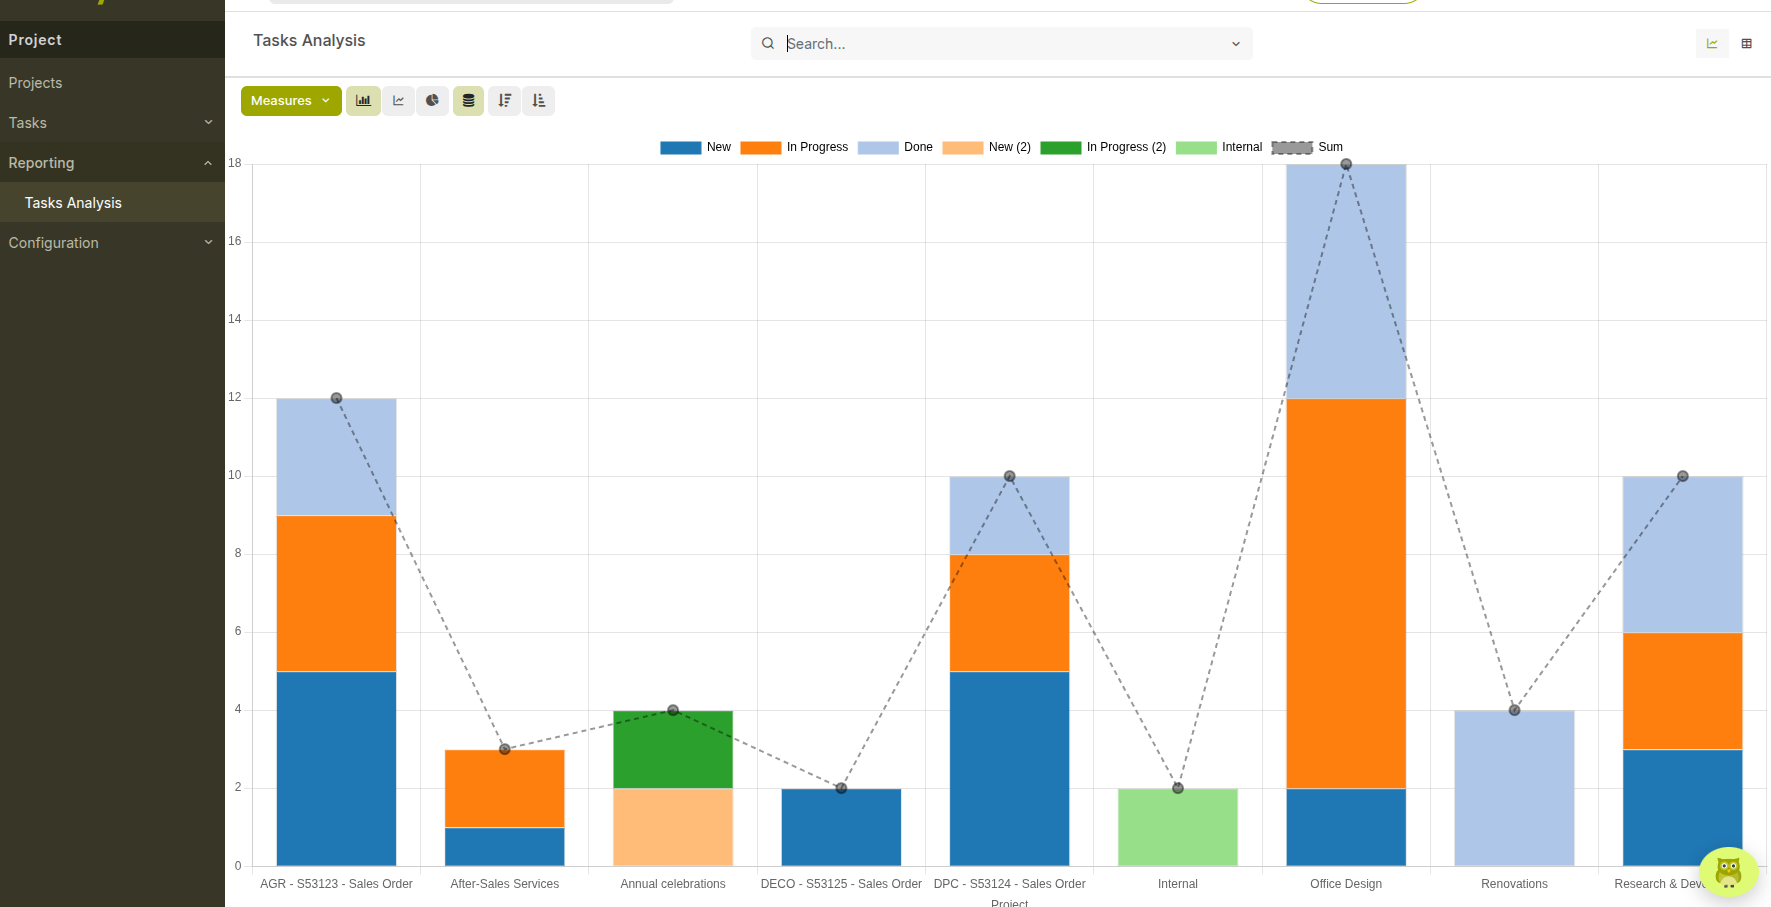
Fig 5.3 — Reporting of task analysis.
How to Access Task Analysis:
- Go to Project → Reporting → Tasks Analysis
- Use the Measures option to select metrics (e.g., task count)
- Apply Filters and Group By options to segment data by:
- Project
- Stage
- Assignee
- Switch between different views:
- Graph view (bar/line charts)
- Pivot view (for detailed analysis)
- List view (for raw data)
5.3 Billable Hours and Invoicing
When a project is configured as billable, hours logged on tasks are marked as billable and can be directly invoiced to the customer. This integration eliminates manual transfer of timesheet data to invoices and ensures billing accuracy.
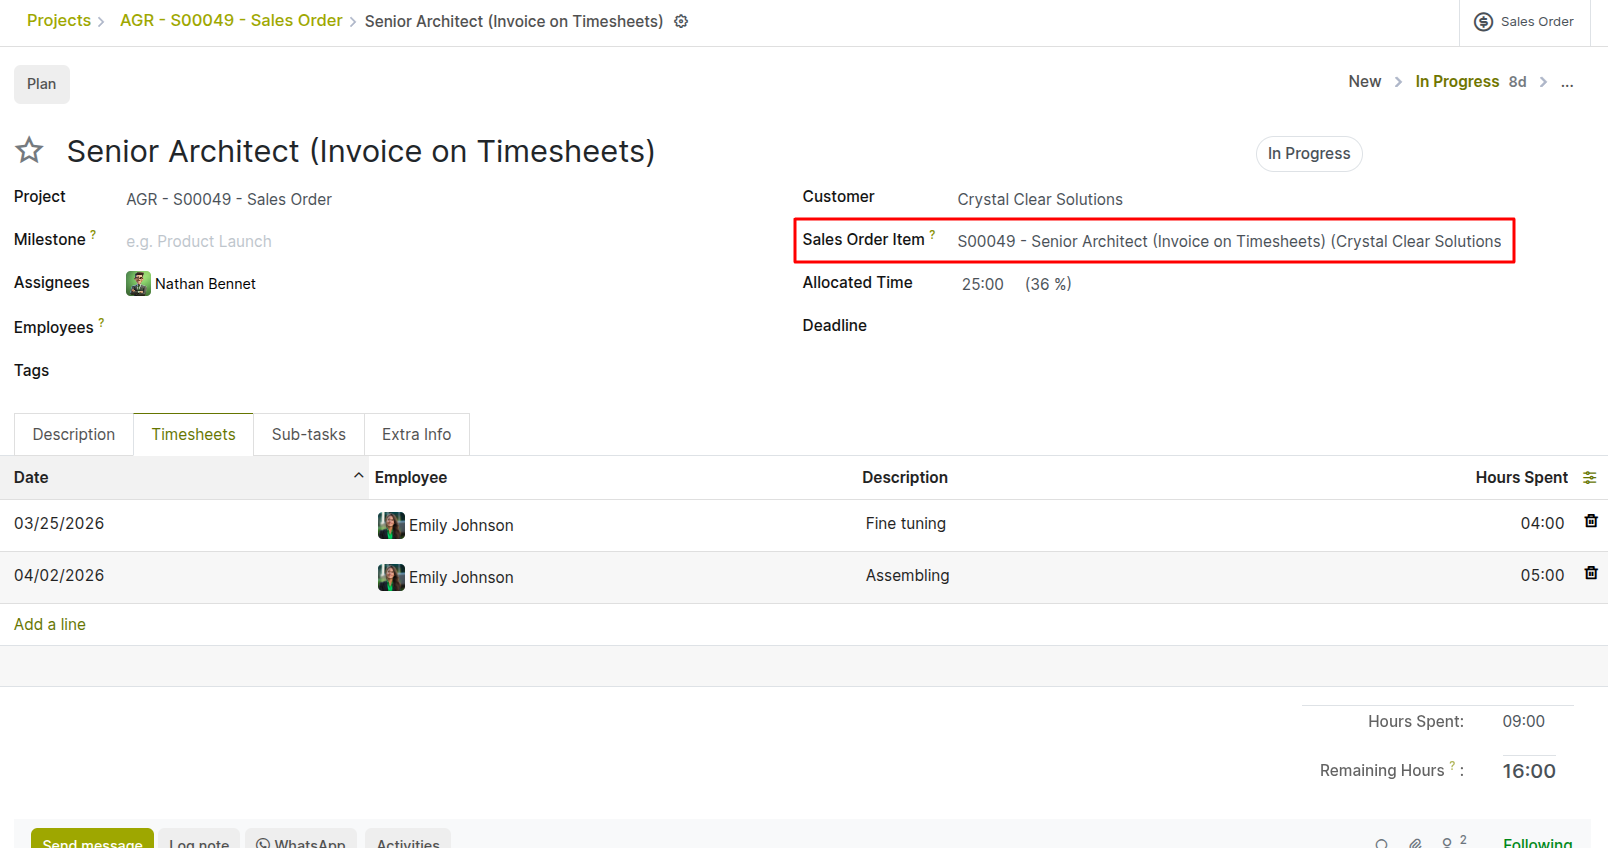
Fig 5.4 — Linking sale order invoiced on timesheet.
Enabling Billable Tasks:
- Go to the project Settings tab and enable Billable Tasks
- Set ‘Sales Order Item’ as the service product sale order line for the selected customer (Product in the line should be service type and Invoicing Policy: ‘Based on Timesheets’)
How to Invoice Billable Hours:
- Go to Project → Projects → open the billable project
- Open any task and add a line in Timesheet tab based on work
- Cyllo populates the sale order lines delivered quantity from logged timesheet hours
- Review and create invoice for that sale order after project completion.
Note
The billing rate per hour is configured on the product linked to the project service or set directly on the timesheet line.

Fig 5.5 — Linked Sale order with billable task lines
6. Reporting & Analytics
Cyllo Project provides reporting tools that help monitor task progress, analyze workload distribution, and track project performance. These reports are based on real-time data and support filtering, grouping, and multiple visualization formats.
6.1 Tasks Analysis
The Tasks Analysis report provides a comprehensive overview of tasks across all projects. It allows users to analyze task distribution, progress across stages, and workload allocation. The report can be viewed in graph, pivot, or list formats, making it flexible for both high-level insights and detailed analysis.
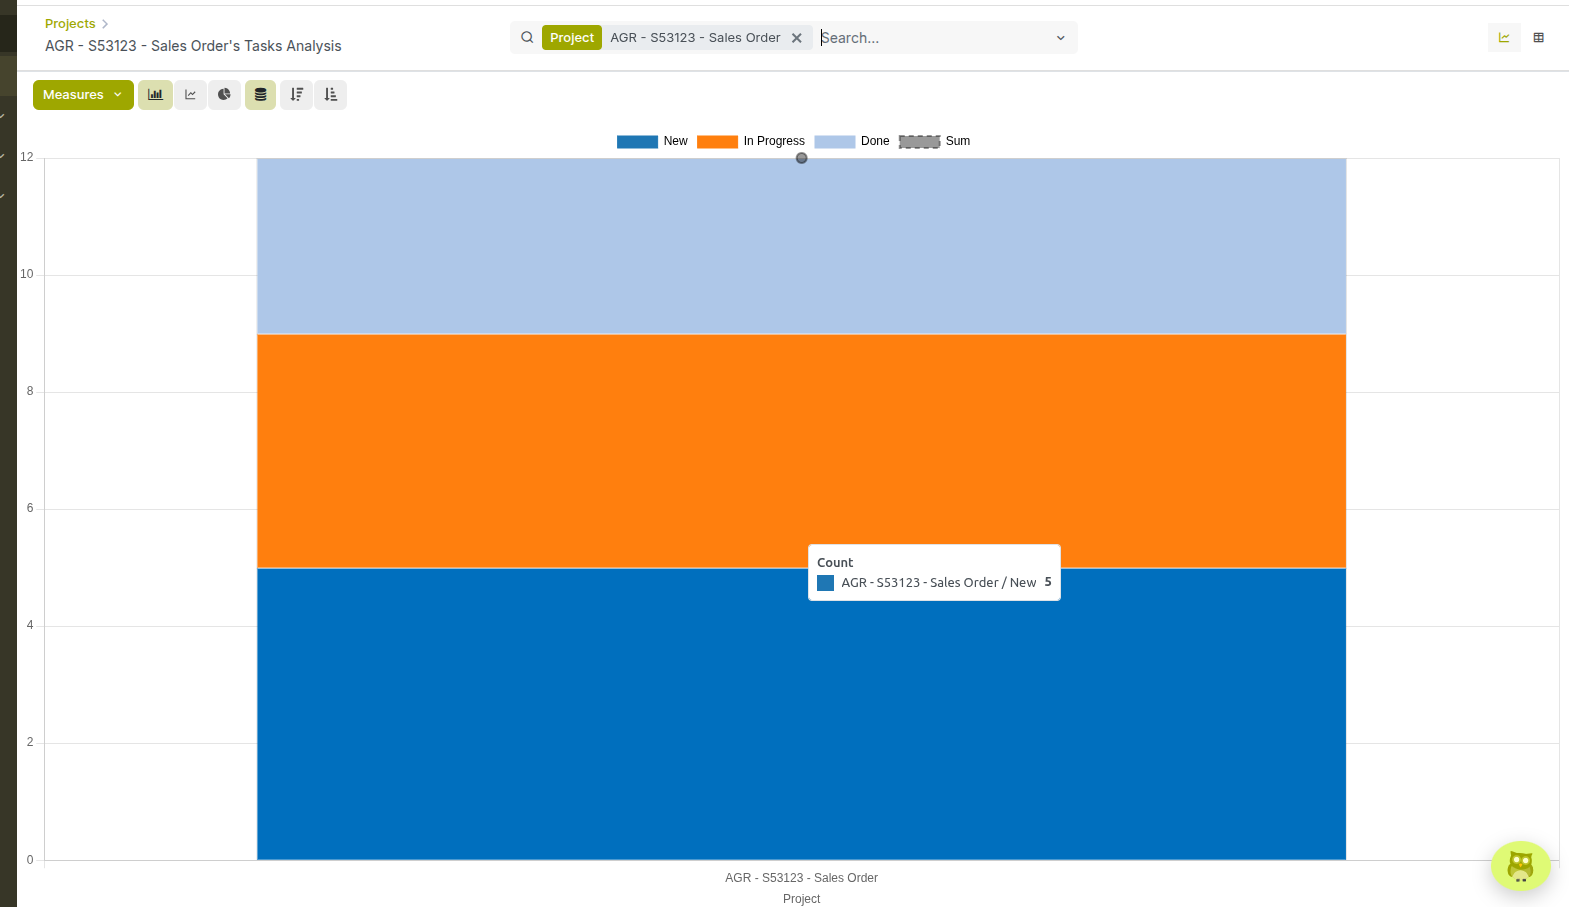
Fig 6.1 — Task analysis report.
How to Access the Project Overview:
- Go to Project → Reporting → Overview
- Use the search bar to filter by project manager, customer, or tag
- Click a project card to drill into its task-level details
6.2 Project Updates
The Project Updates view provides a centralized dashboard to track the overall status and progress of a project. It allows teams to record updates, monitor key metrics, and share progress with stakeholders. This view displays a summary of project performance, including task progress, timesheets, extra time, and related sales data.
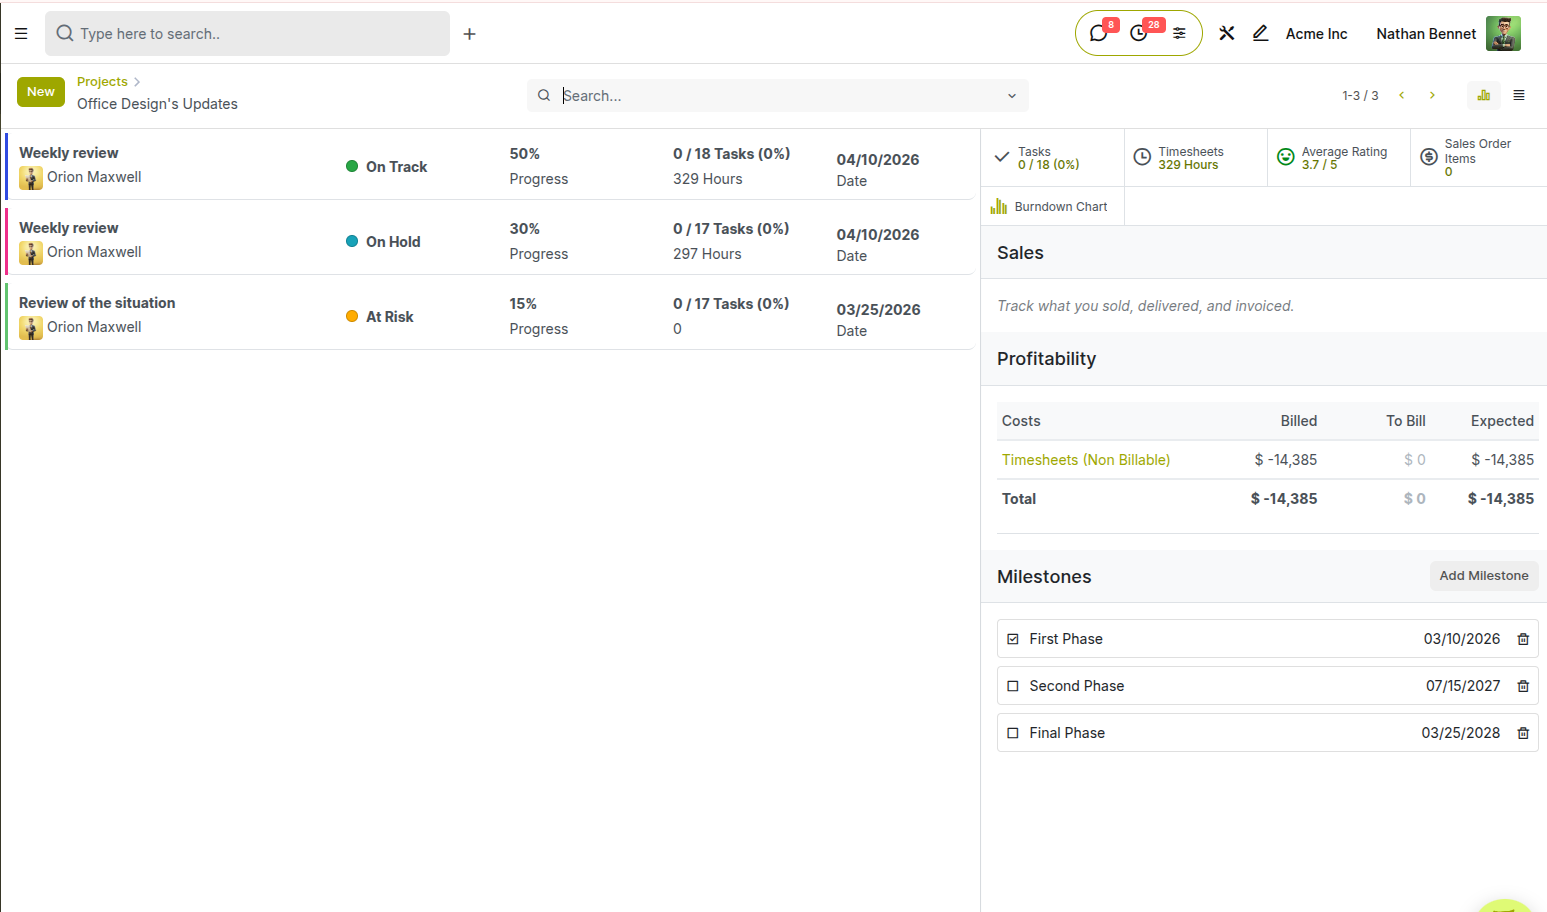
Fig 6.2 — Dashboard view of project
Key Elements in Project Updates:
- Updates Timeline: Displays project updates created by users. If no updates exist, a prompt is shown to create one.
- Progress Indicators: Visual indicators showing project status (e.g., On Track, Off Track, Done) and completion percentages.
- Task Summary: Displays the number of completed vs total tasks (e.g., 1 / 12 tasks).
- Timesheets Overview: Shows total logged hours compared to planned hours (e.g., 285 / 85 Hours).
- Extra Time Indicator: Highlights overtime or excess logged hours.
- Sales & Profitability Section: Displays related Sales Order Items, including:
- Delivered hours
- Invoiced hours
- Burndown Chart Access: Quick access to the burndown chart directly from this dashboard.
How to Access Project Updates:
- Go to Project → Projects
- Click the three-dot menu (⋮) on a project card
- Select Project Updates
How to Create a Project Update:
- Click the New button in the Project Updates view
- Enter the update details (status, progress, notes)
- Save to record the update

Fig 6.3 — Creating a new project update
6.3 Burndown Chart
The Burndown Chart provides a visual representation of task progression over time within a project. It helps teams track how work is evolving across different stages and assess whether progress is moving as expected. The chart displays task counts over time, grouped by stages such as New, In Progress, and Done, allowing users to monitor how tasks transition through the workflow.
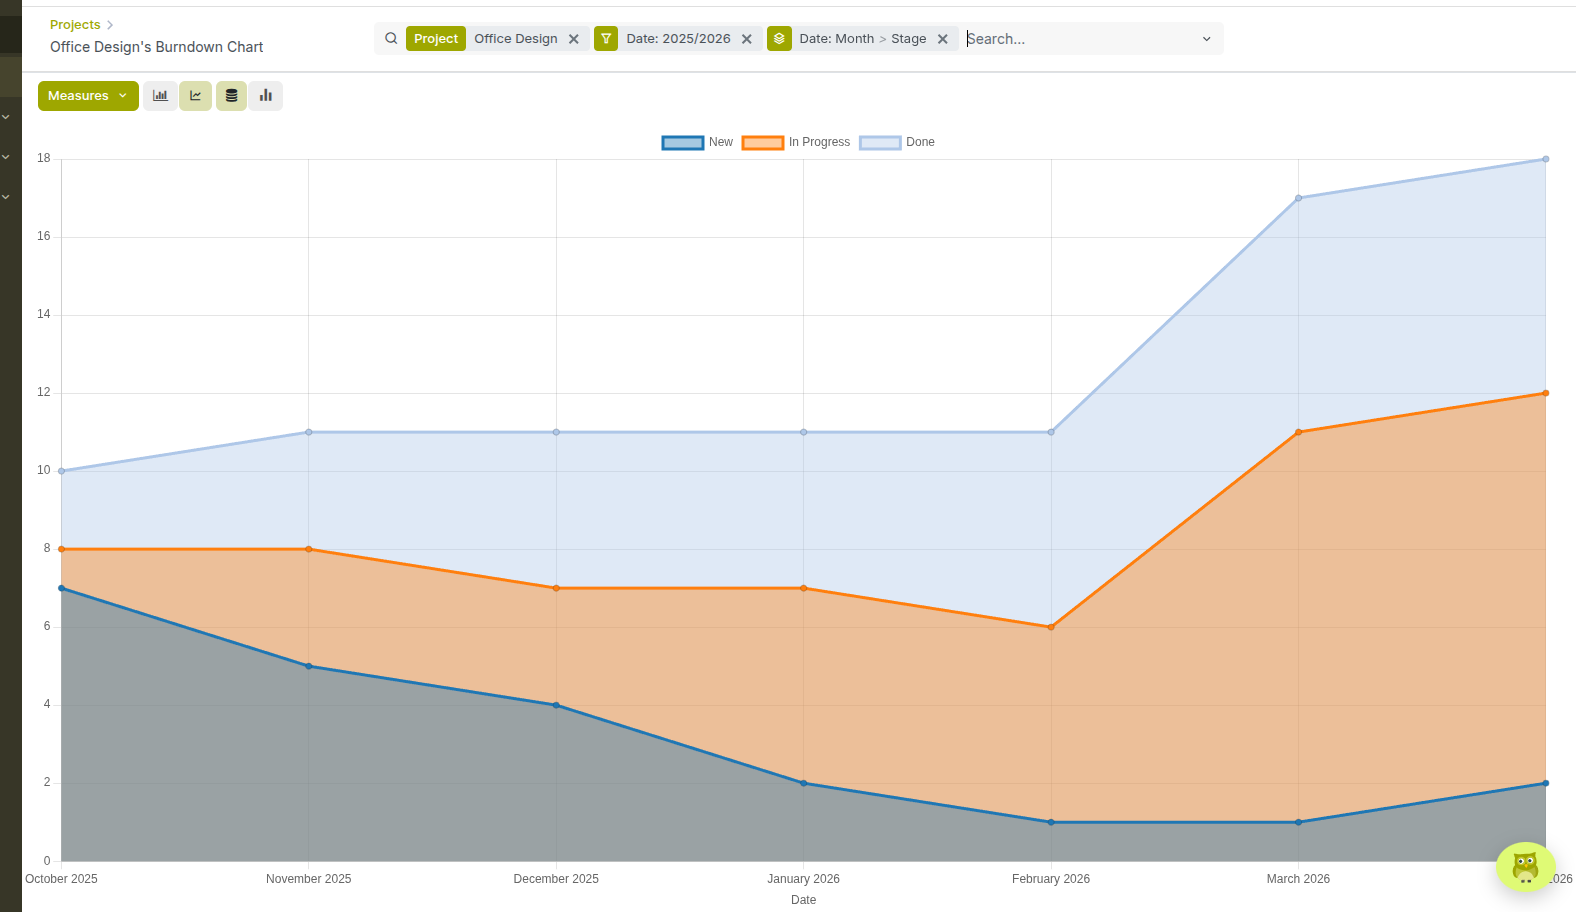
Fig 6.4 — Burndown chart
Key Elements in the Burndown Chart:
- X-axis (Time): Displays the timeline (e.g., months)
- Y-axis (Tasks): Represents the number of tasks
- Stage-wise Visualization: Tasks are grouped and color-coded by stages:
- New
- In Progress
- Done
- Stacked Area/Line Graph: Shows how tasks move between stages over time
- Filters & Grouping: Options like Date, Project, and Stage can be applied to customize the view
How to Access the Burndown Chart:
- Go to Project → Projects
- Click the three-dot menu (⋮) on a project card
- Select Burndown Chart
How to Use the Burndown Chart:
- Use the Filters (e.g., Date range) to analyze a specific period
- Group data by Stage to track workflow progression
- Switch between graph views using the icons (bar, line, stacked)
- Use Measures to adjust what is being analyzed (e.g., task count)
7. Configuration & Settings
This section covers the configuration options available to project administrators and managers, including stage setup, tags, customer ratings, and access rights. Proper configuration ensures that each project is structured to match the team's workflow and governance requirements.
7.1 Stages Configuration
Stages define the workflow that tasks follow within a project, such as To Do, In Progress, Done, and Canceled. These stages help teams organize tasks and track their progress visually in the Kanban view. Stages are managed from the configuration menu and can be reused across projects, depending on setup.
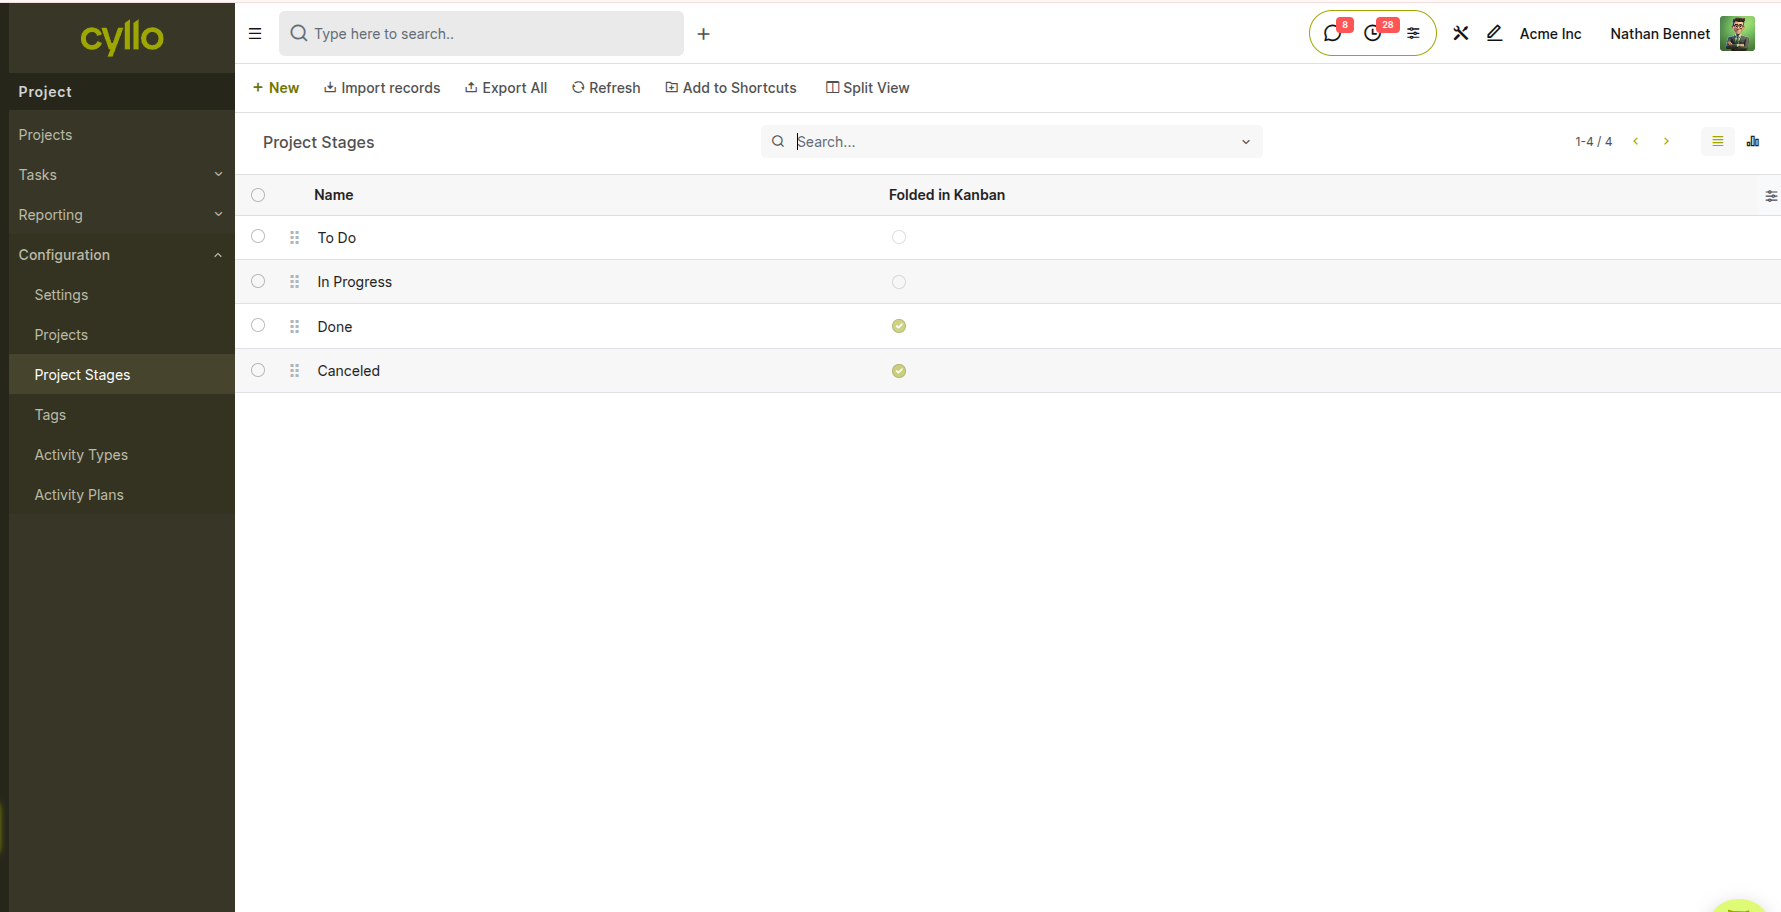
Fig 7.1 — List view of stages configured
How to Configure Project Stages:
- Go to Project → Configuration → Project Stages
- Click New to create a stage or select an existing one to edit
- Enter the Stage Name (e.g., To Do, In Progress, Done)
- Enable Folded in Kanban to collapse the stage column by default in the Kanban view
- Save the stage
7.2 Tags
Tags are free-form labels that can be applied to projects and tasks for flexible categorization and filtering. Teams use tags to group work by client, department, priority theme, or any other custom dimension that is not captured by the project structure alone.
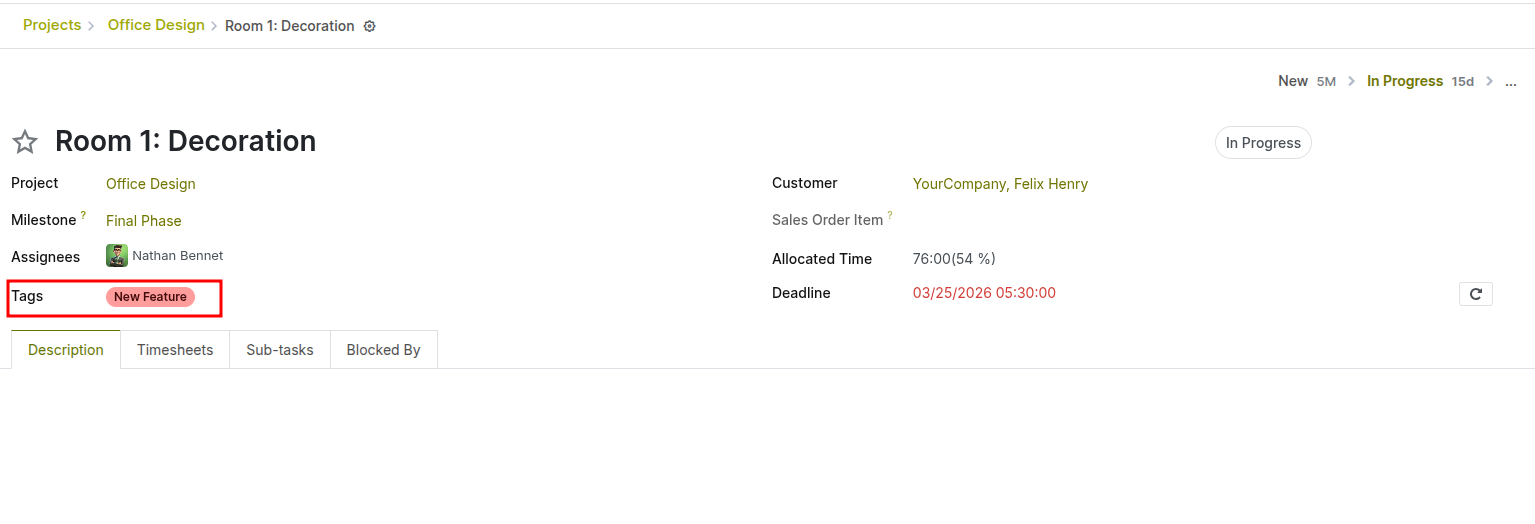
Fig 7.2 — Tags added to a task
How to Create and Assign Tags:
- Go to Project → Configuration → Tags → New
- Enter a tag name and assign a colour
- Save the tag
- To assign: open a project or task, click the Tags field, and select from the list
7.3 Access Rights and Visibility
Setting visibility in project:
- Go to Project → Projects
- Click the three-dot menu (⋮) on a project card
- Select Settings, open ‘settings’ tab
- Set ‘Visibility’ field
- Invited internal users: when following a project, internal users will get access to all of its tasks without distinction. Otherwise, they will only get access to the specific tasks they are following. A user with the project > administrator access right level can still access this project and its tasks, even if they are not explicitly part of the followers.
- All internal users: all internal users can access the project and all of its tasks without distinction.
- Invited portal users and all internal users: all internal users can access the project and all of its tasks without distinction. When following a project, portal users will get access to all of its tasks without distinction. Otherwise, they will only get access to the specific tasks they are following.
Note
When a project is shared in read-only, the portal user is redirected to their portal. They can view the tasks, but not edit them. When a project is shared in edit, the portal user is redirected to the kanban and lists views of the tasks. They can modify a selected number of fields on the tasks. In any case, an internal user with no project access rights can still access a task