

Cyllo Subscription Documentation
Introduction
Cyllo’s Subscription Module is a versatile solution designed to streamline subscription-based services for businesses of any size. It offers a user-friendly platform for managing recurring billing, automating subscription renewals, and tracking subscription performance effectively.
Through Cyllo's Subscription Module, businesses can customize subscription plans to align with their offerings and meet customer requirements efficiently. It enables easy adjustment of subscription terms, pricing models, and billing cycles, empowering businesses to adapt quickly to changing market dynamics.
Utilizing subscriptions is recognized as one of the most effective marketing strategies for nurturing positive client relationships. Subscriptions can significantly prolong client engagements through well-executed tactics. Clients tend to prefer purchasing from companies with whom they have ongoing subscriptions, fostering loyalty and encouraging repeat purchases. Leveraging an ERP system like Cyllo facilitates the systematic creation of new subscription plans and the optimization of renewal strategies.
1.1 Creating a Subscription Order
A Subscription Order is the primary record that tracks recurring service or product billing for a customer. It drives all renewal, invoicing, and lifecycle events. Steps:
- Navigate to Subscriptions > Subscriptions > New.
- Select the Customer from the dropdown.
- Choose a Subscription Plan (Sale Order Template) to auto-populate lines and settings.
- Add Order Lines: select subscription products with a configured recurrence period.
- Set the Start Date (defaults to today) and verify the Next Invoice Date.
- Click Confirm to move the order to the Active state.
- Optionally assign a Salesperson and Tags for reporting.
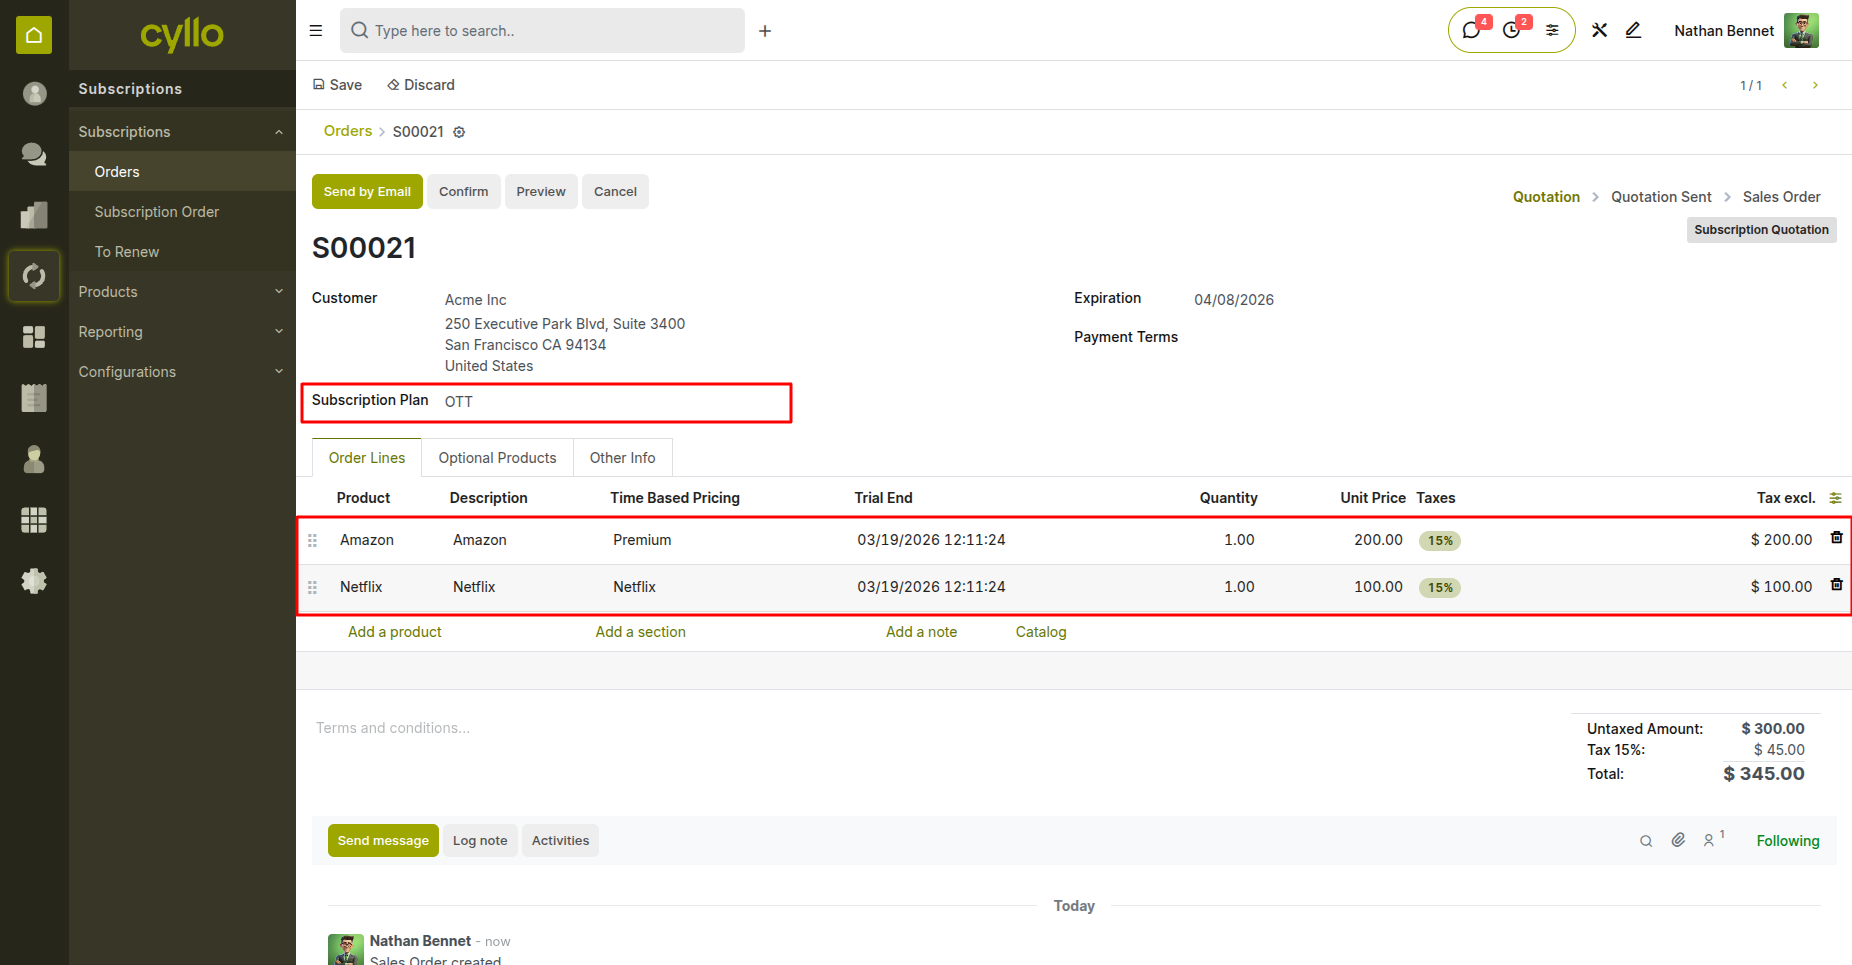
Fig 1.1 — New Subscription Order form with customer, plan, and order line fields
1.2 Creating a Subscription from a Sale Order
Regular quotations and sale orders can automatically generate a linked subscription when confirmed, allowing sales teams to use the standard sales flow. Steps:
- Create or open a Sale Order (Sales > Orders > Quotations > New).
- Add at least one subscription product to the order lines.
- Confirm the sale order by clicking Confirm.
- The system automatically creates a linked Subscription Order in the background.
- The subscription inherits the customer, products, and pricing from the sale order.
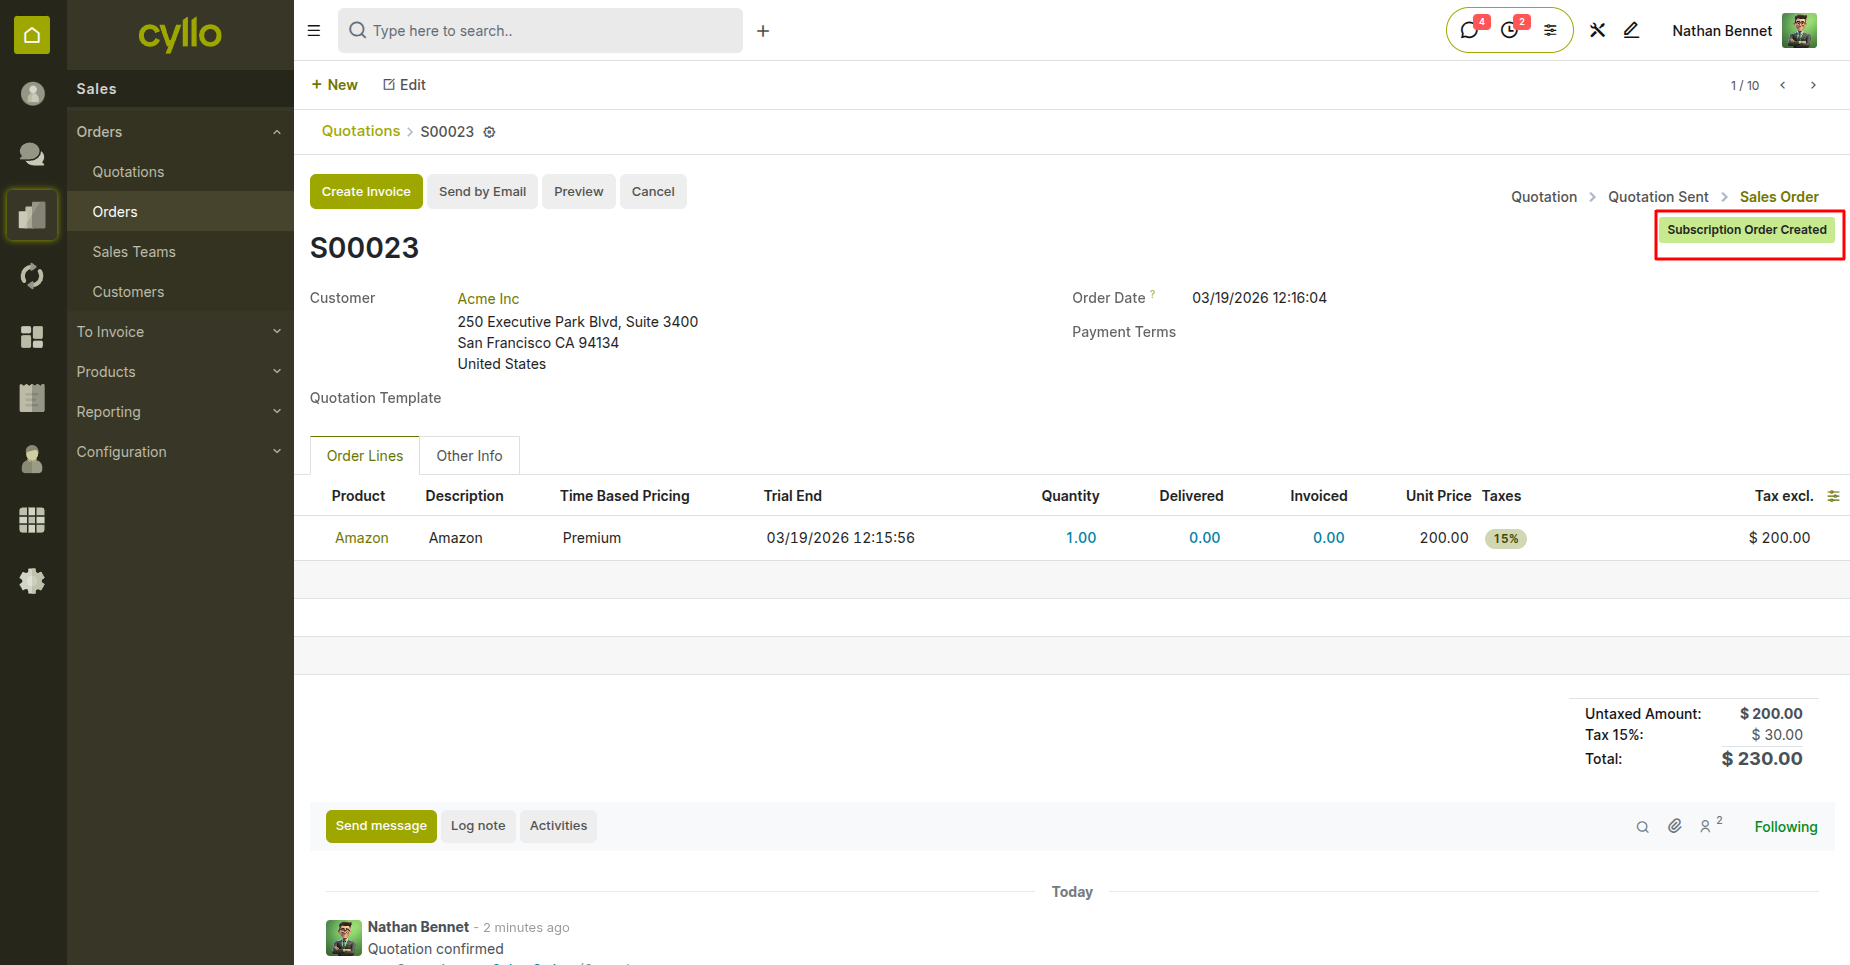
Fig 1.2 — Sale Order with subscription product lines and linked subscription smart button
1.3 Subscription States & Lifecycle
Each subscription progresses through a defined set of states. Understanding these states is essential for managing renewals, closures, and customer communication. States:
- New / Quotation : Order created but not confirmed.
- Active : Confirmed and currently running; invoicing is enabled.
- On Trial : Active but within the trial period (zero-amount invoice issued).
- To Renew : Renewal date has passed or is approaching; reminder may have been sent.
- Requested : Customer has initiated a renewal request from the portal.
- Churned : Subscription has been closed; no further invoicing.
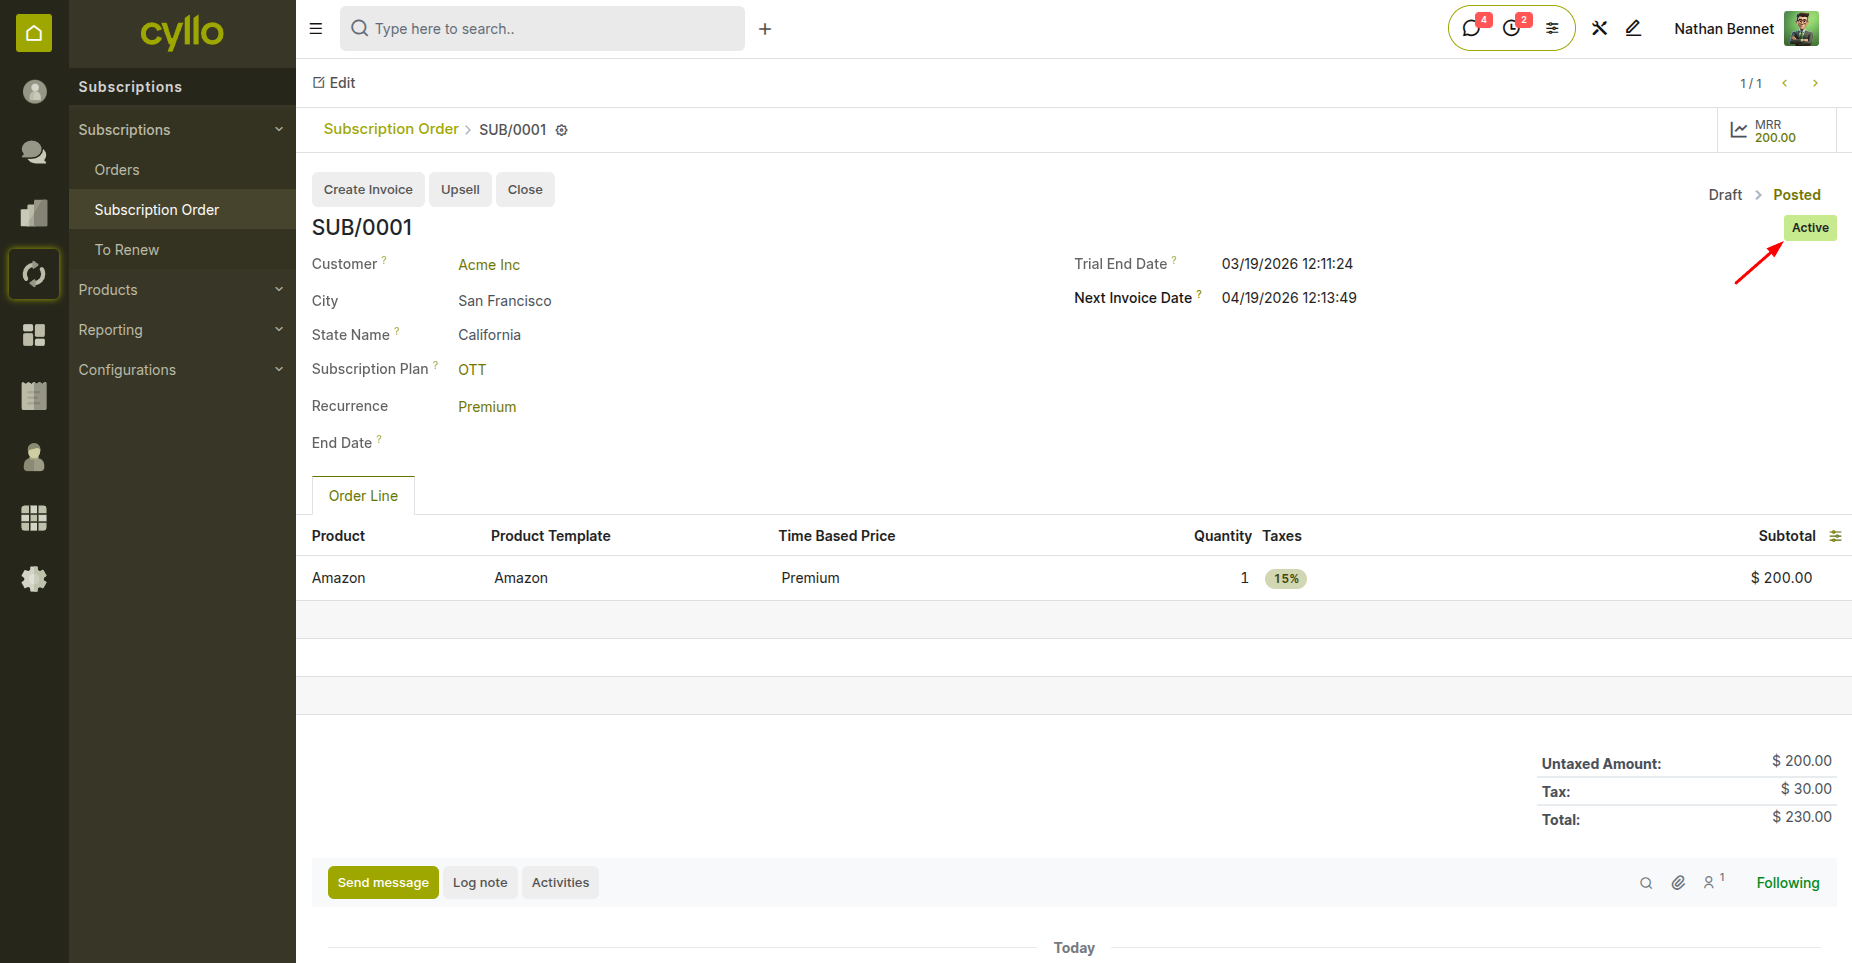
Fig 1.3 — Subscription order in active state.
1.4 Renewing a Subscription
Renewal extends the subscription for another billing period. It can be initiated by the system automatically, by a backend user, or by the customer through the portal. Steps:
- Open the subscription in To Renew state.
- Review the customer's current plan and products.
- Click the Renew button on the form view.
- A new child subscription order is created in Draft state for review.
- Confirm the child order to activate it and advance the renewal date.
- The parent order transitions to Churned upon successful renewal.
1.5 Upselling a Subscription
Upselling allows adding new products or upgrading quantities on an existing active subscription without creating a completely new order. Steps:
- Open the active subscription order.
- Click the Upsell button in the action toolbar.
- A new quotation is created with the existing subscription lines pre-populated.
- Add new products or increase quantities as needed.
- Confirm the upsell quotation to merge the new lines into the running subscription.
- The next invoice will include both original and upsold products.
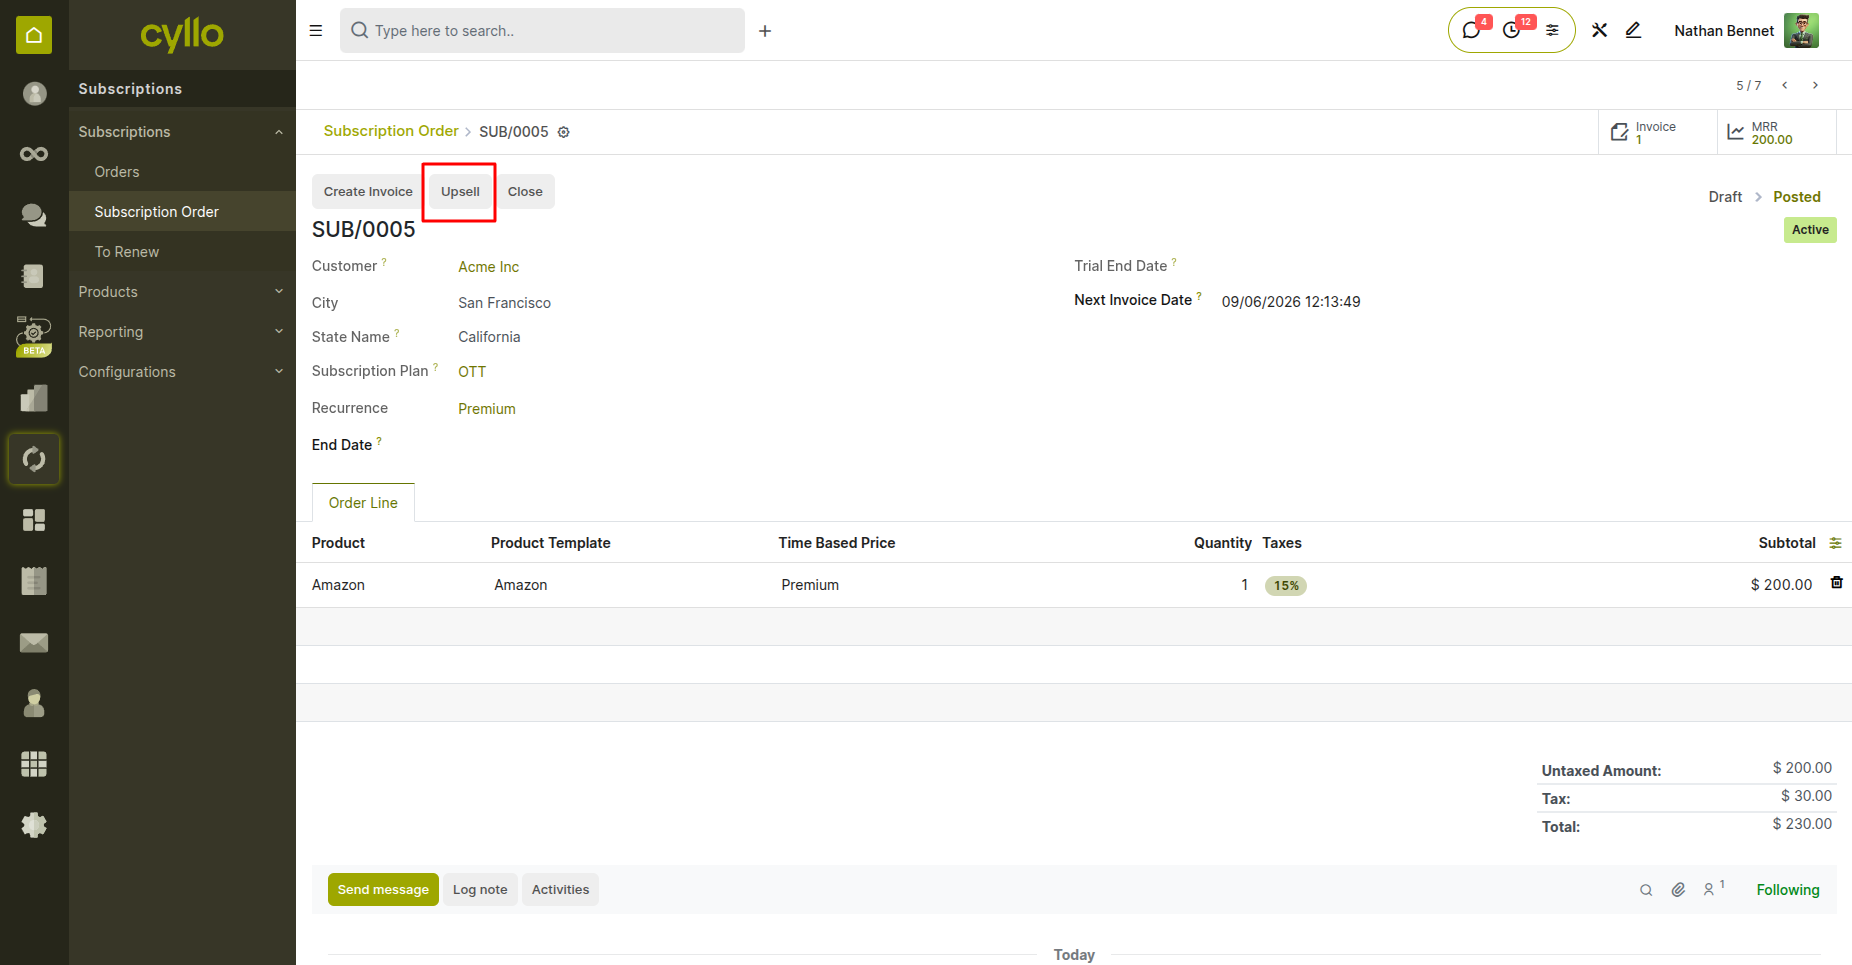
Fig 1.4 — Upsell quotation with existing subscription lines and new product additions
1.6 Closing / Churning a Subscription
Closing a subscription stops all future billing and marks the record as Churned. A close reason must be selected and is logged to the chatter. Steps:
- Open the active subscription.
- Click the Close button to open the Close Subscription wizard.
- Select a Close Reason from the list (or enter a custom reason if available).
- Click Confirm to apply the close.
- The subscription moves to Churned state immediately.
- A churn log entry is automatically posted to the message chatter.
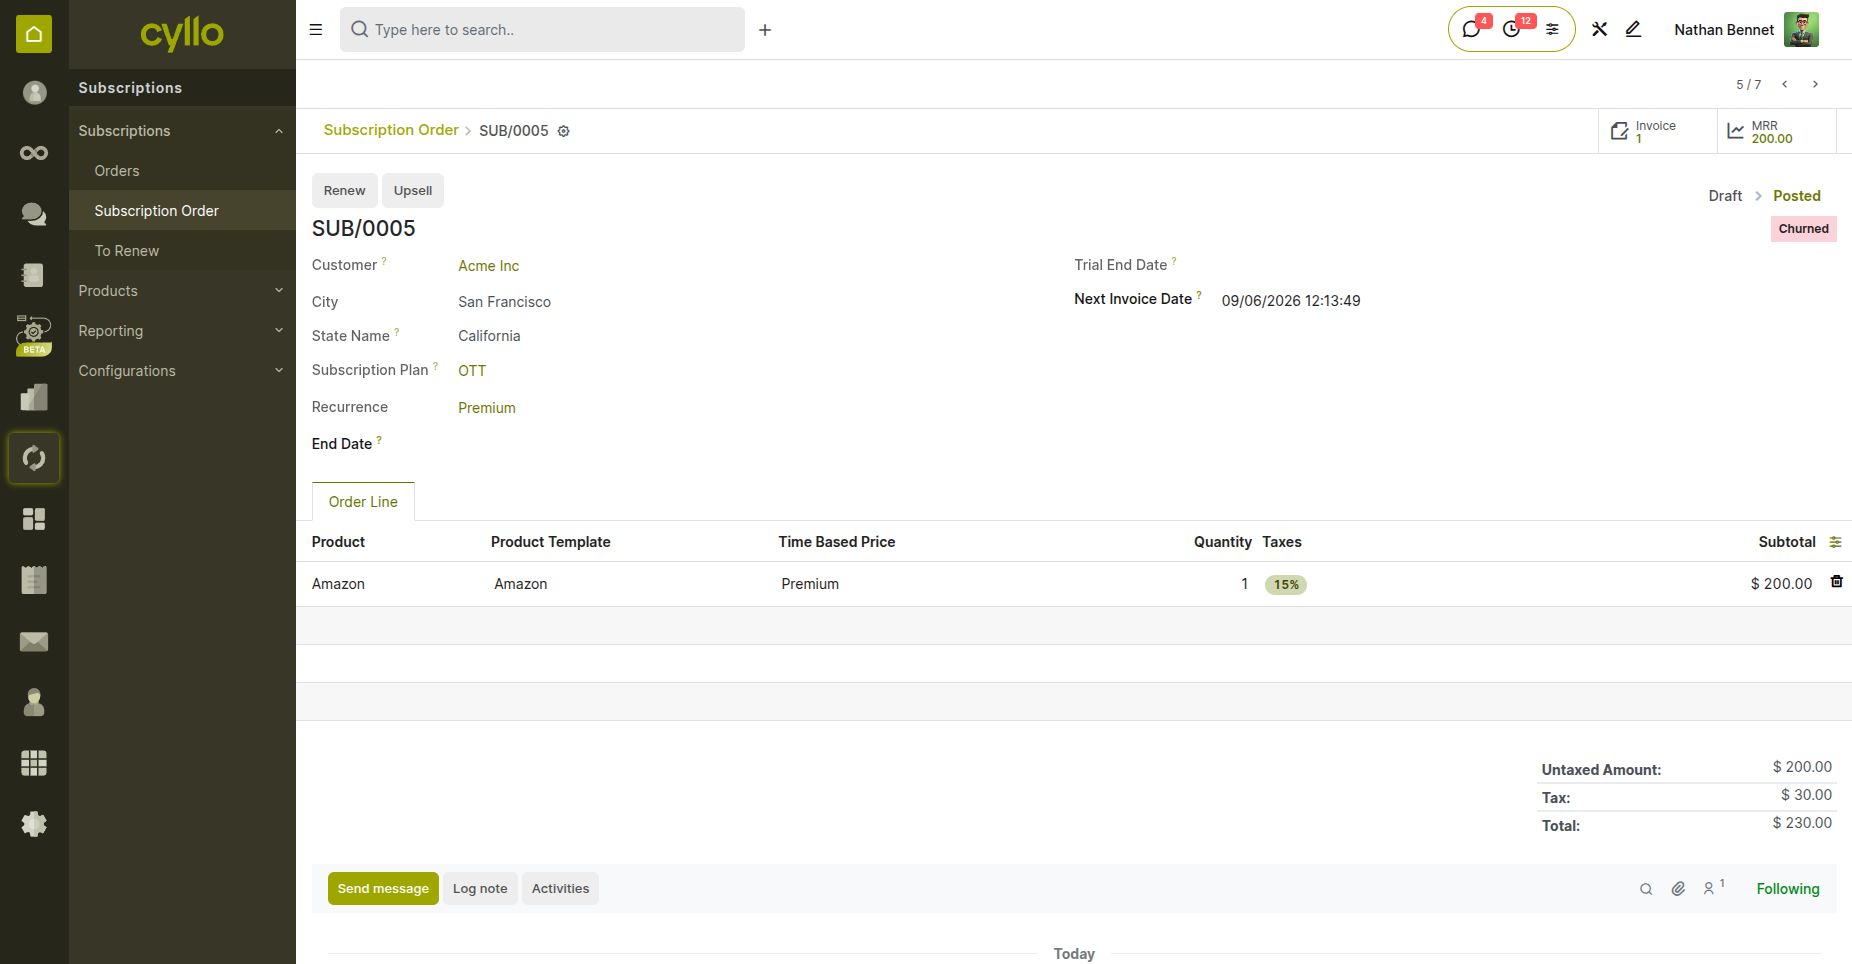
Fig 1.5 — Churned subscription
2. Subscription Plans
2.1 Creating a Subscription Plan
Subscription Plans (stored as Sale Order Templates) define the default configuration applied when a new subscription order is created. They standardize billing cycles, products, and customer permissions. Steps:
- Go to Subscriptions > Configuration > Subscription Plans > New.
- Enter a Plan Name (e.g., Monthly SaaS Basic).
- Set the Duration and Unit (Weeks / Months / Years).
- Add Order Line Templates: specify products and quantities.
- Configure Invoice Creation Mode, renewal and close flags.
- Optionally assign an Email Template for automated communications.
- Save the plan; it will now appear in the Subscription Plan dropdown on orders.
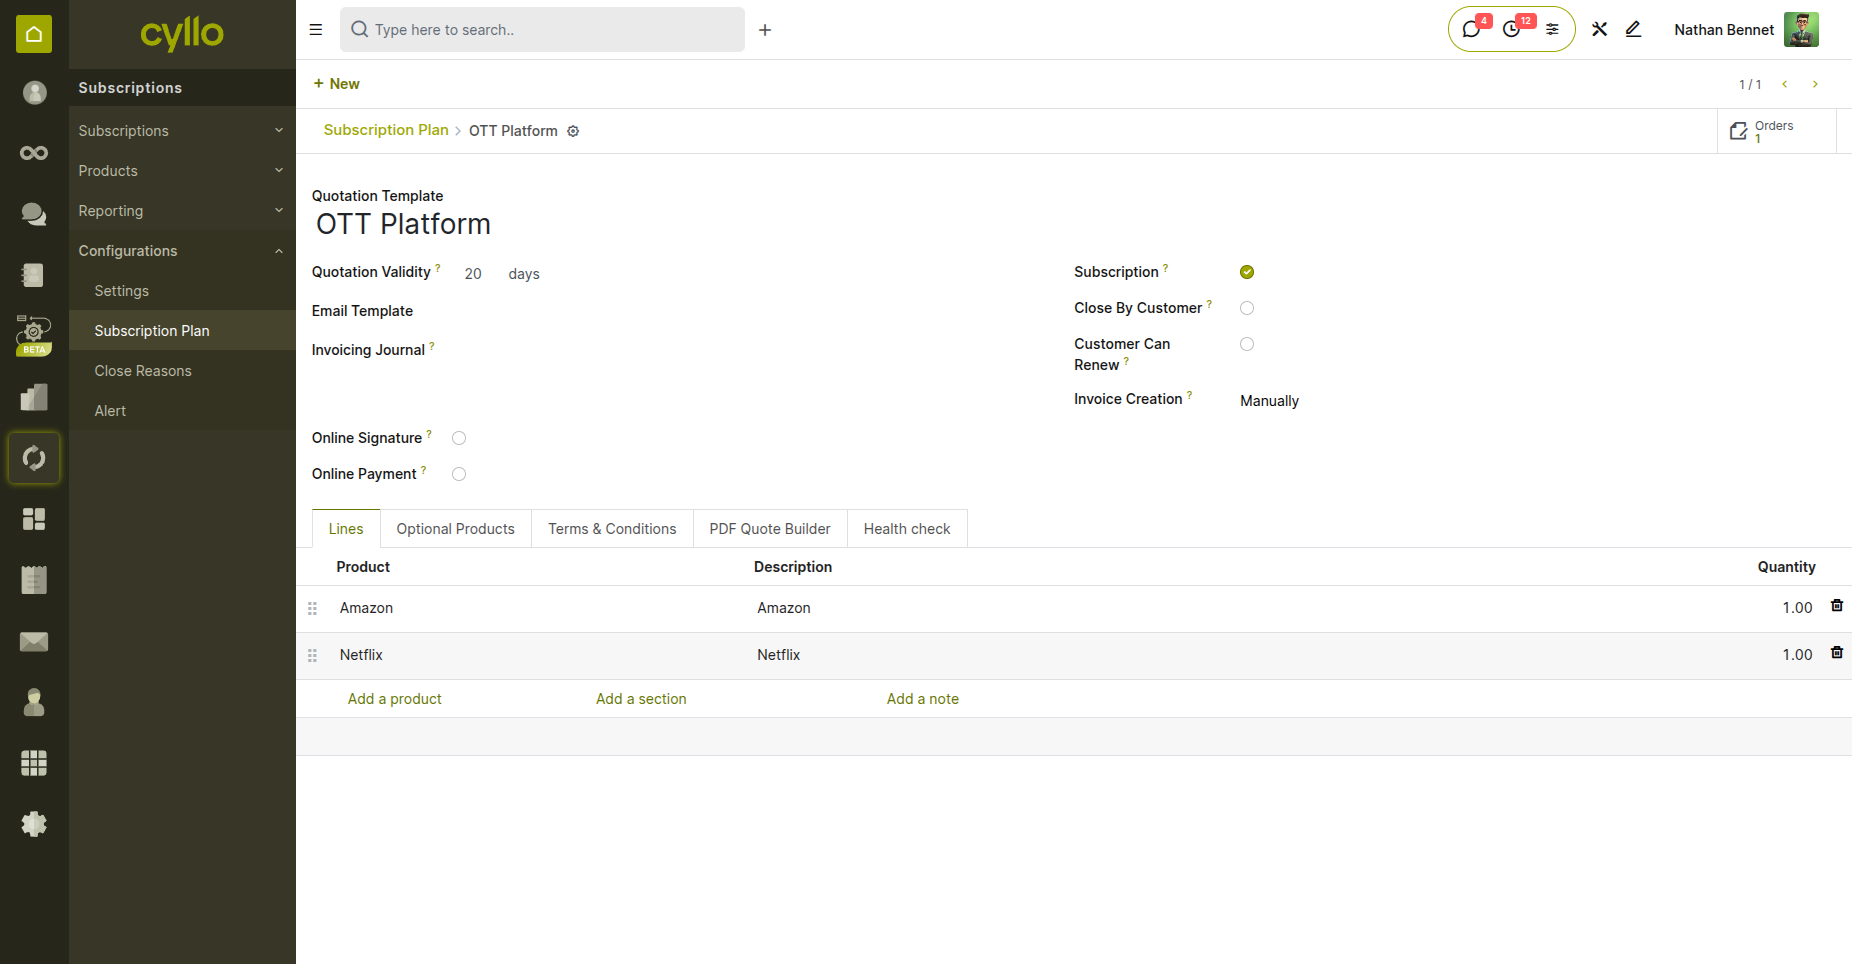
Fig 2.1 — Subscription Plan form
2.2 Plan Duration & Unit
The duration and unit define the billing cycle length. Every subscription created from this plan will inherit these values and use them to calculate the next invoice date. Details:
- Duration : A positive integer representing the cycle length.
- Unit : Weeks, Months, or Years.
- Example : Duration = 1, Unit = Month means monthly billing.
- Example : Duration = 3, Unit = Months means quarterly billing.
- Example : Duration = 1, Unit = Year means annual billing.
- The renewal date is calculated as: Start Date + (Duration x Unit).
Note
Changing the duration or unit on a plan does not retroactively update existing active subscriptions.

Fig 2.2 — Plan duration and unit fields showing monthly and annual billing examples
2.3 Invoice Creation Mode
This setting determines what happens when the automated cron job triggers invoicing for subscriptions linked to this plan. Modes:
- Manually : No invoice is auto-created; a user must create it manually.
- Draft : A draft invoice is created automatically but must be manually confirmed.
- Confirmed : Invoice is created and automatically confirmed (posted).
- Sent : Invoice is created, confirmed, and automatically emailed to the customer.
Note
The Sent mode requires a valid Email Template to be configured on the plan.
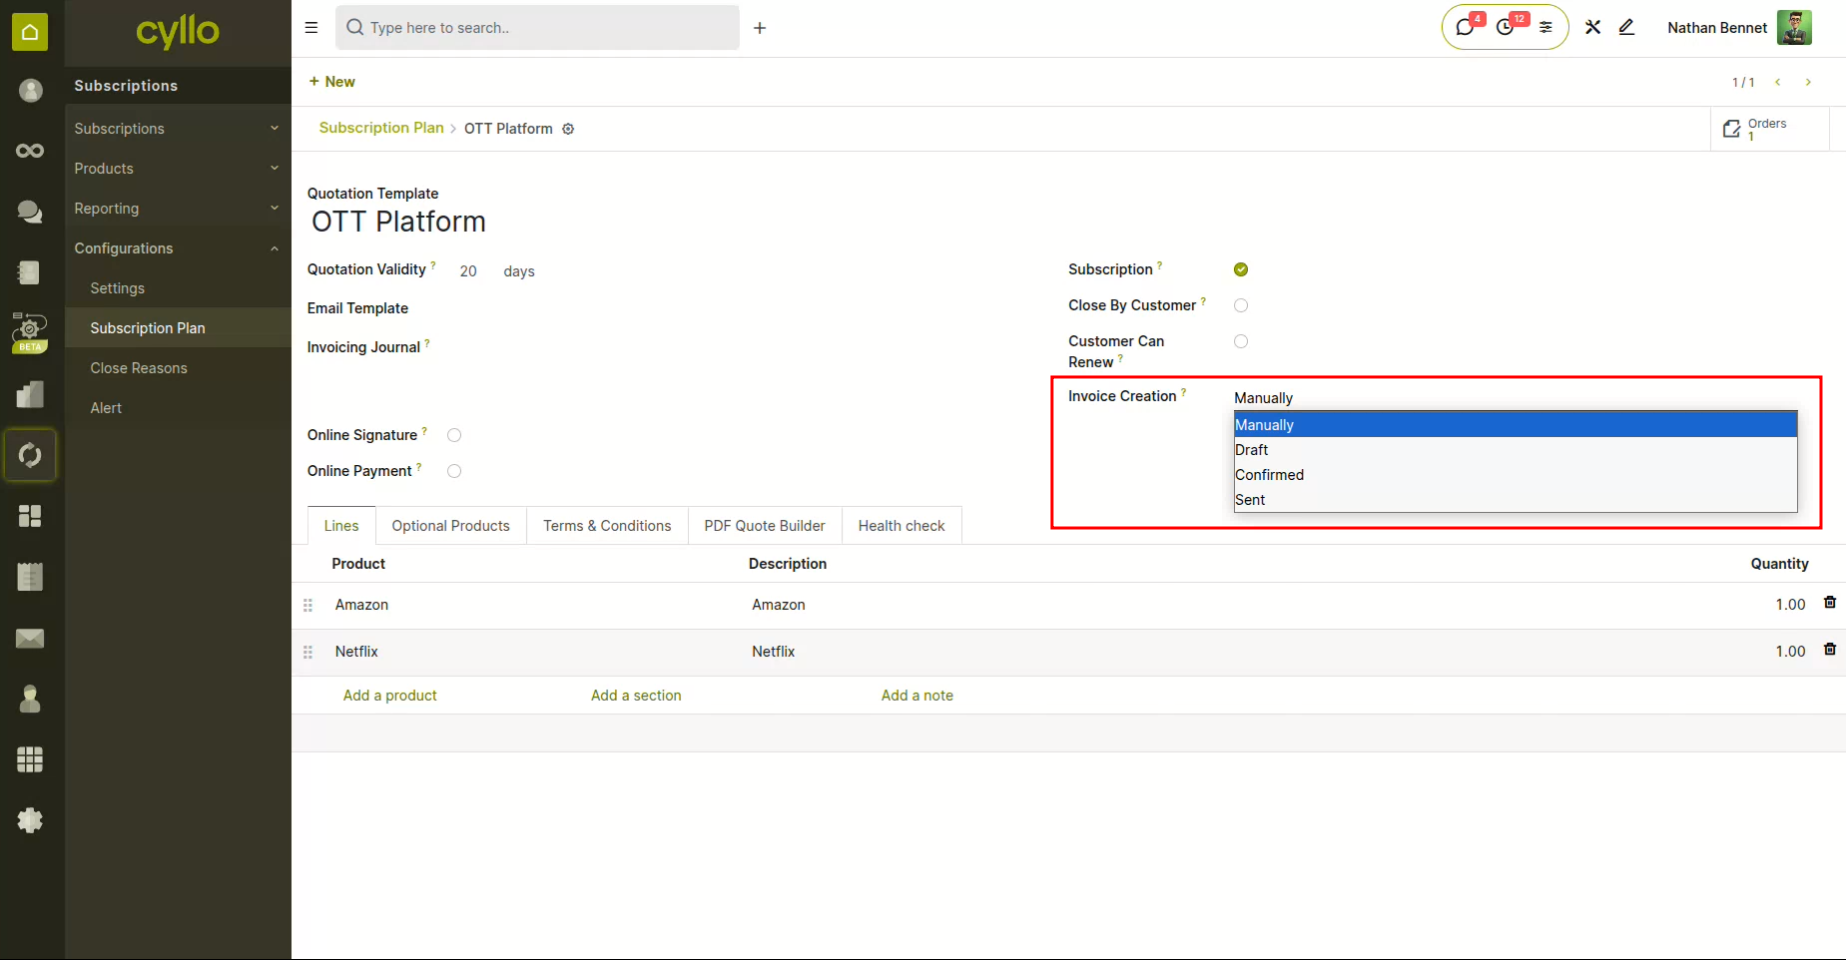
Fig 2.3 — Invoice Creation Mode dropdown on Subscription Plan form
2.4 Customer Can Renew Flag
This boolean flag on the subscription plan controls whether the customer sees and can use the Renew button on their portal subscription detail page. Steps:
- Open the Subscription Plan.
- Locate the Customer Can Renew checkbox.
- Enable it to allow portal-initiated renewals for subscriptions using this plan.
- Disable it to restrict renewals to backend users only.
- Changes take effect immediately for all subscriptions using this plan.
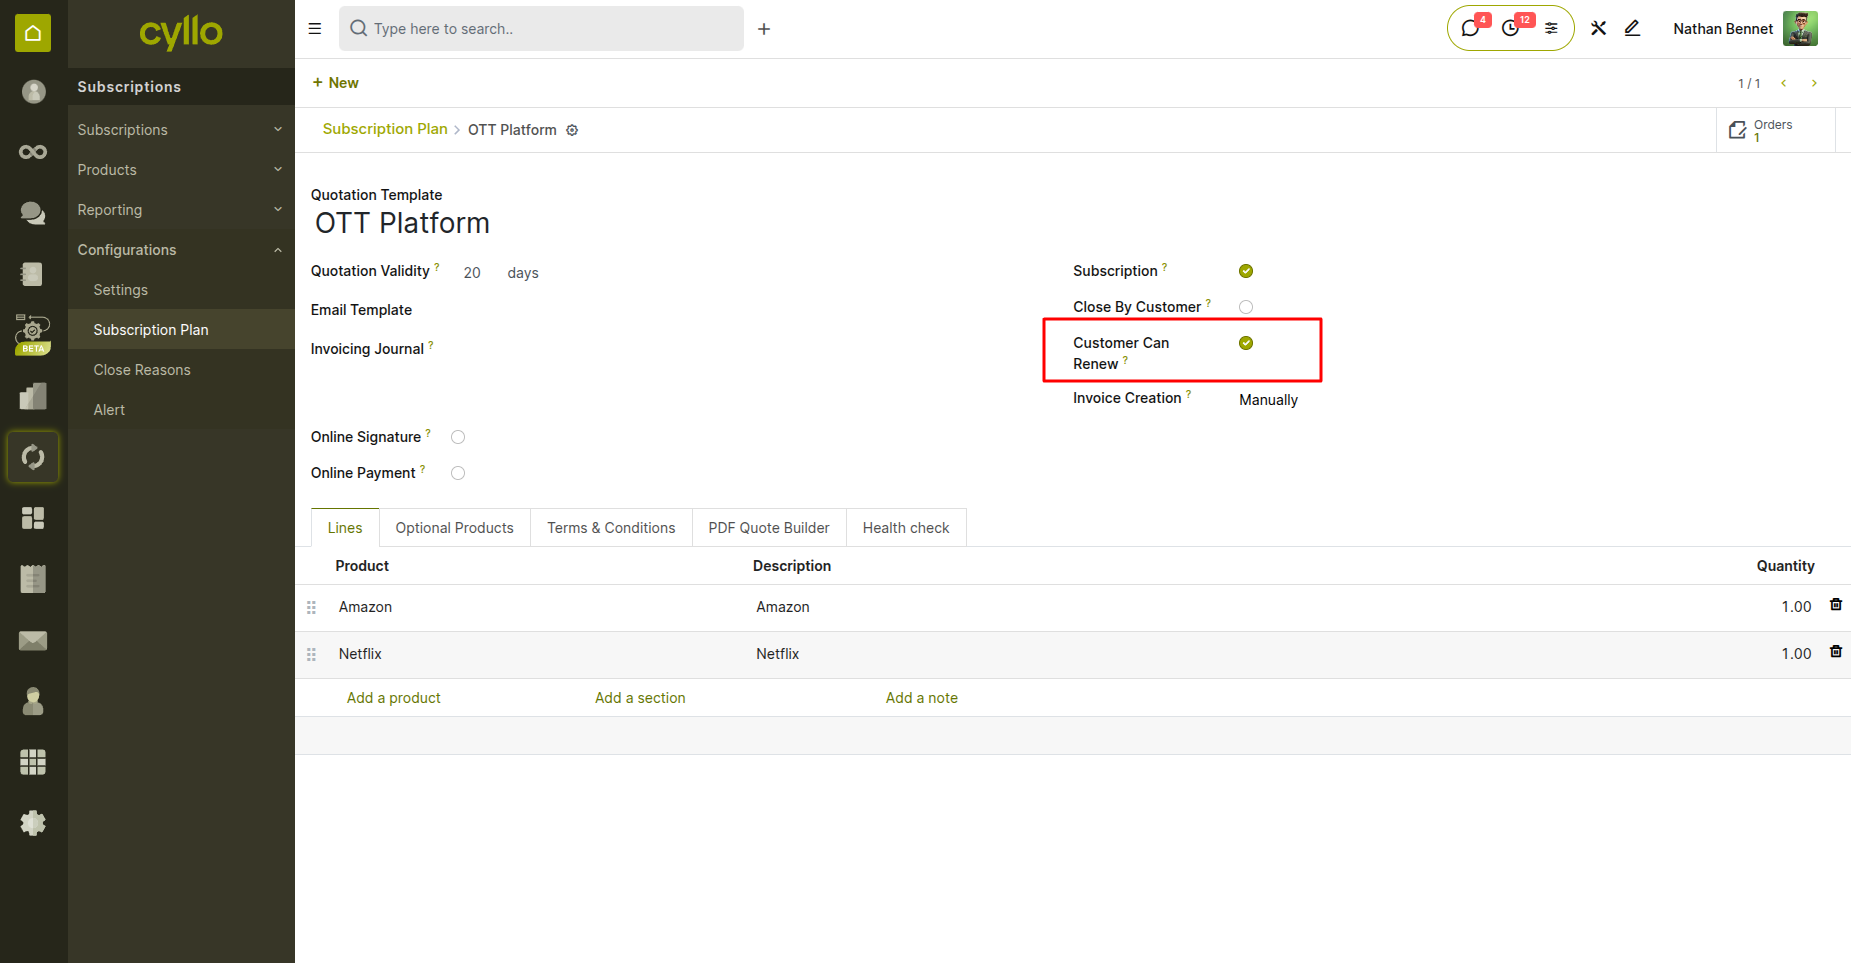
Fig 2.4 — "Customer Can Renew" boolean on Subscription Plan configuration
2.5 Customer Can Close Flag
Similar to the renewal flag, this controls whether customers can self-close their subscription directly from the portal. Steps:
- Open the Subscription Plan.
- Locate the Close by customer checkbox.
- Enable it to display the Close button on the customer portal.
- When closing, the customer must select or enter a close reason.
- The churn is logged automatically to the subscription chatter.
Note
Even when enabled, only Close Reasons marked as Available in Portal will be shown to the customer.
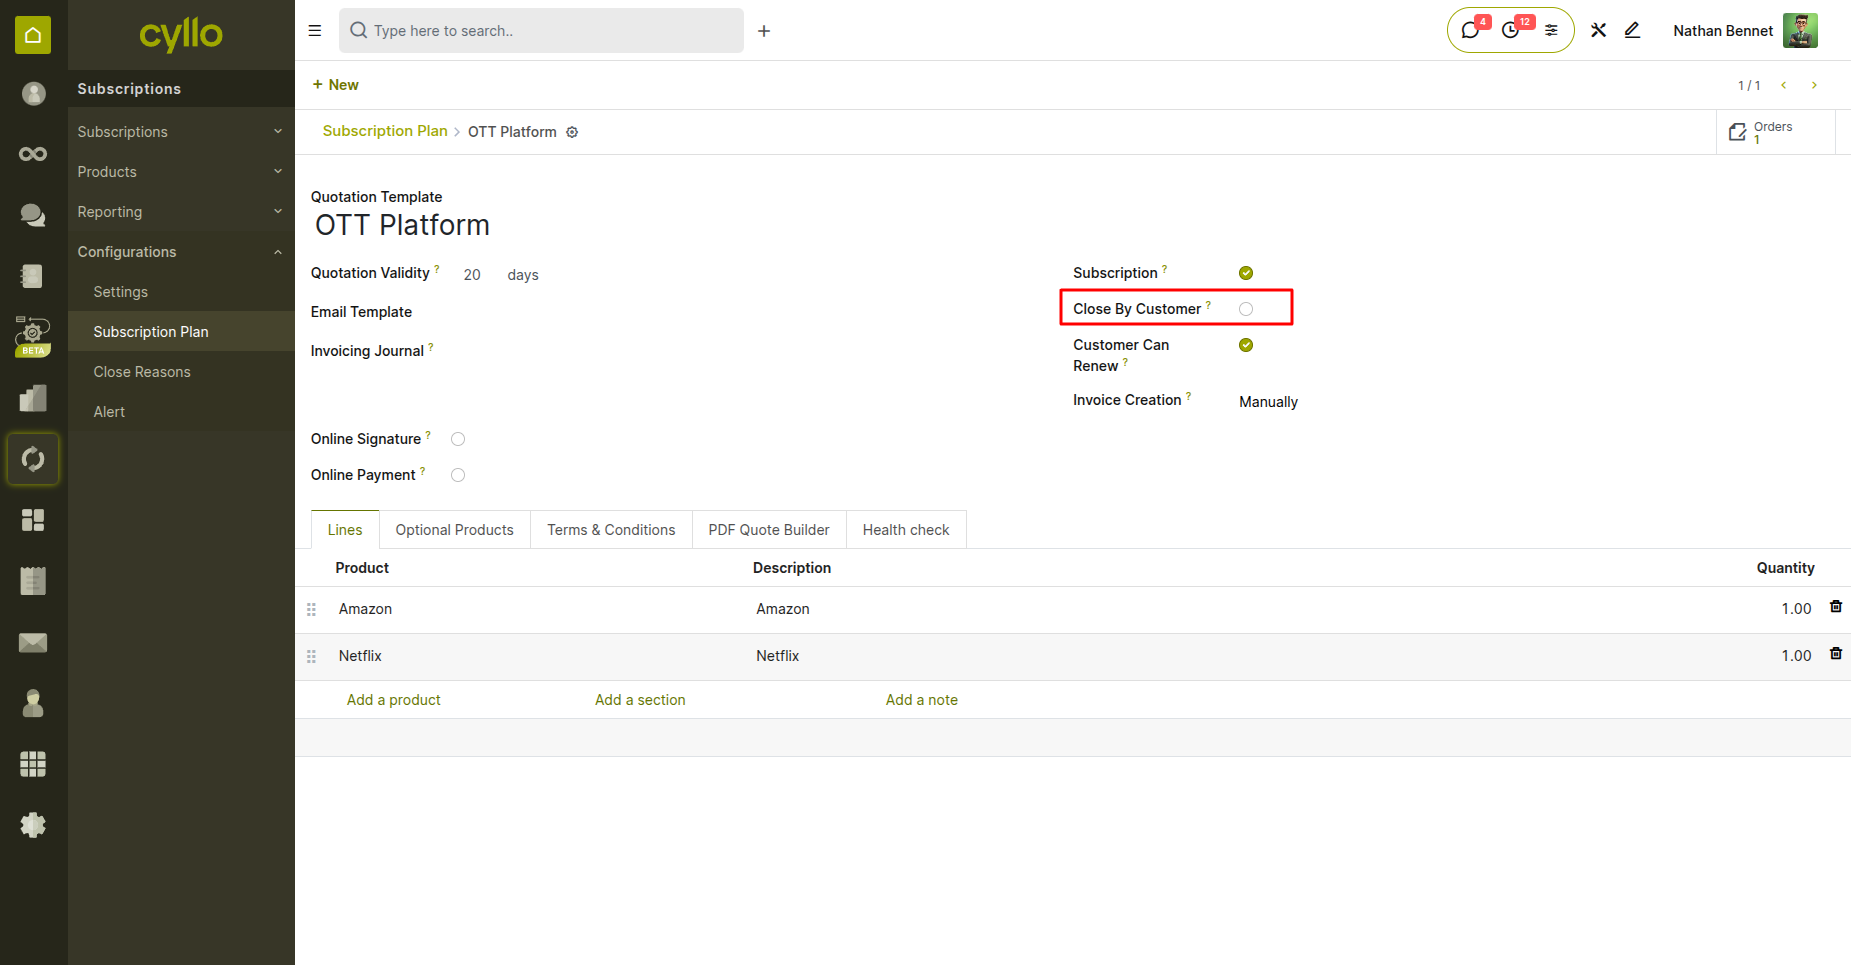
Fig 2.5 — "Close By Customer" boolean disabled in subscription plan
2.6 Email Template Assignment on a Plan
An email template assigned to a plan is used for automated communications such as renewal reminders and invoice delivery (when Invoice Creation Mode is Sent).
Steps:
- Open the Subscription Plan.
- Locate the Email Template field.
- Select an existing email template or create a new one via the dropdown.
- The template can reference subscription fields using dynamic placeholders.
- Save the plan to apply the template assignment.
Note
Ensure the email template is tested before assigning it to a live plan to avoid sending malformed emails.
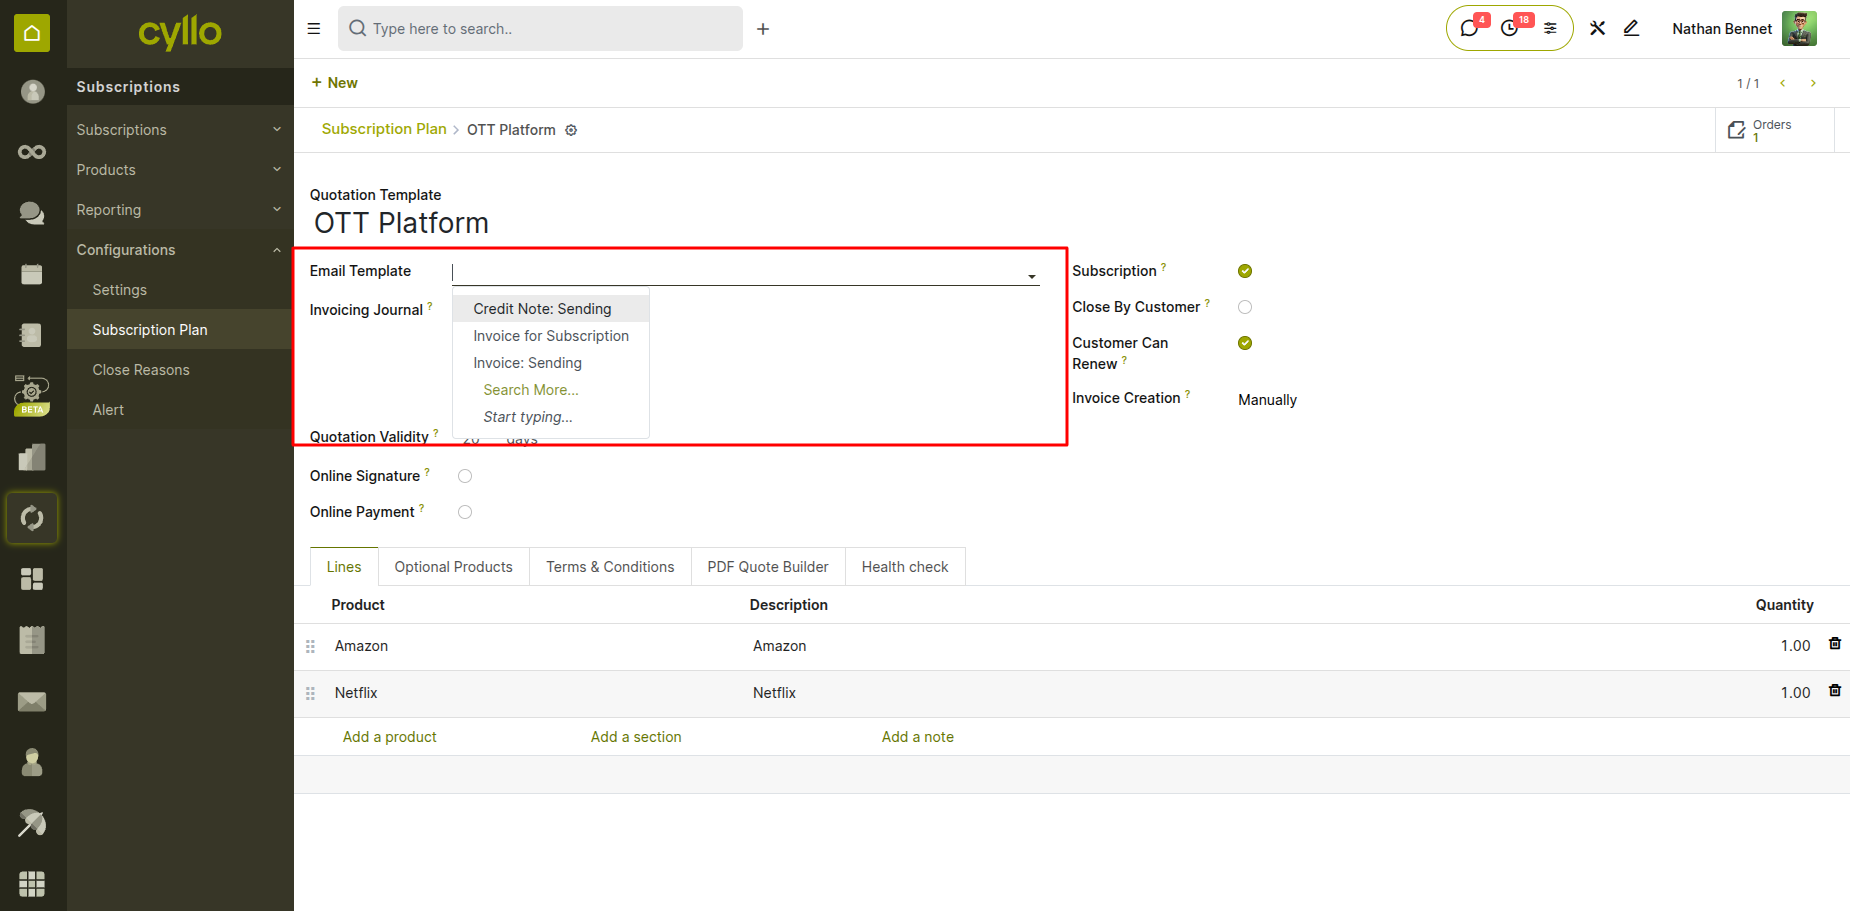
Fig 2.6 — Email Template field on Subscription Plan with template selection dropdown
2.7 Health Filters
Health Filters allow administrators to define criteria that classify subscriptions under a plan as Healthy, At Risk, or In Trouble based on MRR thresholds or other conditions.
Steps:
- Open the Subscription Plan.
- Scroll to the Health Filters section.
- Add a filter rule with condition type (e.g., MRR less than 100 means At Risk).
- Multiple filter rules are evaluated in order.
- Health status is visible on the subscription order form and in reporting.
Note
Health filters are evaluated live and update subscription health state as data changes.
2.8 Viewing Orders Linked to a Plan
Description: A smart button on the Subscription Plan form shows how many subscription orders are currently using that plan, with a direct link to the filtered order list.
Steps:
- Open any Subscription Plan record.
- Locate the Orders smart button at the top of the form (e.g., 12 Orders).
- Click it to navigate to the filtered list of all subscriptions using this plan.
- Use this view to audit active subscriptions, review states, and identify issues.
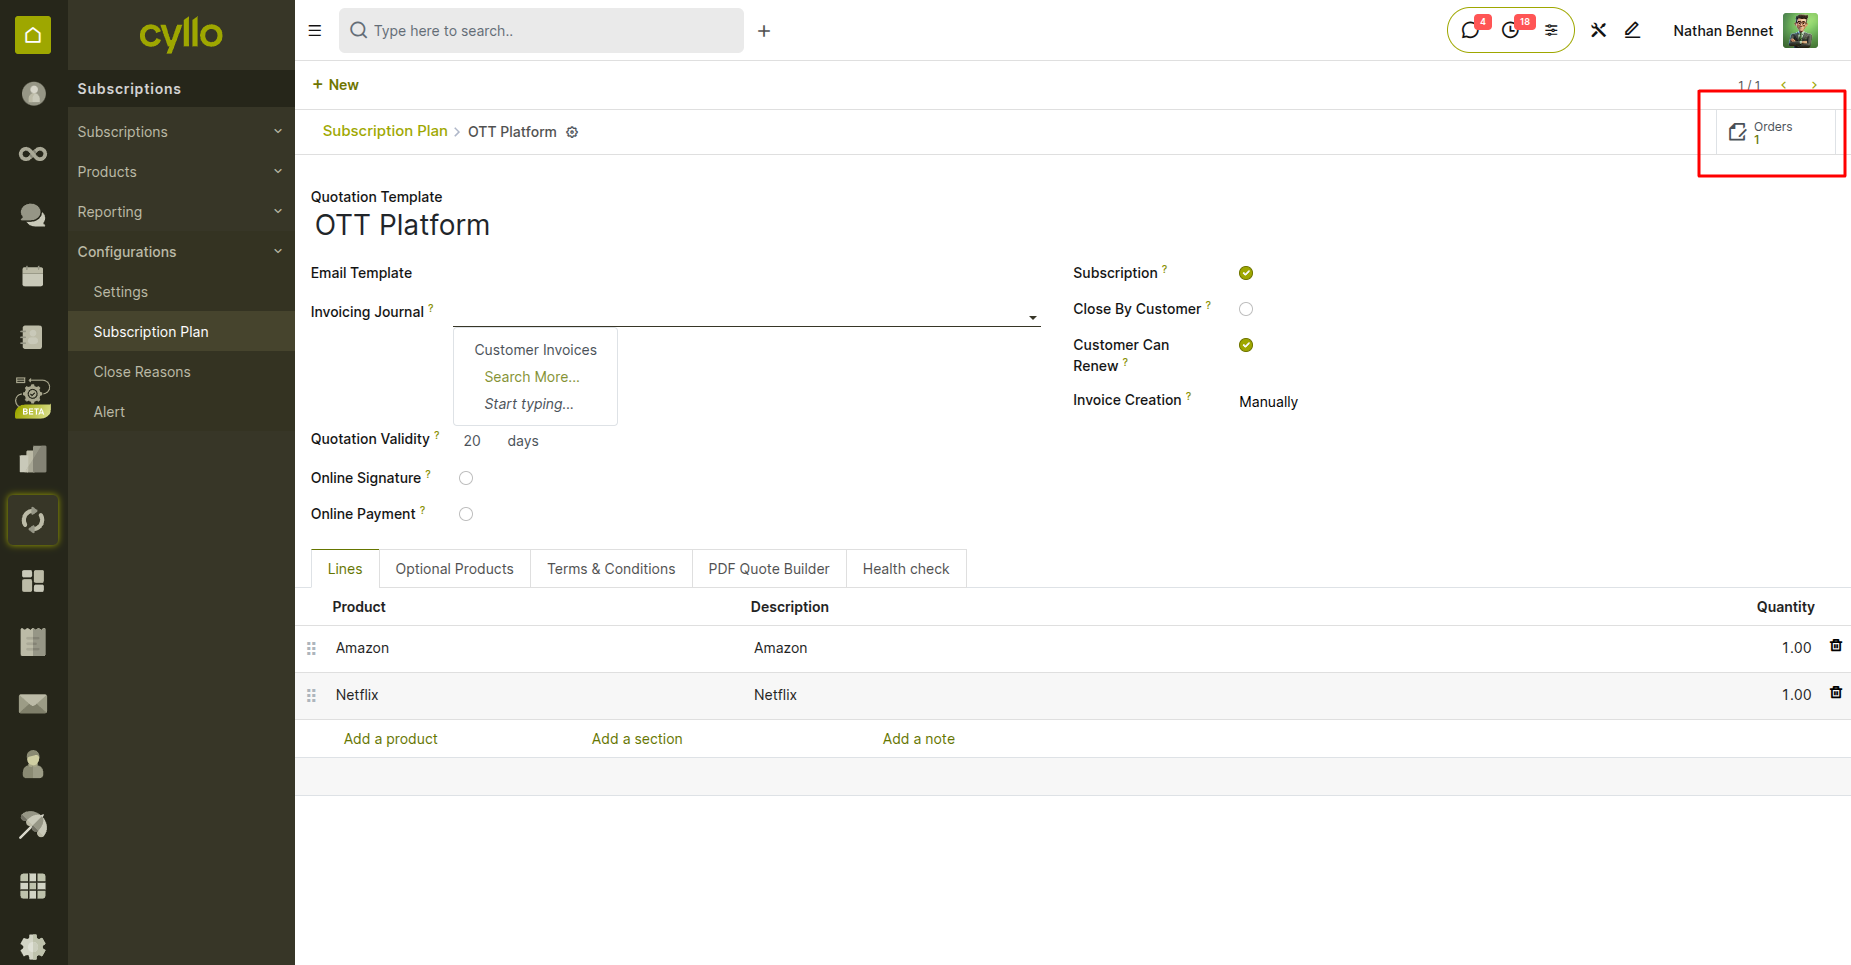
Fig 2.7 — Orders tab in subscription plan form
3. Subscription Products
3.1 Marking a Product as a Subscription Product
A standard product must be explicitly marked as a subscription product before it can be added to a subscription order. Steps:
- Navigate to Subscriptions > Products, or open any product from the product list.
- On the product form, locate the Is a Subscription Product toggle or checkbox.
- Enable this flag to classify the product as a subscription product.
- Once enabled, a Time-based Pricing tab will appear on the product form.
- Save the product.
Note
Products not marked as subscription products cannot be added to subscription orders.
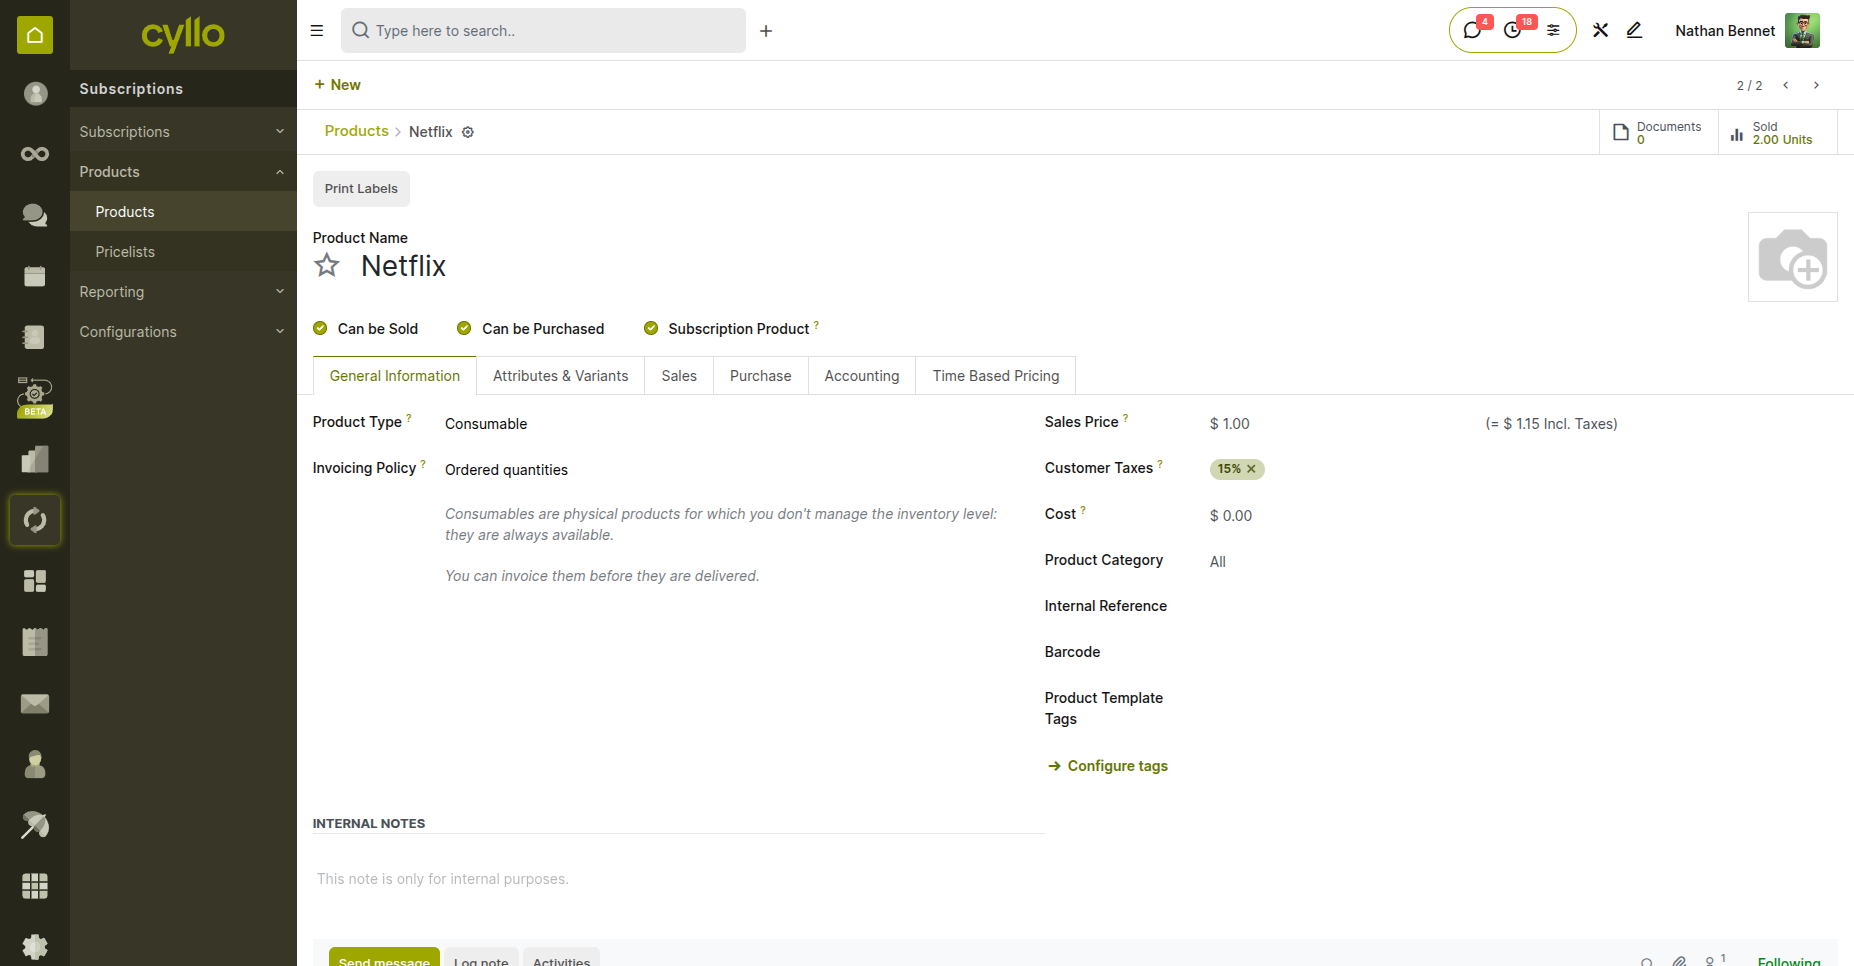
Fig 3.1 — Product form with Is a Subscription Product toggle enabled
3.2 Time-Based Pricing - Adding Recurrence Tiers
Time-based pricing allows a single product to have different prices based on the billing frequency (e.g., lower price for annual billing vs. monthly).
Steps:
- Open a Subscription Product.
- Navigate to the Time-based Pricing tab.
- Click Add a Line to add a pricing tier.
- For each tier, set the Recurrence Period (e.g., Monthly, Yearly) and the Unit Price.
- Add multiple tiers for different recurrence options.
- Save the product.
Note
At least one time-based price tier is required for a subscription product to pass validation.
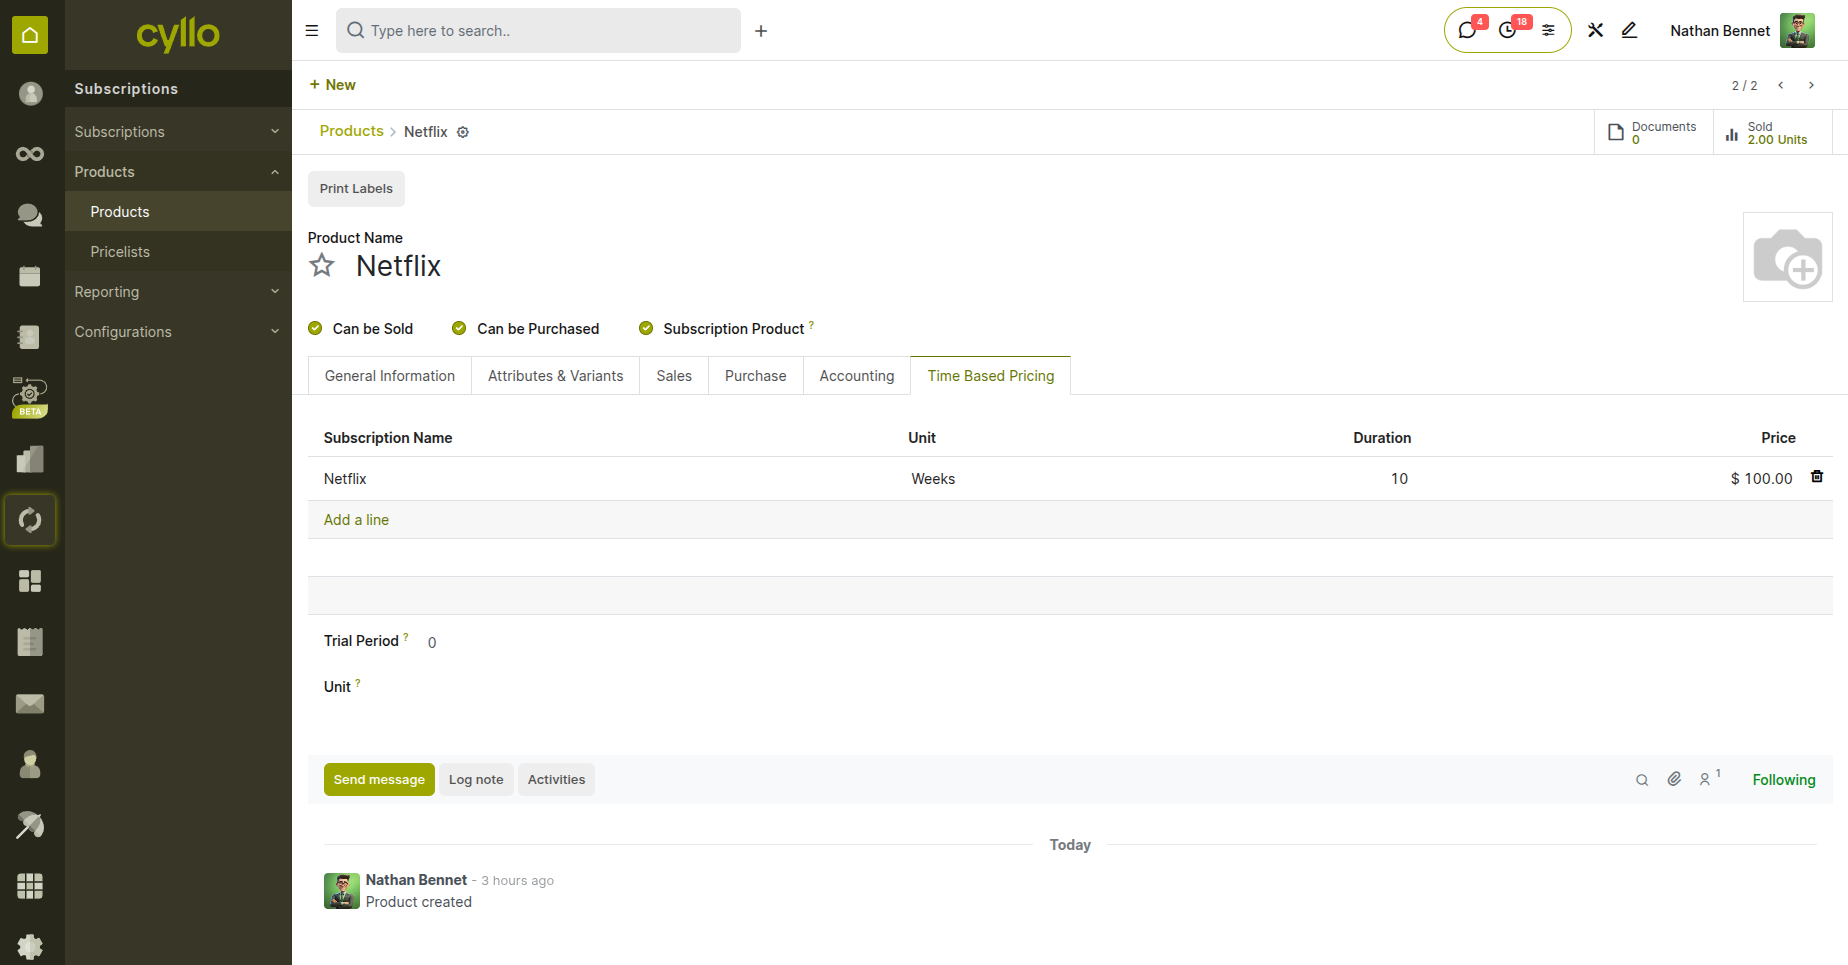
Fig 3.2 — Time-based Pricing tab with monthly and annual recurrence tiers configured
3.3 Recurrence Configuration
Description: Each time-based price tier is linked to a Recurrence Period that defines the billing cycle duration and unit. Details:
- Each row in the Time-based Pricing tab has: Recurrence Period, Duration, Unit, and Unit Price.
- Duration : Numeric length of the billing cycle (e.g., 1, 3, 12).
- Unit : Weeks, Months, or Years.
- Unit Price : The amount charged per recurrence cycle for this product.
- Multiple rows allow customers or admins to choose different billing frequencies.
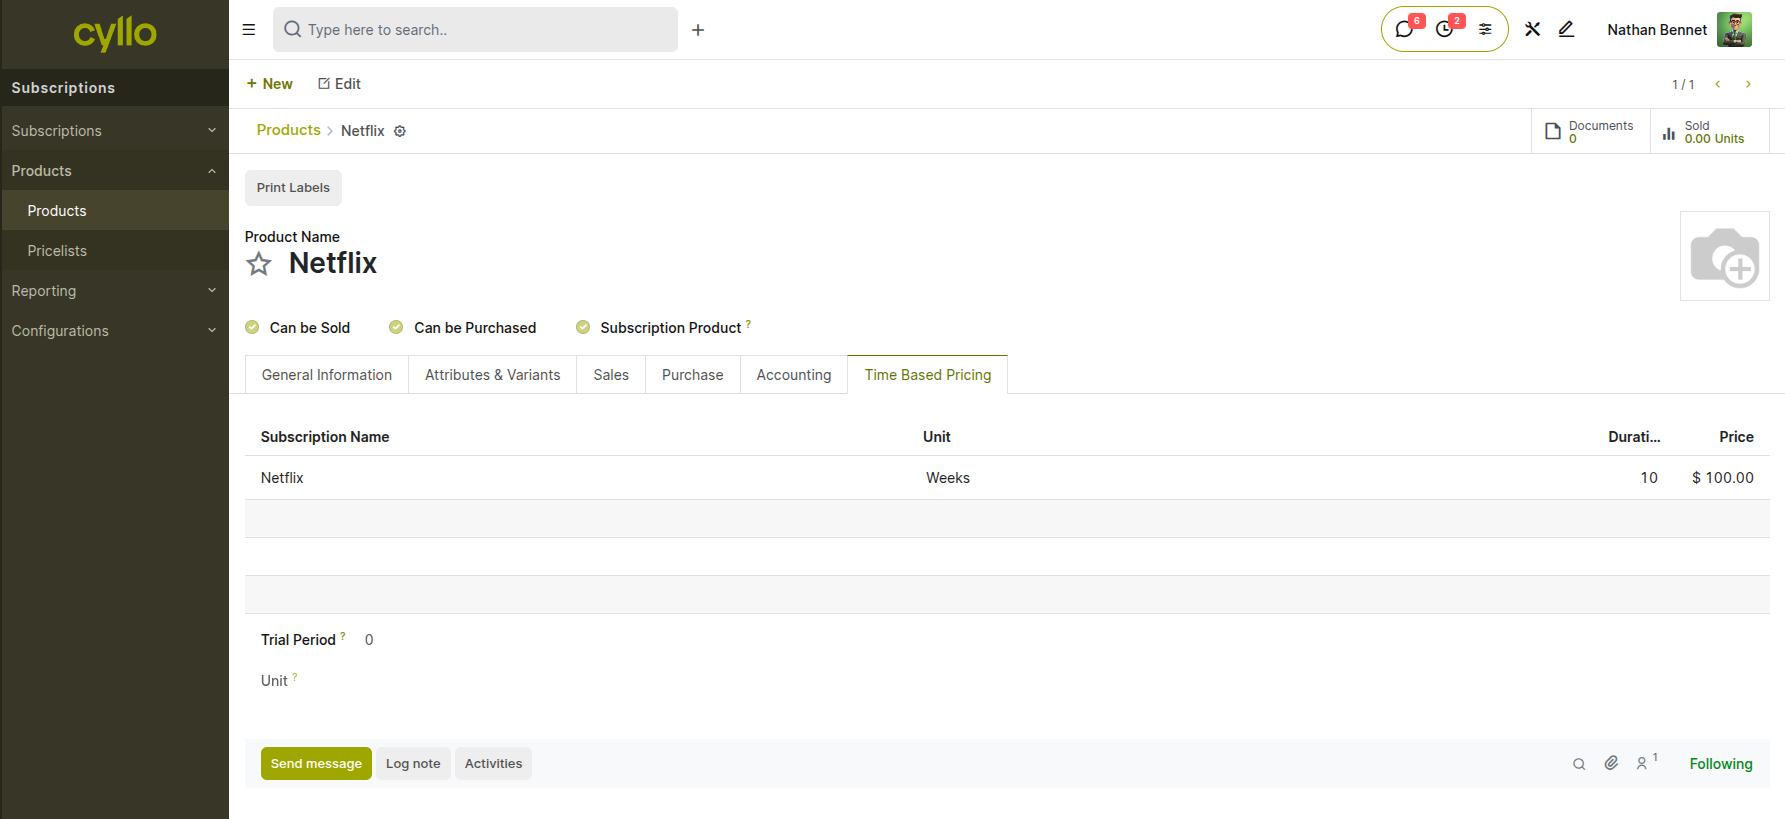
Fig 3.3 — Recurrence Configuration in Time-Based Pricing showing duration, unit, and price columns
3.4 Trial Period Setup on a Product
A trial period allows new subscribers to use the product for a defined period before the first paid invoice is generated.
steps:
- Open a Subscription Product.
- Locate the Trial period and Unit (Days, Weeks, Months).
- Set the trial duration (e.g., 14 Days).
- When this product is added to a subscription, the order will enter On Trial state.
- During the trial, a zero-amount invoice is generated as a record.
- After the trial ends, regular billing begins automatically.
Note
Trial periods are defined per product. If a subscription contains multiple products with different trial durations, the longest trial applies.
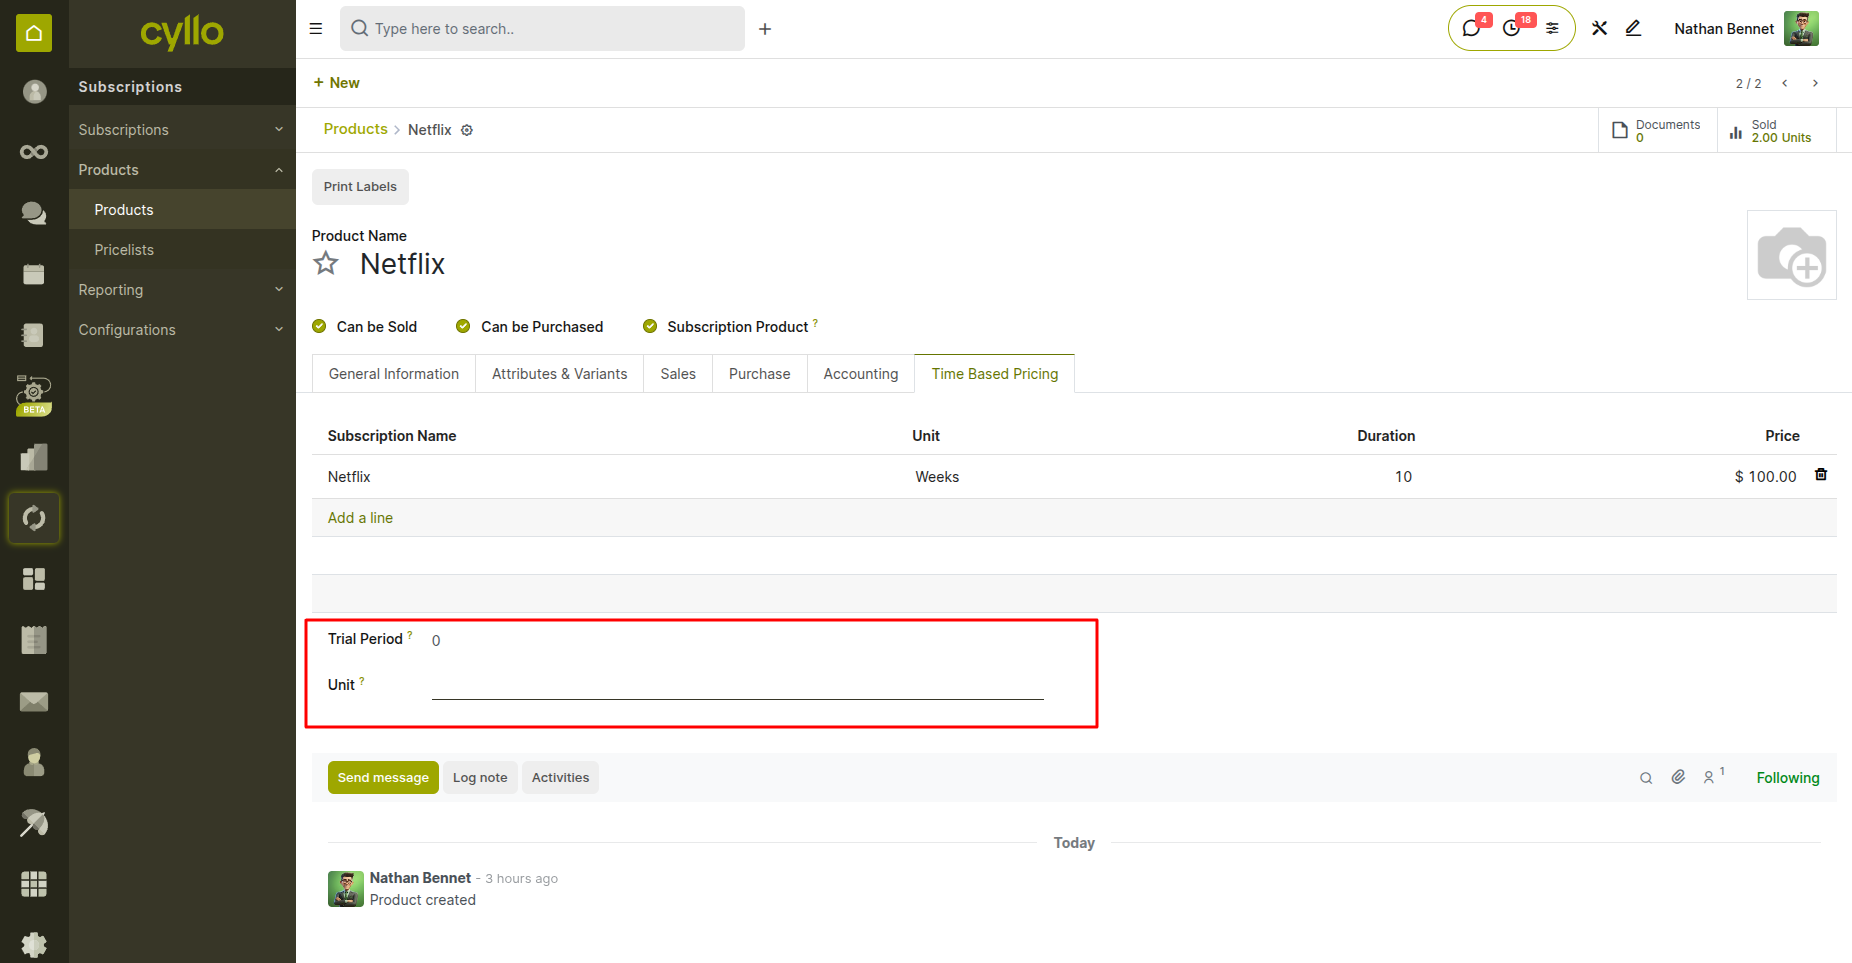
Fig 3.4 — Product form with Trial Period duration and unit fields configured
4. Reccurence Periods
4.1 What is a Recurrence Period
A Recurrence Period is a named configuration record that defines a billing cycle's length (duration + unit). It is referenced by subscription products and plans.
Details:
- Examples : Monthly (1 Month), Quarterly (3 Months), Annual (1 Year), Weekly (1 Week).
- Scope : Global configuration records used across all subscriptions.
- Usage : Referenced in product time-based pricing, subscription plan settings, and order lines.
- Fields : Name, Duration (integer), Unit (Weeks / Months / Years).
4.2 Creating & Managing Recurrence Periods
Administrators can create custom recurrence periods to support any billing cycle needed by the business.
Steps:
- Go to Subscriptions > Configuration > Recurrence Periods > New.
- Enter a descriptive Name (e.g., Bi-Annual).
- Set Duration (e.g., 6) and Unit (e.g., Months).
- Save the record.
- To edit, open the period and modify the fields. Changes affect all linked products and plans.
- To deactivate, toggle the Active field off.
Note
Deactivating a recurrence period does not affect existing subscriptions that already reference it, but it will no longer appear in dropdowns for new records.
4.3 Linking Recurrence Periods to Products
Each row in a product's Time-based Pricing tab is linked to a Recurrence Period, which determines the billing frequency for that price tier.
Steps:
- Open a Subscription Product and go to the Time-based Pricing tab.
- In each pricing row, the Recurrence field references a Recurrence Period record.
- Select from available recurrence periods in the dropdown.
- The Duration and Unit fields are read from the linked period.
- Multiple rows can reference the same or different periods.
4.4 How Recurrence Drives Renewal Date Calculation
The renewal (next invoice) date is computed automatically based on the subscription start date and the recurrence period of the order's products.
Details:
- When a subscription is confirmed, the system reads the recurrence period from the order lines.
- Next Invoice Date = Start Date + Duration x Unit (e.g., Jan 1 + 1 Month = Feb 1).
- If multiple products with different recurrence periods exist, the shortest period is used.
- The renewal date is displayed on the subscription order form as Next Invoice Date.
Note
Always verify the Next Invoice Date after confirming a subscription, especially when mixing products with different recurrence configurations.
4.5 How Invoice Posting Advances the Renewal Date
When an invoice is posted (confirmed), the system automatically advances the Next Invoice Date by one recurrence cycle.
Steps:
- Post (confirm) an invoice from a subscription.
- The system calls the renewal date computation method.
- Next Invoice Date advances by Duration x Unit (e.g., Feb 1 becomes Mar 1 for monthly).
- The subscription order is updated immediately.
- This prevents duplicate invoicing for the same period.
Note
If a draft invoice exists, posting is blocked until the draft is resolved. See Section 5.7 for draft invoice conflict handling.
5. Invoicing
5.1 Manually Creating an Invoice from a Subscription
Users can manually trigger invoice creation for an active subscription at any time, regardless of the automated cron schedule.
Steps:
- Open the active subscription order.
- Click the Create Invoice button in the toolbar.
- A draft invoice is generated for the current billing period.
- Review the invoice lines to verify products, quantities, and prices.
- Click Confirm (Post) to finalize the invoice.
- The Next Invoice Date advances automatically upon posting.
Note
Manual invoice creation respects the Draft Invoice Conflict rule. If a draft invoice already exists for this subscription, the system will block creation of a new one.
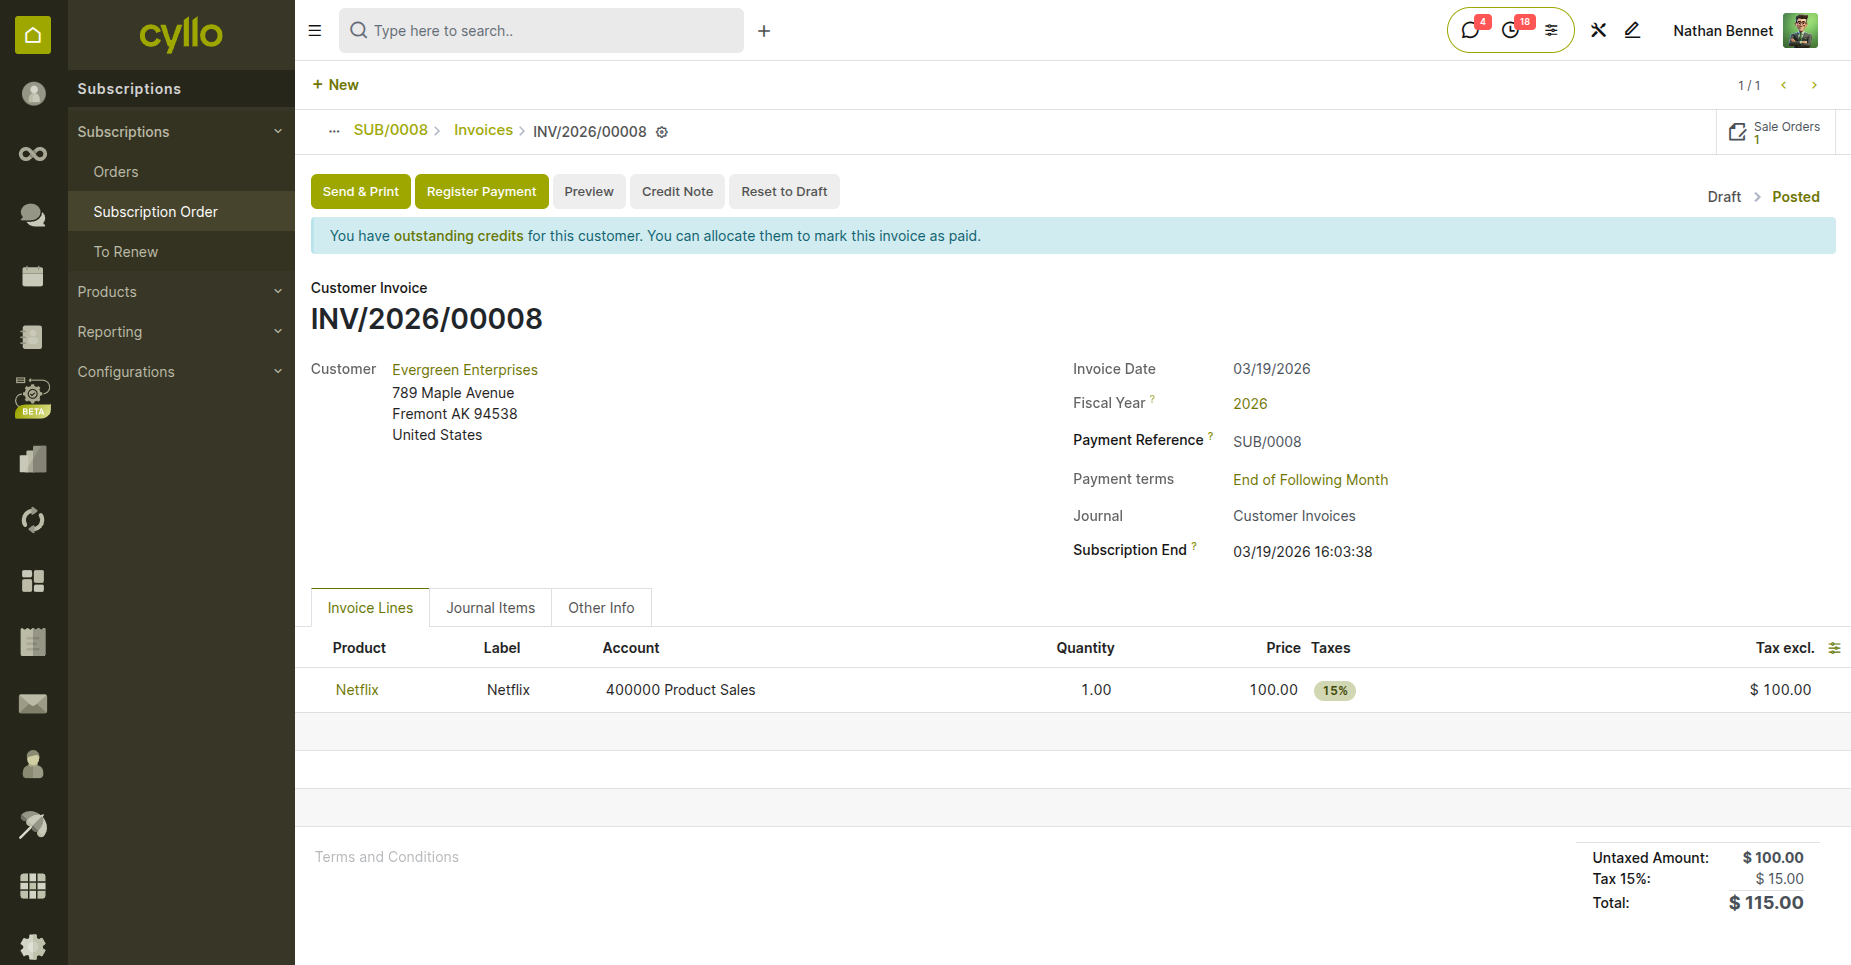
Fig 5.1 — Posted invoice generated from subscription with product lines and billing period
5.2 Trial Period Invoicing
When a subscription is in the On Trial state, invoicing produces a zero-amount invoice. This serves as a formal record without charging the customer.
Steps:
- Confirm a subscription that includes a product with a configured Trial Period.
- The subscription enters On Trial state automatically.
- When the invoice cron runs (or manual invoicing is triggered), a zero-amount invoice is created.
- This invoice is posted like a regular invoice but shows 0.00.
- After the trial period ends, the subscription transitions to Active and regular invoicing resumes.
Note
Zero-amount invoices are still real accounting entries. They appear in the customer's invoice list but do not generate payment requests.
5.3 Automated Invoice Posting - Daily Cron
A scheduled action (cron job) runs daily to automatically create and optionally post invoices for all subscriptions due for billing.
Details:
- The cron job is configured at: Settings > Technical > Automation > Scheduled Actions.
- It runs daily (typically at midnight or a configured time).
- It identifies all subscriptions where Next Invoice Date is on or before today.
- For each, it creates an invoice according to the plan's Invoice Creation Mode.
- Draft mode creates draft only. Confirmed auto-posts. Sent posts and emails.
- Errors are logged in the cron job's output for review.
Note
The cron job processes all companies in a multi-company environment. Ensure each company's subscriptions are correctly configured.
5.4 Invoice Confirmation Modes
The Invoice Creation Mode on the Subscription Plan determines the automated behavior when invoices are generated by the cron job.
Modes:
- Manually : No automated action. A user must create the invoice from the subscription form.
- Draft : Invoice is auto-created in Draft state. Requires manual confirmation.
- Auto-Confirmed : Invoice is auto-created and automatically posted (confirmed).
- Auto-Sent : Invoice is auto-created, posted, and immediately emailed to the customer.
Note
Use Auto-Sent carefully. Once the cron runs, the invoice is sent without human review. Test the email template and invoice format thoroughly before enabling.
5.5 Invoice Email Template
When Invoice Creation Mode is set to Sent, the email template assigned to the subscription plan is used to deliver the invoice to the customer.
Steps:
- Assign an Email Template on the Subscription Plan (see Section 2.6).
- The template is rendered with the invoice as the active record.
- Dynamic fields (customer name, amount, due date) are populated from the invoice.
- The invoice PDF is automatically attached to the email.
- Delivery is logged in the invoice's chatter.
Note
If no email template is assigned but Invoice Creation Mode is Sent, the cron job will raise an error and skip the invoice.
5.6 Viewing All Invoices from a Subscription
A smart button on the subscription order form provides quick access to all invoices generated for that subscription.
Steps:
- Open any subscription order.
- Locate the Invoices smart button at the top of the form (e.g., 3 Invoices).
- Click it to see the filtered list of all invoices linked to this subscription.
- From this view, you can open, confirm, cancel, or print any invoice.
- The count updates automatically as new invoices are created.
5.7 Draft Invoice Conflict Handling
To prevent double-billing, the system blocks invoice creation if an unconfirmed (draft) invoice already exists for the subscription.
Steps:
- If a draft invoice exists and a user clicks Create Invoice, the system raises a validation error.
- The error message indicates that a draft invoice must be resolved first.
- To resolve: either confirm (post) the existing draft invoice, or cancel/delete it.
- Once the draft is cleared, new invoice creation proceeds normally.
- The automated cron also respects this rule and will skip subscriptions with open drafts.
Note
Regularly review draft invoices to avoid blocking the automated billing process. Use Accounting > Invoices and filter by Draft state.
6 - Renewal Management
6.1 Automated Renewal Check - Daily Cron
A daily scheduled action scans all active subscriptions and identifies those approaching or past their renewal date, transitioning them to To Renew state.
Details:
- The renewal cron job runs daily via Settings > Technical > Automation > Scheduled Actions.
- It checks all Active subscriptions where Next Invoice Date is within Renewal Warning Days.
- Qualifying subscriptions are set to To Renew state.
- Optionally, a renewal reminder email is sent to the customer.
- The cron logs its activity and any errors.
NOTE
Renewal Warning Days is a configurable setting. Adjust it in Subscriptions > Configuration > Settings.
6.2 Renewal Reminder Email
When a subscription transitions to To Renew, the system can automatically send a reminder email to the customer notifying them of the upcoming renewal.
Steps:
- Ensure an Email Template is assigned to the Subscription Plan.
- The renewal reminder email is triggered when the cron sets the subscription to To Renew.
- The email uses the plan's assigned template with renewal-specific fields.
- Delivery is logged to the subscription's message chatter.
- The customer can click a renewal link in the email to renew directly from the portal.
6.3 To Renew Queue - Filtered Menu View
A dedicated filtered view shows all subscriptions currently in the To Renew state, giving sales and operations teams a clear action queue.
Steps:
- Navigate to Subscriptions > Subscriptions > To Renew (menu item or filter).
- The list shows all subscriptions with state = To Renew.
- Columns include: Customer, Plan, Next Invoice Date, MRR, Salesperson.
- Select multiple records for bulk renewal processing.
- Use sorting and grouping to prioritize high-value renewals first.
6.4 Customer-Initiated Renewal from Portal
When Customer Can Renew is enabled on the plan, customers can initiate their own renewal directly from the customer portal.
Steps:
- Customer logs into the portal and navigates to their subscriptions.
- Opens the subscription detail page.
- Clicks the Renew button (visible only if plan allows it).
- The subscription transitions to Requested state.
- A notification or activity is created for the backend team.
- Backend user reviews the request and confirms the renewal (see Section 6.5).
- Upon confirmation, the subscription is renewed and the state updates.
NOTE
The customer sees the Requested state after initiating renewal. They will not see the active renewed subscription until a backend user confirms it.
6.5 Backend Renewal Flow
Backend users handle renewals from the subscription form view, typically processing items from the To Renew queue.
Steps:
- Open a subscription in To Renew state.
- Review current plan, products, pricing, and customer information.
- Click Renew to create a new child subscription order.
- Modify the child order if needed (pricing adjustments, product changes).
- Confirm the child order to activate it.
- The parent subscription is automatically churned.
7. Close Reasons
7.1 Creating & Managing Close Reasons
Close Reasons allow businesses to track why subscriptions are being cancelled, providing valuable data for churn analysis.
Steps:
- Navigate to Subscriptions > Configuration > Close Reasons > New.
- Enter a descriptive Name (e.g., Too Expensive, Switching Competitor, No Longer Needed).
- Toggle Available in Portal to control customer visibility.
- Save the record.
- Edit or deactivate reasons as business needs evolve.
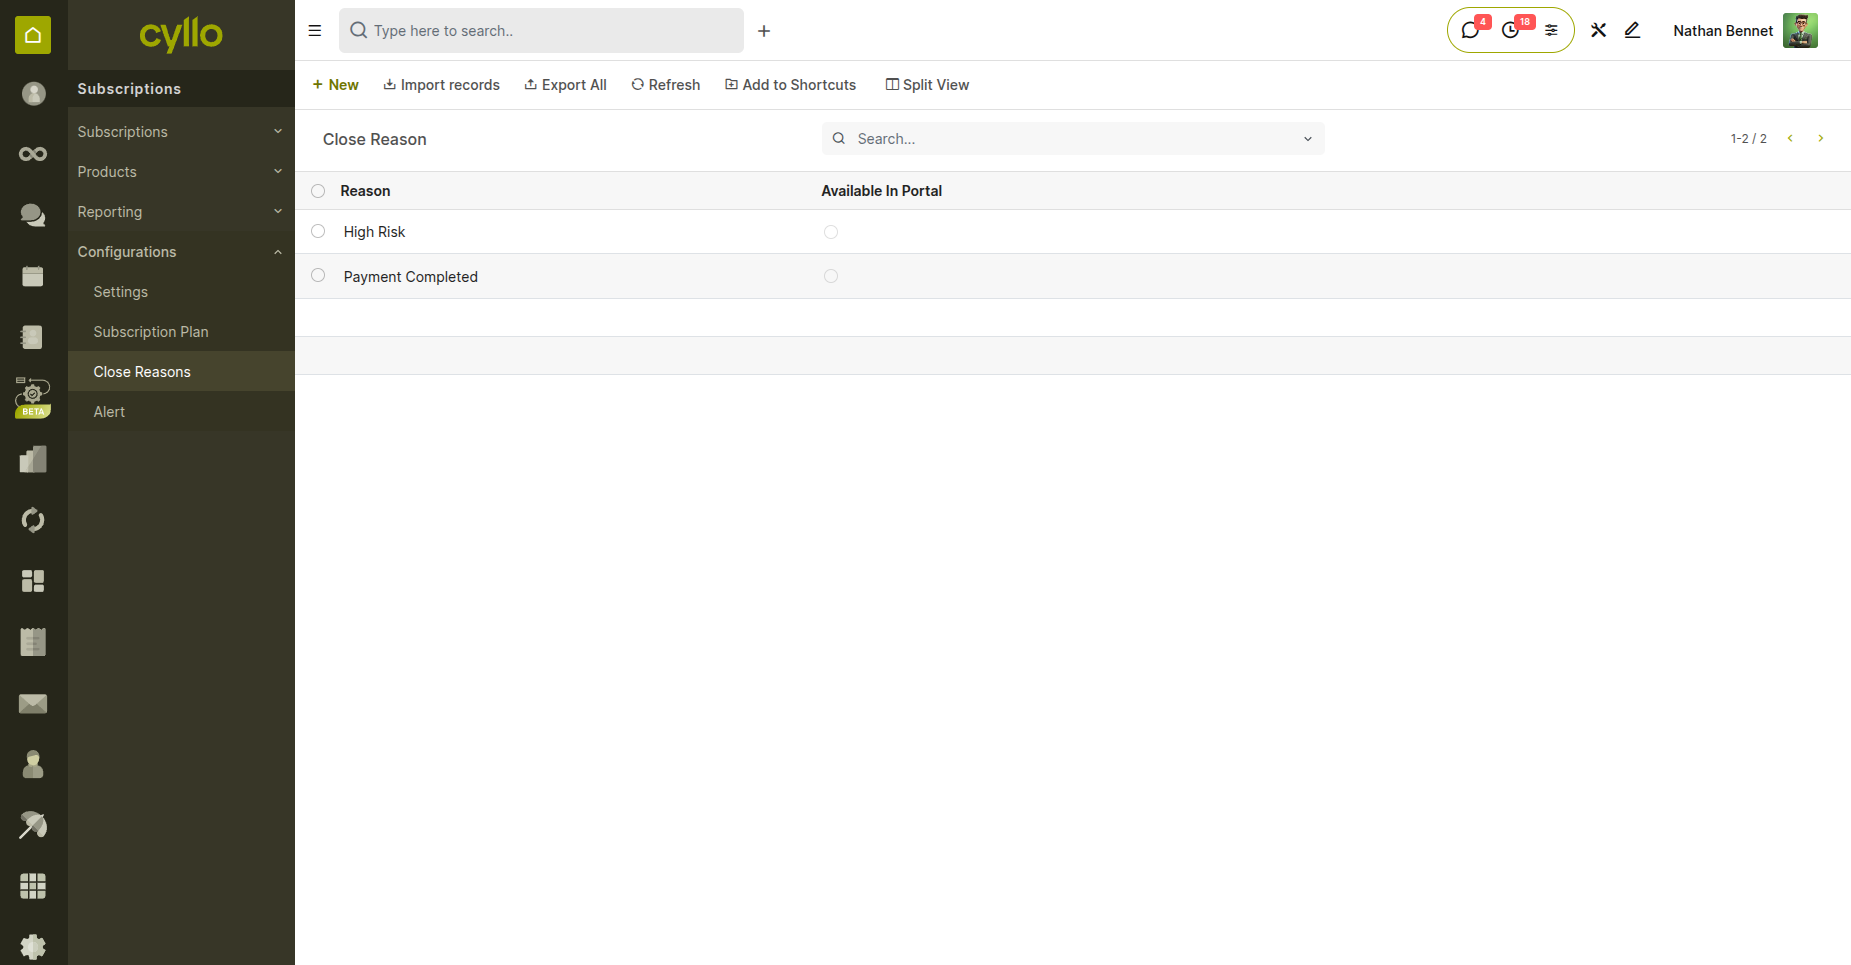
Fig 7.1 — New Close Reason form showing name and Available in Portal checkbox
7.2 Making a Close Reason Available in the Portal
Portal-visible close reasons appear in the customer's self-service close dialog. Only reasons with this flag enabled are shown to customers.
Steps:
- Open a Close Reason record.
- Enable the Available in Portal checkbox.
- Save the record.
- The reason now appears in the close dialog on the customer portal.
- Reasons without this flag are only visible to backend users.
Note
Carefully curate portal-visible reasons. Too many options can overwhelm customers; too few may not capture accurate churn data.
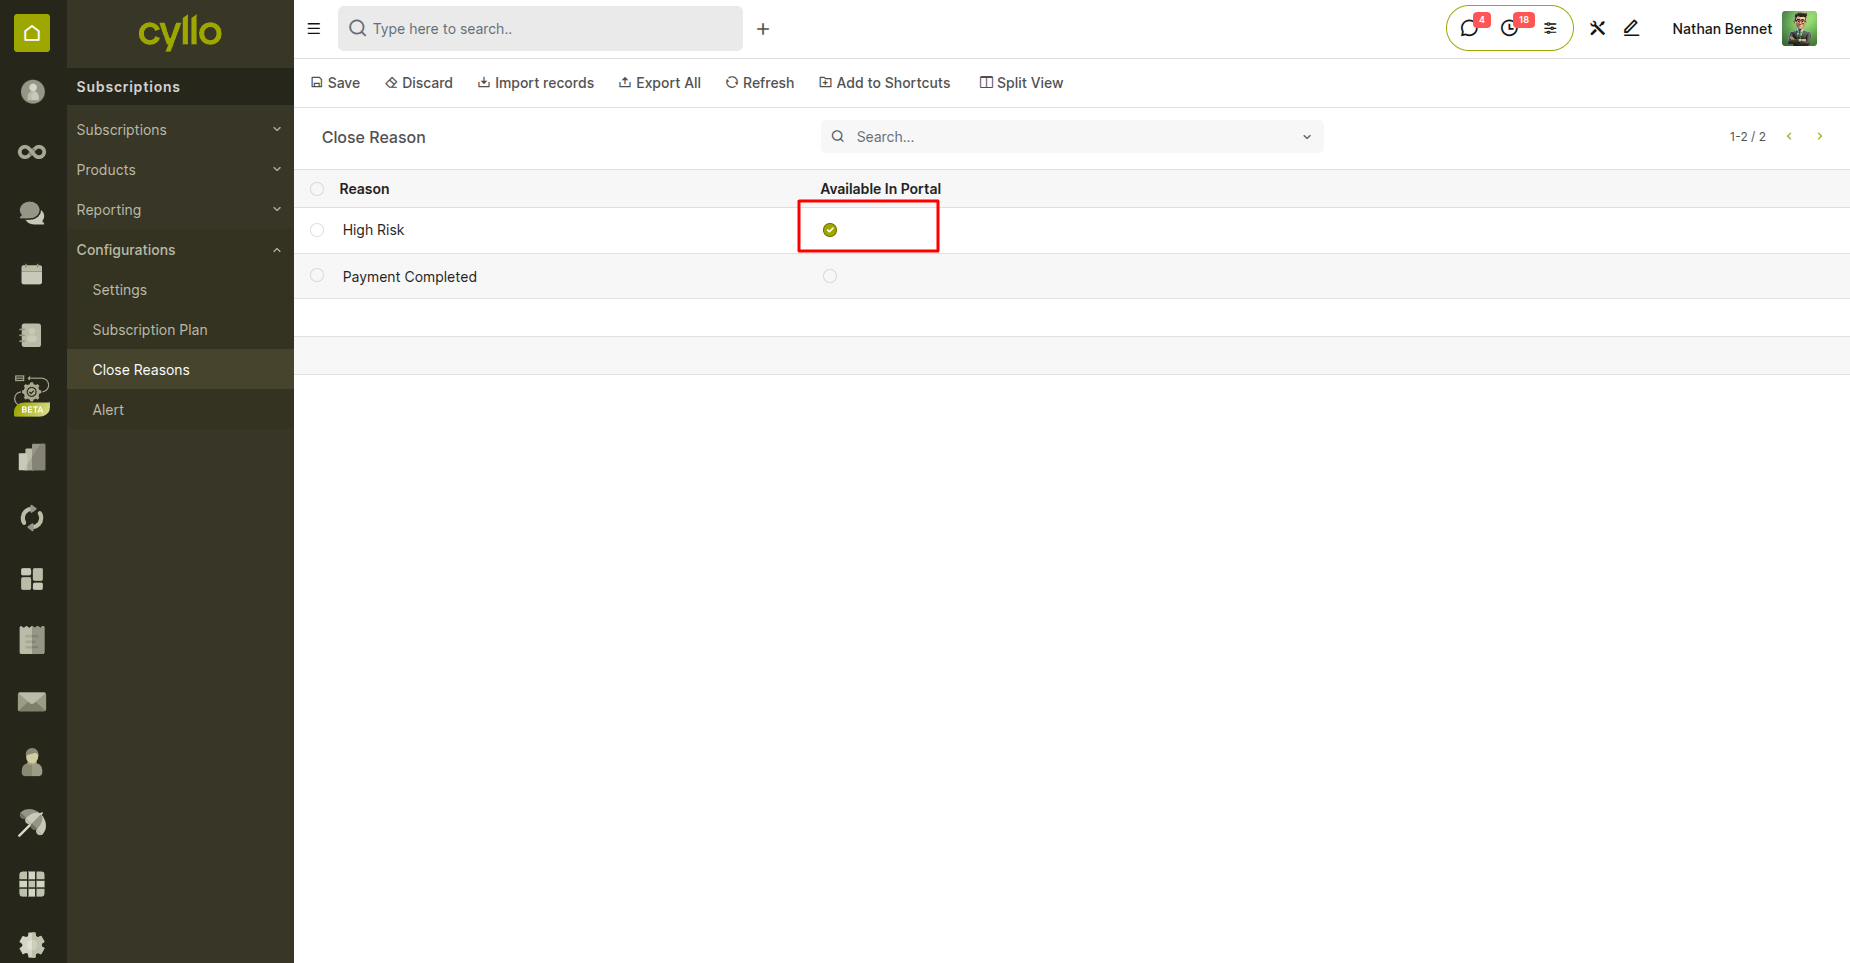
Fig 7.2 — Close Reason form with Available in Portal checkbox enabled
7.3 Closing from the Backend
Backend users can close a subscription at any time using a wizard that ensures a close reason is always recorded.
Steps:
- Open the active subscription to be closed.
- Click the Close button in the action toolbar.
- The Close Subscription wizard opens.
- Select a Close Reason from the dropdown (all reasons visible to backend users).
- Optionally add a note in the reason text field.
- Click Confirm to apply the close.
- Subscription moves to Churned state; churn log posted to chatter.
7.4 Closing from the Portal
When Customer Can Close is enabled on the plan, customers can self-close their subscription from the portal.
Steps:
- Customer navigates to their subscription in the portal.
- Clicks the Close Subscription button.
- A dialog appears with portal-available close reasons as options.
- Customer selects a reason from the list or enters a custom reason (if allowed).
- Confirms the close request.
- Subscription transitions to Churned; backend team is notified.
Note
If no close reasons are marked as Available in Portal, the customer will see an empty dropdown. Ensure at least one portal reason is configured.
7.5 Churn Log
Every subscription closure automatically generates a churn log entry in the subscription's message chatter, providing a permanent audit trail.
Details:
- The churn log is posted automatically when a subscription is closed.
- It includes: Close Reason selected, timestamp, and the user who performed the close.
- For portal closes, the log shows the customer's selected or custom reason.
- The log cannot be deleted and is visible to all users with access to the subscription.
- Use churn logs for customer success reviews and churn pattern analysis.
8 - Alerts
8.1 What is a Subscription Alert
Subscription Alerts are automated rules that monitor subscription data and trigger predefined actions when specified conditions are met.
Details:
- Alerts scan active subscriptions based on configurable filter conditions.
- When conditions are met, one of three actions is executed automatically.
- Alerts help proactively identify at-risk subscriptions before churn occurs.
- They can also automate routine tasks like creating follow-up activities.
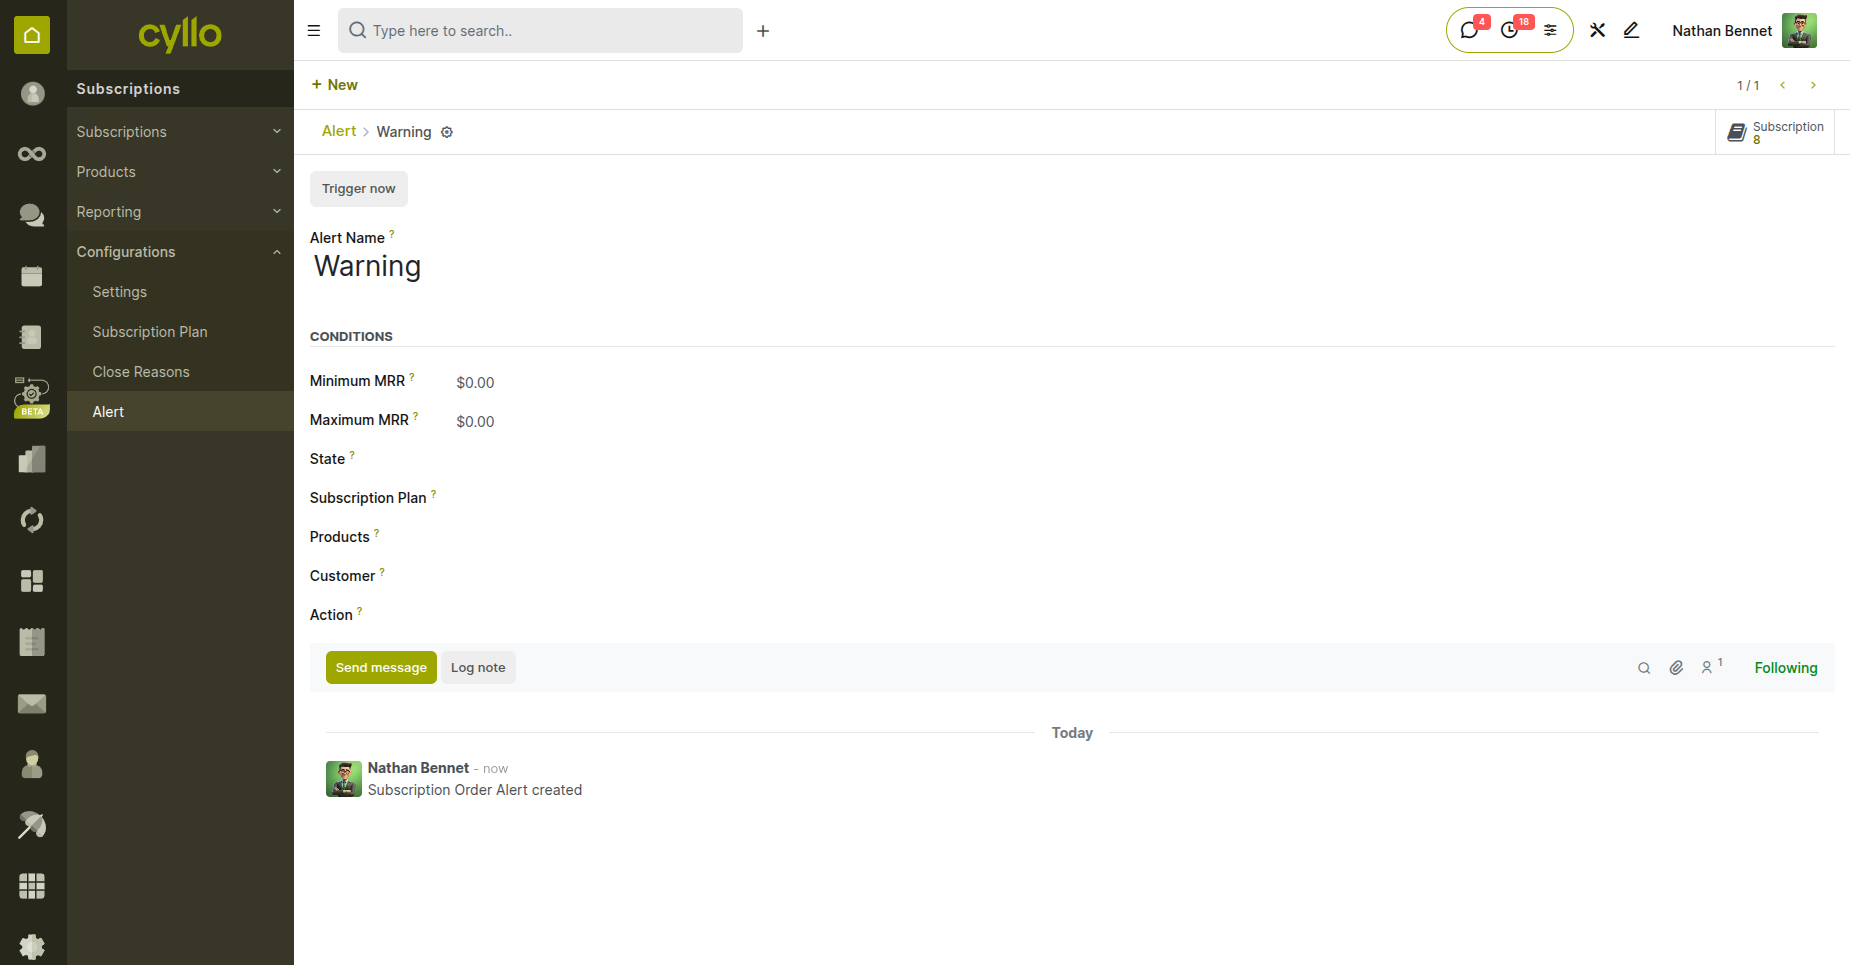
Fig 8.1 — Alerts configuration list showing active alert rules and their action types
8.2 Creating an Alert - Filter Conditions
Alert filters define which subscriptions the alert applies to. Multiple conditions can be combined using AND logic.
Steps:
- Go to Subscriptions > Configuration > Alerts > New.
- Enter an Alert Name.
- Add filter conditions: MRR range (min/max), Subscription Plan, State, Product, Customer.
- Combine multiple conditions to narrow the scope (e.g., MRR less than 100 AND State = Active).
- Set the Action to trigger when conditions are met.
- Save and activate the alert.
Note
Alerts run against all subscriptions in the system. Use specific filter conditions to avoid unintended mass actions.
8.3 Alert Actions
When an alert's filter conditions are met, one of three actions is automatically executed.
Actions:
- Create Next Activity : Schedules a follow-up activity (call, email, task) on the subscription, assigned to the salesperson.
- Set State to Renew : Forces the subscription into To Renew state, adding it to the renewal queue.
- Send Mail to Customer : Sends an email to the customer using a configured email template.
Note
Each alert can have only one action. Create multiple alerts with the same filters but different actions if multiple actions are needed.
8.4 Triggering an Alert Manually
Alerts can be triggered on demand from the Alert form, allowing administrators to test conditions or perform immediate bulk actions.
Steps:
- Open the Alert record.
- Click the Run Manually button.
- The system evaluates all active subscriptions against the alert's filter conditions.
- The configured action is executed for all matching subscriptions.
- A summary or log is displayed showing how many subscriptions were affected.
Note
Manual triggering is useful for testing new alerts. Always preview the affected subscriptions before running in production.
8.5 Viewing Orders Matching an Alert
A smart button on the Alert form shows all subscriptions currently matching the alert's filter criteria.
Steps:
- Open an Alert record.
- Locate the Orders smart button (e.g., 5 Orders).
- Click it to see the filtered list of subscriptions matching the alert conditions.
- Review the list to understand the alert's scope before triggering it.
- This view is live and reflects current data at the time of viewing.
9 - Customer Portal
9.1 Portal Home - Subscription Count & List
The customer portal home page provides an overview of all subscriptions associated with the logged-in customer's account.
Details:
- Customer logs into the portal at /web/login.
- The Home page shows a Subscriptions section with the total subscription count.
- Clicking Subscriptions navigates to the full subscription list.
- The list shows: Subscription Name, Plan, State, Next Renewal Date.
- Only subscriptions where the customer is the partner are visible.
9.2 Subscription Detail Page
The portal subscription detail page provides the customer with full visibility into their subscription's current status.
Details:
- From the subscription list, click any subscription to open its detail page.
- The page displays: subscribed products and quantities, current renewal date, subscription state, total MRR.
- Action buttons (Renew, Close) appear based on plan configuration.
- Invoice history is accessible via a link or button.
- A PDF download button allows the customer to save a subscription report.
9.3 Renewing from the Portal
Description: Portal renewal creates a renewal request that backend users must review and confirm.
Steps:
- Customer opens their subscription detail page.
- Clicks the Renew button (visible only if Customer Can Renew is enabled).
- The subscription transitions to Requested state.
- A notification or activity is created for the backend team.
- Backend user reviews the request and confirms the renewal (see Section 6.4-6.5).
- Upon confirmation, the subscription is renewed and the state updates.
Note
The customer sees the Requested state after initiating renewal. They will not see the active renewed subscription until a backend user confirms it.
9.4 Closing from the Portal
Customers can self-close their subscription from the portal, selecting a reason and confirming the action.
Steps:
- Customer opens their subscription detail page.
- Clicks the Close button (visible only if Customer Can Close is enabled).
- A dialog appears listing portal-available close reasons.
- Customer selects a reason or types a custom reason (if permitted).
- Confirms the close.
- Subscription transitions to Churned; a churn log is posted to the chatter.
Note
Closing from the portal is immediate. There is no backend approval step. Configure permissions carefully.
9.5 Downloading the Subscription Report PDF
Customers can download a formatted PDF report summarizing their subscription details directly from the portal.
Steps:
- Customer opens their subscription detail page.
- Clicks the Download PDF or Print Report button.
- The system generates the subscription report using the configured report template.
- The PDF downloads to the customer's device.
- The report includes: customer details, subscribed products, billing info, and current state.
9.6 Portal States Visible to Customer
Description: Customers see a simplified set of state labels on their portal. These map to the internal subscription states.
States:
- Active : Subscription is confirmed and currently running.
- To Renew : Renewal date is approaching or past; renewal action is recommended.
- Churned : Subscription has been closed; no further billing.
- On Trial : Subscription is active but within the free trial period.
- Requested : Customer has initiated a renewal request awaiting backend confirmation.
Note
Internal states like Quotation or Draft are not shown in the portal. The customer only sees live, actionable states.
10 - Reporting & Analytics
10.1 Subscription Report View
The Subscription Report is a dedicated analytics view that aggregates key metrics across all subscription records.
Steps:
- Navigate to Subscriptions > Reporting > Subscriptions.
- The report view shows aggregated data: MRR, ARR, WRR, total products, customer count.
- Switch between Pivot, Graph, and List views using the view toggle.
- Apply filters and groupings to segment data by state, plan, customer, or date.
- Export to Excel or CSV for further analysis.
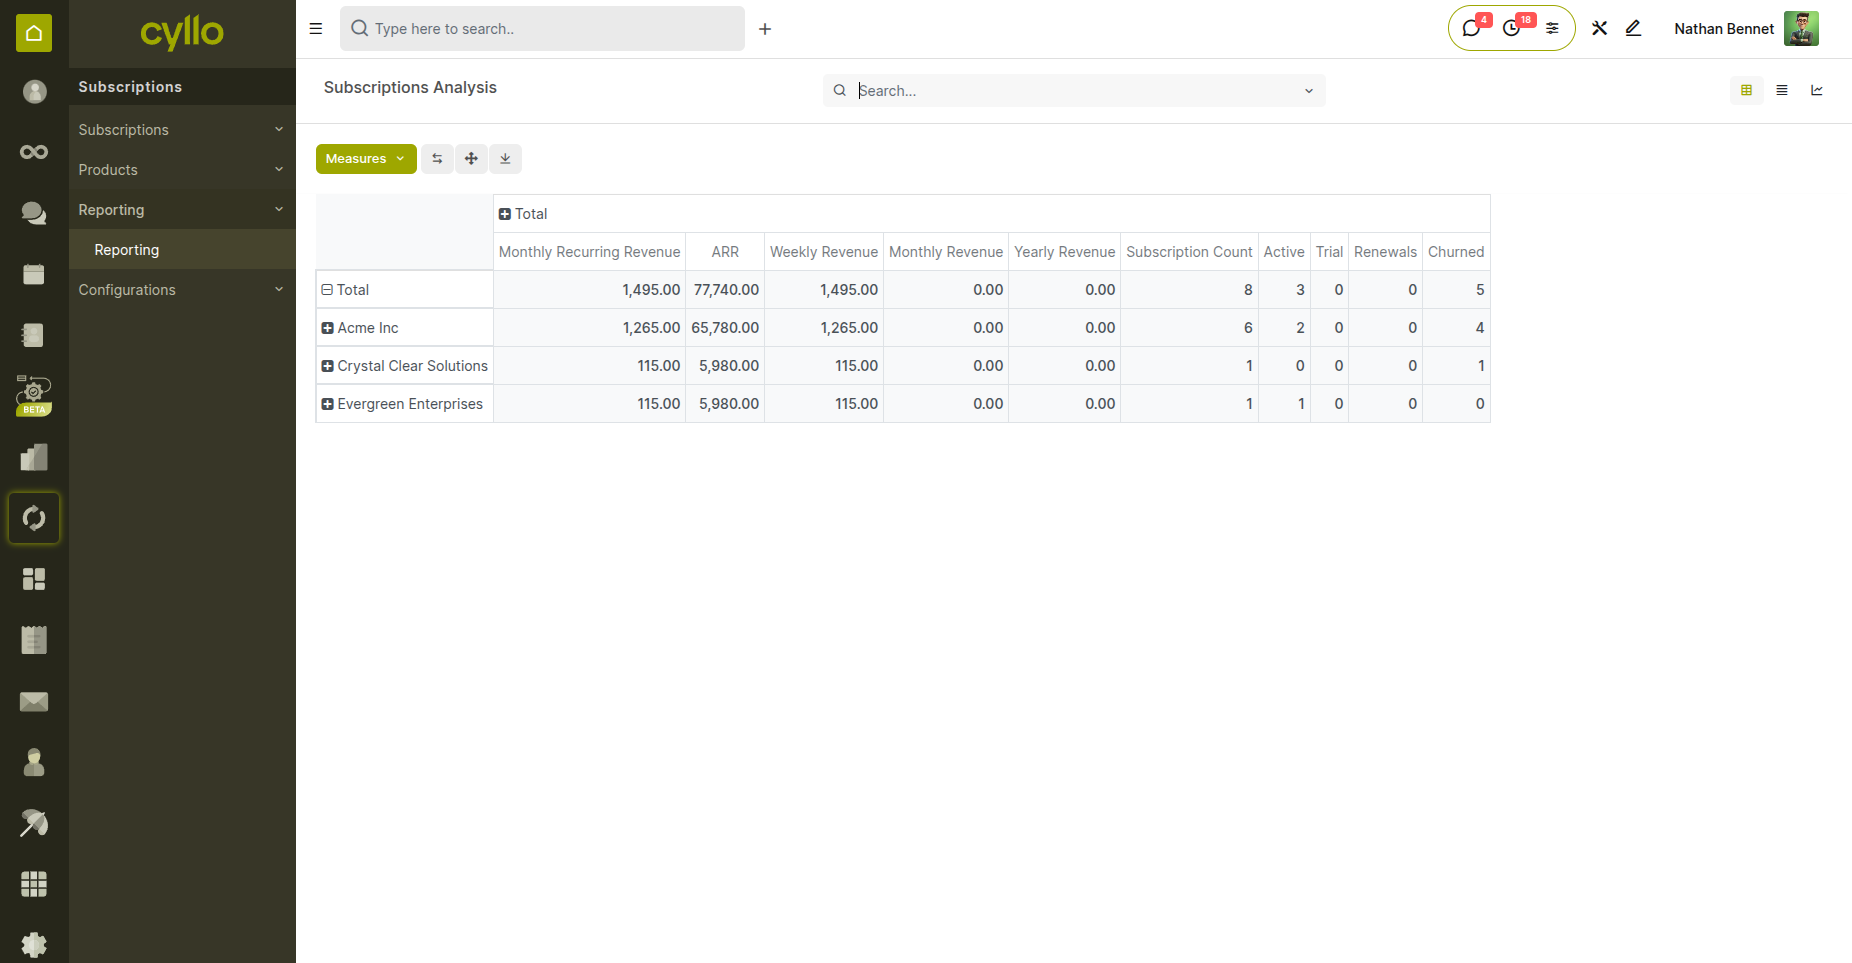
Fig 10.1 — Subscription Report view in Pivot mode showing MRR, ARR, and product metrics
10.2 Weekly Recurring Revenue (WRR)
WRR normalizes all active subscription revenue to a weekly figure, useful for businesses with weekly billing cycles.
Details:
- Calculation : (Monthly Price x 12) / 52 per subscription.
- Aggregation : Across all active subscriptions.
- Location : Visible in the Subscription Report view.
- Filtering : Filter by date range to view WRR trends over time.
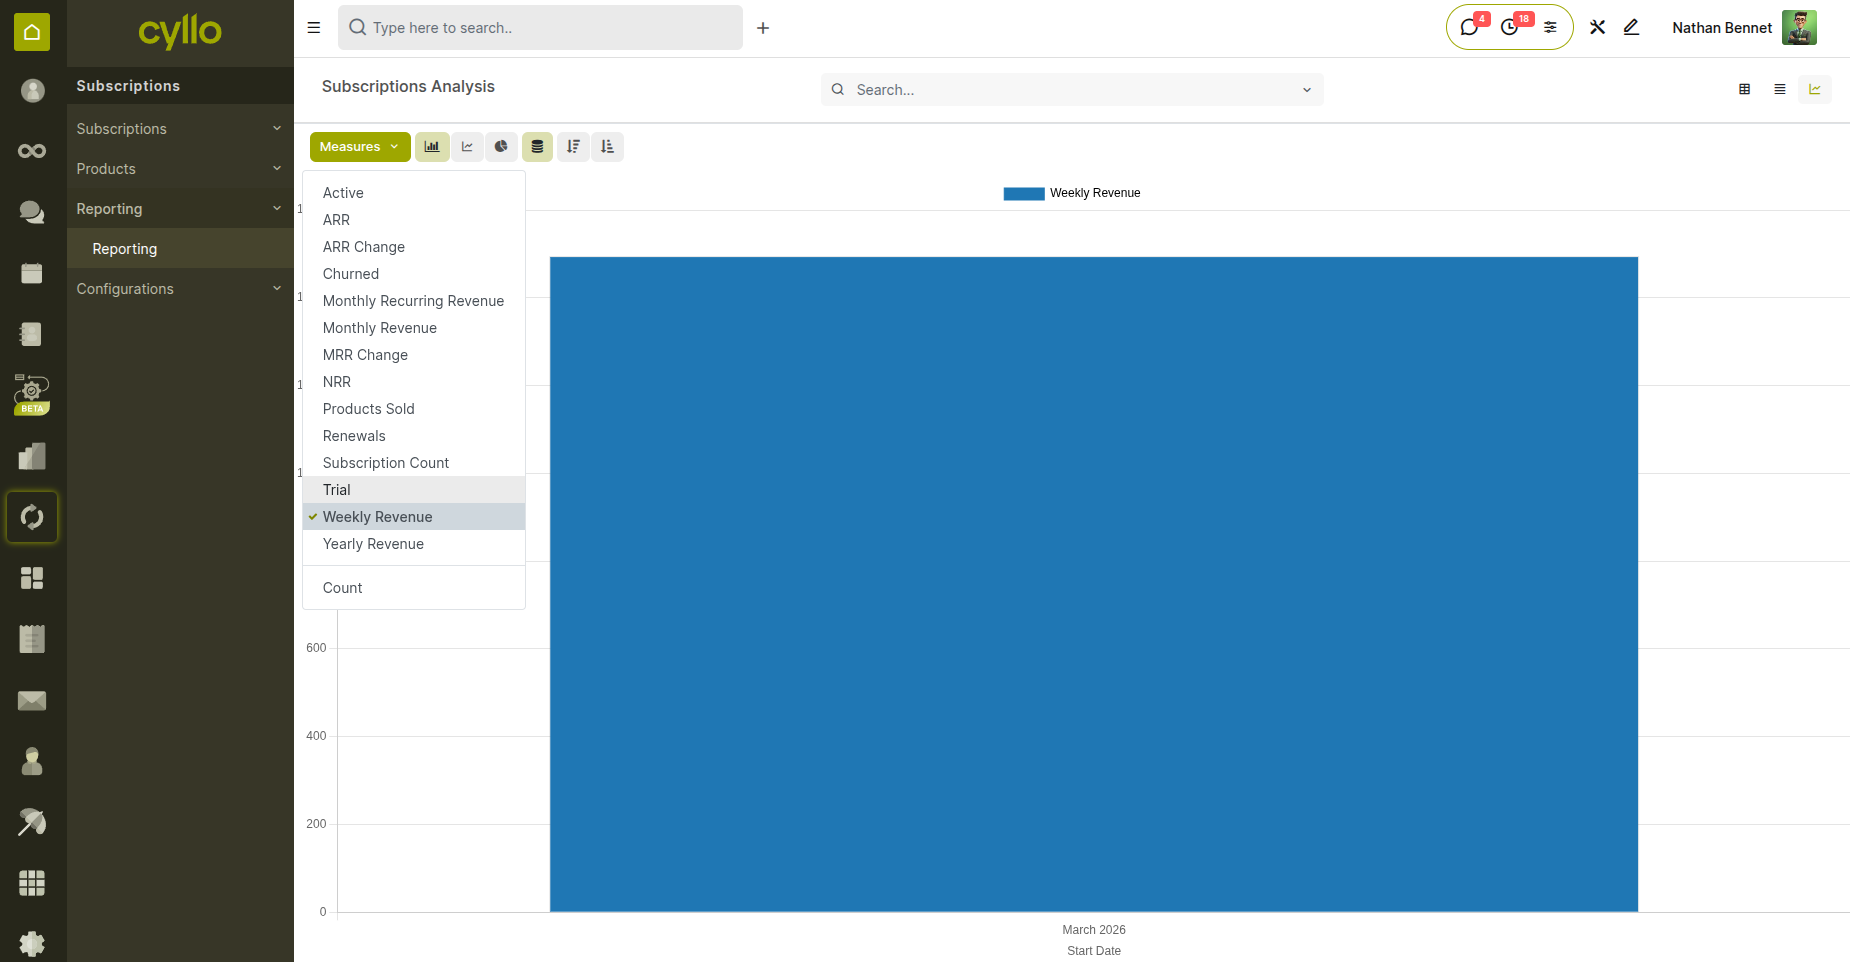
Fig 10.2 — WRR metric displayed in Subscription Report with weekly revenue breakdown
10.3 Monthly Recurring Revenue (MRR)
MRR is the primary subscription health metric, showing the total normalized monthly revenue from all active subscriptions.
Details:
- Per-Subscription MRR : (Annual Price / 12) or (Monthly Price x 1) depending on recurrence.
- Total MRR : Aggregates all active subscription MRRs.
- Tracking : Track MRR growth over time using the date filter in Reporting.
- Changes : New subscriptions add to MRR; churned subscriptions reduce it.
- Smart Button : An MRR smart button on the subscription order form shows the order's contribution.
10.4 Yearly Recurring Revenue (ARR)
ARR (Annual Recurring Revenue) normalizes all subscription revenue to an annual figure, useful for year-over-year comparisons.
Details:
- Formula : ARR = MRR x 12.
- Purpose : Provides a high-level view of annualized revenue run-rate.
- Location : Visible in the Subscription Report and on individual order forms.
- Use Case : Investor reporting, board presentations, and annual planning.

Fig 10.3 — ARR metric in Subscription Report alongside MRR for annual revenue comparison
10.5 Total Products Sold
This metric tracks the total number of subscription product units across all active orders.
Steps:
- Navigate to Subscriptions > Reporting.
- The Total Products metric shows the count of all subscription product lines.
- Filter by product to see unit count for a specific offering.
- Useful for capacity planning and product performance analysis.
10.6 Filtering by State, Recurrence, Customer, Company
The reporting views support multiple filter dimensions for targeted analysis.
Filters:
- State : Filter by Active, To Renew, Churned, On Trial, Requested.
- Subscription State : Filter by the internal subscription stage.
- Recurrence : Filter by Monthly, Annual, Weekly, etc.
- Customer : Filter to a specific customer or customer group.
- Company : In multi-company environments, filter by the owning company.
- Combined : Combine multiple filters for complex segmentations.