

Cyllo Calendar Documentation
Introduction
Cyllo Calendar is a smart scheduling application that helps businesses organize meetings, events, appointments, and daily activities from a single platform. Fully integrated with the Cyllo ecosystem, it enables teams to coordinate work, manage schedules, and stay connected across departments. Whether planning internal meetings, tracking project discussions, or scheduling employee reviews, Cyllo Calendar keeps every event organized and accessible.
When users open the Cyllo Calendar app, they are presented with a clear overview of their scheduled events. Calendar entries can be viewed in Day, Week, Month, or Year layouts, allowing users to switch between detailed and long-term planning. Users can also choose to display or hide weekends based on their scheduling preferences.
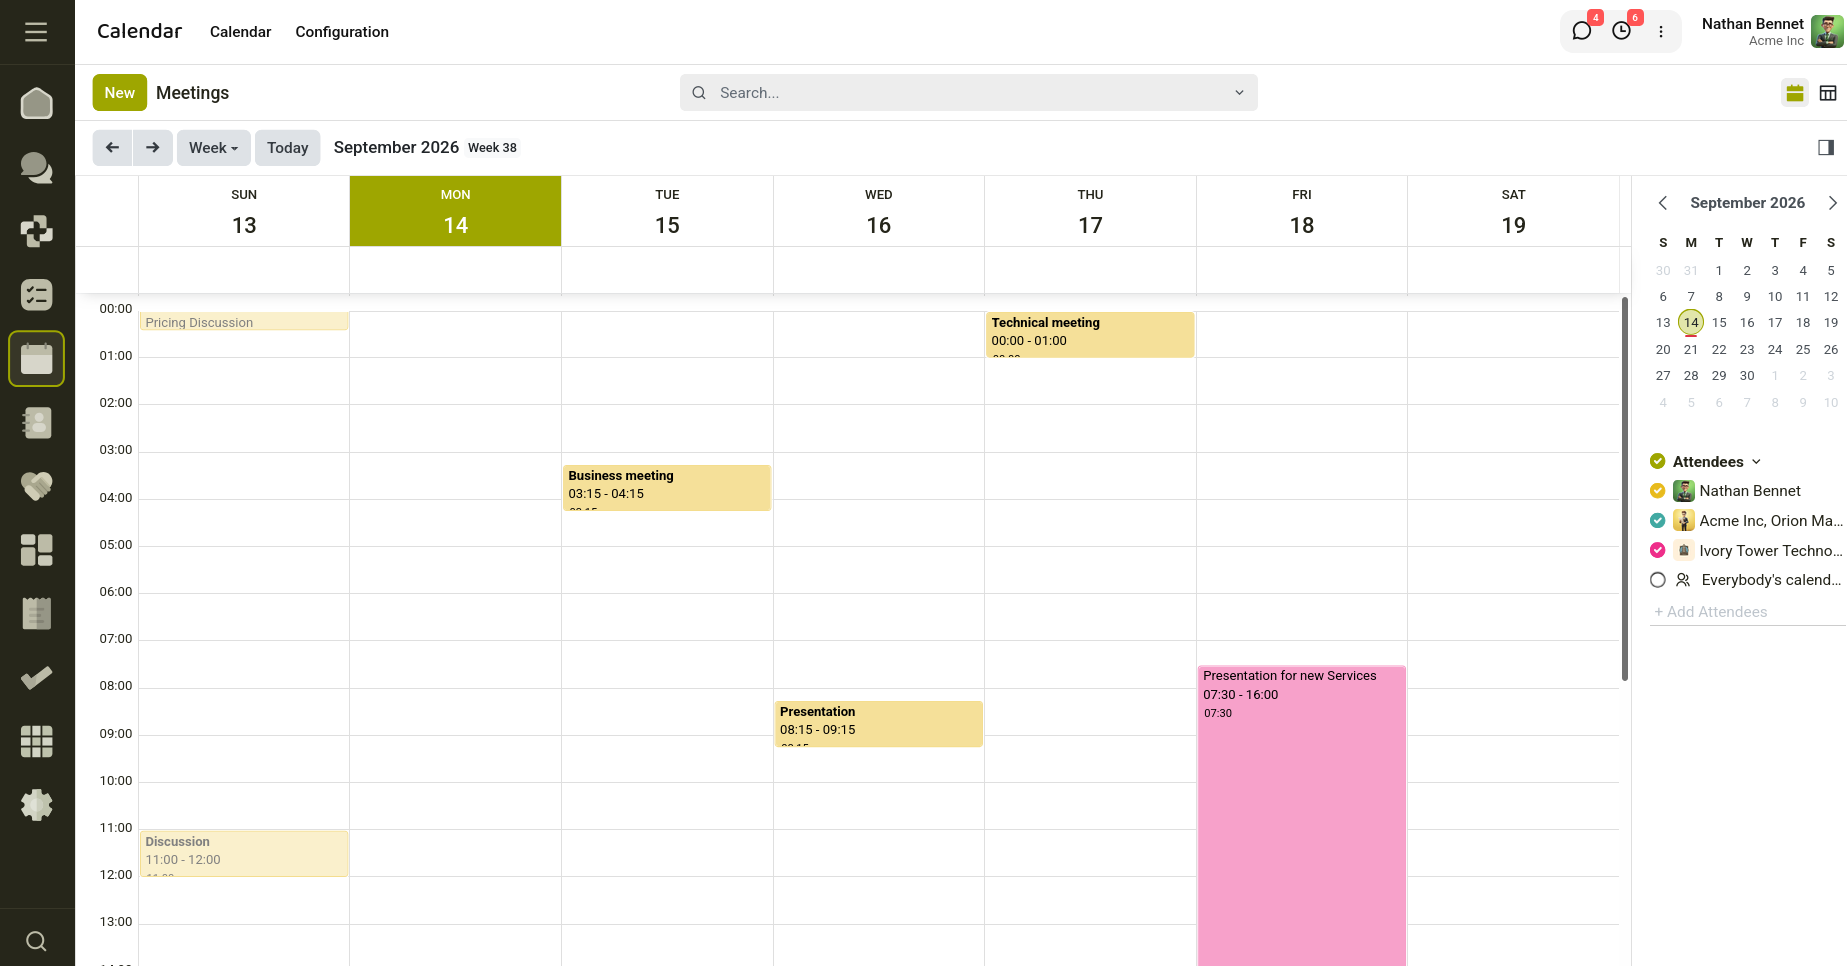
Fig 1.1 — Calender with scheduled events.
2. Sync Third-Party Calendars
Cyllo Calendar seamlessly integrates with popular calendar services such as Google Calendar and Microsoft Outlook, allowing users to keep all schedules synchronized across platforms. After configuring the required integration settings, events created in either Cyllo or the connected calendar are automatically reflected on both platforms, ensuring schedules remain up to date without manual duplication.
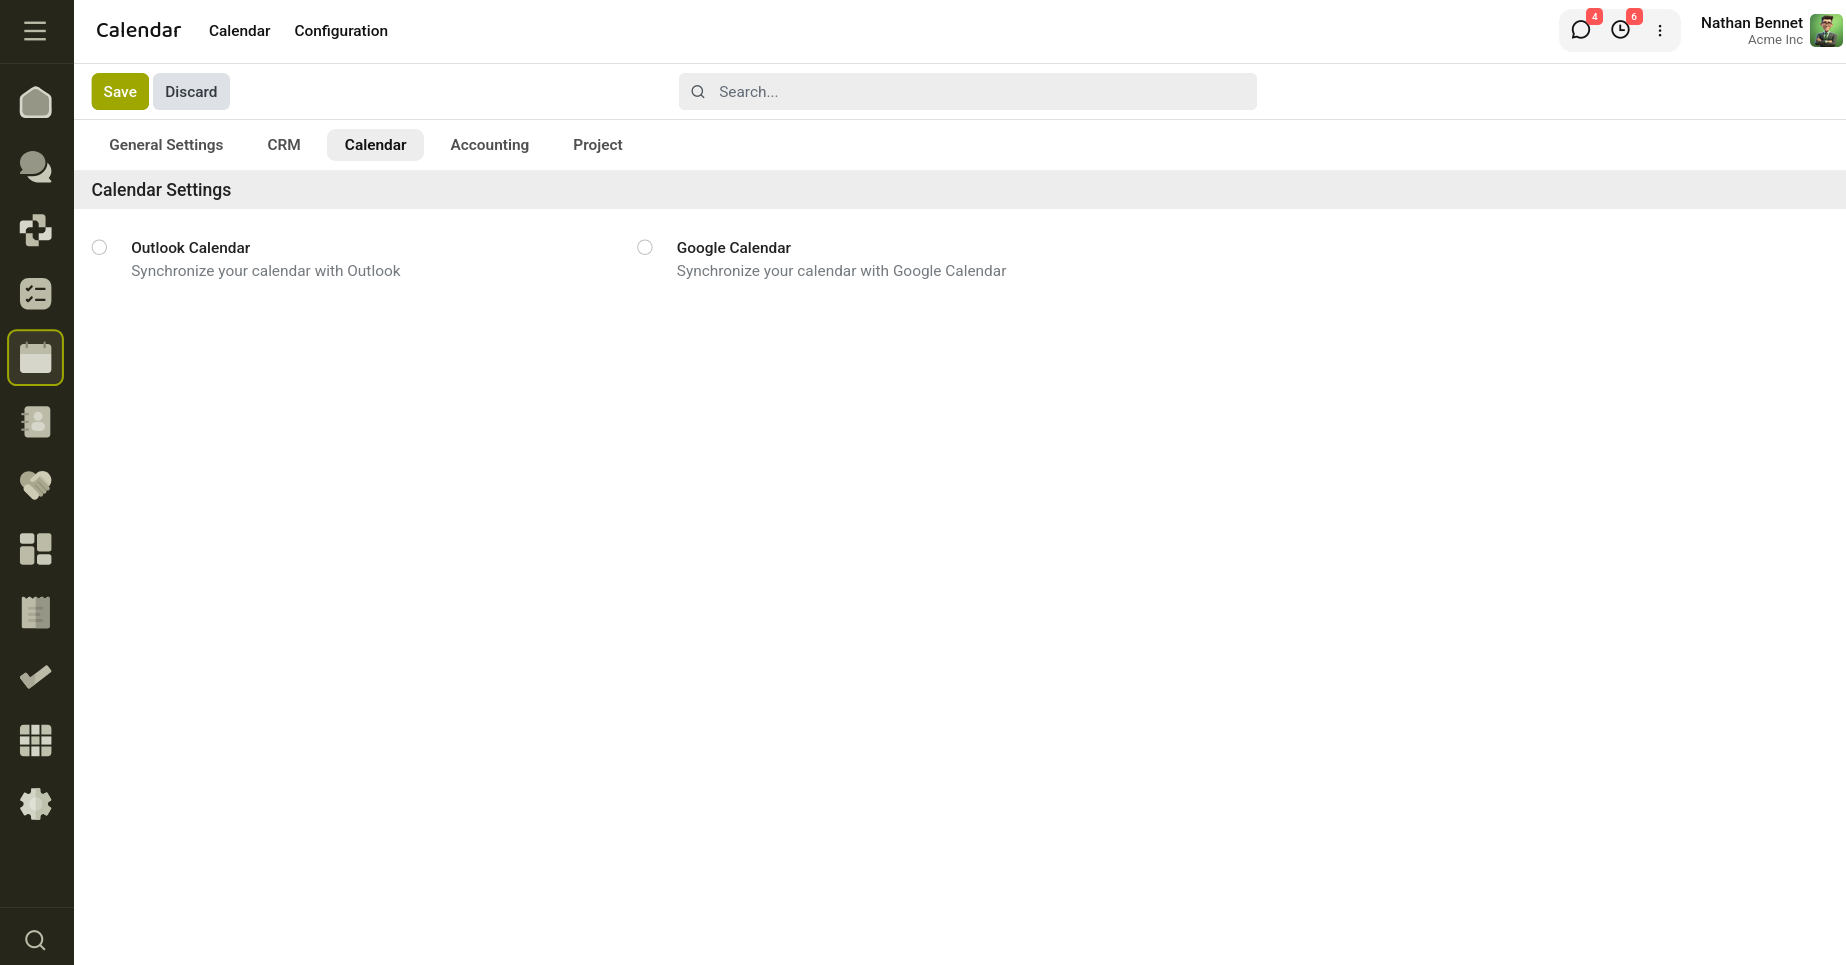
Fig 2.1 — Third-party Calender Integration settings under Settings
3. Plan an Event
To schedule a new event in Cyllo Calendar, simply click on the desired date or time slot in the calendar view. Events can be created directly from any calendar view, with options to invite attendees, set event duration, and generate a Cyllo Meeting link for virtual collaboration. This streamlined process helps teams organize their schedules efficiently from a single interface.
- Open the Calendar application.
- Click on the desired date or time slot in the calendar.
- In the New Event pop-up window, enter the event title.
- Verify or modify the start and end date/time as required.
- Enable the All Day option if the event does not have a specific time.
- Add the required attendees to invite participants.
- Generate a Cyllo Meeting link for virtual meetings.
- Optionally, enter a description for the event.
- Click Save & Close to create the event
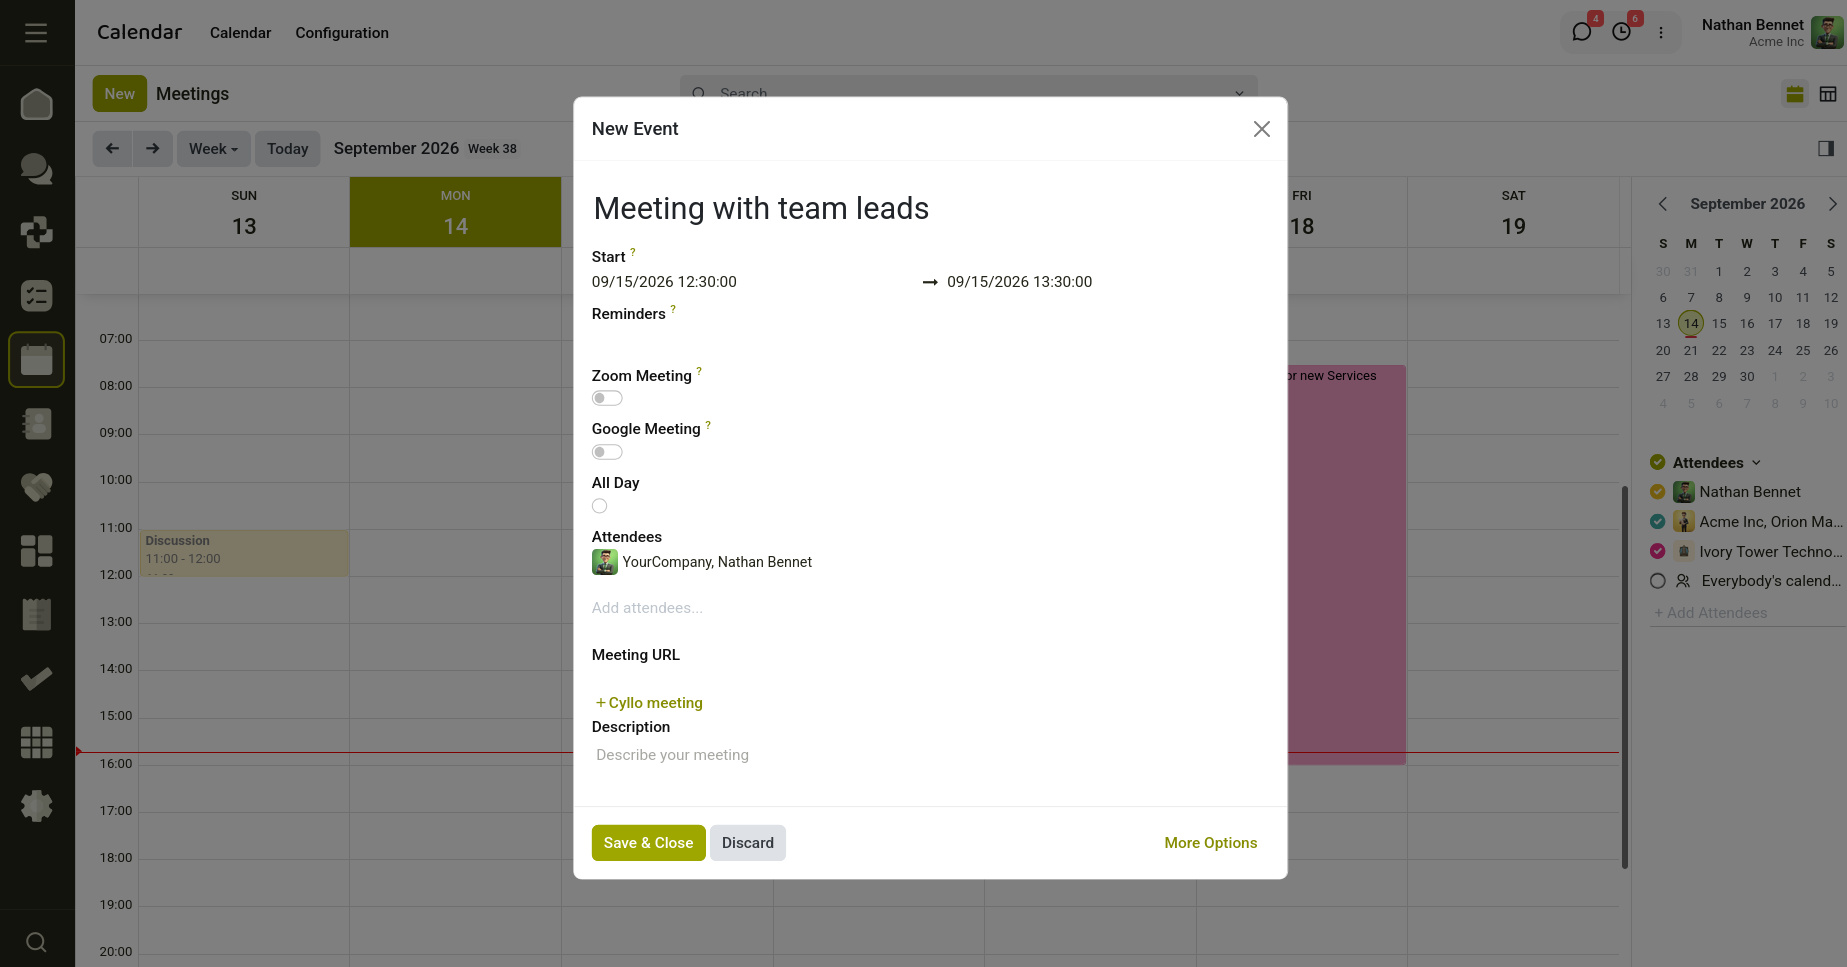
Fig 3.1 — Plan an event from Calender.
4. Zoom Integration
The Cyllo Zoom integrates Zoom Meetings with Cyllo’s Calendar and Activity management system. It enables users to create, manage, and join Zoom meetings directly from Cyllo while maintaining synchronization between Cyllo events and Zoom meetings.
The module supports centralized Zoom authentication, automatic meeting synchronization, token refresh handling, attendee notifications, and seamless event collaboration.
4.1 Key Features
- Global OAuth Integration: A single setup of Zoom Client credentials within Cyllo’s General Settings is sufficient for all system users.
- Automated Meeting Creation: Toggling the "Zoom Meeting" option on a calendar event automatically creates a corresponding meeting in Zoom via API.
- Meeting Synchronization: Updating or deleting a Zoom-enabled calendar event in Cyllo instantly updates or deletes the corresponding meeting on Zoom.
- Email Invitations: Dispatches automated email invitations containing Zoom details when new attendees are added to a meeting.
4.2 Configuration Guide
Step 1: Create Zoom Application Credentials
- Create OAuth Application
- Configure OAuth Settings
- Set the callback URL
- Add the allow-list domain
- Configure Required Scopes
Step 2: Configure Cyllo Settings
- Client ID
- Client Secret
- Redirect URI
- Recording Location
Save the settings.
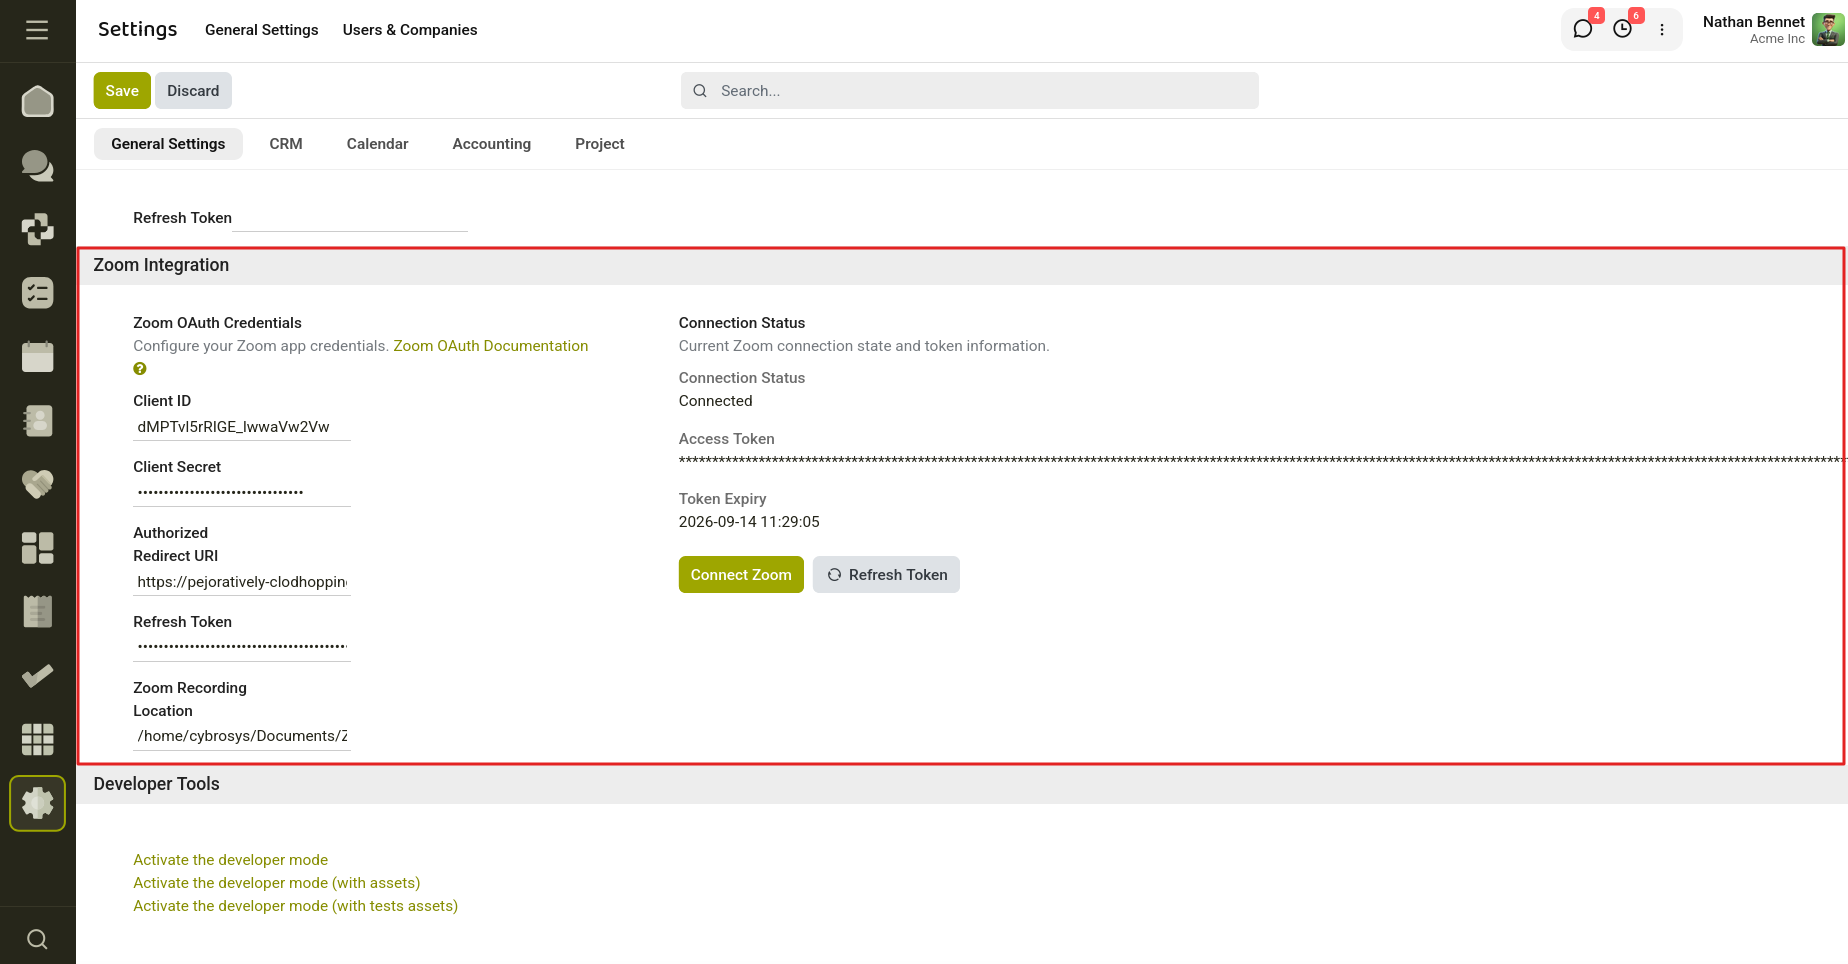
Fig 4.1 — Zoom Integration settings under Settings → General Settings
Step 3: Connect Zoom
- Click Connect Zoom
- Authenticate with Zoom
- Return to Cyllo After successful authorization:
- Connection status becomes Connected
- Access token is generated automatically
4.3 Creating a Zoom Meeting
- Open the Calendar app.
- Create a new event.
- Click More Options to open the detailed event form.
- Enable the Zoom Meeting option.
- Add meeting attendees.
- Save the event.
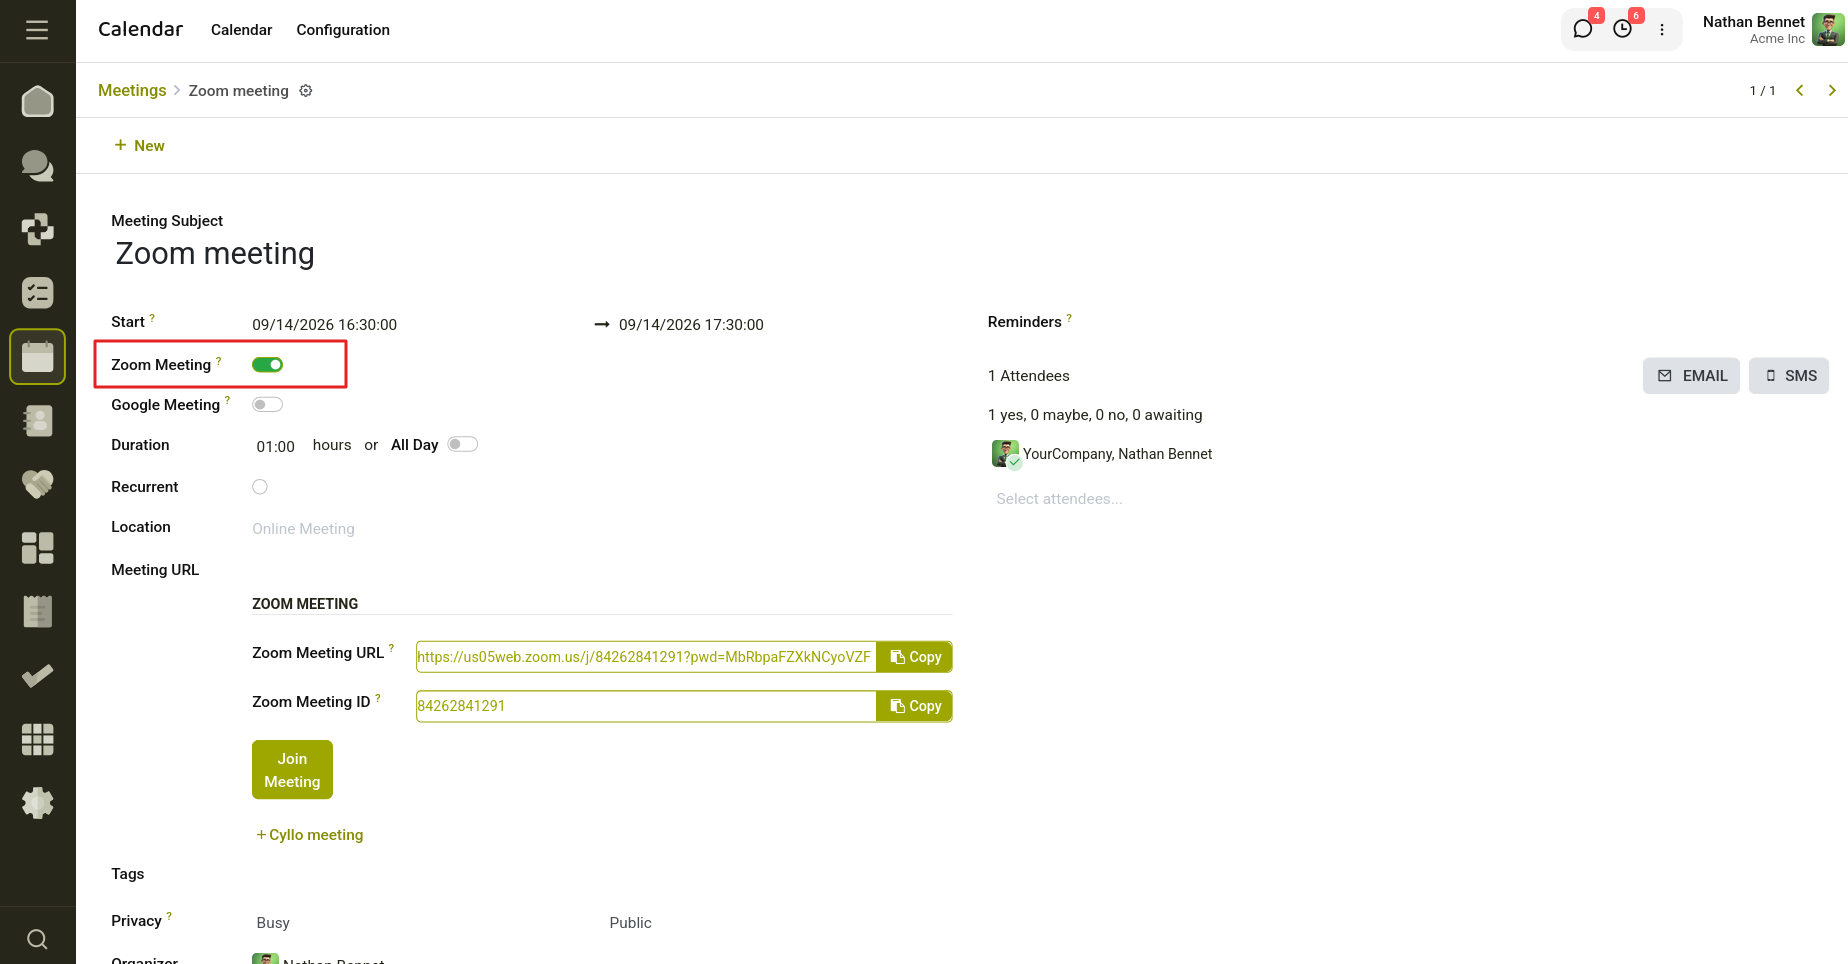
Fig 4.2 — Calendar event form with the Zoom Meeting option enabled
After the event is saved, the module automatically performs several background operations to establish communication between Cyllo and Zoom and ensure that both systems remain synchronized.
4.4 Zoom Meeting Creation
It sends a request to the Zoom API using the configured OAuth credentials and event information from Cyllo. Details such as the meeting title, scheduled date and time, duration, and participants are passed to Zoom. Based on this information, Zoom creates a new meeting and returns the generated meeting details.
This removes the need for users to manually create meetings in the Zoom application, allowing the entire process to be handled directly from Cyllo.
After the Zoom meeting is successfully created, the module links the Cyllo calendar event with the corresponding Zoom meeting. The necessary meeting references and identifiers are stored to maintain a connection between both systems.
This synchronization ensures that any modifications made in Cyllo, such as changing the meeting time, updating event information, or deleting the event, are automatically reflected in Zoom.
4.5 Meeting Information Generation
Once the Zoom API returns the meeting response, the module retrieves and stores the meeting details within Cyllo. Important information generated includes:
- Zoom Meeting URL – Provides a direct link for participants to join the meeting.
- Meeting Password – The password required to access protected meetings. These details are automatically displayed within the calendar event and are further used for invitation emails, notifications, reminders, and quick access to the meeting.
By clicking on the Email button near the attendees, a popup appears with Zoom details.
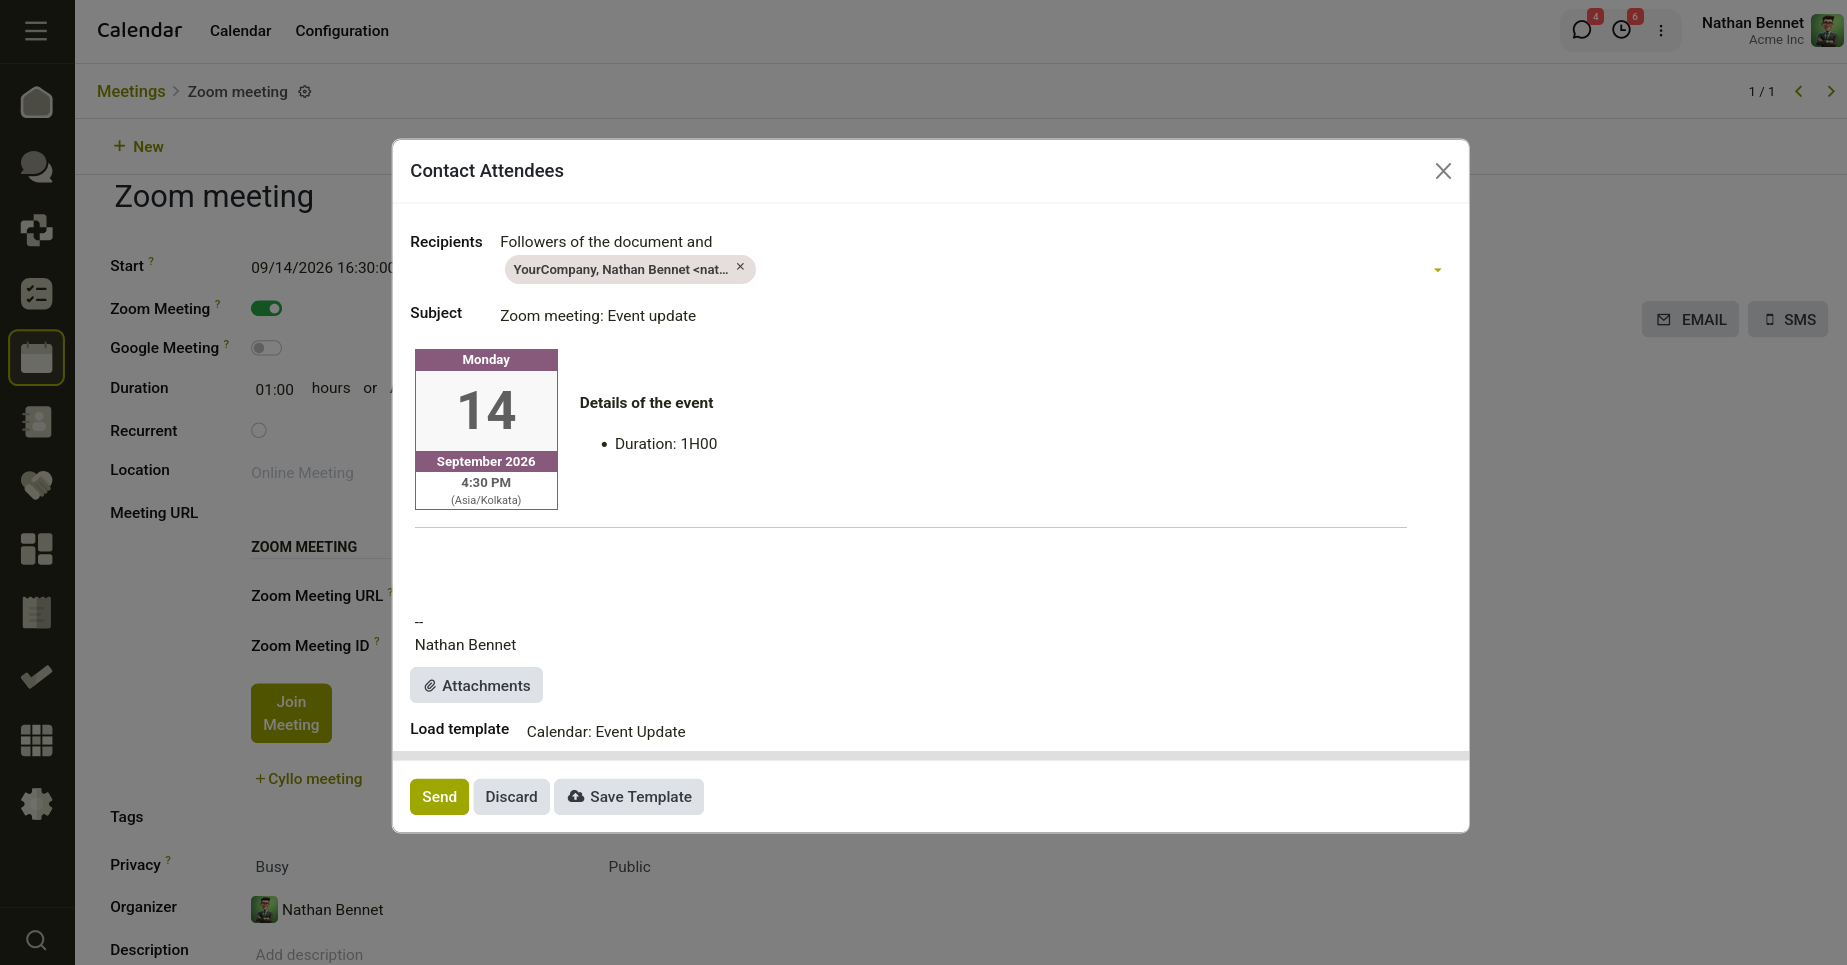
Fig 4.3 — Contact Attendees popup showing Zoom meeting details
5. Google Meet Integration
The Cyllo Google Meet module integrates Google Meet with Cyllo Calendar, allowing users to create and manage Google Meet sessions directly from calendar events. Once configured, the system automatically generates meeting links, synchronizes events with Google Calendar, sends invitations to attendees, and provides meeting reminders.
5.1 Key Features
- Centralized Google OAuth configuration
- Automatic Google Meet creation from Cyllo calendar events
- Automatic generation of meeting links
- Dynamic event description with meeting information and join button
- Automatic synchronization between Cyllo and Google Calendar
- Email invitations for attendees
5.2 Configuration
Access to Google Cloud Console is required before configuring.
Step 1: Create a Google Cloud Project
- Open Google Cloud Console: https://console.cloud.google.com/
- Create a new project.
- Navigate to: APIs & Services → Library
- Search for: Google Calendar API
- Click Enable.
Step 2: Configure OAuth Consent Screen
- Navigate to: APIs & Services → OAuth Consent Screen
- Select your user type: Internal or External
- Fill in the required application information.
- Add the following scope: https://www.googleapis.com/auth/calendar.events
- Save the configuration.
Step 3: Create OAuth Credentials
- Navigate to: APIs & Services → Credentials
- Click: Create Credentials → OAuth Client ID
- Select: Application Type: Web Application
- Enter a name
- Add the Authorized Redirect URI: https://developers.google.com/oauthplayground
- Click Create.
- Copy the generated Client ID and Client Secret
Step 4: Generate Refresh Token
- The module requires a refresh token for offline access.
- Open OAuth Playground: https://developers.google.com/oauthplayground/
- Click the Settings icon.
- Enable: Use your own OAuth credentials
- Enter the Client ID and Client Secret
- Click: Authorize APIs
- Sign in with your Google account and grant permissions.
- Click: Exchange authorization code for tokens
- Copy the generated Refresh Token
After generating the Google OAuth credentials and Refresh Token, these details must be configured in Cyllo so that the system can communicate with Google services.
- Navigate to: Settings → General Settings
- Scroll to the Google Integration section.
- Enter the generated Google credentials (Client ID, Client Secret, Refresh Token).
- Click Save.
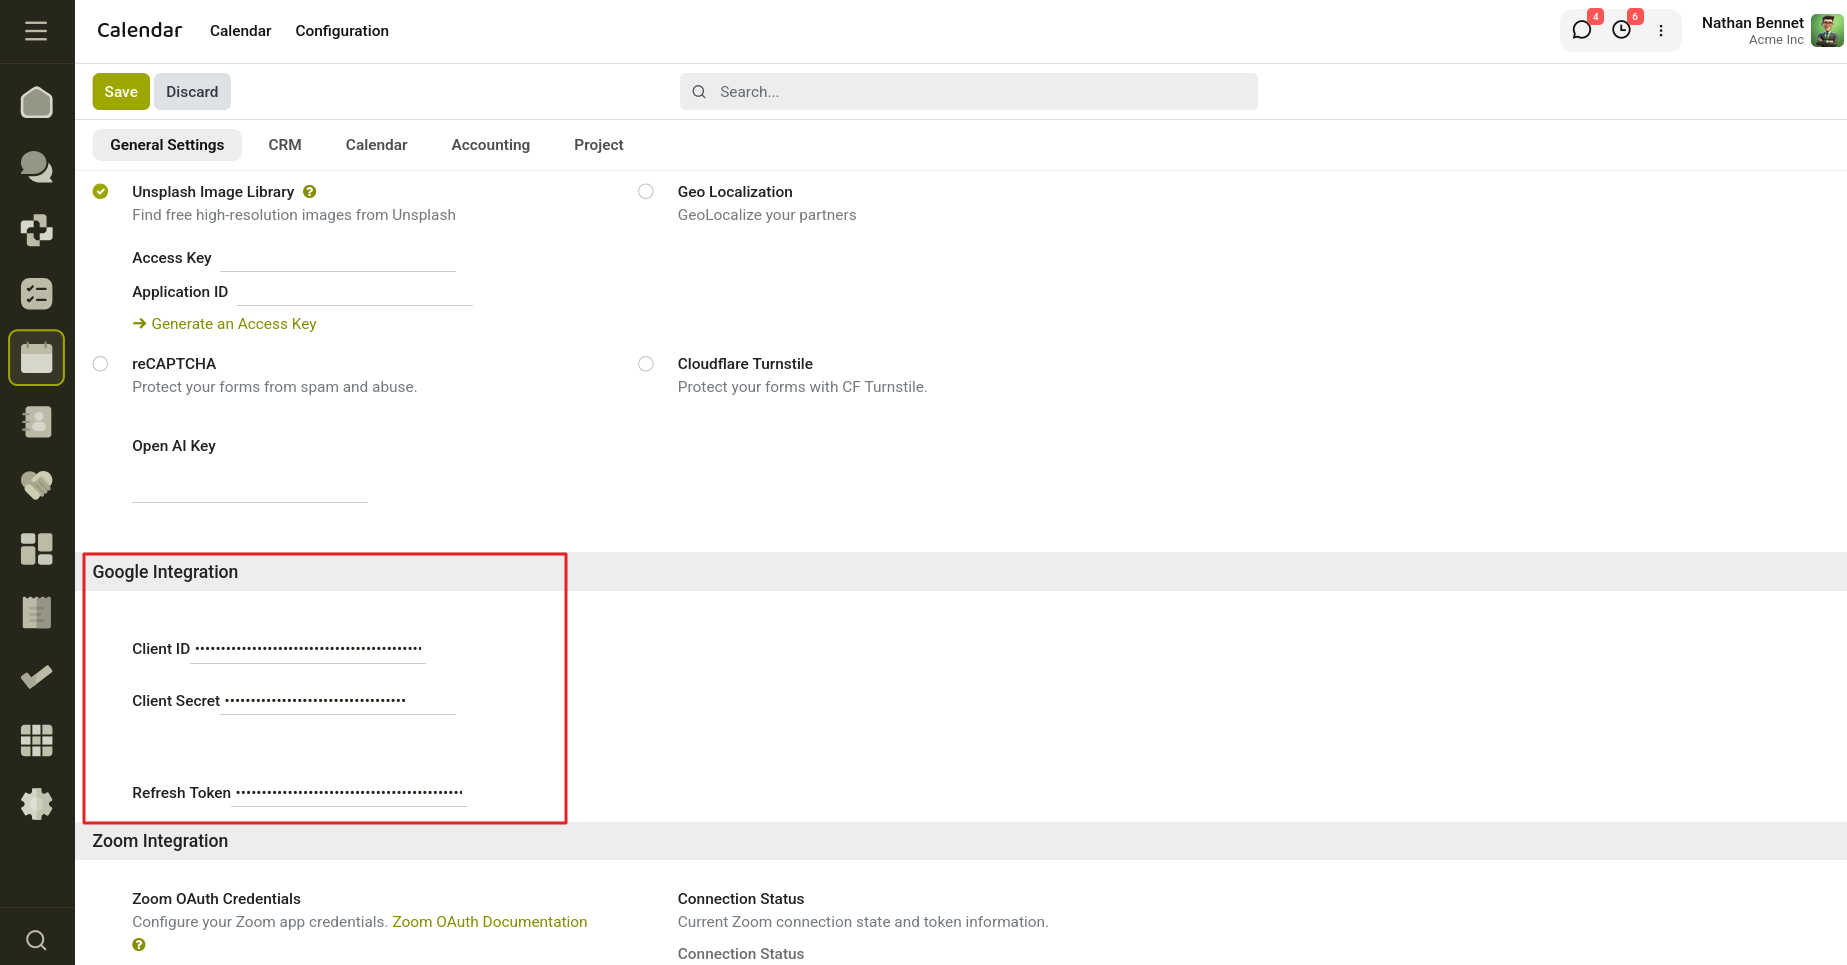
Fig 4.4 — Google Integration using Client ID, Client Secret and Refresh Token
Once saved, Cyllo stores these credentials and uses them whenever Google Meet operations are required. The system can then automatically authenticate with Google and obtain access tokens whenever meetings need to be created or updated.
The Google Meet integration is now successfully configured.
5.3 Creating Google Meet Events
After completing the configuration, users can create Google Meet meetings directly from the Cyllo Calendar.
- Open the Calendar application.
- Create a new calendar event.
- Open the complete event form.
- Enable the Google Meeting option.
- Add meeting attendees if required.
- Click Save. After saving the event, the system automatically performs the following operations:
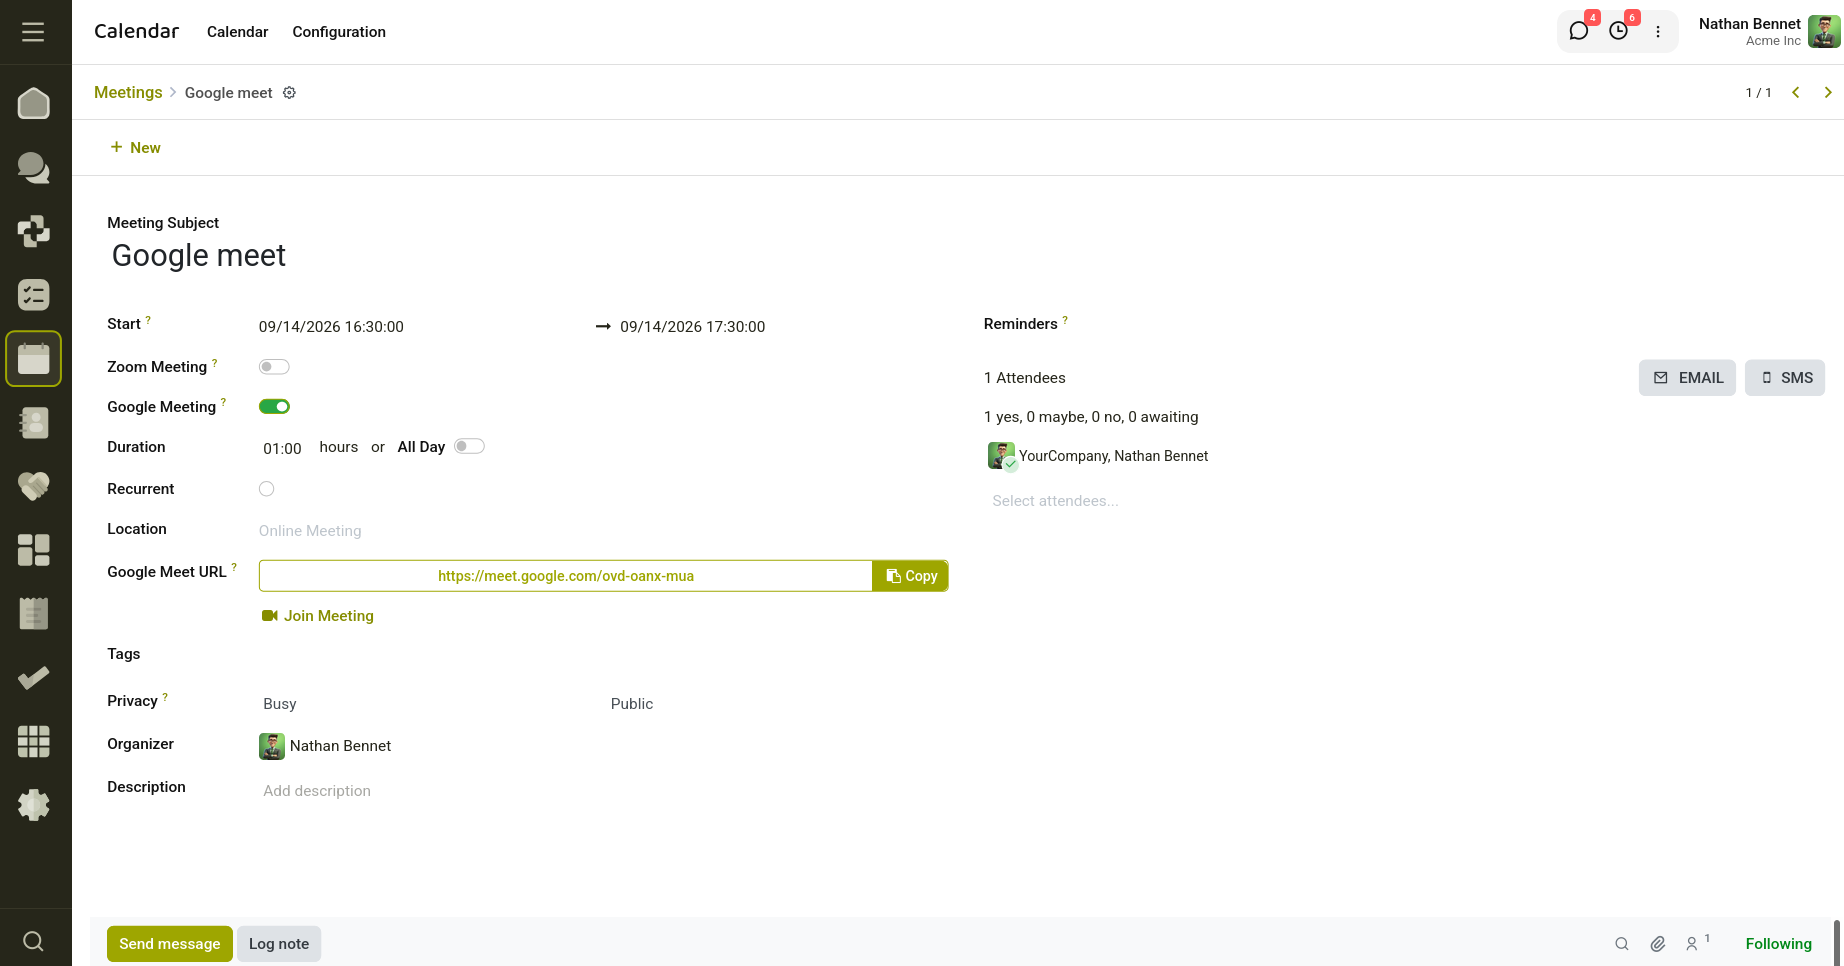
Fig 5.1 — Google Meet link generated on the calendar event
5.4 Google Meet Creation
The system uses the stored Google credentials to authenticate with Google APIs and creates a corresponding Google Calendar event. During this process, Google automatically generates a Google Meet session and a unique meeting URL.
The newly created Google Calendar event is linked with the Cyllo calendar event. This synchronization ensures that both systems remain connected and consistent.
Actions such as updating or deleting the event in Cyllo can also be reflected in the associated Google event.
5.5 Meeting Information Generation
Once the meeting is created successfully, the generated meeting details are retrieved from Google and stored in Cyllo.
Stored information includes:
- Google Meet URL
The Google Meet URL allows participants to join the meeting directly, while the Google Calendar Event ID is used internally to maintain synchronization between Cyllo and Google Calendar.
When attendees are added to the event, Cyllo automatically sends email invitations containing the meeting details and Google Meet link.
This ensures that all participants receive meeting access information immediately after the event is created.