

Cyllo Restaurant Documentation
Introduction
The Restaurant module in Cyllo ERP is a specialized Point of Sale system built for food service operations. It extends the standard POS module with features designed specifically for dine-in restaurant environments — a visual floor plan where staff manage table occupancy in real time, a kitchen workflow that sends orders directly to preparation printers or a kitchen display screen, split billing for multi-guest tables, and an image-driven menu interface optimized for fast, accurate order taking on tablets or touchscreen terminals. All of this operates from the same session-based framework used across Cyllo's retail POS, keeping the experience consistent for operators managing both restaurant and retail counters from one system.
Because the Restaurant module is built on top of Cyllo's POS infrastructure and shares the central Cyllo ERP database, every transaction flows automatically into the connected modules. A bill settled at the table posts immediately to the Accounting module under the configured journals. Menu items are products in the Inventory module — stock-tracked items can display live availability counts. Customer loyalty points earned during a meal update in the same profile used by the Sales and CRM teams. There is no separate restaurant software to synchronize, no end-of-day export, and no risk of discrepancies between the restaurant's records and the company's financial books.
1. Getting Started
This section walks through everything needed before the first service — installing the Restaurant module, enabling it alongside POS, and configuring the restaurant's basic shop properties.
1.1. What is the Restaurant Module?
The Restaurant module is a dedicated POS extension within Cyllo that replaces the standard retail checkout flow with a dine-in service workflow. Instead of a simple product grid and order panel, staff see a live floor map showing all tables. Clicking a table opens the order screen for that table where items can be added, kitchen tickets can be sent, and the bill can be generated when the guests are ready to pay. The module retains the full power of Cyllo's POS payment methods, loyalty programs, discount rules, session reporting, hardware integration and layers restaurant-specific features on top. This means a business running both a restaurant and a retail counter can manage both from the same Cyllo instance using the same product and customer database.
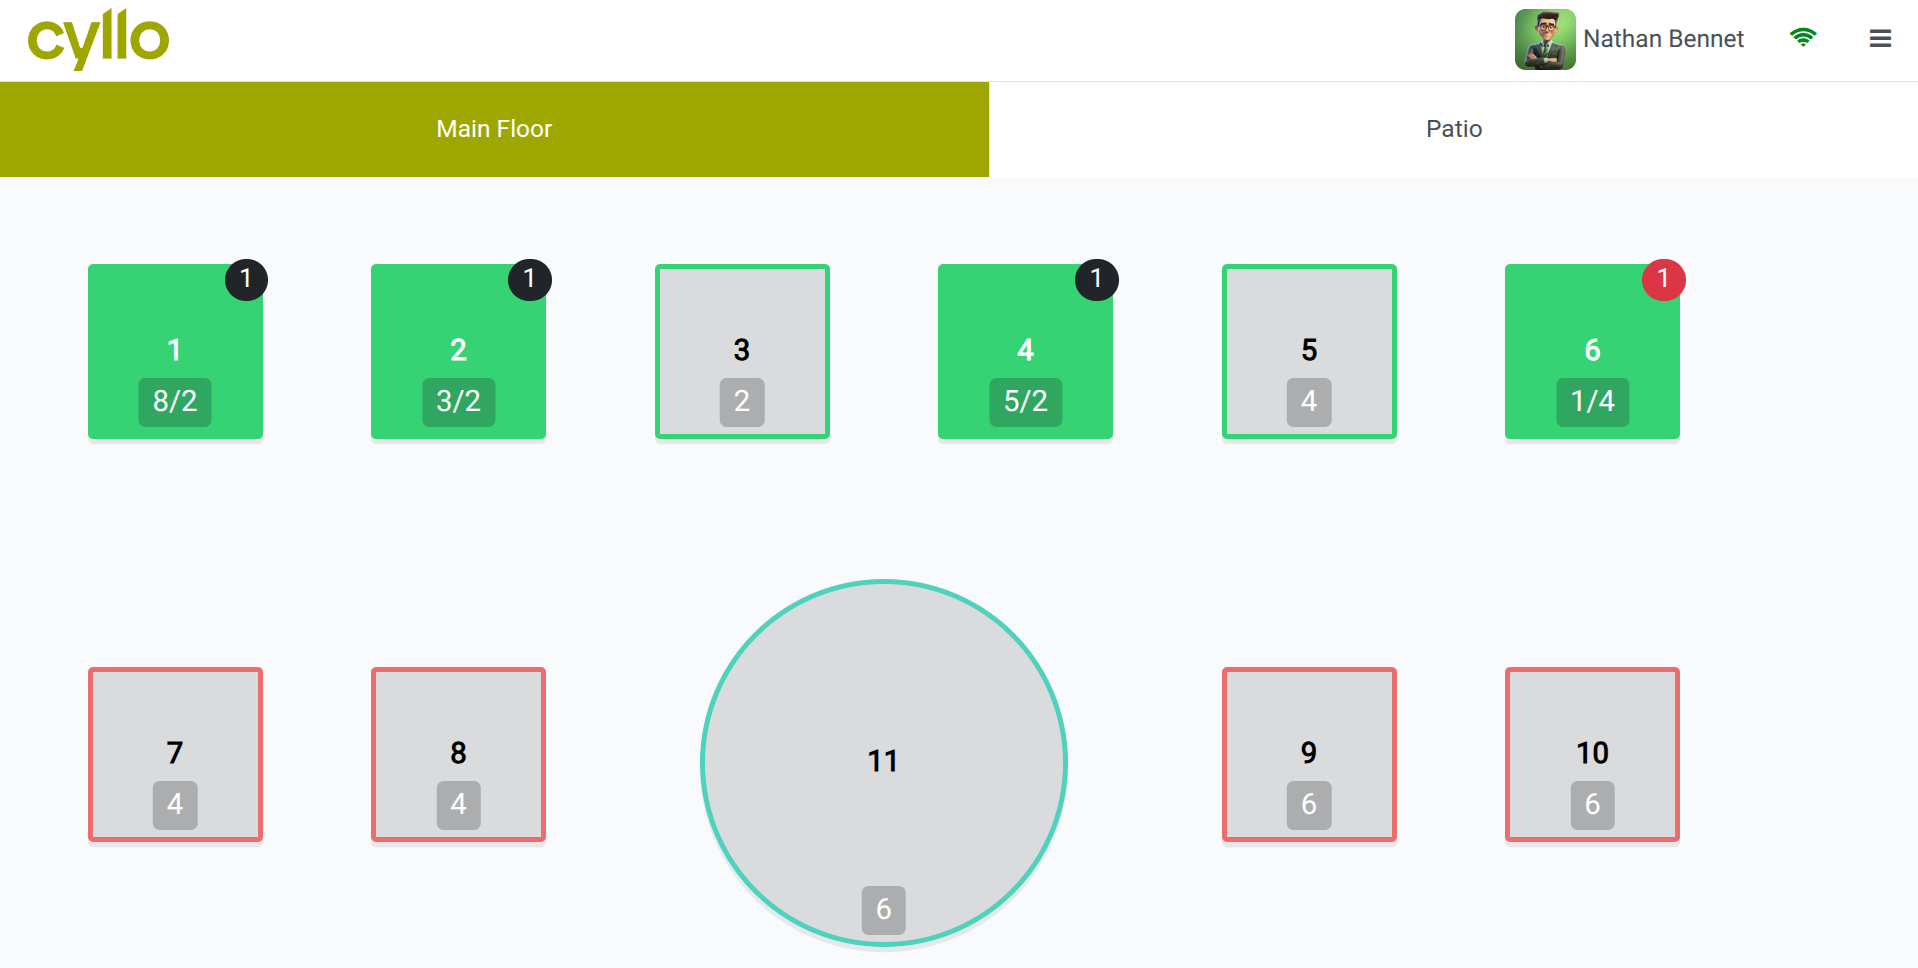
Fig 1.1 — Cyllo Restaurant session — floor plan view with tables shown in green (occupied), seat count below.
Note
The Restaurant module needed to be installed first from apps. Cyllo automatically creates a default Restaurant for you to configure. The Restaurant module does not appear as a standalone app in the menu. It is accessed through Point of Sale → Configuration → Point of Sale, where a new Restaurant section appears in the shop settings after installation.
1.2. Creating a Restaurant POS Shop
A restaurant POS shop is a standard Cyllo POS configuration with the Restaurant options enabled. Each physical dining area or service point — for example, a main dining room and a rooftop bar — is configured as a separate POS shop, each with its own floor plan, menu, and session.
- Go to Point of Sale → Configuration → Point of Sale.
- Click New to create a new shop or open an existing POS shop to convert it for restaurant use.
- Enter the Shop Name (e.g. Main Dining Room, Rooftop Bar).
- In the Restaurant section of the settings, enable the Is a Bar/Restaurant toggle. This activates all restaurant-specific features like floor plan, table management, preparation printers, and kitchen display.
- Configure the remaining tabs — Payment, Connected Devices, Bill & Receipt — as needed.
- Click Save.
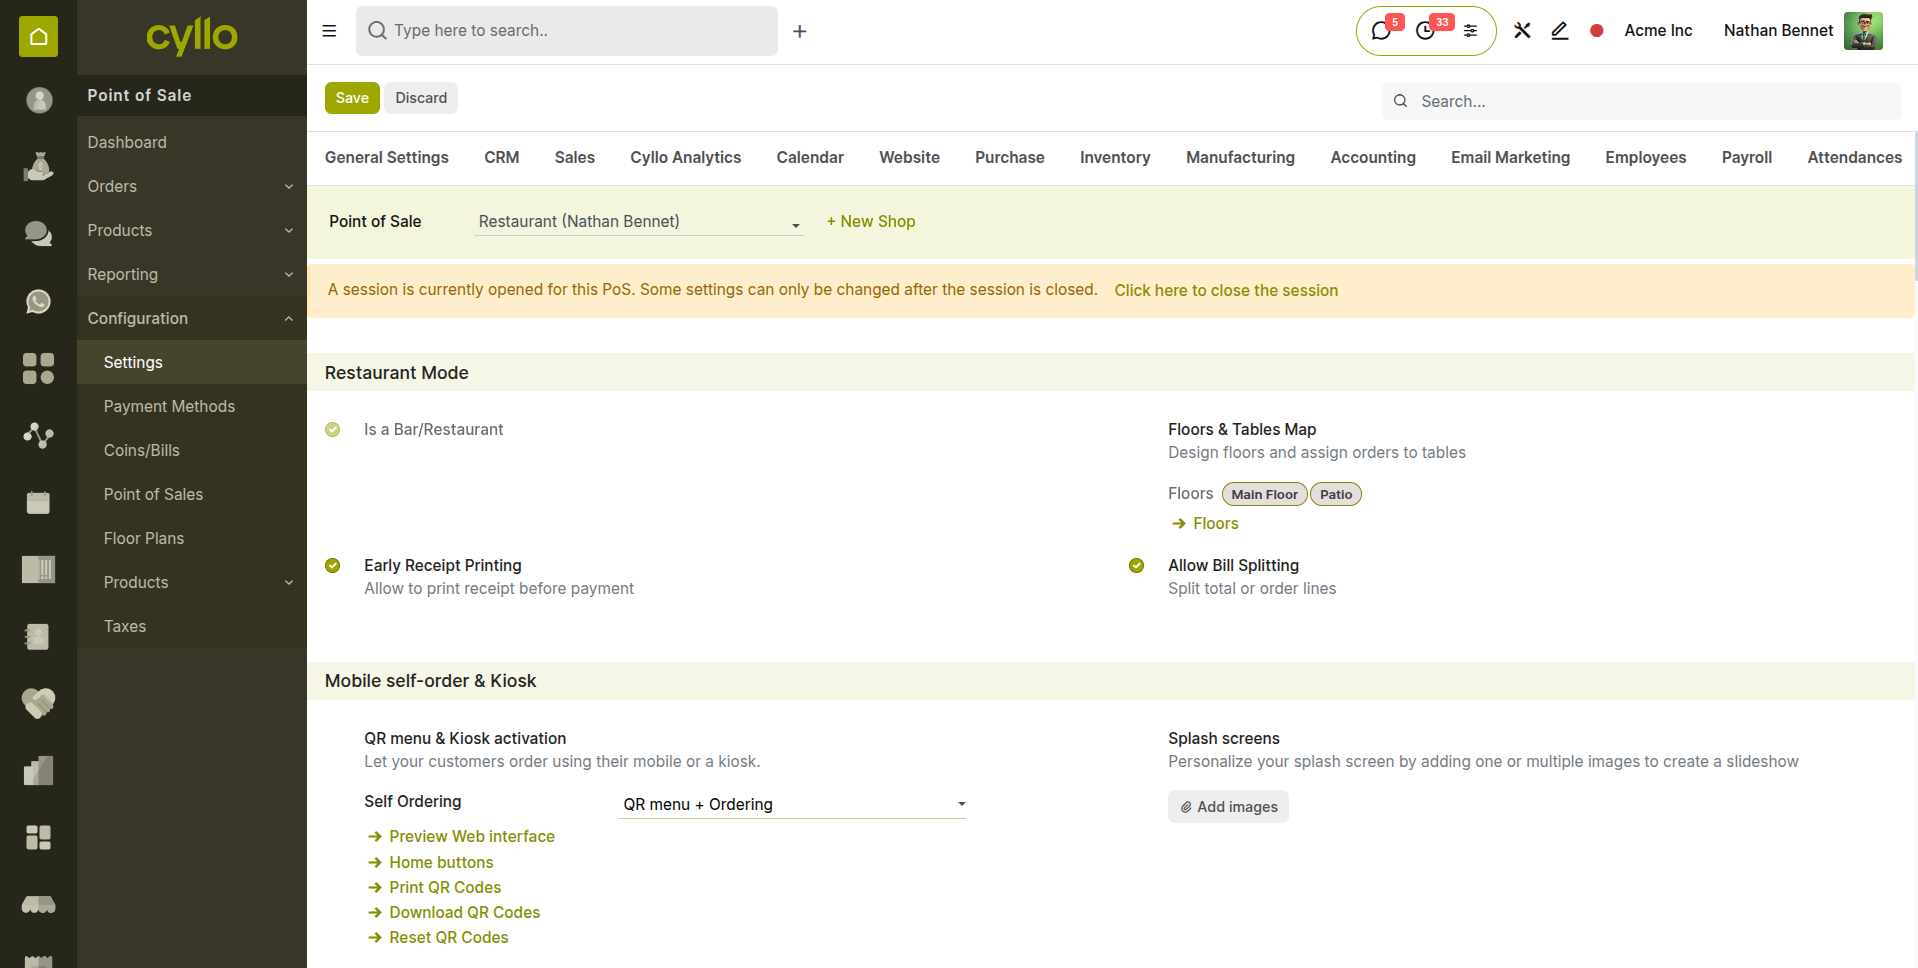
Fig 1.2 — POS shop configuration form — Restaurant section with 'Is a Bar/Restaurant' toggle enabled, Floor Plans and Kitchen Printers options visible
Key Fields
- Is a Bar/Restaurant: Master toggle that activates all restaurant-specific features for this POS shop.
- Floor Plans: Link one or more floor plans to this shop. Each floor plan represents a physical seating area.
- Kitchen Printers: Assign the preparation printers that will receive kitchen tickets from this shop.
- Guest Count: Enable to prompt staff to enter the number of guests when opening a table.
2. Floor & Table Management
The floor plan is the visual heart of the Restaurant module. It gives staff an instant overview of the entire dining area — which tables are free, which are occupied, how long guests have been seated, and whether any table has an active order awaiting kitchen preparation.
2.1. Designing the Floor Plan
The floor plan editor is a drag-and-drop canvas where administrators place and arrange table shapes to match the physical layout of the dining room. The result is a digital map that floor staff see when they open a restaurant session — a direct visual representation of the room they are working in.
- Go to Point of Sale → Configuration → Floor Plans.
- Click New to create a new floor plan.
- Enter the Floor Plan Name, add Tables with seat cound and shape.
- Assign the floor plan to a POS shop by opening the shop configuration (Point of Sale → Configuration → Point of Sale) and adding it in the Floor Plans field.
- Open corresponding Restaurant, click ‘Edit Plan’ in the hamburger menu (≡) at the top-right corner.
- In the floor plan editor, use the Add Table button to place a table shape on the canvas.
- Drag tables to position them on the canvas to match the physical room layout.
- Click and drag the corners of each table shape to resize it to represent the physical table size.
- Click Save when the floor plan is complete.
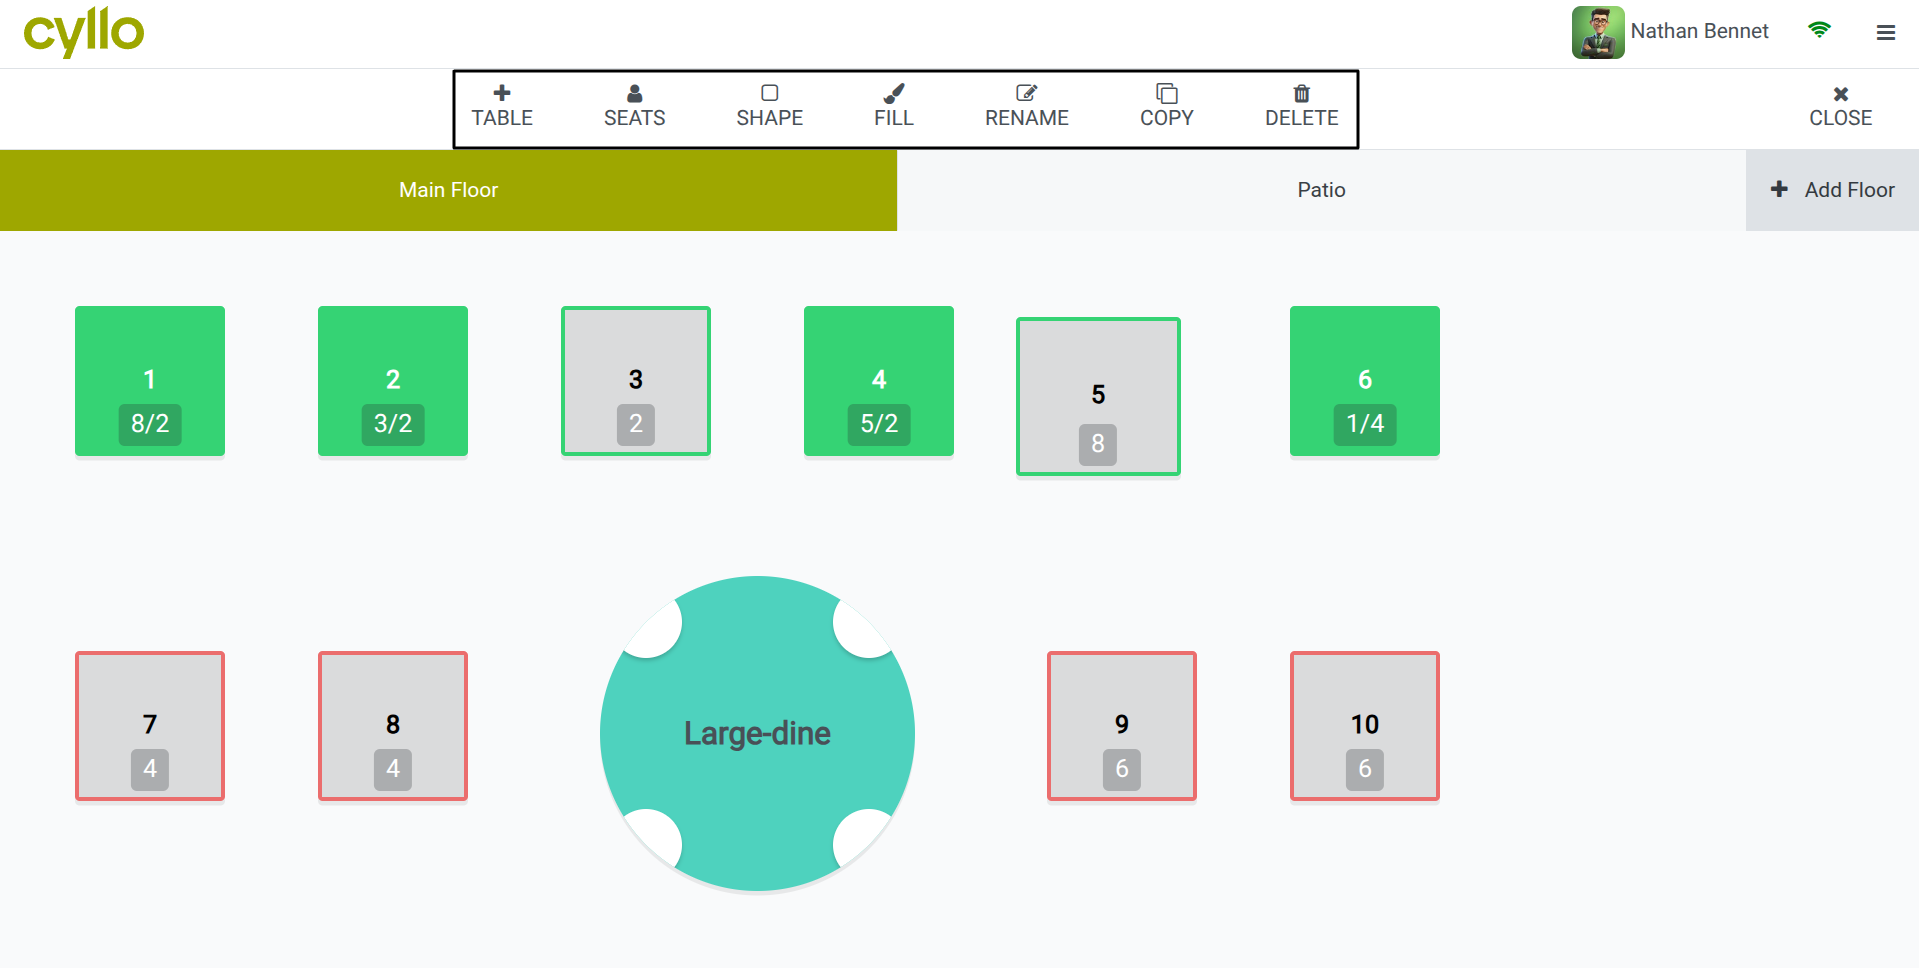
Fig 2.1 — Floor plan editor — canvas with rectangular and round table shapes positioned and labelled, Add Table button at top
TIP
Design the digital floor plan to mirror the physical room as closely as possible. When tables are easy to locate on screen, service staff make fewer selection errors during a busy service.
2.2. Managing Multiple Floors
Restaurants with multiple seating areas (a ground floor dining room, a rooftop terrace, a private events room) can create a separate floor plan for each area. In the restaurant session, floor tabs appear at the bottom of the screen, allowing staff to switch between floors instantly.
- Create a separate floor plan for each physical seating area from Point of Sale → Configuration → Floor Plans.
- Open the POS shop configuration (Point of Sale → Configuration → Point of Sale) and add all floor plans to the Floor Plans field on this shop.
- During a session, tabs for each floor appear at the top of the floor map screen.
- Tap a floor tab to switch to that seating area's map. Each floor maintains its own table statuses independently.
Note
Each floor plan can have a different table layout, table count, and colour scheme. There is no limit to the number of floor plans that can be assigned to a single POS shop.
3. Menu Management
Menus in the Restaurant module are built from the same product catalog used across Cyllo. Each menu item is a product configured for POS use, organised into categories that appear as tabs on the order-taking screen. This section covers how to set up and maintain the restaurant's digital menu.
3.1. Creating Menu Items
Every dish, beverage, or add-on that staff can order for a table is a product in Cyllo's product catalog. Products must be enabled for POS to appear in the restaurant order screen, and should have a clear name, price, category, and image for fast identification during service.
- Go to Point of Sale → Products → Products and click New.
- Enter the Product Name (e.g. Grilled Salmon, House Red Wine, Sparkling Water).
- Set the Sales Price — this is the menu price charged to guests.
- Under the Sales tab, enable Available in POS and set a POS Category (e.g. Mains, Beverages, Desserts).
- Upload a product image. In the restaurant order screen, products are displayed as image tiles, so a clear photo makes ordering faster and reduces errors.
- Under the Accounting tab, assign the Customer Tax relevant to food and beverage sales.
- Click Save.
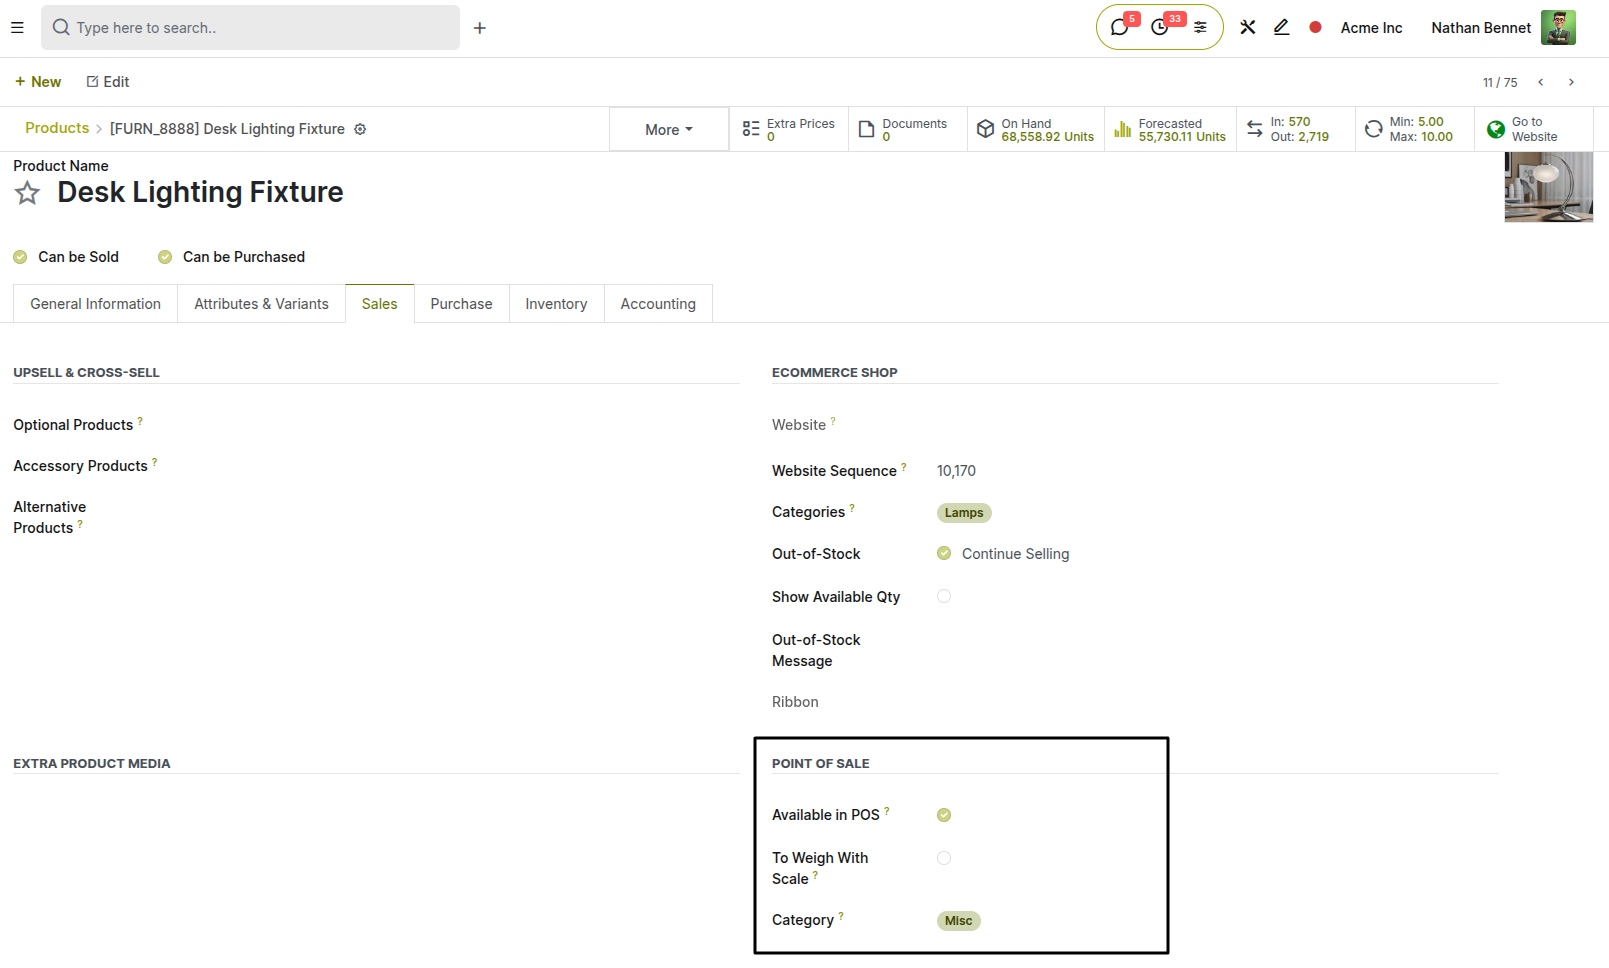
Fig 3.1 — Product form — product name, price, image, Available in POS toggle, and POS Category field on the Sales tab
Key Fields
- Product Name: Displayed on the order screen tile, the kitchen ticket, and the guest bill. Use clear, descriptive names.
- Sales Price: The price billed to the guest. Can be overridden by pricelists for happy hour or special event pricing.
- POS Category: Determines which category tab the item appears under on the order screen.
- Product Image: Shown as the tile image on the order screen. Clear food photography improves order accuracy.
- Available in POS: Must be enabled for the item to appear during a session.
Note
Variants are configured on the product form under the Attributes & Variants tab.
3.2. Menu Categories
POS Product Categories organise the order screen into tabs — Starters, Mains, Desserts, Beverages, Cocktails. Well-organised categories reduce the time staff spend searching for items during a busy service. Categories can be sequenced, nested, and assigned icons or colours.
- Go to Point of Sale → Configuration → Products → POS Product Categories.
- Click New to create a category.
- Enter the Category Name (e.g. Starters, Grills, Soft Drinks).
- Set the Sequence to control the order in which tabs appear on the order screen — lower values appear first.
- Optionally upload an image to use as the category icon on the order screen.
- Save. Assign this category to menu items via each product's POS Category field.
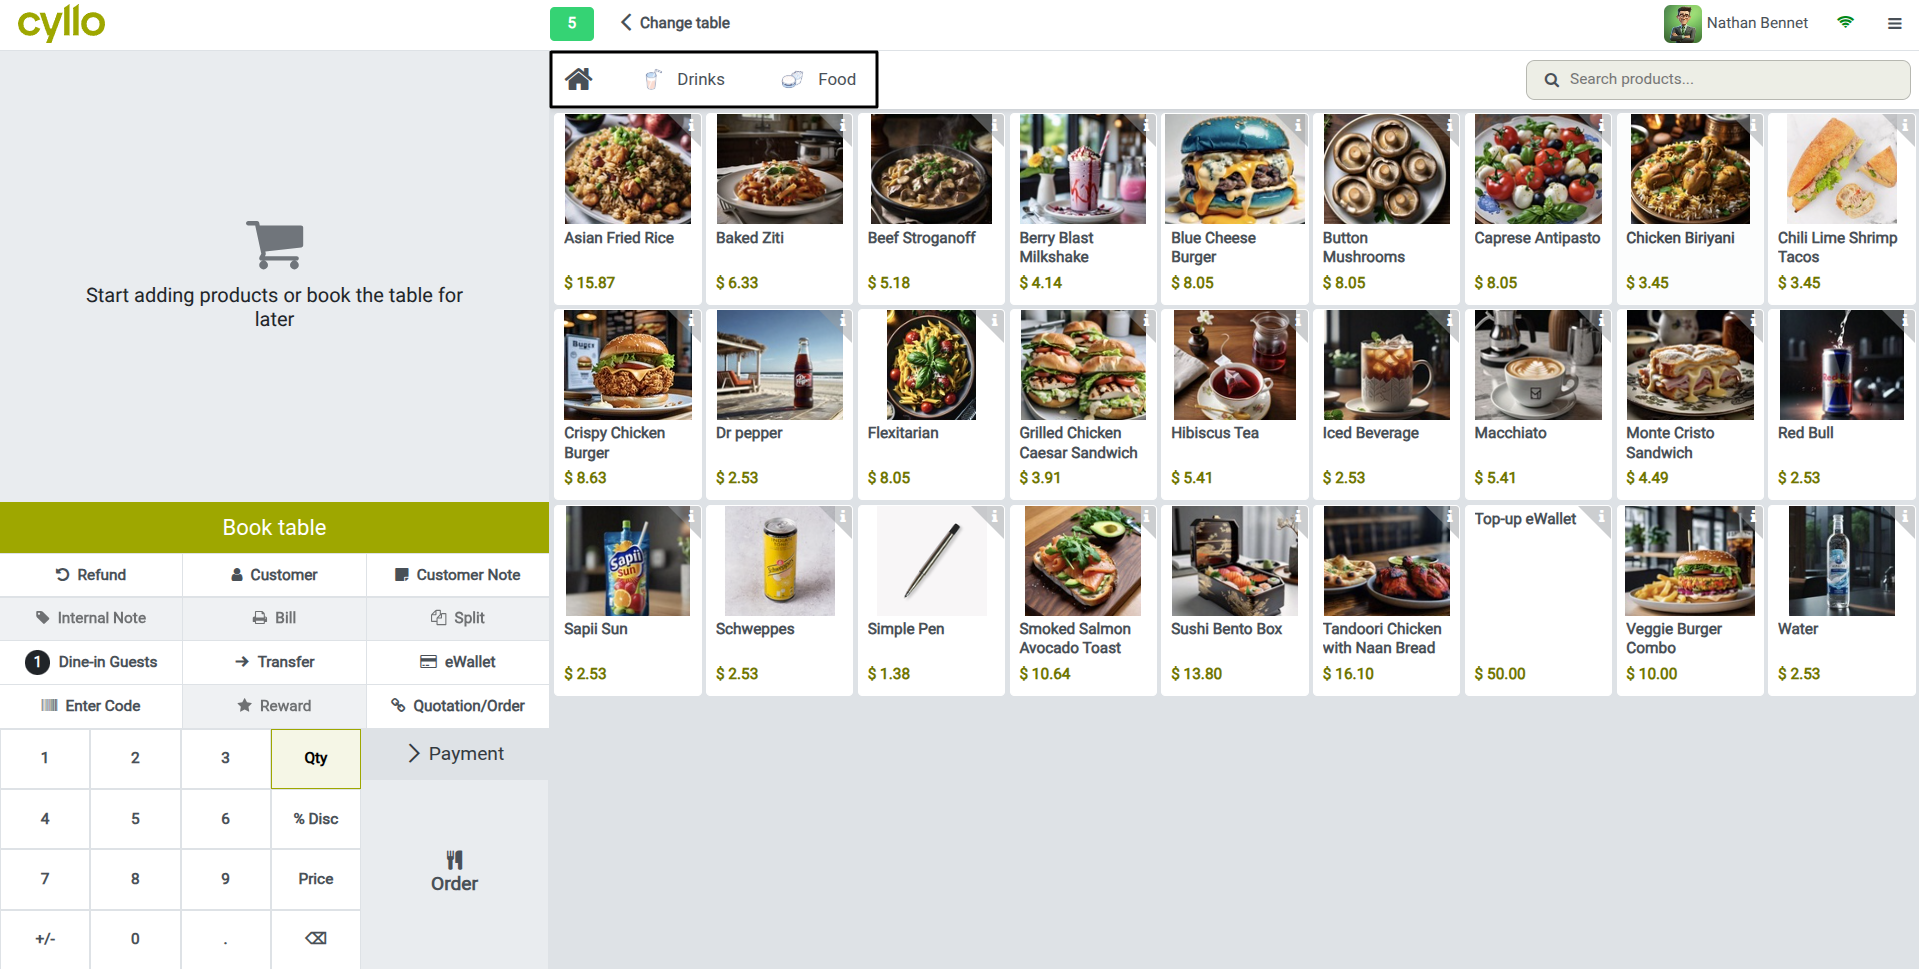
Fig 3.2 — Restaurant order screen — category tabs at the top of the product grid (Starters, Mains, Grills, Desserts, Beverages) with Mains active
TIP
Limit the top-level category tabs to six or fewer for easy navigation on a tablet screen. Use nested sub-categories for beverages (Hot Drinks, Soft Drinks, Cocktails) rather than creating a separate top-level tab for each.
3.3. Product Notes
Guests frequently customize their orders — no onions, sauce on the side, medium-rare. The Restaurant module supports order notes at the product level, allowing staff to attach specific preparation instructions to individual items when adding them to an order. For items with predefined customisation options (steak doneness, pizza size), product variants handle this structurally.
Order Notes:
- In the restaurant session, after tapping a product to add it to the order, tap the Note or pencil icon on the order line.
- A text input panel opens. Type the specific instruction (e.g. No garlic, Extra spicy, Sauce on the side).
- Confirm the note. It is printed below the item name on the kitchen ticket so preparation staff see it alongside the item.
Note
Order notes are printed on kitchen tickets but are not stored as structured data in Cyllo. For regular customisation options that need to be tracked (e.g. dietary requirements), use product variants rather than free-text notes.
3.4. Daily Specials
Seasonal dishes, daily specials, and items that run out mid-service need to be managed quickly without changing the permanent product catalog. Cyllo provides two approaches: toggling a product's availability directly from the session, or using price lists with date ranges for scheduled specials.
Scheduling Daily Specials with Pricelists:
- Go to Sales → Configuration → Pricelists and create a Daily Specials pricelist.
- Add rules that set a fixed price for each special item, with a start and end date matching the promotion period.
- Assign this pricelist to the POS shop during the relevant session. Special prices apply automatically.
- Session Management A restaurant session represents one service period, from when the first table is seated to when the last bill is settled and the till is closed. All orders, payments, and cash movements during a session are tracked together and reported as a single unit.
4.1. Opening a Restaurant Session
Opening a session loads the floor plan, the product catalog, and all active payment methods into the restaurant interface. The session must be open before any table can be seated or order taken. Session opening is the same as opening a session in POS.
4.2. Session Dashboard Overview
The restaurant session opens directly on the floor plan. This is the primary workspace for floor staff throughout the service. The floor plan shows all tables with live status indicators, and a persistent toolbar provides access to session controls.
Key Interface Areas
- Floor Map Canvas: The main working area showing all tables with real-time status colours and order counts.
- Floor Tabs: Switch between seating areas (Ground Floor, Terrace, etc.) at the top of the screen.
- Top Toolbar: Access the hamburger menu (≡) for session controls, cash in/out, manager settings, and close session.
- New Order Button: Create a takeaway or counter order without assigning it to a table.
- Search Bar: Find a specific table by name when the floor plan has many tables.
4.3. Cash In / Cash Out
Cash In and Cash Out record physical cash movements in and out of the till drawer during a session — for example, removing a cash float at the start of service or taking petty cash for supplies. These movements are separate from sales revenue and are itemised in the session closing report.
- In the active session, tap the hamburger menu (≡) in the top-right corner.
- Select Cash In or Cash Out.
- Enter the amount of cash being moved.
- Enter a Reason for the movement (e.g. Opening float, Petty cash – cleaning supplies).
- Tap Confirm. The movement is recorded and the expected closing cash balance is updated.
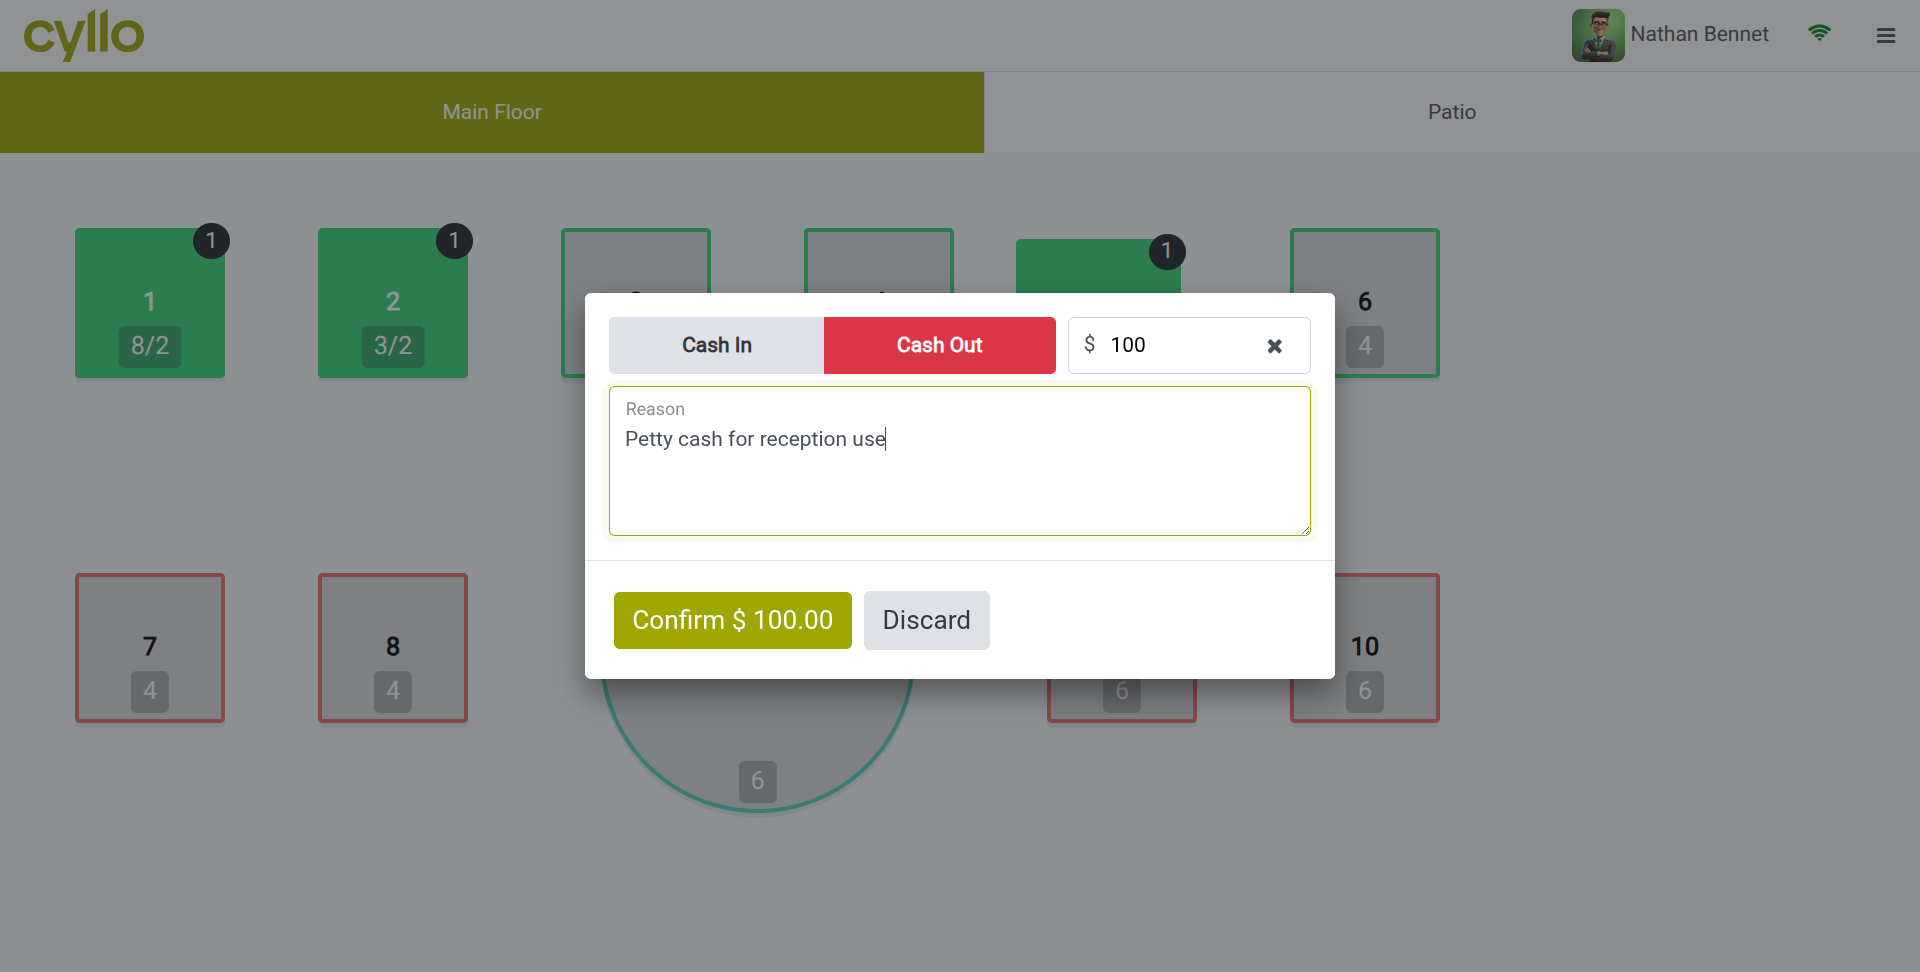
Fig 4.1 — Cash In/Out dialog — Amount field, Reason text input, and Confirm button in a modal over the floor plan
Note
Cash In and Cash Out movements appear in the session closing report under the Cash Movements section. They are not included in sales revenue figures.
4.4. Closing a Session
Closing a session ends the service period and reconciles all payments collected during the session against the expected totals. A session closing report is generated showing total sales, payment breakdown, cash movements, and any discrepancy between expected and counted cash.
WARNING
Session closing is irreversible. Verify that every table has been paid and the till count is accurate before confirming. Once closed, posted accounting entries can only be corrected by journal entries in the Accounting module.
5. Order Taking
This section covers the complete order workflow — from seating guests at a table through adding items, managing special requests, and handling table changes during a service.
5.1. Assigning a Table
The order workflow begins when a waiter taps a table on the floor map to open it for a new group of guests. The table transitions from Available (grey) to Occupied (green) and an order ticket is created for that table.
- On the floor plan, tap a grey (available) table to open it.
- The order screen opens for that table. The table name and guest count are shown at the top of the order panel. Guest count can be entered from the numpad ‘Dine-In-Guests’ button.
- The table on the floor map turns green to indicate it is now occupied.

Fig 5.1 — Guest count entry popup — number pad with guest count and Table T4 shown, over the ordering page.
Note
If a waiter taps an already-occupied table, the existing open order for that table opens directly — it does not create a second order. To create a second simultaneous order for the same table (e.g. a second round), use the New Order button within the table's order screen.
5.2. Taking an Order
Once a table is open, the order screen works like a visual menu. Waiters tap product tiles to add items to the order. Each tap adds one unit of the item. Items are grouped by category on the product grid and can be browsed or searched.
- With the table order open, browse the category tabs at the top of the product grid to find the desired item.
- Tap a product tile to add it to the order. It appears in the order panel on the right with a quantity of 1.
- Tap the same tile again to increase the quantity, or select the order line and use the numpad to type the exact quantity.
- To add a product note, tap the pencil icon on the order line (see Section 3.3 for details).
- Continue adding items. When the order is complete, tap Send to send the items to the kitchen printer or KDS.
- The table status updates to reflect that an order has been sent to the kitchen.
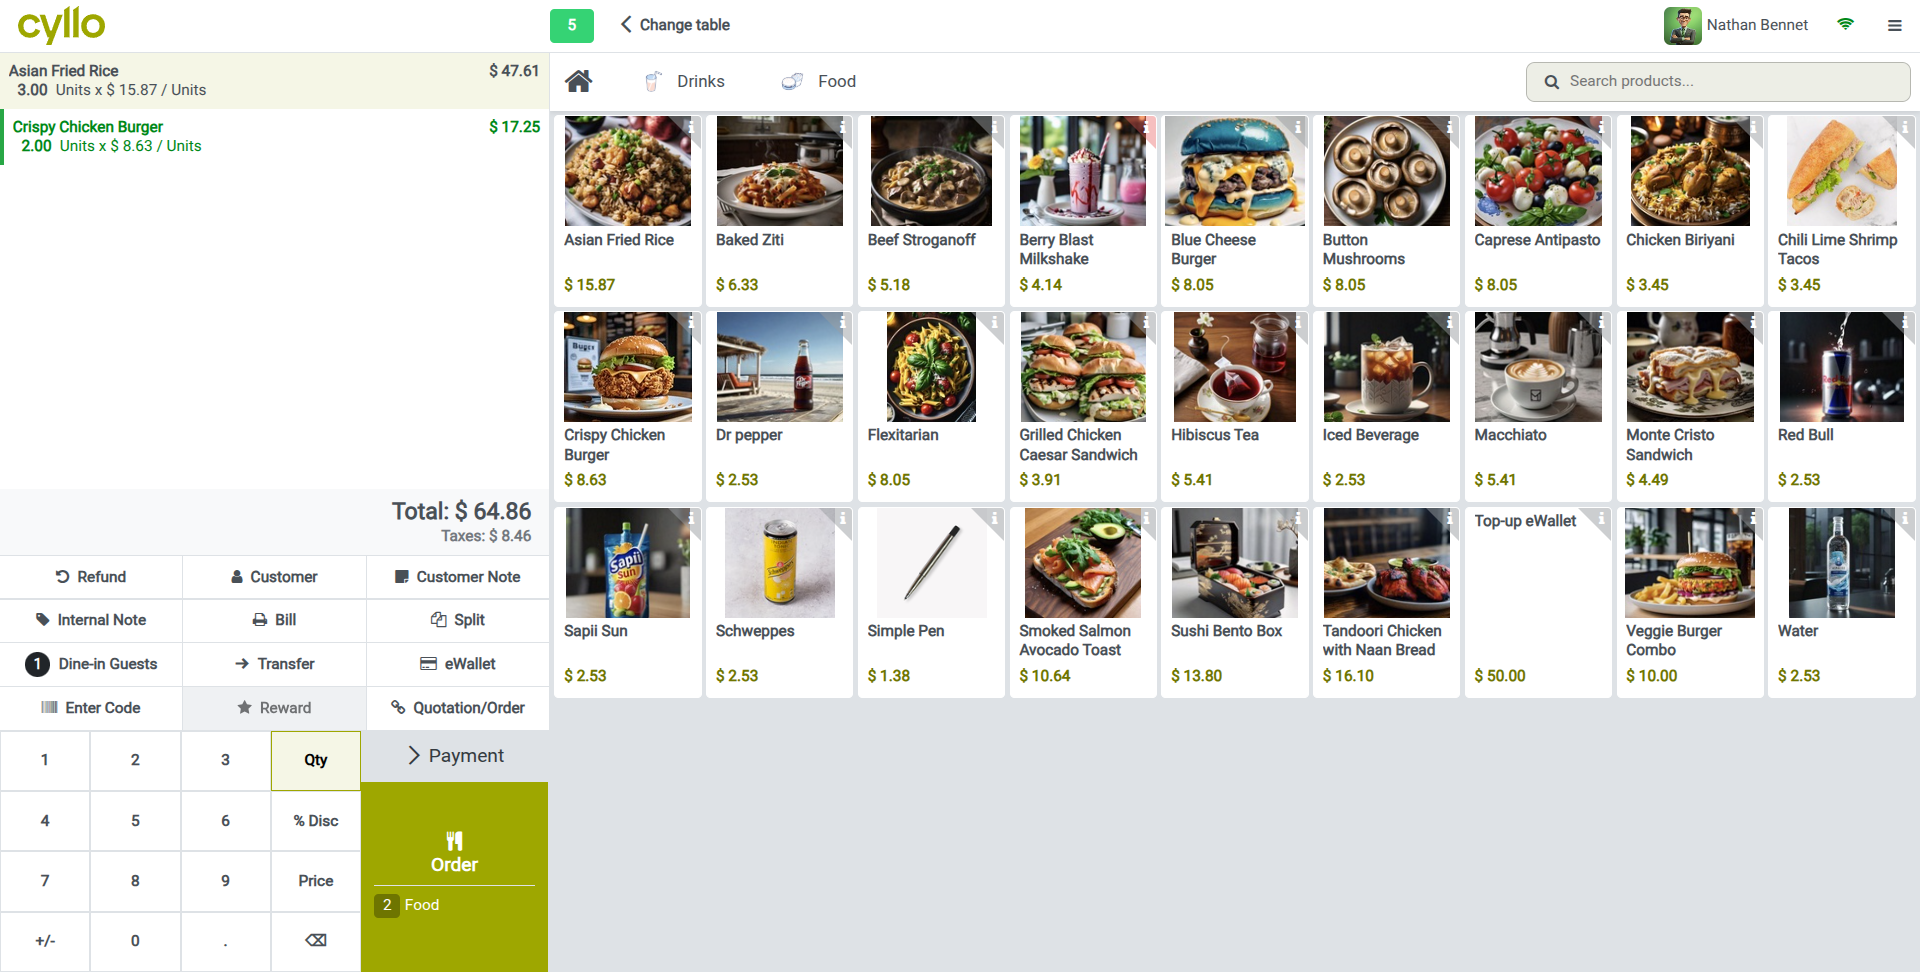
Fig 5.2 — Restaurant order screen — product grid on the right with category tabs, and the active order panel on the left listing items with quantities and prices
TIP
Train waiters to tap Send after each course is ordered rather than waiting until the full meal is entered. This keeps kitchen tickets timely and ensures preparation begins as soon as starters are ordered, without waiting for the main course selection.
5.3. Transferring Orders Between Tables
When guests move to a different table mid-service — for example, from a standing area to a dining table once one becomes available — the open order can be transferred to the new table without losing any items, sent kitchen tickets, or partial payments.
- Open the table order for the table you want to transfer away from.
- Tap the Transfer button in the order screen numpad section.
- The floor plan appears in transfer selection mode. Tap the destination table.
- Confirm the transfer. The original table returns to Available (grey) and the order appears on the destination table immediately.
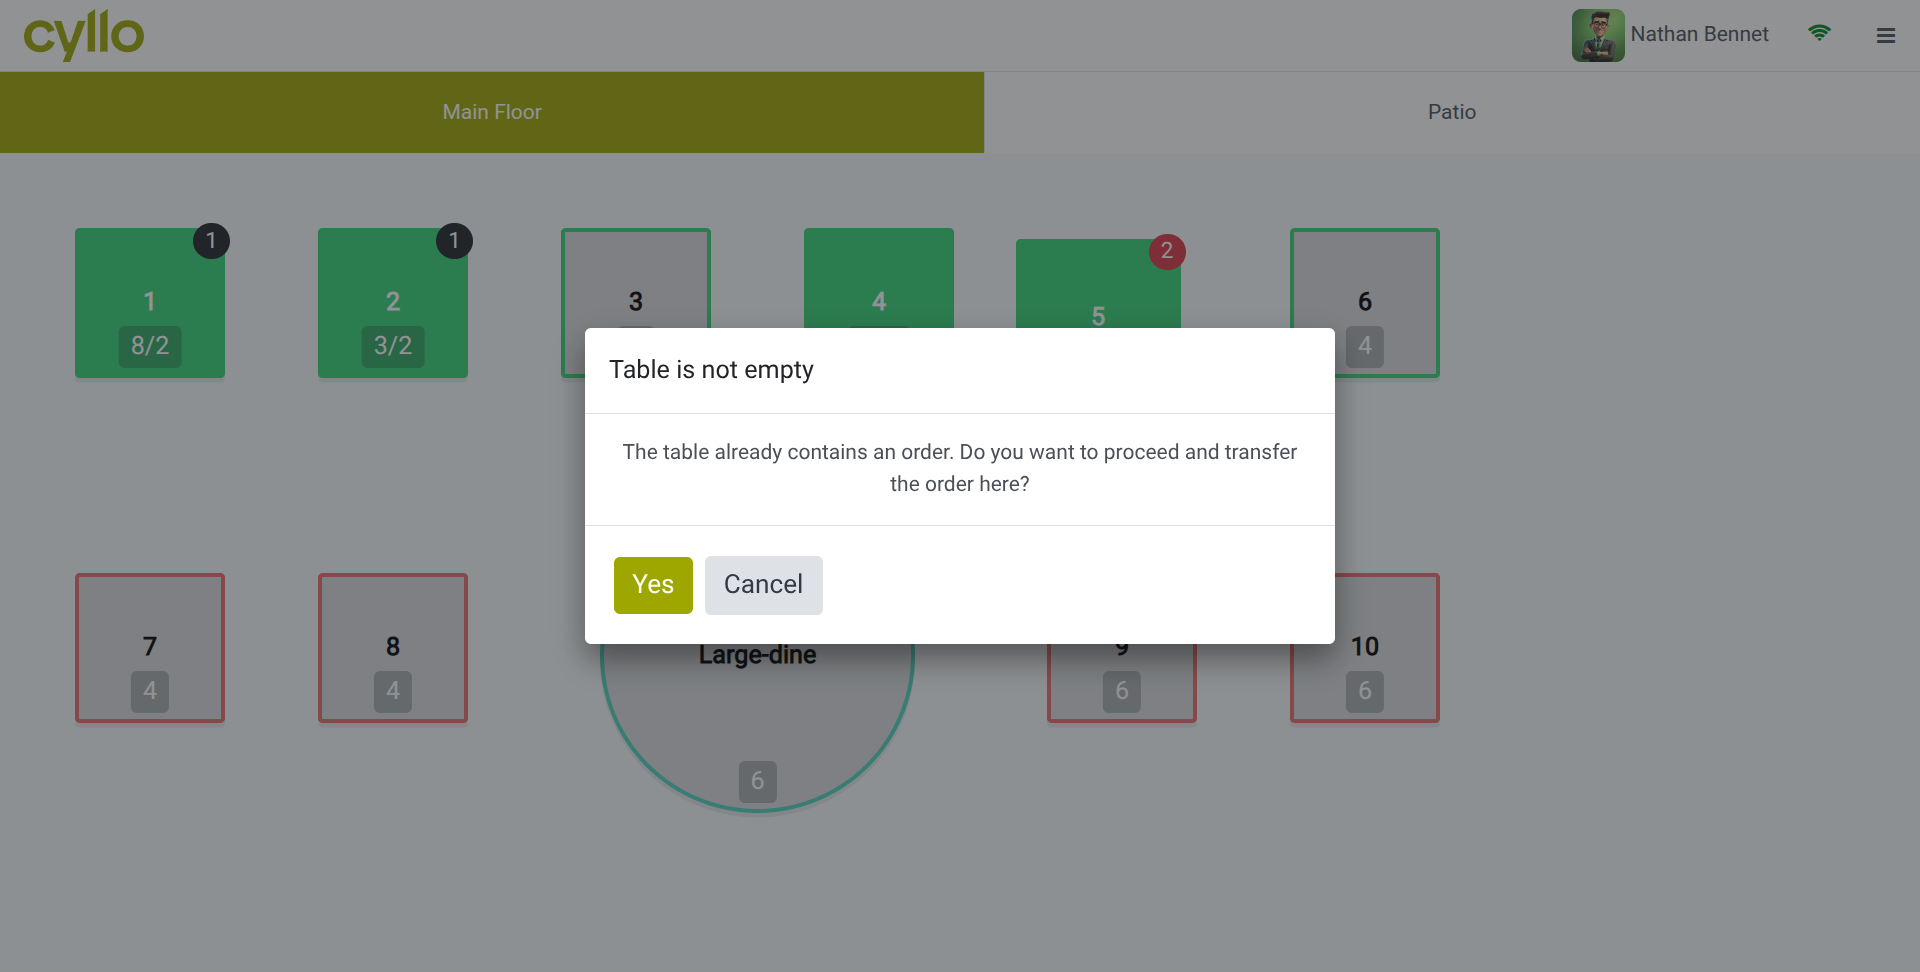
Fig 5.3 — Transfer mode floor view — origin table highlighted, destination table selected with a confirmation popup if already occupied
6. Payments & Billing
This section covers all billing and payment functions — generating and printing a bill, processing single and split payments, applying discounts, and handling refunds or voided orders.
6.1. Generating a Bill
When guests are ready to pay, the waiter generates a bill from the table's order screen. The bill can be printed for the guest to review before payment is processed, which is standard practice in table-service restaurants.
- Open the table's order screen by tapping the table on the floor plan.
- Tap the Bill button (or print icon) in the order panel.
- A bill preview appears showing all items, quantities, unit prices, applicable taxes, and the total.
- Tap Print to send the bill to the receipt printer for the guest to review.
- When the guest is ready to pay, tap Payment to proceed to the payment screen.
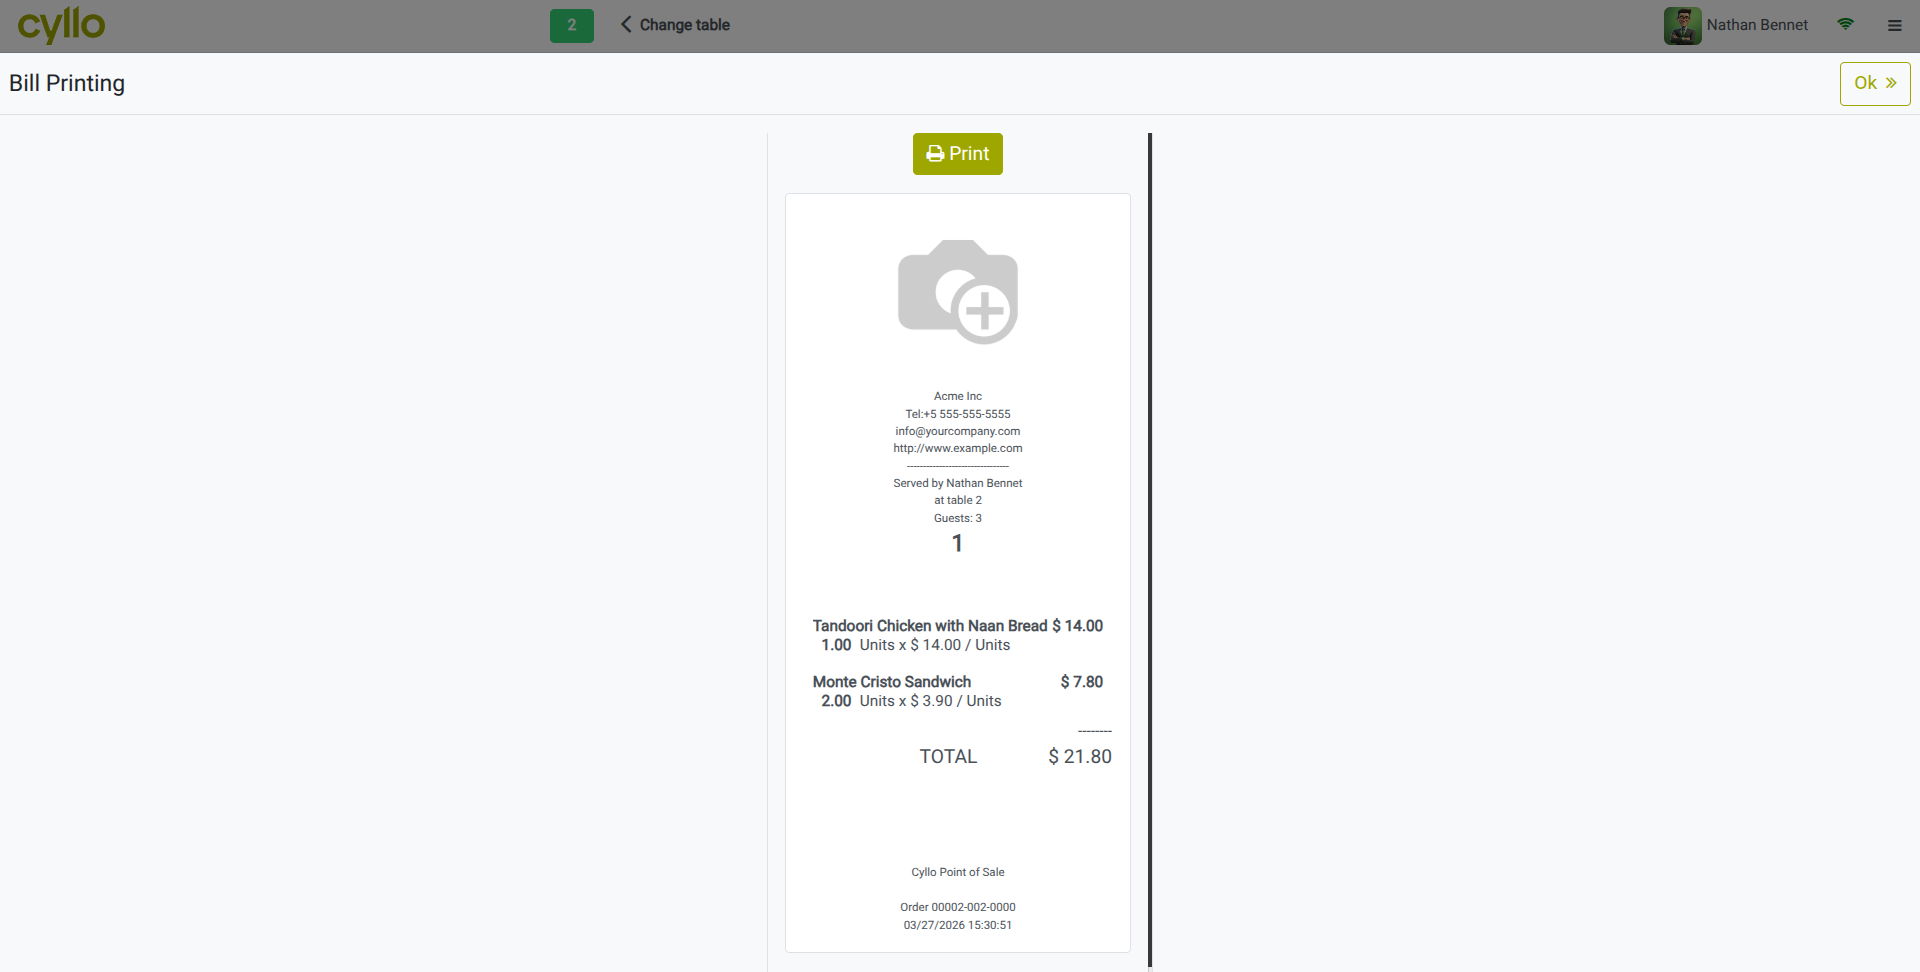
Fig 6.1 — Bill preview screen — itemised list with quantities, prices, tax breakdown, and total; Print button at the top
TIP
Configure the bill header and footer with the restaurant's name, address, VAT number, and a thank-you message. These are set in Point of Sale → Configuration → Settings, under the Bill & Receipt tab
6.2. Processing Payments
The payment screen collects the final settlement for the table. Cyllo supports cash, card, UPI, eWallet, and any other payment method configured for the shop. The cashier selects the method, enters the tendered amount for cash, and confirms to close the table and post the transaction.
- From the table's bill or order screen, tap Payment.
- The payment screen shows the total amount due.
- Select the payment method (Cash, Card, UPI, eWallet).
- For cash: enter the amount tendered. Cyllo calculates and displays the change due automatically.
- For card: the payment terminal processes the transaction. Confirm when the terminal approves.
- Tap Validate. A receipt is printed, the table is freed (returns to grey on the floor map), and the transaction is posted to Accounting.
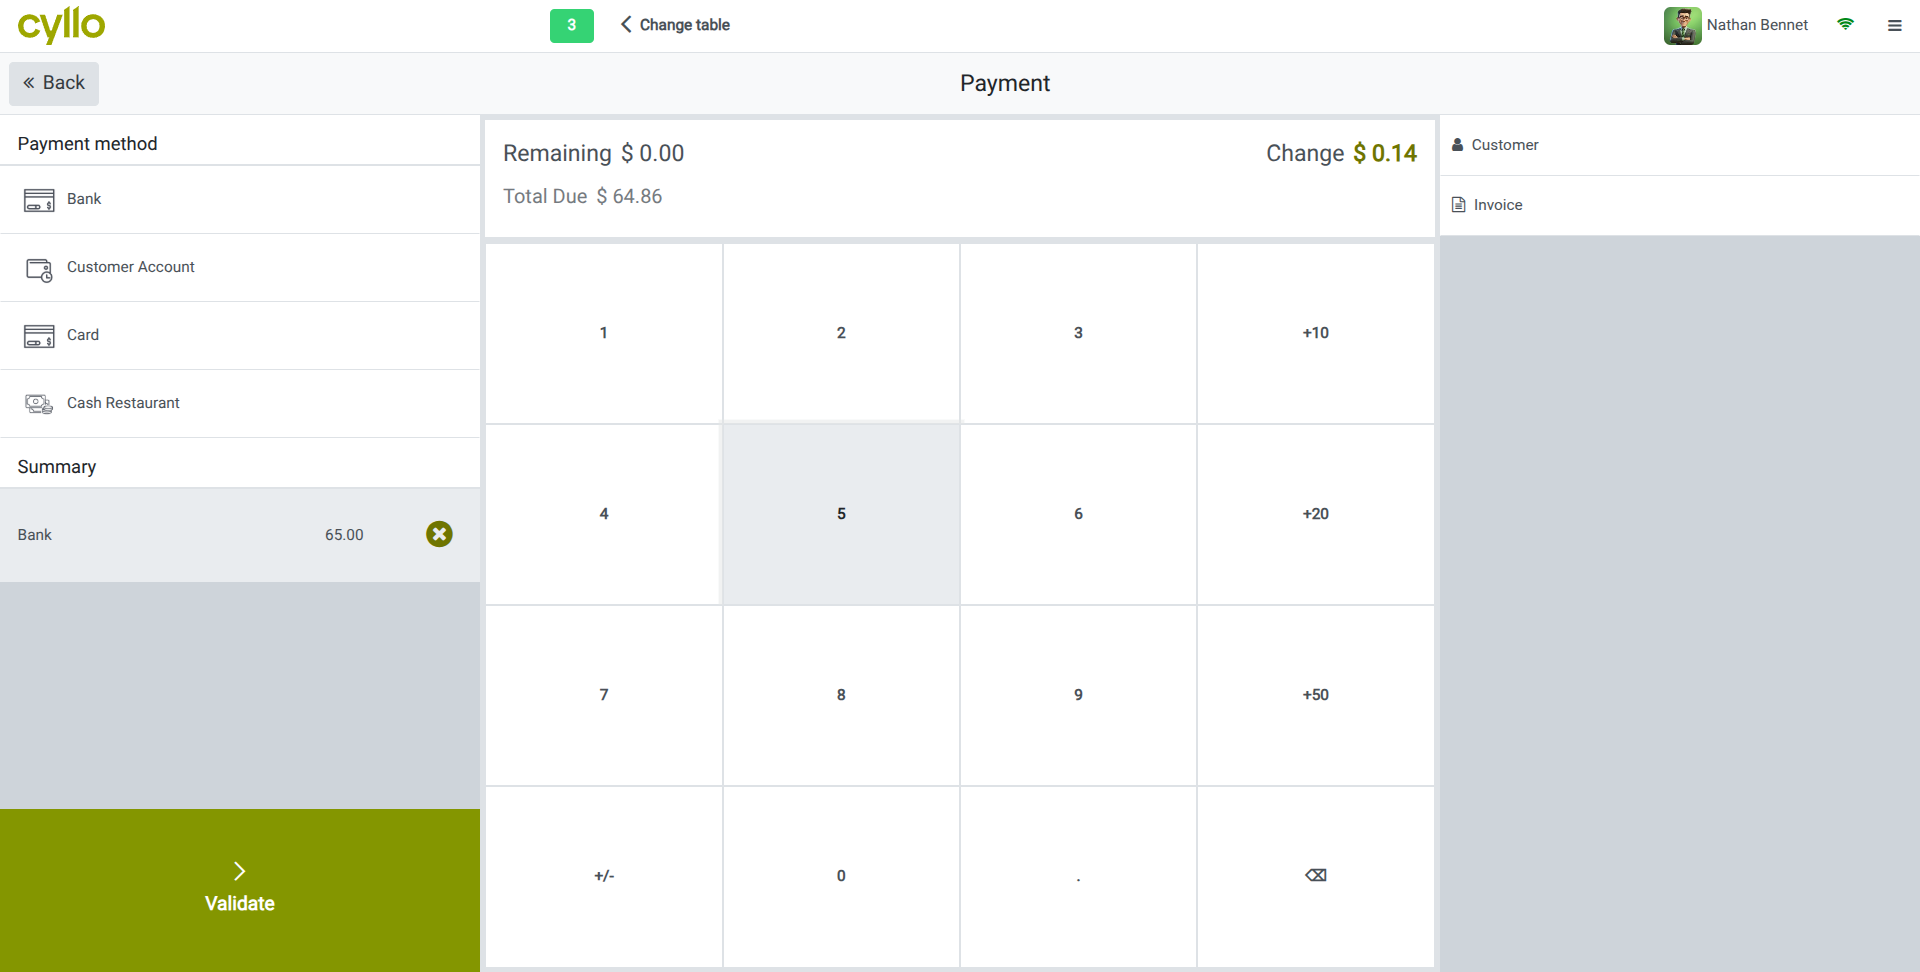
Fig 6.2 — Payment screen — order total, Cash payment method selected, tendered amount entered, change due displayed in large format
Note
If a guest wants a printed receipt in addition to the bill, enable Print Receipt Automatically in the shop settings so the receipt prints immediately after payment is validated without an extra tap.
6.3. Split Bills
Split bills allow a table's total to be divided among guests for separate payment. Cyllo supports splitting by item (each guest pays for the specific items they ordered or by equal share) the total is divided evenly across the specified number of guests.
Split by Item:
- On the order screen numpad, tap ‘Split’.
- The split screen shows all order lines. Tap each item to add it as a separate order.
- Process payment for each guest's portion as different orders using their preferred payment method. Validate each payment in turn.
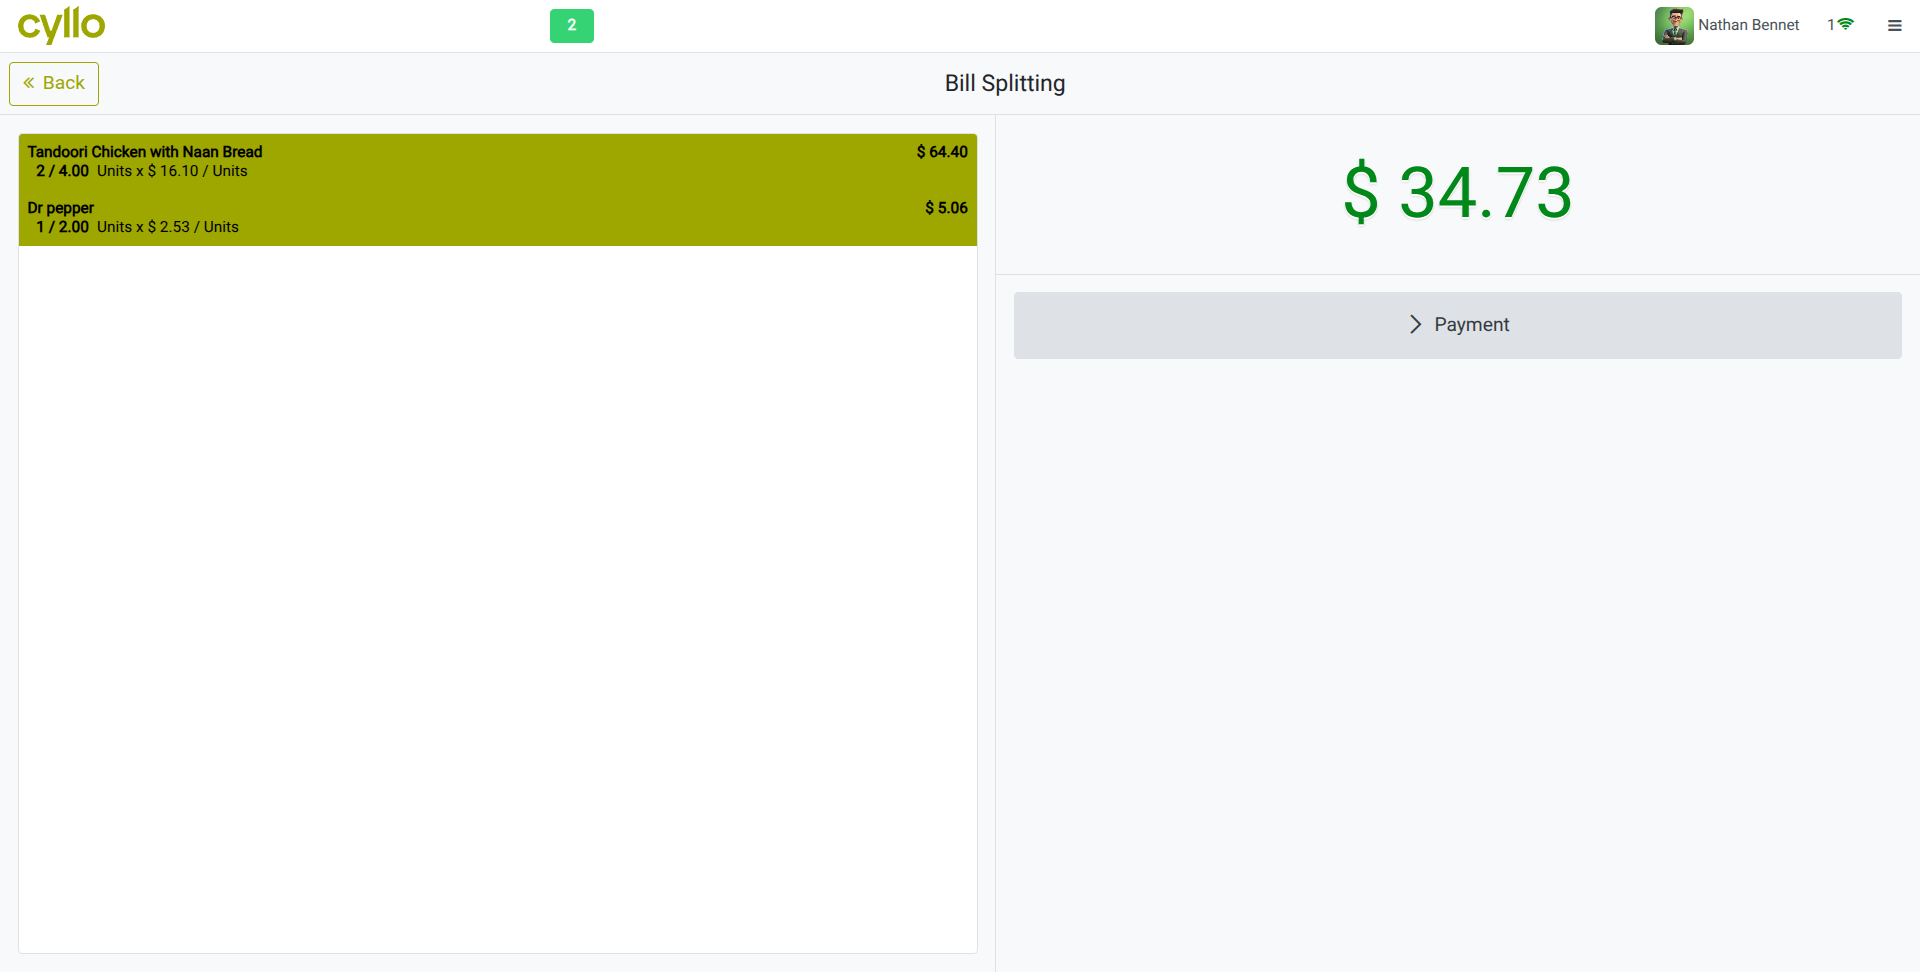
Fig 6.3 — Split bill screen — order items listed and half of each item is splitted to be created as new order/payment
Note
Split bills are processed as separate payment transactions in Cyllo. Each portion is validated individually and each can use a different payment method — for example, one guest pays cash and another pays by card.
6.4. Applying Discounts
Discounts in the restaurant session can be applied per order line or as a global discount on the entire bill. Discounts are available when enabled in the POS shop settings, and a maximum discount cap can be set to require manager approval for discounts above a defined percentage.
6.5. Refunds & Void Orders
When a payment has been processed incorrectly or a guest dispute requires a refund, Cyllo POS supports refunds from within the session or from the order history. A void operation cancels an order entirely before payment; a refund reverses a completed payment.
Voiding an Order (before payment):
- In the order screen, select the item to remove.
- Tap Delete or the backspace icon.
- To void the entire order, tap the order options menu and click the trash icon. The table is freed.
Processing a Refund (after payment):
- Tap the hamburger menu (≡) and select Orders.
- Find the original order from the paid order history list.
- Select the items to refund and tap Return.
- A negative order is created. Process the refund payment using the appropriate method (cash return, card reversal).
- Validate. The refund is posted to Accounting and stock is returned to Inventory if applicable.
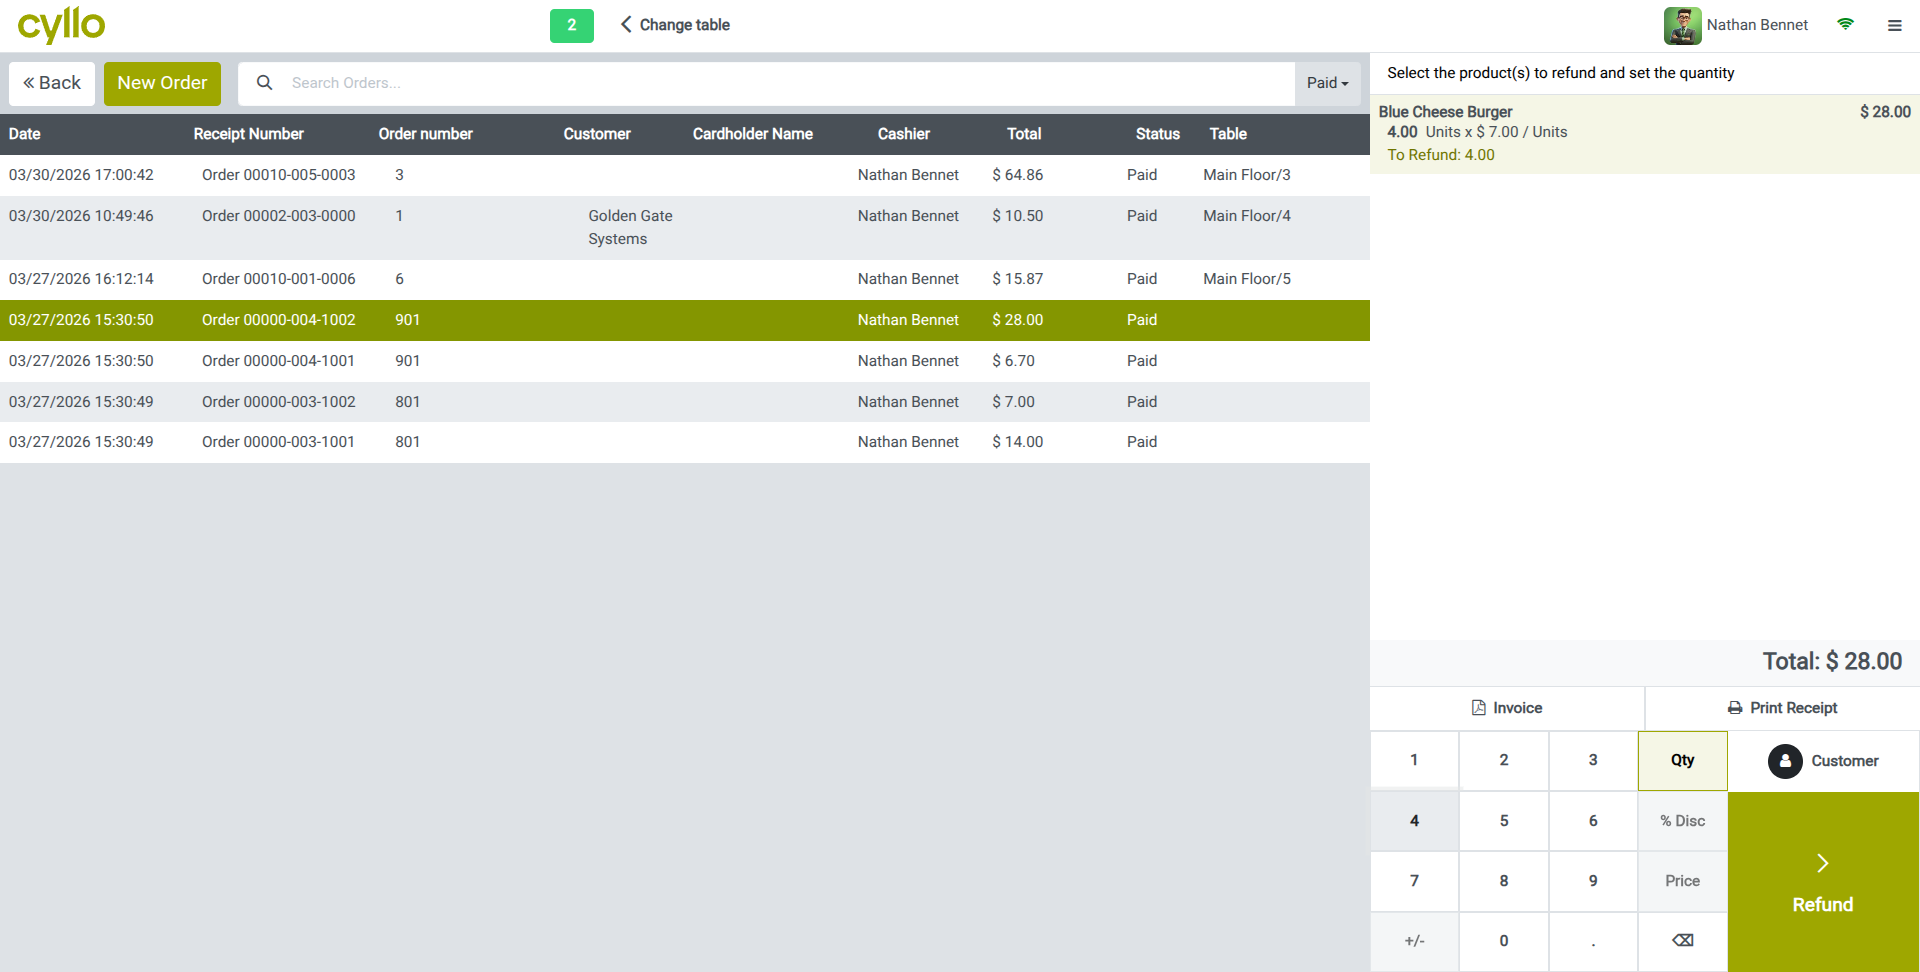
Fig 6.4 — Refund order screen — original order items with quantity selectors for the return amount, and Return button at the bottom
WARNING
Refunding cash from the till reduces the session's cash balance. Ensure the physical cash in the drawer matches the system balance after processing cash refunds to avoid discrepancies at session close.
7. Customer Management
Cyllo's Restaurant module shares the customer database with the wider Cyllo ERP. Linking guests to their table order enables loyalty reward tracking, eWallet and gift card redemption, and customer-specific pricing through pricelists.
7.1. Linking Customers to Orders
Assigning a customer to a table order allows Cyllo to track that customer's spend, apply their loyalty balance, and use their pricelist for pricing. Customers can be looked up by name or phone number directly from the order screen during service.
7.2. Loyalty Program
The Loyalty Program rewards repeat guests with points earned on each visit. Points accumulate in the customer's account and can be redeemed as discounts on future bills. The same loyalty program works across POS, the Sales module, and eCommerce — guests earn and spend points wherever they interact with the business.
7.3. Gift Cards & eWallet
Gift cards and eWallets are stored-value payment methods that guests can use to settle their bill. They are issued as physical cards or digital codes and redeemed at the payment screen. The balance is deducted from the eWallet or gift card in real time and any remaining amount can be paid with another method.
8. Offline Mode
Restaurant operations cannot stop if the internet drops mid-service. Cyllo's offline mode ensures the session continues uninterrupted, with all orders and payments recorded locally until the connection is restored.
8.1. How Offline Mode Works
When the restaurant session loses its connection to the Cyllo server, it automatically switches to offline mode. The floor plan, product catalog, and customer records loaded at session open are cached locally in the browser. Orders can continue to be taken, sent to kitchen printers, and payments processed throughout the outage.
- A connection warning appears in the top toolbar when the session goes offline.
- Table orders, new order lines, and payment records are saved locally in the browser's storage.
- Preparation printer tickets continue to print as long as the printer is on the same local network as the terminal.
- Loyalty point calculations and eWallet balance checks are deferred until the connection is restored — cash and card payments work normally offline.
- The offline state is effectively invisible to floor staff for standard order-taking and payment operations.
WARNING
Products, prices, or customers added to the Cyllo back-end after the session started are not available in offline mode. The session works only with data loaded at open time. Re-open the session after reconnection to load any changes made during the outage.
8.2. Syncing After Reconnection
When internet connectivity is restored, Cyllo automatically synchronises all locally stored orders and payments to the central database. No manual action is required. All records created during the outage are uploaded sequentially and processed as if they had been recorded online.
- The offline indicator disappears and a sync progress message appears briefly as data uploads.
- Loyalty points earned during offline transactions are credited to customer accounts after sync completes.
- Accounting journal entries for all offline payments are posted automatically after sync.
- The session report reflects all transactions — including those recorded offline — once sync is complete.
TIP
After reconnecting, verify the session report order count matches your physical paper records or kitchen ticket count. Any discrepancy indicates an order that did not sync correctly and may need manual review.
9. Hardware Configuration
The restaurant environment typically requires several connected hardware devices — receipt printers at the front desk, preparation printers in the kitchen and bar, a customer display at the payment counter, and an IoT Box to connect USB peripherals. This section covers setup for each device type.
9.1. Receipt Printers
The receipt printer prints the guest bill and payment receipt at the front desk or cashier station. Cyllo supports network-connected ePOS printers (Epson ePOS SDK compatible) for direct printing without additional middleware.
- Connect the receipt printer to the local network and note its IP address.
- Go to Point of Sale → Configuration → Settings and open the restaurant shop.
- Under the Connected Devices tab, click Add a Device in the Printers section.
- Select ePOS Printer and enter the printer's IP address.
- Save and test by opening a session and printing a test receipt from the hamburger menu.
Note
For USB receipt printers, an IoT Box is required. See Section 10.4 for IoT Box setup. Network (ePOS) printers do not require an IoT Box and are the recommended option for new installations.
9.3. Customer Display
A customer-facing display at the payment counter shows the current order total and line items to the guest during checkout. It reassures guests that items are correctly entered and eliminates the need to physically show the tablet screen.
- Connect the customer display to the network or IoT Box.
- Go to Point of Sale → Configuration → Settings and open the restaurant shop.
- Under the Connected Devices tab, enable Customer Display.
- Select the IoT Box device or enter the display URL if using a secondary browser-based display.
- Save. The display activates when the next session opens and updates in real time as items are added to an order.
9.4. IoT Box Integration
The Cyllo IoT Box connects USB and serial hardware — USB receipt printers, USB cash drawers, and certain card terminals — to the Cyllo restaurant session over the local network. It is a small device plugged into the same network as the POS terminal.
Note
The IoT Box and the POS terminal must be on the same local network. If they are on different network segments or VLANs, the IoT Box will not be discoverable. Check with your network administrator if the IoT Box does not appear after adding its IP.
10. Reporting & Analytics
Cyllo provides session-level and aggregate reporting for restaurant operations. Reports cover revenue by session, product performance, table utilisation, and individual waiter performance — giving managers the data needed to optimize service and menu decisions.
8.1. Session Reports
The session report is generated automatically when a session is closed. It provides a complete summary of all transactions during that session — total sales, payment method breakdown, cash movements, and any discrepancy between expected and counted cash.
8.2. Sales Reports
POS sales reports provide analysis across multiple sessions, shops, and date ranges. They allow managers to review product performance, revenue trends, and cashier productivity without accessing individual session records.
11. Settings & Configuration
This section covers the administration settings that shape how the restaurant session behaves — payment configuration, receipt design, tax setup, and staff access controls. These settings are managed from Point of Sale → Configuration and require administrator access.
11.1. Payment Methods
Payment methods define how the restaurant accepts settlement — cash, card, UPI, eWallet. Each method is linked to an accounting journal and can be added or restricted per shop. Configuring accurate payment methods is essential for proper end-of-shift reconciliation.
11.2. Receipt & Bill Customization
The printed bill and receipt can be customized with the restaurant's branding — logo, header text, footer message. These settings are configured in the Bill & Receipt tab of the shop configuration.
11.3. Employee & Waiter Access
The Restaurant module supports staff-level access control through the Employee Login feature. When enabled, each waiter identifies themselves at the start of the session or at each order, allowing management to track individual sales performance and control which staff can access manager functions such as discounts and refunds.
12. Troubleshooting
This section addresses the most common issues encountered in restaurant operations — hardware failures, session anomalies, kitchen communication errors, and closing procedure problems — with clear steps to resolve each.
12.1. Common Issues & Solutions
| Issue | Likely Cause | Solution |
|---|---|---|
| Floor plan not loading in session | Floor plan not assigned to the shop | Go to POS shop config → Floor Plans field and assign the correct floor plan. Re-open the session. |
| Table not changing colour after order | Order not confirmed / sent in session | Ensure the waiter tapped Send after adding items. Status only changes after items are transmitted. |
| Product image not showing on order screen | Image not uploaded on the product form | Open the product in Inventory → Products, upload an image, and save. Refresh the session. |
| Split bill button not visible | Bill Splitting not enabled in shop settings | Go to POS shop → Bill & Receipt tab and enable Bill Splitting. Re-open the session. |
| Session will not close | Unpaid open tables/orders remain on the floor plan | Settle or transfer all open table orders before attempting to close the session. |
| Tips not appearing on bill | Tip Product not configured in shop settings | Go to POS shop → Sales tab and set the Tip Product field. Re-open the session. |
12.2. Session Closing Issues
Session closing failures are almost always caused by one of two conditions: unpaid open table orders, or a browser/network error during the closing process itself. This section covers both scenarios.
Unpaid Tables Blocking Session Close:
- Before closing, return to the floor plan and check for any green tables.
- Open each occupied table, settle the bill, or transfer the order to a takeaway order if the guest has left.
- Once all tables show grey (available), attempt to close the session again.
Session Close Fails Mid-Process:
- If the session closing screen freezes or throws an error, do not close the browser tab.
- Check the internet connection. A dropped connection mid-close prevents posting to Accounting.
- Restore the connection and retry the close from the same browser tab.
- If the session cannot be closed from the POS interface, go to Point of Sale → Sessions in the Cyllo backend, locate the session, and use the Force Close option. Contact your administrator before using this option.
WARNING
Using Force Close on a session bypasses the cash reconciliation step. Any unposted transactions in that session will need to be reviewed and manually reconciled in the Accounting module.