

Cyllo AI Documentation
Introduction
Cyllo AI is a powerful conversational intelligence module embedded directly within the Cyllo ERP platform. It enables users to interact with their business data through natural language, removing the need to manually navigate menus or run reports. With Cyllo AI, users can ask questions about sales performance, inventory levels, financial data, and HR operations; create, update, or delete ERP records through conversation; and receive rich, chart-enabled responses — all within a sleek in-app chat widget. The module supports both analytical queries and full CRUD (Create, Read, Update, Delete) operations powered by a LangGraph-based ReAct agent. Cyllo AI is deeply integrated with other Cyllo modules including Sales, Inventory, Accounting, Purchase, and Human Resources. When a user asks about a sales order or requests a product quantity update, the AI agent automatically resolves the correct data relationships across all connected modules — with no manual data transfer or duplication required. All actions respect Cyllo's access rules, multi-company policies, and field-level security, ensuring that every response is accurate, authorized, and context-aware. The module provides a comprehensive AI framework built on top of the Cyllo ERP database. It supports multiple leading AI providers — Google Gemini, OpenAI ChatGPT, and OpenRouter — giving businesses the flexibility to choose the model that best fits their requirements and budget. With persistent session history, voice input, clickable record hyperlinks, and ECharts-powered data visualizations, Cyllo AI transforms every user's ERP experience into an intelligent, conversational workflow.
1. Overview & Getting Started
This section introduces Cyllo AI, its core purpose, and the prerequisites needed to activate and use the module.
1.1 What is Cyllo AI?
Cyllo AI is an ERP analytics chatbot that uses LangGraph-based AI agents to understand user queries in plain English and translate them into precise ERP operations. It acts as an intelligent assistant that sits inside the Cyllo backend, responding to questions, generating visualizations, and performing data operations without requiring technical SQL or coding knowledge.
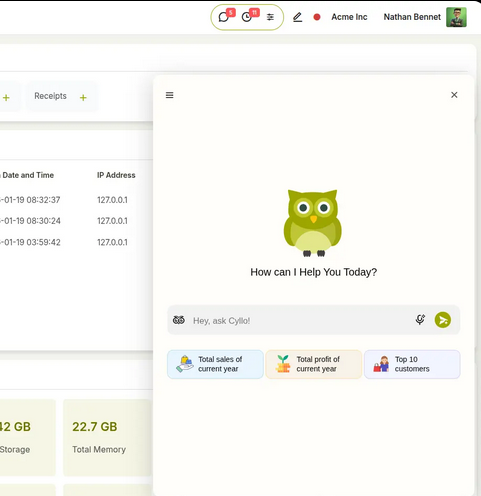
Fig 1.1 — Cyllo chatbot interface
Note
Cyllo AI must be configured with an active LLM API key before it can process queries. See Section 2 for setup steps.
1.2 Key Capabilities
Cyllo AI provides the following core capabilities to all users with access to the module:
- Analytical queries — ask questions about sales, inventory, purchases, HR, or accounting data
- CRUD operations — create, update, or delete ERP records through conversation
- Data visualizations — receive ECharts-powered bar, line, pie, and donut charts inline with responses
- Voice input — speak your question directly into the chat widget using the microphone button
- Clickable record links — responses include hyperlinks that navigate directly to the referenced ERP record
- Multi-company context — queries are automatically filtered by the companies you are currently working in
- Persistent session history — every conversation is saved and can be revisited at any time
2. Configuration & Settings
Cyllo AI must be configured in Settings before it becomes active. This section walks through every configuration option, from enabling the feature to validating your API connection.
2.1 Enabling Cyllo AI
To activate Cyllo AI, complete the setup in Settings → General Settings → Cyllo AI. Enter a valid API key, then click Save before selecting Connect API. The chat icon will appear only after the connection is successfully verified.
Steps to Enable Cyllo AI:
- Enable the Cyllo AI toggle.
- Select the LLM Provider.
- Choose the required Model Name.
- Enter a valid API key with sufficient available credits.
- Click Save.
- Click Connect API.
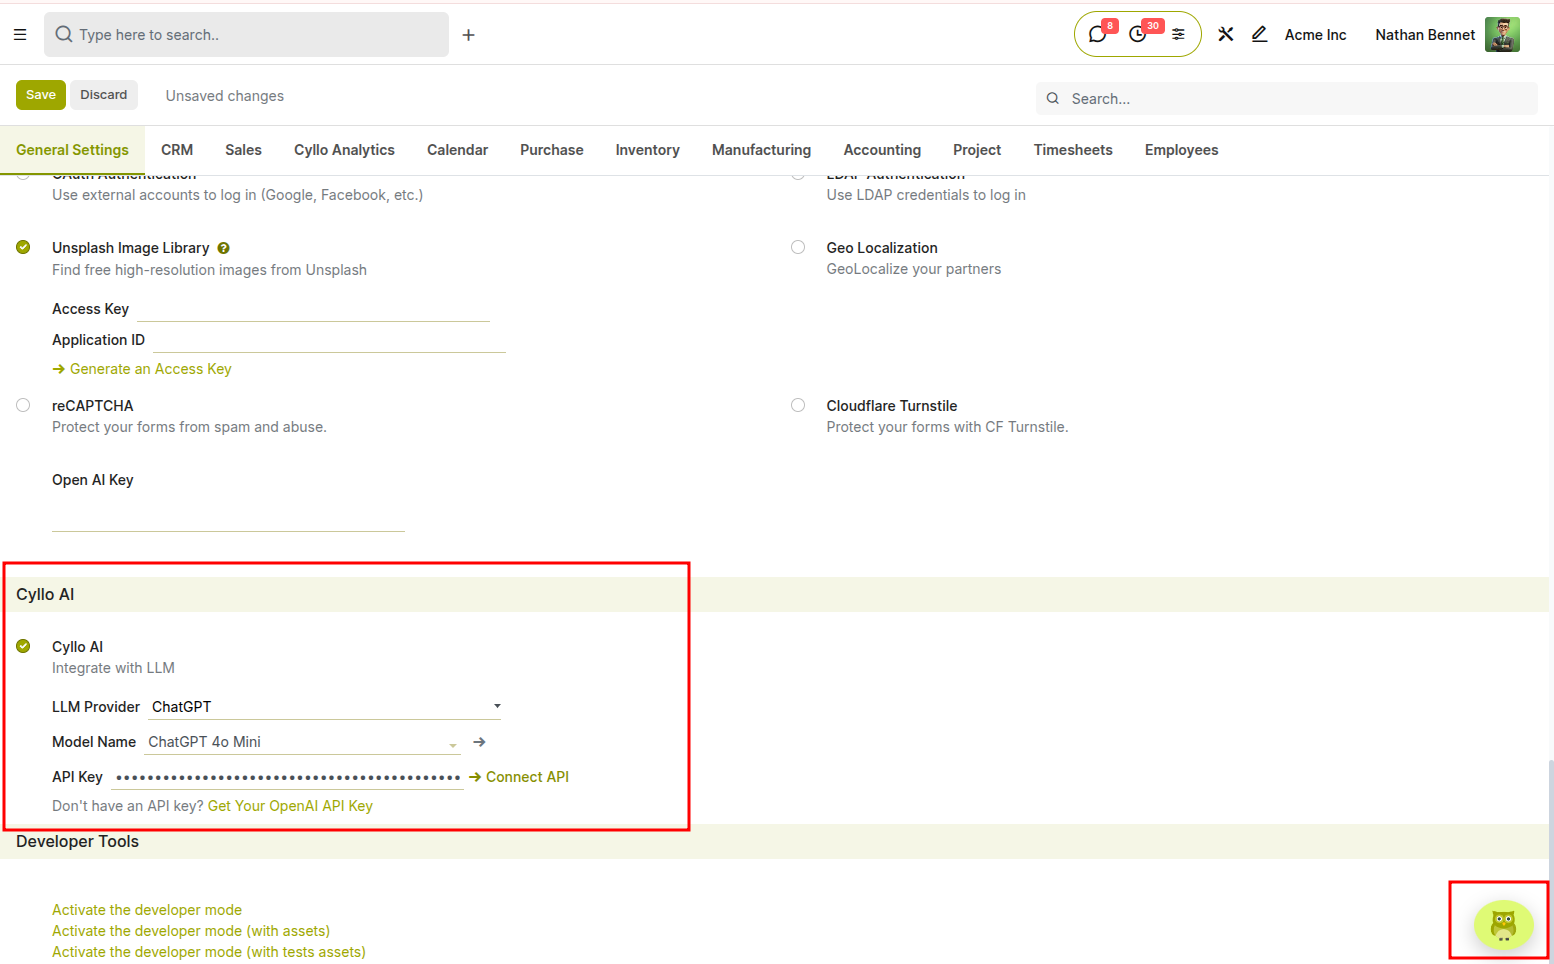
Fig 2.1 — api configuration and cyllo ai icon
Important:
- The chat icon will appear only if:
- The API key is correct and active.
- The API account has enough credits/quota remaining.
- The connection is successfully validated after saving.
3. Cyllo AI Chat Interface
This section covers every aspect of using the Cyllo AI chat widget — from opening the interface and sending messages to using voice input and interpreting chart-enabled responses.
3.1 Accessing the Chat Widget
The Cyllo AI chat widget is available as a floating bubble in the Cyllo backend. It is visible once Cyllo AI has been enabled and a valid API connection has been confirmed in Settings. How to Open the Chat:
- Look for the Cyllo AI icon in the bottom-right corner of the Cyllo backend
- Click the icon to expand the chat window
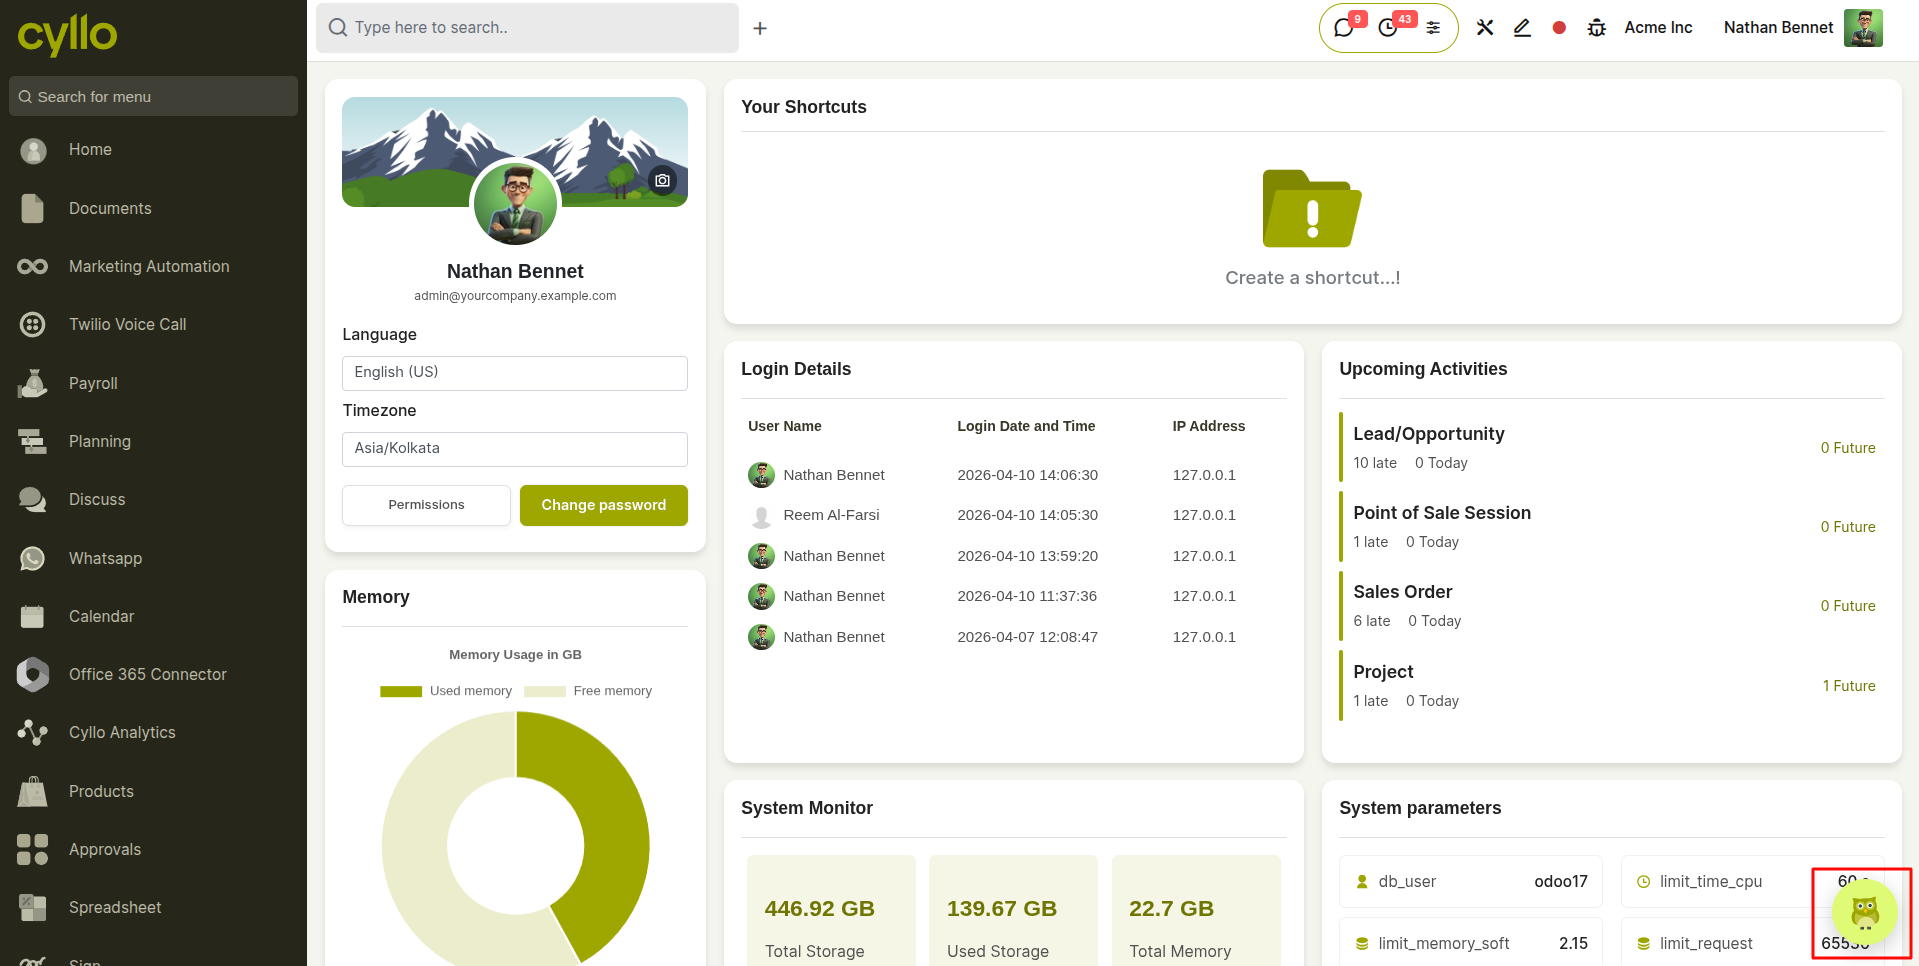
Fig 3.1 — Cyllo backend with the AI chat bubble visible in the bottom-right corner
3.2 Sending a Message
Type any business question or instruction into the input box and press Enter or click the Send button. The agent processes the query, and returns a structured Markdown-formatted response.Cyllo AI can respond to both information requests and action-based commands, including creating, updating, or deleting records, based on the user’s instruction.
How to Send a Message:
- Click inside the chat input field at the bottom of the widget
- Type your question or instruction (e.g., 'Show me the top 5 customers by sales this month' or “Create a new customer named Global Traders”)
- Press Enter or click the Send button
- A loading animation appears while the agent processes the query
- The response appears in the chat window with Markdown formatting, tables, and optional charts
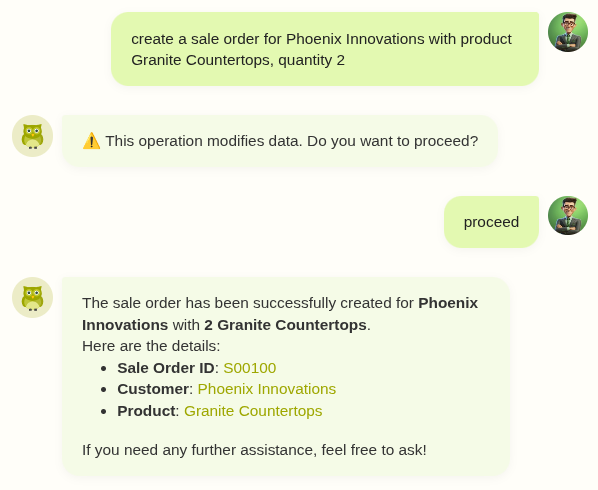
Fig 3.2 — Chat window showing a user message and a formatted bot response with a data table
3.3 Voice Input (Speech-to-Text)
Cyllo AI supports voice-based queries through a built-in speech-to-text feature. Users can dictate their question instead of typing, and the audio is transcribed by the configured LLM provider before being sent to the agent.
How to Use Voice Input:
- Click the microphone icon in the chat input area
- Speak your question clearly — a recording timer appears while the audio is captured
- Click the Stop button when finished speaking
- Cyllo AI transcribes the audio and automatically sends the transcribed text as your query
- The transcribed text is visible in the chat so you can verify accuracy before the response arrives
4. Conversation & Session Management
Cyllo AI stores every conversation as a named session. Users can review past interactions, rename sessions for easier reference, and delete sessions they no longer need.
4.1 Starting a New Session
Each time a user opens the Cyllo AI chat for the first time in a new context (or after starting fresh), a new session is automatically created.
How to Start a New Session:
- Click the New Chat button in the chat sidebar to create a fresh session
- Alternatively, the widget automatically creates a new session if no prior session exists for the current company context
4.2 Viewing Chat History
All past conversations are stored in the Cyllo database and can be accessed from the chat sidebar. Sessions are listed in reverse chronological order, with the most recent session at the top.
How to View a Past Session:
- Click the History icon or open the sidebar panel in the chat widget
- A list of past sessions appears, each labeled with the first message or a custom title
- Click any session to reload its full conversation history in the chat window
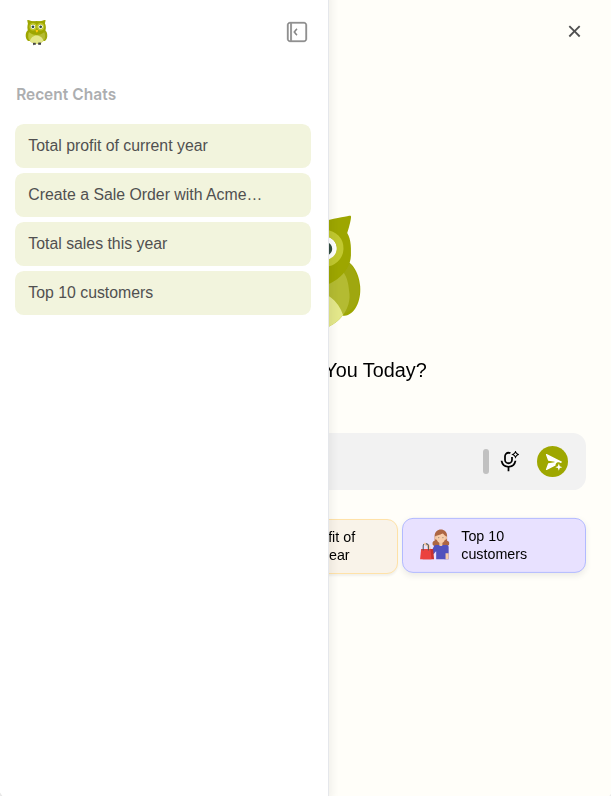
Fig 6.2 — Chat sidebar showing a scrollable list of past sessions with titles
4.3 Renaming a Session
Sessions are automatically titled using the first 60 characters of the opening message. Users can rename any session to a more descriptive title for easier retrieval.
How to Rename a Session:
- Open the chat sidebar and locate the session you wish to rename
- Click the Rename option next to the session entry
- Enter the new title and confirm
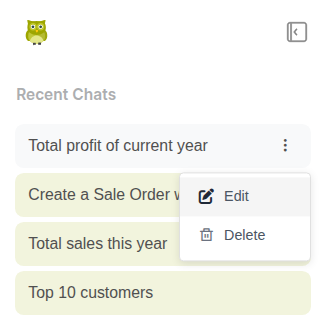
Fig 6.3 — Rename session dialog showing an input field with the current session title pre-filled
4.4 Deleting a Session
Sessions that are no longer needed can be permanently deleted. Deleting a session removes all conversation records associated with that session ID from the Cyllo database.
How to Delete a Session:
- Open the chat sidebar and locate the session to delete
- Click the Delete icon next to the session
- Confirm the deletion in the confirmation prompt
- The session and all its messages are permanently removed
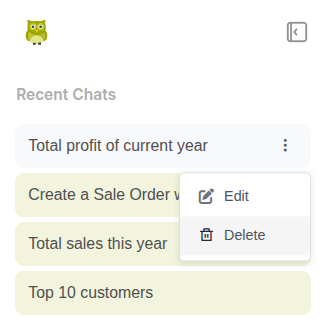
Fig 6.4 — Chat sidebar with a delete confirmation popup for removing a session
Note
Session deletion is permanent and cannot be undone. Export or note any important information from a session before deleting it.
5. Security & Data Privacy
Cyllo AI is designed with strong data privacy controls to ensure secure and role-based access to information. All responses are generated according to the logged-in user’s permissions, so users can only view data they are authorized to access.
5.1 User-Based Data Access
Cyllo AI respects the access rights assigned to each user in the system. The information shown in AI responses is filtered automatically based on the user’s role and permissions.
Key Points:
- Users can only retrieve data they already have permission to view.
- Access restrictions are applied automatically during every query.
- Data visibility may differ between users depending on their assigned roles.
6. Supported LLM Models Reference
The following table lists all pre-configured LLM models available in Cyllo AI. Additional models can be accessed via the OpenRouter provider option.
| Field | Description |
|---|---|
| ChatGPT 4o | OpenAI | gpt-4o | Most capable GPT model; best for complex queries |
| ChatGPT 4o Mini | OpenAI | gpt-4o-mini | Cost-efficient GPT; ideal for everyday use |
| Gemini 2.5 Pro | Google | gemini-2.5-pro | Highest-capability Gemini; multi-step reasoning |
| Gemini 2.5 Flash | Google | gemini-2.5-flash | Fast and balanced; best general-purpose Gemini |
| Gemini 2.0 Flash | Google | gemini-2.0-flash | Previous gen Flash; stable and cost-effective |
| Gemini 1.5 Pro | Google | gemini-1.5-pro | Broad language model; strong general understanding |
| OpenRouter (any) | OpenRouter | Varies | Access any model in the OpenRouter marketplace |
Note
For OpenRouter models, the model list is fetched live from the OpenRouter API and is not pre-configured in Cyllo. The list includes hundreds of models from various providers and is refreshed on demand from Settings.