

Cyllo Inventory Documentation
Introduction
The Inventory module is one of the most essential components of Cyllo ERP, designed to streamline the entire stock management process from incoming shipments to outgoing deliveries. Using this platform, you can receive, store, and dispatch products efficiently while maintaining complete visibility over stock levels, warehouse locations, and product movements through a single unified interface. It also allows you to manage multiple warehouses, storage locations, and fulfillment routes from one centralized system.
Because the Inventory module is tightly integrated with Sales, Purchase, and Accounting, every stock movement — from confirming a delivery to processing a return — automatically reflects across all connected departments, eliminating manual stock updates and data duplication. This makes it significantly easier for warehouse teams and operations managers to work in sync with the rest of the business without switching between tools.
Cyllo's Inventory module provides a comprehensive framework for managing product storage, controlling replenishment rules, applying valuation methods, and monitoring fulfillment performance in real time. All relevant data flows seamlessly through the centralized Cyllo ERP database, ensuring your team always has accurate, up-to-date stock information to respond quickly to demand, prevent shortages, and maintain a complete record of every product movement, adjustment, and transfer for future reference and audit purposes.
1. Inventory Operations
1.1. Receipt (Incoming Shipment)
A Receipt is the operation that records products arriving at your warehouse from a vendor or another location. When a Purchase Order is confirmed, Cyllo automatically generates a Receipt transfer that your warehouse team validates once the goods physically arrive. Receipts can be manually created from inventory.
Go to Inventory > Operations > Transfers > Receipts.
Click ‘New’.
Enter the field values.
- Receive From: Vendor/provider of the receipt.
- Operation Type: Different receipt operations with different routes.
- Destination Location: The place where the products will be moved to after the transfer is validated.
- Scheduled Date: The planned date on which the transfer is expected to be processed or completed.
- Operations tab: Detailed breakdown of products involved in the transfer. Use ‘Add a line’ to enter transferring products and its demanded quantities.
Click ‘Mark as Todo’ to confirm the receipt and click ‘Validate’ to confirm the receipt and update stock levels.
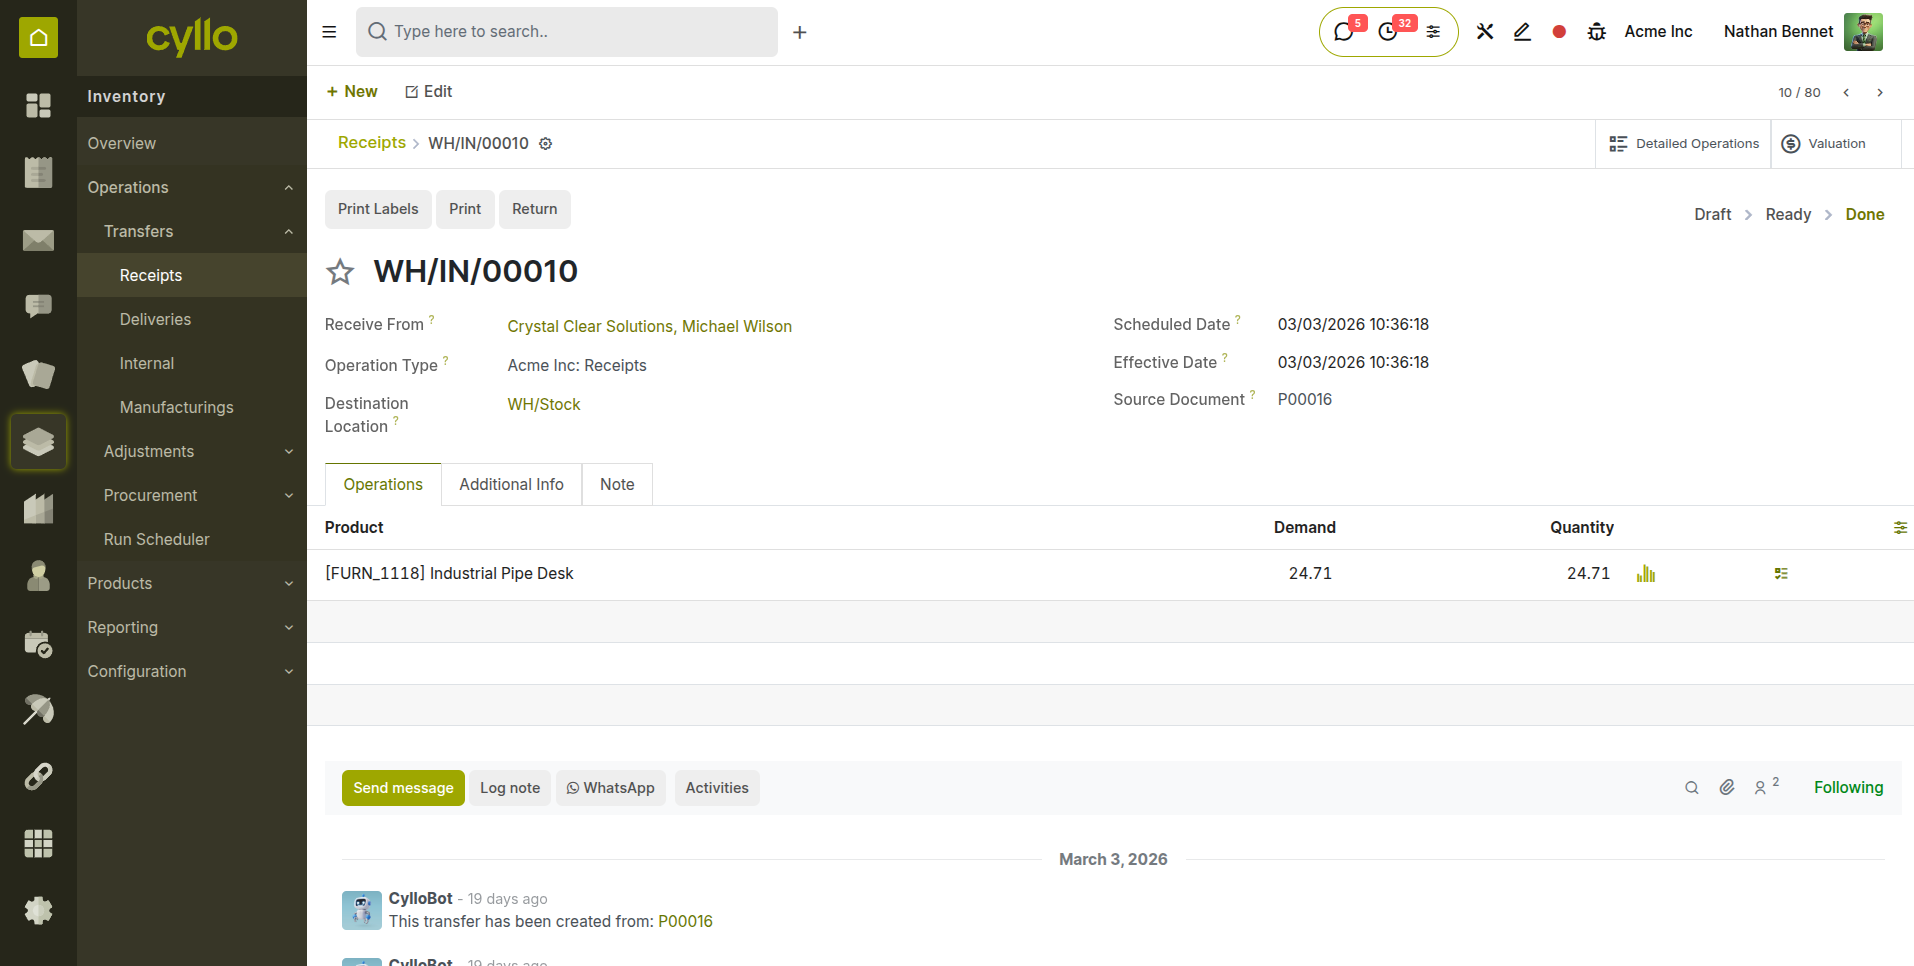
Fig 1.1 — Inventory > Operations > Receipts list view — showing receipt status, vendor, and scheduled date
Note
If you receive a partial quantity, validate what arrived and Cyllo will automatically create a backorder for the remaining quantity.
1.2. Delivery Orders
A Delivery Order records the dispatch of products from your warehouse to a customer. It is automatically created when a Sales Order is confirmed, and your warehouse team processes it by picking and packing the products before validating the shipment. Deliveries can also be manually created from inventory.
- Go to Inventory > Operations > Transfers > Deliveries.
- Click ‘New’.
- Enter the field values.
- Receive From: Vendor/provider of the receipt.
- Operation Type: Different receipt operations with different routes.
- Destination Location: The place where the products will be moved to after the transfer is validated.
- Scheduled Date: The planned date on which the transfer is expected to be processed or completed.
- Operations tab: Detailed breakdown of products involved in the transfer. Use ‘Add a line’ to enter transferring products and its demanded quantities.
- Edit the Done quantities after picking if needed.
- Click ‘Mark as Todo’ to confirm the receipt and click ‘Validate’ to confirm the receipt and reduce stock levels.
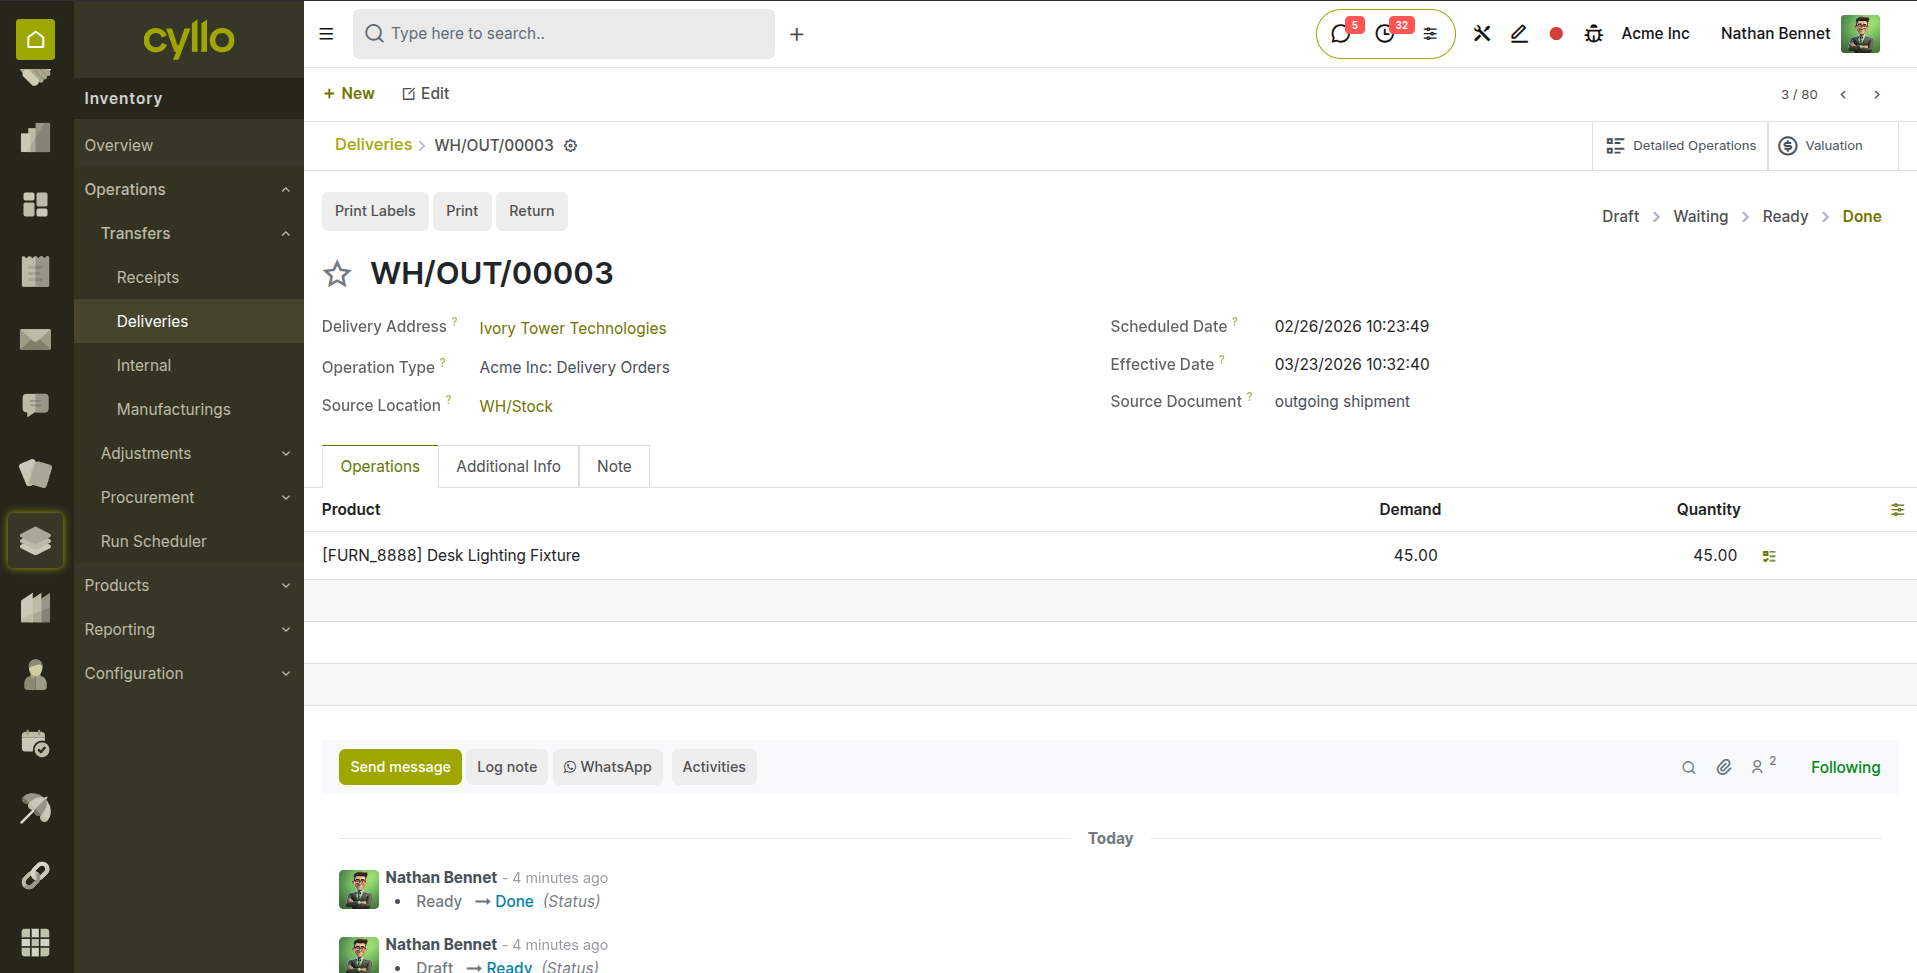
Fig 1.2 — Delivery order form — showing product lines, demand vs done quantities, and Validate button
Note
Validating a delivery automatically triggers the invoicing process in the Sales module if the product is set to invoice on delivery.
1.3. Internal Transfers
Internal Transfers move products between locations within your own warehouse or between warehouses, without involving a vendor or customer. Common uses include moving stock from a receiving area to a storage shelf, or transferring goods between two company warehouses.
- Go to Inventory > Operations > Transfers > internal.
- Click ‘New’.
- Enter the field values:
- Source Location: The inventory location from which the products are being moved.
- Destination Location: The inventory location to which the products are being moved.
- Product: The specific item or items being transferred.
- Demand (or Quantity): The requested quantity of the product to be transferred.
- Operation Type: Defines the type of inventory movement, which is "Internal Transfers" for this process.
- Click ‘Mark as Todo’ to confirm the receipt and click ‘Validate’ once the physical move is complete.
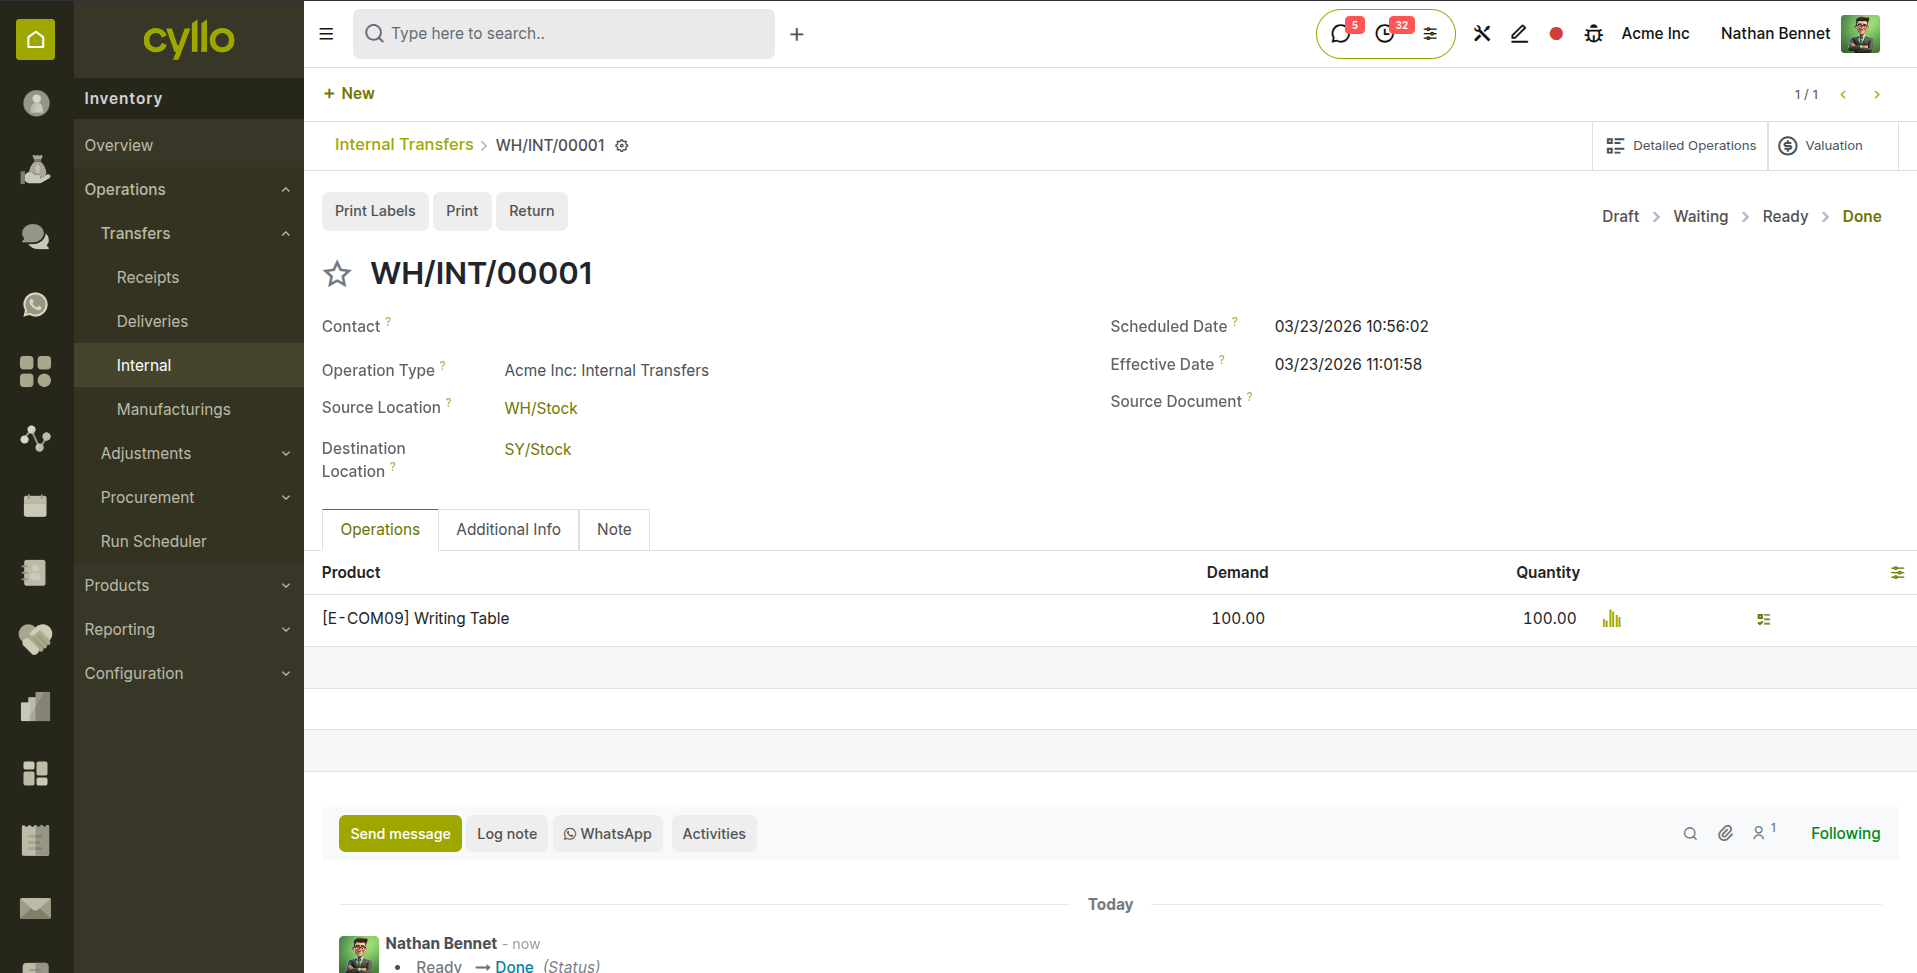
Fig 1.3 — Internal Transfer form — Source Location, Destination Location, and product lines
1.4. Return & Reverse Transfer
A Return reverses a completed transfer — most commonly used when a customer sends back goods or when you return products to a vendor. Cyllo creates a reverse transfer that restores the stock to its original location.
- Open the completed delivery or receipt you want to reverse.
- Click the Return button at the top of the form.
- Select the products and quantities to return.
- Confirm the return location and click Return.
- Validate the return transfer once the goods are physically received back.
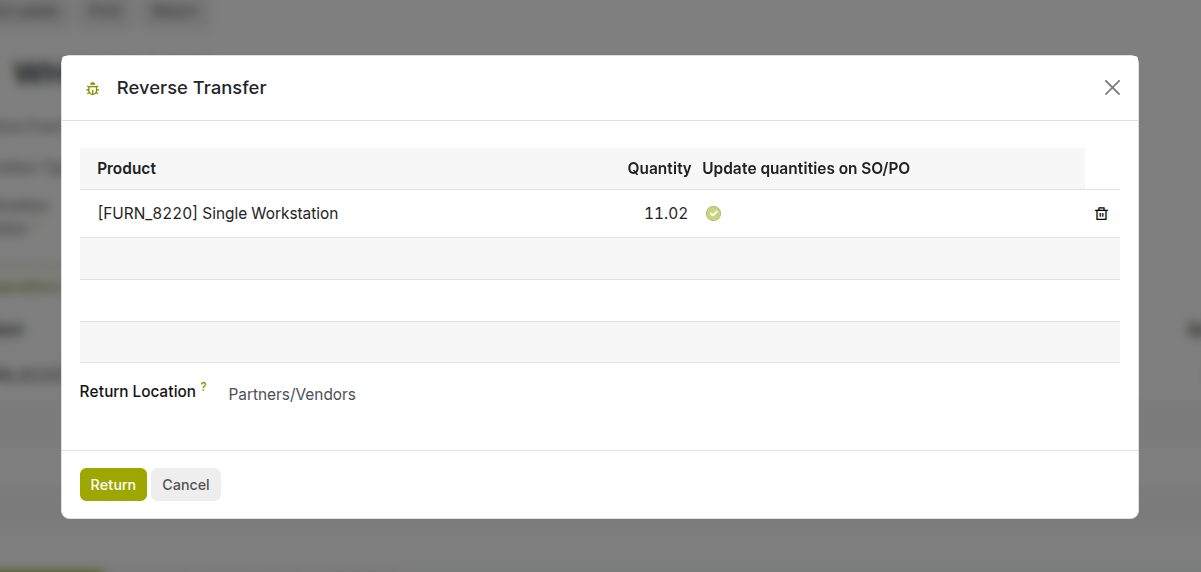
Fig 1.4 — Return dialog — showing product selection, quantity field, and return location
Note
Tip For customer returns, always link the return to the original delivery order. This keeps your traceability report accurate and simplifies the credit note process.
1.5. Multi-step Transfers
Cyllo supports multiple step transfers depending on your warehouse workflow:
| Transfer Mode | When to Use | How It Works |
|---|---|---|
| One-Step Transfer (Deliver goods directly) | Simpler operations where products are picked and immediately moved to their final destination. | Products are picked and validated in one step without a separate picking list, using a simple Validate button. |
| Two-Step Transfer (Pick + Deliver) | Larger warehouses where picking is done in one zone, and then items are delivered. | A detailed transfer is planned first, then executed and validated separately — allows reservation of stock in advance. |
| Three-Step Transfer (Pick + Pack + Deliver) | Used when you need an additional staging area for packing or quality control before shipment. | Products move from stock → picking → packing → delivery to customer location.(Delivery) |

Fig 1.5 — Transfers list — related transfers automatically created for main transfer
Note
Configuring multi-steps is done from the warehouse management form.
1.6. Batch Transfers
Batch Transfers allow a single warehouse operator to process multiple delivery orders or receipts in one go. Instead of picking products order by order, the operator picks all required products for a batch of orders in a single warehouse run, saving significant time and travel distance.
- Go to Inventory > Operations > Transfers > Batch Transfers.
- Click New and select the Operation Type (e.g. Delivery Orders).
- Add the individual transfers to include in the batch.
- Click Validate All once all products in the batch are picked.
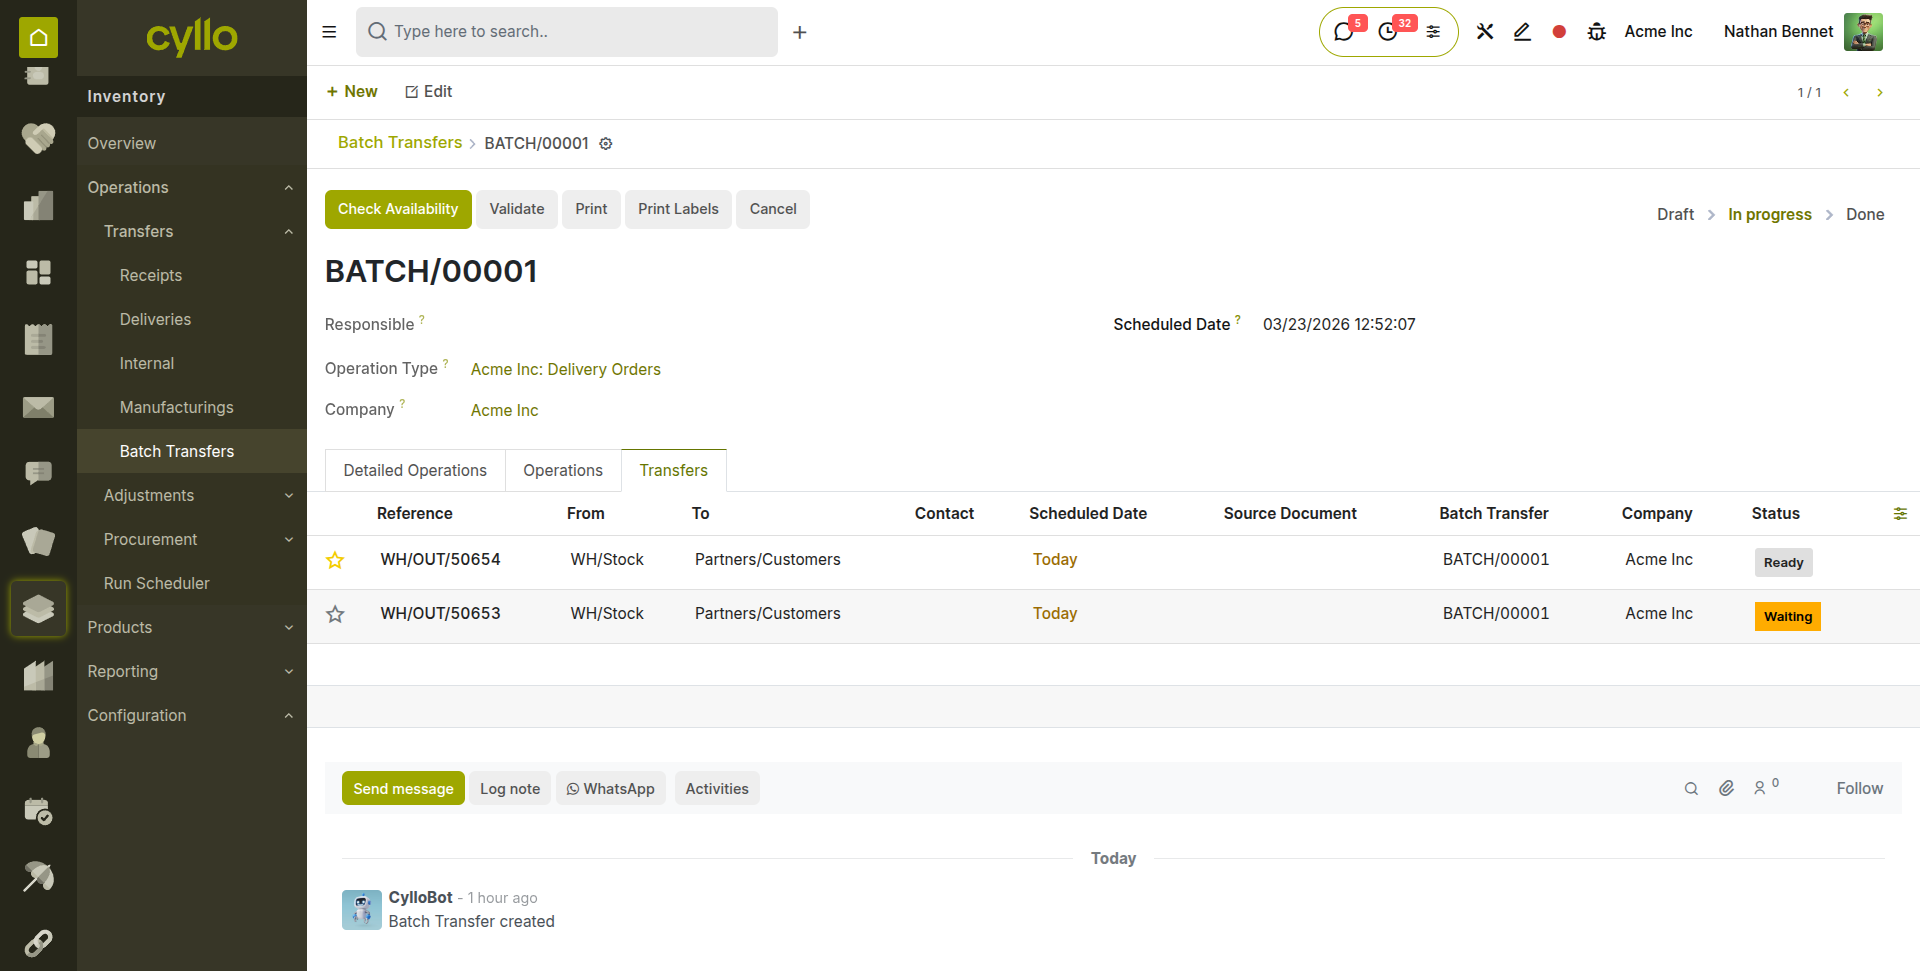
Fig 1.6 — Batch Transfer form — showing multiple delivery orders grouped into a single batch
Note
Batch Transfers must be enabled in Inventory > Configuration > Settings under the Warehouse section.
1.7. Wave Picking
Wave Picking is an advanced picking strategy where transfers are grouped into waves and released to the warehouse floor in controlled intervals. Unlike batch picking — where all orders in a batch are picked together — wave picking allows managers to release work in planned waves based on urgency, carrier cut-off times, or available staff.
- Useful for high-volume warehouses with multiple daily shipment cut-off times.
- Reduces congestion on the warehouse floor by spreading work across time windows.
- Each wave contains a set of transfers that are processed and completed before the next wave is released.
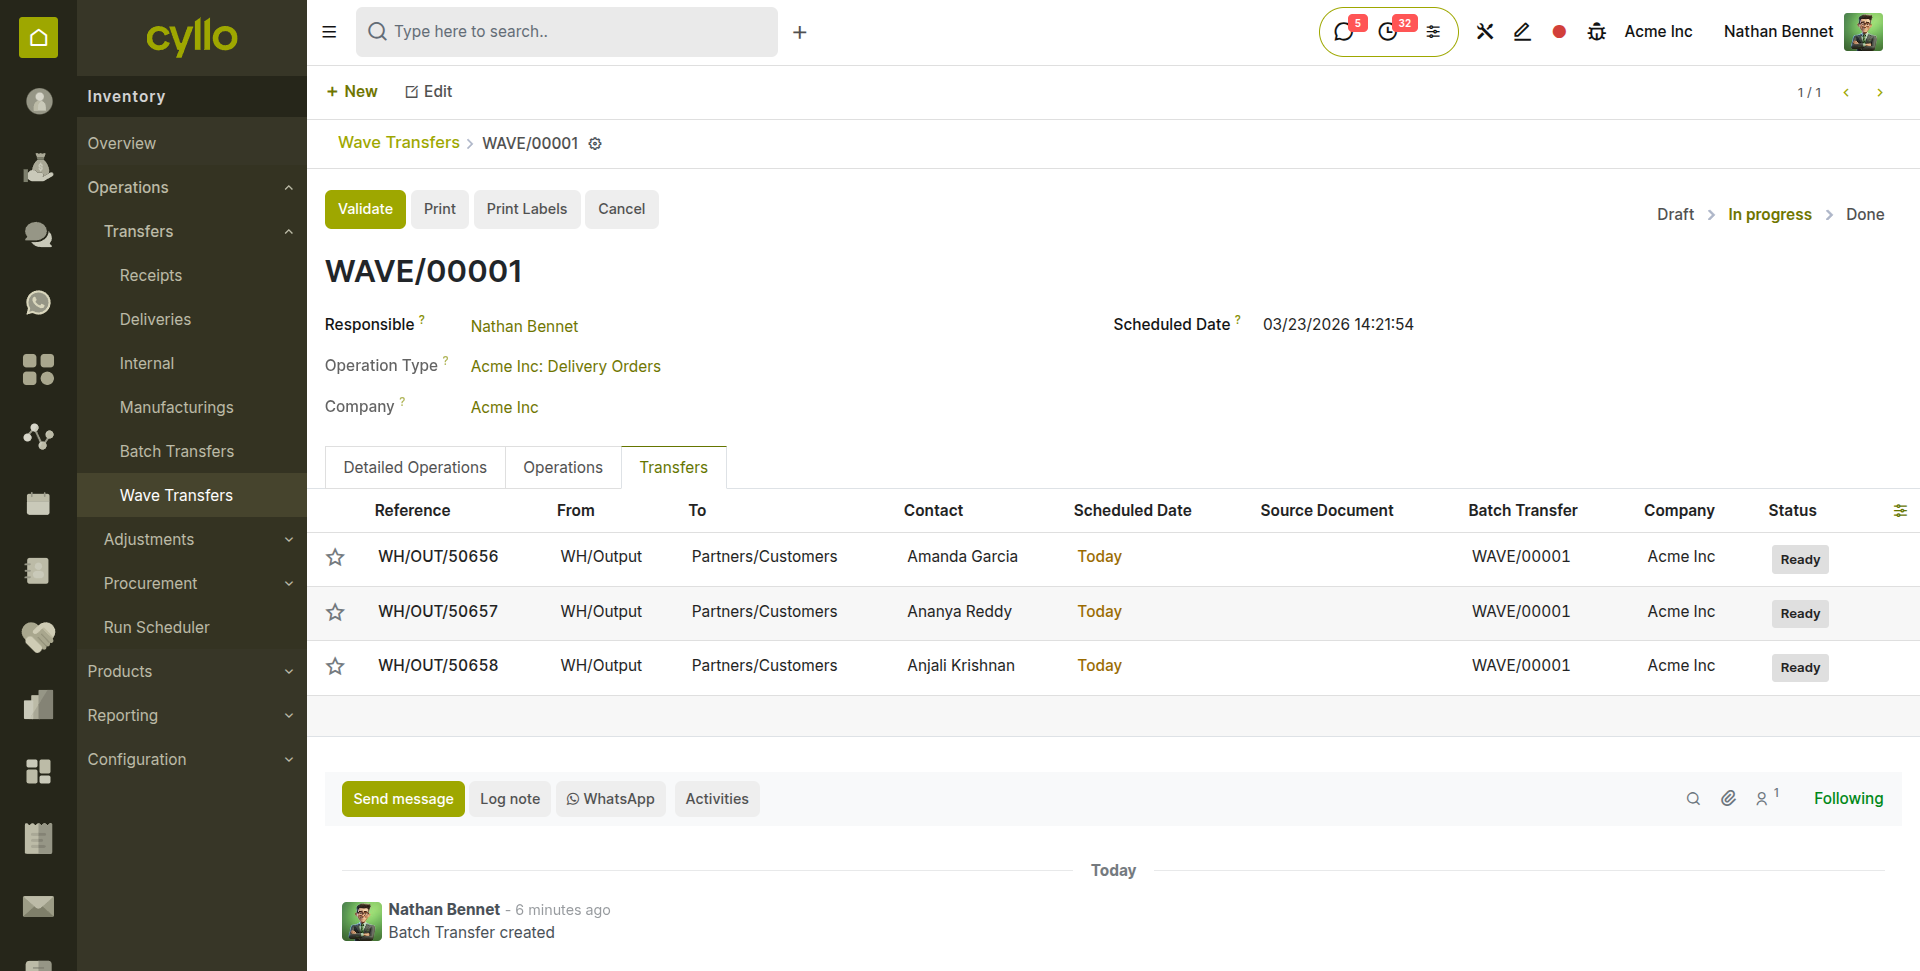
Fig 1.7 — Wave picking interface — transfer list with status.
2. Product Management
2.1. Product Configuration
Every item you buy, sell, or store in Cyllo is defined as a Product. The product form is the central record that controls how the item behaves across all modules — how it is tracked, priced, purchased, and invoiced.
| Field | Description |
|---|---|
| Product Name | The display name used across all modules and documents. |
| Product Type | Storable Product (tracked in stock), Consumable (not tracked), or Service. |
| Internal Reference | Your internal SKU or product code. |
| Barcode | Used for scanning operations and POS. |
| Unit of Measure | Primary unit for selling and reporting (e.g., Units, kg, Litre). |
| Purchase UoM | Unit used when purchasing — can differ from sales UoM. |
| Sales Price | Default selling price on quotations and sales orders. |
| Cost | Purchase cost used for inventory valuation. |
| Product Category | Determines accounting accounts and costing method. |
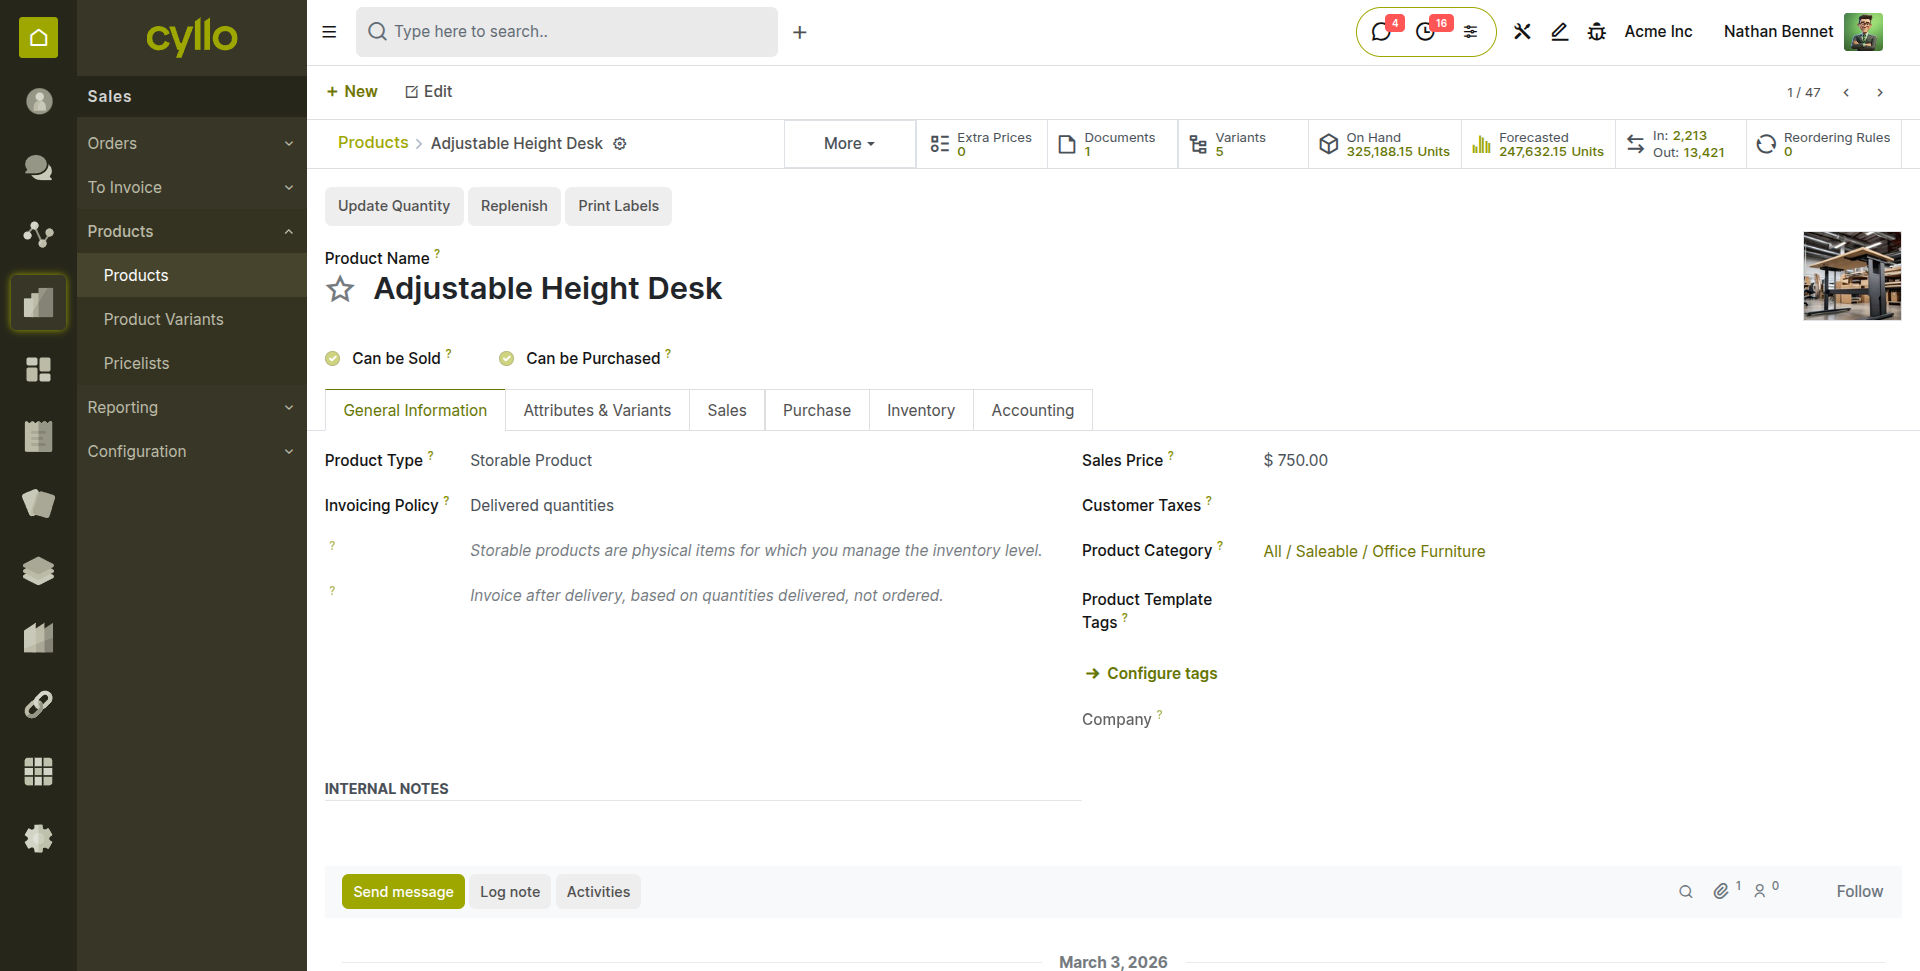
Fig 2.1 —Product form — showing all main tabs: General Information, Sales, Purchase, Inventory, Accounting
Note
Products can be created from Sales → Products → Products → Click ‘New’.
2.2. Categories
Product Categories group products for accounting, costing, and reporting purposes. Each category defines the costing method (FIFO, AVCO, or Standard Price) and the accounting journal entries used for stock valuation. Assigning products to the correct category is critical for accurate financial reporting.
- Go to Inventory > Configuration > Products > Product Categories.
- Click New or open an existing category.
- Set the Parent Category, Costing Method, and Account properties.
- Save and assign this category to your products.

Fig 2.2 — Product Category form — showing costing method dropdown, stock valuation accounts, and parent category field
2.3. Variants
Product Variants allow a single product to exist in multiple versions — for example, a T-shirt available in different sizes and colours. Instead of creating separate product records for each combination, you define Attributes (Size, Colour) and their Values (S, M, L / Red, Blue), and Cyllo generates all combinations automatically.
- Attributes are defined at the product template level (e.g. Size, Colour, Material).
- Each combination of attribute values creates one product variant.
- Variants share the same product template but can have individual prices, barcodes, and stock levels.
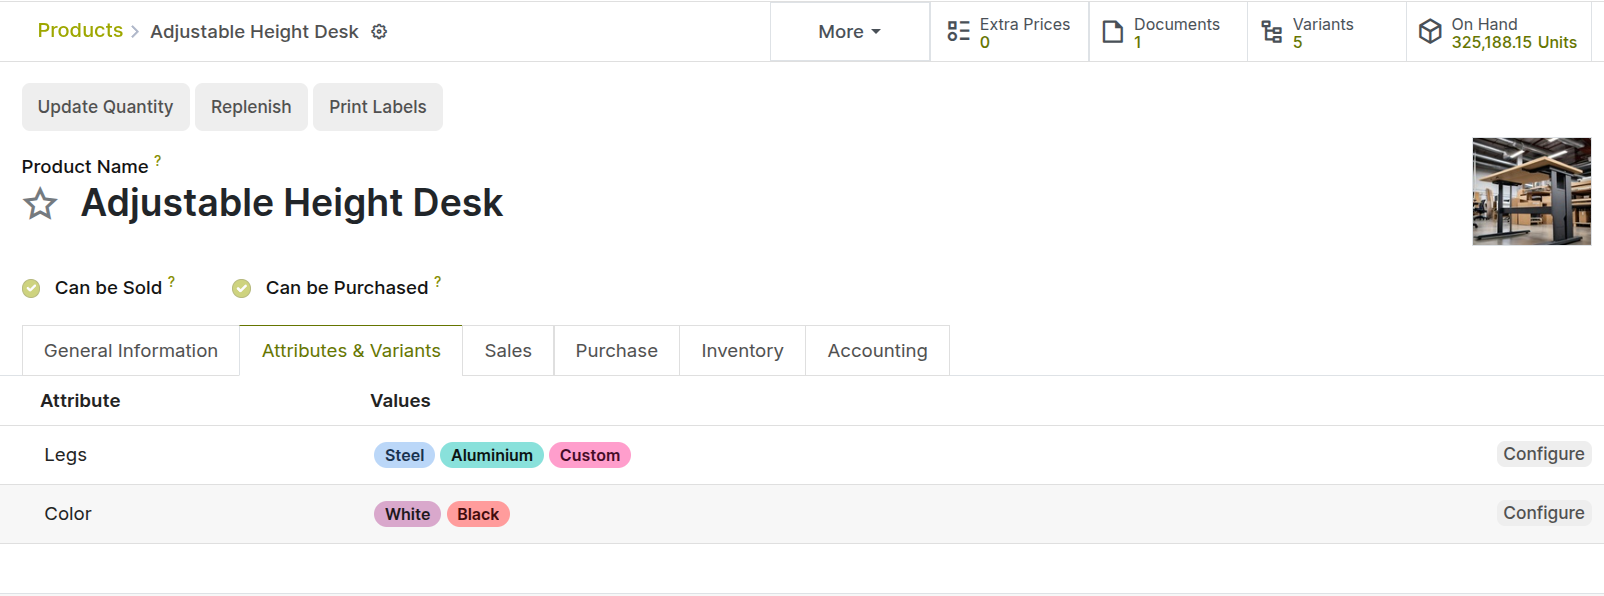
Fig 2.3 — Product template — Variants tab showing attributes (Size, Colour) and generated variant list
Note
Use variants instead of separate products whenever items share the same base product. This keeps your product catalogue clean and simplifies reporting. Enable variants from Sales → Configuration → Settings.
2.4. Packaging
Product Packaging defines the physical containers in which a product is sold or stored — for example, a product sold individually but also available in packs of 6 or boxes of 24. Packaging is used on sales orders and delivery orders to speed up quantity entry and improve picking accuracy.
- Open the product form and go to the Inventory tab.
- Under the Packaging section, click Add a Line.
- Enter the Package Name (e.g. Box of 12) and the Contained Quantity (12).
- Save the product.
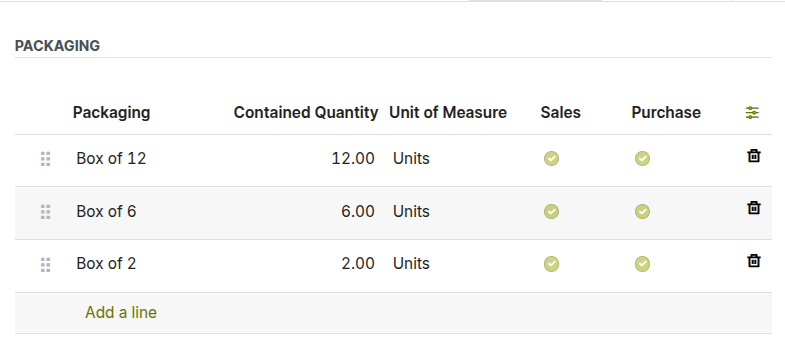
Fig 2.4 — Product form — Inventory tab > Packaging section showing package name and contained quantity
2.5. Unit of Measure
Units of Measure (UoM) define the unit in which a product is counted, sold, or purchased. Cyllo supports different UoMs for selling and purchasing the same product — for example, purchasing in kilograms but selling in grams — and automatically converts quantities between them.
Note
Units of Measure must be enabled in Inventory > Configuration > Settings before they appear on product forms. UoMs must belong to the same category (e.g. Weight, Volume, Length) to be convertible.
To Configure UoM, Go to Inventory → Configuration → Units of Measure → UoM Categories
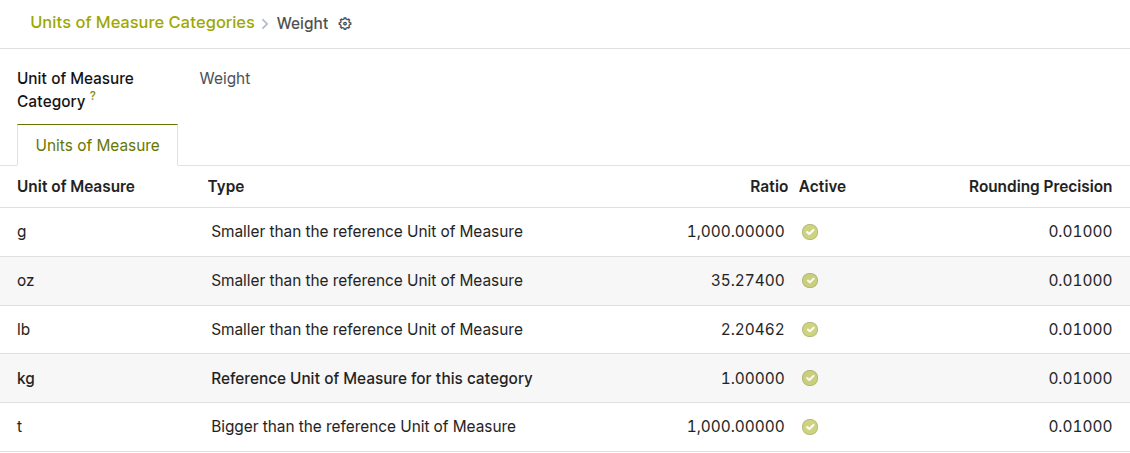
Fig 2.5 — Units of Measure form highlighted in Units of Measure Categories
2.6. Sales Price & Cost Price
Every product in Cyllo has two key prices that serve different purposes:
| Price Field | Purpose | Where It Is Used |
|---|---|---|
| Sales Price | The default price charged to customers. | Quotations, Sales Orders, eCommerce |
| Cost Price | The purchase or production cost of the product. | Inventory Valuation, Margin Reports, Landed Costs |
The Cost Price is updated automatically when using AVCO or FIFO costing methods. With Standard Price, you update it manually. The Sales Price can be overridden on individual quotation lines or controlled using Pricelists.
2.7. Product Availability & Forecasted Stock
Cyllo gives you real-time visibility into how much stock you have and how much you are projected to have in the future. On every product form, the smart buttons at the top show:
- On Hand — the physical quantity currently in your warehouse.
- Forecasted — the projected stock after accounting for confirmed sales orders, purchase orders, and manufacturing orders.
- In Transit — quantity in open receipts not yet validated.
Note
Product forms have smart buttons showing On Hand, Forecasted, and In Transit quantities. Click the Forecast button to open the Forecast report for that product. It shows a timeline of expected stock changes, helping you identify future shortages before they occur.
2.8. Expiry Dates & Removal Dates
For products that are perishable or have regulatory shelf-life requirements, Cyllo supports Expiry Date and Removal Date tracking at the lot or serial number level. This ensures older stock is used first and products past their removal date are flagged before they are shipped.
- Expiry Date — the date after which the product should not be consumed or sold.
- Best Before Date — the date until which the product is at its best quality.
- Removal Date — the date on which the product must be removed from stock (triggered earlier than expiry).
- Enable Expiration Dates in Inventory > Configuration > Settings.
- Open the product and enable Tracking by Lot or Serial Number.
- On the Inventory tab, enable Use Expiration Dates.
- When receiving goods, enter expiry dates for each lot on the receipt.
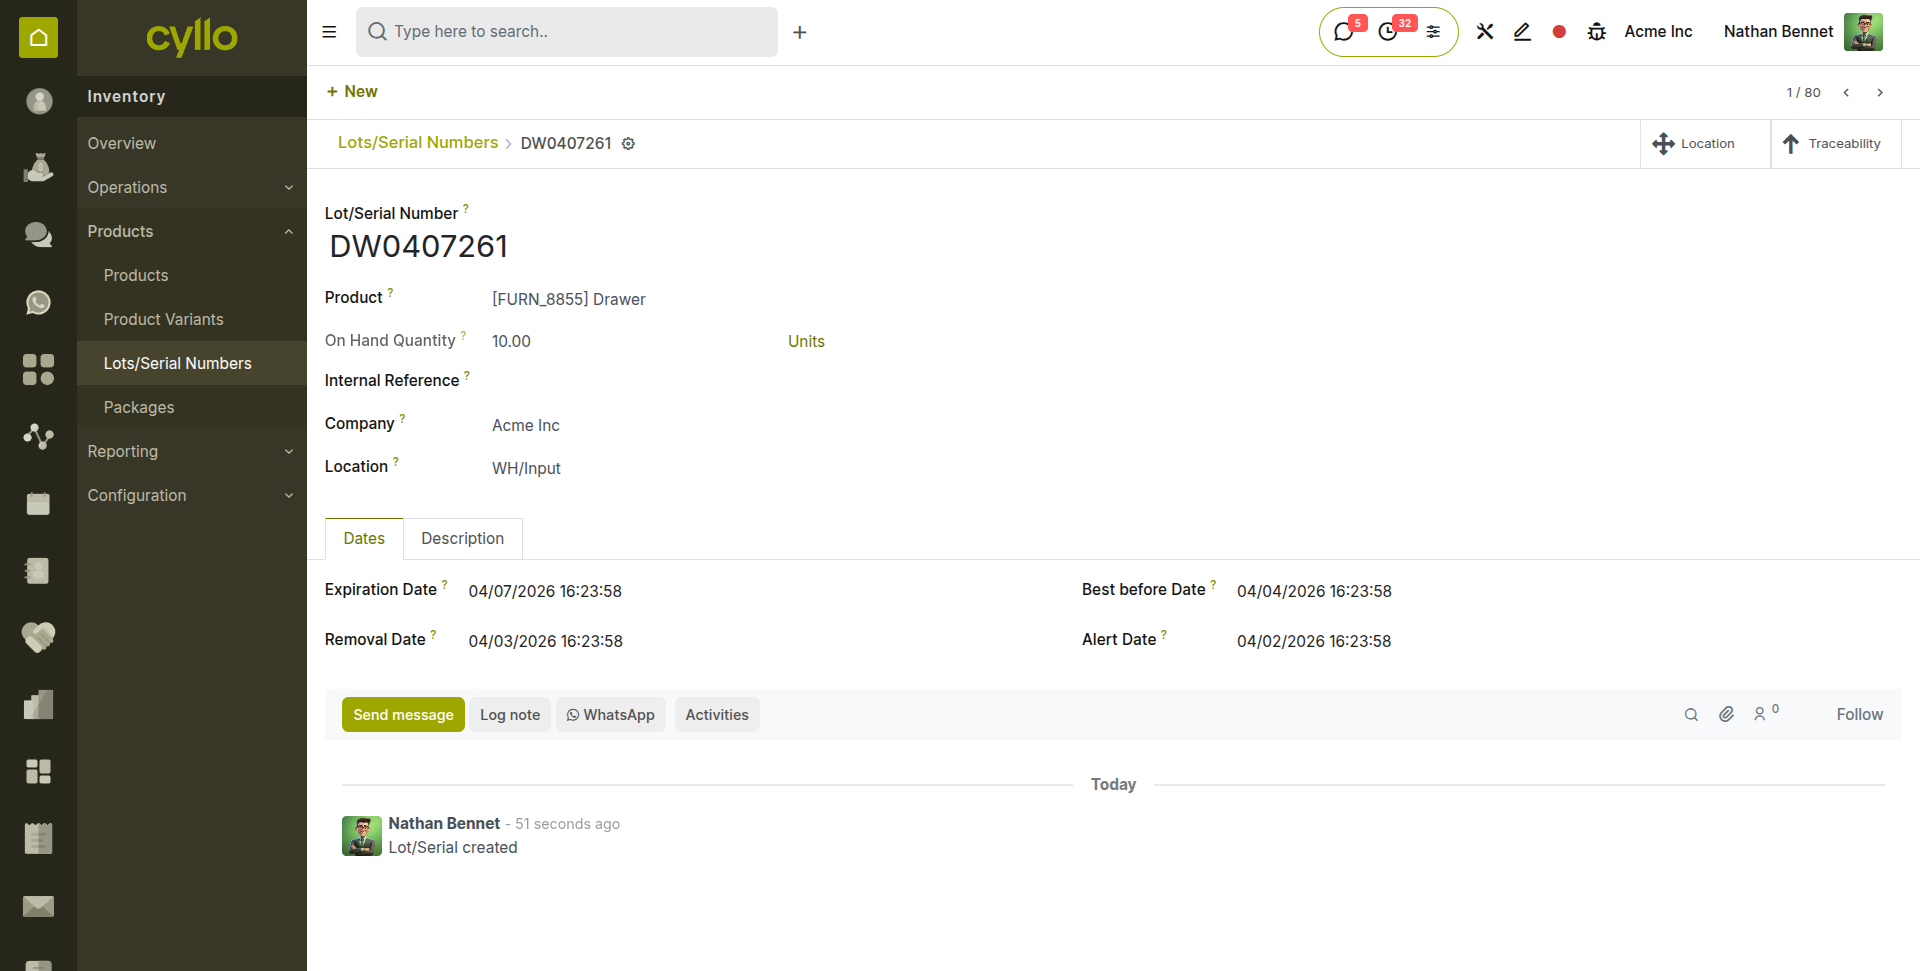
Fig 2.6 — Receipt form — lot/serial number detail showing Expiry Date and Best Before Date fields
3. Warehouse & Locations
3.1. Warehouse Configuration
A Warehouse in Cyllo represents a physical facility where you store goods. Each warehouse has its own set of stock locations, operation types (receipts, deliveries, internal transfers), and routing rules. You can operate one warehouse or dozens from the same Cyllo instance.
- Go to Inventory > Configuration > Warehouse management.
- Click New to create a warehouse or open an existing one.
- Set the Warehouse Name and Short Name (used as a prefix on operations).
- Configure the incoming and outgoing shipment routes (1-step, 2-step, or 3-step).
- Save.
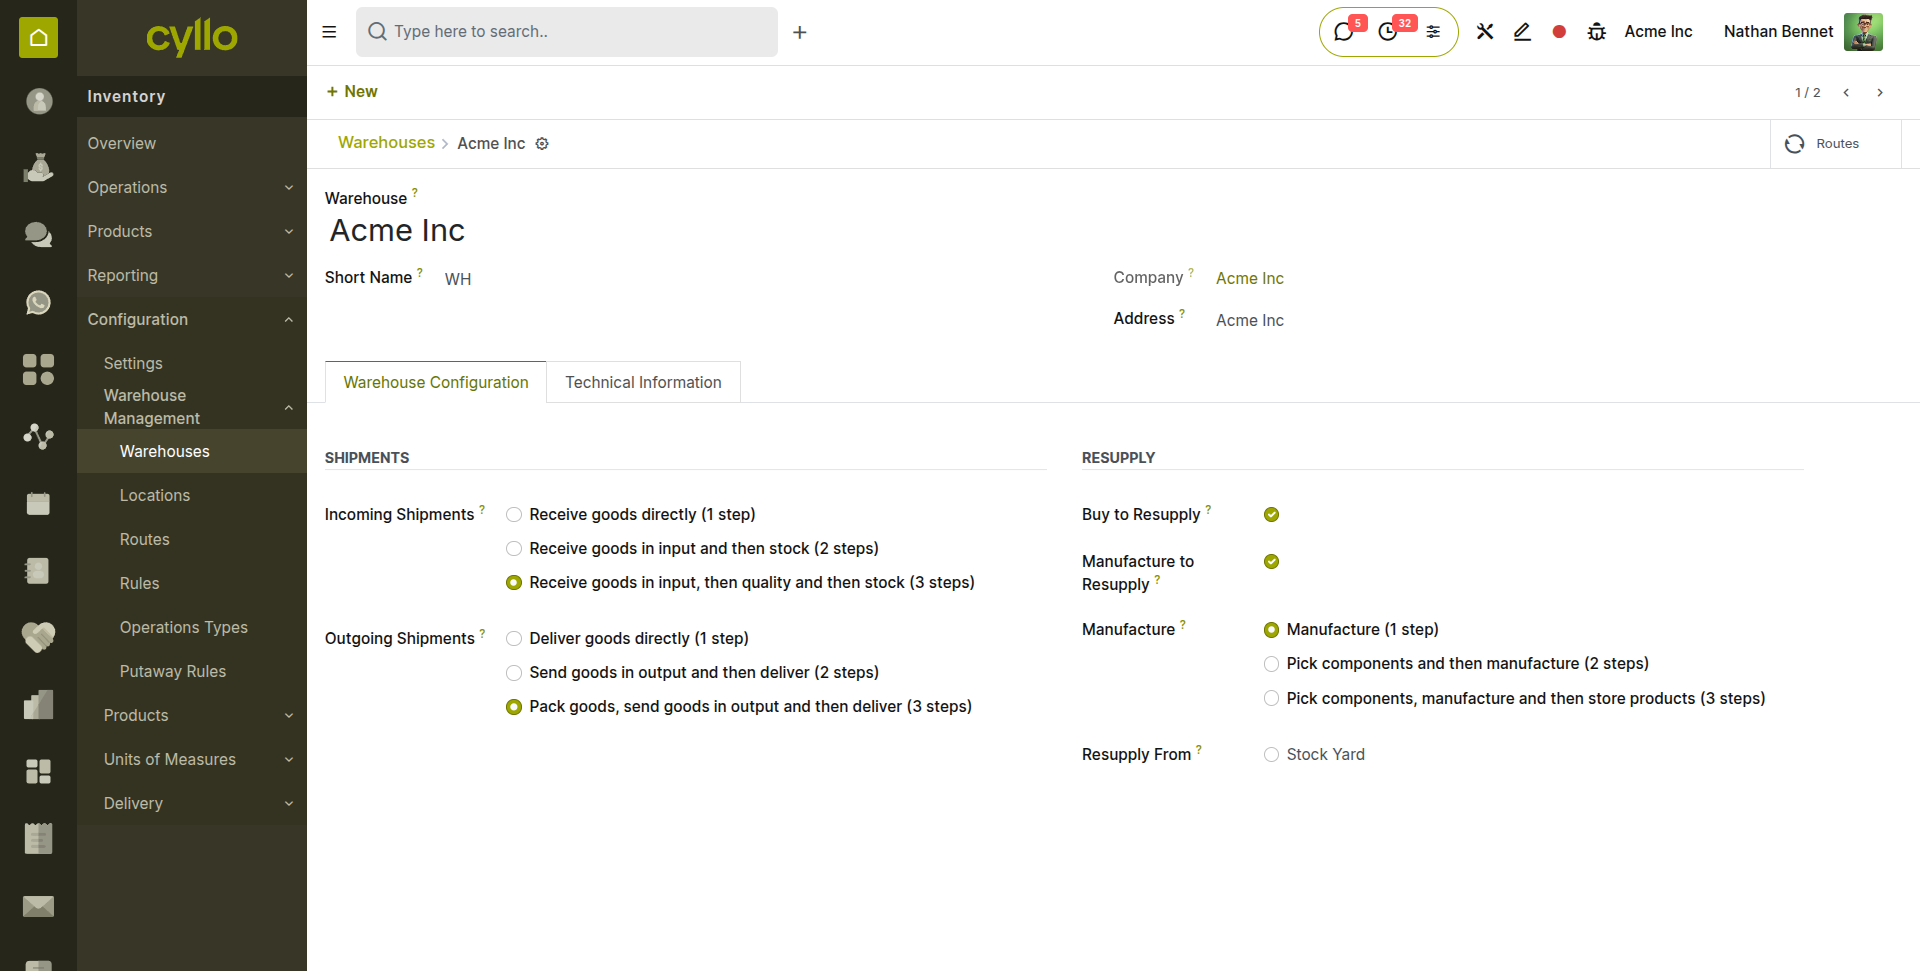
Fig 3.1 — Warehouse configuration form — showing name, short name, and incoming/outgoing shipment route options
3.2. Storage Locations
Locations are the specific places within a warehouse where stock is stored — aisles, shelves, bins, or zones. Using locations allows you to know exactly where every product is at any point in time, making picking faster and more accurate.
- Locations can be organized in an hierarchy — Warehouse > Zone > Aisle > Shelf > Bin.
- Each location can be restricted to specific product categories or configured with putaway rules.
- You can create as many sub-locations as your warehouse layout requires.
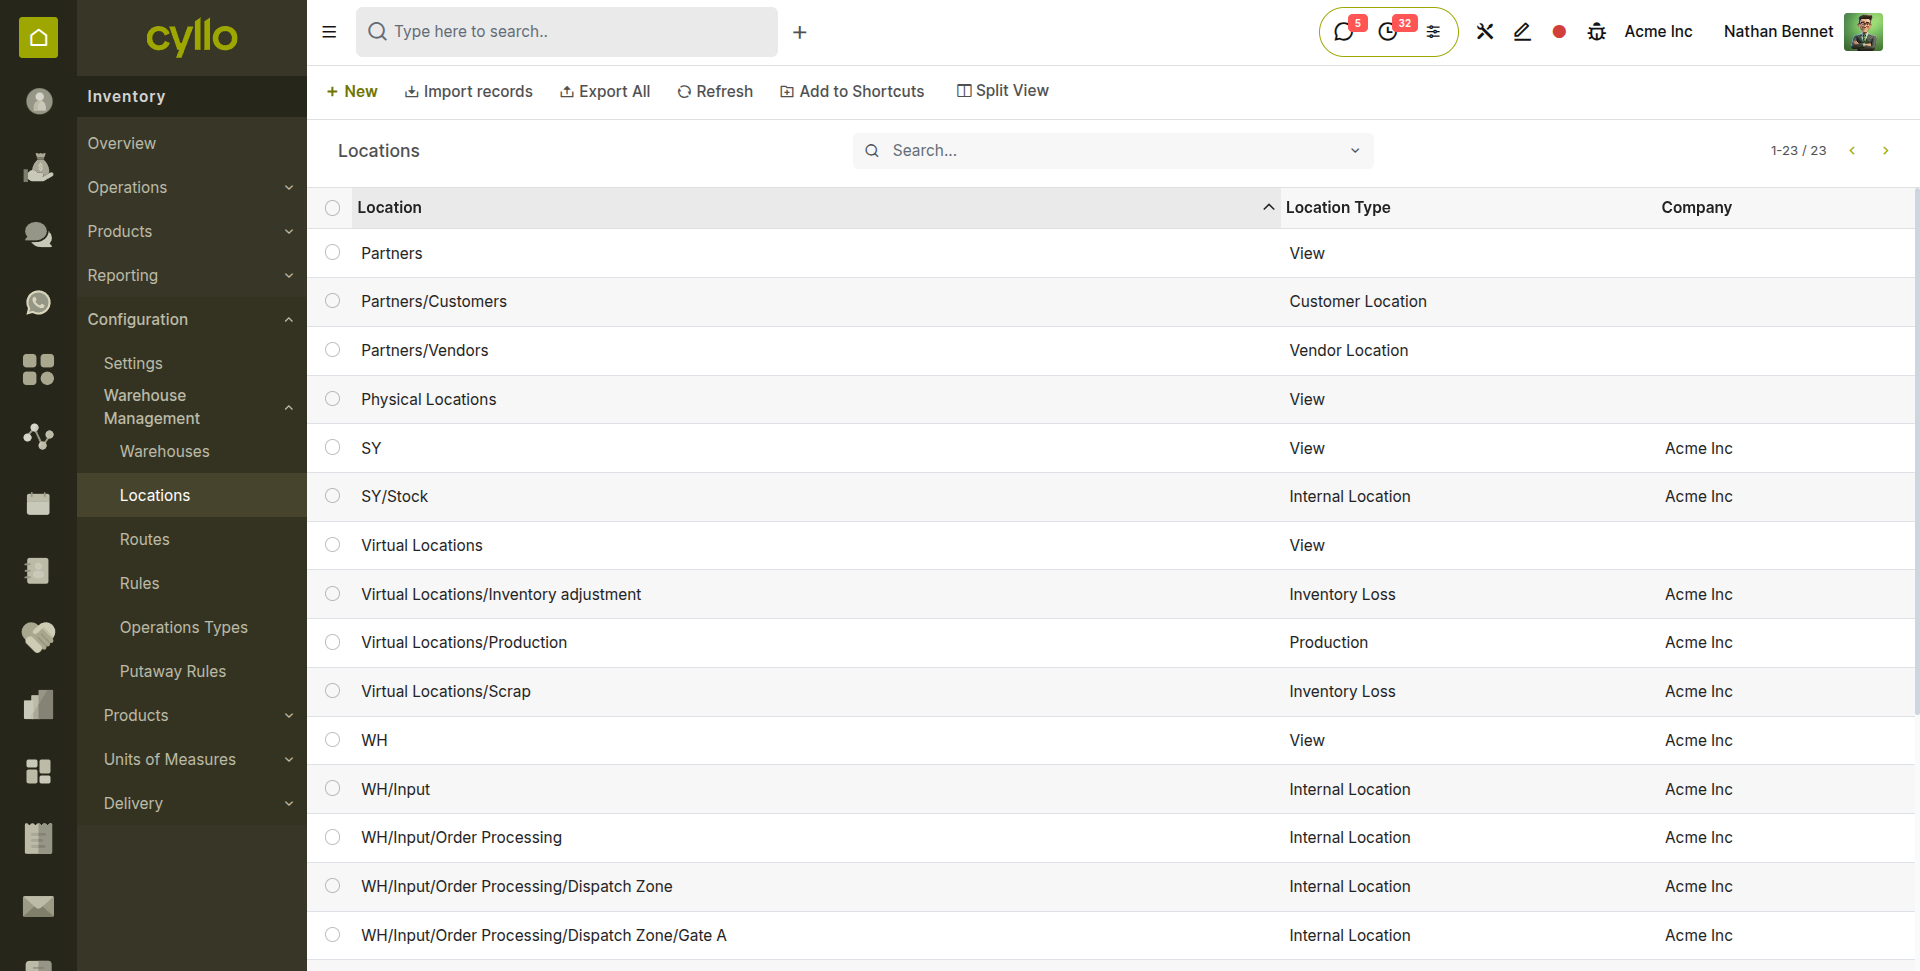
Fig 3.2 — Location hierarchy tree — showing Warehouse > Main Stock > Zone A > Shelf 1 > Bin 01
3.3. Location Types
Every location in Cyllo has a Type that determines its role in the system. Understanding location types is important because they affect how stock moves are recorded and reported.
| Location Type | Purpose |
|---|---|
| Internal | Locations inside your company warehouse — where stock is stored and counted. |
| Vendor | Virtual location representing supplier stock — source for incoming shipments. |
| Customer | Virtual location representing customer stock — destination for outgoing deliveries. |
| View | non-physical location used purely for organizational and hierarchical purposes. |
| Transit | Temporary holding location used during inter-company or inter-warehouse transfers. |
| Production | Virtual location specifically used in manufacturing or assembly processes. |
3.4. Multi-Warehouse Setup
If your business operates from multiple physical locations, Cyllo allows you to manage all warehouses from a single database. Each warehouse has its own stock, operations, and routes, but they can share products, customers, and vendors.
- Each warehouse gets its own set of receipt, delivery, and internal transfer operation types.
- Intercompany transfers between warehouses are tracked as internal transfers.
- Sales orders can be fulfilled from a specific warehouse or automatically routed based on stock availability.

Fig 3.3 — Warehouse list view — showing multiple warehouses with their short names, company, and address
3.5. Putaway Rules
Putaway Rules automatically direct incoming products to the correct storage location when a receipt is validated. Instead of manually choosing where to put each product, Cyllo checks the putaway rules and suggests or auto-assigns the correct shelf or bin.
- Go to Inventory > Configuration > Warehouse Management > Putaway Rules.
- Click New to create a rule.
- Set the Location (the entry point, e.g. WH/Input) and the Product or Category.
- Set the Has Putaway Strategy destination (e.g. WH/Stock/Zone A/Shelf 2).
- Save. The rule applies automatically during receipt validation.

Fig 3.4 — Putaway Rules list — showing location, product category, and destination location columns
3.6. Removal Strategies (FIFO, FEFO, LIFO)
Removal Strategies define which stock is picked first when fulfilling a delivery order. The strategy is set at the product category or location level.
| Strategy | Full Name | How It Works |
|---|---|---|
| FIFO | First In, First Out | The oldest stock (first received) is picked first. Common for most products. |
| FEFO | First Expired, First Out | Stock with the earliest expiry date is picked first. Essential for perishables and |
| LIFO | Last In, First Out | The most recently received stock is picked first. Less common — used in specific industries. |
| Closest Location | Prioritizes picking items from the storage location physically nearest to the picking destination to minimize travel time. | |
| Least Packages | Picked from a location that requires opening or using the fewest distinct packages to fulfill the demand. |

Fig 3.5 — Product Category form — Removal Strategy field showing dropdown options
4. Inventory Tracking
4.1. Lot Numbers
Lot Numbers track groups of products that were produced or received together. They are used when you need to know which batch a product came from — for quality control, recalls, or regulatory compliance. A lot number applies to multiple units of the same product.
- Enable lot tracking on the product form: Inventory tab > Tracking > By Lots.
- Assign lot numbers when receiving products — Click the button at the end of the product line in the receipt form to assign .
- All stock moves for that lot are recorded and visible in the Traceability report.
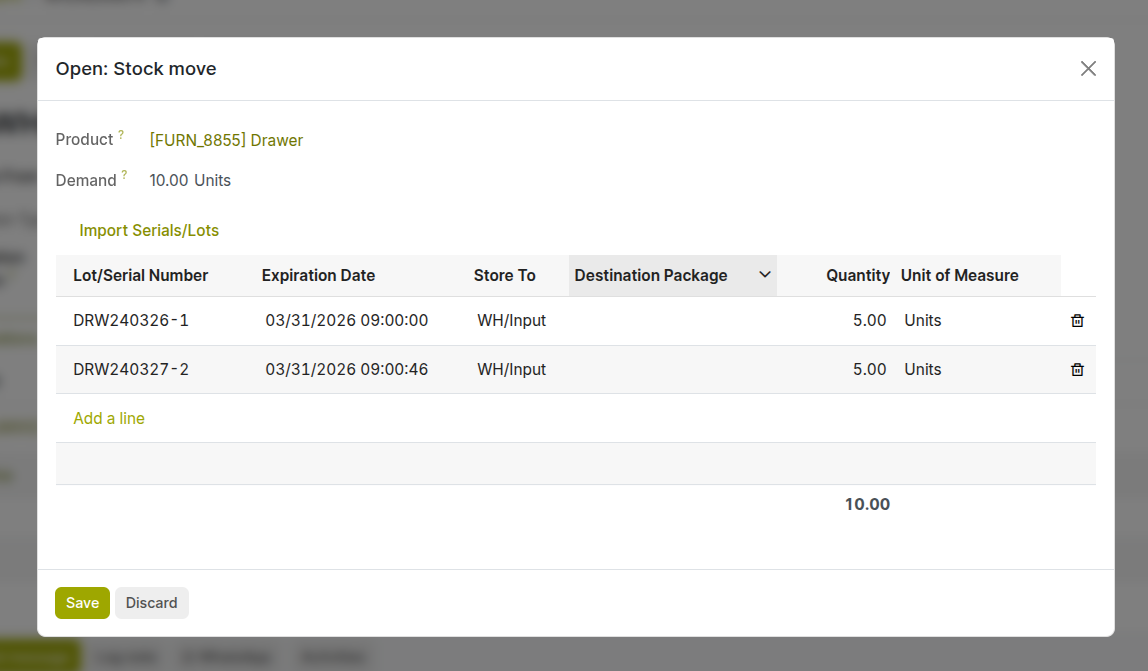
Fig 4.1 — Receipt form — Lot/Serial Number detail popup showing lot number entry and quantity per lot
4.2. Serial Numbers
Serial Numbers track individual units of a product. Unlike lot numbers — which cover multiple units — each serial number identifies exactly one item. Serial tracking is used for high-value products like electronics, machinery, or medical devices where individual unit history matters.
- Enable serial tracking on the product form: Inventory tab > Tracking > By Unique Serial Number.
- Each unit must have a unique serial number assigned at receipt.
- Set serial numbers using ‘+’ button on line or from the end button popup.
- Serial numbers follow the product through every transfer — from receipt to delivery to return.
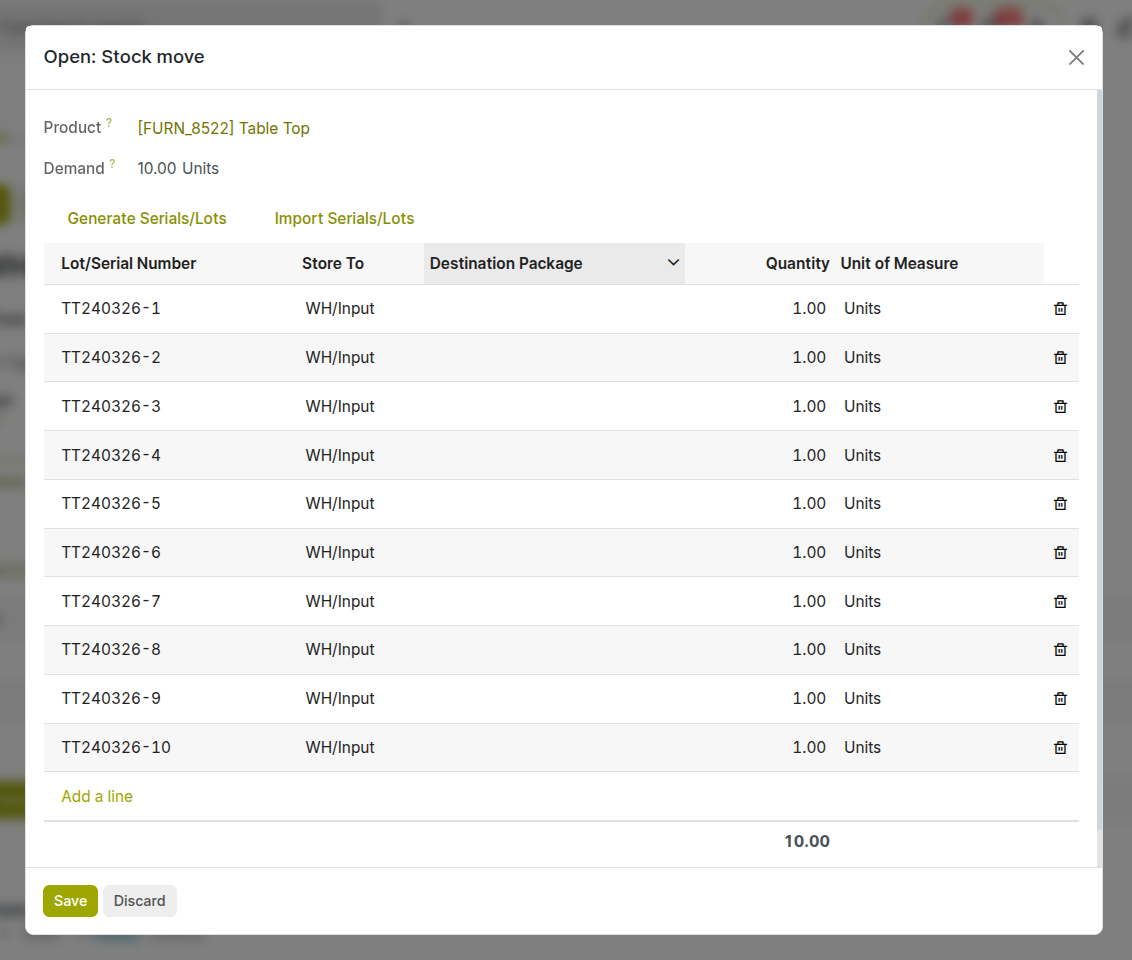
Fig 4.2 — Delivery order — serial number field showing individual serial number assigned to each unit line
4.3. Traceability Report
The Traceability Report gives you a complete history of every move a lot or serial number has made — from the original receipt, through any internal transfers, to the final delivery or return. It is the primary tool for investigating quality issues, handling recalls, and providing regulatory audit trails.
- Go to Inventory > Products > Lots/Serial Numbers.
- Open the lot or serial number you want to trace.
- Click the Traceability button at the top of the form.
- Review the full movement history shown in chronological order.
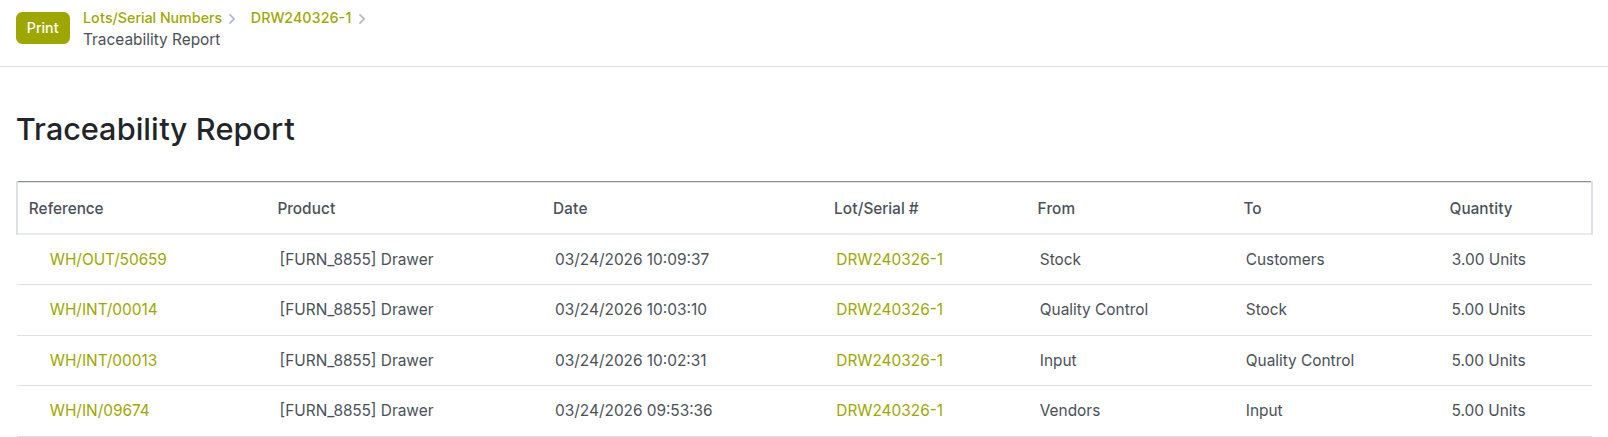
Fig 4.3 — Traceability report — tree view showing all stock moves for a lot number from receipt to delivery
Note
You can also access traceability directly from a delivery order or receipt by clicking the detail icon on top of the form view.
4.4. Stock History
Stock History shows a chronological log of all quantity changes for a product at a specific location. Unlike the traceability report — which focuses on a specific lot — stock history shows the complete movement of a product regardless of lot or serial number.
- Access from the product form by clicking the Moves(In, Out) smart button.
- Filter by date range, location, or operation type to find specific movements.
- Each line shows the origin document, source/destination location, and quantity moved.
4.5. Owner Assignment
Owner Assignment allows you to record that stock stored in your warehouse physically belongs to someone else — for example, consignment stock from a vendor, or customer-owned goods stored at your facility. The stock appears in your location counts but is financially attributed to the owner.
Note
Enable ‘Consignment’ from configuration > settings. Owner assignment is set on individual stock move lines during receipt. Go to the form of a receipt and set the ‘Assign Owner’ field to the relevant partner.
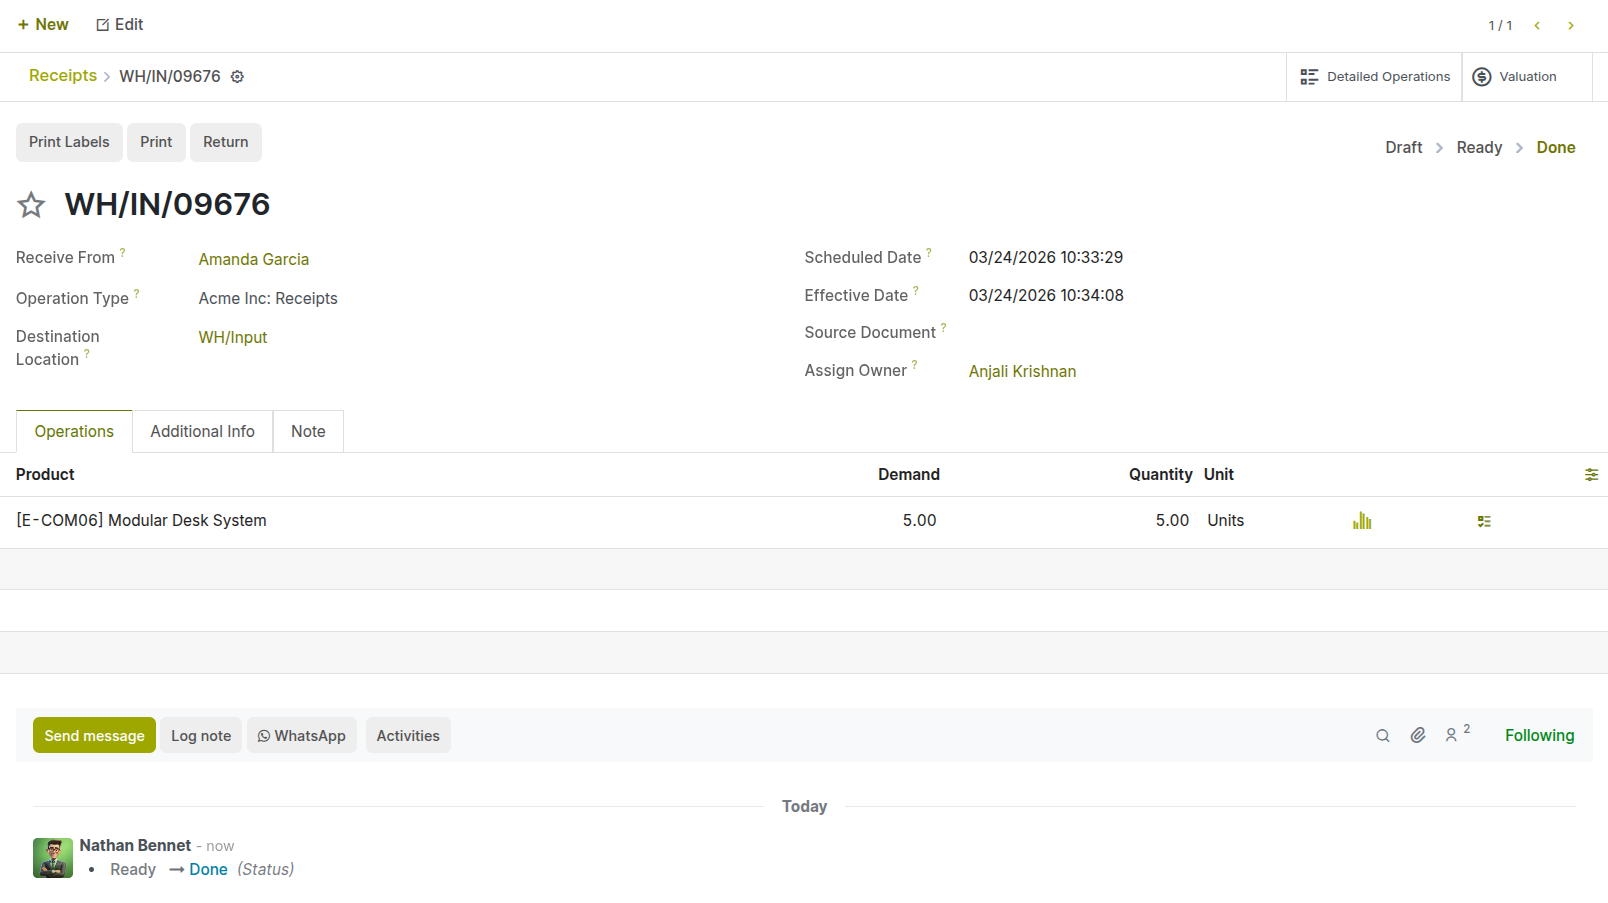
Fig 4.4 — Receipt — Detailed Operations view showing the Owner column assigned to a vendor partner
5. Replenishment & Reordering
5.1. Reordering Rules (Min/Max)
Reordering Rules automate stock replenishment by triggering a purchase order or manufacturing order when a product's stock falls below a defined minimum level. When stock reaches the minimum, Cyllo creates a replenishment order to bring stock back up to the maximum level.
- Go to Inventory > Operations > Procurement > Replenishment.
- Click New to create a rule for a product.
- Set the Product, Location, Minimum Quantity, and Maximum Quantity.
- Set the Multiple Quantity (order in multiples of this number).
- Save. Cyllo will trigger replenishment automatically when stock drops below the minimum.

Fig 5.1 — Replenishment rules list — showing product, location, min qty, max qty, and multiple qty columns
5.2. Make to Order (MTO)
Make to Order (MTO) is a route that triggers a purchase or manufacturing order automatically whenever a confirmed sales order requires a product. Instead of fulfilling from existing stock, the product is ordered or produced specifically for that customer demand.
- Enable ‘Multi-Step Routes’ in Inventory > Configuration > Settings
- MTO is activated as a route on the product form: Inventory tab > Routes > Make to Order.
- When a sales order is confirmed, a purchase or manufacturing order is created and linked to it automatically.
- Useful for custom, expensive, or rarely stocked items.
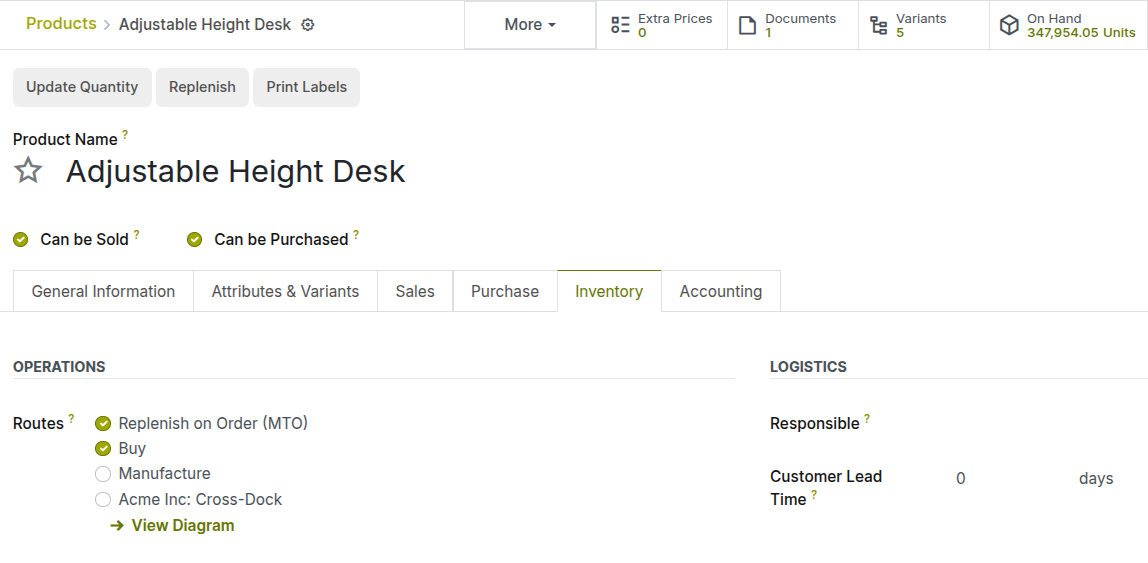
Fig 5.2 — Product form — Inventory tab showing Routes section with 'Make to Order' checkbox enabled
5.3. Make to Stock (MTS)
Make to Stock (MTS) is the default strategy where products are produced or purchased in advance and stored, ready to fulfill customer demand from available inventory. Sales orders are fulfilled from existing stock without triggering a new purchase or manufacturing order.
- Suitable for fast-moving, standardized products with predictable demand.
- Relies on reordering rules or manual purchasing to maintain adequate stock levels.
- Delivery is faster since goods are already on hand when an order is placed.
5.4. Lead Times & Safety Stock
Lead Times define how long it takes for a product to be received after a purchase order is placed. Safety stock is the extra inventory you keep as a buffer to avoid stockouts and absorb unexpected demand or supplier delays.
| Setting | Where It Is Set | Effect |
|---|---|---|
| Vendor Lead Time | Vendor pricelist in product purchase tab | Days from PO confirmation to receipt arrival. |
| Purchase Security Lead Time | Inventory Settings | Extra buffer added to all purchase lead times company-wide. |
| Customer Lead Time | Product form > Sales tab | Days promised to customers from order to delivery. |
| Security Lead Time for Sales | Inventory Settings | Extra buffer added to all sales lead times company-wide. |
| Safety Stock | Reordering rule min qty | Maintains buffer by maintaining quantity higher than minimum. |
5.5. Vendor Lead Time
Vendor Lead Time is the number of days a specific vendor takes to deliver a product after a purchase order is confirmed. Setting accurate vendor lead times allows Cyllo to calculate the correct reorder point and ensure stock arrives before it runs out.
- Open the product form.
- Go to the Purchase tab.
- In the Vendor section, add the vendor and set the Delivery Lead Time in days.
- Save.
Cyllo will use this lead time when calculating replenishment scheduling.

Fig 5.3 — Product form — Purchase tab showing vendor list with Delivery Lead Time column
6. Stock Valuation
6.1. Costing Methods (FIFO, AVCO, Standard)
The Costing Method determines how Cyllo calculates the value of your inventory. It is set at the Product Category level and applies to all products in that category.
| Method | Full Name | How It Works | Best For |
|---|---|---|---|
| Standard Price | Standard Price | A fixed cost is set manually and does not change with purchases. | Manufactured goods with predictable costs |
| AVCO | Average Cost (Moving) | Cost is recalculated as a weighted average each time stock is received. | Products with frequently changing purchase prices |
| FIFO | First In, First Out | The cost of the oldest stock is used when goods are sold or consumed. | Perishables, electronics, and regulated industries |
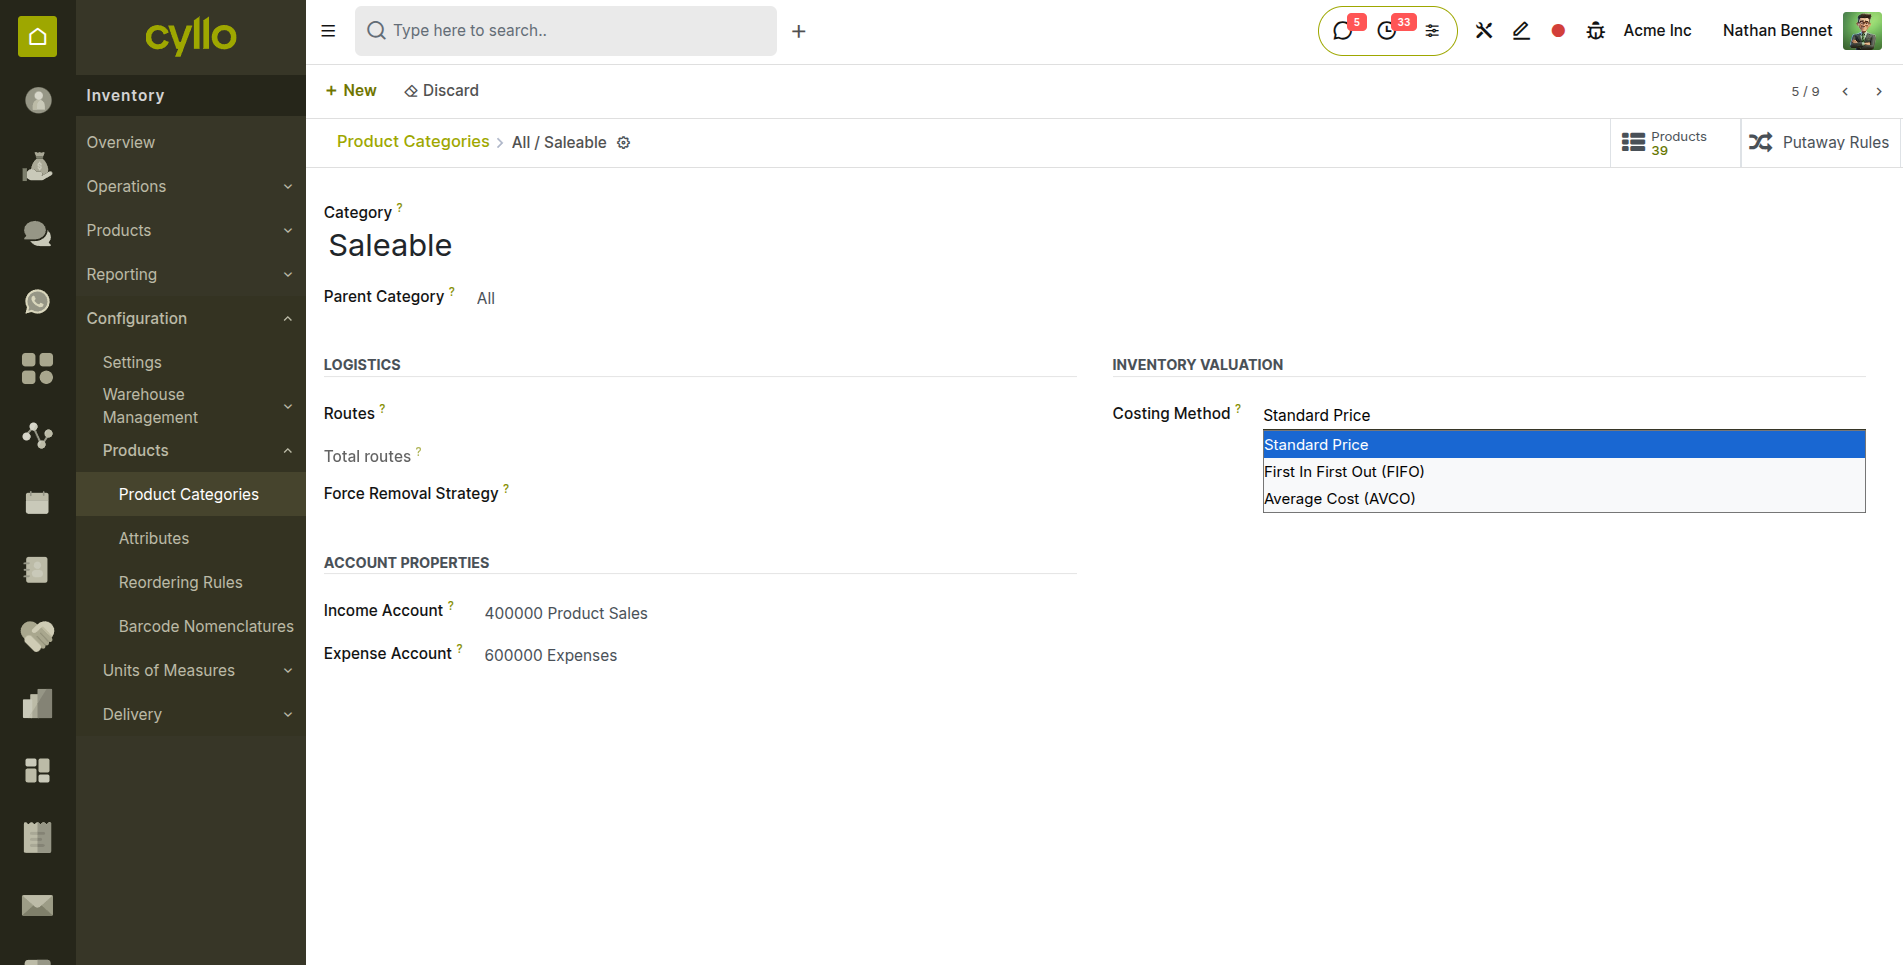
Fig 6.1 — Product Category form — Costing Method dropdown showing Standard Price, AVCO, and FIFO options
6.2. Landed Costs
Landed Costs allow you to add additional costs — such as freight, customs duties, and insurance — to the value of received products. Instead of recording these as expenses, they are distributed across the received stock and included in the product's inventory value.
- Enable ‘Landed Costs’ in Inventory > Configuration > Settings
- Go to Inventory > Operations > Adjustments > Landed Costs.
- Click New and select the Vendor Bill or Receipt to attach costs to.
- Add the cost lines (freight, insurance, duties) with their amounts.
- Choose the split method: By Quantity, By Weight, By Volume, or By Current Cost.
- Click Validate to distribute the costs across the stock moves.
Note
To use a product as a landed cost, enable ‘Is a Landed Cost’ inside the product form purchase tab.
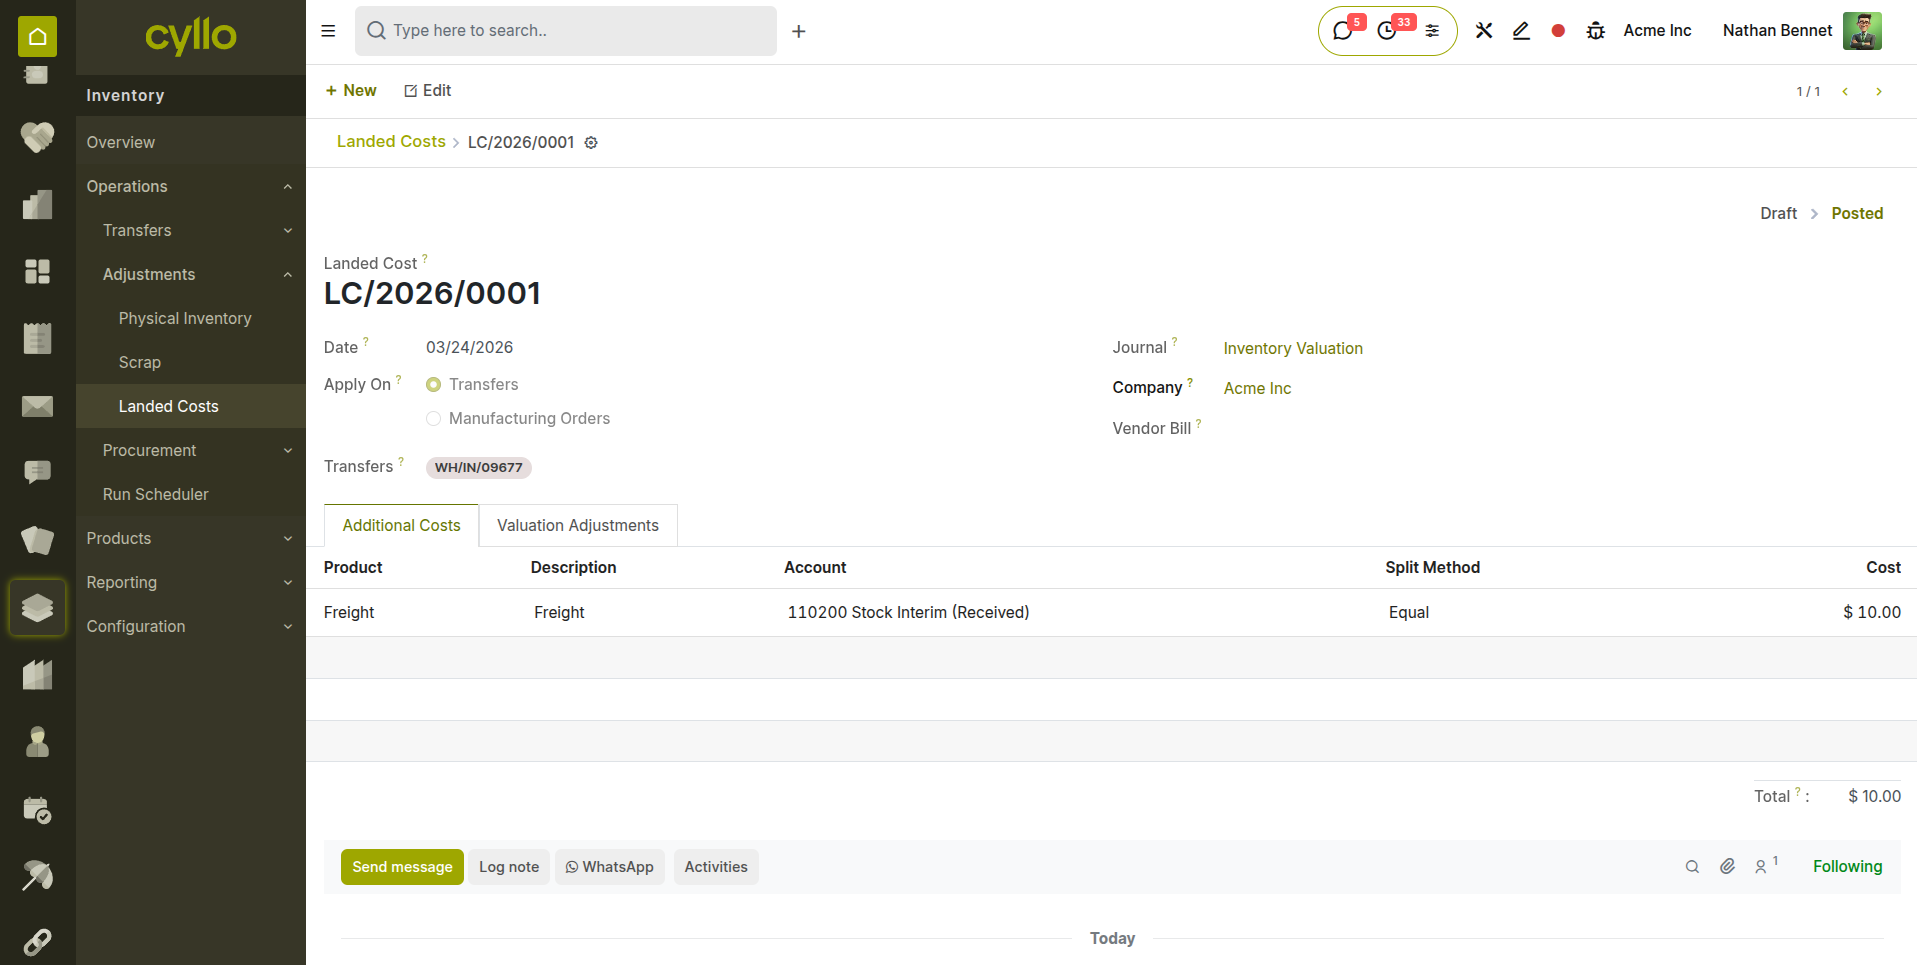
Fig 6.2 — Landed Cost form — vendor bill, cost lines, split method dropdown, and product valuation adjustment table
6.3. Inventory Adjustment
An Inventory Adjustment corrects the stock quantity in Cyllo to match a physical count. When you count the actual goods in your warehouse and find discrepancies, you use an inventory adjustment to update the system.
- Go to Inventory > Operations > Adjustments > Physical Inventory.
- Click New Count or select an existing count.
- Enter the Counted Quantity for each product line.
- Click Apply All to post the adjustment and update stock levels.
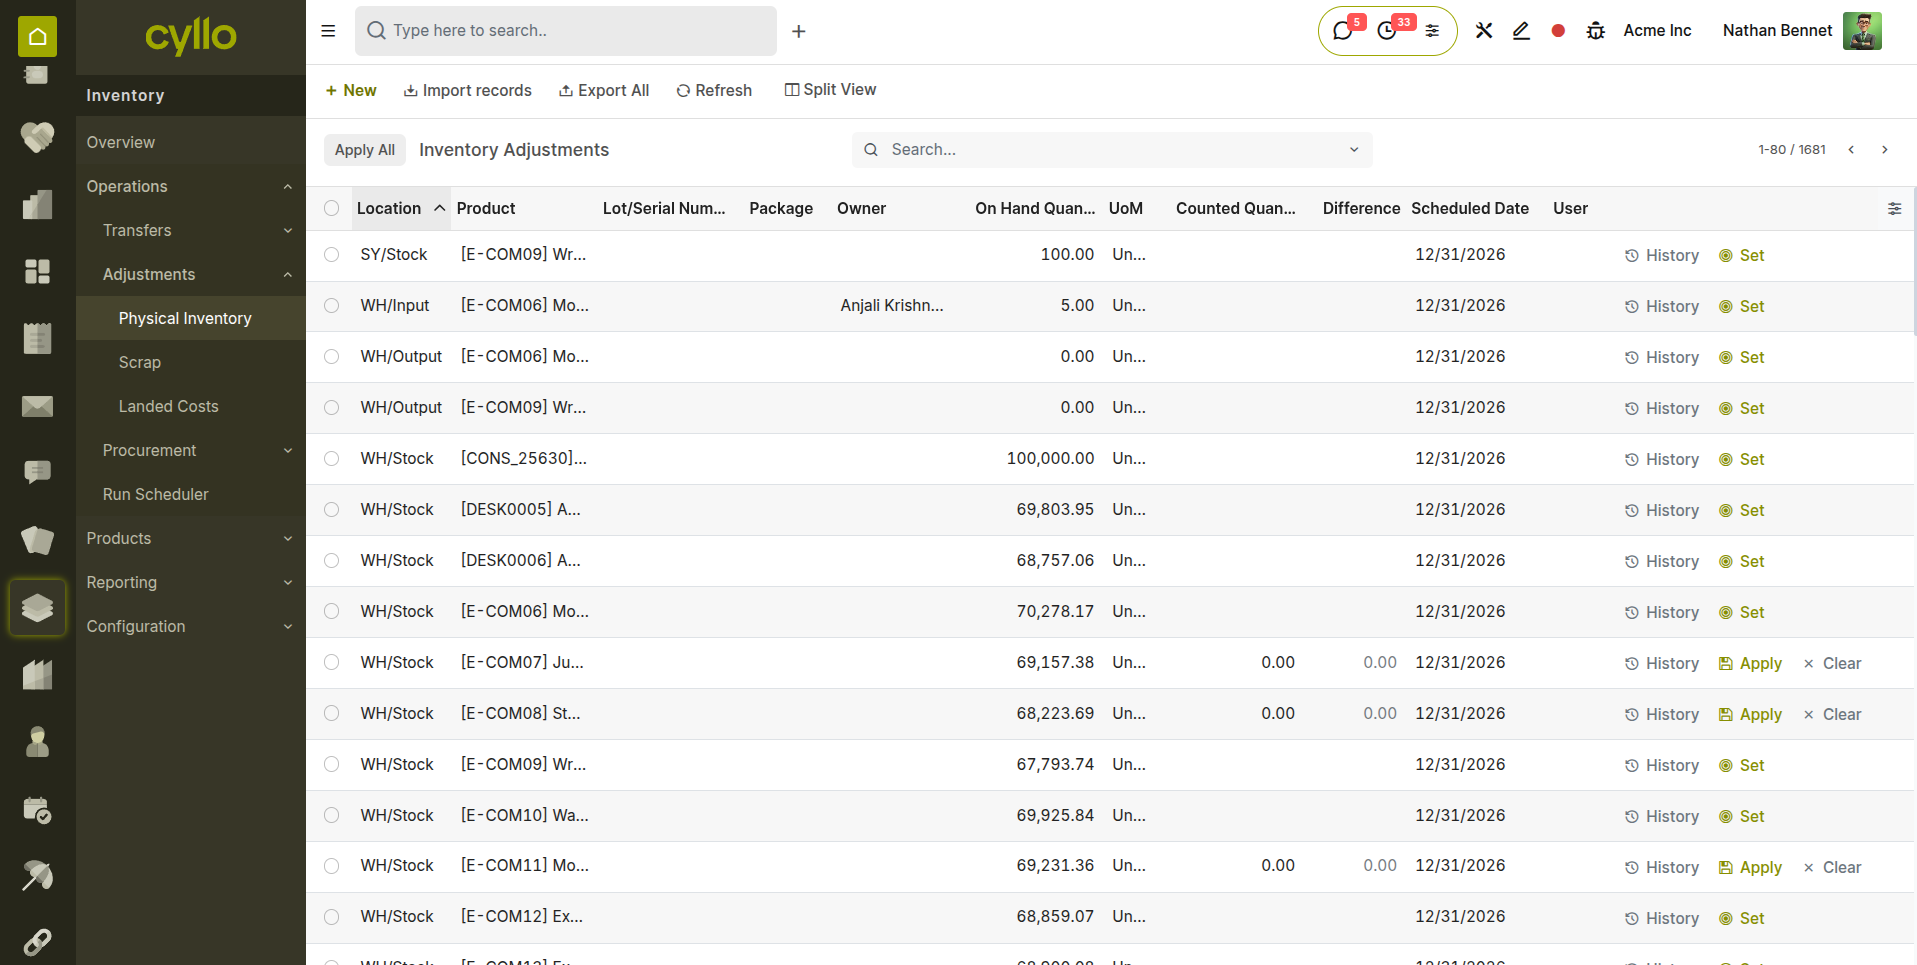
Fig 6.3 — Physical Inventory form — product list with On Hand quantity, Counted Quantity, and Difference columns
Warning
Inventory adjustments create accounting journal entries that affect your inventory valuation accounts. Always perform adjustments at the end of a period and with finance team awareness.
6.4. Cyclic Count
A Cyclic Count (also called a Cycle Count) is a method where a small portion of inventory is counted on a rotating schedule — rather than counting everything at once. This allows continuous accuracy checks without disrupting warehouse operations.
- Assign a cyclic count frequency to product categories or locations.
- Cyllo generates count schedules automatically based on the frequency setting.
- High-value or fast-moving products are counted more frequently than slow movers.
Note
Cyclic counting is more accurate than annual full counts because errors are caught and corrected more frequently. It also eliminates the need to halt warehouse operations for a full stocktake.
6.5. Scrap & Write-Off
Scrapping removes damaged, expired, or unusable products from your inventory. The scrapped quantity is moved to a virtual Scrap Location, reducing your stock count and recording the loss as an expense in accounting.
- Go to Inventory > Operations > Adjustments > Scrap.
- Click New and select the Product and Lot/Serial Number if applicable.
- Enter the Quantity to scrap and the Source Location.
- Click Validate. Stock is removed and the cost is posted to the scrap expense account.
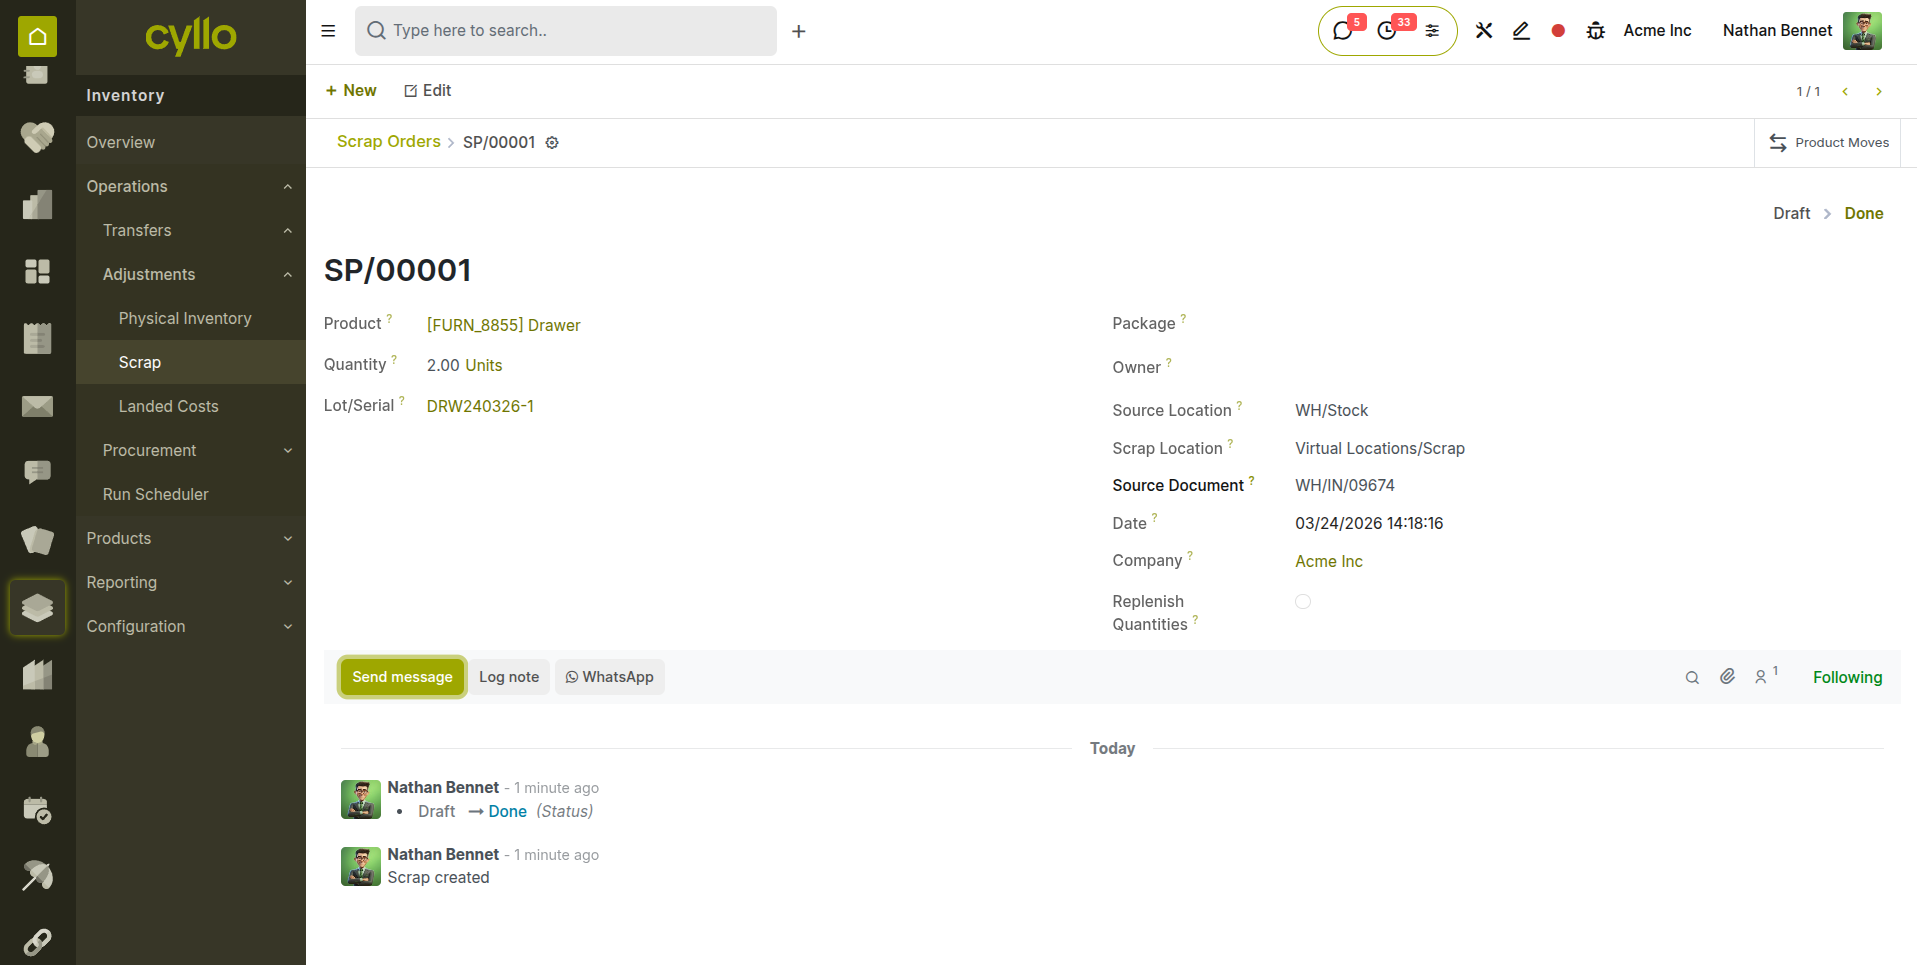
Fig 6.4 — Scrap order form — product, quantity, lot number, source location, and scrap location fields
7. Shipping & Logistics
7.1. Delivery Methods
Delivery Methods define how orders are shipped to customers — by your own vehicles, a courier, or customer pickup. The delivery method is selected on the sales order and determines the carrier, cost, and shipping instructions printed on the delivery order.
- Go to Inventory > Configuration > Delivery Methods.
- Click New or open an existing method.
- Set the Name, Provider (Fixed Price, Based on Rules, or carrier integration), and Delivery Product.
- Save and select the method on sales orders in the Other Info tab.
Note
To use this feature, enable ‘Delivery Methods’ in the configuration settings of inventory.

Fig 7.1 — Delivery Method form— showing method name, provider type,pricings etc..
7.2. Shipping Carriers Integration
Cyllo integrates with major shipping carriers to generate shipping labels, calculate live rates, and track shipments directly from the delivery order form. Supported carriers include DHL, UPS, and local postal services depending on your region.
- Install the carrier integration module from Cyllo Apps (e.g. Cyllo DHL Connector).
- Configure the carrier account credentials in the delivery method settings.
- On a delivery order, click Send to Shipper to generate a label and tracking number automatically.
7.3. Shipping Cost Rules
Shipping Cost Rules calculate the freight charge added to a customer's order based on conditions such as order weight, volume, destination, or total order value. Rules let you create tiered pricing — for example, free shipping above a certain order amount.
| Rule Basis | Example |
|---|---|
| Fixed Price | All orders ship for a flat rate of ₹150. |
| By Weight | 0–5 kg = ₹100, 5–20 kg = ₹250, 20+ kg = ₹500. |
| By Order Value | Orders above ₹5,000 ship free; below ₹5,000 charge ₹150. |
| By Quantity | Each additional unit adds ₹10 to the shipping charge. |
7.4. Multi-step Routes (2-step, 3-step)
Multi-step routes break down a single warehouse operation into multiple stages, giving you more control and accuracy over the physical movement of goods. Instead of going directly from stock to the customer, products pass through intermediate steps like quality control or a packing area.
| Route | Steps | When to Use |
|---|---|---|
| 1-Step | Pick + Pack + Ship in one step | Small warehouses with simple operations. |
| 2-Step | Pick → Ship | Medium warehouses needing a separate picking step. |
| 3-Step | Pick → Pack → Ship | Large warehouses with dedicated packing zones and quality checks. |
7.5. Dropshipping
Dropshipping is a fulfillment method where goods are shipped directly from the vendor to the customer, bypassing your warehouse entirely. When a sales order for a dropship product is confirmed, Cyllo automatically creates a purchase order addressed to the vendor with the customer's delivery address.
- Enable Dropshipping in Inventory > Configuration > Settings.
- On the product form, go to the Inventory tab and enable the Dropshipping route.
- When a sales order is confirmed for this product, a purchase order is automatically created.
- The vendor ships directly to the customer. Confirm receipt in Cyllo to close the loop.
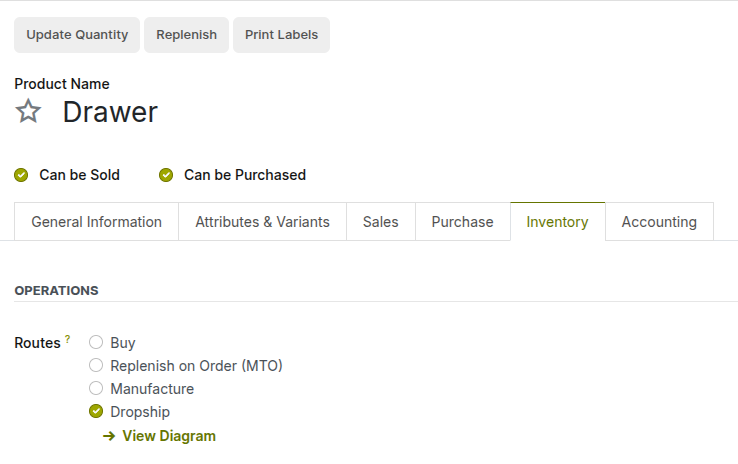
Fig 7.2 — Product form — Dropshipping route configuration on product
8. Reporting & Analytics
8.1. Stock Valuation Report
The Stock Valuation Report provides a complete financial view of your current inventory. It shows the total value of stock on hand for every product, broken down by location and costing method. This report is used by the finance team to reconcile inventory assets on the balance sheet.
- Access from Inventory > Reporting > Valuation.
- Filter by product category, location, or date to narrow the view.
- Export to Excel or PDF for finance review and audits.
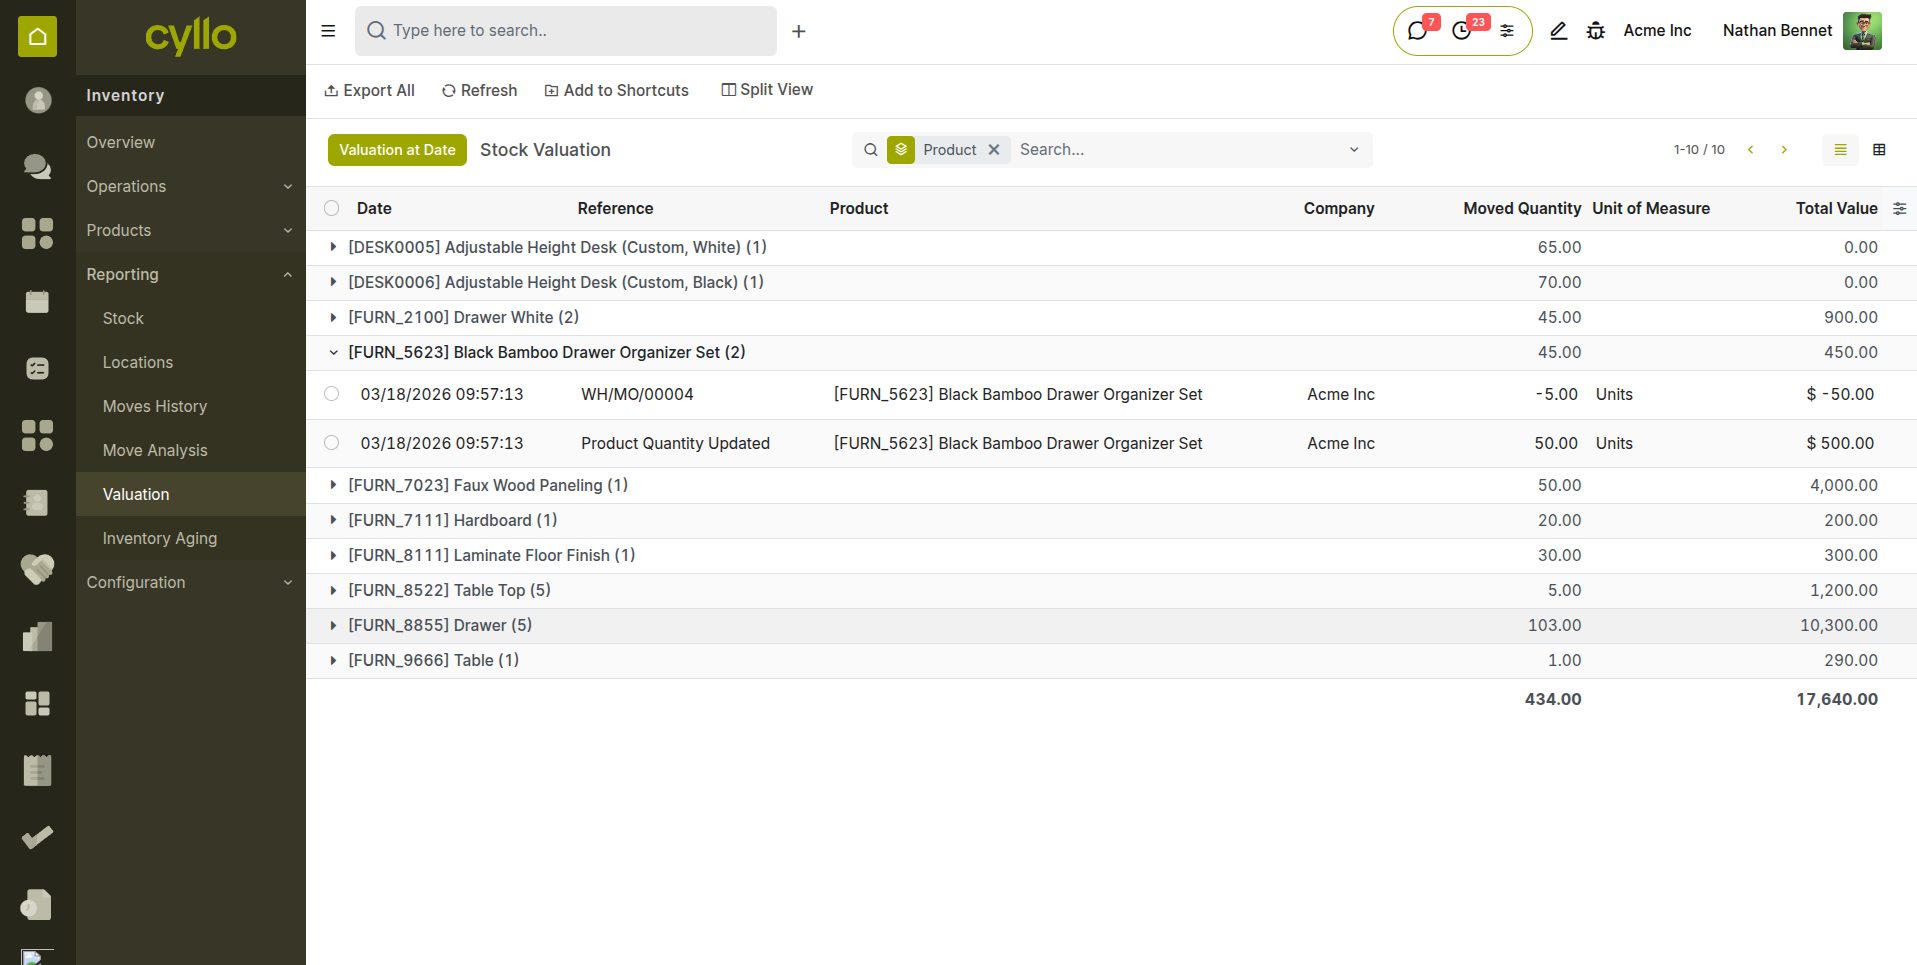
Fig 8.1 — Inventory Valuation report — product list with quantity, uom, and total value
8.2. Inventory Forecasting
The Inventory Forecast report projects future stock levels based on confirmed sales orders, purchase orders, and manufacturing orders. It allows you to identify upcoming shortages before they happen and take preventive action.
- Access from the product form by clicking the Forecast smart button.
- The timeline shows expected stock changes day by day.
- Red dates indicate when stock is projected to go below zero — action required.
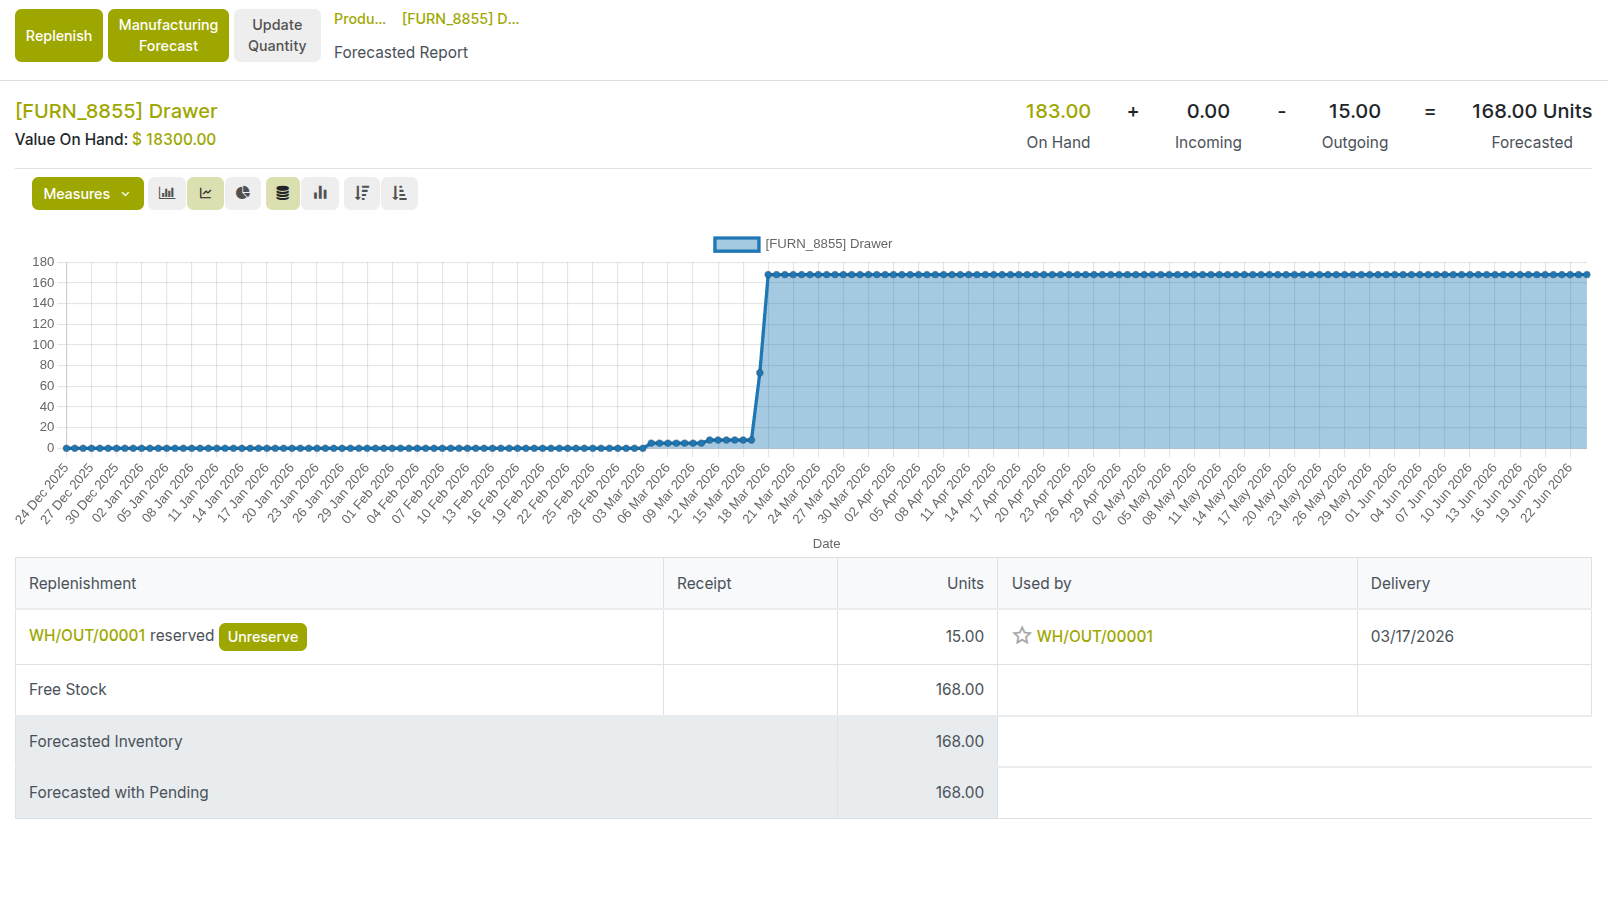
Fig 8.2 — Forecasted stock report for a product — timeline showing incoming and outgoing movements and projected stock level
Note
Review the forecast report weekly for your top-selling products. This gives you enough lead time to place purchase orders before a stockout occurs.
8.3. Product Moves Report
The Product Moves Report shows a detailed log of every stock movement for a product or across all products — every receipt, delivery, internal transfer, scrap, and adjustment. It is the most detailed movement report in Cyllo and is used for reconciliation and investigation.
- Access from Inventory > Reporting > Moves Analysis.
- Filter by product, location, date range, or operation type.
- Group by product, partner, or location to summarize movements.
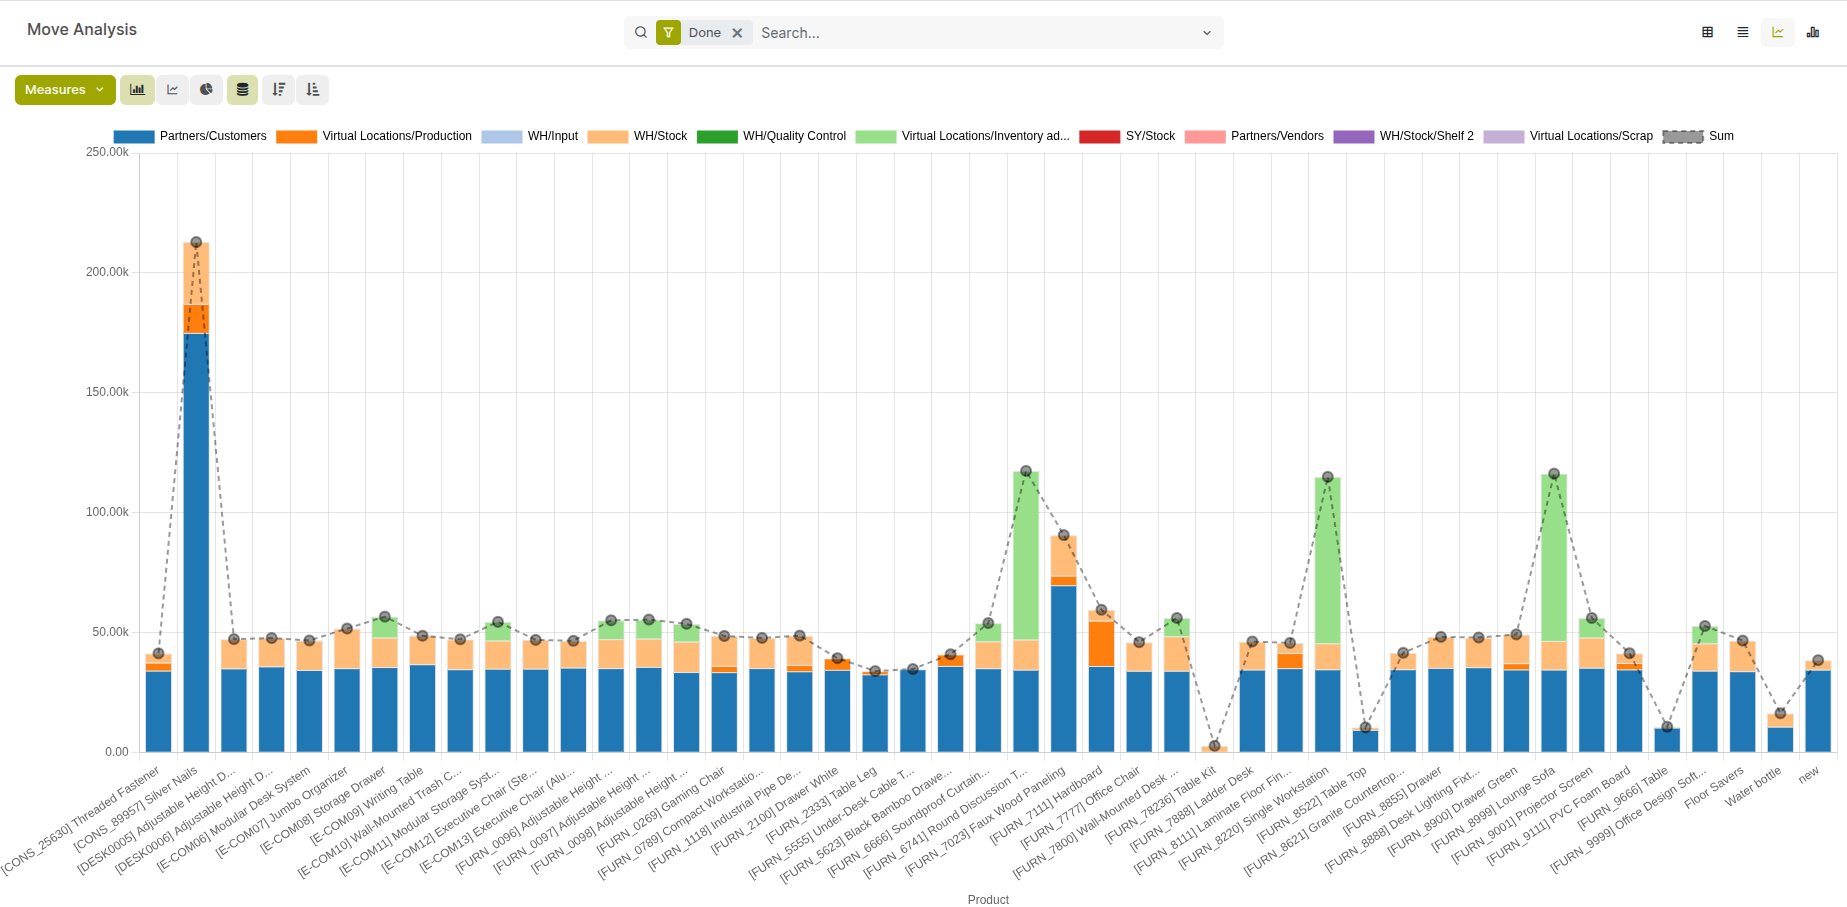
Fig 8.3 — Moves Analysis report — graph grouped by product showing total incoming and outgoing quantities from different locations