

Cyllo Barcode Documentation
Introduction
The Barcode module is a dedicated operational tool within Cyllo ERP that enables warehouse staff to process stock movements like receipts, deliveries, internal transfers, and inventory counts entirely through barcode scanning, without the need to interact with a keyboard or mouse. By integrating directly with the Inventory module, every scan instantly updates stock levels, transfer quantities, and lot or serial number records in real time.
Because the Barcode module operates within the same Cyllo ERP database as Inventory, Sales, and Purchase, there is no separate data entry required. Scanning a product on a receipt automatically validates the quantity against the linked purchase order. Scanning on a delivery confirms what has been picked and triggers the dispatch process. All records remain connected and traceable throughout the entire operation.
Cyllo's Barcode module is designed for speed and accuracy on the warehouse floor. Whether your team uses handheld scanners, mobile devices, or desktop computers with attached scanners, the interface is clean and optimized for scanning-first interaction. It supports standard barcode formats as well as advanced GS1 nomenclature for barcodes that encode product identity, lot number, quantity, and expiry date in a single scan making it suitable for warehouses operating in regulated or high-volume environments.
1. Getting Started
1.1. What is the Barcode Module?
The Barcode module in Cyllo provides a simplified, scan-first interface for warehouse operations. It sits on top of the Inventory module and exposes only the operations relevant to warehouse staff receipts, deliveries, internal transfers, and inventory counts in a format designed for fast, error-free scanning.
Unlike the full Inventory interface which has many configuration options and management views, the Barcode interface is minimal by design. A warehouse operator opens it, selects the operation, scans products one by one, and validates with no menu navigation, no manual typing unless needed.
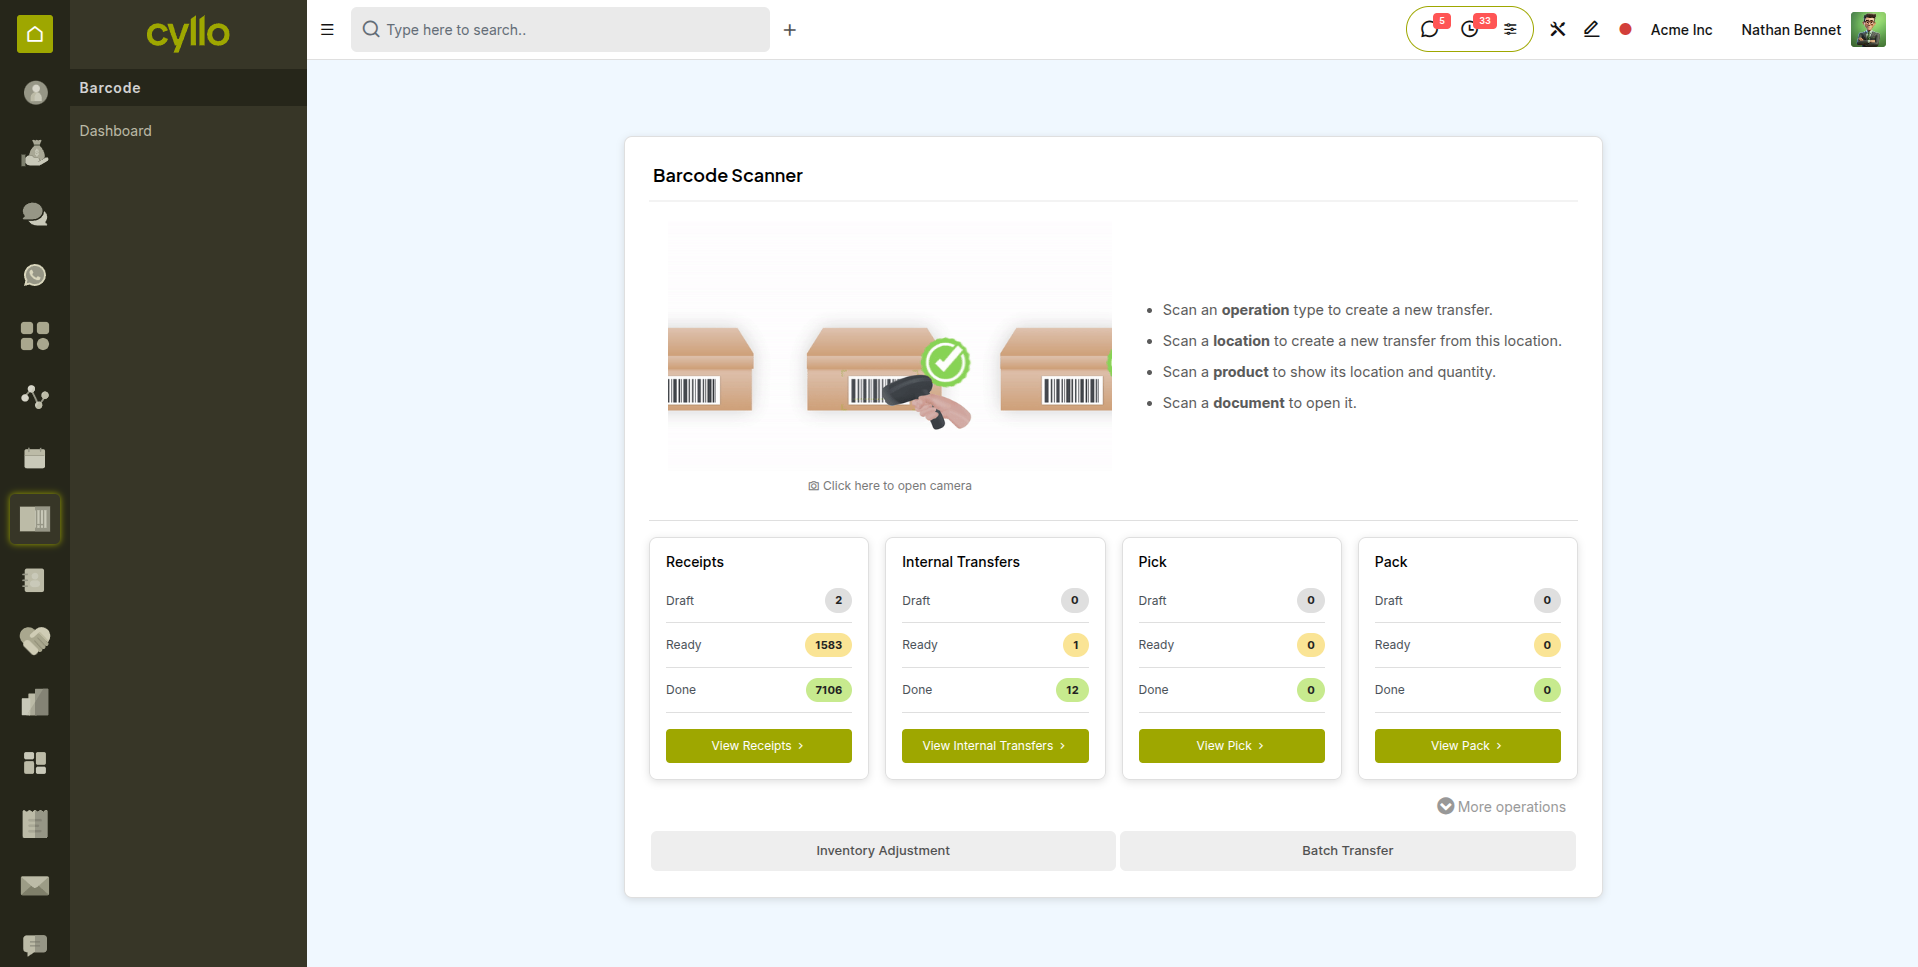
Fig 1.1 — Barcode home screen — Barcode scanning initial interface with different operations
Note
The Barcode module needed to be installed first from apps. The inventory module will be installed automatically due to dependency.
1.2. Assigning Barcodes to Products
Before scanning can work, each product must have a barcode assigned. Cyllo supports any standard barcode format — EAN-13, EAN-8, Code 128, QR Code, and others.
- Go to Inventory > Products > Products or Product Variants in case of variants.
- Open the product you want to assign a barcode to.
- In the General Information tab, locate the Barcode field.
- Type the barcode number manually, or scan it directly into the field using a scanner.
- Save the product.
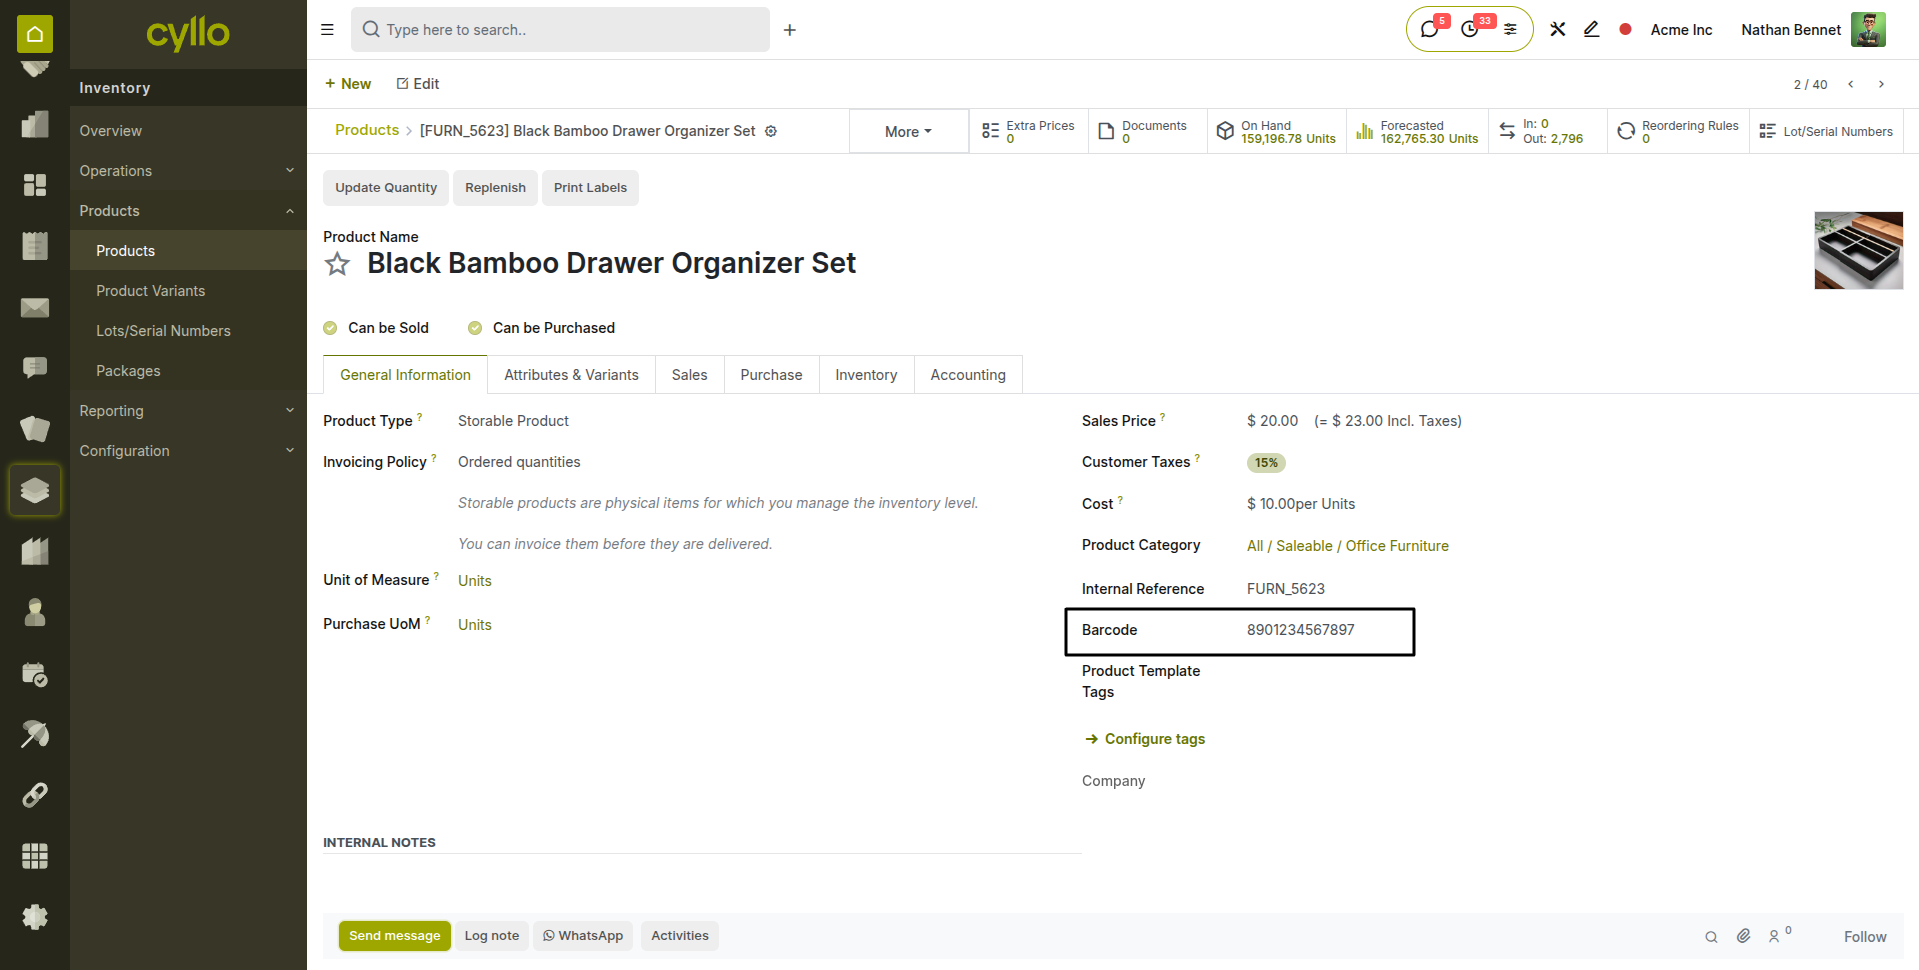
Fig 1.2 — Product form — General Information tab with Barcode field highlighted, showing a sample EAN-13 value
TIP
If your products already have barcodes printed on their packaging, simply scan the packaging barcode into the field. Cyllo accepts any format your scanner reads.
1.3. Assigning Barcodes to Locations
For warehouses using location scanning to guide putaway and picking, each storage location can also be assigned a barcode. When an operator scans a location barcode, Cyllo automatically sets that location as the source or destination for the current operation.
- Go to Inventory > Configuration > Warehouse Management > Locations.
- Open the location you want to configure (e.g. WH/Stock/Shelf 1).
- Enter the barcode value in the Barcode field on the location form.
- Save. Print and attach the barcode label to the physical shelf or bin.
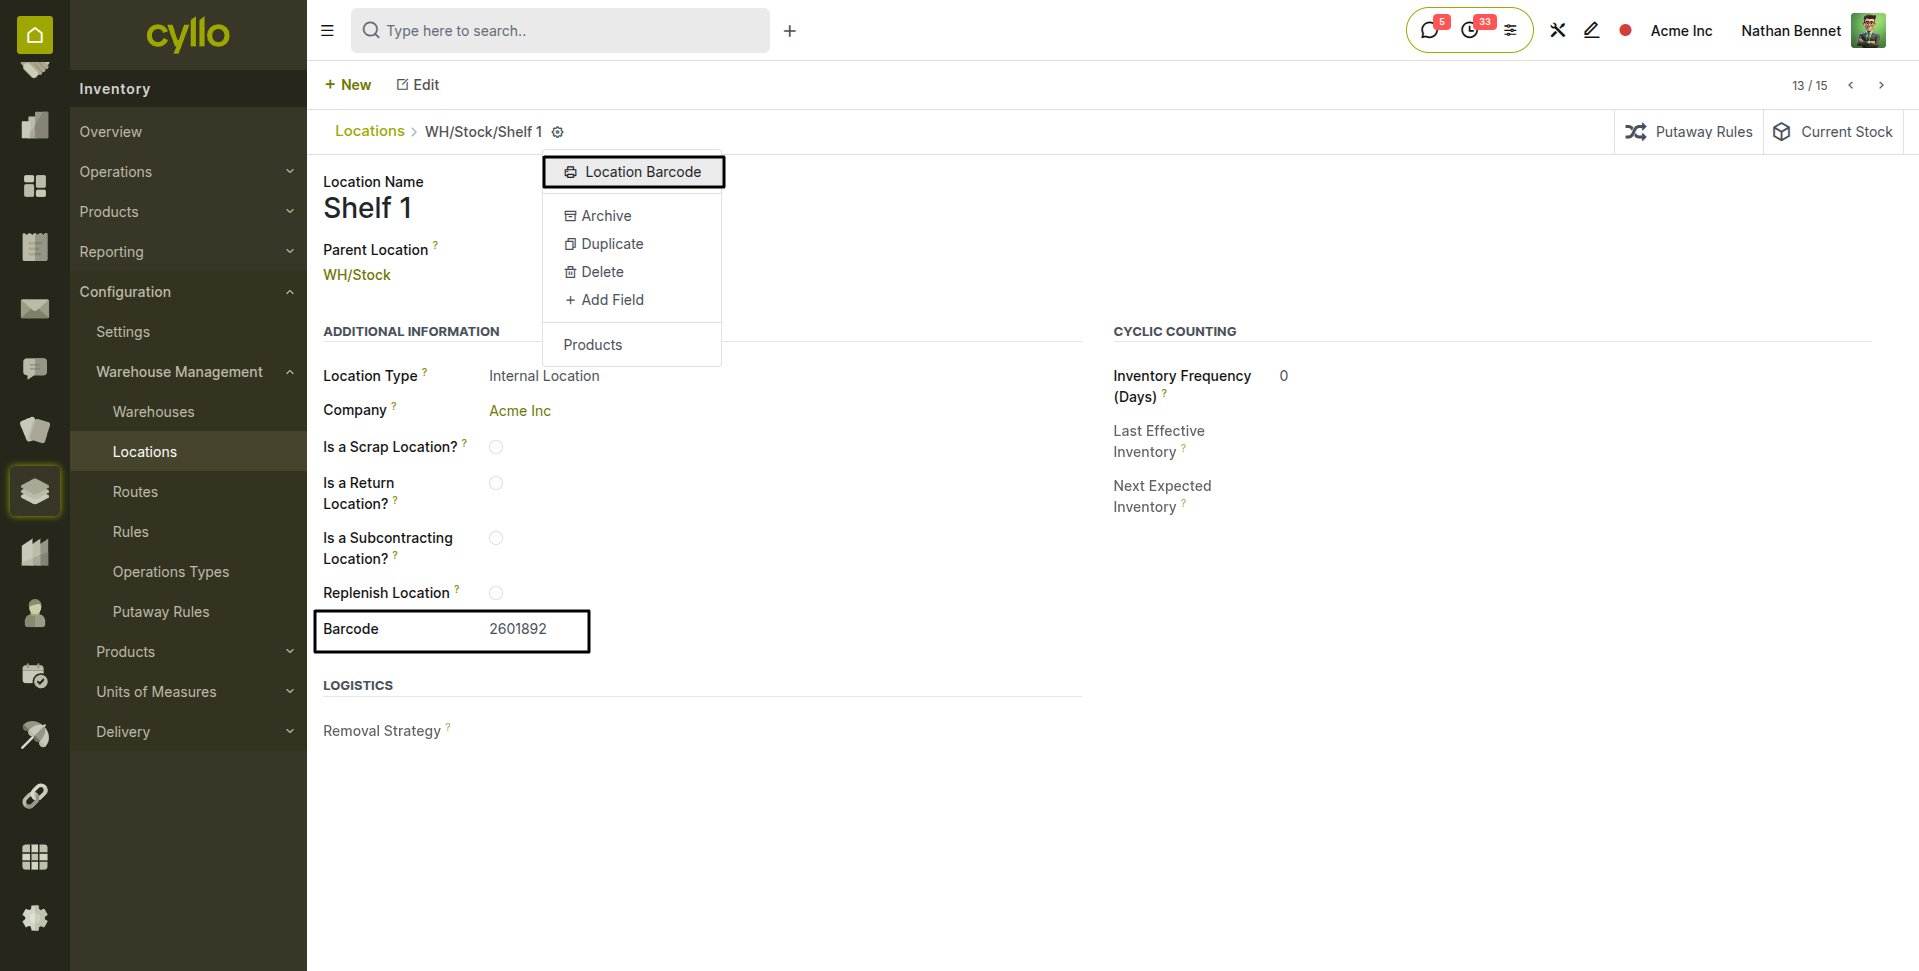
Fig 1.3 — Location form — Barcode field filled and print button of the barcode label in gear icon
1.4. Print Barcodes
Users can print barcodes for products, locations, inventory commands, and operation types by enabling the necessary settings:
- Go to Inventory > Configuration > Settings.
- Under the Barcodes section, select the relevant print options.
- Print the desired barcodes directly.
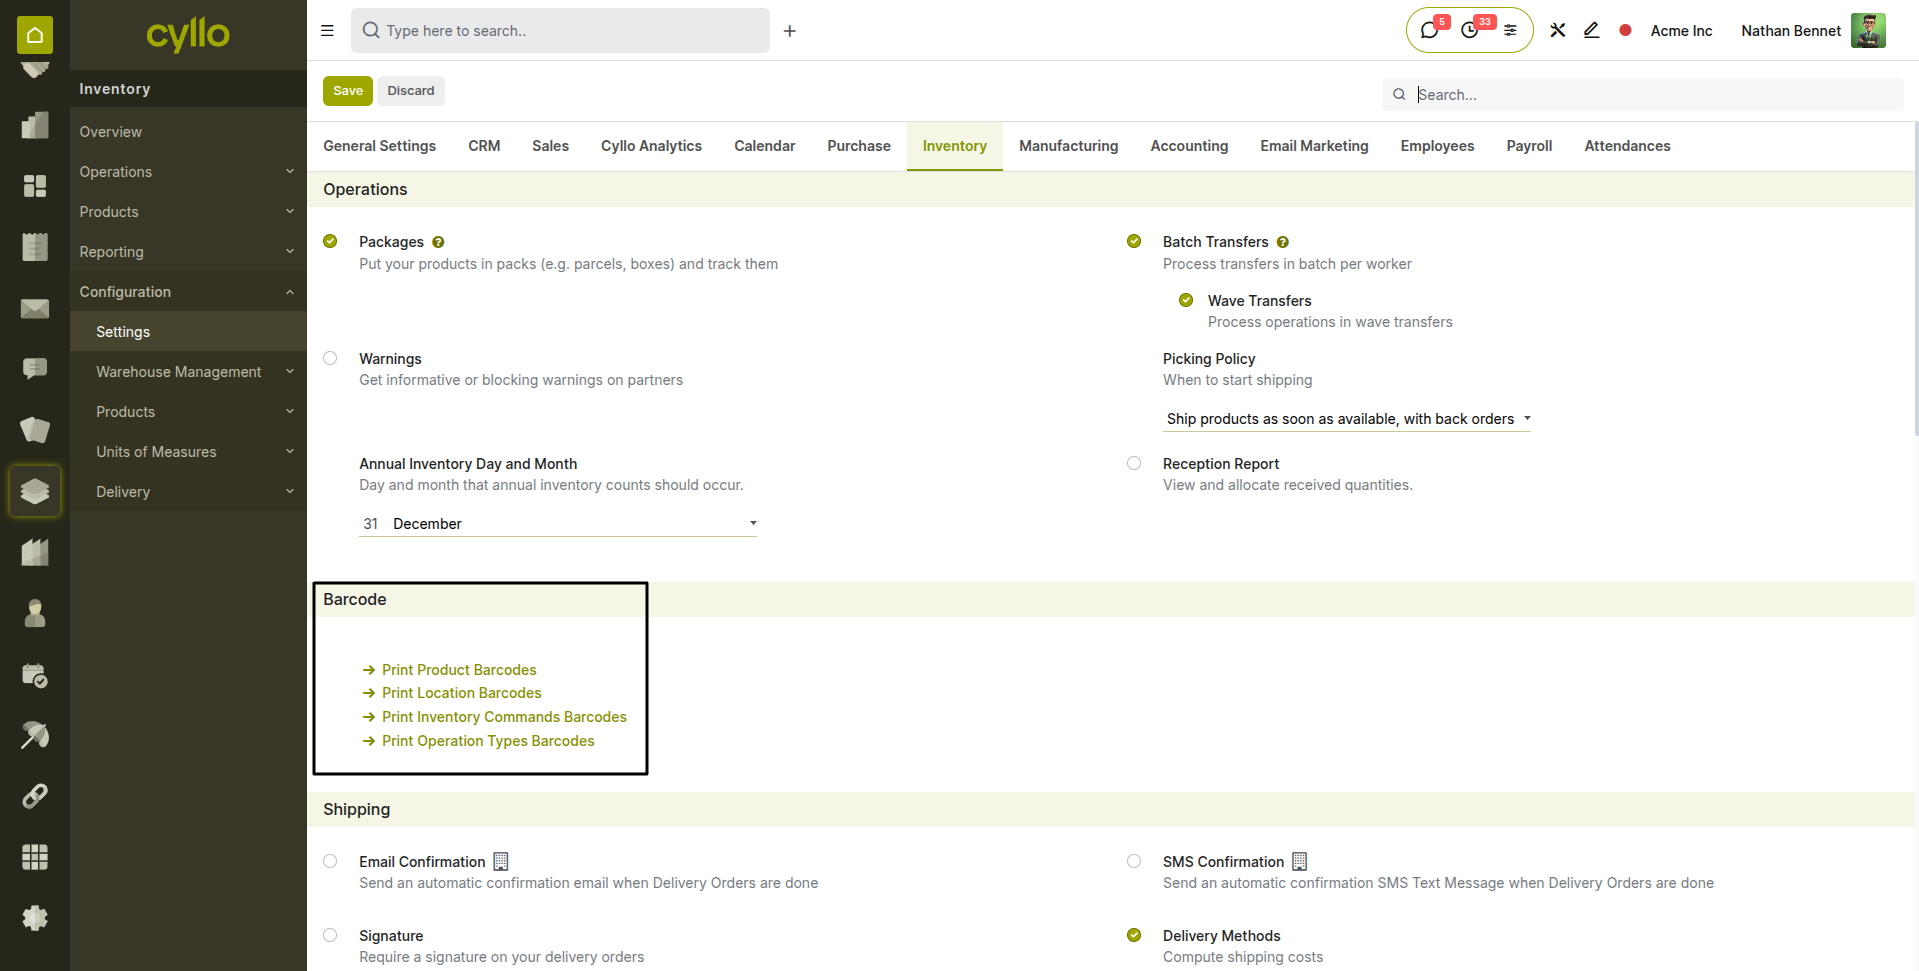
Fig 1.4 — Inventory settings — Barcode printing options
1.5. Scanner Hardware Requirements
Cyllo's Barcode module works with any barcode scanner that operates in keyboard emulation mode — the most common mode for USB and Bluetooth scanners. The scanner behaves like a keyboard, sending the barcode value followed by an Enter key press.
| Scanner Type | Connection | Compatibility |
|---|---|---|
| USB Handheld Scanner | USB | Fully compatible — plug and play, no driver needed. |
| Bluetooth Handheld Scanner | Bluetooth | Fully compatible — pair with device before use. |
| Mobile Device (Android/iOS) | WiFi / App | Supported via Cyllo mobile browser interface. |
| 2D / QR Code Scanner | USB / BT | Compatible — reads QR, DataMatrix, and GS1 codes. |
TIP
When using a Bluetooth scanner with a tablet, ensure the scanner is paired and set to HID (Human Interface Device) mode for keyboard emulation.
2. Barcode Operations
The Barcode module exposes three core operation types from the home screen: Receipts, Deliveries, and Transfers. Each corresponds directly to the matching operation in the Inventory module. Any transfer created in Inventory is immediately available to process through the Barcode interface. Additional operations will be available in case of multi-step routing from the warehouse.
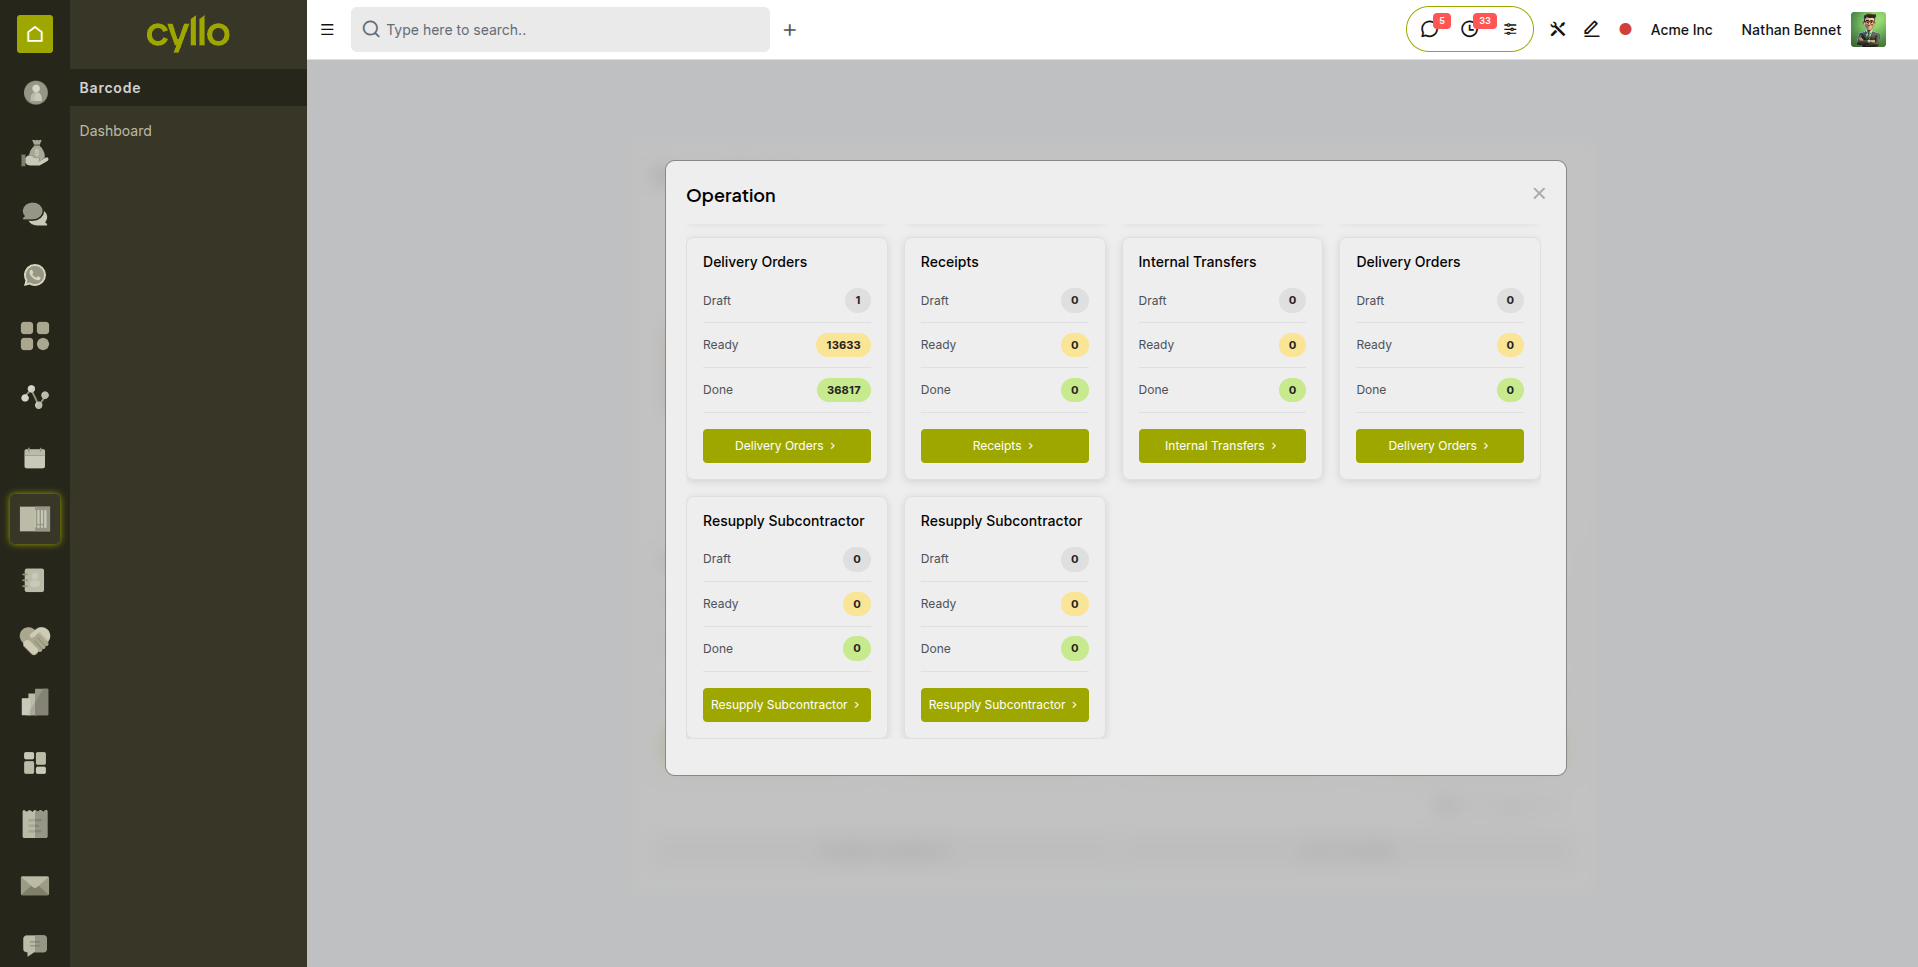
Fig 2.1 — Barcode operations screen — tiles with pending count badges on each accessed from ‘More operations’ button in barcode home screen
2.1. Processing a Receipt
A Receipt in the Barcode module corresponds to an incoming shipment from a vendor. When a Purchase Order is confirmed, a receipt is automatically created and appears in the Barcode app for the warehouse team to validate upon goods arrival.
- Open the Barcode app from the Cyllo main menu.
- Tap View Receipts. A list of pending receipts appears.
- Open the receipt matching the incoming shipment.
- Scan the product barcode — the product appears in the list with a Done quantity of 1.
- Scan the same barcode again to increment, or type the quantity manually.
- If the product is tracked by lot or serial number, Cyllo prompts you to scan or enter it after the product scan.
- Continue scanning all products in the shipment.
- Tap Validate to confirm the receipt and update stock levels.
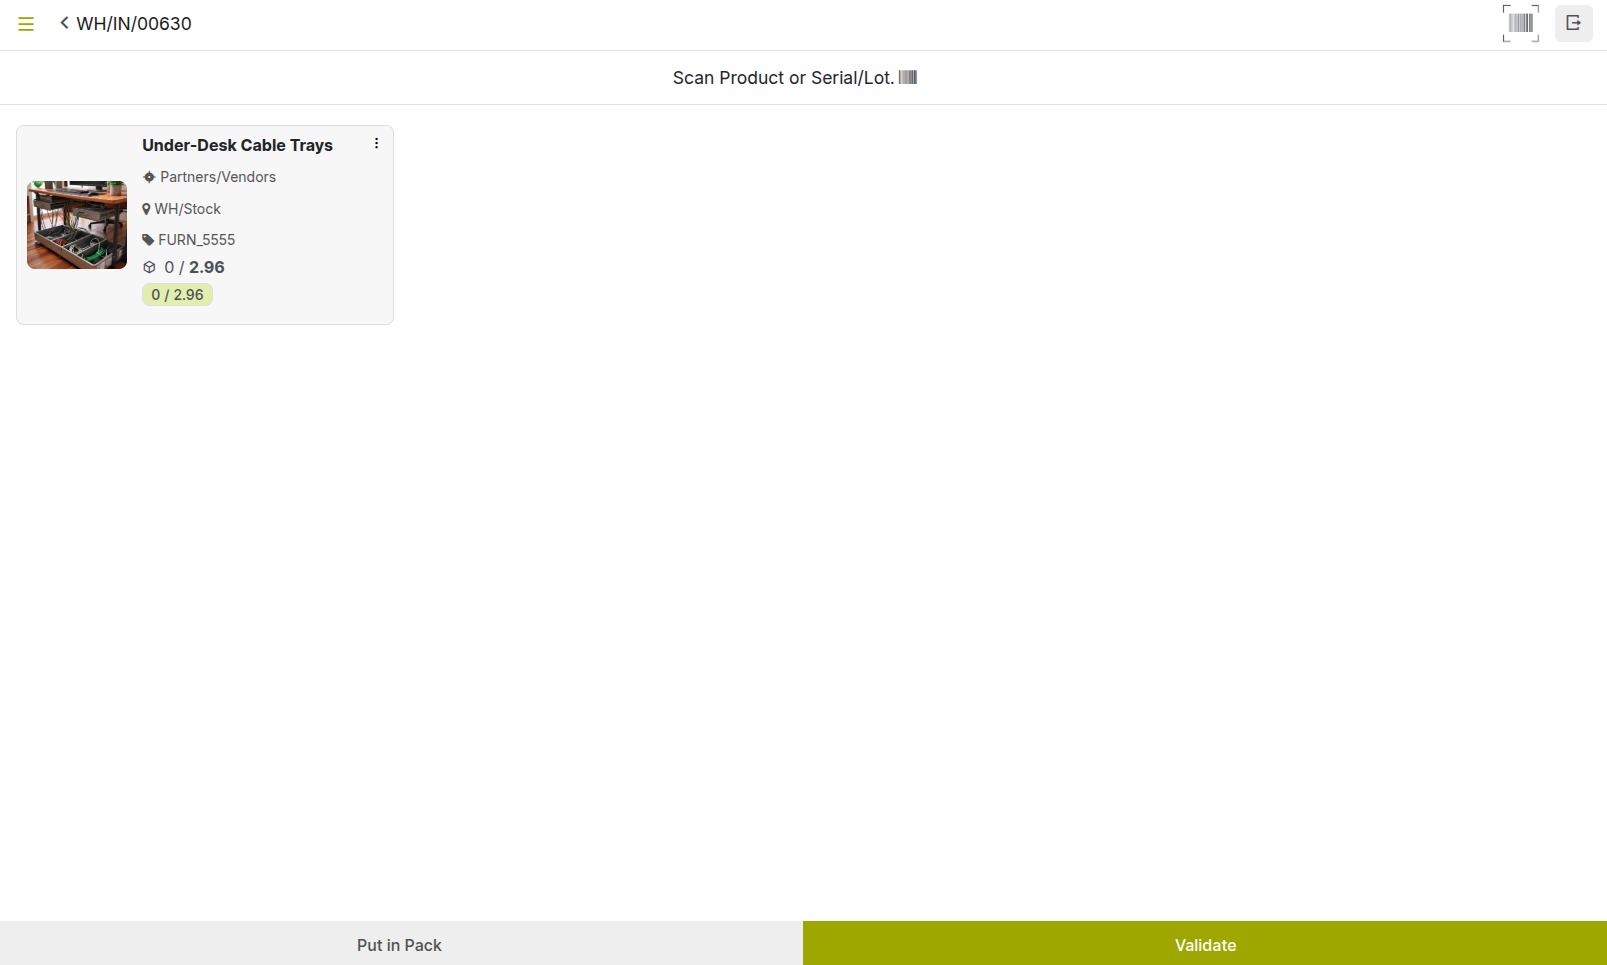
Fig 2.2 — Barcode receipt screen — product lines with scanned quantities
TIP
If the received quantity differs from the ordered quantity, scan only what physically arrived. Cyllo creates a backorder for the remaining quantity automatically when you validate.
Note
If a product requires a serial number, scan it with the barcode scanner. The move line will automatically update the serial number. Configure how serial/lot are applied from Inventory > Configuration > Warehouse Management > Operation Types > Under ‘Lot/Serial Numbers’.
2.2. Processing a Delivery
A Delivery in the Barcode module corresponds to a dispatch of goods to a customer. It is created automatically when a Sales Order is confirmed and appears in the Barcode app for the warehouse team to pick and validate.
- Open the Barcode app and tap Deliveries.
- Open the delivery order to process.
- The screen shows all products that need to be picked with their required quantities.
- Go to the warehouse location and scan the product barcode as you pick each item.
- If location scanning is enabled, scan the source location barcode first, then the product.
- For lot or serial tracked products, scan the lot or serial number after the product barcode.
- Once all products are picked, tap Validate to confirm the delivery.
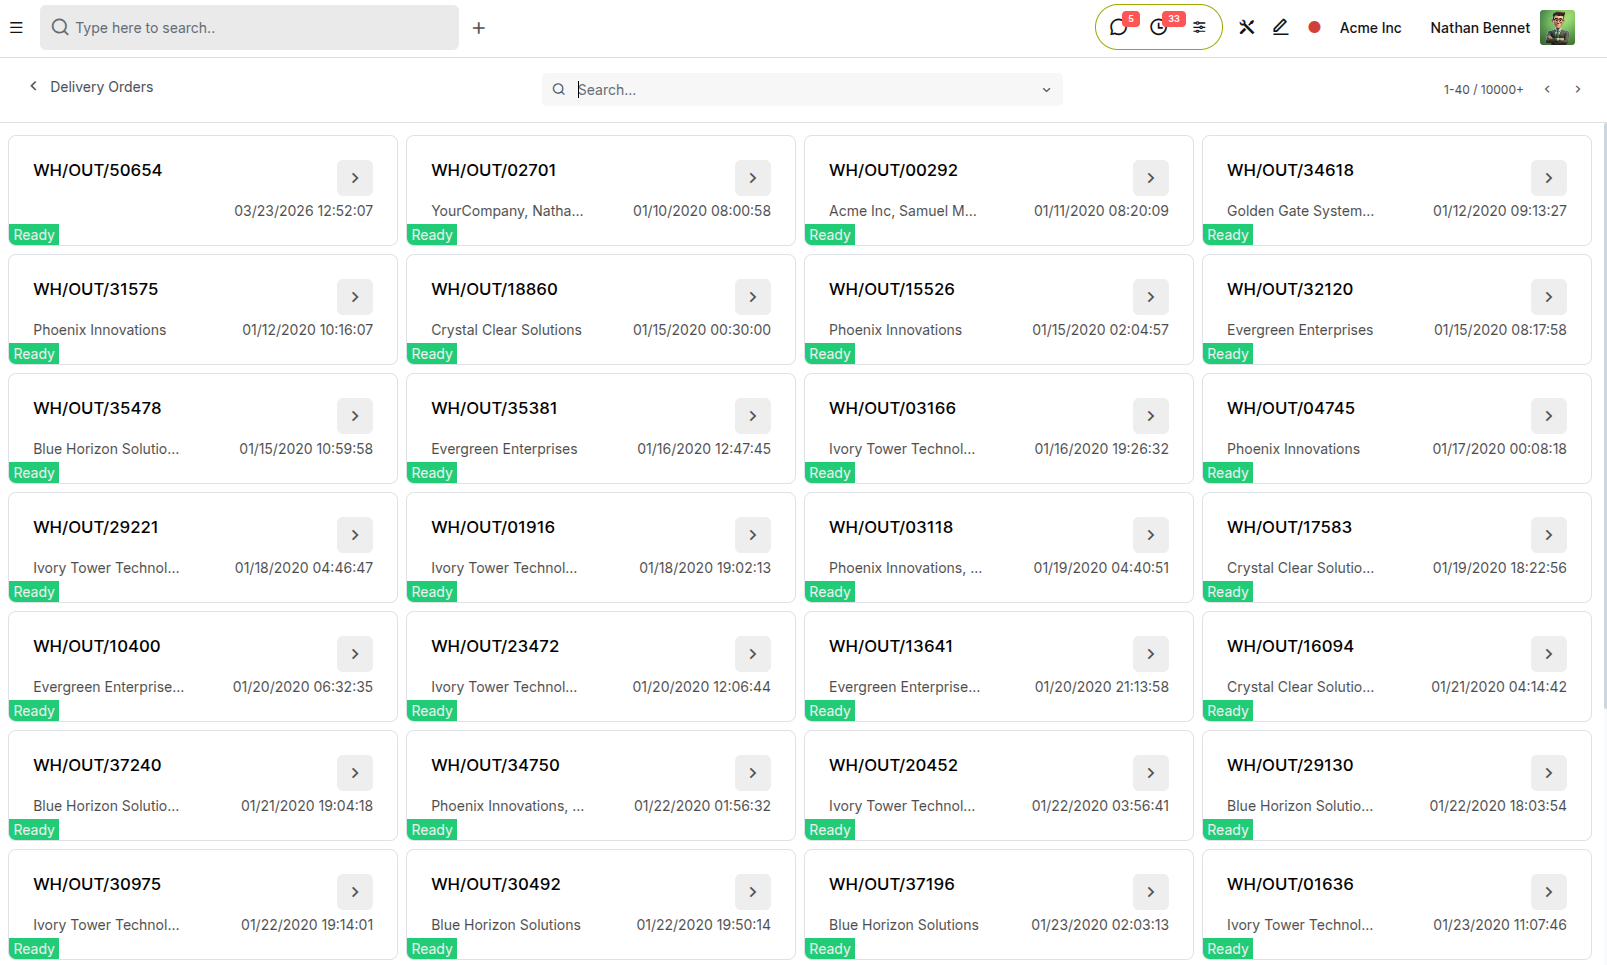
Fig 2.3 — Barcode delivery orders screen — product pick tiles with partner, date and reference
WARNING
Do not validate a delivery if product lines have a Done quantity less than Demand, unless you intend to create a backorder for the remainder. Partial deliveries affect customer invoicing.
2.3. Processing an Internal Transfer
Internal transfers move products between locations within the warehouse — for example, from a receiving area to a storage shelf, or between two warehouses. They appear in the Transfers section of the Barcode home screen.
- Open the Barcode app and tap Transfers.
- Select the internal transfer to process.
- Scan the source location barcode if location scanning is enabled.
- Scan the product barcode to register it as moved.
- Scan the destination location barcode to confirm where the product is going.
- Repeat for all products in the transfer.
- Tap Validate to complete the transfer and update stock at both locations.
2.4. Creating a Transfer from Scratch
In addition to processing pre-existing transfers, the Barcode app allows warehouse staff to create a new transfer on the fly — useful for ad hoc moves, urgent stock relocations, or corrections not planned in advance.
- Open the Barcode app.
- Scan the operation type barcode.
- Scan the source and destination location barcodes.
- Scan each product to add it to the transfer.
- Set quantities as needed and tap Validate.
Note
Transfers created from the Barcode app are immediately visible in the Inventory back-end. The responsible user and date are recorded automatically.
3. Inventory Count via Barcode
3.1. Overview
The Barcode module includes a dedicated Inventory Adjustments section that allows warehouse staff to conduct stock counts directly on the warehouse floor. Counts are recorded in real time and synchronized back to the Inventory module without printed sheets or separate data entry.
This scanning-based approach is significantly faster and more accurate than paper-based counting because the product is identified by its barcode — eliminating manual transcription errors — and quantities are entered at the point of counting rather than recorded separately and entered later.

Fig 3.1 — Barcode app — Inventory Adjustments tile on the home screen with badge showing pending adjustments count
3.2. Starting a Count
A count can be started from the Barcode app at any time, for any product or location. You do not need to pre-configure the count list before starting — simply scan what you find and Cyllo records it.
- Open the Barcode app and tap Inventory Adjustments.
- Scan products or open an existing scheduled count.
- If counting a specific location, scan the location barcode first to set the context.
- Scan the product barcode to add it to the count.
- Scan the same product again to increment by one, or type the quantity manually.
- For lot or serial tracked products, scan the lot or serial number after the product barcode.
- Continue scanning all products in the area.
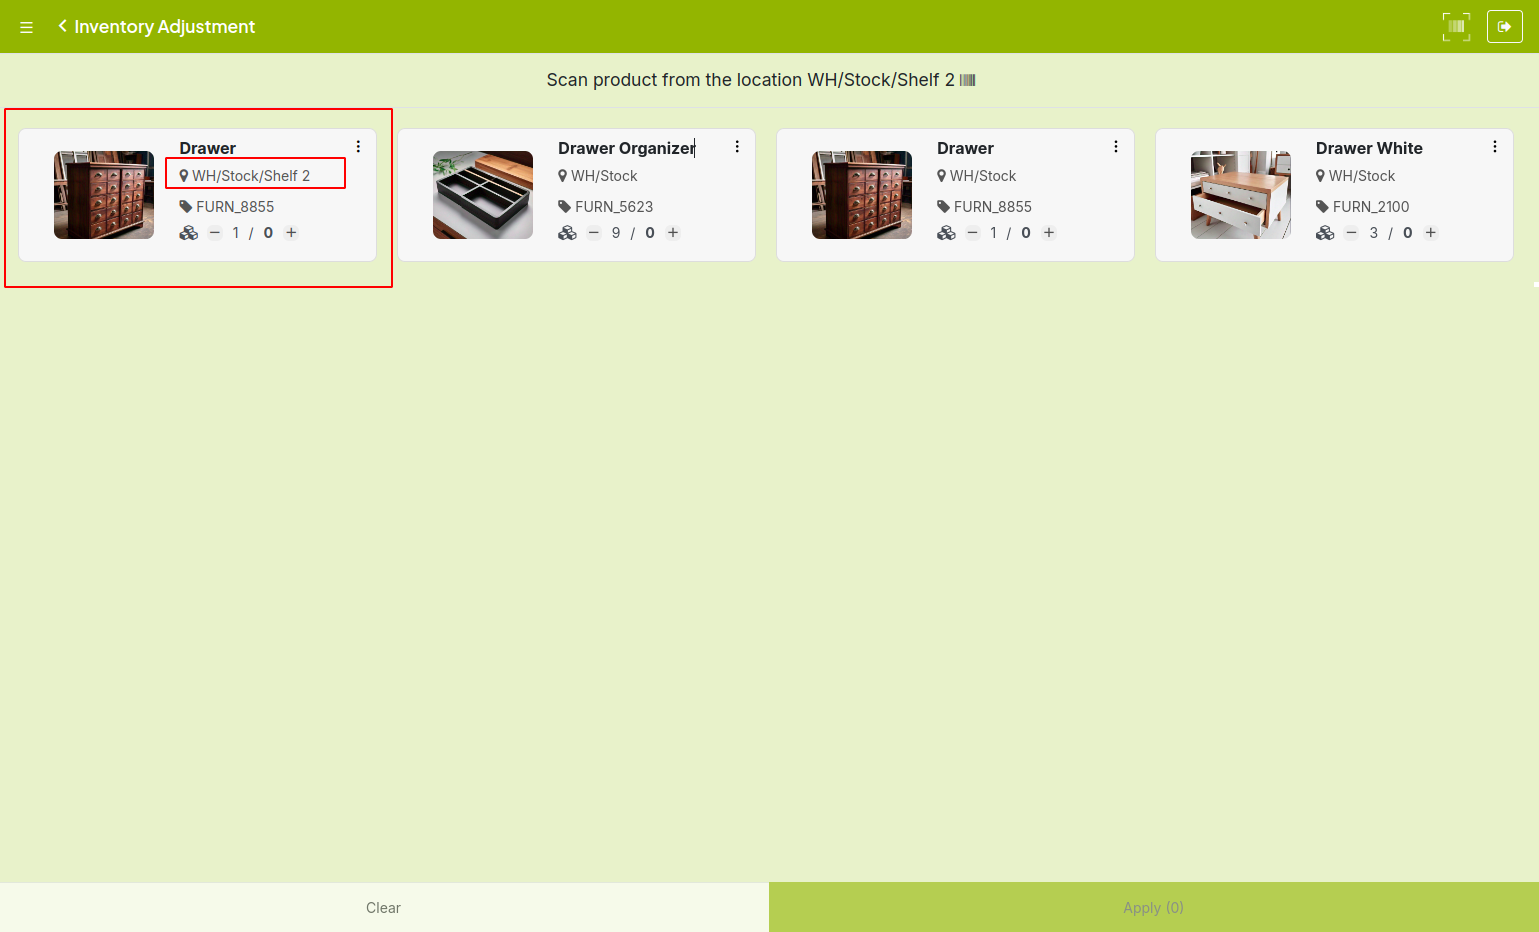
Fig 3.2 — Barcode inventory count screen — active location shown at top, scanned product lines with quantities below
TIP
Print and attach location barcodes to every shelf and bin before starting a full count. This makes location-based counting fast and eliminates location selection errors.
3.3. Applying the Count
Once scanning is complete, the count results are sent to the Inventory module as a pending inventory adjustment. A warehouse manager reviews and applies the count from the back-end to officially update stock levels.
- From the back-end, go to Inventory > Operations > Adjustments > Physical Inventory.
- Locate the count submitted from the Barcode app.
- Review the Counted Quantity against the On Hand quantity.
- Investigate any large discrepancies before applying.
- Click Apply All to post the adjustment and update stock.
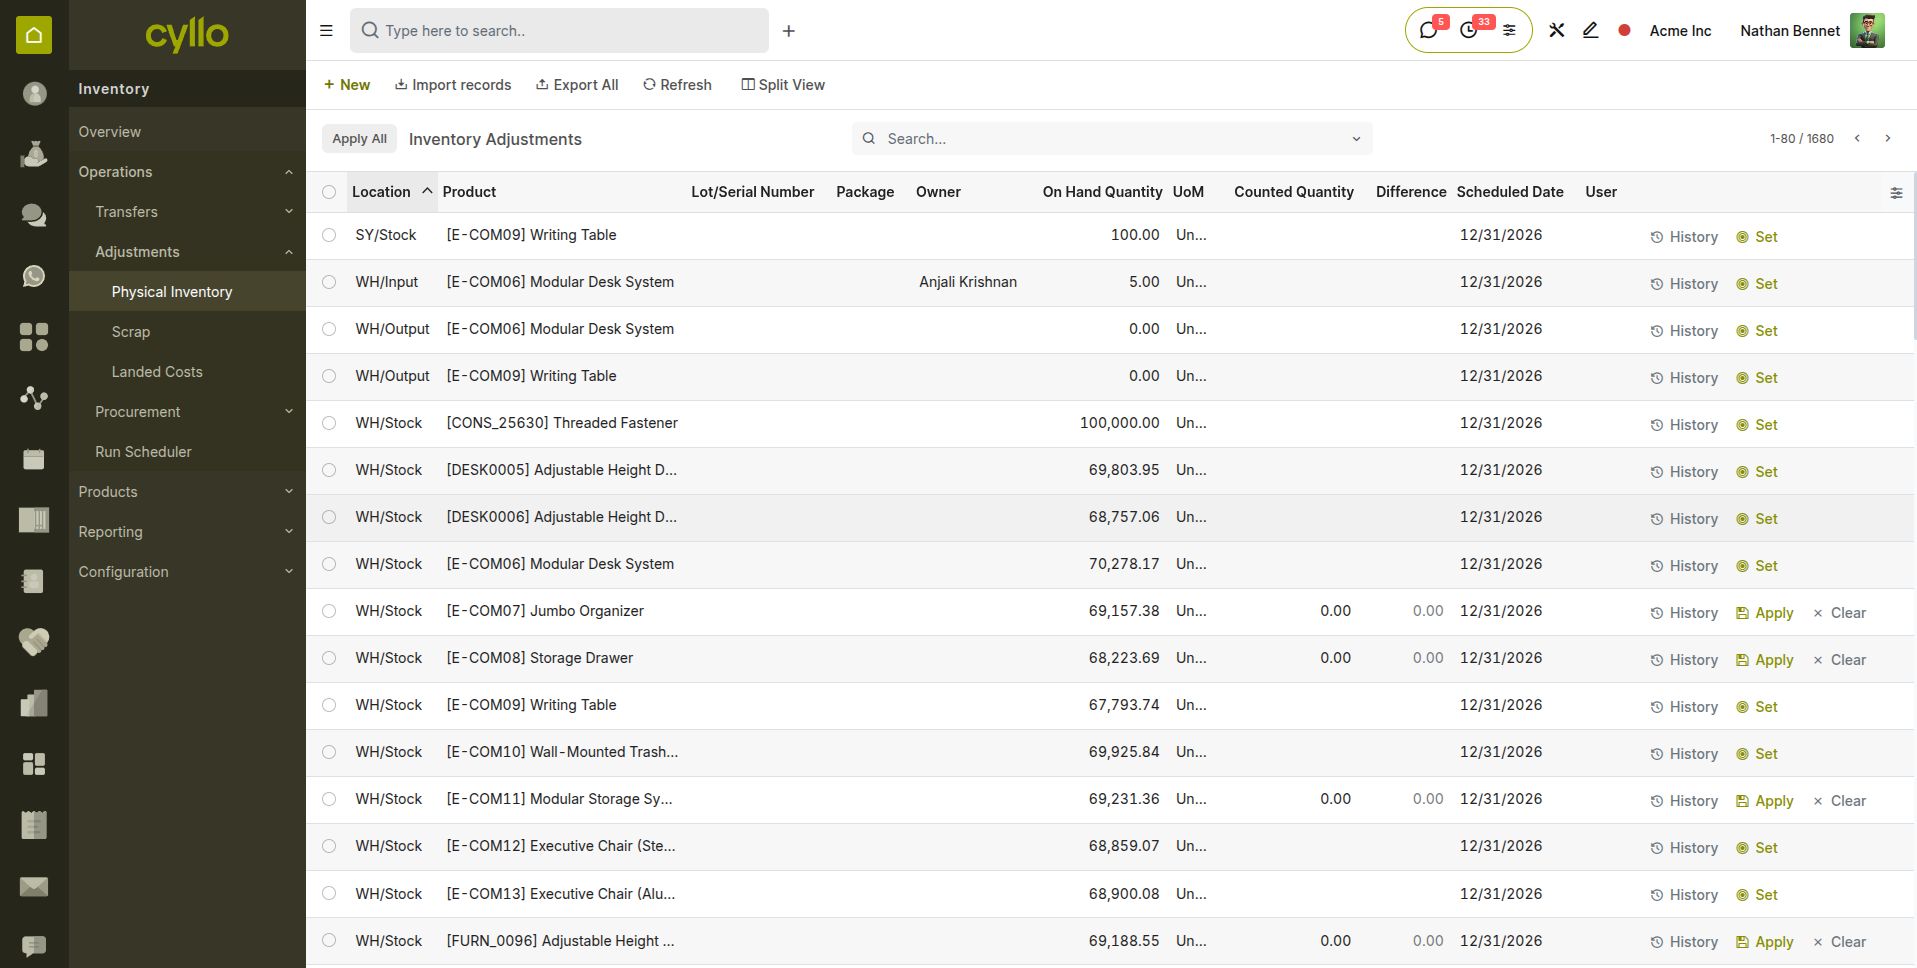
Fig 3.3 — Physical Inventory back-end — count from Barcode app showing product, on-hand, counted, and difference columns
WARNING
Applying an inventory count creates accounting journal entries that adjust inventory valuation. Always have a manager review results before applying, especially for high-value products.
4. Lot & Serial Number Scanning
4.1. Scanning Lot Numbers
When a product is configured for lot number tracking, the Barcode app automatically prompts the operator to scan or enter a lot number after the product barcode is scanned. This ensures every unit received, dispatched, or counted is linked to the correct lot — maintaining full traceability without any extra steps.
- Scan the product barcode as normal.
- Cyllo detects the product is lot-tracked and shows a Lot Number prompt.
- Scan the lot number barcode printed on the product packaging or carton.
- Enter the quantity for this lot if more than one unit.
- Scan another lot number barcode if the same product has multiple lots in this shipment.
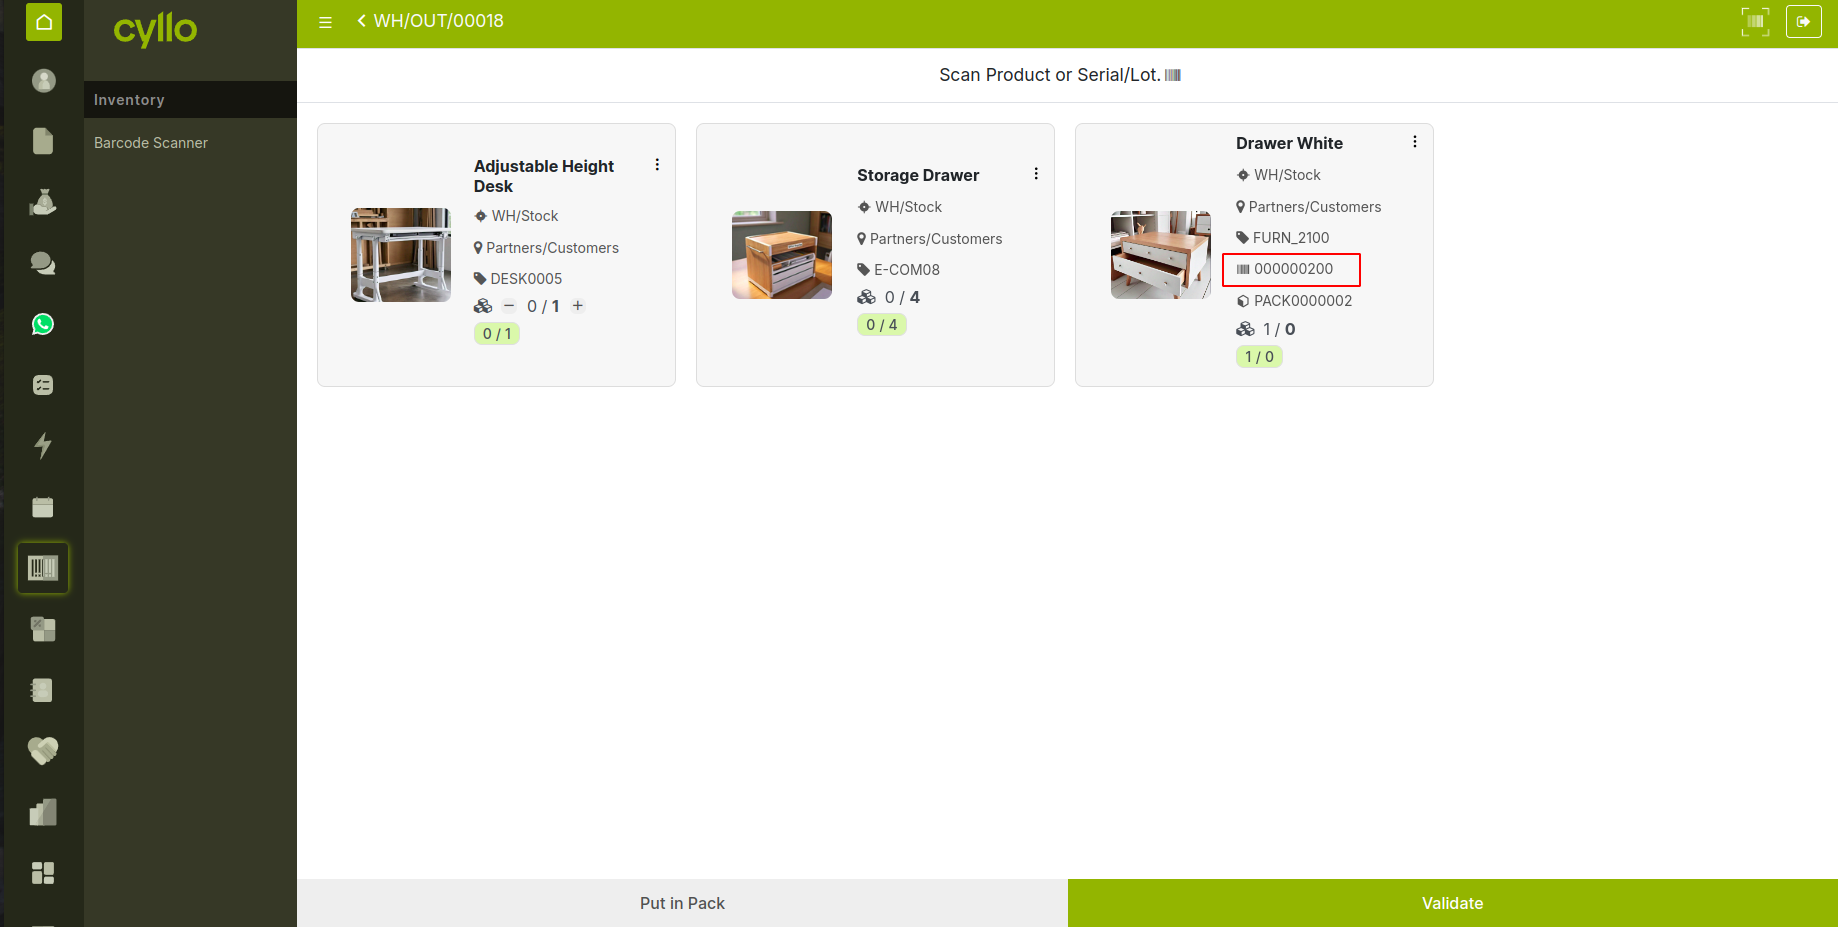
Fig 4.1 — Barcode delivery — lot number prompt appearing after product scan, with lot number field and quantity input visible
Note
If a lot number does not yet exist in the system, Cyllo creates it automatically when scanned during a receipt. On deliveries, only existing lot numbers with available stock are accepted.
4.2. Scanning Serial Numbers Serial number tracking works the same way as lot tracking but requires a unique serial number for every single unit. The Barcode app enforces this — after scanning a product barcode, it prompts for a serial number and allows only one unit per entry.
- Scan the product barcode.
- Cyllo prompts for a serial number.
- Scan the serial number barcode on the individual unit.
- The quantity is automatically set to 1 and the line is added.
- Scan the product barcode again to add the next unit with its own unique serial number.
5. Batch/Wave Picking via Barcode
5.1. What is Batch/Wave Picking?
Batch and Wave Picking are advanced warehouse strategies designed to optimize picking efficiency by reducing unnecessary movement and improving order handling.
Batch Picking allows a warehouse operator to pick items for multiple delivery orders in a single run. Instead of processing each order individually, the operator collects all required products from each location at once and then sorts them by order afterward. This minimizes repeated trips to the same storage locations and significantly speeds up operations. Wave Picking, on the other hand, groups orders based on specific criteria such as delivery schedules, shipping methods, or operational priorities. Orders are released in “waves” and processed together within a defined timeframe. This approach helps coordinate picking with downstream activities like packing and shipping, ensuring better workflow synchronization.
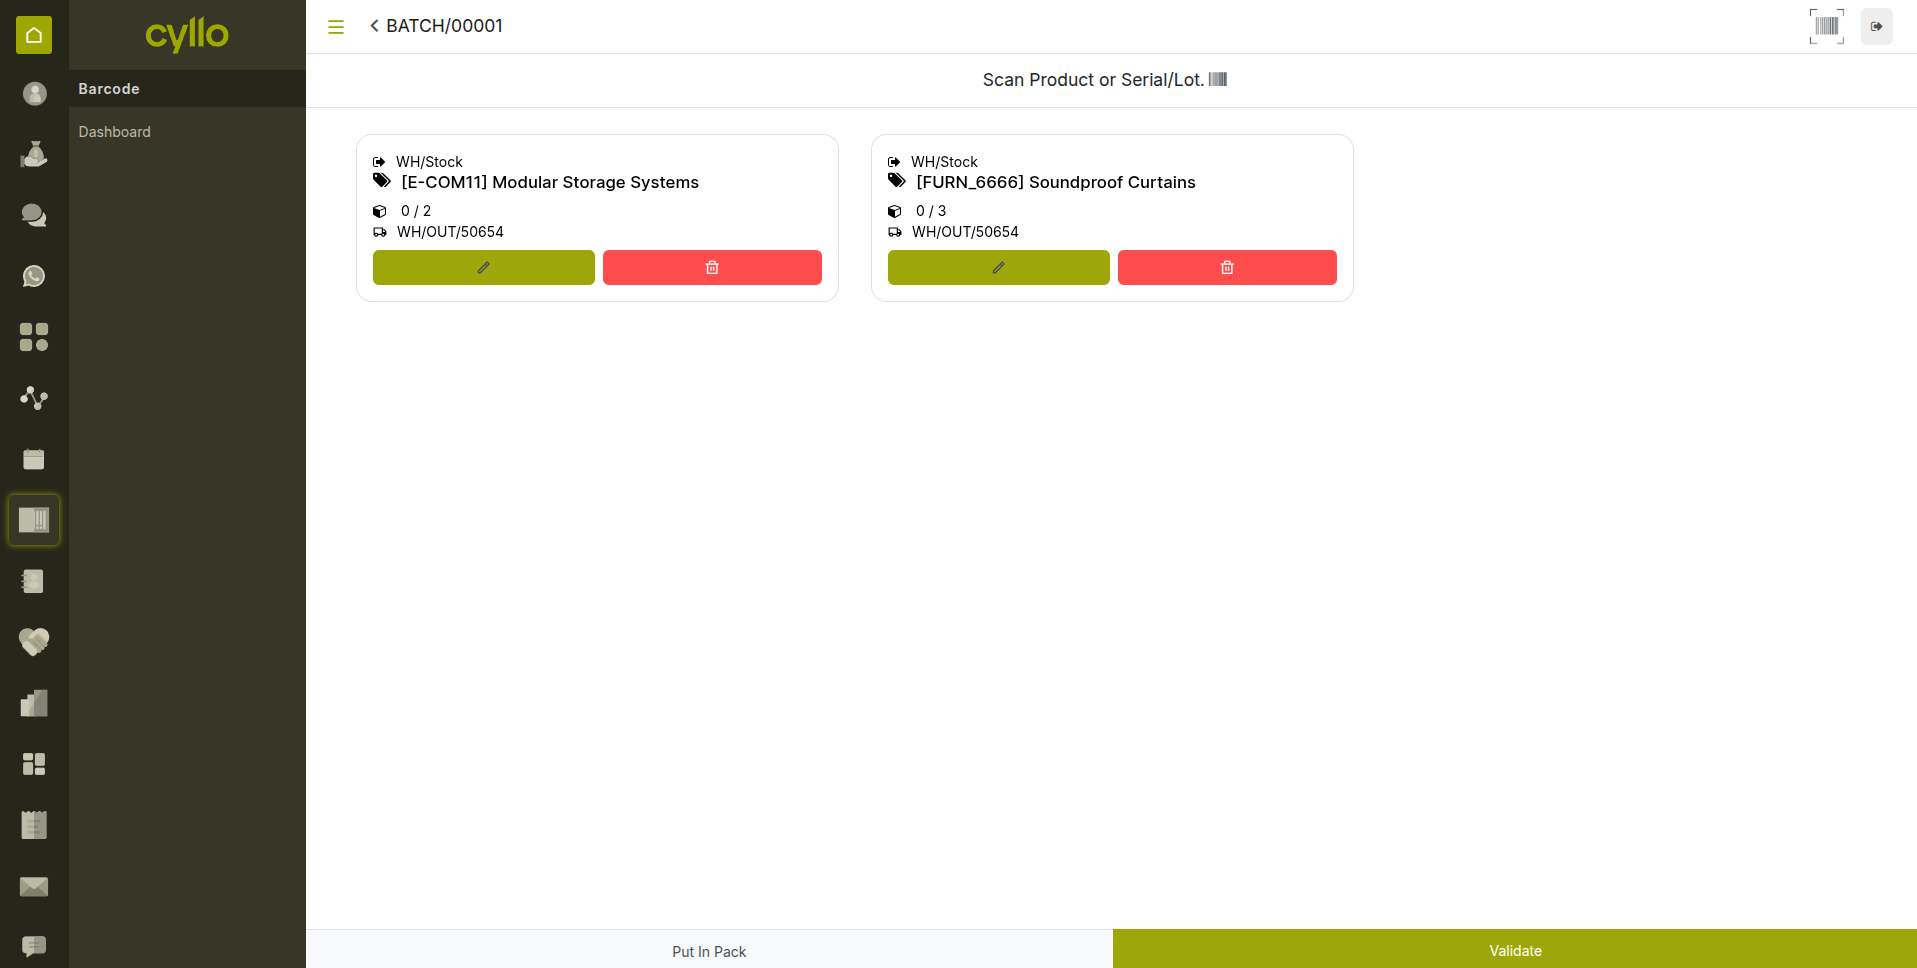
Fig 5.1 — Barcode batch picking screen — consolidated product list across multiple orders with location and quantity per line
5.2. Enabling Batch/Wave Transfers
- Go to Inventory > Configuration > Settings.
- Under the Operations section, enable Batch Transfers and Wave Transfers.
- Click Save.
- Batch Transfers now appear in the Barcode app under the Transfers section.
Note
Batch transfers are created and grouped in the Inventory back-end by a warehouse manager. The operator then processes the pre-created batch through the Barcode app.
5.3. Processing a Batch/Wave via Barcode
- Open the Barcode app and tap Batch Transfers.
- Open the batch assigned to you.
- The screen shows a consolidated product list across all orders in the batch.
- Navigate to the first location shown and scan the location barcode.
- Scan the product barcode — quantity is deducted from the batch.
- Move to the next location as guided and continue scanning.
- Tap Validate when all products in the batch are scanned.

Fig 5.2 — Barcode batch — xpicking showing current location, product to scan, and remaining quantity
TIP
For best efficiency, organize batch picks by location sequence — closest shelf first, furthest last. This minimizes travel time and is the most significant factor in warehouse picking speed.
6. Settings & Configuration
Note
This section is for administrators. Warehouse operators do not need to change these settings.
6.1. Operation Type Configuration for Barcode
Each Operation Type has settings that control how the Barcode module handles it — whether it creates a backorder on partial scans, whether lot or serial numbers are required, and whether pre-existing transfers must exist before scanning begins.
- Go to Inventory > Configuration > Warehouse Management > Operations Types.
- Open the operation type you want to configure (e.g. Receipts).
- Under the Barcode section, configure the following options:
a. Create New — allow operators to create new transfers from the Barcode app for this operation type.
b. Show Entire Transfer — show all product lines at once, or guide one line at a time.
c. Create Backorder — allow or prevent backorder creation when quantities are partially scanned. - Save the operation type.
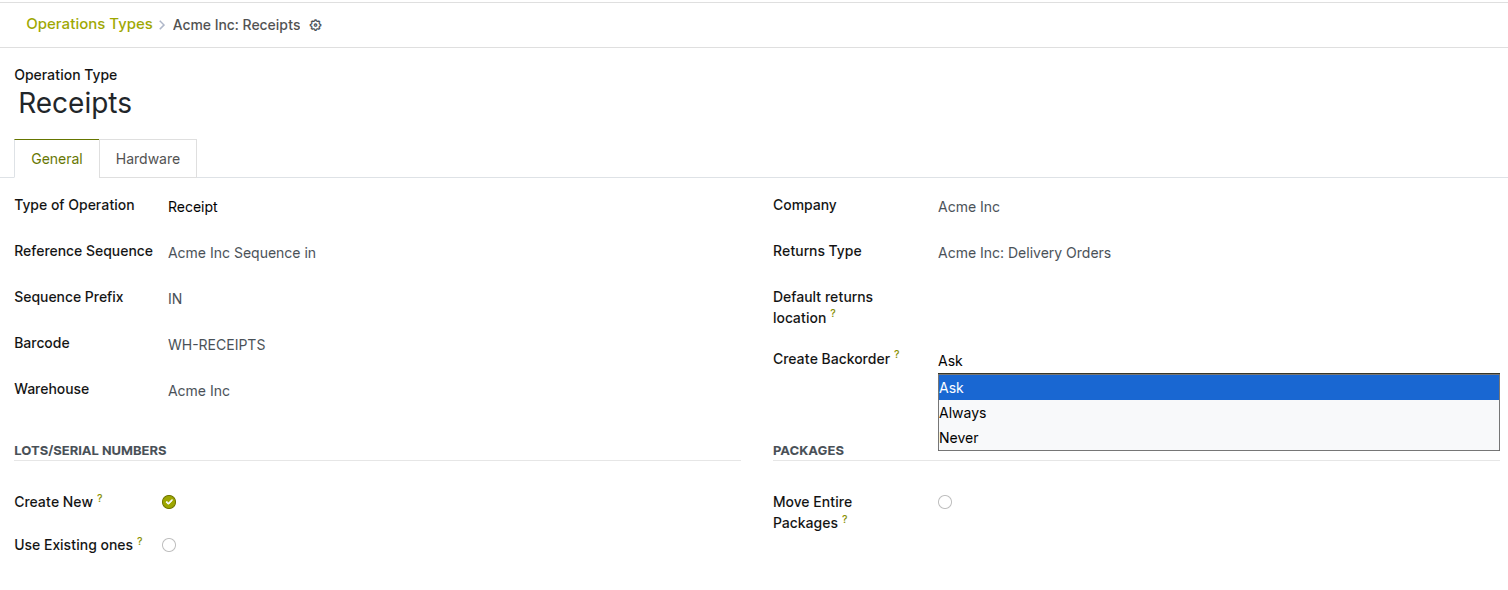
Fig 6.1 — Operation Type form — Barcode section showing Create New, Show Entire Transfer, and Backorders settings
6.2. Printing Barcode Labels
Cyllo can generate and print barcode labels for products, lots, serial numbers, and locations directly from the back-end — useful when receiving products without barcodes or when creating location labels for shelves and bins.
Printing Product Barcodes
- Go to Inventory > Products > Products.
- Select one or more products using the checkboxes.
- Click Action > Print Barcode Labels.
- Choose the label format and quantity per product, then print or download the PDF.
Fig 6.2 — Print Barcode Labels pop up — Action button open with multiple products selected
Printing Location Barcodes:
- Go to Inventory > Configuration > Locations.
- Select the locations you want to label.
- Click ‘Location Barcode’ at the top.
- Print and attach labels to the corresponding physical shelves or bins.
7. Troubleshooting
7.1. Common Issues & Solutions
| Issue | Likely Cause | Solution |
|---|---|---|
| Product barcode not recognised | Barcode not assigned to product or wrong format | Open the product form and verify the Barcode field matches exactly what is printed. |
| Lot number not found on delivery | Lot does not exist or has no stock at the location | Check Inventory > Lots/Serial Numbers and confirm the lot has available stock. |
| Scanner input goes to wrong field | Screen focus is not on the barcode input field | Tap the barcode input field before scanning to ensure it has focus. |
| Transfer not appearing in Barcode app | Transfer is in Draft state or wrong operation type | Confirm the transfer from the Inventory back-end to move it to Ready state. |
| Validate button is disabled | Some product lines have zero Done quantity | Scan all required products or create a backorder for incomplete lines. |
| No pending receipts shown | All receipts are validated or no purchase orders confirmed | Confirm a purchase order in the Purchase module to generate a new receipt. |
| GS1 barcode not decoded correctly | Nomenclature still set to Default | Change Barcode Nomenclature to GS1 in Inventory > Configuration > Settings. |
7.2. Backorder Behaviour
When you validate a receipt or delivery with fewer Done quantities than the Demand, Cyllo asks whether to create a backorder. Understanding the two options prevents confusion:
| Option | What Happens |
|---|---|
| Create Backorder | The validated quantities are confirmed. A new transfer is automatically created for the remaining quantity, keeping it open for processing later. |
| No Backorder | The transfer is validated as-is. The remaining quantity is cancelled. The shortage is not automatically replenished. |
WARNING
Selecting 'No Backorder' on a delivery means the customer will not receive the missing items unless a new delivery is created manually. Always confirm with the sales team before choosing this option.