

Cyllo Accounting Documentation
Introduction
The Accounting module in Cyllo ERP is a complete double-entry bookkeeping and financial management system that handles the full spectrum of day-to-day accounting operations — customer invoicing, vendor bill management, payment registration, bank reconciliation, journal entry creation, tax calculation, and financial reporting. From the moment a sales order is confirmed in the Sales module, Cyllo can auto-generate a customer invoice, post it to the correct accounting journals, and match the incoming payment against it — all without any duplicate data entry. The result is a real-time, always-reconciled set of books that reflects every business transaction the moment it occurs.
Because the Accounting module shares the same Cyllo ERP database as Sales, Inventory, Purchase, and Payroll, every financial movement flows automatically into the books. A delivery validated in the Inventory module posts a stock valuation journal entry. A payslip confirmed in Payroll posts salary expense entries. An eCommerce order paid online creates a customer invoice and marks it as paid — all with zero manual posting required. Cyllo also offers a set of proprietary accounting extensions — Post-Dated Cheque management, Advance Payment handling, Installment Payment scheduling, Automated Follow-ups for overdue receivables, Budget Management with debt tracking, and multi-entity Consolidation — that extend the standard Odoo 17 accounting framework to match the needs of businesses operating in diverse markets and structures.
This documentation covers the Accounting module in full — from initial configuration of the chart of accounts, journals, and payment terms through the daily workflows of invoicing, billing, payment registration, and bank reconciliation, into advanced features such as multi-currency, deferred revenue, analytic accounting, and fiscal positions. It also documents every Cyllo-specific accounting extension and provides guidance on the full suite of financial reports available for balance sheet analysis, profit tracking, cash flow management, and aged receivables monitoring. Each section is written for practising accountants and finance managers who require accurate, step-by-step operational guidance.
1. Getting Started
This section covers the Accounting module's purpose, how to enable it, and a walkthrough of the dashboard that serves as the financial command center.
1.1. What is the Accounting Module?
Cyllo's Accounting module is a full double-entry bookkeeping system built on internationally recognised accounting principles. Every financial transaction — whether entered manually as a journal entry or generated automatically by an integrated module — is posted as a balanced debit/credit pair to a chart of accounts. This ensures that the books are always in balance and that every figure in a financial report can be traced back to the source document that created it. The module supports the complete accounts receivable workflow (customer invoices → payment → bank matching), the accounts payable workflow (vendor bills → payment → bank matching), and the general ledger (manual journal entries, month-end accruals, period closing). It also manages tax calculation and reporting, multi-currency transactions, fiscal period locking, and a full set of standard financial reports — all from within the Cyllo interface.
Note
The POS module needed to be installed first from apps. Cyllo automatically creates a default POS shop called Shop for you to configure.
1.2. Accounting Dashboard Overview
The Accounting dashboard is the financial command center — the first screen displayed when the Accounting module is opened. It provides an instant snapshot of the business’s current financial position without navigating to detailed reports.
By default, this dashboard is journal-centric. It displays all configured journals (such as Bank, Cash, Invoices, and Bills) as individual cards, each showing key real-time data like current balances, last transactions, reconciliation status, and quick action buttons (e.g., New Transaction, Reconcile). This design allows users to directly monitor and operate on day-to-day financial activities from a single interface.
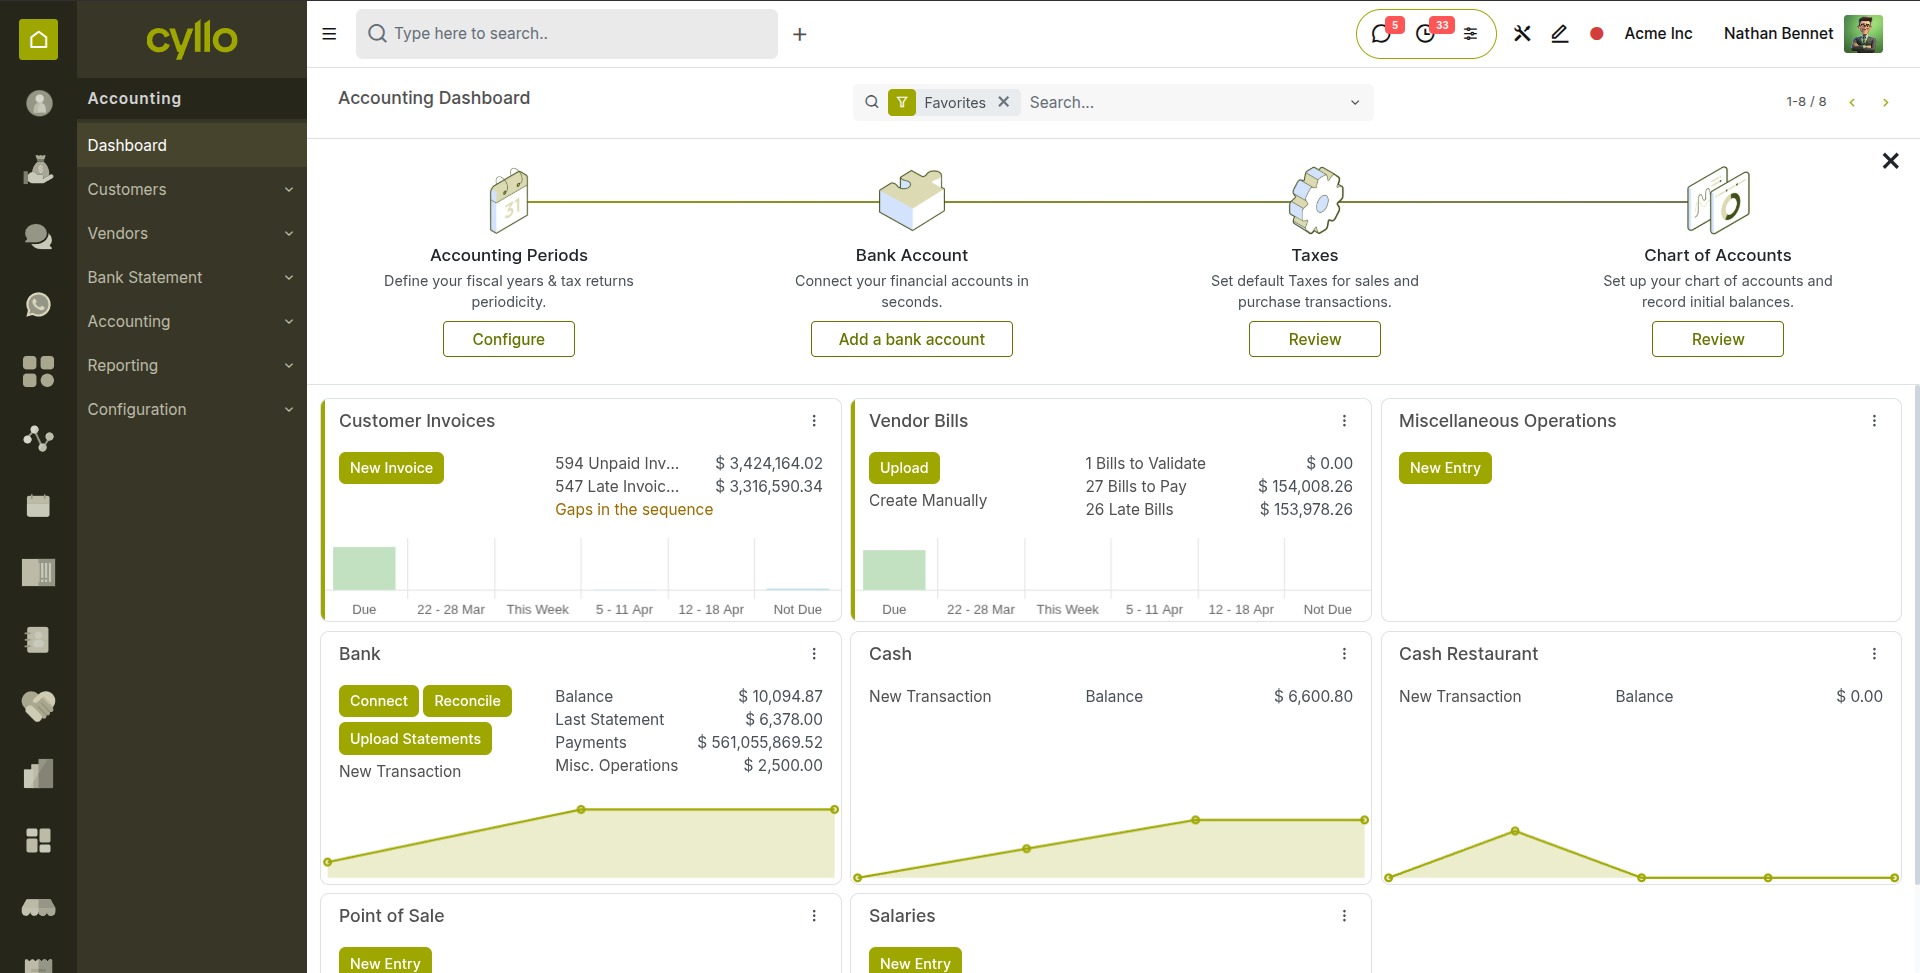
Fig 1.1 — Accounting dashboard — tiles showing To Invoice, Invoices to Pay, Bank balance, and Cash balance with amounts and due count badges
TIP
Pin the Accounting dashboard as your browser homepage for Cyllo to begin every working day with an immediate view of outstanding receivables, payables, and bank position — the three most critical daily financial metrics for most businesses.
2. Chart of Accounts & Initial Configuration
Before recording any transaction, the foundational accounting structure must be set up correctly. This section covers the chart of accounts, account types, journal configuration, payment terms, and fiscal year settings.
2.1. Chart of Accounts
The chart of accounts (CoA) is the complete list of all ledger accounts used by the business — organised into assets, liabilities, equity, revenue, and expense categories. Every journal entry debit or credit is posted to one of these accounts. Cyllo provides a localised chart of accounts templates that can be imported during setup, and accounts can be added or modified at any time.
- Go to Accounting → Configuration → Accounting →Chart of Accounts.
- The list displays all accounts with their Code, Account Name, Type, and current Balance.
- To add a new account, click New.
- Enter the Account Code — a numeric identifier that reflects the account hierarchy (e.g. 1100 for Trade Receivables, 4000 for Revenue).
- Enter the Account Name — a clear, descriptive label used in reports and journal entries.
- Set the Account Type — determines how the account appears in financial reports (see Section 2.2).
- Set the Default Tax if all transactions posted to this account should carry a specific tax by default.
- Click Save.
Fig 2.1 — Chart of Accounts list — Account Code, Name, Type, and Currency columns; filter bar at the top for searching by code or name
Key Fields
- Account Code: Numeric identifier. Follow a consistent numbering convention — 1xxx for assets, 2xxx for liabilities, 3xxx for equity, 4xxx for revenue, 5xxx–6xxx for expenses.
- Account Type: Controls which section of the Balance Sheet or P&L the account appears in, and how it is reconciled.
- Reconcile: Enable for receivable and payable accounts so that payments can be matched against open invoices on this account.
- Default Tax: Pre-populates the tax field on journal entry lines posted to this account — useful for VAT or GST accounts.
- Deprecated: Mark an account as deprecated to prevent new postings without deleting historical entries.
2.2. Account Types
Account types define the financial statement category each account belongs to, control how balances are computed, and determine whether transactions on the account can be reconciled. Choosing the correct account type when creating a new account is essential for accurate financial reporting.
| Account Type | Used For |
|---|---|
| Current Assets | Cash, bank accounts, trade receivables, prepaid expenses, and other short-term assets. |
| Non-Current Assets | Fixed assets, long-term investments, and other assets not expected to be converted to cash within one year. |
| Current Liabilities | Trade payables, VAT payable, accrued expenses, and short-term debt due within one year. |
| Non-Current Liabilities | Long-term loans, deferred tax liabilities, and obligations due beyond one year. |
| Equity | Share capital, retained earnings, and owner's equity accounts. |
| Revenue | All income accounts — sales revenue, service revenue, interest income. |
| Cost of Revenue | Direct costs of goods sold or services rendered — COGS, direct labour. |
| Expenses | Operating expenses — rent, salaries, utilities, depreciation. |
| Other Income | Non-operating income — gains on asset disposals, foreign exchange gains. |
| Other Expense | Non-operating expenses — interest expense, foreign exchange losses. |
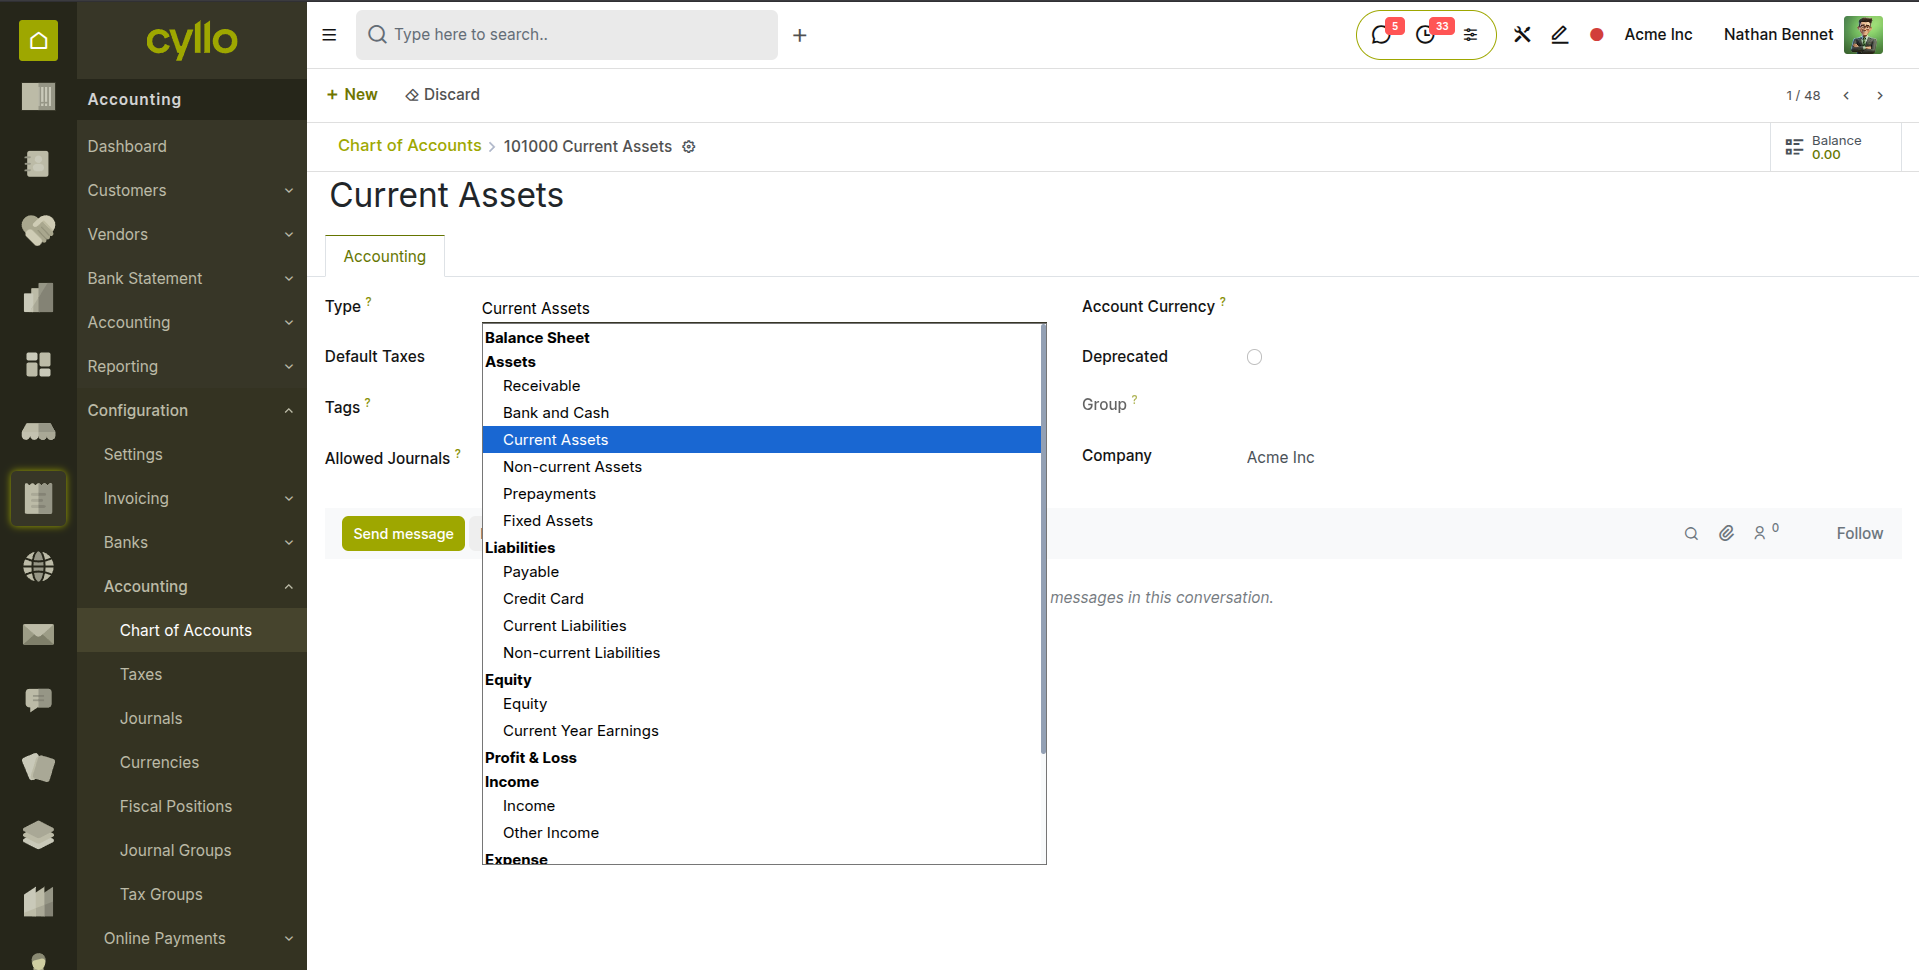
Fig 2.2 — Account form — Account Type dropdown open showing all available type options
2.3. Journal Configuration
Journals are the containers into which journal entries are posted. Every transaction in Cyllo is associated with a journal — customer invoices are posted to the Sales journal, vendor bills to the Purchase journal, cash transactions to the Cash journal, and bank transactions to the Bank journal. Journals link transactions to their accounting accounts and control sequencing and access.
- Go to Accounting → Configuration → Accounting →Journals.
- Click New to create a new journal.
- Enter the Journal Name (e.g. Bank – HSBC, Petty Cash, Sales).
- Select the Journal Type — Sales, Purchase, Bank, Cash, or Miscellaneous. The type determines which transactions can be posted here.
- Set the Default Account — the account to which entries in this journal are posted by default. For a Bank journal, this is the bank account in the chart of accounts. For a Sales journal, this is the accounts receivable account.
- Set the Sequence — controls the reference number format for entries in this journal (e.g. INV/2026/00001 for invoices).
- For Bank journals, enter the Bank Account Number and Currency.
- Click Save.
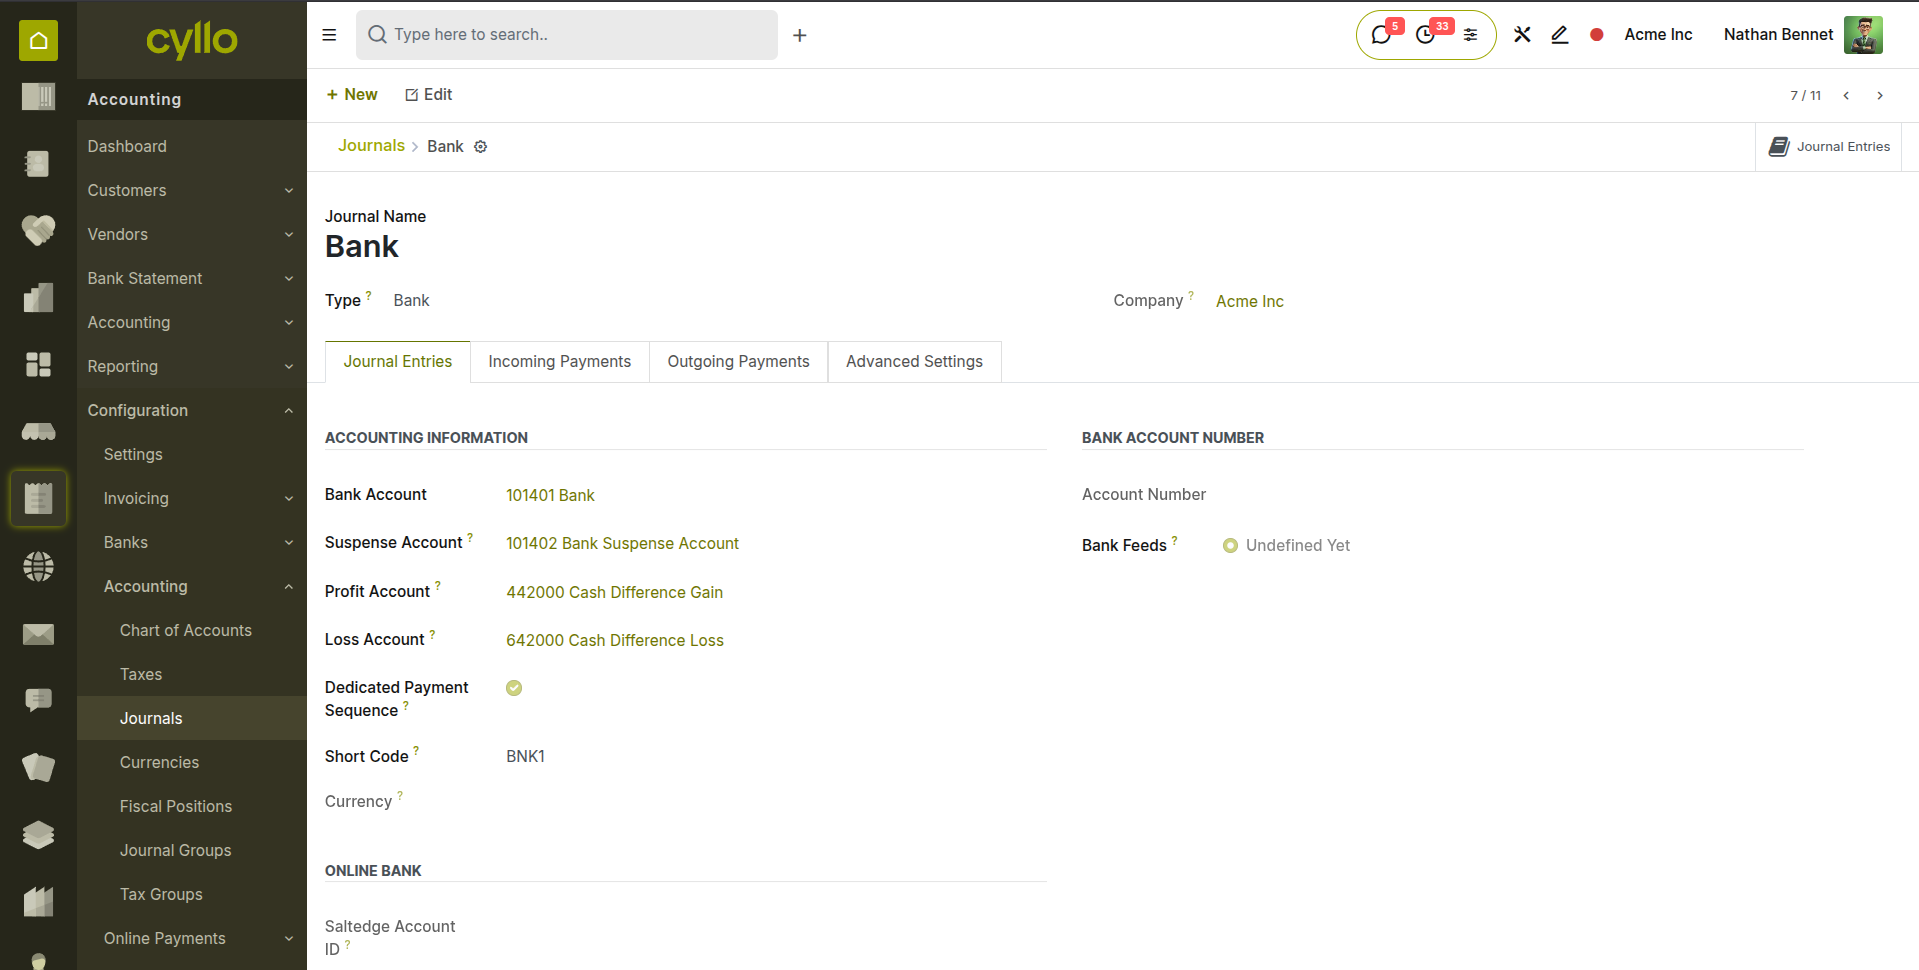
Fig 2.3 — Journal configuration form — Journal Name, Type, Default Account, Currency, and Sequence settings
Journal Types
- Sales: Used for customer invoices and credit notes. Linked to the accounts receivable account.
- Purchase: Used for vendor bills and vendor credit notes. Linked to the accounts payable account.
- Cash: Used for cash receipts and payments. Linked to a petty cash or cash-in-hand account.
- Bank: Used for bank transactions. Linked to a specific bank account in the chart of accounts.
- Miscellaneous: Used for general journal entries, adjustments, accruals, and month-end postings.
2.4. Payment Terms
Payment terms define the due date calculation and payment schedule for invoices and bills. They appear on customer invoices and vendor bills and are used by the system to calculate overdue status, aging, and follow-up triggers. Common examples include Net 30 (full payment due 30 days from invoice date) and 50% advance, 50% on delivery.
- Go to Accounting → Configuration → Invoicing → Payment Terms.
- Click New to create a payment term.
- Enter the Payment Term Name (e.g. 30 Days Net, Immediate Payment, 50/50 Split).
- Add payment term lines by clicking Add a Line:
i. Due: The remaining amount due. Set the Days field to the number of days from invoice date (e.g. 30 for Net 30).
ii. Percent: A percentage of the invoice total due by a specific date (e.g. 50% due on invoice date, 50% due 30 days later).
iii. Fixed Amount: A specific fixed amount due by a specified date — less common but supported. - The system calculates due dates automatically from the invoice date using these lines.
- Click Save and assign this payment term to customers or vendors in their contact record for automatic application.
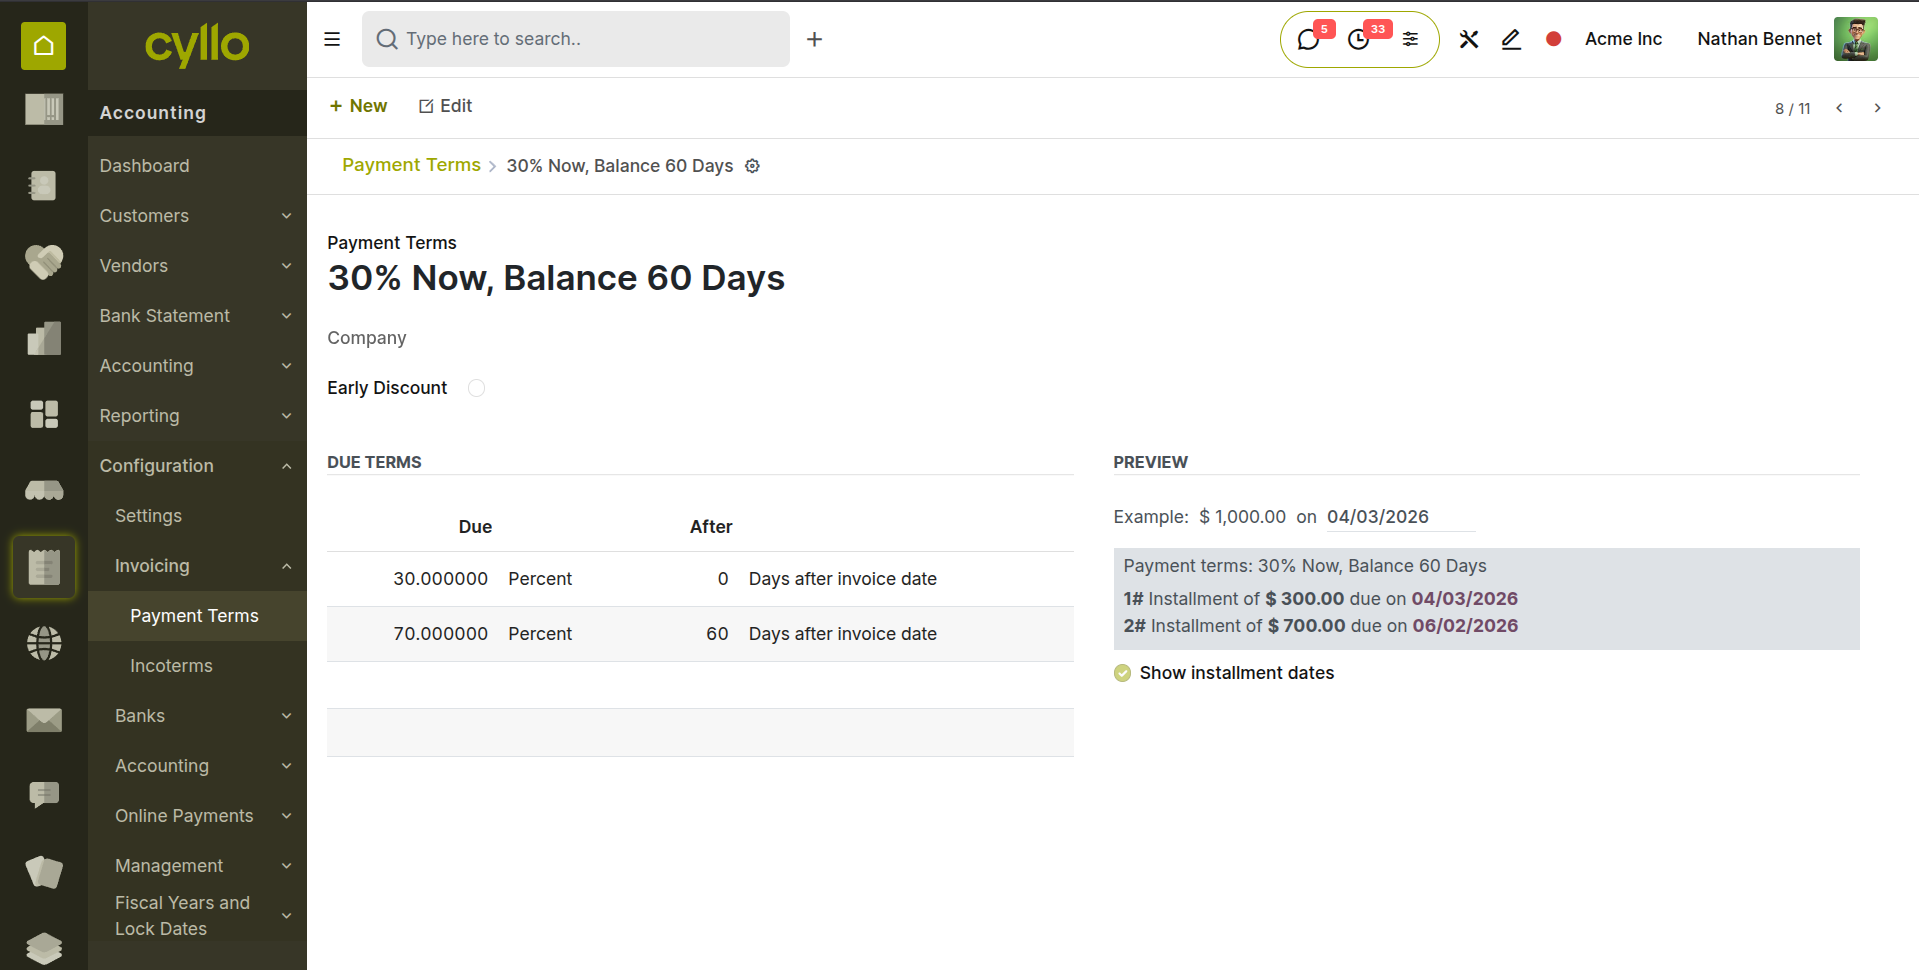
Fig 2.4 — Payment Terms form — two lines: 30% Percent due on invoice date, 70% Balance due 60 days later
Note
Payment terms can be set as a default on a customer or vendor record so they are applied automatically every time a new invoice or bill is created for that partner — no need to select them manually on each document.
2.5. Fiscal Years & Lock Dates
Fiscal years define the annual accounting period for the business. Lock dates prevent new journal entries from being posted to closed periods, protecting historical financial data from accidental or unauthorised modification after accounts have been finalised.
Fiscal Year Configuration:
- Go to Accounting → Configuration → Fiscal Years and Lock Dates → Fiscal Years.
- Click ‘New’ and add Fiscal Year Start and End dates that match the business's accounting year (e.g. 1 January to 31 December, or 1 April to 31 March for UK businesses).
- Click Save.
Setting a Lock Date:
- Go to Accounting → Configuration →Fiscal Years and Lock Dates → Lock Dates.
- Set the Lock Date for Sales, Purchase, All entries — users cannot post entries before this date.
- Click Save.
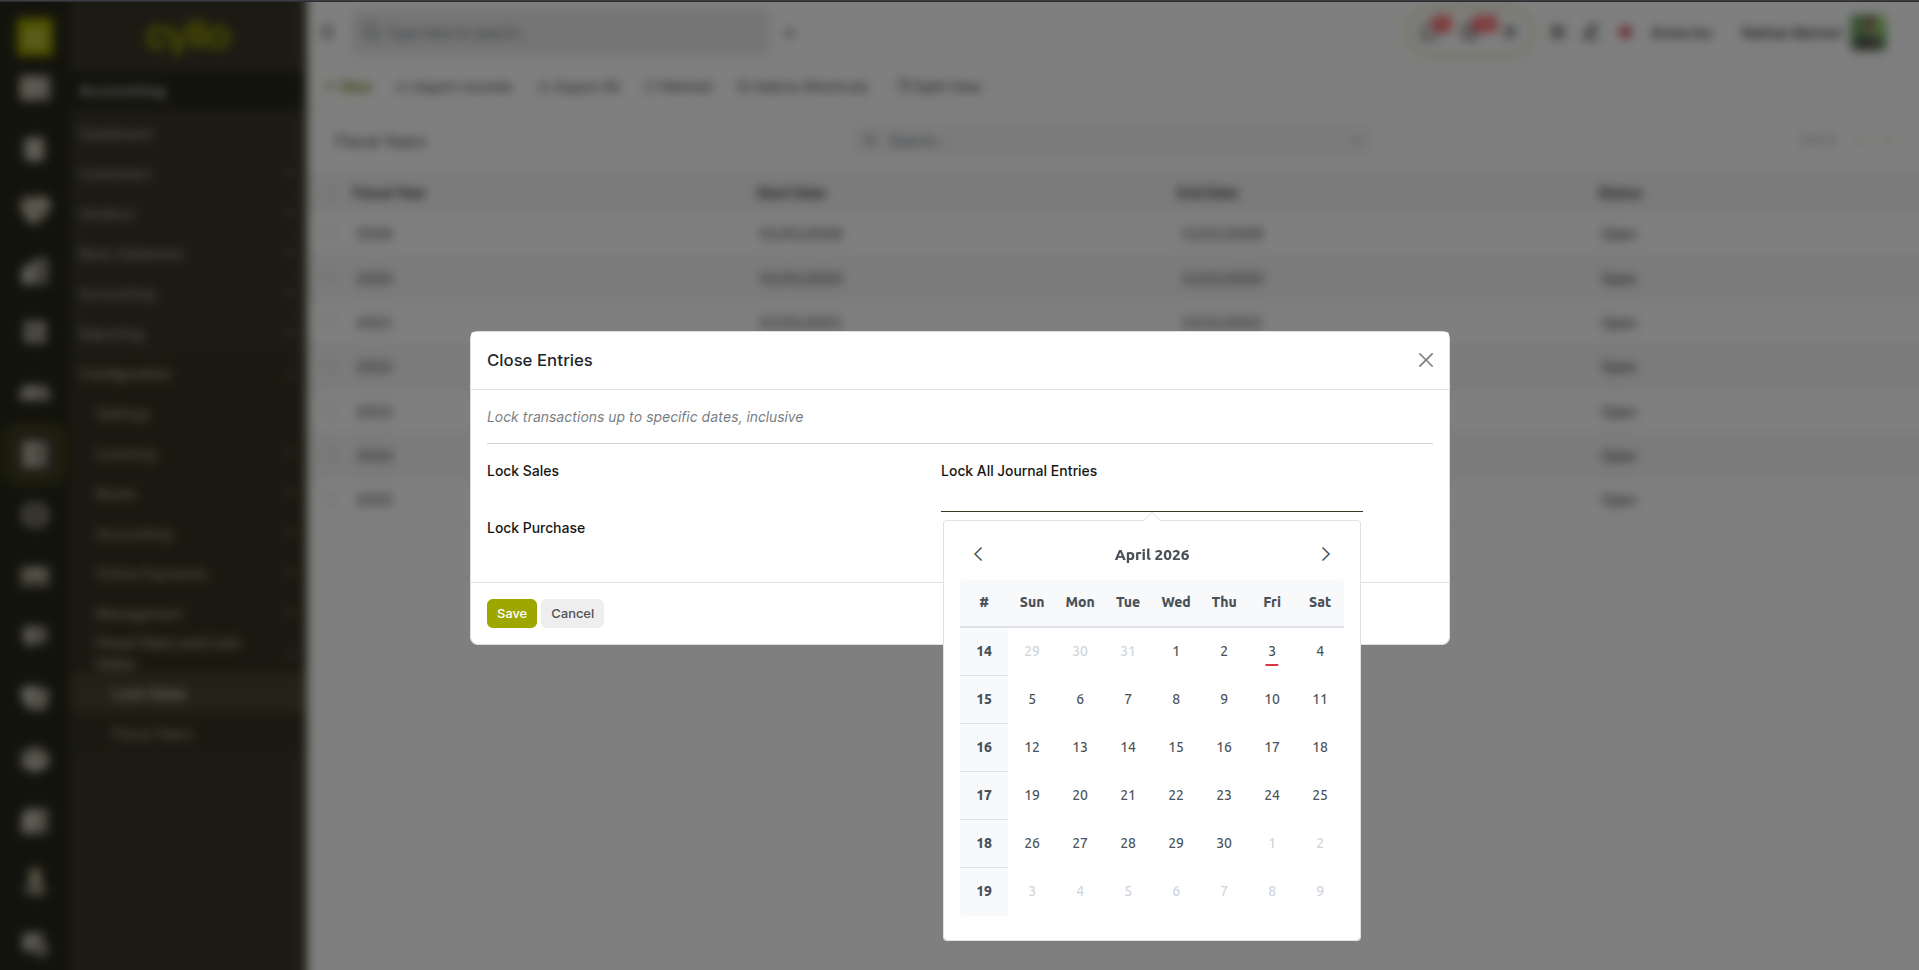
Fig 2.5 — Lock Dates screen — three date fields: Lock for Sales, Purchase and Lock for All Entries, with calendar pickers
WARNING
Once a lock date is set for all users, journal entries in that period cannot be created or modified from the UI. Any corrections to a locked period require the lock date to be temporarily lifted by an administrator. Always set the lock date only after all period-end adjustments, reconciliations, and accruals have been completed and reviewed.
3. Customer Invoicing
Customer invoicing is the primary accounts receivable workflow — creating invoices, posting them to the ledger, and tracking them to payment. This section covers the full customer invoice lifecycle.
3.1. Creating a Customer Invoice
Customer invoices can be created manually for ad-hoc billing, or generated automatically from confirmed sales orders, delivery orders, or project timesheets. Manually created invoices follow the same workflow as auto-generated ones — the difference is only in how the invoice is initiated.
- Go to Accounting → Customers → Invoices and click New.
- Select the Customer from the partner dropdown. The customer's payment terms, currency, and fiscal position are applied automatically from their contact record.
- Set the Invoice Date — this is the date the invoice is issued and from which the due date is calculated based on the payment terms.
- Set the Payment Terms if they differ from the customer's default.
- Add invoice lines by clicking Add a Line under the Invoice Lines tab: i. Product: Select the product or service being invoiced. The account, tax, and price are pre-filled from the product configuration.
ii. Description: A description that appears on the printed invoice. Auto-filled from the product but can be edited.
iii. Quantity: The number of units being billed.
iv. Unit Price: The per-unit price. Pre-filled from the product's sales price.
v. Taxes: The applicable tax. Auto-filled from the product's tax setting. - Review the Tax Summary at the bottom showing the tax breakdown and the total amount due.
- Click Save. The invoice is in Draft state.
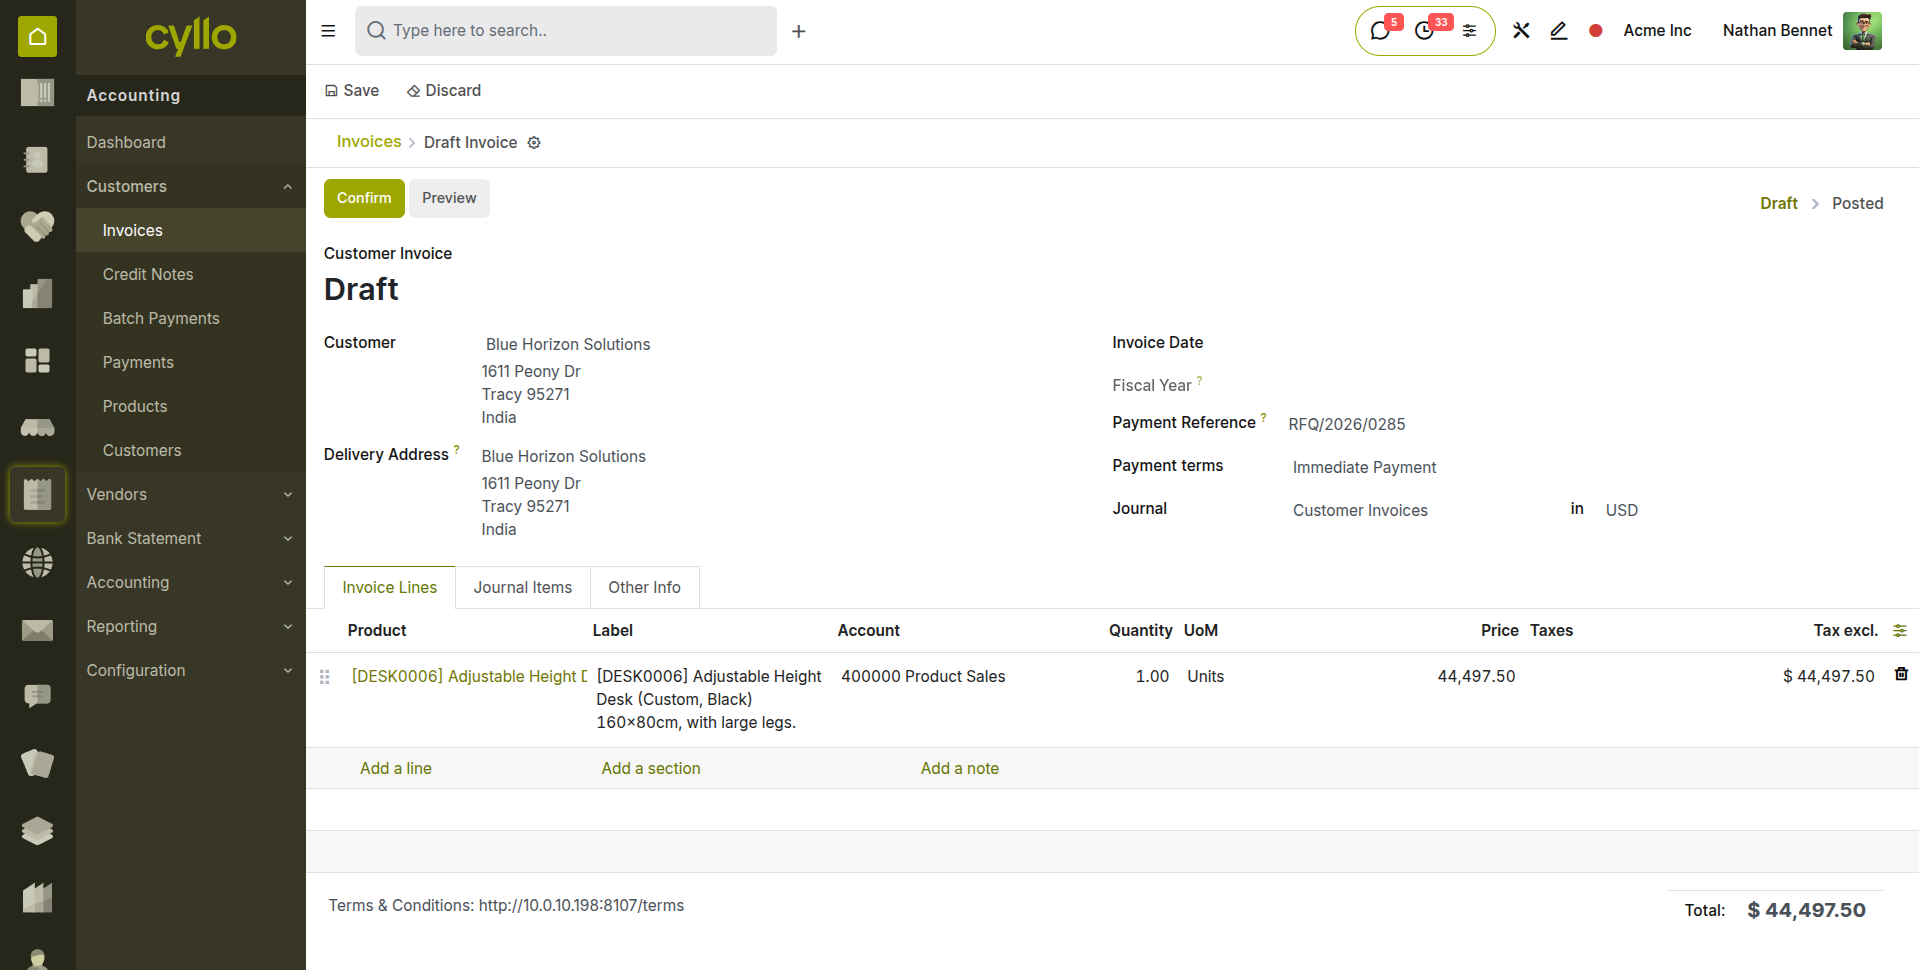
Fig 3.1 — Customer invoice form — Customer, Invoice Date, Payment Terms fields at the top; invoice lines with Product, Quantity, Unit Price, and Tax columns; Tax Summary and Total at the bottom
Key Fields
- Customer: The partner being billed. Determines default payment terms, currency, and fiscal position.
- Invoice Date: The accounting date. Used for period allocation and due date calculation.
- Due Date: Automatically calculated from Invoice Date and Payment Terms. Can be overridden manually.
- Payment Terms: Controls how the due date is calculated. If set to Immediate, the full amount is due on the invoice date.
- Journal: The accounting journal for this invoice. Defaults to the Sales journal.
- Currency: The invoice currency.
3.2. Invoice Workflow
Customer invoices in Cyllo follow a four-state workflow: Draft → Posted → In Payment → Paid (or Cancelled). Understanding each state and what it means for the books is essential for day-to-day accounts receivable management.
| Invoice State | Description |
|---|---|
| Draft | Invoice created but not yet posted to the accounting ledger. Can be freely edited. Has no accounting impact. |
| Posted / Open | Invoice confirmed and posted to the journal. A journal entry is created in the Sales journal. The invoice is now outstanding and appears in the customer's receivables. Cannot be edited — only cancelled or reversed. |
| In Payment | A payment has been registered against the invoice but the bank statement has not yet been reconciled. An interim payment account entry exists. |
| Paid | The payment has been fully matched and reconciled. The receivable is cleared. No balance outstanding. |
| Cancelled | The invoice has been cancelled. A reverse journal entry is posted to negate the original entry. The invoice is archived. |
How to Confirm (Post) an Invoice:
- Open a Draft invoice and review all lines, amounts, and tax calculations.
- Click Confirm. The invoice status changes to Posted, a sequential invoice number is assigned (e.g. INV/2026/00042), and a journal entry is posted to the Sales journal debiting the customer's receivable account and crediting the revenue account.
- To send the invoice to the customer, click Send & Print. An email is sent with a PDF invoice attached, and an activity is logged on the invoice.
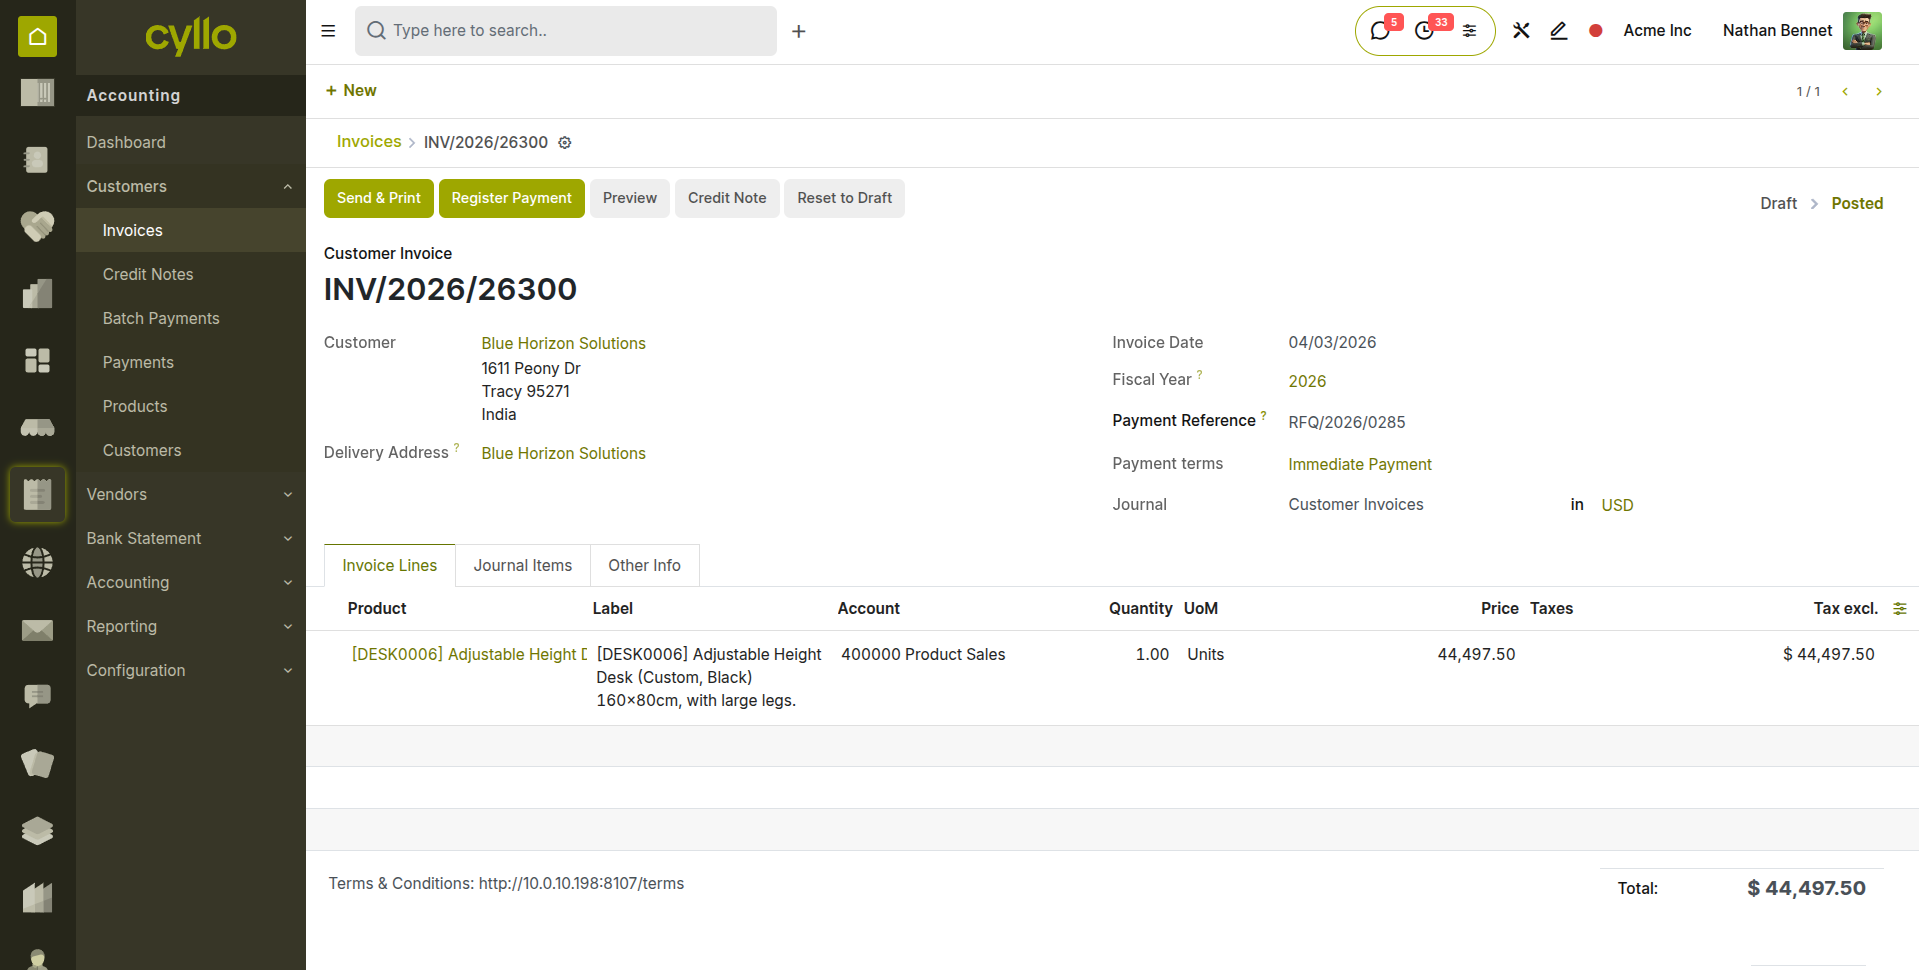
Fig 3.2 — Confirmed invoice — status bar showing Posted state; invoice number assigned; Send & Print button and Register Payment button visible
Note
Once an invoice is in Posted state it cannot be directly edited. To correct an error, either cancel the invoice and create a corrected one, or issue a credit note to reverse the incorrect amount and create a new invoice for the correct amount.
3.3. Credit Notes & Refunds
A credit note is a negative invoice that reverses all or part of a posted customer invoice. Credit notes are used to record returns, correct billing errors, or grant discounts after an invoice has been issued. They create a reverse journal entry that reduces the customer's receivable balance.
- Open the posted invoice to be credited.
- Click the Credit Note button.
- In the credit note dialog, set the Reason — a brief description of why the credit note is being issued (e.g. Product returned, Billing error — incorrect quantity).
- Set the Credit Note Date — the accounting date for the reversal entry.
- Choose the Reversal Method:
- Reverse: Creates a credit note for the full invoice amount and automatically reconciles it against the original invoice, setting both to Paid status.
- Reverse and new invoice: Creates the credit note and immediately creates a new draft invoice for correction.
- Click Reverse. The credit note is created.
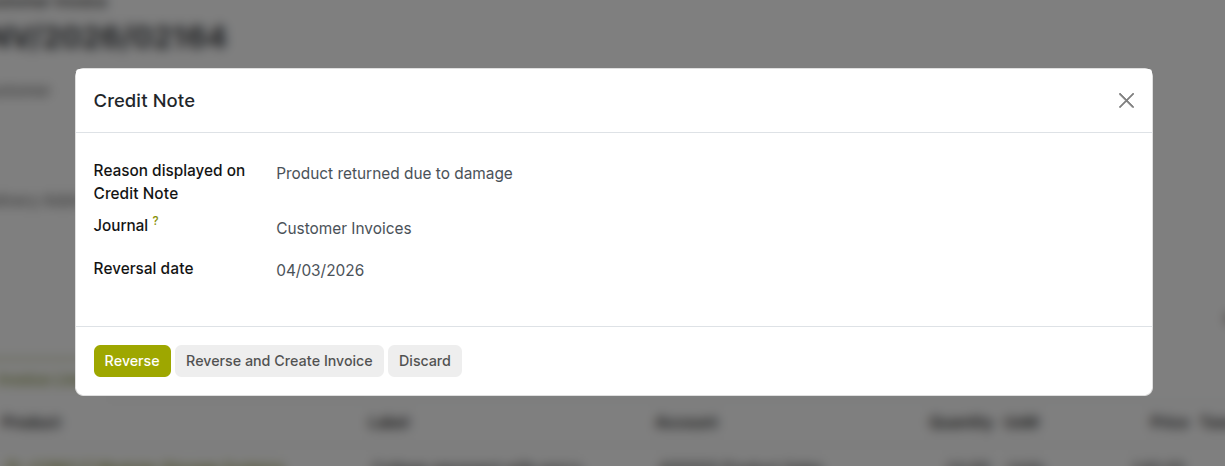
Fig 3.3 — Add Credit Note dialog — Reason field, Credit Note Date, and Journal; Reverse buttons at the bottom
Note
To issue a cash refund to the customer, register a payment on the credit note using the customer's bank or cash journal. This creates a negative payment entry that reduces the company's bank balance and clears the credit note.
4. Vendor Bills
Vendor bills are the accounts payable counterpart to customer invoices — they record what the business owes to suppliers. This section covers how to create, confirm, and manage vendor bills and vendor credit notes.
4.1. Creating a Vendor Bill
Vendor bills can be created manually from a received supplier invoice, or generated automatically from a confirmed purchase order. When created from a purchase order, the product lines, quantities, and agreed prices are pre-filled from the PO, reducing manual entry and ensuring three-way matching between PO, receipt, and bill.
- Go to Accounting → Vendors → Bills and click New.
- Select the Vendor from the partner dropdown. Their payment terms, currency, and fiscal position are applied automatically.
- Set the Bill Date — the date shown on the received supplier invoice. This is the date used for accounting period allocation and due date calculation.
- Enter the Vendor Bill Reference — the supplier's own invoice number. This is critical for reconciling payments to the correct supplier invoice.
- Add bill lines by clicking Add a Line: a. Product: Select the purchased product. The expense account and tax are pre-filled from the product configuration. b. Quantity and Unit Price: Match these to the figures on the received supplier invoice. c. Account: The expense or asset account to which this cost is posted. d. Taxes: The applicable input tax (e.g. input VAT). Pre-filled from the product.
- Review the Tax Summary and total.
- Click Save. The bill is in Draft state.
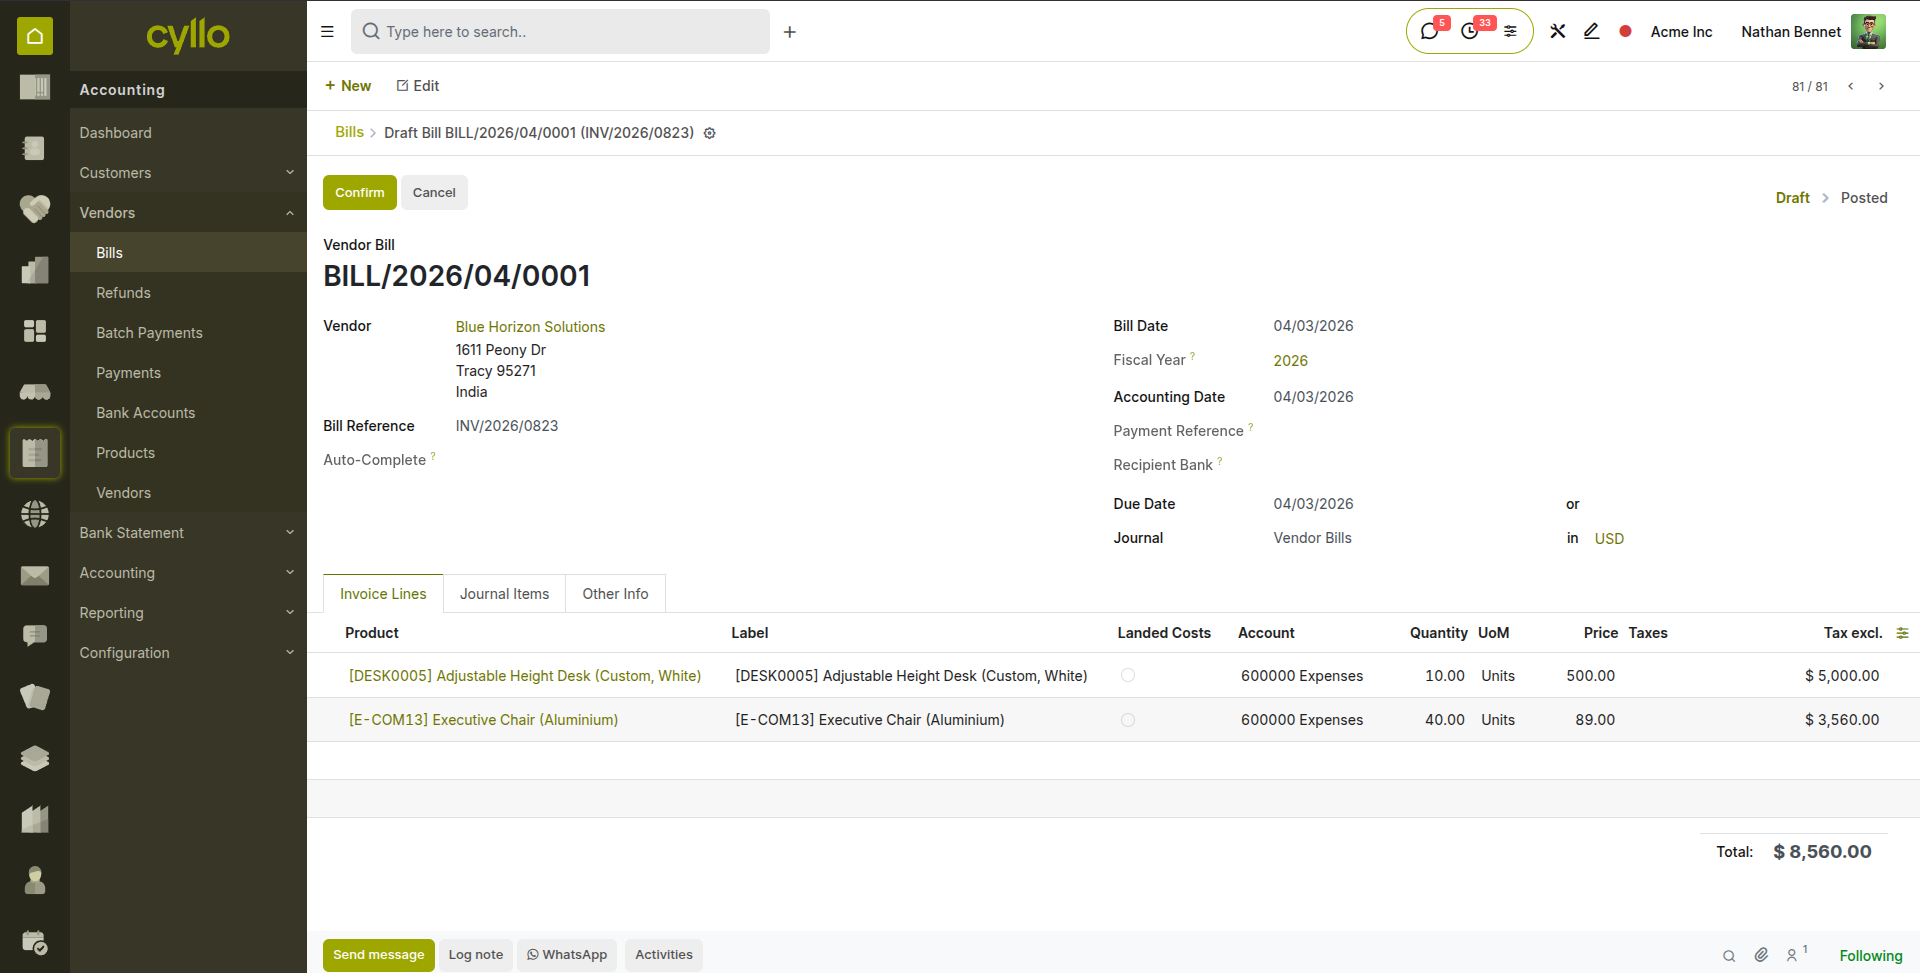
Fig 4.1 — Vendor bill form — Vendor, Bill Date, Vendor Bill Reference fields at top; bill lines with Product, Quantity, Unit Price, Account, and Tax columns
Note
Always enter the Vendor Bill Reference (the supplier's invoice number) before confirming. This field is essential for searching, matching, and resolving queries with suppliers — and is required by many tax authorities as a reference on payment remittances.
4.2. Bill Workflow
Vendor bills follow the same four-state workflow as customer invoices: Draft → Posted → In Payment → Paid. Posting a bill creates a journal entry that credits the vendor's payable account and debits the expense or asset account.
- Review the draft bill carefully — verify the vendor, amounts, and tax against the physical supplier invoice.
- Click Confirm to post the bill. A sequential bill number is assigned (e.g. BILL/2026/04/001) and a journal entry is posted: debit the expense/asset account, credit accounts payable.
- The bill appears in the Vendor Bills list with status Posted and a due date based on the payment terms.
- When payment is ready, use Register Payment (see Section 5.2) to record the outgoing payment.
- Once the payment is matched and reconciled against the bank statement, the bill status moves to Paid.
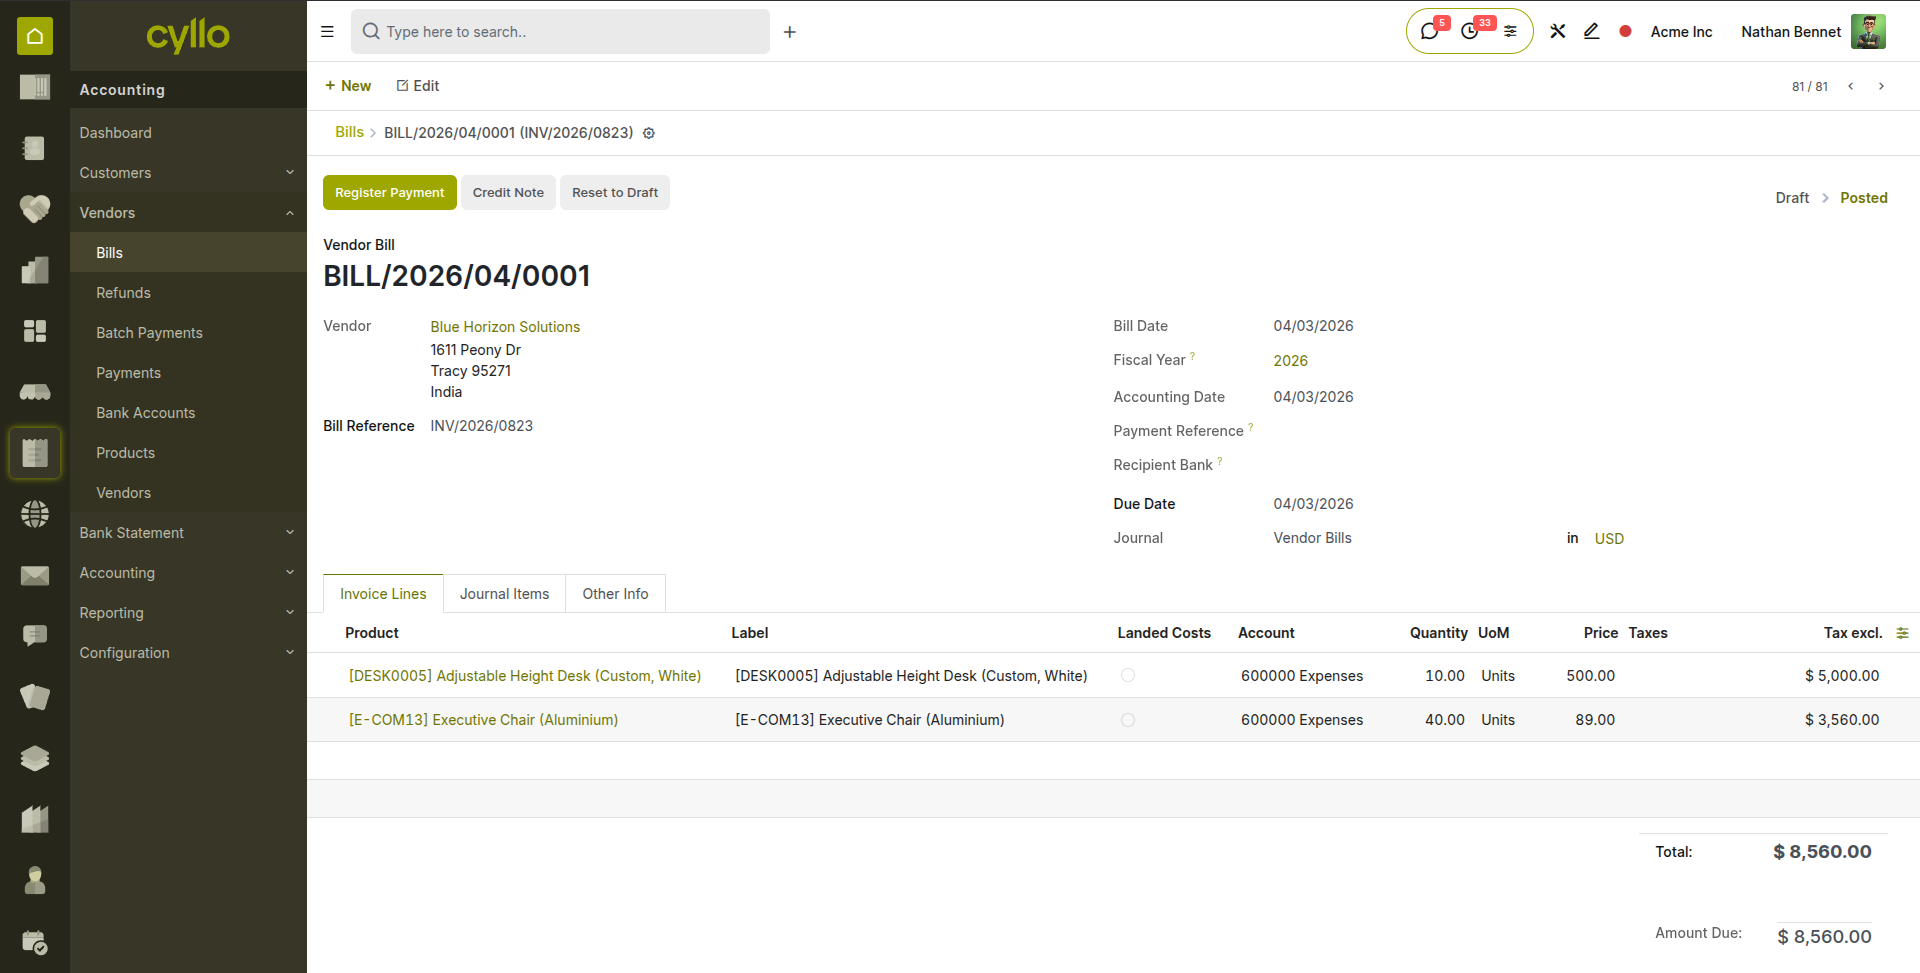
Fig 4.2 — Confirmed vendor bill — Posted status badge, due date shown, bill number assigned; Register Payment button visible
TIP
Set up a three-way matching process for purchase orders: confirm that the received quantity on the delivery order matches the PO quantity, and that the supplier invoice amount matches the PO agreed price, before confirming the bill. Cyllo's Purchase module shows the billed and received quantities on the PO for easy verification.
4.3. Vendor Credit Notes
Vendor credit notes are received from suppliers to correct an overcharge, record a return, or grant a price reduction after a bill has been posted. They reduce the amount owed to the vendor and can be matched against a future bill or paid out as a cash refund.
- Go to Accounting → Vendors → Credit Notes and click New, or open the original posted bill and click Add Credit Note.
- Select the Vendor and set the Credit Note Date.
- Enter the Vendor Credit Note Reference — the supplier's credit note number.
- Add lines for the credited amounts and products.
- Click Confirm to post. A journal entry is created: debit accounts payable, credit the expense/asset account — the reverse of the original bill entry.
- To apply the credit note against a future bill, open the future bill, click Add Outstanding Credits, and select the credit note. The system automatically reconciles the credit note amount against the bill.
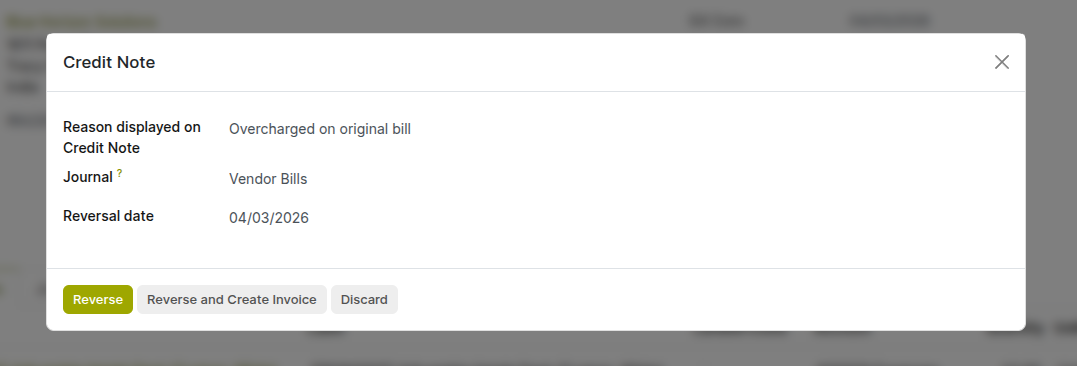
Fig 4.3 — Vendor credit note form — Vendor, Credit Note Date, Vendor Reference fields; lines showing credited product and amount; Posted status after confirmation
5. Payments
This section covers recording customer receipts, vendor payments, batch payment processing, and matching outstanding credits against open invoices or bills.
5.1. Registering Customer Payments
When a customer pays an invoice, a payment record is created in Cyllo that links the received amount to the outstanding invoice. This creates a journal entry that debits the bank or cash account and credits the accounts receivable — partially or fully clearing the invoice.
- Open the posted customer invoice to be paid.
- Click Register Payment.
- In the payment dialog, verify the Amount — defaults to the full outstanding amount but can be reduced for partial payments.
- Set the Payment Date — the date the funds were received.
- Select the Journal — the bank or cash journal where the funds were received.
- Set the Payment Method — typically Manual for bank transfers, or the relevant payment terminal method.
- Add a Memo for reference (e.g. bank transfer reference, cheque number).
- Click Pay. A payment record is created, the invoice status moves to In Payment, and a journal entry debiting the bank and crediting accounts receivable is posted.
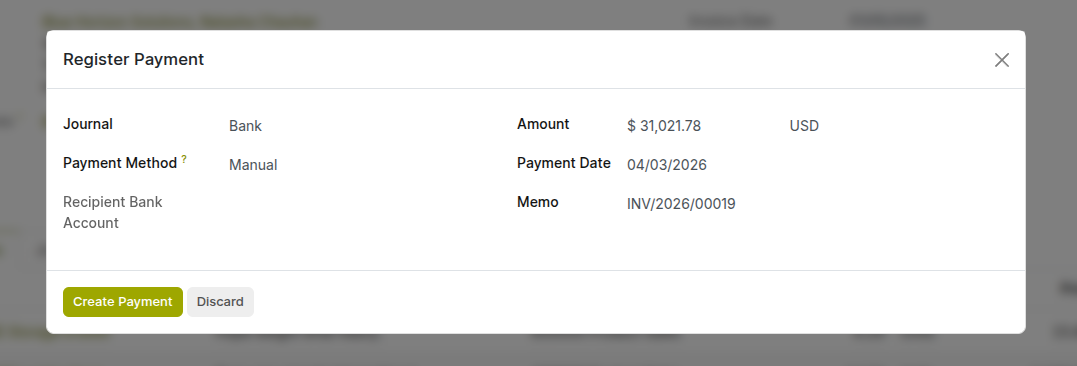
Fig 5.1 — Register Payment dialog — Amount, Payment Date, Journal, Payment Method, and Memo fields; Pay button at the bottom
Note
The invoice remains In Payment status until the corresponding bank statement line is imported and reconciled (see Section 6). Once reconciled, it moves to Paid. If you validate bank statements regularly, invoices will reach Paid status quickly.
5.2. Registering Vendor Payments
Vendor payments record the outgoing payment made to a supplier to settle a posted bill. The payment creates a journal entry that debits accounts payable (reducing the liability) and credits the bank or cash account (reducing the asset).
- Open the posted vendor bill to be paid.
- Click Register Payment.
- Set the Amount — defaults to the full outstanding balance. Adjust for partial payments.
- Set the Payment Date — the date the funds were or will be sent.
- Select the Journal — the bank account from which payment is sent.
- Enter a Memo with the payment reference (bank transfer reference, cheque number, or the vendor's invoice number for reconciliation).
- Click Pay. The bill status moves to In Payment.
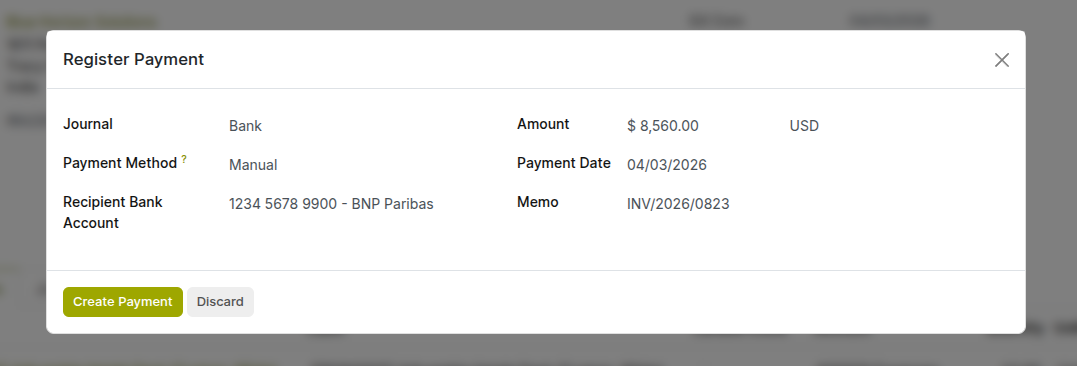
Fig 5.2 — Vendor bill payment dialog — Amount, Date, Journal, and Memo fields; Pay button
TIP
For payments made in advance of receiving the vendor's invoice — for example, a deposit or prepayment — use the Advance Payment feature (Section 11.2) rather than registering a payment against a bill. This ensures the prepayment is correctly tracked as a liability until it is applied against a future bill.
5.3. Batch Payments
Batch payments allow multiple vendor bills or customer refunds to be grouped into a single payment transaction — for example, a single bank transfer that pays three different suppliers on the same day. This reduces bank transaction volume, simplifies reconciliation, and is particularly efficient at month-end when settling multiple outstanding payables.
- Go to Accounting → Vendors → Bills (or Accounting → Customers → Invoices for customer receipts).
- Select multiple posted bills or invoices that should be paid together using the checkboxes in the list view.
- Click Action → Register Payment. Cyllo detects that multiple records are selected and activates batch mode.
- In the batch payment dialog, set the Payment Date and Journal for the combined payment.
- Click Pay. A single payment record is created covering all selected bills, and individual journal entries are generated for each — all linked to the same payment batch.
- The batch payment appears in Accounting → Accounting → Batch Payments where it can be reviewed and the payment file exported for submission to the bank.
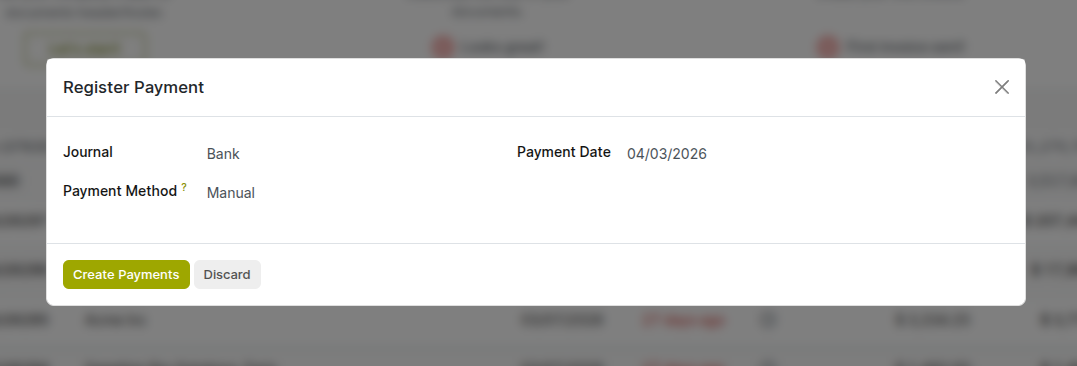
Fig 5.3 — Batch payment dialog — Payment method, Journal and Payment Date fields
5.4. Outstanding Credits & Payment Matching
When a customer has credit notes, overpayments, or advance payments on their account, these appear as outstanding credits that can be matched against new open invoices without requiring a fresh cash payment. Cyllo's payment matching system makes this visible and easy to apply at the invoice level.
- Open a posted customer invoice with an outstanding balance.
- In the Outstanding Credits section at the bottom of the invoice, Cyllo lists all unmatched credit notes and overpayments for this customer.
- Click Add next to a credit to apply it against the current invoice. The credit amount is deducted from the outstanding balance.
- If the credit exactly covers the invoice, the invoice status moves to Paid automatically.
- If the credit only partially covers the invoice, a residual balance remains outstanding.
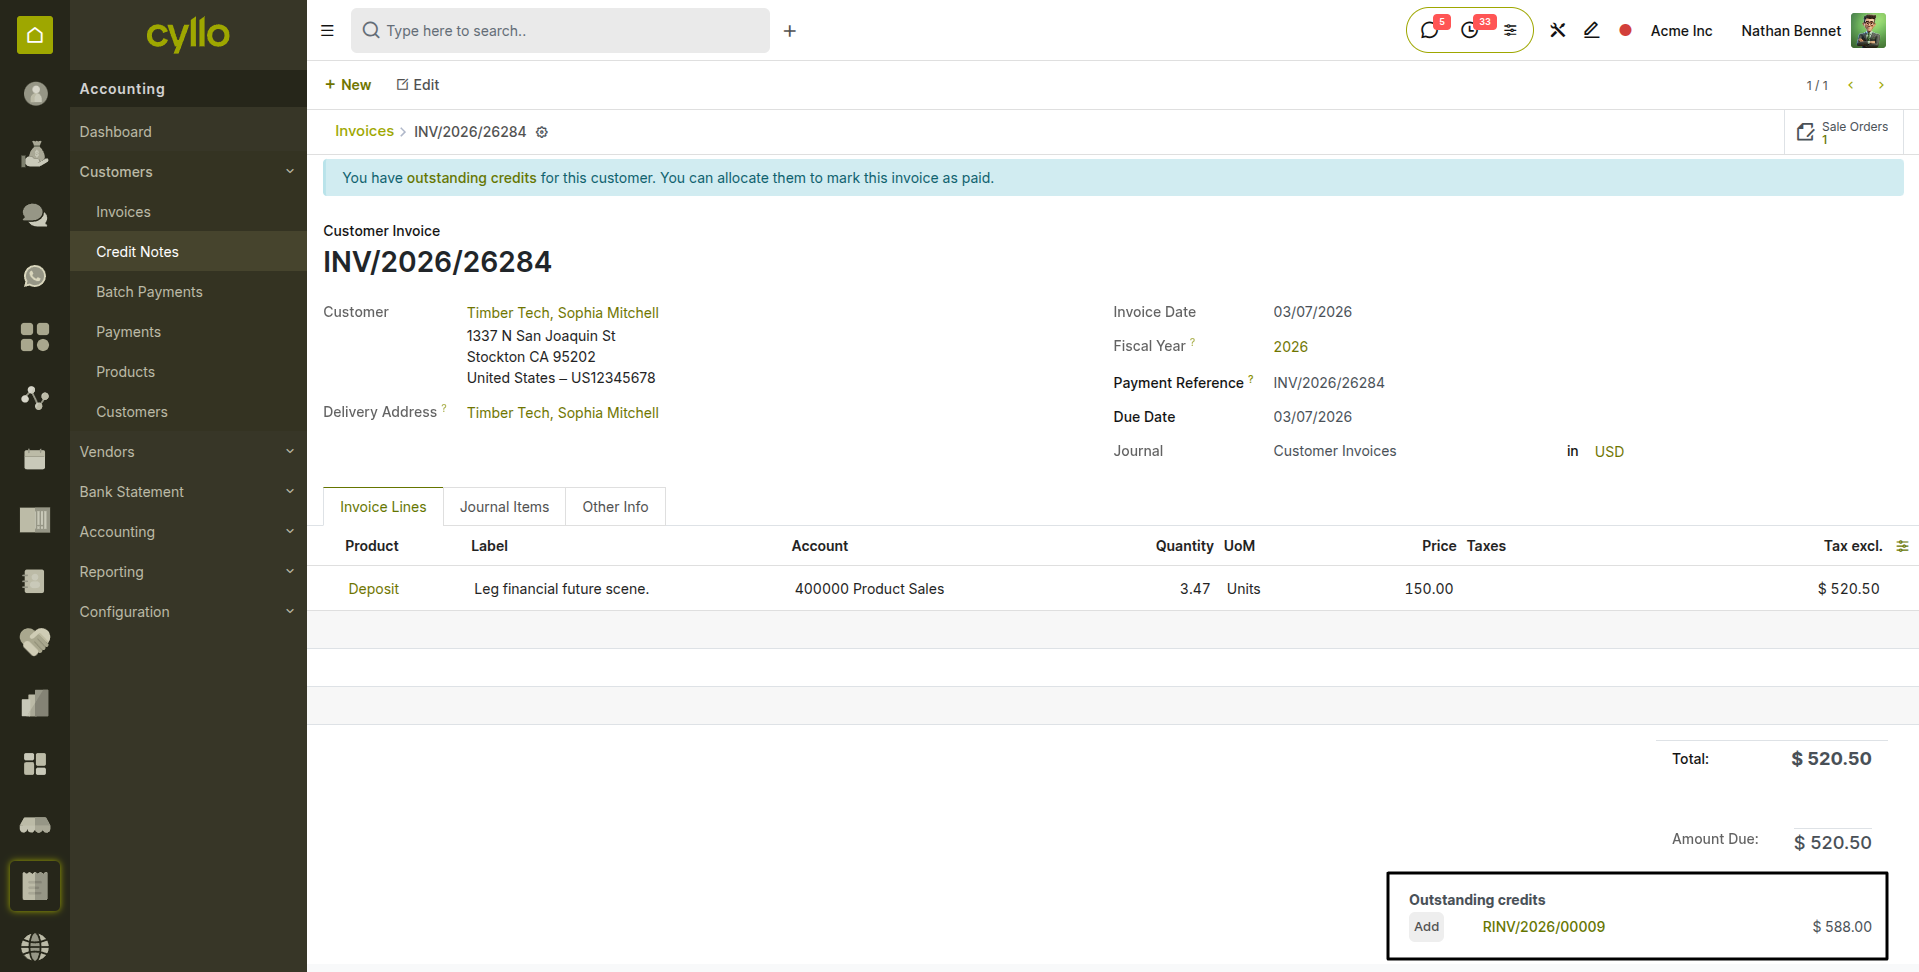
Fig 5.4 — Customer invoice — Outstanding Credits section showing a note of £250 with an Add button; remaining balance updating after applying the credit
Note
The same matching functionality is available for vendor bills via the Outstanding Debits section — vendor credit notes and overpayments can be applied against future bills in the same way.
6. Bank Reconciliation
Bank reconciliation matches the transactions in Cyllo's accounting journals against the actual transactions recorded by the bank. It is the process that moves payments from In Payment to Paid and ensures the bank balance in the books matches the actual bank account balance.
6.1. Bank Journal Setup
Each bank account used by the business requires a Bank journal in Cyllo. The journal is linked to a specific bank account in the chart of accounts. During reconciliation, all transactions on the bank statement are matched to entries in this journal.
- Go to Accounting → Configuration → Accounting → Journals.
- Click New and select Bank as the journal type.
- Enter the Bank Account Number and select the Bank from Cyllo's bank directory, or enter the bank name manually.
- Set the Currency — if the bank account operates in a foreign currency, select that currency here.
- Optionally, enable Online Synchronization if your bank supports direct feed integration — this allows bank transactions to be imported automatically.
- Click Save.
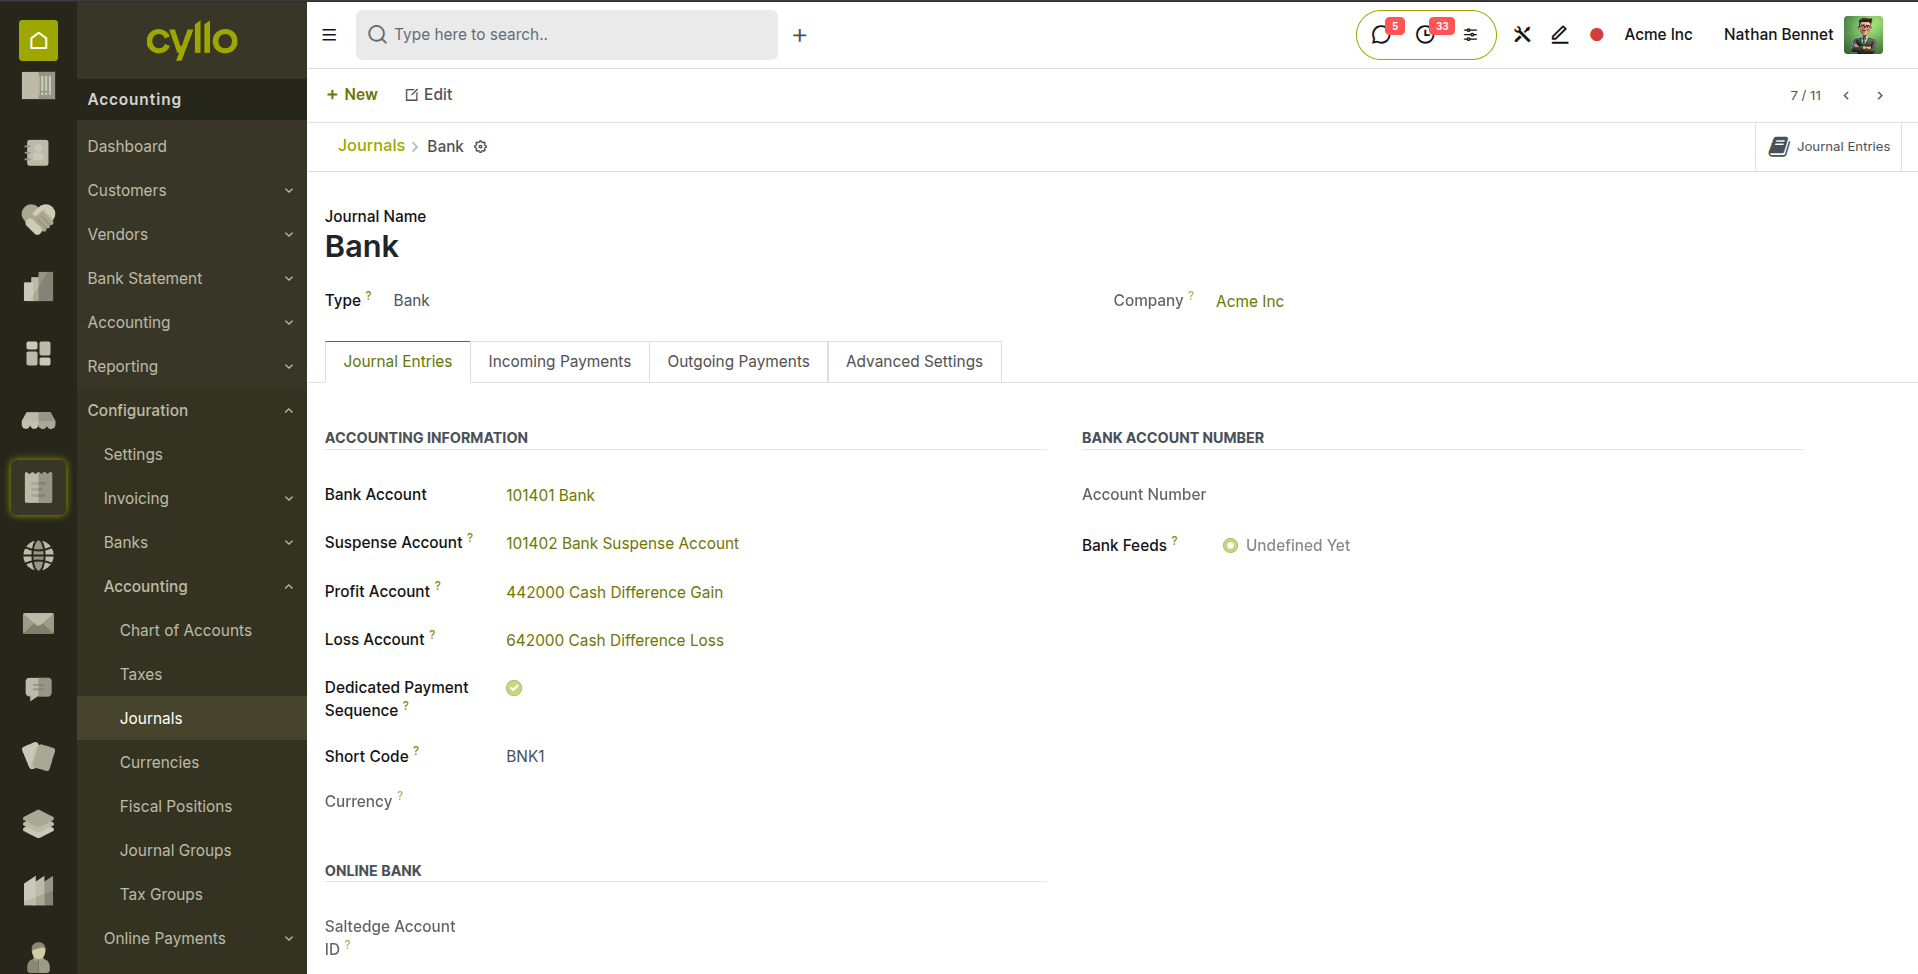
Fig 6.1 — Bank journal configuration — Bank Account, Bank Name, Currency, and Account fields; Online Sync toggle
6.2. Bank Statement Import
Bank statements can be imported into Cyllo in standard formats — OFX, QIF, CSV, and CAMT — downloaded from your bank's online portal. Importing a statement creates bank statement line records that are then matched against accounting entries during reconciliation.
- Go to Accounting → Bank Statements → Import Bank Statement, or open the bank journal from the dashboard and click Import Statement.
- Upload the statement file downloaded from your bank.
- Select the Bank journal to add the statements.
- For CSV imports, map the columns — Date, Description, Amount — to the correct fields in the preview grid.
- Click Import. Cyllo reads the file and creates bank statement lines for each transaction in the selected period.
- The statement opens in the reconciliation view, ready for matching.

Fig 6.2 — Bank statement import dialog — file upload area, Journal selector
Note
If your bank supports OFX or QIF exports, always prefer these over CSV — they include standardised date formats and transaction reference fields that improve automatic matching accuracy. CSV imports require careful column mapping and are more prone to date format errors.
6.3. Automatic Reconciliation
Cyllo's automatic reconciliation engine scans each bank statement line and attempts to match it to an existing accounting entry — a registered payment, a cash receipt, or a journal entry — based on amount, partner reference, label and reconciliation models. Matched lines are proposed for confirmation; unmatched lines are flagged for manual review.
- Automatic matches are shown with a green Matched label and the proposed accounting entry alongside the bank line.
- Click Validate on a proposed match to confirm it. The payment moves from In Payment to Paid and the bank account balance is updated.
- Cyllo learns from reconciliation history — the more reconciliations performed, the better the automatic matching accuracy becomes over time.
- Lines that cannot be automatically matched remain in New state for manual processing.
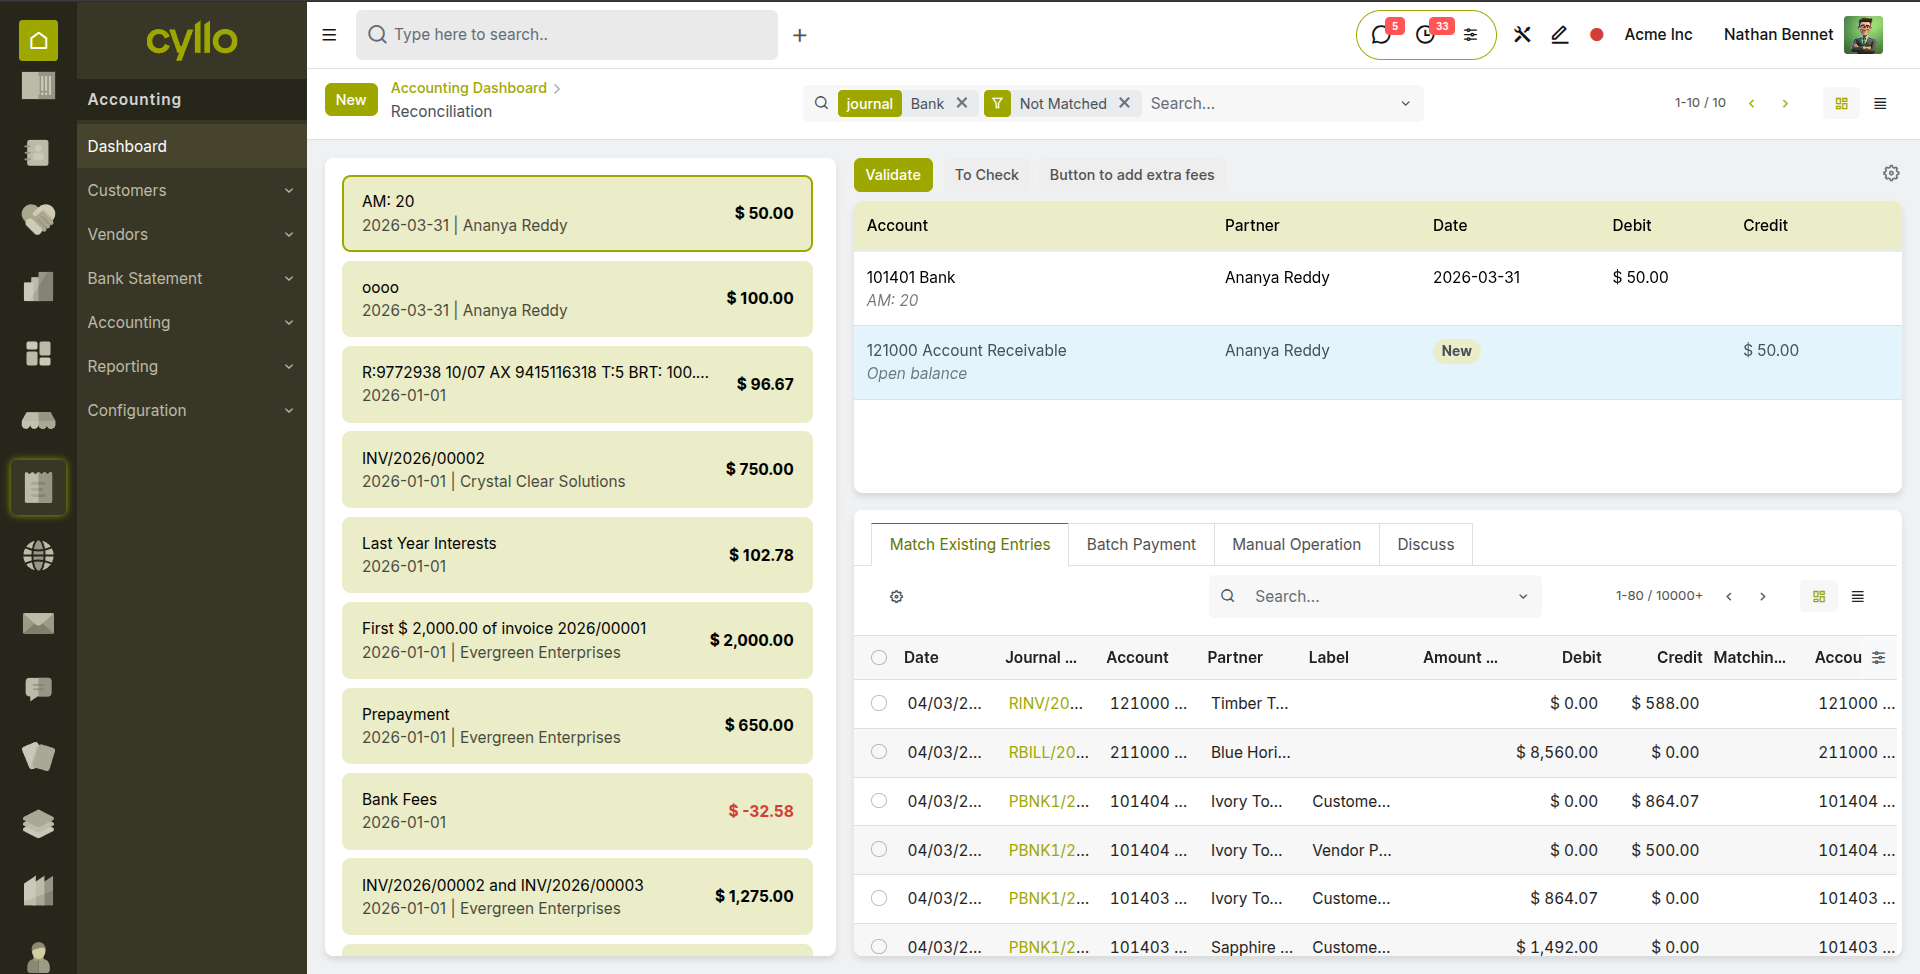
Fig 6.3 — Bank reconciliation view — statement lines on the left with auto-matched accounting entries shown on the right
TIP
Run bank reconciliation daily or weekly rather than monthly. The more frequent reconciliation is performed, the fewer unmatched lines accumulate, the shorter each session takes, and the more confident the business can be in its real-time cash position.
6.4. Manual Reconciliation
When a bank statement line cannot be automatically matched, it requires manual reconciliation. This involves finding the corresponding accounting entry manually and linking it, or — if no entry exists — creating a new journal entry directly from the reconciliation screen.
- In the bank reconciliation view, click on an unmatched statement line to open it in the reconciliation part.
- In the search area that appears, search for the matching accounting entry by partner name, amount, or reference.
- Select the matching entry from the search results. The entry appears alongside the statement line for confirmation.
- If no matching entry exists (e.g. a bank charge that was not previously recorded), click Create a Journal Entry in the reconciliation panel.
- Select the expense account (e.g. Bank Charges), enter the amount, and confirm the entry is correct.
- Click Validate. The line is reconciled, the journal entry is posted, and the bank balance is updated.

Fig 6.4 — Manual reconciliation — unmatched bank line expanded; manual search results showing matching payment; Create Journal Entry option for bank charges
Note
Bank charges, foreign exchange fees, interest income, and other transactions initiated by the bank with no prior accounting entry should all be handled via the Create a Journal Entry option during reconciliation — this ensures they are captured in the books without needing a separate manual journal entry step.
6.5. Reconciliation Models
Reconciliation models are pre-configured rules that tell Cyllo how to handle specific types of bank statement lines during reconciliation — automatically suggesting or creating the correct accounting entry based on defined criteria. Instead of manually searching for a match or typing a journal entry each time a bank charge, interest receipt, or rounding difference appears, a reconciliation model handles it in one click.
How to Access Reconciliation Models:
- Go to Accounting → Configuration → Reconciliation Models.
- The list shows all existing models with their Type and the journal they affect.
- Click New to create a model or open an existing one to edit. Reconciliation Model Types: Cyllo provides three reconciliation model types, each suited to a different reconciliation scenario:
- Button to Generate Counterpart Entry: Adds a clickable button in the reconciliation panel when a statement line is opened. The accountant clicks the button to instantly generate a pre-defined journal entry against the bank line — for example, a bank charge or interest entry. The action is manual but the entry configuration is pre-defined, eliminating the need to type account details each time.
- Rule to Suggest Counterpart Entry: Automatically evaluates statement lines during reconciliation and, when the line matches the rule's conditions, pre-fills a suggested journal entry in the reconciliation panel. Unlike the button type, no click is required to surface the suggestion — Cyllo proposes it based on the line's description, amount, or partner.
- Rule to Match Invoices/Bills: Automatically searches for existing posted invoices or vendor bills that match the bank statement line by amount, partner, reference, or date tolerance. When a match is found, it is proposed directly in the reconciliation panel for one-click confirmation. This is the primary model type for automating the matching of customer receipts and vendor payment lines. How to Create a Reconciliation Model:
- Go to Accounting → Configuration → Reconciliation Models and click New.
- Select the Type — choose one of the three model types described above.
- Enter the Name — this is the internal label that becomes the text on the button (e.g. Bank Charges, Match Customer Receipt, Auto PayPal Fee).
- Set the Journal — select the bank or cash journal this model applies to. If left blank, the model applies to all bank and cash journals.
- Under the Conditions tab, define the criteria that must be true on a bank statement line for this model to activate:
- Label Contains — enter a keyword or phrase that must appear in the bank statement line's description for the model to fire. For example, entering "FEE" means the model only activates on lines whose description contains the word FEE — such as "PAYPAL FEE", "PROCESSING FEE", or "SERVICE FEE". Leave this blank if the model should apply to all lines regardless of description. Use specific keywords to avoid a model activating on unrelated transactions that happen to share a common word.
- Amount Type — select whether the model applies to Debit lines (money leaving the bank account, such as vendor payments or bank charges), Credit lines (money arriving, such as customer receipts or interest income), or Both. Setting this correctly is essential — a model for matching customer receipts should be restricted to Credit lines only, so it never incorrectly activates on outgoing payment lines of the same amount.
- Amount Condition — optionally set a value range within which the bank line amount must fall for the model to activate. Enter a minimum amount, a maximum amount, or both. For example, setting a minimum of 0.01 and maximum of 10.00 restricts a bank charges model to small transactions, preventing it from activating on large transfers that happen to contain the word "FEE" in their description. Leave both fields blank if the model should apply regardless of amount.
- Partner Is Set — when this toggle is enabled, the model only activates on bank statement lines where a partner (customer or vendor) has already been identified — either from a bank feed that includes payee information, or from a previously configured partner mapping. Enable this for match-type models where partner identification is required for accurate invoice matching. For writeoff-type models such as bank charges, leave this disabled since bank charge lines typically do not carry a partner name.
- Under the Counterpart Entry tab (visible for Button and Suggest types), or the Matching Criteria tab (visible for the Match Invoices/Bills type), configure what the model does when it activates:
- For Button and Suggest types — set the Account (the expense or income account for the generated entry), the Tax if applicable, and the Label for the journal entry line that will be created.
- For the Match Invoices/Bills type — enable the matching fields: Match on Label (compares statement description to invoice reference), Match on Amount (requires amounts to agree within tolerance), Match on Partner (requires partner to match), and set the Days of Tolerance to allow for normal bank processing delays between payment date and statement date.
- Click Save. The model is active immediately — it begins evaluating bank statement lines the next time the reconciliation panel is opened.
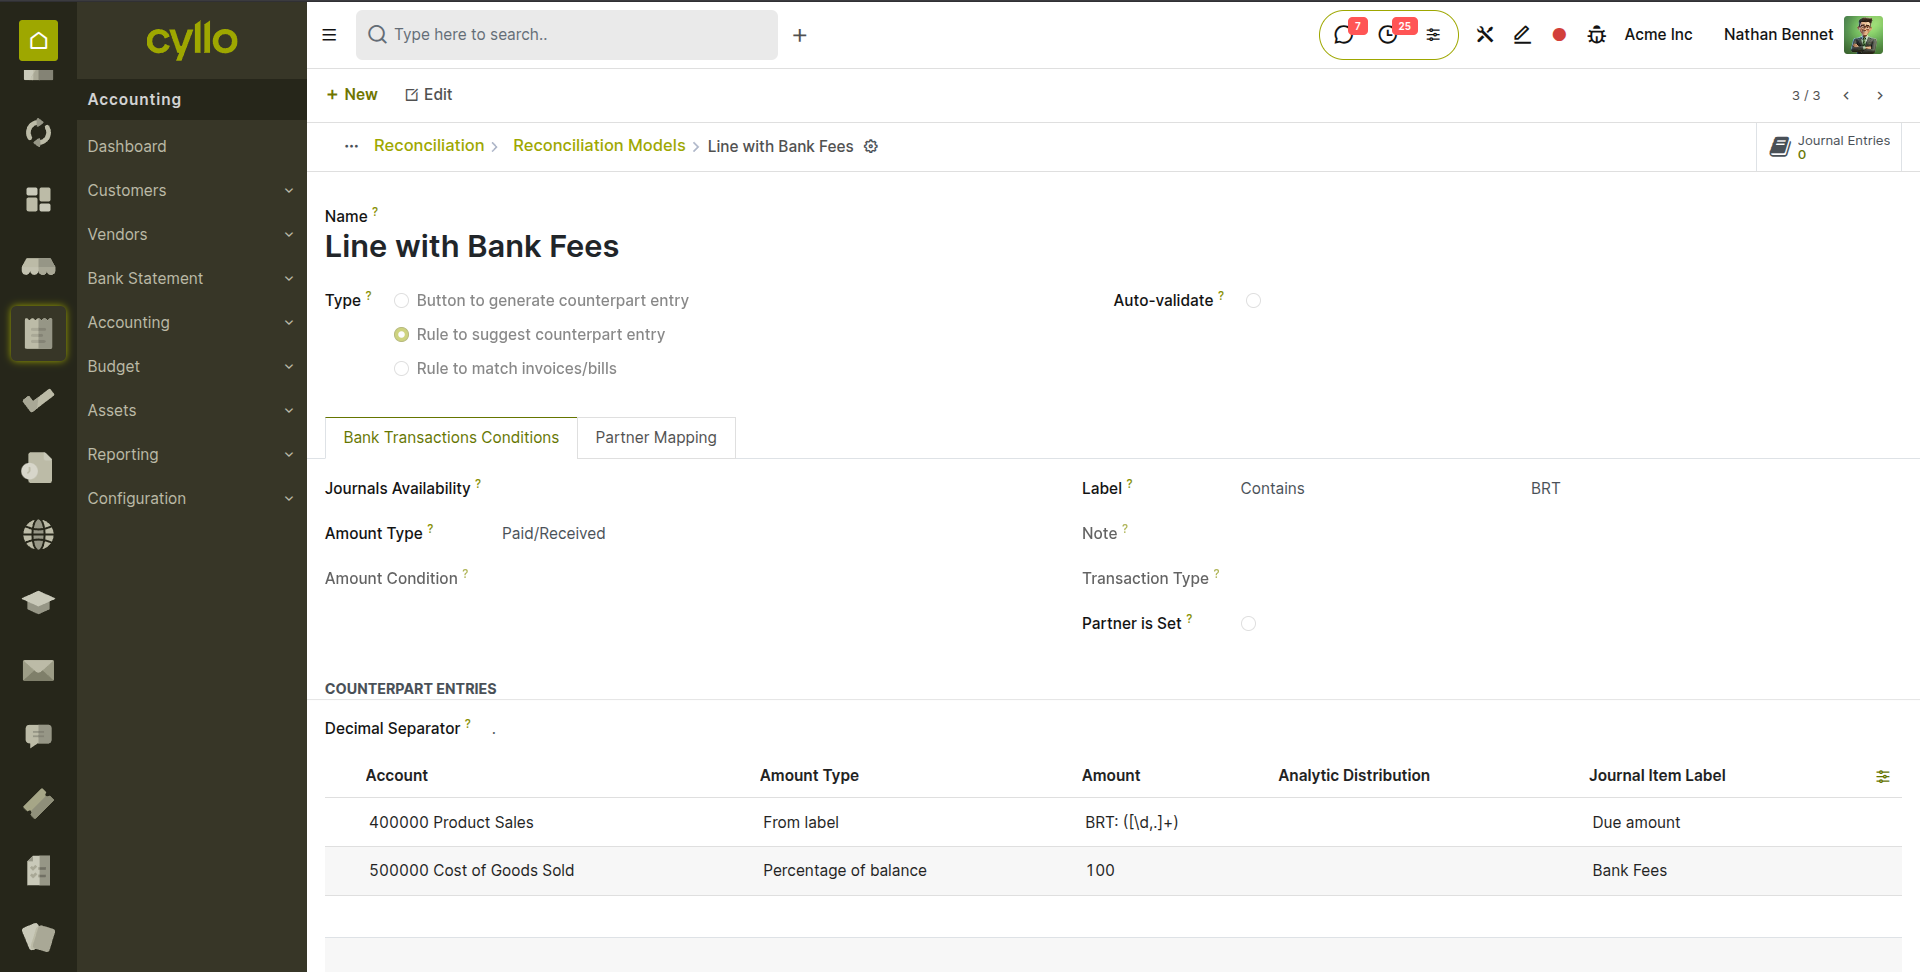
Fig 6.5 — Reconciliation Model form — Name, Type, Journal fields at the top; Conditions tab showing Label Contains, Amount Type. Counterpart Entry tab below
7. Journal Entries
Journal entries are the fundamental building blocks of double-entry accounting. While most journal entries are created automatically by the system (from invoices, bills, and payments), manual journal entries are needed for period-end accruals, depreciation, reclassifications, and other adjustments.
7.1. Manual Journal Entries
Manual journal entries are used for transactions that do not originate from an invoice or payment — such as month-end accruals, depreciation charges, prepayment amortisation, error corrections, and opening balance entries. Every manual journal entry must be balanced — total debits must equal total credits.
- Go to Accounting → Accounting → Journals → Journal Entries and click New.
- Select the Journal — typically Miscellaneous for adjustment entries.
- Set the Date — the accounting date for the entry.
- Add entry lines by clicking Add a Line:
- Account: The account being debited or credited.
- Debit: Enter the debit amount for this line. Leave credit blank.
- Credit: Enter the credit amount for this line. Leave the debit blank.
- Partner: Optional — link to a customer or vendor if the entry relates to a specific partner.
- Analytic Distribution: Assign the line to an analytic account for departmental cost tracking.
- Continue adding lines until the total debits equal the total credits (the balance indicator shows zero difference).
- Add a Ref or internal reference note for audit trail purposes.
- Click Confirm (or Post) to post the entry to the ledger. The entry cannot be edited after posting — use a reversal if correction is needed.
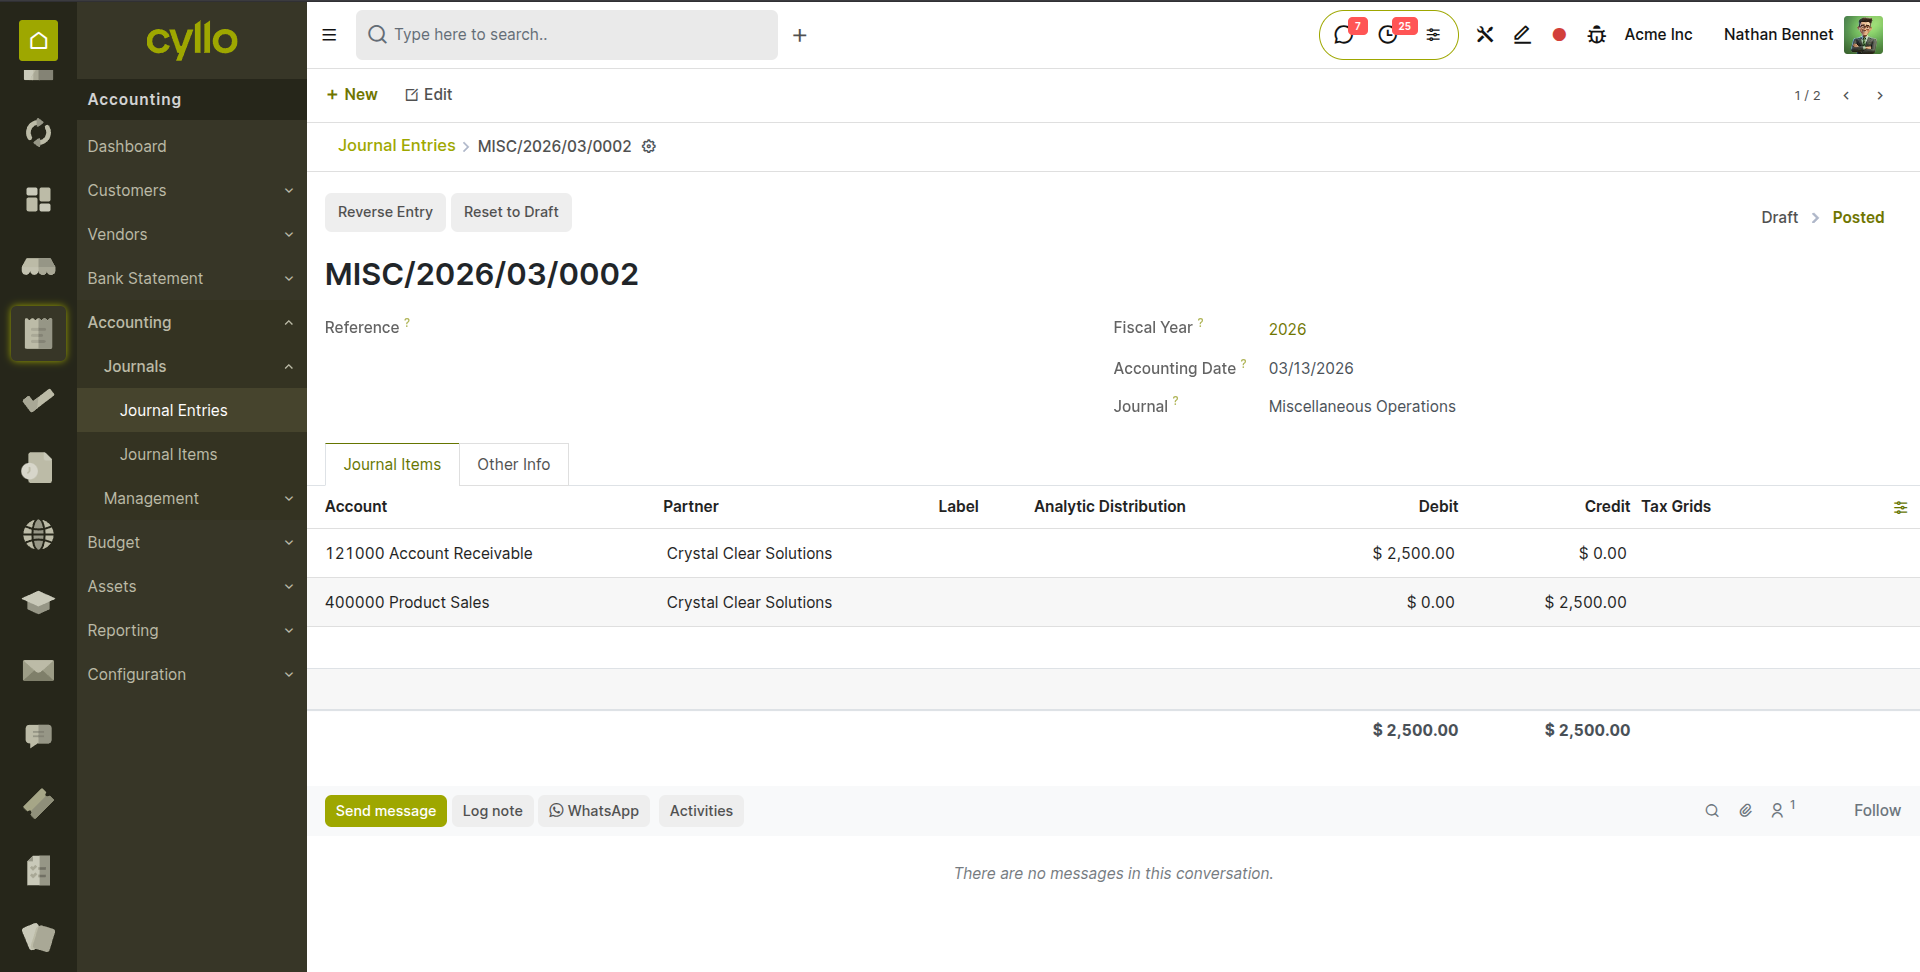
Fig 7.1 — Manual journal entry form — Date, Journal, and Ref fields at top; lines table with Account, Debit, Credit, and Analytic columns; green balanced indicator
WARNING
A journal entry that does not balance (debits ≠ credits) cannot be confirmed. The unbalanced amount is shown in red at the bottom of the entry. Check that every debit has a corresponding credit before attempting to post.
7.2. Journal Items View
The Journal Items view provides a granular, line-by-line view of every debit and credit posting across all journals. It is the most detailed accounting view available in Cyllo — useful for auditors, accountants reviewing specific account movements, and administrators tracing the source of a specific balance.
- Go to Accounting → Accounting → Journals → Journal Items.
- The view lists every individual debit and credit line posted to the ledger, with columns for Date, Journal, Partner, Account, Debit, Credit, and Balance.
- Use the Group By option to group lines by Account to see all movements on a specific account in sequence — equivalent to a T-account view.
- Use the Filter to narrow to a specific date range, account, journal, or partner.
- Click ‘Journal Entry’ in any line to open the source document — the invoice, bill, payment, or manual entry that generated this posting.
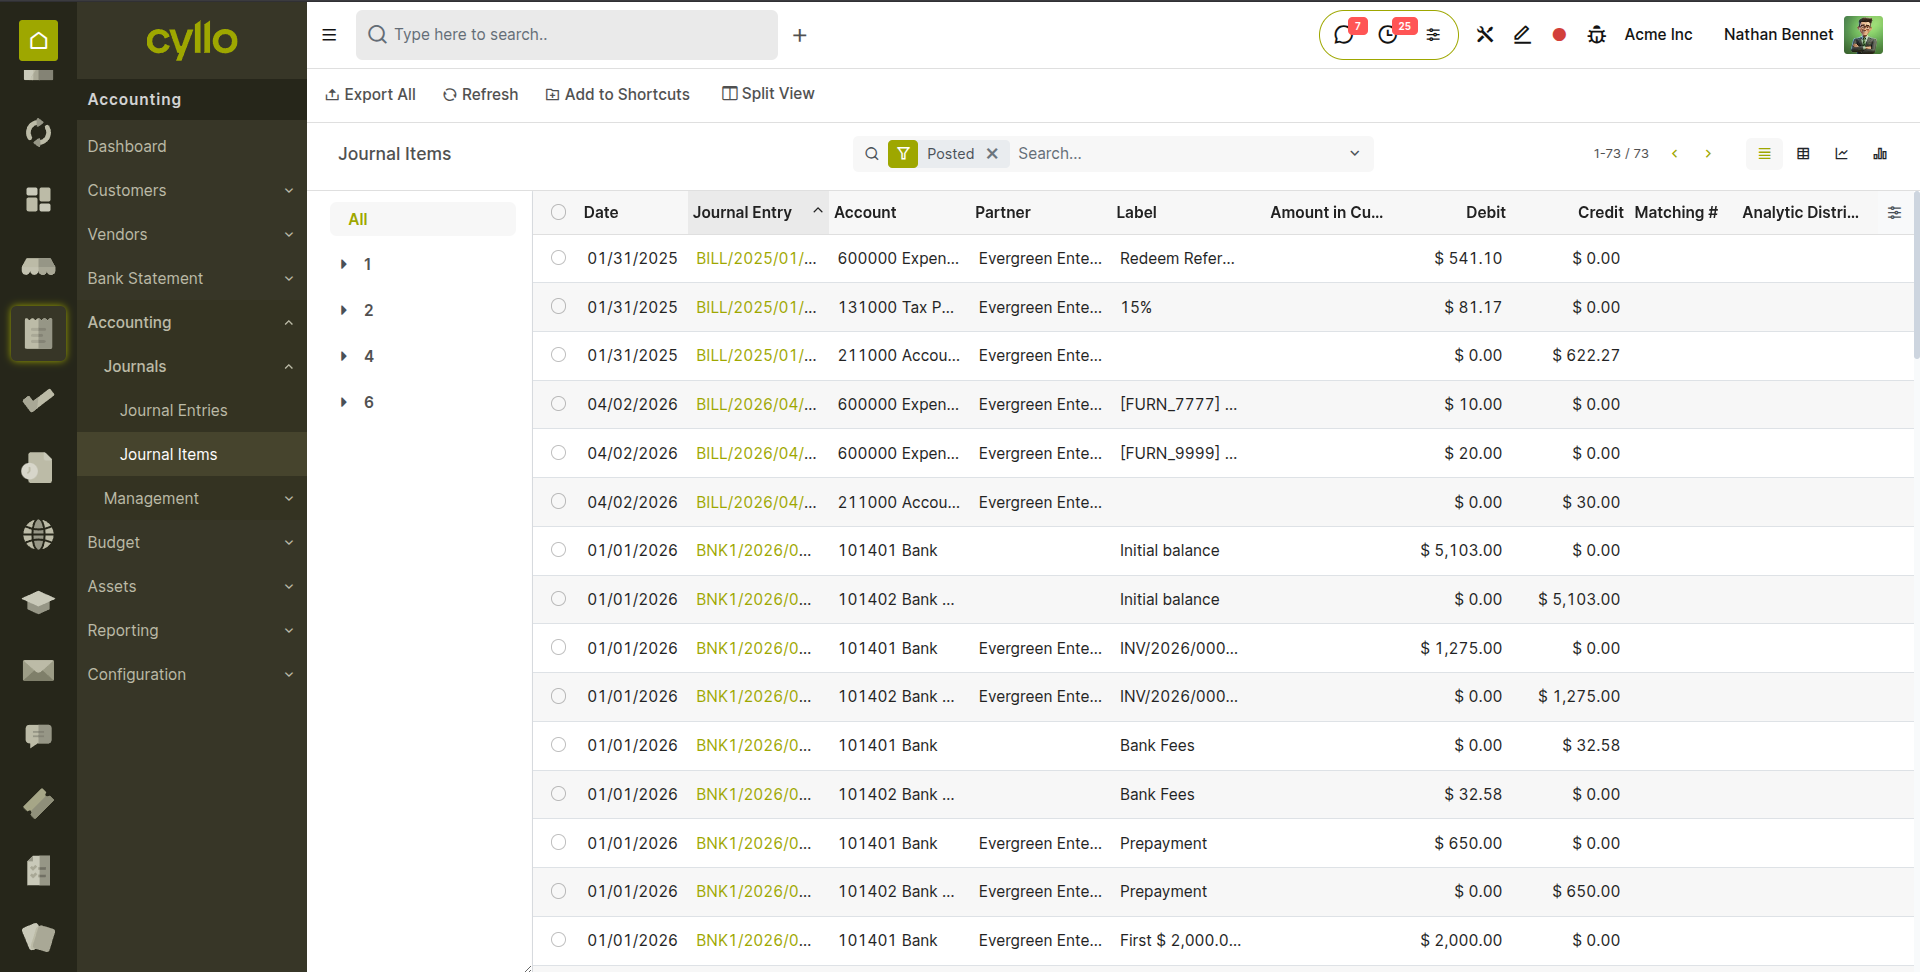
Fig 7.2 — Journal Items view — date, journal, account, debit, credit columns; grouped by Account showing all movements on the Trade Receivables account
7.3. Entry Reversals
A reversal creates a mirror-image journal entry that exactly cancels the original posting — every debit becomes a credit and every credit becomes a debit. Reversals are the correct way to correct or negate a posted journal entry without directly modifying historical records.
- Open the posted journal entry to be reversed from Accounting → Accounting → Journals → Journal Entries.
- Click the Reverse Entry button.
- Set the Reversal Date — the date the reversal entry should be posted. For accrual reversals, this is typically the first day of the new period.
- Select Journal for the reversal.
- Click Reverse. A new draft journal entry is created that exactly mirrors the original but with all debits and credits swapped.
- Review the reversal entry and click Confirm to post it.
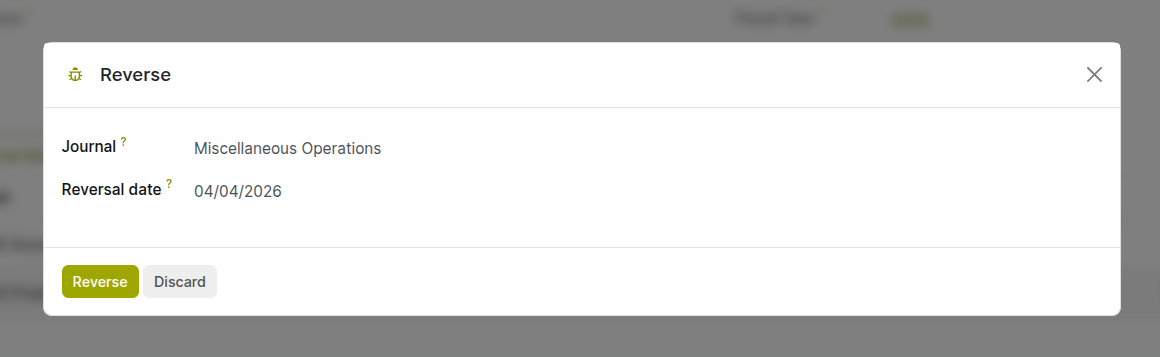
Fig 7.3 — Reverse Entry dialog — Reversal Date and Reason fields; the generated reversal entry shown in draft state alongside the original
TIP
For month-end accrual entries, post the accrual at the end of the month and immediately create a reversal dated the first day of the next month. Post the reversal at the start. This prevents double-counting expenses across periods without needing to remember to manually undo the accrual.
8. Taxes
Cyllo's tax engine calculates and records VAT, GST, sales tax, and other transaction taxes automatically on every invoice and bill. This section covers tax configuration, grouping, fiscal positions for location-based tax mapping, and tax reporting.
8.1. Tax Configuration
Taxes in Cyllo define the rate, calculation method, and accounting impact of a tax applied to a transaction line. Each tax is linked to specific accounts — a tax receivable account for output tax (collected from customers) and a tax payable account for input tax (paid to suppliers and recoverable).
- Go to Accounting → Configuration → Accounting → Taxes and click New.
- Enter the Tax Name (e.g. Standard VAT 20%, GST 18%, Output VAT 5%).
- Set the Tax Computation:
- Percentage of Price: The most common method — the tax is calculated as a percentage of the line amount (e.g. 20% of £100 = £20 tax).
- Fixed Amount: A fixed tax amount per line, regardless of quantity or price.
- Percentage of Tax (Compound): Tax calculated on the base price plus other taxes already applied — used for cascading tax structures.
- Set the Amount — the rate as a number (e.g. 20 for 20%, 5 for 5%).
- Set the Tax Type — Sales (applied on invoices) or Purchase (applied on bills).
- Under the Definition tab, link the Tax Account — the account where the tax amount is posted (output VAT payable or input VAT recoverable).
- Click Save and assign this tax to products or accounts that should carry it.
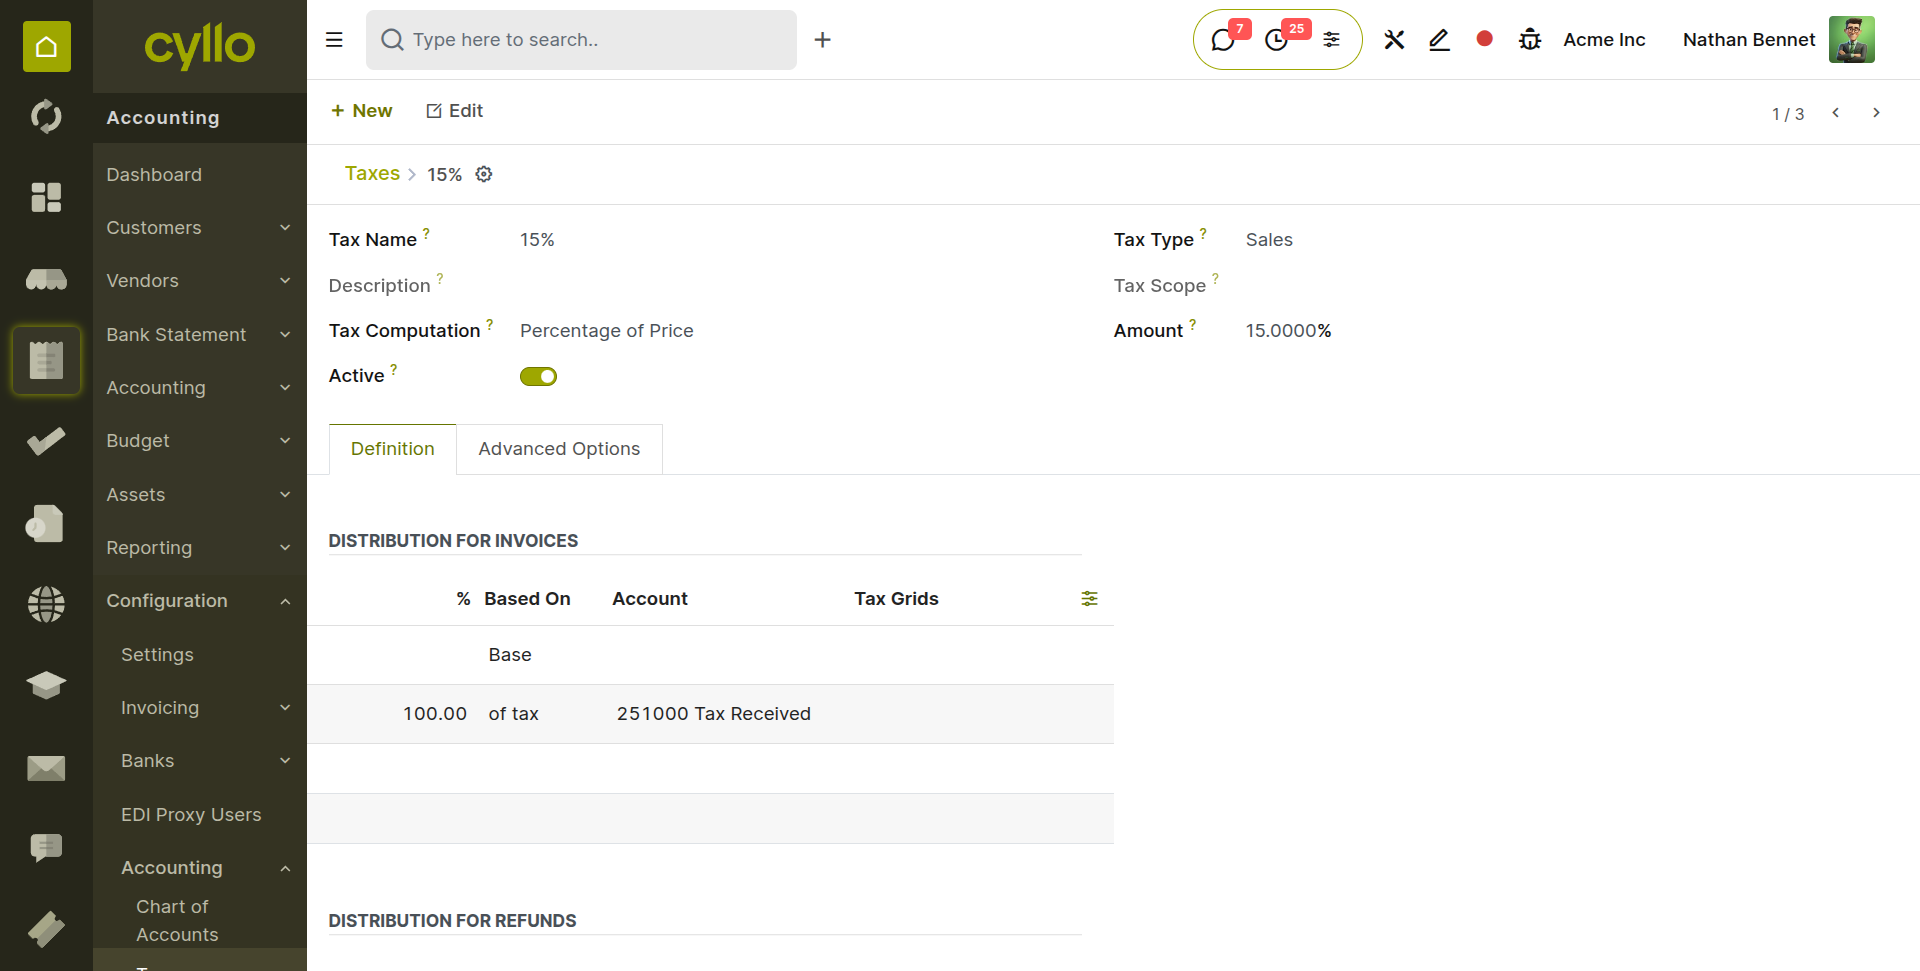
Fig 8.1 — Tax configuration form — Tax Name, Computation (Percentage), Amount, Tax Type; Definition tab showing Tax Account assignment
Key Tax Fields
- Tax Scope: Restrict the tax to Goods, Services, or both — prevents a goods tax from appearing on service invoices.
- Include in Price: When enabled, the price entered on the invoice line is treated as tax-inclusive — the tax is extracted from the price rather than added on top.
- Tax Group: Groups multiple taxes together for display on invoices (see Section 8.2).
8.2. Tax Groups
Tax groups consolidate multiple taxes under a single label on customer invoices and reports. Instead of showing four separate tax lines, a tax group can display a single 'VAT' total, making invoices cleaner and easier for customers to read.
- Go to Accounting → Configuration → Accounting → Tax Groups and click New.
- Enter the Tax Group Name (e.g. VAT, GST, Sales Tax).
- Set the Tax Payable Account and Tax Receivable Account — these are the accounts used when taxes in this group are paid to or received from the tax authority.
- Assign individual taxes to this group by opening each tax and selecting the group in the Tax Group field.
- On invoices, all taxes in the same group are consolidated into a single summary line in the tax table.
8.3. Fiscal Positions
Fiscal positions automatically remap taxes and accounts based on the customer's or vendor's location and tax registration status. When a fiscal position is applied to an invoice, Cyllo swaps the standard tax for the mapped tax — for example, applying a zero-rate tax for EU exports or removing VAT for tax-exempt customers — without any manual intervention.
- Go to Accounting → Configuration → Accounting → Fiscal Positions and click New.
- Enter the Fiscal Position Name (e.g. EU Intra-Community, Export Outside EU, VAT Exempt Customer).
- Under the Tax Mapping tab, click Add a Line: a. Tax on Sales (before): The standard tax normally applied to the product. b. Tax to Apply: The replacement tax (e.g. 0% EU Intra-Community, or blank to remove the tax entirely).
- Under the Account Mapping tab, map any accounts that should also change for this fiscal position.
- Enable Auto-Detection to have Cyllo apply this fiscal position automatically based on the customer's country and VAT registration: a. Country Group or Country: The country or region this fiscal position applies to. b. Tax ID Required: If enabled, the fiscal position is only applied when the customer has a VAT number on their contact record.
- Assign the fiscal position manually to specific customers in their contact record for permanent application.
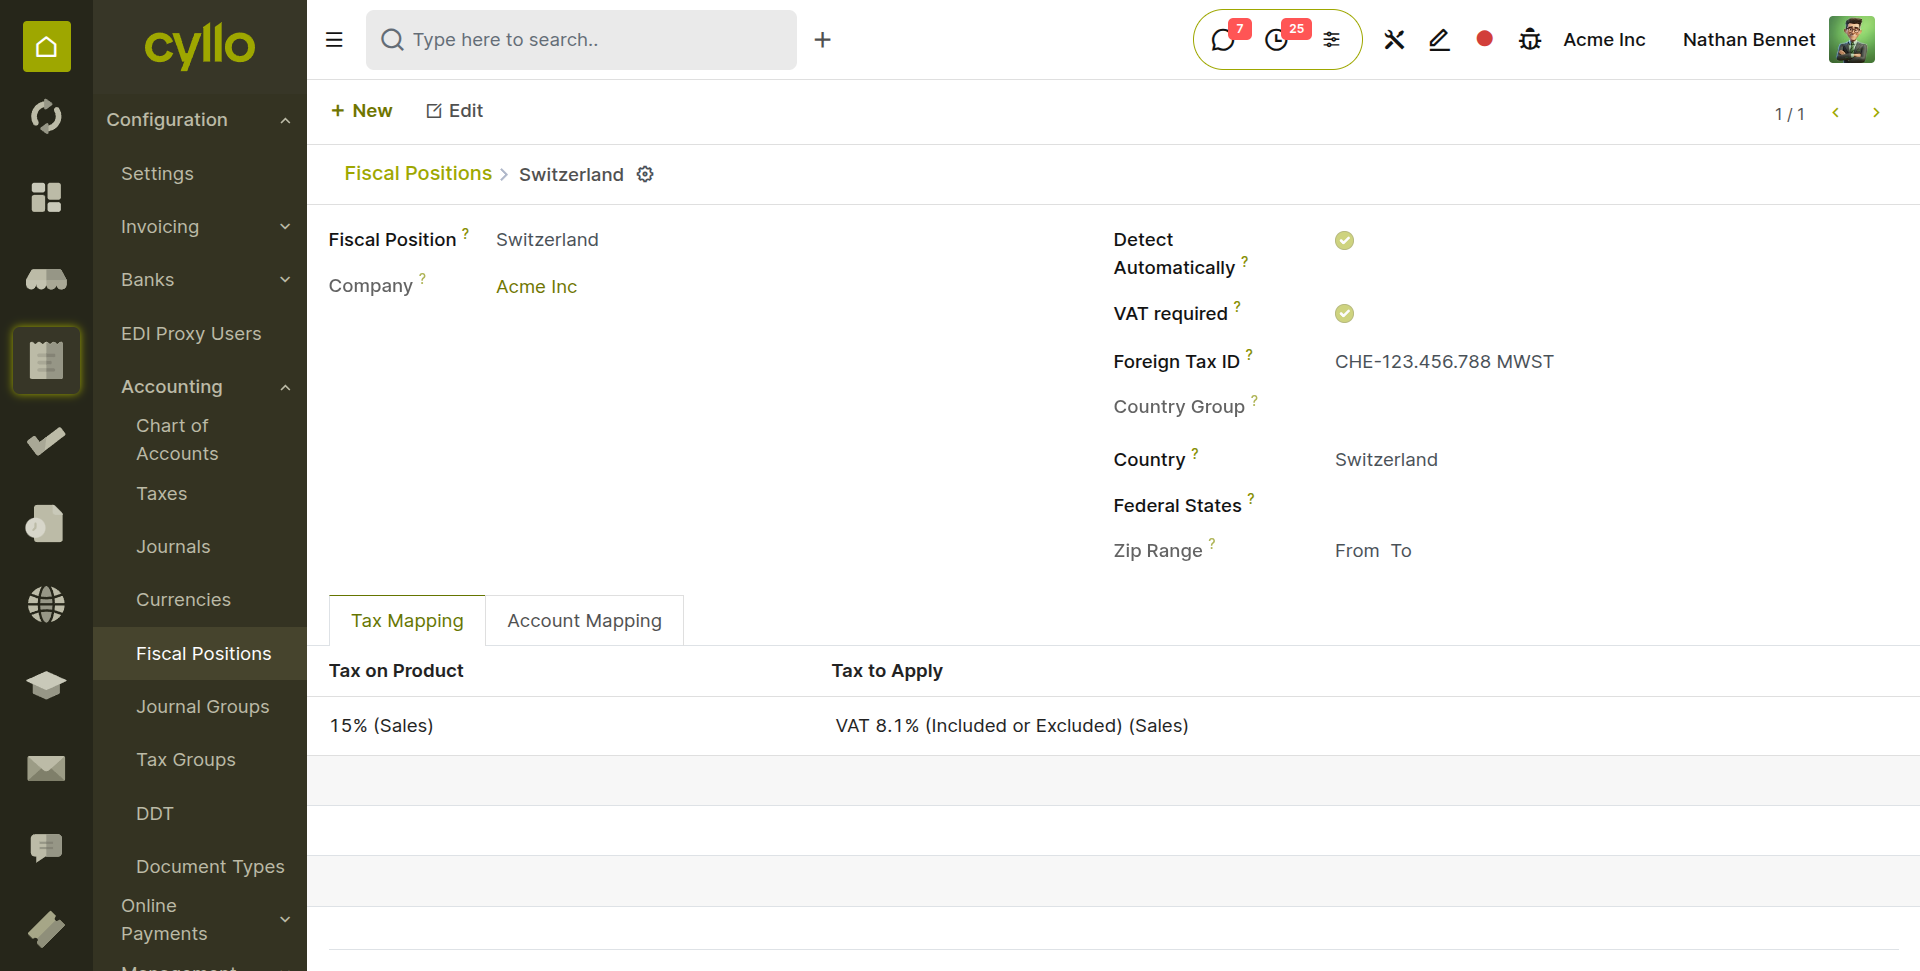
Fig 8.2 — Fiscal Position form — Tax Mapping tab showing Standard tax 15% mapped to Switzerland VAT Rate 8.1%; Auto-Detection section with Country = Switzerland
Note
Fiscal positions are applied per invoice and can be manually overridden — open the invoice and change the Fiscal Position field in the Other Info tab. This is useful when an individual invoice requires different tax treatment from the partner's default.
8.4. Tax Reports
Cyllo generates tax reports that summarise the output tax collected from customers and the input tax paid to suppliers over a defined period. These reports provide the figures required for VAT returns, GST filings, and other tax authority submissions.
- Go to Accounting → Reporting → Accounting Reports → Tax Report.
- Select the Tax Period using the date range filter (e.g. Q1 2026: January – March).
- The report displays: Output Tax (VAT collected on sales), Input Tax (VAT paid on purchases), and Net Tax Payable (output minus input).
- Drill down into any figure by clicking on it — this opens the underlying journal items contributing to that tax total.
- Click Export to download the report in Excel or PDF format for submission to the tax authority.
TIP
Run the tax report before the period-end lock date to identify any missing or incorrect tax postings. Correct them before locking the period — correcting tax errors in locked periods requires reversals and creates additional audit complexity.
9. Analytic Accounting
Analytic accounting provides a secondary dimension for cost and revenue tracking, alongside the main chart of accounts. Where the main ledger answers 'what type of transaction is this?', analytic accounts answer 'which project, department, or cost centre does this belong to?'
9.1. Analytic Accounts & Plans
Analytic accounts are the cost centres, projects, departments, or business segments you want to track separately. Analytic plans organise multiple analytic accounts into a structured hierarchy — for example, a Departments plan containing accounts for Operations, Marketing, Sales, and HR.
- Go to Accounting → Configuration → Analytic Accounting → Analytic Accounts and click New.
- Enter the Account Name (e.g. Project Alpha, Marketing Department, Warehouse Operations).
- Select the Analytic Plan this account belongs to (e.g. Projects, Departments).
- Optionally set a Partner — links this analytic account to a specific customer for project-based billing.
- Set a Budget Amount if you want to compare actual spending against a budget for this account (see Budget Management in Section 11.5).
- Click Save.
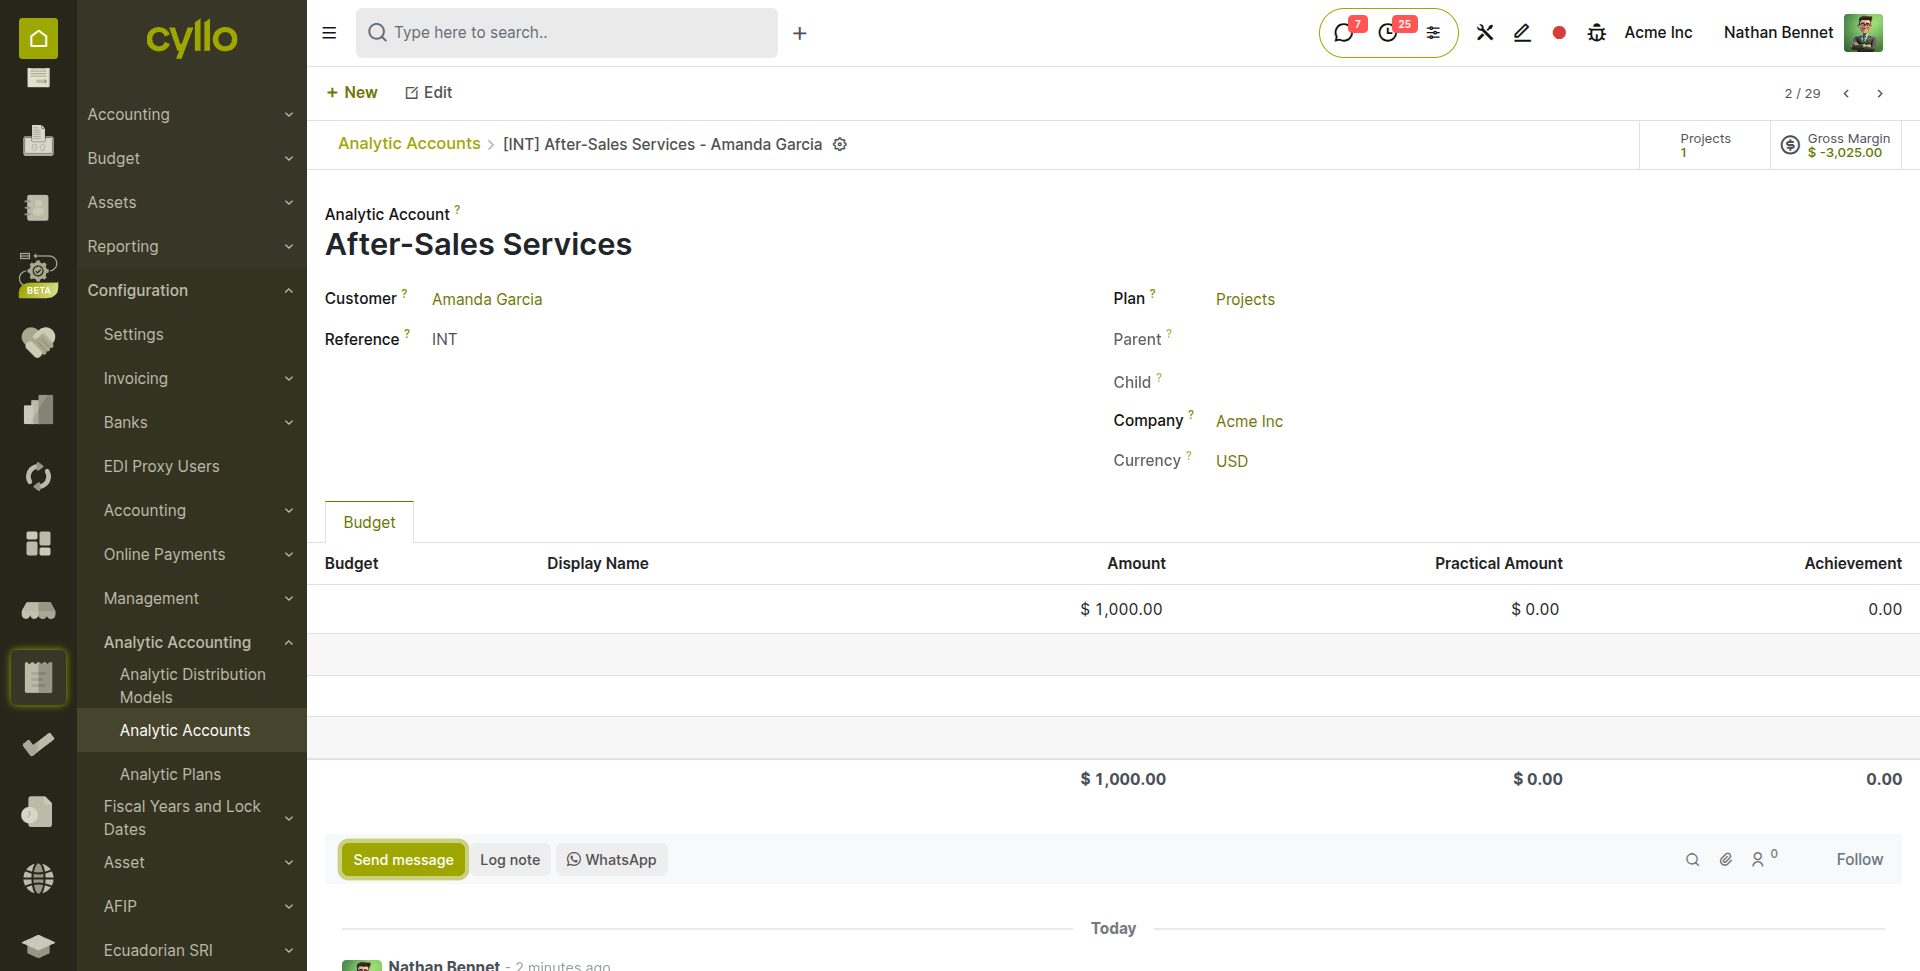
Fig 9.1 — Analytic Account form — Account Name, Analytic Plan (Departments), Partner, and Budget Amount fields
9.2. Distributing Costs Analytically
Analytic distributions assign a portion of a transaction's amount to one or more analytic accounts. This is how costs and revenues are attributed to the correct project or department on every invoice line, bill line, expense, or manual journal entry line.
- When creating an invoice line, bill line, or journal entry line, click the Analytic Distribution field on the line.
- A distribution popup opens. Click Add a Line and select an Analytic Account.
- Enter the Percentage — the proportion of this line's amount to attribute to this account (e.g. 100% to one department, or 60% and 40% split between two departments).
- The percentages for all lines in the distribution must total 100%.
- Click Save on the distribution popup. The analytic attribution is applied to the line.
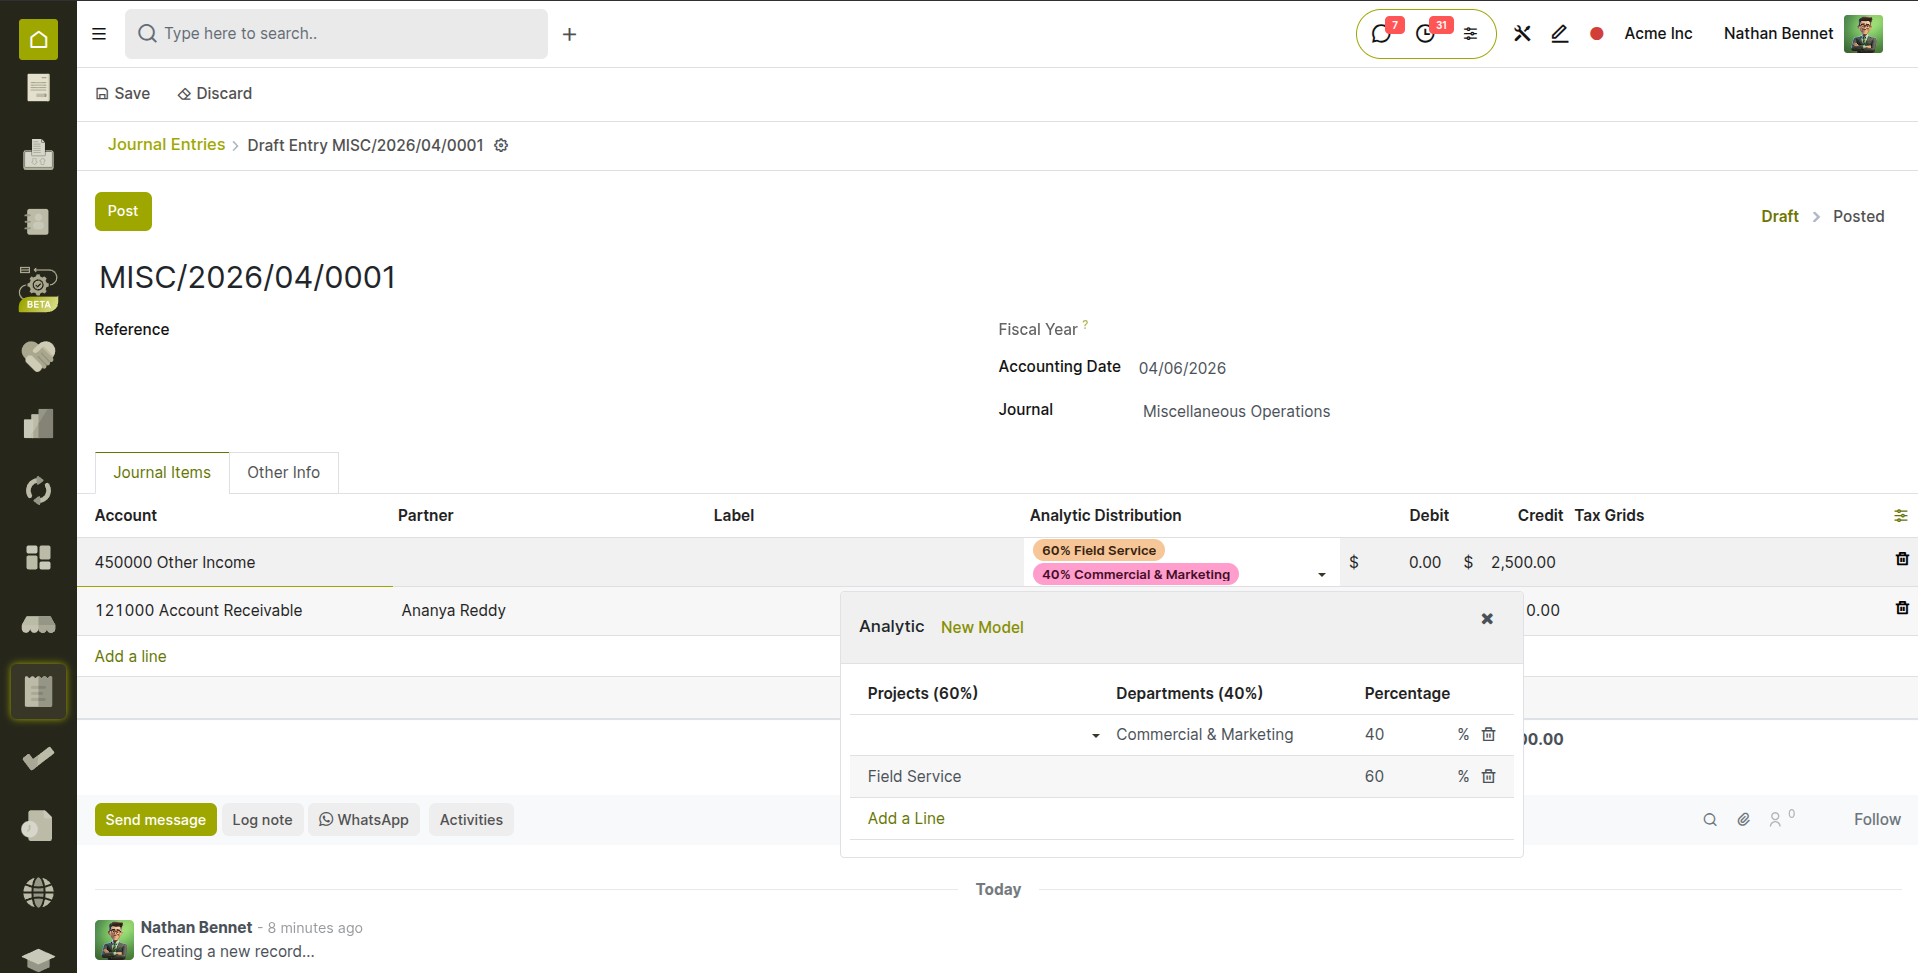
Fig 9.2 — Analytic distribution popup — two lines: Project Field service 60% and Commercial & Marketing 40%; percentage total showing 100%
Note
Analytic distributions are purely for internal management reporting — they do not affect the main accounting ledger balances. The debit/credit postings remain on the main accounts; analytic accounts provide an additional layer of visibility for budget control, profitability analysis, and project cost tracking.
10. Advanced Features
This section covers the advanced accounting capabilities available in Cyllo — Anglo-Saxon accounting treatment, deferred revenue and expense recognition, multi-currency transaction handling, and automatic exchange rate updates.
10.1. Anglo-Saxon Accounting
Anglo-Saxon accounting changes the point at which the Cost of Goods Sold (COGS) is recognised. In the standard (Continental) method, COGS is recognised when goods are delivered to the customer. In the Anglo-Saxon method, COGS is recognised at the time of invoicing. This aligns the expense recognition with the revenue recognition in the same period, providing more accurate period-level profit figures for businesses that invoice at the same time as or after delivery.
Enabling Anglo-Saxon Accounting:
- Go to Accounting → Configuration → Settings.
- Under the Anglo Saxon Accounting section, enable Anglo-Saxon Accounting.
- Click Save.
Once enabled, when a customer invoice is confirmed for a product with stock valuation, Cyllo posts an additional journal entry: debit COGS and credit Inventory — recognising the cost at the time of invoicing rather than at delivery.
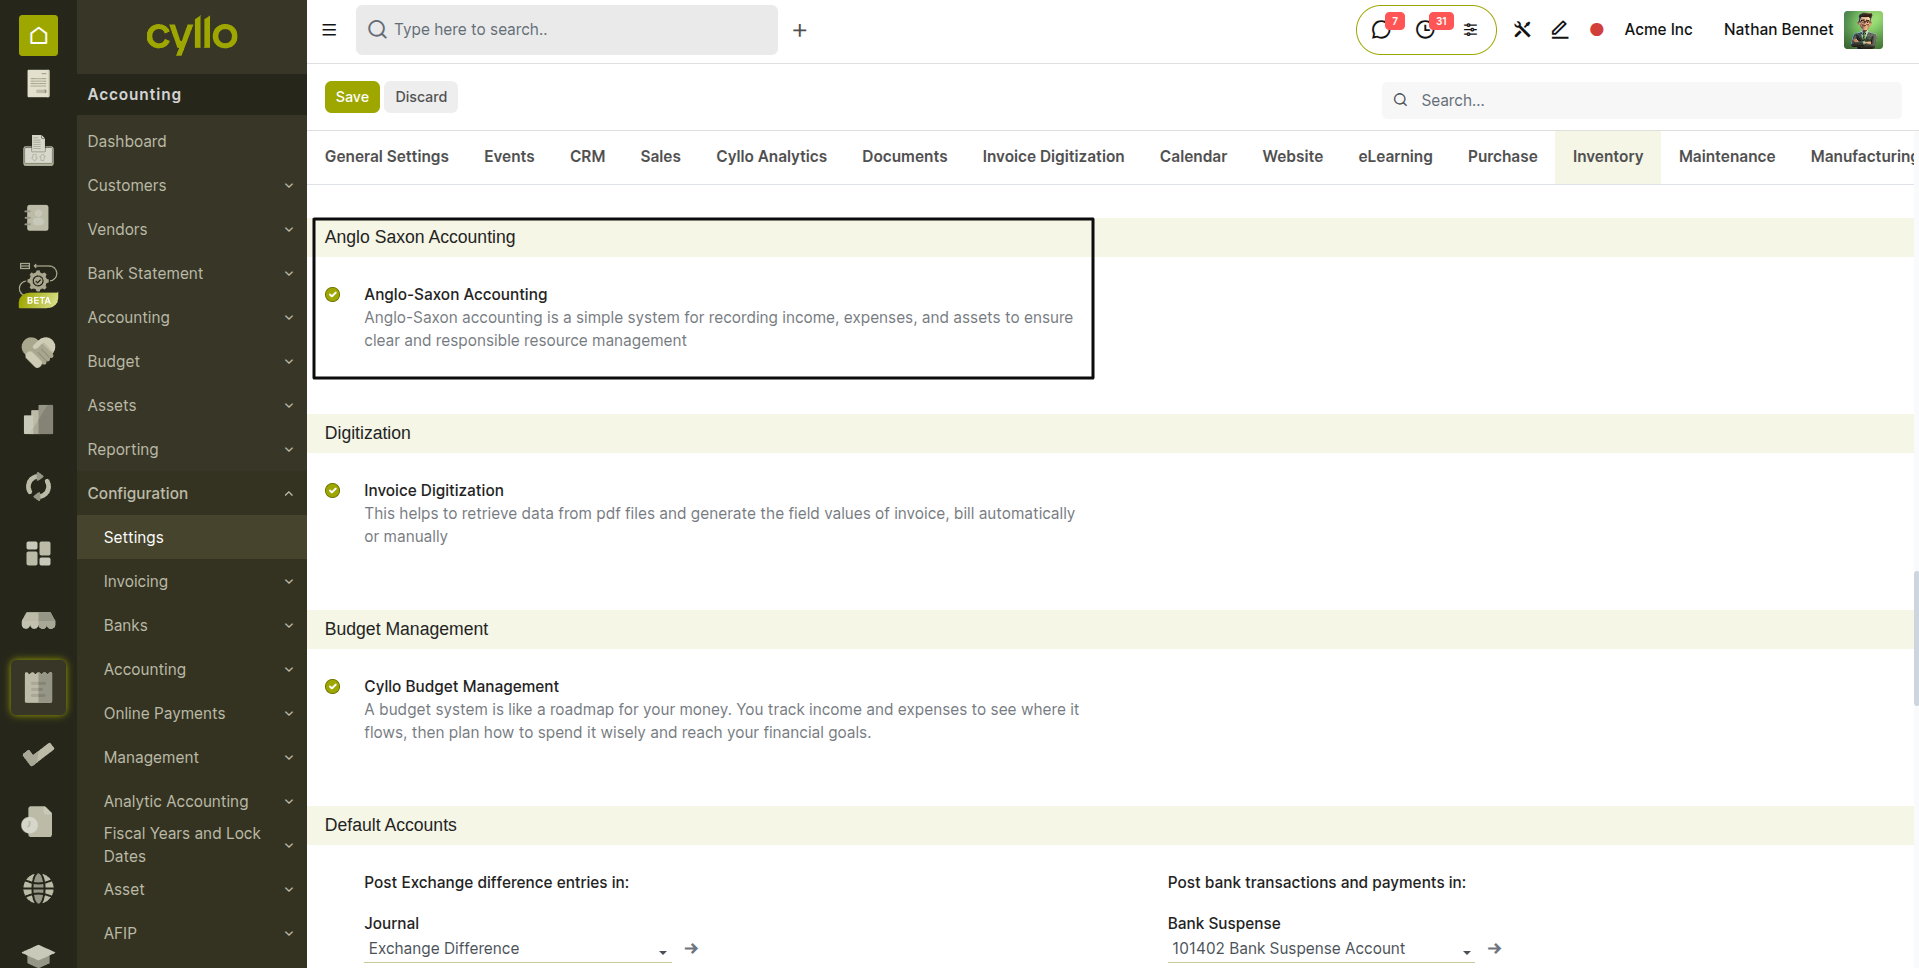
Fig 10.1 — Accounting Settings — Inventory Valuation section with Anglo-Saxon Accounting toggle enabled
Note
Anglo-Saxon accounting only affects products that use automatic inventory valuation (AVCO or FIFO costing methods). Standard-cost and manually-valued products are not affected by this setting.
10.2. Deferred Revenue & Expenses
Deferred revenue and expense recognition ensures that income and costs are recognised in the accounting period to which they relate — not the period in which payment is received or made. This is required by accounting standards such as IFRS 15 and GAAP for subscriptions, prepaid expenses, and advance payments.
Deferred Revenue Example: A customer pays £1,200 for a 12-month software subscription on 1 January. Rather than recognising all £1,200 as revenue in January, deferred revenue spreads £100 per month across the 12 months.
Create Deferred Income Type
- Go to Accounting → Configuration → Deferred Types
- Example: “Subscription 12 Months”
- Computation Method: No Prorata
- Period Count: 12
- Period Unit: Months
- Deferred Account: Deferred Revenue (Liability)
- Recognition Account: Subscription Income
Use Deferred Type in Invoice Invoice Line:
- Product: Software Subscription
- Amount: £1,200
- Deferred Type: Subscription 12 Months Deferred Expenses Example:
The company pays £1,800 for a 12-month Insurance on 1 January. Rather than recognising all £1,800 as expense in January, deferred expense spreads £150 per month across the 12 months.
Create Deferred Expense Type
- Go to Accounting → Configuration → Deferred Types
- Example: “Prepaid Insurance – 12 Months”
- Computation Method: No Prorata
- Period Count: 12
- Period Unit: Months
- Deferred Account: Prepaid Expense (Asset)
- Expense Account: Insurance Expense
Use in Vendor Bill
- Vendor Bill Line:
- Product: Insurance
- Amount: £1,200
- Deferred Type: Prepaid Insurance – 12 Months
Note
In the Invoice/Bill lines, the ‘Deferred revenue/expense’ and ‘Deferred revenue/expense type’ fields must be enabled to use this feature.
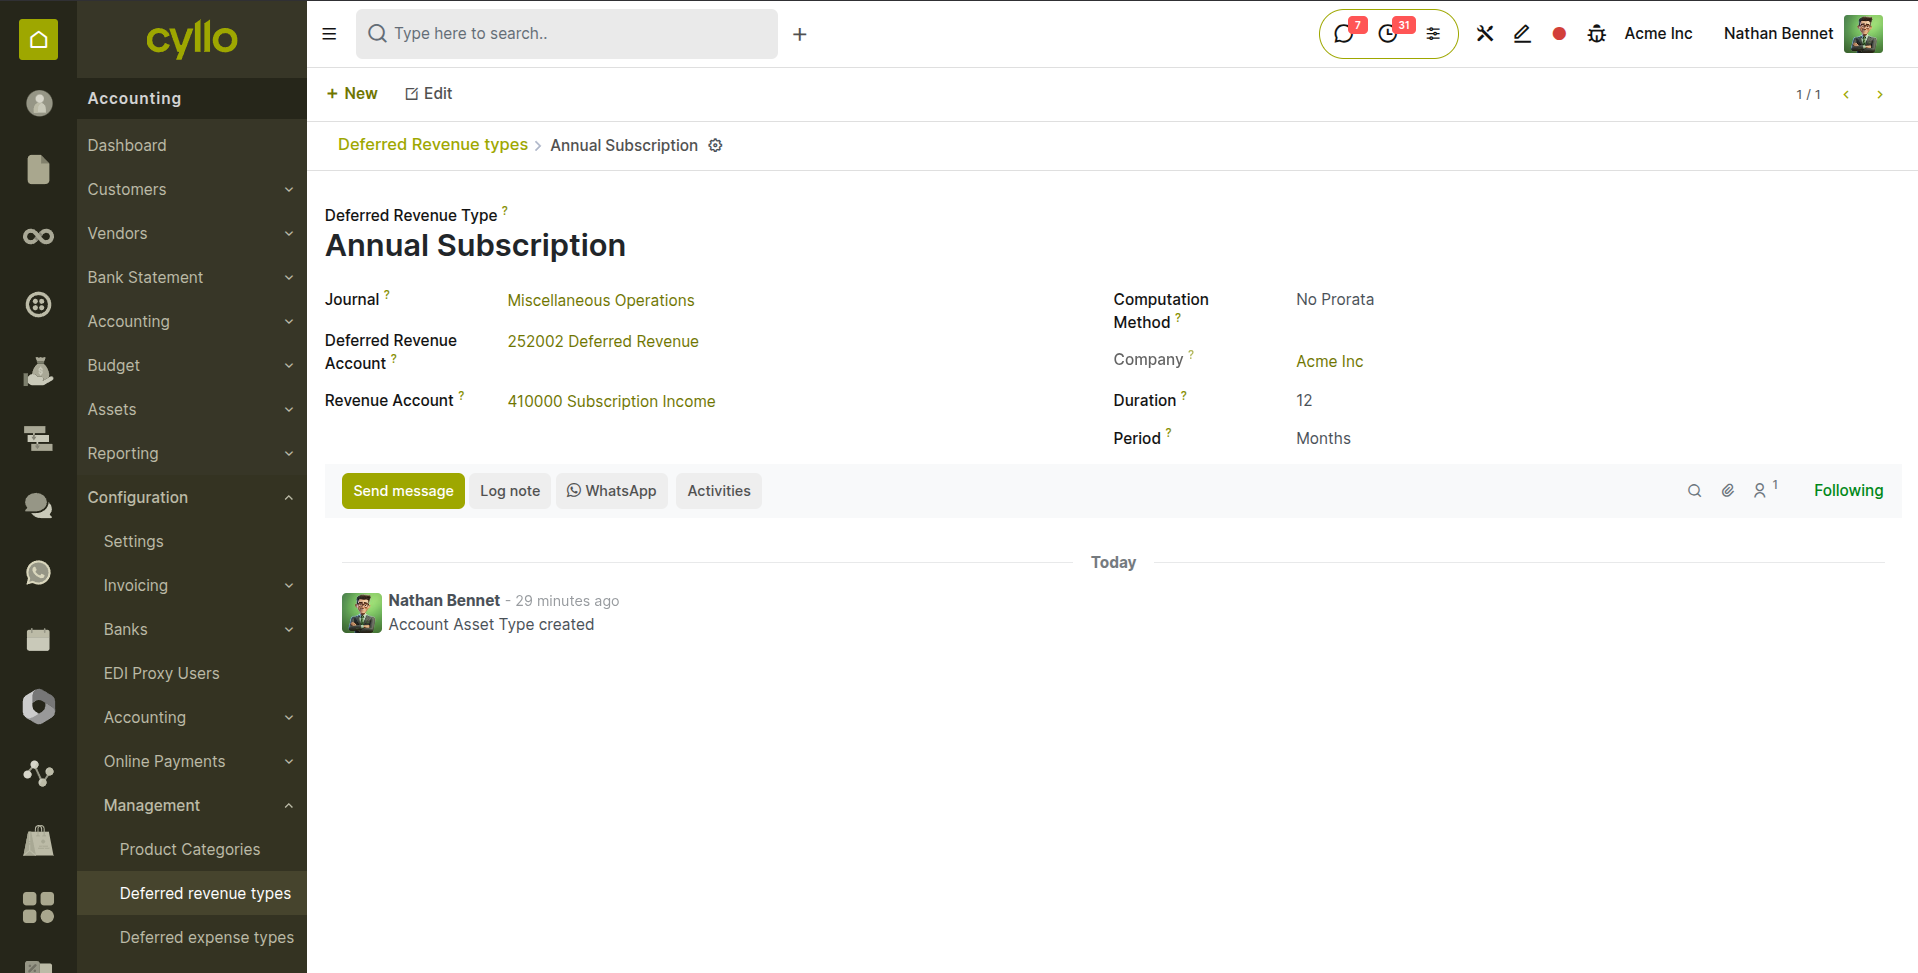
Fig 10.2 — Deferred Revenue Type - form showing 12 months revenue type with recognition entry accounts.
Computation Method:
- No Prorata: Revenue/expense is recognized in equal full periods only, ignoring partial periods at the start or end.
- Constant Period: Each period gets a fixed, uniform amount regardless of the number of days in the period.
- Daily Computation: Amount is recognized proportionally based on the exact number of days elapsed in each period.
10.3. Multi-Currency
Cyllo's multi-currency support allows transactions to be recorded in any currency while the books are maintained in the company's base currency. Exchange rate differences between the transaction date and the payment date are automatically calculated and posted to a currency exchange gain or loss account.
- Go to Accounting → Configuration → Accounting → Currencies. Click the toggle next to any currency to activate it.
- Set the exchange rate for each active currency — either manually or using the Auto Currency Rate Update (see Section 10.4).
- When creating an invoice for a foreign currency customer, select the currency in the Currency field on the invoice. The invoice amounts are displayed in the foreign currency; the accounting entries are posted in the company's base currency at the current exchange rate.
- When a payment is registered for a foreign currency invoice at a different exchange rate than the invoice, Cyllo automatically calculates the exchange rate difference and posts a gain or loss entry to the configured currency exchange accounts.
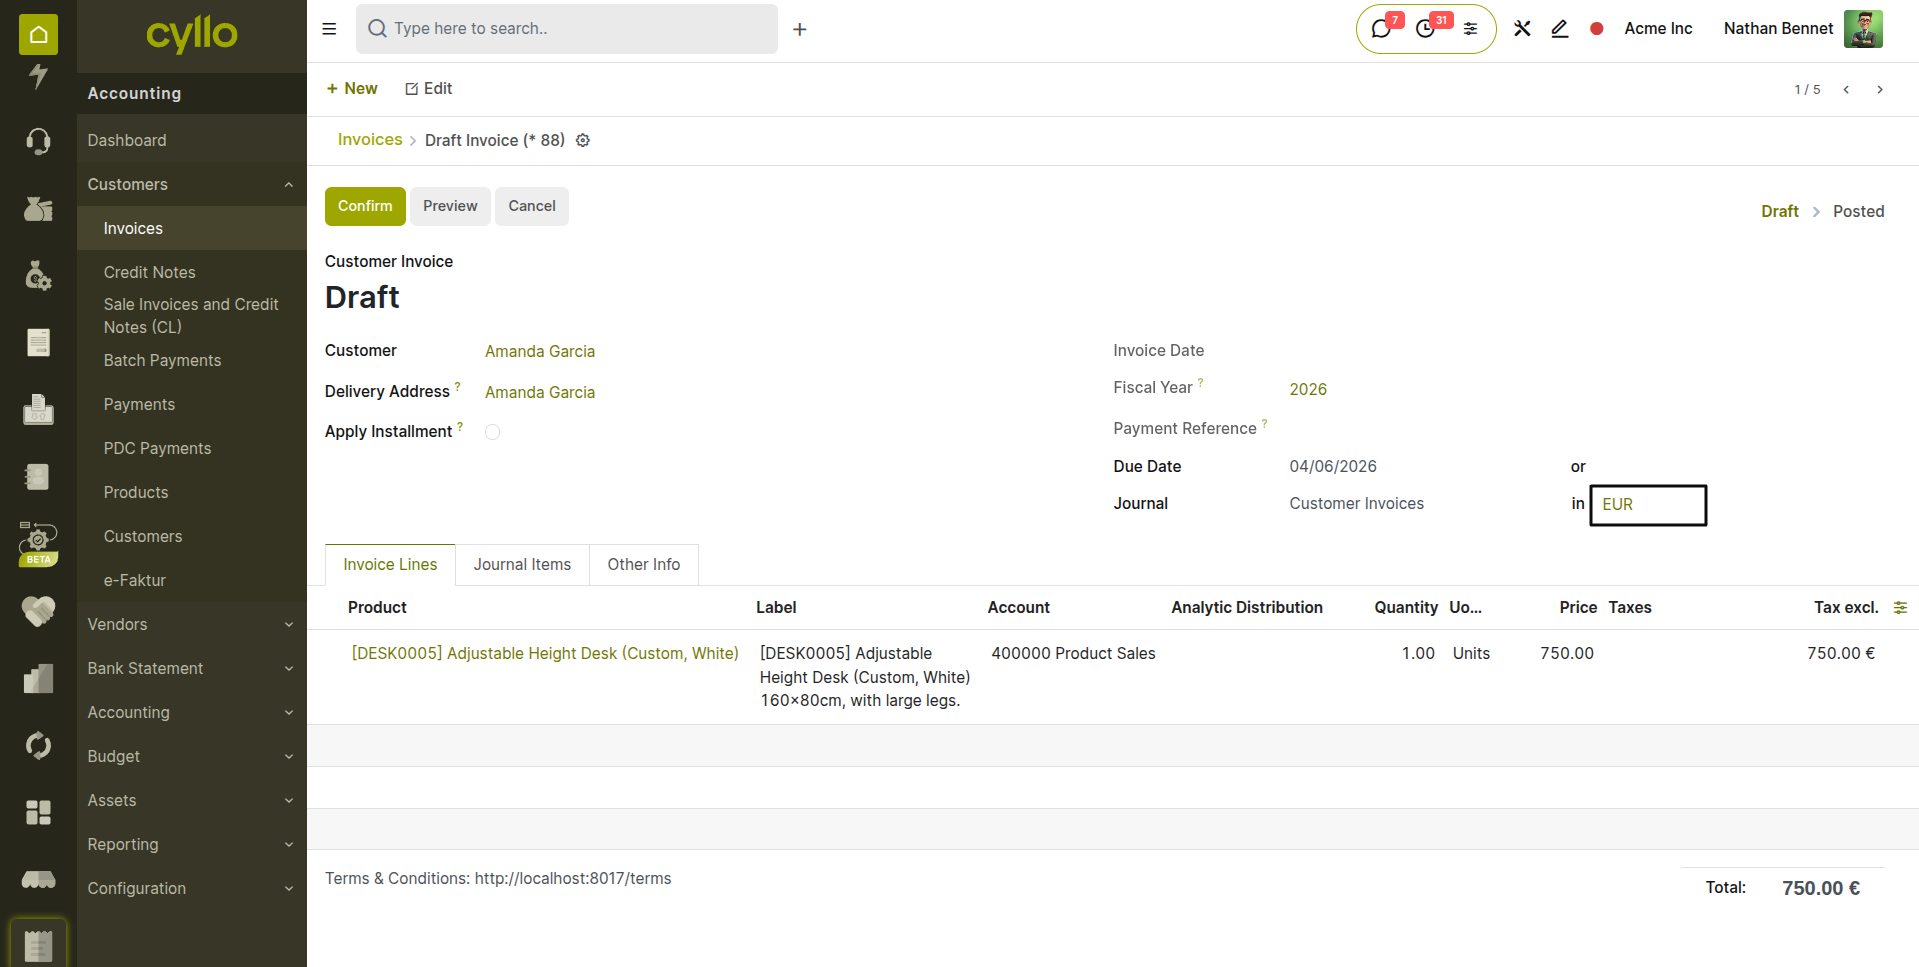
Fig 10.3 — Foreign currency invoice — EUR currency selected; invoice amounts in EUR, accounting entries showing GBP equivalent; exchange rate displayed on invoice
Note
Ensure the Currency Exchange Gain account and Currency Exchange Loss account are correctly set in Accounting → Configuration → Settings under the Default Accounts section. Without these, Cyllo cannot post exchange rate difference entries when payments are registered at different rates.
10.4. Auto Currency Rate Update
The Auto Currency Rate Update feature keeps exchange rates current automatically by fetching live rates from an external provider on a scheduled basis. This eliminates the need to manually update rates each time a foreign currency transaction is recorded.
- Go to Accounting → Configuration → Settings.
- Under the Currencies section, enable ‘Currency Rate Auto-Update’.
- Select the Rate Provider — the external service from which rates are fetched.
- Set the Update Frequency — Daily, Weekly, or Monthly.
- Click Save. Cyllo's scheduler fetches updated rates at the configured interval.
- To manually trigger an immediate update, go to Accounting → Configuration → Currencies and click the Update Now button.
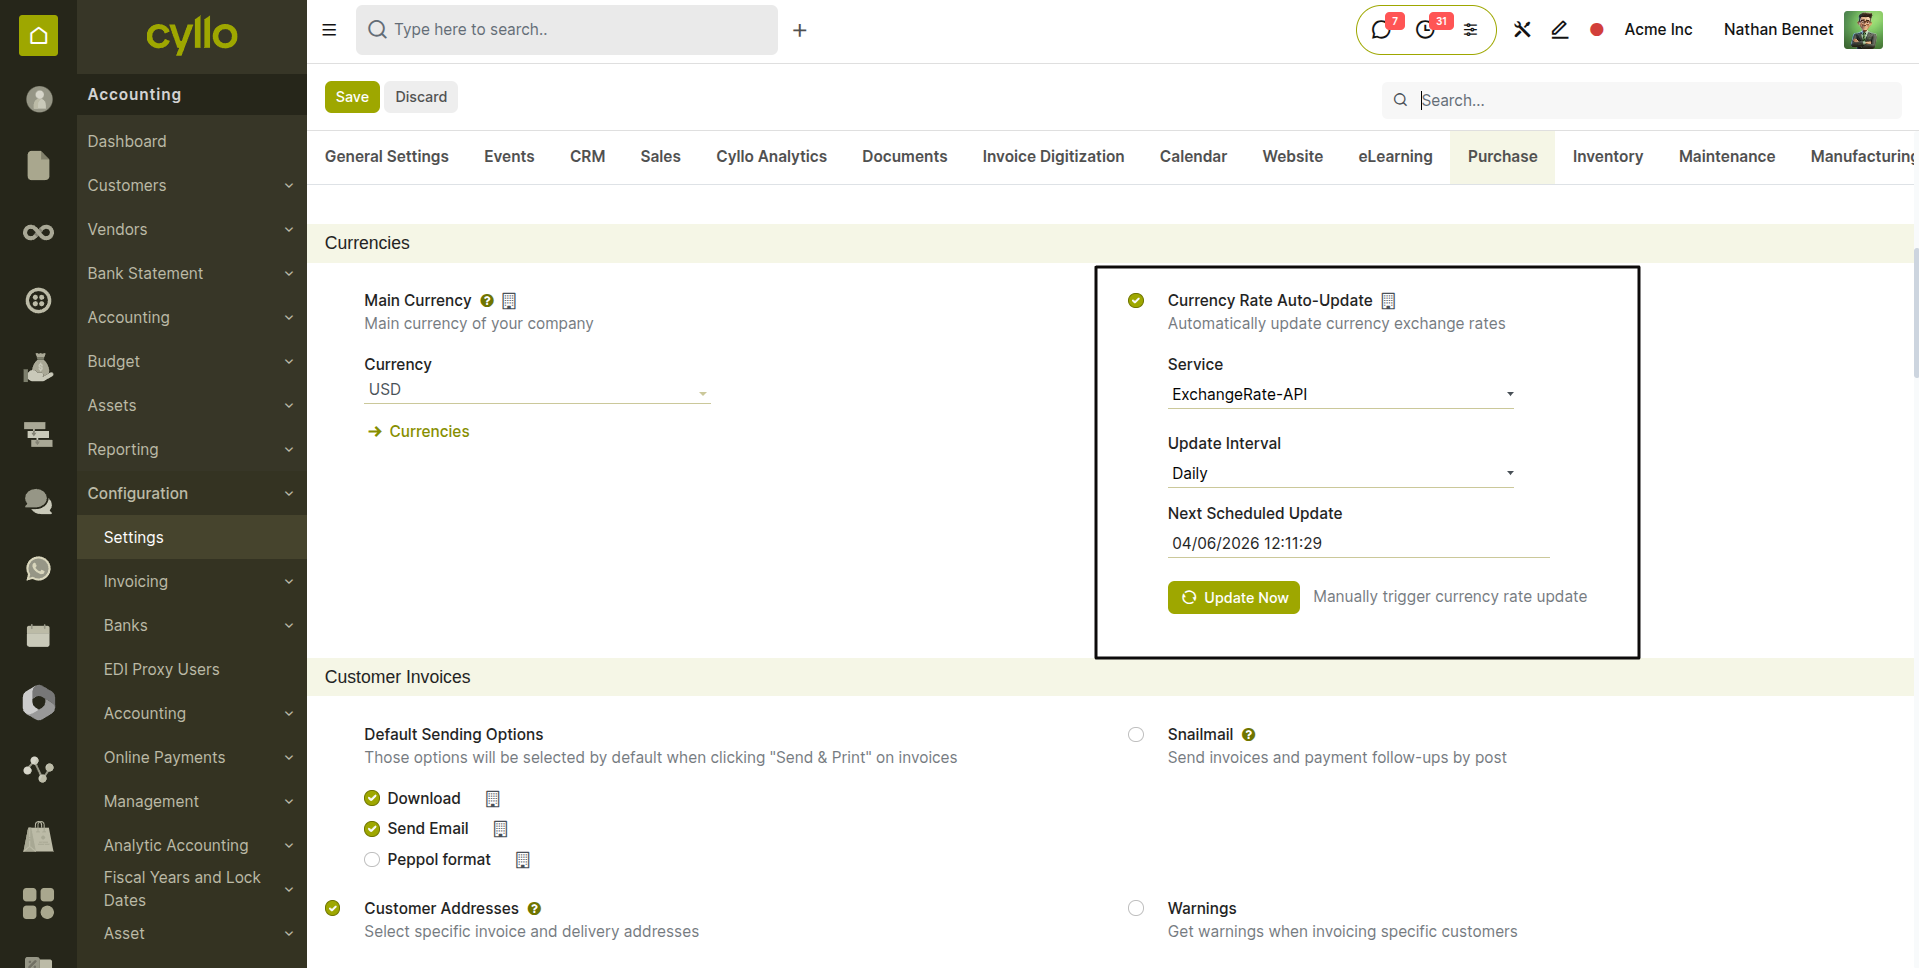
Fig 10.4 — Accounting Settings — Currencies section with Automatic Currency Rates enabled, Rate Provider dropdown, and Update Frequency selector
TIP
For businesses with frequent foreign currency transactions, set the update frequency to Daily. Exchange rate fluctuations between business days can create significant differences on large invoices — keeping rates current reduces the size of exchange gain/loss entries and improves the accuracy of outstanding receivable and payable values.
11. Cyllo Accounting Extensions
In addition to the core accounting features, Cyllo includes a suite of proprietary accounting extensions that address specific business needs — post-dated cheque management, advance payment handling, installment billing, credit card payment tracking, budget management with debt control, and multi-entity financial consolidation.
11.1. Post-Dated Cheque (PDC) Management
Post-dated cheques (PDCs) are a common payment instrument in many markets — the cheque is issued today but dated for a future clearing date. The PDC module allows Cyllo to register PDC receipts from customers and PDC payments to vendors, track their status through to clearing or bouncing, and generate the appropriate journal entries automatically on the clearing date.
Registering a Customer PDC Receipt:
- Go to Accounting → Customers → PDC Payments and click New.
- Select the Customer and the Payment Type as ‘Receive’.
- Enter the Cheque Reference(Number), Cheque Date (the date printed on the cheque — the future clearing date), and the Amount.
- Set the Bank where the cheque will be deposited.
- Click ‘Confirm’. The cheque is registered with status Registered.
- When the cheque clears at the bank, click ‘Done’ to post the final entry (debit bank account, credit PDC receivable), and reconcile with the bank statement.
- If a cheque bounces, click ‘Bounce’ to reverse the interim entry and restore the customer's outstanding balance.
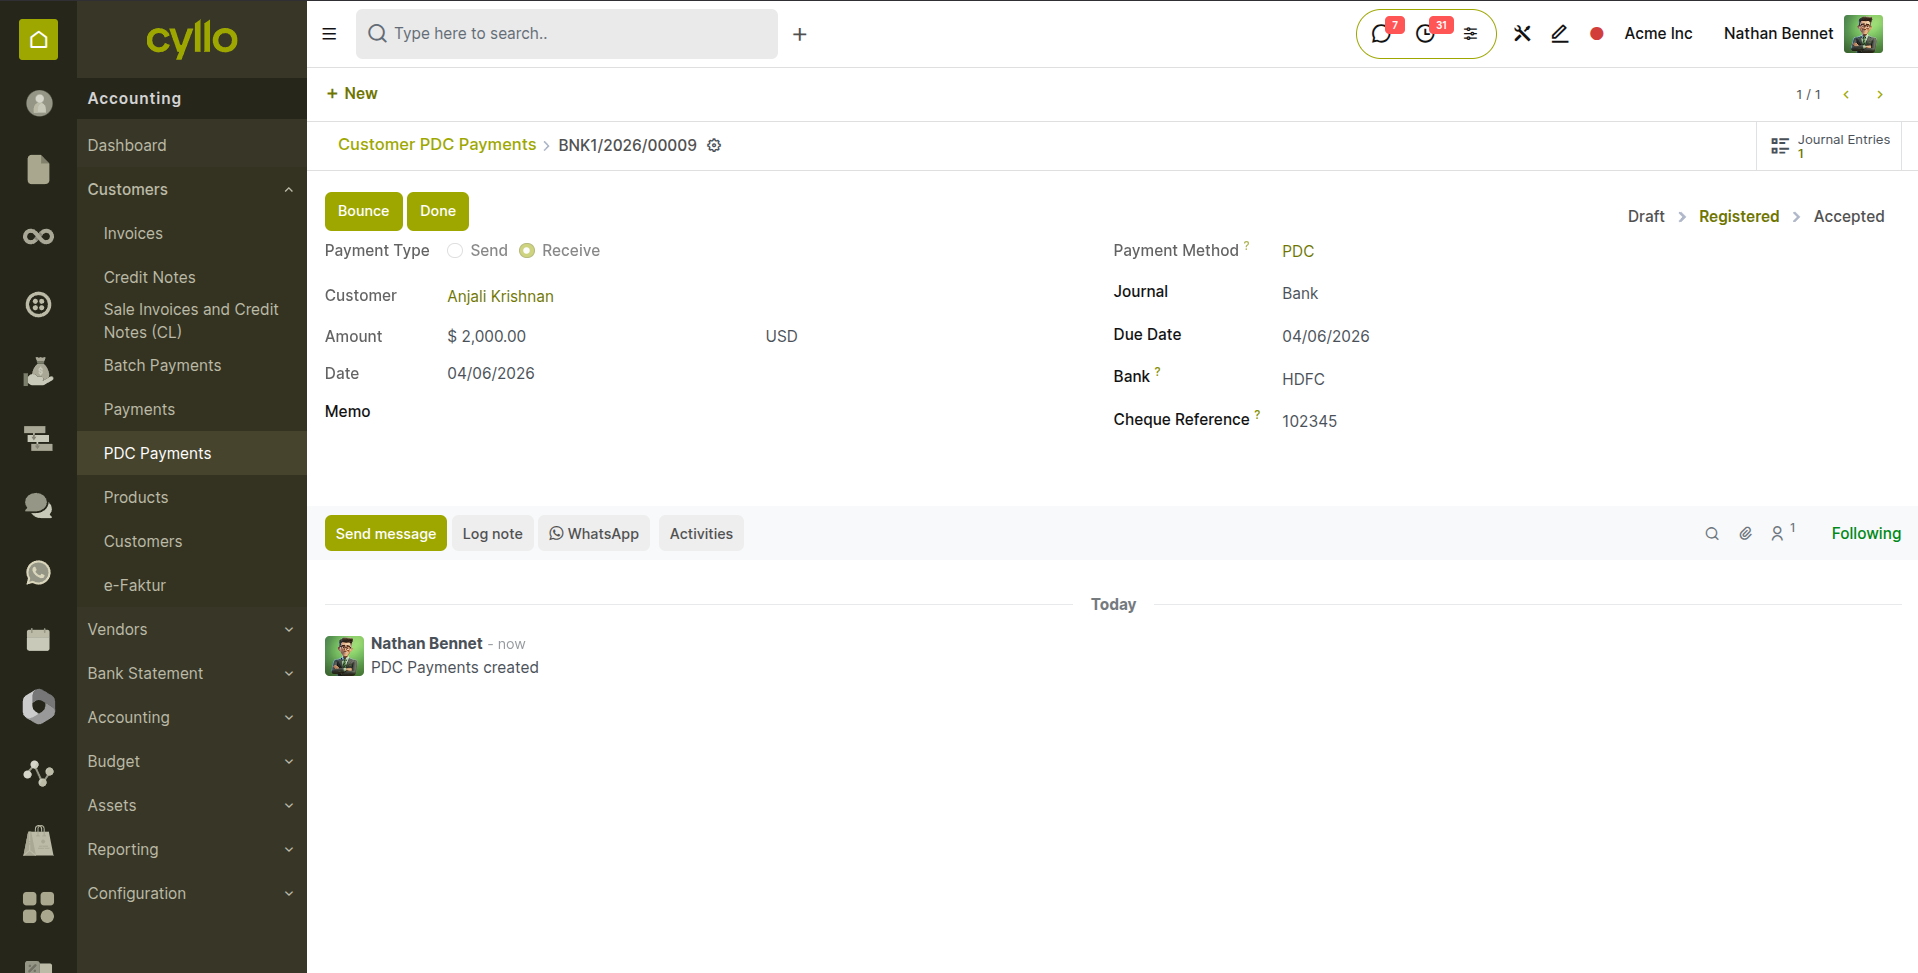
Fig 11.1 — PDC Receipt form — Customer, Cheque Number, Cheque Date, Amount, and Bank fields; status workflow buttons: Done, Bounce
11.2. Advance Payment
The Advance Payment module manages prepayments received from customers before goods or services are delivered, and prepayments made to vendors in advance of receiving their invoice. Advance payments are tracked as liabilities (customer advances) or assets (vendor prepayments) until they are applied against a final invoice or bill.
Customer Advance Payment:
- Go to Accounting → Configuration → Settings, enable ‘Advance Payment’.
- Select the Sales Order for which the advance is received.
- Click ‘Advance Payment’.
- Enter the Advance Amount and the Payment Date.
- Select the Journal (cash or bank) through which the advance is received.
- Click ‘Advance Payment’. An advance invoice is auto-generated and a journal entry posts: debit bank/cash, credit advance payment liability account.
- When the final invoice is created, the advance amount is automatically deducted from the invoice total.
Vendor Advance Payment:
- Go to Accounting → Configuration → Settings, enable ‘Advance Payment’.
- Select the Purchase Order for which the advance is received.
- Click ‘Advance Payment’.
- Enter the Advance Amount and the Payment Date.
- Select the Journal (cash or bank) through which the advance is paid.
- Click ‘Advance Payment’. An advance bill is auto-generated and a journal entry posts: credit bank/cash, debit advance payment asset account.
- When the final bill is created, the advance amount is automatically deducted from the total.
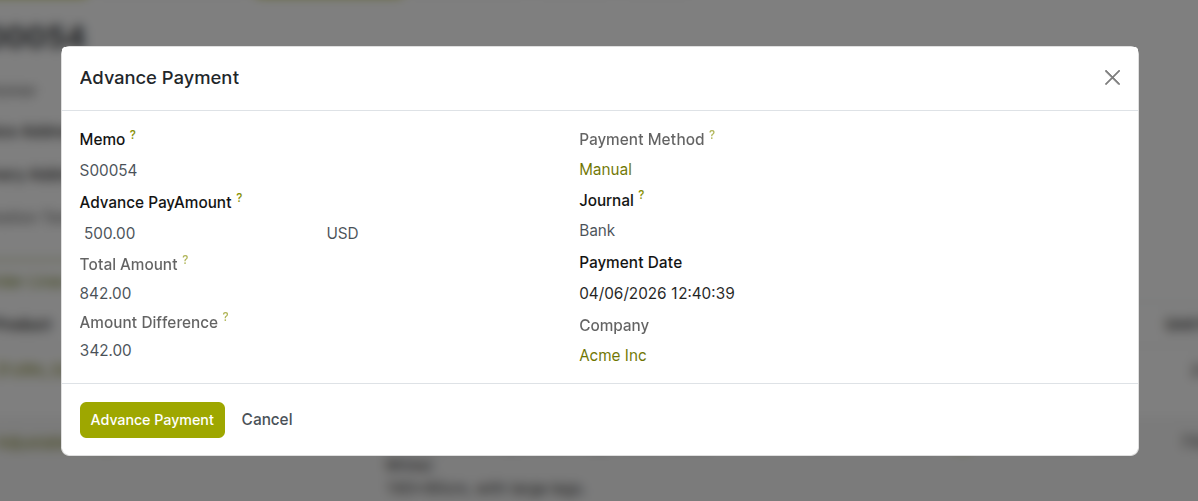
Fig 11.2 — Advance Payment wizard — Amount, Date, Sales/Purchase Order as memo, and Journal
Note
Ensure the user has access to Advance Payment (Purchase) and Advance Payment (Sale).
11.3. Installment Payments
The Installment Payment module breaks a large customer invoice into a defined schedule of smaller partial payments, each with its own due date. Each installment is tracked independently — partial payments can be registered against individual installments, and automated reminders are sent as each installment due date approaches.
- Create a customer invoice and enable ‘Apply Installment’.
- On the invoice, open the Installment tab and add advance payment if it exists.
- Set the Number of Installments and the Installment Frequency (e.g. 3 monthly installments).
- Click ‘Compute Installments’ to calculate the equal installment amount (total / number of installments) and assign due dates based on the frequency from the invoice date.
- Optionally, adjust individual installment amounts if the schedule is not equal splits — for example, 40% on the first installment and 30% on each subsequent one.
- Click Save. The installment schedule is created.
- Register payments against individual installments as each one is settled. The invoice's outstanding balance reduces with each payment.
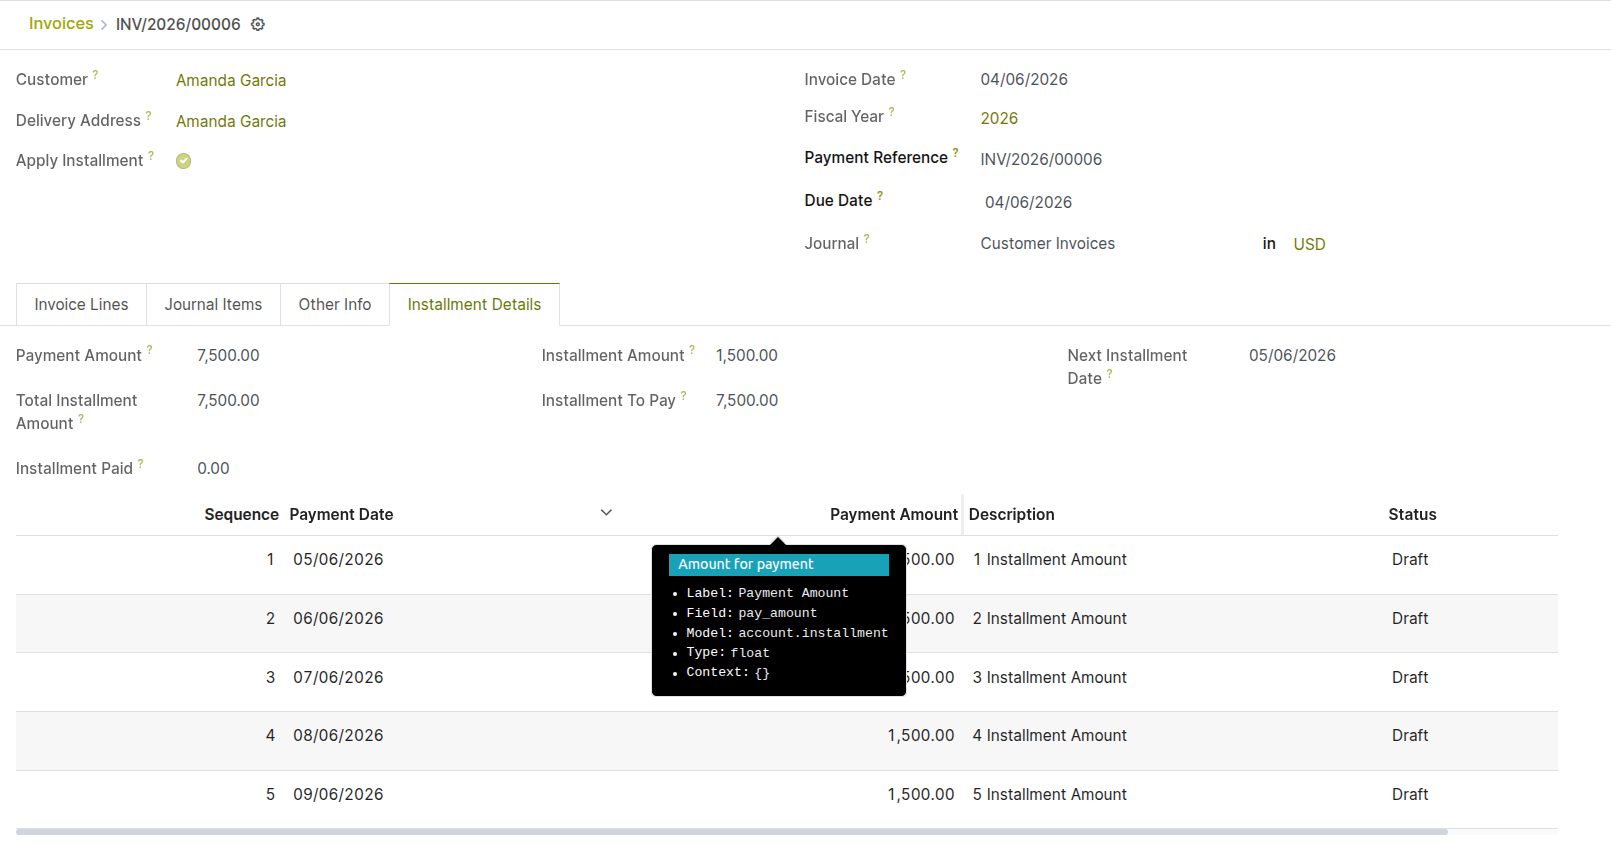
Fig 11.3 — Invoice installment schedule — table showing Installments with Due Date, Amount, and Payment Status (Paid/Pending) columns
Note
Automated reminder emails for upcoming installment due dates are sent based on the follow-up rules configured in the Accounting Follow-ups module. Ensure follow-up rules are configured before activating installment schedules for large customer accounts.
Users must enable ‘Installment payment’ from settings.
11.4. Credit Card Payment
The Credit Card Payment module adds a dedicated credit card payment method to Cyllo, allowing card transactions to be tracked separately from cash and bank payments. This is particularly useful for businesses using credit cards to pay bills, where batch settlement occurs at the end of month rather than transaction by transaction.
- A dedicated Credit Card payment method is configured, linking it to a 'Credit Card Payable’ transit account in the journal you are using this method rather than directly to the bank account.
- When a card payment is registered, it credits the credit card transit account and debits the accounts payable.
- This approach allows easy reconciliation of individual card transactions against the monthly settlement amount, highlighting any processing fees deducted by the card provider.
- Go to Accounting → Configuration → Journals and create a new journal of type Bank.
- Name it Credit Card and link it to a Credit Card Clearing account in the chart of accounts.
- Assign this journal as the payment method for card transactions in POS or Sales.
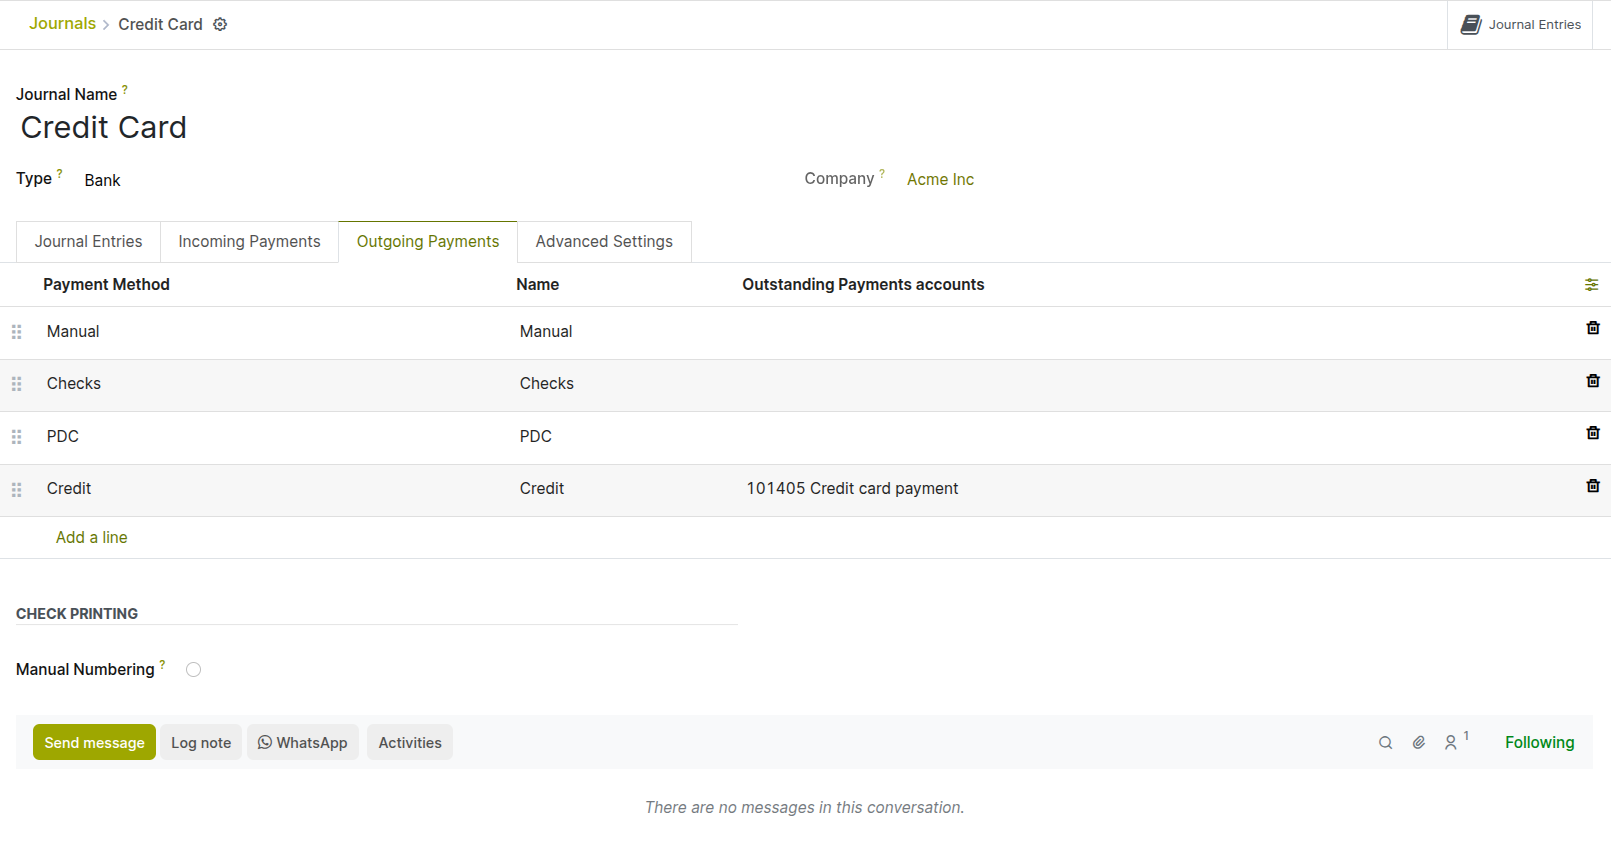
Fig 11.4 — Credit Card journal configuration — journal type Bank, linked to Credit Card Clearing account in payment method.
Note
‘Credit Card Payment’ must be installed from Accounting → Configuration → Settings
11.5. Budget Management
The Budget Management module allows finance teams to define annual or periodic budgets per analytic account, compare actual spending against budgeted amounts in real time, and proactively control costs before they exceed planned limits. Cyllo's Budget Management also includes Debt Management for tracking and managing financial obligations.
Creating a Budget:
- Go to Accounting → Budget → Budget and click New.
- Enter the Budget Name (e.g. FY 2026 Operating Budget, Q2 2026 Marketing Budget).
- Set the Budget Period — the start and end dates the budget covers.
- Add Budget Lines by clicking Add a Line: a. Analytic Account: The cost centre or project the budget applies to. b. Budgeted Amount: The planned amount for this line over the budget period.
- Click Confirm. The budget is active and Cyllo compares actual postings against it in real time.
Monitoring Budget Performance:
- Go to Accounting → Reporting → Management → Budget Analysis.
- The report shows Budgeted Amount, Actual Amount (from journal postings to the analytic accounts), and Variance for each budget line.
- Positive variance (actual less than budgeted) indicates earning budget. Negative variance indicates spending budget.
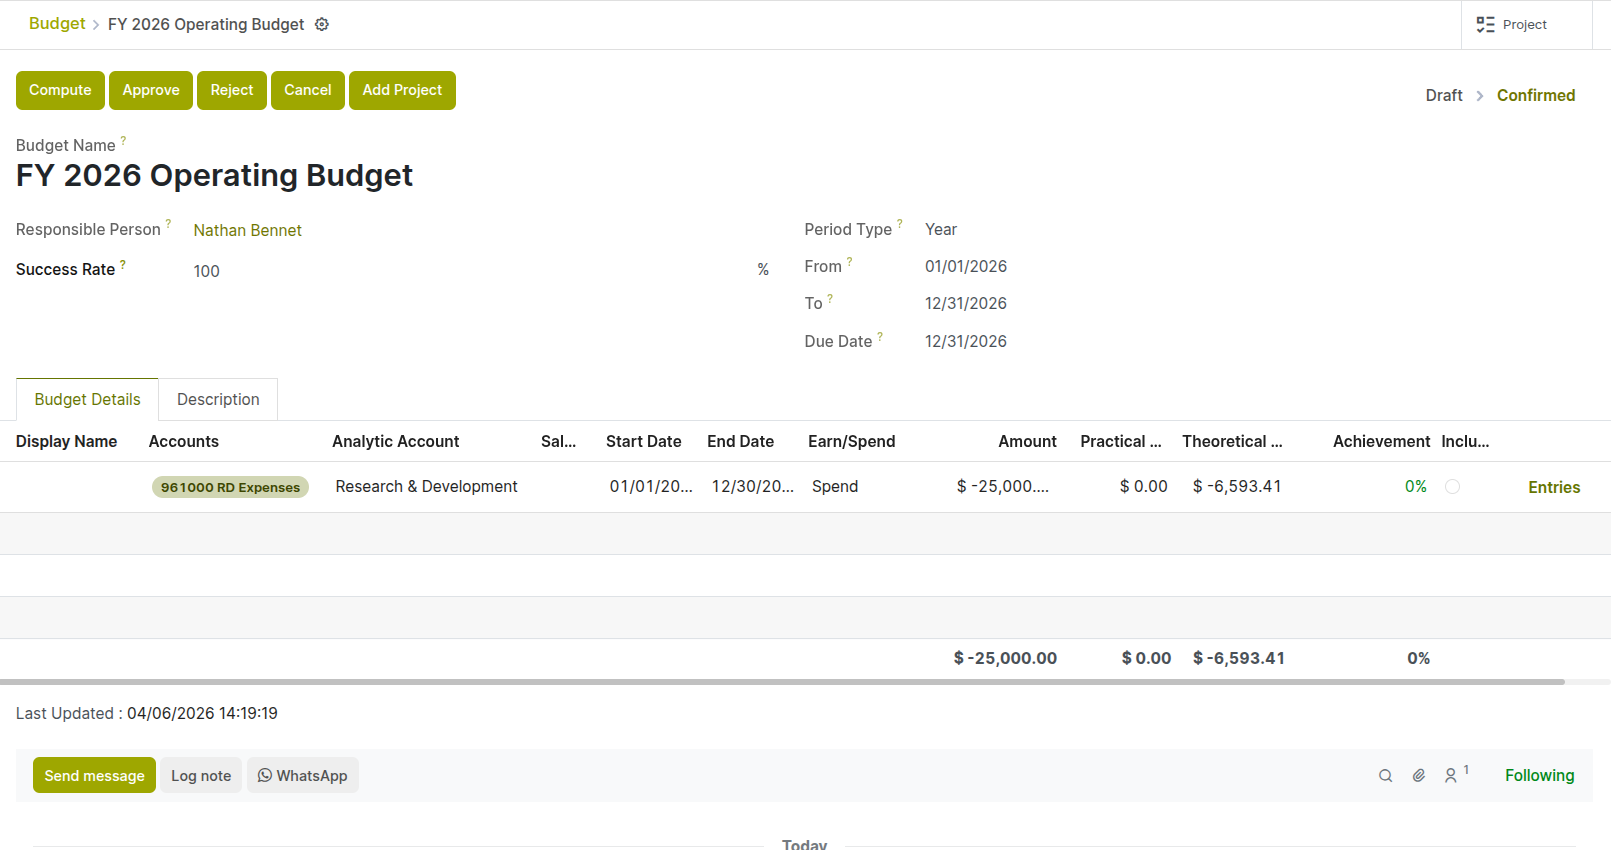
Fig 11.5 — Budget Form — Analytic Account, Budgeted, Actual, and Variance columns
TIP
Set budget alerts by configuring Workflow Automation rules that send an internal notification when a budget line reaches 80% of its budgeted amount. This gives finance teams advance warning to approve or restrict further spending before the budget is exceeded.
Note
‘Cyllo Budget Management’ must be installed from Accounting → Configuration → Settings
11.6. Consolidation
The Consolidation module aggregates financial data from multiple Cyllo companies or entities into a single consolidated view. This is used by holding companies, group finance teams, and businesses with multiple legal entities to produce group-level balance sheets, P&L statements, and management accounts without manual consolidation.
- Each subsidiary company in Cyllo maintains its own separate chart of accounts, journals, and financial records.
- The Consolidation module maps subsidiary accounts to the group chart of accounts and aggregates balances.
- Intercompany transactions — invoices and payments between subsidiaries — can be eliminated to prevent double-counting at the consolidated level.
- Consolidated financial reports (Balance Sheet, P&L) are generated showing the combined position of all included entities.
- Go to Apps → Install ‘Consolidation’ to set up the consolidation chart of accounts and entity mappings.
- Open Consolidation menu.
- Set periods, consolidation accounts, consolidations.
- Add each subsidiary company and map their accounts to the consolidated account structure.
- Set the consolidation period and click Generate Report to produce the consolidated financials.
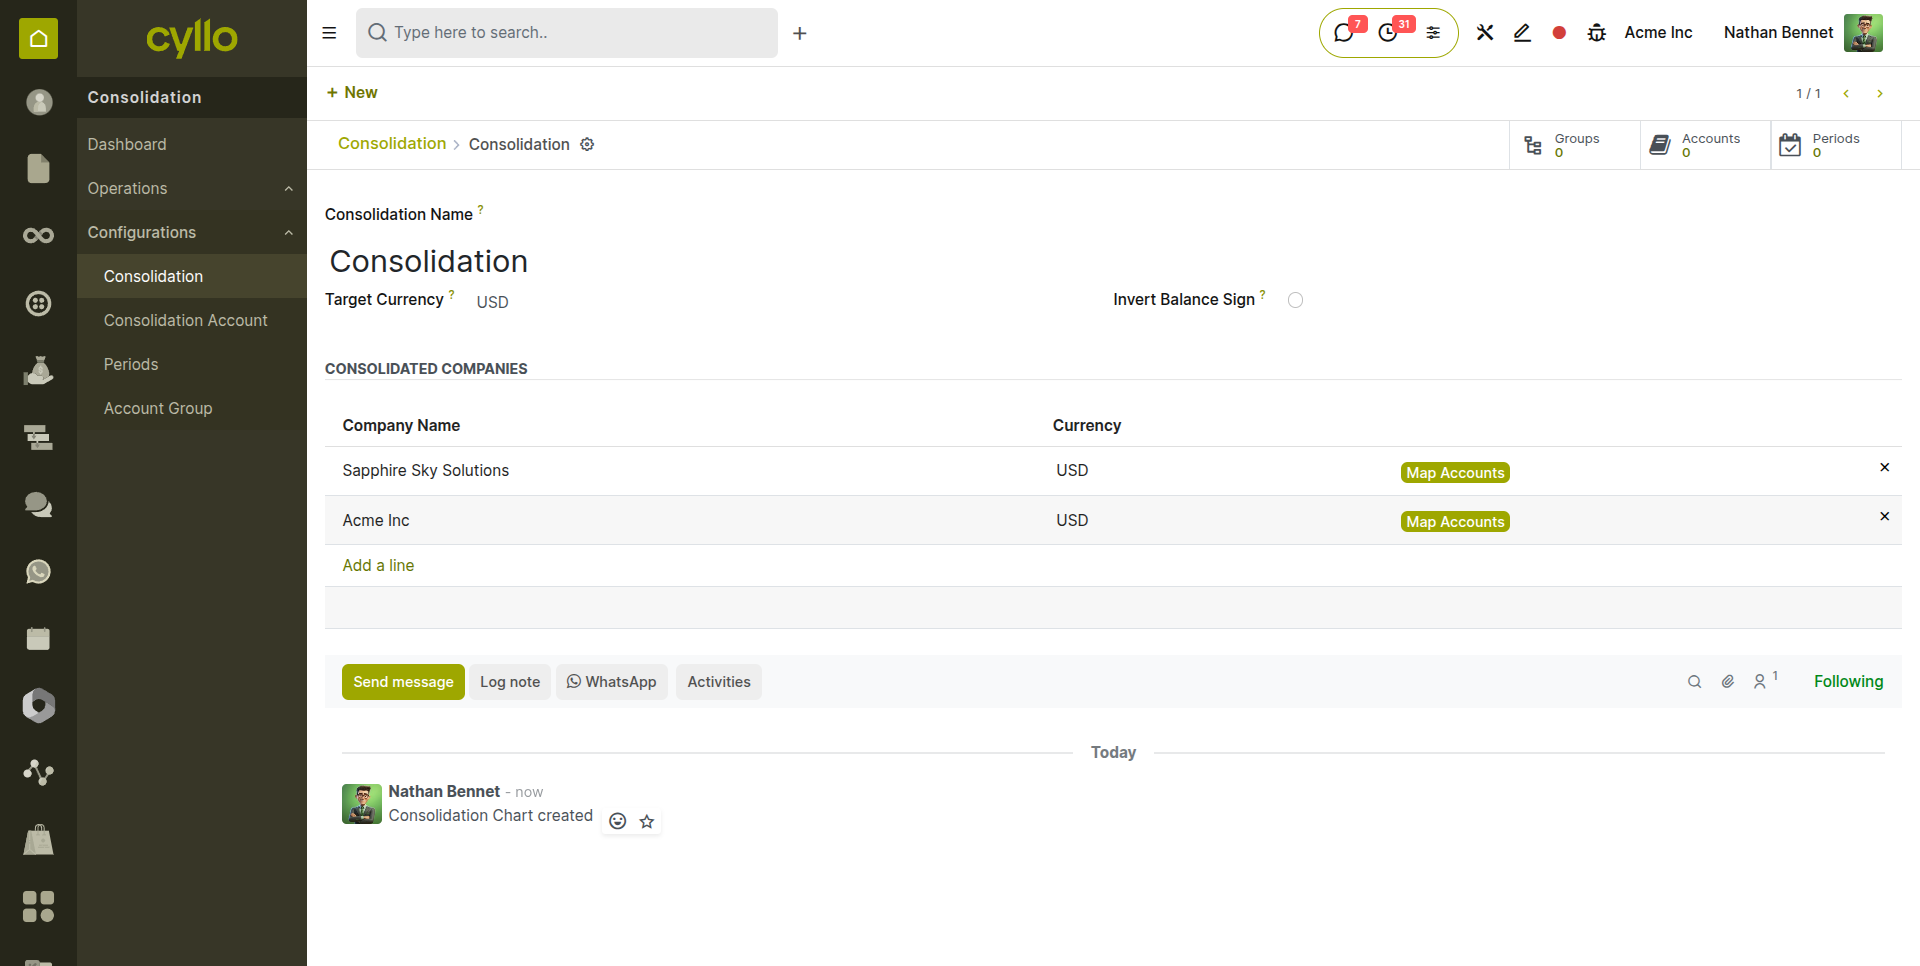
Fig 11.6 — Consolidation configuration — subsidiary companies listed with account mapping
12. Accounting Follow-ups
The Accounting Follow-ups module automates the collection process for overdue customer receivables. It sends escalating reminders at defined intervals after an invoice becomes overdue, tracks the follow-up history per customer, and provides a management overview of at-risk receivables.
12.1. Follow-up Levels & Rules
Follow-up levels define the escalating sequence of reminder actions — from a gentle first email reminder to a formal letter threatening legal action. Each level specifies how many days overdue an invoice must be before the action is triggered and what type of action is taken.
- Go to Accounting → Configuration → Management → Follow-up Levels.
- Click New to add a level or open an existing one to edit.
- Set the Days Overdue — the number of days past the due date at which this level triggers (e.g. 1 day, 15 days, 30 days, 60 days).
- Set the Action Send Email: Automatically emails the customer with the configured follow-up email template.
- Configure the Email Template for each send-email level with the appropriate message tone — polite for early levels, formal for later ones.
- Click Save.
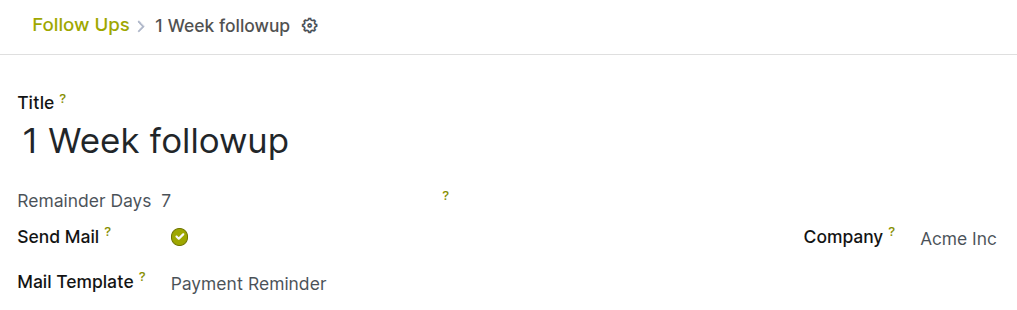
Fig 12.1 — Follow-up Levels configuration — level form showing Days Overdue, Action Type, and Email Template
12.2. Aged Receivables Report
The Aged Receivables report provides a snapshot of all outstanding customer invoices, grouped by how long they have been overdue. It is the primary tool for cash flow planning, credit risk assessment, and prioritising collection efforts.
- Go to Accounting → Reporting → Aged Receivable.
- Set the As of Date — typically today, or a month-end date for a period snapshot.
- Click Export to download the report for external review or board presentation.
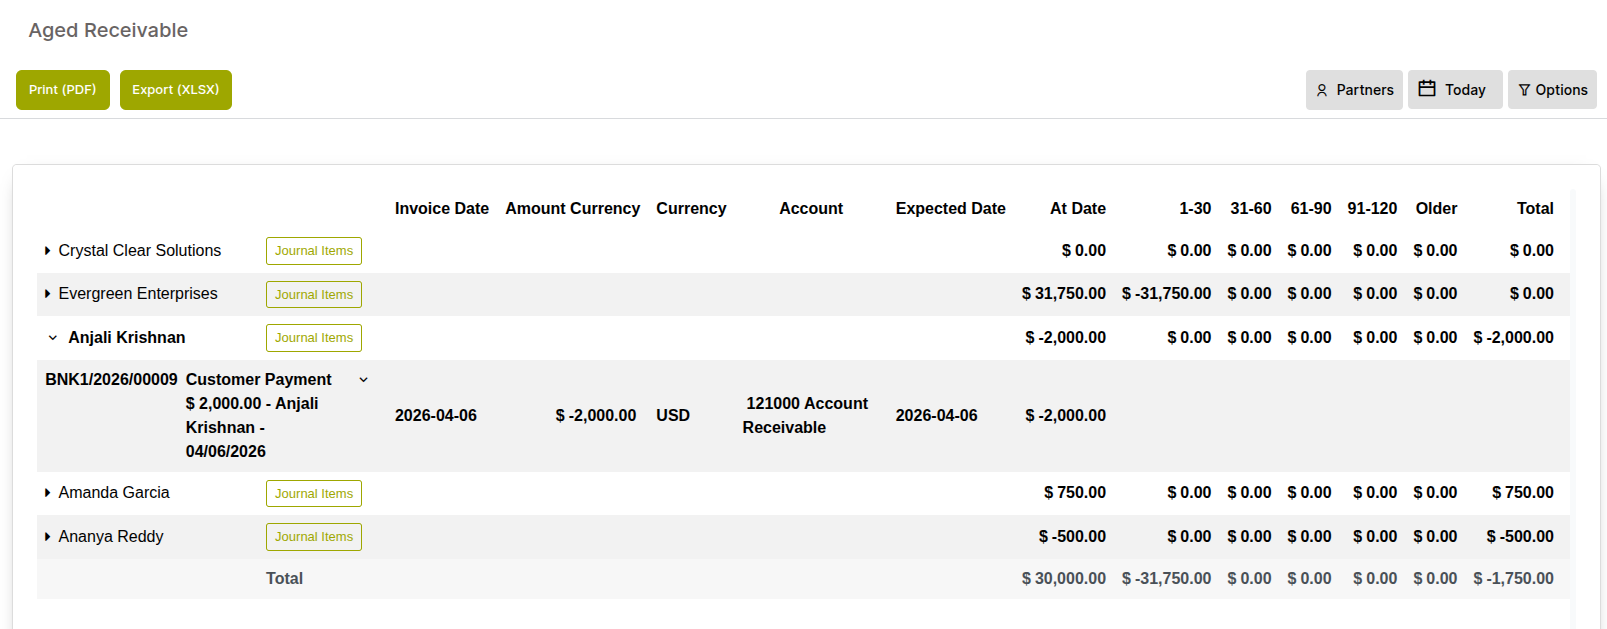
Fig 12.2 — Aged Receivables report — customer rows with balance distributed across 1-30, 31-60, 61-90, 91-120, and 120+ day as older columns; totals at the bottom
13. Financial Reports
Cyllo's Accounting module provides all standard financial reports required for management accounts, statutory filings, and business analysis. All reports are generated from the live ledger data and update in real time as transactions are posted.
13.1. Balance Sheet
The Balance Sheet reports the company's financial position at a specific point in time — what it owns (assets), what it owes (liabilities), and the residual equity. It is a mandatory statutory report and the primary measure of financial health and solvency.
- Go to Accounting → Reporting → Accounting Reports → Balance Sheet.
- Set the As of Date — the reporting date. The balance sheet reflects all posted entries up to and including this date.
- The report displays: Current Assets, Non-Current Assets, Current Liabilities, Non-Current Liabilities, and Equity.
- Click any account group to expand and see the individual account balances contributing to that section.
- Click any account balance to drill through to the underlying journal items.
- Use the Comparison option to compare two periods side by side (e.g. this year vs last year).
- Click Export PDF or Export Excel to download the report.
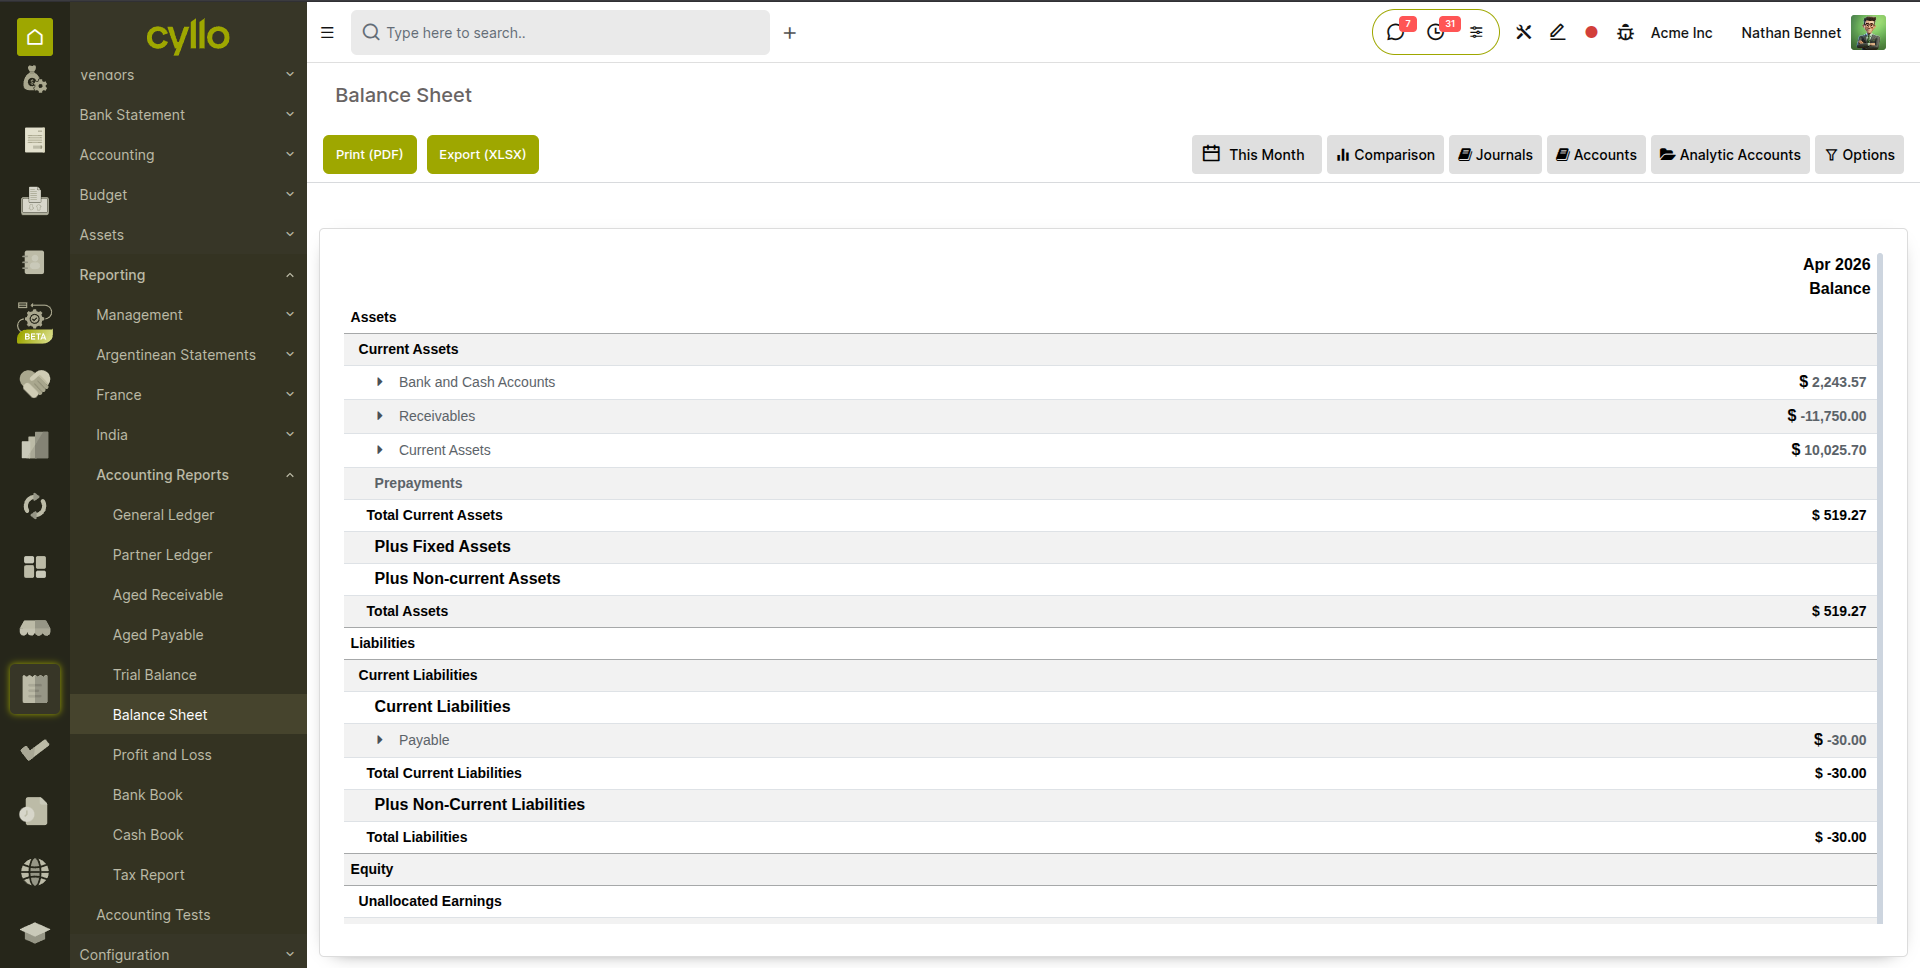
Fig 13.1 — Balance Sheet report — Assets section (Current and Non-Current) on the left, Liabilities and Equity on the right; comparison columns for two periods
13.2. Profit & Loss
The Profit & Loss (P&L) statement — also known as the Income Statement — shows revenue, cost of goods sold, gross profit, operating expenses, and net profit over a defined period. It is the primary measure of business performance.
- Go to Accounting → Reporting → Accounting Reports → Profit & Loss.
- Set the date range for the reporting period.
- The report displays: Revenue, Cost of Revenue (COGS), Gross Profit, Operating Expenses, and Net Profit.
- Expand any section to see individual account balances.
- Use the Comparison option to compare the current period against the prior year or prior period for trend analysis.
- Export in PDF or Excel format.
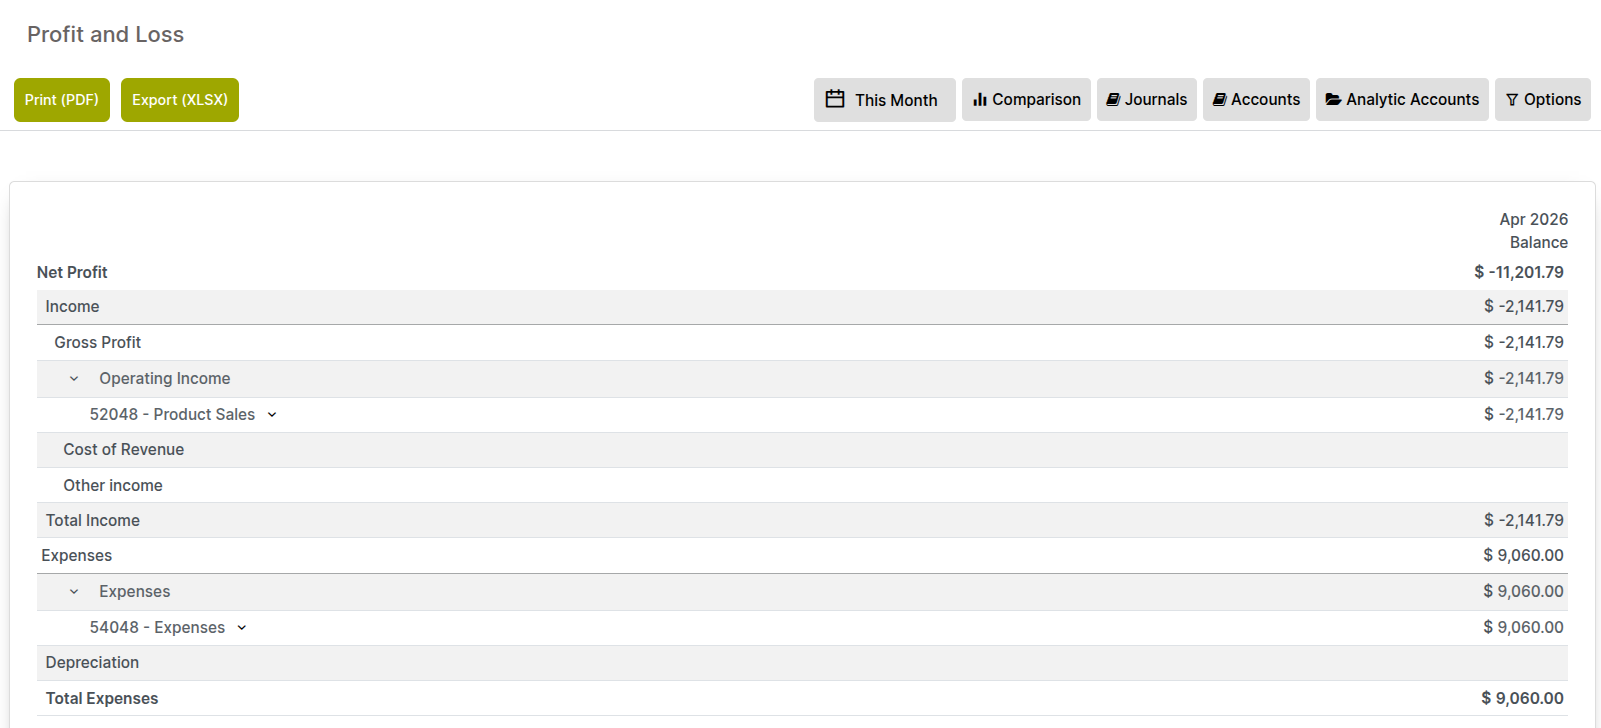
Fig 13.2 — P&L report — Operating Expenses breakdown; Net Profit at the bottom; current vs prior year comparison columns
13.3. General Ledger
The General Ledger shows every transaction posted to every account in the chart of accounts over a selected period, in chronological order. It is the complete audit trail of all accounting activity and is used by auditors, accountants performing reconciliations, and managers tracing the history of a specific account.
- Go to Accounting → Reporting → Accounting Reports → General Ledger.
- Set the date range. Optionally filter to a specific account or journal using the filter bar.
- The report lists all journal entries for each account in chronological order, showing the date, description, reference, debit, credit, and running balance.
- Use the Group By → Account filter to see a separate section per account with a subtotal.
- Click any entry line to open the source document.
- Export to Excel for external audit or detailed analysis.
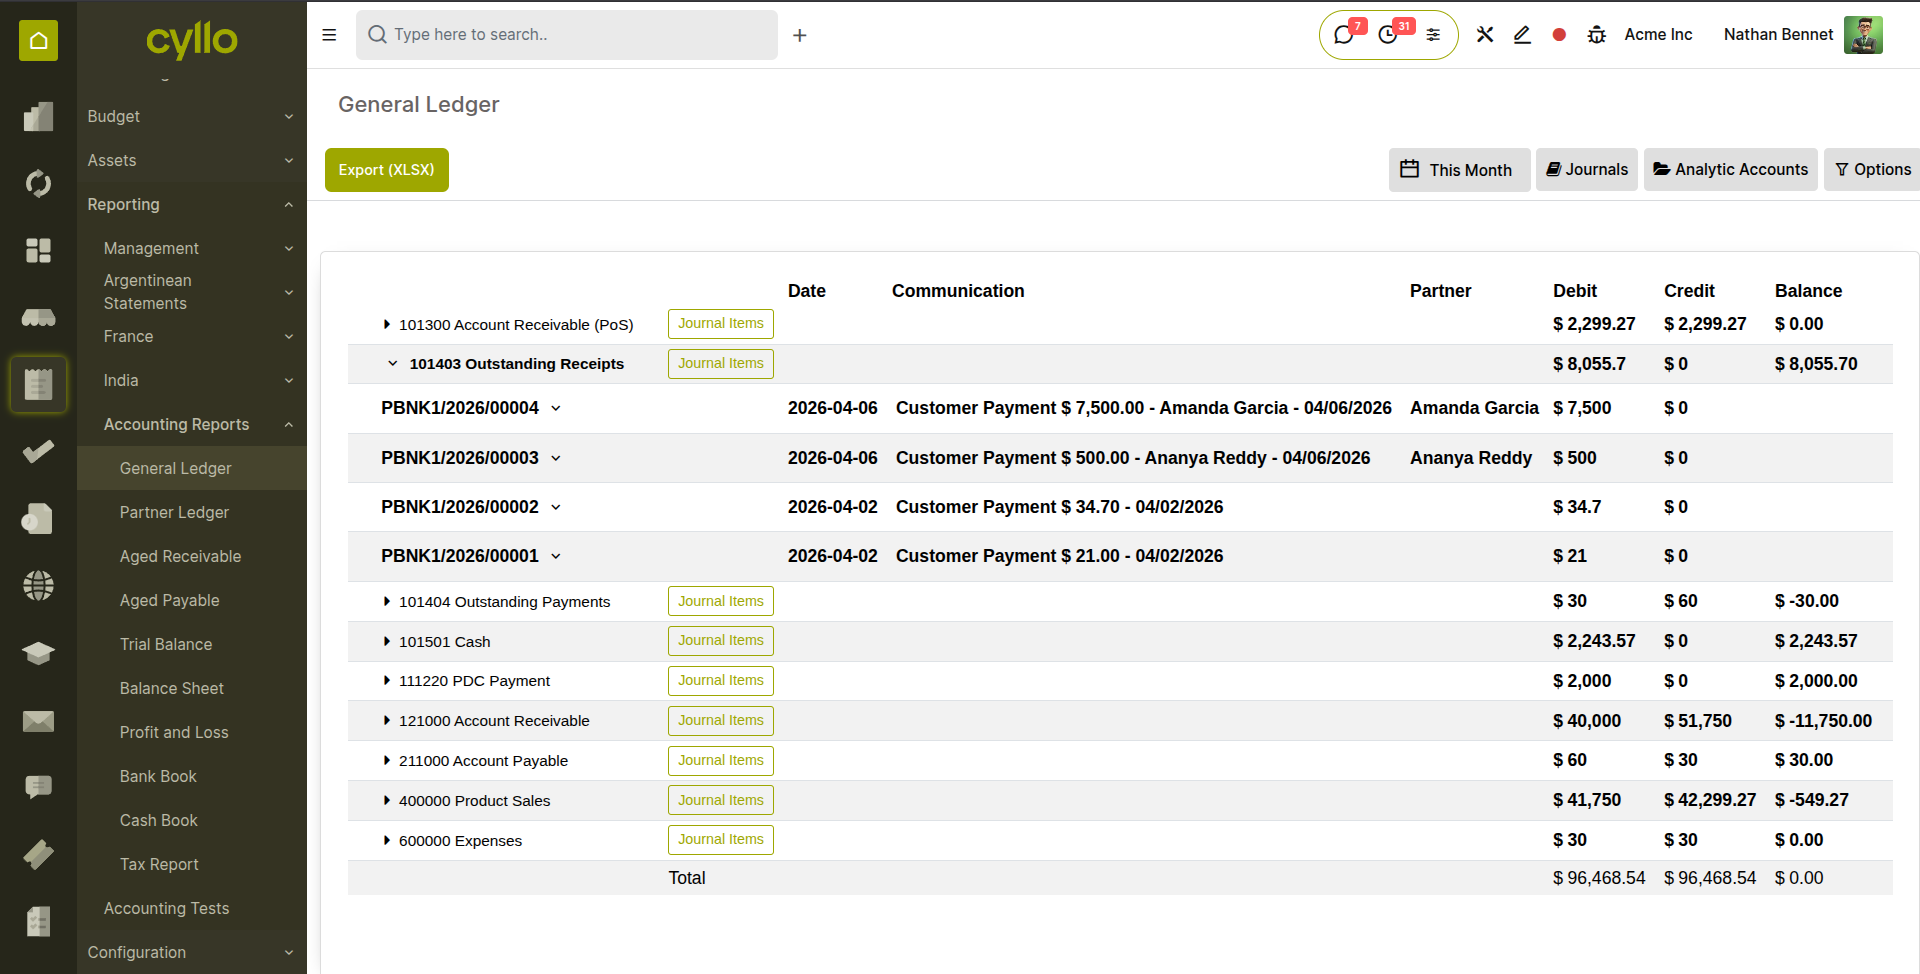
Fig 13.3 — General Ledger report — account sections showing chronological transaction list with running balance; total debits and credits at the bottom
13.4. Aged Payables
The Aged Payables report shows all outstanding vendor bills grouped by how long they have been outstanding. It is the payables counterpart to the Aged Receivables report and is used for cash flow planning and ensuring supplier obligations are settled on time.
- Go to Accounting → Reporting → Aged Payable.
- Set the As of Date and the Ageing Period (default 30 days per bucket).
- The report lists each vendor with their outstanding balance distributed across the ageing buckets.
- Bills in the 0–30 day bucket are current and due soon. Bills in the 31–60 and beyond buckets are overdue and should be reviewed immediately.
- Click any vendor row to drill through to the specific outstanding bills.
- Export to Excel for cash flow forecasting or sharing with treasury management.

Fig 13.4 — Aged Receivables report — customer rows with balance distributed across 1-30, 31-60, 61-90, 91-120, and 120+ day as older columns; totals at the bottom
14. Settings & Configuration
This section covers the global accounting settings, multi-company configuration, and user access controls for the Accounting module.
14.1. Multi-Company Accounting
Cyllo supports multiple companies within a single instance, each with its own chart of accounts, journals, tax settings, and financial reports. Users can switch between companies and, if granted access, record transactions in multiple companies. Inter-company transactions are also supported.
- Each company has an independent chart of accounts, though a shared template can be applied during setup.
- Each company configures its own journals, taxes, payment terms, and fiscal year independently.
- Users assigned to multiple companies see a company switcher in the top bar — clicking it opens a dropdown to switch context.
- Inter-company bills and invoices: when a confirmed sales order in Company A is sold to Company B, a vendor bill can be auto-created in Company B, reducing double-entry between related entities.
- For group reporting, use the Consolidation module (Section 11.6) to merge individual company financials into a single consolidated view.
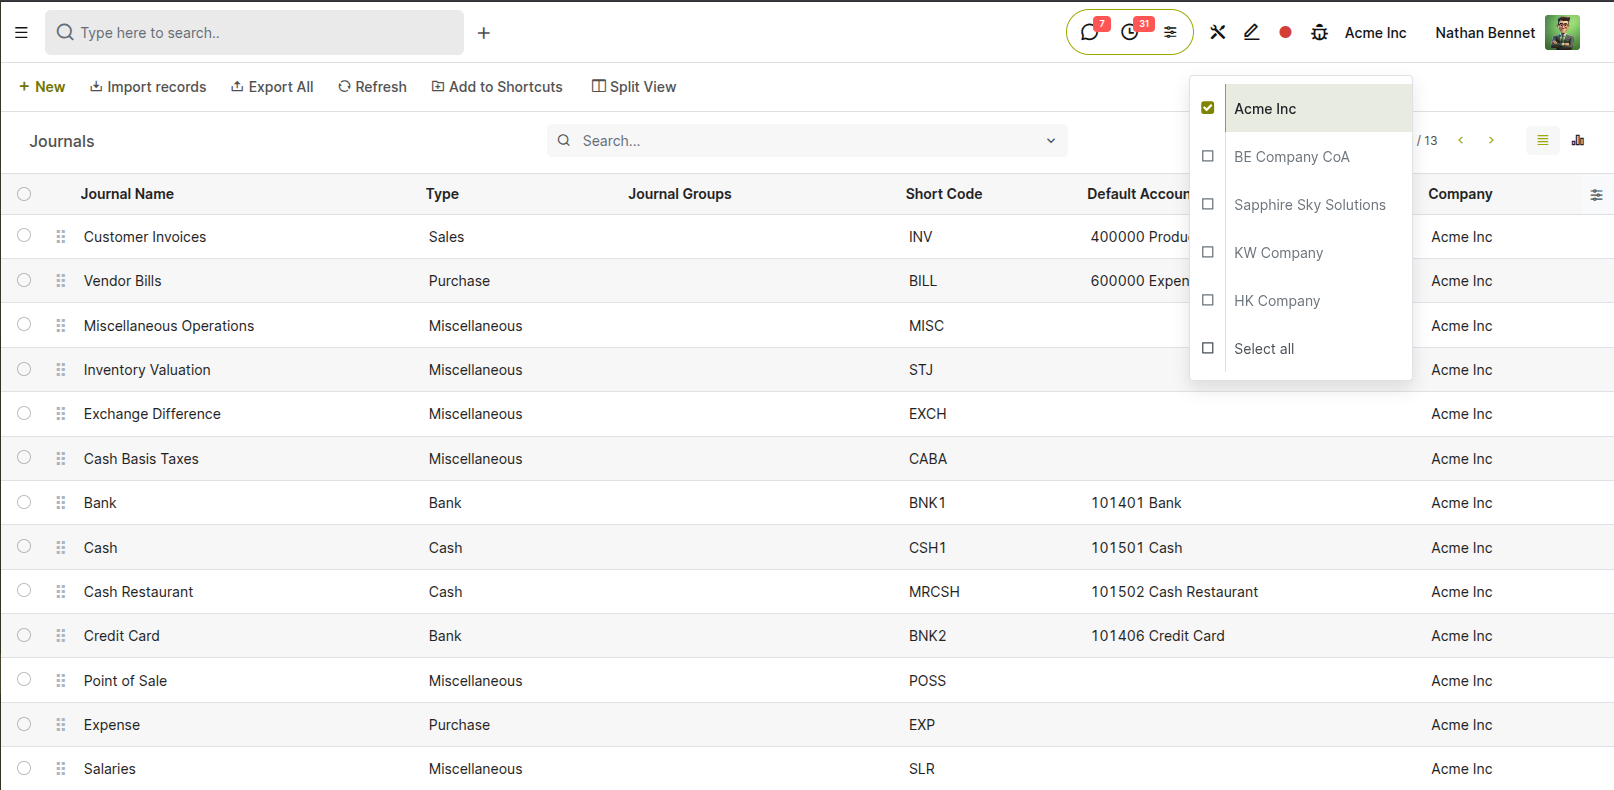
Fig 14.1 — Multi-company setup — company switcher in the top bar; each company's Accounting module showing its own dashboard with independent balance
14.2. Access & Permissions
Access to accounting data is controlled by Cyllo user roles. The accounting module has four access levels, from read-only visibility to full administrative control.
| Role | Accounting Access |
|---|---|
| Billing (Invoicing User) | Can create and confirm customer invoices and vendor bills. Cannot access journals, chart of accounts, financial reports, or configuration. |
| Accounting (User) | Full access to customer invoices, vendor bills, payments, bank reconciliation, and financial reports. Cannot modify chart of accounts or global settings. |
| Accounting (Adviser) | All Accounting User access plus ability to post entries in locked periods, access lock date settings, and perform year-end closing procedures. |
| Billing Administrator | Full access to all accounting features, configuration, settings, and technical accounting options. |
- Go to Settings → Users & Companies → Users and open the user to configure.
- Under the Accounting section, assign the appropriate role from the dropdown.
- Click Save.
15. Troubleshooting
This section covers the most common issues encountered in the Cyllo Accounting module — reconciliation failures, tax report discrepancies, locked period errors, and invoice posting problems.
15.1. Common Issues & Solutions
| Issue | Likely Cause | Solution |
|---|---|---|
| Invoice cannot be confirmed | Required field missing (customer, account, or date) or product with no account configured | Check all mandatory fields are filled. Go to the product form and set the Account on the Sales tab. |
| Payment does not clear the invoice | Payment registered in wrong journal or wrong currency | Verify the payment journal and currency match the invoice. If wrong, cancel the payment and re-register. |
| Bank statement import fails | File format mismatch or incorrect date format in CSV | Use OFX or QIF instead of CSV when possible. For CSV, ensure dates match the expected format (DD/MM/YYYY or YYYY-MM-DD). |
| Journal entry will not post — 'Period Closed' | Lock date set before the entry date | Check the lock date in Accounting → Lock Dates. If the entry date is before the lock, change the entry date or temporarily lift the lock (Adviser role required). |
| P&L shows incorrect revenue | Invoice posted to wrong account | Open the invoice, create a credit note, and post a corrected invoice with the correct revenue account. |
| Tax report balance does not match manual calculation | Rounding differences or entries posted directly to tax accounts | Check Accounting Settings for the rounding method. Avoid posting directly to tax accounts — let the invoice tax engine generate tax postings. |
| Customer invoice shows as Outstanding after payment | Payment not reconciled against the invoice | Go to the invoice, scroll to Outstanding Credits, and apply the payment. Or check that the payment was registered with the correct partner. |
| Currency exchange loss/gain entry missing | Exchange accounts not configured | Go to Accounting → Configuration → Settings → Currencies and set the Exchange Gain and Exchange Loss accounts. |
15.2. Reconciliation Issues
When bank reconciliation produces unexpected results — lines that should match are not being auto-matched, or a reconciled line needs to be unreconciled — the steps below resolve the most common reconciliation problems.
Auto-matching not working:
- Verify that the bank statement line amount exactly matches the payment amount — even a £0.01 difference will prevent automatic matching. Check for bank charges deducted from the payment by the bank.
- Check that the payment date is within a reasonable range of the statement line date. Payments dated long before the statement line may not be suggested as matches.
- Verify the payment was registered in the same journal as the bank statement. A payment in the Cash journal will not be suggested for a Bank journal statement line.
Unreconciling a line:
- Open the bank statement line that was reconciled incorrectly.
- Click the Unreconcile button (or remove the matched entry from the reconciliation panel).
- The payment returns to In Payment status and the bank line returns to New status for correct re-matching.
15.3. Tax & Report Issues
Tax report discrepancies — where the report total does not match the expected tax liability — are almost always caused by one of three issues: transactions posted directly to tax accounts bypassing the invoice, entries posted in the wrong period, or taxes applied on a cash-basis when accrual-basis is expected.
- Go to Accounting → Reporting → Accounting Reports → Tax Report and click on the figure in question to drill into the contributing journal items.
- Review each item — confirm it was generated by an invoice or bill (source document link visible) rather than a manual journal entry directly to the tax account.
- If manual entries exist on tax accounts, review and correct them. Tax accounts should only be posted to by the automated tax engine — manual entries to tax accounts bypass the tax report and create discrepancies.
- Confirm the reporting period filter matches the tax authority's return period exactly — even a one-day difference in the date range can include or exclude transactions incorrectly.
- If the discrepancy is a timing issue (e.g. an invoice dated December but posted in January after the year-end), adjust the invoice date to the correct period and repost, or use the lock date to prevent future occurrences.
15.4. Locked Period Errors
When a journal entry, invoice, or payment cannot be posted because the period is locked, the error message identifies the lock date that is blocking the posting. Only users with the Accounting Adviser role or Administrator can temporarily lift a lock date.
- Read the error message carefully — it states the lock date and which entries are being blocked.
- Go to Accounting → Configuration → Fiscal Years and Lock Dates → Lock Dates.
- If the lock is activated, temporarily move the lock date back to allow the posting.
- Post the required entry.
- Move the lock date forward again to re-protect the period.
Prevention:
- Train all users to check the entry date before posting — entries for a past month should use the correct period date, not today's date.
- Set a workflow where month-end close is completed by a defined date, after which the Adviser immediately applies the lock — minimising the window during which late entries can be posted accidentally.
WARNING
Do not leave a lock date temporarily lifted for more than the minimum time needed to post the required entry. An unlocked period exposes historical financial data to accidental modification by any user with Accounting User access. Restore the lock as soon as the entry is posted and verified.